1
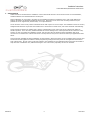
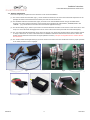
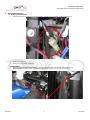
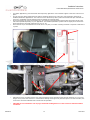
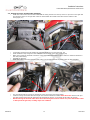
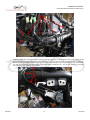
Installation Instructions
- Custom Rider Motorcycles Electronic Cruise Control
customrider.com
Electronic Cruise Control
Installation Manual
Revision. M
05.20.2015
Revision M
1
05.20.2015
Installation Instructions
- Custom Rider Motorcycles Electronic Cruise Control
Parts List
(included in kit) Electronic Cruise Control - Yamaha Raider, Roadliner, Stratoliner Installation (Specific)
1pc
1pc
1pc
1pc
4pc
1pc
2pc
10pc
2pc
Electronic Cruise Control Servo Unit
Relay (87A Relay)
Throttle Cable Bracket
Throttle Loop Cable Hardware
Wire Tap Crimp Connector
Turn Signal Auto Shut-off Module
M10 Metric Bolt for Rear Fender Plastic Flap (Replaces Metal bracket on Fender, Raider Only)
Misc. Cable Ties (Zip Ties)
One Inch Velcro Square (used for relocation mounting of relays)
1pc
Two Button Handlebar Switch Housing
Two Momentary Switches. SET/COAST, RESUME/ACCEL
OR
Three Button Handlebar Switch Housing
Three Momentary Switches. SET/COAST, RESUME/ACCEL, CANCEL
1pc
(NOT INCLUDED in kit)
Misc.
Misc.
Misc.
Misc.
Heat Shrink Tubing, 1/8” thru 1/4”
Expandable Wire Covering (for covering wire from tank to headlight at neck, heat shrink may also be used)
Cable Ties (Zip Ties)
Wire Tap Crimp Connectors or Wire Nuts (to connect wires in headlight if soldering iron is not used)
Tools Needed
8" or 6" Slip Joint Pliers
8" or 6" Needle Nose Pliers
8" or 6" Diagonal Pliers
Wire Strippers (capable to 20G wire)
14mm Box End Wrench
10mm Open End Wrench
11mm Open End Wrench (two required)
3/8"
3/8"
3/8"
3/8"
#2 Phillips Screwdriver, Stubby
#2 Phillips Screwdriver, 6" or 8"
Standard Slotted Screwdriver, Stubby
1/16" Standard L-Wrench Allen
5/32” Standard L-Wrench Allen
Metric L-Wrench Allen Set (1.5, 2, 2.5, 3, 4, 5, 6, 8, 10)mm
Automatic Center Punch or Similar
3/8” Drive Chuck Drill
#25 Drill Bit
10/24 Tap
15/64” Drill Bit
5/16” Drill Bit
Thread Taping Oil or Similar
4” Adjustable Wrench
Knife or Razor Blade
Black Electrical Tape
Wire Hanger (Clothes Hanger)
Thread lock or Loctite (RED & BLUE)
Compressed Air or Similar
WD-40
Grip Glue, Super Glue or Similar
220 Grit Sandpaper
Silicone Sealer, Gasket Maker Sealer or Similar
Soldering Iron (recommended)
Heat Gun (recommended)
Liquid Electrical Tape (optional)
Hacksaw or Similar Sheet Metal Cutting Tool
(Roadliner/Stratoliner Only)
Revision M
Drive Ratchet
Extension (3" & 6")
Deep Sockets Metric (12, 10, 8)mm
Allen Sockets Metric (10, 8, 7, 6, 5, 4)mm
2
05.20.2015
Installation Instructions
- Custom Rider Motorcycles Electronic Cruise Control
Index
Revision M
-
Parts List / Tools Needed
Index
Disclaimer
1.
Getting Started
1.1. Primary Components
1.2. Six Basic Steps for Install (Quick Install Overview)
1.3. Installation Precautions
1.4. Preparation
2.
Mechanical Installation
2.1. Mounting the Servo Control Unit
2.2. Routing the Cruise Throttle Cable and Wiring
2.3. Mounting the Throttle Bracket and Adjustment
3.
Handlebar Control Switch
3.1. Installing the Handlebar Switch
3.2. CANCEL Switch Option (Three Button Kit Only)
4.
Electrical Wiring
4.1. Wire Loom Routing
4.2. Wiring Notes
4.3. Cruise Servo/Handlebar Control Wiring Connections
4.3.1. Two Button Wiring
4.3.2. Three Button Wiring
4.4. The Five Wires Connected to the Motorcycle
4.4.1. +12V Power and Ground Connection
4.4.2. Brake Disengage Connection
4.4.3. Clutch Disengage Connection
4.4.4. Vehicle Speed Signal (VSS) Connection
5.
Testing
5.1. Shop Testing
5.2. Road Testing
5.2.1. Engaging The Cruise For The First Time
5.2.2. Testing the BRAKE, CLUTCH, (CANCEL(3-Button Kit Only)) Disengage Feature
5.2.3. Testing the ACCEL/RESUME & SET/COAST Feature
6.
Important Operating Instructions
6.1. Cruise Control General Operating Information
6.2. Set Function
6.3. Resume Function
6.4. Cancel Function
6.5. Coast & Acceleration Function
7.
Appendix
7.1. Document Revision Notes
3
05.20.2015
Installation Instructions
- Custom Rider Motorcycles Electronic Cruise Control
READ THIS PAGE FIRST
These instructions are to be used as a general reference guide for installing the Rostra Global Cruise Control Accessory (aka product
or kit). This document is specific to the Yamaha Roadliner / Stratoliner / Raider Motorcycle, but portions may apply to other
applications as well.
Disclaimer:
By using these instructions, or installing this product, the individual or customer accepts full responsibility for the products use and
any potential liabilities associated there with. The installation of anything that controls the throttle of a moving vehicle has the
potential for substantial risk both to the operator and others. Use extreme care during the installation of this product, and use
common sense. If installation is completed improperly, or without the highest regard to quality workmanship, it has the potential to
kill you, passengers, bystanders, small children, deer, etc. If you are not technically inclined and/or if you do not feel fully confident
that you can safely install the Cruise Control accessory, we recommend that you have someone qualified install your accessories for
the safety of yourself and others.
The installation and use of this product kit and/or its parts are the responsibility of the persons doing the work and operating the
motorcycle. The information contained within this document is deemed accurate to the best of our knowledge at the time of
publication.
It is the customer’s sole responsibility to comply with laws pertaining to aftermarket parts on public roads.
Custom Rider, its representatives, and any other person(s) referenced within this document and/or having participated in the
creation of this document, assume no legal responsibilities or liabilities, whether to the vehicle, components, person(s), or
property(s), that may result from the use of, or servicing of a vehicle on which this product has been installed, or to any other
vehicle(s), person(s), property(s), regardless of whether or not this product has any involvement directly or indirectly, and/or
whether or not this product has been properly installed. The installer(s), user(s) and/or person(s) attempting to install this product
assumes all liabilities whether to person(s), property(s), self and/or others.
This legal disclaimer is acknowledged by person(s), user(s), driver(s) who install this product, drive and/or ride on a vehicle on which
this product has been installed, and/or who use this document or any associated product parts, whether or not the product(s) is/are
purchased in whole or in part, received as a gift or award, and/or by any means of obtaining this product.
This product kit is a universal automotive cruise control unit. The products parts have not been approved for motorcycle application
by their respective manufacturers. Custom Rider cannot, and will in no way, guarantee this kit will work on all motorcycle
applications.
This kit has been modified for fitment to the following motorcycle applications based solely on testing done by Custom Rider.
(1) 2008-2016 Yamaha Raider
(2) 2006-2016 Yamaha Roadliner/Stratoliner
In the process of modifying this kit for the above applications, all original equipment manufacturer (oem) warranties are voided. No
extended warranties, expressed or implied are offered by the oem, Custom Rider, or any of their staff.
This modified kit may work with other motorcycles types, or for model years in addition to the ones previously specified. Custom
Rider does not provide support for applications for which this product was not directly intended or advertised.
This product may or may not be successfully adapted by the end user for alternate applications. Custom Rider will not provide
technical support for such alternate applications, nor for products not purchased through Custom Rider exclusively. The responsibility
for safe installation and operation lies with the end user.
Custom Rider does not, will not, nor shall ever accept responsibility for any damages whatsoever arising from or associated with
installation, use, or modification of any moving vehicle, its operator(s), innocent bystanders, or property as may be associated with
the purchase, installation, modification or use of this product.
Technical questions related to the installation of the product kits may be submitted via email to [email protected]
All sales of cruise control product kits, and/or associated parts and accessories, are final. Under no circumstances will Custom Rider
accept return units.
- Updated 05.20.2015
Revision M
4
05.20.2015
Installation Instructions
- Custom Rider Motorcycles Electronic Cruise Control
1.
Getting Started
These instructions will describe the installation of the Custom Rider Electronic Cruise Control Kit for the Yamaha Raider,
Yamaha Roadliner and Yamaha Stratoliner motorcycles.
Some modification to rear fender is necessary for the Roadliner/Stratoliner installations due to rear fender differences
between the Raider and Roadliner/Stratoliner Motorcycles. Alternative servo control unit mounting locations may be
possible but is not supported by Custom Rider, or its representatives.
The Cruise Servo Unit is a fully electro-mechanical device that requires no vacuum input. The installation of this unit is fairly
straightforward but does require that the installer have a small amount of basic tools, and a basic electrical understanding.
These instructions assume the installer has a working understanding of the motorcycle and its components related to
throttle operation. There are many additional details and custom settings to the overall operation of this electronic cruise,
however in order to simplify the installation process, this document will only detail the actual installation and wiring
connection as it related to the Custom Rider Kit as currently sold and only for the referenced motorcycle applications noted
above.
This kit has been modified for fitment application as documented in these instructions. It has a modified wiring harness, and
an alternate mounting plate lid installed. All DIP programming settings have been preset for the application noted above
from Custom Rider. All misc. parts not directly related to the installation for the application above have been eliminated to
help with ease of installation. Any additional changes to the cruise kit are proprietary and are not disclosed.
Revision M
5
05.20.2015
Installation Instructions
- Custom Rider Motorcycles Electronic Cruise Control
1.1. Primary Components
There are five primary components to the Electronic Cruise Control Installation:
(1) The Cruise Control Servo Actuator (Fig.1), which contains the electronics as well as the mechanical components in one
package and will be mounted between the battery box and the rear fender skirt.
(2) The Handlebar Mounted Control Switch (Fig.2) mounted on the left handlebar between the grip and OEM switch
housing. This custom switch controls the Cruise Control Servo operations for “SET/COAST”, “RESUME/ACCEL” and
“CANCEL”. (Fig.2 shows both a two button and three button application design)
(3) Five-Pin 87A Relay (Fig.3) which is pre-wired in the harness between the brake circuit and the cruise control servo. This
relay is to control the brake disengage feature of the cruise control with motorcycles that have LED brake lighting.
(4) The Turn Signal Auto Shutoff Module (Fig.4) which corrects the turn signal self-canceling feature. Self-canceling signals
no longer “self-cancel” on other cruise control kits or installation instructions that we have seen online or other. Our
module corrects that issue and returns the signal operation to factory. This part is integrated into the custom harness
and electronics.
(5) The Throttle Cable Mounting Bracket (Fig.5) which mounts to the frame near the throttle bell crank for proper operation
of the cable pull when cruise is engaged.
Fig.1
Fig.3
Revision M
Fig.2
Fig.4
Fig.5
6
05.20.2015
Installation Instructions
- Custom Rider Motorcycles Electronic Cruise Control
1.2. Six Basic Steps for Install (Quick Install Overview)
You should read these instructions fully before beginning installation. This page gives the installer a Quick Install Overview.
There are six basic steps to installing this CC unit:
1) Installing the Servo Control Unit between the battery box and the rear fender
•
Removing the rear fender
•
Removing the rear fender metal bracket(Raider) or cutting relief hole in fender face (Roadliner/Stratoliner)
•
Relocating the relays attached to the back of the battery box
•
Installing the cruise servo control unit
•
Reassembly of rear fender
2) Routing the Throttle Cable and wiring under seat and gas tank
•
Removing the gas tank, left side coil cover, coil mounting bracket, left side motor mount
•
Routing wire harness and throttle cable above Exhaust ex-up motor
•
Routing wire harness and throttle cable along left side frame under tank
•
Routing Fuse, Brake Relay, Ground, Power, Clutch, Brake connection wires under seat
•
Direct throttle cable and bracket towards front of throttle body bell crank
•
Direct handlebar control switch wiring harness towards front left side of neck and front of tank
•
Route switch housing wiring alongside existing wiring on left side of neck to front forks and into opening on bottom of
headlight
3) Installing and Adjusting the Throttle Cable Bracket
•
Removing the gas tank, left side coil cover, coil mounting bracket, left side motor mount
•
Removing the push/pull cables from the bell crank bracket
•
Installing the loop cable on the pull cable
•
Drill/Tap for 10/24 bolt on frame support for throttle cable bracket
•
Connect loop cable to cruise servo throttle cable
•
Adjust throttle cable play to approximately zero to 1/8” slack
•
Reassembly of left push/pull cables to bell crank
•
Reassembly left side motor mount, left side coil mounting bracket and cover, gas tank
4) Installing Handlebar Switch Housing
•
Remove left side grip, open left side OEM switch housing, left side riser cover, handlebar clamp
•
Remove headlight assembly, key switch cover, handlebar rubber grommets
•
Install Cruise Control Switch Housing on handlebar, add eight inches shrink tubing over wires from switch
•
Route wiring to access hole on OEM switch housing near clutch wiring
•
Route wiring through handlebar and out near riser (no heat shrink required for wiring inside handlebar)
•
Route wiring down riser(additional heat shrink should be added after exiting handlebar)
•
Route wiring along riser and down into opening on bottom of headlight
•
Reassembly handlebar grommet, riser, key switch cover, OEM switch housing, and grip
5) Electrical Connection Wiring for Handlebar Switch Housing Harness to Servo Control Harness
•
Wire switch and cruise servo wiring connections per schematic inside headlight housing or underneath tank
•
Reassembly of headlight
6) Electrical Connection Wiring for Cruise Control Servo to motorcycle
•
Follow wiring hookup schematic, ensuring good connections
•
Connect BLACK Ground wire to ground source near oil fill
•
Connect RED power to DC Auxiliary connector BROWN wire
•
Connect PURPLE brake disengage wire to YELLOW brake wire near rear brake harness connector
•
Connect GREY Vehicle speed signal wire to WHITE/YELLOW wire for VSS signal under ECM
•
Connect BLUE clutch disengage wire to BLACK/YELLOW wire or BLACK/RED wire on ECM depending on application
Revision M
7
05.20.2015
Installation Instructions
- Custom Rider Motorcycles Electronic Cruise Control
1.3. Installation Precautions
Warnings & Cautions:
•
DO NOT USE ANY TYPE OF CRUISE CONTROL ON A MOTORCYCLE IN ADVERSE WEATHER CONDITIONS.
•
IT IS IMPORTANT THAT YOU READ AND FULLY UNDERSTAND THIS ENTIRE INSTRUCTION MANUAL BEFORE
PROCEEDING WITH THE INSTALLATION.
•
PAY CLOSE ATTENTION TO ALL CAUTIONS AND WARNINGS CONTAINED IN THIS MANUAL FOR A SAFE AND TROUBLE
FREE INSTALLATION.
•
WHEN TESTING WIRES, USE ONLY A LOGIC PROBE OR VOLT/OHM METER. DO NOT USE A TEST LIGHT, AS THESE CAN
CAUSE DAMAGE TO THE ECM
•
DO NOT ATTEMPT TO ROAD TEST ON JACK STANDS OR A LIFT
•
BEFORE DRILLING ANY HOLES, BE SURE THAT NO COMPONENTS WILL BE DAMAGED AFTER THE DRILL PENETRATES
THE SURFACE.
•
DO NOT MOUNT OR ROUTE WIRING HARNESSES OR KIT COMPONENTS ON OR NEAR ANY HOT, SHARP, OR MOVING
SURFACES
•
IF YOU DO NOT FEEL CONFIDENT THAT YOU CAN SAFELY INSTALL THE CRUISE CONTROL BY YOURSELF, THEN WE
RECOMMEND THAT YOU HAVE IT INSTALLED BY A QUALIFIED PROFESSIONAL.
•
THE SWITCH HOUSING IS WATER RESISTANT, NOT WATERPROOF. WATER MAY ENTER THE SWITCH MOUNTING
HOLES FROM THE REAR.
1.4. Preparation
These instructions are specific to the Yamaha Raider, Roadliner and Stratoliner exclusively. The Raider has a rear fender
plastic mud guard, the Roadliner/Stratoliner rear fender extends all the way down to the swing arm.
Roadliner/Stratoliner installation of the CC Servo between the rear fender and battery box requires modifying the face of the
rear fender in order to allow adequate space for the servo to be installed and easy reinstallation the rear fender. The end
user may also elect to install the servo in an alternate location of their choosing however Custom Rider does not support
any other location or modification to install other than what is represented in this manual. It is highly important that the
servo unit throttle cable orientation is pointed upwards or horizontally (DO NOT point cables downward). Additionally the
throttle bracket should be installed as described in this manual to insure the cruise will operate as described.
1.
2.
3.
4.
5.
6.
7.
8.
9.
10.
Revision M
Remove the seat, tool kit, and rear fender.
Remove the tank.
Remove the left side coil cover, coil mounting plate and all attached components.
Loosen or Remove the left side motor mount and slide out of the way or remove. (Must have access to the bell crank)
Loosen the throttle push/pull cables (both cables)
Remove the handlebar clamp, left side riser cover, ignition key switch cover.
Remove left side grip.
Loosen left side OEM switch housing.
Remove headlight.
Refer to your Motorcycle Service Manual for additional detailed information related to disassembly of the specified
sections discussed in this manual.
8
05.20.2015
Installation Instructions
- Custom Rider Motorcycles Electronic Cruise Control
2.
Mechanical Installation
2.1. Mounting the Servo Unit
•
Disconnect the brake connector to the rear fender, located in the wiring tray under the ECM.(Fig.6)
Fig.6
•
•
Remove the tool tray.
Remove the rear fender completely.
RAIDER ONLY
•
Once you have removed the rear fender, you will remove the metal cross bracket and discard.(Fig.7)
•
Disconnect the removable cable tie attached to the rear fender wire harness and discard.(Fig.8)
Fig.7
Revision M
Fig.8
9
05.20.2015
Installation Instructions
- Custom Rider Motorcycles Electronic Cruise Control
•
Remove the two 10mm nuts holding the metal bracket and plastic mud guard on the rear fender.(Fig.9)
Fig.9
Fig.10
•
Install the two metric supplied bolts in the kit in place of the metal bracket. Reuse the nuts and the plastic mud
cover.(Fig.10)
•
Fender modification for the Raider is complete, set aside fender and move on to “RELAY RELOCATION” Section for
battery box relay mounting.
ROADLINER/STRATOLINER ONLY
•
Mark and cut a square access relief hole in the face of the rear fender.
•
The bottom of the opening should be approximately ½” to ¾” cut into the top portion of the two angled fender cross
supports, approximately 6” wide X 4” high. The hole should be offset towards the rear brake light wiring rubber
grommet, approximately within ¼” from grommet edge. (Fig.11A, 11B)
Fig.11A
•
•
Revision M
Fig. 11B
This opening is adequate to allow relief for the fender to reinstall easily without undue pressure on the servo unit or the
fender mounting hardware.
The servo is water resistant and there is no chance of the rear tire coming into contact with the servo unit.
10
05.20.2015
Installation Instructions
- Custom Rider Motorcycles Electronic Cruise Control
RELAY RELOCATION
•
Remove the two relays from their attachment location on the back of the battery box. Remove the one relay and metal
bracket attached to the side tab on the left side of the battery box.(Fig.12)
Fig.12
•
•
•
•
•
•
•
Fig.13
Remove the relay from the metal bracket. Discard metal bracket.
Move the smallest relay to the empty space between the ex-up servo motor and the right side of the battery
box.(Fig.12, Fig.13)
Loosening the ex-up motor mounting bolts may help fit the relay into the empty space. Once the ex-up motor is
retightened, no other attachment is necessary for this relay.
Roadliner/Stratoliner applications will have one additional relay on left side attached with plastic grommet to the
battery box. This relay usually can stay in place. If it creates an issue with cruise install it should be moved to the
empty space between the ex-up servo motor and the right side of the battery box.(Fig.13)
Clean the smooth face of the two remaining relays with alcohol, and the entire back side of the battery box with
alcohol.
Attached the one inch square of Velcro to each of the relay smooth face, then stick the Velcro to the back of the battery
box.(Fig.14)
The relays should be positioned sideways now instead of upright, and as low as possible to allow space for the cruise
control servo unit. When complete the relays will remain mounted sideways as low on the back of the battery box as
possible as shown.(Fig.15)
Fig.14
•
•
Revision M
Fig.15
Remove the double stick tape protective cover on the metal tab of the cruise control mounting cover.
Slide the metal tab of the cruise control mounting cover between the battery box and the cross member of the
frame.(Fig.16, 17)
11
05.20.2015
Installation Instructions
- Custom Rider Motorcycles Electronic Cruise Control
•
•
•
•
For Raider applications, press the double stick tape firmly against the cross member support to hold the cruise servo in
place.
Do not press the double sided tape firmly without checking alignment of cruise servo unit and fender relief hole for
Roadliner/Stratoliner applications. The cruise servo box will be firmly held in place with double stick tape and after the
tool tray is reinstalled, thereby applying pressure against the mounting plate.
Be sure to position the cruise servo all the way up so that the mounting bracket is flush with the top and as far to the
left side as possible depending on your application. The Roadliner/Stratoliner position will be slightly more centered to
allow alignment to the fender relief hole.(Fig.18, 19, 20)
Once the tool tray is reinstalled and the cruise servo is in place, no further mounting hardware is required to maintain it
in place.
Fig.16
Fig.17
Fig.18
Fig.19
•
Although the CC is mounted near the rear wheel and appears to be exposed to water and the elements, it is not in any
danger of any issues with moisture or road condition damage. Although some potential exposure to dust and water, the
cruise servo will not be affected under normal ride and operation.
•
CAUTION: It is not advised to use any type of throttle locking device or cruise control in adverse weather
conditions.
Revision M
12
05.20.2015
Installation Instructions
- Custom Rider Motorcycles Electronic Cruise Control
2.2. Routing the Cruise Throttle Cable and Wiring
•
Route the cruise control servo throttle cable AND the wiring harness over the top of the ex-up motor on the right side
and along the frame on the right side under the seat towards the middle of the bike near the bottom of the
tank.(Fig.20, 21)
Fig.20
•
•
•
•
•
Fig.21
Temporarily disconnect the tab holding the fuse box and lift up out of the way.(Fig. 22)
Route the Brake relay and ground wire under the fuse box in the open cavity area.(Fig.23)
Make sure to point the electrical connection of the relay socket downward to reduce chance for moisture collection in
the relay socket wiring.
Reinstall the fuse box.
Route the cruise control fuse along the back frame cross member towards the pouch under the ECM computer.
Fig.22
•
•
•
Revision M
Fig.23
The gas tank should be removed or rotated out of the way for the rest of this section.
Continue routing the throttle cable and longer wire harness towards the middle under the frame and the seat up to
the tank and then follow the left side frame rail alongside the air box, on the inside of the frame rail.(Fig.24)
NOTE: Running the throttle cable above the frame through the center section may cause the throttle cable
to later pinch the gas lines, creating vapor lock condition.
13
05.20.2015
Installation Instructions
- Custom Rider Motorcycles Electronic Cruise Control
Fig.24
•
•
•
Loop the throttle cable 180 degrees back to the bell crank by going from the inside of the frame to the outside.(Fig.25)
Be sure to make the bends in the cable smooth and gentle so you don’t kink the cable. The Rostra control cable must
NOT be pinched or buckled anywhere and must move freely using nothing but your fingers when routing is completed.
The cable jacket has been pre-threaded and the throttle bracket is installed on it in your kit. The mounting 10-24 Allen
bolt and washer are located in the parts bag.
Fig.25
Revision M
14
05.20.2015
Installation Instructions
- Custom Rider Motorcycles Electronic Cruise Control
2.3. Mounting the Throttle Bracket and Adjustment
•
Remove the left side coil cover, loosen the two coils mounted to the coil mounting bracket and the two bolts holding the
mounting bracket to the motor mount.
•
Remove the motor mount brace on the left side to give you full access to the bell crank on the throttle body and the
frame boss.(Fig.26)
•
Using a 10mm wrench, loosen the push and pull cables from the bell crank mount and move out of the way.
•
Loosen the front nut(nut nearest the front of the motorcycle) all the way. Do not move or adjust the rear nut. This will
gain you slack and you can remove the push/pull cables from their mounting bracket.(Fig.29)
Fig. 26
•
Our custom throttle bracket mounts the servo throttle cable to the frame boss used for the motor mount. Your bracket
may appear slightly different than one shown in this document due to part revisions but all installation information is
the same.(Fig.27)
Fig. 27
Revision M
15
05.20.2015
Installation Instructions
- Custom Rider Motorcycles Electronic Cruise Control
•
•
•
Position the throttle bracket so that the hole drilled on the frame boss will not drill or enter into the threaded hole used
by the engine mount bracket. Use a center punch to mark the location for the drill and tap.(Fig.28)
Use a #25 drill bit (5/32”) to drill into the frame, followed by a 10-24 tap.
Use Loctite to secure the throttle cable bracket with the supplied bolt and washer in the kit to the frame.
Fig.28
•
•
•
Fig.29
The bracket should be tight and level after installation. Some slight bending may be needed to adjust the bracket. The
throttle cable should point in the direction of the bell crank.(Fig.29)
Install the throttle cable into the bracket using the two 11mm nuts and washers.
Install the loop cable to the throttle bell crank using the cable loop and clip provided in your kit.(Fig.30)
Fig.30
•
•
To remove the pull cable from the bell crank you will open the throttle all the way open by hand. This will allow you to align
the pull cable wire with the remove cutout on the bell crank.
Remove the pull cable from the bell crank. Place the cruise servo loop cable in the area of the pull cable hole connection.
Reinstall the pull cable with the loop cable over the pin on the end of the pull cable and reinsert the pull cable into the bell
crank.(Fig.30)
Revision M
16
05.20.2015
Installation Instructions
- Custom Rider Motorcycles Electronic Cruise Control
•
Both the pull cable and the cruise throttle cable will follow the groove in the bell crank once installed.(Fig.31)
Fig.31
•
•
•
Put one of the sleeves over the coupler. Then connect the other end of the loop cable coupler to the CC throttle cable.
Be sure to put a sleeve onto the cable before you make the final connection between the servo cable and loop cable.
Be sure to install the throttle cable into the bracket with a nut and washer on each side of the bracket before you make the
final connection between the servo cable and the loop cable.(Fig.32)
Revision M
17
05.20.2015
Installation Instructions
- Custom Rider Motorcycles Electronic Cruise Control
Fig.32
•
•
Once the throttle cable bracket is mounted and the loop cable has been attached to the servo throttle cable, use the
supplied lock nut and flag nut to adjust the cable slack. You can wait to tie wrap the cable to various points on the frame
until you have finished running all the wires.
Make sure you have adjusted the cable so that between zero and 1/8” of play exist in the cable slack.
•
If you adjust it so that the throttle is held partially open, your idle will be fast and the throttle will
not be resting closed. Slack greater than 1/8” will cause severe surging on SET. You want to
adjust the throttle cable to have almost zero slack, with the high end being 1/8” at most. You may
find it easiest to adjust the cable to slightly pull the bell crank off the throttle stop screw and then
back off the cruise throttle cable adjustment a few turns to have the cable at almost zero slack.
•
•
Reinstall the push and pull cables and adjust throttle operation.
Check the throttle movement. Check to see that the throttle moves from idle to WOT (wide open throttle) without ANY
binding or interference. Use a good light and carefully watch the throttle arm as it moves through its entire arc to make
sure everything clears and that the Rostra cable cannot hang up on anything on the motorcycle. Also check that the Rostra
cable is not touching anything as it moves as it will eventually cut through whatever it is touching.
The cruise cable will appear to be slack when checking and twisting the throttle. This is normal when the bike is off. When
the bike is on and the cruise control unit is powered, it is designed to take up the slack when the throttle is in use and the
cruise is disengaged.
Once you have completed this portion, you can now reassemble the motor mount and related brackets for coil mounting,
and coil cover. If you find the cable needs additional adjustment after the tank is installed, it can be accomplished by
removing the two lower bolts on the tank and lifting the tank at the rear and propping it up to gain better access to the two
adjusting nuts on the cruise control throttle cable.
•
•
Revision M
18
05.20.2015
Installation Instructions
- Custom Rider Motorcycles Electronic Cruise Control
3.
Handlebar Control Switch
3.1. Installing the Handlebar Switch
•
Slide approximately 6-8 inches of heat shrink over the switch wires and slide all the way up to the back of the switch. This
should be enough covering to protect the wires exposed between the switch and the point of entry into the handlebar
opening.(Fig.33)
•
Remove the left grip and slide the new switch housing onto the 1” bar all the way up to the existing OEM switch housing.
•
There is a set screw on the back side of the cruise switch housing used to tighten the housing to the bar but not until after
you have pulled the wires from the switch housing into the bottom of the OEM switch housing and fed the wires down inside
the handlebar to the risers.
•
Once complete you may reassemble the OEM switch housing and reinstall the grip.
•
The cruise control switch wires are routed into the OEM control housing in the same location as the existing clutch wiring on
the far inside.
•
Be careful not to nick or cut the wires on the handlebar opening. Doing so may cause a broken wire or short in the wiring.
Fig.33
•
•
You will add additional heat shrink covering to the wires at the point where they exit the handlebar near the riser. Add
enough to cover the wires from the handlebar until they enter the headlight.
Feed the wires from the cruise control switch down the left side riser, alongside the existing wiring. Follow alongside the
wiring under the key switch cover down and into the headlight housing. Depending on your routing method the wires may
or may not need additional wire added.
ROUTING THE CRUISE SERVO SWITCH WIRING PIGTAIL
•
The wire harness from the servo unit should now be near the front of the tank near the neck.
•
Zip tie the four wire pigtail to the existing wiring that exits from under the tank on the left side.
•
Cover the four wire pigtail with heat shrink or a similar wire cover and route the pigtail and loop from the frame to the front
forks following the same wiring loom for the left and right OEM Switch housings already there on the left side. Feed the
servo wire pigtail up to and into the headlight.
Revision M
19
05.20.2015
Installation Instructions
- Custom Rider Motorcycles Electronic Cruise Control
Fig. 34
Fig.35
3.2. CANCEL Switch Option (Three Button Kit Only)
•
The three button switch housing incorporates a normally closed switch (NC). This switch is used to “power cycle” the cruise
unit. It is always the top button in a three button switch.(Fig.35)
•
Pressing the “CANCEL” button will interrupt the +12V power circuit of the cruise servo unit and clear the cruise set point
memory.
•
The two button switch housing does not use a “CANCEL” button. Two button switch housings only use “SET/COAST and
RESUME/ACCEL” buttons. To clear the servo set point memory, removing the ignition key (shutting off the motorcycle) will
clear the set point.(Fig.34)
4.
Electrical Wiring
4.1. Wire Loom Routing
CAUTION : DO NOT MOUNT OR ROUTE WIRING HARNESSES OR KIT COMPONENTS ON OR NEAR ANY HOT,
SHARP, OR MOVING SURFACES WITHIN THE VEHICLE.
•
•
•
•
•
•
•
Revision M
This kit has been pre-wired and routing should be simple if you are installing the cruise control servo in the intended
location between the rear fender and battery box.
Roadliner/Stratoliner Applications: If attempting to relocate the cruise servo under the tank to avoid modifying the rear
fender you may find it necessary to route the wire harness differently to obtain the best setup for access to the brake
relay and fuse. Wiring length for under seat connections may need to be lengthened.
Following the routing recommendations will simplify the process and save you a good deal of time.
Route the wire harness from the cruise servo above the ex-up motor alongside the throttle cable on the right side under
the seat.
The five wiring connections to the motorcycle, brake relay, and fuse will all terminate under the seat.
The longer harness will continue up the frame on the left along with the throttle cable.
The four wire handlebar switch connector (A) should terminate before exiting from under the tank near the left side
neck cover. The connector (A) pigtail will follow the wiring from the tank to the forks and route into the headlight. A
braid cover or heat shrink is a good option to cover the wires and clean up the install.
20
05.20.2015
Installation Instructions
- Custom Rider Motorcycles Electronic Cruise Control
4.2. Wiring Notes
A couple of essential points for better installation performance:
1.
2.
3.
It is recommended to solder all connections for best performance. Solder less crimp connector may be used, but we
prefer a soldered and heat shrink connection over solder less spade connectors.
The BLUE Clutch Disengage wire should be connected last.
It is recommended to disconnect battery to avoid any damage to ECM or cruise unit while installation of wiring.
4.3. Cruise Servo/Handlebar Control Wiring Connections
•
Once you have routed the handlebar switch wiring and the cruise servo “Connector A” wiring into the back of the
headlight you will connect the wires for switch operation.
•
The Connector A servo pigtail has four wires; Black, Green, Yellow, and Red/Brown Stripe.
4.3.1.
Revision M
Two Button Wiring
•
Connect green wire from servo pigtail to green wire from handle bar switch. This is the SET/COAST button
control wire (TOP BUTTON on Switch)
•
Connect yellow wire from servo pigtail to yellow wire from handle bar switch. This is the RESUME/ACCEL
button control wire (BOTTOM BUTTON on Switch)
•
Connect black wire AND red/brown wire from servo pigtail to the black wire from handle bar switch. All two
black wires (one from switch housing and one from cruise pigtail under tank) and the red/brown wire (from
pigtail under tank) should be wired together.
21
05.20.2015
Installation Instructions
- Custom Rider Motorcycles Electronic Cruise Control
4.3.2.
Revision M
Three Button Wiring
•
Connect green wire from servo pigtail to green wire from handle bar switch. This is the SET/COAST button
control wire (TOP LEFT BUTTON on Switch)
•
Connect yellow wire from servo pigtail to yellow wire from handle bar switch. This is the RESUME/ACCEL
button control wire (BOTTOM LEFT BUTTON on Switch)
•
Connect red/brown wire from servo pigtail to red wire from handle bar switch. This is the CANCEL button
control wire (BOTTOM RIGHT BUTTON on Switch)
•
Connect black wire from servo pigtail to black wire from handle bar switch.
22
05.20.2015
Installation Instructions
- Custom Rider Motorcycles Electronic Cruise Control
4.4. The Five Wires Connected to the Motorcycle
The following five wires are the only connections between the Cruise Control Servo and the motorcycle. All connections are
made under the seat using a wiretap crimp connector supplied in the kit or via soldering if end user so choses. We
recommend using a small cable tie to secure the two wires together to prevent damage or pull out of wiring.
4.4.1.
+12V Power and Ground Connection (RED & BLACK)
+12V Power is connected into the brown wire of the DC Auxiliary connector located under the ECM in the black
pouch. Locate the two wire connector plug used for accessory items. It is powered only when the motorcycle is key
on. (Fig.36, 37, 38)
Fig.36
Fig.37
Fig.38
Ground is connected to the central ground bolt next to the oil fill cap. (Fig.39, 40, 41)
Fig.39
Revision M
23
05.20.2015
Installation Instructions
- Custom Rider Motorcycles Electronic Cruise Control
Fig.40
4.4.2.
Fig.41
Brake Disengage Connection (PURPLE)
The purple brake disengage wire is routed to the left side of the motorcycle, near the frame cross member. This is
where the rear fender wire harness connector is located. It is a five wire connector.
Tap into the yellow brake wire on the bike side of the connector plug and not the rear fender harness side. This
way when you remove the fender in the future, you will not need to cut the wire. (Fig.42, 43, 44)
Fig.42
Fig.43
Revision M
Fig.44
24
05.20.2015
Installation Instructions
- Custom Rider Motorcycles Electronic Cruise Control
4.4.3.
Clutch Disengage Connection (BLUE)
The blue clutch disengage wire is routed to the ECM connection harness. Locate the (black wire with yellow stripe;
2006-2011 models) or the (black wire with red stripe; 2012-present models) on the larger of the two connectors of
the ECM.
2006-2011 Models
On the Raider this wire is located center top of the wire bundle. On the Roadliner/Stratoliner this wire is located
outside top of the wire bundle. (Fig. 45, 46, 47)
Fig.45
Fig.46
Revision M
Fig.47
25
05.20.2015
Installation Instructions
- Custom Rider Motorcycles Electronic Cruise Control
2012-Present Models
On all models this wire is located center top of the wire bundle. The wire color will be black with yellow stripe or red
with black stripe depending on your application. (Fig. 48)
Fig.48
4.4.4.
Vehicle Speed Signal (VSS) Connection (GREY)
The grey VSS signal wire is routed under the ECM to the vehicle speed signal connector in the black pouch. Locate
the three wire connector plug and tap into the white wire with yellow stripe. (Fig. 49, 50, 51)
Fig.49
Revision M
26
05.20.2015
Installation Instructions
- Custom Rider Motorcycles Electronic Cruise Control
Fig.50
5.
Fig.51
Testing
5.1. Shop Testing
•
WARNING : DO NOT ATTEMPT TO ROAD TEST ON JACK STANDS OR A LIFT !
•
•
•
•
You cannot test the CC unit on the jack in the shop. Yes it will engage, but because there is no road load resistance, the
cruise will accelerate over speed quickly and is not a safe test method.
If you have wired everything properly, the cruise unit will operate as described without diagnostic testing. If you want to be
certain you have everything correctly wired and operational, follow the diagnostic test outlined here.
NOTE:
The Cruise Control Servo Unit will not enter diagnostic mode if the BLUE Clutch Disengage wire is connected. If you have
already connected this wire, temporarily remove to test the Cruise installation. Connect this NSS wire after all diagnostics
are completed and before actually riding the motorcycle.
Diagnostic Test Mode
•
The Cruise Control Servo Unit is equipped with an Amber Self Diagnostic LED located underneath the rubber grommet
on top of the cruise module.
•
If you have verified all of your wired connections and you still have trouble with your cruise control unit, you may need
to verify your connections via the diagnostic test mode.
•
You MUST disconnect the BLUE CLUTCH WIRE from the BLACK/YELLOW STRIPE in order for diagnostic
mode to work.
•
Remove rear fender and slide servo unit out and to the right side of the rear tire.
•
Remove the rubber grommet covering the DIP switches. Note the location of the Amber Diagnostic LED(Fig.52)
Revision M
27
05.20.2015
Installation Instructions
- Custom Rider Motorcycles Electronic Cruise Control
Fig.52
•
•
•
•
•
Turn off the ignition key.
PRESS and HOLD the RESUME button while turning on the ignition key.
Release the RESUME button.
The Cruise Control Module Unit is now in Diagnostic Mode. The Amber Diagnostic LED should be OFF at this time.
Press and Release the SET/COAST button. The LED should light each time the button is pressed and go out when it is
released. If so, continue to next step. If not, go to sub steps.
o
Check steps to enter diagnostic mode and test again.
o
Check DIP switch #12. It should be set to OFF for normally open circuit control switch.
o
Check power to the cruise unit if none of the diagnostic commands are functioning.
o
Check cruise control switch for continuity
•
Press and Release the RESUME/ACCEL button. The LED should light each time the button is pressed and go out when it
is released. If so, continue to next step. If not, go to sub steps.
o
Check steps to enter diagnostic mode and test again.
o
Check power to the cruise unit if none of the diagnostic commands are functioning.
o
Check cruise control switch for continuity
•
You will need a second person to help perform the next test. Press and Release the Brake Pedal. The LED should light
each time the brake is pressed and go out when it is released. If so, continue to next step. If not, go to sub steps.
o
Check steps to enter diagnostic mode and test again.
o
Check brake light is functioning properly when pressed.
o
Check power to the cruise unit if none of the diagnostic commands are functioning.
Check the VSS signal output source. For this test the bike should be in Neutral and on a stand that allows the rear
wheel to roll.
Roll the rear wheel forward or backward, the LED should flash and continue to flash at the same rate. If so, continue to
next step. If not, go to sub steps.
o
Check steps to enter diagnostic mode and test again.
o
Check DIP switch #10. It should be ON for Square wave input. If set incorrectly, reset and reenter
diagnostic mode.
o
Check power to the cruise unit if none of the diagnostic commands are functioning.
o
Either your VSS wire connection is incorrect, or your connection is bad. Inspect your VSS connection and
reenter diagnostic mode.
•
•
Revision M
28
05.20.2015
Installation Instructions
- Custom Rider Motorcycles Electronic Cruise Control
5.2. Road Testing
5.2.1. Engaging The Cruise For The First Time
•
Safety First. A road test is the most dangerous time for a new user of a motorcycle electronic cruise control. Put on all
your gear. If something goes wrong and you lose control, now is the time to test your riding gear.
•
The cruise control servo unit is powered any time the motorcycle is on.
•
The cruise control unit should engage at a speed of 40 MPH and above up to a speed of 90 MPH. Below 40 MPH the
cruise may hunt and surge to maintain a set speed until it fails and shuts off, so it is not recommended to use the
cruise below 40 MPH.
•
Accelerate on a straight level section of roadway to a speed of 40 MPH.
•
Hold the motorcycle at a steady speed, press and release the “SET” button to engage the cruise. The motorcycle may
experience a slight surge of acceleration by 3-5 MPH and then recover and settle in at the selected speed. This action
is normal for this application. The throttle cable retracts at a set force of 25/ft.lbs. Because a motorcycle is much
lighter than an automobile, the result is a slight overshoot when activating the cruise. Heavier bike and rider
combinations will see less surge than a lighter bike and rider combinations.
•
Slowly let the bike's speed drop a little bit by releasing the throttle and the cruise control should maintain speed.
•
Once engaged, the cruise control unit will hold the motorcycle at a reasonably steady speed regardless of wind or hills.
•
You should be ready to disengage the unit by tapping a brake and/or pulling in the clutch at the same time just in case
something does not work correctly.
5.2.2. Testing the BRAKE, CLUTCH, (CANCEL(3-Button Kit Only)) Disengage Feature
•
If the initial cruise engagement works properly, you should now test the BRAKE, CLUTCH, and CANCEL shutoff options
for proper operation.
•
NOTE: After each shutoff option test you will need to re-engage the cruise by pressing SET in order to test the next
shutoff option.
•
Engage the cruise between 40-55 MPH and test each one of the shutoff methods.
•
If all shutoff methods work properly, continue to Section 5.2.3 to test the SET/COAST, RESUME/ACCEL features.
5.2.3. Testing the SET/COAST & RESUME/ACCEL Feature
•
SET: Set the cruise by pressing the SET button.
•
ACCEL: To accelerate, “TAP” the RESUME/ACCEL button to increase speed by 1-1/2 miles per hour. Holding the ACCEL
button will cause the motorcycle to rapidly accelerate and may not be desirable. We recommend using the tap method
to gentle increase speed by a few miles at a time. You can tap the ACCEL button repeatedly to “bump up speed.
•
COAST: Test the COAST button by following the same steps as above for acceleration using the “TAP“ method. Holding
the COAST button will cause the motorcycle to slow quickly. Taping to slow by a few miles, or pressing the clutch,
tapping the brake is a more preferred method for slowing down.
•
RESUME: Set the cruise speed at a safe speed and press the clutch, or brake to disengage or come to a stop. Return to
near the previous set speed and then press the RESUME button and release the throttle.
•
The cruise should reengage at the previous speed and maintain.
6.
Important Operating Instructions
6.1. Cruise Control General Operating Information
•
The cruise control servo is ALWAYS ON whenever the motorcycle is running. There are a few safety features built
into the unit for safe operation, but it is also a good idea to understand the general operation or your new cruise
product.
•
The Cruise Control Servo WILL NOT engage when the motorcycle is operating below 35MPH; when the kickstand is
down; when the motorcycle is in NEUTRAL gear; when clutch or either brake are compressed.
6.2. Set Function
•
The SET button will engage the cruise control at any speed above 35MPH and operating as described up to
approximately 100MPH. The cruise servo will generally hold the SET speed regardless of terrain with some
exceptions.
•
The SET button will NOT operate below 35MPH effectively. The motorcycle may speed up and slow in a “Hunt”
mode to maintain speed below 35MPH until shutting itself off.
•
On initial SET button press, the cruise may surge over speed by 3-5 MPH and then slow and maintain set speed.
This is due to the weight relationship to the cruise servo operation. The light weight of the motorcycle in relation
to the cruise throttle pull. This will be less noticeable on a heavier motorcycle/rider combination.
•
Once the operator has become comfortable with the initial set/surge operation they will learn to adjust engagement
operation to minimize this effect. This is done by over accelerating at the set point desired and then allowing the
motorcycle to slow and settle back to the set speed.
Revision M
29
05.20.2015
Installation Instructions
- Custom Rider Motorcycles Electronic Cruise Control
6.3. Resume Function
•
The RESUME button should not be used to accelerate to a previous SET speed unless within 5MPH of previous SET
speed.
•
Pressing the RESUME button at 40MPH to return to 70MPH will cause the motorcycle to accelerate rapidly and is
considered dangerous operation.
•
Pressing the RESUME button at 80MPH to return to 70MPH is acceptable. The motorcycle will slow naturally when
the operator releases the throttle grip and the cruise will then maintain the set speed once the motorcycle slows to
the previous SET speed.
6.4. Cancel Function
•
The CANCEL button is a momentary switch that interrupts the power circuit to the cruise control servo unit. Power
is restored as soon as the button is released.
•
Pressing the CANCEL button will “power cycle” the cruise unit. A power cycle will clear all previously SET speed
points from the cruise servo memory buffer. It is recommended to PRESS AND HOLD the CANCEL button for a
minimum of 3 seconds to allow the cruise memory buffer to clear.
•
When pressing the CANCEL button for less than 3 seconds, you may experience a failure of normal operation of the
cruise unit. Not clearing the buffer completely with the CANCEL button may cause the cruise to not operate. This is
identified as cruise not engaging when set button is pressed and is an indicator of an unclear buffer. In this case
holding the cancel button for 3-5 seconds should resume normal operation. Turning off the motorcycle and
restarting will also achieve the same result.
6.5. Coast & Acceleration Function
•
When using the COAST and ACCEL button to speed up or slow down, it is better to “tap” multiple times to increase
or decrease speed gradually.
•
Pressing and holding the COAST button will cause the motorcycle to slow rapidly, a feeling similar to “falling on its
face”.
•
Pressing and holding the ACCEL button will cause the motorcycle to accelerate or “take off like a rocket” quickly.
•
The cruise servo will increase or decrease in speed by approximately 1 to 1-1/2MPH with each TAP of the COAST or
ACCEL buttons.
•
Another method would be to disengaging the cruise and slow or accelerate to the new speed and press SET again.
Revision M
30
05.20.2015
Installation Instructions
- Custom Rider Motorcycles Electronic Cruise Control
7.
Appendix
7.1. Document Revision Notes
Date
Revision
Sept 15, 2009
Initial Document.
A
Dec 05, 2009
Review, addition of details over several sections. Updated APPENDIX.
B
Feb 05, 2010
Document – Initial Website Release for wide review. Collect feedback for follow review 30 days.
C
March 06, 2010
Add info for mounting Engaged Light Location in Speedo.
C1
March 20, 2010
Resolved Turn Signal Auto Shutoff Issue. Custom Circuit Design in process and will ship will all kits.
C2
March 29, 2010
Document Updates from Feedback, Final Release supplied with Custom Rider Electronic Cruise Control Kit.
D
May 14, 2010
Added Cruise Engage LED Location Template. Additional misc. updates to document.
E
June 25, 2010
Review and re-write to facilitate more end user friendly installation process. Streamlined installation instructions.
Eliminated detail related to pre-wiring and setup of servo control. All kits now pre-wired, DIP setting specific for
Raider/Roadliner/Stratoliner operation prior to shipping. Add images for the five motorcycle hookup connections.
Add photo credit.
F
July 26, 2010
Convert instructions to Booklet Form. Schematic removed.
Oct 27, 2010
Updated to include 2006-2011 Roadliner/Stratoliner models. Updated Diagnostic DIP switch image (60)to show
accurate DIP settings when using Diagnostic Mode. Updated Throttle Cable Adjustment Section to improve
wording for correct adjustment of zero slack. Added supplemental pages for Kuryakyn ISO grip modification
needed to fit up to switch housing. Reworded connection wiring for servo wires to switch wires(connection in
headlight) to be more clear. Added image of 4”x6” hole required for Roadliner/Stratoliner fender.
Dec 04, 2010
Updated to include Three Button switch housing installation notes.
Oct 22, 2011
Updated model years covered. Add note regarding routing of throttle cable under frame near front of seat.
F1
F2
G
G1
June 16, 2012
Updated model years covered. Add note regarding 12V Engage LED (no longer included in kit after June 2012.)
User review poll showed the LED was not being installed or used by majority of end users. In addition, the four
button switch housing will be discontinued once all stock is consumed. Three button housing is preferred for
housing with cancel feature. Bonus button(garage door operation) not a needed feature.
H
May 04, 2013
Updated model years covered. Added revision for model year’s 2012-forward with regards to clutch connection
wiring color change (Section 4.4.3). Removed four button images and reference sections. Removed LED engage
images and reference sections. Complete review for misc. updates, changes, obsolete information.
J
May 01, 2014
Updated model years covered. Removed Speedometer section related to LED for engage. No longer applicable.
K
Unpublished Revision. Wiring Harness Revision, removal of Cruise Engage LED two wire from long harness; feature
not used by end users enough to justify inclusion.
L
Updated model years covered. Removed LED wiring harness and related manual information. Removed Cruise
Engaged LED reference sections. Complete review for misc. updates, changes, obsolete information. Reset Fig.
numbering after section removals.
M
March 15, 2015
May 20, 2015
Revision M
Note
31
05.20.2015