1
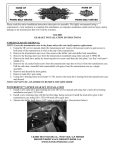
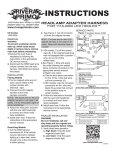
PC-1000-A PRO-CLUTCH INSTRUCTIONS_PC-1000-A PRO-CLUTCH#2A72D0.qxd 2/15/12 4:03 PM Page 1
QUALITY & PERFORMANCE SINCE 1973
HOME OF PRIMO BELT DRIVES
PRO-CLUTC H
TM
1056-0002 / For All 1936-1984 Big-Twin Applications
I n s ta l l at I o n
I n s t r u c t I o n s
Congratulations, you have just purchased Rivera Primo’s Pro-ClutchTM, the best clutch upgrade in the
world. Please follow the directions for a simple, trouble free installation!
If you have any questions about this installation please contact Rivera Primo and a knowledgeable
Pro-ClutchTM technician will assist you! Thank you for purchasing a Pro-ClutchTM !
RIVERA PRIMO’s PRO-CLUTCH TM for early-model (1936-1984) Big-Twin motorcycles upgrades the clutch in
two ways: First, by increasing the friction area by almost 50%. Second, by replacing the coil-spring clutch-pack
with our proprietary diaphragm spring design. Diaphragm-spring operated clutches have proven to be more
durable than typical coil spring clutch packs, when utilized in street & high-performance motor vehicle applications. PRO-CLUTCH TM installs quickly into the existing clutch basket (belt or chain) by removing the OEM hub
and caged (loose) bearings, and installing the PRO-CLUTCH TM hub adapter assembly and clutch pack!
PRO-CLUTCH TM will easily transmit ALL your motor’s horsepower to the transmission without slipping or grabbing! Smooth, easy hand-control makes this high performance PRO-CLUTCH TM (formerly PC-1000-A) a must for
any high-performance 1936-1984 Big-Twin Harley motorcycle!
Rivera Primo Inc. 12450 Whittier Blvd., Whittier, CA 90602
TEL: (562) 907-2600 FAX: (562) 907 2606 / www.riveraprimoinc.com / E-mail: [email protected]
1
1108-0007 / Revised 2-2012
PC-1000-A PRO-CLUTCH INSTRUCTIONS_PC-1000-A PRO-CLUTCH#2A72D0.qxd 2/15/12 4:03 PM Page 2
SAFETY FIRST
When performing work on any motorcycle, and prior to starting this installation
disconnect BOTH battery cables! If the motorcycle is on a lift, fasten it securely to
prevent it from falling! Read and become familiar with the Pro-ClutchTM instructions
before starting. For safety, use only the proper tools for this installation!
1
STEP 1:
1A
This is the Rivera Primo Pro-ClutchTM. Get familiar
with it before disassembling it for installation! Strip
the clutch basket of all the OEM clutch components
such as bearing cage & bearings, clutch plates,
pressure plate, coil springs etc!
Note the position of the new lock-clips P/N1058-0106
1058-0111 (pair)
1058-0106 (individual)
STEP 2:
To prepare the Pro-ClutchTM for installation disassemble the pressure plate
assembly and clutch pack while noting the exact sequence of the components for reference during
reassembly! See the exploded view on page 6 of this installation guide.
STEP 3:
Remove the 6 Allen head bolts and the lock-ring at
the rear of the adapter! Keep track of ALL the Allen
bolts!
3
STEP 4: Install the Rivera Primo Pro-ClutchTM hub & adapter into the OEM clutch basket. Use Rivera
Primo’s “Blue” thread lock on the Allen bolts and tighten to 80 INCH POUNDS (not foot pounds!)
4
4A
4B
Install the adapter into the basket! Install the lock-ring on the rear of the adapter!!
2
PC-1000-A PRO-CLUTCH INSTRUCTIONS_PC-1000-A PRO-CLUTCH#2A72D0.qxd 2/15/12 4:03 PM Page 3
4C
STEP 4C:
Install the clutch basket/hub assembly onto the transmission main-shaft using two drops of Rivera’s Blue threadlock or equal and tighten the clutch hub nut to 50-60 footpounds of torque.
5
STEP 5:
First plate installed is the .120” steel plate. It goes
all the way to the rear of the clutch hub
6
STEP 6:
Next clutch in is a friction(as shown above) then
steel, alternating until all the plates are installed!
ATTENTION!
If the clutch is to be operated in an oil bath,
it is recommended that the friction plates be
soaked in primary lubricant for 15-20 minutes. Wipe off excess lubricant prior to
installation.
Rivera Pimo recommends using Dextron III
ATF (Automatic Transmission Fluid) in the
primary for best performance with the Pro
Clutch.
3
PC-1000-A PRO-CLUTCH INSTRUCTIONS_PC-1000-A PRO-CLUTCH#2A72D0.qxd 2/15/12 4:03 PM Page 4
6A
Install Steel plate last!
STEP 6A:
Last clutch plate to be installed is a steel drive plate!
7
Pressure plate
8
Anti- seize!
STEP 7:
The billet aluminum pressure plate is installed
next, flat surfaces facing inward as shown!
STEP 8:
Dab some high-quality anti-seize on the stud threads
of the Pro-ClutchTM hub! This will prevent the nuts
from sticking and cause the studs to come loose
when the Pro-ClutchTM is disassembled.
4
PC-1000-A PRO-CLUTCH INSTRUCTIONS_PC-1000-A PRO-CLUTCH#2A72D0.qxd 2/15/12 4:03 PM Page 5
STEP 9:
The diaphragm spring & spring retainer are installed
next. Spring retainer goes bevel-side in! Tighten the
shoulder nuts until they bottom completely & are snug!
The lock-clips (1058-0106) should be installed as pictured. Bend one tab over each nut to keep it tight. The
diaphragm spring should be compressed to within
.010”-to-.020” of being flat. The spring will have a very
slight outward bow.
9
Side view
Spring retainer beveled side in!
10
Tighten nuts until they bottom!
STEP 10:
Install the clutch adjustment screw, and adjust the
clutch per the instructions in your Harley-Davidson
service manual.
Install the clutch adjuster!
Your finished installation will look like this
Be sure to bend one of the locking tabs over each shoulder nut to keep them tight. Rivera Primo’s Pro-ClutchTM
for pre-Evolution applications eliminates the creep &
chatter associated with early style clutch installations.
Your early model HD will be easier & safer to operate
with the
Pro-ClutchTM installed. A special PRO
CLUTCH TM clutch hub nut is included in every kit!
5
PC-1000-A PRO-CLUTCH INSTRUCTIONS_PC-1000-A PRO-CLUTCH#2A72D0.qxd 2/15/12 4:03 PM Page 6
1056-0002 1936-1984 Big-Twin
The following 1056-0002 parts list supercedes all preceding information for
Rivera Primo’s PC-1000, PC-1000-C & PC-1000-A Pro-ClutchTM assemblies.
1)
2)
3)
4)
5)
6)
7)
8)
9)
10)
11)
12)
13)
14)
15)
16)
17)
18)
19)
20)
21)
22)
23)
1-1057-0012 . . . . . bearing adaptor
1-1018-0015 . . . . . bearing
1-1101-0066 . . . . . large snap ring
1-1101-0068 . . . . . small snap ring
1-1057-0013 . . . . . steel lock ring
6-1100-0131 . . . . . screws for lock ring
1-2061-0003 . . . . . steel inner hub
1-1061-0012 . . . . . aluminum outer hub (1.712")
2-1100-0112 . . . . . screws for clutch hub
4-1100-0113 . . . . . bolts for clutch hub
4-2057-0026 . . . . . nuts for clutch hub screws
1-2057-0030 . . . . . special clutch hub nut & seal
7-1054-0006 . . . . . friction clutch plate
7-2060-0006 . . . . . steel clutch plate (.047")
1-1060-0003 . . . . . steel clutch plate (.120") rear
1-2058-0001 . . . . . pressure plate (aluminum)
1-2059-0003 . . . . . diaphragm clutch spring (medium)
1-2057-0005 . . . . . clutch adjustment screw
1-1057-0004 . . . . . adjustment screw lock-nut
2-1058-0106 . . . . . locking clips
1-2059-0200 . . . . diaphragm spring retainer
4-1057-0015 . . . . . shouldered nuts for retainer
1-2057-0024 . . . . . washer set (4-and-4)
6
PC-1000-A PRO-CLUTCH INSTRUCTIONS_PC-1000-A PRO-CLUTCH#2A72D0.qxd 2/15/12 4:03 PM Page 7
PRO-CLUTCH ADjUSTMENT
As delivered, the Pro-ClutchTM clutch-pack requires no adjustment, having been set at the factory.
After the Pro-ClutchTM has accumulated significant mileage, it may require some adjustment due to normal wear.
Use the procedures outlined below if & when adjustment is required. For best performance the diaphragm spring
MUST be compressed to within .010”-.020” of being flat when the shouldered spring retainer nuts have been properly tightened (bottomed)! This will provide maximum spring pressure to the clutch pack, with minimum hand
effort at the handlebar!
Three clutch springs are available: A stock replacement spring (black in color), a medium spring for street performance (silver in color), and a competition spring (gold in color) for drag race only applications.
If the diaphragm spring adjustment requires LESS ARCH,
this can be accomplished by using one or more of the special .020” washers on each of the shouldered nuts. (photo A)
If the diaphragm spring adjustment requires lMORE ARCH,
this can be accomplished by using one or more of the special
.030” washers on the clutch hub studs nuts as pictured.
Photo A
Photo B
The diaphragm spring will be compressed to within .010”-to-.020”
of being flat when correctly installed & adjusted
This is a diaphragm spring that is correctly adjusted. A little daylight is showing at either edge, because the spring is within
.010”-to-.020” of being flat! (Slightly bowed outward) as seen in
photo D.
Photo C shows a diaphragm spring that is compressed too far,
and needs to be adjusted. Special adjustment washers be
added to the clutch hub studs as shown in photo B.
WRONG
RIGHT
Photo D
Photo C
GENERAL WARRANTY
Rivera Primo Inc.’s sole obligation and the customer’s sole remedy is limited to replacement or repair of products free of
charge in the event products fail to perform as warranted for a period of one year from actual date of purchase. Proof of
purchase must accompany any warranty claim. In no event shall Rivera Primo Inc. be liable for claims for any other damages, whether direct, incidental, foreseeable, consequential, or special (including but not limited to loss of use, revenue or
profit), whether based upon warranty, contract, tort (including negligence) or strict liability arising in connection with the
sale or the failure of Rivera Primo Inc. products to perform in accordance with the stated specifications.
Rivera Primo Inc. makes no other warranty of any kind whatsoever, and specifically disclaims and excludes all other warranties of any kind or nature whatsoever, directly or indirectly, express or implied, including, without limitation, as to the
suitabilitly, productivity, durability, fitness for a particular purpose or use, merchantability, condition, or any other matter
with respect to Rivera Primo Inc. products.
7
PC-1000-A PRO-CLUTCH INSTRUCTIONS_PC-1000-A PRO-CLUTCH#2A72D0.qxd 2/15/12 4:03 PM Page 8
TAPERED SHAFT HUB REMOVER TOOL
1062-0002
.Tapered hub removal tool (all applications). Simply mount the tool on the left hand threads of the transmission main
shaft, and give the end of the tool a sharp tap with a medium weight hammer and the clutch hub simply “pops” off.
Available now for all tapered shaft clutch hubs.
CLUTCH HUB PULLER
1062-0003 . . . Quickly attaches to most Pro-ClutchTM
or Primo Belt Drives diaphragmspring
style clutch hub to allow
quick easy
removal.
CLUTCH HUB HOLDER
1062-0001 . . . Engages & holds clutch hub splines to allow correct torque specification
to be applied to the clutch hub nut (left-hand thread) when installing a
Rivera Primo Inc. 12450 Whittier Blvd., Whittier, CA 90602
TEL: (562) 907-2600 FAX: (562) 907 2606 / www.riveraprimoinc.com / E-mail: [email protected]
8