1
Alignment & Troubleshooting
4. Alignment & Troubleshooting
This chapter describes the main functions for service, such as the product maintenance method, the test
output related to maintenance and repair, DCU using method, Jam removing method, and so on. It includes
the contents of manual.
4.1 Alignment and Adjustments
4.1.1 Control Panel overview
1
ID Copy
You can copy both sides of the ID Card like a driver’s license to a single side of paper.
2
Direct USB
Allows you to directly print files stored on a USB Memory device when it is inserted into the
USB memory port on the front of your machine. (SCX-4x28 Series only)
Reduce/Enlarge
Makes a copy smaller or larger than the original. (SCX-4x24 Series only)
3
Display
Shows the current status and prompts during an operation.
4
Status
Shows the status of your machine.
5
Fax
Activates Fax mode.
6
Copy
Activates Copy mode.
7
Scan/Email
Activates Scan mode.
8
Menu
Enters Menu mode and scrolls through the available menus.
9
Left/right arrow
Scroll through the options available in the selected menu, and increase or decrease values.
10
OK
Confirms the selection on the screen.
11
Back
Sends you back to the upper menu level.
12
Number keypad
Dials a number or enters alphanumeric characters.
13
Address Book
Allows you to store frequently used fax numbers in memory or search for stored fax numbers
or email addresses.
14
Redial/Pause
In ready mode, redials the last number, or in Edit mode, inserts a pause into a fax number.
15
On Hook Dial
Engages the telephone line.
16
Stop/Clear
Stops an operation at any time. In ready mode, clears/cancels the copy options, such as the
darkness, the document type setting, the copy size, and the number of copies.
17
Start
Starts a job.
Service Manual
4-1
Samsung Electronics
Alignment & Troubleshooting
4.1.2 Understanding The Status LED
The color of the Status LED indicates the machine’s current status.
Status
Description
Off
7KHPDFKLQHLVSRZHUHGRIIOLQH
7KHPDFKLQHLVLQSRZHUVDYHPRGH:KHQGDWDLVUHFHLYHGRUDQ\
button is pressed, it switches to on-line automatically.
Green
Red
Service Manual
On
7KHPDFKLQHLVSRZHUHGRQDQGFDQEHXVHG
Blinking
:KHQWKHJUHHQ/('VORZO\EOLQNVWKHPDFKLQHLVUHFHLYLQJGDWDIURP
the computer.
:KHQWKHJUHHQ/('UDSLGO\EOLQNVWKHPDFKLQHLVSULQWLQJGDWD
On
$SUREOHPKDVRFFXUUHGVXFKDVDSDSHUMDPFRYHURSHQRUQRSDSHULQ
the tray, so that the machine cannot continue the job.
7KHWRQHUFDUWULGJHLVHPSW\RUQHHGVWREHFKDQJHG
Blinking
$PLQRUHUURUKDVRFFXUUHGDQGWKHPDFKLQHLVZDLWLQJIRUWKHHUURUWREH
cleared.
7KHWRQHUFDUWULGJHLVORZ2UGHUDQHZWRQHUFDUWULGJH
4-2
Samsung Electronics
Alignment & Troubleshooting
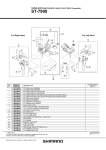
4.1.3 Paper path
Scanner Part
PICK-UP52//(5
$')52//(5
COVER OPEN
ADF-UPPER
)(('52//(5
EXIT 52//(5
$')/2:(5
SCAN UPPER
$')*/$66
:+,7(%$5
Engine Part
LSU
DEVE
FUSER
DUPLEX
CASSETTE
Service Manual
4-3
Samsung Electronics
Alignment & Troubleshooting
4.1.3.1 Clearing Document Jams
:KHQDQRULJLQDOMDPVZKLOHSDVVLQJWKURXJKWKH$')'RFXPHQW-DPDSSHDUVRQWKHGLVSOD\
Input Misfeed
4. Align the left end of the ADF roller with the slot
and push the right end of the ADF roller into the
right slot (1). Rotate the bushing on the right end
of the roller toward the document input tray (2).
1. Remove any remaining pages from the ADF.
2. Open the ADF cover.
1 ADF cover
5. Close the ADF cover. Then load the removed
page(s), if any, back into the ADF.
3. Rotate the bushing on the right end of the ADF
roller toward the ADF (1) and remove the roller
from the slot (2). Pull the document gently to the
left and out of the ADF.
Service Manual
4-4
Samsung Electronics
Alignment & Troubleshooting
Exit misfeed
Roller misfeed
1. Remove any remaining pages from the ADF.
1. Open the scanner lid.
2. Seize the misfeed paper, and remove the paper
from the document output tray by carefully
pulling it to the right using both hands.
2. Seize the misfeed paper, and remove the paper
from the feed area by carefully pulling it to the
right using both hands.
/RDGWKHUHPRYHGSDJHVEDFNLQWRWKH$')
3. Close the scanner lid. Then load the removed
pages back into the ADF.
Service Manual
4-5
Samsung Electronics
Alignment & Troubleshooting
4.1.3.2 Clearing paper jams
:KHQDSDSHUMDPRFFXUVWKHZDUQLQJPHVVDJHDSSHDUVRQWKHGLVSOD\VFUHHQ5HIHUWRWKHWDEOHEHORZWR
locate and clear the paper jam.
Message
Location of jam
Paper Jam 0
Open/Close Door
In the paper feed area or inside the machine
Paper Jam 1
Open/Close Door
Inside the machine
Paper Jam 2
Check Inside
Inside the machine or in the fuser area
Duplex Jam 0
Check Inside
Inside the machine
Duplex Jam 1
Open/Close Door
In the paper feed area or inside the machine
In the paper feed area
2. Remove the jammed paper by gently pulling it
straight out as shown below.
If paper is jammed in the paper feed area, follow
the next steps to release the jammed paper.
1. Pull the tray open.
If the paper does not move when you pull, or if
you do not see the paper in this area, check In
the toner cartridge area.
3. Insert the tray back into the machine. Printing
automatically resumes.
Service Manual
4-6
Samsung Electronics
Alignment & Troubleshooting
In the manual tray
In the toner cartridge area
:KHQ\RXSULQWXVLQJWKHPDQXDOWUD\DQGWKH
machine detects that there is either no paper or
that the paper has been improperly loaded, follow
the next steps to release the jammed paper.
If paper is jammed in the toner cartridge area,
follow the next steps to release the jammed paper.
1. Open the front cover and pull the toner cartridge
out
1. Check if the paper is stuck in the feeding area,
and if so, pull it out gently and slowly.
/RDGDSDSHULQWRWKHPDQXDOWUD\
2. Remove the jammed paper by gently pulling it
straight out as shown below.
3. Open the front cover and close it. The machine
will resume printing.
3. Replace the toner cartridge and close the front
cover. Printing automatically resumes.
Service Manual
4-7
Samsung Electronics
Alignment & Troubleshooting
In the paper exit area
In the duplex unit area
If paper is jammed in the paper exit area, follow the
next steps to release the jammed paper.
If the duplex unit is not inserted correctly, paper
jam may occur. Make sure that the duplex unit is
inserted correctly.
1. If a long portion of the paper is visible, pull it
straight out. Open and close the front cover
¿UPO\7KHPDFKLQHZLOOUHVXPHSULQWLQJ
1. Pull the duplex unit out of the machine.
,I\RXFDQQRW¿QGWKHMDPPHGSDSHURULIWKHUHLV
any resistance removing the paper, stop pulling
and go to step 2.
2. Remove the jammed paper from the duplex unit.
2. Open the rear cover.
3. Pull the guide rear on each side down and
carefully take the jammed paper out of the
machine. Return the guide rear to its original
position.
If the paper does not come out with the duplex
unit, remove the paper from the bottom of the
machine.
1 Guide rear
4. Close the rear cover. Printing automatically
resumes.
Service Manual
,I\RXFDQQRW¿QGWKHMDPPHGSDSHURULIWKHUHLV
any resistance removing the paper, stop pulling
and go to step 3.
4-8
Samsung Electronics
Alignment & Troubleshooting
2. If you see the jammed paper, remove the paper
from the machine by gently pulling it straight out
as shown below.
3. Open the rear cover.
4. Pull the guide rear on each side down and
remove the paper. Return the guide rear to its
original position.
,I\RXFDQQRW¿QGWKHMDPPHGSDSHURULIWKHUHLV
any resistance removing the paper, stop pulling
and go to step 3.
3. Pull the tray half.
1 Guide rear
5. Close the rear cover. Printing automatically
resumes.
In the optional tray
If paper is jammed in the optional Tray, follow the
next steps to release the jammed paper.
1. Pull the optional tray open.
4. Remove the jammed paper by gently pulling the
paper straight up and out.
5. Insert the trays back into the machine. Printing
automatically resumes.
Service Manual
4-9
Samsung Electronics
Service Manual
Darkness
Resolution
Multi Send
Delay Send
Prio rity Se nd
Forw ard
Secur e Receive
Add Page
Cancel Job
Fax Feature
Sending
Redial Tim es
Redial Term
Prefix Dial
ECM Mode
Send Report
Image TCR
Dial Mode
Receiv ing
Receiv e Mode
Rin g to An swer
Fax Setup
Fax Setup
(Continued)
Stamp Rcv Name
Rcv Start Code
Auto Re duction
Discard Size
Ju nk Fax Set up
DRPD Mode
Dupl ex Pri nt
Change D efaul t
Resoluti on
Dark ness
Auto Re port
.
TCP/IP
Ethern et Spe ed
Clear Settin g
Network I nfo
Network
Reduce/Enlar ge
Darkness
Origina l Type
/D\ out
Norm al
2-Up
4-Up
ID Copy
Pos ter Cop y
Clon e Cop y
Adjus t Bk gd.
Copy Feature
Clear Settin g
All S etting s
Fax Setup
Copy Setu p
Scan Setup
Sys tem Setup
Network
Addre ss B ook
Sent Report
Fax Rcv Repo rt
System Setup
(Continued)
Duple x
Change Default
Copie s
Copy Colla tion
Redu ce/Enlar ge
Darkness
Origina l Type
Copy Setup
Report
All Report
Configura tion
Supplie s Info
Address Book
Send Report
Sent Report
Fax Rcv Repor t
Schedule Jobs
Junk Fax Report
Netw ork Info.
User Auth /LV t
Main tenance
&/R Empty Msg
Ignore Tone r
Supplie V/ ife
Serial N umbe r
System Setup
(Continued)
USB Feature
Scan Size
Origina l Type
Resolutio n
Scan Colo r
Scan Form at
E-mail Fe ature
Scan Size
Origina l Type
Resolutio n
Scan Colo r
Scan Form at
Scan Feature
Mach ine Setup
Mach ine ID
Mach ine Fax No.
Date & Time
Clock Mod e
/Dngu age
Default Mode
Power Sav e
Timeout
Job Timeout
Alt itude Adj.
Import Setting
Export Se tting
Paper Setup
Paper Si ze
Paper Type
Paper So urce
Sound/Vo lum e
Key Sou nd
Ala rm Sound
Speaker
Ringer
System Setup
Change Default
USB Default
E-mail Defa ult
Scan Setup
Alignment & Troubleshooting
4.1.4 Menu Map
The control panel provides access to various menus to set up the machine or use the machine’s functions.
These menus can be accessed by pressing Menu. Refer to the following diagram. Menus available in Fax,
Copy, or Scan mode vary.
4-10
Samsung Electronics
Alignment & Troubleshooting
4.1.4.1 Accessing to menus
The next steps are the example to print the menu map of this machine, and they are the general way to
VHOHFWPHQXDQGFRQ¿JXUH\RXUPDFKLQH
1. Make sure your machine is properly connected all the necessary cables, and turn on the machine.
2. Press the Menu button until you see the menu (ex. Information) you want on the bottom line of the display.
3. Press the OK button to access the menu.
3UHVVWKH/HIWULJKWDUURZEXWWRQVXQWLOWKHPHQXLWHPH[0HQX0DS\RXZDQWGLVSOD\VRQWKHERWWRP
line.
3UHVVWKH2.EXWWRQWRFRQ¿UPWKHVHOHFWHGLWHP
3UHVVWKH/HIWULJKWDUURZEXWWRQVXQWLOWKHPHQXLWHPH[3ULQW"\RXZDQWGLVSOD\VRQWKHERWWRPOLQH
7. Press the OK button to process your selection, save your input or selection.
An asterisk (*) appears next to the selection on the display, indicating that it is now the default.
8. To exit the menu, press the Back button repeatedly, or the Stop button.
Note - If you want to set the basic menu items, please consult the user guide.
Service Manual
4-11
Samsung Electronics
Alignment & Troubleshooting
4.1.5 Tech Mode
4.1.5.1 How to Enter Tech Mode
In service (tech) mode, the technician can check the machine and perform various test to isolate the cause
of a malfunction.
:KLOHLQ7HFKPRGHWKHPDFKLQHVWLOOSHUIRUPVDOOQRUPDORSHUDWLRQV
To enter the Tech mode
To enter the Tech mode, press
LQVHTXHQFHDQGWKH/&'EULHÀ\
GLVSOD\Vµ7(&+¶WKHPDFKLQHKDVHQWHUHGVHUYLFHWHFKPRGH
4.1.5.2 Setting-up System in Tech Mode
In service (tech) mode, the technician can check the machine and perform various test to isolate the cause
of a malfunction.
SCX-4824FN/4828FN
6HQG/HYHO
'70)/HYHO
Pause Time
Dial Mode
Modem Speed
Error Rate
RDS
Clear All Mem
Clear Counts
Flash Upgrade
Silence Time
Service Manual
Switch Test
Modem Test
Dram Test
Rom Test
Pattern Test
Shading Test
4-12
All Report
Protocol
Configuration
.H\+LVWRU\
Error Info
Usage Page
Component Check
Service Support
Samsung Electronics
Alignment & Troubleshooting
4.1.5.3 Data Setup
SEND LEVEL
You can set the level of the transmission signal. Typically, the Tx level should be under -12 dBm.
&DXWLRQ7KH6HQG)D[/HYHOLVVHWDWWKHEHVWFRQGLWLRQLQWKHVKLSPHQWIURPIDFWRU\1HYHUFKDQJHVHWWLQJV
arbitrarily.
DIAL MODE
This function can choose dial method.
*Default : Dial(Dial/Pulse)
MODEM SPEED
You can set the maximum modem speed.
Communication is done with modem speed automatically set at lower speed when communicating with a
slower speed modem since communication is done on the standard of the side where modem speed is low
for transmission/reception. It is best set 33.6Kbps as default setting.
ERROR RATE
:KHQWKHHUURUUDWHLVDERXWH[FHHGWKHVHWYDOXHWKH%DXGUDWHDXWRPDWLFDOO\DGMXVWVWRESV
This ensures that the error rate remains below the set value.
You can select the rate between 5% and 10%.
CLEAR ALL MEMORY
The function resets the system to factory default settings.
This function is used to reset the system to the initial value when the product is functioning abnormally. All the
values are returned to the default values, and all the information, which was set by the user, will be erased.
< Method >
6HOHFWWKH>0(025<&/($5@DWWKH7(&+02'(
2. Push the OK button.
3. Select you country. (There are four country groups. Refer to the table below.)
4. Push the OK button then it will clear all memory.
NOTICE : Always perform a memory clear after replacing the main board. Otherwise, the system may not
operate properly.
Country Group
USA/Canada
USA/Canada
Mexico
Brazil
Country
Service Manual
UK
UK
Germany
France
Italy
Spain
Austria
Netherlands
Belgium
Portugal
Sweden
Norway
Denmark
Finland
Switzerland
Greece
Ireland
Turkey
4-13
Russia
Russia
India
Oman
Poland
Bangladesh
Kuwait
Moroco
Algeria
Pakistan
UAE
Bahrain
Srilanka
Saudi Arabia
Chile
Peru
Argentina
+XQJDU\
Romania
Bulgaria
Czech
Southafrica
South Africa
Samsung Electronics
Alignment & Troubleshooting
Flash Upgrade
7KH)LUPZDUH8SJUDGHIXQFWLRQDQGKDVWZRPHWKRGV/RFDODQG5HPRWH
1) Local Machine Upgrade
5&35HPRWH&RQWURO3DQHOPRGH
This method is for USB Port Connect to PC and activate RCP(Remote Control Panel) to upgrade the
Firmware.
< Method >
+RZWR8SGDWH)LUPZDUHXVLQJ5&3
1. Connect PC and Printer with USB Cable.
2. Execute RCP and select Firmware Update.
6HDUFK)LUPZDUH¿OHWRXSGDWHZLWK%URZVH,FRQ
&OLFN8SGDWHLFRQ¿UPZDUH¿OHLVWUDQVPLWWHGWR3ULQWHUDXWRPDWLFDOO\DQGSULQWHULVLQLWLDOL]HGZKHQLW
¿QLVKHG
5. Click Refresh icon and check what is updated.
'26&RPPDQGPRGH
This method is just for USB Port. Connect to PC with USB cable and enter DOS Command to upgrade
the Firmware
< Method >
7KH¿UVWRIDOOQHHGWKH¿OHVGRZQEDWGRZQBFRPELQISUWH[HDQG5RP)LOH¿OHQDPHIRUXSJUDGH
6DYHWKH¿OHVLQWKHVDPHIROGHU
2. In the DOS, input as below and push the enter key. Then, it will be automatically upgraded.
3. There are two commands for the conditions of product.
:KHQWKHSURGXFWLVLQLGOHFRQGLWLRQGRZQ³URP¿OH´
:KHQWKHSURGXFWLVLQ5HDG\FRQGLWLRQ7(&+02'('$7$6(783)/$6+83*5$'(/2&$/FRS\E
³URP¿OH´OSW
4. Do not turn off the power while upgrading process.
2) Remote Upgrade
7KLVLVDIXQFWLRQWKDWDID[ZLWKWKHODWHVW¿UPZDUHVHQGV¿OHVWRDID[LQORQJGLVWDQFHWKURXJKWHOHSKRQH
line.
< Method >
%HIRUHUHPRWHXSJUDGHWKHODWHVW¿UPZDUHVKRXOGEHORDGHGLQWRWKHPDFKLQH
7(&+02'('$7$6(783)/$6+83*5$'(5(027(
2. Input the fax number, which needs to be upgraded. (Several faxes can be upgraded at the same time. In
this case, enter the each fax number.)
$IWHUSXVKWKHHQWHUEXWWRQVHQGWKH¿UPZDUH¿OHE\FDOOLQJWRWKHDSSRLQWHGQXPEHU$URXQGa
PLQXWHVQHHGVWRVHQGWKH¿OH
< Caution >
1. sending and receiving fax must be the same model.
2. A sending fax must be set up as ECM mode, and a receiving memory must be set up as 100%. If not, the
function operates abnormally
Service Manual
4-14
Samsung Electronics
Alignment & Troubleshooting
S/W of Maintenance
1. Clearing the Memory
<RXFDQVHOHFWLYHO\FOHDULQIRUPDWLRQVWRUHGLQ\RXUPDFKLQHVPHPRU\
1) Press Menu on the control panel until Maintenance appears on the top line of the display.
2) Press the scroll button (left-key or right-key) until you see Clear Memory on the bottom line and press
OK
7KH¿UVWDYDLODEOHPHQXLWHP&OHDU$OO0HPGLVSOD\VRQWKHERWWRPOLQH
6HHQH[WSDJH7KHUHDUHVRPHLWHPWRGLVSOD\RQWKH/&'
3) Press the scroll button (left-key or right-key) until you see the item you want to clear.
4) Press Enter. The selected memory is cleared and the display asks you to continue clearing the next
item.
5) To clear another item, press Enter and repeat steps 3 and 4
- To return to Standby mode, press Stop/Clear.
- As below item you can selectively clear information stored in your machine s memory.
&OHDU$OO0HP
- Clears all of the data stored in the memory and resets all of your settings to the factory default.
3DSHU6HWWLQJ
- Restores all of the Paper Setting options to the factory default.
&RS\6HWXS
- Restores all of the Copy Setup options to the factory default.
)D[6HWXS
- Restores all of the Fax Setup options to the factory default.
)D[)HDWXUH
- Cancels all of the scheduled fax jobs in the machine s memory.
- As below item you can selectively clear information stored in your machine s memory.
$GYDQFHG)D[
- Restores all of the Advanced Fax setting options to the factory default.
6RXQG9ROXPH
- Resets the sound and volume settings to the factory default.
0DFKLQH6HWXS
- Resets all of the system settings, such as the machine ID, date and time, display language and save
modes, to the factory default.
6HQW5HSRUW
- Clears all of records of your faxes sent.
5&95HSRUW
- Clears all of records of your faxes received.
3KRQH%RRN
- Clears the one-touch, speed and group dial numbers stored in the memory.
2. Adjust shading
:KHQWKHVFDQXQLWEHFRPHVGLUW\LWFDQDOWHUWKHVKDGLQJYDOXH
,I\RXUFRS\KDVEODFNOLQHVRULVEOXUUHGDGMXVWWKHVKDGLQJVHWWLQJ
/RDGDVKHHWRIZKLWHSDSHULQWRWKH$')
2) Make machine Tech mode.
3) Press Menu on the control panel and scroll until Machine Test displays.
4) Scroll to Shading Test and Press OK.
5) Select Shading&Print appears on the bottom line and press OK.
6) Your machine picks up the paper and adjusts the shading value.
7) After adjusting, shading value will be printed with graphic image.
Service Manual
4-15
Samsung Electronics
Alignment & Troubleshooting
3. Remote Diagnostic System(RDS)
5'6DQG)7(*7$XWRPDWLF2UGHULQJ6\VWHPZLOOHQKDQFHWKHTXDOLW\DQGWKHVSHHGRIDIWHUVDOHV
service and monitor the performance of the MFP at the customer site.
0)36KRXOGEHFRQQHFWHGE\0)36HUYHU
3.1 Required components of RDS
RDS for MFP system consists of the following three components that communicate with each other
1. Main RDS Server connected to FAX-MODEM.
2. RDS Client Application.
3. RDS on MFP.
3.2 Enable of RDS on MFP
This value is in Tech Mode.
The factory default for Consumables Status Update / Error Proactive value is Disabled.
< Method >
1. MFP Should be connected by RDS Server.
2. Service numbers should have the proper values.
7(&+02'(!'$7$6(783!127,)<721(5!5'6!6HUYLFH1XPEHU
3. Machine Serial No. should have the proper values.
7(&+02'(!'$7$6(783!127,)<721(5!7RQHU!6HULDO1R
4. Criter value input is optional, default is set to 1000-page.
7(&+02'(!'$7$6(783!127,)<721(5!5'6!&ULWHU9DOXH
5. Remote Test should be On
0DLQWHQDQFH!5HPRWH!7HVW2Q
6. Change the password : if you forgot the Notify Toner password, enter the new password.
7(&+02'(!'$7$6(783!127,)<721(5!5'6!5'63DVVZRUG
,I\RXDUHWRHQDEOHWKH5'6V\VWHP1RWLI\7RQHURSWLRQVKRXOGEH>2II@
3.3 Call setup & Release
In order to perform any RDS activity on a Customer MFP, the SVC will have to setup a call to it.
2QVXFFHVVIXOFRPSOHWLRQRIFDOOVHWXSRQHRUPRUH5'6IXQFWLRQVFDQEHH[HFXWHGEHIRUHFDOOUHOHDVHLV
manually initiated.
:KHQFRQQHFWLQJWRDGHYLFH5'6ZLOOTXHU\WKH0)3IRUVHULDOQR,I6HULDO1RLVD]HUROHQJWKVWULQJ
invalid string, user will be prompted to enter a valid serial no. for the device. If the user chooses not to enter
WKHVHULDOQXPEHUDWWKDWSRLQWKHFDQHQWHUHGLWLWODWHUDOVR6HULDOQXPEHUZLOOEHFRQ¿JXUDEOHMXVWOLNHDQ\
other MFP parameter
)ROORZLQJVXFFHVVIXOFRQQHFWLRQIROORZLQJGHWDLOVRIWKH0)3ZLOOEHGLVSOD\HG
Tel. No, Model, Server Port (that is connected to), Status, Serial Number, Firmware Version, Engine
Version, Emulation Version
,QFDVHWKHHVWDEOLVKHGFDOOLVGURSSHGGXHWRDQHUURUFRQGLWLRQ5'6&OLHQW$SSOLFDWLRQZLOOQRWLI\WKHXVHU
It will then be necessary to manually request for another call setup to the desired MFP before any RDS
function can be reattempted.
,IQRDFWLYLW\LVGHWHFWHGRQDFRQQHFWHGFDOOIRUDPD[LPXPGXUDWLRQRIPLQXWHVVHFRQGVWKHFDOO
will be released / disconnected from the MFP-side.
Service Manual
4-16
Samsung Electronics
Alignment & Troubleshooting
4.1.5.4 Machine Test
SWITCH TEST
8VHWKLVIHDWXUHWRWHVWDOONH\VRQWKHRSHUDWLRQFRQWUROSDQHO7KHUHVXOWLVGLVSOD\HGRQWKH/&'ZLQGRZ
each time you press a key.
MODEM TEST
Use this feature to hear various transmission signals to the telephone line from the modem and to check the
modem. If no transmission signal sound is heard, it means the modem part of the main board malfunctioned.
DRAM TEST
8VHWKLVIHDWXUHWRWHVWWKHPDFKLQH¶V'5$07KHUHVXOWDSSHDUVLQWKH/&'GLVSOD\
,IDOOPHPRU\LVZRUNLQJQRUPDOO\WKH/&'VKRZV2.!!
ROM TEST
8VHWKLVIHDWXUHWRWHVWWKHPDFKLQH¶65207KHUHVXOWDQGWKHVRIWZDUHYHUVLRQDSSHDULQWKH/&'GLVSOD\
)/$6+9(59
(1*,1(9(59
PATTERN TEST
Using this pattern printout, you can check if the printer mechanism is functioning properly.
It is needed in the production progress. Service person doesn’t need to use it.
SHADING TEST
7KHIXQFWLRQLVWRJHWWKHRSWLPXPVFDQTXDOLW\E\WKHVSHFL¿FFKDUDFWHURIWKH&&'&KDUJH&RXSOHG
Device). If the copy image quality is poor, perform this function to check the condition CCD unit.
< Method >
6HOHFWWKH>$'-8676+$',1*@DWWKH7(&+02'(
2. Push the SET UP button then an image will be
scanned.
$IWHUWKHVFDQ&&'6+$',1*352),/(ZLOOEH
print out.
4. If the printed image is different to the image, the
CCD is defect.
NOTICE : When you test CCD, make sure that the
cover is closed.
Service Manual
4-17
Samsung Electronics
Alignment & Troubleshooting
4.1.5.5 Report
PROTOCOL LIST
This list shows the sequence of the CCITT group 3 T.30 protocol during the most recent sending or receiving
operation. Use this list to check for send and receive errors. If a communication error occurs while the
PDFKLQHLVLQ7(&+PRGHWKHSURWRFROOLVWZLOOSULQWDXWRPDWLFDOO\
OTHER ITEM
This list provides a list of the user system data settings and tech mode settings.
&RQ¿JXUDWLRQUHSRUW
Service Manual
4-18
Samsung Electronics
Alignment & Troubleshooting
supplies information report
Service Manual
4-19
Samsung Electronics
Alignment & Troubleshooting
4.1.6 EDC Mode
EDC Mode is independently controled system f/w and diagnose printer’s each function.
Ŷ0HWKRGWRHQWHU
$IWHUWXUQRQWKHV\VWHPSRZHUFKHFNWKH³5HDG\´PHVVDJHRQWKH/&'
2. To enter the EDC Mode, Push the button like next time.
³0HQXĺ6WRSĺ/HIWDUURZĺ%DFNĺ2.ĺ5LJKWDUURZ´
7KHPHVVDJH³&20321(177(673UHVV0HQX.H\´GLVSOD\RQWKH/&'
7RJHWRXWRIWKH('&0RGH3UHVVWKH³6WRS´NH\
Service Manual
4-20
Samsung Electronics
Alignment & Troubleshooting
Ŷ('&0RGH0HQX
0. Cover Status
Item
Front Cover
Description
:KHQWKHIURQWFRYHURSHQHG³2SHQ´PHVVDJHGLVSOD\/&',IWKHIURQW
FRYHUFORVHG³&ORVHG´PHVVDJHGLVSOD\/&'
1. Sensor Status
Item
Description
Regi/Feed/Exit Sensor
,IDFWXDWRULVFKHFNHGE\VHQVRU:LWKRXW3DSHUPHVVDJHZLOOEH
GLVSOD\HGLIQRW:LWK3DSHUZLOOEH
Empty
,ISDSHUH[LVWVLQWKHWUD\³3UHVHQWZLOOEHGLVSOD\HG,IQRW³(PSW\ZLOO
be.
2. Motor Test
Item
Description
Main Mtr Nor.
,I³2.´NH\LVSXVKHGDIWHU³21´GLVSOD\HGPRWRUZLOOEHUXQ0DLQPRWRU
ZLOODXWRVWRSDIWHUVHFRQGVDQG´2))´PHVVDJHZLOOEHGLVSOD\HG
Slow
,I³2.´NH\LVSXVKHGDIWHU³21´GLVSOD\HGPRWRUZLOOEHVORZO\UXQ
0DLQPRWRUZLOODXWRVWRSDIWHUVHFRQGVDQG´2))´PHVVDJHZLOOEH
displayed.
3. Fan Test
Item
Description
Fuser Fan
,I³2.´NH\LVSXVKHGDIWHU³21´GLVSOD\HGIDQZLOOEHUXQ)XVHUIDQZLOO
DXWRVWRSDIWHUVHFRQGVDQG´2))´PHVVDJHZLOOEHGLVSOD\HG
SMPS Fan
,I³2.´NH\LVSXVKHGDIWHU³21´GLVSOD\HGIDQZLOOEHUXQ6036IDQZLOO
DXWRVWRSDIWHUVHFRQGVDQG´2))´PHVVDJHZLOOEHGLVSOD\HG
/68)DQ
,I³2.´NH\LVSXVKHGDIWHU³21´GLVSOD\HGIDQZLOOEHUXQ/68IDQZLOO
DXWRVWRSDIWHUVHFRQGVDQG´2))´PHVVDJHZLOOEHGLVSOD\HG
4. Clutch Test
Item
Description
Pick up Clutch
:KHQ³2.´NH\LVSXVKHGDIWHU´21´PHVVDJHGLVSOD\HGFOXWFKWXUQRQ
SLFNXSFOXWFKZLOOEHWXUQRIIDIWHUVHFRQGVDQG´2))´PHVVDJHZLOOEH
displayed.
Regi Clutch
:KHQ³2.´NH\LVSXVKHGDIWHU´21´PHVVDJHGLVSOD\HGFOXWFKWXUQRQ
SLFNXSFOXWFKZLOOEHWXUQRIIDIWHUVHFRQGVDQG´2))´PHVVDJHZLOOEH
displayed.
Service Manual
4-21
Samsung Electronics
Alignment & Troubleshooting
5. Fuser Ctrl
Item
Description
Temp Control
)XVHURQDQGRII³21´LVVHOHFWHGIXVHUZLOOEHDFWLYHDQGGLVSOD\WKH
IXVHUWHPSHUDWXUH>;;;@EXW³2))´LVVHOHFWHGIXVHUZLOOEHVWRSDQG>@
display
Fuser Temp.
)XVHUWHPSHUDWXUHGLVSOD\HGRQ/&'H[DPSOH>@
6. LSU Control
Item
Description
/'3RZHU
:KHQ³2.´NH\LVSXVKHGDIWHU´21´PHVVDJHGLVSOD\HG´2))´PHVVDJH
will be displayed after 10 seconds
/680RWRU
,I³2.´NH\LVSXVKHGDIWHU³21´GLVSOD\HGPRWRUZLOOEHUXQ/68PRWRU
ZLOODXWRVWRSDIWHUVHFRQGVDQG´2))´PHVVDJHZLOOEHGLVSOD\HG
/685HDG\
,I³2.´NH\LVSXVKHGDIWHU³21´GLVSOD\HGPRWRUZLOOEHUXQ´´PHVVDJH
will be displayed.
+V\QF
,I³2.´NH\LVSXVKHGDIWHU³21´GLVSOD\HGPRWRUZLOOEHUXQ´´PHVVDJH
will be displayed.
7. DEV Control
Item
Description
7+9
,I³2.´NH\LVSXVKHGDIWHU³21´GLVSOD\HG7+9ZLOOEHWXUQHGRQ
7+9
,I³2.´NH\LVSXVKHGDIWHU³21´GLVSOD\HG7+9ZLOOEHWXUQHGRQ
Dev Bias
,I³2.´NH\LVSXVKHGDIWHU³21´GLVSOD\HG'HY%LDVZLOOEHWXUQHGRQ
0+9%LDV
,I³2.´NH\LVSXVKHGDIWHU³21´GLVSOD\HG0+9%LDVZLOOEHWXUQHGRQ
Ŷ$&521<06$1'$%%5(9,$7,216
'(9'HYHORSLQJ+LJK9ROWDJH
('&(PEHGGHG'LDJQRVWLF&RQWURO
):±)LUPZDUH
+936±+LJK9ROWDJH3RZHU6XSSO\
+:+DUGZDUH
/'±/DVHU'LRGH
/68±/DVHU6FDQQLQJ8QLW
0+90DLQ+LJK9ROWDJH&KDUJH9ROWDJH
23&2SWLFDO3KRWR&RQGXFWRU
6&)6HFRQG&DVVHWWH)HHGHU
7+97UDQVIHU+LJK9ROWDJH
Service Manual
4-22
Samsung Electronics
Alignment & Troubleshooting
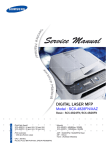
4.1.7 Abnormal Image Printing and Defective Roller
If abnormal image prints periodically, check the parts shown below.
7-2
7-1
No
Roller
Abnormal image period
Kind of abnormal image
1
OPC Drum
75.5mm
:KLWHVSRW%ORFN6SRWV
2
Charge Roller
26.7mm
Block Spot and Periodic Band
3
Supply Roller
47.1mm
Periodic Band by little difference of density
4
Developing Roller
35.2mm
:KLWH6SRW+RUL]RQWDOEODFNEDQG
5
Transfer Roller
47mm
Ghost, Damaged Image by abnormal transfer
6
+HDW5ROOHU
77.8mm
Black Spots or Vertical Black Band
7-1
3UHVVXUH5ROOHUBVW
62.8mm
Blackground
7-2
3UHVVXUH5ROOHUBVW
37.7mm
Blackground
Service Manual
4-23
Samsung Electronics
Alignment & Troubleshooting
4.1.8 Error Message
Messages appear on the control panel display to indicate the machine’s status or errors. Refer to the tables
below to understand the messages’ meaning and correct the problem if necessary. Messages and their
meanings are listed in alphabetical order.
[[[LQGLFDWHVWKHPHGLDW\SH
\\\LQGLFDWHVWKHWUD\
Message
Meaning
Suggested solutions
[COMM. Error]
The machine has a communication
problem.
Ask the sender to try again.
[Incompatible]
The machine has received a fax from
which is registered as a junk fax.
The received fax data will be deleted.
5HFRQ¿UPMXQNID[VHWXS
[Line Error]
Your machine cannot connect with the
receiving fax machine or has lost
contact because of a problem with the
phone line.
Try again. If the problem persists, wait
an hour or so for the line to clear and
try again.
Or, turn the ECM mode on.
[No Answer]
The receiving fax machine has not
answered after several redial
attempts.
Try again. Make sure that the receiving
machine is operational.
[Stop Pressed]
Stop/Clear has been pressed during
an operation.
Try again.
[yyy]
Paper Empty
There is no paper in the tray.
/RDGSDSHULQWKHWUD\
[yyy]
Paper Mismatch
7KHSDSHUVL]HVSHFL¿HGLQWKHSULQWHU
properties does not match the paper
you are loading.
/RDGWKHFRUUHFWSDSHULQWKHWUD\
Authentication
Failure
The ID or password you entered is
incorrect.
Enter the correct ID or password.
Cancel?
Ĵ Yes Ķ
Your machine’s memory has become To cancel the fax job, press the OK
full while trying to store an original into button to accept Yes. If you want to
memory.
send those pages that have been
successfully stored, press the OK
button to accept No. You should send
the remaining pages later, when
memory is available.
Connection Error
Connection with the SMTP server
failed.
Check the server settings and the
network cable.
Data Read Fail
Check USB Mem.
Time expired while reading data.
Try again.
Data Write Fail
Check USB Mem.
Storing to the USB memory failed.
Check the available USB memory
space.
Service Manual
4-24
Samsung Electronics
Alignment & Troubleshooting
Message
Meaning
Suggested solutions
Document Jam
The loaded original has jammed in the Clear the jam.
ADF.
Door Open
The front cover is not securely
latched.
Close the cover until it
locks into place.
Duplex Jam 0
Check Inside
Paper has jammed during duplex
printing. This is applicable only to
machines with this feature.
Clear the jam.
Duplex Jam 1
Open/Close Door
Paper has jammed during duplex
printing. This is applicable only to
machines with this feature.
Clear the jam.
Enter Again
You entered an unavailable item.
Enter the correct item again.
File Format
Not Supported
7KHVHOHFWHG¿OHIRUPDWLVQRW
supported.
8VHWKHFRUUHFW¿OHIRUPDW
Fuser Fan
Locked
There is a problem in the cooling fan
of the machine.
Open and then close the front cover.
Group Not
Available
Use a speed dial number or dial a
You have tried to select a group
number manually using the number
location number where only a single
location number can be used, such as keypad.
when adding locations for a Multiple
Send operation.
Install Toner
The toner cartridge is not installed.
Install the toner cartridge.
Invalid Toner
The toner cartridge you have installed
is not for your machine.
Install the a Samsunggenuine toner
cartridge designed for your machine.
,3&RQÀLFW
The network IP address you have set
is being used by someone else.
Check the IP address and reset it if
necessary.
Line Busy
The receiving fax machine did not
Try again after a few minutes.
answer or the line is already engaged.
Low Power
The machine is in the previous stage
of the power save mode.
:KHQGDWDLVUHFHLYHGLWVZLWFKHVWR
on-line automatically.
Mail Exceeds
Server Support
The mail size is larger than the
supported size by SMTP server.
Divide your mail or reduce the
resolution.
Main Motor Locked
There is a problem in the main motor.
Open and then close the front cover.
Memory Full
The memory is full.
Delete unnecessary fax jobs and
retransmit after more memory
becomes available. Alternatively, split
the transmission into more than one
operation.
Not Assigned
The speed button or speed dial
number you tried to use has no
number assigned to it.
Enter the number manually using the
number keypad or store the number or
address.
Service Manual
4-25
Samsung Electronics
Alignment & Troubleshooting
Message
Meaning
Suggested solutions
Not Available
Try Again Later
Can not perform the task immediately
because too many tasks are running
at once.
Try again when current task is
completed.
One Page is
Too Large
Single page data exceeds the
FRQ¿JXUHGPDLOVL]H
Reduce the resolution and try again.
Operation Not
Assigned
You are in the Add Page/Cancel Job
operation, but there are no jobs
stored.
Check the display to see if there are
any scheduled jobs.
Out-Bin Full
The output tray of the machine is full
of paper.
Remove paper.
Paper Jam 0
Open/Close Door
Paper has jammed in the feeding area Clear the jam.
of the tray.
Paper Jam 1
Open/Close Door
Paper has jammed inside the
machine.
Paper Jam 2
Check Inside
Special print media has jammed in the Clear the jam.
paper exit area.
Replace Toner
This message appears between Toner Replace the toner cartridge with a new
(PSW\DQG7RQHU/RZVWDWXV
one.
Retry Redial?
7KHPDFKLQHLVZDLWLQJIRUDVSHFL¿HG You can press OK to immediately
redial, or Stop/Clear to cancel the
time interval to redial a previously
redial operation.
busy station.
Scanner locked
The scanner module is locked
Unlock the scanner and press Stop/
Clear.
Self Diagnostics
Temperature
The engine in your machine is
checking problems detected.
:DLWDIHZPLQXWHV
Self Diagnostics
LSU
7KH/68/DVHU6FDQQLQJ8QLWLQ
your machine is checking problems
detected.
:DLWDIHZPLQXWHV
Send Error
(AUTH)
There is a problem in SMTP
authentication.
&RQ¿JXUHWKHDXWKHQWLFDWLRQVHWWLQJ
Send Error
(DNS)
There is a problem in DNS.
&RQ¿JXUHWKH'16VHWWLQJ
Send Error
(POP3)
There is a problem in POP3.
&RQ¿JXUHWKH323VHWWLQJ
Send Error
(SMTP)
There is a problem in SMTP.
Change to the available server.
Send Error
:URQJ&RQ¿J
There is a problem on the network
interface card.
&RQ¿JXUH\RXUQHWZRUNLQWHUIDFHFDUG
correctly.
Service Manual
4-26
Clear the jam.
Samsung Electronics
Alignment & Troubleshooting
Message
Meaning
Suggested solutions
Toner Empty
The toner cartridge has run out. The
machine stops printing.
Press OK to toggle the message to
Stop or Continue.
Ĵ Stop Ķ
You can select the option among Stop
or Continue with the left/right arrow.
If you select Stop by pressing OK on
the control panel, the machine stops
printing. If you select Continue, the
machine keeps printing, but the quality
cannot be guaranteed.
If you do not select any, the machine
will work as Stop is selected.
Replace the toner cartridge with a new
one.
Toner Exhausted
The lifespan of the toner cartridge
which the arrow indicates is reached.
This message appears when the
toner is completely empty, and your
machine stops printing. Replace the
corresponding toner cartridge with a
Samsunggenuine cartridge.
Toner Low
The corresponding toner cartridge is
almost empty.
Take out the toner cartridge and
thoroughly shake it. By doing this, you
can temporarily reestablish printing
operations.
Updating Data
Please Wait...
This message appears when there is
a change in the system setting or
when you back up a data.
Do not turn the power off when this
message is showing. Changes may
not be saved and datas can be lost.
Service Manual
4-27
Samsung Electronics
Alignment & Troubleshooting
4.2 Troubleshooting
4.2.1 Procedure of Checking the Symptoms
%HIRUHDWWHPSWLQJWRUHSDLUWKHSULQWHU¿UVWREWDLQDGHWDLOHGGHVFULSWLRQRIWKHSUREOHPIURPWKHFXVWRPHU
Power On
*UHHQ/('RQ"
- No Power
- Power Module error
- Main PBA error
- Panel PBA error
Ready or
Power save
(UURU/('21"
Refer to
/('6WDWXV
Error Message
Test Print
printing
Quality is
1RPDO"
Refer to "Solution
of Image Problem"
END
Service Manual
4-28
Samsung Electronics
Alignment & Troubleshooting
4.2.2 The cause and solution of Bad image
1) Vertical Black Line and Band
Description : 1. Straight thin black vertical line occurs in the printing.
2. Dark black vertical band occur in the printing.
Digital Printer
Digital Printer
Digital Printer
Digital Printer
Digital Printer
1. Damaged develop roller in
the Toner cartridge. Deformed Doctor-blade
or cleaning-blade.
2. Scratched surface of
the charge roller in the toner cartridge.
3. Partly depression or
deformation on the surface of
the transfer roller.
Service Manual
4-29
If causes 1 and 2 occur in the
toner cartridge, replace the toner
cartridge and try to print out.
Replace the transfer roller if
occurred as No. 3.
Samsung Electronics
Alignment & Troubleshooting
2) Vertical White Line
Description : White vertical voids in the image.
Digital Printer
Digital Printer
Digital Printer
Digital Printer
Digital Printer
1. Foreign matter stuck onto the
window of internal lenses
RI/68PLUURU.
2. Foreign matter or
toner particles between the toner
cartridge roller and blade. (In case the life of the
toner cartridge has been expired, white
lines or light image occur in
front of the image.)
Replace the toner cartridge.
3. It may occur when Burr and
foreign substances are on the window
of the toner cartridge frame.
No 3. : Remove the foreign matter
and burr of the exposure window.
(toner cartridge)
4. If the fuser is defective,
voids occur periodically at the
top of a black image.
No. 4. : Open the front cover and
check ribs that corresponds to the
position of the voids. Remove if
found.
5. It may occur when foreign
substances are on the OPC Drum.
6. Partly depression or
deformation on the surface of the
transfer roller
Service Manual
Foreign matter stuck onto the
ZLQGRZ&OHDQWKH/68ZLQGRZ
with recommended cleaner(IPA)
Clean the window with a clean
cotton swab.
4-30
If the problems are not solved,
replace the toner cartridge.
Replace the transfer roller if
occured as NO.6
Samsung Electronics
Alignment & Troubleshooting
3) Horizontal Black Band
Description : Dark or blurry horizontal stripes occur in the printing periodically.
(They may not occur periodically.)
Digital Printer
Digital Printer
Digital Printer
Digital Printer
Digital Printer
Service Manual
1. Bad contacts of the voltage
terminals to toner cartridge.
Clean each voltage terminal of the
Charge, Supply, Develop and
Transfer roller. (remove the toner
particles and paper particles)
2. The rollers of toner
cartridge may be stained.
Charge roller = 26.7mm
Supply roller = 47.1mm
Develop roller = 35.2mm
Transfer roller = 47mm
1. Clean the right Gear that has
relatively small gap of the teeth
in the OPC.
2. If the malfunction persists,
replace the toner cartridge.
4-31
Samsung Electronics
Alignment & Troubleshooting
4) Black/White Spot
Description : 1. Dark or blurry spots occur periodically in the printing
2. White spots occur periodically in the printing
Digital Printer
Digital Printer
Digital Printer
Digital Printer
Digital Printer
1. If dark or blurry
black spots occur periodically,
the rollers in the Toner cartridge may
be
or
be contaminated
contaminated with
with foreign
foreign matter
matte or
paper particles.
26.7 mm interval
( Charge roller : 37.7
OPC drum : 75.5 mm interval)
2. If faded areas or
voids occur in a black image
at intervals of 75.5 mm, or black spots
occur elsewhere, the OPC drum
surface is damaged.
3. If a black image is
partially broken, the transfer
voltage is abnormal or the transfer
roller's life has expired.
Service Manual
4-32
Run OPC cleaning Mode Print
and run the Self-test 2 or 3 times.
In case of 75.5 mm interval
unremovable in 1, cleanly remove
foreign substances stuck on the
OPC location equivalent to black
spots and white spots with a dry
duster.
1. The transfer roller guarantees
50,000 sheets printing. If the
roller's life is expired, replace it.
2. In case of 75.5 mm interval
unremovable in 1, take measures
as to replace the toner cartridge
and try to print out.
3. Clean the inside of the set
against the paper particles and
foreign matter in order not to
cause the trouble.
Samsung Electronics
Alignment & Troubleshooting
5) Light Image
Description : The printed image is light, with no ghost.
Digital Printer
Digital Printer
Digital Printer
Digital Printer
Digital Printer
1. Develop roller is
stained when the toner of toner
cartridge is almost consumed.
No 1 : Replace the toner cartridge
and try to print out.
1R:ait 30 minutes after printer
is powered on before you start
printing.
2. Ambient temperature
is below than 10.
3. Bad contact
caused by the toner stains
between the high voltage terminal in
WKH+936DQGWKHRQH
in the set.
4. Abnormal output
IURPWKH+936
5XQVHOIWHVWDQGFKHFNa
Service Manual
Check if the Toner Save mode is off.
Check if the density is light.
4-33
No3 : Clean up the contaminated
area by the toner.
5HSODFHWKH+936LIWKH
problems are not solved by the
above four instructions.
Samsung Electronics
Alignment & Troubleshooting
6) Dark Image or a Black Page
Description : The printed image is dark.
Digital Printer
Digital Printer
Digital Printer
Digital Printer
Digital Printer
1. No charge voltage in the engine board.
Service Manual
Check the state of the connector
which connects the engine board
DQG+936
2. Charge voltage is not turned
on due to the bad contacts between
power supply in the side of the Toner
cartridge and charge terminal
RI+936
1. Clean the high voltage charge
terminal.
5HSODFHWKH+936LIQRWVROYHG
by the above direction 1 and 2.
3. VD0 signal of the Main PBALV/RZVWDWH
5HSODFHWKH/688QLWRU0DLQ3%$
4-34
Samsung Electronics
Alignment & Troubleshooting
7) Uneven Density
Description : Print Density is uneven between left and right.
1. The pressure force
on the left and right springs of the
transfer roller is not even, the springs are
damaged, the transfer roller is improperly
installed, or the transfer roller
bushing or holder is
damaged.
2. The life of the Toner cartridge
has expired.
3. The toner level is not even on
the toner cartridge roller due to the
bad blade.
Service Manual
4-35
Replace both the left and right
6SULQJ+ROGHU.
Occur in the toner cartridge gently
shake the toner cartridge.
Replace the toner cartridge and
try to print out.
Samsung Electronics
Alignment & Troubleshooting
8) Background
Description : Light dark background appears in whole area of the printing.
Digital Printer
Digital Printer
Digital Printer
Digital Printer
Digital Printer
1. Does character exist less than
2% per a page, and hasnÕt it been
XVHGORQJWLPH"
,VDUHF\FOHGWRQHUFDUWULGJHEHXVHG"
The A/S is not guaranteed if using
a recyled the toner cartridger.
+DVWKHOLIHVSDQRIWKHWRQHU
FDUWULGJHHQGHG"
Replace the toner cartridge when
the life span of it has been ended.
4. Is the movement(Up and Down)
RIWKHWUDQVIHUUROOHUVPRRWK"
Clean the bushing part of the
transfer roller.
1. If the problem is still not solved,
replace the toner cartridge.
2. Gently shake the toner
cartridge.
,VWKH+936QRUPDO"
Service Manual
The toner cartridge is basically
designed to print 7K sheets with
5% image. If it prints more than
8K sheets with 2% coverage, a
background can occur.
4-36
Samsung Electronics
Alignment & Troubleshooting
9) Ghost (1)
Description : Ghost occurs at 75.5 mm intervals of the OPC drum in the whole printing.
75.5mm
Digital Printer
Digital Printer
Digital Printer
Digital Printer
Digital Printer
Digital Printer
1. Bad contacts
caused by contamination
from toner particles between high voltage
terminal in the main body and the
electrode of the Toner
cartridge.
Clean the terminals when
contaminated by toner particles.
2. Bad contacts caused
by contamination from toner particles
between high voltage terminal in the main
body and the one in the
+936ERDUG
Occur in the toner cartridge,
replace the toner cartridge and
try to print out.
3. The life of toner cartridge is expired.
4. Transfer roller lifetime(50K sheets)
has expired.
Replace the engine board if not
solved by the above directions 1-2.
If not solved by the direction 3,
check the transfer roller lifetime
and replace it.
Continue..
Service Manual
4-37
Samsung Electronics
Alignment & Troubleshooting
Continue..
:ait about 1 hour after power on
before using printer.
5. Abnormal low temperature
(below 10).
Occur in the toner cartridge,
replace the toner cartridge and
try to print out.
6. Damaged cleaning blade in the
toner cartridge.
Service Manual
4-38
Samsung Electronics
Alignment & Troubleshooting
10) Ghost (2)
Description : Ghost occurs at 75.5 mm intervals of the OPC drum in the whole printing.
(When printing on card stock or transparencies using manual feeder)
75.5mm
Digital Printer
Digital Printer
Digital Printer
Digital Printer
Digital Printer
Digital Printer
:KHQSULQWLQJRQFDUGVWRFN
thicker than normal paper or
WUDQVSDUHQFLHVVXFKDV2+3, higher
transfer voltage is
required.
Service Manual
4-39
Select 'Thick Mode' on paper type
menu from the software application
and after using returning to the
original mode is recommended.
Samsung Electronics
Alignment & Troubleshooting
11) Ghost (3) : Fuser
Description : Ghost occurs at 62.8 mm or 77.6mm intervals.
62.8 or 77.6mm
Digital Printer
Digital Printer
Digital Printer
Digital Printer
Digital Printer
Digital Printer
The temperature of the fuser is
maintained high.
Service Manual
4-40
Disassemble the fuser and remove
the contaminated toner particles on
the roller and clean the foreign
matter between Thermistor and
+HDWUROOHU.
(Caution: can be deformed)
Samsung Electronics
Alignment & Troubleshooting
12) Stains on the Face of Page
Description : The background on the face of the printed page is stained.
Digital Printer
Digital Printer
Digital Printer
Digital Printer
Digital Printer
Service Manual
1. Toner leakage due to improperly
sealed toner cartridge.
Replace the toner cartridge.
2. If the transfer roller is
contaminated, stains on the face of
page will occur.
If the transfer roller is
contaminated, run PC Cleaning
Mode Print 2 or 3 times.
And perform Self-Test 2 or 3 times
to remove contamination.
4-41
Samsung Electronics
Alignment & Troubleshooting
13) Stains on Back of Page
Description : The back of the page is stained at 47 mm or 62.8mm intervals.
47 or 62.8mm
Digital Printer
Digital Printer
Digital Printer
Digital Printer
Digital Printer
Digital Printer
Perform the OPC Cleaning Mode
Print 2 or 3 times. Run Self-Test to
remove the contamination of the
transfer roller.
1. 47mm : Transfer roller is
contaminated.
2. 62.8mm : Pressure roller is
contaminated.
Service Manual
4-42
1. Replace the transfer roller if
contaminated severely.
2. Disassemble the fuser and clean
WKH+5+HDW5ROOHUDQG35
(Pressure roller). And check the
DUHDEHWZHHQ+5DQGThermistor.
If contaminated, clean the area
not to be deformed.
Samsung Electronics
Alignment & Troubleshooting
14) Blank Page Print out (1)
Description : Blank page is printed.
Digital Printer
Digital Printer
Digital Printer
Digital Printer
Digital Printer
Bad ground contacts in OPC and/or
toner cartridge.
Service Manual
4-43
1. Check if the Ground-OPC is
defective(set inside right side).
2. Remove contamination of the
terminals of the toner cartridge
and the unit.
Samsung Electronics
Alignment & Troubleshooting
15) Blank Page Print out (2)
Description : 1. Blank page is printed.
2. One or several blank pages are printed.
3. When the printer turns on, several blank pages print.
1. Bad ground contacts in OPC and/or
toner cartridge.
1. Perform the engine self test
using EDC Mode to check if the
Solenoid is normal.
2. If not solved by the above
directions 1-2, Replace the
engine board.
3. Turn the power off, delete the
data of PC and try printing again.
2. Abnormal solenoid.
Service Manual
Remove contamination of the
terminals of the toner cartridge.
4-44
Samsung Electronics
Alignment & Troubleshooting
4.2.3 The cause and solution of the bad discharge
1) Wrong Print Position
Description : Printing begins at wrong position on the paper.
:rong sense time caused by defective
feed sensor actuator.
Service Manual
Replace the defective actuator
4-45
Samsung Electronics
Alignment & Troubleshooting
2) JAM 0
Description : 1. Paper is not exited from the cassette.
2. Jam-0 occurs when the paper feeds into the printer
1. Check the Solenoid by using
EDC Mode.
Replace the solenoid.
2. Check if the pad is loose due to
bad sealing of the side-pad.
Replace the side-pad Assembly
/ or R, if necessary.
3. Check the surface of the roller-pickup
for foreign matter.
Clean with soft cloth dampened
with IPA(Isopropyl Alcohol) or
water.
4. If continuous clusters
occur, check whether the assembly
slot between shaft-pickup and
housing-pickup opens or
is broken away.
Replace the Main PBA and/or
Sensor.
5. If the paper feeds into
the printer and Jam 0 occurs, perform
EDC Mode to check feed-sensor
of the engine board.
Service Manual
4-46
Samsung Electronics
Alignment & Troubleshooting
3) JAM 1
Description : 1. Recording paper is jammed in front of or inside the fuser.
2. Recording paper is stuck in the discharge roller and in the fuser just after
passing through the Actuator-Feed.
Service Manual
1. If the recording paper is jammed in
front of or inside the fuser.
Replace the SMPS or Exit-Sensor.
2. If the recording paper is
stuck in the discharge roller and the
fuser just after passing through the
Actuator-Feed, Feed Actuator
may be defective.
1. Replace the Main PBA.
2. Reassemble the Actuator-Feed
and Spring-Actuator if the
movement is bad.
4-47
Samsung Electronics
Alignment & Troubleshooting
4) JAM 2
Description : 1. Recording paper is jammed in front of or inside the fuser.
2. Recording paper is stuck in the discharge roller and in the fuser just after
passing through the Actuator-Feed.
1. If the paper is
completely fed out of the printer,
but Jam 2 occurs : Exit sensor is defective.
¥ After the paper is completely discharged, actuator
Exit should return to the original position to shut the
photo-sensor. Sometimes it takes longer
hour than it should and does
not return.
Check if the exit sensor actuator is
defective.
¥ Check if the actuator exit is
deformed (Check if the lever part
is deformed in shape).
¥ Check whether burrs occur in the
assembly part of the actuator exit
or not and if the actuator is
smoothly operated.
¥ Check if foreign matter and wire
get caught in the actuator exit's
operation.
2. If the paper is
rolled in the Fuser Roller:
¥ This occurs when a Guide claw is broken
away or transformed.
¥ It occurs when the Spring of a Guide claw is broken
away or transformed.
,WRFFXUVZKHQWKH+HDW5ROOHURU
Pressure-Roller is seriously
contaminated with
the toner.
3. Paper is accordion in the fuser.
Service Manual
4-48
If the paper is stuck in the fuser :
disassemble the fuser and remove
the jammed paper, and clean the
surface of the pressure roller with
dry gauze.
Remove the jammed paper after
disassembling the fuser : Clean
the surface of the pressure roller
with dry gauze.
¥ Remove the toner particles
stained on the rib.
¥ Check the assemblage and
performance of the exit.
Samsung Electronics
Alignment & Troubleshooting
5) JAM Duplex
Description : Recording paper is Jamned in front or inside a duplex module.
1. A case that a paper jam occurs
on (A) after it is reversed:
replace a 2nd exit roller after
checking its operation.
2. A case that a paper jam occurs
on (B) after it is reversed:
replace a duplex roller after
checking its operation
2. It is a case that a paper cannot
reach to a registration sensor.
Service Manual
4-49
Samsung Electronics
Alignment & Troubleshooting
6) Multi-Feeding
Description : Multiple sheets of paper are fed at once.
&KHFNWKH*XLGHVLGH/5RU*XLGH
Rear in the Cassette, if the
position is correct.
Replace the solenoid if necessary.
2. Solenoid malfunction
(the solenoid does not work properly):
Perform EDC Mode.
Service Manual
Replace the Main PBA.
3. Pad-Friction is contaminated
with foreign matter.(oil...)
Clean the pad friction with soft
cloth dampened with IPA
(Isopropyl Alcohol).
4. The face of paper is blended.
Use the smooth paper.
4-50
Samsung Electronics
Alignment & Troubleshooting
7) Paper rolled in the fuser
Description : If contaminated at intervals of 77.6mm on the back of a paper.
After disassembling the fuser,
clean contamination between the
heat roller and the thermostor and
remove the contamination of the
pressure roller.
1. Contamination of the
pressure roller or heat roller
%DFNJURXQG+RWRIf set).
1. If there is heavy background,
repair it by the background
troubleshooting method.
2. Clean the surface of the heat
roller with IPA or water
3. Check the warp or separation
of the print claw and the holder
plate claw, and then manage it.
2. Check the claw of the fuser
whether it is deformed.
Service Manual
4-51
Samsung Electronics
Alignment & Troubleshooting
8) Paper rolled on the OPC Drum
Description : Paper is rolled up in the OPC.
Recommend to use normal paper.
1. Paper is too much thin.
+RZWRUHPRYHWKHUROOHGSDSHU
in the OPC.
Remove the paper while turning
the OPC against the ongoing
direction.
Clean fingerprints on the OPC
softly with soft cloth dampened
with tissue.
2. The face of paper is curled.
Service Manual
4-52
Samsung Electronics
Alignment & Troubleshooting
4.2.4 The cause and solution of the malfunction
1) Fuser Error
Description : Fuser error is displayed on LCD
Replace the fuser if a thermostat
is open.
1. Check whether a thermostat,
AC wire, and heat lamp are
open or not.
2. Check whether a
thermistor is open or not.
Replace the fuser if a thermistor
sensor is located deep inside of
a sponge.
+HDWODPS212))WHVW
Check whether the overheat
mode circuit operates normally
or not.
4. It could not operate
due to a gear of a fuser is melted.
Service Manual
Replace the fuser.
4-53
Samsung Electronics
Alignment & Troubleshooting
2) LSU Error
Description : “PMOTOR ERROR/HSYNC ERROR’
&KHFNZKHWKHUWKH/68
connector is disconnected or not.
5HSODFHD/68
Replace a main board if the same
error occurs again after replacing
D/68
&KHFNZKHWKHUWKH/68
motor is rotating or not.
&KHFNWKH+6<1&VLJQDO
Service Manual
4-54
Samsung Electronics
Alignment & Troubleshooting
3) Not function of the gear of the fuser due to melting away
Description : The motor breaks away from its place due to gear melting away.
1. Replace the Fuser.
2. Replace the Main PBA.
3. Replace the SMPS.
&KHFNWKH+HDW/DPS
Service Manual
4-55
Samsung Electronics
Alignment & Troubleshooting
4) Paper Empty
Description : Paper empty error message is displayed on LCD when paper is loaded in the
cassette.
1. Bending or deformation
of the actuator of the paper sensor.
Replace the defective actuator.
2. The function of the
engine board is defective
Replace the Sensor PBA.
3. Check the Connector.
Service Manual
4-56
Samsung Electronics
Alignment & Troubleshooting
5) Paper Empty without indication
Description : Paper empty error message does not display when the paper cassette is empty.
1. Bending or deformation
of the actuator of the paper sensor.
Replace the defective actuator.
2. The function of the
engine board is defective
Service Manual
Replace the engine board.
4-57
Samsung Electronics
Alignment & Troubleshooting
6) Cover Open
Description : The ERROR lamp is on even when the print cover is closed.
1. The hook lever in the
front cover or Guide rear
may be defective.
Replace the hook lever,
if defective.
2. Check the connector
and circuit of the cover switch department
in the Main Control board.
Service Manual
4-58
1. Check the insertion of the
&RYHU2SHQ6:&RQQHFW
2. Replace the Main Control
ERDUGRU&RYHU2SHQ6:.
Samsung Electronics
Alignment & Troubleshooting
7) No error LED when the cover is open
Description : The Error LED does not come on even when the printer cover is open
1. Check the connector and
circuit of the cover switch department
in the Main Control board.
Perform EDC test
Service Manual
4-59
1. Check the insertion of the
&RYHU2SHQ6:&RQQHFW
2. Replace the Main Control
ERDUGRU&RYHU2SHQ6:.
Samsung Electronics
Alignment & Troubleshooting
8) No Power
Description : When system power is turned on, all lamps on the operator panel do not come on.
Replace the power supply cord
or SMPS.
1. Check if the power input
and SMPS output are normal.
2. Check the inferiority
RI/('3DQHORU/'&ZLQGRZRQWKH
front-cover if the OP panel does not
appear after normal
warming-up.
Service Manual
4-60
1. Replace the control board.
2. Replace the OP panel.
Samsung Electronics
Alignment & Troubleshooting
9) Vertical Line Getting Curved
Description : When printing, vertical line gets curved.
,IWKHVXSSO\RIYLV
unstable in the Main Control board
OLQNLQJZLWK/68FKHFNGULYHE\
EDC Mode:
/68&KHFN
5HSODFH/68
1. Replace theToner Joint PBA.
2. Replace the MainPBA.
2. Chect the Deve PBA
in the Toner Cartridge.
Service Manual
4-61
Samsung Electronics
Alignment & Troubleshooting
4.2.5 The cause and solutions of bad environment of the software
1) The printer is not working (1)
Description : While Power turned on, the printer is not working in the printing mode.
Check the power of the printer and perform
the Self-Test. If the test printing works, that
means no problems in the printer itself.
If the test printing does not work, that
means bad functioning of the printer
(not because of software).
1. Run Self-Test Mode:
Turn the power on while pressing
the test printing button for 2 or 3 seconds
before printing works.
Replace the printer cable. If the problems
not solved even after the cable replaced,
check the amount of the remaining tone.
2. Check if the PC and the
printer is properly connected and
the toner cartridge installed.
Check if the connection between PC and printer
port is proper. If you use windows, check if the
printer driver in the controller is set up. If the printer
driver is properly set up, check in which program
the printing is not working. The best way to find out
is to open the memo pad to check the function of
printing. If it is not working in a certain program,
adjust the setup the program requires. Sometimes,
WKHSULQWRXWLVQRUPDOZLWKLQWKH:LQGRZVEDVLF
programs, but it's not working in a particular
program. In such case, install the new driver again.
,IQRWZRUNLQJLQWKH:LQGRZVEDVLFSURJUDP
Check the setup of the port of CMOS is on ECP.
And check the address of IRQ 7 and 378
3ULQWLQJLVQRUZRUNLQJLQWKH:LQGRZV
4. Check if the printer cable is
directly connected to peripheral devices
Service Manual
If the scanner needs to be connected to the
printer, first the remove the scanner from
the PC to see if the printer is properly
working alone.
4-62
Samsung Electronics
Alignment & Troubleshooting
2) The printer is not working (2)
Description : After receiving the printing order, no response at all or the low speed of printing occurs
due to wrong setup of the environment rather than malfunction of the printer itself.
Not working with the message 'insufficient
printer memory' means hard disk space
problem rather than the RAM problem.
In this case, provide more space for the
hard disk. Secure more space using the
disk utilities program.
1. Secure more space of the hard disk.
2. Printing error occurs even
if there is enough space in the hard disk.
The connection of the cable and printer
port is not proper. Check if the connection
is properly done and if the parallel port in
CMOS is rightly set up.
3. Check the parallel-port-related
items in the CMOS Setup.
As a printer port, Select ECP or SPP
among SPP(Normal), ECP, and EPP
modes(increase printing speed) SPP
normal mode support 8-bit data transfer,
while ECP Mode transfer the 12-bit data.
If the regular font is not printing, the cable
or the printer driver may be defective.
Turn the PC and printer off, and reboot the
system to print again. If not solved,
double-click the printer in my computer If
the regular fonts are not printed this time
again. the cable must be defective so
replace the cable with new one.
4. Reboot the system to print.
Service Manual
4-63
Samsung Electronics
Alignment & Troubleshooting
3) Abnormal Printing
Description : The printing is not working properly even when the cable has no problem. (even after
the cable is replaced) If the printer won’t work at all or the strange fonts are repeated,
the printer driver may be defective or wrong setup in the CMOS Setup.
Select SPP(Normal) or ECP/37 Port the
among ECP, EPP or SPP in the CMOS
Setup.
1. Set up the parallel
port in the CMOS SETUP.
Check the printer in My Computer.
(to see if the printer driver is compatible to
the present driver or delete the old driver,
if defective and reinstall the new driver)
2. Printer Driver Error.
3. Error message
from insufficient memory.
(The printing job sometimes stops or due
to insufficient virtual memory, but it actually
comes from the insufficient
space of the hard
disk.)
Service Manual
Delete the unnecessary files to secure
enough space of the hard disk and start
printing job again.
4-64
Samsung Electronics
Alignment & Troubleshooting
4) SPOOL Error
Description : To spool which stands for “simultaneous peripheral operations online” a computer
document or task list (or “job”) is to read it in and store it, usually on a hard disk or
larger storage medium so that it can be printed or otherwise processed at a more
FRQYHQLHQWWLPHIRUH[DPSOHZKHQDSULQWHULV¿QLVKHGSULQWLQJLWVFXUUHQWGRFXPHQW
1. Insufficient space of the
hard disk in the directory assigned
for the basic spool.
Delete the unnecessary files to provide
more space to start printing job.
If there are some files with the extension
name of ****.jnl, Delete them and Reboot
WKH:LQGRZVWRUHVWDUWSULQWLQJMRE
2. If the previous printing
error not solved.
Shut down all other programs except the
current one, if possible.
:KHQH[SHFWHGWRFROOLGH
with other program.
:KHQDQDSSOLFDWLRQ
program or the printer
driver is damaged.
Delete the printer driver completely and
reinstall it.
After rebooting the computer, check for
viruses, restore the damaged files and
reinstall the program to do the printing job.
:KHQVRPHILOHVUHODWHGWR
OS are damaged or virus infected.
6. Memory is less than
suggested one.
Add up enough memory to the PC.
How to delete the data in the spool manager.
In the spool manager, the installed drivers and the list of the documents waiting to be
printed are shown. Select the document to be deleted and check the delete menu.
If you intend to delete the current document being printed, the data being transferred
to the printer will be put out and then the document is removed. Before choosing the
document, the menu is still inactive.
2USXWWKHGRFXPHQWRXWRIWKHOLVWDQGUHSHDWWKHURXWLQHDVLQWKHDERYHRU¿QLVKWKH
spool manager.
Service Manual
4-65
Samsung Electronics
Alignment & Troubleshooting
4.2.6 Fax & Phone Problems
1) No Dial Tone
Description : While on-hook button is pressed, there is no dial tone.
Service Manual
1. Check if the telephone
line cord is connected to
7(//,1(FRUUHFWO\.
If the telephone cord is normal but
there is no dial tone, then try to
UHSODFHWKH/,8%
G
&KHFNLILWPDNHV&/,&.
VRXQGZKLOH2+'NH\LVSUHVVHG
,I\RXFDQQRWKHDUWKH2+'
&/,&.VRXQGWKH23(Ass'y may
be defective. Try to replace the
OPE Ass'y.
3. Check the connection of
+$51(66EHWZHHQWKH
/,8DQGWKH0DLQ%
G
Check the Speaker connection,
and try to replace it.
4. Check if the SPEAKER
is connected correctly.
/DVWO\, try to replace the Main B'd.
4-66
Samsung Electronics
Alignment & Troubleshooting
2) Defective MF DIAL
Description : The MF DIAL is not functioning.
Service Manual
1. Check if the telephone line is
connected correctly.
,I\RXFDQQRWFDWFKWKH2+'
&/,&.VRXQGWKH23(Ass'y may
be defective. Try to replace the
OPE Ass'y.
:LOHWKH%877ON KEY is
pressed, check to catch
D&/,&.VRXQG
,I\RXFDQFDWFKD&/,&.VRXQG
after checking the connection of
+$51(66EHWZHHQWKH/,8DQG
the Main PBA, try to replace the
+$51(66
3. Check the connection of
+$51(66EHWZHHQWKH
/,8DQGWKH0DLQ3%$
The problem still persists, then
UHSODFHWKH/,8DQGWKHPDLQ%
G
in sequence.
Notes: Product supports the MF
',$/ type only.
4-67
Samsung Electronics
Alignment & Troubleshooting
3) Defective FAX FORWARD/RECEIVE
Description : The FAX FORWARD/RECEIVE is not functioning.
1. Check if you can catch
a dial tone by pressing
2+'
If the MODEM testing is normal
and there is no dial tone, then try
WRUHSODFHWKH/,8%
G
2. Check if you can
catch a RECEIVE tone while
MODEM testing in the
7(&+0RGH
Service Manual
If the MODEM testing is abnormal,
try to replace the Main B'd.
4-68
Samsung Electronics
Alignment & Troubleshooting
4) Defective FAX FORWARD
Description : RECEIVE is functioning, but FORWARD is not functioning or the received data are
broken.
1. Check if there is NOISE
when pressing on-hook dial.
If it makes NOISE while using
on-hook dial, replace or
repair the telephone line.
2. Check the RECEIVE
condition by trying to forward
a FAX to another fax machine from
the forwarding side FAX.
3. Check if the telephone
line connected to the Product
is contaminated or gets
stripped off or down.
Service Manual
4-69
Samsung Electronics
Alignment & Troubleshooting
5) Defective FAX RECEIVE (1)
Description : FORWARD is functioning, but RECEIVE is not functioning or the received data are
broken.
1.Check if there is NOISE
when pressing on-hook dial.
If it makes NOISE while
on-hooking, replace or repair
the telephone line.
2.Check the RECEIVE
condition by trying to receive a
FAX at another fax machine.
Service Manual
4-70
Samsung Electronics
Alignment & Troubleshooting
6) Defective FAX RECEIVE (2)
Description : The received data are lengthened or cut in the printing.
1. Check if there is NOISE
when pressing on-hook dial.
If it makes NOISE, rearrange the
telephone line. (Refer to 'Defective
FAX RECEIVE'.)
2. Ask to the forwarding
side, check the image quality of another
machine receiving a FAX
additionally sent to.
Service Manual
4-71
Check if the FAX status of the
forwarding side is also normal.
Samsung Electronics
Alignment & Troubleshooting
7) Defective FAX RECEIVE (3)
Description : The phone is ringing continuously, but it cannot receive.
Even when the RECEIVE Mode is
changed to FAX MODE, it cannot
UHFHLYHWKHQUHSODFHWKH/,8DQG
the Main B'd in sequence.
Check if the RECEIVE Mode is
7(/ MODE or FAX MODE.
Service Manual
4-72
Samsung Electronics
Alignment & Troubleshooting
8) Defective FAX RECEIVE (4)
Description : The received data is reduced by more than 50% in the printing.
After checking the data of the
forwarding side, correct the
FAX of the forwarding side.
Check the FAX status of the
forwarding side.
Service Manual
4-73
Samsung Electronics
Alignment & Troubleshooting
9) Defective Automatic Receiving
Description : The automatic receiving function is not working.
1. If the RECEIVE Mode is set to
the 7(/ MODE, reset it to the
FAX MODE.
2. Even after the RECEIVE Mode
is changed to the FAX Mode,
it cannot receive, then try to
UHSODFHWKH/,8DQGWKH0DLQ
B'd in sequence.
1. Check if the RECEIVE Mode is
7(/ MODE or FAX MODE.
Service Manual
4-74
Samsung Electronics
Alignment & Troubleshooting
4.2.7 Copy Problems
1) Black Copy
Description : Black page is printed out when copy.
Room light ca transit a thin
original.
1. Check the Scan-Cover open.
Service Manual
2. Check shading profile.
Remake shading profile in the
tech mode.
3. Check white/black reference
voltage in Main PBA.
Replace U60 if it is defective.
. U60-154 = 0.5V
. U60-155 = 3.3V
4-75
Samsung Electronics
Alignment & Troubleshooting
2) White Copy
Description : White page is printed out when Copy.
1. Check the CIS problem in Main PBA.
Check the CIS harness contact.
2. Check shading profile.
Remake shading profile in the
tech mode.
Service Manual
4-76
Samsung Electronics
Alignment & Troubleshooting
3) Abnormal noise
Description : There is noise when copy.
Check the right position of the
Scanner Motor, and check the any
mechanical disturbance in the
CIS carriage part.
1. Check the Scanner Motor
and any mechanical disturbance.
2. Check the Motor Driver in Driver PBA.
Service Manual
4-77
If any driver is defective, replace it.
. Connection PBA U4-1, 19 or
U5-1, 19=0V to 24V swing signal
when operating.
Samsung Electronics
Alignment & Troubleshooting
4) Defective Image Quality
Description : The copied image is light or bad.
Remake shading profile in the
tech mode.
1. Check shading profile.
Service Manual
2. Check the gap between
original and scanner glass.
The gap above 0.5 mm can
cause a blurred image.
3. Check printing quality.
See "Print" troubleshooting.
4-78
Samsung Electronics
Alignment & Troubleshooting
4.2.8 Scanning Problems
1) Defective PC Scan
Description : The PC Scan is not functioning at all.
1. Check the Cable (USB or Parallel)
If the PC and the cable are not
connected properly, reconnect it.
2. Check if the driver is
installed properly.
After confirming that it is proper
by performing a PC printing test
related to driver setup, if it is not
so, reinstall it.
(Refer to User's Manual.)
If copy function works, replace the
Main PBA.
If copy function doesn't work,
replace the CIS Ass'y and try
again.
3. Check if copy function
operates normally.
Service Manual
4-79
Samsung Electronics
Alignment & Troubleshooting
2) Defective Image Quality of PC Scan
Description : The image PC scanned is not clear or bad.
Service Manual
1. Check the waveform form
by performing a CIS
test in 7(&+0RGH
If the CIS waveform form is
abnormal, try to replace the CIS
Ass'y.
2. Check if the resolution is
set too low in PC Scan options.
(Refer to User's Manual.)
If the resolution is set to low, let
the user be acquainted with the
using method well.
4-80
Samsung Electronics