1
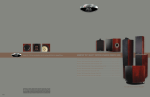
ICRUZE INTERFACE CABLE
MPC FX IM-MB1
I N S TA L L AT I O N & U S E R G U I D E
IMPORTANT NOTE:
This cable and/or module is for use in installations
that typically have a CD changer installed from
the factory or are prewired for one in a non-dash
location. It is a complicated installation
and professional installation is HIGHLY
recommended.
The installation of iCruze® will disconnect
and cease the normal operation and function
of the factory-installed CD changer, satellite
radio, and/or DVD entertainment systems.
This Interface Cable is designed to work with
Monster® Factory•Linx™ Interface Module IM-MB1
& Monster Factory•Linx M-Bus Extension Cable.
Make certain you have purchased this Interface
Module and Extension Cable or your iCruze
installation will not function.
The Monster Factory•Linx ™ Interface Cable(s)
and/or Module(s) enclosed are custom designed
for your particular vehicle. Because every vehicle
is different, unique adaptors are required to make
your iCruze installation and operation function
exactly as it was designed. Each is designed
and tested to fit correctly and made from the top
quality materials for trouble-free operation.
A NOTE FROM THE HEAD MONSTER
Thank you for purchasing the Monster®
Factory•Linx™ iCruze ® —one of the most exciting
products Monster has ever offered. Monster
worked closely with the engineers at Apple
to design iCruze to give you the most reliable,
most complete control of your iPod ® through
your factory car stereo. iCruze also gives
you a direct connection for crystal clear
sound quality. And it charges your iPod
the entire time you’re driving, so when
you leave the car your iPod is charged up
and ready to go. You’ll soon be wondering
how you ever got along without your iPod
and iCruze in your car.
When you put music, driving and iPod
together, Life is Good.
Monsterously,
Noel Lee,
The Head Monster
Noel Lee,
The Head Monster
LOSS OF CERTAIN EXISTING FUNCTIONS
Use and installation of iCruze® requires disconnection and loss
of use of any existing factory installed non-integrated CD-changer
(i.e. trunk, center console, under seat).
iCruze is not compatible with some vehicles that have existing,
factory installed integrated CD changers. Typically this is an in-dash
CD changer. Call your dealer and ask if your factory stereo has a CD
or CD changer port/option on the rear of the stereo. If yes, then
it is iCruze compatible.
Existing factory installed vehicle features, such as Satellite Radio,
DVD entertainment systems, navigation systems and video cameras
may be impacted by or cease to function with use and installation
of iCruze, if these components were connected to the CD changer
port. Check the iCruze in-store selection guide, visit iPodiCruze.com,
or call customer service at 1-415-840-2000 (9am–5pm Monday
through Friday PT) for more details.
INSTALLATION SAFETY PRECAUTIONS & WARNINGS
Monster® is not responsible for any damage to your vehicle while
installing iCruze. The wiring and installation of the iCruze requires
technical skill. Monster recommends iCruze installation by a MECP
certified professional car audio technician. If you choose to install
yourself, be aware that specialized car stereo removal tools
may be needed and can be found available for purchase
on our website iPodiCruze.com.
Make sure you have purchased the correct Monster Factory•Linx™
Interface Cable and/or Module. See the iCruze Factory•Linx
in-store selection guide or visit iPodiCruze.com to ensure you have
everything you need to install iCruze in your car. Double check
the iCruze in-store selection guide, visit iPodiCruze.com,
or call customer service at 1-415-840-2000 (9am–5pm
Monday through Friday PT) for more details.
If your factory stereo is protected by an anti-theft code,
have the code available so you can use your stereo once
re-connected. Consult your car owner’s manual or contact
your local car dealer for more information.
Before installing iCruze, remove the cable from the negative
battery terminal. Failure to do so may cause electrical shock
and/or injury.
iCruze is designed to be installed in the dash near the car stereo.
Installation elsewhere or in a dusty or moist area may cause
problems or product failure.
Many connectors in your car may look the same. Do not force
or alter the cable connectors to fit. Failure to do so may damage
your vehicle’s electronics, cause shock or fire.
While installing iCruze, make sure to avoid sharp edges which
can damage wiring. Failure in doing so may cause iCruze
to not work or result in a fire.
Do not attempt to take iCruze apart. The internal circuits
are static sensitive and contain no user serviceable parts.
IMPORTANT iPOD FUNCTION NOTES & SAFETY
®
Monster is not responsible for any lost data on your iPod
even during normal use of this product.
Monster is not responsible for damage caused to your iPod
from misuse.
iCruze® is compatible with iPod® models with dock connector.
You should never leave or store your iPod in your vehicle
for an extended amount of time. Failure to do so may damage
your iPod from heat, cold and moisture extremes. See your iPod
manual for acceptable temperature ranges.
For added safety and security while driving, Monster recommends
placing the iPod in your glove box or other stow-away location
such as a center console.
Your iPod must have certain firmware for proper iCruze
compatibility. Minimum Version 1.2 for iPod Mini, version 1.0
for iPod Photo, iPod nano, iPod video, and version 2.2 for iPod.
Visit apple.com/support for more information.
When you unplug the iPod from the iCruze, you will notice that
the iPod will display the iCruze logo for a short time which is
normal. It will revert back to the usual screen shortly after this
time period.
The functions and control of your iPod may differ depending
on your radio. iCruze is limited by the available functions of your
radio. i.e.— If your radio does not have a shuffle/random this
feature will not be available.
iCruze utilizes playlists on your iPod to access music. Be sure
to refer to your installation and user guide that came with iCruze
for more details on how to optimize your playlist for use with
the main iCruze unit.
iCruze is not compatible with Bose audio systems. If your
Mercedes-Benz says Bose on the stereo or any of the speaker
covers, iCruze is not compatible.
INCLUDED ITEMS
(1) Monster Performance
Car ™ Factory•Linx™
iCruze Interface Module
Part # 156823
®
(1) Monster Performance
Car Factory•Linx iCruze
Fiber Optic Link
1999-2004 Mercedes Benz ®
(2) Monster Performance
Car Factory•Linx iCruze
Inline Connector
Part # 169201
BEFORE YOU BEGIN
Because iCruze® emulates a CD changer, if your vehicle currently has
a CD changer installed, it will need to be unplugged for the iCruze
to operate. Should you experience a problem, please call Customer
Service at 1-415-840-2000 (9am–5pm Monday through Friday PT)
to report it.
IMPORTANT: Please completely read and review the installation
guide that came with iCruze BEFORE you begin this installation
for steps required prior to Interface Cable installation.
INSTALLATION
Review the installation guide that came with iCruze for installation
steps required prior to Interface Cable/Module installation.
WARNING :
IT IS NOT RECOMMENDED TO DISCONNECT THE BATTERY ON
1999 AND LATER MERCEDES-BENZ VEHICLES. IN MANY OF
THESE VEHICLES, A SPECIAL POWER RETENTION UNIT MUST BE
CONNECTED TO THE VEHICLE TO MAINTAIN MEMORY POWER FOR
VARIOUS MODULES IN THE VEHICLE. DISCONNECTING THE BATTERY
MAY REQUIRE RETURNING THE VEHICLE TO THE DEALERSHIP FOR
REPROGRAMMING. BE CAREFUL WHEN CONNECTING THE POWER
AND GROUND FOR THE ICRUZE INTERFACE MODULE TO PREVENT
SHORTING OUT ANY FACTORY WIRING.
WHEN WORKING WITH THE FIBER OPTIC CABLES USED IN THESE
MERCEDES-BENZ VEHICLES, NOTE THAT THEY ARE EASILY
DAMAGED. TAKE CARE THAT THE CABLES ARE NOT CRUSHED,
KINKED, CUT OR NICKED WHILE WORKING WITH THEM.
THE FACTORY FIBER OPTIC CABLES CAN BE IDENTIFIED
BY AN ORANGE/BROWN SEMI-RIGID INSULATION.
THE FIBER OPTIC CABLES MUST NOT BE BENT IN A RADIUS
TIGHTER THAN 1-INCH (2-INCH DIAMETER). DOING THIS WILL
PERMANENTLY DAMAGE THE CABLE.
NOTE: The Mercedes fiber optic system is configured as
a closed ring. The ring begins at the radio, goes through each
component and ends back at the radio. All connections must
be complete or the ring is broken and there will be no sound.
Light enters the factory cables through the clear lens and exits each
factory cable through the red lens. The iCruze interface cable has
clear lens on the RX cable, and a red lens on the TX cable. Proper
connection of the iCruze cable is shown in later diagrams.
iCruze must be connected in the CD changer location because
of the sequence of components required by the Mercedes fiber
optic system. Locating the iCruze in a different position on the
“chain” may cause the entire audio system to stop functioning.
Installation Diagram/ Location Overview
�������������������
����������
���������
������
������
������
����������������������
��
�����
����������
��
�������
��
�����
�������
����������
����������
�����������������
����
����������
��
�������
��������������������
���������������������
����������������
Alternate Configuration
�������������������
����������
���������
������
������
������
��
�����������������
����������
�������
���������
��
��
��������
����
��
����������������������
�������������������
����������
����������������������
����������
��
��������������������
���������������������
����������������
Step 1
Identify the location of the Mercedes CD changer. It does not matter
if a CD changer is installed, you need only determine the location
where it would be installed. If you do not already have a CD changer,
see the chart below and verify you have the correct location by
finding the fiber optic connector (a 90 degree connector with two
yellow cables) and a second connector with 3 wires. This is where
the iCruze® IM-MB1 Interface Module will need to be installed.
NOTE: If the changer location is the in the trunk area, you
will want to purchase an M-Bus extension cable (Monster
Performance Car Part # MPC FX MBUS-5M) so the iCruze
can be mounted in the dash. If you do not, the included
iPod® cable may not reach to the dash area.
FACTORY CD CHANGER LOCATIONS
Model
Year
Changer Mounting Location
C230, C240, C320, C32 AMG
C230 Kompressor
C230 Kompressor
C280, C230K
CL500, CL600, CL55 AMG
CLK320, CLK430, CLK500, CLK55 AMG
CLK320, CLK430, CLK55 AMG
E300
2001-2004
2002-2004
2001
1999-2000
1999-2004
2003-2004
1999-2002
1999
Glovebox
Glovebox
Passenger Side Trunk
Passenger Side Trunk
Driver Side Trunk
Glovebox
Passenger Side Trunk
Driver Side Trunk
E320, E430, E55 AMG
G500, G55 AMG
ML320, ML350, ML430, ML500, ML55 AMG
S420, S430, S500, S600, S55 AMG
SL500, SL600, SL55 AMG
SLK230, SLK320, SLK32 AMG
1999-2002
2002-2004
2003-2004
2000-2003
1999-2004
1999-2004
Passenger Side Trunk
Driver Side Trunk
Passenger Side Trunk
Driver Side Trunk
Driver Side Trunk
Passenger Side Trunk
Step 2
If you have a CD changer
already installed, it will need to be
disconnected now. At the changer
location, get the factory fiber optic
connector and carefully open it so you
can remove the individual fiber optic
cables. Inside, one cable will have
a red lens on the end and the other
a clear lens. Also locate the 3-wire
power connector, it will be very close
to the fiber connector.
Step 2
Open Connector
to Separate Fibers
Step 3
Open the iCruze MB1 Interface Module
package and remove the Module
and the fiber optic cable harness.
One end of the harness has a pair
of loose fibers and the other end has
the fibers joined in a single connector.
Remove the screws in the single
connector so you may separate
the two fibers from the connector.
Step 3
Remove Screws and Separate Fibers
Step 4
There are a pair of inline fiber optic
connectors in the MB1 Interface
Module package. These will connect
the factory fibers to the iCruze® MB1
Interface Module fibers. Connect the
factory fiber with the red lens to one
of the inline connectors by lifting the
metal tab and inserting the lens. Snap
the metal tab down to secure the lens.
Step 4
iCruze Cable
(clear tip)
Inline Connectors
Factory Fiber
(red tip)
iCruze
Cable
(red tip)
Factory Fiber (clear tip)
CAUTION: The factory fibers have ends that are shaped
differently for red and clear. The inline connectors will accept
red at one end and clear at the other. If the red lens does not
push in easily, try the other end of the inline connector.
Once the factory red fiber is in one side of the inline connector,
connect the CLEAR tipped fiber from the iCruze MB1 Interface
Module to the other end of the inline connector. Please verify —
red factory fiber to clear iCruze MB2 Interface Module fiber.
Now do the same with the other fibers and inline connector.
Clear factory fiber to red iCruze MB1 Interface Module fiber.
Step 5
The Interface Module fibers should
now be connected to the factory fibers.
Each end of the fiber now has a black
connector that needs to be connected
to the iCruze MB1 Interface Module.
The fiber connectors are labeled
RX and TX. Looking at the Interface
Module, the RX fiber plugs into the
left port and the TX connector goes
into the right port.
Step 5
MB1
MODULE
RX
Connector
TX
Step 6
There should also be a 3 wire
connector at the factory CD changer
location. With a multimeter, verify
the power and ground wires. They
are typically red for power and black
or brown for ground. Connect
the power wire to the red wire
and ground to the black wire
on the iCruze MB2 Interface Module.
The remaining factory wire (which
is typically blue) connects
to the blue wire on the iCruze
MB1 Interface Module.
Step 6
Factory Plug
Connect Red wire to 12 volts
Black wire to ground
Blue wire to remaining wire
Step 7
If your CD changer location is the trunk,
you will now connect the proper end
of your iCruze® M-Bus extension cable
to the iCruze MB1 Interface Module
and route the remaining end to the
dash. The best place to mount the
iCruze unit is a convenient, out-ofthe-way place under the dash, route
the cable to there. Connect the iCruze
M-Bus extension cable to the iCruze
Interface Cable. Connect the other end
of the iCruze Interface Cable to the
rectangular port on the iCruze.
Step 7a
For installations
with trunk mounted
CD changer
Step 7b
If your changer location is the
glovebox, connect the iCruze Interface
Cable to the round port on the
iCruze MB1 Interface Module and the
rectangular plug to the iCruze.
For installations
with glove box
mounted CD changer
Step 8
The iCruze Interface Cable used in
Step 7 has a loose yellow wire.
Connect the yellow wire to constant,
unswitched power. This should be
available from the car stereo wire
harness, the fusebox and sometimes
the cigarette lighter. Consult your car’s
factory service manual for the location
of a wire near where you have chosen
Step 8
Connect Yellow
wire to constant
battery power
to mount the iCruze unit. (An MECP certified installation professional
can also help.)
To prevent cutting the car’s wire harness, a T-Tap-type connector
is recommended (be certain to use the proper size T-Tap to ensure
a reliable connection).
Step 9
On the iCruze Interface Cable there
is a blue/white striped wired that
goes between both ends of the
cable. In the middle is a connector
that comes apart. Pull the ends to
disconnect them. The female end
is not used and can be left alone.
Step 9
Step 10
Cut off the male “bullet” end and connect it to 12-volt
accessory power.
FINAL NOTE
In very rare instances, the factory fiber optic connector is not
plugged in the factory radio. The entire audio system will continue
to function but the iCruze will not respond. If after a complete
installation, you get no sound from iCruze, check to be sure the
factory fiber optic connector is plugged into the radio. Power cycle
the ignition and radio to ensure a proper reboot if the connector
was not plugged into the radio.
INSTALLATION COMPLETE
Refer back to the installation guide that came with iCruze
to complete your iCruze installation and for more details
on using iCruze functions and features.
OPERATION NOTES
To access iCruze®, press the CD button the radio. If the vehicle has
an in-dash CD player and there is a CD present, you will need to press
the CD button twice. After the initial installation, let the radio play
for at least 30 seconds before selecting the iCruze via the CD button.
CUSTOMER SUPPORT
If you have questions, please try iPodiCruze.com for the latest
updates to manuals, products and more. You can also call
1-415-840-2000 (9am–5pm Monday through Friday PT) for assistance.
LIMITED WARRANTY FOR CONSUMERS
United States
Monster Cable Products, Inc. 455 Valley Drive, Brisbane, CA 94005 USA, 1 (415) 840-2000 (“Monster”)
extends to You this Limited Warranty. Statutory or common law may provide You with additional rights
or remedies, which shall not be affected by this Limited Warranty.
DEFINITIONS
“Adequate Use” means use of the Product (i) within a home or dwelling, (ii) for private (as opposed
to commercial) purposes, (iii) in conformance with all applicable local, state or federal law, code
or regulations (including without limitation building and/or electrical codes), (iv) in accordance
with manufacturer recommendations and/or instructions in the materials and documentation that
accompany the Product, and (v) with proper electrical grounding.
“Authorized Dealer” means any distributor, reseller or retailer that (i) was duly authorized to do business
in the jurisdiction where it sold the Product to You, (ii) was permitted to sell You the Product under
the laws of the jurisdiction where You bought the Product, and (iii) sold You the Product new
and in its original packaging.
“Formal Warranty Claim” means a claim made in accordance with the section “Formal Warranty
Claims” herein.
“Product” means a Product (i) that is listed in the Specifications Table below, (ii) that You bought from
an Authorized Dealer new and in its original packaging, and (iii) whose serial number, if any, has not
been removed, altered, or defaced.
“Product Defect” means a defect, malfunction, non-conformance to this Limited Warranty, or other
inadequacy of the Product that existed at the time when You received the Product from an Authorized
Dealer and that causes a failure of the Product to perform in accordance with Monster’s documentation
accompanying the Product, unless such failure has been caused completely or partly by (a) any use other
than Adequate Use, (b) transportation, neglect, negligence misuse or abuse by anyone other than Monster’s
employees; (c) alteration, tampering, modification, or installation of the product by anyone other than
a Monster employee; (d) accident (other than a malfunction that is caused by a Product Defect),
including power surges; (e) maintenance or service of the Product by anyone other than a Monster
employee; (f) exposure of the Product to heat, bright light, sun, liquids, sand or other contaminants;
or (g) acts outside the control of Monster, including without limitation acts of God, fire, storms,
earthquake or flood.
“Warranty Period” means the time period during which Monster must have received Your Formal
Warranty Claim. The different Warranty Periods related to Product Defects are defined in the Specifications
Table below. The Warranty Period commences on the date when You purchased or received (whichever
occurs later) the Product from an Authorized Dealer as evidenced by the Authorized Dealer’s invoice,
sales receipt or packing slip. If You do not have written proof of the date of purchase or receipt, then the
Warranty Period commences three (3) months after the date when the Product left Monster’s factory
as evidenced by Monster’s records. The Warranty Period ends after the time defined in the Specifications
Table has expired or after You have transferred ownership of the Product, whichever occurs earlier. Also,
You must call Monster and obtain a Return Authorization Number (as described under “How to Make
a Claim”) within two (2) months after You discover a Product Defect (or should have discovered it,
if such Product Defect was obvious).
“You” means the first individual person that purchased the Product in its original packaging from
an Authorized Dealer. This Limited Warranty does not apply to persons or entities that bought
the Product (i) in used or unpackaged form, (ii) for resale, lease or other commercial use, or (iii) from
someone other than an Authorized Dealer.
SCOPE OF THIS LIMITED WARRANTY
PRODUCTS. If a Product contained a Product Defect when You bought it from an Authorized Dealer
and Monster receives a Formal Warranty Claim from You within two (2) months after You discover
such Product Defect (or should have discovered it, if such Product Defect was obvious) and before
the end of the Warranty Period for Product Defects applicable to the affected Product, then Monster will
provide You with one of the following remedies: Monster will (1) repair or, at Monster’s sole discretion,
replace the Product, or (2) refund to You the purchase price You paid to the Authorized Dealer for the
affected Product if repair or replacement is not commercially practicable or cannot be timely made.
NOTE: MONSTER DOES NOT ASSUME ANY LIABILITY FOR ANY INCIDENTAL, CONSEQUENTIAL OR
INDIRECT DAMAGES UNDER THIS LIMITED WARRANTY. SOME STATES DO NOT ALLOW THE EXCLUSION
OR LIMITATION OF INCIDENTAL OR CONSEQUENTIAL DAMAGES, SO THE ABOVE LIMITATION OR
EXCLUSION MAY NOT APPLY TO YOU.
GENERAL PROVISIONS
CHOICE OF LAW/JURISDICTION. This Limited Warranty and any disputes arising out of or in
connection with this Limited Warranty (“Disputes”) shall be governed by the laws of the State
of California, USA, excluding conflicts of law principles and excluding the Convention
for the International Sale of Goods. The courts located in the State of California, USA shall have
exclusive jurisdiction over any Disputes.
OTHER RIGHTS. THIS LIMITED WARRANTY GIVES YOU SPECIFIC LEGAL RIGHTS, AND YOU MAY ALSO
HAVE OTHER RIGHTS, WHICH VARY FROM STATE TO STATE. THIS LIMITED WARRANTY EXTENDS ONLY
TO YOU AND CANNOT BE TRANSFERRED OR ASSIGNED. If any provision of this Limited Warranty
is unlawful, void or unenforceable, that provision shall be deemed severable and shall not affect
any remaining provisions. In case of any inconsistency between the English and other versions of this
Limited Warranty, the English version shall prevail.
REGISTRATION. Please register Your Product at www.MonsterCable.com. Failure to register will not
diminish Your warranty rights.
SPECIFICATIONS TABLE
PRODUCT MODEL NUMBER
WARRANTY PERIOD FOR PRODUCT
MPC FX IM-MB1
Two (2) Years
FORMAL WARRANTY CLAIM
HOW TO MAKE A CLAIM. (1) Call, or write to, Monster within two (2) months after You discover a
Product Defect (or should have discovered it, if such Product Defect was obvious); (2) Give a detailed
explanation of how the damage occurred; (3) Obtain a Return Authorization Number; (4) Upon receipt
of a claim form (which may be sent to You after You filed Your Formal Warranty Claim), fill out the
claim form entirely; (5) Return the Products, shipping prepaid by You (to be refunded if You are entitled
to a remedy under the Scope of this Limited Warranty), to Monster for verification of damage, along
with a copy of Your original sales receipts and proof of purchase (UPC label or packing slip) for such
Products, the completed claim form, and printed Return Authorization Number on the outside of the
return package (the claim form will include instructions for return).
TOLL-FREE TELEPHONE NUMBERS. United States: 1-877-800-8989 (toll-free), or 1-415-840-2000.
ADDRESS: Monster Cable Products, Inc. 455 Valley Drive, Brisbane, CA 94005 USA
FURTHER PROCEEDINGS. Monster will determine whether a Product Defect existed. Monster may, at
its discretion, direct You to obtain a repair estimate at a service center. If a repair estimate is required,
You will be instructed on how to properly submit the estimate and the resulting invoice to Monster for
payment. Any fees for repairs may be negotiated by Monster.
TIMING. If You bring a Formal Warranty Claim and fully comply with all terms and conditions of this
Limited Warranty, Monster will use its best efforts to provide You with a remedy within thirty (30)
days after receipt of Your Formal Warranty Claim (if You reside in the United States - forty-five (45)
days if You reside elsewhere), unless obstacles outside Monster’s control delay the process.
Ver.12/14/2004 – US ©2006 Monster Cable Products, Inc.
NOTES
NOTES
455 Valley Drive
Brisbane, CA 94005 USA
Visit us on the Web at
MonsterPerformanceCar.com
Monster iCruze is designed and engineered in the USA,
and manufactured for Monster to its quality specifications.
Made in China.
© 2006 Monster Cable Products, Inc.
455 Valley Drive, Brisbane CA 94005 USA
Monster, Monster Performance Car, Factory•Linx, the Monster
Performance Car logo and the product design are the products
of registered or unregistered trademarks of Monster Cable Products, Inc.
or its subsidiaries in the U.S. and abroad. iCruze and Soundgate
are registered and unregistered trademarks of The Putnum Group, Inc.
iPod, Apple are trademarks of Apple Computer, Inc. Mercedes-Benz
is a trademark of DaimlerChrystler AG Corporation.
Images and illustrations shown may vary from actual product.
Specifications subject to change without notice.
rm 162850