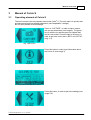
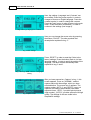
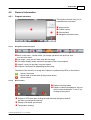
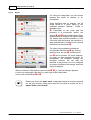
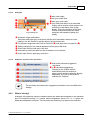
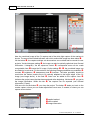
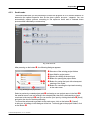
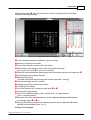
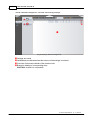
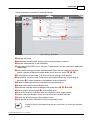
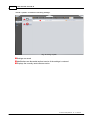
1
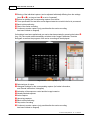
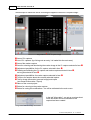
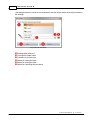
User manual Celvin® S
Control software SnapAndGo from Version 1.6
Order No. BG56-A0160
Order No. BG56-A0320
Order No. BG56-A0420
Order No. BG56-A0830
© 2015 biostep GmbH , V1.3 - 09.2015
Directory
Directory
I Basic Instructions
1
II General Information
3
1 Scope ...................................................................................................................................
of delivery
3
2 Symbols
................................................................................................................................... 4
3 Unpacking,
...................................................................................................................................
installation and connection
5
4 Safety ...................................................................................................................................
instructions
6
III Manual of Celvin S
7
1 Operating
...................................................................................................................................
element of Celvin S
7
IV SnapAndGo
10
1 Program
...................................................................................................................................
start
10
2 General
...................................................................................................................................
information
11
Program structure
.......................................................................................................................................................... 11
Navigation .........................................................................................................................................................
and action pane
11
Device status
......................................................................................................................................................... 11
Export
......................................................................................................................................................... 12
Histogram ......................................................................................................................................................... 13
Automatic exposure
.........................................................................................................................................................
time calculation
13
What is binning?
.......................................................................................................................................................... 13
3 New project
................................................................................................................................... 14
Capturing in basic
..........................................................................................................................................................
m ode
15
Capturing in m
..........................................................................................................................................................
aster m ode
17
Serial m ode .......................................................................................................................................................... 21
4 Open...................................................................................................................................
project
27
5 Settings
................................................................................................................................... 30
6 Information
................................................................................................................................... 37
7 Help ................................................................................................................................... 37
V Maintenance and Servicing
38
1 Service
...................................................................................................................................
address
38
2 Cleaning
................................................................................................................................... 38
3 Notes................................................................................................................................... 39
4 Contamination
...................................................................................................................................
questionnaire
41
© 2015 biostep GmbH , V1.3 - 09.2015
Basic Instructions
1
1
Basic Instructions
Before Celvin® S, observe the notes in this operating manual!
The basic prerequisite for the correct handling and the undisturbed operation
of the device is the knowledge of the contents of this operating manual. Make
sure that this operating manual is available to the operating personnel and can
be consulted at any time. The biostep® GmbH accepts no liability for personal
or material damage that is due to an incorrect or inappropriate use or due to a
modification at the device made by unauthorised personnel.
The device is only intended for research purposes (and for the purpose of
quality control!)
Copyright:
The copyright of the present operating manual remains with biostep® GmbH.
The operating manual is only intended for the operating personnel and for the
buyer of the device.The complete manual or parts of this operating manual
may only be copied, communicated or otherwise made public with the written
consent of biostep® GmbH.
No part of this manual may be reproduced in any form (photocopy or other
procedures) or be duplicated by use of electronic
processing systems without the written permission of biostep® GmbH.
Contravention could lead to criminal proceedings
Please keep the operating manual as information base for your device.
Subject to technical modifications!
September 2015
biostep® GmbH
© 2015 biostep GmbH , V1.3 - 09.2015
2
User manual Celvin® S
Manufacturer and
Device data:
customer service address:
(to be completed by the customer)
biostep® GmbH
Innere Gewerbestraße 7
Type:
Celvin® S
Serial number:
__________________
Installation site:
__________________
Installation date:
__________________
Inventory number:
__________________
D-09235 Burkhardtsdorf
Telephone: +49 (0) 3721-3905-0
Telefax: +49 (0) 3721-3905-28
© 2015 biostep GmbH , V1.3 - 09.2015
General Information
2
General Information
2.1
Scope of delivery
3
The Celvin® S, (order numbers: BG56-A0160, BG56-A0320, BG56-A0420, BG56-A0830)
consists of:
1 basic device Celvin® S
1 power cord
1 USB data cable
1 CD with control software SnapAndGo
1 CL substrate Lumixx® ready, 50ml
1 CD mit analysis software TotalLab® 1D
1 sample cover panel for blots
1 biostep® CL test blot
1 operating manual
Optional components / reorder equipment:
1. Sample holder and sample cover panel for Celvin® S
sample holder for microtiter plates Celvin® S 420 (order no. BG56-C0210)
sample holder for microtiter plates Celvin® S 830 / 320+ / 160+ (order no. BG56-C0210)
sample holder for petri dishes (order no. BG56-C0230)
sample frame for accurate positioning in detection area
Celvin® S 830 (order no. BG56-C0305)
sample frame for accurate positioning in detection area
Celvin® S 160+ (order no. BG56-C0305)
sample frame for accurate positioning in detection area
Celvin® S 320+ (order no. BG56-C0305)
sample cover panel for blots (order no. BG56-C0250)
2. CL substrates
CL substrates
CL substrates
CL substrates
CL substrates
Lumixx® ready, 100ml (order no. LN04-K2005)
Lumixx® ready, 250ml (order no. LN04-K2010)
Lumixx® plus, 250ml (order no. LN04-K2050)
Lumixx® plus, 500ml (order no. LN04-K2055)
3. Other equipment parts
CD with analysis software Totallab® Quant / CLIQS 1D (order no. BW01-A0100)
biostep® CL test blot (order no. BZ09-Q1060)
If you want more information about our products, please visit : www.biostep.de
Check the intactness of the packaging board and of the device. In case of
transport damages, please contact immediately the forwarding agent! Note the
period for notifying defects of the individual transport companies (railway, post,
packet services or forwarding agent). It is possibly only 24 hours.
Defects and damages must be immediately reported to the biostep® GmbH!
© 2015 biostep GmbH , V1.3 - 09.2015
4
2.2
User manual Celvin® S
Symbols
This operating manual contains the following important symbols in order to point out to
hazards and operating errors.
In particular, the internal laboratory instructions concerning the occupational safety while
handling materials that are potentially dangerous to health, as well as with electrical and fully
automatic devices must be strictly observed.
This "info symbol" gives an indication on information about the correct
handling of the device or on general information for a better understanding.
A non-observance of these instructions may have the result that the device is
incorrectly operated, or is even damaged.
The cleaning, error handling and maintenance of the device are described in
the corresponding chapters.
Caution! General source of hazard!
This general “attention sign” points out to possible personal injury, material and
/ or environmental damages, which are associated with a potential misuse.
Warning against dangerous electrical voltage!
Warning against magnetic field!
At this “hint symbol”, you get hints for the application or particular useful
information for the optimal use of the device.
Please notice further symbols, which also contain important
information and notices!
© 2015 biostep GmbH , V1.3 - 09.2015
General Information
2.3
5
Unpacking, installation and connection
Install the device onto a solid, vibration-free and even surface. Keep a distance
to objects of at least 20 cm. Also observe the admissible environmental
conditions for the device. You can find this information in the technical data.
Check the specification about the supply voltage on the type plate
on the rear side of the device.
Only use the supplied mains cable with connector plug or a cable
of the same type. Connect the mains cable of the device only to
an electrical socket with earth contact. Check the connection
cable in regular intervals for damages.
Install the supplied operator software SnapAndGo on the PC. Follow the
instructions on the screen.
Connect the Celvin® S with the PC (USB port) and with the mains connection
via the supplied cables. Switch on the Celvin® S.
Caution! The use of computers with USB 3.0 port can lead to problems.
Either use USB 2.0 or interpose a UBS 2.0 hub between computer
and Celvin® S.
© 2015 biostep GmbH , V1.3 - 09.2015
6
2.4
User manual Celvin® S
Safety instructions
The Celvin® S is constructed according to the latest technology and the
recognised safety-relevant rules. Nevertheless, hazards for the user or for third
persons may arise during operation, and / or impairments at the device or at
other material assets. The device may only be used:
for the intended use,
in flawless technical safety condition.
The device is operated with an alternating voltage of 110 - 230 V, 50-60 Hz.
Therefore, the following notes must be imperatively observed:
When connecting the Celvin® S to the mains, only the supplied power cable
or a cable of the same type may be used.
Never work with a defective device.
Check the connecting cable for damages before commissioning. Do not use
defective cables under any circumstances.
Pull the plug out of the electrical socket, when the device is not used for a
longer time or before cleaning it.
The device may only be opened or maintained by an authorized specialist
who is instructed at the Celvin® S.
CAUTION! Magnetism!
The lid is locked via two magnets that create a magnetic field. Attention with
cardiac pacemakers and other magnetically sensitive objects.
General Notes
The operation is exclusively made by trained specialist personnel.
If there are doubts about the reliable operational readiness (e.g. obvious damages),
the device must not be connected to a power source and not be switched on.
Do not expose the device to extreme temperatures, use it and store it at room
temperature.
Do not expose the device to a high air humidity (rF> 80%), in order to avoid
condensation at components or at the lens.
Make sure that the device is placed on a hard and level surface in an appropriate
working height.
Use the device only for the intended purpose – the capture of luminescent samples
(Western-blot / Microarrays).
Use appropriate volumes of ECL substrate. Make sure that no fluid runs down at the
housing of the device.
Do not expose the device to direct sunlight.
Touch the lid of the device only from the outside, in order to avoid that your fingers get
pinched.
© 2015 biostep GmbH , V1.3 - 09.2015
Manual of Celvin S
3
Manual of Celvin S
3.1
Operating element of Celvin S
7
The touch screen is the only operator panel at the Celvin® S. The main task is to quickly start
a measurement with pre-entered parameters (see SnapAndGo / settings).
But it is also possible to recall settings.
Press on “CAPTURE”, in order to start a capture
with pre-set parameters (see image 8). The green /
blue or white color and the open lock indicate that
the lid is not locked. Press the right or left arrow, in
order to get to the menu items „INFO“ and „SETUP“
(Img. 2, 4).
Im g. 1 Start screen
Press this button in order to ge tinformation about
the Celvin® S (see image 3)
Im g. 2 Info
Im g. 3 Inform ation about the Celvin®
Press this button, in order to get to the settings (see
image 5-8).
Im g. 4 Setup
© 2015 biostep GmbH , V1.3 - 09.2015
8
User manual Celvin® S
Here, the settings „Language“ and „Contrast“ can
be modified. Press the person symbol, in order to
change to German or English language. Press the
contrast symbol, in order to change the contrast.
Press the „back“ arrow in order to return to the main
menu. Press the button „downwards“, in order to
continue in the settings (see image 6).
Im g. 5 Settings language and contrast
Here you can change the screen color by pressing
the button „COLOR“. The other symbols had
already been explained in Img. 5.
Im g. 6 Color settings
Press „RESET“ in order to reset the Celvin to the
factory settings. Press the button „Back to 1st item,
language setting“, in order to get to the setting of the
language. The other buttons had already been
explained in Img. 5 and 6.
Im g. 7 Settings RESET and back to language
setting
Im g. 8 Capture m ode
After you have pressed on „Capture“ in Img. 1, this
screen appears. Press on „NORMAL“, and the
capture starts with the settings, which you have
selected before. The screen Img. 9 appears. The
capture modes „AUTO 1“ and „AUTO 2“ carry out
captures according to automatically calculated
exposure times. „AUTO 1“ provides quick pictures
(high number), „AUTO 2“ provides pictures with high
quality. The settings for this are made in the
SnapAndGo settings.
© 2015 biostep GmbH , V1.3 - 09.2015
Manual of Celvin S
9
The capture is in progress, the lid is locked, which
is indicated by the small lock symbol top left and the
red background color.
Im g. 9 Im age capturing
The capture is finished. Press „FINISHED“, in order
to get back to the initial screen in Img. 1.
Im g. 10 Finished im age capturing
© 2015 biostep GmbH , V1.3 - 09.2015
10
User manual Celvin® S
4
SnapAndGo
4.1
Program start
Open the control software
SnapAndGo (Img. 11).
Im g. 11
Startup icon
When you have opened the control
software SnapAndGo, you will see the
following screen (Img. 12).
Im g. 12 Loading Screen
Afterwards, the SnapAndGo main menu appears:
Im g. 13 Main m enu
In the menu bar 1, you can create a new project, open an existing project,
or you go to the settings or to the information (Img. 13).
© 2015 biostep GmbH , V1.3 - 09.2015
SnapAndGo
4.2
General information
4.2.1
Program structure
11
The exposure window (Img. 14) is
subdivided into 4 sections:
1 Image section
2 Control section
3 Device status
4 Navigation and action pane
Im g. 14 Program structure
4.2.1.1
Navigation and action pane
Im g. 15 Navigation and action pane
1 Back / main menu - via this button, you always get back to the previous view
or to the main menu
2 Live image - here you can start / stop the live image
3 This status display always shows the progress of the current capture
4 Capture - here you can start / stop the capture
5 Continue / Save and Exit (depending on the mode)
The status of the actions Live Image and Capture is symbolised by LEDs on the buttons:
Action is executed
Action waits for termination of the previous action
Action inactive
4.2.1.2
Device status
1 Display of locking status
2 Display of camera temperature, the unit
can be switched between °F and °C by
clicking on the symbol
Im g. 16 Device status
3 Display of LED white light, clicking the bulb switches the light on and off,
but does not change the intensity
Display of lid status open/closed
4
5 Temperature warning
© 2015 biostep GmbH , V1.3 - 09.2015
12
4.2.1.3
User manual Celvin® S
Export
For saving the image data, you can choose
between the export for analysis or for
presentation.
When exporting data for analysis, the tiff
image format or a direct export to the
evaluation software TotalLab / CLIQS is
available to you
4. Depending on the mode and the
presence of a colorimetric marker, the
options 2 and 6 may be deactivated. When
exporting data for analysis, the original image
(for binning with reduced resolution) or the
full screen (after the binning, the resolution is
again arithmetically increased to full camera
resolution) can be chosen 3.
Im g. 17 Export
The export for presentation includes the
four possible data formats 9 jpg, tiff, bmp
and png. Here, the size 7 and the resolution 8 can be chosen. For those captures,
for which you have selected the export for
presentation, the histogram settings are
accepted. However, the raw data are
distorted. If the pictures are to be analysed
by means of software, then always select the
export for analysis.
After the selection of the desired output format (4, 9), a „Save as“ dialogue appears,
in which you can assign a file name. In order to get to the output folder,
click on one of the buttons 1 or 5
Please note that in the basic mode, image data that have not been exported
yet, will get lost when exiting since they are not saved as project file as in
master mode or serial mode.
© 2015 biostep GmbH , V1.3 - 09.2015
SnapAndGo
4.2.1.4
13
Histogram
1 Max. peak height
2 Min. grey scale value
3 Max. grey scale value
4 Grey value area that is to be stretched.
Im g. 18 Histogram
All grey values outside of this area are not
used for the calculation of the image
display. Due to the limitation of this area,
a clear contrast enhancement arises,
especially with samples lighting very
weakly.
5 Automatic image optimisation.
Sets lower and upper grey scale limits with the aid of calculation values set in the
settings. Use this function to quickly adjust a good contrast ratio.
6 Full dynamic range sets lower limit to minimum (2) and upper limit to maximum (3).
7 Sliding controller for the manual adjustment of the grey scale limits.
8 Direct input field for lower grey scale limit.
9 Increment by which the value is to be increased or to be reduced.
q Direct input field for upper grey scale limit.
4.2.1.5
Automatic exposure time calculation
1 Start of the automatic suggestion
calculation
2 to 5 calculated suggestions.
Clicking on one of these buttons
automatically sets the respective
exposure time and the respective binning.
Afterwards, one click on the button is
sufficient for "Capture".
Im g. 19 Autom atic exposure tim e calculation
The sensitivity of the automatic suggestion calculation can be modified in the
settings.
4.2.2
What is binning?
At binning, the brightness values of adjacent pixels are added and assigned to one individual
pixel. For example, binning 3 x 3 means that the brightness values of 3 x 3 = 9 pixels are
added and assigned to one pixel. This increases the sensitivity, but reduces the resolution.
© 2015 biostep GmbH , V1.3 - 09.2015
14
4.3
User manual Celvin® S
New project
Im g. 20 New project
Under the item „New Project“, the options of the three capture modes (basic mode,
master mode and continuous mode) open up.
Click on the buttons 1, 2 or 3, in order to get into the corresponding mode.
© 2015 biostep GmbH , V1.3 - 09.2015
SnapAndGo
4.3.1
15
Capturing in basic mode
In the basic mode, simple captures can be made. This mode is intended for testing
purposes. The capture of colorimetrically stained marker proteins is not possible.
The captures in basic mode are not GxP compliant.
Im g. 21 Basic m ode
1 Setting of the exposure time via sliding controller or direct input
2 Setting of the binning via sliding controller or direct input
3 Setting of the intensity of the white light LEDs via sliding controller or direct input,
clicking on the dark bulb sets the intensity to 0%
4 Here you can make calculate a suggestion for the exposure time
5 Menu item capture parameters
6 Image parameters
7 Export (see chapter "Export")
8 Button „Back to main menu“
9 Button „Start live image“
q Button „Start capture“
w Button „Finish“
Open the lid and start the live image 9. Put on the blot and position it correspondingly.
1, Select the desired exposure time via sliding controller, direct input or make calculate a
suggestion via button 4. Via the sliding controller 2, you enter the desired binning level
(1 = no binning, 6 = 6 x 6 binning).
If desired, the intensity of the white light LEDs can be adjusted. Press the
button q for starting the capture. After successful capture, in the "Control section",
one passes automatically to the tab "image parameters".
© 2015 biostep GmbH , V1.3 - 09.2015
16
User manual Celvin® S
The control surface for the area “Image parameter” is subdivided as follows:
1 Histogram of the grey value dispersion
with sliding controller for the manual
adjustment of the optimal area.
Im g. 23 Grayscale im age
2 Exposure control serves for the control
display for overexposed and
underexposed areas in the image. The
respective colors can be changed in the
settings.
Im g. 22 Basic m ode: Im age param eters
Adjust here the image as desired.
Afterwards, export your capture, since
otherwise it gets lost when leaving the
basic mode (see chapter "Export").
Afterwards, you can leave this mode again
by clicking on one of the outer buttons in
the "Navigation pane", or you can make a
new capture.
Im g. 24 Activated exposure control
3 Inverting the image.
Im g. 25 Inverted im age
4 Note field for remarks about the current
image.
© 2015 biostep GmbH , V1.3 - 09.2015
SnapAndGo
4.3.2
17
Capturing in master mode
This mode is suitable for the GxP compliant captures of CL Western blots with
colorimetrically stained marker proteins. You reach this mode by clicking on the button 2 in
the main menu.
Im g. 26 Master m ode
After having selected the master mode, the following screen appears:
1 Structure of the existing project folders
2 Input field for project name
3 Symbol for validity of the text input
4 Symbol for opening the project folder
5 Button for saving the input with
subsequent entering of the mode
6 Button for cancelling the input and
returning to the main menu
Im g. 27 Dialogue for project nam e
Select a previously created project path 1 and assign a project name in the field 2. If the
entered name is not yet existing in the selected path, then this is indicated by a check mark
next to the text input 3 and you can confirm your input by clicking the button 5 [Save] and
get to the view for the image capture. To cancel the action and to get back to the main menu,
click on the button 6 [Cancel]. In doing so, all settings in this dialogue will be lost. In order to
directly get to the project folder, click on button 4.
© 2015 biostep GmbH , V1.3 - 09.2015
18
User manual Celvin® S
After pressing the button [Save] 5 (Img. 27), the exposure window opens:
Im g. 28 Master m ode: Capturing im age
In the capture parameters, the following can be adjusted: If available, methods can be called
up 1.The setting of the exposure time 2 is done via sliding controller. The sliding controller
3 serves for the setting of the binning and 4 for the intensity regulation of the white light
LEDs. Pressing the button 5 starts the calculation of suggestions for the exposure. Under
item 6, the capture parameters are summarized, and under item 7, the image parameters.
By clicking the button 8, you return to the main menu, 9 activates the live image, q starts
the capture, and w continues in the program to the capture of the colorimetrically stained
marker proteins.
First, press the button 9 while the lid is open, in order to activate the live image
and to correctly align the blot. Afterwards, you close the lid and select 2 the
exposure time in milliseconds [ms], seconds [s], minutes [m] or
hours [h] via the sliding controller. Press on the button q, in order to start the
capture.
© 2015 biostep GmbH , V1.3 - 09.2015
SnapAndGo
19
After the capture, the display passes automatically from the capture parameters to the
image parameters:
With the histogram 1 and the sliding
controllers, you can select the desired grey
scale areas for an optimal representation.
You can activate the exposure control 2 and
/ or the inversion 3.
Im g. 29 Master m ode: Im age param eters
By pressing the button
marker proteins:
w
(Img. 28), you continue by capturing colorimetrically stained
Im g. 30 Master m ode: Capturing m arker
With the aid of the sliding controller 1, you can control the intensity of the white light LEDs
in the live image. More over, also here you can select an exposure control 2 and the
inversion 3. When the exposure is sufficient, press the button 7 for the capture.
The capture is done, and now you can mark with the mouse pointer the areas of the
marker proteins 4. To continue, press the button 8.
© 2015 biostep GmbH , V1.3 - 09.2015
20
User manual Celvin® S
Im g. 31 Master m ode: Finalization
Now, the combined image of the CL capture and of the white light capture of the markers is
shown. The area of the method indicates, with which method the image has been taken 1.
Via the button 2, the capture settings can be saved as new method and be reused for new
projects. Via the histogram setting 3, the image can also be optically optimised (see General
information / histogram). Via the exposure control 4, overexposed area can be made
recognisable. Item 5 inverts the CL image. Via the settings 6 - 9, the combined image can
be rotated or be mirrored. For the markers, the following change possibilities are available: q
contrast, w brightness, e transparency and r inversion. The latter possibility should be
used when the marker proteins are to be optically adapted to the bright edges of the CL
image (see image above). In the field t, notes can be added to the capture. Item o
indicates the project name that has been assigned at the beginning. Via the tab u, you get to
the image information. Within the tab i, the capture can be exported (see General
information / Export).
With one click on the button a, you close the project. The button p leads you back to the
marker capture, where you can make adjustments once more, if needed, or where you can
capture a new marker.
1 applied method
2 save method
3 image information
Im g. 32 Master m ode: Im age
inform ation
© 2015 biostep GmbH , V1.3 - 09.2015
SnapAndGo
4.3.3
21
Serial mode
The serial mode offers you the possibility to monitor the progress of a CL reaction and thus to
determine the optimal exposure time for the given system enzyme / reagents. You can
automatically capture pictures according to set exposure times and to evaluate these
pictures either individually or summed up.
Im g. 33 Serial m ode
After pressing on the button 3, the following dialogue appears:
1 Structure of the existing project folders
2 Input field for project name
3 Symbol for validity of the text input
4 Button for opening the project folder
5 Button for saving the input with subsequent
entering of the mode
6 Button for cancelling the input and returning
to the main menu
Im g. 34 Dialogue for project nam e
Select a previously created project path 1 and assign a new project name in the field 2.If
the entered name is not yet existing in the selected path, then this is indicated by a check
mark next to the text input 3 and you can confirm your input by clicking the button 5 [Save]
and get to the view for the blot positioning.
To cancel the action and to get back to the main menu, click on the button 6 [Cancel].
In doing so, all settings in this dialogue will be lost. To directly get to the project folders, click
on the button 4.
© 2015 biostep GmbH , V1.3 - 09.2015
22
User manual Celvin® S
After pressing button 5, the positioning window opens. Now, please put on and position your
blot:
Im g. 35 Serial m ode: Preview
1 Setting of the intensity of the white light LEDs via sliding controller or direct input,
clicking on the dark bulb sets the intensity to 0%
2 Status display for temperature and lid status
3 Back to the main menu
4 Continue to the series recording
In order to continue to the capture, the temperature must be stable, and the lid
must be closed. However, the temperature control can be deactivated in the
settings.
!Switching off the temperature control is not recommended as the optical
calibration of the camera can only be applied if the camera has reached the
required operating temperature!
© 2015 biostep GmbH , V1.3 - 09.2015
SnapAndGo
23
After pressing button 4 (Img. 35), the window “Series recording” opens. All settings
requested can be applied here:
Im g. 36 Serial m ode: Configuration
1 Choice between separate or added-up series recording
2 Number of captures to be made
3 Type of the automatic exposure time calculation
4 Specification of the exposure time for the first and the last image
(can only be set, if item 3 is not set to "constant")
5 Button for switching between starting time and end time that has been set under item 4
6 Delay between the individual captures
7 Setting of the binning
(for further information about binning see General information - binning)
8 Saving the settings as series method
9 Loading a previously saved series method
q Cancelling of all settings
w List of the captures, as configured under items 1 to 7
e Consecutive image number
r Status of the individual capture (red = waiting, blue = is being captured,
green = capture finished)
t Exposure time of the individual captures (can be adjusted individually differing from
the settings (items 1 to 7))
y Delay of the individual capture to the following capture (can be adjusted individually
differing from the settings (item 1 to 7))
Continue on next page
© 2015 biostep GmbH , V1.3 - 09.2015
24
User manual Celvin® S
u Binning of the individual capture (can be adjusted individually differing from the settings
(item 1 to 7), as long as item 1 is set to "separate")
i Button for deleting the corresponding capture from the list
o Time specification for total time and an approximate time at which the list is processed.
p Back to blot positioning
a Start of the series recording
s Continue to marker capture (only possible after the series recording
has been finished or stopped)
If all settings have been applied and your series has been started by pressing the button a
(img. 36), the control area automatically switches to tab “Image Parameters” and the
histogram as well as the progress of the series recording will be displayed:
Im g. 37 Serial m ode: Im age Capturing
1 Selected type of series
2 Histogram settings for the corresponding capture (for further information,
see General information / histogram)
3 Activation of the exposure control and the image inversion
4 Already finished captures
5 Active capture
6 Upcoming captures
7 Back to blot positioning
8 Stop series recording
9 Continue to marker capture (only possible after the series recording
has been finished or stopped)
© 2015 biostep GmbH , V1.3 - 09.2015
SnapAndGo
25
By pressing button 9 (Img. 37), colorimetric markers can be exposed
in the window “Capturing Marker”:
Im g. 38 Serial m ode: Capturing m arker
With the aid of the sliding controller 1 you can control the intensity of the white light LEDs in
the live image. Moreover, also here you can select an exposure control 2 and
the inversion 3. When the exposure is sufficient, press the button 7 for the capture.
The capture is done, and now you can mark with the mouse pointer the areas of the
marker proteins 4. To continue, press the button 8 and the window Image “Image
Finalization” opens.
© 2015 biostep GmbH , V1.3 - 09.2015
26
User manual Celvin® S
The last steps to finalize the series recording are applied in the area “Complete image”.
Im g. 39 Serien m ode: Com plete im age
1 Area of CL captures
2 List of CL captures (by clicking onto an entry, it is loaded into the main area)
3 Area of the marker capture
4 Area for selecting and deselecting the marker image to the CL capture selected in item 2
5 Adjustment possibilities for the CL capture selected in item 2
6 Rotating and reflecting the CL capture and marker capture selected in item 2,
as long as selected in item 4
7 Adjustment possibilities for marker capture selected in item 4
8 Text box for remarks about the currently selected capture
9 Tab for image information (see next image) and export
(see General information / Export)
q Name of the current project
w Button for returning to the marker capture
e Button for saving the modifications. You will be redirected to the main menu.
In the tab "Information", you get an overview about
when and under which circumstances the
capture has been created.
Im g. 40 Serial m ode: Im age inform ation
© 2015 biostep GmbH , V1.3 - 09.2015
SnapAndGo
4.4
27
Open project
Under "Open project..." in the main menu, saved projects can be loaded again, in order to
view them once more, to adapt or to export them. Moreover, project folders can be created
or, if there are no projects in the corresponding folder, they can also be deleted.
Im g. 41 Open project
1 Creates a new project folder with the aid of an input dialogue (Img. 42)
2 Deletes the selected project folder
3 Sort ascending or descending by date
4 Sort ascending or descending by alphabet
5 Existing project folders
6 Projects within the selected project folder
7 Captures within the selected project
Select at first the desired project folders 5. Select the desired project in the area 6.
Open the selected project by double-clicking on one of the captures in the area 7.
Only empty project folders can be deleted. The deletion of the main folder from
the software is also not possible.
© 2015 biostep GmbH , V1.3 - 09.2015
28
User manual Celvin® S
This dialogue allows to create a new subfolder within the project folder previously selected in
the settings.
Im g. 42 Create new folder
1 Existing folder structure
2 Text input for folder name
3 Proofed icon for text input
4 Button for saving the input
5 Button for saving the input
6 Button for cancelling the procedure
© 2015 biostep GmbH , V1.3 - 09.2015
SnapAndGo
29
Im g. 43 Open Project: Opened Project
1 Area of the CL captures
2 List of the CL captures (by clicking onto an entry, it is loaded into the main area)
3 Area of the marker capture
4 Area for selecting and deselecting the marker image to
the CL capture selected in item 2
5 Adjustment possibilities for the CL capture selected in item 2
6 Rotating and reflecting the CL capture and marker capture selected in item 2,
as long as selected in item 4
7 Adjustment possibilities for marker capture selected in item 4
8 Text box for remarks about the currently selected capture
9 Tab for image information (see next image) and export (see General information / Export)
q Name of the current project
w Button for returning to the main menu. The last modifications are discarded here.
e Button for saving the modifications. You will be redirected to the main menu.
In the tab "Information", you get an overview about
when and under which circumstances the
capture has been created.
Im g. 44 Open project: Im age inform ation
© 2015 biostep GmbH , V1.3 - 09.2015
30
4.5
User manual Celvin® S
Settings
Im g. 45 Settings
The area "Settings" is divided into several subareas, which are explained below. The first tab
“General” includes following settings:
Im g. 46 Settings: General
1 Settings are saved
2 Modifications are discarded and last version of the settings is restored
3 Selection of the display language of the software
4 Indicates the limit (as a percentage), from which pixel value
the overexposure and underexposure control shall be activated
5 Sliding controller for determining the upper and lower limit in percent.
6 Options for pixel color for underexposed image sections
7 Options for pixel color for overexposed image sections
8 Indicates the pre-set path, in which the exported pictures are stored.
This path can be changed individually at the beginning of a capture.
9 Buttons for opening a dialogue for the path selection
q When activated, export and project paths are defined on the user folder of the user who is
currently logged in
w Indicates the pre-set path, in which the project files are stored.
This path is treated as main directory.
Within this folder, further project subfolders can be created.
e Path to the TotalLab evaluation software. The path must refer to the file „1d.exe“
r Button for manually changing the path defined under item e
© 2015 biostep GmbH , V1.3 - 09.2015
SnapAndGo
31
The tab “Mode standards” includes the following settings:
Im g. 47 Settings: Mode standards
1 Settings are saved
2 Modifications are discarded and last version of the settings is restored
3 Indicates the level of the lighting source, to which the light is set when entering a mode.
4 Default value for exposure control at chemiluminescence captures.
This also concerns the basic mode captures.
5 Default value for exposure control at marker captures.
6 Provides safety queries in order to ensure the GxP compliance.
7 If not set, the light will be switched off during the capture in this mode.
8 If checked, a capture in master mode is not possible until
the set temperature of the camera is reached.
9 The live image is activated automatically, when navigating to the marker capture
in this mode.
q Defines which mode is pre-selected in the series recording.
w If checked, a capture in the series mode is only possible after reaching
the set temperature of the camera.
e The live image is activated automatically when navigating in this mode to
the capture to the marker capture view.
© 2015 biostep GmbH , V1.3 - 09.2015
32
User manual Celvin® S
The tab “Image optimization” includes the following settings:
Im g. 48 Settings: Im age optim ization
1 Settings are saved
2 Modifications are discarded and last version of the settings is restored
3 Percentage histogram threshold. Data below this value are hidden in the automatic
image optimization. This is done by clicking on the button for automatic
image optimization (Img. 18) of the histogram or automatically,
if 'Automatic image optimization' had been selected in the settings.
4 If the automatic image optimization is activated, the histogram adjustments are applied
automatically according to the value set above when displaying a new image.
5 Defines the lower limit for signal recognition at the automatic exposure time calculation.
If the limit is too low, it may result in calculation errors. Possibly, higher values need more
calculation time, but result in improved accuracy.
6 Defines the grey scale set point to be aspired at automatic exposure time calculation.
7 Area for the calibration of the camera
8 Date of the last calibration
9 Button for starting a new calibration. This action is password-protected and can only
be carried out by authorized persons!
q Symbol for temperature testing with current device temperature
w Storage location, where the calibration data are stored.
e Opens a selection dialogue, in which you can define an individual storage location
of the calibration data.
© 2015 biostep GmbH , V1.3 - 09.2015
SnapAndGo
33
The tab “Device” includes the following settings:
Im g. 49 Settings: Device
1 Settings are saved
2 Modifications are discarded and last version of the settings is restored
3 Specifies the binning used when capturing is started in quantity mode at
the device touch screen. In Celvin display this capture mode is named 'Auto 1' (Img. 8).
4 Specifies the binning used when capturing is started in quality mode at
the device touch screen. In Celvin display this capture mode is named 'Auto 2' (Img. 8).
© 2015 biostep GmbH , V1.3 - 09.2015
34
User manual Celvin® S
The tab “Method management” includes the following settings:
Im g. 50 Settings: Method m anagem ent
1 Settings are saved
2 Modifications are discarded and last version of the settings is restored
3 Overview of all saved methods of the master mode
4 Button for deleting of corresponding entry
CAUTION: A restore is not possible
© 2015 biostep GmbH , V1.3 - 09.2015
SnapAndGo
35
The tab “Notification” includes the following settings:
Im g. 51 Settings: Notification
1 Settings are saved
2 Modifications are discarded and last version of the settings is restored
3 Activate / deactivate the e-mail notification
4 Login data for the SMTP server. Ask your IT department, if you do not know the data that is
needed here.
5 User-specific settings are used, when activated. Each user can configure individual
sender, recipient, subjectand content details for his account (item s 6 , 7 , 9 ).
6 E-mail address of the sender. This must not be an existing e-mail address.
7 Input field for recipient e-mail. Confirm your input with the Enter key or by clicking on
the button 8, in order to add the e-mail address to the recipient list.
8 Button for adding the entered e-mail address to the recipient list
9 Subject and content of the notification mail
q Sends test message with the settings made under items 4, 6, 7 and 9
w Resets subject and message (9) to the default value
e Area for the acoustic notification after the completion of the image capture
r Opens a selection dialogue, where you can select an individual audio file
t Resets the acoustic signal to the standard sound
y Activates the acoustic notification for the corresponding mode
In order to remove a recipient from the list, click on the „X“ next to the recipient
e-mail.
© 2015 biostep GmbH , V1.3 - 09.2015
36
User manual Celvin® S
The tab “Update” includes the following settings:
Im g. 52 Settings: Update
1 Settings are saved
2 Modifications are discarded and last version of the settings is restored
3 Displays the currently used software version
© 2015 biostep GmbH , V1.3 - 09.2015
SnapAndGo
4.6
37
Information
Under item 4, information about software, hardware
and manufacturer can be seen.
Im g. 53 Main m enu:
Inform ation
4.7
Help
Under item
opened.
Im g. 54 Main m enu: Help
© 2015 biostep GmbH , V1.3 - 09.2015
5, the pdf version of this manual is
38
User manual Celvin® S
5
Maintenance and Servicing
5.1
Service address
If you have questions or problems with the device, get in contact with the service department
of the biostep® GmbH in Burkhardtsdorf. Make sure to specify the serial number of the device
and the software version you currently use.
biostep® GmbH
Service department
Innere Gewerbestraße 7
D-09235 Burkhardtsdorf
Tel: +49 (0) 3721-3905-0
Fax: +49 (0) 3721-3905-28
E-mail: [email protected]
If the device must be sent to the biostep® GmbH, complete the
contamination questionnaire and enclose it to the device with a copy of the
delivery note and short explanations of the problems encountered.
The contamination questionnaire serves for the safety of our service
employees and thus must be carefully completed!
Recommendation:
Let your device maintain in regular intervals by the manufacturer.
We recommend one maintenance per year.
5.2
Cleaning
Be sure to switch off the device before cleaning it.
Risk of contamination!
Absolutely observe the prescriptions for cleaning of the device. Careless
cleaning or the non-observance of the prescriptions can lead to malfunctions!
Disinfect the device before cleaning it.
Disconnect the device from the voltage supply before cleaning it.
When cleaning the device, make sure that no fluid enters into it.
Clean the housing parts with a slightly moistened cloth. A soap solution can
be used. Afterwards, dry the device thoroughly.
In no case use any scouring agents, aggressive detergents or solvents
(except alcohol).
In case of heavy soiling, Isopropanol can be used.
Example for a disinfectant:
For the disinfection, use an aqueous solution:
25 g ethanol 96 %, 35 g 1-propanol, 0.1 g glyoxalad 100 g aqua dest.
Apply the solution and allow it to take effect for some minutes, depending on the
contamination. If necessary, moisten the device repeatedly with the disinfection
solution.
© 2015 biostep GmbH , V1.3 - 09.2015
Maintenance and Servicing
5.3
Notes
© 2015 biostep GmbH , V1.3 - 09.2015
39
40
User manual Celvin® S
© 2015 biostep GmbH , V1.3 - 09.2015
Maintenance and Servicing
5.4
41
Contamination questionnaire
Contamination questionnaire
for repair orders
Dear customer,
For safety reasons, we kindly ask you to answer the following questions, before your device is
maintained, repaired or given back, or before you send your device to the biostep® GmbH or to
your local sales agency.
Company:
Department:
Town:
Street:
Name:
Telephone No.:
Device / Article:
Serial No.:
The device is free of hazardous substances
The device got into contact with the following hazardous substances:
Substance class
Substance name
Toxic substances
Caustic substances
Explosive substances
Radioactive substances
Infectious substances
Oxidizing substances
Other hazardous substances
The device has been decontaminated according to the legal regulations.
(Mark with a cross where applicable)
Description of the effected decontamination:
Date:
© 2015 biostep GmbH , V1.3 - 09.2015
Signature: