1
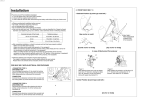
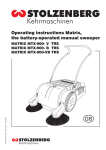
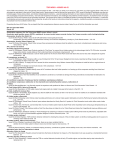
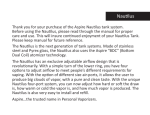
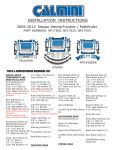
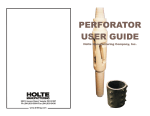
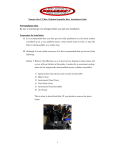
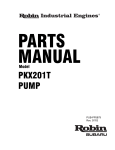
4-STROKE How to Check Valve to Piston Tolerances
Three main tolerances need to be checked when “Clay Checking” a piston for valve clearance
tolerances. Those tolerances are as follows; Valve to piston IN and EX (Pocket Depth), Valve to piston
In and EX (Pocket Diameter), Piston to Head (deck height)
NOTE: Anytime an engine’s stock components (piston, camshaft etc.) have been changed or altered.
The following measurement test is recommended to ensure clearances are still within the proper
specification.
To check the above named tolerances, the following process should be followed;
1. Use regular modeling clay (see figure A). Make a wafer like piece of clay for each valve pocket
approximately 1/8” of and inch thick and slightly bigger than the pocket on the piston (see figure B)
lay clay onto pockets on top of piston, press in softly. Secondly, mold two pieces of clay into ¼” balls
and install onto top of piston, above wrist pin, on outer edge of piston towards cylinder wall (see figure
C ).
2. When assembling engine to perform “Clay Check” use proper base and headgasket. Rings are
optional. It is not necessary to install the piston circlips, because you will be taking piston off rod to
measure and remove clay. Head, cylinder, camshaft top plate bolts etc. to not need to be torqued, they
only need be snugged down so tolerances can be checked.
NOTE: It is MANDATORY that cam timing is set correctly (refer to OEM service manual for proper
instruction regarding your specific engine year and model).
Cam chain tentioner MUST also be installed and engaged. Failure to install/engage cam chain
tentioner will adversely affect the cam timing.
3. Once piston has been prepped with clay and engine has been roughly assembled. Engine will need to
be turned over 360 degrees so both Intake and Exhaust valves open and close all the way. Thus leaving
indentation in clay on top of piston. (see figure D)
4. After turning over engine to mark the clay, carefully disassemble top end and take piston off
connecting rod. Make sure you can account for all pieces of clay. The clay should still be attached to
piston (if any pieces of clay have been dislodged, reapply to piston and repeat step #3). All pieces of
clay must be accounted for. You cannot leave any clay in the engine. Piston/clay should look like
figure D.
5. With piston in hand take exacto knife and slice clay down center of valve pockets (see figure E) and
carefully remove outer piece of clay. Basically you are dissecting a cut away so we can see and
measure how close the valve comes to the piston. Repeat for 2 clay pieces above wrist pin that are
measuring the piston to head clearance.
6. After clay has been cut away measure remaining depth of clay as shown in figure F. Consult chart
below for minimum clearances.
Recommend Tolerances:
Valve pocket depth Valve to piston, Intake and Exhaust: .060” minimum
Valve pocket circumference Valve to piston, Intake and Exhaust: .040” minimum
Piston to Head: .060’ minimum
If tolerance are within specification. Clean/remove all clay from piston, head, cylinder, headgasket etc.
Assemble engine.
If tolerances are tighter than recommended, custom piston machining will be required. Machine work
must be performed by a trained professional. Consult your engine builder and or piston manufacture
before machining.
WARNING! Running engine with piston to valve clearance below tolerance can and will cause
SEVERE engine damage.
Many of you are wondering why a piston and or camshaft manufacture would sell a part that
could possible have incorrect tolerance. It is impossible for manufactures of these parts to assemble
and check all the camshaft/piston combinations on the market. It is the responsibility of engine builder
(engine assembler) to check all tolerances.
For example; Many piston manufactures will take a stock piston and redesign it in a larger size or add
material to top of piston to increase compression. But they will not change stock valve pocket size and
location. Most aftermarket camshafts have increased lift, this allows valve to open farther (get closer to
piston). In some cases valve lift and duration (amount and time) are changed significantly requiring
piston to be modified.
Purchasing tested piston and valve combinations from professional engine builders is best
chance for success. Buying cams and pistons from a discount house selling untested parts without any
technical support can be a risky way to go.
Figure A-
Figure B-
Figure C-
Figure D-
Figure E-
Figure F-