1
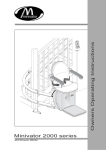
Minivator Travel Track
User Manual
2
For your safety
ENGLISH
Minivator Travel Track
Important
Fully read this manual prior
to using your Minivator
Travel Track. Failure to
take notice of the hazards,
warnings and procedures
detailed in the manual could
result in death, serious injury
or damage to your Travel
Track.
information
Your Minivator
Travel Track
Use your Minivator Travel Track safely
• Your Minivator Travel Track is
designed as a portable overhead
track system only. Never use the
Travel Track for any other purpose
than lifting clients with appropriate
ancillary lifting equipment.
The operation and use of the Minivator
Travel Track is simple and intuitive.
However, due to the function that the
Travel Track performs it is imperative that
the safety precautions are observed to
ensure problem free lifting.
• Never allow children to operate or
play with the Travel Track.
• Do not use the Travel Track if a fault
has occurred – contact your Minivator
dealer or our Customer Service
department on 08700 118282.
• Keep animals away from the Travel
Track.
• The Travel Track contains no user
serviceable parts. In the event of
damage or malfunction please
contact your Minivator dealer or our
Customer Service department on
08700 118282.
• Only clean your Travel Track in line
with the instructions detailed on
page 13.
• Your Minivator Travel Track should
never be used on inclined surfaces.
1
• The Travel Track must only be used
on a solid, even, flat, stable and dry
surface.
• The Daily Check List (see page 13)
must be completed every day before
using the Travel Track to ensure safe
operation.
• Only lift a client positioned within the
footprint of the frame.
• Please read the User Manual very fully
and carefully before using the Travel
Track.
• Ensure that the client is positioned
directly below the lifting unit before
beginning any lifting operation.
• The individual setting up the Travel
Track must fully understand the set
up methods and safety features of
the Travel Track and lifting equipment
used with it.
• Have the frame and lifting unit
regularly examined and serviced by a
competent service engineer.
• The safe working load is 130 kg.
Do not exceed this.
2
Introduction
Contents
Thank you for choosing a Minivator Travel
Track to assist you in your moving and
handling needs. Please read these operating
instructions carefully before use. Your
Minivator Travel Track has been designed
and built with careful attention to detail. In
order to ensure many years of trouble free
use please follow the instructions carefully.
Introduction and
Manufacturing Standards 3
Description and Applications 4
Erecting
5
Please contact your Minivator dealer or
our Customer Service Department in the
United Kingdom on 08700 118282 if your
Travel Track requires attention and we
would be pleased to help you.
Minivator recommend that you do not
undertake maintenance tasks other than the
routine care explained in this handbook. Please
contact your supplier or Minivator dealer if you
require further information.
A thorough examination and test is
recommended every 6 months and a full service
once per year. This should be undertaken by a
competent person.
Maximum safe working load for this Minivator
Travel Track is 130kg, or 285lbs, or 20½ stones.
Manufacturing
Standards
Minivator has been accredited as
conforming to the international standard of
manufacturing, recognised by the award of
ISO 9001.
Page
Folding away 11
Transporting
13
Daily Check List 13
Cleaning and Care 13
Maintenance
14
Ancillary Equipment
15
Troubleshooting
16
Spares 17
Technical Specification
17
Warranty and Service
17
Description and applications
The Minivator Travel Track is a portable,
lightweight, overhead track system which folds
into an integral transport case. When used
with a compatible portable lifting unit and
sling the Travel Track can be used as an aid to
assist carers in transferring clients safely and
efficiently from a wheelchair, armchair, bed,
bath, shower seat or toilet, and lifting from the
floor, with 90° rotation. It is suitable for clients
in the recumbent, sitting and sitting/recumbent
positions.
The Minivator Travel Track is built and tested
to conform to the BS EN ISO 10535:2006
Standard. It also carries the CE mark.
Minivator is audited regularly to ensure
we continue to conform to ISO 9001 which
ensures you have a high quality, well
manufactured product.
3
4
ENGLISH
Minivator Travel Track
Minivator Travel Track
ENGLISH
Erecting
Note: The Travel Track is designed to
be easily and intuitively set up.
Before use please ensure that it complies
with any applicable local moving and
handling guidelines.
The Travel Track weighs approximately
23kg. Ensure that help is available when
removing the Travel Track from its sleeve
if necessary.
1. Move the Travel Track on its wheels to the
selected location (Fig 1) and stand upright on its
base (Fig 2).
2. Take a firm grip of the top handle on the
opposite side to the wheels and using them
as a pivot lower the Travel Track onto the floor
(Fig 3).
3. Pull the ring situated above the top handle (as
per step 2) and release the catch (Fig 4).
Figure 1
Figure 3
Figure 5
Figure 2
Figure 4
Figure 6
4. Take a firm hold of the top handle and lift the
case, swinging the top half of the case over until
it is fully open (Figs 5 and 6).
Note: There is a possible trapping point
between the two halves of the case as
it opens. Make sure there is nothing to
obstruct the case from fully opening and
all body parts are kept well away from
this area.
5. When the case is fully open a catch will
automatically engage to lock the case in the
open position.
6. Check the catch has engaged by lifting the top
handle a little. The whole case should lift as a
single piece and not fold in the middle if the
catch is correctly engaged.
Note: Ensure that health and safety
guidelines on lifting are always followed to
ensure that no personal injury occurs.
5
6
Minivator Travel Track
ENGLISH
Erecting (continued)
Green band
7. Select a blue/yellow leg handle and disengage
a leg from its clip by pulling it upwards. Unfold
the leg past the upright position until it engages
with the retaining catch at the end of the track
(Fig 7).
Note: A visual indication is provided on the
release button to show that the leg is fully
engaged. The release button will show a
green band (Fig 8) to show that the leg is in
the locked position.
Note: There is a possible trapping point
between the leg and the leg location
feature. Keep hands and fingers clear of
this area when unfolding the legs.
Figure 7
Figure 10
Figure 8
Figure 11
Figure 13
8. Repeat this operation for all four legs (Fig 9).
9. Move the Travel Track carefully if required to its
cleared position.
Green
band
10.Grip the legs below the leg handles and roll
the Travel Track onto its side (Fig 10). Using the
handles on the top of the case rotate the Travel
Track on its four feet (Figs 11 and 12).
11.Once the Travel Track is standing on its legs the
next stage is to extend them.
12.Select a leg. Grip the handle at the end of the
case next to this leg and carefully lift the end of
the Travel Track to waist height.
13.Grip the lower yellow/blue leg handle firmly
with your other hand and release your grip on
the case handle.
14.With the hand that was gripping the case
handle pull down on the blue/yellow foot and
extend the lower tube fully (Fig 13).
Figure 9
7
Figure 11
Figure 12
8
Minivator Travel Track
20.Repeat the above process (steps 12-19) for the
two legs at the other end of the frame (Fig 17).
15.Before proceeding ensure that the locking catch
is engaged correctly. The side of the catch has a
red coloured indicator that is only visible when
the catch is not correctly engaged (Fig 14). If,
after extending the leg fully the red indicator is
still visible, lift the lower leg slightly - the catch
should snap into place automatically.
✘
ENGLISH
Erecting (continued)
Green band
21.The Travel Track should now be standing evenly
on all four partially extended legs.
22.Move to one end of the case.
23.Select a leg and firmly grip the blue/yellow
upper leg handle tube. Push the handle upwards
and extend the middle tube to its furthest
extent (Fig 18).
16. Push the yellow/blue handle down to the locked
position (Fig 16).
Note: At this point the frame has only one
partially assembled leg and it is unstable.
Care is required. If handling the Travel Track
in this unstable configuration causes a
problem please seek assistance.
24.Make sure the locking catch engages as
previously described.
25.Lock the blue/yellow handle as previously
described.
17.Transfer your grip to the other leg at the same
end of the case and extend the lower tube on
that leg. As previously, ensure that the lower
tube is locked in position by observing the red
indicator on the locking catch.
26.Repeat for the other three legs (Fig 19).
27.Before attaching a lifting unit check that all
the locking catches are fully engaged and that
all of the locking blue/yellow handles are in the
down position.
18.Push the yellow/blue handle down to the locked
position on this leg.
Figure 11
9
Figure 17
Figure 15
Figure 18
Figure 16
Figure 19
✔
Note: The folding design of the Travel Track
means that there are a number of potential
pinching/trapping points during set up.
Take care to keep hands and fingers away
from these and possible trapping points
during the erection process.
19.Lower the case and position the partially
extended legs on the floor.
Figure 14
10
Minivator Travel Track
ENGLISH
Folding Away
Green band
1. Remove the lifting unit from the track and move
the trolley to the parking position marked on
the track (Fig 21). To move the trolley pull down
gently whilst pushing.
2. Select a leg and lift the blue/yellow lower leg
handle and use it to lift the lower leg slightly off
the floor. Lift the locking catch and retract the
lower leg approximately 75 mm (3 inches).
3. Transfer your grip to other leg. Lift the blue/
yellow handle and then unlock the locking catch
(Fig 22). Now fully retract the lower leg.
Figure 22
Figure 25
Figure 23
Figure 26
Figure 24
Figure 27
4. Whilst retaining your grip on the leg, use the
weight of the Travel Track and lower it gently to
fully retract the opposite leg.
Note: The locking catches will not lift
if there is any load on the leg. This is a
safety feature that prevents the leg from
retracting under load.
Figure 21
5. Lower the end of the frame so it stands on the
two partially retracted legs.
15.Pull the ring to release the case locking
mechanism and then fold the track by lifting the
handle until the case latch engages (Fig 26).
6. Repeat steps 2-4 for the other two legs.
7. Stay at the same end and retract the middle legs
by lifting the locking catch and the blue/yellow
handles and sliding the middle sections into the
top sections.
Note: Make sure the case catch has engaged
and the base cover is secured by lifting
one of the handles at the end of the case a
small amount.
8. Lower to the floor.
9. Repeat the process for the other two legs.
16.The Travel Track is now ready for transporting
(Fig 27).
10.The Travel Track should now be standing on four
fully retracted legs.
11. Using the handles on the top of the Travel Track
case, rotate the Travel Track onto its side (Fig 23)
and then, using the legs, onto its back with the
legs pointing upwards.
12.Select a leg and press the leg release button (Fig
24). Holding a blue/yellow handle, fold the leg
down gently and clip it into the leg clip in the
case (Fig 25).
13.Repeat step 12 on the remaining three legs.
Figure 11
14.Find the end of the case with the silver ring.
11
12
Transporting
Cleaning and Care
Note: Personal protective clothing should
be worn when carrying out cleaning or
disinfection.
The wheels on the base of the folded Travel Track
have been provided for ease of transportation. The
Travel Track is more easily controlled if it is pulled
rather than pushed.
All surfaces should be cleaned by wiping with a
disposable cloth moistened with hand hot water
and a neutral detergent. Rinse using clean water
and dry with paper towels.
The Travel Track weighs approximately 23 kg.
Handles are provided but care should be exercised
when lifting. For example you may need assistance
for lifting into a car boot or down stairs
When used by a patient known or suspected of
having an infection this piece of equipment should
be disinfected. After washing, wipe over with
NaDCC at 1,000 ppm of available chlorine (or other
chlorine releasing agent). Alternatively wipe over
with a 70% Isopropranol Alcohol wipe.
Daily Check List
The operation of the Travel Track is simple,
however, it is important to make sure the Travel
Track and any lifting unit and sling used with it are
in good working order before lifting a client.
Cautions
Do Not use Hypocarbonate or Phenol based
cleaning agents.
Following is a Daily Check List which will help to
ensure problem free lifting.
Tests show undiluted Dettol may damage
paint and plastic parts if prolong contact is
allowed.
1. Check the trolley moves freely in the track. (Note
the trolley will not run along the track unless it
is loaded or the loop is pulled down).
Do not use abrasive compounds or pads.
2. Check the legs are in the locked position.
3. Confirm the leg latches are fully engaged
(Fig 15 and 16).
Maintenance
Minivator recommend that the Minivator range of
patient lifting devices and lifting accessories receive
a thorough six-monthly examination and test. This
examination and test should be carried out by a
competent person. This product should also receive
a full service once a year.
Case (open)
• Check the case catch operates smoothly and
releases the case halves correctly.
• Open the case fully and check for wear and/or
stiffness in the hinge.
Minivator and Minivator Dealers can offer this after
sales care.
• Confirm the track locking catch operates
automatically and releases when activated.
If not, the reason must be identified and any
necessary repairs/adjustments must be made.
This maintenance, servicing and examination
is in line with the requirements of No 2307
Health and Safety: The Lifting Operations and
Lifting Equipment Regulations 1998 (LOLER). The
examination, tests, servicing and repairs should
be carried out in accordance with the Travel Track
Service Manual which is available upon request.
• Lubricate catch pivots.
Stage 1 – leg opening (all four legs)
• Make sure the leg clips retain the legs securely.
Warning: Use only Minivator approved
replacement parts.
• Check the leg pivots operate smoothly and the
pivot bolts are fully tightened.
First Line Maintenance
• Swing the legs to the locked position and check
the leg locking catch is engaged. Confirm by
checking the green band is visible on the release
button. If the release button does not engage and
the green band is not visible the assembly must
be investigated and repair/lubrication carried out.
(For more details please refer to Service Manual)
The Minivator Travel Track has been designed
to be maintenance free as far as is practicable,
however some checks and first line maintenance
is recommended to ensure the correct, safe and
trouble free performance of the gantry:
4. Confirm the leg clamps are in the locked
position (Fig 15 and 16).
Case (closed)
5. Check the lifting unit is safely connected to
the trolley.
• Check for any sharp edges caused by wear and
tear, damage or missing parts.
6. Check for sharp edges caused by damage,
missing parts or wear. Do not use until hazard
has been eliminated.
• Take whatever action necessary to eliminate
sharp edges.
• Activate leg release button and confirm leg
releases correctly.
• Confirm leg catch assembly is fully tightened
to track.
Leg extension (all four legs)
• Pull the lower leg to full extension and make sure
the leg catch engages correctly (no red visible).
• Check that the handles are firmly attached. If
they are loose, tighten as necessary.
Note: The Travel Track should not be used
on inclined surfaces.
• Operate the leg clamp handle (blue/yellow) and
make sure the leg is firmly clamped.
• Check the case remains firmly closed with the
catch engaged. If not, the reason must be
identified and any necessary repairs/adjustments
must be made.
• Fully extend the middle leg and check the leg
catch and leg clamping.
• Check leg foot is securely attached and confirm
the ball and socket joint is free to rotate.
Lubricate joint with any mineral based grease if
required.
• Check the wheels for free rotation and firm
attachment. Remove any threads or fibres that
may prevent the wheels from free running.
13
14
ENGLISH
Minivator Travel Track
Maintenance (continued)
Ancillary Equipment
Track (best conducted with Travel Track
fully erected)
Warning
The maximum working load of the combination
of the Minivator Travel Track, lifting unit and sling
must be taken as the lowest Safe Working Load
(SWL) of any part of the combination.
• Check for track alignment.
• Confirm presence of end of track buffers.
• Pull down lifting unit attachment loop on trolley
and confirm free unimpeded travel along full
length of track.
For example: The Travel Track is rated at 130 kg
SWL, a lifting unit may be rated at 200 kg SWL and
a sling rated at 175 kg SWL. The Safe Working Load
of the combination is therefore 130 kg.
• Confirm function of trolley parking.
Please check with the manufacturer of the lifting
unit that their product is compatible with the Travel
Track. The operating instructions, safety precautions
and maintenance procedures recommended by the
manufacturer should be followed at all times.
• Clean inside surfaces of track with lint free cloth,
soap and water. Dry thoroughly.
Lifting unit
Any lifting unit used in conjunction with the
Minivator Travel Track should be thoroughly
examined and maintained according to the
manufacturer’s instructions.
Note: Please refer to the manufacturer’s
specification for weight of the lifting unit.
The maximum Safe Working Load of the
Minivator Travel Track is 130 kg.
Slings
Troubleshooting
Symptom
Possible Cause
Remedy
Case catch will not engage
1.Loose catch spring
1. Call Service Engineer
2.Loose catch spigot
2. Call Service Engineer
3.Wear on either spring
or spigot
3. Call Service Engineer
Track catch will not disengage
1.Cable snapped
1. Call Service Engineer
2.Cable stretched
2. Call Service Engineer
Leg locking catch will not 1.Spring loaded plunger stuck.
engage (green indicator not 2.Catch assembly shifted on
showing) mountings
1. Call Service Engineer
Leg locking catch will not release
1.Load on leg
1. Take load off leg
2.Leg clamping handle still locked
2. Release leg clamp
1. Call Service Engineer
2. Call Service Engineer
Any slings used in conjunction with the Minivator
Travel Track should be thoroughly examined
and maintained according to the manufacturer’s
instructions.
Leg extends under own weight
1.Catch spring broken
2.Nylon screw in leg catch worn
2. Call Service Engineer
Load test
Leg clamping light/loose
1.Worn clamp handle
1. Call Service Engineer
A load test should be carried out in accordance
with the manufacturer’s test procedures. Any
maintenance, repair, thorough examination
or testing must be carried out by a competent
person.
2.Worn pressure pad
2. Call Service Engineer
Legs will not retract
1.Damage to leg
1. Call Service Engineer
2.Leg clamping still engaged
2. Release leg clamp
15
Legs will not extend
1.Foreign object causing jamming
1. Call Service Engineer
Trolley not running along track
1.Parking still engaged
1. Apply load to hook
Trolley movement stiff or noisy
1.Foreign bodies in track
1. Clean track
2.Wheels worn/damaged
2. Call Service Engineer
3.Bearings worn/damaged
3. Call Service Engineer
16
ENGLISH
Minivator Travel Track
Minivator Travel Track
Item
Part Number
Item
Part Number
Box Half Lower
HP808.10
Trolley buffer
HPS6527
Upper Box Half – Labelled
HP808.130
Leg clamping pad
HP808.79
End Cover
HP808.106
Transport wheel (Pair)
HPS6359
Carrying handle
HPS5238
User Manual
HP800-105-1
Leg assembly
HP808.51
Service Manual
HP800-106-1
Trolley assembly
HP808.57
Technical specification
Warranty and Service
Safe Working Load (SWL)
130 kg
Maximum overall height
2150 mm
Maximum overall length
2560 mm
Minivator standard terms and conditions apply to
all sales. A copy is available upon request. These
contain full details of warranty terms and do not
limit the statutory rights of the customer.
Maximum overall width
1820 mm
Height to track
1940 mm
Closed width
360 mm
Closed depth
400 mm
Closed length
1140 mm
Weight
23 kg
Operating temperature
+5°C to +40°C
ENGLISH
Spares
Minivator recommends the Travel Track receives a
thorough six-monthly examination and test. We
also recommend the examination and test is carried
out by a competent person.
The examination, tests, servicing and repairs should
be carried out according to the recommendations
detailed in the Hoist Service Manual which is
available upon request.
For service, maintenance and any questions
regarding this, or other Minivator products, please
contact Minivator or your local Dealer.
17
18
Minivator Limited
82 First Avenue
Pensnett Estate
Kingswinford
West Midlands DY6 7FJ
England
User support: 08700 118282
International Desk: +44 (0)1384 275736
Email: [email protected]
North America
Sterling Stairlifts
10 Industrial Park Drive
Mount Pocono PA
18344
United States
Tel: 570 895 2480
Toll Free: 1 866 276 LIFT/5438
Email: [email protected]
www.minivator.de
www.minivator.fr
www.minivator.es
www.minivator.co.uk
www.sterling-stairlifts.com
www.minivator.it