1
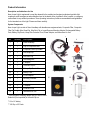
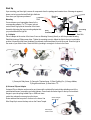
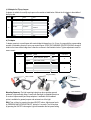
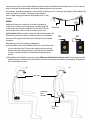
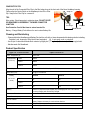
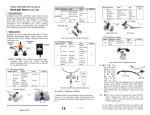
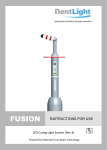
Setting New Standards through Innovation
NANO
INSTRUCTIONS FOR USE
Nano Loupe Light (Rev 2S and 2C)
Powered by Patent-pending Optics and Teflon Nano-Wire Technology
Product Information
Description and Indications for Use
Nano Loupe Light is engineered to meet the demand for the smallest and toughest professional portable light
requiring a small homogenous and well-defined spot in the dental office, physician’s office, hospital, or emergency
environment for any medical procedures. These operating instructions provide recommendations and guidelines
for the intended use of the light. Please read them carefully.
System Components
Nano Loupe Light consists of Nano Headlamp with durable nano-engineered wire, Composite Filter, Composite
Filter Flip Paddle, Wire Wrap/Clip, Wire Shirt Clip, a Loupe/Eyewear Mounting Adapter, Rechargeable Battery
Pack, Battery Clip/Pouch, Lamp Wire Protection Cord, Power Adapter, and Instructions for Use.
1
No.
Quantity
1
1
Nano Headlamp
2
1
Clip-on Composite Filter
3
1
Composite Filter Flip Paddle
4
1
Wire Wrap/Clip
5
1
Wire Shirt Clip
6
1
Articulating Arm*
7
1
L-Adapter *
8
1
Universal Clip-on *
9
1
Battery Clip/ Pouch ***
10
1
Battery Pack **
11
1
Power Adapter
12
1
Mounting Plate/Nut *
13
1
U-Adapter*
14
1
Y-Adapter*
15
1
Protection Cord
16
1
Instructions for Use
4
Description
* One compatible mounting adapter per kit of user’s choice.
Default kit (if not specified) is Universal Clip-on.
** 2S or 2C battery
*** 2S Clip or 2C Pouch
6
3
2
7
8
5
12
13
9
10
15
11
14
Product Safety Warnings and Cautions
Prior to installation and activation of the light, please read these instructions carefully and follow safety
procedures as well as the specific safety comments and recommendations presented throughout the
instructions for use. The manufacturer accepts no liability for any damage resulting from the improper use of
this unit and/or for any purpose other than those covered by these instructions.
1.
CAUTION! Heat sink (metal ring) end of Nano Headlamp will be hot when in use for extended period of time
at Level III. Do not touch with bare skin.
2.
CAUTION! Do not look directly at light emitted from the device. Eye injury may result.
3. Do not touch and open any electronics parts and circuit boards. Warranty void if seal broken.
4. Do not immerse Nano Headlamp in waters or solutions. Warranty void in case of liquid damage.
5. Charge batteries while not in use to extend the lifetime of the rechargeable battery.
a.
Do not short circuit battery.
b.
Do not store above 60 C (140 F).
c.
Dispose of unserviceable batteries according to the national rules and regulations. Batteries must not be
incinerated.
Glossary of Symbols
A number of symbols are used on the device, accessories and throughout this manual, it is important that the
user/operator of Nano understands the meaning of each symbol to avoid possible injury to the operator or/and patient.
Please read before using this device. Symbol is used to alert you to potential personal injuries
and hazard.
Waste Electrical and Electronics Equipment (WEEE)
Attention, consult accompanying documents
Manufacturer
European Authorized Representative
Date of Manufacturing
Keep Dry
For Licensed Dental Professional Use Only!
DC Voltage
SN
Serial Number
REF
Product Number
Start Up
Upon receiving your Nano light, remove all components from the package and examine them. If damage is apparent,
please contact your authorized DentLight distributor
Mounting
from whom your light was purchased.
Composite
Screw
Filter
Mounting
Nano
Cross reference your loupes/glass frame for the
Wire
corresponding adapter. For TTL loupes, take out
custom fixture/ logo plate at the center of the frame.
Assemble light using the loupe mounting adapter that
Articulating
Nano
you purchased with the light kit:
Arm
Headlamp
a) L-Adapter
Heat Sink
Place L-adapter at the center of the frame. Screw on Mounting Screw(s) directly or with the provided Mounting
Plate/Nut(s) using a Philips screw driver. Tighten the mounting screw(s). Adjust the light to the most comfortable
position to ensure that the Nano Headlamp is positioned at a distance away from the nose pad. Direct the light to
the center of your field of vision. Route the Wire by bending in an angle to conform to the frame:
2)
1)
4)
3)
5)
6)
1) Orascoptic Rudy frame; 2) Orascoptic Titanium frame; 3) Zeiss EyeMag Pro; 4) Orange Adidas;
5) Surgitel metal frame; 6) Sheervision TTL
b) Universal Clip-on Adapter
Universal Clip-on Adapter can be used on any frames with a relatively flat center bridge including most of the
meta/titanium frames, prescription and safety glasses. Press thumb and index finger on the top front and back
flanges to open the spring-loaded Clip-on. Slide into frame
90 degrees
center then release for secure grip on the frame.
Route and bend the lamp wire to conform to the frame. Use
Wire Wrap/clip to secure the lamp wire on the Frame Temple.
Frame Temple
Wire Wrap
DFV Designer
Titanium Frame
c) U-Adapter for Flip-up Loupes.
U-adapter is suitable for most flip-up loupes on the market as listed below. Slide-in the U-Adapter to the middle of
the flip-up bar.
Adapter Brand
U
Model
Frame
Orascoptic
Any frame
LEGACY
Surgitlel
FLM
Anyframe
PeriOptix
Any frame
LEGACY, PANORAMIC,
Prismatics
Rose Micro
Any frame
Flipup
Sheervision
FLIP-UP
Any frame
Keeler
Flipup
d) Y-Adapter
Y adapter mounts to curved frames with center bridge thickness from 4 to 10 mm. It comes with the corresponding
number of Articulating Arms to fit onto your custom loupes. OPEN THE VARIABLE CENTER SPACING enough to
slide into the frame center bridge from a direction as shown in the illustration below. Tighten adjustment screw for
secure mount.
Adapter
Brandname
Model
Frame
DFV
Skylon, Skyview, Sports
Nike
Surgitlel
Half Jacket, Radar
Oakley
Yoeman
Aluminum
Pounce, Revolve,
Nike
Sheervision
Under Armour
Plastic
Sheervision
Del Rey
Plastic
# of Arms
2
Y
DFV
0
Surgitel Oakley
DFV Yoeman
DFV Nike
Mounting Summary: The light mounting instructions above provides general
guidance to light assembly steps. Consult with DentLight for detailed instructions
on custom loupe assembly and loupe adapters. A washable Soft Headband
option is available for general purpose and universal use of the light.
RUN: Turn on Nano by pressing the raised ON/OFF button. Adjust power levels
by PRESSING AND HOLDING ON/OFF button for 2 seconds. Turn off anytime
by pressing the ON/OFF button again. Light will remember the last power setting
Soft Headband
when turning on the next time. Battery Indicator shows the status of the battery when the light turns on or off. In case no
lamp is connected, the battery beeps and turns off automatically after a few seconds.
At low battery, an audible beep alarms 1 minute before the light goes off. To recharge, simply plug in Power Adapter (5V)
cord to the male DC connector. The battery charge indicator
turns on while charging and turns off automatically when it is fully
charged.
WIRING:
Angle set the lamp wire coming out of the Nano Headlamp to
conform to the contour of your loupe frame. Use Wire Wrap/Clip
to attach lamp wire to frame temple/leg. Use Shirt Wire Clip to fix
the lamp wire on the collar of scrub on the back of your neck.
Wire Wrap
Angle Set
Use Protection Cord to protect the lamp wire and extend the service life.
Minimize wire stress at the battery connection junction. Avoid bending
wire close to 90 degrees at the lamp wire to Protection Cord or Battery
connection.
YES
NO
Place battery in one of the following configurations:
(a) Position Battery Pack with the Battery Clip/Pouch on the waist or belt
of your scrub/pocket rim. Route the wire straight up from your back.
Route the wire with minimum tension or stress at the Connector/Wire
Junction to extend wire lifetime. Avoid bending 90 degrees at the
junction.
(b) Place Battery Pack directly in your scrub pocket. Make sure that Protection Cord is used. Route the lamp wire with
minimum tension or stress at the Connector/Wire Junction to extend lamp wire lifetime. Avoid bending 90 degrees at
the Connector/Wire Junction.
(a)
(b)
Wire Clip
Connector/
Wire
Junction
Protection
Cord
COMPOSITE FILTER:
Align the slot of the Composite Filter Clip to the Rim Ledge close to the front end of the Nano Headlamp housing.
Further align the Center Notch on the Headlamp to that of the Filter
Snap-on
Clip. Snap on the Filter Clip for a secure fit.
TIPS
Wire routing –Route lamp wire to minimize stress. DO NOT ROUTE
OR BEND WIRE 90 DEGREES AT THE WIRE CONNECTOR
JUNCTION!
Clip Slot
Center Notch
Rim Ledge
Use Protection Cord all the times to extend service life.
Battery – Charge Battery Pack while not in use to extend battery life.
Cleaning and Disinfecting
− Clean and disinfect Headlamp and Battery Pack with a soft cloth or tissue dampened with cleaning solution including:
Cavicide, Lysol, Isopropyl or Ethyl alcohol and equivalent.
Do not spray, soak, or autoclave.
− Use Q-tips to clean lens and electrical contacts by slightly dampening the tip (do not soak) with Isopropyl alcohol.
− Machine wash Soft Headband.
Product Specification
Type of information
Specifications
Color Temperature (K)
5000- 6500
Light Intensity
Level I
16000
Level II
20000
Level III
40000
(±15% lux)*
Power Adapter
Input: 100-240V - 50/60Hz; Output: 5V DC 2A
Beam Size (inch)
2.8 @ 14 inch distance
Battery
performance
(hours)
Nano 2S
Nano 2C
Level I
24
10
Level II
14
6
Level III
10
4.5
Battery
Lithium Ion (2S) and Lithium Polymer (2C). Recharging time 3 hrs. LED indicator
on during charging and off when fully charged.
Overcurrent Protection
Auto
Lamp Dimension (mm)
18 (diameter)
Service Lifetime
Life time of the device is two years in normal office use based on the life of the
battery. Replace the battery for continued use after that.
EMC Compliance
Battery Dimensions (mm)
IEC 60601-1-2
45x76x15 (2C); 46x74x21mm (2S)
Weight (grams):
Lamp: 6; Battery: 85 (2C), 140 (2S)
Limited Life-time WARRANTY
Register your Nano light at www.dentlight.com. DentLight Inc. extends a Life-time warranty on the LED bulb and
one-year warranty on the rest of the components including battery, lamp and protection cord against defects in
material and workmanship to the original purchaser of this product. This warranty is valid providing factory inspection
indicates that any such defect was developed during normal and proper use. DentLight shall under no circumstances
be liable for incidental, special, consequential damages and damage from misuse including the following expressed
or implied:
−
−
−
−
−
Improper operation, accident or neglect, misuse or abuse, such as physical damage (drops, cuts, scratches, etc.);
Liquid, water, rain, extreme humidity, ultrasonic, autoclaving;
Tampering, improper repairs or modifications that have not been carried out by a certified Service Center;
Use of other spare parts and accessories other than from the manufacturer such as incorrect power adapter;
Other acts which are not the faults of DentLight.
For service, call 1-800-763-6901 (in US) to obtain RMA number. Fill out RMA form online and return as instructed. In
case of a warranty claim, the complete apparatus must be returned. Alternatively, contact your dealer for service return.
Troubleshooting Guide
Problem
Error Indication
Possible Solutions
Light will not
turn on
1. No Battery Bar or no battery
power indicating beep.
2. Battery full but beeps when lamp
is connected.
3. Wire/connector broken.
Battery will not
charge
1. Broken pins in battery DC plug;
2. Battery out of capacity.
1) Charge Battery Pack overnight.
2) Bad connection between the lamp and the
battery. Replace battery or lamp or have it sent
back for service.
3) Replace wire or return to manufacturer for
component service.
Replace battery pack or return to manufacturer
for service.
Reorder and Optional Item Codes
REF
Description
REF
Description
8600113
Nano 2S
8500024
L-adapter
8600112
Nano 2C
8500021
U-adapter
8600020
Nano Headlamp
8500223
Soft Headband
8600130
Nano 2S Battery Pack
8500040Y*
Power Adapter
8600230
Nano 2C Battery Pack
8501012
Protection Cord
* Y: US, EU, UK, AU (Australia)
DentLight Inc.
Emergo Group
1825 Summit Ave. #210
Plano, TX 75074, US
Tel: (800) 763 6901
Outside US: 1-972-889-8857
www.dentlight.com
Molenstraat 15
2513 BH The Hague
Netherlands
Tel: +31(0)70 345 8570
Fax: +31(0)70 346 7299
1/2015, v2.4