1
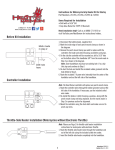
HEAT DEMON
INSTALLATION INSTRUCTIONS
These instructions describe the installation of the various Heat Demon Kits on Harley-Davidson model motorcycles that do not have
inserts inside the handlebar.
!!Warning!! A Service Manual is required to install this kit. The rider’s safety depends upon the correct installation of this
kit. If the procedure is not within your capabilities or you do not have the correct tools, have your Harley-Davidson dealer
perform the installation. Improper installation of this kit could result in death or serious injury.
Components: This ‘HEAT DEMON’ Grip Warmers Kit includes the internal heaters for the handlebar, the 4 level temperature
controller, epoxy adhesive, electrical wires and connectors, rubber grommet, plastic stir sticks, craft stick, wire ties, and a plastic
snake to assist the installation.
Tools: A 3/8” Drill, 5 sharp drill bits from 3/32” to 5/16” or a step drill, a hammer and center punch, a round file, a pliers and wire
cutter, a small straight blade screw driver, T25 and T27 TORX drives, and safety glasses.
Installation: These instructions describe installing the Heat Demon with the temperature controller mounted on the LEFT
side. To install with the controller mounted on the RIGHT side, follow these instructions except be aware of the notes that
reference the Right side Controller installation. Also the Controllers are different so if you are mounting the Controller on
the Throttle side make sure you have the Right Side Heat Demon Kit.
To install the Heat Demon on the bikes with the electronic throttle, refer to Section B on page 4.
A.
B.
Open or remove the seat according to the service-manual instructions.
Disconnect the battery, negative cable first, according to the service-manual instructions.
!!! Warning
!!! Warning
To protect against shock and accidental start-up of the vehicle, disconnect the battery cables, negative cable first, before
proceeding. Always disconnect the negative battery cable first. If the positive battery cable should contact ground with
the negative cable installed, the resulting sparks may cause a battery explosion that could result in death or serious
injury.
The following installation instructions cover the Heater Installation, Controller Installation, Power and Electrical
Connections, and the Grip Replacements.
1.
2.
3.
4.
5.
6.
7.
8.
Remove the Brake perch assembly, Switch Housing, and Right Grip from the Handlebar according to the service-manual
instructions and move aside or leave hanging. Before removing the perch assembly, place a mark on the handlebar with a
permanent marker next to the perch clamp on the side toward the yoke. Remember to insert a spacer between the rear
brake light switch and the lever to keep the switch from being broken.
On the Clutch side remove the Switch Housing from the handlebar according to the service-manual instructions. Also
place a mark on the handlebar next to the Clutch perch clamp on the side toward the yoke.
Using a T27 TORX drive head remove the half of the clamp that secures the clutch hand lever to the handlebar and discard.
The Heat Demon controller will replace this clamp when finishing the installation. Separate the clutch hand lever assembly
from the handlebar and move away from the bar. When installing a Right Side Controller Kit, the Right or Brake side
clamp that secures the perch on that side will be replaced by the Controller.
Mark the location of the Left Grip and remove it by twisting, heating, injecting brake cleaner fluid or with air pressure.
Almost all grips can be removed without damage. If this does not work it may be necessary to cut the grip for removal.
A hole needs to be drilled in the bottom of the handlebar to route the power wires and wires from the Controller. The
location of the hole should be in the groove or recess on the bottom of the handlebar below or in line with the point marked
in step 2 but 3/4 inch toward the left end of the handlebar. Start by punching a hole location with a center punch to pierce
the chrome. Use safety glasses that completely cover the eyes to protect from steel chips while drilling! Start with a
small drill like a 3/32” size to make the initial hole. Then use progressively larger drills or a step drill to increase the hole
size to 5/16”. After the hole is drilled use a round file or deburring tool to remove the sharp edges. If the Controller is
mounted on the Brake side drill the hole in the recess on the bottom of the bar below or in line with the point marked in
step 1 but ¾ inch toward the right end of the handlebar.
With a small screwdriver, install the small rubber grommet into the hole that was drilled in the handlebar. The hole will not
be round so the grommet needs to be worked into position. Be careful not to push the grommet into the inside of the bar.
When the Controller is mounted on the Right side, the grommet will be installed as described in Step 9.
Uncoil the plastic snake from the kit and run it from the right end of the handlebar out the left end. Twisting the snake or
inserting it vertically versus flat can help to push around the corners.
Attach the white and yellow wires from the Right Grip Heater (Item 3) to the hole in the plastic snake and pull them
through the bar so they exit the left end. (See drawing below) If the Controller is mounted on the Right Side the 4 wires
from the controller, the red and black power cable wires, and the heater wires should all be pulled through the bar at the
same time. To combine the 8 wires, first push the 4 wires from the controller and the 2 power cable wires (non-stripped
Heat_Demon_2
Rev 04/07/11
1
ends) through the grommet and slide the grommet up next to the Controller. Feed the 4 wires from the Controller and the 2
power wires through the hole in the bottom of the bar so they extend 6 inches beyond the right end of the handlebar. Twist
together or tape the 8 wires to the plastic snake and pull through the handlebar and out the Left end, carefully feeding the
Controller wires and power cable through the bottom hole as the snake is being pulled.
9. Push the right heater into the handlebar by squeezing it together and sliding it fully inside of the bar. The end of the heater
with the orange or black cap should be pushed in first. When the Contoller is mounted on the Right side, pull the
Controller wires on the left end of the bar until the Controller is 1” from the handlebar and install the grommet into the
bottom hole. Cut the yellow and white wire, or all 8 wires , to extend 4 inches beyond the left end of the handlebar.
10. For Left Side Controller Kits, push the 4 wires from the Controller through the hole in the grommet so they extend out the
left end of the handlebar. It works best to push them one at a time. Let the Controller hang down 1” from the handlebar.
Also, the Red and Black non-stripped wires from the end of the 6 foot long power cable need to be pushed through the hole
in the grommet so they extend 4” out the left end of the handlebar. Let the rest of the cable hang.
11. The wire connections are done near the left end of the handlebar. Hold the Left Grip Heater (Item 2) near the end of the bar
so these wires can be connected to the other wires that extend out the end of the bar. Use the small connectors, from the
parts bag, with 2 holes to connect the two green and then the two red wires. Push the wires into the holes of the connector
so they extend as far as possible into the connector. The wires can be viewed from one side of the clear plastic. With the
wires pushed to the end take pliers and push the yellow cap down completely flat. Very important. See picture below.
This will pierce the insulation and make the connection and some moisture resistant grease will be pushed out of the
connector. The cap needs to be pushed down completely so the grease comes out of the connector otherwise it will not
make the electrical connection. Wipe off the grease and pull on the wires to make sure they are connected. If they are not
connected there is one extra connector, or the wires will need to be stripped, soldered and insulated. When soldering be
sure to heat the wires so the solder flow into the strands so there is not a cold solder joint and a poor connection.
12. Next use the connectors with 3 small holes to connect the 3 white, 3 yellow, and 3 black wires. Push the wires into the
connectors to the end and using pliers push the red cap down to pierce the insulation and make the connection. Grease will
also need to be pushed out to assure a good connection. Wipe off the grease and pull on the wires to assure a good
connection. The following wiring diagram shows the connections.
13. Fold the wires and connectors inside of the Left Grip Heater and push into the left end of the handlebar by squeezing
together and sliding it along with the wires until completely inside. The end of the heater with the orange or black cap
should be pushed in first and the power cable can be pulled out as the heater is pushed in.
14. IT IS VERY IMPORTANT TO PERFORM THE FOLLOWING TEST AT THIS STEP: Product test before
completing the installation of the Controller and Left Grip. Connect the Red and Black wires of the power cable to 12V
temporarily to confirm the proper operation. Press the button on the Controller multiple times and confirm the 4 LED’s
light from yellow to red and off. Next press the button so all 4 LED’s are on. Leave the power on for 5 minutes or more to
confirm good wire connections and that the heaters are working properly. Each end of the handlebar should get to 160F
and should be so hot it is not possible to keep touching.
15. Install the Right Throttle Controls and Grip according to the service manual.
16. The Left Grip should be installed on the handlebar at the previously marked position followed by the Switch Housing.
(Instructions for installing the Left Grip are detailed on the last page).
17. Verify that the wire harness conduit runs in the groove at the bottom of the handlebar. Be sure that the upper switch
housing harness will not be pinched under the handlebar when the switch housing screws are tightened.
Heat_Demon_2
Rev 04/07/11
2
18. Attach the Controller to the Clutch perch assy (or the Brake perch assy if mounting on the Right side) by first starting the
screws but do not tighten. Assure the wires from the Controller and the power wires fit into the opening on the front side of
the Switch Housing with the wire harness conduit and are not pinched when the Controller in tightened to the clamp.
19. Note!! Tighten the screws that hold the Controller to the clutch hand lever assembly. Tighten the screws to 60 inlbs. It is important to tighten the screws equally on each side so the gap is the same between the Housing and the
lever assembly. When tight there will be a small gap of about 1/32” on each side. If you do not have a torque
wrench, hand tighten with a T27 or T25 TORX screwdriver handle that is equivalent to about 30 in-lbs. Then use a
small ¼” socket drive handle and tighten the screws another ¼ turn. This will result in a holding force of approx
60 in-lbs of torque. Press on the clutch hand lever assembly to assure it does not move.
20. Run the power cable along the wire harness conduit to the yoke area. Add wire ties where needed.
21. The power wires should be connected to the Accessories circuit. The Heat Demon draw 3 amps so a check should be made
to assure the circuit is not overloaded. Connect the Red wire to an accessory wire, which is an Orange wire with a White
stripe, with a red splice connector from the parts bag. On older bikes it can be the white wire. Connect the Black wire to a
good ground location with the ring terminal or to another black wire with the other red splice connector. The connection to
the accessory circuit can be done behind the headlight or in the battery area. The plastic snake can be used to help route the
cable under the gas tank without removing it. On 2011 and newer Softail models the power wires should be run under the
seat and attached to a Matrix connector near the battery. The mating Matrix connector part number is 72673. On Right
Side installations, if the wire connections are made in the battery area, additional lengths of wire need to be added to the red
and black wires.
22. Reconnect the battery cables. !!Warning!! Always connect the positive battery cable first.
23. Turn on the accessories switch and check that the Controller is wired properly by pressing the button and confirm that each
time it is pressed the 4 lights turn on sequentially and turn off the fifth time, plus the grips are warm after 10 minutes.
Operation:
The Controller will provide 4 levels of heat to the heaters inside of the handlebar. A thermistor senses the temperature and provides a
feedback to the Controller so a precise level of heat is supplied to the grips.
Press the button on the Controller once and the Yellow light or LED shows that the lowest level of heat is selected.
Press the button a second time and the Orange light or LED will indicate the next higher level of heat has been selected.
Pressing the button a third time the Red/Orange LED is on and the fourth time the deep Red LED is on indicating higher levels of
heat have been selected for colder conditions.
Pressing the button a fifth time will shut off all of the lights and the power.
Holding the button down for 3 seconds will lower the intensity of the LED’s for night operation. Holding it down again for 3
seconds will adjust the LED’s for daytime use.
Left grip installation Instructions:
As the grips are heated the rubber or polymer material becomes more flexible and this makes the adhesion to the handlebar more
difficult. Likewise, new grips have a slippery mold release material on the inside of the grip and this also makes it more difficult to
adhere the grips. The following installation steps need to be followed to assure the grips will be secured to the handlebar.
The following instructions describe the application of a two part epoxy adhesive and the installation of the Left Grip. The various
rubber or polymer grip designs are typically the standard molded one piece or the metal and resilient material assembly like the ISO
version from Kuryakyn. The installation is different so each is described below.
A. Standard One Piece Grip
The one piece grip is typically smooth on the inside and will squeegee off the epoxy adhesive that is applied when it is pushed onto
the handlebar. Utilizing the plastic stir sticks that are included in the kit will help to keep the adhesive under the grip and secure it to
the bar.
1.
2.
3.
4.
5.
6.
7.
We recommend roughening the inside of the grip to remove the mold release oil or old adhesive and provide
grooves that the adhesive can attach to. Use a piece of course sandpaper to abrade the inside of the grip.
Cut the end off the epoxy adhesive pack and squeegee out both materials. Mix the two parts very well with the
enclosed craft stick.
Place 1/3 of the epoxy adhesive around the bottom inside of the grip. Place another 1/3 if the adhesive in a line
inside of the grip from the bottom to the entrance of the grip. Spread the remaining epoxy adhesive around the
inside entrance of the grip.
Holding the grip horizontal with the adhesive line on the bottom, place the two plastic stir sticks inside of the
grip ¼” to ½” apart on each side of the adhesive line placed in Step #3.
Hold the ends of the plastic stir sticks so they extend about 1” outside of the end of the grip and rotate it so the
stir sticks are on top. Slide the grips onto the handlebar trapping the stir sticks between the grip and the
handlebar. Push the grip onto the bar to the point marked previously.
Remove the plastic stir sticks by bending up the ends and pulling out with a pliers. This will allow the adhesive
to spread out inside of the grip. If one of the stir sticks should break, cut it off and leave inside of the grip. Wipe
off any excess adhesive.
The epoxy adhesive will cure in 18 hours at room temperature or it will cure in 2 hours with the Heat Demon
Controller set to the highest heat level. Do not move the grips until the epoxy adhesive is cured.
Heat_Demon_2
Rev 04/07/11
3
B. Kuryakyn Style Grips
The following steps describe the installation procedure for this metal and polymer style grip that typically has many cavities on the
inside.
1. Complete step #1 and #2 from above. It is important to thoroughly roughen the inside of the grip.
2. Follow step #3 above but skip parts #4, #5, and #6 because the stir sticks are not used. When all of the adhesive
is inside the Left Grip slide it onto the handlebar to the point previously marked for it’s location. Rotate the grip
to the desired orientation and wipe off any excess epoxy adhesive.
The epoxy adhesive will cure in 18 hours at room temperature or it will cure in 2 hours with the Heat Demon Controller set to the
highest heat level. Do not move the grips until the epoxy adhesive is cured
SECTION B:
Heat Demon Installation Instructions for 2008 and later Touring Model Motorcycles with Electronic Throttle
On motorcycle models with the electronic throttle, the right side heater is installed over the sending module which is installed inside
of the handlebar. On some bikes like the Road Glide or the CVO Electra or Street Glide Sreaming Eagle models, the inside diameter
of the handlebar is smaller so the Heat Demon heater cannot be installed over the electronic module. It is possible to remove the
handlebar and take it to a machine shop and have it reamed out to a 7/8” inside diameter.
These instructions are an addition to the standard Heat Demon installation instructions that are included with the Kit.
After step 1, the electronic throttle control needs to be removed from the inside of the handlebar. The headlight needs to be removed
and the connector disconnected so the throttle control can be pulled out the end of the handlebar. The electronic throttle module
wiring harness exits the handlebar in the bottom center of the handlebar adjacent to the yoke. Track the harness from this location
near the yoke up to the main plug usually mounted to a support. (If necessary, remove the main plug from the support by sliding the
plug forward.) Make sure the throttle harness will not get caught on other wiring as you carefully slide the electronic throttle module
out the end of the handlebar. The module should be withdrawn only far enough to expose the wiring coming from within the bar.
Caution – The module wiring is connected to the harness via a plug that is located midpoint between the module and the hole near the
yoke. Resistance is sometimes felt as this plug moves withing the handlebar. Constant gentle pressure is all that is needed to
withdraw the module. Do not jerk or tug on the module as damage to the wiring or module could occur.
When the electronic control is removed, complete steps 2 through 7. In steps 8 and 9 the right side heater is wrapped around the
electronic throttle module so the inside rubber cover of the heater is touching the plastic end where the wires are exiting the module
assembly. Squeeze the heater tight against the module and insert both into the right end of the handlebar. Note that end of the
handlebar is notched to correspond to the tab on the gear end of the throttle module. Keeping a firm hold on the heating element
wrapped around the throttle module, use constant gentle pressure to slide the module back into the bar so that the tab and notch are
aligned and lock together.
Complete steps 10 through 15.
Reconnect the electronic throttle harness, reinstall the headlight and follow the remainder of the Heat Demon Installation Instructions
to complete the install.
Trouble Shooting Tips:
The majority of problems encountered with the Heat Demon installation and operation are related to the electrical connections. The
problem with the grips not heating or the grips not getting hot enough are usually related to poor wire connections.
1. Check the plastic connectors to assure the wires are pushed all the way in and the caps is pushed completely flat.
2. Solder the wires if there is a question with the plastic connectors. Solder correctly so the heat applied will cause the solder to flow
completely into the wires and not just on the surface which can result in a cold solder joint.
3. Check to assure there is a good ground connection which is very important. If necessary go directly to the ground or negative
terminal on the battery.
B. Additional system operation checks for components.
1. If the LED's do not light on the Controller disconnect all of the wires going to the Controller and only connect the white wire to
12V positive from the battery and the Black wire to the ground or negative on the battery. Press the button to confirm the LED's light
which indicates the Controller is OK. If the LED's do not light the electronics have been destroyed and the green wire should be
checked for a direct connection to ground and repaired before the Controller is replaced.
2. If one grip gets hot and the other is cold check the white and yellow wire connections going to the heater on that side.
3. If both heaters are on all the time and get too hot no matter what setting the Controller is on or even if it is off, then one of the
yellow wires is making contact with ground somewhere through a pinched or cut wire insulation.
4. If one LED blinks when power is applied then goes off there is probably a poor ground or the 12V supply is on the control side of
a relay verses the power side.
5. If the LED's are dim and it is not possible to change heat levels the button is binding or stuck down. The two screws on the bottom
of the Controller can be removed and the button and electronics can be pushed out so the button can be adjusted.
6227 University Avenue NE
Fridley, MN 55432 (763) 571-9193
www.symtec-inc.com www.heatdemon.com
Email: [email protected]
Heat_Demon_2
Rev 04/07/11
4