1
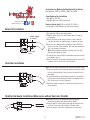
Instructions for Motorcycle Grip Heater Kit for Harley
Part Numbers: 211055, 211056, 212055 & 212056
Items Required for Installation
• Drill with a 5/16" Bit
• Grip Glue Rated for 250oF (If Desired)
1-888-571-9193
www.HeatDemon.com
Need installation help? Call us at (888) 571-9193 or
visit YouTube.com/HeatDemon for instructional videos.
Before Kit Installation
1. Disconnect the battery leads, negative first.
2. Mark the inside edge of each perch mount clamp as shown in
the diagram.
3. Remove the perch mount clamp you wish to replace with the
controller, the brake and clutch housing assemblies and grips.
4. On the side the controller will be mounted on, drill a 5/16" hole
on the bottom side of the handlebar 3/4" from the mark made in
Step 2 as shown in the diagram.
Note: Some handlebars may have an existing hole. If so, skip
this step and continue to Step 6.
5. De-burr the hole and install the included rubber grommet into the
hole drilled in Step 4.
6. Route the included 7 ft power wire internally from the center of the
handlebar and out the left side of the handlebar.
Mark made
in step 2
3
4"
Drill hole
here
Controller Installation
R
Note: The Heat Demon controller will replace one perch mount clamp.
1. Route the controller wires through the rubber grommet and out the
left side of the handlebar. If necessary, use the included coiled
wire snake.
2. Re-install the brake or clutch housing assemblies, along with the
perch mount clamp not being replaced. Use the marks made in
Step 2 in previous section for alignment.
3. Mount the controller using the stock bolts and make sure not to
pinch any wires.
B
G
W
Y
Red 3 Wire Connector
Yellow 2 Wire Connector
Throttle-Side Heater Installation (Motorcycles without Electronic Throttle)
Note: Please see Page 2 for throttle-side heater installation
instructions for motorcycles with electronic throttle.
1. Route the throttle-side heater wires through the handlebar and
out of the left side using the included coiled wire snake.
2. Insert the throttle-side heater completely into the handlebar.
1
Instructions: 909055_B
Updated: March 16, 2014
Throttle-Side Heater Installation (Motorcycles with Electronic Throttle)
Note: For handlebars with an inner diameter of 0.875” and larger,
use the rolled-aluminum two-wire heater.
1. Remove the throttle sensor from the handlebar according to your
model’s service manual.
2. Wrap the rolled aluminum heater around the throttle sensor.
3. Route the throttle-side heater wires through the handlebar and
out of the left side using the included coiled wire snake.
4. Insert the heater and sensor back into the handlebar, making sure
not to damage the heater.
Note: For handlebars with an inner diameter smaller than 0.875”,
use the flexible two-wire heater.
1. Remove the throttle sensor from the handlebar according to your
model’s service manual.
2. Remove the release paper from the flexible heater and adhere it
to the throttle sensor as shown in the diagram.
3. Insert the heater and sensor back into the handlebar, making sure
not to damage the heater.
Clutch-Side Heater Installation
YW
GB
1. Make connections as shown in the diagram, using the included red
and yellow push-button connectors. Make sure to completely
crush the push-button connectors.
2. Fold the excess wires inside of the clutch side heater and insert
completely into the handlebar.
3. Using the included red tap connectors, connect the other end of
the 7ft power cable to an accessory circuit; red to positive, black
to negative.
4. Reconnect the battery leads. With the vehicle and controller on, you
should start to feel heat in approximately 5-10 minutes.
5. Re-install the grips. If desired, apply a thin coat of grip glue to the
inside of the grips before pushing on the handlebar.
R
R
B
G
W
Y
Red 3 Wire Connector
Yellow 2 Wire Connector
Warranty & Damage
This Heat Demon product has a five year limited warranty.
The warranty does not cover:
• Products worn by use;
• Tampering or misuse of the product, including operation
outside of design specifications;
• Damages made to products installed incorrectly, including
shorting or pinched wires;
• Damages caused by crashes or natural disasters.
Because Heat Demon does not have any control over the connection and use
of the product, or any other related electronics, no liability will be assumed
nor accepted for damage resulting from the use of the product. In no case
shall liability exceed the product’s original cost.
Steering Wheel
Seat Heaters
Grip Heaters
Visit www.HeatDemon.com for more Heat Demon products.
2
Instructions: 909055_B
Updated: March 16, 2015