1
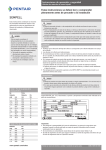
Sempell Dewrance Bleed steam check valves
Installation and maintenance instructions
Before installation these instructions must be fully read and understood
General
• This covers bled steam check valves fitted
with pneumatic actuator and external limit
switches.
• For spare parts, refer to sheet giving details
of classification. When ordering spare parts,
quote full product number stamped on
nameplate.
• Refer to Appendix 2 for specific product
numbers.
1 Safety notice
Proper installation, operation and maintenance
are essential to the safe and reliable operation
of all valve products. The relevant procedures
recommended by Dewrance and described
in this manual, are effective methods of
performing the required tasks. Some of these
procedures require the use of tools specifically
designed for an intended purpose. These
special tools should be used when, and as,
recommended.
It is important to note that this manual contains
various ‘safety messages’ which should be
carefully read in order to minimize the risk of
personal injury, or the possibility that improper
procedures will be followed which may damage
the involved Dewrance product, or render it
unsafe. It is also important to understand that
these ‘safety messages’ are not exhaustive.
Dewrance cannot possibly know, evaluate,
and advise any customer of all the conceivable
ways in which tasks might be performed, or
of the possible hazardous consequences of
each way. Consequently, Dewrance has not
undertaken any such broad evaluation and,
thus, who uses a procedure and/or tool, which
is not recommended by Dewrance, or deviates
from Dewrance recommendations, must be
thoroughly satisfied that neither personal
safety, nor valve safety, will be jeopardised
by the method and/or tools selected. If not so
satisfied, contact Dewrance if there are any
questions relative to tools/methods. Some
of the products manufactured by Dewrance
may be used in radioactive environments.
Consequently, prior to starting any operation in
a radioactive environment, the proper “health
physics” procedures should be consulted and
followed, if applicable.
The installation, operation and maintenance
of valves and/or valve products may involve
proximity to fluids at extremely high pressure
and/or temperature. Consequently, every
precaution should be taken to prevent injury
to personnel during the performance of any
procedure. These precautions should consist
of, but not limited to, ear drum protection, eye
protection and the use of protective clothing
(i.e. gloves etc.) when personnel are in or
around a valve work area. Due to the various
circumstances and conditions in which these
operations may be performed on Dewrance
products, and the possible hazardous
consequences of each way, Dewrance can
not possibly evaluate all conditions that might
injure personnel or equipment. Nevertheless,
Dewrance does offer the safety precautions
listed on page 5 for customer information only.
It is the responsibility of the purchaser or user
of Dewrance valves/equipment to adequately
train all personnel who will be working with
the involved valves/equipment. Further,
prior to working with the involved valves/
equipment, personnel who are to perform
such work should become thoroughly familiar
with the contents of this manual. Accordingly,
should any additional copies of this manual be
required, they can be purchased by contacting
Dewrance.
Nr. D129
www.pentair.com/valves
© 2012 Pentair plc. All Rights Reserved.
VCIOM-01422-EN 15/05
Sempell Dewrance Bleed steam check valves
Installation and maintenance instructions
2 Safety precautions
4 Design features and nomenclature
• Do not attempt to remove the packing gland
nuts while valve is under pressure.
• Do not attempt to eliminate cover seal
leakage, by tightening the cover nuts, while
the valve is under pressure.
• The cover should never be removed while the
valve is under pressure.
• Do not attempt to remove the Actuator while
the valve is under pressure.
• No alteration and/or modification should
be made to any Dewrance valve, except as
sanctioned and/or authorized by Dewrance.
• Never install, or attempt to use, any valve
that is not properly identified as to its material
and pressure class.
This range of valves has been specifically
designed for installation in bled (extraction)
steam lines between steam turbines and feed
water heaters but are equally applicable to
reheater connections and bleed on pass-out
lines in process plants.
Their function is to prevent the reverse flow
of stored steam and water from the heater or
its bled steam pipe to the turbine. Installation
would be in a horizontal pipe as near to the
turbine as possible. These valves are free
acting whereby the disc moves to the closed
position when flow in the forward direction
ceases. Gravity action on the disc provides a
closing moment from the fully open to fully
closed position. Where power assistance is
required, a spring return pneumatic cylinder
is accommodated whilst still maintaining the
automatic gravity closing feature.
3 Introduction
Dewrance bled steam check valves are built to
high standards of precision and accuracy, and
must pass rigid inspection before leaving the
factory. It is imperative that these valves are
properly installed, maintained and operated to
ensure optimum performance.
The purpose of this service manual is to
instruct installation crews maintenance
personnel and operators in these
fundamentals. This manual should be made
available to these personnel at all times, so
that they can become, and remain, familiar
with the details of these valves.
Dewrance bled steam check valves are
intended for high-pressure service in fluids
approved by Dewrance. When shipped from the
Dewrance factory, they are guaranteed to be
in good condition; however, Dewrance cannot
assume responsibility for damage to valves
due to faulty installation, improper operation
or other conditions beyond its control.
All Dewrance bled steam check valves are
based on the same seat geometry of a conical
seated disc in a conical body seat. The seating
intensity is high enough to give a good seal
and yet low enough not to cause any surface
scuffing. The position of the hinge pin ensures
that the disc opens and closes without a
rubbing action to effect a tight seal over the
full range of pressures.
The combination of disc geometry and the body
shape produce a seat angle which gives a short
disc travel as the flow falls progressively with
decreasing flow. This disc will be on the seat
when flow ceases and before reversal takes
place without slamming. This arrangement
gives a low pressure drop and flow under the
disc assists in keeping the valve fully open
over a wide range of flows.
2
Sempell Dewrance Bleed steam check valves
Installation and maintenance instructions
Figure 1
Safety guard (fitted only
when solenoid valve has
manual push button)
Main air supply in
Filter
regulator
Do not use eyebolts
for lifting valve
Only use for lifting
pneumatic actuator
View of limit switches
in direction of arrow ‘X’
Figure 2
Scrap view of hinge pin area in
direction of arrow ‘A’ (Figure 1)
Radial clearance
(cold)
Max. 0.35 mm
Min. 0.18 mm
Assembly check
Clearance gap between bushes 96 and 99 with
dick in shut position to be 0.6 to 1.0 mm
Parts list (referring to Figures 1 and 2)
Ref. no.
1
3
4
5
17
17a
24
28
28a
28b
39
48
51
58
68
No. off
1
1
1
1
1
2
2
**
4
8
1
4
1
1
**
Description
Body
Cover
Stem
Gland
Cover gasket
Side flange gasket
Side flange
Cover stud
Gland stud
Side flange stud
Stem indicator
Pillar
Disk
Hinge pin
Gland packing
Ref. no.
78
78a
78b
80
80a
88
96
99
160
160a
200
200a
200b
A
B
No. off
**
4
8
1
1
1
2
2
1
1
4
4
1
1
2
Description
Cover nut
Gland nut
Side flange nut
Neck bush
Guide bush
Adaptor plate
Hinge pin bush
Hinge pin housing
Stem guide
Limit switch striker plate
Cap head screw
Safety washer
Set screw
Pneumatic actuator
Limit switch
** Quote product number for quantity
3
Sempell Dewrance Bleed steam check valves
Installation and maintenance instructions
5 Commissioning
A. Connecting to electrical supply
For single acting pneumatic actuator with
solenoid valve wired for normally closed
positions.
1.Ensure that the adjusting nut on the filter
regulator is fully out (anti-clockwise) then
turn on the air supply to the inlet supply of
the filter regulator.
2.Connect the electrical supply to the
solenoid valve.
3.Energize the solenoid valve.
4.Screw in the adjusting nut on the filter
regulator (clockwise) until the working
pressure is obtained (Refer to certified
General Arrangement drawing for details of
air pressure requirements). The valve stem
(4) will go to the fully instroked position.
5.To ensure correct and safe operation, check
the outstroke by de-energizing the solenoid
valve. As the air pressure is relieved, the
stem (4) will move to the fully outstroked
position.
Warning!
Care must be taken when exhausting the solenoid
valve that the area close to the valve is kept clear.
Do not attempt to obstruct exhausting orifices
by hand.
B. Solenoid valve check
Next, it is necessary to check the functional
operation of the solenoid to ensure that it
responds correctly via the control system.
1.With solenoid valve energized, the stem (4)
and the indicator plate (39) will move to a
fully instroked position. This will indicate the
correct operation of the solenoid. Open limit
switch operation can also be checked at this
stage.
2.Select the ‘close valve’ position via the
control system (for on-load testing) i.e.
solenoid de-energized and check the
actuator has moved to the fully outstroked
position. Closed limit switch operation can
also be checked at this stage.
3.Select the ‘open valve’ position via the
control system (for on-load testing) and
check that the actuator has moved to the
fully instroked position.
4.With the working air pressure still set, a
simulated turbine trip should now be carried
out via the control system to ensure the
correct solenoid response.
5.Local on-load testing can be achieved by
operating the push button on the solenoid
valve. When the actuator is fully outstroked,
release the push button and the pneumatic
actuator will return to the fully instroked
position.
6.After satisfactory completion of the above
steps, fully screw out (anti-clockwise) the
adjusting nut on the filter regulator and deenergize the solenoid valve. The stem (4) will
move to the fully outstroked position.
When the valve is required to be put into
service, screw in (clockwise) the adjusting
nut on the filter regulator until the working
air pressure is obtained. The stem (4) will
move to the fully instroked position when
the valve is ready for service.
6 Storage
Indoor storage of valves is recommended.
If prolonged storage is anticipated, the valves
should be stored in humidity controlled
storage areas.
If valves are ordered to a more stringent
cleaning and storage procedure, the
recommendations in that procedure should
be followed.
7 Installation and welding
When valves are received, an enclosed ‘Packing
Note’ will provide an itemised statement of all
valves and parts included in the shipment. The
recipient should check and account for each
item on the list, and then keep this packing note
as a permanent record for these valves/parts.
Unloading the valves should be done with care.
Remember that, although the valve is a rugged
piece of equipment, it may still be damaged by
abusive handling. Skidded or chocked valves
should not be unskidded until immediately
before installation.
Improper installation of a valve can have very
serious consequences, resulting in a possible
malfunction, which may result in extensive
and costly repairs. Compliance with the
following recommendations will do much to
assure optimum performance of the valve
after installation.
It is essential that precautions be taken to
prohibit the entry of foreign debris inside
the valve, which could damage the seating
surfaces before and/or after installation.
4
Sempell Dewrance Bleed steam check valves
Installation and maintenance instructions
Caution
Provisions should be made for supporting the
valve and adjacent piping so that the pipeline
stresses will not be transmitted to the valve
body during site welding of the pipe to the valve.
Welding and stress relieving procedures should
conform to the applicable code or standard.
Weld with care and beware of weld splatter
damaging internal parts
Cleaning of pipelines in which the valve is
installed, and all connecting lines, is essential
before the unit is put into operation. Welding
beads, scale and foreign debris in the line can
cause damage to the valve seats and can result
in leakage.
When raising pressure at any time in the
pipeline system, the valve gland nuts should be
tightened or ‘followed up’ at regular intervals.
8 Disassembly (Refer to Figures 1 and 2)
Warning!
Ensure that there is no pressure in the pipeline
or valve. The pipeline should be drained prior to
dismantling the valve.
1. Fully retract the regulating nut on the filter
regulator to zero pressure.
2. De-energize the solenoid to exhaust the air
in the pneumatic cylinder (A).
3. Isolate the compressed air and electrical
supplies.
4.Label and record cables before
disconnecting electrical connections to
solenoid valves and limit switches.
5. Disconnect compressed air connection.
6.Loosen gland nuts (78a) then utilizing the
eyebolt in the top of the actuator (A) and
suitable lifting equipment, support the
weight of the actuator. Unscrew and remove
the lower actuator nuts that secure the
actuator to the adaptor plate (88). Carefully
raise the actuator to the half way position.
Slacken set screw (200b). Utilizing the hole
in stem (4) and the flat portion on the piston
rod, unscrew stem (4) from the actuator
piston rod and remove stem indicator (39).
Protect actuator from ingress of foreign
matter.
(See Appendix 1 for actuator maintenance
instruction).
7.Screw three suitable eyebolts into the
threaded holes on the side of the cover (3).
Thread size is stamped adjacent to the
holes.
8.Unscrew all cover nuts (78).
9.Utilizing the eyebolts and suitable lifting
equipment, lift off the cover assembly.
10.Remove gland nuts (78a)
11.Remove gland (5), gland flange (30) and
gland packing (68).
12.Refer to the diagram below. Check guide
bush (80a) for wear or scoring. Should a new
bush be required, then first remove the old
bush. Do this by knocking back the places
where the stem guide has been peened over
the bush and then knocking guide out with
suitable punch.
Figure 3
Cover (3)
Stem guide (160)
Guide bush (80a)
Peened over to retain
guide bush as shown
5
Sempell Dewrance Bleed steam check valves
Installation and maintenance instructions
13.Ensure that the disk (51) is in the closed
position.
14.Referring to Figure 2 check and record the
gap between hinge pin bush (96) and hinge
pin housing (99).
15.Remove indicator locking nut (78) and
indicator bracket (160). Refer to Figure 1
Appendix 1.
16.Unscrew and remove side flange nuts (78b).
17.Remove side flange (24).
18.Remove hinge pin housing (99). A tapped
hole is provided in the end of the housing
to facilitate the removal.
19.Withdraw the hinge pin (58). A tapped hole
is provided in both ends of the hinge pin to
facilitate the removal. This tapped hole is
the same size as the one in the hinge pin
housing (99).
20.To remove the disk (51), place a nylon sling
through to hinge pin bush holes (96) in lugs
on the disk then, using lifting equipment,
hoist out the disk.
Caution
When lifting out the disk (51), the tendency is for
the disk to swing away from the body seat. Care
must be taken not to damage the body and disk
seating faces when lifting.
9 Re-assembly (Refer to Figures 1 and 2)
A. Pre-assembly checks
Ensure the following checks are performed
prior to assembling the valve.
Figure 4
• Body (1)
Check the finish of the stem, which operates
through the gland. The stem must be smooth
and free from scoring.
• Cover (3)
Ensure that the body is cleaned of any other
foreign debris, which may have accumulated
in the valve body.
1. Inspect the gasket sealing face for damage.
2. Inspect the internal walls of the gland box
for steam cuts or pitting.
Should it be necessary to replace the hinge
pin bushes. Push the bushes into position and
‘peen’ over in three places as shown below.
Note: it is not recommended to re-use any
packings or gaskets.
In case of defects considered to be outside
the acceptable standards, replacement parts
should be fitted.
Dewrance provide in-house factory repair
facility and a fast response spare parts service.
• Studs (28, 28a and 28b)
Check for wear or damage; replace with new
ones as necessary.
• Hinge pin (58)
It is important that the pin is straight within
0.06 mm, if greater that this pin must be
straightened.
Caution: take care not to damage pin during
this operation.
• Neck bush (80)
Inspect bore of bush for wear or scoring,
replace with as necessary.
• Hinge pin bush (96)
Check Bush for wear, if damaged, bush must
be replaced in the following manner:
Using suitable punch, knock back the peened
metal and tap out the bush.
Press in new bush and secure by peening in
three places as shown below.
Hinge pin
bush (96)
Disk to be peened
over in 3 places
Note: ensure bush is fully
pushed in before peening
Disk (51)
6
Sempell Dewrance Bleed steam check valves
Installation and maintenance instructions
B. Assembly procedure
1.Ensure that the disk (51) and body (1)
seating faces are clean. Place a nylon sling
through hinge pin bushes (96) located in
disk and using lifting equipment, lower disk
into body (1). As the disk is being lowered, it
will have to be pushed over at the same time
until the disk comes into contact with the
body seat.
Caution: care must be taken to prevent
damage to disk and body seating faces, the
angle of the seat to disk faces will keep the
disk in position.
2.Align hinge pin bushes (96) and slide in
hinge pin (58).
3.Ensure gasket faces on body (1) and hinge
pin housing (99) are clean, fit new side
flange gasket (17a), slide in hinge pin
housing (99).
4. Fit side flange (24) over side flange
studs (28a).
5.Screw on side flange nuts (78b) and tighten
in a diametrically opposing sequence to a
torque value shown in Appendix 2.
6.Using feeler gauges, check that the
minimum clearance gap between hinge
pin bush (96) and hinge pin housing (99) is
0.6 mm to 1 mm (0.024” to 0.040”). The valve
is designed to these tolerances. In the event
of tolerances being outside the above limits,
proceed as follows:
Remove the hinge pin housing (99) on the
affected side/s referring to diagram below,
remove by grinding sufficient metal from
face shown to achieve above tolerances.
Ensure that the face is machined square
to C/L. Refit hinge pin housing (99).
7.Ensure gasket faces on cover (3) to body (1)
are clean. Fit new cover gasket (17) into
recess in body (1).
8. If guide bush (80a) has been replaced,
ensure that the stem guide (160) has been
peened over to retain the guide bush (80a),
refer to section VII (page 14).
9.Slide stem (4) through guide bush (80a,) and
into stem guide (160) and neck bush (80).
10.Fit new gland packing (68), gland (5), gland
flange (30) and gland nuts (78a).
11.Using eyebolts and lifting equipment fit
cover assembly over cover studs (28),
making sure that the location dowel is
lined up correctly.
Caution: care should be taken not to
damage cover studs (28). Support stem (4)
during this operation as it could become
dislodged.
12.Lightly lubricate cover studs (28) with a high
temperature anti seize compound and fit
cover nuts (78). Gasket compression is an
important factor in obtaining a long term
tight joint. It is essential that the gasket
be pulled down evenly. Use feeler gauges
between the cover (3) and body (1) flange
to ensure this compression is even.
Caution: do not lubricate gasket or gasket
sealing faces. Cover nuts (78) must be
tightened in a diametrically opposing
sequence in a minimum of 3 stages to a
torque value shown in Appendix 2.
13.Using lifting equipment as previously
described, lift up actuator (A) and lower
over valve ensuring that actuator screwed
tie rods locate into adaptor plate (88).
Lower to half way position then fit position
indicator (39) over stem (4) and screw
stem into actuator piston rod, secure
with pin (200b).
Lower actuator all the way down onto
adaptor plate face (88), secure with lower
actuator nuts.
14.Tighten gland nuts (78a).
15.Reconnect electrical and compressed air
connections.
16.Reinstate electrical and compressed air
supplies.
17.Screw in adjusting nut on filter regulator
until the working air pressure is obtained.
18.Stroke valve fully open and close to check
ease of operation.
Figure 5
Hinge pin housing (99)
Material to be removed
from this face by grinding
7
Sempell Dewrance Bleed steam check valves
Installation and maintenance instructions
10 Inventory Philosophy
The basic objective in formulating a service
parts inventory philosophy is to provide prompt
valve service capability, thus preventing
maintenance outage time extensions.
To accomplish this, it is necessary to have
immediate availability of the proper inventory
of service parts for optimum valve quantities.
This can be achieved at a minimum of cost
by defining the inventory on a frequency of
need basis.
To assist towards this objective, the field
service and repair organisation of Dewrance
recommends that the following guidelines
be utilized to establish meaningful inventory
levels:
1. Identify the total number of valves in service
by size, type number, pressure/temperature
class, and tag number.
2. Identify the frequency of replacement
tendency of specific parts:
Class I Parts most frequently replaced.
Class IIParts less frequently replaced,
but critical in the event of an
emergency requirement.
Class III Parts seldom replaced.
Class IVHardware e.g. nuts, bolts,
pins etc.
Class VParts practically never requiring
replacement.
3. “Need probability coverage’ is defined as the
probable percent (%) of total, uninterrupted
operational time which can be expected by
stocking predetermined valve component
classifications.
Classification of spare parts
Classification
Class I
Parts most frequently replaced
Class II
Parts less frequently replaced but critical
in the event of an emergency requirement
Class III
Parts seldom replaced
Class IV
Hardware (e.g. nuts, studs, pins, ect)
Class V
Parts practically never requiring replacement
Determine “need probability coverage”
which is computable with a specific
company’s operational objectives and
service parts inventory investment
philosophy. Then relate “need probability
coverage” to parts classifications, which
will satisfy that need.
Guidelines are as follows:
Parts classification
Class I
Class I and II
Class I, II and III
Class I, II, III and IV
Need probability coverage
70%
85%
95%
99%
4.Consult recommended spare parts list by
valve type to determine quantity of parts
valves to be covered by the inventory plan.
5.Select parts and specify quantities.
Identification and ordering essentials
When ordering service parts, please furnish
the following information to ensure receiving
the correct replacement parts:
Identify valve by:
1. Full product no.
2. Size.
3. Type
4. Pressure/
temperature class
5. Tag number
Specify parts required by:
1. Part name
2. Part number (if known)
3. Quantity
Item N°
17
17a
68
4
5
51
Description
Cover gasket
Side flange gasket
Gland packing
Stem
Gland
Disk
80
80a
24
30
39
48
58
88
96
99
28
28a
28b
78
78a
78b
Balance
Neck bush
Guide bush
Side flange
Gland flange
Stem indicator
Pillar
Hinge pin
Adaptor plate
Hinge pin bush
Hinge pin housing
Cover stud
Gland stud
Side flange stud
Cover nut
Gland nut
Side flange nut
8
Sempell Dewrance Bleed steam check valves
Installation and maintenance instructions
11 Valve repair
A. Factory refurbishment
Many customers find it desirable to return
their valves to Dewrance for restoration or
modernising. Products returned to Dewrance
valve repair center are restored to original
specifications and returned with a new valve
warranty.
B. Service warranty
Factory repaired valves carry a warranty that
covers workmanship and new parts installed
during repair, for a period of one year from
date of repair completion.
Dewrance must be notified and given the
opportunity to inspect and correct the problem.
Dewrance will not accept any backcharges
for unauthorized repair sources performing
corrective repairs on its products.
12 Troubleshooting
The following table indicates the difficulties,
which may be encountered, the most probable
cause and the necessary corrective action.
C. Dewrance product repair by unauthorized
sources
Dewrance has not authorized any outside
repair companies, contractors, or individuals
to perform warranty repair service on new
products, or field/factory repaired products
of its manufacture. Therefore customers
contracting for such repair services from
unauthorized sources must do so at their
own risk. Likewise, if any Dewrance product
falls to perform within the scope of its design,
TROUBLESHOOTING
Problem
Body/cover joint leakage
Probable cause
1. Gasket damaged
Cover gland box leaking
2.Cover nuts loose
1. Gland packing damaged
Disk will not open and
fully close
2. Gland nuts loose
1. Foreign material trapped
between disk and seat
2.Air supply low to actuator
3. Gland nuts too tight
4.Clearance between hinge
pin housing/bush incorrect
Corrective action
1. Disassemble valve, and fit new gasket as
outlined in manual
2.Tighten cover nuts as outlined in manual
1. Disassemble valve, and correct discrepant
condition as outlined in manual
2.Tighten gland nuts as outlined in manual
1. Disassemble valve, and correct discrepant
condition as outlined in manual. Inspect
system for cleanliness
2.Check air pressure and filter regulator.
Pressure should be as outlined in manual.
Inspect pipework for leaks
3.Tighten as outlined in manual
4.Check clearance as outlined in manual
9
Sempell Dewrance Bleed steam check valves
Installation and maintenance instructions
Appendix 1 - Pneumatic Actuator
Maintenance
A. Dismantling procedure
1. Before starting to dismantle cylinder
assembly from its installation, it is
important to note by an appropriate means,
the position of port and pipework in relation
to each other and its installation.
2.Remove cylinder assembly from its
installation and lift clear using the lifting
eye fitted.
3. Place cylinder on a service bench with the
front of the cylinder towards you. (Front of
cylinder refers to piston rod end of cylinder).
4.Undo the elbow fitting pipe ‘nut on the air
supply to the valve, remove the solenoid cap
and undo and remove the F.R.L mounting
plate and F.R.L assembly. Remove the
junction box plate and preserve. - (Preserve
parts means keep for later maintenance
operation).
5.To dismantle the cylinder, the tie rod nuts
on the front end of the cylinder must be
loosened as indicated in Figure 6, until
the installed -compression springs have
reached their free length.
Removal of tie rod nuts
1.Loosen nuts ‘1’ and ‘3’ 5 to 6 turns.
2.Loosen nuts ‘2’ and ‘4’ 5 to 6 turns.
3.Repeat steps 1 and 2 until compression
spring reaches its free length.
Tightening of tie rod nuts
Tightening of nuts is the reverse procedure
of removal.
Figure 6
Warning!
the tie rod fixings on the back face of the cylinder
are welded solid no attempt should be made
to dismantle the cylinder from this end as this
will result in the uncontrolled release of the
compression spring.
6.Remove the tie rod nuts and lift the back
cover and tie rods clear. Remove the
compression springs and preserve.
7.Remove tube from front end cover, if
necessary by holding tube (do not clamp)
and lightly tapping on the four corners of the
front cover with a fiber mallet until the tube
is clear of the front spigot ‘O’ ring. Preserve.
8.Wipe the piston rod clean. Remove the
piston rod and piston assembly from the
front end cover bush. Take particular care
not to damage seats or bearings when
passing rod end through bush. Preserve.
9. Grip the piston and rod assembly as
indicated (Figure 7), and tap out the locking
roll pin with a 5mm diameter punch.
Preserve roll pin. Loosen piston rod using
spanner flats. Refer to page 38 for spanner
sizes. No marking or gripping should be
made on the shaft O.D. Undo the remaining
thread engagement by hand supporting both
piston rod and piston. Preserve.
10.Place front-end cover on bench with bush
fixing screws facing uppermost. Remove
screws with a 6 mm A/F hex. wrench. Turn
front-end cover over and support it such
that the bush is clear of the bench. Push
bush out from back face of front cover.
Preserve.
Figure 7
Do not grip on or mark in any
way the piston rod surface
Tap out lock roll pin
Loosen piston rod using
spanner flats only
Grip piston rod/piston assy. by tail rod only
10
Sempell Dewrance Bleed steam check valves
Installation and maintenance instructions
B. Inspection and spare parts
1.Spares for this cylinder are as follows:
(I) Spigot ‘O’ ring (front cover)
(II)
Bush ‘O’ ring
(III) Piston rod ‘O’ ring
(IV) Piston rod wiper
(V)
Piston rod ‘U’ ring
(VI) Piston ‘U’ ring
(VII) Piston tape
The above parts can be ordered by quoting
RK SK (SK No. is stamped on the end cover).
Other spares can be ordered quoting the SK
No. and the description of the part required.
2.Tube - clean tube bore and inspect for
scoring and wear. If damaged, order a new
tube. If not damaged cover with a clean
cloth and preserve.
3. Front cover spigot ‘O’ ring. Remove ‘O’ ring
and inspect for damage or distortion.
If damaged, order spare ‘O’ ring. If not
damaged preserve cover and ‘O’ ring.
4. Bush - see Figure 8. Remove ‘O’ ring from
bush and inspect for damage or distortion.
If damaged, order spare ‘O’ ring. If not
damaged preserve ‘O’ ring.
Remove wiper seat from front end of bush
and ‘U’ ring from back end of bush with
the use of a blunt flat bladed screw driver,
taking care not to cause damage to wiper,
‘U’ ring, seating faces or bearing surfaces.
Inspect wiper and ‘U’ ring for damage
or distortion. If either is damaged order
a. spare to replace the damaged item. If
there is no damage preserve.
Bush bearings - inspect bearing surfaces.
If 75% of the bearing surface appears to be
Bronze in color, the bearings will require
replacing. This can be done by carefully
pressing the bearings out or machining
them out. Either method must result in
no damage to the bush itself, as this will
cause damage or bad fitting of replacement
bearings. Replacement bearings should be
ordered to the SK No. and pressed in one
from each end of the bush until in position
shown in Figure 8.
5. Piston (Figure 9) - remove piston rod ‘O’
ring from centre bore of piston, inspect for
damage or distortion. If damaged order
spare, If not damaged, preserve.
Remove piston ‘U’ ring from piston. Use of a
blunt flat bladed screw driver placed in the
center of the ‘U’, stretch the ‘U’ ring over
the piston lip. This is permitted but caution
should be taken not to damage the seating
faces or ‘U’ ring itself. Inspect ‘U’ ring for
damage. If damaged order a spare. If not
damaged, preserve.
Remove piston tape from piston and inspect
for wear. If piston is worn, order spare. If
not, then preserve. Note the piston tape is
cut at 45° and should have a 2-5 mm gap
when fitted (see Figure 9)
6. Piston rod. Inspect for scoring and general
wear. If worn order a replacement. If not
worn, wrap in a clean cloth and preserve.
Figure 8
Figure 9
2 - 5 mm gap
in piston tape
Bearings
Wiper seal
Piston rod O-ring
Note orientation
Piston rod O-ring
Note orientation
Position piston rod O-ring
Bush O-ring
11
Sempell Dewrance Bleed steam check valves
Installation and maintenance instructions
C. Cleaning and re-assembly
1. Bush - see Figure 8. After inspection of
bearings and re-fitting if required the wiper
seal and ‘U’ ring grooves should be wiped
out and air blasted, the wiper seal and
‘O’ ring wiped clean and then re-fitted in
the positions indicated in Figure 8. Bung
up each end of the bush with clean cloth
Wipe clean the ‘O’ ring groove and outside
diameters of the bush and air blast. Wipe
clean the bush ‘O’ ring and refit. Wrap
assembly in clean cloth and preserve.
2. Front cover - wipe out center bore of front
cover and air blast. Place front face of front
cover uppermost on bench. Remove outer
cloth from bush. Align small O.D. of bush in
center bore of front cover and rotate bush
to align fixing screw holes. Press bush
into end cover ensuring ‘O’ ring and wiper
are not sheared or otherwise damaged on
assembly. Press bush down until flange is
seated. Refit fixing screws and tighten using
6 mm A/F hex. wrench.
Place front-end cover on edge with port
uppermost. (Do not place front cover front
face down on the bush head, as this will
cause distortion to the lip seal). Wipe clean
and air blast the spigot ‘O’ ring groove,
spigot diameter and inside face of the front
cover. Wipe ‘O’ ring clean and refit in spigot
groove. Air blast port Cover in clean cloth
and preserve.
3. Piston rod assembly - wipe out center bore
of piston and blast clean. Clean piston rod
‘O’ ring and refit in bore (Figure 9) of piston.
Wipe the piston rod clean, insert threaded
end of piston rod into bore of piston passing
it through piston rod ‘O’ ring until solid. Refit
piston tail rod and tighten hand tight. Grip
piston rod assembly by Tail rod in a -vice
(Figure 2) and tighten rod assembly using
spanner flats (see Paragraph E for wrench
sizes) until the lockpin hole in the tail rod
and threaded part of the piston rod are in
line. Tap the lock rollpin in such that it is
located midway through the tail rod, using
5 mm dia punch. Clean cut ‘U’ ring groove
and piston tape groove, air blast. Clean
‘U’ ring and piston tape, refit. Preserve
assembly.
4. Front cover and piston rod assembly support front-end cover on one edge on a
bench. Remove cloth bungs from bush, and
air blast bore. Wipe the piston rod clean and
lightly grease the full length and diameter
(see Paragraph D for grease type). Offer the
piston rod end up to the back face of the
bush, carefully passing the rod end through
the ‘U’ ring, bearings and rod wiper. Push
piston up to face of end cover.
5.Tube - lightly grease the outside diameter
of the piston, ‘U’ ring and piston tape (see
Paragraph D for grease type)- Wipe out
and air blast the tube bore and the tube
end about to be fitted. Fit tube over piston
tape, ‘U’ ring and front cover spigot up to
spigot ‘O’ ring. Tip the assembly up onto
the tube end and lightly tap the front cover
using a fiber mallet onto the tube past the
spigot ‘O’ ring, taking care not to shear or
otherwise damage the ‘O’ ring.
6.Springs and back cover - place the frontend cover and tube assembly on its side,
air blast open end of tube. Wipe the springs
clean and place them in the open end of the
tube, resting on the tube bore. Wipe clean
the tube end. Wipe clean and air blast the
spigot and inside face of the rear end cover.
Position the springs in their spring seat in
the back of the piston and offer the back
cover spring seat up to the springs checking
the orientation of the two end covers, i.e.
mounting plate holes in line and rear cover
silencer on the opposite side to the inlet port
on the front cover.
7.Refit tie rods as indicated in Figure 6. Fit
tie rod front nuts/ferrules to front end of
cylinder and do up finger tight. Check that
the springs are correctly seated. Then
proceed to fully tighten (see Paragraph E
for wrench sizes) in the reverse order to
that described in Figure 6.
8.Refit F.R.L. (Filter Regulator Lubricator)
and junction box mounting plates. Clean
and reconnect the air supply pipe nut to
elbow fitting ensuring an airtight joint, refit
solenoid cab to solenoid valve.
9.Refit cylinder assembly to rig, making any
trimming adjustments as required.
D. Recommended grease and lubricant
Grease - rocol MTS2000, or equivalent.
Air line lubricant - Shell Tellus 37, or
equivalent.
E. Wrench sizes
Piston rods:
320 mm bore cylinders 42 mm A/F
250 mm bore cylinders 36 mm A/F
200 mm bore cylinders 36 mm A/F
Tie rod nuts:
320 mm bore cylinders 36 mm A/F
250 mm bore cylinders 30 mm A/F
200 mm bore cylinders 38 mm A/F
12
Sempell Dewrance Bleed steam check valves
Installation and maintenance instructions
Appendix 2
400/425/450 class body - 200, 250, 300, 350, 400, 425 and 450 class disk
Product
Torque wrench values side flange nuts (78b)
B43EN200QFDN
B31EV400RFDC
Torque wrench values cover nuts (78)
B43EN200QFDN
B31EV400RFDC
Torque (lb·ft)
Torque (Nm)
25
46
34
62
219
424
297
575
PENTAIR VALVES & CONTROLS
www.pentair.com/valves
All Pentair trademarks and logos are owned by Pentair plc. All other brand or product names are trademarks or registered marks of their respective owners.
Because we are continuously improving our products and services, Pentair reserves the right to change product designs and specifications without notice.
Pentair is an equal opportunity employer. © 2015 Pentair plc. All rights reserved.
13