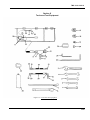
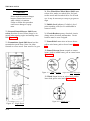
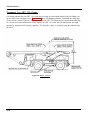
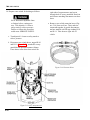
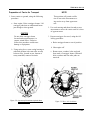
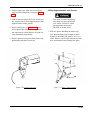
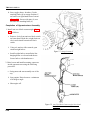
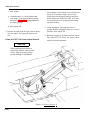
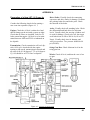
1
TM 5-3810-305-10
●
TECHNICAL MANUAL
OPERATOR’S MANUAL
FOR
CRANE, WHEEL MOUNTED,
HYDRAULIC, LIGHT, 7 1/2 TON
(ROUGH TERRAIN CRANE)
MODEL LRT 110
CONSISTS OF:
Type I General Purpose
(3810-01-165-0646)
Type II Airborne/Airmobile
(3810-01-165-0647)
This technical manual is an authentication of the manufacturers commercial literature and does not conform with the format and content specified in AR 25–30, Military Publications, This technical manual does, however, contain available
information that is essential to the operation and maintenance of the equipment.
Distribution Restriction: Approved for public release; distribution is unlimited.
HEADQUARTERS, DEPARTMENT OF THE ARMY
9 AUGUST 1991
WARNING
If NBC exposure is suspected, all air filter media should be handled by personnel wearing
protective equipment. Consult your unit N B C
Officer or NBC NCO for appropriate handling
or disposal instructions.
IF NBC EXPOSURE IS SUSPECTED ALL
AIR FILTER MEDIA WILL BE HANDLED
BY PERSONNEL WEARING FULL NBC
PROTECTIVE EQUIPMENT. SEE OPERATOR/MAINTENANCE MANUAL.
7690-01-114-3702
To order this NBC decal use:
National Stock Number (NSN) -7690-01-114-3702
Part Number (PN) – 12296626
Commercial and Government Entity Code (CAGEC) – 19207
TM 5-3810-305-10
lNSERTLATEST
UPDATED
PAGES /WORK
PACKAGES
DESTROY
SUPERSEDED
DATA
LIST OF EFFECTED PAGES/ WORK PACKAGES
Note
The portion of text or illustration effected by the updates is indicated by a vertical line in the
outer margins of the page Updates to wiring diagrams are indicated by shaded areas
Dates of issue for original and updated pages/ work packages are
Original
O 09 Aug 91
Change
1 01 Nov 00
TOTAL NUMBER
Page 1WP
No
Cover 1
Cover 2
a - LOEP
b - LOEP
i
ii
1-1
1-2
1-3
1-4
1-5
1-6
1-7
1-8
1-9
1-1o
1-11
1-12
1-13
1-14
1-15
1-16
1-17
1-18
1-19
1-20
1-21
1-22
1-23
1-24
1-25
1-26
1-27
1-28
1-29
1-30
1-31
1-32
1-33
OF PAGES FOR FRONT AND REAR MATTER IS 16 AND TOTAL NUMBER
WORK PACKAGES IS 876 CONSISTING OF THE FOLLOWING:
*Revision
No.
1
1
1
1
1
1
1
1
Page 1WP
No
*Revision
No
1-34
1-35
1-36
1-37
1-38
1-39
1-40
1-41
1-42
1-43
1-44
1-45
1-46
1-47
1-48
2-1
2-2
2-3
2-4
2-5
2-6
3-1
3-2
3-3
3-4
4-1
4-2
4-3
4-4
4-5
4-6
4-7
4-8
4-9
4-1o
4-11
4-12
4-13
4-14
Page I WP
No
4-15
4-16
4-17
4-18
4-19
4-20
4-21
4-22
4-23
4-24
4-25
4-26
4-27
4-28
4-29
4-30
4-31
4-32
4-33
4-34
4-35
4-36
4-37
4-38
4-39
4-40
4-41
4-42
4-43
4-44
4-45
4-46
4-47
4-48
A
OF
*Revision
No
TM 5-3810-305-10
INSERT LATEST UPDATED
Page I WP
No
4-49
4-50
4-51
4-52
4-53
4-54
4-55
4-56
4-57
4-58
4-59
4-60
4-61
4-62
4-63
4-64
4-65
4-66
4-67
4-68
4-69
4-70
4-71
4-72
4-73
4-74
4-75
4-76
5-1
5-2
5-3
5-4
5-5
5-6
5-7
5-8
5-9
5-10
5-11
5-12
5-13
5-14
5-15
5-16
5-17
5-18
5-19
5-20
*Revision
No.
PAGES /WORK
Page I WP
No
PACKAGES
*Revision
No.
DESTROY
SUPERSEDED
Page / WP
No
*Revision
No
F-4
F-5
F-6
F-7
F-8
INDEX-I
IN DEX-2
IN DEX-3
IN DEX-4
IN DEX-5
IN DEX-6
IN DEX-7
IN DEX-8
Authentication
Sample 2028 Front
Sample 2028 Back
2028 Front
2028 Back
2028 Front
2028 Back
2028 Front
2028 Back
5-21
5-22
5-23
5-24
5-25
5-26
5-27
5-28
5-29
5-30
5-31
5-32
5-33
5-34
5-35
5-36
5-37
5-38
5-39
5-40
5-41
5-42
5-43
5-44
5-45
5-46
5-47
5-48
5-49
5-50
A-1
A-2
B-2
B-3
B-4
c-1
c-2
D-1
D-2
D-3
D-4
D-5
D-6
E-1
E-2
F-1
F-2
F-3
B
DATA
TM 5-3810-305-10
c-1
HEADQUARTERS
DEPARTMENT OF THE ARMY
WASHINGTON,
DC, fA/ovember2000
CHANGE
NO. 1
OPERATOR’S MANUAL
CRANE, WHEEL MOUNTED,
HYDRAULIC, LIGHT, 7 1/2 TON
(ROUGH TERRAIN)
MODEL
LRT 110
CONSISTS
OF:
Type I General Purpose
(NSN 3810-01-165-0646)
Type II Airborne/Airmobile
(3810-01-165-0647)
TM 5-3810-305-10,
9 August 1991 is changed as follows
1
Remove old pages and insert new pages as indicated below
2
New or changed material is indicated by a vertical bar in the margin
3
Added or revised illustrations
are indicated by a vertical bar adjacent to the illustration
Insert Pages
Remove Pages
List of Effective Pages
i and ii
1-7 thru 1-8
1-19 thru 1-20
i and ii
1-7 thru 1-8
1-19 thru 1-20
Approved
for public release,
distribution
is unlimited
File this sheet in the front of the publication for reference
purposes
By Order of the Secretary of the Army:
Official:
ERIC K. SHINSEKI
General, United States Army
Chief of Staff
JOEL B. HUDSON
Administrative Assistant to the
Secretary of the Army
0025801
DISTRIBUTION: To be distributed in accordance with the initial distribution requirements for IDN: 255732,
TM 5-3810-305-10.
TM 5-3810-305-10
c-1
TECHNICAL
HEADQUARTERS
DEPARTMENT OF THE ARMY
WASHINGTON,
DC, fAlovember2000
MANUAL
TM 5-3810-305-10
OPERATOR’S
MANUAL
FOR
CRANE, WHEEL MOUNTED,
HYDRAULIC, LIGHT, 7 1/2 TON
(ROUGH TERRAIN)
MODEL LRT 110
CONSISTS
OF-
Type I General Purpose
(NSN 3810-01-165-0646)
Type II Airborne/Airmobile
(3810-01 -165-0647)
REPORTING OF ERRORS AND RECOMMENDING IMPROVEMENTS
You can help improve this publication If you find any mistakes or if you know of a way to improve
the procedures, please let us know Submit your DA Form 2028-2 (Recommended Changes to
Equipment Technical Publications), through the internet, on the Army Electronic Product Support (AEPS) website The internet address is http //aeps ria army mil If you need a password,
scroll down and click on “ACCESS REQUEST FORM” The DA Form 2028 is located in the
ONLINE FORMS PROCESSING section of the AEPS Fill out the form and click on SUBMIT
Using this form on the AEPS will enable us to respond quicker to your comments and better
manage the DA Form 2028 program You may also mail, fax or e-mail your letter, DA Form
2028, or DA Form 2028-2 direct to Commander, U S Army Tank-automotive
and Armaments
Command, ATTN AMSTA-AC-NML, Rock Island, IL 61299-7630 The e-mail address is [email protected]. mil The fax number is DSN 793-0726 or Commercial (309) 782-0726
I
This technical manual is an authentication of the manufacturers commercial literature and does
not conform with the format and content specified in AR 25-30 Military Publications This technical manual does, however, contain information that is essential to the operation and maintenance of the equipment
I
Distribution
Restriction
Approved for public release, distribution
is unlimited
i
TABLE OF CONTENTS
Title
TM5-3810-305-10
Page
CHAPTER I INTRODUCTION
Section I
Purpose and Function
Capabilities
Section II
Performance Characteristics
Section III
Equipment Specifications
Section IV
Power
and Utility Requirements
Section V
Environmental Requirements
Section VI
Section VII List of Items Furnished
Section VIII List of Items Required
Storage Data
Section IX
Tools and Test Equipment
Section X
Warranty Information
Section XI
Section XIl Safety Precautions
1-1
1-3
1-5
1-5
1-11
1-24
1-24
1-24
1-24
1-24
1-25
1-27
1-27
CHAPTER 2 PREPARATION FOR USE
2-1
GENERAL THEORY OF OPERATION
3-1
CHAPTER 4 OPERATION INSTRUCTIONS AND FUNCTIONS
Use of Operator’s Controls and Indicators
Section I
Initial Adjustments and Control Settings
Section II
Start-up
Section III
Section IV Operation Under Normal Conditions
Section V Wire Rope Instructions
Section VI Operation Under Emergency or Abnormal Conditions
Section VII Shutdown
Section VIII Transportability
4-1
4-3
4-10
4-17
4-18
4-28
4-56
4-71
4-72
TYPE II SUPPLEMENT
CHAPTER 5
Sectionalization
Section I
Transportability
Section II
5-1
5-2
5-46
APPENDIX A NEW EQUIPMENT PREPARATION
A-1
APPENDIX B LUBRICATION INSTRUCTIONS
B-1
A p p e n d i x C References
A p p e n d i x D Components Of End Item and Basic Issue Item List
C-1
A p p e n d i x E Additional Authorization List
E-1
A p p e n d i x F Operator/Crew PMCS
F-1
Index
I-1
CHAPTER 3
D-1
ii
TM5-3810-305-10
CHAPTER 1
INTRODUCTION
The purpose of this chapter is to introduce the operator to the LRT 110 Crane functions, capabilities,
performance. data and specifications. A special section on safe operation of the equipment is also included at the end of the chapter.
Title
Section
Page
I
Purpose and Function
General
Major Component Nomenclature
1-3
1-4
1-4
II
Capabilities
1-5
III
Performance Characteristics
General
Engine
Electrical System
Transmission
Torque Converter
Wheels
Axles
Brakes
Suspension
Steering
Hydraulic System
Swing System
Drawbar
Pintle Hook
Outriggers
Boom
Winch
Boom Cylinders
Counterweight
Decibel Level Chart
1-5
1-5
1-5
1-6
1-6
1-7
1-7
1-7
1-7
1-7
1-7
1-8
1-8
1-8
1-8
1-9
1-9
1-9
1-9
1-10
1-10
IV
Equipment Specifications
Weights
Dimensions
Capacities
Capacity Chart Notes
Load Ratings on Outriggers
1-11
1-11
1-11
1-15
1-16
1-19
1-1
TM5-3810-305-10
Title
Section
Load Ratings on Tires
Maximum Permissible Hoist Line Load
Radius From Centerline of Rotation
Working Area Diagram
1-2
Page
1-20
1-21
1-22
1-23
V
Power and Utility Requirements
1-24
VI
Environmental Requirements
1-24
VII
List of Items Furnished
Hook Block
Cable
Boom Angle Indicator
Boom Length Markers
1-24
1-24
1-24
1-24
1-24
VIII
List of Items Required
1-24
IX
Storage Data
1-24
X
Tools and Test Equipment
1-25
XI
Warranty Information
1-27
XII
Safety Precautions
Introduction
General Warnings
General Cautions
Safety Decals
Minimum Safety Requirements For
Work Platforms Suspended From
Load Line or Rigidly Mounted
On Boom
1-27
1-27
1-27
1-36
1-41
1-42
TM5-3810-305-10
Section I
Purpose and Function
Figure 1-1. Major Component Locations (Left Side)
Figure 1-2. Major Component Locations (Right Side)
1-3
TM5-3810-305-10
General
The purpose of this manual is to familiarize
operators with the operation and maintenance of
the LRT 110 Crane. This manual provides
information and data for operation and lubrication. The operator of the LRT 110 Crane must
not attempt to operate the vehicle before he has
obtained a thorough understanding of the manual
contents.
The LRT 110 Crane is a wheel-mounted, selfcontained, two- and four-wheel drive, two- and
four-wheel steering crane. A diesel engine
powers the LRT 110 Crane, driving through a
powershift transmission with tandem pump
hydraulic power for operation of the crane,
outriggers, fully revolving upperstructure and
steering system.
The LRT 110 Crane design meets all the applicable requirements of OSHA, EPA, PCSA Std.
#4, ANSI B30.5 and the specified SAE Standards.
1-4
Major Component Nomenclature
NOTE
All directional references in this
manual (right or left, front or
rear, etc.) correspond to the
position of the operator when
facing forward in operator’s cab.
Upperstructure: The upperstructure includes
the counterweight and hydraulic winch.
Boom Attachment: The boom attachment includes the crane boom, boom lift cylinder and
hook block.
Carrier: The carrier includes the chassis, frame,
engine, transmission, swing bearing, planetary
axles, outriggers, operator’s cab, fuel tank,
hydraulic reservoir, batteries and tool compartment.
TM5-3810-305-10
Section II
Capabilities
The LRT 110 Crane is capable of
● Lifting 15,000 pounds at a 10-foot radius or 4,000 pounds at a 30-foot radius, throughout a 360-degree
rotation on outriggers.
●
Lifting 13,600 pounds straight over the front on tires.
●A
travel speed of up to 22 miles per hour on a level hard surface.
●A
travel speed of up to 2.5 miles per hour carrying a 4,500 pound load at a 20-foot radius straight over
the front.
● Rough
terrain travel when switched into four-wheel drive.
● Continuous
●
operation in temperatures of up to 120 degrees F or altitudes of up to 5,000 feet.
Fording up to 30 inches of water.
● Operating
in ammunition and petroleum dumps.
Section Ill
Performance Characteristics
General
The following are performance specifications for the LRT 110 Crane.
Engine
Type
Cummins 4B3.9
Four cylinder
Bore and Stroke
4.02 x 4.72 in.
(102 x 120mm)
Displacement
239.3 in.
(3.92 L)
Maximum Gross Horsepower
80 hp (60 kw) at 2,800 rpm
1-5
TM5-3810-305-10
Maximum Gross Torque
184 lb-ft (249 Ν⋅ m) at 2,800 rpm
Net Power
60 hp (44.7 kw) at 2,800 rpm
Air Filter
Dry type
Electrical System
Alternator
24 V, 40 amp
Battery
440 cold cranking amp at 24 V
Transmission
Type
Funk, Powershift
Four speeds forward/reverse
Shift Controls
Forward/reverse lever
Gear speed (1 thru 4)
select lever
Two/four-wheel drive
select lever
Forward/
Two- or
Four- Wheel
Drive
1-6
Gear
Gear Ranges
Maximum
Speed
Maximum
Tractive
Effort
Gradeability
At Stall
1
3.3 mph
(5.3 km/h)
18,830 lb
(8,54 1 kg)
99.2%
2
6.2 mph
(9.9 km/h)
9,930 lb
(4,504 kg)
38.8%
3
11.4 mph
(18.3 km/h)
5,400 lb
(2,449 kg)
19.1%
4
22.0 mph
(35.4 km/h)
2,900 lb
(1,315 kg)
9.2%
TM 5-3810-305-10
c-1
Torque Converter
Type
Single stage, three element
Free wheel stator (Size 1175 in, STR-29)
I
Wheels
Type
Disc
825x22
5 in (210 x572 mm)
108 in wheelbase (2,743 mm)
Tires
5, 14 PRRadial
115 psi (793 kPa) pressure
12 0x22
I
Axles
Type
Soma, planetary, Model 3
Ratio total reduction of1961
1
Brakes
Type
Hydraulically boosted hydraulic, dual
system with front-to-rear split
Suspension
Type
Oscillating rear axle
Automatic hydraulic lockout
Driving Mode
Two-wheel, rear drive for hard
surfaces at high speeds
Four-wheel drive for off-road, rough terrain
Steering
Type
Full fluid linked power steeling
Auxiliary steering pump driven by wheel
rotation provides steering and braking duling
power loss
Modes
Two-wheel steering, four-wheel
steering, crab steering
Turning Radius
Two-wheel
Four-wheel
32 ft, 2 in (980 m)
18 ft, 4 in (5 59 m)
1-7
I
TM 5-3810-305-10
c-1
Hydraulic Svstem
Hydlaulic Pump Drive
One tandem hydraulic pump,
driven off transmission at O 87 times engine rpm
Steering, Brake and Swing Circuit
Pump 21 gal
(79 5L) per mirdoperating at 2,440 rpm
and 2,650 psi (18,272 ld?a)
Priority flow 10 gal
(37 8 L) per min
2,500 psi (17,238 kPa)
Winch Circuit
18 gal (68 1 L) pel rein/operating
and 2,650 psi (18,272 kPa)
Boom Hoist, Telescope
and Outligger Circuit
21 gal (79 5 L) per mird operating
at 2,440 rpm and 2,750 psi (18,961 IcPa)
Hydraulic Valve Bank Hoist,
Telescope, Swing, Outrigger
Foul-spool, two-way valve
Winch Valve
Single-spool, two-way valve
Oil Filtration
Full flow system with 100-mesh (140-micron)
screen and 10-micron return filter
Swing Svstem
Type
Worn gear reduction unit
powered by hydraulic motor
Speed
No load 308 rpm
Drawbar
Continuous Pull
10,000 lb
(4,536 kg)
Pintle Hook
Towing Capacity
40,000 lb
(18,144 kg)
Outriggers
Type
1-8
Flipper
7 in (178 mm) lift on
12 00x 225, 14 PR standard tires
at 2,440 rpm
TM5-3810-305-10
Extend Time per Outrigger
4.50 sec
Retract Time per Outrigger
4.00 sec
Boom
Type
Standard, two section
35.75 ft ( 10.90 m)
Construction
All welded, box beam
Point Sheaves
Cast, ductile iron, mounted
on non-friction bearings.
Two sheave boom head
Retraction
To 21.75 ft (6.63 m)
(PCSA Standards)
Base and Tip Sections
70,000 psi (483 N/mm2) material
Winch
Maximum Line Speed
(NO LOAD)
First layer: 177 ft
(53.95 m) per min
Third layer: 216 ft
(65.84 m) per min
Drum Capacity
350 ft (107 m)
Five layers
Rope Size
1/2 in. 6 x 9 Independent Wire Rope Core
(IWRC), Improved Plow Steel (IPS), Preformed
Boom Cylinders
NOTE
All cylinders contain pilot check valves.
Boom Hoist Time
28.5 sec
Boom Down Time
25.3 sec
Telescope Extend Time
27.2 sec
Telescope Retract Time
22.7 sec
Counterweight
Weight
2,200 lb (998 kg)
1-9
TM5-3810-305-10
Decibel Level Chart
Within the 85-dB envelope, hearing protection is
required. Failure to follow this procedure could
cause SERIOUS INJURY.
NOTE
Radius dimensions illustrated in Decibel Level
Chart are from center of rotation. Points on the
profile are from nearest surface of the crane.
Exposing the unprotected human ear to sound
levels above 85 dB (measured on the “A” scale)
for prolonged periods can result in permanent
hearing loss.
In order to avoid hearing loss, ear plugs or
other suitable protective devices should be worn
when working within the 85 dBA envelope (40 ft
maximum from the nearest surface of the crane)
as shown on Figure 1-3.
Sound levels in the operators cab can reach 87
dBA with the cab closed and therefore operators
should wear hearing protection while operating
the LRT 110 Crane.
Figure 1-3. Decibel Level Chart - 85 - dB Profile
1-10
TM5-3810-305-10
Section IV
Equipment Specifications
Weights
Vehicle Weight Distribution:
Front
Rear
Total
Hook Block
(One sheave)
Type II (Differences)
10,760 lb
(4,881 kg)
ll,710 lb
(5,312 kg)
12,110 1b
(5,493 kg)
12,520 lb
(5,679 kg)
22,870 lb
(10,374 kg)
24,230 lb
(10,991 kg)
235 lb
(107 kg)
Dimensions
Winch:
Drum Diameter
8.5 in.
(216 mm)
Drum Length
12.25 in.
(311 mm)
Flange Diameter
14.56 in.
(370 mm)
Cylinders:
Boom Extend
Bore: 4.0 in.
(102 mm)
Stroke: 168 in.
(4.27 m)
Rod: 3 in.
(76 mm)
Boom Hoist
Bore: 8.5 in.
(216 mm)
Stroke: 39.3 in.
(998 mm)
Rod: 3 in.
(76 mm)
1-11
TM5-3810-305-10
Outrigger:
Bore: 5.0 in.
(127 mm)
Stroke: 17.75 in.
(45 1 mm)
Rod: 3.0 in.
(76 mm)
Figure 1-4. General Dimensions
1-12
TM5-3810-305-10
NOTE
All dimensions assume boom fully retracted and crane equipped with standard tires
1.
Overall Length
25 ft, 8.16 in.
(7.83 m)
2.
Centerline of Rotation
to Boom End
17 ft, 8 in.
(5.39 m)
3.
Boom End to Front of Carrier
6 ft, 6.5 in.
(1.99 m)
4.
Tailswing Radius
7 ft, 9 in.
(2,36 m)
5.
Centerline of Rotation to
Boom Pivot
4 ft, 8.5 in.
(1.44 m)
6.
Height of Cab
6 ft, 2 in.
(1.88 m)
7.
Ground Clearance to
Transmission
14.4 in.
(366 mm)
8.
Ground Clearance to
Outrigger Box
15 in.
(38 1 mm)
9.
Centerline of Rotation
to Centerline of Rear Axle
4 ft, 2.9 in.
(1.29 m)
10.
Wheelbase
9 ft
(2.74 m)
11.
Centerline of Front
Outrigger Box to
Centerline of Rear
Outrigger Box
14 ft, 4 in.
(4.37 m)
12.
Overall Length of Carrier
19 ft, 1.6 in.
(5.83 m)
1-13
TM5-3810-305-10
Figure 1-5. G eneral Dimensions
13.
Overall Travel Width
8 ft
(2.44 m)
14.
Overall Height
7 ft, 8.5 in.
(2.35 m)
15.
Ground Clearance to Lowest
Point of Axle
14 in.
(356 mm)
16.
Outrigger Extension Below
Grade
7.3 in.
(185 mm)
17
Track
6 ft, 10.3 in.
(2.09 m)
18.
Width of Carrier
8 ft
(2.44 m)
19.
Effective Width of
Outriggers
12 ft, 4.9 in.
(3.78 m)
20
Overall Width Over Floats
13 ft, 7.9 in.
(4.16 m)
1-14
TM5-3810-305-10
Capacities
Cooling System
28 qt
(26.5 L)
Fuel
44 gal
(166.5 L)
Crankcase
11 qt
(10.4 L)
Hydraulic System
45 gal
(170.3 L)
Hydraulic Oil Reservoir
23.8 gal
(90. 1 L)
Transmission:
Capacity
20.5 qt
(19.4 L)
Refill
12 qt
(11.4L)
Hub (es)
3 qt
(2.8 L)
Differential
14 qt
(13.2 L)
Axle:
Swing Reduction Unit
3 qt
(2.8 L)
Winch
2 qt
(1.9L)
1-15
TM5-3810-305-10
Capacity Chart Notes
● Never
lift or swing load directly over
operator’s compartment or over ground
personnel in the work area, Failure to
follow this procedure could cause
DEATH or serious injury.
● All
notes on the Capacity Chart must be
treated as WARNING’S. Failure to
follow these procedures could cause
DEATH or serious injury.
NOTE
The following is a direct copy of
the notes on the Capacity Chart
found on the machine. For clarification of the notes, refer to
page 1-18.
GENERAL
1. Crane load ratings as determined by boom
length, radius and boom angle apply to this
crane only as originally manufactured and
equipped. THEY ARE MAXIMUM LOAD
RATINGS.
2. The crane and its load ratings are in accordance with Power Crane and Shovel Association Standard No. 4, SAE Crane Load Stability Test Code J-765a, SAE Method of Test for
Crane Structure J-1063, and Safety Code for
Cranes, Derricks and Hoists, ANSI B30.51982.
3. Improperly operated or maintained equipment
can be dangerous. The operator and other
personnel should read and fully understand
the Operator’s Manual furnished by the manufacturer before operating or maintaining this
1-16
machine. Rules for safe operation of equipment should be adhered to at all times. If
either manuals or lift chart are missing, they
should be ordered by machine serial number
through the distributor.
4. Operators and supervisors must fully understand Safety Standards for Mobile Hydraulic
Cranes ANSI B30.5 or latest, and be familiar
with Federal, State and local safety regulations. Consult section of Operator’s and
Service Manual for more exacting description
of the use of this lift chart.
SET-UP
5. Crane load ratings are based on the machine
being leveled and standing on a firm, uniform
supporting surface.
6. Crane load ratings on outriggers are based on
all outrigger beams fully extended and the
tires raised free of the supporting surface.
7. Crane load ratings on tires depend on appropriate inflation pressure and tire conditions.
Caution must be exercised when increasing
air pressure in tires. Consult Operator’s
Manual for precautions.
8. Consult appropriate section of Operator’s and
Service Manual for more exact description of
hoist line reeving.
9. The use of more parts of line than required by
load may result in having insufficient rope to
allow the hook block to reach the ground.
10. Properly maintained wire rope is essential to
safe crane operation. Consult Operator’s
Manual for proper maintenance and inspection requirements.
TM5-3810-305-10
11. When spin resistant wire is used, the allowable rope loading shall be the breaking
strength divided by five (5) unless otherwise
specified by wire rope manufacturer.
OPERATION
12. Crane load ratings must not be exceeded.
DO NOT ATTEMPT TO TIP THE MACHINE TO DETERMINE ALLOWABLE
LOADS.
them are based on the machine’s structural
strength. All other ratings are based on
stability and do not exceed the specified
percentage of tipping load as determined by
SAE Crane Stability Test Code J765a.
18. For all boom lengths between the retracted
and extended boom length, the rated loads
are determined by boom angle only shown in
the extended boom column. For boom angles
not shown, use capacity of the next lower
boom angle.
19. When either radius or boom length, or both,
are between listed values, the smaller of the
two load ratings shall be used.
13. Crane load ratings are for lift crane service.
Applications for other than lift crane (clamshell and magnet) are permitted. Due to
significant variations in materials and applications, consult factory for optimum capability.
20. Load ratings are dependent upon the crane
being maintained according to manufacturer’s
specifications.
14. Weight of hooks, hook blocks, slings and all
other load handling devices must be considered part of the load to be handled and must
be subtracted from the load ratings to obtain
the allowable load to be lifted.
21. The maximum load which may be telescoped
is limited by boom angle, hydraulic pressure,
boom lubrication, etc. It is safe to attempt to
extend and retract within the limits of the capacity chart.
15. Crane load ratings are based on freely suspended loads. SIDE LOAD ON BOOM OR
JIB IS EXTREMELY DANGEROUS.
22. It is recommended that load handling devices, including hooks and hook blocks, be
kept away from boom head at all times.
16. Practical working loads depend on the supporting surface, wind velocity, pendulum
action, jerking or sudden stopping of loads,
hazardous surroundings, experience of personnel, proper operation, tire inflation, tire
condition, traveling with loads, multiple
machine lifts, proximity of electrical wires,
etc. Appropriate reduction of load ratings
must be made for these and any other conditions which may affect practical working
loads.
23. The boom angles shown on the capacity chart
give an approximation of the operating radius
for a specified boom length. The boom
angle, before loading, should be greater to
account for boom deflection.
24. DO NOT LIFT LOAD OVER OPERATOR.
17. Crane load ratings with an asterisk (*) beside
1-17
TM5-3810-305-10
DEFINITIONS
25. Operating Radius: The horizontal distance
from the axis of rotation before loading to the
center of the vertical hoist line or tackle with
load applied.
26. Freely Suspended Load: Load hanging free
with no direct external force applied except
by the hoist rope.
27. Side load: Horizontal force applied to the
lifted load either on the ground or in the air.
28. Working Arc: Areas measured in a circular
arc around the centerline of rotation as shown
on the working area diagram.
CLARIFICATIONS
All notes on the Capacity Chart must be treated as WARNINGS. Failure to follow these
procedures could cause DEATH or serious injury.
NOTES 4 & 8
The Service manual and Operator’s manual are the same, Operation manual.
Operator’s manual, refer to section XII.
NOTE 7
Consult this manual, page 1-20, Load Ratings on Tires; tire pressure must be maintained
at 90 psi.
NOTES 5, 8 & 10
Consult Hoist Line Reeving (refer to page 2-2) and Wire Rope Instructions (refer to
page 4-28).
NOTE 13
The use of clamshells, magnets or work platforms, which are not provided with the machine, is not permitted.
1-18
TM 5-3810-305-10
c-1
LOAD RATINGS ON OUTRIGGERS
ON OUTRIGGERS
RADIUS
10
12
13
14
15
20
25
28
30
BOOM LENGTH
21 75Ft
Retracted
FRONT
360°
51°
15,000*
15,000*
43°
40°
35°
29°
15,000*
15,000*
15,000*
14,1OO*
15,000*
15,000*
14,1OO*
13,000
E
BOOM LENGTH
3575 Ft.
Extended
FRONT
&
15,000*
70°
15,000*
66°
15,000*
64°
15,000*
62°
14,1OO*
161°
51°
10,3OO*
7,700*
38°
27°
6,300
5,700
17°
360°
15,000*
15,000*
15,000*
14,1OO*
13,200
7,900
5,400
4,500
4,000
RADIUS
10
12
13
14
15
20
25
28
30
1-19
TM 5-3810-305-10
c-1
Load Ratinas On Tires
NOTES”
1 For Pick and Carry Operation, boom must be centered over the front of the machine
2 The load should be restrained from swinging.
3 Creep Speed is crane movement of less than 200 ft (61 m) in a 30-rninute period and not exceeding
1 Omph (1 6km/h)
RECOMMENDED
12 R22.5
LOAD RANGE H
TIRE
PRESSURE
STATIONARY
TRAVEL
115 Dsi
115 nsi
ON TIRES
R
Notes for On Tires Cspacltles
A
B
Tha load should be restrained
from swinging
c
Creep Spead is crane movament
of lass than 200 ft (61 m) In a
30 minute period and not axceeding 10 mph (1 6 kmih)
D
1-20
For Pick and Cerry operetlon,
boom must be centared ovar
tha front of tha mschlna
Refer to General Notes for additional information
A
:
M
A
x.
M
I
N.
12R22.5
STATIONARY
LR - H
:
PICK & CARRY
y
CREEP 12.6 klPkI
lJ
u
s IX IX
10 710 510
360°
7,300’
12,800’
9,800’
8,700’
10
12 67° 43”
5,800
11,000’
8,400’
7,400’
12
15 63° 29°
4,100
7,500
6,800”
6,000’
15
20 57°
0°
2,600
4,700
4,700
4,500’
20
25 40°
o“
1,900
3,400
3,400
3,400
25
28 29°
0°
1,600
2,800
2,800
2,800
2a
30 17°
0°
1,400
2,600
2,600
2,600
30
ST. OVER FRONT
s
TM5-3810-305-10
MAXIMUM PERMISSIBLE HOIST LINE LOAD
Line Parts
Maximum Load
Boom Head
Hook Block
I
I
1
6,000 lb
(2,722 kg)
1
D
I
I
2
12,000 lb
(5,443 kg)
1 -D
1
I
I
3
15,000 lb
(6,804 kg)
1-2
1-D
1, 2, D = Cable to sheave position and dead end. Sheaves are numbered left to right.
Wire Rope = 6 x 19 Class, 23,000 lb (10,433 kg) minimum breaking strength; l/2-inch diameter.
I. P.S., I. W.R.C., Preformed
1-21
TM5-3810-305-10
Figure 1-6. Radius from Centerline of Rotation
1-22
TM5-3810-305-10
NOTE
Never lift or swing load directly
above operator’s compartment or
over ground personnel in the
work area. Failure to follow this
procedure could cause DEATH
or serious injury.
Working areas are areas measured in a circular arc around
centerline or rotation.
CRANE WORKING POSITIONS
Figure 1-7. Working Area Diagram
1-23
TM5-3810-305-10
Section V
Power and Utility Requirements
* *NOT APPLICABLE**
Section VI
Environmental Requirements
**NOT APPLICABLE**
Section VII
List of Items Furnished
Hook Block: A 10-ton single-sheave hook block
is provided with swivel hook and safety latch.
Sheaves comply with SAE J-881. The weight of
the hook block provides adequate overhaul of the
cable, insuring smooth cable operation of the hy draulic winch.
Boom Lenght Markers: Boom length markers
are located on both sides of the inner boom to
indicate retraced length of 21.75 ft (6.63 m) or a
fully extended boom length of 35.75 ft (10.90 m)
and are used in conjunction with Capacity Chart.
Cable; A l/2-inch diameter, 6 x 19 class cable
of right regular lay, having an independent wire
rope core and constructed of improved plow
steel, is provided, having a 3.5:1 safety factor in
accordance with SAE J-959. The winch drum
capacity is such that when the crane is properly
reeved, three wraps of cable are maintained at all
times on the hoist drum.
Boom Angle Indicator: A mechanical boom
angle indicator conforming to SAE J375 is
provided for angular boom elevations.
Figure 1-8. Boom Lenght Marker
Section Vlll
List of Items Required
**NOT APPLICABLE**
Section IX
Storage Data
LRT 110 Cranes being placed in storage must be
adequately protected from deterioration during
extended periods of idleness. Proper protection
insures that the crane can be restored to service
with minimum effort.
What specific preparation procedures are required depends upon the length of time the crane
is to be stored. Short Term Storage is defined as
1-24
30 days or less. Extended Storage is defined as
more than 30 days.
NOTE
For a complete list of storage instructions for the LRT 110 Crane, refer to
Koehring Commercial Maintenance
Instructions.
TM5-3810-305-10
Section X
Tools and Test Equipment
Figure 1-9. Tools and Test Equipment
1-25
TM5-3810-305-10
The LRT 110 Crane Tool Kit Consists of
Tool
Use
Qty
1
1 Wrench, 3/4 x 7/8
Emergency swing
2 Wrench, 9/16 x 5/8
Hose connections
1
3 Wrench, 5/8 x 11/16
Hose connections
1
4 Wrench, 3/4 x 7/8
Hose connections
1
5 Wrench, 12 inch,
Adjustable
All purpose
1
6 Wrench, Lug
Wheel nuts
1
7 Handle
Lug wrench
1
8 Adapter, -8 to -6
Hose adapter
2
9 Cap, -4
Emergency hose
1
10 Reducer, -6 to -4
1
Winch brake hose
11 Tee, -8
Emergency hose adapter
1
12 Plug, -4
Open hose ends
1
13 Plug, -6
Open hose ends
1
14 Plug, -lo
Open hose ends
1
15 Plug, -12
Open hose ends
3
16 Disconnect, (Quick),
Female
Reservoir tank
2
17 Adapter, -6 to -4
Hose adapter
3
18 Hose
1
Outrigger emergency return
19 Adapter, -6 to -6
Hose adapter
1
20 Cap, -6
Hose cap
2
21 Cap, -12
Hose cap
1
22 Adapter, -12 to -8
Hose adapter
1
23 Wrench, He. , 5/16
Boom hold valve
1
24 Wrench, He: . 5/32
Extend cylinder hold valve
1
25 Hose
1
Hand pump supply hose
26 Pin
Engages handle on hand pump
1
27 Hose
Pressure supply from hand pump 1
28 Pump, Hand
1
Emergency crane operation
29 Adapter
1
Hose adapter
1
30 Hose
Test guage connector
1
31 Elbow
Hose fitting
1
32 Plug, Pipe, -4
Hose plug
2
33 Plug, Cap
Hose cap
34 Adapter, Hex,
1
(Axle Plug)
Axle check plug removal
Hook block to pintle air
35 Link
1
transport
36 Cylinder, Ether
Cold start assist
1
(in container)
1-26
TM5-3810-305-10
Section Xl
Warranty Information
Refer to Warranty Technical Bulletin, TB 5-3810-305-15.
Section XII
Safety Precautions
Introduction
The LRT 110 Crane is designed to
conform to all applicable SAE, ANSI and
OSHA safety requirements.
As a crane operator, your responsibility for
safety is not lessened by the operational aids and
warning devices provided.
Guard against a false sense of security. Failure
to follow even a single safety precaution can
cause DEATH or SERIOUS INJURY. You are
responsible for your own safety as well as others
working around you.
Warning decals are placed conspicuously on the
vehicle warning of hazards including the danger
of electrocution if the boom or load is swung into
power lines.
In addition to the following list, WARNINGS,
CAUTIONS and NOTES appear throughout the
manual directly above the procedure to which
they apply.
indicates a hazard which
can result in DEATH or serious injury.
I
Exercise good judgment when
operating the LRT 110 Crane.
Read and understand all safety
precautions before operating the
crane. Failure to follow these
precautions could cause DEATH
or serious injury.
Genera I Warnings
Do not attempt to operate the
LRT 110 Crane until all operating instructions have been read
and understood. Knowledge of
controls alone is inadequate
preparation to operate this vehicle. Failure to follow this
procedure could cause DEATH
or serious injury.
CAUTION
is a reminder of safety
practices or directs attention to usage practices
that may result in damage to equipment.
NOTE is a statement containing information that
will make the procedure easier to perform.
To avoid many dangerous practices, play it safe by following
correct procedures. Failure to
follow these procedures could
cause loads to fall causing
DEATH or serious injury.
1-27
TM5-3810-35-10
Be aware of limited work area
while working on the deck area
of the LRT 110 Crane. The deck
and fender surface is small and
can become slippery in inclement
weather. Failure to follow this
procedure could cause DEATH
or serious injury.
Never disconnect hydraulic lines
or fittings before venting pressure. Turn dipstick cap 1/4 turn
to safety notch to relieve pressure. Failure to follow this
procedure could cause SERIOUS
INJURY.
Alert all personnel that the
upperstructure is to be lifted off
the carrier. Keep all uninvolved
personnel clear of the vehicle
while hoisting and removal are
taking place. Check all pin
connections, cable alignment and
machine bubble level before
proceeding with the lift. Failure
to follow this procedure could
cause DEATH or serious injury.
Keep hands and arms clear of all
pinch points while checking the
alignment of the upperstructure
and the earner mounting surface.
Failure to follow this procedure
could cause SERIOUS INJURY.
1-28
Keep arms and hands from under
upperstructure. Failure to follow
this procedure could cause
SERIOUS INJURY.
Vehicle must be level to prevent
possible loss of control of upperstructure when lifting off of
ground. DEATH or serious
injury may result if upperstructure gets out of control.
Check that all pins and pin locks
are installed and secured properly. DEATH or serious injury
may result if upperstructure
comes loose.
Stay clear of hoisted upperstructure while it is being positioned
over carrier. Failure to follow
this procedure could cause
DEATH or serious injury.
Turn the face during the following procedure to avoid having
hydraulic oil splash in face or
eyes. Failure to follow this
procedure could cause SERIOUS
INJURY.
TM5-3810-305-10
Weight of (component) is approximately XX lb (XX kg). Use
two people to properly support
and lift (component). Failure to
follow this procedure could cause
DEATH or serious injury.
Unwarranted use of BY-PASS
switch can result in damage to
the LRT 110 Crane and cause
DEATH or serious injury.
Cooling system is pressurized.
Use extreme caution and proper
protection when removing
radiator cap after operating
temperature is reached. When
removing cap, loosen it slowly to
the left, then pause a moment.
Steam and hot gases will be
escaping through the radiator
cap; avoid being burned by these
gases. Continue to turn cap until
it can be removed. Failure to
follow this procedure could cause
SERIOUS INJURY.
●
●
Battery gases can explode. Do not
smoke or allow sparks or open flames
near batteries. Wear safety glasses or
goggles when checking the batteries.
Failure to follow this procedure could
cause DEATH or serious injury.
corrosion or electrolyte makes contact,
take immediate action to stop the
burning effects:
EYES: Flush with cold water for
no less than 15 minutes and seek
medical attention immediately.
SKIN: Flush with large amounts
of cold water until all acid is
removed. Seek medical attention
as required.
INTERNAL: If corrosion or
electrolyte is ingested, drink
large amounts of water or milk.
Follow with milk of magnesia,
beaten egg or vegetable oil. Seek
medical attention immediately.
CLOTHING/EQUIPMENT:
Wash area with large amounts of
cold water. Neutralize acid with
baking soda or household ammonia.
Failure to follow this procedure
could cause DEATH or serious
injury.
The operator must exercise sound
judgment in positioning outriggers. The outriggers should not
be set near holes, on rocky
ground or on extremely soft
ground. Setting outriggers in
such locations may result in the
vehicle tipping, causing DEATH
or serious injury.
Sulfuric acid contained in batteries can
cause serious bums. If battery
1-29
TM5-3810-305-10
The LRT 110 Crane must be
level prior to extending boom or
lifting loads. To achieve this
condition, outriggers should be
extended to lift carrier wheels off
the ground. Use bubble level
next to the operator’s seat to
insure that vehicle is level. The
bubble must be centered in circle.
Failure to follow this procedure
could cause DEATH or serious
injury.
Hook latch is intended to retain
loose slings or devices under
slack conditions. It is not intended to be an anti-fouling
device. Caution should be used
to prevent the latch from supporting any of the load. Periodic inspection of latch must be made to
insure its proper operating
condition. Failure to follow this
procedure could cause DEATH
or serious injury.
An operator must be guided by
the Capacity Chart mounted on
vehicle when considering load
weights. Rated loads must never
be exceeded. Failure to follow
this procedure could cause
DEATH or serious injury.
The intent of the information is
to prevent any possibility of
either reverse winding of the
rope on the winch drum, causing
breakage of winch cable, or the
unseating of cable from winch
drum, resulting in uncontrolled
fall of the hook block and load.
Failure to follow this procedure
could cause DEATH or serious
injury.
Never lift and swing a load
directly over operator’s compartment or over ground personnel in
the work area. Failure to follow
this procedure could cause
DEATH or serious injury.
Using an axe or hatchet to cut
wire rope may be dangerous. If
necessary to use, proceed with
great caution. Failure to follow
this procedure could cause
SERIOUS INJURY. Portable
hydraulic and mechanical rope
cutters are available. In remote
areas, however, it may at times
be necessary to use less desirable
cutting methods.
Incorrect cable type or size will
not function properly and may be
dangerous when used. Failure to
follow this procedure could cause
DEATH or serious injury.
1-30
TM5-3810-305-10
If exhaust gases or exposure
Make certain slings, ties and
hooks are of sufficient capacity,
properly set and secure before
performing any lift operation.
Failure to follow this procedure
could cause DEATH or serious
injury.
●
●
Always use a qualified signalman and
observe load while the equipment is in
operation.
When spotting a load, it may become
necessary to alter the boom angle or
length, If adjustment is necessary,
consult the LRT 110 Capacity Chart
before performing a lift. Failure to
follow this procedure could cause
DEATH or serious injury.
Exhaust gases can produce symptoms of headache, dizziness and
loss of muscular control.
DEATH, permanent brain damage or other serious injury may
be caused by exhaust gases.
symptoms are observed, ventilate
the area immediately and treat
affected personnel:
●
Administer artificial respiration, if
required.
●
Expose affected personnel to fresh air.
●
Keep affected personnel warm.
●
Do not permit physical exertion.
●
Refer to FM 21-11, First Aid For
Soldiers for a more detailed description
of treatment procedures.
Never operate equipment with
personnel on the hook or a load.
Failure to follow this procedure
could cause DEATH or serious
injury.
Crane operators must always be
prepared to take emergency
action while a load is suspended
in the air. Never leave the
operator’s compartment with a
load suspended. Failure to
follow this procedure could cause
DEATH or serious injury.
1-31
TM5-3810-305-10
●
Keep all parts of body and tools
away from moving cable. Failure to follow this procedure
could cause DEATH or serious
injury.
Never allow boom or load to
swing into power lines. If the
crane must be operated in the
vicinity of power lines, follow
these safety precautions:
●
●
●
●
●
1-32
Contact the power company and have
all power lines and ground wires turned
off.
Never allow any portion of the
equipment, including cable, hook block,
lines and load, closer to power lines
than the distances shown on the
Electrical Warning (Danger) Decal.
Know the maximum height and reach
of the crane and erect a suitable
barricade around all power sources.
Warn all personnel in the work area of
the power source and electrocution
hazard.
If contact with a power source does
occur, DO NOT STEP OFF THE
CRANE. Stay on the vehicle until the
power is turned off or the equipment is
lowered and clear of the power source.
If fire or other conditions force the
operator to leave the crane, jump off
and away, keeping all parts of the body
clear of the equipment.
Failure to follow these procedures could cause DEATH
serious injury.
Diesel fuel and other combustible
materials are used in the operation and maintenance of this
equipment. Do not smoke or
allow open flames in areas where
combustible materials are stored
or used. Failure to follow this
procedure could cause DEATH
or serious injury.
No personnel are permitted on
the deck while rotating upperstructure. Failure to follow this
procedure could cause DEATH
or serious injury.
Improperly attached wire rope
terminals lead to serious or
possibly unsafe conditions.
Failure to follow this procedure
could cause DEATH or serious
injury.
TM5-3810-305-10
When using U-bolt clips, extreme care must be exercised to
make certain that they are attached correctly. Failure to
follow this procedure could cause
DEATH or serious injury.
Failure to make a termination in
accordance with the instructions,
or failure to periodically check
and retighten to the recommended torque, will cause a
reduction in efficiency rating,
which could cause DEATH or
serious injury.
Failure to install wedge sockets
in accordance with the instructions could cause DEATH or
serious injury.
Clamp the dead end close to the
socket to prevent the rope and
wedge from disengaging from
the socket. Failure to follow this
procedure could cause DEATH
or serious injury.
During the execution of this
procedure, the danger exists of
uncontrollably dropping a load.
Rotate the upperstructure to a
safe position. Failure to follow
this procedure could cause
DEATH or serious injury.
Entry of air into lowering port
will cause winch motor to cavitate. The winch motor lowering
port tee must be capped to prevent load from free falling when
hand pump pressure is applied.
Failure to follow this procedure
could cause DEATH or serious
injury.
When working the hand pump,
clear all personnel from the area.
Failure to follow this procedure
could cause DEATH or serious
injury.
When lowering boom to a horizontal position, work from side
of upperstructure, not under
boom. Failure to follow this
procedure could cause DEATH
or serious injury.
1-33
TM5-3810-305-10
Everyone must be clear of the
area before moving hoist control
lever. Failure to follow this
procedure could cause DEATH
or serious injury.
Starting fluid is toxic and highly
flammable. Container is pressurized to act as an expellent. Do
not heat container and do not
discharge starting fluid in confined areas or near an open
flame. Failure to follow this
procedure could cause SERIOUS
INJURY.
Adequate ground bearing support
must be provided for the outrigger when operating on soft
surface. Be alert for signs of
LRT 110 Crane movement
during operations. Failure to
follow this procedure couild
cause DEATH or serious injury.
Never use less than the number
of parts of line called for by the
Capacity Chart. Failure to follow
this procedure could cause
DEATH or serious injury.
1-34
Within the 85-dB envelope,
hearing protection is required.
Failure to follow this procedure
could cause SERIOUS INJURY.
All notes on the Capacity Chart
must be treated as WARNINGS.
Failure to follow these procedures could cause DEATH or
serious injury.
When use of a work platform is
least hazardous to personnel and
is the only practical means of
accomplishing a task, make
certain all personnel follow
minimum safety procedures.
Failure to follow these procedures could cause DEATH or
serious injury.
Read and understand all safety
precautions before attempting an
operation using a work platform.
Failure to follow this procedure
could cause DEATH or serious
injury.
TM5-3810-305-10
All safety procedures and criteria
established are the MINIMUM
requirements for use of a work
platform on the LRT 110 Crane.
Applicable government and
industry standards must also be
adhered to. Failure to follow this
procedure could cause DEATH
or serious injury.
Never use a work platform if
inspection indicates a structural
or mechanical fault of any kind.
Failure to follow this procedure
could cause DEATH or serious
injury.
No personnel are permitted on
the work platform during the
performance of any test. Do not
allow personnel on work platform if any test procedure indicates a malfunction in equipment. Failure to follow this
procedure could cause DEATH
or serious injury.
No operations with a work
platform are authorized “on
tires.” Always make certain the
LRT 110 Crane is on a stable
surface with the outriggers fully
extended. Failure to follow this
procedure could cause DEATH
or serious injury.
Never use a work platform near
energized power lines or ground
cables. Failure to follow this
procedure could cause DEATH
or serious injury.
Never allow electrically connected electrode holders to
contact metal components of a
work platform. Electrode holder
contact can cause burning and/or
melting of work platform suspension which could allow the work
platform to fall. Failure to
follow this procedure could cause
DEATH or serious injury.
Dry cleaning solvent P-D-680
used to clean parts is toxic and
flammable. Use only in well
ventilated areas and avoid contact with eyes, skin or clothing.
Wear the proper protective
clothing and equipment: goggles
or safety glasses, face shield and
gloves. Do not breath vapors. Do
not use near sparks or open
flames and do not smoke while
using it. Failure to follow this
procedure could cause DEATH
or serious injury.
1-35
TM5-3810-305-10
CAUTION
Compressed air used for cleaning
purposes must not exceed 30 psi
(207 kPa). Safety glasses must
be used when cleaning parts.
Failure to follow this procedure
could cause DEATH or serious
injury.
General Cautions
In addition to personnel hazards, the operator is
also responsible for avoiding potential damage to
equipment.
I
Make sure three sheaves and
cable are in alignment with
boom. Failure to follow this
procedure could cause damage to
equipment.
CAUTION
Keep all hoses out of the way
when lowering upperstructure.
Make sure the winch extension
hoses are not pinched against the
outrigger beam as the upperstructure is lowered. This could result
in damage to the extension hoses.
CAUTION
When removing hook block from
storage bracket, pay out cable
while raising boom to prevent
damage to windshield.
CAUTION
DO NOT use a torque wrench for
removal purposes. Failure to
follow this procedure could cause
damage to equipment.
1-36
CAUTION
Do not allow outrigger beam,
located under upperstructure, to
contact winch hoses. Failure to
follow this procedure could cause
damage to equipment.
CAUTION
Make sure the base plate opening
clears the connections on the
rotary manifold. Failure to
follow this procedure could cause
damage to equipment.
TM5-3810-305-10
CAUTION
When attaching hook block to
hook block tieback, take up cable
slowly while lowering boom to
prevent damage to windshield.
Do not make directional changes
between forward and reverse
while vehicle is in motion.
Failure to follow this procedure
could cause damage to equipment.
CAUTION
Do not attempt to move the
vehicle with the parking brake
engaged. Failure to follow this
procedure could cause damage to
equipment.
I
CAUTION
I
Never operate engine with oil
level below the ADD 1 QT mark
or above the FULL mark. Failure to follow this procedure
could cause damage to equipment.
I
CAUTION
I
If disconnect system malfunctions and hook block is drawn
into the boom point, vehicle may
be damaged. Care should be
taken when performing disconnect test.
CAUTION
If any gauge fails to operate, shut
engine off and notify maintenance. Failure to follow this
procedure could cause damage to
equipment.
CAUTION
Release starter button as soon as
the engine starts. If engine stalls
during start-up procedure, allow
engine to stop revolving before
re-engaging starter. Failure to
follow this procedure could cause
damage to equipment.
CAUTION
When operating on hard surfaces,
use two-wheel drive only. Failure to do so may result in severe
drive line “wind-up” and component failure.
Keep tension on cable to prevent
damage from slack.
1-37
TM5-3810-305-10
CAUTION
Speed is not to exceed 25 mph
(40 km/h). Failure to follow this
procedure could cause damage to
equipment.
CAUTION
Traveling with high transmission
temperature (above 250 degrees
F [121 degrees C]) can cause
damage to vehicle. Do not shut
engine off when transmission is
overheating.
CAUTION
Never shift between forward and
reverse while the LRT 110 Crane
is in motion. Failure to follow
this procedure could cause
damage to equipment.
Downshifts should not be made
when vehicle speed exceeds
maximum speed of next lower
range. Downshifting at excessive speeds will overspeed drive
train components and cause
damage to drive shafts
Do not operate for extended
periods with wide-open throttle
at speeds below minimums
shown. Failure to follow this
procedure could cause damage to
equipment.
1-38
Under emergency or extreme
traveling circumstances, it is
possible to stop the LRT 110
Crane with the parking brake.
However, this results in rapid
brake wear. After stopping 3 or
4 times by this method, parking
brake adjustment should be
made. Failure to follow this
procedure could cause damage to
equipment.
CAUTION
I
A dirty cab can result in damage
to instruments and controls.
Always consider possible obstructions which may be encountered during swings when varying boom height or length.
Think swing through, considering all obstacles, before making
swing. Failure to follow this
procedure could cause damage to
equipment.
CAUTION
I
Never hold controls in an “activated’ position once hoist/lower
cylinder or extend/retract cylinder has reached its limit of travel,
This can cause overheating of
hydraulic oil.
TM5-3810-305-10
ALWAYS START AND STOP
SWINGS GRADUALLY.
Stopping swing too abruptly will
cause load to oscillate and
impose side loads on boom. This
will cause damage to boom.
I
CAUTION
I
Never pull to the side with a
crane boom. Crane booms are
not designed for excessive side
pull and may collapse if subjected to excessive side loading.
CAUTION
Do not continue to pull block up
after contact has been made with
boom head. This will result in
damage to boom head and
sheaves. The cable may also be
broken, causing load to drop.
When spotting load, it may be
necessary to alter boom length or
boom angle. In making these
adjustments, the operator must
guard against exceeding rated
load as determined by the Capacity Chart. Failure to follow this
procedure could cause damage to
equipment.
Insufficient tire pressure reduces
the “On Tires” capacity. Attempts to pick rated capacity
without properly inflated tires
may cause vehicle to tip and/or
result in damage to tires and
rims.
I
CAUTION
I
Traveling over uneven terrain
with rear axle oscillation locked
out can result in instability.
Excessive boom length can also
cause instability depending on
terrain and wind pressure. Failure to follow this procedure
could cause damage to equipment.
I
CAUTION
I
Never use a chromate-base
corrosion inhibitor when coolant
contains ethylene glycol. Use
only nonchromate-base inhibitors. Chromate-base inhibitors
reacting with ethylene glycol can
produce chromium hydroxide,
commonly known as “green
slime.” This substance reduces
the heat transfer rate and can
cause serious engine overheating.
I
CAUTION
I
Water added to battery can freeze
before it mixes with electrolyte.
During very cold weather, add
water to battery just prior to, or
during operation of, vehicle. If
vehicle is not to be run, connect
an external charger to battery if
adding water.
1-39
TM5-3810-305-10
BE ALERT FOR SIGNS OF
PUMP CAVITATION. The
hydraulic oil provides lubrication
for pumps. When too heavy or
stiff, it will not flow fast enough
to meet pump demand and a
vacuum or “cavitation” will be
created. A “screaming” noise
indicates inadequate pump
lubrication and, if allowed to
continue for more than a short
period, will result in serious
damage to pumps.
I
CAUTION
I
If the LRT 110 Crane is to be
towed a distance of more than 1
mile (1.6 km) and/or at speeds
greater than 3 mph (4.8 km/h),
the front driveshaft must be
disconnected from the front axle.
As an alternative to disconnecting the driveshaft, if (he engine is
operable, the engine may be
started and allowed to idle during
the towing process. This will
circulate lubricant in the transmission, lubricating the clutches
during the towing operation.
Failure to disconnect the driveshaft or to run the engine will
cause internal damage to the
transmission as the vehicle is
towed.
1-40
The tow bar MS500048 is the
only tow bar to be used on this
vehicle. If not available, see
organizational maintenance.
Failure to follow this procedure
could cause damage to equipment.
Be certain correct socket and
wedge as supplied are used.
Failure to follow this procedure
could cause damage to equipment.
CAUTION
Loops formed by overrun can
cause kinks and dog legs in the
cable, resulting in damage and
premature cable failure.
I
CAUTION
I
Never use a steel hammer or
pinch bar to move cable over on
drum. These tools can easily
damage cable.
If traveling more than five miles
on improved roads or two miles
on rough terrain or unimproved
roads, remove anti-two block
weight and chain from the switch
and secure it to the anchor point
of the wedge socket located
either on the boom head or hook
block, whichever is accessible.
Failure to follow this procedure
could cause damage to the hook
block switch.
TM5-3810-305-10
Safety Decals
Read and follow all safety decals.
Failure to follow this procedure
could cause DEATH or serious
injury.
Figure 1-10. Safety Decals
1-41
TM5-3810-305-10
Minimum Safety Requirements for Work
Platforms Sus pended From Load Line or
Rigidly Mounted on Boom
General
When use of a work platform is
least hazardous to personnel and
is the only practical means of
accomplishing a task, make
certain all personnel follow these
minimum safety procedures.
Read and understand all safety
precautions listed in this section
before attempting an operation
using a work platform. All
safety procedures and criteria established in this section are the
MINIMUM requirements for use
of a work platform on the LRT
110 Crane. Applicable government and industry standards must
also be adhered to. Failure to
follow this procedure could cause
DEATH or serious injury.
There are two methods for mounting a work
platform on the LRT 110 Crane. The first is to
suspend the work platform from the load line.
The second is to rigidly mount the work platform
to the boom.
Before attempting any operation using a work
platform, all of the conditions listed here must be
met, including crane equipment and work platform requirements and procedures for inspection,
rigging, testing and operation.
1-42
LRT 110 Crane Equipment Requirements
For Use of a Work Platform
1. The LRT 110 Crane must be in compliance
with PCSA Std. No. 4 and ANSI B30.5-1982.
2. In addition, the following equipment and/or
controls must be included and functioning on
the LRT 110 Crane:
a. For use of a work platform suspended
from a load line:
●
An operable anti-two block warning
device which automatically deactivates
the control function bringing about the
two-blocking condition.
●
A boom angle indicator.
●
Capacity Chart (refer to page 1-19).
●
A boom extension indicator,
●
A winch drum rotation indicator.
b. For use of a work platform rigidly
mounted to the boom:
●
A boom angle indicator.
●
Capacity Chart (refer to page 1-19).
●
A boom extension indicator
●
A means to rigidly attach a Koehring
supplied and/or approved work
platform to the boom tip.
TM5-3810-305-10
LRT 110 Crane Work Platform
Requirements
1. Work platforms suspended from a load line
or rigidly mounted to the boom shall comply
with all applicable government and/or industry standards relating to design and manufacture, including, but nor limited to, ANSI
A92.2-1979.
a. Design considerations for a work platform
suspended from a load line include:
●
●
Material and design safety factors.
Construction, including fasteners and
welding.
●
Flooring.
●
Hand rails.
●
Toe boards.
●
Safety lanyard attachments.
●
Gates.
●
Hoisting and tag line attachments.
●
Load limit, occupant limit and work
platform weight instructions on labels
and warnings.
b. Design considerations for a work platform
rigidly mounted to the boom include:
●
●
●
●
Hand rails.
●
Toe boards.
Safety lanyard attachments.
Gates.
A means of adjusting and locking the
work platform level.
Load limit, occupant limit and work
platform weight instructions on labels
and warnings.
2. Specifications for a work platform must be in
writing and must describe the platform
weight, load and occupancy limit, method of
platforms inspection and maintenance and
procedures for attachment to the LRT 110
Crane. The above, plus any appropriate precautionary information applicable to the
platform must be permanently placed either in
the vehicle or on the work platform.
Inspection, Rigging, Testing and
Operating a Work Platform for the LRT
110 Crane
1. The inspection, operation and safety requirements for a work platform suspended from a
load line or rigidly mounted to the boom must
at all times comply with PCSA Std. No. 4 and
all appropriate government regulations.
2. In addition, all of the following limitations
and minimum safety requirements apply:
Material and design safety factors.
Construction, including fasteners and
welding.
Flooring,
1-43
TM5-3810-305-10
Never use a work platform if
inspection indicates a structural
or mechanical fault of any kind.
Failure to follow this procedure
could cause DEATH or serious
injury.
a. Inspection: A complete inspection of the
LRT 110 Crane and the work platform
must be performed prior to any operation.
Inspection is to be performed daily or each
time the operator is replaced or the LRT
110 Crane is converted from material to
personnel handling.
Inspection must include the boom and all
mechanical and rigging equipment vital to
the safety of work platform operation.
Before a work platform suspended from a
load line may be used, the following
additional inspections must be performed:
manual trigger releases. As an
alternative, shackles with bolts, nuts
and retaining pins may be used.
●
Inspect wire rope ends making certain
they are properly anchored to boom,
fall ball, hook blocks and drums (refer
to page 2-3).
●
With the boom at maximum elevation
and the work platform on the ground or
at its lowest operational level, inspect
the hoist drum making certain at least
three wraps of wire rope remain.
●
Make certain the minimum safety
factors for wire rope are adhered to at
all times.
Use 7:1 as the minimum safety factor for
manufacturer’s specified wire rope and
10:1 as the minimum safety factor for
rotation resistant rope for the combined
weight of lifting attachments, platform,
personnel and tools.
Inspection of hook and wire rope.
Daily inspection of load line.
The anti-two block device must be
calibrated to sound a warning and
deactivate the control function bringing
about the two-blocking condition
whenever the hook block assembly,
platform or fall ball assembly is less
than 3 ft (914 mm) from the boom tip.
Inspect hook latches on fall ball
assemblies and sheave block assemblies
making certain they close and lock,
eliminating hook throat openings and
are full-load bearing hook latches with
1-44
No personnel are permitted on
the work platform during the
performance of any test. Do not
allow personnel on work platform if any test procedure indicates a malfunction in equipment. Failure to follow this
procedure could result in
DEATH or serious injury.
b. Testing: The following daily test procedures are to be performed on the LRT 110
Crane and the work platform whenever the
operator changes or a significant change in
lifting conditions occurs.
TM5-3810-305-10
To test the work platform and equipment, use the
following procedure:
before using a work platform:
●
Make certain the LRT 110 Crane is
level and stable, with outriggers fully
extended on a solid, level surface.
●
Make certain the operator is
experienced and in good physical and
emotional condition.
●
Make certain the operator does not
leave his station. While the work
platform is in use, the operator is to
remain in the vehicle with the engine
running.
●
All unauthorized personnel will leave
the LRT 110 Crane working area while
a work platform is in use.
●
All operations using a work platform
must be planned by the operator along
with supervisors, signal personnel and
personnel to be lifted prior to the
operation.
1. Load the work platform with ballast at least 2
times the weight of intended load.
Acceleration and deceleration
must be smooth and controlled.
Failure to follow this procedure
could cause damage to equipment.
2. Raise and lower the load at maximum line
speed.
3. Test the control/braking function by bringing
the load to a smooth stop.
4. The specific operation to be undertaken shall
be performed in its entirety.
5. When the test is completed, inspect the work
platform and equipment for any evidence of
damage or defect.
All limiting and warning devices shall be activated by each control function which may create
a two-blocking condition.
No operations with a work
platform are authorized “On
Tires,” Always make certain the
LRT 110 Crane is on a stable
surface with the outriggers fully
extended. Failure to follow this
procedure could cause DEATH
or serious injury.
c. Operation and safety: Always observe the
following operation and safety procedures
. The crane operator must avoid any
sharp or sudden movements while a
work platform is in use.
Never use a work platform near
energized power lines or ground
cables. Failure to follow this
procedure could cause DEATH
or serious injury.
●
Always maintain at least twice the
distance from power lines required by
OSHA 29CFR, Part 1910, while a work
platform is in use.
1-45
TM5-3810-305-10
●
●
Make certain the combined weight of
the work platform plus any attachment
devices, personnel, tools and equipment
does not exceed 1/2 of the lifting
capacity specified by the Capacity
Chart (refer to page 1-19).
●
●
Never travel the LRT 110 Crane while
a work platform is occupied.
●
●
●
Make certain that no more than one
crane function at a time is operated
while the work platform is in use.
Make certain personnel have radio or
telephone communication with the
crane operator at all times while the
work platform is in use.
●
●
In the event of a communication failure, personnel on the work platform must be returned
to the ground immediately using hand signals,
No operations using a work platform are to
performed without functioning communication equipment.
If other cranes or equipment are in the area of
a work platform operation, communication
between all machine operators will also be
maintained.
●
●
Make certain work platforms are not
used in winds on excess of 10 mph (16
km/h), rain, snow, ice, sleet, electrical
storms or other adverse conditions.
Make certain personnel never stand on
top rail, midrail or toe board of work
platform.
Before positioning a work platform,
make certain the vehicle is away from
any overhead obstacles.
Before a work platform is raised or
lowered, make certain all ropes,
electrical cords, hoses, etc. are free
from entanglement.
After positioning a work platform,
make certain all locks are set before any
work is performed.
When off the ground, make certain the
work platform is secured before
personnel enter or leave.
When working from a work platform, belting
off or otherwise attaching a work platform to
an adjacent pole, structure or other equipment
shall not be permitted, except when personnel
are entering or leaving the work platform.
●
●
●
●
1-46
Make certain personnel keep all parts
of the body, tools and other equipment
inside the work platform area during
raising or lowering operations.
Make certain all movement by
personnel on a work platform is done in
a slow and controlled manner.
Make certain personnel on the work
platform wear safety belts with lanyards
attached to hook or shackle.
Lifting a work platform is a single
crane operation. Never use more than
one crane to lift a work platform.
Never use a work platform to lift an
external load.
TM5-3810-305-10
Never allow electrically connected electrode holders to
contact metal components of a
work platform. Electrode holder
contact can cause burning and/or
melting of work platform suspension which could allow the work
platform to fall. Failure to
follow this procedure could cause
DEATH or serious injury,
●
●
If a welding operation is to be
performed, make certain electrode
holders do not contact metal
components of the work platform.
When the work platform is suspended
from a load line, a stabilizing tag line
must be attached to the work platform
and controlled to minimize any swaying
motion.
1-47 (1-48 blank)
TM5-3810-305-10
CHAPTER 2
PREPARATION FOR USE
The purpose of this chapter is to familiarize the operator with the preparation of cable for use.
Title
Hoist Line Reeving
Installing Wedge Socket On Cable
Spooling Cable On Drums
Installing Cable On Winch
Page
2-2
2-3
2-3
2-4
2-1
TM5-3810-305-10
Hoist Line Reeving
When reeving the machine in preparation for any
job, it should be kept in mind that hoisting and
lowering speeds decrease as the number of parts
of line increases. For most efficient use of the
LRT 110 Crane, it is therefore desirable to use
minimum required number of parts for lifting.
Never use less than the number
of parts of line called for by the
Capacity Chart. Failure to follow
this procedure could cause
DEATH or serious injury.
To determine the number of parts needed, refer
to the Capacity Chart, page 1-21.
1. Remove socket and wedge from cable and
thread it through the hook block for 2-part
and 3-part reeving (Figure 2-1 ).
2. When required number of parts has been determined, reeve cable as shown.
3. Attach a wedge-type cable socket to cable
dead end and secure it to either the boom
head or hook block as required.
4. Dead end cable on hook block for an odd
number of line parts, and on boom peak for an
even number of parts.
The crane has sufficient cable provided to allow
hook to reach ground level with any boom length
and elevation when reeved with minimum parts
of line required for the load being lifted.
Figure 2-1. Hoist Line Reeving
2-2
TM5-3810-305-10
Installing Wedge Socket on Cable
CAUTION
Be certain correct socket and
wedge as supplied are used.
Failure to follow this procedure
could cause damage to equipment.
4. Make lifts of gradually increased loads until
wedge is finally seated. Avoid imposing
shock loading on cable until wedge is firmly
in place.
5. With no more than 2 in. (50.8 mm) of cable
protruding, clamp dead end of cable with a
cable clamp (Figure 2-4).
When installing wedge-type sockets on cable,
use the following procedure:
1. Lead cable through socket and forma large
loop. Draw cable end back through socket
approximately 2 in. (50.8 mm) (Figure 2-2).
Figure 2-4. Clamped Cable
Spooling Cable on Drums
Figure 2-2. Cable Loop
2. Insert wedge and allow cable strands to adjust
around it (Figure 2-3).
Care must be exercised when installing cable on
winch drum. Improper spooling can result in
cable damage through crushing, kinking, dog
legs, abrasion and cutting. Poorly installed cable
will also adversely affect operating characteristics of machine by causing uneven application of
force and motion. This, in turn, can cause premature fatiguing and failure of cable.
1. Inspect and clean winch thoroughly before
proceeding with installation.
2. Check lagging and drum flanges for cracks,
breaks and excessive wear.
Figure 2-3. Inserted Wedge
3. Check for deformed or outsized drum and
excessive undercutting at base of flange.
These indicate that repair or replacement of
drum is necessary.
3. Seat wedge and loop just tightly enough to
allow handling by attaching socket to a strong
support and engaging winch to take a strain
on cable.
2-3
TM5-3810-305-10
4. After correcting any defects revealed by in-
spection and determining that the winch is in
good operating condition, spool cable (refer
to Chapter 4, Section V, Wire Rope Instructions, page 4-28).
5. Place a pipe or bar through the reel center.
6. Mount the cable shipping reel with the bar
horizontal on jacks or a suitable supporting
structure (Figure 2-5).
7. Draw the cable from the top of the reel, in
order to avoid reverse bending as it is spooled
onto the winch drum.
Installing Cab Ie on Winch
Install cable on winch drum in accordance with
the following procedure:
1. Position cable over boom tip sheave and route
back to winch drum.
2. Position winch drum with cable anchor pocket
on top.
3. Insert cable into small opening of cable
pocket. Loop cable around clamp and back
into pocket about 3/4 of the way through the
pocket. Use cable clamp for 1/2 in. cable
(refer to Koehring Commercial Parts Manual). Insert small end first. Pull on cable and
the clamp will slip into the pocket, securing
the cable (Figure 2-6).
Figure 2-5. Spooling Cable on Winch Drum
I
CAUTION
I
Loops formed by overrun can
cause kinks and dog legs in the
cable, resulting in damage and
premature cable failure.
Figure 2-6. Securing Cable on Winch
8. Apply braking force to the reel flange to
prevent overrun as the cable is being drawn
off.
9. Using a timber or block, apply force against
the shipping reel flange to provide the required breaking force.
2-4
4. Rotate the drum slowly to insure that first
layer of cable is evenly wound onto drum.
TM5-3810-305-10
5. Install remainder of cable. Tension cable by
braking shipping reel and slowly operate
winch in the raise mode to wind cable onto
winch drum.
CAUTION
Never use a steel hammer or
pinch bar to move cable over on
drum. These tools can easily
damage cable.
6. Using a lead or brass hammer, tap cable over
against preceding turns, making sure that adjacent turns are tight against one another.
After cable is wound onto winch drum, reeve
cable as desired.
2-5 (2-6 blank)
TM5-3810-305-10
CHAPTER 3
GENERAL THEORY OF OPERATION
The purpose of this chapter is to provide the operator with a general description of the LRT 110 Crane
and an overall view of its components and their functions.
Title
General Theory of Operation
Transmission Theory of Operation
Axle Theory of Operation
Winch Theory of Operation
Page
3-2
3-2
3-2
3-3
3-1
TM5-3810-305-10
General Theory of Operation
Transmission Theory of Operation
The LRT 110 Crane is a self-contained vehicle
featuring 7 1/2 ton maximum lifting capacity,
optional four-wheel drive, outriggers for added
stability during lifting operations and three
different steering modes: front wheel steering
for normal driving, crab steering for diagonal
moves and four-wheel steering for minimumradius turns.
The transmission is capable of four-speed shifting in both forward and reverse. Direction and
speed are selected through hydraulically actuated
multiple-disc clutches. The clutches are power
absorbing, allowing shifts under full engine
power in both forward and reverse. The clutches
are hydraulically controlled and spring released.
Hydraulic control makes the clutches selfadjusting. Each clutch is made of friction plates
and polished-steel reaction plates.
Power originates from an in-line, four-cylinder,
diesel engine mounted at the rear of the vehicle.
The transmission is mounted directly on the
engine and is used to turn drive shafts and to
power the tandem hydraulic pump. One-half of
the tandem hydraulic pump supplies hydraulic
pressure to the winch, and the other half supplies
hydraulic pressure to actuate the boom telescope
cylinder, boom hoist cylinder, boom swing
motor, outrigger cylinders, axle lockout cylinders
and steering controls, and to provide hydraulic
assistance for the brake system.
The boom is a two-section telescope-type with a
rotating boom support. Two large-diameter,
double-acting hydraulic cylinders telescope and
hoist the boom assembly. The hydraulic swing
motor and worm gear rotate the upperstructure.
The cable and hook block assembly are operated
by the hydraulic winch. The hydraulic and
electrical systems on the upperstructure are connected to the rest of the vehicle by the hydraulic
rotary manifold and electrical collector ring.
3-2
The transmission receives power from the engine
through the torque converter. The torque converter is fluid driven, creating a smooth and
shock-free drive. Fluid drive also eliminates
engine stalling and lugging when vehicle has a
heavy load. With light loads, the torque converter is able to transmit engine power directly to
the transmission at most engine speeds with no
torque multiplication. This provides variable and
automatic speed ratios, reducing need for shifting
gears.
Axle Theory of Operation
The front and rear axles have remote breathers to
allow operation in up to 30 in. (762 mm) of
water. The rear axle has lockout cylinders to
provide increased stability during hoisting.
Steering for each axle is enhanced by dual-acting
hydraulic cylinders which are tied together by a
single tie rod which provides smooth, sharp,
synchronized turning with minimum alignment
and adjustment requirements. The service brakes
are shoe-type hydraulic units, and are part of the
axle. The front axle has a disc brake that can be
used either as a parking brake or as an emergency brake. Each axle has its own differential.
TM5-3810-305-10
Winch Theory of Operation
The winch is made up of four basic assemblies:
winch base, hydraulic motor and brake valve,
brake cylinder and motor support, and drum
assembly. The hydraulic motor turns the gears in
the drum assembly, working the cable.
The winch has a dual braking system: a dynamic
brake and a static brake. These two types of
brakes work together to control the speed of the
drum assembly. The dynamic brake uses hydraulic pressure to operate the brake valve which
controls the flow of hydraulic oil to the hydraulic
motor, The static brake is made of multiplefriction discs, a brake clutch assembly, and a
hydraulic piston and cylinder. The static brake is
automatically applied unless it is released by
brake valve pilot pressure at a level lower than
that required to open the pilot-operated spool
valve.
Either brake system does not affect the winch
during hoisting operations. When the operator’s
control is placed in neutral, rollers between the
cam and outer race wedge to prevent the drum
assembly from turning. The brake valve stops oil
flow from the hydraulic motor. For lowering a
load slowly, the operator can allow only enough
oil to release the brake without engaging the hydraulic motor. The heat build-up is dissipated by
the hydraulic oil. For faster lowering, the hydraulic pressure is increased by the operator to
both release the brake and engage the hydraulic
motor.
3-3 (3-4 blank)
TM5-3810-305-10
CHAPTER 4
OPERATING INSTRUCTIONS AND FUNCTIONS
The purpose of this chapter is to familiarize the operator with controls and instruments necessary for the
operation of the LRT 110 Crane. Included also are the Preventive Maintenance Checks and Services
(PMCS) and vehicle operating procedures.
Do not attempt to operate the LRT 110 Crane until all operating instructions have been read and understood. Knowledge of controls alone is
inadequate preparation to operate this vehicle. Failure to follow this
procedure could cause DEATH or serious injury.
Section
Title
Page
Use of Operator’s Controls and Indicators
Controls and Instruments
4-3
II
Initial Adjustments and Control Settings
Checks and Inspections
Operator Observations
Cable Inspection
Preventive Maintenance Checks and Services (PMCS)
Operator Troubleshooting
4-10
4-11
4-12
4-13
4-15
III
start-up
Starting the Engine
4-17
IV
Operation Under Normal Conditions
Operating the Engine
Before Moving the LRT 110 Crane
Pre-Move Checklist
Moving the Vehicle to a Job Site
Upshifting and Downshifting Recommendations
Stopping the Engine
Lift Procedure on Outriggers
Lift Procedure “On Tires”
Hand Signals for LRT 110 Crane Operation
4-18
4-18
4-18
4-18
4-20
4-20
4-20
4-25
4-27
V
Wire Rope Instructions
Wire Rope Identification and Construction
Wire Rope Installation
Unreeling and Uncoiling
Seizing Wire Rope
Cutting Wire Rope
End Fittings and/or Attachments
Socketing
Wire Rope Clips
U-Bolt Clips
Fist Grip Clips
4-28
4-30
4-31
4-34
4-35
4-35
4-36
4-37
4-38
4-39
I
4-1
TM5-3810-305-10
Section
Title
Wedge Sockets
Drums, Plain (Smooth)
Flexibility of Wire Rope
Breaking in a New Wire Rope
Wire Rope and Operation Inspection
Guideline to Inspections and Reports for Equipment,
Wire Rope and Wire Rope Slings
Wire Rope Inspection
Illustrated Examples of Possible Wire Rope Damage
Rope Inspection Summary
Equipment Inspection
Cable Lubrication
VI
VII
VIII
4-2
Page
4-40
4-42
4-42
4-43
4-43
4-44
4-45
4-51
4-54
4-55
4-55
Operation Under Emergency and Abnormal Conditions
Emergency Load Lowering Procedure
Unusual Operating Conditions
4-56
4-64
Shutdown
Vehicle Shutdown Procedures
4-71
Transportability
Land Transport
Air Transport
Rail Transport
Marine Transportation
4-72
4-74
4-75
4-76
TM5-3810-305-10
Section I
Use of Operator’s Controls and Indicators
Figure 4-1. Control and Instrument Identification.
The controls and instruments are illustrated from operator’s view point with the machine in travel position.
4-3
TM5-3810-305-10
Controls and Instruments
Figure 4-2. Dash Panel
1. Tachometer/Hour Meter indicates engine
rpm (normal idle 800 rpm; governed 2,950 rpm)
and operating hours of engine (Figure 4-2).
2. Dash Lights illuminate dash panel and side
sloping dash panel (Figure 4-3).
3. Rear Axle Centering Indicator light is off
when axle is centered with wheels parallel to line
of travel for two-wheel steering. Light is on
when wheels are off center. When light is off,
switch to two-wheel steering (Figure 4-2).
4. Horn is activated when pushed, and is deactivated when blackout lighting is used.
Figure 4-3. Slide Sloping Dash Panel
5. Engine Water Temperature Gauge indicates
engine coolant temperature (temperature range is
140 to 220 degrees F [60 to 104 degrees C];
approximately 190 degrees F [88 degrees C] is
normal operating temperature).
8. Cold Start is recommended for ambient temperatures below 32 degrees F (O degrees C ) and
required at 10 degrees F (-12 degrees C) and
below.
6. Engine Oil Pressure Gauge indicates engine
oil pressure (idle of 10 psi [69 kpa] minimum to
governed speed no load of 55 psi [379 kPa]; cold
oil may read 90 psi [621 kPa]).
9. Transmission Temperature Gauge indicates
oil temperature out of convertor (normal range is
160 to 190 degrees F [71 to 88 degrees C]; cool
down is required above 250 degrees F[121
degrees C]).
7. Fuel Gauge indicates amount of fuel in fuel
tank.
4-4
10. Voltmeter indicates battery condition (24
volts is normal indication).
TM5-3810-305-10
11. Ignition Switch turns electrical circuits ON
and OFF, and stops engine in the OFF position
(Figure 4-3).
NOTE
Starter will not activate unless
transmission is in neutral.
12. Starter Button starts engine.
13. Windshield Wiper Switch has three positions: OFF, LO, and HI.
Figure 4-6. Swing Lever
14. Work Light Switch turns three flood lights
on and off, and is deactivated when blackout
lighting is used.
15. Vehicle Light Switch provides on/off operation of service drive lights, stop lights, blackout
marker and blackout drive lights.
16. Dash Light Switch turns dash panel and
instrument lights on.
17. Outrigger Switch (Front) activates valve
for independent operation of front left or right
outriggers.
Figure 4-5. Outtrigger Lever
Figure 4-3. Side Sloping Dash Panel
18. Outrigger Switch (Rear) activates valve for
independent operation of rear left or right outriggers.
19. Steering Selector has three positions: fourwheel is full clockwise position, two-wheel is
center position, and crab is full counterclockwise
position. Switch to crab or four-wheel steering
only when axles are centered (axle center indicator light is out), or steering will be limited and
may be locked (Figure 4-4). If wheels should
become locked, switch to two-wheel steering,
turn front wheels, switch back to crab or fourwheel steering and center rear wheels.
20. Outrigger Control Lever raises or lowers
outrigger beams. Each beam operates independently with control switches: pull to raise; push to
lower (Figure 4-5).
Figure 4-4. Steering Selector
21. Swing Lever contols rotation of upperstruc ture: push to swing right; pull to swing left.
When the upperstructure is 5 degrees off front
center, rear axle pivot cylinders are locked into
position to maintain stability for crane work
(Figure 4-6).
4-5
TM5-3810-305-10
CAUTION
Do not make directional changes
between forward and reverse
while vehicle is in motion.
Failure to follow this procedure
could cause damage to equipment.
24. Two Wheel-Four Wheel Drive Shift Lever
selects drive mode: two-wheel drive for hardsurface travel and four-wheel drive for off-road
use. It may be necessary to creep to get gears to
align.
25. Bubble Level indicates if vehicle is level
prior to making a lift (level is with bubble in
center of circle).
22. Forward-Neutral-Reverse Shift Lever
selects direction of travel. Must always be in
neutral when starting engine and making crane
lifts (Figure 4-7),
26. Circuit Breakers protect electrical circuits
during minor electrical malfunctions. Circuit
breakers must be reset if tripped.
23. Transmission Speed Shift Lever has four
transmission speeds from 1 thru 4 in either
forward or reverse travel. Start travel in 1st gear.
27. Boom Hoist Lever raises or lowers boom:
pull to raise boom; push to lower boom (Figure
4-8).
28. Boom Telescope Lever extends or retracts
boom: push to extend boom; pull to retract boom
(Figure 4-9).
Figure 4-8. Boom Hoist Lev er
Figure 4-9. Boom Telescope
29. Winch Lever lowers or raises load: push to
lower load; pull to raise load (Figure 4- 10).
Figure 4-10. Winch Lever
Figure 4-7. Right Hand
4-6
TM5-3810-305-10
30. Turn Signal Lever activates right- or lefthand turn signals, plus emergency flashers, and is
deactivated when blackout lights are on (Figure
4-11).
Anti-Two Block Warning Light is a visual
warning light to indicate approaching two-block
condition.
Anti-Two Block Audible Horn Warning
Switch is used to deactivate the audible warning
system while traveling.
Figure 4-11. Turn Signal Lever
31. Anti-Two Block Panel is equipped with an
audio/visual anti-two block warning system designed to alert operator of impending two-block
conditions (i.e., the hook or hook block is being
drawn into boom point sheaves). The vehicle is
equipped with a shut-off disconnect system on
the control linkage. It is activated when the hook
block contacts the anti-two block counterweight:
winch hoisting will cease, and boom will not
extend or lower; raising and retracting boom and
winch down functions will remain active. Appropriate counteraction should be taken to prevent two-blocking (Figure 4-12).
Unwarranted use of BY-PASS
switch can result in damage to
the LRT 110 Crane and cause
DEATH or serious injury.
Anti-Two Block BY-PASS Switch allows an
operator to override the anti-two block system.
This then allows hook or block to be drawn
closer to boom point. It is recommended that the
BY-PASS switch be used only in cases of extreme emergency. The operator must exercise
sound judgment.
32. Diagnostic Connector Panel is located in
rear of operator’s cab to plug in Vehicle Test
Module (VTM) to run STE/ICE tests. Fuel shutoff switch is part of STE/ICE system and always
remains on unless it is used for STE/ICE tests
(Figure 4-13). Panel also has lubrication fitting
for turntable bearing. For lubrication instructions,
refer to Appendix B.
Figure 4-12. Anti-two Block Panel
Figure 4-13. Diagnostic Connector Panel
4-7
TM 5-3810-305-10
33. Speedometer indicates travel speed in mph
and km/h. An audible warning will sound at 25
mph (40 km/h) (Figure 4-14).
36. Brake Pedal activates hydraulic service
brakes.
37. Heater Switch turns fan ON or OFF and is
located on top of heater behind operator’s seat.
38. Seat Adjust Lever adjusts seat front to rear
and is located under left-hand comer of seat.
33
Figure 4-14. Speedome ter
34. Accelerator Pedal increases fuel flow and
engine speed (Figure 4-1 ).
CAUTION
Do not attempt to move the
vehicle with the parking brake
engaged. Failure to follow this
procedure could cause damage to
equipment.
35. Parking Brake Lever activates parking
brake: push down to engage parking brake; pull
up to release. Always engage parking brake
before leaving vehicle. Minor adjustments may
be made by turning the knob on the end of the
parking brake lever clockwise to tighten the
brake. When the parking brake is properly
adjusted the crane cannot drive through it in third
gear.
4-8
39. Heater Shut-Off Valve shuts off flow of
heated coolant and is located below the left side
of heater, behind operator’s seat.
40. Boom Angle Indicator indicates angle of
boom from 0 thru 75 degrees elevation, in 1degree increments.
41. Fire Extinguisher is located on left-hand
side of cab on rear wall for emergency fires.
42. Defroster Fan is mounted on upper right
comer of cab and is controlled by ON-OFF
switch on mounting base.
TM5-3810-305-10
43, Boom Length Markers are located on side
of boom and are used to indicate boom length.
44. Capacity Chart is located in cab on lefthand side and is used to determine proper lift
capacity.
45. Steering Wheel controls direction of vehicle.
Figure 4-1. Control and Instrument Identification
4-9
TM5-3810-305-10
Section II
Initial Adjustments and Control Settings
Checks and lnspections
The following items should be checked each day
before start-up and start of operations. Check all
fluid levels with vehicle parked on level ground.
Cooling system is pressurized.
Use extreme caution and proper
protection when removing
radiator cap after operating
temperature is reached. When
removing cap, loosen it slowly to
the left, then pause a moment.
Steam and hot gases will be
escaping through the radiator
cap; avoid being burned by these
gases. Continue to turn cap until
it can be removed. Failure to
follow this procedure could cause
SERIOUS INJURY.
Coolant - Check to be sure level is near top of
radiator tank. Check through inspection hole in
hood.
General Condition - Inspect vehicle in general
for wear, leakage and damage.
Leakage - Make a ground check below the
vehicle for signs of leaks.
CAUTION
Never operate engine with oil
level below the ADD 1 QT mark
or above the FULL mark. Failure to follow this procedure
could cause damage to equipment.
Engine Oil - The level should be indicated on
the dipstick (Figure 4-15). Oil level should be
checked when engine is cold.
Transmission Oil - Check transmission oil level
dipstick with engine running and transmission in
neutral. Check at a transmission operating
temperature of 160 to 190 degreesF(71 to 88
degrees C). Insure that oil is at FULL line
indicated on dipstick.
Hydraulic System - Check hoses, tubes, components, reservoir dipstick, valves, pumps, motors,
connections, cylinder mounting bushings and
pins. The system level, with all cylinders retracted in travel mode, should be at FULL mark
on dipstick located on reservoir fill cap.
Lubrication - Perform daily lubrications as
shown in lubrication chart (refer to Appendix B).
Diesel fuel and other combustible
materials are used in the operation and maintenance of this
equipment. Do not smoke or
allow open flames in areas where
combustible materials are stored
or used. Failure to follow this
procedure could cause DEATH
or serious injury.
Fuel/Water Separator - Drain water from fuel/
water separator, mounted on outer fuel filter.
Fuel - Check fuel gauge. Engine fuel should be
adequate for sustained operations. When adding
fuel use ASTM NO. 2 or 2D climatized Diesel
Fuel.
FULL
Figure 4-15. Engine, Oil Level
4-10
TM5-3810-305-10
Air Cleaner - With engine running, check air
cleaner restriction indicator located on outside of
hood support assembly (yellow is normal; red
requires service). Reset indicator each time hood
is opened by pushing the button on the bottom of
the indicator. If it does not reset, notify maintenance.
Tires - Check for proper pressure before traveling. Tires should only be checked when cold
(refer to Recommended Tire Pressure Chart,
page 1-20). Check for severe cuts and foreign
objects imbedded in tread.
Cable and Blocks - Inspect hoist cable, hoist
block, hook latch and boom attachment for
readiness.
Boom Head - Inspect cable retention pins and
hair pin totters at boom head for correct installation.
CAUTION
Keep tension on cable to prevent
damage from slack.
CAUTION
If disconnects malfunction and
hook block is drawn into the
boom point, vehicle may be
damaged. Care should be taken
when performing disconnect test.
NOTE
A warning light will appear on
anti-two block panel and an
audible signal will be heard if
horn switch is in ON position,
The LRT 110 Crane is equipped with disconnects
on control linkage. A check of this system
should be made prior to lifting. Hoist hook block
so that actual contact between block and anti-two
block counterweight is made. If all functions are
operating properly, winch hoisting will cease and
boom will not extend or lower. Should any of
these functions continue, disconnects are not
working and a complete system check must be
made. Boom retract, boom raise and winch
down functions remain active and will be unaffected by anti-two block system.
Cable - Reeve hoist cable as required.
Anti-Two Block System - Inspect anti-two
block switch found on boom head for damage.
Check for free movement of the counterweight
attached to switch. Be sure counterweight is
secured around correct line of hoisting cable in
proper manner. Inspect all electrical connections
and wires as well as the entire length of cable attached to the cable reel and its connections for
evidence of excessive wear, damage or improper
installation. Check cable reel for proper tension
and to insure that reel is free to rotate. Verify
visual and audible warning devices operation by
lifting counterweight.
Brake Fluid - Check reservoirs on front of dash.
Fill to FULL line on reservoirs.
Safety Equipment - Check safety equipment,
including tall lights, parking brake, hazard warning devices and fire extinguisher.
Operator Observations
As the operator, it is your responsibility to
observe and report any unusual sounds, odors or
other signs of abnormal performance that could
indicate trouble ahead. On a routine basis,
during the days operations the following items
should be checked.
4-11
TM5-3810-305-10
1. Visual inspection - Check complete vehicle
for any unusual condition.
2. Check for any leaks or damage to the hydraulic system.
3. Check engine compartment for:
●
●
●
●
●
Tension and wear of belt.
Oil level.
Air cleaner restriction indicator.
Air intake piping condition.
Muffler and exhaust pipe condition.
4. Check dash gauges for proper operation.
5. Check hydraulic reservoir dipstick level.
6. Check crane boom for:
●
●
●
●
●
Wear or damage to hook block.
Wear on cable retention pin at boom head.
Proper function of anti-two block system.
Proper cable spooling on winch.
Wear of cylinder pin connections.
7. Check tires, axles and drive lines for wear or
damage.
8. Check cab for:
●
●
●
●
●
●
4-12
Properly functioning instruments.
Properly operating controls.
Clean windows.
Properly functioning safety equipment <
Properly working lights.
Cleanliness - free of mud and debris.
Time Intervals - Unusual Conditions
The LRT 110 Crane will require extra service
and care when operated under unusual conditions, High or low temperatures, long periods of
hard use and continued use in sand, water, mud
or snow will break down lubricants. Add or
change lubricant more often under these conditions. However, during long periods when the
LRT 110 Crane is not in use, the service intervals
can be lengthened.
CabIe lnspection
All cable in active service should be inspected
DAILY along with spooling, sheaves, wedge
sockets and any other cable fittings for damage.
A thorough cable inspection should be made
WEEKLY by a competent inspector.
Refer to Section V, Wire Rope Instructions, page
4-28, for guidelines covering inspection, maintenance, repair and replacement of cable.
Incorrect cable type or size will
not function properly and may be
dangerous when used. Failure to
follow this procedure could cause
DEATH or serious injury.
Before installing a new or replacement cable,
make certain cable is of the correct type and size.
Cable Specifications
The LRT 110 Crane is equipped with 180 ft
(54.86 m) of 1/2 in. diameter 6x19 IWRC IPS
cable.
TM5-3810-305-10
Preventive Maintenance Checks and
Services (PMC)
The following Preventive Maintenance Checks
and Semites (PMCS) should be followed regularly to maintain the LRT 110 Crane at peak
operating condition. Perform PMCS more often
to compensate for continuous operation or under
abnormal conditions (i.e., extreme cold or heat;
exposure to moisture or salt; operation in dust or
sand).
Daily Check or Every 8 Hours of Service
Check hydraulic reservoir fluid level (refer to
lubrication chart, Appendix B, and page 4-10).
Fill fuel tank (refer to page 4-10).
Check engine oil level (refer to page 4-10).
Check coolant level (refer to page 4-10).
Check air cleaner (refer to page 4-11).
CAUTION
If any gauge fails to operate, shut
engine off and notify maintenance. Failure to follow this
procedure could cause damage to
equipment.
Check instruments, gauges and safety equipment
using the following procedure :
1. Start engine. Check to see if all gauges are
operational.
2. Check all lights, warning horns, mirrors and
turn signals.
3. Check all controls for proper operation. Controls should move smoothly, without binding
or excessive free play.
4. Check transmission oil level (refer to page 4-
10).
Check hydraulic components.
Check anti-two block system (refer to page 411).
Make overall visual inspection, including
ground, for leakage.
Check cable and related equipment (refer to page
4-11).
Check brake fluid (refer to page 4-11).
Lubricate rear axle pivot and axle lockout cylinders. Raise crane on outriggers before greasing
(refer to lubrication chart, Appendix B).
Verify that tires are inflated properly (refer to
page 1-20).
Check for dirt accumulation in outrigger box.
Lubricate turntable gear and pinion gear teeth
(refer to lubrication chart, Appendix B).
Drain fuel/water separator (refer to page 4-10).
Weekly Check or Every 40 Hours of Service
Perform the Daily Check.
Perform Daily and Weekly lubrication (refer to
lubrication chart, Appendix B).
4-13
TM5-3810-305-10
Check battery condition:
●
●
Battery gases can explode. Do
not smoke or allow sparks or
open flames near batteries.
Wear safety glasses or goggles
when checking the batteries.
Failure to follow this procedure
could cause DEATH or serious
injury.
Sulfuric acid contained in
batteries can cause serious
burns. If battery corrosion or
electrolyte makes contact, take
immediate action to stop the
burning effects:
EYES: Flush with cold water for
no less than 15 minutes and seek
medical attention immediately.
SKIN: Flush with large amounts
of cold water until all acid is
removed. Seek medical attention
as required.
INTERNAL: If corrosion or
electrolyte is ingested, drink
large amounts of water or milk.
Follow with milk of magnesia,
beaten egg or vegetable oil. Seek
medical attention immediately.
CLOTHING/EQUIPMENT:
Wash area with large amounts of
cold water. Neutralize acid with
baking soda or household ammonia.
Failure to follow this procedure
could cause DEATH or serious
injury,
4-14
1. Check electrolyte level. Fill battery cells to
0.75 in. (19. 1 mm) above the separator plates
with distilled water.
2. Check battery box. It should be clean and dry
with no signs of leakage from batteries.
3. Check cables. Corroded cables must be
cleaned, tightened and coated with grease.
Batteries should be clean and free of damage.
Check tire condition (refer to page 4-11).
Visually inspect the LRT 110 Crane. Inspect
structural members and welds for cracks, alignment and wear.
Visually inspect hook block. Inspect hook block
for damage and wear to sheaves and tubes.
Check hydraulic cylinders and rods. Inspect
cylinders for damage and leaks. Inspect rods for
nicks, burrs and scratches.
Lubricate control disconnects (refer to lubrication chart, Appendix B).
Lubricate sheaves Type II (refer to lubrication
chart, Appendix B).
Two Week Check or Every 80-100 Hours of
Service
Perform Daily and Weekly Checks.
Perform Daily, Weekly and Two Week lubrication (refer to lubrication chart, Appendix B).
Verify that wheel nuts have been torqued to 450
to 500 lb-ft (610 to 678 N ● m).
Check engine belt. Visually inspect belt for
glazing, cracks and fraying.
TM5-3810-305-10
Visually check the condition of the hydraulic oil.
Thickening of oil or a change in its appearance,
such as darkening, may serve as an indicator of
when an oil change is needed.
Clean radiator exterior. Wash radiator with soap
and water to remove dirt and foreign material
from fins of radiator.
Periodic testing of oil is the safest, most accurate
method of determining the condition of the oil.
An oil sample may be taken through the fitting
on inlet end of the reservoir return filter. Obtain
hydraulic oil sample for analysis every 100 hours
of service.
Operator Troubleshooting
1. Engine Does Not Crank
Problem
a. Ignition switch OFF
b. Transmission shift not in neutral
c. Loose battery cables
d. Low battery voltage
Remedy
a.
b.
c.
d.
Turn ON
Shift into neutral
Refer to maintenance
Refer to maintenance
2. Engine Cranks But Does Not Start
Problem
Remedy
a. Out of fuel
a. Check guage and fill tank (refer to page
4-l0)
b. Turn ON
c. Use cold start assist
d. Check fuel solenoid wire connection. If
loose refer to maintenance
b. STE/ICE fuel switch OFF
c. Temperature below 32 degrees F (O degrees C)
d. No fuel at engine
3. Electrical Circuit Non-Functional
Problem
Remedy
a. circuit breaker tripped
b. Lights will not come on
c. Low battery voltage (below 22 V)
a. Check and reset
b. Check for blackout mode and correct
c. Increase engine speed and observe
voltmeter. If no response, refer to maintenance
d. Refer to maintenance
d. High battery voltage (above 29.5 V)
4-15
TM5-3810-305-10
4. Engine Overheating
Problem
Remedy
a. Low coolant level
a. Cool down and check radiator (refer to
page 4-10)
b. Refer to maintenance
c. Stop engine, check and clean
b. Broken fan belt
c. Radiator fins plugged
5. Engine Oil Pressure
Problem
Remedy
a. Low (below 10 psi [69 kPa])
a. Stop engine, check and add oil (refer to
page 4-10)
b. Stop and refer to maintenance
b. High (above 90 psi [621 kpa])
6. Transmission Overheating
Problem
Remedy
a. Too high a gear ratio
b. Low oil level (oil below FULL line)
c. High oil level (oil above FULL line)
a. Stop, cool down and change gears
b. Check and refer to maintenance
c. Stop and refer to maintenance
7. Control Lever(s) Inoperative or Erratic
Problem
Remedy
a. Low hydraulic oil level
a. Add hydraulic oil as required (refer to
page 4-10)
b. Refer to maintenance
c. Refer to maintenance
b. Anti-two block system malfunction
c. Lever or linkage damaged
8. Boom Hoist or Extend Cylinders Inoperative or Erratic
Problem
a. Low hydraulic oil level
b. Load is too heavy
c. Anti-two block system malfunction
4-16
Remedy
a. Add hydraulic oil as required (refer to
page 4-10)
b. Consult Capacity Chart for maximum
loads and reduce as required
c. Refer to maintenance
TM5-3810-305-10
Section Ill
Start-Up
Starting the Engine
Once the Checks, Inspections and Observations
have been completed, the engine maybe started.
1. Make sure parking brake is on.
Exhaust gases can produce
symptoms of headache, dizziness
and loss of muscular control.
DEATH, permanent brain damage or other serious injury may
be caused by exhaust gases.
2. Move transmission shift lever to the neutral
position.
3. Set throttle to one-half speed.
4. Turn ignition switch to the ON position.
If exhaust gases or exposure
symptoms are observed, ventilate
the area immediately and treat
affected personnel:
●
●
●
●
●
Administer artificial
respiration, if required.
Expose affected personnel to
fresh air.
Keep affected personnel warm.
Do not permit physical
exertion.
Refer to FM21-11, First Aid
For Soldiers for a more detailed
description of treatment
procedures.
I
CAUTION
I
Do not engage starter motor for
more than 30 seconds at a time.
Should engine fail to start within
30 seconds, allow starter motor
to cool for 2 minutes before
attempting to start engine again.
Failure to follow this procedure
could cause damage to equipment.
5. Push starter button to start engine. Release
starter button as soon as engine starts. If
engine stalls during start-up procedure, allow
engine to stop revolving before re-engaging
starter.
6. Move throttle back to idle as soon as engine
starts. Idle speed range is 720 to 880 rpm.
7. With engine running, check oil pressure
gauge. If gauge does not register minimum
readings of 10 psi (69 kpa) idle to 30 psi (207
kPa) governed speed, no load, within 15 seconds, stop engine and refer to maintenance.
4-17
TM5-3810-305-10
Section IV
Operation Under Normal Conditions
Operating the Engine
When engine reaches operating temperature of
140 degrees F (60 degrees C), operations may
begin. While engine is running, check gauges at
frequent intervals and be alert for any abnormal
engine sounds or faulty engine performance.
terrain, road conditions and any hazards likely to
be encountered enroute. Think the move through
in advance and carry it out safely.
Pre-Move Check List
Before moving vehicle to and from job sites,
complete the following steps:
NOTE
1. Secure hook block to hook block tieback.
Maintaining battery in a fully
charged state is important for
starting engine.
2. Verify that tires are inflated properly (refer to
Recommended Tire Pressure Chart, page 120).
When idling engine for extended periods, maintain an idle speed sufficient to prevent battery
from being discharged, a voltmeter reading of
26+ V.
3. Check to be sure rear wheels are centered,
then switch to two-wheel steer.
4. Adjust seat and mirrors for clear vision.
Before Moving the LRT 110 Crane
Moving the Vehicle to a Job Site
CAUTION
If traveling more than 5 miles on
improved roads or 2 miles on
rough terrain or unimproved
roads, remove anti-two block
weight and chain from the switch
and secure it to the anchor point
of the wedge socket located
either on the boom head or hook
block, whichever is accessible.
Failure to follow this procedure
could cause damage to the hook
block switch.
The LRT 110 Crane is capable of both off-road
and on-road travel. The kind of travel undertaken will determine how carrier is operated.
Before moving the LRT 110 Crane around work
site or between sites, carefully consider type of
4-18
The general procedure for moving the LRT 110
Crane is as follows:
1. Buckle seat belt.
2. Start engine.
3. Check to be sure engine oil pressure is in
normal operating range (30 psi [207 kPa]
engine idling to 55 psi [380 kPa] governed no
load).
4. Shift into two-wheel drive, 1st gear. This is
recommended for normal travel conditions.
TM5-3810-305-10
CAUTION
Do not attempt to move the
vehicle with the parking brake
engaged. Failure to follow this
procedure could cause damage to
equipment.
5. Release parking brake.
6. Shift into forward travel.
Good judgment in selection of gear range and
route of travel is essential when operating offroad.
Though designed primarily for use in off-road
conditions, there may be instances when highway
travel is necessary. In such instances, the LRT
110 Crane is subject to the same regulations
governing the operation of other heavy equipment on public roads. Adequate lighting, flares,
flags and safety equipment must be on the vehicle at all times.
In addition to conditions of terrain, gear selection
while traveling is also determined by transmission temperature. Normal operating temperature
is 160 to 190 degrees F (71 to 88 degrees C).
CAUTION
Traveling with high transmission
temperature (above 250 degrees
F [121 degrees C]) can cause
damage to vehicle. Do not shut
engine off when transmission is
overheating.
If transmission temperature rises above 250
degrees F (121 degrees C) while traveling, the
LRT 110 Crane must be stopped and allowed to
cool. Shift to neutral and run engine at 1,000 to
1,200 rpm. The temperature should drop rapidly
to 160 to 190 degrees F(71 to 88 degrees C). If
temperature does not drop, trouble is indicated,
and should be determined before moving again.
Overheating generally occurs due to working in
too high a gear ratio.
CAUTION
When operating on hard surfaces,
use two-wheel drive only. Failure to do so may result in severe
drive line “wind-up” and component failure.
7. Accelerate engine by depressing accelerator
pedal until LRT 110 Crane starts to move.
CAUTION
Speed is not to exceed 25 mph
(40 km/h). Failure to follow this
procedure could cause damage to
equipment.
The operator may start to travel from idle in
either forward or reverse, and in 1st gear.
CAUTION
●
Never shift between forward
and reverse while the LRT 110
Crane is in motion. Failure to
follow this procedure could
cause damage to equipment.
●
Downshifts should not be
made when vehicle speed
exceeds maximum speed of
next lower range.
Downshifting at excessive
speeds will overspeed drive
train components and cause
damage to drive shafts.
Full power shifts under load may be made without endangering transmission or drive train
components.
4-19
TM5-3810-305-10
CAUTION
Do not operate for extended
periods with wide-open throttle
at speeds below minimums
shown. Failure to follow this
procedure could cause damage to
equipment.
1. Put transmission in neutral.
2. Engage parking brake.
3. Turn off accessories.
4. Reduce engine speed.
5. Turn ignition switch OFF.
Upshifting and Downshifting
Recommendations
Shift from:
CAUTION
A dirty cab can result in damage
to instruments and controls.
1 to 2 or from 2 to 1 at 2-3 mph (3-5 km/h)
2 to 3 or from 3 to 2 at 3-6 mph (5-10 km/h)
3 to40 or from 4 to 3 at 6-11 mph (10-18 km/h)
6. Keep cab clean.
Lift procedure
on Outriggers
Use four-wheel drive only when greater traction
is necessary.
Four-wheel drive engagement is accomplished
by a mechanical coupling in transmission. It
may be necessary to creep to get gears to align.
CAUTION
Under emergency or extreme
traveling circumstances, it is
possible to stop the LRT 110
Crane with the parking brake.
However, this results in rapid
brake wear. After stopping 3 or
4 times by this method, parking
brake adjustment should be
made. Failure to follow this
procedure could cause damage to
equipment.
Stopping the Engine
Before stopping the engine, perform the following steps:
4-20
Never allow boom or load to
swing into power lines. If the
crane must be operated in the vicinity of power lines, follow
these safety precautions:
●
●
●
Contact the power company
and have all power lines and
ground wires turned off.
Never allow any portion of the
equipment, including cable,
hook block, lines and load,
closer to power lines than the
distances shown on the
Electrical Warning (Danger)
Decal.
Know the maximum height
and reach of the crane and erect
a suitable barricade around all
power sources.
TM5-3810-305-10
●
●
●
Warn all personnel in the work
area of the power source and
electrocution hazard.
If contact with a power source
does occur, DO NOT STEP
OFF THE CRANE. Stay on
the vehicle until the power is
turned off or the equipment is
lowered and clear of the power
source.
If fire or other conditions force
the operator to leave the crane,
jump off and away, keeping all
parts of the body clear of the
equipment.
Failure to follow these procedures could cause DEATH or
serious injury.
Keep all parts of body and tools
away from moving cable. Failure to follow this procedure
could cause DEATH or serious
injury.
In making lifts, the operator must successfully
coordinate several functions. These include the
boom raise/lower, boom extend/retract, load
hoist/flower and swing functions. Although
experienced operator tends to operate two or
more of these functions simultaneously, the lift
procedure can be broken down into the following
sequence of operations:
The operator must exercise
sound judgment in positioning
outriggers. The outriggers
should not be set near holes, on
rocky ground or on extremely
soft ground. Setting outriggers
in such locations may result in
vehicle tipping, causing
DEATH or serious injury.
The LRT 110 Crane must be
level prior to extending boom
or lifting loads. To achieve this
condition, outriggers should be
extended to lift carrier wheels
off the ground. Use bubble
level next to the operator’s seat
to insure that vehicle is level.
The bubble must be centered in
circle. Failure to follow this
procedure could cause DEATH
or serious injury.
1. Set outriggers with boom over front of vehicle, not side. When a firm footing or level
ground is not otherwise available, use substantial timbers, solid blocking or other
structural members for support. Distribute
load so as not to exceed safe bearing capacity
of underlying material and to enable leveling
of the LRT 110 Crane.
While operating the LRT 110 Crane, frequently
check and level the crane. Proper positioning is
critically important to both safety and effectiveness of craning operations.
4-21
TM5-3810-305-10
●
●
Hook latch is intended to retain
loose slings or devices under
slack conditions. It is not
intended to be an anti-fouling
device. Caution should be used
to prevent the latch from
supporting any of the load.
Periodic inspection of latch
must be made to insure its
proper operating condition.
Failure to follow this procedure
could cause DEATH or serious
injury.
Make certain slings, ties and
hooks are of sufficient
capacity, properly set and
secure before performing any
lift operation. Failure to follow
this procedure could cause
DEATH or serious injury.
I
CAUTION
I
When removing hook block from
storage bracket, pay out cable
while raising boom to prevent
damage to windshield.
Raise boom to a 50-degree elevation, keeping
hook block in vertical position. Unhook hook
block from storage bracket. Lower boom to
horizontal position while raising hook block.
Before making a LRT 110 Crane lift, be sure
hook is properly engaged with slings. The lifting
device should be employed to make lift. Be
certain hook latch is not supporting any of the
load (refer to the warning decal on the hook
block).
4-22
An operator must be guided by
the Capacity Chart mounted on
vehicle when considering load
weights. Rated loads must never
be exceeded. Failure to follow
this procedure could cause
DEATH or serious injury.
2. Use the Capacity Chart attached to the LRT
110 Crane to interpret conditions and limitations that exist when making a lift. The determining factors are lifted load, radius, boom
angle, working position and hoist line
reeving.
Use load ratings from the Capacity Chart attached to the LRT 110 Crane when making all
lifting calculations.
The intent of the following
information is to prevent any
possibility of either reverse
winding of the rope on the winch
drum, causing breakage of winch
cable, or the unseating of cable
from winch drum, resulting in
uncontrolled fall of the hook
block and load. Failure to follow
this procedure could cause
DEATH or serious injury.
Always consider, anticipate and/or determine by
trial, the maximum amount of cable that will be
payed off the winch drum to perform each
different craning application of this vehicle.
Provide for no less than three wraps of cable
remaining on winch drum, as specified in all
applicable crane operating safety standards.
TM5-3810-305-10
The increased possibility of inadequate wraps
remaining on winch drum occurs when operating
with a higher number of line parts than are
required for load being lifted, particularly at
longer boom lengths and high boom angles.
Sufficient cable is initially provided to allow the
hook block to reach ground level when reeved
for the required parts of line indicated on the
Capacity Chart for all given loads. Reeving with
more parts of line than required may result in all
of the cable being payed off the winch drum.
CAUTION
Always consider possible obstructions which may be encountered during swings when varying boom height or length.
Think swing through, considering all obstacles, before making
swing. Failure to follow this
procedure could cause damage to
equipment.
CAUTION
Keep tension on cable to prevent
damage from slack.
When lifting with the LRT 110 Crane, a signalman must always be used to direct the operation.
Limited visibility to the rear is caused by upperstructure being in the operator’s line of vision.
3. Raise boom to required angle, consulting the
boom angle indicator for the boom angle.
The boom elevation is controlled by a hand lever.
To LOWER boom, push lever forward. To
RAISE boom, pull lever back. Improved control
is obtained by operating engine at low speed
while “metering” controls. Always operate and
release controls slowly to minimize dynamic
effects of load. During a lift, where precise
control of load is required, do not attempt to use
more than one function at a time.
●
●
Always use a qualified
signalman and observe load
while the equipment is in
operation.
I
CAUTION
I
Never hold controls in an “activated’ position once hoist/lower
cylinder or extend/retract cylinder has reached its limit of travel.
This can cause overheating of
hydraulic oil.
4. Swing boom over load. Upperstructure and
boom swing is controlled by swing lever. To
swing boom to the RIGHT, push lever forward. To swing boom to LEFT, pull lever
back. Swing speed increases as lever is
moved further forward or back. Swing speed
also varies with engine speed.
When spotting a load, it may
become necessary to alter the
boom angle or length. If
adjustment is necessary,
consult the LRT 110 Capacity
Chart before performing a lift.
Failure to follow this procedure
could cause DEATH or serious
injury.
4-23
TM5-3810-305-10
Never lift and swing a load
directly over operator’s compartment or over ground personnel in
the work area. Failure to follow
this procedure could cause
DEATH or serious injury.
CAUTION
ALWAYS START AND STOP
SWINGS GRADUALLY.
Stopping swing too abruptly will
cause load to oscillate and
impose side loads on boom. This
will cause damage to boom.
When ready, try for a smooth, controlled, safe
swing. The swing should be SLOW. Start
SLOWLY and allow load to buildup just enough
momentum to carry it through to the point where
it is to be lowered. Begin slowing swing in
advance of point where load is to be lowered.
Slow swing GRADUALLY, enabling it to
“coast” to a stop over desired spot.
If properly executed, load will hang motionless
when swing is terminated. If load is oscillating,
swing was made too rapidly and/or stopped too
abruptly.
.5. Extend boom to desired length (refer to the
Capacity Chart). EXTEND boom by pushing
extend/retract lever forward and RETRACT
by pulling lever back.
6. Lower hook block to load and fasten hook.
Make sure hook is properly engaged in slings
or lifting device employed to make the lift.
Be certain hook latch is not supporting any of
the load (refer to warning decal on hook
block).
Hoisting or lowering load with winch is controlled by winch lever. To LOWER load, push
lever forward. To RAISE load, pull lever back.
Improved control is obtained by operating engine
at low speed while “metering” control.. Always
actuate and release this lever slowly to minimize
dynamic effects on load and to prevent “bird
caging” of cable on winch drum.
●
Never operate equipment with
personnel on the hook or a
load. Failure to follow this
procedure could cause DEATH
or serious injury.
●
Crane operators must always
be prepared to take emergency
action while a load is
suspended in the air. Never
leave the operator’s
compartment with a load
suspended. Failure to follow
this procedure could cause
DEATH or serious injury.
7. Lift load to desired height. Do not lift higher
than necessary.
CAUTION
Never pull to the side with a
crane boom. Crane booms are
not designed for excessive side
pull and may collapse if subjected to excessive side loading.
4-24
The LRT 110 Crane is equipped with an anti-two
block system. If hook or block is raised too close
to boom head, a warning light appears on panel.
If horn switch is activated, an audible warning
will sound. This vehicle is also equipped with
control disconnects to prevent winch from
raising load and boom from extending or lower-
TM5-3810-305-10
ing. To reactivate the system disconnects, retract
or raise boom and/or lower hook.
CAUTION
Do not continue to pull block up
after contact has been made with
boom head. This will result in
damage to boom head and
sheaves. The cable may also be
broken, causing load to drop.
If the operator needs to raise hook block beyond
point at which the anti-two block is activated, he
may override the system by using anti-two block
BY-PASS switch (refer to page 4-7).
CAUTION
When spotting load, it may be
necessary to alter boom length or
boom angle. In making these
adjustments, the operator must
guard against exceeding rated
load as determined by the Capacity Chart. Failure to follow this
procedure could cause damage to
equipment.
8. Swing and spot load over the location where it
is to be placed. When lowering light loads,
be sure to maintain sufficient cable tension,
preventing cable from becoming loose on
cable drum. Loose cable can slip and bind
suddenly, causing “jerky” lowering and shock
loading of boom. Loose wraps may form
loops which can be overlaid when cable is
wound onto winch drum. These conditions
may result in personal injury or property
damage.
9. Lower load and unfasten hook.
CAUTION
When attaching hook block to
hook block tieback, take up cable
slowly while lowering boom to
prevent damage to windshield.
10. Center boom over cab and raise boom to a
50-degree angle. Lower hook block down far
enough to hook it into hook block tieback on
front of the LRT 110 Crane. Lower boom to
travel position while taking up slack in cable.
**
“
Lift Procedur e On Tires
CAUTION
●
●
Insufficient tire pressure
reduces the “On Tires”
capacity. Attempts to pick
rated capacity without properly
inflated tires may cause vehicle
to tip and/or result in damage
to tires and rims.
The following precautions are
necessary to prevent a
“pendulum” effect of a
swinging load. Failure to
follow these precautions can
result in vehicle tipping over.
Listed below are special precautions for “On
Tires” lifts. Load Ratings shown in the “On
Tires” portion of the Capacity Chart are based on
the following conditions:
1. Boom shall be carried straight over front of
vehicle.
2. Travel speed shall be reduced to suit conditions.
3. Specified tire pressure shall be maintained.
4-25
TM5-3810-305-10
4. Sudden starts and stops shall be avoided.
5. Tag or restraint lines shall be provided to snub
swinging of load.
CAUTION
Traveling over uneven terrain
with rear axle oscillation locked
out can result in instability.
Excessive boom length can also
cause instability depending on
terrain and wind pressure.
6. Load shall be carried as near to ground as
possible with necessary minimum boom
length. Carry straight over front since rear
axle oscillation is locked out when boom
moves off center more than 5 degrees.
4-26
TM5-3810-305-10
for the LRT 110 Crane Operation
Hand S ignals
_
The following are hand signals and their meaning for the operation of the LRT 110 Crane. Both operator and person indicating the necessary movement of the LRT 110 Crane must be familiar with all hand
signals and their interpretation (Figure 4-16).
HAND SIGNALS FOR CRANE OPERATIONS
Figure 4-16. Hand Signals for Crane Operation
4-27
TM5-3810-305-10
Section V
Wire Rope Instructions
Rope Identification and
Construction
Wire rope is identified not only by its component
parts, but also by its construction, i.e., by the way
the wires have been laid to form strands, and by
the way the strands have been laid around the
core.
The following illustration is a comparison of
typical wire rope lays (Figure 4-17):
This difference in appearance is a result of
variations in manufacturing techniques: regular
lay ropes are made so that the direction of the
wire lay in the strand is opposite to the direction
of the strand lay in the rope; lang lay ropes (C)
and (D) are made with both strand lay and rope
lay in the same direction. Finally, the last rope
illustrated (E), called alternate lay, consists of
alternating regular and lang lay strands.
Wire rope nomenclature also defines: length, size
(i.e., diameter), type, direction of lay, grade of
rope, type of core and whether it is preformed
(p/f) or non-preformed (rip/f). If the direction
and type of lay are omitted from the rope description, it is presumed to be a right regular lay.
In addition, if no mention is made as to preforming, this will be presumed as a requirement
for preforming. On the other hand, an order for
elevator rope requires an explicit statement since
p/f and rip/f ropes are used extensively.
An example of a complete description would
appear thus:
D
600 ft 3/4 in. 6x25 FW Left lang lay
Improved plow IWRC.
E
(Rope described above would be made PREFORMED.)
Figure 4-17.
a.Right Regular Lay b. Left Regular Lay c. Right Lang Lay
There are four basic constructions around which
d. Left Lang Lay e. Right Alternate Lay.
standard wire ropes are built (Figure 4-18):
In Figure 4-17, illustrations (A) and (C) show
strands as normally laid into the rope to the right,
in a fashion similar to the threading in a righthand bolt, Conversely, the “left lay” rope strands
illustrations (B) and (D) are laid in the opposite
direction.
Again in Figure 4-17, the first two illustrations
(A) and (B) show regular lay ropes. Following
these are the types known as lang lay ropes.
Note that the wires in regular lay ropes appear to
line up with the axis of the rope; in lang lay rope
the wires form an angle with the axis of the rope.
4-28
6x21 SEALE
WITH IWRC
6x31 WARRINGTON
SEALE WITH IWRC
6x43 FILLER WIRE SEALE 6x46 SEALE FILLER
WITH FIBER CORE
WIRE WITH IWRC
Figure 4-18. Basic
Design Construction
TM5-3810-305-10
Illustrated below are a few combinations of basic design constructions (Figure 4- 19). Wire rope is identified by reference to its number of strands, as well as the number and geometric arrangement of wires in
the strand (Figure 4-20).
6x7 6x9 WARRINGTON 6X19 SEALE
Figure 4-19. Basic Constructions
6X25 FW
Figure 4-20. A Single Wire Rope Strand
Table 1. Wire Rope Classification
Based on the normal number of wires in each strand
Classification
Description
6x7
Containing 6 strands that are made up of 3 through 14 wires, of
which no more than 9 are outside wires.
6x19
Containing 6 strands that are made up of 15 through 26 wires, of
which no more than 12 are outside wires.
6x37
Containing 6 strands that are made up of 27 through 49 wires, of
which no more than 18 are outside wires.
6X61
Containing 6 strands that are made up of 50 through 74 wires, of
which no more than 24 are outside wires.
6x91
Containing 6 strands that are made up of 75 through 109 wires, of
which no more than 30 are outside wires.
6x127
Containing 6 strands that are made up of 110 or more wires, of
which no more than 36 are outside wires.
8x19
Containing 8 strands that are made up of 15 through 26 wires, of
which no more than 12 are outside wires.
19x7
and
18x7
Containing 19 strands, each strand is made up of 7 wires. It is
manufactured by covering an inner rope of 7x7 left Iang lay
construction with 12 strands in right regular lay. (The rotationresistant property that characterizes this highly specialized
construction is a result of the counter torques developed by the
two layers.) When the steel wire core strand is replaced by a
fiber core, the description becomes 18x7.
When a center wire is replaced by a strand, it is considered as a single wire, and the rope classification
remains unchanged. There are, of course, many other types of wire rope, but they are useful only in a
limited number of applications and, as such, are sold as specialties. They are usually designated according to their actual construction.
4-29
TM5-3810-305-10
Wire Rope Installation
Checking The Diameter
It is most important to check the diameter of the delivered rope before installation. This is to make
certain that the rope diameter meets the specified requirements for the given machine or equipment.
With an undersize diameter rope, stresses will be higher than designed for and the probability of breaking the rope will be increased; an oversize diameter rope will wear out prematurely. This happens
because of abuse to the rope caused by pinching in the grooves of the sheave and drum. In checking,
however, the “true” rope diameter must be measured. And this is defined as the diameter of the circumscribing circle, i.e., its largest cross-sectional dimension. To insure accuracy, this measurement should
be made with a wire rope caliper using the correct method (B, Figure 4-21). For measuring ropes with
an odd number of outer strands, special techniques must be employed.
Design specifications for wire rope are such that the diameter is slightly larger than the nominal size,
according to the allowable tolerances shown in Table 2.
Table 2. 0versize Limits o f Wire Rope Diameters*
Nominal Rope Diameter
Over 1/4 in. and larger (6.35 mm and larger)
Allowable Limits
-o
+5%
*These limits have been adopted by the Wire Rope Technical Board (WRTB), and are being considered
for inclusion in the forthcoming revised edition of “Federal Standard RR-W-410.” In the case of certain
special purpose ropes, such as aircraft cables and elevator ropes, each has specific requirements.
In measuring a wire rope correctly, always measure the larger dimension. The “true” diameter (A) lies
within the circumscribed circle (B). Avoid using incorrect measurement position (C, Figure 4-21).
Figure 4-21. How to Measure (or caliper) a Wire Rope
4-30
TM5-3810-305-10
Unreeling and Uncoiling
Wire rope is shipped in cut lengths, either in
coils or on reels. Great care should be taken
when the rope is removed from the shipping
package since it can be permanently damaged by
improper unreeling or uncoiling. Looping the
rope over the head of the reel or pulling the rope
off a coil while it is lying on the ground, will
create loops in the line. Pulling on a loop will, at
the very least, produce imbalance in the rope and
may result in open or closed kinks (Figure 4-22).
Once a rope is kinked, the damage is permanent.
To correct this condition, the kink must be cut
out, and the shortened pieces used for some other
purpose.
Improper handling will help create open (A) or
closed (B) kinks. The open kink will open the
rope lay; the closed kink will close it. Do not
allow the rope to form a small loop. If, however,
a loop forms and is removed at the point shown
(C), a kink will be avoided. When the looped
rope is put under tension (D), a kink will form.
The rope is then permanently damaged and is of
little value.
Figure 4-22. Wire Rope Kinking
Unwinding wire rope from its reel also requires
careful and proper procedure. There are three
methods to perform this procedure correctly:
1. Method A: The reel is mounted on a shaft
supported by two jacks or a roller payoff
(Figure 4-23). Since the reel is free to rotate,
the rope is pulled from the reel by a workman,
holding the rope end and walking away from
the reel as it unwinds. A braking device
should be employed so that the rope is kept
taut and the reel is restrained from overrunning the rope. This is necessary particularly with powered de-reeling equipment.
Figure 4-23. Mounted Unreeling
4-31
TM5-3810-305-10
2. Method B: Mount the reel on an unreeling
stand (Figure 4-24). It is then unwound in the
same manner as described in Method A. In
this case, however, greater care must be
exercised to keep the rope under tension
sufficient to prevent the accumulation of slack
- a condition that will cause the rope to drop
below the lower reel head.
Figure 4-24. On Vertical Unreeling&
3. Method C: Hold the end of the rope while the
reel itself is rolled along the ground. With
this procedure the rope will pay off properly;
however, the end being held will travel in the
direction the reel is being rolled. As the
difference between the diameter of the reel
head and the diameter of the wound rope
increases, the speed of travel will increase.
When re-reeling wire rope from a horizontally
supported reel to a drum, it is preferable for the
rope to travel from the top of the reel to the top
of the drum (Figure 4-25). Re-reeling in this
manner will avoid putting a reverse bend in the
rope as it is being installed. If a rope is installed
inducing a reverse bend, it may cause the rope to
become livelier and, consequently, harder to
handle.
When unwinding wire rope from a coil, there are
two suggested methods for carrying out this
procedure in a proper manner:
Figure 4-25. Horizontal Re-reeling
4-32
1. Method A: Place the coil on a vertical unreeling stand. The stand consists of a base with a
fixed vertical shaft. On this shaft there is a
“swift,” consisting of a plate with inclined
pins positioned so that the coil may be placed
over them. The whole swift and coil then
rotate as the rope is pulled off. This method
is particularly effective when the rope is to be
wound on a drum.
TM5-3810-305-10
2. Method B (the most common as well as the
easiest uncoiling method): Hold one end of
the rope while rolling the coil along the
ground like a hoop (Figure 4-26).
Incorrect methods of unreeling and uncoiling
wire rope will most likely result in kinks (Figures
4-27 and 4-28). Such improper procedures
should be strenuously avoided in order to prevent
the occurrence of loops. These loops, when
pulled taut, will inevitably result in kinks. No
matter how a kink develops, it will damage
strands and wires, and the kinked section must be
cut out. Proper and careful handling will keep
the wire rope free from kinks.
Figure 4-26. Correct Method of Uncoiling Wire Rope
u
.
.
Figure 4-27. Incorrect Method of Unreeling Wire ROPe
Figure 4-28. Incorrect Method of Uncoiling Wire Rope
4-33
TM5-3810-305-10
Seizing Wire Rope
While there are numerous ways to cut wire rope,
in every case certain precautions must be observed. Proper seizings are always applied on
both sides of the place where the cut is to be
made, In a wire rope, carelessly or inadequately
seized, ends may become distorted and flattened,
and the strands may loosen. Subsequently, when
the rope is put to work, there may be an uneven
distribution of loads to the strands. This condition will significantly shorten the life of the rope.
Figure 4-29. Seizing Wire Rope - Method A
There are two widely accepted methods of
applying seizing.
1. Method A: Lay one end of the seizing wire in
the groove between two strands; wrap the
other end tightly in a close helix over a
position of the groove using a seizing iron (a
round bar 1/2 to 5/8 in. diameter by 18 in.
long) (Figure 4-29). Both ends of the seizing
wire should be twisted together tightly, and
with a finished appearance. Seizing widths
should not be less than the rope diameter.
2. Method B: The second of two accepted methods for placing seizing on wire rope is illustrated in Figure 4-30. The seizing itself
should be a soft or annealed wire or strand.
The seizing wire diameter and the length of
the seize will depend on the diameter of the
wire rope. But the length of the seizing
should never be less than the diameter of the
rope being seized. For preformed ropes, one
seizing on each side of the cut is normally
sufficient. But for those that are not preformed, a minimum of two seizings is recommended (Figure 4-3 1). Seizings should be
spaced six rope diameters apart.
Figure 4-30. Seizing Wire Rope - Method A
NONPREFORMED
BEFORE CUTTING
AFTER CUTTING
PREFORMED
AFTER CUTTING
Figure 4-31.
4-34
SeizinG Applied Before Cutting
TM5-3810-305-10
Table 3 lists seizing lengths and seizing wire diameters suggested for use with some commonly used
wire ropes.
Table 3. Seizing: Suggest ed Diameters and Lengths
Rope Diameters
mm
in.
9.5-14.3
3/8-9/1 6
Seizing Lengths
in.
0.5
Seizing Wire Diameters
mm
in.
1.2
0.048
mm
13
NONPREFORMED
Cu tting Wire Rope
BEFORE CUTTING
AFTER CUTTING
Using an axe or hatchet to cut
wire rope may be dangerous. If
necessary to use, proceed with
great caution. Failure to follow
this procedure could cause
SERIOUS INJURY. Portable
hydraulic and mechanical rope
cutters are available. In remote
areas, however, it may at times
be necessary to use less desirable
cutting methods.
Wire rope is cut after being properly seized
(Figure 4-3 1). Cutting is a reasonably simple
operation provided appropriate tools are used.
There are several types of cutters and shears
commercially available. These are specifically
designed to cut wire rope.
PREFORMED
BEFORE CUTTING
AFTER CUTTING
Figure
4-31. Seizing Applied Before Cutting
WIRE ROPE SOCKET - SPELTER OR RESIN Attachment
WIRE ROPE SOCKET - SWAGED
MECHANICAL SPLICE - LOOP OR THIMBLE Attachment
End Fittings and/or Attachments
There are many available designs of end fittings
and attachments, some of which were developed
for particular applications. The most common
ones are illustrated in Figure 4-32.
WEDGE SOCKET
CLIPS - NUMBER OF CLIPS VARIES WITH ROPE SIZE
LOOP OR THIMBLE SPLICE - HAND TUCKED
Figure 4-32. End Fittings and Attachments
4-35
TM5-3810-305-10
Table 4. Terminal Efficiencies (Approximate)
Efficiencies are based on nominal strengths
Method of attachment
Efficiency
Rope with IWRC* Rope with FC**
Wire Rope
Socket-Spelter or
100%
100%
Resin Attachment
Swagged Socket
95%
Mechanical Spliced Sleeve
1 in. (25.40 mm) Diameter
and Smaller
—
(Not Established)
95%
92.5%
86%
86%
I
Loop or Thimble Splice
Hand Spliced (Tucked)
(Carbon Steel Rope)
1/2 in. (12.70 mm)
Loop or Thimble Splice
Hand Spliced (Tucked)
(Stainless Steel Rope)
1/2 in(12.70 mm)
Wedge Sockets***
(Depending on Design)
76%
75 to 95%
75 to 95%
Clips***
(Number of Clips Varies
with size of Rope)
*IWRC. - Independent Wire Rope Core
**FC - Fiber Core
80%
80%
,
.
***Typical values wnen applied properly.
Refer to fittings manufacturers for exact
values and method.
Socketinq
Improperly attached wire rope
terminals lead to serious or
possibly unsafe conditions.
Failure to follow this procedure
could cause DEATH or serious
All wire rope elements must be held securely by
the terminal. If this is not accomplished, the
strands will “loaf on the job” and there is every
likelihood that a strand will become “high”
(Figure 4-33). Selective abrasive wear of the
loose strand will necessitate early removal of the
rope.
injury.
Figure 4-33. A "High" Strand
4-36
TM5-3810-305-10
Wire Rope Clips
To avoid many dangerous practices, play it safe by following
correct procedures. Failure to
follow these procedures could
cause loads to fall causing
DEATH or serious injury.
Wire rope clips are widely used for attaching
wire rope to haulages, mine cars and hoists, and
for joining two ropes,
Clips are available in two basic designs: the Ubolt and fist grip (Figure 4-34). The efficiency
of both types is the same.
When preparing a wire rope for socketing, it is of
extreme importance to follow recommended
procedures (refer to page 4-40). Procedures
other than those stipulated here may develop the
required strength but this cannot be predetermined without destructive tests. It is far safer
and ultimately less costly to follow well-established practices.
There are many ways to go wrong in socketing
procedures. Some of the more common PITFALLS THAT SHOULD BE GUARDED
AGAINST include:
1. Turning back the strands, inward or outward,
before the “broom” is inserted into the socket.
U-BOLT
Figure 4-34. Basic Designs
FIST GRIP
of Wire Rope Clips
2. Turning back the strands and seizing them to
the body of the rope.
3. Turning back the strands and tucking them
into the body of the rope.
4. Tying a knot in the rope.
5. Driving nails, spikes, bolts and similar objects
into the socket after the rope is in, so as to
“jam” it tight; this is particularly dangerous
and ruinous.
4-37
TM5-3810-305-10
U-Bolt Clips
2. Apply the next clip as near the loop as possible. Turn nuts firmly, but do not tighten.
Refer to Table 5 and Figure 4-35 for specifications of U-bolt clips.
The recommended method of applying U-bolt
clips to get maximum holding power of the clip
is as follows:
●
●
3. Space additional clips, if required, equally
between the first two. Turn nuts, take up rope
slack and tighten all nuts evenly on all clips to
recommended torque.
When using U-bolt clips,
extreme care must be exercised
to make certain that they are
attached correctly. Failure to
follow this procedure could
cause DEATH or serious
injury.
Failure to make a termination
in accordance with the
following instructions, or
failure to periodically check
and retighten to the
recommended torque, will
cause a reduction in efficiency
rating which could cause
DEATH or serious injury.
1. Turn back the specified amount of rope from
the thimble. Apply the first clip one base
width from the dead end of the wire rope (Ubolt over dead end; live end rests in clip
saddle). The U-bolt must be applied so that
the “U” section is in contact with the dead end
of the rope (Figure 4-36). Tighten nuts
evenly to recommended torque.
Figure 4-35. Attaching U-bolts
RIGHT WAY FOR MAXIMUM
ROPE STRENGTH
WRONG WAY: CLIPS STAGGERED
WRONG WAY: CLIPS REVERSED
Figure 4-36. U-bolt Clip Dimensions
Table 5.* U-Bolt Clip Spec ifications
Min.
Amount
no. of of rope to Torque
Clip
H
clips
turn back
F
D
E
c
G
B
Size
A
11.5 in.
65 lb-ft
1/2 in, 0,50 in. 1.88 in. 1.00 in. 1.19 in. 1.13 in. 0.88 in. 1.91 in. 2.28 in. 3
292 mm
88 N ● m
12,7 mm 47,8 mm 25,4 mm 30,2 mm 28.7 mm 22,4 mm 48,5 mm 57.9 mm
*From the Crosby Group
4-38
Weight
75 lb/100
34 kg/100
TM5-3810-305-10
NOTE
Fist Grip Clips
Rope will stretch and shrink in
diameter when loads are applied,
4. Apply the initial load and retighten nuts to the
recommended torque. Inspect periodically
and retighten.
A termination made in accordance with the
above instructions, and using the number of
clips shown, has an approximate 80% efficiency rating. This rating is based upon the
catalog breaking strength of wire rope. If a
pulley is used in place of a thimble for turning
back the rope, add one additional clip.
NOTE
The following information is
based upon the use of U-bolt
clips on new rope.
The number of clips shown is based upon
using right regular or lang lay wire rope, 6x19
class or 6x37 class, fibre core or IWRC, IPS
or XIPS. If Scale construction or similar
large outer wire type construction in the 6x19
class is to be used for sizes 1 in. and larger,
add one additional clip.
The number of clips shown also applies to
right regular lay wire rope, 8x19 class, fibre
core, IPS size 1-1/2 in. and smaller; and right
regular lay wire rope, 18x7 class, fibre core,
IPS or XIPS, sizes 1-3/4 and smaller.
Failure to make a termination in
accordance with the following
instructions, or failure to periodi tally check and retighten to the
recommended torque, will cause
a reduction in efficiency rating,
which could cause DEATH or
serious injury.
Refer to Figure 4-37 and Table 6 (page 4-40) for
specifications of fist grip clips.
The recommended method of applying fist grip
clips is as follows:
1. Turn back the specified amount of rope from
the thimble. Apply the first clip one base
width from the dead end of the wire rope.
Tighten nuts evenly to recommended torque.
2. Apply the next clip as near the loop as possible. Turn nuts firmly but do not tighten.
3. Space additional clips, if required, equally
between the first two. Turn nuts, take up rope
slack, and tighten all nuts evenly on all clips
to recommended torque.
For other classes of wire rope not mentioned
above, it may be necessary to add additional
clips to the number shown.
If a greater number of clips are used than
shown in the table, the amount of rope
turnback should be increased proportionately.
Figure 4-37. Fist Grip Clip Dimensions
4-39
TM5-3810-305-10
Table 6.* Fist Grip Clip Specifications
M i n . Amount
L
no. of rope to Torque Weight
Size
A
c
B
D
E
F
H
approx
M
N
clips turn back
G
1/2 in. 0.50 in. 1.88 in. 0.56 in.
1.25 in. 0.50 in. 1.00 in. 2.19 in, 0.28 in. 2,75 in, 0.88 in. 2.19 in. 3
11 in. 65 lb-ft 60 lb/100
12.7 mm 47.8 mm 14.2 mm 31.8 mm 12.7 mm 25.4 mm 55,6 mm 71. mm 69.9 mm 22.4 mm 55.6 mm
279 mm 88 N m 27 kg/100
Clip
●
*From the Crosby Group
NOTE
Rope will stretch and shrink in
diameter when loads are applied.
4. Apply the initial load and retighten nuts to the
recommended torque. Inspect periodically
and retighten.
A termination made in accordance with the
above instructions, and using the number of
clips shown, has an approximate 80$% efficiency rating. This rating is based upon the
catalog breaking strength of wire rope. If a
pulley is used in place of a thimble for turning
back the rope, add one additional clip.
The number of clips shown is based upon
using right regular or lang lay wire rope, 6x19
class or 6x37 class, fibre core or IWRC, IPS
or EIPS. If Scale construction or similar large
outer wire type construction in the 6x19 class
is to be used for sizes 1 in. and larger, add one
additional clip.
NOTE
The following information is
based upon the use of fist grip
clips on new rope.
The number of clips shown also applies to right
regular lay wire rope, 8x19 class, fibre core, IPS,
sizes 1-1/2 in. and smaller; and right regular lay
wire rope, 18x7 class, fibre core, IPS or EIPS,
sizes 1-1/2 and smaller.
For other classes of wire rope not mentioned
above, it may be necessary to add additional clips
to the number shown.
4-40
If a greater number of clips are used than shown
in the table, the amount of rope turnback should
be increased proportionately.
Wedge Sockets
One of the more popular end attachments for
wire rope is the wedge socket. For field or onthe-job attachment, it is easily installed and
quickly dismantled.
Failure to install wedge sockets
in accordance with the following
instructions could cause DEATH
or serious injury.
The recommended method for the installation of
wedge sockets is as follows:
1. Inspect the wedge and socket. All rough
edges or burrs that might damage the rope
should be removed.
2. If the end of the rope is welded, the welded
end should be cut off. This will allow the distortions of the rope strands, caused by the
sharp bend around the wedge, to adjust
themselves at the end of the line. If the weld
is not cut off, the distortions will be forced up
the working line. This may result in the
development of high strands and wavy rope.
TM5-3810-305-10
3. Place the socket in an upright position and
bring the rope around in a large, easy-tohandle loop. Care must be taken to make
certain that the live-loaded-side of the rope is
in line with the ears (Figure 4-38).
Clamp the dead end close to the
socket to prevent the rope and
wedge from disengaging from
the socket. Failure to follow this
procedure could cause DEATH
or serious injury.
4. Clamp the dead end of the rope (Figure 4-39)
(refer to page 2-3).
5. Secure the ears of the socket to a sturdy
support and carefully take a strain on the live
side of the rope. Pull the wedge and rope into
position with tension sufficiently tight to hold
them in place.
RIGHT
WRONG
Figure 4-38. Installing the Wedge Sock et
6. After final pin connections are made, increase
the loads gradually until the wedge is properly seated. Avoid sudden shock loads.
Figure 4-39. Clamping the Dead End of the Wire Rope
4-41
TM5-3810-305-10
Drums. Plain (Smooth)
Installation of a wire rope on a plain (smooth)
face drum requires a great deal of care. The
starting position should be at the drum end so
that each turn of the rope will wind tightly
against the preceding turn (Figure 4-40). Close
supervision should be maintained all during
installation. This will insure the following:
1. The rope will be properly attached to the
drum.
3. Each turn will be guided as close to the preceding turn as possible, so that there are no
gaps between turns.
4. There will beat least two dead turns on the
drum when the rope is fully unwound during
normal operating cycles.
By holding the right or left hand with index
finger extended, palm up or palm down, the
proper procedure for installing left and right lay
rope on a smooth drum can be easily determined.
OVERWIND RIGHT TO LEFT
USE LEFT LAY ROPE
LEFT LAY OVERWOUND
ROPE AT
FLANGE
USE RIGHT LAY ROPE
RIGHT LAY OVERWOUND
UNDERWIND RIGHT TO LEFT
USE RIGHT LAY ROPE
L
RIGHT LAY UNDERWOUND
Figure 4-40 Drum Winding and Appropriate Hand Signals
Flexibility of Wire Rope
The term flexibility is frequently thought of as
being synonymous with resistance to bending
fatigue. This is not true. Flexibility refers to the
capability of flexing or bending. While a high
degree of fatigue resistance may sometimes
accompany the flexibility characteristic, it does
not necessarily follow that this is so. A fiber
core rope, for example, is more flexible than an
IWRC rope. Yet, when the IWRC rope is bent
around undersize sheaves at relatively high loads,
it will usually perform better than the more
4-42
flexible fiber core rope. The reason for this lies
in the ability of IWRC rope to retain its roundness and freedom of internal movement. Under
the same conditions, a fiber core rope will flatten
and inhibit free internal adjustment, thereby
leading to early failure.
As noted earlier, a design choice is almost
invariably the result of compromise. Ultimately,
what is sought is an efficient, economical solution; hence, whatever the compromise, it must
help achieve this goal.
TM5-3810-305-10
Breaking in a New Wire Rope
A new wire rope requires careful installation and
close adherence to all the appropriate procedures
previously noted. After the rope has been installed and the ends secured in the correct manner, the mechanism should be started carefully
and then permitted to run through a cycle of
operation at very slow speed. During this trial
operation, a very close watch should be kept on
all working parts - sheaves, drums, rollers - to
make certain that the rope runs freely, and
without any possible obstructions as it makes its
way through the system. If no problems appear
in running the rope, the next step should include
several run-throughs of the normal operational
cycle under light load and at reduced speed. This
procedure allows the component parts of the new
rope to make a gradual adjustment to the actual
operation conditions.
Wire Rope and Ope rations Inspection
To insure a high level of safety while keeping the
annual cost of wire rope at a reasonably low
level, it is essential to maintain a well-planned
program of periodic inspection. Frequently,
there are statutory and/or regulatory agencies
whose requirements must be adhered to, but
whether or not these exist in a given locale, the
wire rope user can be guided by the suggested
procedures that follow,
Abrasion, bending and crushing represent the
ABC’s of wire rope abuse, and it is the primary
goal of good inspection practice to discover such
conditions early enough so that corrections can
be made or ropes replaced safely and with minimum effort. When any degradation indicates a
loss of original rope strength, a decision must be
made quickly as to allowing the rope to remain in
service. But such a decision can only be made
by an experienced inspector. And this determination will be based on:
1. Details of the equipment’s operation: Will
the rope break?
2. Frequency of inspection: Will it be safe
until the next scheduled inspection?
3. Maintenance history: How rapid is the
degradation?
4. Consequences of failure: Will it present
hazards to personnel?
5. Historical records of similar equipment.
To make certain that sufficient information is
obtained, following are guidelines that should be
adhered to:
The groove size is evaluated on the basis of how
the gage leaf fits the groove. Daylight under the
gage is not tolerable when using the worn groove
gage. If a full oversize gage is used, some
daylight may be acceptable, but this really must
be judged by relating the measurement to the
actual size of the rope.
For new rope, extra caution should be observed
as to its fit in the groove. Characteristically,
ropes become smaller in diameter immediately
after being placed in service. As a result, they
would operate satisfactorily in a “worn” groove;
one that was gaged OK by the” worn” groove
gage. Nonetheless, in some cases, a rope may
not “pull down,” and if this happens, abnormal
wear may occur.
It is important to remember that a tight groove
not only pinches and damages the rope, but that
the pinching prevents the necessary adjustment
of the wires and strands. On the other hand, a
groove that is too large will not provide sufficient support; in this case, the rope will flatten
and thereby restrict the free sliding action of the
wires and strands.
4-43
TM5-3810-305-10
The size of the groove is not the only critical
item to be examined closely. The condition of
the groove is also an important factor of concern.
Is it smooth or imprinted? If the groove is
imprinted, then it must be re-machined or, if it is
imprinted too deeply, it means that sheave, roller
or drum must be replaced. If replacement is
indicated, a larger sheave or drum should be
installed if possible, or a harder material should
be specified for the replacement
Groove examination should also concern itself
with how the groove is wearing. If it is worn offcenter, thereby forcing the rope to undercut or to
rub against the flange, it then becomes necessary
to correct the alignment of the reeving system,
and to specify a harder material.
When checking the grooves, the bearings of the
sheaves and rollers should also be examined.
They should turn easily. If not, each bearing
must be properly lubricated. “Wobble” in the
sheave, from broken or worn bearings, is not
acceptable. Bad bearings will set up vibrations
in the wire rope that can cause rapid deterioration
unless the condition is remedied. Bad bearings
also increase the force on the rope that is needed
to move a given load, since friction forces will be
greatly increased.
Sheaves with broken flanges may allow the rope
to jump from the sheave and become fouled in
the machinery. When this happens, the rope is
cut, curled, and the crowns of the wires in the
strands are burred. There is ample evidence to
support the rule that sheaves with broken flanges
must be replaced immediately.
A sheave or drum with a flat spot can induce a
“whip” into the line. This whip, or wave, travels
until it is stopped by the end terminal, at which
point the rope may bend severely. This condition
helps to accelerate the fatigue breakage of wires.
Sometimes the reeving is such that the whip or
4-44
wave is arrested by a sheave, or the drum itself.
In these circumstances, the whipping will cause
wire breaks along the crowns of the strands.
Obviously, sheaves or drums that excite vibrations of this sort must be repaired or replaced.
Guideline to Inspections and Reports for
Equipment. wire Rope and Wire Rope
Slings
1. Maintain all inspection records and reports for
the length of time deemed appropriate.
2. Prior to each daily use, the following procedure should be followed:
a. Check all equipment functions.
b. Lower load blocks and check hooks for
deformation or cracks.
c. During lowering procedure and the following raising cycle, observe the rope and the
reeving. Particular notice should be paid to
kinking, twisting or other deformities.
Drum winding conditions should also be
noted.
d. Check wire rope and slings for visual signs
of anything that can cause them to be
unsafe to use, i.e., broken wires, excessive
wear, kinking or twisting, and marked
corrosion. Particular attention should be
given to any new damage during operation.
3. Monthly Inspections are recommended with a
signed report by an authorized competent inspector. The Monthly Reports should include
inspection of the following:
a. All functional operation mechanisms for
excessive wear of components, brake
system parts and lubrication.
b. Limit switches.
TM5-381-305-10
c. Crane hooks for excess throat opening or
twisting along with a visual for cracks.
d. Wire rope and reeving for conditions
causing possible removal.
e. Wire rope slings for excessive wear,
broken wires, kinking, twisting and mechanical abuse.
f. All end connections such as hooks, shackles, turnbuckles, plate clamps, sockets, etc.
for excessive wear and distortion.
4. An Annual Inspection with a signed report
must be made for the following:
a. Crane hook for cracks.
b. Hoist drum for wear or cracks.
c. Structural members for cracks, corrosion
and distortion.
d. For loose structural connections such as
bolts, rivets and weldments.
Wire Rope Inspection
The following is a fairly comprehensive listing of
critical inspection factors. It is not, however,
presented as a substitute for an experienced
inspector. It is rather a user’s guide to the accepted standards by which ropes must be judged.
1. Abrasion: Rope abrades when it moves
through an abrading medium or over drums
and sheaves. Most standards require that rope
is to be removed if the outer wire wear exceeds 1/3 of the original outer wire diameter.
This is not easy to determine and discovery
relies upon the experience gained by the
inspector in measuring wire diameters of
discarded ropes.
2. Rope stretch: All ropes will stretch when
loads are initially applied. As rope deteriorates from wear, fatigue, etc. (excluding
accidental damage), continued application of
a load of constant magnitude will produce
varying amounts of rope stretch. A “stretch”
curve plotted for stretch vs. time (Figure 441) displays three discrete phases:
a. Initial stretch, during the early (beginning)
period of rope service, caused by the rope
adjustments to operating conditions (constructional stretch).
b. Following break-in, there is a long period the greatest part of the rope’s service life during which a slight increase in stretch
takes place over an extended time. This
results from normal wear, fatigue, etc. On
the plotted curve - stretch vs. time - this
portion would almost be a horizontal
straight line, inclined slightly upward from
its initial level.
c. Thereafter, the stretch begins to increase at
a quicker rate. This means that the rope is
reaching the point of rapid deterioration; a
result of prolonged subjection to abrasive
wear, fatigue, etc. This second upturn of
the curve is a warning indicating that the
rope should soon be removed.
Figure 4-41. S tretch vs. Time
4-45
TM5-3810-305-10
3. Reduction in rope diameter: Any marked
reduction in rope diameter indicates degradation. Such reduction may be attributed to:
a. Excessive external abrasion.
b. Internal or external corrosion.
nificant reduction in diameter when a load is
applied. Therefore, a rope manufactured
close to its nominal size may, when it is
subjected to loading, undergo a greater reduction in diameter than that stipulated in the
minimum diameter table. Yet, under these
circumstances, the rope would be declared
unsafe although it may, in actuality, be safe.
c. Loosening or tightening of rope lay.
d. Inner wire breakage.
e. Rope stretch.
f. Ironing or milking of strands.
In the past, whether or not a rope was allowed
to remain in service depended to a great
extent on the rope’s diameter at the time of
inspection. Currently this practice has undergone significant modification.
Previously, a decrease in the rope’s diameter
was compared with published standards of
minimum diameters. The amount of change
in diameter is, of course, useful in assessing a
rope’s condition. But, comparing this figure
with a fixed set of values is, for the most part,
useless. These long-accepted standards are
not, in themselves, of any serious significance
since they do not take into account such
factors as:
a. Variations in compressibility between
IWRC and Fiber Core.
b. Differences in the amount of reduction in
diameter from abrasive wear, or from core
compression, or a combination of both.
c. The actual original diameter of the rope
rather than its nominal value.
As a matter of fact, all ropes will show a sig4-46
As an example of the possible error at the
other extreme, we can take the case of a rope
manufactured near the upper limits of allowable size. If the diameter has reached a
reduction to nominal or slightly below that,
the tables would show this rope to be safe.
But it should, perhaps, be removed.
Today, evaluations of the rope diameter are
first predicated on a comparison of the original diameter - when new and subjected to a
known load - with the current reading under
like circumstances. Periodically, throughout
the life of the rope, the actual diameter should
be recorded when the rope is under equivalent
loading and in the same operating section.
This procedure, if followed carefully, reveals
a common rope characteristic: after an initial
reduction, the diameter soon stabilizes. Later,
there will be a continuous, albeit small,
decrease in diameter throughout its life.
Core deterioration, when it occurs, is revealed
by a more rapid reduction in diameter and
when observed it is time for removal.
Deciding whether or not a rope is safe is not
always a simple matter. A number of different but interrelated conditions must be evaluated. It would be dangerously unwise for an
inspector to declare a rope safe for continued
service simply because its diameter had not
reached the minimum arbitrarily established
in a table if, at the same time, other observations lead to an opposite conclusion.
TM5-3810-305-10
Because criteria for removal are varied, and
because diameter, in itself, is a vague criterion, the table of minimum diameters has
been deliberately omitted from this manual.
4. Corrosion: Corrosion, while difficult to
evaluate, is a more serious cause of degradation than abrasion. Usually, it signifies a lack
of lubrication. Corrosion will often occur
internally before there is any visible external
evidence on the rope surface. Pitting of wires
is a cause for immediate rope removal. Not
only does it attack the metal wires, but it also
prevents the rope’s component parts from
moving smoothly as it is flexed. Usually, a
slight discoloration because of rusting merely
indicates a need for lubrication.
Severe rusting, on the other hand, leads to
premature fatigue failures in the wires, necessitating the rope’s immediate removal from
service. When a rope shows more than one
wire failure adjacent to a terminal fitting, it
should be removed immediately. To retard
corrosive deterioration, the rope should be
kept well lubricated. In situations where
extreme corrosive action can occur, it may be
necessary to use galvanized wire rope.
is not visible. Excessive vibration or whip
can cause abrasion and/or fatigue. Drum
crossover and flange point areas must be carefully evaluated. All end fittings, including
splices, should be examined for worn or
broken wires, loose or damaged strands,
cracked fittings, worn or distorted thimbles
and tucks of strands.
8. Heat Damage: After a fire or the presence of
elevated temperatures, there may be metal
discoloration or an apparent loss of internal
lubrication; fiber core ropes are particularly
vulnerable. Under these circumstances, the
rope should be replaced.
9. Protruding Core: If, for any cause, the rope
core protrudes from an opening between the
strands, the rope is unfit for service.
10. Damaged End Attachments: Cracked, bent,
or broken end fittings must be eliminated.
The cause should be sought out and corrected. In the case of bent hooks, the throat
openings - measured at the narrowest point should not exceed 15% over normal nor
should twisting be greater than 10%.
5. Kinks: Kinks are permanent distortions
caused by loops drawn too tightly. Ropes
with kinks must be removed from service.
6. “Bird caging”: Bird caging results from torsional imbalance that comes about because of
mistreatments such as sudden stops, the rope
being pulled through tight sheaves, or wound
on too small a drum. This is cause for rope
replacement unless the affected portion can be
removed.
7. Localized conditions: Particular attention
must be paid to wear to the equalizing
sheaves. During normal operations this wear
4-47
TM5-3810-305-10
11. Peening: Continuous pounding is one of the
causes of peening. The rope strikes against
an object such as some structural part of the
machine, or it beats against a roller, or it hits
itself. Often, this can be avoided by placing
protectors between the rope and the object it
is striking. Another common cause of peening is continuous passage, under high tension, over a sheave or drum. Where peening
action cannot be controlled, it is necessary to
have more frequent inspections and to be
ready for earlier rope replacement.
The external appearance of two ropes are illustrated, one of which has been abraded and
the other peened (Figure 4-42). Also shown
are the cross-section of both wires in these
conditions. Note that a crack has formed as a
result of heavy peening.
12. Scrubbing: Scrubbing refers to the displacement of wires and strands as a result of
rubbing around or against an object. This, in
turn, causes wear and displacement of wires
and strands along one side of the rope.
Corrective measures should be taken as soon
as this condition is observed.
13, Fatigue Failure: Wires that break with square
ends and show little surface wear have
usually failed as a result of fatigue. Such
failures can occur on the crown of the
strands, or in the valleys between the strands
where adjacent strand contact exists. In
almost all cases, these failures are related to
bending stresses or vibration.
If the diameter of the sheaves, rollers or drum
cannot be increased, a more flexible rope
should be used. But, if the rope in use is
already of maximum flexibility, the only
remaining course that will help prolong its
service life is to move the rope through the
system by cutting off the dead end. By
moving the rope through the system, the
fatigued sections are moved to less fatiguing
areas of the reeving. This technique is most
frequently used in rotary drilling.
14. Broken Wires: The number of broken wires
on the outside of a wire rope are considered
an index of its general condition, and whether
or not it must be considered for replacement.
Frequent inspection will help determine the
elapsed time between breaks. Ropes should
be replaced as soon as the wire breakage
reaches the numbers given in Table 7. Such
action must be taken without regard to the
type of fracture.
On occasion, a single wire will break shortly
after installation. However, if no other wires
Table 7. When to Replace Wire Rope. Based on Number of Broken Wires
ANSI
No.
B30.5
4-48
Equipment
Crawler. Locomotive & Truck Cranes
Number Broken Wires
Number Broken Wires
In Standing Ropes
In Running Ropes
In One
At End
In One
In One
Connection
Strand Rope Lay
Rope Lay
2
3
6
3
TM5-3810-305-10
break at that time, there is no need for concern. On the other hand, should more wires
break, the cause should be carefully investigated.
On any installation, valley breaks - i.e.,
where the wire ruptures between strands should be given serious attention. When two
or more such conditions are found, the rope
should be replaced immediately.
It is well to remember that once broken wires
appear - in a normal rope operating under
normal conditions - a good many more will
show up within a relatively short period.
Attempting to squeeze to the last measure of
service from a rope beyond the allowable
number of broken wires (Table 7) will create
an intolerably hazardous situation.
PEENING
A diagnostic guide to some of the most
prevalent rope abuses is given in Table 8. On
the following pages these abuses are illustrated and described.
A wire that has broken under a tensile load in
excess of its strength is recognized by the
“cup and cone” configuration at the fracture
point (A, Figure 4-43). The necking down of
the wire at point of failure shows that failure
occurred while the wire retained its ductility.
A fatigue break is usually characterized by
squared-off ends perpendicular to the wire
either straight across or Z-shaped (B) and
(c).
ABRASION
Figure 4-42. Effects of Abrasion and Peening
Figure 4-43. Types of Breaks in Wire Rope
4-49
TM5-3810-305-10
Table 8. Diagnostic Guide to Common Wire Rope Abuses
Abuse
Symptoms
Possible Causes
Fatigue
Wire break is transverse - either straight across
or Z-shaped. Broken ends will appear grainy,
Check for rope bent around too small a radius;
vibration or whipping; wobbly sheaves; rollers too
small; reverse bends; bent shafts; incorrect rope
construction; improper installation; poor end
attachments. All running rope if left in service long
enough will fail by fatigue.
Tension
Wire break reveals predominantly cup and cone
fracture with some 45-degree shear breaks.
Check for overloads; sticky, grabby clutches;
jerky conditions; loose bearing on drum; fast
starts, fast stops; broken sheave flange; wrong
rope size and grade; poor end attachments.
Check for too great a strain on rope after factors
of deterioration have weakened it.
Abrasion
Wire break mainly displays outer wires worn
smooth to knife-edge thinness. Wire broken
by abrasion in combination with another factor
will show a combination break.
Check for change in rope or sheave size; change
in load; overburden change; frozen or stuck
sheaves; soft rollers, sheaves, or drums;
excessive fleet angle; misalignment of sheaves;
kinks; improperly attached fittings; grit and sand;
objects imbedded in rope; improper grooving.
Cut or Gouged Wire ends are pinched down, mashed and/or
or Rough Wire cut in a rough diagonal shear-like manner.
Check on all the above conditions for mechanical
abuse, or either abnormal or accidental forces
during installation.
Torsion or
Twisting
Wire ends show evidence of twist and/or corkscrew effect.
Check on all the above conditions for mechanical
abuse, or either abnormal or accidental forces
during installation.
Mashing
Wires are flattened and spread at broken ends.
Check on all the above conditions for mechanical
abuse, or either abnormal or accidental forces
during installation.
Corrosion
Wire surfaces are pitted with break showing
evidence either of fatigue tension or abrasion.
Indicates improper lubrication or storage.
Abrasion plus
Fatigue
Reduced cross-section is broken off square
thereby producing a chisel shape.
A long-term condition normal to the operating
process.
Abrasion plus
Tension
Reduced cross-section is necked down as
in a cup and cone configuration. Tensile break
produces a chisel shape.
A long-term condition normal to the operating
process.
4-50
TM5-3810-305-10
STRAND
Illustrated Examples of Possible Wire
Rope Damage
1. Interstrand and core-to-strand nicking: A
strand has been removed from the rope to
show the equivalent lines of nicking where
strands are in contact with one another, as
well as with the core (Figure 4-44).
Figure 4-44. Interstrand and Core-to-Strand
2. Cork-screwed rope: This condition results
from rope being pulled around an object
having a small diameter (Figure 4-45).
Figure 4-45. Cork-Screw Rope
3. Damaged reel: When a reel has been damaged in transit, it is a safe assumption that irreparable damage has been done to the rope
(Figure 4-46).
Figure 4-46. Damaged
Reel
4-51
TM5-3810-305-10
4. Shipping damage: Wire rope abuses during
shipment create serious problems (Figure 447). One of the more common causes is
improper fastening of rope end to reel, e.g.,
nailing through the rope end. These illustrations show two acceptable methods:
6. Incorrect handling results indifferent types of
damage to wire rope (Figure 4-49):
a. Rope damaged by being rolled over some
sharp object (A).
b. Damage resulting from bad drum winding
(B).
c. Drum crushing is evidence of bad winding
conditions (C).
d. Damage resulting from a deeply corrugated sheave (D).
A
Figure 4-47. Shipping Damage
a. One end of a wire “noose” holds the rope
and the other end is secured to the reel
(A).
b. The rope end is held in place by a J-bolt or
U-bolt that is fixed to the reel (B).
c
5. “High strand” wire rope: The excessive wear
of a single strand is caused by improper socketing (Figure 4-48).
Figure 4-48. “High Strand” Wire Rope
4-52
Figure 4-49. Damage From Incorrect Handling
TM5-3810-305-10
7. There are different types of wire rope damage
(Figure 4-50):
a. Dog leg (A).
b. Popped core (B).
c. Bird caging (C).
d. Snagged strand wires (D).
e. Spiraling that is brought about when rope
jumps from the sheave (E).
f. A tension break resulting from overloading (F).
D
E
B
Figure 4-50. Typ es o f W i r e R o v e D a m a g e
F
4-53
TM5-3810-305-10
8. There are different types of wearing of wire
rope (Figure 4-5 1):
Wire rope inspection includes examination of
basic items such as:
a. From excessive bending (A).
1. Rope diameter reduction.
b. Localized wear brought about by poor cutoff practice (B).
2. Rope lay.
3. External wear.
c. Rope slides over or against itself (C).
4. Internal wear.
d. Flexing the rope exposes broken wires
hidden in valleys between strands. This is
known as valley-type fatigue breaks (D).
5. Peening.
6. Scrubbing.
7. Corrosion.
8. Broken wires.
B
c
D
Figure 4-51. Wearing of Wire Ropes
Rope Inspection Summary
Any wire rope that has broken wires, deformed
strands, variations in diameter or any change
from its normal appearance must be considered
for replacement. It is always better to replace a
rope when there is any doubt concerning its
condition or its ability to perform the required
task. The cost of wire rope replacement is quite
insignificant when considered in terms of injuries
to personnel, the cost of down time or the cost of
replacing broken structures.
4-54
Some sections of rope can breakup without any
prior warning. Already discussed in some detail
as to cause and effect, sections where this occurs
are ordinarily found at the end fittings, and at the
point where the rope enters or leaves the sheave
groove of boom hoists, suspension systems or
other semi-operational systems. Because of the
“working” that takes place at these sections, no
appreciable wear or crown breaks will appear.
Under such an operation, the core fails thereby
allowing the strands to notch adjacent strands.
However, when this happens, valley breaks will
appear. As soon as the first valley break is
detected, the rope should be removed immediately.
If preventive maintenance, previously described,
is diligently performed, the rope life will be
prolonged and the operation will be safer. Cutting off a given length of rope at the end attachment before the core deteriorates and valley
breaks appear, effectively eliminates these
sections as a source of danger.
TM5-3810-305-10
Equipment lnspection
Any undetected fault on a sheave, roller or drum,
be it of relatively major or minor significance,
can cause a rope to wear out many times faster
than the wear resulting from normal operations.
As a positive means of minimizing abuses and
other-than-normal wear, the procedures here set
forth should be adhered to. Every observation
and measurement should be carefully recorded
and kept in some suitable and accessible file.
1. Give close examination to the method by
which the rope is attached both to the drum
and to the load. Make certain that the proper
means of attachment is applied correctly, and
that any safety devices in use are in satisfactory working order.
5. Whenever possible, follow the path that the
rope will follow through a complete operating
cycle. Be on the lookout for spots on the
equipment that have been worn bright or cut
into by the rope as it moves through the
system. Ordinarily, excessive abrasive wear
on the rope can be eliminated at these points
by means of some type of protector or roller.
Cable Lubrication
Refer to Appendix B, page B-2 for complete
information regarding lubrication of the cable.
2. Carefully check the groove and working
surface of every sheave, roller and drum to
determine whether each (groove and surface)
is as near to the correct diameter and contour
as circumstances will permit, and whether all
surfaces that are in contact with the rope are
smooth and free of corrugations or other
abrasive defects.
3. Check sheaves and rollers to determine
whether each turns freely, and whether they
are properly aligned with the travel of the
rope. All bearings must be in good operating
condition and furnish adequate support to the
sheaves and rollers. Sheaves that are permitted to wobble will create additional forces
that accelerate the deterioration rate of the
rope.
4. If starter, filler and riser strips on drums are
used, check their condition and location.
Should these be worn, improperly located or
badly designed, they will cause poor winding,
dog legs and other line damage.
4-55
TM5-3810-305-10
Section VI
Operation Under Emergency or Abnormal Conditions
Emergency Load Lowering Procedure.
Swing the Boom Mechanically
In the event that lowering a suspended load by
the normal means is impossible due to engine
failure, pump failure or a hydraulic line failure, a
hydraulic hand pump is provided. The following
procedures will restore the vehicle to a normal
traveling or towing attitude.
1. Remove three nuts (1), bolt (2), three washers
(3), five bolts (4), washers (5), deck plate (6),
and pinion cover (7, Figure 4-52).
During the execution of this
procedure, the danger exists of
uncontrollably dropping a load.
Rotate the upperstructure to a
safe position. Failure to follow
this procedure could cause
DEATH or serious injury.
NOTE
NOTE
Move swing lever in same swing
direction to relieve oil pressure
as the upperstructure is being
turned.
2. Attach a wrench to the protruding shaft of the
swing box drive. Turn swing box drive shaft
clockwise to swing boom to the right and
counterclockwise to swing boom to the left.
3. Rotate the upperstructure and the load to a
safe area.
Two men are required to perform
this task.
Figure 4-52. S wing Drive Box
4-56
TM5-3810-305-10
Prepare Equipment
The hand pump is mounted in the left side tool box. The pump supply and pressure hose with a connector tee is also located in this box.
The pump is used from this location by inserting the pin in the pump handle,
Attach Supply Hose
Attach the quick disconnect on the pump supply hose to the nipple on the reservoir side of the filter
manifold (Figure 4-53).
Figure 4-53. Quick Disconnect on Supply Hose
4-57
TM5-3810-305-10
Lower Load with Winch
8. Using a wrench on the swing box, rotate upperstructure back to the travel position.
NOTE
Retract Boom
If there is no load on hook
proceed to Retract Boom.
1. Bring hand pump pressure hose up to winch
and remove smallest cap on the connector tee.
2. Disconnect the brake hose from the tee in the
lowering port on the winch motor.
Entry of air into lowering port
will cause winch motor to cavitate. The winch motor lowering
port tee must be capped to prevent load from free falling when
hand pump pressure is applied.
Failure to follow this procedure
could cause DEATH or serious
injury.
3. Install cap on winch motor lowering port tee.
Never disconnect hydraulic lines
or fittings before venting pressure. Turn dipstick cap 1/4 turn
to safety notch to relieve pressure. Failure to follow this
procedure could cause SERIOUS
INJURY.
1. Turn dipstick 1/4 turn to safety notch to
relieve pressure.
2. Locate counterbalance valve on top of boom
extend cylinder at base of boom.
3. Loosen jam nut on counterbalance valve extending up from valve block and turn the
adjusting screw in until it bottoms (Figure 454). Keep track of number of turns required
to bottom out screw.
4, Connect connector tee to winch brake hose.
When working the hand pump,
clear all personnel from the area.
Failure to follow this procedure
could cause DEATH or serious
injury.
5. Close pressure release lever on pump. Pump
slowly until winch brake is released. The
load will lower slowly to the ground.
6. With the load safely down, open pressure
release lever on hand pump.
7. Disconnect brake hose from connector tee and
reattach to lowering port tee. Install cap on
connector tee.
4-58
Figure 4-54. Holding Valve (Adjusting Screw)
4. Turn ignition switch ON and pull back on
boom telescope lever until boom is fully retracted.
NOTE
If boom retracts, proceed to step
12.
5. Remove hose from retract port adapter on
control valve extend/retract section (first
section from the left side) (refer to Figure 453).
TM5-3810-305-10
6. Take cap off largest adapter on connector tee,
and put it on valve adapter.
9. Close pressure release lever on hand pump
and pump until boom is fully retracted.
7. Attach connector tee to the retract hose.
10. When boom is retracted, open pressure
release lever on pump and disconnect connector tee from retract hose.
NOTE
Another person is required in the
cab to pull back on boom telescope lever to open valve and
allow oil to flow thru valve while
pumping is taking place.
11. Connect retract hose to boom retract cylinder
port adapter.
12. Back out adjusting screw on extend cylinder
counter balance valve to its exact original adjustment (turns) and tighten jam nut.
8. Pull back on boom telescope lever.
13. Turn ignition switch OFF.
Figure 4-53. Quick Disconnect on Supply Hose
4-59
TM5-3810-305-10
Lower Boom
Everyone must be clear of the
area before moving hoist control
lever. Failure to follow this
procedure could cause DEATH
or serious injury.
When lowering boom to a horizontal position, work from side
of upperstructure, not under
boom. Failure to follow this
procedure could cause DEATH
or serious injury.
3. Turn ignition switch ON. Push forward on
boom hoist control lever in cab until boom is
lowered to horizontal position.
1. With a 5/ 16 in. hex allen wrench, remove plug
from the hold valve cartridge protruding up
on bottom side of hoist cylinder (Figure 455).
4. Turn ignition switch OFF.
2. With the same wrench, back-out internal plug
counterclockwise until wire retaining ring
stops it. Do not force plug beyond this point.
It cannot be removed because approximately
0.5 in. (13 mm) of threads remain at stop.
6. Tighten internal plug on hold valve cartridge
until it bottoms out in the original position.
Replace plug.
5. Swing boom mechanically over one side
(refer to page 4-56).
7. Swing boom mechanically over cab (refer to
page 4-56).
Figure 4-55. Internal Plug
4-60
TM5-3810-305-10
Lower the LRT 110 Crane Off the
Outriggers
2. Remove reducer -6 to -4 and cap -4 from
connector tee on pressure hose (Figure 4-56).
3. Remove single return hose and adapter from
Never disconnect hydraulic lines
or fittings before venting pressure. Turn dipstick cap 1/4 turn
to safety notch to relieve pressure. Failure to follow this
procedure could cause SERIOUS
INJURY.
tee and connect connector tee to tee.
4. Use reducer -6 to -4 and cap -4 to cap adapter
on single return hose removed from tee in
step 3.
5. Remove appropriate extend hose from outrigger solenoid.
1. Turn dipstick 1/4 turn to safety notch to
relieve pressure.
Figure 4-56. L owering the LRT Crane off the Outriggers
4-61
TM5-3810-305-10
6. Remove plug and place elbow and female
quick disconnect on one end of emergency
return hose and connect hose to disconnect
port on top of hydraulic reservoir. Remove
cap and connect other end of emergency
return hose to outrigger extend hose (Figure
4-56).
7. Close pressure release lever on hand pump.
Pump to retract outrigger to travel position.
8. Repeat steps 5 thru 7 for each outrigger as
necessary.
Figure 4-56. Lowering the LRT Crane off the Outriggers
4-62
TM5-3810-305-10
9. Remove pressure hose, emergency return hose
and pump supply hose, replace caps and place
in tool box.
10. Connect outrigger hoses.
11. Remove pin from pump handle and store in
tool box.
12. Install pinion cover (7), deck plate (6), five
washers (5), bolts (4), three washers (3), bolt
(2), and three nuts (1, Figure 4-52).
Figure 4-52. Swing Drive Box
4-63
TM5-3810-305-10
Secure Hook Block
1. If cable and hook block are lying on the
ground after completing these emergency procedures, tighten cable and install wood block
on winch to retain tension on cable. Remove
cable from hook block socket and secure
cable to vehicle.
Weight of the hook block is
approximately 235 lb (107 kg).
Use adequate hoist and sling to
lift hook block. Do not lift over
personnel or let personnel walk
underneath suspended load.
Failure to follow this procedure
could cause DEATH or serious
injury.
2. Using hoist and sling, lift hook block to tool
box for carrying purposes.
Unus ual Operating ConditionS
Special problems in maintenance and operation
are caused by unusual conditions such as extremes in heat, cold, humidity, high altitude, salt
water and dusty or sandy work sites. When
operating under such conditions, special precautions must be taken to prevent vehicle damage,
minimize wear and avoid component deterioration.
Extreme Cold
In periods of extreme cold, problems of freeze
damage, adequate lubrication and battery failure
may become particularly troublesome. With the
onset of very cold weather, it is advisable to
“winterize” the LRT 110 Crane by servicing the
cooling system and switching to the lubricant
recommended for cold weather usage. Follow
recommendations in this manual when operating
4-64
the LRT 110 Crane under very extreme conditions.
1. Prevent freeze damage. To prevent freeze
damage to the cooling system and cracking of
engine block or head, drain and flush cooling
system. Clean radiator exterior, making
certain all air passages through core and
cooling fins are free of foreign matter.
CAUTION
Never use a chromate-base corrosion inhibitor when coolant
contains ethylene glycol. Use
only nonchromate-base inhibitors. Chromate-base inhibitors
reacting with ethylene glycol can
produce chromium hydroxide,
commonly known as “green
slime.” This substance reduces
the heat transfer rate and can
cause serious engine overheating.
Refill cooling system. Add an antifreeze solution as recommended in the amount and
strength appropriate to anticipated temperatures. A corrosion inhibitor is recommended.
Inspect clamps, radiator hoses and radiator.
Replace or repair any cooling system component found to be defective.
Condensation in fuel tank contaminates the
fuel supply with water. This can freeze in
fuel lines and block fuel flow to engine. To
minimize this possibility, keep tank as full as
possible during cold weather. This may entail
refilling tank more frequently than usual, but
the inconvenience is small compared to
clearing a blocked fuel line.
2. Check and drain the fuel/water separator. If
water is found in fuel tank, drain tank and
refill it with uncontaminated fuel.
TM5-3810-305-10
3. Lubricate with correct lubricants. For temperatures below -10 degrees F (-23 degrees
C), service the LRT 110 Crane with Arctic
diesel fuel in fuel tank and Arctic lubricating
oil MIL-L-46167 in the engine. To aid cold
weather start below O degrees F (-18 degrees
C), service hydraulic system and transmission
with Arctic lubricating oil MIL-L-46167
(refer to Lubrication chart, Appendix B).
5. Idle vehicles must be properly stored (refer to
maintenance). At the end of work period, or
whenever vehicle is to be left idle for extended periods, park it on a wood, concrete,
asphalt or mat surface. This will prevent it
from being frozen to the ground.
6. For cold weather starting, use the cold start
device.
CAUTION
Water added to battery can freeze
before it mixes with electrolyte.
During very cold weather, add
water to battery just prior to, or
during operation of, vehicle. If
vehicle is not to be run, connect
an external charger to battery if
adding water.
4. Battery care is needed. The battery is more
likely to sustain freeze damage if not kept
fully charged. Its electrolyte will freeze at a
higher temperature than a fully charged
battery. Be certain battery is charging when
engine is running. Use an external charger to
restore full charge when the vehicle is not
being operated.
Starting fluid is toxic and highly
flammable. Container is pressurized to act as an expellent. Do
not heat container and do not
discharge starting fluid in confined areas or near an open
flame. Failure to follow this
procedure could cause SEVERE
INJURY.
It is recommended that the cold start device
be used for starting the LRT 110 Crane in ambient temperatures below 32 degrees F (O degrees C) and required at temperatures of 10
degrees F (- 12 degrees C) and below.
The battery can discharge if snow or ice short
circuits the terminals. Keep battery posts and
cable connectors clean and dry. Remove any
corrosion with a solution of baking soda and
water.
During extremely cold weather, when the
vehicle is to remain idle overnight or for any
extended period, it is advisable to remove and
store battery in a heated area.
For cold start at -25 degrees F (-32 degrees
C), the batteries have sufficient charge for
only one start attempt.
4-65
TM5-3810-305-10
To install cold start cylinder:
a. Remove cylinder from tool box and remove
cap from top of cylinder (Figure 4-57).
To use the cold start device:
a . Pull cold start knob out and wait 3 to 5
seconds for ether to fill charging valve.
(Omit this step if temperature is above O
degrees F [- 18 degrees C]).
b. Push cold start knob in and wait 3 to 5
seconds for ether to spray into intake
manifold. (Omit this step if temperature is
above 0 degrees F [-18 degrees C]).
c. Repeat steps a and b. (Omit this step if
temperature is above O degrees F [- 18
degrees C]).
CAUTION
Figure 4-57. Cold Start Cylinder
b. Remove protector cap from valve or, if
empty cylinder is in place, loosen clamp
and unscrew cylinder.
c. Invert cylinder and thread into cold start
mounting valve.
d. Secure cylinder with clamp.
Before starting engine using the cold start
device, be sure to inspect engine oil and
transmission oil filters for bulges and ruptures. The applicable Preventive Maintenance
Checks and Services are also to be completed
(refer to page 4-13).
If temperature is below O degrees F (- 18
degrees C), briefly turn ignition switch ON to
check battery voltage. If battery voltage is
below 24 volts, the LRT 110 Crane will
require a slave start (refer to page 4-68).
Headlights are to be turned on for 3 minutes
to warm the batteries, then all switches and
accessories are to be turned off.
4-66
Do not crank engine for periods
longer than 30 seconds if tachometer indicates less than 250
rpm and no longer than 1 minute
if tachometer indicates over 250
rpm. Failure to follow this procedure could cause damage to
equipment.
d. Pull cold start knob out and wait 3 to 5
seconds. Turn ignition switch ON and
press start button. Then push cold start
knob in while holding start button. Hold
accelerator pedal all the way down while
cranking engine.
e. Pull cold start knob out and wait 3 to 5
seconds for ether to fill charging valve.
f. Push cold start knob in and wait 3 to 5
seconds for ether to spray into intake
manifold.
g . Inject additional ether as necessary to
attain and then maintain a minimum of
500 rpm.
TM5-3810-305-10
h. Continue to hold start button until tachometer indicates 500 rpm or 1 minute of
time is reached.
i. Check oil pressure gauge for 10 psi (69
kPa), or higher at idle 720 to 880 rpm.
j . Operate engine at 1,000 to 1,500 rpm, until
engine temperature reaches 120 to 140
degrees F (49 to 60 degrees C).
NOTE
Minor oil leakage of filters is
normal and can be as much as 3
tablespoons per minute for the
first 5 minutes of operation.
k. Inspect engine oil filter and transmission
oil filter for leaks. There should be no
leaks present after 5 minutes of operation.
Close engine hood.
1. Attempt to move the LRT 110 Crane forward and backward to check for frozen
brakes and tires.
m. Check brakes and steering functions
before exceeding 5 mph (8 km/h).
ALLOW THE ENGINE TO WARMUP SO
that optimum engine power is obtained at
low speed for the protection of the hydrau-
CAUTION
BE ALERT FOR SIGNS OF
PUMP CAVITATION. The
hydraulic oil provides lubrication
for pumps. When too heavy or
stiff, it will not flow fast enough
to meet pump demand and a
vacuum or “cavitation” will be
created. A “screaming” noise
indicates inadequate pump
lubrication, and, if allowed to
continue for more than a short
period, will result in serious
damage to pumps.
If cavitation noise is noticed, hydraulic oil
must be warmed. To do this, actuate a function, allow the cylinders involved to reach the
limits of their travel and hold control in
engaged position for 10 minutes. When
running hydraulic oil over relief to warm it,
be sure to restrict flow by turning engine at as
slow a speed as possible.
Increase engine speed gradually, allowing
sufficient time for oil to run through the
system before commencing operation. If
cavitation noise is still noticed, repeat the
procedure listed above. Refer to the lubrication chart, Appendix B, for recommended oil
viscosity for the winter season.
lic system.
7. Special attention must be given to the hydraulic oil.
4-67
TM5-3810-305-10
8. Slave start engine when necessary. Maintain
batteries at full 24-volt charge. The slave
receptacle on side of battery compartment
may be used for charging batteries or slave
starting engine from an external power source
(Figure 4-58).
Turn ignition switch ON and engage starter
until engine starts.
After starting, allow engine speed to return to
idle for engine warm-up and remove slave
power cable connection.
Cold weather shutdown procedure. Park the
LRT 110 Crane on prepared surface, if possible, free of snow, ice and water, to prevent
tires from freezing to surface. Be sure slave
receptacle is accessible. Remove all ice and/
or snow accumulations from the vehicle and
proceed as follows:
a. Turn off all accessories, i.e., heater, fan,
etc.
If slave starting, make sure when connecting
slave start cables that ignition switch is OFF,
transmission is in neutral and parking brake is
applied.
Connect external power source cable plug to
slave receptacle. The LRT 110 Crane is a 24volt negative ground system.
CAUTION
Do not crank engine for periods
longer than 30 seconds if tachometer indicates less than 250
rpm, and no longer than 1 minute
if tachometer indictes over 250
rpm. Failure to follow this
procedure could cause damage to
equipment.
4-68
b. Check transmission fluid level.
c. Check voltmeter. If voltmeter reads below
24 volts, indicating insufficient charge in
battery for unassisted start, notify organizational maintenance.
d. Perform vehicle shutdown (refer to page
4-71).
e. Drain water from fuel separator by opening drain valve and pumping handle on lift
pump. Close drain valve when procedure
is completed.
TM5-3810-305-10
f. Restart engine and check to insure all
controls are properly positioned for starting.
Run engine for 3 to 5 minutes to charge
battery.
Crankcase oil is particularly important because it helps dissipate heat. Check the oil
level frequently and add oil as required to
maintain the correct level. Low oil will
hinder heat dissipation.
g. Turn ignition switch OFF and service
vehicle.
Emergency Window Removal
If it is necessary to rescue an operator that is
trapped in the cab, remove the front glass. Using
any available pointed object such as a knife,
screwdriver or stick, pry out the seal lip of the
weatherstripping. Pry in under the glass to raise
it so that it can be removed. This same method
can be used on any of the side or rear windows
for emergency purposes.
An able and conscious operator can also exit the
cab by placing his feet against the glass and with
moderate force, push the glass out of front or rear
windows.
Extreme Heat
Like extreme cold, extreme heat requires that
precautions be taken with respect to the cooling
system, battery and lubrication. Protect the
vehicle by performing the following recommended procedures:
1. Lubricate with correct lubricants. High temperatures necessitate the use of lubricants
which are both higher in viscosity and resist
deterioration at higher operating temperatures. Refer to the Lubrication section,
Appendix B and use the lubricants recommended for the expected temperatures.
The cooling system is pressurized. Use extreme caution and
proper protection when removing
radiator cap after operating temperature is reached. When
removing cap, loosen it slowly to
the left, then pause a moment.
Steam and hot gases will be
escaping through the radiator
cap; avoid being burned by these
gases. Continue to turn cap until
it can be removed. Failure to
follow this procedure could cause
SERIOUS INJURY.
2. Prevent overheating. To insure proper coolant circulation, drain and flush the cooling
system. Clean any foreign matter from the
radiator cooling fins and core air passages.
Replace defective hoses and tighten hose
clamps. Eliminate any leaks detected and fill
the system with a 5070 solution of ethylene
glycol and water. A corrosion inhibitor is
also recommended.
Engine overheating due to loss of coolant will
most often be corrected by SLOWLY replacing the lost coolant with engine idling.
Water containing larger than normal concentrations of salt or minerals should not be used
in the cooling system. Salt will cause corrosion and mineral deposits will collect on the
coolant passage walls. Both processes inhibit
proper cooling.
4-69
TM5-3810-305-10
3. Check the battery. Increased evaporation
rates will cause the battery electrolyte level to
fall more rapidly during very hot weather.
Check the level frequently and add distilled
water as required to maintain the proper level.
4. Keep air circulation free. Air circulation
around the engine and battery must not be
restricted. Keep air intake and exhaust
openings clear of leaves, paper and other
foreign matter which may restrict air flow.
Keep the engine clean of dirt, grease and
other substances which inhibit heat dissipation.
Use sound judgment in operating the engine.
Avoid the two extremes of racing and lugging.
Advance the throttle only enough to handle
the load, yet be certain that the engine speed
is high enough to maintain adequate fan speed
for cooling.
Run the engine only when engaged in work
operations or when traveling the vehicle.
Avoid prolonged periods at idling and shut
the engine down if operations are interrupted.
Sandy or Dusty Work Sites
The presence of large amounts of sand or dust at
the work site can contribute to accelerated
component wear. Either substance will act as an
abrasive when deposited on moving parts. The
problem is combated by more frequent lubrication and by the servicing of breathers and filters
at shorter intervals. Follow the recommendations
below when operating in sand or dust on a
regular basis:
1. Check the filler caps, filters, breathers, air
cleaner and grease fittings.
Keep sand and dust out of the hydraulic
system by keeping the reservoir filler cap
tight and servicing the hydraulic system filters
frequently.
The fuel system should be kept free of sand
and dust by keeping the tank filler cap tight
and servicing the fuel filters frequently.
When lubricating, thoroughly clean each
grease fitting before attaching the grease gun.
Pump generous amounts of grease into all
lubrication points, using the fresh grease to
pump out the old grease. The increased
frequency of lubrication and service noted
above should be determined by observations
made at work site. Inspection will indicate
how long it takes for lubricants, breathers and
filters to accumulate unacceptable amounts of
sand or dust. The frequency of lubrication
and service should be adjusted accordingly.
The engine and air cleaner should also be
serviced frequently to prevent sand and dust
from entering the engine. The engine oil and
oil filter should be changed at shorter than
normal intervals to insure a clean oil supply to
the engine’s moving parts.
Adequate ground bearing support
must be provided for the outrigger when operating on soft
surface. Be alert for signs of
LRT 110 Crane movement
during operations. Failure to
follow this procedure could cause
DEATH or serious injury.
2. Insure that the terrain is adequate to support
the crane’s weight.
4-70
TM5-3810-305-10
High Humidity or Saltwater
In some locations, such as coastal areas, the LRT
110 Crane may be exposed to the deteriorating
effects of salt, moisture or both. To protect
exposed metallic surfaces, wiring, hoist rope,
paint and other items, keep them dry and well
lubricated. Follow the recommendations below
when operating in these conditions:
Where paint may not be applied, such as on
polished or machined surfaces, coat the area with
grease to repel water.
Keep bearings and their surrounding surfaces
well lubricated to prevent the entry of water.
Cable must be kept well lubricated to prevent
moisture and salt from penetrating the cable
strands.
Check for deterioration.
Fording
Make frequent inspections for rust and corrosion.
Remove them as soon as they are detected. Dry
and paint exposed surfaces after rust and corrosion have been removed.
There are no special preparation or maintenance
vehicle requirements to ford up to 30 in, (762
mm) of water.
Section Vll
Shutdown
Vehicle Shutdown Procedu r es
Before securing the LRT 110 Crane, make sure
of the following:
2. Secure hook block to hook block tieback.
3. Lower boom to travel position.
1. Fully retract boom and center it over the front
of the LRT 110 Crane.
CAUTION
When attaching hook block to
hook block tieback, take up cable
slowly while lowering boom to
prevent damage to windshield.
4. Make certain all outriggers are in the up
position.
5. Place transmission shift lever in neutral.
6. Apply parking brake.
7. Turn ignition switch OFF.
4-71
TM5-3810-305-10
Section Vlll
Transportability
As required by the procurement specification,
provisions are included on the LRT 110 Crane
for highway, air, marine and rail transportation.
Figure 4-60 illustrates the weight distribution and
location of slinging eyes, tiedown lugs and
towing lugs.
Land Transport
The LRT 110 Crane may be driven on public
roads (refer to Vehicular Operation, page 4-18),
Normal transport over highways should be
accomplished by hauling on a flatbed truck or
trailer.
LRT 110 Crane Towing Procedure for
Emergency Recovery Only
This towing procedure is to be used for emergency recovery only, such as a dead engine or
any other breakdown unabling the LRT 110
crane to be moved under its own power. Refer to
page 4-56 of this manual for “Emergency Load
Lowering” to return the LRT 110 Crane to a
travel mode for towing purposes. Do not tow the
LRT 110 Crane in any convoy or troop movement by this procedure. For convoy or troop
movement, transport on a flatbed truck or trailer.
To prepare the vehicle for towing:
1. Position the boom over the front in the travel
position to prevent engagement of rear axle
lockout.
CAUTION
When attaching hook block to
hook block tieback, take up cable
slowly while lowering boom to
prevent damage to windshield.
4-72
Figure 4-59. Driveshaft
2. Attach the hook block to the hook block
tieback with enough tension to take the slack
out of cable.
C A U T I O N
If the LRT 110 Crane is to be
towed a distance of more than 1
mile (1.6 km) and/or at speeds
greater than 3 mph (4.8 km/h),
the front drive shaft must be disconnected from the front axle.
As an alternative to disconnecting the drive shaft, if the engine
is operable, the engine may be
started and allowed to idle during
the towing process. This will circulate lubricant in the transmission, lubricating the clutches
during the towing operation.
Failure to disconnect the drive
shaft or to run the engine will
cause internal damage to the
transmission as the vehicle is
towed.
TM5-3810-305-10
3. Disconnect the drive shaft by removing four
capscrews and two caps (Figure 4-59). The
driveshaft must be disconnected from the
front axle and secured to a frame crossmember to prevent it from contacting the rotating
axle input yoke or the ground while the
vehicle is being towed. The spider bearing
caps must be taped or wired together to
prevent them from falling off and being lost.
4. Place the two-wheel/four-wheel drive shift
lever, located at the right of the operator’s
seat, in the two wheel drive position to prevent damage to the transmission during
towing.
5. Attach tow bar to the lugs on the outrigger
and to towing vehicle.
6. Release the parking brake in the operator’s
cab by pulling the lever up to release it. If the
vehicle’s electrical power is available, turn on
the emergency four-way flashers.
The crane may now be towed at speeds up to
20 mph (32 km/h) (depending on existing
conditions) for whatever distance is necessary. When making turns, make them as wide
as possible (no sharp turns) at no more than 5
mph (8 km/h).
CAUTION
The tow bar MS500048 is the
only tow bar to be used on this
vehicle. If not available, see organizational maintenance. Failure to follow this procedure
could cause damage to equipment.
Figure 4-60. Preperation for Travel
4-73
TM5-3810-305-10
Air Transport
The overall height of the LRT 110 Crane allows
for transport without disassembly by C-5, C- 141,
and C-130 aircraft. Prepare the LRT 110 Crane
as follows:
1. Retract the boom and lower it over the rear of
the carrier (Figure 4-61 ).
CAUTION
2. Use the link in the tool box to connect the
hook block to the pintle hook on the rear outrigger. With the winch, take up the slack in the
cable.
3. R e f e r t o T M 5 5 - 3 8 1 0 - 1 6 5 - 1 4 . T r a n s p o r t a b i l i t y
Guidance for the Crane. 7.5 Ton. Rough
Terrain. Koehring. Type 1, {NSN 3810-01165-0646}, Type 2, {NSN 3810-01-165-0467}
and the shipping data plates for tiedown
requirements.
Apply only enough tension to the
cable to take up the slack. Failure to follow this procedure
could cause damage to equipment.
OVERALL LENGTH 342 in. (8.69 m)
OVERALL HEIGHT 93 in. (2.36 m)
SHIPPING CUBAGE 1767 cu. ft (50.04 cu. m)
OVERALL WIDTH 96 in. (2.44 m)
Figure 4-61. Air Transport Tiedowns
4-74
TM5-3810-305-10
Rail Transport
Weight of hook block is approximately 235 lb (107 kg). Use adequate lifting equipment and
always properly support hook
block. Do not lift over personnel
or let personnel walk underneath
suspended load. Failure to
follow this procedure could cause
DEATH or serious injury.
1. Using hoist and sling, remove the hook block
from the cable. Store it in the tool box and
block it to prevent it from moving.
2. Retract the boom and lower it over the front.
Wind the cable back on the winch drum, and
wire the socket down to prevent the cable
from loosening on the winch drum.
3. Install a 1/2 in. 6x19 IWRC cable around the
load sheave and the hook block tieback.
4 . Refer to TM55-3810-01-165-14,
Transporfor the Crane. 7.5
tability Guidance
Ton, Rough Terrain, Koehring, Type 1,
{NSN 3810-01-165-0646}, Type 2 {NSN
3810-01-165-0467} and the shipping data
plates for tiedown requirements.
5.
Place the fuel shut-off on the rear wall of the
cab in the off position. Put the transmission
shift lever in the center (neutral) position, and
release the parking brake.
6. Remove all loose tools and equipment from
the operators cab. Stow and secure all tools
and equipment in the tool box.
7. Band the tool and battery box lids shut.
4-75
TM5-3810-305-10
Transport For LRT 110 Crane
For loading aboard ship, the LRT 110 Crane may be slung in a horizontal attitude from the lifting eyes
on the ends of the outrigger boxes. Figure 4-66 shows the slinging geometry, indicating the sling apex
of the vehicle’s center of gravity. If provisions exist, the LRT 110 Crane may be driven aboard the ship
in a forward or backward direction. Once aboard, the LRT 110 Crane may be maneuvered into tight
quarters by using the crab steering capability. Tie down the vehicle as required using the tiedown lugs
provided.
Figure 4-66. Marine Transport
4-76
TM5-3810-305-10
CHAPTER 5
TYPE II SUPPLEMENT
Section
Title
Sectionalization
Preparation for and Sectionalization of the LRT 110
Type II Crane for External Air Transport (EAT)
Preparation for and Assembly of Sectionalized LRT 110
Type II Crane After External Air Transport (EAT)
Transportability
Land Transport
Air Transport
Rail Transport
Marine Transport
Helicopter Transport
Page
5-2
5-26
5-46
5-48
5-49
5-50
5-50
5-1
TM5-3810-305-10
Section I
Sectionalization
The LRT 110 Type II Crane is equipped with a
sectionalization kit complete with all components
and tools necessary to disassemble it into two
separate loads for transport, and reassemble it on
another site. All of the sectionalization compo-
nents are stored on the LRT 110 Crane with
pinned connections in storage locations A thru E
(Figure 5-l). All tools, extension hoses and
accessories required are stowed in carrier tool
box on left side of vehicle.
TOOL BOX
Figure 5-1. Storage Locations
Preparation for and Sectionalization of
the LRT 110 Type II Crane for External Air
Transport (EAT).
Preparation for Separating Upperstructure from Carrier
The LRT 110 Crane should be positioned on a
suitable unobstructed location for disassembly
procedure.
Vehicle must be level to prevent
possible loss of control of upperstructure when lifting off of
carrier. DEATH or serious
injury may result if upperstructure gets out of control.
1. Start engine and with boom lowered over cab,
retracted and in travel position, proceed as
follows:
5-2
TM5-3810-305-10
a. Set outriggers by extending beams and
lowering outrigger pads to the ground.
Lift the LRT 110 Crane off ground and
level it, using bubble level on right side of
console.
CAUTION
When removing hook block from
storage bracket, pay out cable
while raising boom to prevent
damage to windshield.
b. Raise boom to a 50-degree elevation,
keeping hook block in vertical position.
Unhook hook block from storage bracket.
Lower boom to horizontal position while
raising hook block.
c. Shut engine off.
2. Remove anti-two block counterweight (Figure
5-2) as follows:
a. Using 6 mm hex allen wrench, open and
split the anti-two block counterweight
hanging down from boom tip around hoist
cable.
b. Separate and remove counterweight halves
from cable. Using capscrews, reassemble
counterweight halves after removal.
Figure 5-2. Anti-Two Block Counterweight. Switch and
Hook Block
c. Remove counterweight from anti-two
block switch by removing thumbscrew
from clevis holding chain to anti-two
block switch.
d. Remove counterweight and chain. Stow
in tool box. Reinstall clevis on anti-two
block switch with thumbscrew.
5-3
TM5-3810-305-10
Observe length of cable end
protruding from cable socket and
clamp. If cable end extends
more than 2 in. (51 mm), adjust
cable so no more than 2 in. (51
mm) protrude. Excessive cable
protrusion can push cable out of
socket when hook block is
hoisted with plate to boom head.
Failure to follow this procedure
could cause DEATH or serious
injury.
NOTE
When counterweight has been
removed from anti-block switch,
the switch is shut off and LRT
110 Crane control disconnect
system has been deactivated.
Functions of raising winch, and
extending and lowering boom
will not operate. To use any of
these functions for the following
procedures, turn on anti-two
block BY-PASS switch. This is
to be done only as required.
3. Prepare to raise hook block up to boom head
by removing plate ( 1, Figure 5-3) from tool
box and place over dead end bracket on top of
hook block. The LRT 110 Crane should be
reeved with a two-part line for this procedure.
4. Start engine and swing upperstructure and
boom around to right side of carrier to 2
o’clock position.
5. Shut engine off.
5-4
Figure 5-3.Preparation for Raising the Hook Block
TM5-3810-305-10
Weight of mast is approximately
98 lb (44 kg). Use two people to
properly support and lift mast.
Failure to follow this procedure
could cause DEATH or serious
injury.
6. Remove two pins (2) and mast (3) from stor-
age location D (Figure 5-4) on left side of upperstructure. Lay mast (3) on carrier deck for
future assembly and store two pins (2) in tool
box for future use.
7. Start engine. Swing upperstructure to left side
of the LRT 110 Crane to an approximate 10
o’clock position.
Figure 54. Storage Location D
5-5
TM5-3810-305-10
8. Lower hook block to ground, positioning it on
its side (Figure 5-5). Maintain tension on
cable and continue to pay out 3 ft (914 mm)
of cable. Insert wedge block between winch
cable and winch brace at counterweight side
(Figure 5-6).
9. Shut engine off.
Figure 5-5. Hook Block
Figure 5-6. Wedge Block in Winch Drum
Figure 5-7. Storage Location C
5-6
TM5-3810-305-10
10. Install toggle sheave brackets on top of boom
as follows:
a. Remove two right side attaching links (4)
and toggle sheave brackets (5) from
storage location C (Figure 5-7) on right
front side of carrier frame.
b. Remove two sheave pins (6) from toggle
sheave brackets (5).
c. Attach two toggle sheave brackets (5) and
attaching links (4, Figure 5-8) to studs on
top of boom. The cable should lay over
two toggle sheave brackets (5), between
ears. Secure two attaching links (4) and
toggle sheave brackets (5) with two lynch
pins (7) tethered to attaching links (4).
d. Remove two sheaves (8) from tool box
and install on toggle sheave brackets (5)
with sheave pins (6). Make sure hex head
of sheave pin (6) is aligned with key stock
on toggle sheave bracket (5).
Figure 5-8. Installing Sheaves
With anti-two block safety
feature not functional, do not
apply excessive line pull to cable.
This can cause serious damage to
cable, hook block, boom head
and winch.
e. Start engine. Hold on anti-two block BYPASS switch (Figure 5-9).
f. Maintain tension on cable and remove
wedge block from winch drum. Using
winch control lever, pull hook block and
plate up to and in contact with boom head.
Stop as soon as contact is made.
Figure 5-9. Anti-Two Block Panel
5-7
TM5-3810-305-10
11. Shut engine off.
Be aware of limited work area
while lifting, reaching and
assembling the mast and lift arm.
The deck and fender surface is
small and can become slippery in
inclement weather. Failure to
follow this procedure could cause
DEATH or serious injury.
12. Install mast (3) on carrier as follows:
Figure 5-10. Assembling the Mast
a. With the aid of another person, raise mast
(3) from deck, and lower it over square
pivot bearing (9, Figure 5-10), located on
right side of frame, behind operator’s cab.
Position stop on mast (3) towards center
line of vehicle between stops. Mast base
ears should be over fender. Align ears on
top of mast with support ears on frame.
b< Remove two truss rods (10), adjustable
truss rod (11 ) and six pins (12) from storage location A (Figure 5:11) on right side
of upperstructure.
Figure 5-11. Storage Locations A and B
c. Install two truss rods (10) to top of carrier
frame, one on left side, behind cab, and the
remaining one on right side of cab. Install
four pins (12, Figure 5-11 A) in connecting
points.
Figure 5A. Installing the Truss Rods
5-8
TM5-3810-305-10
13. Install lift arm (16) as follows:
a. With lift arm (16) still in storage location
B on right side of boom, pull out sheave
pin (13) and remove sheave (14) from
sheave bracket (15, Figure 5-11 ).
e. Using two pins (12), attach adjustable
truss rod (11) to top of mast (3) and top of
lift arm (16). The mast and arm assembly
is now complete.
f. Temporarily swing mast and arm assembly
out of the way.
b. Temporarily lay sheave (14) aside.
14. Start engine. Raise boom until a minimum
boom angle of 45 degrees is observed on
boom angle indicator.
Weight of the lift arm is
approximately 95 lb (43 kg).
Use two people to properly
support and lift the lift arm.
Failure to follow this procedure
could cause DEATH or serious
injury.
c. Remove lift arm (16) and pins (17) and
(18) from storage brackets. Place pin (18)
in tool box for future use.
d. With sheave bracket (15) down, connect
lift arm (16) to base of mast (3) with pin
(17, Figure 5-12).
15. Shut engine off.
The crane winch is used to hoist and separate
upperstructure from carrier. Extension hoses are
added to winch hydraulic circuit, supplying
power to winch to hoist upperstructure off carrier
and lower it to ground.
The rotary manifold is located internally in
center of upperstructure. Access to rotary manifold is through opening under boom and through
cutout on sides of upperstructure.
Figure 5-12. Assembling the Mast
5-9
TM5-3810-305-10
16. Prepare crane winch for hoisting as follows:
Never disconnect hydraulic lines
or fittings before venting pressure. Turn dipstick 1/4 turn to
safety notch to relieve pressure.
Failure to follow this procedure
could cause SERIOUS INJURY.
right side of upperstructure and run in
through hole to rotary manifold. Reach in
and release attaching disconnects on these
hoses.
c. Remove two coiled extension hoses (Figure 5-14) from tool box. Their ends are
connected together by quick disconnects,
and are marked with ID tags reading H-10
and H-11. Take them to right side of
vehicle.
a. Turn dipstick 1/4 turn to safety notch to
relieve pressure.
b. Disconnect two winch hoses, tagged H-10
and H-11 (Figure 5-13), attached to rotary
manifold with quick disconnect fittings.
These hoses come down from winch on
Figure 5-14. Extension Hoses
Figure 5-13. Rotary Manifold Hoses
5-10
TM5-3810-305-10
NOTE
Be sure to keep the hoses and
their quick disconnect ends clean
during this procedure.
d. Disconnect ends and uncoil hoses.
e. Locate the two quick disconnect fittings
that extend down from two tees on winch
valve next to frame, underneath right side
of earner. Remove protective dust caps
and connect male connectors of extension
hose H-10 to H- 10 winch hose and extension hose H-11 to H-11 winch hose (Figure5-15).
f. Connect loose ends of H- 10 and H- 11 extension hoses to respective tagged fittings.
The winch hoses are now attached from
valve to original winch hoses with these
extensions.
Figure 5-15. Quick Disconnect Fittings
5-11
TM5-3810-305-10
CAUTION
DO NOT use a torque wrench for
removal purposes. Failure to
follow this procedure could cause
damage to equipment.
17. Remove 10 upperstructure mounting capscrews and 20 washers from inside upperstructure, by using a 36 mm socket, two
adapters, torque multiplier, short and long extensions, breaker bar, and extension bar
(Figure 5-16). All these tools are found in
tool box (refer to Tools for Sectionalization,
page 5-45). Set mounting capscrews and
washers aside where they will not be kicked
off deck, as they will be reinstalled shortly.
REAR
w
FRONT
Location
Ref
1
2
3
4
13
14
15
16
17
18
TOOLS REQUIRED
(REFER TO
6
2
8
6
2
8
6
3
2
6
2
8
6
3
2
6
3
2
6
4
2
6
2
8
6
4
2
6
3
2
BY TOOL NUMBER
PAGE 5-45)
4
15
25
4
15
25
8
4
15
4
15
25
8
4
15
8
4
15
8
15
25
4
15
25
15
25
8
8
4
15
5
5
25
5
25
25
5
5
5
25
Figure 5-16. Tools Used for Remov al of Mou nting Caps crews
5-12
5
5
5
5
TM5-3810-305-10
18. With a 36 mm socket, remove stop pin and
lockwasher from torque arm bracket on side
of rotary manifold. Stem stop pin and lockwasher in tool box.
19. Disconnect wire harness (Figure 5-17) connected to electrical collector ring.
20. Relieve pressure in extend-retract valve
circuit by turning ignition switch ON, holding on anti-two block BY-PASS switch and
operating boom telescope lever in both directions several times until pressure is released.
Turn ignition switch OFF and proceed as follows:
opening. Hang left retract hose over right
extend hose and under tab (Figure 5-18).
NOTE
Make sure that all capscrews and
stop pin are removed from inside
upperstructure and wire harness
is disconnected from electrical
collector ring.
21. Start engine. Lower hook block 12 in. (305
mm) from boom head and proceed as follows:
a. Lower boom to horizontal position.
a. Disconnect boom extend-retract hose
quick disconnects from rotary manifold.
b. Shut engine off.
b. Remove two plugs size 12 from tool box
and plug hoses.
c. Roll both hoses back to rear opening and
hang the right extend hose over lip of
Figure 5-18 L ocation of B oom Extend-Retract Hoses
After Dis connection
5-13
TM5-3810-305-10
22. Relieve pressure in boom hoist circuit by
turning ignition switch ON, holding on antitwo block BY-PASS switch and operating
boom hoist lever in both directions several
times until pressure is released. Turn ignition
switch OFF and proceed as follows:
a. Disconnect two boom hoist cylinder hoses
(Figure 5-19) from manifold. Access is
through cutout in front of upperstructure.
b. After disconnecting, pull hose ends out
through front hole to keep them out of the
way. Remove two plugs size 10 from tool
box and plug hose ends (Figure 5-20).
Figure 5-20 Location of Boom Hoist Cylinder Hoses
After Disconnection
Figure 5-19
5-14
Rotary Manifold Hoses
TM5-3810-305-10
Preparation for Removing Upperstructure
from Carrier
1. Swing mast and lifting arm around from
beside cab and position it over lifting point of
boom, between toggle sheaves (Figure 5-21).
2. Start engine. Lower hook block to ground
and begin paying out cable to form slack from
toggle sheaves up to clevis on lift arm. Maintain tension on cable to prevent unspooling.
3. Insert wedge block between winch cable and
winch brace at counterweight (Figure 5-6).
Figure 5-6 Wedge Block in Winch Drum
Figure 5-21 Positioning of Mast and Lifting Arm
5-15
TM5-3810-305-10
4. Take loose sheave (14, Figure 5-22) that was
removed from lift arm (16) in step 13.a of
Preparation for Separating Upperstructure
from Carrier and insert it in slack of cable.
5. Raise sheave (14) and cable up into clevis on
lift arm (16) and using sheave pin (13), install
sheave (14) in place in clevis.
CAUTION
Make sure three sheaves and
cable are in alignment with
boom. Failure to follow this
procedure could cause damage to
equipment.
6. Remove wedge block and raise hook block to
boom head and draw cable tight. Maintain
tension on cable to prevent unspooling. The
tightened cable will help support boom and
upperstructure while removing remaining
capscrews.
7. Shut
Figure 5-22 Lifting the Upperstructure
5-16
TM5-3810-305-10
8. Remove 8 remaining mounting capscrews and
16 flat washers on outside of upperstructure,
using a 36 mm socket, two adapters, torque
multiplier, short and long extensions, breaker
bar and extension bar (Figure 5-23).
REAR
FRONT
Location
Ref.
5
6
7
8
9
10
11
12
TOOLS REQUIRED BY TOOL NUMBER
(REFER TO PAGE 5-45)
6
3
2
8
15
25
6
3
2
8
15
25
6
3
2
8
4
15
6
2
8
4
15
25
4
2
8
15
25
6
6
4
2
8
15
25
6
3
2
8
15
25
8
15
25
6
3
2
5
5
25
5
5
5
5
5
5
Figure 5-23 Tools Used for Removal of Mounting Capscrews
5-17
TM5-3810-305-10
Removing Upperstructure from Carrier
Alert all personnel that the
upperstructure is to be lifted off
the carrier. Keep all uninvolved
personnel clear of the vehicle
while hoisting and removal are
taking place. Check all pin
connections, cable alignment and
machine bubble level before proceeding with the lift. Failure to
follow this procedure could cause
DEATH or serious injury.
3. Swing upperstructure around and lower it to
ground as follows:
a. Using one person pushing on lift arm and
mast assembly, one person guiding
counterweight end of upperstructure and
one person holding the tether rope, swing
upperstructure around to right side of
carrier.
1. Remove tether rope from tool box and knot
rope to boom head quick reeving pin (Figure
5-24).
NOTE
Two personnel are required on
the deck next to upperstructure,
one on each side, to observe upperstructure separation. Another
person is required on the ground
to handle the tether rope.
2. Start engine. Hold on anti-two block BYPASS switch and slowly hoist upperstructure
off carrier. Be sure that, while it is raising, it
is clearing rotary manifold and electrical collector ring cover. It will not be necessary to
clear manifold cover by more than 1 to 2 in.
(25 to51 mm). Stop hoisting at this point.
5-18
Figure 5-24 Attached Tether Rope
TM5-3810-305-10
b. Align upperstructure parallel to carrier
with boom tip to rear and counterweight to
front (Figure 5-25).
Keep arms and hands from under
upperstructure. Failure to follow
this procedure could cause
SERIOUS INJURY.
c. Install canvas bag, located in tool box,
around and under base plate of upperstructure. Pull drawstring tight and tie.
I
CAUTION
Keep all hoses out of the way
when lowering upperstructure.
Make sure the winch extension
hoses are not pinched against the
outrigger beam as the upperstruc ture is lowered. This could result
in damage to the extension hoses.
d. Lower upperstructure until just short of
touching ground.
Figure 5-25 Lowering the Upperstructure
5-19
TM5-3810-305-10
e. Remove posts (19), (20), (21) and (22) and
six pins (23) from storage locations A, D
and E (Figures 5-26, 5-27 and 5-28). Two
pins (2) and tube (24) are located in tool
box. Connect one end of posts (19) and
(20) to ends of post (21) with two pins
(23). Swing remaining ends of posts (19)
and (20) up and attach to ears on side of
Figure 5-26 Storage Location D
Figure 5-27 Storage L ocation E
5-20
boom with two pins (23, Figure 5-29).
Connect one end of post (22) to center of
post (21) with pin (23); then swing other
end of post (22) up and attach to ears
underneath boom with pin (23). Attach
tube (24) to posts (21) and (20) with two
pins (2).
Figure 5-28 Storage Location A
Figure 5-29 Support for Front of Boom
TM5-3810-305-10
NOTE
Make sure hook is turned sideways, and trunnion rotated so
that bottom of hook block sets
level on ground. Use tether rope
around hook to hold hook in
place while lowering.
4. Lower upperstructure on to front support
between outriggers. Position of lift arm (16)
should be straight out from side of carrier
frame (Figure 5-30).
Figure 5-30 Lowering Upperstructure on Support
5-21
TM5-3810-305-10
Removing and Stowing Parts Used for
Separation
1. When upperstructure is down, continue to pay
out approximately 18 ft (5.49 m) to remove
tension on hoist cable.
2. Shut engine off.
3. Block cable at winch drum with a wooden
wedge (Figure 5-6) to prevent cable from unwinding.
4. Dismantle and restow lift arm ( 16) as follows:
a. Remove hoist line from lift arm (16) by removing pin (12) connecting adjustable
truss rod (11 ) to top of mast (3, Figure 531).
Weight of the lift arm is approximately 95 lb (43 kg), Use two
people to properly support the lift
arm. Failure to follow this
procedure could cause DEATH
or serious injury.
b. Manually lower lift arm (16) down toward
boom.
c. Remove sheave (14) from clevis on lift
arm (16). This will leave the cable slack.
d. Remove adjustable truss rod (11 ) by removing pin (12) from top of lift arm (16).
e. Remove bottom pin (17) and lift arm (16)
from mast (3, Figure 5-3 1). Restow in
storage location B (Figure 5-11) on right
side of boom.
Figure 5-6. Wedge Block in Winch Drum
Figure 5-31 Assembling the Mast
5-22
TM5-3810-305-10
f. Install sheave (14) back in clevis on lift
arm (16). Index sheave pin (13) and lock
sheave bracket (15) to side of lift arm ( 16).
g. Maintain tension on cable and remove
wooden wedge from winch drum.
h. Start engine. Hold on anti-two block BYPASS switch and use winch to pull loose
cable down snug against boom, from
boom head to winch. Stop as soon as all
slack is removed from cable.
i. Shut engine off.
5. Remove and stow mast (3) as follows:
a. Remove two truss rods (10) from mast (3,
Figure 5-11A). Stow truss rods (10) and
adjustable truss rod (11) in storage location A (Figure 5-11) on upperstructure.
Figure 5-11. Storage Locations A and B
Figure 5-11A. Installing the Truss Rods
5-23
TM5-3810-305-10
Weight of mast is approximately
98 lb (44 kg). Use two people to
properly support and lift mast.
Failure to follow this procedure
could cause DEATH or serious
injury.
b. Lift mast (3) up off pivot bearing and stow
in storage location D (Figure 5-4) on
upperstructure.
c. Disconnect H-10 and H-11 winch extension hoses from both upperstructure and
underneath carrier. Install dust caps on
disconnect fittings at winch valve on right
side of carrier.
e. Remove dust caps and plugs from tool box
(three sizes, two of each). Plug or cap
open hose ends and all open fittings on
rotary manifold (Figure 5-20). Lock dipstick cap on hydraulic tank.
f. Maintain normal rear axle oscillation with
rotary manifold disconnected from upperstructure. Remove wrench from tool box
and, using two mounting capscrews and
four washers, install wrench (Figure 5-32)
with pin end engaged in hole of torque
arm bracket on rotary manifold. Use
breaker bar and 36 mm socket to tighten
two mounting capscrews.
g. Thread remaining 16 mounting capscrews
and 32 washers back into threaded holes of
swing bearing.
d. Roll up hoses H- 10 and H- 11 and connect
ends together (Figure 5-14). Return them
to tool box.
Figure 5-14. Extension Hoses
Figure 5-4. S torage Location D
5-24
TM5-3810-305-10
Preparation of Carrier for Transport
1. Lower carrier to ground, using the following
procedure:
a. Start engine. Raise outrigger beams. Lift
outrigger pads that are underneath boom
just enough to clear ground.
CAUTION
Do not allow outrigger beam,
located under upperstructure, to
contact winch hoses. Failure to
follow this procedure could cause
damage to equipment.
NOTE
This position will permit oscillation of rear axle when maneuvering carrier away from upperstructure.
2. Use crab steering and short forward-reverse
movements to move the carrier until it is clear
of upperstructure.
3. Prepare outriggers for travel, using the following procedure:
a. Raise outrigger beams to travel position.
b. Shut engine off.
b. Using swing lever, rotate swing bearing to
unlocked position with cam roller on axle
lockout valve, located at rear, bottom of
rotary manifold, centered in notch.
Figure 5-20 Location of Boom Hoist Cylinder Hoses
After Disconnection
c. Remove nuts, washers, bolts and pads
from ends of outrigger beams. Reinstall
bolts, washers and nuts after pads are
removed.
Figure 5-32 Rear Axle Oscillation
5-25
TM5-3810-305-10
d. Stow pads in hanger brackets on right side
of boom toward tip. Secure with rod (25)
and two cotter pins (26, Figure 5-33) located on boom.
Preparation for and Assembly of
Sectionalized LRT 110 Type II Crane After
External Air Tranport (EAT)
Preparation for Assembly
4. Clean and stow all remaining items and tools,
used for sectionalization disassembly, in tool
box.
5. Check fuel tank. Add diesel fuel to bring level
up to the 3/4 full mark.
NOTE
Carrier is to be positioned parallel to upperstructure on operator’s right side, with boom tip to
rear and counterweight to front. Front outrigger
beam is to be positioned approximately even
with upper hose clamp (Figure 5-34).
1. Install pads on outrigger beams.
Prior to air lifting carrier, rear
axle must be in locked position.
6. Start engine. Rotate swing bearing 10 or
more degrees from unlocked position (refer to
step 1 b). Cam roller on valve must be out of
notch on rotary manifold. Shut engine off.
The vehicle is now “sectionalized.”
a. Remove two cotter pins (26) and rod (25)
that stow pads on right side of boom
(Figure 5-33). Remove pads for installation and reinstall rod (25) and pins (26) on
side of boom.
b. Remove nuts, washers and bolts from ends
of outrigger beams and install pads.
Reinstall bolts, washers and nuts to ends
of outrigger beams. Torque nuts to 240 lbft (325 N m).
●
Figure 5-33 Secure Pads on Boom
5-26
TM5-3810-305-10
2. Start engine. Position carrier next to upperstructure as follows:
a. Extend outrigger beams and pads down
close to ground.
b. Using swing lever, rotate swing bearing to
unlocked position with cam roller on axle
lockout valve, located at rear, bottom of
rotary manifold, centered in notch.
c. Maneuver carrier over toward upperstructure, positioning right front outrigger beam
in under upperstructure (Figure 5-34).
Vehicle must be level to prevent
possible loss of control of upperstructure when lifting off of
ground. DEATH or serious
injury may result if upperstructure gets out of control
Figure 5-34 P o s i t i o n i n g O u t r i g g e r
d. With carrier in place, extend outrigger
beams, raising carrier off ground at all
four corners. Level carrier, using bubble
level on right side of console.
5-27
TM5-3810-305-10
e. Align left edge of wrench (Figure 5-32)
with right side of lockout valve. Using a
36 mm socket and breaker bar, remove
two capscrews and four washers attaching
wrench to swing bearing and rotary manifold. Remove wrench and stow in tool
box. Capscrews and washers will be
installed at a later time.
f. Shut engine off.
g. Remove remaining 16 capscrews and 32
washers from top of swing bearing. Set
them aside, for reinstallation at a later
time.
h. Check and clean top of swing bearing, if
necessary, where upperstructure will be
bolted down.
i. Remove all dust caps and plugs from connectors on hoses and rotary manifold in
center of swing bearing (Figure 5-20).
Stow caps and plugs in tool box.
3. Attach winch extension hoses as follows:
a. Remove two coiled extension hoses (Figure 5-14) from tool box. Their ends are
connected together by quick disconnects,
and are marked with ID tags reading H-10
and H-11. Take them to right side of
carrier.
NOTE
Be sure to keep the hoses and
their quick disconnect ends clean
during this procedure.
b. Disconnect ends and uncoil hoses.
Figure 5-32 Rear Axle Oscillation
Figure 5-20 Location of Boom HoistCylinder Hoses
After Disconnection
5-28
TM5-3810-305-10
●
●
Never disconnect hydraulic
lines or fittings before venting
pressure. Turn dipstick cap 1/4
turn to the safety notch to
relieve pressure. Failure to
follow this procedure could
cause SERIOUS INJURY.
Turn the face during the
following procedure to avoid
having hydraulic oil splash in
face or eyes. Failure to follow
this procedure could cause
SERIOUS INJURY.
NOTE
During reconnection of hydraulic
quick disconnects, pressure
build-up may prevent reconnection. Striking the cone at the
center of the disconnect will
relieve the pressure.
Figure 5-14. Extension Hoses
c. Turn dipstick cap 1/4 turn to safety notch
to relieve pressure.
d. Locate two quick disconnect fittings that
extend down from two tees on winch valve
next to frame, underneath right side of
carrier. Remove protective dust caps and
connect male connectors of extension hose
H-10 to H-10 winch hose and extension
hose H-11 to H- 11 winch hose (Figure 535). Attach female connectors of extension hose H-10 to H-10 valve fitting and
extension hose H-11 to H-11 valve fitting.
Stow plugs in tool box.
Winch hoses are now attached from valve to
original winch hoses with these extensions.
Figure 5-35 Quick Disconnet Fittings
5-29
TM5-3810-305-10
Be aware of limited work area
while lifting, reaching and
assembling mast and lift arm.
Deck and fender surface is small
and can become slippery in
inclement weather. Failure to
follow this procedure could cause
DEATH or serious injury.
4. Install mast (3) on carrier as follows:
a. Remove two pins (2) and mast (3) from
storage location D (Figure 5-4) on left side
of upperstructure. Store two pins (2) in
tool box for future use.
b. With the aid of another person, raise mast
(3) and lower it over square pivot bearing
(9, Figure 5-10), located on right side of
frame, behind operator’s cab. Position
stop on mast (3) towards center line of
vehicle between stops. Mast base ears
should be over fender. Align ears on top
of mast with support ears on frame.
Weight of the mast is approximately 98 lb (44 kg). Use two
people to properly support and
lift mast. Failure to follow this
procedure could cause DEATH
or serious injury.
Figure 5-10. Assembling the Mast
Figure 5-4. Storage Location D
Figure 5-11. Storage Locations A and B
5-30
TM5-3810-305-10
c. Remove two truss rods (10), adjustable
truss rod (11 ) and six pins (12) from
storage location A (Figure 5-11) on right
side of upperstructure. Install two truss
rods (1 O) to top of carrier frame, one on
left side, behind cab, and the remaining
one on right side of cab. Install four pins
(12) in connecting points (Figure 5-11A).
c. Remove lift arm (16) and pins (17) and
(18) from storage brackets. Place pin (18)
in tool box for future use.
d. With sheave bracket (15) down, connect
lift arm (16) to base of mast (3) with pin
(17, Figure 5-12).
NOTE
5. Install lift arm (16, Figure 5-12) as follows:
a. With lift arm (16) still in storage location
B on right side of boom, pull out sheave
pin (13) and remove sheave (14) from
sheave bracket (15, Figure 5-11 ).
b. Temporarily lay sheave (14) aside.
Weight of the lift arm is approximately 95 lb (43 kg). Use two
people to properly support and
lift the lift arm. Failure to follow
this procedure could cause
DEATH or serious injury.
Adjustable truss rod (11) has
been permanently adjusted for
the LRT 110 Crane and should
never require adjustment.
e. Using two pins (12), attach adjustable
truss rod (11) to top of lift arm (16) and
then to top of mast (3). Mast and arm assembly is now complete.
f. Swing assembly around and position over
rear fender.
Figure 5-12. Assembling the Mast
Figure 5-11A. Installing the Truss Rods
5-31
TM5-3810-305-10
Preparing the Upperstructure for Lift
1. Remove wedge block from tool box and
locate it near winch.
2. Start engine. Lower hook block to ground.
Pay out a loop of cable approximately 18 ft
(5.49 m) from winch to reach up to sheave
clevis at top of lift arm (16, Figure 5-36).
Using wedge block, wedge cable to prevent
cable unspooling (Figure 5-6).
4. Raise sheave (14) and cable up into clevis on
lift arm (16) and using sheave pin (13), install
sheave (14) in clevis. Swing lift arm (16)
over upperstructure.
5. Maintain tension on end of cable and remove
wedge block from cable spool. Operate
winch until hook block is secured to boom
head.
3. Take loose sheave (14, Figure 5-36) that was
removed from lift arm (16) in step 5.a of
Preparation for Assembly and insert it in
slack of cable.
Check that all pins and pinlocks
are installed and secured properly. DEATH or serious injury
may result if upperstructure
comes loose.
r
Figure 5-6. Wedge Block in Winch Drum
Figure 5-36 Preparing Upperstructure for Lift
5-32
TM5-3810-305-10
6. Remove tether rope from tool box and knot
rope to boom head quick reeving pin (Figure
5-24).
7. Hold on anti-two block BY-PASS switch and
use winch to slowly hoist upperstructure until
support bracket clears ground.
8. Remove three pins (23, Figure 5-37) from
boom support that connects it to upperstructure and remove boom support. Set aside for
later disassembly and storage.
Lifting Upperstructure onto Carrier
Stay clear of hoisted upperstructure while it is being positioned
over carrier. Failure to follow
this procedure could cause
DEATH or serious injury.
9. Remove protective bag from base plate of upperstructure and place in tool box.
1. With one person handling the tether rope,
raise upperstructure high enough to check
bottom of mounting base plate to see if it is
clean. Remove any foreign material that may
have accumulated on mounting base plate.
Figure 5-24 Attached Tether Rope
Figure 5-37 Boom Support Removal
5-33
TM5-3810-305-10
NOTE
Keep hands and arms clear of all
pinch points while checking the
alignment of the upperstructure
and the carrier mounting surface.
Failure to follow this procedure
could cause SERIOUS INJURY.
Two personnel are required on
the deck next to the upperstructure, one on each side, to observe
the upperstructure alignment.
Another person is required on the
ground to handle the tether rope.
2. Continue to hoist assembly high enough to
clear rotary manifold and electrical collector
ring cover (1 to 2 in. [25.4 to 50.8 mm] is
sufficient).
3. By pushing on lift arm and pulling with tether
rope, manually swing upperstructure into
mounting position with boom pointing in a 10
o’clock direction on left side of carrier (Figure
5-38).
CAUTION
Make sure the base plate opening
clears the connections on the
rotary manifold, Failure to
follow this procedure could cause
damage to equipment.
4. Slowly lower the upperstructure over rotary
manifold to within 0.5 in. (13 mm) of rotary
manifold.
Figure 5-38 Installing Upperstructure
5-34
TM5-3810-305-10
Installing Upperstructure on Carrier
1. Align the upperstructure and swing bearing by
manually starting four mounting capscrews
and eight washers into the outside comer
holes 6, 8, 9 and 11 (Figure 5-38). Lower
upperstructure to swing bearing.
2. Align torque arm on rotary manifold and
anchor ear on inside of upperstructure frame
by swinging the upperstructure.
3. With alignment correct, install four mounting
capscrews and eight washers in remaining
outside mounting holes. Tighten eight
mounting capscrews. The final torquing will
be done after remaining mounting capscrews
are installed on inside of upperstructure.
Removing and Stowing Parts Used for
Assembly
1. Remove hoist cable from lift arm (16) as follows:
a. Remove tether rope from boom head and
stow in tool box.
b. Lower hook block to ground and pay out
cable 12 in. (305 mm) while maintaining
tension on cable. Insert wedge block in
winch drum (Figure 5-6).
c. Remove sheave (14) and cable from lift
arm (16) by removing pin (13) from the
clevis that retains sheave (14, Figure 539). Temporarily lay pin (13) and sheave
(14) aside.
Figure 5-6. Wedge Block in Winch Drum
Figure 5-39 Lifting the Upperstructure
5-35
TM5-3810-305-10
d. Swing lift arm and mast out of the way.
e. Shut engine off.
2. Disconnect winch extension hoses as follows:
a. Relieve pressure in winch circuits by
turning ignition switch ON, holding on
anti-two block BY-PASS switch and operating winch lever in both directions several times until pressure is released. Turn
ignition switch OFF.
Turn the face during the following procedure to avoid having
hydraulic oil splash in face or
eyes. Failure to follow this
procedure could cause SERIOUS
INJURY.
b. Disconnect winch extension hoses H-10
and H-11 (Figure 5-15) from both upperstructure and underneath carrier. Do not
connect winch lines to rotary manifold at
this time. Install dust caps on quick
disconnect fittings on valve under carrier.
WINCH
HOSES
Figure 5-14. Extension Hoses
EXTENSION
HOSES
Figure 5-15. Quick Disconnect Fittings
5-36
TM5-3810-305-10
c. Roll up hoses H-10 and H-11 and connect
ends together (Figure 5-14). Return them
to tool box.
3. Relieve pressure in extend-retract and boom
hoist circuits by turning ignition switch ON,
holding on anti-two block BY-PASS switch
and operating extend-retract and boom hoist
levers several times in both directions until
pressure is released. Turn ignition switch
OFF.
5. Remove toggle sheave brackets (5) and attaching links (4) from boom (Figure 5-8) as
follows:
a. Remove two pins (6) and sheaves (8) from
toggle sheave brackets (5). Stow sheaves
(8) in tool box. Remove cable from
bracket (5) and restow pins (6) in brackets
(5).
b. Remove lynch pins (7) and attaching links
(4) from studs on top of boom.
4. Push the boom hoist cylinder hoses, sticking
out through cutout in front of upperstructure,
back inside and attach to fittings on rotary
manifold (Figure 5-19).
c. Remove cable from between ears and
remove toggle sheave brackets (5).
Figure 5-8 Sheaves
Figure 5-19 Rotary Manifold Hoses
5-37
TM5-3810-305-10
d. Stow toggle sheave brackets (5)with
attaching links (4) in storage location C,
on bracket on right-hand front of earner
(Figure 5-7). Secure with pins (6) connected to the attaching links (4).
Completion of Upperstructure Assembly
1. Install anti-two block counterweight (Figure
5-2) as follows:
a. Remove clevis from anti-two block switch
on boom head. Hook the weight chain on
clevis and reinstall on anti-two block
switch.
b. Using a 6 mm hex allen wrench, open
counterweight halves.
Figure 5-7. Storage Location C
c. Install weight halves around hoist line
hanging down over boom head sheave.
Secure halves with thumbscrews.
2. Raise boom and install mounting capscrews
inside upperstructure using the following
procedure:
a. Swing mast and arm assembly out of the
way.
b. Start engine. Raise boom to a minimum
of 45-degree angle.
c. Shut engine off.
Figure 5-2. Anti-Two Block Counterweight, Switch and
Hook Block
5-38
TM5-3810-305-10
d. Remove stop pin and lockwasher from
tool box and install in upperstructure
torque arm bracket. Make sure end of stop
pin goes down through ear on side of
rotary manifold. Tighten stop pin with a
36 mm socket and breaker bar (Figure 540).
Figure
5-40
Rotary Manifold Hoses
TM5-3810-305-10
e. Install 10 mounting capscrews and 20
washers inside of upperstructure (Figure 541).
f. Tighten all 18 capscrews. Refer to Figure
5-41 for torquing sequence and tool requirements for each mounting capscrew.
Set the torque wrench to 205 lb-ft (278
N m). Using torque multiplier in conjunction with torque wrench, the actual torque
on the capscrew is 722 lb-ft (979 N m).
●
●
REAR
FRONT
Location
Ref.
1
5-40
TOOLS REQUIRED BY TOOL NUMBER
(REFER TO PAGE 5-45)
2
3
4
5
6
6
6
6
6
2
2
3
2
3
8
8
2
8
2
6
7
8
9
10
11
12
13
14
15
6
6
6
6
6
6
6
6
6
6
3
3
3
3
3
3
3
3
3
4
2
4
4
8
4
8
8
4
4
4
4
2
2
2
2
2
2
2
2
2
16
17
6
6
4
4
18
6
7
7
8
8
7
7
7
8
13
13
4
13
4
4
13
13
13
13
25
7
7
13
7
13
13
7
7
7
7
5
25
25
7
25
7
7
25
25
25
25
5
5
25
5
25
25
5
5
5
5
5
5
5
4
5
13
7
25
4
13
7
25
5
5
25
25
25
4
5
5
5
13
2
3
2
7
Figure 5-41 Tools Used for Tightening of Capscrews
25
5
2
25
TM5-3810-305-10
3. Connect hoses and wiring harness to rotary
manifold using the following procedure:
a. Relieve pressure in extend-retract valve
circuit by turning ignition switch ON,
holding on anti-two block BY-PASS
switch and operating boom extend-retract
lever in both directions several times until
pressure is released. Turn ignition switch
OFF.
b. Connect extend-retract hoses, hooked
under tabs (Figure 5-13), onto rotary
manifold.
c. Remove plugs from winch hoses and stow
in tool box. Connect winch hoses H-10
and H-11 to connectors on rotary manifold.
d. Reconnect wiring harness on collector
ring. The anti-two block system is now
operable.
e. Check to make sure the torque arm stop
pin, hoses and wiring harness are all in
place and connected to rotary manifold.
f. Turn hydraulic reservoir cap 1/4 turn
clockwise to close reservoir.
Figure 5-13. Rotary Manifold Hoses
5-41
TM5-3810-305-10
Removal and Stowage of Remaining
Parts Used in Assembly
1. Lower boom to horizontal position using the
following procedure:
a. Remove wedge from winch and stow in
tool box.
b. Start engine. Lower boom to a horizontal
position while raising hook block.
c. Remove plate (1) from top of hook block
(Figure 5-3) and stow in tool box.
d. Shut engine off.
2. Remove and stow lift equipment as follows:
Weight of lift arm is approximately 95 lb (43 kg). Use two
people to properly support and
lift the lift arm. Failure to follow
this procedure could cause
DEATH or serious injury.
a. Remove pin (12) from adjustable truss rod
(11) at top of mast (3) and lower lift arm
(16) to deck. Remove pin (12) from
adjustable truss rod (11 ) and set adjustable
truss rod (11 ) aside temporarily. Remove
pin (17) from lift arm (16) at base of mast
(3, Figure 5-42).
b. Remove lift arm (16) and stow in location
B using one pin from tool box. Install
sheave (14) back in clevis on lift arm (16)
with pin (13). Index sheave pin (13) and
lock sheave bracket to side of lift arm (16,
Figure 5-11 ).
Figure 5-3. Preparation for Raising the Hook Block
5-42
Figure 5-42 Disassembling the Mast
TM5-3810-305-10
c. Remove two truss rods (10) from mast (3,
Figure 5-42) and stow two truss rods (10)
and adjustable truss rod (11, Figure 5-11)
in location A on upperstructure.
Weight of mast is approximately
98 lb (44 kg). Use two people to
properly support and lift the
mast. Failure to follow this
procedure could cause DEATH
or serious injury.
e. Disassemble and stow boom support that
was removed in step 8 of Preparing the
Upperstructure for Lift. Remove two pins
(2) and tube (24, Figure 5-29) and store in
tool box. Remove three remaining pins
(23) that connect posts (19), (20) and (22)
to post (21). Using pins (23), stow post
(19) at storage location D (Figure 5-26) on
upper structure, post (20) at storage location A (Figure 5- 11) on upperstructure and
posts (21) and (22) at storage location E
(Figure 5-27) on frame.
d. Remove mast (3, Figure 5-42) and lay on
deck.
Figure 5-11 Storage Locations A and B
Figure 5-29 Support for Front of Boom
Figure 5-26 Storage Location D
Figure 5-27 Storage Location E
5-43
TM5-3810-305-10
f. Start engine.
g. Swing boom to 2 o’clock position and
stow mast (3) on upperstructure storage
location D (Figure 5-4) using additional
pin from tool box.
h. Shut engine off.
3. Account for and clean all tools used in assembly procedures. Put away all tools in tool
box.
Lower the LRT 110 Crane to the Ground
1. Start engine. Center boom over cab and raise
boom to a 50-degree angle. Lower hook
block down far enough to hook it into hook
block tieback on front of the LRT 110 Crane.
Lower boom to travel position while taking
up slack in cable.
2. Raise outriggers, lowering the crane to
ground. Retract outrigger beams up to travel
position. Shut engine off.
3. Recheck stowage of all items used for assembly of the LRT 110 Crane, The crane is now
ready for normal operation.
CAUTION
When attaching hook block to
hook block tieback, take up cable
slowly while lowering boom to
prevent damage to windshield.
Figure 5-4. Storage Location D
5-44
TM5-3810-305-10
TOOLS AND PARTS FOR SECTIONALIZATION
REF
1
2
TOOL
3
4
5
6
7
8
9
10
11
12
13
14
15
16
17
18
19
20
21
22
23
24
25
HOSE H-10, H-11
TORQUE MULTIPLIER
w/reaction bar, 3/4 drive,
1/2 input
SHORT EXTENSION, 3/4 drive
LONG EXTENSION, 3/4 drive
EXTENSION BAR
36 mm SOCKET
TORQUE WRENCH, 1/2 drive
REDUCER, 3/4 f to 1/2 m
HAMMER
TAPERED PUNCH
PLIERS
ROPE
ADAPTER, 1/2 f to 3/4 m
WOODEN WEDGE
BREAKER BAR, 3/4
PLASTIC CAP -10
PLASTIC PLUG -10
PLASTIC CAP -12
PLASTIC PLUG -12
PLASTIC CAP -16
PLASTIC PLUG -16
BAG
WRENCH
PLATE
PIN, HAIR
26
27
ALLEN WRENCH -6 mm
TUBE
USE
Winch extension hoses
4 to 1 mechanical advantage
for torquing swing bearing capscrews
QTY
2
1
1
Use with torque multiplier
1
Use with torque multiplier
1
Use with breaker bar and torque wrench
1
Swing bearing capscrews
1
Torquing swing bearing capscrews
1
Adapt extension to torque multiplier
1
All purpose use
1
All purpose use
1
All purpose use
1
Tether boom tip
1
Adapt torque wrench to extensions
1
Wedge winch cable
1
Removing swing bearing capscrews
2
Cap hoist connectors on manifold
2
Plug hoist hoses
Cap extend-retract connectors on manifold 2
2
Plug extend-retract hoses
2
Cap winch connectors on manifold
2
Plug winch hoses
1
Base plate protector
1
Axle oscillation
1
Hook block
1
Secure extension bar to breaker bar
/torque wrench
1
Anti-two block counterweight
1
Boom support assembly
Also use the basic issue tools as required from pages 1-25 and 1-26 of this manual.
5-45
TM5-3810-305-10
Section II
Transportability
As required by the procurement specification,
provisions are included on the LRT 110 Crane
for land, air, marine and rail transportation.
Figure 5-44 illustrates the weight distribution and
location of slinging eyes, tiedown lugs and
towing lugs.
Land Transport
The LRT 110 Crane may be driven on public
roads (refer to Vehicular Operation, page 4- 18).
Normal land transport should be accomplished
by hauling on a truck or trailer.
LRT 110 Crane Towing Procedure for
Emergency Recovery Only
This towing procedure is to be used for emergency recovery only, such as a dead engine or
any other breakdown unabling the LRT 110
Crane to be moved under its own power. Refer
to page 4-56 for “Emergency Load Lowering” to
return the LRT 110 Crane to a travel mode for
towing procedures. Do not tow the LRT 110
Crane in any convoy or troop movement by this
procedure. For convoy or troop movement,
transport on a flatbed truck or trailer. To prepare
the vehicle for towing:
1. Position the boom over the front in the travel
position to prevent engagement of the rear
axle lockout.
CAUTION
When attaching hook block to
hook block tieback, take up cable
slowly while lowering boom to
prevent damage to windshield.
2. Attach the hook block to the hook block
tieback with enough tension to take the slack
out of cable.
5-46
Figure 5-43 Drive Shaft
CAUTION
If the LRT 110 Crane is to be
towed a distance of more than 1
mile (1.6 km) and/or at speeds
greater than 3 mph (4.8 km/h),
the front driveshaft must be disconnected from the front axle.
As an alternative to disconnecting the driveshaft, if engine is
operable, engine may be started
and allowed to idle during the
towing process. This will circulate lubricant in the transmission,
lubricating the clutches during
the towing operation. Failure to
disconnect the driveshaft or to
run engine will cause internal
damage to the transmission as the
vehicle is towed.
3. Disconnect the driveshaft by removing four
capscrews and two caps (Figure 5-43). The
driveshaft must be disconnected from the
front axle and secured to a frame crossmember to prevent it from contacting the
TM5-3810-305-10
rotating axle input yoke or ground while the
vehicle is being towed. The spider bearing
caps must be taped or wired together to
prevent them from falling off and being lost.
4. Place the two-wheel/four-wheel drive shift
lever, located at right of operator’s seat, in the
two-wheel drive position to prevent damage
to the transmission during towing.
CAUTION
The tow bar MS500048 is the
only tow bar to be used on this
vehicle. If not available, see organizational maintenance. Failure to follow this procedure
could cause damage to equipment.
5. Attach tow bar to lugs on outrigger and to
towing vehicle.
Figure 5-44 Preparation for Travel
5-47
TM5-3810-305-10
6. Release the parking brake in the operator’s
cab by pulling up lever to release it. If the
vehicle’s electrical power is available, turn on
emergency four-way flashers.
The vehicle may now be towed at speeds up
to 20 mph (32 km/h) (depending on existing
conditions) for whatever distance is necessary. When making turns, make them as wide
as possible (no sharp turns) at no more than 5
mph (8 km/h).
Air Tranport
CAUTION
Apply only enough tension to the
cable to take up the slack. Failure to follow this procedure
could cause damage to equipment.
2. Use the link in the tool box to connect the
hook block on the rear outrigger. With the
winch, take up the slack in cable.
3. Refer to TM55-3810-01-165 -14, Transpor-
The overall height of the LRT 110 Crane allows
for transport without disassembly by C-5, C-141
and C-130 aircraft. Prepare the LRT 110 Crane
as follows:
tability Guidance for the Crane, 7-5
Ton, Rough Terrain, Koehring, Type 1,
{NSN 3810-01-165-0646}, Type 2 {NSN
3810-01-165-0467} and the shipping data
plates for tiedown requirements.
1. Retract the boom and lower it over the rear of
carrier (Figure 5-45).
Figure 5-45 Air Transport Tiedowns
5-48
TM5-3810-305-10
Rail Transport
Prepare
the LRT 110 Crane for rail transport as follows:
Weight of the hook block is
approximately 235 lb (107 kg).
Use adequate lifting equipment
and properly support the hook
block. Do not lift over personnal
or let personnel walk underneath
suspended. Failure to follow this
procedure could cause DEATH
or serious injury.
1. Using hoist and sling, remove the hook block
from cable. Store it in the tool box and block
it to prevent it from moving.
2. Retract the boom and lower it over the front.
Wind cable back on drum, and wire socket
down to prevent cable from loosening on
winch drum.
3. Install a 1/2 in. 6x19 IWRC cable around load
sheave and hook block tieback.
4 . Refer to TM55-3810-165-14 Transportability
Guidance for the Crane, 7.5 Toni Rough
Terrain. Koehring, Type 1, {NSN 3810=01165-0646}, Type 2, {NSN 3810-01-165-0467}
and the shipping data plates for tiedown
requirements.
5. Place the fuel shut-off on the rear wall of cab
in the off position. Put the transmission shift
lever in center (neutral) position, and release
the parking brake
6. Remove all loose tools and equipment from
the operator’s cab. Stow and secure all tools
and equipment in the tool box.
7. Band the tool and battery box lids shut.
5-49
TM5-3810-305-10
Marine Transport
Helicopter Transport
For loading aboard ship, the LRT 110 Crane may 1. The LRT 110 Crane must be “sectionalized’
be slung in a horizontal attitude from lifting eyes
in two sections according to the instructions
on ends of outrigger boxes. Figure5-46 shows
found in Chapter 5, Section 1.
slinging geometry, indicating sling apex of the
2. Attach the slings to the lifting eyes provided
vehicle’s center of gravity. If provisions exist,
on the outrigger beams of the carrier, and on
the LRT 110 Crane may be driven aboard the
the boom and upperstructure.
ship in a forward or backward direction. Once
aboard, the LRT 110 Crane may be maneuvered
3. After delivery, reassemble the LRT 110
into tight quarters by using the crab steering caCrane, following instructions found in Chappability. Tie down the vehicle as required using
ter 5, Section I.
tiedown lugs provided.
Figure 5-46 Marine Transport
5-50
TM5-3810-305-10
APPENDIX A
Preparation of a New LRT 110 C rane for
Conduct the following checks before putting a
new crane into operation (Figure A-1 ):
Drive Shafts: Visually check the connecting
capscrews and drive shafts for damage. Examine
the parking brake disc and brake pack. Check
the function of the brake.
Engine: Check the oil level, coolant level and
that all clamps on the air intake system are tight.
Check that all filters are installed. Look for oil
leaks around the engine. Oil level is to be maintained between ADD and FULL as indicated on
the dipstick.
Axles: Visually check all attaching bolts. Check
the differentials and hub drives for lubricant
levels. Visually check the steering cylinders and
tie rods for damage. Check to be sure the torque
on all wheel nuts is 450 to 500 1b-ft (610 to 678
N ● m). Visually check tires for damage, and
verify tire pressure. Tire pressure should be 90
psi (620 kPa).
Transmission: Check transmission oil level dipstick. Oil level is checked with the engine
running at idle speed, transmission in neutral and
oil warm (160 to 190 degrees F [71 to 88 degrees
C]). Oil should be at FULL line on dipstick.
Swing Gear Box: Check lubricant level in the
swing gear box.
Winch: Check oil level, and that the vent is free
to open.
Figure A-1. Loaction of check Points
A-1
TM5-3810-305-10
Check fuel in the fuel tank.
Special Break in Requirements for New
LRT 110 Cranes.
Check hydraulic oil level in the reservoir.
Check all hydraulic components and fittings for
oil leaks.
These requirements are to be performed after
indicated hours of service.
8 hours: Torque wheel nuts to 450 to 500 lb-ft
Check batteries for electrolyte level and that all
battery connections are tight and not corroded.
Check brake fluid in brake reservoir.
Lubricate the LRT 110 Crane according to the
lubrication chart found in Appendix B up to and
including the two weeks (80 to 100 hours).
(610 to 678 N m) for a 2-week period.
●
20 hours: Drain, change filter and refill the
transmission with new fluid.
40 hours: Make an initial replacement of the hydraulic return line filter.
100 hours: Do the following:
Start the engine and check the gauges while
running at low idle rpm. When engine temperature reaches the operating temperature of 190
degrees F (88 degrees C), increase the rpm and
continue to monitor the gauges, making sure
everything is functioning properly. Shut engine
off!
If not already on the LRT 110 Crane, install the
cable, hook block and anti-two block counterweight according to the instructions found in
Chapters 2 and 4. When all checks are completed and the LRT 110 Crane is reeved, the
operator should familiarize himself with the
controls and operate the LRT 110 Crane at half
throttle to gain experience.
A-2
1. Drain and change winch lubricant.
2. Tighten the swing bearing capscrews. The 18
capscrews in the outer race hold the upperstructure to the bearing. The 22 capscrews in
the inner race hold the bearing to the carrier.
Torque all 40 capscrews to 722 lb-ft (979
N m). Torque winch base mounting capscrews to 249 lb-ft (338 N m). Torque capscrews of counterweight to 845 lb-ft (1,146
N m).
●
●
●
TM5-3810-305-10
APPENDIX B
Lubrication Instructions
Oil levels are to be checked with the LRT 110
Crane parked on a level surface in transport position. Check while the oil is cold, unless otherwise specified.
●
●
●
On plug-type check points, the oil levels are to
be at the bottom edge of the check port. Overlubrication of nonsealed fittings will not harm the
fittings or components. Under-lubrication will
lead to a shorter lifetime.
On sealed U-joints, care must be exercised to
prevent rupturing seals, Fill only until expansion
of the seals becomes visible.
Items not equipped with grease fittings, such as
linkages, pins, and levers, should be lubricated
with lubricating oil MIL-L-2104 once a week.
Oil, applied sparingly, will provide the necessary
lubrication and help prevent the formation of
rust. Grease fittings that are worn and will not
hold the grease gun, or those that have a stuck
check ball, must be replaced. Where slide pads
are used, cycle the boom and relubricate to insure
complete lubrication of the entire wear area.
All lubrication and check time intervals are based
on hours of operation under average working
conditions:
●
Daily or 8 hours, whichever comes first.
●
Weekly or 40 hours, whichever comes first.
●
●
Four months or 500 hours, whichever comes
first.
Six months or 1,000 hours, whichever comes
first.
Yearly or 1,500 to 2,000 hours, whichever
comes first.
Time Intervals - Unusual Conditions
The LRT 110 Crane will require extra service
and care when operated under unusual conditions. High or low temperatures, long periods of
hard use and continued use in sand, water, mud
or snow will break down the lubricants. Add or
change lubricants more often under these conditions. However, during long periods when the
crane is not in use, the service intervals can be
lengthened.
Turntable Gear and P inion Gear Teeth
Never apply grease to turntable
gear while the upperstructure is
in motion. Failure to follow this
procedure could cause DEATH
or serious injury.
Gear teeth must be lubricated with a saturated
brush or swab. Grease a segment; stand clear,
swing the upperstructure 10 degrees and grease
another segment. Repeat until entire ring gear is
coated.
Two weeks or 80 to 100 hours, whichever
comes first.
Three months or 250 hours, whichever comes
first.
B-1
TM5-3810-305-10
No personnel are permitted on
the deck while rotating upperstructure. Failure to follow this
procedure could cause DEATH
or serious injury.
●
Lubricate swing bearing through the grease
fitting on the inside of cab while rotating the
upperstructure.
Cable Lubrication
During fabrication, ropes receive lubrication; the
kind and amount depending on the rope’s size,
type, and anticipated use. This in-process treatment will provide the finished rope with ample
protection for a reasonable time if it is stored
under proper conditions. But, when the rope is
put into service, the initial lubrication may be
less than needed for the full useful life of the
rope. Because of this possibility, periodic applications of a suitable rope lubricant are necessary.
The important characteristics of a good wire rope
lubricant are as follows:
1. It should be free from acids and alkalis.
2. It should have sufficient adhesive strength to
remain on the ropes.
3. It should be of viscosity capable of penetrating the interstices between wires and strands.
4, It should not be soluble in the medium surrounding it under the actual operating conditions.
5. It should have a high film strength.
6. It should resist oxidation.
B-2
●
Dry cleaning solvent P-D-680
used to clean parts is toxic and
flammable. Use only in well
ventilated areas and avoid
contact with eyes, skin or
clothing. Do not breath vapors.
Wear the proper protective
clothing and equipment:
goggles or safety glasses, face
shield and gloves. Do not use
near sparks or open flames and
do not smoke while using it.
Failure to follow these
procedures could cause
SERIOUS INJURY.
Compressed air used for
cleaning purposes must not
exceed 30 psi (207 kPa).
Safety glasses must be used
when cleaning parts. Failure to
follow this procedure could
cause SERIOUS INJURY.
Before applying lubrication, accumulations of
dirt or other abrasive material should be removed
from the rope. Cleaning is accomplished with a
stiff wire brush and dry cleaning solvent P-D680, and dried with compressed air. Immediately
after it is cleaned, the rope should be lubricated.
When it is normal for the rope to operate in dirt,
rock or other abrasive material, the lubricant
should be selected with great care to make
certain that it will penetrate and, at the same
time, will not pick up any of the material through
which the rope must be dragged. As a general
rule, the most efficient and most economical
means to do cable lubrication/protection is by
using some method or system that continuously
applies the lubricant while the rope is in motion.
Many techniques are used, including the continuous bath, dripping, pouring, swabbing, painting,
and where circumstances dictate, automatic systems can be used to apply lubricants either by a
drip or pressure spray method (Figure B- 1 ).
TM5-3810-305-10
The arrows in the illustration indicate the direction in which the rope is moving.
Figure B-1. Methods of Applying Lubrication
B-3
TM5-3810-305-10
B-4
Figure B-2. Lubrication Points
APPENDIX C
PUBLICATION
TM5-3810-305-10
REFERENCES
PUBLICATION INDEXES
DA Pam 25-30 . . . . . . . . . . .
Consolidated Index of Administration Publications
FORMS
Refer to DA Pam 738-750, The Army Maintenance Management System (TAMMS), for
instructions on the use of maintenance forms pertaining to the vehicle.
PUBLICATION REFERENCES
General
AR 310-2 . . . . . . . . . . . . . . .
CTA 50-970 . . . . . . . . . . . . .
DA Pam738-750 . . . . . . . . . .
FM 5-20 . . . . . . . . . . . . . . . .
FM 9-207 . . . . . . . . . . . . . . .
FM 20-22 . . . . . . . . . . . . . . .
FM 21-11 . . . . . . . . . . . . . . .
FM 21-60 . . . . . . . . . . . . . . .
FM 31-70 . . . . . . . . . . . . . . .
FM 31-71 . . . . . . . . . . . . . . .
FM 90-3(HTF) . . . . . . . . . . .
FM 90-6(HTF) . . . . . . . . . . .
MIL-M-63042C(TM) . . . . . . . .
TC 25-7 . . . . . . . . . . . . . . . .
TM 5-331 A . . . . . . . . . . . . . .
TM 9-238 . . . . . . . . . . . . . . .
TM 43-0139 . . . . . . . . . . . . . .
Identification and Distribution of DA Publications and Issue
of Agency and Command and Administrative PubIications.
Expendable/Durable Items (Except Medical, Class V. Repair
Parts, and Heraldic Items)
The Army Maintenance Management System (TAMMS)
Camouflage
Operation and Maintenance of Army Materiel in Extreme
Cold Weather 0 to -65° F (TO 36-1-40)
Vehicle Recovery Operations
First Aid for Soldiers
Visual Signals
Basic Cold Weather Manual
Northern Operations
Desert Operations (How to Fight)
Mountain Operations (How to Flight)
Manuals, Technical:
Procedures for Obstruction of Equipment to Prevent
Enemy Use
Training Management Skills, Unit Development
Utilization of Engineer Construction Equipment: Volume A:
Earthmoving, Compaction, Grading and Ditching
Equipment
Deepwater Fording of Ordnance Materiel
Painting Instructions for Field Use
Vehicle
FM 21-306 . . . . . . . . . . . . . .
LO 5-2350-262-12 . . . . . . . . .
TB 750-651 . . . . . . . . . . . . . .
TM 5-2350-262-10-HR . . . . . .
Manual for Tracked Combat Vehicle Driver
Lubrication Order for Armored Combat Earthmover (ACE),
M9
Use of Antifreeze Solutions and Cleaning Compounds in
Engine Cooling Systems
Hand Receipt Manual Covering End hem/Components of
End Item (COEl), Basic Issue hems (Bll), and Additional
Authorization List (AAL) for Armored Combat Earthmover
(ACE), M9
Transportability Guidance For The Crane,
7.5 Ton, Rough Terrain, Koehring Type 1,
(NSN 3810-01-165-0646), Type 2 (NSN 381001-165-0647) .
TB 5-3810-305-15 . . . . . . . Warranty Technical Bulletin For: Crane,
7.5 Ton, Rough Terrain, Koehring Type
1 and 2.
TM 55-3810 -01-165 -14....
C-1
TM5-3810-305-10
APPENDIX C
TM 9-6140-200-14 . . . . . . . . . . .Operator’s Organizational, Direct Support and General
Support Maintenance Manual for Lead-Acid Storage Batteries: 4HN, 24 V, MS75047-1; 2HN, 12 V; 6 TN, 12 V
TM 55-2350-262-14 . . . . . . . . . .Technical Manual Transportability Guidance Armored
Combat Earthmover. M9
Night Vision Equipment
TM 11-5855-236-10 . . ...”... . . Operator’s Manual for Night Vision Goggles, AN/PVS-5 and
AN/PVS-5A
TM 11-5855-238-10-HR . . . . . . Hand Receipt Manual Covering End Item/Components
of End Item (COEI), Basic Issue Items (Bll), and Additional Authorization List (AAL) for Night Vision Goggles
AN/PVS-5 and AN/PVS-5A
Chemical, Biological, and Nuclear
FM 3-4 . . . . . . . . . . . . . . . . . . . . . .. NBC Protection
FM 3-5 . . . . . . . . . . . . . . . . . . . . . . NBC Decontamination
FM 3-6 . . . . . . . . . . . . . . . . . . . . . . . Field Behavior of NBC Agents (Including Smoke and
Incendiaries)
TF 3-4899 . . . . . . . . . . . . . . . . . . . CBR Decontamination, Unit Level, MCB Proficiency
TM 3-4230-214-12&P . . . . . . . . Operator’s and Organizational Maintenance Manual Including Repair Parts and Special Tools Lists: Decontaminating
Apparatus, Portable DS2, 1 1/2 Quart. ABC M 11
TM 34240-280-10. . . . . . . . . . . . . Operator’s Manual: Mask. Chemical-Biological, Aircraft,
ABC-M24 and Accessories: Mask. Chemical-Biological.
Tank, M25 and Accessories: Mask. Chemical-Biological.
Tank, M25A1 and Accessories
TM 34240-282-L . . . . . . . . . . . . List of Applicable Publications (LOAP) 12 and 20 CFM
Gas-Particulate Filter Units
TM 36910-227-10 . . . . . . . . . . .Operator’s Manual: Training Set, Chemical Agent Identification: Simulants, M72A2
TM 43-0001 -26-1 . . . . . . . . . . . .Army Equipment Data Sheets, Chemical Defense Equipment
Communications
SB 11-131 . . . . . . . . . . . . . . . . . . .Vehicular Radio Sets and Authorized Installations
TM 11-5820-498-12 . . . . . . . . . . Operator’s and Organizational Maintenance Manual:
Radio Sets AN/VRC-53. AN/VRC 64. AN/VRC-125, and
AN/GRC-160
TM 11-5820-498-12-HR . . . . . . Hand Receipt Manual Covering End Item/Components
of End Item (COEI), Basic Issue Items (Bll), and Additional Authorization List (AAL) for Radio Sets AN/VRC-53,
AN/VRC-64, AN/GRC-125, and AN/GRC-160
C-2
TM5-3810-305-10
APPENDIX D
BASIC ISSUE ITEMS
TYPE I TYPE II
D-1
TM5-3810-305-10
APPENDIX D
COMPONENTS OF END ITEM AND BASIC ISSUE ITEMS LIST
Crane. Wheel Mounted. NSN 3810-01-165-0646-Non-Sectionalized
Type 1&2
ILLUST. NO. NSN
DESCRIPTION/CAGEC and PART NO.
USABLE ON CODE
QTY.
1.
5120-01-145-7452
ratchet wrench/55719/P/N R2428
3/4"X7/8"
105-106
1
2.
5120-00-277–8301
open end wrench/55719/P/N S2022 B
105-106
1
1 05- I 06
1
9/16”X5/8”
3.
wrench/55719/P/N
5X8"x 11/16"
V02022
4.
5120-00-240-5609
Open end wrench/19207/P/N 11655789-4
3/4”X7/8”
105-106
1
5.
5120-00-264-3796
adj. wrench/55719/P/N DA212
12"
105-106
1
6.
5120-00-293–1289
socket wrench/09386/P/N 18806
105-106
1
7.
5120-00-266-1927
1 05- I 06
1
8.
4730-00-079-8814
straight adapter/90906/P/N MS51500A6-83
8 to -6
105-106
1
9.
5310-01-212–6134
plain nut/01276/P/N 210292-4S
-4
105-106
1
10.
4730-00-706-8711
tube reducer/01276/P/N 221501-6-4S
105-106
1
105-106
1
105-106
1
-6 to -4
11.
4730-00-203-5266
pipe tee/01276/P/N 2090-8-8S
-8
12.
4730-01–271–3751
13.
4730-01-247–2611
tube plug ftg./01276/900599-6S
–6
105-106
1
14.
5365-01-280-6488
machine plug/17335/P/N 2408-10
–lo
105-106
1
15.
4730-01–270-9651
tube plug ftg./57760/P/N 03CP-12
105-106
3
coupling half/01276/P/N FD(90-1021–04-04
105-106
2
16.
D-2
TM5-3810-305-10
17.
4730-(00-955- 1559
straight:adapter/96906/P/N MS51500A6
–6 to -4
105-106
3
18.
4720-01-267-4258
hose
105-106
1
19.
4730-00-781–6089
tube nipple/96906/P/N MS51501A65
–6 to –6
105-106
2
20.
5310-00-257-6177
plain nut/01276/P/N 210292-6S
105– 106
2
21.
4730-00-647-3311
tube cap/87373/P/N 306CP–12
–12
105-106
2
22
4730-01-297-9072
straight adapter/57760/P/N 0103-8-12
-12 to -8
I 05-106
1
23
5120-00-198-5409
socket key wrench/57719/P/N ALW10
5/16”
105-106
1
24.
5120-00-198–5392
socket key wrench/16786/P/N P848000210
5/32’’–hex
105–106
1
25.
4720-01–262–5215
hose assy./81495/P/N709 1270-78
105–106
1
26.
5315-01-267-2927
retaining pin)96652/P/N 1200-03125-02000
105-106
1
27.
4720-01–266-4240
hosea assy./81495/P/N 709 1270-142
105–106
1
28.
4320-01-126-0014
hyd. ram pump/19184/P/N HP-121-DA-TL
105-106
1
adapter/57760/0203-4-6
105– 106
1
29.
assy./81495/709 1272–166
30.
4720-01-262-5211
hose assy./81495/P/N 709–1272–18
105-106”
1
31.
4730-00-812-7999
pipe to tube elbow/81343/P/N 6-4070202
105-106”
1
32.
4730-01-266-1369
pipe plug/81492/P/N 1219–137
-4
105-106”
1
33.
5340-01-269-1701
protective cap plug/23540/P/N 249–2
105-106”
2
34.
2590-01-267-1359
special adapter/81495/709-4227
105-106
1
35.
3040-01–285–2914
link/81495/P/N 37881
105–106
1
36.
2910-00-646-9727
engine cartridge/53203/P/N 020030
105-106
1
D-3
TM5-3810-305-10
D-4
Appendix D
.
,
T y p e II Sectionalization T o o l K i t
TM5-3810-305-10
Appendix D
Basic Issue Items
Crane, Wheel Mounted, Hydraulic
NSN 3810–01–165-0647 Sectionalized. Type II
Type II Basic Issue Items (BII) . include the BII for the Type I LRT 110 in addition to the below listed BII.
Illust. No.
1.
NSN
4720-01-274-1841
A. 9905-01-268-7581
B. 9905-01-268-7582
Description/CAGEC and Part No.
Usable on Code
hose,extension, h–11, h–11
h–10 label
h–11 label
Qty
106
106
2
106
1
1
2
5120-00-509–9092
torque multiplier/55719/P/N GA184A
106
1
3.
5120–01-030-1187
5" extesion.drive/55719/P/N GA184A
106
1
4.
5120-00-227–8079
16" extension, 3/4" drive/55719/P/N LI22
106
1
5.
5120-01–278–7281
breaker bar 3/4" drive/55719/P/N 1226-57
106
1
6.
5120–01-119-4806
36MM socket/55719/P/N LDHM362
106
1
7.
5120-01-276-7016
torque wrench. 1/2" drive/81495/P/N TQR250
106
1
adapter 3/4f to 1/2 MM/55719/GLA62
106
1
8.
9.
5120-01-133-8880
hammer 55719)/P/N BPN 16B
106
1
1 0.
5120-00-272-8985
tapered punch/55719/P/N 1816A
106
1
11.
5120-00-223–7396
pliers/1495/P/N 1226-3
106
1
12.
4020-01-28-6173
rope/8149/P/N 12178–144
106
1
13.
5120-00–144-5207
adapter. 1/2f to 3/4 M/55719/P/N GLA12
106
1
14.
5510-01-276-9242
wooden wedge/81495/P/N 709 1985
106
1
15.
extension bar/81495/P/N 709 1977
106
1
16.
metal bar/81495/P/N 709 1977
106
1
17.
wrench.6MM/81495/P/N610 1039
106
1
18.
8105-01-286-0935
bag/81495/P/N 709 4324
106
1
19.
5315-01-284-9813
lock pin/3942 8/P/N 9017A114
106
1
20.
3020-01-26l–6856
groove pulley/81495/P/N 709A1565
106
1
21.
5365-01-276-7509
space plate/81495/P/N 709 1998
106
1
D-5
TM5-3810-305-10
Appendix D
D-6
22.
3040-01-273-9314
connecting link/81495/P/N 709 1877
106
1
23.
5340-00-071-3836
protective cap/01276/P/N 5657-10
106
1
24.
4730-01-128-5831
protective plug/01276/P/N5659-10
106
1
25.
5340-00-071-3834
protective cap/01276/P/N 5657-12
106
1
26.
5354-01-013-1040
protective plug/01276/P/N 5659-12
106
1
27.
4730-01-246-8511
protective cap/01276/P/N 5657–16
106
1
28.
5340-01-239-8742
protective plug/01276/P/N 5659-16
106
1
TM5-3810-305-10
Appendix E
Additional Authorized List(AAL)
Description
NSN
U/M
1.Helmut,Construction
8415-00-889-3767
Ea
2
2.Gogles,Protective
4240-00–252-3776
Pr
2
3.Grease Gun
4930-00-253-2478
Ea
1
4. Adapter,Grease Gun Flex
4930-00-288-1511
Ea
1
5. Bag,Pamphlet
7520-00-559-9618
Ea
1
6.Fire Extinguisher
4215-00-555-8837
Ea
1
7. Kit,Sign Vehicle
9909-00-565-6267
Ea
1
8. Kit,First Aid
6545-00-922-1200
Ea
1
Qty
WARNING
The pintle hook, NSN 2450-00-835-9093, is authorized for use on Aviation Support Unit Cranes only.
The towing capacity of this pintle hook is 30,000 lbs.. This capacity is 10,000 lbs. less than the standard
cranes pintle hook capacity of 40,000 lbs.. Failure to consider the lower capacity may result in death,in–
jury, or damage to equipment.
NOTE
The smaller pintle hook, adapter aand capscrews are all required to support the Aviation Support Unit Crane.
9. Hook, Pintle
2540-00-835-9093
Ea
1
10.Adapter
2540-01–332-0108
Ea
1
11.Capscerws
5305-00-042-6417
Ea
4
E-1
APPENDIX F
OPERATOR/CREW
TM5-3810-305-10
PREVENTIVE MAINTENANCE CHECKS AND SERVICES (PMCS )
GENERAL
Your Preventive Maintenance Checks and Services Table lists the
inspections and care of your equipment required to keep it in
good operating condition.
Record all deficiencies and shortcomings along with corrective
action taken on DA Form 2404.
OPERATOR/CREW PREVENTIVE MAINTENANCE CHECKS AND SERVICES
1. The number column of your PMCS is the source for the number
used on the TM Number Column on DA Form 2404.
PMCS Table tells your when to do
2. The interval column of your
a certain check of service.
a. While you operate, perform your Before (B) PMCS.
keep in mind the WARNINGS and CAUTIONS.
Always
b. While you operate, perform your During (D) PMCS.
keep in mind the WARNINGS and CAUTIONS.
Always
c.
Right after you operate, perform your After (A) PMCS.
3. The procedure column of your PMCS Table tells you how to do
the required checks and services. Carefully follow these
instructions. If you do not have the tools, or if the procedure
tells you to, have unit maintenance do the work.
4. If your equipment does not perform as required, refer to the
troubleshooting section in this manual for possible problems.
Report any malfunctions or failures on the proper DA Form 2404 or
refer to DA Pamphlet 738-750.
NOTE
The terms ready\available and mission capable
refer to the same status: Equipment is on hand
and is able to perform listed combat missions (see
DA Pamphlet 738-750).
5. Equipment is not ready/available if column. This column
tells you when and why your equipment cannot be used.
6. Always do your PMCS in the same order so it gets to be a
habit. Once you’ve had some practice, you will spot anything
wrong in a hurry.
7.
When you do your PMCS, take along a rag or two.
8. While performing PMCS, observe WARNINGS and CAUTIONS
preceding those operations which could endanger your safety or
could result in damage to equipment.
F-1
APPENDIX F
TM5-3810-305-10
WARNING
Dry cleaning solvent, P-D-680 is toxic and
flammable. Wear protective goggles and gloves
and use only in well ventilated area. Avoid
allowing solvent to contact skin, eyes, and
clothes, and do not breathe vapors. Do not
use near open flame or excessive heat. If
you become dizzy while using cleaning solvent,
get fresh air immediately and get medical aid.
If solvent comes in contact with skin or
clothing; wash with water. If solvent gets
in your eyes, flush with water and get medical
aid immediately. Flash point of solvent is
138°F (59°C).
a. Keep it clean. Dirt, grease, oil and debris only get in
the way and may cover up a serious problem. Clean as you work
and as needed. Use dry cleaning solvent (P-D-680) to clean metal
surfaces. Use soap and water when you clean rubber or plastic
material.
b. Bolts, nuts, and screws. Check that they are not loose,
missing, bent or broken. You can’t try them all with a tool, or
course, but look for chipped paint, bare metal or rust around
bolt heads. Tighten any bolt, nut, or screw that you find loose.
c Welds.
Look for loose or chipped paint, rust or gaps
where parts are welded together. If you find a bad weld, report
it to unit maintenance.
d. Electric wires and connectors. Look for cracked or
broken insulation, bare wires and loose or broken connectors.
Report damaged or loose wiring to unit maintenance.
Hoses and fluid lines. Look for wear, damage and leaks.
e
Make sure clamps and fittings are tight. Wet spots show leaks
but a stain around a fitting or connector can also mean a leak.
If leakage comes from a loose fitting or connector, tighten the
fitting or connector. If something is broken or worn out, report
it to unit maintenance.
f. Vehicle must be on level ground in order to get correct
fluid level measurement.
9. It is necessary for you to know how fluid leaks affect the
status of your equipment. The following are definitions of the
types/classes of leakage you need to know to be able to determine
the status of your equipment. Learn and be familiar with them and
REMEMBER - when in doubt, notify your supervisor.
F-2
Class I
Seepage of fluid (as indicated by wetness or
discoloration) not great enough to form drops.
Class II
Leakage of fluid great enough to form drops, but not
enough to cause drops to drip from the item being
checked/inspected.
APPENDIX F
Class III
TM5-3810-305-10
Leakage of fluid great enough to form drops and fall
from the item being checked/inspected.
CAUTION
Equipment operation is allowable with minor leakages
( C l a s s I o r I I ) . Of course, consideration must be
given to the fluid capacity in the item/system being
checked/inspected. When operating with Class I or II
leaks, continue to check fluid levels as required on
your PMCS. Class III leaks should be reported to
your supervisor or unit maintenance. Equipment is
not ready/available if any gasoline leak is present,
whether Class I, II, or III (Reference AR 385-55).
F-3
TM5-3810-305-10
F-4
APPENDIX F
APPENDIX F
TM5-3810-305-10
F-5
TM5-3810-305-10
F-6
APPENDIX F
APPENDIX F
TM5-3810-305-10
OPERATOR/CREW PREVENTIVE MAINTENANCE CHECKS AND SERVICES
B . BEFORE
D - DURING
A - AFTER
W - WEEKLY
M - MONTHLY
F-7
M5-3810-305-10
F-8
APPENDIX F
TM5-3810-305-10
INDEX
A
Accelerator Pedal
Air Cleaner, Checks and
Inspections
Air Transport-Type I
Air Transport-Type II
Anti-Two Block Panel
Anti-Two Block System,
Checks and Inspections
Attachments for Wire Rope,
End Fittings and/or
Axle, Theory of Operation
Axles
c
4-8
4-11
4-72
5-48
4-7
4-11
4-35
3-2
1-7,
A-1
Boom
1-9
Boom Angle Indicator
1-24
Boom Angle Indicator
4-8
Boom Cable Retention Pins, Checks
and Inspections
4-11
Boom Cylinder
1-9
Boom Hoist Lever
4-6
Boom Length Markers
1-24,
4-9
Boom Telescope Lever
4-6
Brake Fluid, Checks and
Inspections
4-11
4-8
Brake Pedal
1-7
Brakes
Break-In Requirements for
A-1
New Cranes
Breaking in New Wire Rope
4-43
4-6
Bubble Level
Cable:
Inspection
Installing on Winch
Items Furnished
Lubrication
Specifications
Spooling on Drums
Capabilities
Capacities
Cautions, General
Centerline of Rotation
Chart, Radius from
Characteristics,
Performance
Check List, Pre-Move
Checks and Inspections:
Air Cleaner
Anti-Two Block System
Boom Pin
Brake Fluid
Cable
Cable and Blocks
coolant
Engine Oil
Fuel
Fuel/Water Separator
Hydraulic System
Leakage
Lubrication
Safety Equipment
Tires
Transmission Oil
Checks and Services,
Preventive Maintenance
Circuit Breakers
Clips, Wire Rope:
Fist Grip
U-Bolt
4-11,
4-43
2-4
1-24
B-1
4-12
2-3
1-5
1-15
1-36
1-22
1-5
4-18
4-11
4-11
4-11
4-11
4-11
4-11
4-10
4-10
4-10
4-10
4-10
4-10
4-10
4-11
4-11
4-10
4-13
4-6
4-37
4-39
4-38
INDEX-1
TM5-3810-305-10
Cold Start
Cold, Extreme
Completion of
Upperstructure Assembly
Construction of Wire Rope,
Identification and
Control and Instrument
Identification
Control Settings, Initial
Adjustments and
Converter, Torque
Coolant, Checks and
Inspections
Counterweight
Cranes, New, Break-In
Requirements
Cutting Wire Rope
Cylinder, Boom
4-4,
4-66
4-64
5-38
4-28
4-3
4-10
1-7
4-10
1-10
A-1
4-35
1-9
D
Dash Lights
Dash Light Switch
Decals, Safety
Decible Level Chart
Definition of Load Rating
References
Freely Suspended Load
Operating Radius
Side Load
Working Arc
Defroster Fan
Diagnostic Connector Panel
Diagnostic Guide to Common
Wire Rope Abuses
Dimensions, Equipment
Specifications
Dimensions, General
Drawbar
Drive Shafts
Drums-Plain (Smooth) for
Wire Rope
INDEX-2
4-4
4-5
1-41
1-10
1-16
1-18
1-18
1-18
1-18
4-8
4-7
4-50
1-11
1-12
1-8
A-1
4-42
E
Electrical System
Emergency Load Lowering
Procedure:
Attach Supply Hose
Lower the Boom
Lower the Crane off the
Outriggers
Lower the Load with the
Winch
Prepare the Equipment
Retract the Boom
Secure the Hook Block
Swing the Crane
Mechanically
Emergency Window Removal
End Fittings and/or
Attachments for Wire Rope
Engine Oil Pressure Gauge
Engine Oil, Checks and
Inspections
Engine Temperature Gauge
Engine:
Operating
Starting
Stopping
Environmental Requirements
Equipment Inspection, Wire
Rope
Dimensions
Load Rating on Outriggers
Load Rating on Tires
Maximum Permissible Hoist
Line Load Chart
Radius from Centerline of
Rotation Chart
Weights
Working Area Diagram
Extreme Heat
Extreme Cold
1-6
4-56
4-57
4-60
4-61
4-58
4-57
4-58
4-64
4-56
4-69
4-35
4-4
4-10,
A-1
4-4
4-18
4-17
4-20
1-24
4-55
1-11
1-19
1-20
1-21
1-22
1-11
1-23
4-69
4-64
TM5-3810-305-10
F
Fire Extinguisher
Flexibility of Wire Rope
Forward-Neutral-Reverse
Lever
Fuel Gauge
Fuel, Checks and
Inspections
Fuel/Water Separator,
Checks and Inspections
Hydraulic System, Checks
and Inspections
4-8
4-42
4-6
4-4
4-10
4-10
G
Gear Ranges
General Theory of Operation:
General:
Cautions
Dimensions
Warnings
Guidelines to Inspections
and Reports of Equipment,
Wire Rope and Wire Rope
Slings
1-6
3-2
1-36
1-12
1-27
4-10
I
Identification and
Construction of Wire Rope
Ignition Switch
Initial Adjustments and
Control Settings
Inspection Summary of Wire
Rope
Inspection, Cable
Inspections, Checks and
Installing:
Cable on Winch
Upperstructure on Carrier
Wedge Socket on Cable
Instrument Identification,
Control and
Items Furnished, List of
Items Required, List of
4-28
4-5
4-10
4-54
4-11,
4-45
4-10
2-4
5-35
2-3
4-3
1-24
1-24
4-44
J
H
4-18
Job Site, Moving to a
Hand Signals for Crane
Operation
Heat, Extreme
Heater:
Shut-Off
Switch
Helicopter TransportType II
High Humidity or Saltwater
Hoist Line Load Chart,
Maximum Permissible
Hoist Line Reeving
Hook Block
Hook, Pintle
Horn
Hydraulic System
4-27
4-69
4-8
4-8
5-50
4-71
1-21
2-2
1-24
1-8
4-4
)-8
L
Land Transport-Type I
Land Transport-Type II
Leakage, Checks and
Inspections
Lift Procedure:
on Outriggers
on Tires
Lift, Preparing
Upperstructure for
Lifting Upperstructure onto
Carrier
4-72
5-46
4-10
4-20
4-25
5-32
5-33
INDEX-3
TM5-3810-305-10
List of Items Furnished:
Boom Angle
Boom Length Markers
Cable
Hook Block
List of Items Required
Load Chart:
on Outriggers
on Tires
Load Lowering Procedure,
Emergency
Load Rating References,
Definition of
Load Rating:
on Outriggers
on Tires
Lowering the LRT 110 Crane
to the Ground
Lubrication Chart
Lubrication Instructions
Lubrication Points,
Illustrated
Lubrication, Cable
Lubrication, Checks and
Inspections
N
1-24
1-24
1-24
1-24
1-24
1-19
1-20
4-56
1-16
1-19
1-20
5-44
B-4
B-1
B-4
B-2
4-10
M
Major Components:
Location
Nomenclature
Marine Transport-Type I
Marine Transport-Type II
Maximum Permissible Hoist
Line Load Chart
Minimum Safety Requirements
for Work Platforms
Suspended from Load Line
or Rigidly Mounted on Boom
Moving the LRT 110 Crane,
Before
Moving to a Job Site
INDEX-4
1-3
1-4
4-76
5-50
1-21
1-42
4-18
4-18
New Cranes, Break-In
Requirements
Nomenclature, Major
Component
A-1
1-4
o
Operating Instructions and
Functions:
Initial Adjustments and
Control Settings
Operation Under Emergency
and Abnormal Conditions
Operation Under Normal
Conditions
Shut Down
start-up
Transportability
Use of Operator’s Controls
and Indicators
Operations Inspection,
Wire Rope and
Operation:
Under Emergency and
Abnormal Conditions
Under Normal Conditions
Operator Observations
Operator Troubleshooting
Outriggers:
Control Lever
Lift Procedure
Load Chart
Load Rating
Performance Characteristics
Switch (Front)
Switch (Rear)
Oversize Limits of Wire
Rope Diameters
4-1
4-10
4-56
4-18
4-71
4-17
4-72
4-3
4-43
4-54
4-18
4-11
4-15
4-5
4-20
1-19
1-19
1-5
4-5
4-5
4-30
TM5-3810-305-10
P
R
Parking Brake Lever
Parts Used for Assembly,
Removing and Stowing
Parts Used for Separation,
Removing and Stowing
Performance,
Characteristics:
Electrical System
Engine
Outriggers
Torque Converter
Transmission
Pintle Hook
Power and Utility
Requirements
Pre-Move Check List
Precautions, Safety
Preparation for Use:
Hoist Line Reeving
Installing Cable on Winch
Installing Wedge Socket
on Cable
Spooling Cable on Drums
Preparation:
for and Assembly of Carrier
and Upperstructure
of Carrier for Transport
for Removing Upperstructure from Carrier
for Separating Upperstructure from Carrier
of Upperstructure for
Lift
of New Crane for
Operation
Preventive Maintenance
Checks and Services
(PMCS)
Purpose and Function:
General
Major Component
Nomenclature
4-8
5-35
5-22
1-6
1-5
1-9
1-7
1-6
1-8
1-24
4-18
1-27
2-2
2-4
2-3
2-3
5-26
5-25
5-15
5-2
5-32
A-1
4-13
1-3
1-4
1-4
Radius from Centerline of
Rotation Chart
Rail Transport-Type I
Rail Transport-Type 11
Rail Transport Materials
List-Type I
Rail Transport Materials
List-Type II
Rear Axle Centering
Indicator
Reeving, Hoist Line
Removal and Stowage:
of Parts Used for
Assembly
of Parts Used for
Separation
of Remaining Parts Used
in Assembly
Removing Upperstructure
from Carrier, Preparation
for
Replacement of Wire Rope
Requirements, Environmental
1-22
4-75
5-49
4-78
5-52
4-4
2-2
5-35
5-22
5-42
5-15
4-48
1-24
s
Safety Decals
Safety Equipment, Checks
and Inspections
Safety Precautions:
General Cautions
General Warnings
Introduction
Minimum Safety
Requirements for Work
Platforms Suspended
from Load Line or
Rigidly Mounted on Boom
Safety Decals
Saltwater, High Humidity or
Sandy or Dusty Work Sites
1-41
4-11
1-36
1-27
1-27
1-42
1-41
4-71
4-70
INDEX-5
TM5-3810-305-10
Seat Adjust Lever
Sectionalization:
Preparation for and
Sectionalization of
LRT 110 Crane,
Type II, for External
Air Transport (EAT)
Preparation for and
Assembly of
Sectionalized LRT 110
Crane, Type II, After
External Air Transport
(EAT)
Seizing Wire Rope
Separating Upperstructure
from Carrier, Preparation
Shut Down
Socketing Wire Rope
Special Break-In
Requirements for New
Cranes
Specifications, Equipment
Speedometer
Spooling Cable on Drums
start-up
Starter Button
Starting the Engine
Steering
Steering Selector
Stopping the Engine
Storage Data
Stowage:
of Parts Used for
Assembly
of Parts Used for
Separation
of Remaining Parts Used
in Assembly
Suspension
INDEX-6
4-8
5-2
Swing Gear Box
Swing Lever
Swing System
Systems:
Electrical
Hydraulic
Swing
A-1
4-5
1-8
1-6
1-8
1-8
T
5-26
4-34
4-71
4-36
A-1
1-11
4-8
2-3
4-17
4-5
4-17
1-7
4-5
4-20
1-24
5-35
5-22
5-42
1-7
Tachometer/Hour Meter
Terminal Efficiencies
(Approximate) for Wire
Rope
Test Equipment, Tools and
Time Intervals-Unusual
Conditions
Tires:
Checks and Inspections
Lift Procedure
Load Chart
Load Rating
Tools and Test Equipment
Torque Converter
Towing Procedure for
Emergency Recovery OnlyType I
Towing Procedure for
Emergency Recovery OnlyType II
Transmission
Transmission Oil, Checks
and Inspections
Transmission Speed Shift
Lever
Transmission Temperature
Gauge
Transmission
Theory of Operation
Transport, Preparation of
Carrier for
Transportability-Type I:
Air Transport
4-4
4-36
1-25
B-1
4-11
4-25
1-20
1-20
1-25
1-7
4-72
5-46
1-6
4-10
A-1
4-6
4-4
3-2
5-25
4-74
TM5-3810-305-10
Land Transport
Marine Transport
Rail Transport
4-72
4-76
4-75
Utility Requirements, Power
and
1-24
v
Towing
Transportability-Type II:
Air Transport
Helicopter Transport
Land Transport
Marine Transport
Rail Transport
Towing
Troubleshooting, Operator:
Electrical Circuit NonFunctional
Engine Cranks but Does
Not Start
Engine Does Not Crank
Engine Oil Pressure-High
or Low
Engine Overheating
Transmission Overheating
Turn Signals
Two Wheel/Four Wheel Drive
Lever
4-72
5-48
5-50
5-46
5-50
5-49
5-46
4-15
4-15
4-15
4-16
4-16
4-16
4-7
4-6
u
Unreeling and Uncoiling
Wire Rope
Unusual Conditions, Time
Intervals
Upperstructure:
Completion of Assembly
Installing on Carrier
Lifting onto Carrier
Preparing for Lift
Use of Operator’s Controls
and Indicators
4-31
B-1
5-38
5-35
5-33
5-32
4-3
Vehicle Lights Switch
Vehicle Shutdown
Procedures
Voltmeter
4-5
4-71
4-4
w
Warnings, General
Warranty Information
Wedge Socket on Cable,
Installing
Wedge Sockets for Wire Rope
Weights, Equipment
Specifications
Wheels
Winch
Winch Lever
Winch, Theory of Operation
Window Removal, Emergency
Windshield Wiper Switch
Wire Rope Classifications
Wire Rope Clips:
Fist Grip
U-Bolt
Wire Rope Damage,
Illustrated Examples
Wire Rope Identification
and Construction
Wire Rope Inspection for:
Abrasion
Bird Caging
Broken Wires
Corrosion
Damaged End Attachments
Fatigue Failure
Heat Damage
Kinks
Localized Conditions
1-27
1-27
2-3
4-40
1-11
1-7
1-9
A-1
4-6
3-3
4-69
4-5
4-28
4-37
4-39
4-38
4
-
5
1
4-28
4-45
4-47
4-48
4-47
4-47
4-48
4-47
4-47
4-47
INDEX 7
TM5-3810-305-10
Peening
Protruding Core
Reduction in Rope
Diameter
Scrubbing
Stretched Rope
Wire Rope Installation
Wire Rope Instructions
Breaking in a New Wire
Rope
Cable Lubrication
Classifications
Clips
Cutting Wire Rope
Diagnostic Guide to
Common Wire Rope Abuses
Drums-Plain (Smooth)
End Fittings and/or
Attachments
Equipment Inspection
Flexibility of Wire Rope
Guidelines to
Inspections and Reports
for Equipment, Wire
Rope and Wire Rope
Slings
Identification and
Construction
Illustrated Examples of
Possible Wire Rope
Damage
Inspection
Inspection Summary
Installation
Operations Inspection
Oversized Limits of Wire
Rope Diameters
Seizing Wire Rope
Socketing
Terminal Efficiencies
(Approximate)
Unreeling and Uncoiling
Wedge Sockets
When to Replace Wire Rope
INDEX-8
4-48
4-47
4-46
4-48
4-45
4-30
4-28
4-43
B-1
4-29
4-37
4-35
4-50
4-42
4-35
4-55
4-42
4-44
4-28
4-51
4-45
4-54
4-30
4-43
4-30
4-34
4-36
4-36
4-29
4-40
4-43
Wire Rope Slings
Work Lights Switch
Work Platforms Suspended
from Load Line or Rigidly
Mounted on Boom, Minimum
Safety Requirements for
Work Sites, Sandy or Dusty
Working Area Diagram
Working Positions
4-44
4-5
1-42
4-70
1-23
1-23
By Order of the Secretary of the Army:
GORDON R. SULLIVAN
General, United States Army
Chief of Staff
official:
PATRICIA P. HICKERSON
Brigadier General, United States Army
The Adjutant General
Distribution:
To be distributed IAW DA Form 12-25-E (Block No. 5737) Operator’s maintenance requirements for TM 5-3810-305-10.
U.S. GOVERNMENT PRINTING OFFICE : 1994-300-421 (03207)
THE METRIC SYSTEM AND EQUIVALENTS
PIN:
068527-001
This fine document...
Was brought to you by me:
Liberated Manuals -- free army and government manuals
Why do I do it? I am tired of sleazy CD-ROM sellers, who take publicly
available information, slap “watermarks” and other junk on it, and sell it.
Those masters of search engine manipulation make sure that their sites that
sell free information, come up first in search engines. They did not create it...
They did not even scan it... Why should they get your money? Why are not
letting you give those free manuals to your friends?
I am setting this document FREE. This document was made by the US
Government and is NOT protected by Copyright. Feel free to share,
republish, sell and so on.
I am not asking you for donations, fees or handouts. If you can, please
provide a link to liberatedmanuals.com, so that free manuals come up first in
search engines:
<A HREF=http://www.liberatedmanuals.com/>Free Military and Government Manuals</A>
– Sincerely
Igor Chudov
http://igor.chudov.com/