1
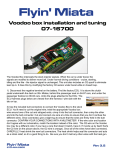
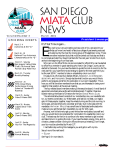
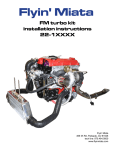
499 35 Rd
Palisade, CO 81526
E-mail: [email protected]
970.464.5600 (tech)
1.800.FLY.MX5S (359.6957, orders only)
Voodoo Box Calibration, Installation, & Turbo Kit Tuning
01/17/11
1) Set pot “S” to where its LED comes on just before 0 on your boost gauge.
2) Set pot “G” to where its LED comes on just after 0 on your boost gauge.
The “S” LED should come on just before the “G” LED when accelerating.
3) Set pot “R” to achieve the desired A/F ratio when approaching redline at full throttle. This should be
determined with a Wideband O2 sensor. We recommend 10.0:1 - 12.5:1, depending on how much
boost (more boost = richer / lower numbers) and how good your gas is (93 can go a little leaner, 91
should be richer).
4) Set pot “Y” such that the desired A/F ratio is maintained in the lower RPM at full throttle. This is
the slope up to the pot R value, but not necessarily the same value. If you go lean when you tip in,
or when you “surprise” the throttle, say on a downshift, raise this value. If you go rich and bog under
these conditions, lower it. You’re looking for a value between 10.0 and 13.0 when you first see boost.
5) The following are values that we have found to work in cars tuned here at FM: It is however important to note that there is not a lot of consistency when it comes to dialing these in, so to be safe we
highly recommend tuning the Voodoo box with a Wideband O2 sensor.
Turbo- Y = 8, R = 6
Super- Y = 5, R = 4
The Voodoo Box intercepts the stock injector signals. When the car is under boost, the
signals are modifed to deliver more fuel. This allows the user to take advantage of the extra
headroom in the factory fuelling system. Under normal driving conditions - cruise, starting,
idling and the like - the injector signal is unchanged. This unit also includes an O2 spoof to eliminate
lean tip-in. It does this by modifying the factory O2 sensor under boost while in closed loop.
1) Disconnect the negative terminal on the battery. Find the factory ECU. It is above the clutch
pedal underneath the dash on 99+ Miatas, behind the passenger seat on 94-97 cars, and under the
passenger footrest on 90-93 cars. Undo the plugs attached to the ECU. The ECU harness plugs
below are viewed from the harness side with the tab on top.
3) Use the included butt connectors to connect the Voodoo Box to the stock
ECU. You’ll need to cut the original wire, twist the appropriate Voodoo box
wire around one of the cut and stripped ends, crimp it into the butt connector,
then crimp the other end into the butt connector. Cut and connect one wire at a time to ensure that
you don’t confuse the different wires. Once connected, give a slight tug to ensure that the wires are
firmly held in the butt connector. CONFIRM YOUR CONNECTIONS WITH A MULTIMETER! If the
wire color and location don’t agree with our schematics, match the location instead of the color. Once
all of the wires have been connected, CAREFULLY heat shrink the new butt connectors. The heat
shrink helps seal the connector and acts as a strain relief, so it’s a good thing to do. Be very careful
using the heat gun, as you don’t want to melt any other wires.
4) Using the supplied plastic T connector, tap into the vacuum line running to the boost
gauge. Attach the new vacuum line to the Voodoo Box. MAKE SURE THIS IS SECURE!
5) Use double-sided tape to attach the Voodoo Box to the stock ECU case.
1999-00:
Voodoo Box: ECU
red: white with red stripe, pin 1B
black: black with yellow stripe, pin 3A
blue: yellow with black stripe, pin 3W
grey: violet with green stripe, pin 3X
grey: yellow with red stripe, pin 3Y
grey: yellow with green stripe, pin 3Z
green: blue, pin 2C
2001-05
Voodoo Box: ECU
red: white with red stripe, pin 4AF
black: black, pin 3A
blue: yellow with black stripe, pin 2A
grey: violet with green stripe, pin 2D
grey: yellow with red stripe, pin 2G
grey: yellow with green stripe, pin 2J
green: blue, pin 4W
1996-97
Voodoo Box: ECU
red: white with red stripe, pin 4B
black: black, pin 4D
blue: yellow, pin 4U
grey: yellow with black stripe, pin 4V
grey: green with white stripe, pin 4W
grey: green, pin 4X
green: red with green stripe, pin 3C
1994-95
Voodoo Box: ECU
red: white with red stripe, pin 1B
black: black, pin 2B
blue: yellow, pin 2U
grey: yellow with black stripe, pin 2V
grey: green with white stripe, pin 2Y
grey: green, pin 2Z
green: red with blue stripe, pin 2N
1990-93
Voodoo Box: ECU
red: white with red stripe, pin 1B
black: black, pin 2B
blue: yellow, pin 2U
grey: yellow with black stripe, pin 2V
grey: not used, except 2Y on 93 CA cars
grey: not used, except 2Z on 93 CA cars
green: red with blue stripe, pin 2N
There are 2 separate chips for the Voodoo Box. The reason is that the 90-93 (except 93 CA) cars
were batch injection while all other Miatas are sequential injection.
- 90-93 (except 93 CA)
- 94-05 and 93 CA
If you are attaching the Voodoo box to an OTM, use the following for your reference along with your
car’s factory wiring diagram to determine the correct placement of your wires. Also, determine your
chip needs based on the descriptions above.
red: switched B+ from the main relay
black: chassis ground
blue: injector 1
grey: injector 2
grey: injector 3
grey: injector 4
green: primary O2 sensor signal
Tuning Instructions/Suggestions
Now that your turbo kit and Voodoo box are installed it is time to tune your car. Fuel and timing tuning
are essential for safe, powerful, and reliable operation of your turbocharged engine. There are three
factors here that need to be addressed: fuel, timing, and boost pressure. All three must come together
for your car to run at its best.
There are certain tools that will allow you to tune your Voodoo turbo system properly. The most
important tool for fuel tuning is a Wideband oxygen sensor with a display. This will allow you to
precisely monitor your air/fuel ratio in real-time whereas the stock narrowband O2 sensor that comes
in your car will not. (The stock NBO2 will only tell you 3 things- leaner than stoich, stoichiometric, and
richer than stoich.) If you purchase your own WBO2 you can tune your Voodoo box yourself based
on the recommended A/F targets listed earlier in this manual. If you do not, you can have the car
tuned at a dyno shop. They will have a WBO2 attached to their dyno. Once the car is tuned properly
(and we recommend a little bit conservatively) you should not have to mess with it- unless you travel
somewhere that has fuel of a lower octane. In this case it is best to keep out of full throttle if you do
not have the tools available to reduce your boost level or retard your timing manually.
If you do not tune the Voodoo box with a WBO2 you will need to set things conservatively. You may
be able to set the wastegate can to around 5 psi and run with the recommended numbers in the
beginning of these instructions. You may be able to turn your fuel outputs to max and run 1-2 psi
more. If at any time your car feels like it is bogging, struggling, not revving freely when you are in
boost, etc. you are lean and you need to increase fuel or reduce boost immediately to prevent engine
damage. Please consider this only a temporary option until you can gain access to a WBO2 for
proper fuel tuning.
Note- all other factors held constant, the 99-05 Miatas have more headroom in the fuel system than
the 90-97 Miatas. This means that the later cars can support more boost than the earlier cars will.
While I have seen the M2 cars support between 190-220 rwhp (depending on external factors), the
testing (which isn’t as thorough yet) we have done on M1 cars shows support for around 140-160
rwhp. If you want to eek a little more you can usually go with around a 15% larger injector- more
than this limits your car’s ability to maintain a stoichiometric idle and cruise for closed loop conditions
which is a problem for emissions and fuel economy. This means that 90-93 cars (blue top injector)
can use 94-97 tan top injectors, 94-97 cars can use 270cc injectors, and 99-00 cars (maroon injector)
can use 01-05 purple injectors. We have seen 01-05 cars support RWHP in the low 200s on stock
injectors, and honestly if you want more power than that you should upgrade to a standalone ECU
since the 6 degrees max static retard from our adjustable timing wheel will not cut it. (01-05 cars have
higher compression.)
Now on to timing tuning. A tool that is useful for tuning the timing on 99-05 Miata is an OBD-2
scantool that has the ability to monitor voltage output from your factory knock sensor. This will detect
knock long before you can hear it. If you have a 90-97 Miata or no scantool, you will have to listen for
knock when tuning your timing and (assuming your A/F ratios are good) back off a couple degrees
when you advance to the spot where you hear any. ALL TUNING MUST BE DONE WITH THE TOP
UP AND WINDOWS UP! You’ll never hear a ping with the windows or top down. If you set up the
timing in the winter you will likely have to back it off some more when it turns to summer as warmer
intake temps will increase the likelihood of knock.
The Voodoo box only controls fuel. With any turbo
kit you must also control your timing as stock
timing is too much for boost. If you have a 90-97
Miata you can dial in a static amount of timing
retard by adjusting your Cam Angle Sensor and
checking its position with a timing light. Refer to a
service manual for how to do this. (When using a
timing light jump GND to TEN in your diagnostics
connector (box with the flip up lid by the driver’s
side shock tower) so that you force the factory ECU into open loop.) We
recommend starting with 4 degrees of timing, which is 6 degrees retarded from OEM 10 degrees.
Retarding your timing will move the notch clockwise on the backing plate marks. As conditions
allow, you can advance from there (bringing it back counter clockwise). For 99-05 cars we include an
adjustable timing wheel with our Voodoo and Voodoo 2 kits that is slotted to allow for up to 6 degrees
of static retard (verify where you are with a timing light!). You’ll need to remove the alternator and
power steering belts (refer to the service manual for clarification), then remove the crank pulley. The
crank pulley is removed by taking out the four M6 (10mm head) bolts (torque them back down 150
in-lbs (NOT ft-lbs) when you’re done). This is NOT the big bolt in the middle. Remove the original
timing wheel and reinstall the new as shown (the stamp is now a sticker). Always tighten the bolts
holding the timing wheel, even if you intend to re-adjust it later. Once again, start with the max 4
degrees (6 degrees retarded) and advance as much as you can while keeping it reliably south of
where any knock occurs.
Note- In general, we don’t recommend over 8 psi when
your available retard is 6 degrees. (Maybe a little less
for California, maybe a little more for Texas etc.)
Remember with a static retard your off-boost timing
is down as well which reduces throttle response and
raises your exhaust gas temps. If you want more
boost you should upgrade to a standalone ECU
such as our Hydra for 90-05 Miata.
rotate plate this way to retard timing
(shown at maximum 6°)
We have recommended boost levels for our Voodoo
and Voodoo 2 turbo kits, however within the nature
of tuning and variability there is some fudge factor.
W. E. BOWSER
For example, if you live in California (the worst gas in
this stamp goes on the front
the U.S. for turbo cars, 91 octane that is more like 8990) and you are tuning for the best-running car possible,
you simply won’t be able to run as much boost as someone
with the same car and the same kit in Texas (The best pump gas
we’ve seen, 93 octane that smells like race gas). What we are hoping for with optimal tuning is to get
your car to the best of its ability given its surroundings. For 90-97 cars start at 5 psi and work up from
there as you tune. For 99-05 cars start at 6. If you have an intercooled kit you will simply end up tuned
with more boost than you would have if you did not have the IC. Your fuel and timing tuning along with
available octane should dictate the boost level that you can attain. If at any time you have questions
about tuning or want to run an idea by us, feel free to call the Flyin’ Miata tech line.
Now that the theory is down, here is a step by step to get you going after everything is installed and
you are ready to start tuning your Voodoo turbo system. Remember to make absolutely sure that the
vacuum hose into the Voodoo box is secure!
1) Set your initial boost low using washers as described in the turbo kit installation instructions.
Shortening the distance between the wastegate itself (the pin coming out of the turbo) and the
actuator (gold can) raises boost and lengthening the arm lowers it. We preload the arm length
to around 6 psi- if you want to be conservative you may want to back it off. Test and repeat as
necessary. If you lose that little C clip you’re on your way to Home Depot. A good way to avoid losing
the clip is to have a magnet next to the clip when you pry it off.
2) Start the car and check your timing. Set your timing as appropriate to 4 degrees of advance (as
described above) as a starting point. If at any time in the procedure below you hear knock, rather
than retard the timing any more you need to lower your boost. If you want more boost you’ll need a
standalone ECU and larger injectors.
3) With the car running, you need to set your O2 adjustment and fuel addition parameters (S and
G potentiometers, respectively). Once the idle has settled down (a few seconds after starting),
disconnect the vacuum line going to the Voodo box. Do NOT remove it at the Voodoo box, as
(depending on the hose size) the hose might be glued on. Disconnect the hose at the barb, where it
can be easily reconnected. Use something to plug the end of the line going to the engine, to ensure
that you don’t have a vacuum leak. The end of the hose going to the Voodoo box needs to be open
to the atmosphere. Adjust the S pot so that the light is just on and the G pot so that the light has just
gone out. In other words, spin the S parameter so that the light goes out. Now adjust it back until the
light turns back on, but stop as soon as it comes back on. The G pot is adjusted opposite - turn the
pot until the light turns on, then turn it back so that the light has just gone out. Since the map sensor
is now seeing atmospheric pressure, you’ve just adjusted the S pot to turn on just before atmospheric
pressure and the G pot to turn on just after. Fine tuning may be needed, but this should be close. If
one or both of the lights won’t come on regardless, this doesn’t mean you have a defective box. It
just means that you have to adjust these parameters by driving and watching for 0 on your gauge.
4) Once you are ready, drive the car and stay out of boost. (Having a passenger help is much safer
for tuning the Voodoo box, by the way.) Turn your fuel delivery output to max output (pot R) to start
on the conservative side. If you are tuning for max output you will most likely leave it there and just
tweak your fuel slope (pot Y) for the midrange. 90-97 cars will most likely be at max fuel output while
99-05 cars may hit 8psi and still be rich at max (meaning fuel output can be turned down to hit the
desired A/F target and increase HP). Be aware that all lights will probably come on at high vacuum,
that doesn’t mean anything one way or another.
5) Slowly introduce boost while monitoring your boost gauge and A/F ratio. The idea here is to get
as much boost as you can (within the guidelines above) while being able to maintain your target A/F
ratio (first page and above) all the way to redline. One way to do this is to leave your fuel output at
maximum and increase your boost on the WG actuator 1/2 turn at a time until you hit your A/F target
all the way to redline. If you lean out anywhere, including at high RPM, lower your boost. Once you’re
satisfied with the fueling, put the top back on the Voodoo box. Please be very careful in tightening the
screws, as it’s easy to break the bottom half of the case.
6) Once your fuel delivery and boost pressure is set you will determine if any more base timing can
be dialed in to the system. You want the most base timing you can get while NEVER hearing any
knock. Advance your timing 1 degree at a time and test. If you reach a point where you experience
knock, set your timing 2 degrees retarded from that point to remain conservative. Any time you get
different gas or it gets a lot warmer out listen again for knock and retard 1 degree as necessary.
(Remember, each marker on your timing plate is 2 degrees. The 10 degree marker is labeled.)