1
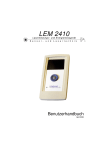
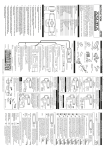
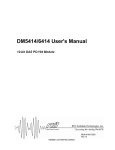
Instruction Manual
E84111-K00060-00
Published Feb.2008
Ver.3-1.01
INTRODUCTION
NOTICE
This manual assumes that you have and know how to use the tools and equipment necessary to
safely perform service operations on your vehicle. This manual assumes that you are familiar with
typical automotive systems and basic service and repair procedures. Do not attempt to carry out
the operations shown in this manual unless these assumptions are correct. Always have access to
a factory repair manual. To avoid injury, follow the safety precautions contained in the factory repair
manual.
PRODUCT
USE
APPLICATION VEHICLE
PART No.
REMARKS
A/F-Knock Amp.
Measuring air-fuel ratio and knock level.
Any vehicle that operates on a DC12V negative ground.
44006-AK003
A/F Amp. is applicable to unleaded gasoline engine vehicles.
Knock Amp. is applicable to vehicles with non-resonance type knock
sensors for gasoline engines or vehicles in the vehicle specific wiring list.
OUTLINE
HKS A/F Knock Amp. converts the signals from sensors to the air-fuel ratio and the knock level
using the knock sensor equipped with the vehicle or the provided A/F sensor.
The air-fuel ratio and knock level is displayed on the unit's screen, and can output voltage to
other devices.
2 A/F sensors can be connected.
2 knock sensors equipped with the vehicle can be connected.
A headphone terminal is provided with this product. It enables users to listen to the knock sensor
signal so that knocking can be confirmed by sound.
Connecting the A/F Knock Amp to an F-CON unit allows monitoring of the A/F value and knock
level, as well as data-logging through use of the Power Writer software.
Power Writer software can only be used by HKS Certified Pro Dealers.
NOTE
This product does not include a headphone; it must be purchased separately.
There is only 1 A/F sensor provided with this product. If more sensors are necessary, they are
available as an optional part.
PRODUCT SPECIFICATIONS
Operating Voltage
Displayable A/F
Measuring Range
DC11 16V
2.0 25.0 A/F
0.55 1.5 Lambda
1.0 Lambda = 14.54 A/F
8.0 22.0 A/F
Operating Temperature (Min. - Max.) Monitor Unit
Amplifier
Maximum Electrical Power Consumption
-1-
-10 70
-10 85
70W
This manual indicates items that require careful attention in order to safely install this product,
and lists precautions to avoid any possible damage and/or accidents.
For any lost, defective and/or damaged parts, contact your dealer to order.
HKS will not be responsible for any damage caused by incorrect installation, and/or use, or use
after modification and/or dismantling of this product.
HKS will not responsible for any damage caused by the removing vehicle's interior/exterior,
electric parts or modification for installation.
This product was designed and tested based on installation onto a factory vehicle or a vehicle
using other HKS products. The performance and/or safety cannot be guaranteed if this product
is installed onto other inapplicable vehicles.
This product operates only on vehicles with DC12V negative ground.
The specifications of this product are subject to change without notice.
This manual is subject to revision without notice.
The user must keep this manual.
SAFETY INSTRUCTIONS
Warning
To avoid possible accidents, do not mount the unit where it may become a distraction during
driving
Do not install this product on a vehicle with DC24V negative ground. It may cause a fire.
Make sure to remove the cable from the negative terminal of the battery to avoid possible
damage to other electronics parts and/or a fire caused by a short circuit.
Cease use of this product if any unusual situation is noticed. Consult the dealer immediately.
-2-
Caution
Do not install this product by yourself unless you have and know how to use the tools and
equipment necessary to safely perform service operations on your vehicle.
Do not modify, disassemble, and/or remodel the product and attached parts to avoid any
damage to the unit and/or harness.
Handle this product carefully, as this product is made using precise electrical components.
Prevent oil and/or water from entering the unit, or engine damage can result.
Make sure all connections and wiring are not disconnected, short circuited, or incorrect. If so, it
may cause an electric shock, short, or damage to the vehicle.
If the product or the vehicle with the product does not perform properly, consult your
retailer/dealer immediately.
Daily maintenance of the vehicle is the responsibility of the owner/user.
This manual shows a typical installation. Actual installation may vary depending on the vehicle
application.
Refer to the factory service manual when removing factory parts.
Do not lose and/or damage any removed factory parts.
Make sure to use appropriate tools to tighten nuts and bolts. Do not over-tighten bolts and nuts.
-3-
INDEX
INTRODUCTION
1
PRODUCT SPECIFICATIONS
1
SAFETY INSTRUCTIONS
2
INDEX
4
PARTS LIST
5
OPTIONAL PARTS LIST
5
NAMES & FUNCTIONS
1. AMP UNIT
2. MONITOR UNIT
3. Display Index
6
7
8
INSTALLATION
1. Advice for Installation
2. Disconnecting the Battery Terminal
3. Wiring
3.1 Connecting bullet connecter
3.2 Wiring Diagram
3.3 Wiring
(1) Ignition power and Ground
(2) A/F Amp. Functions Wiring
(3) Knock Amp. Function Wiring
4. Installing A/F Sensor
5. Installing the Monitor Unit
6. After Installation
10
11
11
11
12
13
14
15
16
16
OPERATION
Operation Outline Diagram
Monitor Mode
Setting Mode
1. A/F Amp. Setting
2. Knock Amp. Basic Setting
3. Function Setting 1
4. Function Setting 2
5. Function Setting 3
17
19
21
23
25
27
28
TROUBLESHOOTING
30
REPAIR SERVICE
31
FOR SUBSEQUENT OWNERS
31
AFK SET UP SHEET
32
REVISION OF INSTRUCTION MANUAL
34
-4-
Parts List
1
AMP UNIT
2
MONITOR UNIT
QT:1
3
5
KNOCK SENSOR HARNESS 6
MONITOR UNIT HARNESS
QT:1
QT:1
FEMALE BULLET CONNECTOR x 4 FEMALE BULLET CONNECTOR x 2
FEMALE SLEEVE x 4
MAIN HARNESS
QT:1
4
A/F SENSOR HARNESS
QT:1
8
A/F SENSOR
QT:1
7
O2 SENSOR BOSS
QT:1
QT:1
FEMALE SLEEVE x 2
Instruction Manua
MALE BULLET CONNECTOR x 4
MALE BULLET CONNECTOR x 2
MALE SLEEVE x 4
MALE SLEEVE x 2
l
Installation should
be performed
by a professional.
Prior to installation
and use, thoroughly
instruction manual.
read the
Retain this instruction
manual
for later reference.
E84111-K00060-00
2008/01
Ver.3-1.01
9
CONNECTOR SET 1
10
1 Set
Japanese x 1
CONNECTOR SET 2
11
1 Set
DOUBLE-SIDED TAPE
12
QT:1
English x 1
INSTRUCTION MANUAL
1 Set
OPTIONAL PARTS LIST
1 A/F SENSOR
44999-AK022
QT:1
2 A/F SENSOR HARNESS
QT:1
44999-AK023
3 O2 SENSOR BOSS
x5
x5
5
O2 SENSOR BOSS
+ BOLTS(5 pc)
44999-AK001
1 Set
-5-
17461-023259
QT:1
4 O2 SENSOR BOSS BOLT
QT:1
90370-006111
NAMES & FUNCTIONS
1. AMP UNIT
1. Power LED
8. Headphone Terminal
7. Knock Sensor Number
Select Switch
2. Main Connector
6. Knock Amp. Connector
3. A/F Amp. Connector 1
4. A/F Amp. Connector 2
5. Monitor Connector
1. Power LED
LED turns on when the power is on.
2. Main Connector
Connect the main harness.
3. A/F Amp. Connector 1
Connect the A/F sensor harness.
4. A/F Amp. Connector 2
Connect the A/F sensor harness. (Option)
5. Monitor Connector
Connect the monitor harness.
6. Knock Amp. Connector
Connect the knock sensor harness.
7. Knock Sensor Number Select Switch
Select the number of the knock sensor to use; the lower for 1 and the upper for 2.
8. Headphone Terminal
Connect a headphone to listen for engine knock.
-6-
2. MONITOR UNIT
Front
4. Digital Display 3
1. Button 1
5. Bar Graph
2. Volume
6. Indicator
3. Button 2
4. Digital Display 1
4. Digital Display 2
1. Button 1
In monitor mode, press and hold this button for more than one second to decrease display
refresh rate. Holding this button for an extended period of time will increase the refresh rate time
value, such that the refresh rate decreases further. In setting mode, use this button to activate
the setting.
2. Volume
Turn this knob to adjust the volume of the headphone. Press and hold this knob for more than
one second to reset peak hold value. Rotate this knob while in setting mode to select and edit
values.
3. Button 2
In monitor mode, press and hold this button for more than one second to increase display
refresh rate. Holding this button for an extended period of time will decrease the refresh rate time
value, such that the refresh rate increases further. In setting mode, use this button to switch the
setting group.
4. Digital View 1 / 2 / 3
The following values are displayed: A/F Value 1, A/F Value 2, Knock Level, respective Peak
Hold Values, and the A/F Comparison Value. Selection of the display values can be done via
settings.
5. Bar Graph
A bar graph of the values shown in Digital Display 1. Each bar of the bar graph is based on the
selected item or the minimum and maximum values of the selected item.
6. Indicator
This item appears depending on the condition(s) below.
: This appears when the value for the Digital Display 1 exceeds the warning value.
: This appears when changing values in setting mode.
: This appears when selecting values in setting mode.
-7-
Back
7. Monitor Harness Connector (3 pin)
8. Spare Connector (2 pin)
9. Spare Connector (5 pin)
7. Monitor Harness Connector
Connect the harness from the monitor.
8. Spare Connector (2 pin) - unused
9. Spare Connector (5 pin) - usused
3. Display Index
1. Opening
On initial start-up, an opening demo will appear on the
monitor after the internal buzzer sounds. After the
demo is finished, the display will switch to A/F sensor
warm-up mode.
2. A/F Sensor Warm-up Mode
Knock level value will be displayed on the KNK area of
the display. The A/F display will be in initial warm-up
mode. Once the warm-up is complete, the unit will
switch to monitor mode.
3. Monitor Mode
Monitored values are displayed.
Default Setting
Digital Display 1: Knock Level
Digital Display 2: A/F Value 1
Digital Display 3: OFF
-8-
4. Setting Mode
While in monitor mode, press button 2 to switch to
setting mode. All settings are performed in this mode.
For details, see "Operation Outline" from page 17.
5. Warning
If warning is set to ON and the warning conditions are
met, the internal buzzer will sound and the
indicator will show on the screen. Also, if the
backlight setting is ON, the backlight will begin to
blink.
NOTE
The display unit may show a black line/stripe. This is caused by static electricity and it does not
affect the functions or performance of the unit. To remove the black line/stripe, wipe the monitor
with an anti-static cloth or a cloth with an anti-static solution.
-9-
INSTALLATION
1. Advice for Installation
10
2. Disconnecting the Battery Terminal
11
3. Wiring
3.1 Connecting bullet connecter
3.2 Wiring Diagram
3.3 Wiring
(1) Ignition power and Ground
(2) A/F Amp. Functions Wiring
(3) Knock Amp. Function Wiring
11
11
12
13
14
4. Installing A/F Sensor
15
5. Installing the Monitor Unit
16
6. After Installation
16
WARNING
Do not install this product onto a vehicle with DC24V negative ground. It may
cause a fire.
This manual shows a typical installation. Actual installation may vary depending
on the vehicle application.
1. Advice for Installation
Do not install this product to the following locations:
1. Amp Unit and Monitor Unit
Where they can be exposed to extremely high or low temperatures.
Where temperature changes are extreme.
High humidity areas.
Where the unit may get wet.
High dust areas
In areas of high electro-magnetic disturbance.
2. A/F Sensor
Near flammable objects and/or flammable gas.
Where an exhaust drain may enter.
Where the unit comes into contact with other objects or the ground.
- 10 -
2. Disconnecting the Battery Terminal
Disconnect the negative terminal from the battery.
3. Wiring
Inner wires
Wire
3.1 Connecting bullet connecter
Male bullet
(1) Male bullet connecter
Male Sleeve
connector
Cut the wire.
Fit the covered wire tightly
Strip the cover of the wire.
Fit the inner wire tightly
into the male bullet connector.
into the male bullet connector.
Insert the wire through the male sleeve.
Fit the inner wires tightly into the male bullet connector.
Fit the covered wire tightly into the male bullet connector.
Inner wires
Wire
Insulate the exposed wires with a sleeve.
(2) Female bullet connecter
Female Sleeve
Female bullet
connector
Cut the wire.
Fit the covered wire tightly
Strip the cover of the wire.
into the female bullet connector.
Fit the inner wire tightly
Insert the wire through the Female sleeve.
into the female bullet connector.
Fit the inner wires tightly into the female bullet connector.
Fit the covered wire tightly into the female bullet connector.
Insulate the exposed wires with a sleeve.
3.2 Wiring Diagram
F-CON
A/F-Knock Amp.
Amp Unit
Red : IG Power
Black : Ground for Sensors
Black : Ground for Power
A/F-Knock Amp.
Monitor Unit
Monitor
Harness
Brown : Spare Signal Line
unused
GCC Connector : A/F Voltage Output
Female and Male Bullet
Connectors are shown in the
diagram below:
A/F SENSOR HARNESS
GCC Connector : Knock Voltage Output
Female Bullet
Connectors
Male Bullet
Connectors
Black : Ground for Sensors
White: O2 Heater Dummy Output 1
White/Black: O2 Heater Dummy Output 2
Yellow:
O2 Dummy Output 1
Yellow/Black: O2 Dummy Output 2
White: Knock Sensor 1 Input
Gray: Knock Sensor 2 Input
ECU
Interior
Engine Room
A/F Sensor
- 11 -
3.3 Wiring
(1) Ignition power and Ground
Use the main harness. IG power must be connected to the wire capable of more than 10A
such as the 12V power socket. (Do not connect to the ECU wire.)
Use a chassis ground. If this process is not completed, the A/F and/or knock level voltage
output readings may be incorrect.
A/F-Knock Amp.
Amp Unit
Red : IG Power
Black : Ground for Sensors
Black : Ground for Power
A/F-Knock Amp.
Monitor Unit
Monitor
Harness
Female and Male Bullet
Connectors are shown in the
diagram below:
Female Bullet
Connectors
Male Bullet
Connectors
Black : Ground for Sensors
About Grounding
Main Harness
Ground for Power
Ground for large voltage circuits such as A/F sensor heater voltage.
Ground for Sensors
Ground for the A/F measuring circuit and the analog voltage output circuits.
Knock Input Harness
Ground for Sensors
Ground for the knock sensor signal input circuit.
If the knock amp. function is not used, this grounding process is not necessary.
If readings from the A/F and/or knock voltage output are incorrect, or if the sound from the
knock sensor is not clear, changing the grounding location may solve the problem.
- 12 -
(2) A/F Amp. Functions Wiring
Wiring to view the A/F Value on the Monitor.
Install the A/F sensor to the vehicle, and connect the sensor to the Amp. unit using the
A/F sensor harness.
When only 1 A/F sensor is used, connect it to [A/F Amp.1] connector.
When 2 A/F sensors are used, connect one to [A/F Amp.1] and the other to [A/F Amp.2]
connector.
Connect the Amp. unit to the monitor.
Wiring for the A/F Voltage Output to F-CON
Connect the main harness of the GCC connector to [Ignition GCC Connector] of the FCON unit. By default, A/F1(Blue wire) is connected. To use A/F2(Blue/Black wire),
replace the wire with A/F1.
A/F1 and 2 cannot be used together.
To Replace the Factory O2 Sensor
To replace the factory O2 sensor, use the provided bullet connector to connect the O2
dummy output wire and O2 heater dummy wire from the main harness to their respective
vehicle-side wires.
The dummy signals may not be applicable depending on the vehicle. If not applicable, do
not connect these wires.
F-CON
Red : IG Power
Black : Ground for Sensors
Black : Ground for Power
A/F-Knock Amp.
Amp Unit
Monitor
Harness
Brown : Spare Signal Line
unused
Female and Male Bullet
Connectors are shown in the
diagram below:
GCC Connector : A/F Voltage Output
A/F SENSOR HARNESS
White :
A/F-Knock Amp.
Monitor
Female Bullet
Connectors
O2 Heater Dummy Output 1
O2 Heater
Output
(minus side)
White/Black : O2 Heater Dummy Output 2
Yellow :
O2 Dummy Output 1
O2 Sensor
Signal
Input
Yellow/Black : O2 Dummy Output 2
Interior
Engine Room
A/F Sensor
- 13 -
Male Bullet
Connectors
ECU
(3) Knock Amp. Function Wiring
Wiring to View Knock Level on the Monitor.
Reference the vehicle-specific wiring diagrams to connect wires of the knock sensor.
When only 1 knock sensor is used, connect it to [Knock Sensor 1] terminal (White wire) of
the knock sensor harness. Set the knock sensor number select switch to the lowest
position.
When 2 knock sensors are used, connect one to [Knock Sensor 1] terminal and the other
to [Knock Sensor 2] terminal (Gray wire) of the knock sensor harness. Set the knock
sensor number select switch to the uppermost position.
Wiring for the Knock Voltage Output to F-CON
F-CON iS
Connect the GCC connector of the knock sensor harness to [Fuel GCC Connector] of
the F-CON iS unit.
F-CON V Pro
Connect in the same manner as for the F-CON iS, or connect the GCC connector
(Purple wire) of the knock sensor harness to either [Voltage Output 1 (Terminal #23)] or
to [Voltage Output 2 (Terminal #24)].
Using the Power Writer Software (only used by HKS Certified Pro Dealers), edit the
"Control" tab, under "Parameter Setting".
Listen to Knock Sound Using a Headphone
This wiring is conducted to listen to the knock sensor signal via headphones. Enabled via
"Wiring to View Knock Level on the Monitor" steps. Connect headphones to the
headphone terminal and adjust volume as necessary.
F-CON
Red : IG Power
Black : Ground for Sensors
Black : Ground for Power
A/F-Knock Amp.
Amp Unit
A/F-Knock Amp.
Monitor Unit
Monitor
Harness
Brown : Spare Signal Line
unused
GCC Connector : A/F Voltage Output
Female and Male Bullet
Connectors are shown in the
diagram below:
GCC Connector : Knock Voltage Output
Female Bullet
Connectors
Black : Ground for Sensors
ECU
White : Knock Sensor 1 Input
Gray : Knock Sensor 2 Input
Interior
Engine Room
- 14 -
Male Bullet
Connectors
4. Installing A/F Sensor
Install the A/F sensor onto the exhaust pipe using M18 x P1.5 bolt(s). If the vehicle is equipped
with a factory O2 sensor that is mounted with the same size bolt(s), use these bolt(s) to install
the replacement A/F sensor. The dummy signals of the O2 sensor signal and the O2 sensor
heater signal will output from the amp unit. Connect the bullet connector of the main harness
referencing Section 3.2. Wiring Diagram.
The dummy signals may not be applicable depending on the vehicle.
If the factory O2 sensor is not replaced with the A/F sensor, weld an O2 sensor boss (not
included) onto the exhaust pipe to install the sensor.
Install the sensor so that the end of the sensor faces upward at least 10 higher than 180
(flat) position relative to the exhaust pipe, as illustrated in the diagram below. The point of the
sensor should be faced downward to prevent moisture and/or fuel buildup, which can lead to
shorter life span of the sensor.
When using an O2 sensor boss to install the sensor, apply heat-resistant grease to the screw
thread to prevent burns to the sensor/boss.
10
Exhaust Pipe
For vehicles with turbochargers, do not install the sensor onto the exhaust manifold before the
turbocharger. If exhaust gas pressure is high, A/F measurement errors may result.
Do not install the sensor where exhaust gas temperature can exceed 800 , to prevent
damage to the A/F sensor.
Do not leave the A/F sensor on the exhaust pipe when A/F Knock Amp. is not used.
A/F-Knock Amp. OPTIONAL PARTS
NAME
O2 SENSOR BOSS
O2 SENSOR BOSS BOLT
O2 SENSOR BOSS + BOLTS(5 pc)
PART No.
17461-023259
90370-006111
44999-AK001
REMARKS
M18xP1.5(BOSS)
M18xP1.5(BOLT)
5 pc
Warning
Do not hit and/or drop the sensor as the sensor is made of precision components.
When installing, make sure the sensor wires do not touch or come close to high heat areas.
Do not handle the sensor right after operation, as the sensor becomes very hot during the
operation.
When welding the O2 sensor boss, the sensor must first be removed from the boss, to
prevent damage to the sensor. Make sure there are no gas leaks from the welded location.
- 15 -
5. Installing the Monitor Unit
A/F-Knock Amp. Monitor Unit (Back)
DOUBLE-SIDED TAPE
(1) Remove any dirt, dust, and/or oil from the area
the unit is going to be mounted.
(2) Mount the monitor using the double-sided
tape.
Advice
The monitor can be best viewed if looking down on
the monitor from a higher vantage point. Therefore,
position the monitor lower than eye level or tilt the
monitor downward.
6. After Installation
(1) Insulate unused wires with electrical tape to prevent shorts.
(2) Make sure all wiring is correctly done.
Make sure all bullet connectors and connectors are connected correctly.
(3) Reconnect the negative terminal to the battery.
OPERATION
Operation Outline Diagram
17
Monitor Mode
19
Setting Mode
1. A/F Amp. Setting
21
2. Knock Amp. Setting
23
3. Function Setting 1
25
4. Function Setting 2
27
5. Function Setting 3
28
- 16 -
Operation Outline Diagram
Ignition ON
Setting the A/F Lean Value
Short
Rotate
Setting the A/F Rich Value
A/F Sensor Warm-up
Rotate
Setting the A/F Value Peak Hold Direction
Monitor Mode
Rotate
(Page 21)
Version Information
Headphone Volume Adjustment :
Rotate
Rotate
Display refresh rate - Decrease :
Press and hold
Reset
Display refresh rate - Increase
:
Press and hold
:
Press and hold
Switch the displayed name & number.
:
Press and hold
Reset Peak Value
Function Setting 3
(Page 28)
Short
Short
Lambda 1 A/F Value Setting
Short
Knock Input Amp. Gain Setting
Rotate
Rotate
A/F Value Setting at 0.5[V] A/F Voltage Output
Headphone Volume Adjustment
Rotate
Rotate
A/F Value Setting at 4.5[V] A/F Voltage Output
Setting Knock Detection Condition
Rotate
Voltage Setting at Lean O2 Dummy Output
Rotate
Voltage Setting at Rich O2 Dummy Output
Rotate
O2 Dummy Output Variance Gain Setting
Rotate
Monitoring A/F Sensor Temperature
Switch the displayed name & number.
:
Press and hold
Switch the displayed name & number.
:
Press and hold
A/F Amp. Setting
Knock Amp. Setting
(Page 21)
(Page 23)
- 17 -
Switch Operation
: Button
: Button
: Volume
Button
Volume
Button
Short
Short
Setting the Bar Graph & Digital Display 1
Setting the Bar Graph A/F Minimum Value
Rotate
Rotate
Setting Digital Display 2
Setting the Bar Graph A/F Maximum Value
Rotate
Rotate
Setting Digital Display 3
Setting the Warning A/F Value
Rotate
Rotate
Setting the Backlight Level
Setting the Bar Graph Knock Minimum Value
Rotate
Rotate
Setting the Display Refresh Rate
Setting the Bar Graph Knock Maximum Value
Rotate
Rotate
Setting Backlight Blinking at Warning
Setting the Warning Knock Value
Rotate
Setting the Bar Graph Peak Hold Function
Switch the displayed name & number.
:
Press and hold
Switch the displayed name & number.
:
Press and hold
Function Setting 1
Function Setting 2
(Page 25)
(Page 27)
- 18 -
Monitor Mode
This mode is shown after the A/F sensor warm-up sequence is completed. The A/F value and the knock
level can be monitored in this mode. Displayed items and warning alert timing can be changed via settings.
See Setting Mode section from page 21 for more details.
: Press and release quickly
Operation Symbols
: Rotate volume dial
: Press and hold for more than one second
1. Viewing A/F Value
Display position and display range of the A/F value can be edited.
Peak hold can also be displayed.
will be shown on the screen to indicate the peak hold display
position.
Select lean peak hold or rich peak hold to display via settings.
To reset peak hold value, press and hold the volume knob for more than one second while in Monitor Mode.
If the bar graph peak function is in use, the bar graph peak value is also reset.
Peak hold value/bar graph peak value are not saved, and are deleted when the unit is next powered off.
The warning value can be set in Digital Display 1.
A/F Value display range
: 2.0 25.0 [A/F]
When 2 A/F sensors are used, the difference between the A/F values 1 and 2 can be viewed.
(A/F comparison value is based on A/F value 1.)
While the A/F values are being compared,
is shown on the display.
Peak hold function cannot be used while A/F values are being compared.
A/F Comparison Value Display Range
: -9.9
- 19 -
9.9 [A/F]
2. Viewing Knock Level Value
The display position and knock level value display range can be edited.
Peak hold can also be displayed.
will be shown on the screen to indicate the peak hold display
position.
To reset peak hold value, press and hold the volume knob for more than one second while in Monitor Mode.
If the bar graph peak function is in use, the bar graph peak value is also reset.
Peak hold value/bar graph peak value are not saved, and are deleted when the unit is next powered off.
The warning value can be set in Digital Display 1.
When multiple knock sensors are connected, the average value is shown.
Knock Level Value Display Range
: 0 100
3. Volume Adjustment
Headphone volume can be adjusted when listening to knocking sounds via the unit's volume
knob. (The volume also can be adjusted in Setting Mode.)
Volume can still be adjusted for up to three seconds after initial volume adjustment. If no volume
changes are made for longer than three seconds, the adjusted volume will be set to the Amp unit,
and the unit will beep and the display will return to the Monitor Mode.
Headphone volume adjustment range
: 0 255
4. Display Refresh Rate Setting
Pressing and holding button 1 or 2 will change the display refresh rate speed.
(The rate also can be adjusted in Setting Mode.)
Refresh rate can still be adjusted for up to one second after the initial adjustment. If no refresh
rate changes are made for longer than one second, the change will be set to the Amp unit, and
the unit will beep and the display will return to the Monitor Mode.
Display Refresh Rate Adjustment Range
:1 5
- 20 -
Setting Mode
This mode is to set various A/F Amp and Knock Amp functions. If the factory sensor was
replaced with the O2 sensor, O2 sensor settings can be made in this mode. If using this unit for
the first time, or have performed a full reset, all settings will be set to default.
To Run Setting Mode:
Power on the A/F-Knock Amp. Once the start-up demo finishes, press button 2 to run Setting
Mode. See the operation outline diagram for more details.
Operation Symbols
: Press and release quickly
: Rotate volume dial
: Press and hold for more than one second
Pressing the volume knob for more than one second while in Setting Mode will change the Digital
Display 1 name to the name/number of the currently active parameter that is being set.
Use the above function if you are unsure of which settings are being made.
Press the volume once more for more than 1 second to return.
Settings are saved even when the unit is powered off.
Operation
(1) Press button 1 when settings displayed. The unit will
beep, and
or
will appear and blink on the
screen.
(2) Turn the volume knob to change values. When setting
is complete, press button 1.
1. A/F Amp. Setting
1.1 Lambda 1 A/F Value Setting
Enter the A/F value coefficient for the fuel being used.
If the vehicle uses unleaded gasoline, the above step is
not necessary.
2
Setting range :
4.00
Default Value :
14.54
20.00 (in 0.1 increments)
1.2 A/F Value Setting at 0.5[V] A/F Voltage Output
Set the A/F value (P05) when the A/F voltage output setting is 0.5[V].
Setting range :
2.0
Default Value :
8.0
25.0 (in 0.1 increments)
[A/F]
For settings using an
F-CON V Pro, see section 1.3.
- 21 -
P45
P05
0.5
4.5
Voltage Output [V]
1.3 A/F Value Setting at 4.5[V] A/F Voltage Output
Set the A/F value (P45) when the A/F voltage output setting is 4.5[V].
Setting range : 2.0
25.0 (in 0.1 increments)
Default Value : 20.0
[A/F]
P45
Settings Using an F-CON V Pro
Set P05 to 8.5 and P45 to 20.0. Use the F-CON V Pro
PowerWriter software (used only by Certified HKS Pro
Dealers) to change the parameter "Ignition GCC Input" to
"A/F", and "A/F Conversion Table" to "HKS".
P05
0.5
4.5
Voltage Output [V]
1.4 Voltage Setting at Lean O2 Dummy Output
Set the voltage at lean O2 dummy output.
Setting range : 0
255 [x10mV] (in 1 increments)
Default Value : 19 [x10mV]
1.5 Voltage Setting at Rich O2 Dummy Output
Set the voltage at rich O2 dummy output.
Setting range : 0
255 [x10mV] (in 1 increments)
Default Value : 95 [x10mV]
1.6 O2 Dummy Output Variance Gain Setting
Set the gain for O2 dummy output variance.
Setting range : 0.1
Default Value : 1.0
- 22 -
5.0 (in 0.1 increments)
1.7 Monitoring A/F Sensor Temperature
The current temperature reading of the A/F sensor is shown.
The A/F sensor temperature is shown to confirm that the
A/F sensor is operational. No settings can be made here.
Check the temperature reading as a reference if any
problems occur.
2. Knock Amp. Setting
Perform basic settings for the Knock Amp.
The set value can be entered referring to the current knock level on the digital display 3.
If the knock level display is not selected to use, setting is not necessary.
Knock Voltage Output
Knock Voltage Output will output voltage that corresponds with
knock level. Reference 3.3(3) Knock Amp. Function Wiring from
page 14.
Use the appropriate PowerWriter to set "Control" tab in
"Parameter Setting" of F-CON to use.
Voltage Output [V]
4.5
0.5
1
100
[Knock Level]
2.1 Knock Input Amp. Gain Setting
Adjust the knock signal sensitivity. Sensitivity adjustments will affect the displayed knock
signal level.
The lower the sensitivity value, the less the knock level value display rises.
The higher the sensitivity value, the higher the knock level value display rises. (or indicates)
Setting range : 0
28 (in 1 increments)
Default Value : 23
2.2 Headphone Volume Adjustment
Set the headphone knock listening volume.
The volume can also be adjusted by turning the volume knob while in Monitor Mode.
Setting range : 0
Default Value : 10
- 23 -
34 (in 1 increments)
2.3 Setting Knock Detection Condition
Sets the threshold value between knock signal and non-knock signal. To adjust knock
detection condition: while in neutral, raise engine rpm up to the very limit that knock level
values are not shown, then adjust. The threshold value may vary depending on slight engine
variances and variances in each vehicle's knock sensor.
If this setting is not made properly, a non-knock signal may be incorrectly read as a knock
signal.
This setting must be done after first completing section 2.1. Knock Input Amp Gain Setting.
Setting range :
0
Default Value :
15
255 (in 1 increments)
The knock sensor signal may vary depending on the engine specifications and/or vehicle's
characteristics. For this reason, initial setup is necessary to properly display knock level values.
Knock Level Initial Setting
1. Set the knock input amp gain and headphones volume adjustment to the following initial set values:
knock input amp gain
23
headphones volume adjustment 10
2. Connect the headphones and maintain high engine RPM while in neutral. Adjust the volume knob until you can
hear sounds clearly. The knock sensor detects the vibration of the engine, therefore the volume will become louder
as the engine rpm gets higher. Turn down the volume to avoid distortion at high revs.
3. If distortion or crackling can be heard even with the volume turned down, lower the knock input amp gain value.
4. While maintaining high engine RPM while in neutral, check to make sure there is no audible knocking.
5. Adjust the knock detection condition set value. In small increments, decrease the knock detection condition value
until the knock level value on Digital Display 3 does not read 0. Then increase the knock detection condition set
value in small increments until the knock level value on Digital Display 3 continuously reads 0.
If the knock level stays 0 even the knock detection condition set value is 0, set the knock detection condition set
value to 0 and go to the procedure 6 below.
6. Using headphones, listen to make sure that knocking is not occuring while checking the display to make sure the
knock level display reads 0, even under load. If the knock level display does not read 0, increase the knock
detection condition value to adjust.
7. If the knock level value is too high when knocking occurs, lower knock input amp gain value, and repeat from step
4.
1 The knock sensor converts engine block vibrations to electric signals. The knock sensor will detect engine block
vibrations regardless of engine knock occuring, so signal levels will be constantly fluctuating. The knock level
initial setting is done to prevent engine block vibrations from being misread as knock signals.
2 When knocking occurs, the knock sensor will output a high frequency burst signal. Depending upon such
variables as engine specification, knock sensor wiring layout, or operational noise/vibrations from solenoid valves
installed in the engine bay, the knock sensor may detect and output signals very similar to actual engine knock.
In these cases, knock level values may be misconstrued as knock readings.
3 If sound coming through the headphones is unclear due to noise, check for proper ground of the Knock Amp
connector's ground wire. Grounding this wire on a separate location than the main connector's ground wire may
resolve the issue.
- 24 -
3. Function Setting 1
Function Setting 1 sets display position or display method.
OFF
A/F 1
A/F 2
KNK
A/F 1 2 CPr
Nothing is displayed.
Displays A/F sensor 1's A/F value readings.
If
is displayed, peak hold value is shown.
Displays A/F sensor 1's A/F value readings.
If
is displayed, peak hold value is shown.
Knock level value is displayed.
(If multiple sensors are used, the average value is shown.)
If
is displayed, the peak hold value is shown.
The difference between A/F Values 1 and 2 is calculated based on
A/F Value 1.
Pressing the volume knob for more than one second while displaying/setting Digital
Display 2 or 3 will turn underlines ON/OFF.
3.1 Setting the Bar Graph & Digital Display 1
Select the item to be displayed for the bar graph and Digital Display 1.
Only the bar graph and Digital Display 1 will be shown
while setting.
Setting range :
(A/F comparison value)
Default Value :
3.2 Setting Digital Display 2
Select the item to be displayed for Digital Display 2.
Only Digital Display 2 will be shown while setting.
Setting range :
(A/F comparison value)
Default Value :
3.3 Setting Digital Display 3
Select the item to be displayed for Digital Display 3.
Only Digital Display 3 will be shown while setting.
Setting range :
(A/F comparison value)
Default Value :
- 25 -
3.4 Setting the Backlight Level
Set the backlight brightness level.
Setting range :
0
Default Value :
100
100 (in 1 increments)
3.5 Setting the Display Refresh Rate
Set the display refresh rate. If the values or bar graph refreshes too slow/fast, adjust the refresh
value.
Press and hold button 1 and 2 while in Monitor Mode will also adjust the refresh rate.
Setting range : 1
5 (in 1 increments)
Default Value : 3
3.6 Setting Backlight Blinking at Warning
Sets whether or not the backlight will blink when the warning function is activated.
Setting range : ON/OFF
Default Value : ON
3.7 Setting the Bar Graph Peak Hold Function
Select ON or OFF for bar graph peak hold value setting.
Setting range : ON/OFF
Default Value : OFF
The bar graph peak hold value can be reset by pressing and holding the volume knob for
more than one second while in Monitor Mode. However, if peak hold is on the "Lo" (rich) side,
this function cannot be used.
- 26 -
4. Function Setting 2
Function Setting 2 sets the bar graph's minimum, maximum, and warning values. The A/F value
and the knock level value can be set separately.
When A/F comparison value is selected, both the bar graph's minimum and maximum values will
be automatically set as a positive or negative value in relation to 0. Ex: If the bar graph A/F min
value is set to -3.0, the A/F max value is automatically set to 3.0.
4.1 Setting the Bar Graph A/F Minimum Value
Set the A/F minimum value for the displayed bar graph.
When viewed as an A/F comparison value, setting the this minimum value will set the maximum
value at the same time.
Setting range :
A/F value
: 2.0
Bar Graph A/F Maximum Value
(in 0.1 increments)
A/F comparison value : -9.9 -0.1 (in 0.1 increments)
Default Value :
A/F value (8.0)
4.2 Setting the Bar Graph A/F Maximum Value
Set the A/F maximum value for the displayed bar graph.
When viewed as an A/F comparison value, setting the this maximum value will set the minimum
value at the same time.
Setting range :
A/F value
: Bar Graph A/F Minimum Value 25.0
(in 0.1 increments)
A/F comparison value : 0.1 9.9 (in 0.1 increments)
Default Value :
A/F value (20.0)
4.3 Setting the Warning A/F Value
Sets the warning A/F value. This value is only applicable when both A/F value and A/F
comparison values are shown on the bar graph and Digital Display 1, respectively.
When the A/F comparison value is selected, the warning A/F value will be shown as positive,
however the warning value is still active as a negative value of the same number, as well.
Ex: If the warning A/F value setting is 2.0, the display will show "2.0". However, the warning
function will activate at greater than +2.0, less than -2.0.
Setting range :
A/F value :
2.0 25.0 (in 0.1 increments)
OFF(Turn the volume dial more than the max value)
A/F comparison value :
0.1 9.9 (in 0.1 increments)
OFF(Turn the volume dial more than the max value)
Default Value :
- 27 -
A/F value (OFF)
4.4 Setting the Bar Graph Knock Minimum Value
Set the bar graph knock minimum value.
Setting range :
0
Default Value :
0
Bar Graph Knock Maximum Value
(in 1 increments)
4.5 Setting the Bar Graph Knock Maximum Value
Sets the bar graph knock maximum value.
Setting range :
Bar Graph Knock Minimum Value 100
(in 1 increments)
Default Value :
100
4.6 Setting the Warning Knock Value
Sets the warning knock value. This value is only applicable when knock level value is displayed
on the bar graph and Digital Display 1.
Setting range :
0
Default Value :
100
100 (in 1 increments), OFF
5. Function Setting 3
5.1 Setting the A/F Lean Value
Sets the A/F Lean value.
Setting range :
2.0
Default Value :
20.0
- 28 -
25.0 [A/F] (in 0.1 increments)
5.2 Setting the A/F Rich Value
Sets the A/F Rich value.
Setting range :
2.0
Default Value :
8.0
25.0 [A/F] (in 0.1 increments)
5.3 Setting the A/F Value Peak Hold Direction
Sets the A/F Value peak hold direction. "Lo", a smaller value (Rich-side) will be acquired as a
peak hold value. "Hi", a larger value (Lean-side) will be acquired as a peak hold value.
Setting range :
Lo/Hi
Default Value :
Hi
5.4 Version Information
The main unit version information will appear on Digital Display 2 and the display unit version
information on Digital Display 3.
Digital Display 3 :
display unit version
Digital Display 2 :
main unit version
5.5 Reset
All settings are deleted and returned to the default setting.
Setting range :
No/YES
Default Value :
No
- 29 -
TROUBLESHOOTING
If this product is not performing properly; check all wiring and connections, referring to the
following before contacting your HKS Certified Pro Dealer.
Symptom
Unit does not
power on.
Cause
The power cable is not connected.
Improper grounding.
Communication error (1) (if Error No.001)
Communication error (2) (if Error No.100)
Error message
appears.
Communication error (3) (if Error No.010)
Communication error (4) (if Error No.002)
Communication error (5) (if Error No.008)
Make sure connectors are connected properly.
Check if communication is interrupted by
engine/chassis vibrations while driving.
Make sure the display harness is connected
properly.
Communication error (6) (if Error No.888)
Sensor's warm
-up sequence
does not end.
Countermeasure
Make sure the power cable/line is wired
correctly.
Remove any paint and/or rust from the
grounding section.
Check to make sure the relay harness is
connected properly. Turn the ignition off, then
on.
Check if communication is interrupted by
engine/chassis vibrations while driving.
Make sure all harnesses are connected
properly.
The A/F sensor is not
connected.
The A/F sensor harness is cut
off.
The A/F output
does not respond The A/F sensor is worn-out.
properly/fast
enough.
Check if communication is interrupted by
engine/chassis vibrations while driving.
Make sure the display harness is connected
properly.
Make sure the Setting Mode is not attempting
to display other sensors that are not
connected.
Make sure the A/F sensor harness is
connected properly.
Replace the A/F sensor.
Incorrect setting of the A/F value
at 0.5[V] or 4.5[V] A/F voltage
Verify all settings.
The A/F values output.
Make sure the A/F conversion table is correct.
on the A/F-Knock Incorrect Power Writer
Amp display and setting.
on the F-CON
Ground the black ground wire (the spade
Power Writer
terminal with one wire) from the main harness
do not match.
Improper grounding of the A/F
and the black ground wire (the spade terminal
Knock Amp and F-CON
with two wires) to different chassis ground
positions.
If the error message does not disappear, turn the ignition off and on to erase the error message.
- 30 -
Caution
Do not use this product if unusual occuraces should occur.
Consult with your HKS Certified Pro Dealer immediately.
Warning
Do not try to repair the product yourself. Consult with your HKS Certified Pro
Dealer.
If any unusual noises, scents, and/or vibrations are noticed while driving,
please refer to a factory repair manual.
REPAIR SERVICE
For questions about this product, any optional, lost, defective and/or damaged
parts, please contact your HKS Certfied Pro Dealer.
FOR SUBSEQUENT OWNERS
If this product is passed on to a new owner, make sure this instruction manual is included
along with the product. Do not uninstall this product by yourself.
Warning
If this product is removed, make sure all wires from the vehicle are insulated with
electrical tape to prevent a possible short.
- 31 -
SET UP SHEET
Setup Date:
Vehicle:
Specifications & Remarks
Model:
Model Year:
Engine Type:
A/F Amp. Initial Setting
Lambda1 - A/F Value
A/F
A/F Value at A/F Voltage Output 0.5[v]
A/F
A/F Value at A/F Voltage Output 4.5[v]
A/F
Voltage at Lean O2 Dummy Output
x10mV
Voltage at Rich O2 Dummy Output
x10mV
Gain Setting for O2 Dummy Output Variance
Knock Amp. Initial Setting
Gain Setting for Knock Input amp.
Headphone Volume
Knocking Conditions
- 32 -
Function Setting 1
Bar Graph Display
OFF / A/F1 / A/F2 / KNK
A/F1(P.H.) / A/F2(P.H.) / KNK(P.H.) / A/F Comparison Value
Digital Display 2
OFF / A/F1 / A/F2 / KNK
A/F1(P.H.) / A/F2(P.H.) / KNK(P.H.) / A/F Comparison Value
Digital Display 3
OFF / A/F1 / A/F2 / KNK
A/F1(P.H.) / A/F2(P.H.) / KNK(P.H.) / A/F Comparison Value
Backlight Level
DisplayRefresh Rate
Warning Backlight
OFF / ON
Bar Graph Peak Setting
OFF / ON
Function Setting 2
Bar Graph A/F Min. Value
A/F
Bar Graph A/F Max. Value
A/F
Warning A/F Value
A/F
Bar Graph Knock Min. Value
Bar Graph Knock Max. Value
Warning Knock Value
Function Setting 3
Lean Value
A/F
Rich Value
A/F
Lo / Hi
A/F P.H. Direction
- 33 -
REVISION OF INSTRUCTION MANUAL
Ver.
Date
3-1.01
Feb.2008
Details
1st Edition
- 34 -
Pursuing the Ultimate in Engine Performance and Efficiency.
Produced by HKS Company Limited.