1
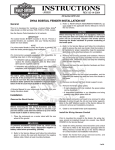
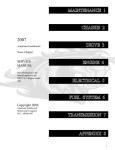
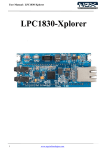
INSTRUCTIONS
REV. 11-19-96
-J00588
®
Kit Number 46029-97
HERITAGE SPRINGER FRONT END KIT
GENERAL
This kit is designed for installation on 1996 and later Softail
motorcycles. See Service Parts illustrations for kit contents.
NOTE
We recommend this kit be installed by a factory trained technician at an authorized Harley-Davidson Dealership.
NOTE
When installing this front end kit on FLSTC models, a turn
signal kit, Part No. 68409-97, must also be installed.
1WARNING
Do not install this front end kit on any non-approved
motorcycle. Installation of the FLSTS Springer front end
on anything other than Softail models could lead to
possible personal injury. Do not install on three-wheeled
vehicles of any kind.
This kit is designed for use with the supplied 16 in. front
wheel. Do not use any other front wheel with this kit. Use of
a different front wheel could adversely affect handling and
result in personal injury.
Use only the fender that comes with the kit. Other
fenders may not fit properly and can endanger the rider.
1WARNING
The rider’s safety depends on the correct installation of
this kit. USE THE APPROPRIATE SERVICE MANUAL
PROCEDURES. If the procedure is not within your
capabilities or if you do not have the correct tools, have
your Harley-Davidson Dealer perform the installation.
DO NOT change the front brake hardware. The FLSTS
Springer front brake hardware was designed to hold the
brake components in position under any foreseeable
circumstance.
DO NOT use front end components that have been
remanufactured (straightened, plated, welded) in any
way. There can be no certainty that remanufactured
front end components will have the strength of the
original, unchanged components.
Harley-Davidson has designed and manufactured this
custom front end according to our very stringent and
well-tested standards. If you modify the FLSTS Springer
front end in any way that changes our original design,
Harley-Davidson cannot and does not assume
responsibility for mishaps resulting from these
changes.
1WARNING
The FLSTS motorcycle was NOT designed for sidecar
use. The FLSTS Springer fork was NOT designed for
sidecar use. DO NOT use either the motorcycle or any
FLSTS Springer fork equipped vehicle for this purpose.
Use of any FLSTS Springer fork equipped vehicle for
this purpose could cause personal injury.
DISASSEMBLY
NOTE
See applicable Service Manual for detailed disassembly procedures.
A Service Manual for your motorcycle is available from your
Harley-Davidson Dealer.
1WARNING
The components of your FLSTS Springer front end and
their design relationship to each other are very
important. Altering these relationships by modifying the
FLSTS Springer front end could adversely affect the
handling of the motorcycle and cause personal injury.
Use only Dunlop D402F tires with this kit. Using any
other tire, or a tire with a higher aspect ratio, could allow
the front wheel to bind on the fender during hard stops
or big bumps.
1WARNING
To avoid accidental start-up of vehicle and possible personal injury, disconnect the battery cables before proceeding. Always disconnect the negative cable first. If
the positive cable should contact ground with the negative cable installed, the resulting sparks may cause a
battery explosion resulting in personal injury.
1.
Remove seat and disconnect battery (negative cable
first).
DO NOT alter the fender to modify the fender location
relative to the tire. Doing this could allow the front wheel
to bind on the fender during hard stops or big bumps or
adversely affect the handling characteristics of this
motorcycle.
1 of 14
1WARNING
Gasoline is extremely flammable and highly explosive
under certain conditions. Be sure engine is cold and do
not smoke or allow open flame or sparks anywhere in
the area when refueling or servicing fuel system. Doing
so could result in fire or explosion causing personal
injury.
2.
Drain gas and remove fuel tanks.
3.
Remove air cleaner and backplate and disconnect
throttle cables from carburetor.
4.
Disconnect front end wiring systems at connectors
located between fuel tanks. Feed wires through upper
fork bracket.
5.
Remove hand controls, switch housings and turn
signals from handlebar.
6.
Remove the following original parts: front wheel, inner
tube, fork, upper and lower fork brackets, risers,
handlebar, axle, headlight, throttle cables, steering head
bearings, bearing races, front brake line and wheel
spacers.
NOTE
Install riser studs (32) in the following three steps:
a.
b.
c.
2.
Apply anti-seize to upper triple clamp pinch bolt (21),
install and tighten to 25-30 ft-lbs.
3.
Lubricate outside of riser bushings (33) and install one
on each rigid fork leg stud. Install one into the top of
each riser (34).
4.
Place risers in position over riser studs.
NOTE
Be certain the risers are installed correctly oriented to the
handlebars.
5.
Install washers (35) and new locknuts (36). Tighten
locknuts to 25-30 ft-lbs. Place ground spring (37) in one
of the risers.
6.
Place handlebars on risers and put riser caps (38) in
position. Install socket head screws (39). Adjust
handlebars and tighten socket head screws to 12-15 ftlbs, making gap between caps and risers even, front
and rear.
7.
See Service Parts illustration on page 9. Install new
bearing races (27) from kit using Kent-Moore tool Part
No. HD-39302.
Install new handgrip on left handlebar. To install
handgrip, apply Fellobond 205 adhesive to inside surface
of handgrip.
8.
Pack new top and bottom bearings with Special
Purpose Grease, Part No. 99857-97, available at your
Harley-Davidson dealer. (Bottom bearing is installed on
new fork assembly).
Install original hand controls, master cylinder, and switch
housings on handlebars. Install new throttle cables into
right handlebar control and leave cable ends that attach
to carburetor loose for now.
9.
Install turn signals on handlebars.
INSTALLATION
Bearing Races and Fork Assembly
1.
2.
3.
4.
Install fork assembly into frame steering head with new
upper bearing (28) and new upper dust shield (29).
Secure fork assembly to frame with hex bearing retainer
(23).Tighten hex bearing retainer to 40-45 ft-lbs to seat
bearings, then back off retainer. Retighten retainer to
10-12 ft-lbs for initial steering head adjustment.
Fill steering head with Special Purpose grease by
pumping grease into fitting, located on left side of
steering head, until grease comes out by top and
bottom dust cover. Wipe off excess grease.
NOTE
Be certain to maintain recommended steering head bearing
lubrication intervals. FLSTS steering head bearings should
be lubricated through the neck fitting with Special Purpose
grease at every 2500 mile service interval; and remove,
inspect, and repack bearings at every 20,000 mile service
interval.
Risers and Handlebar
1.
Start threads of both studs in fork leg.
Tighten both studs securely.
Torque both studs to 60-65 ft-lbs.
See Service Parts illustration on page 9. Install upper
triple clamp (22) and riser studs (32). Tighten studs to
60-65 ft-lbs.
-J00588
NOTE
Turn signals are not supplied in this kit. If this kit is being
installed on a FLSTC model, purchase and install Handlebar
Mounted Turn SIgnal Kit, Part No. 68409-97).
10. Use new harness clips from kit to secure switch and
directional wires to handlebars.
Link and Caliper Brackets
1.
See Service Part illustration on page 10. Assemble link
(42) to caliper bracket assembly (46) using screw (41),
washer (60), and acorn nut (43). Tighten acorn nut to 3540 ft-lbs.
2.
Install rubber spacer (48) and thrust washer (47) onto
pivot sleeve on left rocker. Gray surface of thrust washer
should face inward.
3.
Assemble link and caliper bracket by sliding caliper
bracket onto pivot sleeve on rocker, and assemble link to
fork leg bracket (44) using screw (40), washer (60), and
acorn nut (43). Tighten acorn nut to 35-40 ft-lbs.
2 of 14
Brake Line
1WARNING
Brake line routing is critical. Brake line must not contact
springs or spring fork components. Contact with any of
these components could cause wear in brake line. This
could cause leakage and brake failure, possibly resulting
in personal injury.
NOTE
Be certain that the straight end of the wire clip is under and
in contact with the fork stop tab on the upper fork casting.
5.
Fender
1.
1.
See Service Parts illustration on page 12. Insert brakeline
(96) through front fork assembly. Brakeline must go in
behind left fork leg above the lower fork casting and
come out in front of the right fork leg.
1WARNING
Caution must be used not to bend or twist the brakeline.
This could cause misalignment, leakage and brake
failure, possibly resulting in personal injury.
With brake line in place, tighten mounting screws.
Fender should already be painted to match rest of
motorcycle.
NOTE
Special care must be taken to avoid getting paint in bearing
bores or on threads.
2.
See Service Parts illustration on page 13. Press
spherical bearings (102) into fender. Race of bearings
should be installed flush with the inboard side of fender
bushings.
3.
Loosely assemble brakeline to lower fork casting on left
side with screw (97). See Figure 1.
3.
Feed fender lamp assembly (113) wire harness into
fender top hole and out through side hole.
4.
Assemble clamp (101) and throttle cable retainer wire
clip to upper rigid fork casting using screw (92). See
Figure 2.
4.
Place harness into metal clip inside of fender and
carefully close clip to hold harness in place.
5.
Using alcohol, or glass cleaner, lubricate the rubber
grommet of the lamp assembly and place it into position
in the hole on top of the fender. Install small grommet
(116) in side of fender.
6.
Loosely install rear lamp housing screw (114).
7.
Install front lamp housing screw (115) while holding nut
from inside of fender, and tighten screw securely.
8.
Tighten rear lamp housing screw securely.
9.
Gently pull the wire harness out the side of the fender
until there is a minimum of slack under the fender. Be
sure that there is as much wire harness to tire clearance
as possible.
6034
10. Insert wire terminals into 2 place connector housing.
11. Install from outside the nylon insert assemblies (104
and 105) into each fender bushing and push assemblies
up against spherical bearing races.
Figure 1
6035
s0125x2x
Figure 2
-J00588
Figure 3
3 of 14
s0125x2x
6.
Install thick spacer (107) onto axle with large O.D. of
spacer to outside of bushing.
7.
Install castlenut (108). Tighten castlenut to 60 ft-lbs (81
Nm) and check to see if special clip (109) can be
installed. If required, tighten nut just enough to align
hole and nut slots.
8.
Insert special pin through axle hole.
1WARNING
DO NOT operate motorcycle without special pin
installed or handling may be adversely affected resulting in personal injury.
9.
Install left and right hub cap seals (110) and right and
left hub caps (111). Tighten until hubcap makes contact,
then tighten 1/4 turn more.
Brake Caliper
Figure 4
1CAUTION
Installation of the front fender on FLSTS front end is different from other models due to tight clearances. Use a
clean shop rag to protect fender paint from damage.
1WARNING
Whenever a caliper is installed, BEFORE moving
motorcycle, you must pump brake fluid pressure back
up until the pistons push the pads against the brake
disc. If you don’t pump fluid pressure up again, the
brakes will not be available to stop the motorcycle,
possibly resulting in personal injury.
12. See Figures 3 and 4. Slide fender into position keeping
right fork leg between fender and struts.
13. Raise fender until fender holes are aligned with fork
holes for axle.
14. While holding fender in position, slide axle through the
fender and front end to temporarily support assembly.
15. Install screw (117), washer (118), and nut (120).
Tighten nut to 18-22 ft-lbs (24-30 Nm). Install spring clip
(119) on screw.
Wheel
1.
Mount tire, balance wheel, and install original disc on
new wheel. Refer to applicable Softail Service Manual
for detailed procedure.
1WARNING
D.O.T. brake fluid can cause eye irritation. In case of
contact with eyes, flush with plenty of water and get
medical attention. KEEP BRAKE FLUID OUT OF THE
REACH OF CHILDREN!
1WARNING
Whenever a hydraulic brake line or fitting is opened, the
fitting should be flushed with brake fluid and the brake
system must be bled. Do this to eliminate any air or
contaminents from the brake system. Air in the fluid will
cause the brake pedal to have a spongy feel. If a
contaminant becomes lodged in the seat of a fitting or
the sealing surface, leakage of fluid could occur and air
could be drawn into the system, possibly causing brake
failure and personal injury.
1WARNING
1WARNING
Do not replace the specified Dunlop D402F tire with a
higher aspect ratio tire. Doing this could adversely
affect the handling of the motorcycle and cause
personal injury.
Do not re-use brake pad mounting plate. Use of original
brake pad mounting plate could cause front brake
failure and possible result in personal injury. Use new
brake caliper assembly from kit with brake pads. Refer
to Softail Service Manual for detailed procedure.
2.
Remove front axle.
1.
Place caliper mounting plate, with disc pad, on disc.
3.
See Service Parts illustration on page 10. Place right
hand conical spacer (62) and left hand flat spacer (70)
into wheel hub.
2.
See Figure 5. Install brake caliper (B) on brake disc.
The brake bracket has a cast-in nub that engages a
hole in the mounting plate.
See Service Parts illustration on page 13. Install thin
spacer (106) onto axle with large O.D. end of spacer
contacting axle head.
3.
Position the caliper with the disc between the friction
pads. Slide the caliper mounting plate into brake caliper
from the rear. Be sure that the spring clip on the caliper
mounting plate is properly positioned on the brake
caliper.
4.
5.
Install front wheel assembly and slide axle through
fender, rockers, and wheel from the right side of the
motorcycle.
-J00588
4 of 14
Passing Lamps and Horn
s0129x2x
G
1.
Disconnect VOES hose (A) from carburetor.
2.
Slide fuel line protection sleeve (B) off of fuel line.
3.
Loosen hex nut on back of enrichner knob and
disconnect from VOES/horn bracket.
4.
Remove horn by removing acorn nut and flange nut at
horn bracket. Disconnect horn wire and horn ground
wire from horn and remove wires from retainer clip on
back of horn.
5.
Trace horn ground wire back to termination and remove
from motorcycle.
6.
Disconnect VOES connector.
7.
Remove VOES/horn bracket by removing 3 screws and
sliding bracket off of fuel hose.
8.
Remove VOES with hoses from bracket. Remove fuel
line grommet and install grommet in new VOES bracket
(C).
9.
Apply spot light label (D) to new VOES bracket. The
hole in the label should be concentric with the hole in
the bracket.
F
B
E
C
D
A
A Lower mounting bolt
B Brake caliper
C Washer
D Upper mounting bolt
E Cotter pin
F Banjo washers
G Banjo bolt
Figure 5
4.
Place flat washer (C) on upper mounting bolt (D), then
insert the bolt through the bracket holes and the
mounting plate. Screw the bolt into the threaded
bushing.
5.
Coat the outside diameter of lower mounting bolt (A)
with Dow Corning MOLY 44 grease. Insert the lower
mounting bolt through the caliper and the bracket hole.
Thread the bolt into the tapped hole at the lower end of
the mounting plate. Tighten lower mounting bolt to 2530 ft-lbs (34-41 Nm).
6.
Tighten upper mounting bolt (D) to 42-46 ft-lbs (57-62
Nm). Install cotter pin (E).
7.
Install brake line on caliper with banjo washers (F). Hold
brake line in place and tighten banjo bolt (G) to 17-22 ftlbs (23-30 Nm). Install brake line clamp and brake line
clamp bolt.
8.
9.
Turn handlebars so master cylinder is level. Fill
reservoir with D.O.T. 5 HYDRAULIC BRAKE FLUID to
1/8 in. (3.2 mm) below top.
Install the master cylinder cover. Actuate the master
cylinder and check for leaks. Bleed the brakes following
instructions in your Service Manual.
10. Assemble VOES assembly (E) to new bracket using
new clip.
11. Insert screw used to mount bracket to motorcycle into
outer most hole on VOES bracket. This may not be
possible once the switch is assembled.
13. Assemble passing lamp switch (F) to VOES bracket.
Position switch so wires are in rearward position.
Tighten nuts on both sides of VOES bracket to lock
switch into place.
A
i00815
D
E
C
F
B
Headlamp
1.
See Service Parts Diagram, page 12. Fasten headlamp
mounting block (82) behind upper shock mount,
applying Loctite 242 (blue) to socket head screw (85).
Attach headlamp to mounting block.
A VOES hose
B Fuel line sleeve
C VOES bracket
D Spot light label
E VOES assembly
F Passing lamp switch
Figure 6
-J00588
5 of 14
14. Reinsert fuel hose back through grommet in bracket,
and slide bracket back in place.
26. Install fuel tanks, connect battery, positive cable first,
and install seat.
15. Insert remaining two screws through VOES bracket and
reassemble bracket to motorcycle with original nuts.
Torque nuts to 30 ft-lbs (41 Nm).
1WARNING
16. Reconnect VOES connector.
17. Locate Yellow/Black horn wire. Notice it is looped over
and restrained with black tear tape. Grab horn wire
close to tape and pull firmly outward to release the extra
horn wire.
18. Route horn wire forward under upper triple clamp,
between upper rebound springs, to horn.
19. Reinstall enrichner knob into VOES bracket and tighten
hex nut.
20. Slide fuel line protective sleeve back over the fuel line.
After installing seat, pull upward on front of seat to be
sure it is locked in position. If seat is loose, it could shift
position during vehicle operation and startle the rider,
causing loss of control and personal injury.
27. Check all electrical circuits, including brake lights,
headlamp and turn signals, for proper operation. Follow
procedure in Softail Service Manual to aim headlamp.
Springer Steering Head Bearing
Adjustment
NOTE
The fork has more weight on the left side than the right side.
The balance point is just right of center.
21. Reconnect VOES switch hose to carburetor.
1.
Raise motorcycle so that wheels are off the floor an
equal amount.
2.
See Service Parts illustration on page 9. Remove the
acorn nut (19) and washer (20). Loosen, but do not
remove, the upper triple clamp pinch bolt (21).
3.
Place a suitable marking material, such as masking
tape, over the front fender tip.
4.
Find the balance point of the front end.
5.
Install a pointer so the base is stationary on the floor and
the pointer is centered on the fender.
6.
Tap the fender on one side until the front end begins to
fall away by itself. Mark this point on the marking
material. Repeat on the other side.
22. See Service Parts illustration on page 12. Assemble
horn to passing lamp assembly as follows:
a.
Assemble horn ground wire to right hand terminal
on horn.
b.
Assemble horn to lamp assembly using screws (90)
and nuts (91), trapping horn ground wire between
back of horn bracket and left horn mounting nut.
23. See Service Parts illustration on page 9. Place shock
(2) into position on motorcycle with with top fastener left
loose.
24. Place passing lamp bracket onto motorcycle and tighten
top shock absorber fastener.
25. Finish wire connections as follows:
a.
b.
Route passing lamp wires back between upper
rebound springs and under upper triple clamp to
passing lamp harness connector [73] and mate
connector halves.
Route headlamp harness back between upper
rebound springs and under upper triple clamp and
mate headlamp harness connector [38].
NOTE
The correct distance between the fall away marks must be 12 inches (25-50 mm).
7.
Tighten or loosen the hex bearing retaining nut (23) as
necessary until the fall away distance is 1-2 inches.
8.
Tighten the triple clamp pinch bolt (21) to 25-30 ft-lbs
(34-41 Nm).
Install the rubber washer (20) and acorn nut (21).
Tighten acorn nut to 30-35 in-lbs (3.4-4.0 Nm).
c.
connect Yellow wire spade terminal to Yellow
passing lamp switch harness wire [connector 74].
9.
d.
Mate fendertip wire connector [32].
10. Repeat measurement to verify adjustment is correct.
After making wire connections, cable strap any loose
wires and check that no wires are pulled or pinched
when front end travels from full left to full right position.
11. Install and adjust new throttle cables, and original clutch
cable following applicable Service Manual procedures.
1WARNING
Always connect the positive battery cable first. If the
positive cable should contact ground with the negative
cable installed, the resulting sparks may cause a battery
explosion producing personal injury.
-J00588
6 of 14
i00816
RIGHT
PASSING
LAMP
[73A]
GY/BK
FENDERTIP LAMP
[32B]
1
2
[73B]
1
2
[32A]
REAR VIEW
PASSING LAMP
SWITCH
O/W
BK
HEADLAMP
Y
1
1
[74A]
Y
[74B]
GY/BK
[38B]
O/W
W
Y
BK
LEFT
PASSING
LAMP
LEFT
TURN
SIGNAL
[24A]
1
2
3
4
5
6
1
2
3
4
O/W
Y
BE
W
W/V
Y/BK
Y/BK
RIGHT
TURN
SIGNAL
[31B]
BK
BN
BE
BE
V
BK
1
2
3
4
5
6
HORN
BK
Figure 7
-J00588
7 of 14
Service Parts, pages 9 and 10, Illustration legend
ITEM
DESCRIPTION
PART NO.
Spring and Rigid Fork Components
1
Screw
2
Shock absorber assembly
3
Washers (4)
4
Acorn nuts (4)
5
Spring fork
6
Acorn nuts (2)
7
Springs, inner compression (4)
8
Spring rod assemblies (2)
9
Spring seats (4)
10
Springs, outer compression (2)
11
Spring cups, compression (2)
12
Travel bumpers (4)
13
Spring rod bushings (2)
14
Spring cups, rebound (2)
15
Springs, rebound (2)
16
Spring restraints (2)
17
Spring bridge assembly
18
Washers, spring rod (2)
19
Acorn nut
20
Washer, rubber
21
Pinch bolt
22
Upper triple clamp
23
Bearing retainer
24
Screw, spring bracket
25
Washer, spring bracket
26
Screws (3)
27
Bearing races (2)
28
Bearing cone
29
Dust shield
30
Rigid fork assembly
31
Screw
855B
54484-97
6812
7680W
45619-97
45567-88
46054-88
45628-92
45937-88
46055-88
46056-88
45936-88
45935-88
46057-88
46053-88
46060-88
46065-88
6353
7959
6829
4350A
45491-97
48306-88
3538
7232
3533
48315-60
48345-60
48361-80
45633-97
4029A
Handlebar Riser Components
32
Riser studs (2)
33
Riser rubbers (4)
34
Risers (2)
35
Washers (2)
36
Nuts (2)
37
Ground spring
38
Riser caps (2)
39
Screws (4)
56550-97
53157-97
56548-97
6756
7768W
46058-97
56538-88
3494A
-J00588
ITEM
DESCRIPTION
PART NO.
Suspension Lower End Components
40
Screw
41
Screw
42
Brake link
43
Acorn nuts (2)
44
Fork leg bracket
45
Screws (2)
46
Caliper bracket assembly
47
Thrust washer
48
Quad ring
49
Rocker, left hand
50
Rocker, right hand
51
Bearings (2)
52
Pivot studs, spring fork (2)
53
Pivot studs, rigid fork (2)
54
Washers (4)
55
Nuts (4)
56
Bearing, ball (4)
57
Bearing, race (2)
58
Bearing retainer assemblies (2)
59
Jam nuts (2)
60
Washers (2)
4164
4165
41047-97
7862
45656-97
4163
44235-97
6042
11260
45787-97
45629-97
9139
45683-90
45684-90
45662-88
7880
9141
9140
45655-88
45659-88
6812
Front Laced Wheel Assembly (not shown)
43016-97
Hub Components (between rockers)
61
Axle
62
Right hand spacer
63
Oil seals (2)
64
Bearing cones (2)
65
Bearing races (2)
66
Hub
67
Sleeve
68
Shim pack
69
70
71
Spacer washer
Left hand spacer
Torx screws (5)
41116-97
43624-97
47519-83A
9137
9136
43673-97
43608-82
43290-82
43291-82
43292-82
43293-82
43294-82
43650-82
43360-97
3655
8 of 14
®
Service Parts
Part No. 46029-97
Date 11/96
Springer Front End Kit
19
sp46029-1
20
4
21
18
17
39
22
38
16
23
37
7
36
14
15
35
8
25
33
12
13
26
34
31
9
33
3
32
24
30
7
4
29
3
3
12
11
1
Lower
bearing
shown
installed
28
2
3
27
6
10
4
5
Assembled
on fork stem
-J00588
9 of 14
®
Service Parts
Part No. 46029-97
Date 11/96
Springer Front End Kit
46029-2
44
43
40
45
60
57
42
58
59
53
43 56
41
52
57
60
54
55
46
51
49/50
54
with item 46
71
with item 49
70
63
48
47
64
69
65
68
67
66
Stock (reuse)
65
64
62
63
61
-J00588
10 of 14
Service Parts, pages 12 and 13, Illustration legend
ITEM
DESCRIPTION
PART NO.
ITEM
Handlebar (not shown)
Handlebar grip (not shown)
Handlebar clips (4) (not shown)
55933-97
56206-94A
56073-83
Throttle cable assembly (not shown)
129
Throttle cable ferrules
56338-96
56508-76
Fender Components
102
Spherical bearings (2)
103
Fender
104
O-rings (2)
105
Nylon inserts (2)
106
Spacer, right side
107
Spacer, left side
108
Nut
109
Clip
110
Hub cap seals (2)
111
Hub caps (2)
112
Mounting pad
113
Fender lamp assembly
(bulb is P.N. 52441-95)
114
Screw
115
Screw
116
Grommet
117
Screw/with hole for spring clip
118
Washer
119
Spring pins (2)
120
Locknut
128
Nut, keps
Headlamp/Passing Lamps/Horn Components
72
Headlamp Assembly
67906-97
73
Passing Lamps (2)
68758-97
74
Cable straps (2)
(for securing fendertip lamp wiring
to front brake line)
10065
75
Wire connector sockets (2)
73191-96
76
Connector housing
73152-96WE
77
Passing lamp bracket
58089-97
78
Clamp blocks (2)
68720-62
79
Nuts (2)
7892
80
Grommets (2)
11410
81
Screws (2)
3538
82
Mounting block
67892-93
83
Screws (2)
2917
84
Washers (2)
6379W
85
Screw
3214
86
Horn
69070-97
87
Horn ground wire (not shown)
70410-97
88
Horn cover
69069-97
89
Screws (3)
2939
90
Screws (2)
2447
91
Locknuts (2)
7624
3538
10190
41739-84A
41733-88
45091-97
4091
41747-82A
41731-88A
44215-97
10076
6019
Caliper Assembly (not shown, see Figure 5)
44079-97
PART NO.
9194
59164-97
11261
9207
9196
9268
7987
508
43467-97
43466-97
59355-97
59357-97
2447
2448
11437
3268
6109
509
7739
7838
VOES/Passing Lamp Bracket Assembly Components
121
Passing lamp switch
67915-97
122
Spotlight label
68798-97
123
Bracket
69127-97
124
Retaining nut
11192
(item 121-124 not shown, see Figure 6)
For Fuel Tank Installation
125
Fuel line clamp
Brake Components
92
Screw
93
Throttle cable retainer (not shown)
94
Banjo bolt (master cylinder)
95
Seal washers (2) (master cylinder)
96
Brake line
97
Screw
98
Banjo bolt (caliper)
99
Seal washers (2)(caliper)
100
Flange screw (not shown)
101
Clamp
127
Washer (not shown)
-J00588
DESCRIPTION
126
Cable Straps (4)
(for securing wiring to frame)
10014
10006
11 of 14
®
Service Parts
Part No. 46029-97
Date 11/96
Springer Front End Kit
sp46029-3
94
72
95
101
85
92
83
83
73
84
82
96
84
97
81
75
80
74
76
90
91
78
77
79
88
86
89
99
98
-J00588
12 of 14
®
Service Parts
Part No. 46029-97
Date 11/96
Springer Front End Kit
sp46029-4
114
113
116
103
115
112
117
109
108
107
118
105
120
119
102
104
106
102
104
105
110
s0126a2x
111
106
Axle
107
Spacer Orientation
-J00588
13 of 14
i00842
107
106
47
109
125
25
108
19
117
48
40
41
35
90
81
x2
26
20
116
128
36
24
91
71
120
31
43
4
95
99
124
F
100
D
39
119 E
98
G
83
94
119
85
21
89
1
76
84
118
3
x4
60
x2
97
127
C
115
114
(numbers correspond to index numbers on Service Parts pages, letters correspond to Figure 5)
Common Hardware Specifications and Notes (parts and special hardware not listed)
1
3
4
21
24
25
26
31
35
36
39
43
60
Screw, 3/8-16 x 2 socket head
Washer, 13/32 x 11/16 x 1/16
Acorn nut, 3/8-16
Screw, 3/8-16 x 1-1/2 socket head
Screw, 5/16-24 x 1/2 button head
Lockwasher, 5/16 external tooth
Screw, 5/16-24 x 3/8 button head
Screw, 3/8-16 x 2-1/4 socket head
Washer, 1/2 x 1-1/16 x 3/32
Locknut, 1/2-13 x 19/32 x 3/4 hex
Screw, 5/16-18 x 7/8 socket head
Acorn nut, 3/8-16, locking (dimple on side)
Washer, 13/32 x 11/16 x 1/16
71
81
83
84
85
91
97
108
118
120
128
Screw, 5/16-18 x 7/8 Torx pan head
Screw, 5/16-24 x 1/2 button head
Screw, 3/8-16 x 3/4 socket head
Washer, 3/8 x 5/8 x 3/64
Screw, 3/8-16 x 1-1/4 socket head (thread cutting)
Locknut, # 10-24 x 1/4 x 3/8 hex
Screw, # 10-24 x 1/2 washer head (self-tapping)
Castle nut, 5/8-18 x 15/16 hex
Washer, 5/16 x 11/16 x 1/8
Locknut, 5/16-18 x 11/32 x 1/2 hex
Hex nut, # 10-24 (keps)
Identification Photo for Loose Hardware and Small Parts
-J00588
14 of 14