1
To Purchase This Item, Visit BMI Gaming | www.bmigaming.com | 1-800-746-2255 | + 1-561-391-7200
To Purchase This Item, Visit BMI Gaming | www.bmigaming.com | 1-800-746-2255 | + 1-561-391-7200
Table of Contents
General Operation
2
Air Blast Cleaning System
3
Setup
4
Changing Ticket Bags
5
Loading Printer Paper
6
Tower Light Status
7
Ticket Taker General
7-9
Ticket Taker Overview
7-8
Ticket Taker Operation
9
Clearing a Ticket Jam
9
Troubleshooting Guide
10-13
Programming
14
Error Codes
16
Parts List
17-18
Schematics
19-20
2
To Purchase This Item, Visit BMI Gaming | www.bmigaming.com | 1-800-746-2255 | + 1-561-391-7200
Built for Reliability
The Benchmark Ticket Station is a compact ticket cash in machine that was engineered for
reliability. Here are some of the key features you should be aware of:
1. Self Cleaning
• All of the opto sensors and barcode scanners are automatically cleaned with an air
blast regularly
2. Independent Systems
• Each door contains a ticket taker system independent from one another. If there is
a problem with one of the systems, the remaining systems will still operate
3. Redundant Power Supplies
• There are two power supplies in each ticket station.
4. Status Tower Light
• The ticket station features a tower light ht that will signal a printer problem (out
of paper etc.), a ticket taker problem, and will let you know when the ticket bags
are full
5. Low Dust Cutting
• The cutters in the Ticket Station are designed to cut the tickets like a pair of
scissors for low dust creation, contributing to clean optos and barcode scanners.
1 to 4 Stations Field Expandable
Standard unit is complete and ready to add another station at any time. Just bolt the door on and
plug it in.
Important Note:
Each of the access doors uses a power lockout switch. When the door is open, the ticket taker
will not operate unless you manually pull the switch to turn it on. If you must activate the power
while the door is open, use caution around the moving parts and belts in the ticket taker.
For more information and service details, please visit www.benchmarkgames.com.
3
To Purchase This Item, Visit BMI Gaming | www.bmigaming.com | 1-800-746-2255 | + 1-561-391-7200
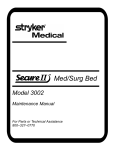
Setup
1. Install Power Cord
The power cord can be run down and out the bottom of
the machine or up and out the top of the machine.
• To run the cord out the bottom of the machine:
1. Feed the power cord through the lower power
cord hole in the bottom of the machine.
2. Connect power cord to the power connector at
the main harness.
-Be sure to secure the wires tight along the
inside corner away from the scale floor View inside looking down
3. Plug power cord into a power
receptacle. If a floor receptacle is
used, position machine over the top of
it.
• To run the cord up and out the top of the
machine:
1. Detach the power wires from the
wire clips on the inside left corner of
machine
2. Run power wires up inside corner
attaching into wire clips
3. Remove wire plate screws and wire
plate
4. Connect power cord to power
connector on the main harness.
5. Run the power cord up and out the top
of the machine securing with wire
clips.
6. Replace wire plate and reattach with screws.
2. Install ticket bags (see “Changing Ticket Bags”
section of this manual).
3. Program barcode, machine number, etc. as desired
(see “Programming section of this manual).
View inside looking up
View UI
4
To Purchase This Item, Visit BMI Gaming | www.bmigaming.com | 1-800-746-2255 | + 1-561-391-7200
General Operation
1. Insert tickets into the ticket taker
using the easy load ticket
ramp. The LED display will
indicate the number of tickets
counted and the Print Receipt
Button will flash.
2. When all of the tickets have been
fed into the machine, press the
Print receipt button and wait for
the printer to completely print the
receipt. The receipt will feed to
the front of the printer bezel
and stop.
3. Pull the receipt straight out.
4.
Air Blast Cleaning System
The Air blast cleaning system in the Ticket Station is comprised of an air pump, a relay, the main
air hose plumbing, one air valve per ticket taker, and the local air hose plumbing that is
distributed from a manifold after the air valve.
The cleaning cycle starts whenever any one of the ticket takers has taken 350 tickets. It restarts
every 350 tickets thereafter.
At the beginning of the cleaning cycle, the pump runs for about 10 seconds to build pressure in
the system. The air solenoid corresponding to the ticket taker that has taken the 350 tickets is
then activated, releasing an air blast over the barcode scanners and opto sensors.
Changing Ticket Bags
1. Open front door.
2. Remove basket containment rail.
3. Remove front ticket basket, pull
ticket bag through the bottom of the
basket, and remove ticket bag.
4. Repeat step 3 for the rear ticket bag.
5. Replace ticket bags and basket
containment rail.
5
To Purchase This Item, Visit BMI Gaming | www.bmigaming.com | 1-800-746-2255 | + 1-561-391-7200
Loading Printer Paper
The printer will take different paper roll sizes. Small paper rolls (usually 7/16” diameter core)
should be loaded on the small spindle located on the printer assembly. The largest paper roll
that can be used on the small spindle is 2-3/4” diameter. Large paper rolls (11/16” diameter
core) are loaded on the large spindle located above the printer assembly on the door. The
largest paper roll that can be used on the large spindle is 6”.
Note: The printer will only print on one side of
the paper. Pay attention to the orientation of the
paper roll when installing.
Loading Small Rolls
1. Turn the roller release handle counter
clockwise ¼ turn so that the paper will be
allowed to feed into the printer.
2. Load the paper onto the small spindle so
that the free end is fed from the bottom of
the roll and over the guide rail.
3. Feed paper as shown in the picture on the
side of the printer.
4. Turn the roller release handle clockwise ¼
turn into the ready position. The printer will automatically feed.
5. Tear excess from bezel.
Loading Large Rolls
1. Turn the roller release handle counter clockwise
¼ turn so that the paper will be allowed to feed into
the printer.
2. Load the paper onto the large spindle with the
free end of the paper facing down and away from
the door.
3. Feed the paper under the small spindle, over the
ticket guide rail and into the printer.
4. Turn the roller release handle clockwise ¼ turn
into the ready position. The printer will
automatically feed.
5. Tear excess from bezel.
6
To Purchase This Item, Visit BMI Gaming | www.bmigaming.com | 1-800-746-2255 | + 1-561-391-7200
Tower Light Status
The tower light located on the top of the Ticket Station will let you know from across the room if
something in the machine needs attention. You can further narrow the location of the problem
from outside the machine by looking at the LCD display on each door. The door with the
problem will have an error code on it. Here is what the lights indicate:
White Light Flashing indicates power and is used as an attraction so customers can easily locate
the machine
White Light Solid indicates that it is time to change the bag containing discarded tickets.
Red Light Solid indicates that there is a ticket taker problem. Refer to troubleshooting section of
this manual.
Yellow Light Solid indicates that there is a problem with the printer. This is most often seen
when a printer need paper. If the printers do not need paper, refer to the troubleshooting section
of this manual.
Ticket Taker General
Note: When a door is open for service, the lockout switch kills the 24V to the corresponding
door. This keeps the ticket taker from operating for safety. If you must activate the power at the
lockout switch for troubleshooting or programming, use caution around the ticket taker belts and
cutters. ALWAYS STAY CLEAR OF THE TICKET CUTTERS.
Ticket Taker Overview
The ticket takers are comprised of 4 main parts plus the drive motor:
1. Ticket taker main body includes:
a. Ticket sense transmitter
b. Lower steel roller
7
To Purchase This Item, Visit BMI Gaming | www.bmigaming.com | 1-800-746-2255 | + 1-561-391-7200
2. Ticket taker top assembly includes:
a. Upper urethane roller
b. Ticket sense opto receiver
c. Notch sense opto receiver
d. Upper barcode scanner
e. Rollers
3. Ticket taker belt assembly includes:
a. Ticket transport belts
b. Lower barcode scanner
c. Notch opto transmitter
4. Ticket taker cutter assembly
5. Drive motor assembly includes:
a. Stepper motor
b. Hall effect sensor
8
To Purchase This Item, Visit BMI Gaming | www.bmigaming.com | 1-800-746-2255 | + 1-561-391-7200
Ticket Taker Operation
When ticket is inserted the ticket taker, the ticket sense opto is interrupted which starts the ticket
taker drive motor. The upper and lower rollers take the ticket(s) to the transport belts which
carry the ticket(s) to the cutters. There are blue flat springs in the top assembly that push down
on the 6 steel rollers in the top assembly keeping the ticket down on the transport belts. During
the ticket travel over the transport belts, the notch opto senses the center notch of the tickets and
the upper and lower side of the ticket is scanned for a barcode. We sense that the motor is
turning with a hall effect sensor which is activated by a magnet located in the motor pulley
passing over the circuit board. If there is no signal pulsing from the hall effect sensor when the
motor is supposed to be running, the power to the motor will be turned off.
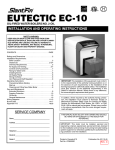
Clearing a Ticket Jam
1. Pull Captive Pins to unlock cutter
assembly(1 each side)
a. Pins can be secured in the retracted
position by turning them
counterclockwise while pulling
2. Tilt cutter assembly down
3. Use brass handle to pull top assembly
back and up to remove.
4. Remove jammed tickets.
5. Carefully replace top assembly.
6. Tilt cutter assembly up and re-secure captive pins.
Cutter Assembly Shown Tilted Down
Top Assembly Shown Removed
9
To Purchase This Item, Visit BMI Gaming | www.bmigaming.com | 1-800-746-2255 | + 1-561-391-7200
Troubleshooting Guide
Note: There are (2) power distribution circuit boards mounted to the power supply
housing. Each board holds (3) fuses, one 5V & two 12V. If there is a DC power
problem, check these fuses.
Ticket Taker will
not start
1. Check ticket sense opto pair. LED should come on
and power output should pull to ground on the ticket
sense opto receiver when opto is blocked by ticket.
Check for good power and ground to ticket sense opto
transmitter and ticket sense opto receiver.
2. Check for good signal to ticket eater pcb input from
ticket sense opto receiver
3. Check all ticket eater motor connections
Ticket Taker
runs
continuously
1. Ticket sense opto path is blocked; check for ticket or
debris.
2. Bad ticket sense opto receiver or transmitter.
10
To Purchase This Item, Visit BMI Gaming | www.bmigaming.com | 1-800-746-2255 | + 1-561-391-7200
Ticket Taker
runs slowly
then stops
Hall effect pcb output not getting to the ticket eater board.
1. Check that when the motor is running, the LED on
the hall effect pcb is flashing at least one time per
motor revolution. If the LED does not flash:
a. Check to see if the motor pulley is tight on the
motor shaft.
b. Check the distance of the motor pulley from the
hall effect sensor pcb. There is a magnet on
the inside of the motor pulley that activates the
sensor every revolution. If the pulley is located
too far from the sensor pcb, the magnetic
strength will be too weak to activate the sensor.
c. Check voltage to the hall effect pcb
If the LED does flash, check the output of the hall effect
sensor pcb all the way to the ticket eater pcb
11
To Purchase This Item, Visit BMI Gaming | www.bmigaming.com | 1-800-746-2255 | + 1-561-391-7200
Ticket Taker will
not count with
Ticket inserted
in any direction
1. Check notch count opto pair. LED on notch opto
receiver should flash as tickets are fed into ticket
taker.
a. If LED does not flash, check power to the notch
opto transmitter and notch opto receiver.
b. If LED is always on, something is blocking the
opto path or the opto is dirty.
2. If LED does flash, check output of notch count opto all
the way to the ticket eater pcb.
3. Check power to barcode pcb’s and output all the way
back to ticket eater pcb.
Ticket Taker
counts
accurately with
barcode only up
or only down
Ticket count is
intermittent
1. Check power to and output from barcode scanner pcb
corresponding to the side that does not work.
Single tickets
do not count
accurately
To help diagnose the problem, you can, through
programming options, change the ticket verification to notch
from barcode. If the ticket count becomes accurate, the
problem is related to the barcode. If the count is still
intermittent, the problem is probably related to the notch opto
sensors.
1. Bad tickets with poor printing or out of spec barcode.
2. Clean barcode scanner pcb’s and opto notch
transmitter and receivers (if this works check pump
operation and pneumatic cleaning system for leaks).
3. Check for loose wire connections to barcode scanners
or opto notch optos
Check that tickets travel through the ticket taker at a
consistent rate without stopping or slowing dramatically.
1. Check for debris in ticket eater
2. Check for equal spring pressure from the flat springs,
make sure they are not bent
3. Check ticket transport belts for tracking, breakage,
stretch or extreme wear
12
To Purchase This Item, Visit BMI Gaming | www.bmigaming.com | 1-800-746-2255 | + 1-561-391-7200
Printer does not
print
Sensors need
cleaning often
1. Out of paper
2. Paper installed backwards. The printer will only print
on one side of the paper. See “Installing Printer
Paper” section of this manual to verify correct
installation.
3. Paper guide plate pushed up. This plate needs to
be all the way in the down position in order for the
printer to print. If you find this in the up position, check
to be sure receipt path is clear and that paper can be
fed freely through the door.
1. Make sure the air pump comes on every 350 tickets.
2. Make sure there are no leaks in the main air plumbing
3. Make sure there are no leaks in the local air plumbing
at the doors. Check air hose connections at the air
valve manifolds.
Note: If the problem is most often with one particular ticket
taker, it is most likely a leak in the air plumbing system local
to the door with the problem after the air valve.
Shown with ticket
baskets removed
13
To Purchase This Item, Visit BMI Gaming | www.bmigaming.com | 1-800-746-2255 | + 1-561-391-7200
Programming
PLEASE NOTE: The lockout switch must be activated for all programming functions to
work. Be sure to pull the plunger out to activate power to the ticket taker board before
programming. Use caution as the ticket taker now has power.
If at any time the message “COMM. ERROR” is displayed, there is a problem with
communications between the boards, and programming is not possible. If this condition
occurs, check to be sure lockout switch is activated, or turn off the machine, check all
harness connections, insure that the power switch is on to the Ticket Eater board, and turn on
the machine.
1.) Entering Programming Mode
To enter program mode, press and
hold the PROGRAM button
located on the back of the Printer
Interface Board (the board with the
LCD display). After 2 seconds,
“PROGRAM MODE” will appear on
LCD Display. At this time, release
button. Momentarily, ”PLEASE
WAIT will appear while the Totals
retrieved. At this time “TOTAL
TICKETS” with the number of
tickets taken in will be displayed.
the
the
are
2.) TOTAL TICKETS
The total tickets taken in are displayed. The total will rollover to zero when it reaches
10,000,000. Depressing the PROGRAM button will reset the count to zero, and depressing
the NEXT button will display “LAST RECEIPT NUMBER”.
3.) LAST RECEIPT NUMBER
The last receipt number printed is displayed. This number automatically increments on every
print, and rolls over to 1 after Receipt Number 9999. Depress the PROGRAM button to reset
the receipt number, and depress the NEXT button to display “ENTER PROGRAM MODE?”
4.) “ENTER PROGRAM MODE?”
Depressing the PROGRAM button at this time will enter the area of Program Mode where
parameters may be changed. Depressing the NEXT button will return the game to Run Mode.
5.) “DATE/TIME”
If Program Mode has been entered, the first setting is the Date and Time. The cursor will be
flashing and at the Month position. Depressing the PROGRAM button will step through the
month from 01 to 12. Depressing the NEXT button will move the cursor to the Day position.
Enter the Day using the PROGRAM button. Depressing the NEXT button will move the
cursor to the Year position. Depressing the PROGRAM button will increment the Year from
00 to 99. Depressing the NEXT button will move the Cursor the Hour position. The time is
14
To Purchase This Item, Visit BMI Gaming | www.bmigaming.com | 1-800-746-2255 | + 1-561-391-7200
set in 24-Hour format. Depressing the PROGRAM button will increment the Hour from 00 to
24 Hours. Depressing the NEXT button will move the cursor to the Minutes position.
Depressing the PROGRAM button at this time will increment the minutes from 00 to 59.
Depressing the NEXT button will go to the next option, “ENTER MACHINE NUMBER”
6.) “ENTER MACHINE NUMBER”
The machine number for each unit can be set from 0 to 99. Depressing the PROGRAM
button will increment this value, and depressing the NEXT button will move to the next
option, BarCode entry.
7.) “ENTER BARCODE?”
Depressing the PROGRAM button will allow for entry/editing of the 4-Digit Interleaved 2 of
5 barcode present on the ticket for ticket validation. Depressing the NEXT button will skip
this step.
8.) “BARCODE:
0000”
This option sets the 4-Digit barcode. The flashing cursor will be over the first digit.
Depressing the PROGRAM button will change the value of this digit from 0 to 9 then back to
0. Depressing the NEXT button will move the cursor to the next digit. Continue in this
manner until the last digit is entered, then depressing the NEXT button will move to the next
option, “TICKET SECURITY”.
9.) TICKET SECURITY
This option sets the Level of ticket barcode validation used. The PROGRAM button will
change the value from 0 to 2, then back to 0, and the NEXT button will move to the next
option, “SAFETY MODE”. The Three security levels are as follows:
LEVEL 0 – Notch Only Validation, no Barcode required
LEVEL 1 - Barcode Validation, Standard (Recommended)
LEVEL 2 – Barcode Validation, HIGH Security
10.) SAFETY MODE
This option sets the Safety Level of the ticket eaters. Off is the normal mode and is
recommended. ON lessens the power of the ticket eaters. Depressing the PROGRAM button
changes the setting, and depressing the NEXT button moves to the next option, “TICKET
VALUE”
11.) TICKET VALUE
This option sets the value of each ticket. The PROGRAM button will change the value from
1 to 5, then back to 1, and depressing the NEXT button moves to the next option, “RECEIPT
CHECKDIGIT”
12.) RECEIPT CHECKDIGIT
This option turns the checkdigit added to the receipt barcode on or off. The PROGRAM
button will change the setting, and depressing the NEXT button moves to the next option,
“CARDSWIPE ENABLE”
15
To Purchase This Item, Visit BMI Gaming | www.bmigaming.com | 1-800-746-2255 | + 1-561-391-7200
13.) CARDSWIPE ENABLE
This option is selected if one of the many available cardswipe systems is interfaced with the
Ticket Station. Depressing the PROGRAM button scrolls through the three options which are
OFF (Normal Operation), PULSE, and SERIAL. Contact your cardswipe system supplier for
more information. Depressing the NEXT button moves to the next option, “EDIT
DISPLAY?”
14.) “EDIT DISPLAY?”
Depressing the PROGRAM button will allow for editing of the “WELCOME TO” message
that is displayed on the machine. Depressing the NEXT button will skip this step and go to
“EDIT RECEIPT?”. If the PROGRAM button is depressed, the display will show the current
“WELCOME TO” message, and a flashing cursor will be at the beginning of the second line
of the display, which is the only line that may be edited.
Editing the Display
Depressing the PROGRAM button will change the character at the flashing cursor. Every
time the PROGRAM button is depressed, the next character in the list will be displayed. If
the end of the list of characters is reached, the first in the list is displayed (refer to List of
Characters at the end of this section). The line will appear exactly as it is edited, including
leading and trailing spaces.
Depressing the NEXT button will move to the next character. If the flashing cursor is not at
the beginning of the line and the BACK button is depressed, the flashing cursor will move to
the previous character. Depressing the NEXT button when the flashing cursor is over the last
character will save the displayed Welcome Message, and go to the next option, which is
“EDIT RECEIPT?”
15.) “EDIT RECEIPT?”
Depressing the PROGRAM button will allow for editing of the first four lines of the receipt,
as well as the line found after the ticket quantity is printed. Each of the five lines can be a
maximum of 32 characters long, including spaces and punctuation.
Depressing the NEXT button will skip this step and go to “RE-ENTER PROGRAM
MODE?”. If the PROGRAM button is depressed, the display will show the current first line
of the receipt, and a flashing cursor will be at the beginning. The first twenty characters will
be on the first line of the display, and the last twelve characters will be on the second line of
the display. A black square will be displayed past the end of the 32 character line.
NOTE: If this option is selected, all 32 characters on all five lines must be stepped
through to leave this option!
Editing the Receipt
All five lines on the receipt are edited in the same way. It is recommended that the
information that is desired for the five lines be written out in advance to insure that the 32
character limit isn’t exceeded. The lines should be edited with NO leading spaces. Each line
will be automatically centered on the receipt when it is printed.
Depressing the PROGRAM button will change the character at the flashing cursor. Every
time the PROGRAM button is depressed, the next character in the list will be displayed. If
16
To Purchase This Item, Visit BMI Gaming | www.bmigaming.com | 1-800-746-2255 | + 1-561-391-7200
the end of the list of characters is reached, the first in the list is displayed (refer to List of
Characters at the end of this section).
Depressing the NEXT button will move to the next character. If the flashing cursor is not at
the beginning of the line and the BACK button is depressed, the flashing cursor will move to
the previous character. Depressing the NEXT button when the flashing cursor is to the left of
the black square will save the line and the next line will be displayed for editing. If it is the
fifth line, the next option will be shown, “RE-ENTER PROGRAM MODE?
16.)RE-ENTER PROGRAM MODE?
This option gives you the opportunity to go through the programming settings again.
Depressing the PROGRAM button will re-enter the Program Mode at the beginning, and
depressing the NEXT button will leave Program Mode, and return to Run Mode.
CHARACTER LIST for DISPLAY and RECEIPT EDITING
[SPACE] ! “ # $ % & ‘ ( ) * + , - . / 0 1 2 3 4 5 6 7 8 9 : ; < > ? @
A B C D E F G H I J K L M N O P Q R S T U V W X Y Z [ * ] ^
_ \ a b c d e f g h I j k l m n o p q r s t u v w x y z
ERROR CODES
The LCD Display on the Ticket Station will show common error codes to help in
troubleshooting. There are two Types of errors; those associated with the Ticket Eater and
those associated with the Printer. The LCD Display will show which type of error it is,
“TICKET ERROR” or “PRINTER ERROR” along with the associated error number.
The Errors are as follows:
1.) Ticket Errors:
ERROR 1: Ticket Jam
2.) Printer Errors:
ERROR 1: Printer Platen Open
ERROR 2: Printer Out Of Paper
ERROR 3: Printer Head Temperature Abnormal
ERROR 4: Printer Cutter Cover Open (usually indicates a Paper Jam)
ERROR 5: Printer Communications Failure
NOTE:
If one of Errors 1 through 4 occur in the middle of a receipt print, the Printer may default to
ERROR 5. Insure that all of the possible errors are checked before assuming a
communications failure.
If the Printer is in the middle of printing the receipt and runs out of paper, it will retain the
information for that receipt AS LONG AS POWER IS NOT TURNED OFF TO THE
PRINTER. Reload the paper without turning the printer off and it will complete the printing
of the last receipt.
17
To Purchase This Item, Visit BMI Gaming | www.bmigaming.com | 1-800-746-2255 | + 1-561-391-7200
Major Parts List
87-ASM-24
Ticket Taker
87-ASM-25
Ticket Taker
Top
87-ASM-26
Ticket Taker
Belt Assy.
87-ASM-27
Ticket Taker
Body
87-ASM-28
Ticket Cutter
87-ASM-45
Ticket Taker
Stepper Motor
87-ASM46
Solenoid
Valve
Assy.
PCB-020
Opto Transmitter
Single
PCB-021
Opto Receiver Single
PCB-022
Barcode
Reader
PCB-026
Hall Effect
Sensor
PCB-027
Printer
Driver
Board
PCB-028
Stepper driver
single white
series
18
To Purchase This Item, Visit BMI Gaming | www.bmigaming.com | 1-800-746-2255 | + 1-561-391-7200
ELM-021
Lockout
Switch
ELM-022
Tower Light, 3
color
PCB-029
5 digit led
display
ELM-023
Printer, Thermal
MOT-004
Air Pump
19
To Purchase This Item, Visit BMI Gaming | www.bmigaming.com | 1-800-746-2255 | + 1-561-391-7200
P1
12 PIN CONNECTOR DOOR 1
12
11
10
9
8
7
6
5
4
3
2
1
12 VOLTS COMMON 22 GA YELLOW
GND SIGNAL 22 GA BLACK
12 VOLTS 18 GA YELLOW
1
22 GA YELLOW/GREEN
GREEN/WHITE
WHITE/BLACK/RED
GND 18 GA BLACK
3
2
4
5
22 GA RED 5 VOLTS
GND 18 GA BLACK
WHITE/BLK/GREEN
6
7
S1
24 VOLTS 18 GA ORANGE/BLK
8
SW-SPST
9
10
N CONNECTOR DOOR 2
11
12
11
10
9
8
7
6
5
4
3
2
1
12 VOLTS COMMON 22 GA YELLOW
22 GA SIGNAL GND BLACK
12 VOLTS 18 GA YELLOW
12
GND
WHITE/BLACK/GREE
BOTTOM
12A
3
2
1
5V
OK/TICKETS FULL
12A
GND
6
5
9
8
GREEN/WHITE
MIDDLE
4
GND
12A
GND
EATER FAULT
7
TOP
GND
WHITE/BLACK/RE
12B
12A
12
11
10
12B
22 GA YELLOW/GREEN
4 PIN MOLEX FEMALE
WHITE/BLACK/RED
GND 18 GA BLACK
24 VOLTS 18 GA ORANGE/WHITE
22 GA RED
GND 18 GA BLACK
WHITE/BLK/GREEN
YELLOW
1
2
3
4
4 PIN MOLEX MALE MICRO_FIT
ORANGE
24 VOLTS 18 GA ORANGE/BLK
YELLOW
1
2
3
4
S2
24 VOLT POWER 1
1
2
3
SW-SPST
P2
PIN CONNECTOR DOOR 3
1
12
11
10
9
8
7
6
5
4
3
2
1
12 VOLTS COMMON 22 GA YELLOW/WHITE
GND SIGNAL 22 GA BLACK/WHITE
12 VOLTS 18 GA YELLOW/WHITE
2
3
12 VOLTS COMMON 22 GA YELLOW/WHITE
4
WHITE/BLACK/RED
GND 18 GA BLACK/WHITE
5
22 GA 5 VOLTS RED/WHITE
GND 18 GA BLACK/WHITE
WHITE/BLK/GREEN
6
7
S3
8
24 VOLTS 18 GA ORANGE/BLK
9
SW-SPST
10
12 PIN CONNECTOR DOOR 4
12
11
10
9
8
7
6
5
4
3
2
1
11
12 VOLTS COMMON 22 GA YELLOW/WHITE
22 GA SIGNAL GND BLACK/WHITE
12 VOLTS 18 GA YELLOW/WHITE
12
12 VOLTS COMMON 22 GA YELLOW/WHITE
WHITE/BLACK/RED
GND 18 GA BLACK/WHITE
24 VOLTS 18 GA ORANGE/WHITE
22 GA RED/WHITE
GND 18 GA BLACK/WHITE
WHITE/BLK/GREEN
S4
24 VOLTS 18 GA ORANGE/BLK
SW-SPST
ORANGE/WHITE
FULL TICKET BAG
SW-SPST
12A
GND
3
2
1
5V
12A
GND
6
5
4
9
8
7
12
11
10
GND
12A
GND
GND
12B
12A
12B
To Purchase This Item, Visit BMI Gaming | www.bmigaming.com | 1-800-746-2255 | + 1-561-391-7200
YELLOW
M
4 PIN MALE MICRO FIT
4
3
2
1
22 GA WHITE/BLACK/GREEN
22 GA GREEN/WHITE
22 GA WHITE/BLACK/RED
12 PIN DOOR CONNECTOR
12 VOLTS COMMON 22 GA YELLOW
12
22 GA SIGNAL GND BLACK
11
10
9
22 GA YELLOW/GREEN
8
7
6
5
4
22 GA RED
3
5 VOLTS
2
1
12VOLTS COMMON
PRINTER
12 VOLTS 18 GA YELLOW/BLK
POWER
GND 18 GA BLACK
24 VOLTS 18 GA ORANGE/BLK 5 MM POWER CONNECTOR
GND 18 GA BLACK
1
2
3
4
5
6
7
8
9
10
11
12
13
14
15
16
TICKET EATER BOARD J1
BLUE
GREEN
2 PIN FEMALE MICRO FIT 2 PIN MALE MICRO FIT
18 GA WHITE/ORANGE
1
2
12VOLTS COMMON
2
1
18 GA GREY
18 GA BLUE
AIR SOLENO
Lamp
L1
.25 PDQ TERM .25 SPADE
22 GA WHITE/GREY
1
2
3
4
18 GA GREEN
18 GA PINK
.25 SPA
TO STEPPER MOTOR
4 PIN FEMALE MICRO FIT
TICKET EATER BOARD J2
.25 PD
12VOLTS COMMO
OPTICON BOTTOM
1
2
3
1
2
3
1
2
3
1
2
3
OPTO FRONT RECIEVER
OPTO BACK RECIEVER
OPTICON TOP
14
13
12
11
10
9
8
7
6
5
4
3
2
1
RED
18 GA WHITE/BLUE
.25 SPADE S1
5 VOLTS 22 GA RED/BLACK
SW-SPST
PRINTER INTERFACE
.25 PDQ TERM
22 GA WHITE/VIOLET
12VOLTS COMMON
1
2
3
4
GND 22 GA BLACK/ORANGE
TE TOP ASSY FEMALE TE TOP ASSY
1
2
3
4
5
6
22 GA YELLOW/BLUE
22 GA GREY/BLACK
GND 22 GA VIOLET/WHITE
6
5
4
3
2
1
.25 SPA
.25 PD
LED DISPLAY 5 DIGIT
24 GA BLUE 485
24 GA GREY 486
12VOLTS COMMON
5 VOLTS 22 GA RED/BLACK
GND 22 GA BLACK/ORANGE
6 PIN FEMALE MICRO FIT
6 PIN MALE MICRO FIT
1
2
3
4
5 VOLTS
1
2
3
1
2
3
OPTO XMITER BOTTOM
OPTO XMITER BOTTOM
5 VOLTS
12VOLTS COMMON
22 GA WHITE/GREEN
22 GA RED
22 GA BLACK
MOTOR RUN SENSOR
1
2
3
21
To Purchase This Item, Visit BMI Gaming | www.bmigaming.com | 1-800-746-2255 | + 1-561-391-7200
8
ITEM NO.
1
2
3
4
D
5
6
7
8
9
10
11
5
6
7
Description
Part Number
ticket guide bracket
87-SHM-25
ticket guide rail
87-MAC-04
ticket guide end plate
87-MAC-03
ticket guide shim
87-SHM-50
ticket guide attach
87-SCM-52
rod
ticket guide rail lower
87-MAC-12
ticket guide rod
87-SCM-57
Mirrorticket guide rail
87-MAC-13
lower
CR-FHMS 0.138N/A
32x0.75x0.75-N
MSHXNUT 0.138-32-D-N
N/A
screwnail 13x750
N/A
4
QTY.
1
2
2
2
1
REVISIONS
ZONE
DATE
DESCRIPTION
REV.
A Release to Production
9
1
9
9
1
1
1
2
D
2
4
4
2
07/28/07
9
6
8
4
4
C
2
3
C
11
7
3
11
B
B
3
PROPRIETARY AND CONFIDENTIAL
5
THE INFORMATION CONTAINED IN THIS
DRAWING IS THE SOLE PROPERTY OF
BENCHMARK GAMES. ANY
REPRODUCTION IN PART OR AS A WHOLE
WITHOUT THE WRITTEN PERMISSION OF
BENCHMARK GAMES IS
PROHIBITED.
1
A
DRAWN BY:
S. Corso
UNLESS OTHERWISE SPECIFIED:
DIMENSIONS ARE IN INCHES
TOLERANCES:
ANGULAR: +/-1 DEG.
.XX=
+/-.010"
.XXX= +/-.005
.XXXX= +/-.003
Benchmark Games
TITLE:
ticket guide assembly
COMMENTS:
SIZE DWG. NO.
MATERIAL
B
FINISH
7
6
5
4
3
2
REV
54-ASM-04
SCALE: 1:2
8
A
WEIGHT:
SHEET 1 OF 1
'
,7(012
ToPurchase This Item, Visit BMI Gaming
| www.bmigaming.com | 1-800-746-2255
| + 1-561-391-7200
'HVFULSWLRQ
WLFNHWHDWHUWRS
EHOWDVVHPEO\WLFNHWWDNHU
FXWWHUVWHHSSLWFK
;/ZLGHWLPLQJEHOW
;/ZLGHWLPLQJEHOW
VKRXOGHUZDVKHULG[[
3DUW1XPEHU
$60
$60
$60
*(5
*(5
6&0
47<
&53+06[[1
1$
QXWILEHUORFN
1$
5(9,6,216
5(9
=21(
'$7(
'(6&5,37,21
$ 5HOHDVH
% 8SGDWHSDUWV
& &KDQJHUHFHLYHUWRWUDQVPLWWHURQEHOWDVVHPOE\SDJH
'
&
&
7LFNHW7DNHU%RG\
$60
%
%
35235,(7$5<$1'&21),'(17,$/
$
7+(,1)250$7,21&217$,1(',17+,6
'5$:,1*,67+(62/(3523(57<2)
%(1&+0$5.*$0(6$1<
5(352'8&7,21,13$5725$6$:+2/(
:,7+2877+(:5,77(13(50,66,212)
%(1&+0$5.*$0(6,6
352+,%,7('
'5$:1%<
6&RUVR
%HQFKPDUN*DPHV
81/(6627+(5:,6(63(&,),('
',0(16,216$5(,1,1&+(6
72/(5$1&(6
$1*8/$5'(*
;; ;;; ;;;; 7,7/(
WLFNHWHDWHUEHOW
&RPSOHWH
&200(176
6,=(
%
0$7(5,$/
),1,6+
':*12
5(9
$60
6&$/(
$
:(,*+7
6+((72)
'
&
ToPurchase This Item, Visit BMI Gaming
| www.bmigaming.com | 1-800-746-2255
| + 1-561-391-7200
,7(0
12
3$57180%(5
[KH[[/
[3306
ULYHWB[GRPH
VWHHOSODWHG
+H[1XW
/RF 5HY
'(6&5,37,21 H[SORGH47<
+H[
6SDFHUB))
+H[1XW
WLFNHWHDWHU
6+0
WRSFRYHU
VKPUROOHU
WLFNHWHDWHU
6+0
WXQQHOEORFN
EHDULQJDVV\
$60
WLFNHWHDWHU
WRS
WLFNHWWDNHU
UROOHU
0$&
FRQWDLQPHQW
SODWH
UROOHU
0$&
DOLJQPHQW
SODWH
IODWVSULQJ
WLFNHWHDWHU
6+0
WRSUROOHU
KDOI
DLUILWWLQJ
*(1
EDUEHG
WR0
+H[
[KH[[/ 6SDFHUB))
IODWVSULQJ
6+0
WLFNHWHDWHU
WRSUROOHU
WUDFN
3/$
SODVWLF
'HVFULSWLRQ
'DWH
'
0DMRU5HYLVLRQ
(
&KDQJHVFUHZVWRORQJ
'
&
%
%
81/(6627+(5:,6(63(&,),('
',0(16,216$5(,1,1&+(6
72/(5$1&(6
)5$&7,21$/
$1*8/$50$&+ %(1' 7:23/$&('(&,0$/ 7+5((3/$&('(&,0$/ )2853/$&('(&,0$/ $
,17(535(7*(20(75,&
72/(5$1&,1*3(5
0$7(5,$/
),1,6+
'21276&$/('5$:,1*
'5$:1
1$0(
'$7(
6&RUVR
%HQFKPDUN*DPHV,QF
7,7/(
WLFNHWHDWHUWRSWRSFRYHUUROOHU$
35235,(7$5<$1'&21),'(17,$/
7+(,1)250$7,21&217$,1(',17+,6
'5$:,1*,67+(62/(3523(57<2)
%(1&+0$5.*$0(6,1&$1<
5(352'8&7,21,13$5725$6$:+2/(
:,7+2877+(:5,77(13(50,66,212)
%(1&+0$5.*$0(6,1&,6
352+,%,7('
6,=( ':*12
%
$60
6+((72)
6&$/( :(,*+7
,7(0
12
'
3$57180%(5
&
'(6&5,37,21 H[SORGH47
<
WLFNHWHDWHU
WRSFRYHU
VKPUROOHU
6+0
$)%0$
6,1&
6+0
FDEOHBFODPSB
$60
[KH[[/
[3306
[3306
[3306
[3306
ULYHWB[
GRPHVWHHOSODWHG
+H[1XW
%1$
0$&
3&%
6&0
6&0
$60
3&%
0$&
%
6+0
*(1
[KH[[/
6+0
3/$
ToPurchase This Item, Visit BMI Gaming
| www.bmigaming.com | 1-800-746-2255
| + 1-561-391-7200
/RF 5HY
WLFNHWHDWHU
WXQQHOEORFN
EHDULQJDVV\
WLFNHWHDWHU
WRS
+H[
6SDFHUB))
WLFNHWWDNHU
UROOHU
FRQWDLQPHQW
SODWH
EDUFRGH
VFDQ
/%6$0
WLFNHWHDWHU
WRSFRYHU
VSDFHU
VKRXOGHU
ZDVKHU
UROOHUWRS
RSWR
UHFHLYHU
VPDOO
UROOHU
DOLJQPHQW
SODWH
IODWVSULQJ
WLFNHWHDWHU
WRSUROOHU
KDOI
DLUILWWLQJ
EDUEHG
WR0
+H[
6SDFHUB))
IODWVSULQJ
WLFNHWHDWHU
WRSUROOHU
WUDFN
SODVWLF
'HVFULSWLRQ
'DWH
'
(
'
&
%
81/(6627+(5:,6(63(&,),('
$
',0(16,216$5(,1,1&+(6
72/(5$1&(6
)5$&7,21$/
$1*8/$50$&+ %(1' 7:23/$&('(&,0$/ 7+5((3/$&('(&,0$/ )2853/$&('(&,0$/ ,17(535(7*(20(75,&
72/(5$1&,1*3(5
0$7(5,$/
),1,6+
'21276&$/('5$:,1*
+H[1XW
'5$:1
1$0(
'$7(
6&RUVR
%HQFKPDUN*DPHV,QF
7,7/(
WLFNHWHDWHUWRSWRSFRYHUUROOHU$
35235,(7$5<$1'&21),'(17,$/
7+(,1)250$7,21&217$,1(',17+,6
'5$:,1*,67+(62/(3523(57<2)
%(1&+0$5.*$0(6,1&$1<
5(352'8&7,21,13$5725$6$:+2/(
:,7+2877+(:5,77(13(50,66,212)
%(1&+0$5.*$0(6,1&,6
352+,%,7('
6,=( ':*12
%
$60
6+((72)
6&$/( :(,*+7
,7(012
'HVFULSWLRQ
3&%
EHOWSXOOH\DVV\ORQJ
VSDFHUWLFNHWEHOW
DVVHPEO\
EHOWDVVHPEO\FRYHU
OHIW
%5*
'
,QFK6SXUJHDU'3
73$):
61+/1
EHOWDVVHPEO\FRYHU
%/7
&53+06
[[1
FROODUVKDIW
3&%
06+;1876&
EHOWSXOOH\DVV\VKRUW
&53+06
[[1
&
ToPurchase This Item, Visit BMI Gaming
| www.bmigaming.com | 1-800-746-2255
| + 1-561-391-7200
3DUW1XPEHU 47<
3&%
$60
6&0
6+0
%5*
*(5
$60
XUHWKDQEHOW
1$
+$5
RSWR
WUDQVPLWWHU
VTXDUH
1$
$60
5(9,6,216
'$7(
'(6&5,37,21
5(9
=21(
$
%
&
'
&
%
%
35235,(7$5<$1'&21),'(17,$/
7+(,1)250$7,21&217$,1(',17+,6
'5$:,1*,67+(62/(3523(57<2)
%(1&+0$5.*$0(6$1<
5(352'8&7,21,13$5725$6$:+2/(
:,7+2877+(:5,77(13(50,66,212)
%(1&+0$5.*$0(6,6
352+,%,7('
$
'5$:1%<
6&RUVR
%HQFKPDUN*DPHV
81/(6627+(5:,6(63(&,),('
',0(16,216$5(,1,1&+(6
72/(5$1&(6
$1*8/$5'(*
;; ;;; ;;;; 7,7/(
$
WLFNHWHDWHUEHOW
%HOW$VVHPEO\$60
&200(176
6,=(
%
0$7(5,$/
),1,6+
':*12
5(9
$60
6&$/( :(,*+7
6+((72)
'
,7(012
3$57180%(5
LGOHUSXOOH\SLQ
LGOHUSXOOH\ZRIODQJHV
FRXQWRSWRPRXQW
SODWH
*(1
6&0
'(6&5,37,21
6&0
6&0
47<
6+0
*(1
VSDFHUEHOW
DVVHPEO\MHW
1$
1$
1$
*(1
1$
1$
6+0
QXWILEHUORFN
&53+06
[[1
&53+06
[[1
GHJILWWLQJ
06+;1876&
VSDFHU[RG[
/
EHOWDVVHPEO\FRYHU
ULJKWVKP
ToPurchase This Item, Visit BMI Gaming
| www.bmigaming.com | 1-800-746-2255
| + 1-561-391-7200
5(9,6,216
'$7(
'(6&5,37,21
5(9
=21(
$
%
&
'
&
&
%HOW$VVHPEO\&RYHU/HIW
%
,7(012
3$57180%(5
LGOHUSXOOH\ZRIODQJHV
EHOWDVVHPEO\FRYHU
LGOHUSXOOH\SLQ
&53+06
[[1
'(6&5,37,21
6&0
6+0
6&0
47<
1$
%
35235,(7$5<$1'&21),'(17,$/
7+(,1)250$7,21&217$,1(',17+,6
'5$:,1*,67+(62/(3523(57<2)
%(1&+0$5.*$0(6$1<
5(352'8&7,21,13$5725$6$:+2/(
:,7+2877+(:5,77(13(50,66,212)
%(1&+0$5.*$0(6,6
352+,%,7('
$
'5$:1%<
%HOW$VVHPEO\&RYHU
6&RUVR
%HQFKPDUN*DPHV
81/(6627+(5:,6(63(&,),('
',0(16,216$5(,1,1&+(6
72/(5$1&(6
$1*8/$5'(*
;; ;;; ;;;; 7,7/(
WLFNHWHDWHUEHOW
%HOW$VVHPEO\&RYHU$60
%HOW$VVHPEO\&RYHU/HIW$60
&200(176
6,=(
%
0$7(5,$/
),1,6+
':*12
6&$/(
$
5(9
:(,*+7
6+((72)
,7(012
'HVFULSWLRQ
3DUW1XPEHU
WLFNHWHDWHUWRSVLGH
6+0
VKP
EHOWDVVHPEO\UHOHDVH 6&0
FDPUROOHU
VKRXOGHUEROW[
1$
[
EHOWDVVHPEO\UHOHDVH 6&0
KDQGOH
EHOWDVVHPEO\UHOHDVH 6+0
FDPVKP
VKRXOGHUZDVKHU
6&0
[[
EHOWDVVHPEO\UHOHDVH 6+0
FDPULJKW
'
%5*
LGOHUVKDIWDVV\
VSDFHUWRSDVVHPEO\
VSDFHUEHOWDVVHPEO\
ODWFK
VSDFHUEHOWDVVHPEO\
PRXQW
WLFNHWHDWHUERWWRP
FRYHU
UROOHUVKDIWORZHUDVV\
WLFNHWHDWHUWRSVLGH
OHIW
$)%0$
6,1&
&53+06
[[1
&53+06
[[1
+$5
&
%
$60
VKRXOGHUZDVKHU
LG[[
VWDWLFEUXVK
&53+06
[[&
&53+06
[[1
3&%
$
ToPurchase This Item, Visit BMI Gaming
| www.bmigaming.com | 1-800-746-2255
| + 1-561-391-7200
5(9,6,216
'$7(
'(6&5,37,21
5(9
=21(
$
%
&
'
$60
6&0
6&0
6&0
6+0
$60
6+0
1$
1$
&
%
RSWR
WUDQVPLWWHU
VTXDUH
47<
1$
GHJUHH
ILWWLQJ
WRKRVH
LGOHUDUP
VLGHEHOW
35235,(7$5<$1'&21),'(17,$/
06+;187'6
06+;1876&
7+(,1)250$7,21&217$,1(',17+,6
'5$:,1*,67+(62/(3523(57<2)
%(1&+0$5.*$0(6$1<
5(352'8&7,21,13$5725$6$:+2/(
:,7+2877+(:5,77(13(50,66,212)
%(1&+0$5.*$0(6,6
352+,%,7('
'5$:1%<
6&RUVR
%HQFKPDUN*DPHV
81/(6627+(5:,6(63(&,),('
',0(16,216$5(,1,1&+(6
72/(5$1&(6
$1*8/$5'(*
;; ;;; ;;;; 7,7/(
$
WLFNHWHDWHUEHOW
%RG\$VVHPEO\$60
&200(176
6,=(
%
0$7(5,$/
),1,6+
':*12
5(9
$60
6&$/( :(,*+7
6+((72)
'
,7(0
'HVFULSWLRQ
12
VSLUDOFURVVFXWVWHHS
SLWFK
VSLUDOFURVVFXWVWHHS
SLWFKWRS
*HDU&XWWHU/RZHU
WRUVLRQVSULQJ
FXWWHUVSDFHU
FXWWHUSODWHULJKW
$)%0$
6,1&
UROOBSLQB[
FXWWHUFRYHU
*HDU&XWWHU8SSHU
&53+06
[[1
FXWWHUSODWHOHIW
ToPurchase This Item, Visit BMI Gaming
| www.bmigaming.com | 1-800-746-2255
| + 1-561-391-7200
3DUW1XPEHU
47<
6&0
6&0
*(5
635
6&0
6+0
%5*
1$
6+0
*(5
1$
6+0
5(9,6,216
=21(
'$7(
'(6&5,37,21
5(9
$
%
&
'
&
&
%
%
35235,(7$5<$1'&21),'(17,$/
7+(,1)250$7,21&217$,1(',17+,6
'5$:,1*,67+(62/(3523(57<2)
%(1&+0$5.*$0(6$1<
5(352'8&7,21,13$5725$6$:+2/(
:,7+2877+(:5,77(13(50,66,212)
%(1&+0$5.*$0(6,6
352+,%,7('
$
'5$:1%<
6&RUVR
%HQFKPDUN*DPHV
81/(6627+(5:,6(63(&,),('
',0(16,216$5(,1,1&+(6
72/(5$1&(6
$1*8/$5'(*
;; ;;; ;;;; 7,7/(
$
WLFNHWHDWHUEHOW
&XWWHU$VVHPEO\$60
&200(176
6,=(
%
0$7(5,$/
),1,6+
':*12
5(9
$60
6&$/( :(,*+7
6+((72)
To Purchase This Item, Visit BMI Gaming | www.bmigaming.com | 1-800-746-2255 | + 1-561-391-7200
8
D
Description
ITEM NO.
1
idler arm side belt shm
2
idler arm roller
AFBMA 12.2 - 0.1875 3
0.5000 - 0.1960 8,SI,NC,8
4
nut fiberlock 1032
washer
5
10IDx375ODx036Thick
5
6
7
Part Number
87-SHM-85
87-SCM-60
QTY.
1
1
BRG-001
2
N/A
1
N/A
1
4
2
3
1
REVISIONS
ZONE
REV.
DATE
DESCRIPTION
A Release to Production
07/31/07
1
D
5
3
C
C
2
3
B
B
4
PROPRIETARY AND CONFIDENTIAL
THE INFORMATION CONTAINED IN THIS
DRAWING IS THE SOLE PROPERTY OF
BENCHMARK GAMES. ANY
REPRODUCTION IN PART OR AS A WHOLE
WITHOUT THE WRITTEN PERMISSION OF
BENCHMARK GAMES IS
PROHIBITED.
A
DRAWN BY:
S. Corso
UNLESS OTHERWISE SPECIFIED:
DIMENSIONS ARE IN INCHES
TOLERANCES:
ANGULAR: +/-1 DEG.
.XX=
+/-.010"
.XXX= +/-.005
.XXXX= +/-.003
Benchmark Games
TITLE:
idler arm side belt
COMMENTS:
SIZE DWG. NO.
MATERIAL
B
FINISH
87-ASM-49
SCALE: 2:1
8
7
6
5
4
3
A
2
WEIGHT:
REV
SHEET 1 OF 1
To Purchase This Item, Visit BMI Gaming | www.bmigaming.com | 1-800-746-2255 | + 1-561-391-7200
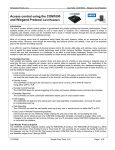
Static Brush Installation
Remove Top Assembly
Clean rear top edge of sheet metal where
static brush will mount.
Adhere static brush along back edge of top
assembly between rivets as shown.
See manual or inside front door for
instructions.
Remove Motor Belt
Remove side belt by loosening both pulley
clamps and pulling both pulleys off of the
shafts simultaneously.
To Purchase This Item, Visit BMI Gaming | www.bmigaming.com | 1-800-746-2255 | + 1-561-391-7200
Remove Cutter Assembly.
Remove Belt Assembly.
See manual or inside front door for
instructions.
Clean sheet metal on bottom side of ticket
taker at back edge where static brush will be
installed.
Adhere static brush along back bottom edge of
metal as shown.
Reassemble in reverse order.
*Important: When reinstalling side belt and pulleys, be sure that the pulley
marked “27” is mounted in the back on the cutter shaft as shown in the
instructions above.
To Purchase This Item, Visit BMI Gaming | www.bmigaming.com | 1-800-746-2255 | + 1-561-391-7200
Ticket Chute Upgrade Instructions
The chute upgrade should solve problems associated with tickets backing up into the
cutter and will also keep tickets from building up on and around the ticket baskets.
To upgrade your machine:
1. Remove the old chutes1 from the cutter
assembly2 by removing the (4) chute
mounting screws3.
Note: Older machines may not have these old
chutes on them. If your machine does not have
them, go to step 2.
2. Remove inside most power supply mount
screw4 from the ticket basket plate5. Insert
the supplied #12 x 5/8” screw6 in its place
from the bottom.
3. Assemble new chute assembly7 using (8) supplied screws and nuts.
To Purchase This Item, Visit BMI Gaming | www.bmigaming.com | 1-800-746-2255 | + 1-561-391-7200
4. Place the new chute assembly7 on the
ticket basket plate5 inside the
machine. The chute should be
approximately centered from left to
right and from front to back. Use the
ticket chute as a template to mark the
ticket basket plate mount hole
locations. Use the side doors for
easier access.
5. Using the marks, pre-drill mount screw
holes using a 1/8” drill bit.
6. Mount the chute using the supplied
screws.
To Purchase This Item, Visit BMI Gaming | www.bmigaming.com | 1-800-746-2255 | + 1-561-391-7200
Cardswipe Options – Benchmark Ticket Station
There are two modes for interfacing cardswipe systems to the Benchmark Ticket Station.
They are Serial Mode and Pulse Mode. Either mode can be selected in the field by
entering the Ticket Station’s programming mode and selecting the option that is desired.
Hardware Connections
There are 5 wires that are used (ALL TTL Levels).
Inputs (to Ticket Eater Board):
ENABLE
TRANSFER TICKETS/COMPLETE TRANSACTION
Outputs(From Ticket Eater Board):
BUSY/FAULT
DATA
CLOCK/PULSE
PLEASE NOTE: the outputs are open collecter, so pull-up resistors will be required.
The connector that is in the Ticket Station harness is a Molex #19-09-1062, 6-pin
male. The pinout, wire colors, and connections to the Ticket Eater Board are as
follows:
Pin1 == Pink/White == CLOCK/PULSE == J2-3
Pin2 == Blue/Yellow == BUSY/FAULT == J2-10
Pin3 == White/Black/Yellow == TRANSFER TICKETS/COMPLETE TRANSACTION
== J1-11
Pin4 == White/Grey == DATA == J2-6
Pin5 == Grey/Red == ENABLE == J1-9
Pin6 == Not Used
To Purchase This Item, Visit BMI Gaming | www.bmigaming.com | 1-800-746-2255 | + 1-561-391-7200
Protocols:
Serial Mode:
The interfaced system must pull the ENABLE input low to enable the ticket eater.
Whenever the card is swiped, the cardswipe system would call for a ticket count by
pulling the TRANSFER TICKETS input low for a minimum of 30mS. Immediately
following, the ticket eater board will transmit the amount in ASCII, MSB first, using
the CLOCK and DATA lines. For example, the amount 54321 would be transmitted
as 0x35,0x34,0x33,0x32,0x31. The ticket eater board will wait for 2.5 seconds. If
your system needs a retransmission, it must pulse again within that 2.5 seconds and
the amount will be retransmitted, otherwise the ticket eater board assumes that the
transmission was successful and the ticket count is cleared. If this line is pulsed and
there are no tickets, the ticket eater board will respond with
0x30,0x30,0x30,0x30,0x30. There is no "PRINT RECEIPT" button.
CLOCK and DATA:
Timings are:
Clock pulse width = 50us min
Clock period = 700us min
Data valid on falling clock edge
Most significant digit transferred first (10000’s)
Least significant bit transferred first
Pulse Mode:
When the card is swiped, the cardswipe system pulls the ENABLE line low, which
enables the Ticket Eater. After tickets are inserted, the pushbutton is depressed, (which
is connected to the TRANSFER TICKETS/COMPLETE TRANSACTION Input). The
Ticket Station responds by sending one 50mS Low pulse for each ticket on the
CLOCK/PULSE output, and the ticket total is cleared. The pulse train is 50% duty cycle.
If the Ticket Station has faulted, the BUSY/FAULT output will be held low.
To Purchase This Item, Visit BMI Gaming | www.bmigaming.com | 1-800-746-2255 | + 1-561-391-7200
Air Reservoir Update
The Air Reservoir Update provides a more sustained air blast to clean the optics in the
ticket taker.
Ticket taker controller pcb with revision of 7.5 or later is required for this update*.
The software was revised so that the pump runs longer in order to build up full pressure
since the reservoir adds significant volume to the system.
Note: It is important in systems that do not have a reservoir that pcb version 7.4 or
earlier is used. Using version 7.5 or later without the reservoir will stress the air pump.
Note: There is an intentional orifice drilled into the reservoir to limit system pressure to
less than 30 PSI.
Parts required:
Qty.
Description
1
reservoir
1
conduit clamp
1
#8-32 hex nut
1
Tee fitting/pressure gage assy.
3
cable ties
1 per door
ticket taker controller boards,
version 7.5 or later
Installation Instructions:
1. Remove ticket bags and baskets from Ticket Station to allow access to the inside
back panel of the machine.
2. Attach reservoir to back panel by mounting clamp using screw stud that is pressed
into the metal and supplied nut.
3. Cut air line using the center of the “T” fitting as cut point.
4. Attach each cut end of the air line to the “T” fitting.
5. Use two cable ties to secure air line to “T” fitting as shown.
To Purchase This Item, Visit BMI Gaming | www.bmigaming.com | 1-800-746-2255 | + 1-561-391-7200
6. Remove air line from fitting at air valve on main front door. You may need to cut
the line.
7. Remove air valve from bracket.
8. Install “T” fitting with pressure gage into air valve and remount air valve.
9. Attach air line to fitting.
10. Use cable tie to secure air line to fitting.
11. Replace ticket taker controller boards with version 7.5 or later.
12. Test:
a. Run enough tickets through the machine to start the pump cycle.
b. Watch the pressure gage. The pressure should build to no less than 25
PSI.
i. If the pressure does not reach 25 PSI before blowing off, the
system has a leak somewhere. Check all connections throughout
system before valves (red hose connections). Fix any leaks.
ii. If pressure builds to more than 25 PSI before blowing off,
everything is working as it should.
To Purchase This Item, Visit BMI Gaming | www.bmigaming.com | 1-800-746-2255 | + 1-561-391-7200
Cutter Tilt Control Update
The Cutter Tilt Control Update keeps the cutter assembly from misalignment during
ticket jam clearing procedure.
Parts required:
Qty. Description
2
shoulder washers
2
#4-40 x 3/8” machine screws
2
#4-40 fiber lock nuts
Installation instructions:
Attach two shoulder washers to outside of ticket cutter side plates as shown. Screws
are inserted through existing holes in the side of the cutter side plates.