1
Original Instructions
Instucciones originales
Instruções originais
Consignes originales
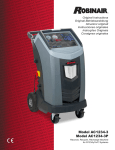
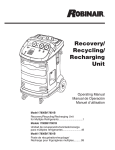
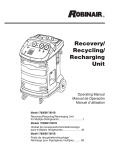
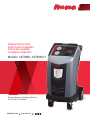
Models: 34788NI, 34788NI-H
Recover, Recycle, Recharge Machine
for R134A A/C systems
ROBINAIR.COM
800.533.6127
DISCLAIMER: Information, illustrations, and specifications contained in this manual are based on the latest information available
at the time of publication. The right is reserved to make changes at any time without obligation to notify any person or organization
of such revisions or changes. Further, ROBINAIR shall not be liable for errors contained herein or for incidental or consequential
damages (including lost profits) in connection with the furnishing, performance, or use of this material. If necessary, obtain additional
health and safety information from the appropriate government agencies, and the vehicle, refrigerant, and lubricant manufacturers.
Table of Contents
Safety Precautions . . . . . . . . . . . . . . . . . . . . . . . . . . . . . . . . . . . . . . . 2
Introduction
Technical Specifications . . . . . . . . . . . . . . . . . . . . . . . . . . . . . . . . 5
Features of the 34788NI/34788NI-H . . . . . . . . . . . . . . . . . . . . . . . 6
Control Panel Functions . . . . . . . . . . . . . . . . . . . . . . . . . . . . . . . . 7
Symbol Legend . . . . . . . . . . . . . . . . . . . . . . . . . . . . . . . . . . . . . . . 8
Setup Menu Functions . . . . . . . . . . . . . . . . . . . . . . . . . . . . . . . . . 10
Initial Setup
Unpack the Machine . . . . . . . . . . . . . . . . . . . . . . . . . . . . . . . . . .
Unpack the Accessory Kit . . . . . . . . . . . . . . . . . . . . . . . . . . . . . .
Power Up the Machine . . . . . . . . . . . . . . . . . . . . . . . . . . . . . . . .
Select Language . . . . . . . . . . . . . . . . . . . . . . . . . . . . . . . . . . . . .
Select Units . . . . . . . . . . . . . . . . . . . . . . . . . . . . . . . . . . . . . . . . .
Set Date and Time . . . . . . . . . . . . . . . . . . . . . . . . . . . . . . . . . . . .
Edit Print Header . . . . . . . . . . . . . . . . . . . . . . . . . . . . . . . . . . . . .
Service Vacuum . . . . . . . . . . . . . . . . . . . . . . . . . . . . . . . . . . . . . .
Select Oil Viscosity (34788NI model) . . . . . . . . . . . . . . . . . . . . .
Adjust Background Fill Target . . . . . . . . . . . . . . . . . . . . . . . . . . .
Tank Fill . . . . . . . . . . . . . . . . . . . . . . . . . . . . . . . . . . . . . . . . . . . .
Unit Activation . . . . . . . . . . . . . . . . . . . . . . . . . . . . . . . . . . . . . . .
11
11
11
12
12
12
12
13
13
13
13
15
Operating Instructions
Enter Service Data . . . . . . . . . . . . . . . . . . . . . . . . . . . . . . . . . . . .
Recover . . . . . . . . . . . . . . . . . . . . . . . . . . . . . . . . . . . . . . . . . . . .
Vacuum . . . . . . . . . . . . . . . . . . . . . . . . . . . . . . . . . . . . . . . . . . . .
Flush Hoses . . . . . . . . . . . . . . . . . . . . . . . . . . . . . . . . . . . . . . . . .
Charge . . . . . . . . . . . . . . . . . . . . . . . . . . . . . . . . . . . . . . . . . . . . .
Automatic . . . . . . . . . . . . . . . . . . . . . . . . . . . . . . . . . . . . . . . . . .
System Flush . . . . . . . . . . . . . . . . . . . . . . . . . . . . . . . . . . . . . . . .
16
17
19
20
21
23
24
Maintenance
Schedule . . . . . . . . . . . . . . . . . . . . . . . . . . . . . . . . . . . . . . . . . . .
Electrical Protection . . . . . . . . . . . . . . . . . . . . . . . . . . . . . . . . . .
Load Language . . . . . . . . . . . . . . . . . . . . . . . . . . . . . . . . . . . . . .
Adjust Background Fill Target . . . . . . . . . . . . . . . . . . . . . . . . . . .
Tank Fill . . . . . . . . . . . . . . . . . . . . . . . . . . . . . . . . . . . . . . . . . . . .
Filter Maintenance . . . . . . . . . . . . . . . . . . . . . . . . . . . . . . . . . . . .
Calibration Check . . . . . . . . . . . . . . . . . . . . . . . . . . . . . . . . . . . .
Change Vacuum Pump Oil . . . . . . . . . . . . . . . . . . . . . . . . . . . . . .
Leak Check . . . . . . . . . . . . . . . . . . . . . . . . . . . . . . . . . . . . . . . . .
Select Oil Viscosity (34788NI model) . . . . . . . . . . . . . . . . . . . . .
Edit Print Header . . . . . . . . . . . . . . . . . . . . . . . . . . . . . . . . . . . . .
Replace Printer Paper . . . . . . . . . . . . . . . . . . . . . . . . . . . . . . . . .
Install a Printer . . . . . . . . . . . . . . . . . . . . . . . . . . . . . . . . . . . . . .
26
27
27
28
28
29
31
32
33
34
35
35
36
Replacement Parts and Glossary . . . . . . . . . . . . . . . . . . . . . . . . . . . 37
Troubleshooting Messages . . . . . . . . . . . . . . . . . . . . . . . . . . . . . . . . 38
Storage and Transportation of Equipment . . . . . . . . . . . . . . . . . . . 41
Disposal of Equipment . . . . . . . . . . . . . . . . . . . . . . . . . . . . . . . . . . . 42
34788-NI/34788NI-H Rev.B
1
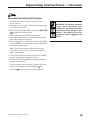
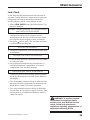
Safety Precautions
Explanation of Safety Signal Words Used in this Manual
The safety signal word designates the degree, or level, of hazard seriousness.
DANGER: Indicates an imminently hazardous situation which, if not avoided, will result in
death or serious injury.
WARNING: Indicates a potentially hazardous situation which, if not avoided, could result
in death or serious injury.
CAUTION: Indicates a potentially hazardous situation which, if not avoided, may result in
minor or moderate injury.
CAUTION: Used without the safety alert symbol indicates a potentially hazardous situation which,
if not avoided, may result in property damage.
These safety messages cover situations Robinair is aware of. Robinair cannot know, evaluate,
and advise you as to all possible hazards. You must verify that conditions and procedures do not
jeopardize your personal safety.
Explanation of Safety Decals Used on the 34788NI/34788NI-H
Carefully read the instructions.
Do not use in open air in case of rain or high humidity.
Wear gloves.
Wear protection goggles.
Alternating voltage.
Grounding protection.
Electrical shock hazard.
2
Safety Precautions
WARNING : To prevent personal injury,
ALLOW ONLY QUALIFIED PERSONNEL TO OPERATE THE MACHINE. Before operating the machine,
read and follow the instructions and warnings in this manual. The operator must be familiar with air
conditioning and refrigeration systems, refrigerants, and the dangers of pressurized components. If
the operator cannot read this manual, operating instructions and safety precautions must be read
and discussed in the operator’s native language.
USE THE 34788NI/34788NI-H AS OUTLINED IN THIS MANUAL. Using the machine in a manner
for which it was not designed will compromise the machine and nullify the protections provided.
PRESSURIZED TANK CONTAINS LIQUID REFRIGERANT. Do not overfill the internal storage vessel
(ISV), because overfilling may cause explosion resulting in personal injury or death. Do not recover
refrigerants into nonrefillable containers; use only type-approved refillable containers that have
pressure relief valves.
HOSES MAY CONTAIN LIQUID REFRIGERANT UNDER PRESSURE. Contact with refrigerant
may cause personal injury, including blindness and frozen skin. Wear protective equipment,
including goggles and gloves. Disconnect hoses using extreme caution. Ensure the phase has
been completed before disconnecting the machine to prevent the release of refrigeration
to the atmosphere.
DO NOT BREATHE REFRIGERANT AND LUBRICANT VAPOR OR MIST. R134a reduces the oxygen
available for breathing, resulting in drowsiness and dizziness. Exposure to high concentrations of
R134a causes asphyxiation, injury to the eyes, nose, throat, and lungs, and can affect the central
nervous system. Use the machine in locations with mechanical ventilation that provides at least one
air change per hour. If accidental system discharge occurs, ventilate the work area before resuming
service.
DO NOT DISPERSE REFRIGERANT INTO THE ENVIRONMENT. Such a precaution is necessary to
prevent the possible presence of refrigerant in the working environment.
TO REDUCE THE RISK OF FIRE, do not use the machine in the vicinity of spilled or open containers
of gasoline or other flammable substances.
TO REDUCE THE RISK OF FIRE, do not use an extension cord. An extension cord may overheat
and cause fire. If you must use an extension cord, use the shortest possible cord with a minimum
size of 14 AWG.
TO REDUCE THE RISK OF FIRE, do not use the machine in the vicinity of flames and hot surfaces.
Refrigerant can decompose at high temperatures and can free toxic substances to the environment
which can be noxious to the user.
TO REDUCE THE RISK OF FIRE, do not use the machine in environments containing explosive
gases or vapors.
TO REDUCE THE RISK OF FIRE, do not use this machine in ATEX classified zones or areas. Protect
the machine from conditions that may cause electrical failure or other hazards relating to ambient
interaction.
DO NOT USE COMPRESSED AIR TO PRESSURE TEST OR LEAK TEST THE MACHINE OR VEHICLE
AIR CONDITIONING SYSTEM. Mixtures of air and R134a refrigerant can be combustible at elevated
pressures. These mixtures are potentially dangerous and may result in fire or explosion causing
personal injury and / or property damage.
HIGH VOLTAGE ELECTRICITY INSIDE THE MACHINE HAS A RISK OF ELECTRICAL SHOCK.
Exposure may cause personal injury. Disconnect the power before servicing the machine.
NEVER LEAVE THE MACHINE LIVE IF AN IMMEDIATE USE IS NOT SCHEDULED. Disconnect the
electrical supply before a long period of inactivity or before internal maintenance is performed. To
ensure that unauthorized personnel cannot run the machine, use the Lockout / Tag Out feature.
DO NOT MODIFY THE PRESSURE RELIEF VALVE OR CHANGE THE CONTROL SYSTEM SETTINGS.
Using the machine in a manner for which it was not designed will compromise the machine and
nullify the protections provided.
34788-NI/34788NI-H Rev.B
3
Safety Precautions
CAUTION : To prevent equipment damage,
TO PREVENT CROSS-CONTAMINATION, USE THIS MACHINE WITH R134A REFRIGERANT ONLY.
The machine is equipped with special connectors to recover, recycle, and recharge only R134a
refrigerant. Do not attempt to adapt the machine for another refrigerant. Do not mix refrigerant
types through a system or in the same container; mixing of refrigerants will cause severe damage
to the machine and the vehicle air conditioning system.
DO NOT USE THIS MACHINE IN DIRECT SUNLIGHT. Position the machine far from heat sources,
such as direct sunlight which can cause excessive temperatures. The use of this machine under
normal environmental conditions (10°C to 50°C) keeps pressures under reasonable limits.
DO NOT USE THIS MACHINE OUTDOORS DURING RAIN OR HIGH HUMIDITY. Protect the machine
from conditions that may cause electrical failure or other hazards relating to ambient interaction.
DO NOT USE THIS MACHINE IN AREAS WHERE THERE IS A RISK OF EXPLOSION.
SET UP THE MACHINE ON AN EVEN SURFACE AND UNDER SUFFICIENT LIGHTING. LOCK THE
FRONT WHEELS, AND DO NOT SUBJECT THE MACHINE TO VIBRATION.
Further information regarding health and safety may be obtained from the refrigerant manufacturer.
Protective Devices
Robinair No. 34788NI/34788NI-H is equipped with the following protective devices :
•
•
Over pressure valves.
A maximum pressure switch stops the compressor when excessive pressure is sensed.
WARNING: Tampering with these protective devices could result in serious injury.
Refrigerant Tank Test
Official records and recurring tests necessary for pressurized instruments are governed by laws
and / or national regulations depending on the country where the refrigerant tank is used. The
system manager is responsible for respect of laws, regulations, and technical rules. During normal
service, refrigerant tanks do not need maintenance. Refer to the Maintenance section of this
manual for more information.
4
Introduction
The Robinair No. 34788NI/34788NI-H machine is
used on R134a equipped vehicles and is designed
to be compatible with existing service equipment
and standard service procedures. This machine
is a single-pass system (i.e. refrigerant flows
through a filter once) that meets specifications for
recycled refrigerant. Follow recommended service
procedures for the containment of R134a.
Note: Refrigerant systems require special oils. Refer
to the A/C system manufacturer’s service manual for
oil specifications.
34788NI shown
Technical Specifications
Compressor . . . . . . . . . . . . . . . . . . . . . . . . . . . . . 1/3 HP
Dimensions . . . . . . . . . . . . . . . 107 cm x 61 cm x 76 cm
Display . . . . . . . . . . . . . . . 3.94 x 6.34 cm graphical LCD
Filter . . . . . . . . . . . . . . . . . . . . . . . . . . . . . 68 kg (150 lbs)
Humidity. . . . . . 32.2°C (90°F), 80% RH non-condensing
Manometer . . . . . . . . . . . . . . . . . . . . Ø 100 mm (3.9 in.)
Maximum Pressure . . . . . . . . . . . . . . . 27 bar (390 PSI)
Noise . . . . . . . . . . . . . . . . . . . . . . . . . . . . . . . . <70 dB(A)
Nominal Voltage . . . . . . . . . . . . . . . . . . . . . . 115V, 60 Hz
Oil Tank . . . . . . . . . . . . . . . . . . . . . . . . . . . . . . . . 355 ml
Operating Temperature . . . . . . . . . . . . . . . 10°C to 50°C
Power Consumption . . . . . . . . . . . . . . . . . . . . . 1380 VA
Pump Free-Air Displacement . . 1.5 CFM (35 l/m) 50 Hz
Service Hoses . . . . . . . . . . . . . . . . . 250 cm / SAE J2196
Tank Capacity. . . . . . . . . . . . . . . . . . . . . . . 10 kg (22 lbs)
Weight . . . . . . . . . . . . . . . . . . . . . . . . . . . . . . . . . . 73 kg
34788-NI/34788NI-H Rev.B
5
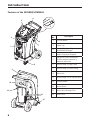
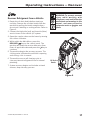
Introduction
Features of the 34788NI/34788NI-H
3
4
5
Item
No.
2
6
7
1
8
9
10
11
12
13
6
Description
1
Oil Drain Bottle
2
Printer Cap
3
Low-side (blue) and High-side
(red) Manifold Gauges.
4
Graphic Display and Keypad
5
USB and SD card Connections;
2224VRMS double insulation in
respect to main lines
6
Vacuum Pump Oil Sight Glass
7
Vacuum Pump Oil Drain Fitting
8
Wheel Lock
9
Vacuum Pump Oil Fill Cap and Port
10
Oil Inject Bottle
11
Service Hoses
12
Service Hose Storage Ports
13
Power Cord
Introduction
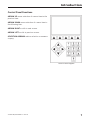
Control Panel Functions
ARROW UP moves selection of a menu item to the
previous item.
ARROW DOWN moves selection of a menu item to
the following item.
ARROW RIGHT scrolls to next screen.
ARROW LEFT scrolls to previous screen.
SELECTION ARROWS make a selection or answers
a query.
Control Panel Keypad
34788-NI/34788NI-H Rev.B
7
Introduction
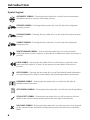
Symbol Legend
AUTOMATIC SYMBOL - Pressing the key under this icon will enter the automatic
refrigerant recovery, vacuum, and charge process.
RECOVER SYMBOL - Pressing the key under this icon will enter the refrigerant
recovery process.
VACUUM SYMBOL - Pressing the key under this icon will enter the system vacuum
process.
CHARGE SYMBOL - Pressing the key under this icon will enter the refrigerant
charge process.
NEXT/FORWARD SYMBOL - Pressing the key under this icon will proceed to
additional menu selection options, or proceed to an additional step in a function or
process.
BACK SYMBOL - Pressing the key under this icon will return to previously seen
menu selection options, or return to the previous screen within a function or
process.
HELP SYMBOL - Pressing the key under this icon will provide help and information
corresponding to the current screen and/or function being viewed or performed.
DATABASE SYMBOL - Pressing the key under this icon will enter the vehicle
database retrieval process.
SETUP MENU SYMBOL - Pressing the key under this icon will enter the Setup Menu.
YES/ACCEPT SYMBOL - Pressing the key under this icon will accept any choices
made on the current screen and proceed to the next step of the function.
NO/CLOSE SYMBOL - Pressing the key under this icon will reject any choices made
on the current screen and return to the previous step of the function or the Main
Menu.
8
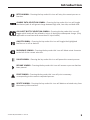
Introduction
RETRY SYMBOL - Pressing the key under this icon will retry the current process or
function.
HS LS
CHARGE PATH SELECTION SYMBOL - Pressing the key under this icon will toggle
the desired path of refrigerant charge between high side, low side, and both side.
OIL INJECT BOTTLE SELECTION SYMBOL - Pressing the key under this icon will
toggle which bottle will be utilized to inject oil during the subsequent charge. (Only
applicable on machines with more than oil inject bottle)
ON/OFF SYMBOL - Pressing the key under this icon will toggle the highlighted
function on or off as desired.
BACKSPACE SYMBOL - Pressing the key under this icon will delete a text character
to the left of the current selection.
PAUSE SYMBOL - Pressing the key under this icon will pause the current process.
RESUME SYMBOL - Pressing the key under this icon will resume a process that has
been paused.
PRINT SYMBOL - Pressing the key under this icon will print a summary
corresponding to the current completed process.
DELETE SYMBOL - Pressing the key under this icon will delete a selected entry from
the memory of the machine.
34788-NI/34788NI-H Rev.B
9
Introduction
Setup Menu Functions
Access the following functions by pressing the Menu key and selecting Setup.
Calibration Check
Select Units
Use to verify internal scale calibration. Refer
to Calibration Check in the Maintenance
section of this user manual.
Program the machine to display units of
measure in kilograms or pounds. The default
display is kilograms.
Edit Print Header
Date and Time
Programs information that will appear on the
printout each time a print function is used.
Program the machine for current date and
time.
Filter Maintenance
System Flush
The filter removes acid, particulates, and
moisture from the refrigerant. To meet
requirements, it is mandatory to replace the
filter after 150 kg (331 lbs.) of refrigerant has
been filtered.
Provides a method of removing oil by forcing
liquid refrigerant through an A/C system or
components of an A/C system. After flushing,
the refrigerant is recovered by the machine
and filtered by the recycling circuit.
This menu item displays the filter capacity
remaining until the machine locks down
and no longer functions. Refer to Filter
Maintenance in the Maintenance section.
System Information
Flush Hoses
Displays the revision level of the software in
the machine.
Tank Fill
Production Menu
Use this Setup Menu item to transfer
refrigerant from a source tank to the ISV. The
tank fill value may be adjusted up or down to
suit the user’s needs. Refer to Tank Fill in the
Maintenance section.
For Robinair production use only.
Unit Activation
Pump Maintenance
Failure to register and activate the machine
within 30 days of initial startup will cause the
machine to lock out and no longer function.
Select this Setup Menu item and follow the
prompts before the trial period expires.
Flushes residual oil from the machine’s
service hoses to prepare for service of next
vehicle.
Displays the amount of time remaining until
the next vacuum pump oil change is needed.
For maximum vacuum pump performance,
change vacuum pump oil every time the filter
is replaced. Refer to the Change Vacuum Pump
Oil in the Maintenance section.
Refrigerant Management
Displays the amount of refrigerant recovered,
charged, and replenished (for the life of the
machine), and filtered since the last filter
change.
Select Language
Select a language for screen prompts. English
is the default language.
Service Menu
For Robinair service center use only.
10
View Service Data
Displays vehicle information that was entered
into the Enter Service Data screen. Vehicles
are displayed by date of service and VIN
number. The database stores 25 VIN entries.
Hose Equalize
Use this Setup Menu item to recover
refrigerant from the service hoses back into
the vehicle A/C system. This item is useful
after performing diagnostics which do not
require the need to recover the A/C system
into the RRR machine. You will be prompted
to connect the low side service hose to the
appropriate port and to start the vehicle’s
A/C system on max.
Initial Setup
Unpack the Machine
1. Remove the bandings from the box.
2. Remove the top carton infold, the molded pulp
tray, and the angle boards.
3. Remove the sleeve from the bottom carton
infold.
4. Gently roll the unit forward and off the pallet,
avoiding any sudden shocks to the machine.
WARNING: To prevent personal
injur y while working with
refrigerant, read and follow the
instructions and warnings in this
manual, and wear protective
equipment such as goggles and
gloves.
Unpack the Accessory Kit
Unpack the accessory kit from the box, and remove the plastic packaging.
Accessory Kit
Calibration Weight
533 g
Pouch containing the user manual, warranty card to be filled out and mailed,
Material Safety Data Sheets (MSDSs), and service center list.
Power Up the Machine
1.Unwind the power cord from the handle, and
plug it into a correct voltage, grounded outlet.
2.Position the machine so the plug and the power
switch are of easy access for the operator. Verify
the fan vents on the rear of the machine are not
obstructed.
3.Lock the front wheels.
4.Toggle the power switch on the control panel to
turn the machine ON.
The machine launches into the initial Setup mode.
34788-NI/34788NI-H Rev.B
11
Initial Setup
Select Language
The operator selects the language for the screen
prompt displays. English is the default language. 1.Use the UP or DOWN arrow key to toggle
through the available languages one line at a
time.
2.Press the key to set the selected language.
Select Units
The operator sets the display for units of measure.
Metric is the default.
1.Use the UP or DOWN arrow key to toggle
Imperial or Metric units.
2.Press the key to choose the displayed unit of
measure.
Set Date and Time
Use the arrow keys to move the cursor. Use the
keypad to modify the information displayed.
1.Use the UP and DOWN arrow keys to select
which item to change: day, month, year, or time.
Press
to toggle between AM and PM.
2.Use the multi-tap interface on the numeric
keypad to modify the information.
3.Press the key to save.
Edit Print Header
This machine has the capability to store recovery,
vacuum, charge, and flush information for up to
25 vehicles. The information loaded into Edit Print
Header will appear on each printout. If you want
to add a printer to your machine, refer to Printer
Installation in the Maintenance section of this
manual.
1.Enter text by using the arrows and the multi-tap
interface on the numeric keypad:
• LEFT arrow and
key acts as backspace keys.
• RIGHT arrow moves the cursor to the right.
• ZERO (0) key acts as a spacebar when double
tapped.
• UP and DOWN arrows navigate between the
rows.
2.Press the key to save/exit the function; press
the
key to return to the previous header
without saving data.
12
Note: To update an existing language
or to add a new language, refer to Load
Language in the Maintenance section of
this manual.
Initial Setup
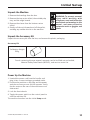
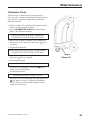
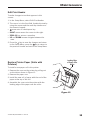
Service Vacuum
At this point the machine clears its internal
plumbing before proceeding with setup.
1.Check the vacuum pump oil level sight glass and
verify the oil level is at the center of the sight
glass.
2.When prompted, connect the service hoses from
the machine to their storage ports as shown in
Figure 1. Press the key to continue.
3.The machine enters a 5-minute vacuum and
will automatically enter the next set-up process
when complete.
Service Hoses
Connected to
Storage Ports
Select Oil Viscosity (34788NI model)
The oil inject functionality in this machine is
automatic and timing based. The viscosity of the
oil being injected significantly affects the accuracy.
Figure 1
1.Using the arrow keys, highlight your desired
PAG oil viscosity (46, 100, 125, or 150). Once
highlighted, press the
key to accept your
choice.
2.The unit is now ready to accurately inject your
chosen oil.
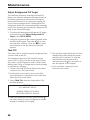
Adjust Background Fill Target
This machine possesses a background tank fill
feature. An external refrigerant storage vessel can
be fluidly connected to the machine (using the
black tank fill hose) for a continuous topping off
of the internal storage vessel. Drawing from the
refrigerant within the connected external storage
vessel, the machine will periodically charge the ISV
tank to the desired fill target.
Using the arrows and the numeric keypad, enter
the desired fill target (default amount is 6.8 kg).
Tank Fill
This procedure transfers refrigerant from a source
tank to the internal storage vessel (ISV) in the
machine. The maximum capacity of the ISV is
10 kg (22 lbs). Use arrow keys to move the cursor;
use the keypad to enter a value.
1. The machine displays fields for desired tank
fill amount, charge capacity, and the amount
of recoverable refrigerant (recover capacity)
within the internal storage vessel. Enter the
34788-NI/34788NI-H Rev.B
Note:
Charge Capacity: The amount of
refrigerant in the ISV that can be charged
into a vehicle A/C system.
Recover Capacity: The amount of
additional refrigerant that could be
recovered into the ISV.
13
Initial Setup
Tank Fill contd.
desired tank fill amount. Note: Add at least
3.6 kg of refrigerant to ensure enough is available
for charging.
2. Connect the tank fill (black) hose to the liquid
connector on the source tank.
3. Open the source tank valve.
4. Position the source tank in such a way that
liquid refrigerant is supplied to the connection.
5. Press the key to start the tank fill process.
The machine begins filling the internal storage
vessel (ISV). Add at least 3.6 kg of refrigerant
to ensure enough is available for charging. This
process takes 15 – 20 minutes.
6. The machine stops when the designated
amount of refrigerant has been transferred
to the ISV or when the source tank is empty.
Follow the messages on the display screen.
7. Close the source tank valve.
8. Press the
key to return to the Setup Menu.
The machine is ready for operation.
Note:
• There is no need to calibrate the scale; it is
calibrated at the factory.
• After the tank fill process is complete, the
display does not show the same amount as the
programmed fill level.
The display shows the amount of refrigerant that
is available for charging, which is approximately
1.27 kg less than the total amount of refrigerant in
the tank.
14
Initial Setup
Unit Activation
Failure to register and activate the machine within
30 days of initial startup will cause the machine to
lock out and no longer function.
1.Select Unit Activation from the Setup Menu. The
machine displays
XX DAYS LEFT ON TRIAL
PERIOD TO ACTIVATE UNIT.
ACTIVATE NOW?
2.Press the
key to start the activation process.
The machine displays
PRODUCT ACTIVATION
PERSONAL PRODUCT CODE:
XXXXXXXXXXX
FOR ACTIVATION CODE VISIT
HTTPS://REGISTER.SERVICESOLUTIONSPORTAL.COM
ENTER CODE:
XXXXXXXXXXXX
3.Open a web browser on a personal computer
and enter the web address shown in Step 2.
4.Enter your user name and password, and log
in to the website. Note: If you are a first-time
user, click the REGISTER button to create a user
name and password.
5.On the personal computer, enter the Personal
Product Code of your machine into the Product
Activation key box on the website to receive an
activation code.
6.On the machine, enter the activation code into
the correct field. Note: Enter the code exactly as
received. Capitalization is required.
7.Record the activation code on a piece of paper
and file it in a secure place. Press the
key.
8.The machine displays
ACTIVATION SUCCESSFUL.
Press the key. The 34788NI/34788NI-H has
been activated.
34788-NI/34788NI-H Rev.B
15
Operating Instructions — Enter Service Data
Enter Service Data
After selecting any service function, information
about the vehicle may be entered into and stored
in the machine’s database.
1.The machine displays
ENTER SERVICE DATA NEW
2.Press the
key to enter a new record, or scroll
to select a previously serviced vehicle and press
the
key. The highlighted selection will be in
red. The machine displays
ENTER SERVICE DATA
VIN:_____________________________
MILEAGE:______________________
MAKE:__________________________
MODEL:________________________
3.Use the arrow keys to move between rows and
the multi-tap keypad to enter text.
Information entered on this screen is stored by
date and vehicle identification number (VIN).
The database stores the most current 25 entries,
with the most recent at the top of the list.
The information will also appear on
service summary printouts if using the
34788NI/344788NI-H machine.
16
Operating Instructions — Recover
Recover Refrigerant from a Vehicle
1.Empty the oil drain bottle before starting a
recovery. Remove the oil drain bottle from the
machine by pulling the bottle straight down —
do not use a twisting or rocking motion. Refer to
Figure 2.
WARNING: To prevent personal
injur y while working with
refrigerant, read and follow the
instructions and warnings in this
manual, and wear protective
equipment such as goggles and
gloves.
2.Connect the high-side (red) and low-side (blue)
service hoses to the vehicle A/C system.
3.Open the coupler valves on the hoses by turning
the collars clockwise.
4.While within the Main Menu, press the
RECOVER
key on the control panel. The
machine will enter the service data entry form.
Enter all applicable data and press the
key to
continue.
5.The machine begins the recovery process. The
clicking noise indicates the solenoid is opening
and closing — this is normal.
6.The machine runs a self-clearing cycle to
clear any internal refrigerant from its internal
plumbing.
Oil Drain
Bottle
7.System recovery begins and includes a timed
vacuum, deep recovery process.
Figure 2
34788-NI/34788NI-H Rev.B
17
Operating Instructions — Recover
Recover Refrigerant from a Vehicle continued
8. After recovery, the machine will perform an oil
drain, which may require up to 90 seconds to
complete.
9. After the oil drain is complete, a summary is
displayed showing the total amount of gas
recovered. You are also prompted to “Check Oil
Drain Bottle” to note how much oil was drained
bosed on the graduations seen on the drain
bottle. If your machine has a printer, you may
print out recovery information and pre-recover
diagnostics by selecting the key. Press the
key to return to the Main Menu.
Note: The displayed recovered weight can vary
depending on ambient conditions and should not
be used as an indicator of scale accuracy.
10.The amount of oil that was removed from
the A/C system is the amount of new oil that
should be charged into the A/C system after
evacuation is complete.
• Use only new oil to replace the oil removed
during the recycling process.
• Dispose of used oil according to government
regulations.
Recovery is complete. If your machine has a
printer, you may print out vacuum information by
selecting the key. Press the key to return to the
main menu.
18
Operating Instructions — Vacuum
Evacuate the Vehicle A/C System
1.Connect the service hoses to the vehicle’s
service ports.
2.Open the service hose coupler valves by turning
the collars clockwise.
3.While within the Main Menu, press the VACUUM
key on the control panel.
4.Select Vacuum Leak Check if desired to
automatically perform a 5-minute pressure rise
leak check after the vacuum.
WARNING: To prevent personal
injur y while working with
refrigerant, read and follow the
instructions and warnings in this
manual, and wear protective
equipment such as goggles and
gloves.
5.Press the
key to accept the 15-minute default
evacuation time, or enter a desired vacuum time
using the number keys.
Note: The vacuum process will halt if pressure
rises above .35 bar (5 psi). Recover refrigerant
before proceeding.
6.The machine pulls a vacuum on the A/C system
for the programmed amount of time.
7.The machine stops when the specified amount
of time has elapsed.
If your machine has a printer, you may print out
vacuum information by selecting the key.
Press the
key to return to the Main Menu.
34788-NI/34788NI-H Rev.B
19
Operating Instructions — Flush Hoses
Flushing the Hoses
If the next vehicle to be serviced contains a
different type of oil than the previous vehicle
serviced, it is recommended the service hoses be
flushed of residual oil to prevent contamination.
1.Select FLUSH HOSES from the Setup Menu. The
machine displays
CONNECT HOSES TO STORAGE PORTS
AND OPEN COUPLER VALVES.
WARNING: To prevent personal
injur y while working with
refrigerant, read and follow the
instructions and warnings in this
manual, and wear protective
equipment such as goggles and
gloves.
2.Connect the service hoses to the machine’s
storage port connections as shown in Figure 3.
3.Open the service hose coupler valves by turning
the collars clockwise.
4.Press the
key to begin the hose flush process,
which runs for three minutes, followed by a
recovery.
5.When the hose flushing process is compete, the
display reads
FLUSH HOSES
COMPLETE
Press the
Menu.
key to exit and return to the Setup
6.Close the coupler valves by turning the collars
counterclockwise.
Storage
Port
Connections
Figure 3
20
Operating Instructions — Charge
Recharge the Vehicle A/C System
(34788NI model)
1.Connect both service hoses to the vehicle’s
service ports.
2.While within the Main Menu, press the CHARGE
key. You will be prompted to enter
service data. Press the
key once complete to
continue. The display shows
WARNING: To prevent personal
injur y while working with
refrigerant, read and follow the
instructions and warnings in this
manual, and wear protective
equipment such as goggles and
gloves.
CHARGE: XX.XXX KG ON HIGH SIDE
ADDITIONAL OIL: XXX ML
3.Use the arrow keys and the numeric keypad to
enter the desired charge amount.
4.Using the arrow key, maneuver to the “charge
path selection”. High Side is default. To change,
press the CHARGE PATH HS LS key on the
control panel. This will allow you to toggle
between high, low and both side charge paths.
The text will change on the display to your
current selection. You may also choose to inject
oil to the system during the charge. Use the
numeric keypad to enter the desired oil inject
amount. Make sure there is available oil in the
oil inject bottle located on the backside of the
machine. If injecting oil, you should also verify
that the correct oil viscosity is currently set on
your machine. See section Select Oil Viscosity.
Note: The charging process differs from
vehicle to vehicle. Charge function for
vehicles equipped with a single-service
fitting should be carried out manually.
Refer to the vehicle service manual for
specific instructions.
5.Press the
key to start the charge process.
Moving or bumping the machine at this point
may result in an inaccurate charge. When the
charge cycle gets close to the desired weight
value, the machine slows down. It will charge,
settle, charge again, settle, etc.
6.When the CHARGE COMPLETE screen appears,
it includes a summary of charge results. If
your unit has a printer, you may print out the
summary by pressing the print key. Press the
key to proceed to clear the service hoses.
7. You will be prompted to close the coupler valves
and disconnect the hoses from the vehicle.
Press the key to recover any remaining
refrigerant from the hoses. Once the hose clear
is complete, you will be returned to the Main
Menu.
CAUTION: If the low-side (blue) or highside (red) coupler valve is left open
and connected during the hose clearing
process, the system will pull refrigerant
back out of the vehicle.
8.The vehicle A/C system is now ready for use.
34788-NI/34788NI-H Rev.B
21
Operating Instructions — Charge
Recharge the Vehicle A/C System
(34788NI-H model)
1.While within the Main Menu, press the CHARGE
key. The display shows:
Is the service being performed on a system with an
electric compressor using POE oil?
2.If the system does not have an electric
compressor with POE oil, press the
key
to continue. If the system has an electric
compressor with POE oil, press the
key to
flush all residual oil from the hoses. You will be
prompted to “Connect service hoses to storage
ports and open couple valves.” See Figure 1.
Continuing will begin the process of flushing
the hoses. Once complete, press the key to
continue through the Charge process.
3.You will now be prompted to enter service data.
Once complete, press the
key to continue.
The display shows:
CHARGE: XX.XXX KG ON HIGH SIDE
4.Connect both service hoses to the vehicle’s
service ports and open coupler valves.
5.Use the arrow keys and the numeric keypad to
enter the desired charge amount.
6.Using the arrow key, maneuver to the “charge
path selection”. High Side is default. To change,
press the CHARGE PATH HS LS key on the
control panel. This will allow you to toggle
between high, low and both side charge paths.
The text will change on the display to your
current selection.
7.Press the
key to start the charge process.
Moving or bumping the machine at this point
may result in an inaccurate charge. When the
charge cycle gets close to the desired weight
value, the machine slows down. It will charge,
settle, charge again, settle, etc.
8.When the CHARGE COMPLETE screen appears,
it includes a summary of charge results. If
your unit has a printer, you may print out the
summary by pressing the print key. Press the
key to proceed to clear the service hoses.
22
9. You will be prompted to close the
coupler valves and disconnect the
hoses from the vehicle. Press the
key to recover any remaining
refrigerant from the hoses. Once the
hose clear is complete, you will be
returned to the Main Menu.
10. The vehicle A/C system is now ready
to use.
Operating Instructions — Automatic
Automatic Function
The AUTOMATIC function allows a user to perform
an automatic recovery, vacuum, leak test, and / or
charge sequence. A total automatic sequence may
take up to an hour to complete.
1.Connect high-side (red) and low-side (blue)
service hoses to the A/C system.
2.Open the service hose coupler valves by turning
the collars clockwise.
3.While within the Main Menu, press the
AUTOMATIC key on the control panel. The
display shows:
VACUUM TIME: XX:XX
VACUUM LEAK TEST: ON
CHARGE: XX.XXX KG ON HIGH SIDE
10. When the AUTOMATIC COMPLETE
screen appears, it includes a
summary of result. If your unit has
a printer, you may print out the
summary by pressing the print key. Press the key to proceed.
11. You will be prompted to close the
coupler valves and disconnect the
hoses from the vehicle. Press the
key to recover any remaining
refrigerant from the hoses. Once
the clear is complete, you will be
returned to the Main Menu.
12. The vehicle A/C system is now ready
to use.
ADDITIONAL OIL: XXX ML
4. Use the numeric keypad to enter the desired
length of vacuum.
5.Using the arrow key, maneuver downwards to
the choose whether to perform a vacuum leak
test or not. ON is the default setting. To toggle,
press the
key on the control panel.
6.Using the downwards arrow key, maneuver to
the “charge amount” entry field. Use the arrow
keys and numeric keypad to enter the desired
charge amount.
7.Using the arrow key, maneuver to the “charge
path selection”. High Side is default. To change,
press the HS LS key on the control panel. This
will allow you to toggle between high, low, and
both side charge paths. The text will change on
the display to your current selection.
8.Using the arrow key, maneuver to the “additional
oil” entry field. Use the numeric keypad to enter
the desired additional oil inject amount.
9. Press the
key to begin the AUTOMATIC
cycle. Your unit will now automatically proceed
through all applicable functions: RECOVER,
VACUUM, AND CHARGE. If the vehicle being
serviced has previously undergone a recover
and vacuum procedure, the machine will only
perform a CHARGE.
34788-NI/34788NI-H Rev.B
WARNING: To prevent personal
injur y while working with
refrigerant, read and follow the
instructions and warnings in this
manual, and wear protective
equipment such as goggles and
gloves.
Information About Automatic Function
• The CHARGE function for vehicles equipped
with a single-service fitting should be carried
out manually according to procedures in the
vehicle manufacturer’s service manual.
• After the RECOVER process, you will be
prompted to “Check oil bottle and enter oil
to be injected”. The entered oil inject amount
should be equal to the amount of oil drained,
and can be found by looking at the graduations
on the drain bottle.
• If RECOVER was not performed, the amount
of oil to be injected may be entered while
programming the CHARGE information.
• If problems are encountered during the
automatic sequence, an audio alert sounds
three times. The sequence remains paused
until the user enters a decision regarding how
to proceed.
23
Operating Instructions — System Flush
System Flush
The SYSTEM FLUSH function is performed using
a vehicle manufacturer-approved flushing adapter.
Refer to the instructions included with the adapter
also as you perform the following steps.
1. Verify the flusher filter and strainer are not
plugged.
2. Mount the flusher to the rear of the Robinair
machine. Do not make any connections at this
time.
WARNING: To prevent personal
injur y while working with
refrigerant, read and follow the
instructions and warnings in this
manual, and wear protective
equipment such as goggles and
gloves.
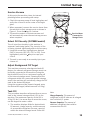
3. Remove the oil drain bottle (see Figure 4) from
the Robinair machine. Drain the oil bottle, and
dispose of the oil according to regulations in
your area. Reinstall the oil drain bottle on the
machine.
4. Recover all refrigerant from system to be
flushed.
5. Note the amount of oil collected during
recovery. This amount must be replaced, as
well as any oil collected during flush.
Note: The amount of oil collected and reported
during System Flush does not include the amount
of oil collected during the initial recovery.
6. Verify there is at least 6.0 kg (13.2 lb.) of
refrigerant in the Robinair machine. The
machine will not be able to complete a system
flush without at least 6.0 kg of refrigerant in
the ISV.
Note: If the machine does not have at least 6.0 kg
(13.2 lb.) of refrigerant on-board, see the section
of this manual titled Tank Fill.
Oil Drain
Bottle
7. Disconnect the Robinair machine from the
vehicle.
8. Refer to the vehicle service manual, and
connect the appropriate flushing adapters and
bypasses.
9. Connect the low-side (blue) service hose
directly to the filter of the flushing kit.
10.Remove the high-side (red) service coupler, and
connect the high-side (red) service hose to the
system suction line adapter.
11.Use the supplied hose to connect the system
discharge adapter to the flusher inlet.
12.Connect hoses according to the instructions
included with the flush kit.
24
Figure 4
Operating Instructions — System Flush
System Flush contd.
13.Select SYSTEM FLUSH from the SETUP MENU.
The unit will prompt you to enter any service
data if desired. Press the
key to continue to
the system flushing process.
14. Depending on the particular flush process
that is enabled on you model of machine, you
may or may not be prompted to enter in a total
“Flush Time”.
WARNING: Do NOT disconnect
service couplers during the flushing
process. Refrigerant could spray out of
the fittings, and exposure may cause
personal injury.
15. The machine will then automatically enter the
Vacuum process and proceed to a leak test.
16. Once the vacuum and leak tests are completed,
the unit will enter the actual system flushing
process, followed by an oil drain.
17. When the Flush Complete screen appears,
it includes a system flush result summary. If
your unit has a printer, you may print out the
summary by pressing the key. Press the key
to return to the SETUP MENU.
18. The vehicle A/C system has been flushed.
CAUTION: The flushing kit has a
replaceable filter as well as a debris
strainer, both of which can get plugged.
At the end of the flush cycle, check
the high-side (red) gauge for system
pressure, and check the adapter for
complete removal of refrigerant.
If pressure exists or refrigerant
remains, exit the flushing cycle and
enter the recovery mode to recover
refrigerant through both the high-side
(red) and low-side (blue) hoses. Then
service the filters and repeat the flush
process.
34788-NI/34788NI-H Rev.B
25
Maintenance
Maintenance Schedule
Maintenance Task
Recommended Interval
Change filter
After 150 kg (331 lbs.) of refrigerant has
been filtered. Refer to Filter Maintenance in
the Maintenance section of this manual.
Change vacuum pump oil
When the filter is replaced. Refer to Change
Vacuum Pump Oil in the Maintenance
section of this manual.
Check casters and wheels for ease of
operation
Monthly.
Check internal scale calibration
Monthly. Refer to Calibration Check in the
Maintenance section of this manual.
Check machine for leaks
Monthly. Check hoses and connections for
leakage. Disconnect power, remove the
shroud, and use an electronic leak detector
to check fittings.
Clean air intake panels (see Figure 5)
Monthly. Use a clean cloth.
Clean cabinet and control panel
Monthly. Use a clean cloth.
Inspect power cord and hoses for cuts
and abrasions
Daily.
Lubricate wheel bearings and inspect
brake components
Monthly.
Pressure Test
Every 10 years — performed by an
authorized Robinair service center.
WARNING: To prevent personal
injury,
Air
Intakes
• Only qualified personnel may
perform inspections and repairs
to this machine.
• Read and follow instructions and
warnings in this manual.
• Wear protective equipment such
as goggles and gloves.
Figure 5
26
Maintenance
Electrical Protection
The machine is equipped with a circuit breaker
on the center divider as shown in Figure 6. If the
breaker trips, its button will pop out. A tripped
circuit breaker will cause the machine to lose all
power.
1.Remove the front shroud.
2.Press the circuit breaker button to reset.
3.Replace the shroud.
Circuit
Breaker
Figure 6
Load Language
Use the following instructions to add or update a
language from an SD card.
1.Choose SELECT LANGUAGE from the Setup
Menu.
Insert SD card
containing new
or
updated
language.
2.Use the arrow keys to scroll to LOAD NEW. Press
the
key.
3.Insert the SD card containing the language data
into the side panel on the machine. See Figure
7.
4.Follow the prompts to select the language to
load or update. If loading a new language, it
will be necessary to select which language to
replace.
34788-NI/34788NI-H Rev.B
Figure 7
27
Maintenance
Adjust Background Fill Target
This machine possesses a background tank fill
feature. An external refrigerant storage vessel can
be fluidly connected to the machine (using the
black tank fill hose) for a continuous topping off
of the internal storage vessel. Drawing from the
refrigerant within the connected external staorage
vessel, the machine will periodically charge the ISV
tank to the desired fill target.
1.To choose the background refrigerant fill target
of the machine, find Adjust Background Fill
Target in the SETUP MENU.
2 Using the arrows and the numeric keypad, enter
the desired fill target. Press the
key to save
the new value and exit. Press the
key to exit
and continue to use the previously entered
amount.
Tank Fill
This menu item is used to transfer refrigerant from
a source tank to the ISV.
The maximum capacity of the internal storage
vessel (ISV) is 10 kg. Use the arrow keys to move
the cursor; use the keypad to enter a value. Note:
Add at least 3.6 kg of refrigerant to ensure enough
is available for charging.
1.Connect the tank fill (black) hose to the liquid
connector on a full source tank.
2.Position the source tank in such a way that
liquid refrigerant is supplied to the connection.
Open the source tank valve.
3.Select TANK FILL from the Setup Menu. The
machine displays
TANK FILL
FILL AMOUNT: XX.XYY
CHARGE CAPACITY: XX.XXYY
RECOVER CAPACITY: XX.XXYY
4.Enter the quantity to recover, and press the
key. Add at least 3.6 kg of refrigerant to ensure
enough is available for charging.
28
5.The machine begins filling the ISV and
automatically stops when the preset
tank fill level is reached. To stop the
tank fill before the preset level is
reached, press the key. An option to
exit will appear on the display.
6.Once complete, remove the hose
from the source tank.
Maintenance
Filter Maintenance
The filter is designed to trap acid and particulates,
and to remove moisture from refrigerant. To
meet the mandate for adequate moisture and
contaminant removal, the filter must be replaced
after 68 kg (150 lbs.) of refrigerant has been
filtered.
The machine gives a warning when 125 kg (276
lbs.) of the filter capacity has been used; the
machine locks down when the 68 kg (150 lbs.)
filter capacity has been reached and will no longer
function.
WARNING: To prevent personal
injury while working with
refrigerant, read and follow the
instructions and warnings in this
manual, and wear protective
equipment such as goggles and
gloves.
Check Remaining Filter Capacity
1.Select FILTER MAINTENANCE from the Setup
Menu or when the machine prompts. The
machine displays
REMAINING FILTER CAPACITY:
XXX.XO KG
REPLACE FILTER NOW?
Caution: To prevent equipment
damage, use only authentic Robinair
No. 34724 filters in this machine. All
performance tests and claims are
based on using this specific filter.
The machine displays the amount of filter
capacity remaining until the machine locks
down.
2.Press the
key to change the filter; press the
key to resume using the machine.
WARNING: The components in the machine
are under high pressure. To prevent personal
injury, change the filter only when the machine
prompts.
Replace the Filter
1.If the
key was selected to change the filter,
the machine prompts for the new filter code to
be entered.
ENTER NEW FILTER SERIAL NUMBER
Use the keypad to enter the serial number
that appears on the new filter and press
to
continue.
Note: If INVALID SERIAL NUMBER is displayed, the
serial number has been incorrectly entered, or the
filter has already been used in this machine.
34788-NI/34788NI-H Rev.B
29
Maintenance
Filter Maintenance continued
2.The machine clears the existing filter and then
displays:
Remove the four screws
holding the shroud.
SERIAL NUMBER ACCEPTED
TURN POWER OFF AND REPLACE FILTER
Shut off the machine. Remove the oil bottle. Remove
the four screws holding the shroud. See Figure 8.
3.Hang the shroud on the back of the machine as
shown in Figure 9.
4.Remove the filter by turning it counterclockwise
(as viewed from the bottom of the filter).
5.Look at the new filter - verify both o-rings are
lubricated and correctly located in the grooves
as shown in Figure 9.
6.Install the new filter by threading it clockwise
into place. Verify the filter is positioned correctly
as shown in Figure 9. Tighten the filter to
.
20 N m.
Figure 8
Hang Shroud
Here
Filter
Figure 9
30
Maintenance
Calibration Check
This function is used to ensure the machine’s
internal scale is always calibrated. During this test,
use only the calibration weight that is provided
with the machine.
1.Refer to Figure 10, and verify the magnet on the
bottom of the machine is clean.
2.Select CALIBRATION CHECK from the Setup
Menu. The machine displays
PLACE CALIBRATION WEIGHT ON MAGNET
LOCATED ON THE BOTTOM OF THE UNIT
3.Attach the calibration weight to the magnet on
the bottom of the machine. Select the
key to
continue.
4.The machine displays
REMOVE CALIBRATION WEIGHT FROM MAGNET
LOCATED ON THE BOTTOM OF THE UNIT
Remove the calibration weight from the magnet.
Select the
key to continue.
•
Magnet
Figure 10
If the display shows
CALIBRATION CHECK PASSED
the scale is in calibration. Select the
return to the Setup Menu.
•
key to
If the display shows
CALIBRATION CHECK FAILED. RETRY?
the scale is out of calibration. You may press the
key again to retry. If calibration continues
to fail, contact an authorized Robinair service
center for assistance.
34788-NI/34788NI-H Rev.B
31
Maintenance
Change Vacuum Pump Oil
1.Select PUMP MAINTENANCE from the Setup
Menu or when prompted. The display shows
how long the vacuum pump has operated since
the last oil change.
OIL LIFE REMAINING
XXX:XX (HHH:MM)
CHANGE OIL NOW?
CAUTION: To prevent personal
injury, do NOT operate the machine
at any other time without the oil fill
port cap installed, because the vacuum
pump is pressurized during normal
operation.
2.Press the
key to change vacuum pump oil. If
the machine displays
WARMING OIL FOR DRAIN
XX:XX
Oil Fill
Cap and
Port
allow the vacuum pump to run for two minutes
to warm up the oil. If the oil is already warm, the
display shows
DRAIN USED OIL FROM PUMP
AND REPLACE WITH 150 ML OF NEW OIL
REMOVE FILL CAP TO SPEED DRAINING OF OIL
Sight
Glass
3.SLOWLY open the oil fill cap to verify there is no
pressure in the machine. Then carefully remove
the cap. See Figure 11.
Oil Drain
Fitting
4.Remove the oil drain fitting cap and drain the oil
into a suitable container for disposal. Replace
the cap and close tightly. Press the key to
continue.
5.The machine displays
FILL VACUUM PUMP TO THE CENTER
OF THE SIGHT GLASS
REPLACE FILL CAP
Slowly add vacuum pump oil to the pump
through the oil fill port until the oil reaches the
center of the sight glass. Install the cap on the
oil fill port and close tightly. Press the key to
return to the Pump Maintenance screen.
Figure 11
Caution: It is the responsibility of the
user to monitor vacuum pump oil level
and clarity. If contaminated oil is not
removed from the vacuum pump and
replaced, the vacuum pump will be
permanently damaged.
32
Maintenance
Leak Check
A leak test may be performed on the machine at
any time. During this test, components containing
refrigerant are pressurized and monitored for
pressure decay, which could indicate a leak.
1.Select LEAK CHECK from the Setup Menu. The
machine displays
CONNECT SERVICE HOSES TO STORAGE PORTS
AND OPEN COUPLER VALVES
Connect the service hose couplers to the
storage ports at the rear of the machine. Open
the couplers by turning the collars clockwise.
2.Press the
key to start. The machine performs
a self-recovery and displays
RECOVER IN PROGRESS
3.The machine performs a 30-second vacuum test
and displays
VACUUM LEAK CHECK IN PROGRESS
If the vacuum test fails, the machine will prompt
to check for leaks.
4.Once the machine passes the vacuum test, a
controlled pressure is applied to its internal
components. The machine displays
PRESSURE LEAK CHECK IN PROGRESS
Pressure is held for five minutes and monitored
for decay. Minutes and seconds count down on
the display.
•
If an acceptable pressure decay is detected, the
machine recovers refrigerant and returns to the
Setup Menu, ready for normal operation.
•
If an unacceptable pressure decay is detected,
the machine will prompt to check for leaks. Take
the machine to an authorized Robinair service
center for repair.
WARNING: To prevent personal
injury should the machine require
transport to a local Robinair service
center, follow local government
regulations regarding transportation of
equipment containing R134a.
34788-NI/34788NI-H Rev.B
33
Maintenance
Select Oil Viscosity (34788NI model)
The oil inject functionality in this machine is
automatic and timing-based. The viscosity of the oil
being injected significantly affects the accuracy.
1.To choose the viscosity of the oil being used,
find Select Oil Viscosity in the SETUP MENU.
2.Using the arrow keys, highlight your desired
PAG oil viscosity (46, 100, 125, or 150). Once
highlighted, press the
key to accept your
choice.
3.The unit is now ready to accurately inject your
chosen oil.
CAUTION: To avoid chemical
incompatibilities with the internal
components of the machine, use
only oils approved by the vehicle
manufacturer. Problems resulting
from the use of non-approved oils will
cancel the warranty.
34
Maintenance
Edit Print Header
To make changes to text that appears in this
screen:
1.In the Setup Menu, select Edit Print Header.
2.The cursor is in the first field. Update the text by
using the arrows and the multi-tap interface on
the numeric keypad:
•
arrow acts as a backspace key.
• RIGHT arrow moves the cursor to the right.
• ZERO (0) key acts as a spacebar.
• UP and DOWN arrows navigate between the
rows.
3.Press the
key to save the changes and return
to the Setup Menu; press the
key to return to
the previous header and exit to the Setup Menu.
Leading Edge
of Paper Over
Roller
Replace Printer Paper (Units with
Printers)
To install a new paper roll in the printer:
1.Remove the cover on the printer by pulling out
on the tab as shown in Figure 12.
2.Remove the paper core.
3.Install the new roll of paper with the end of the
paper at the top of the roll.
4. Assemble the cover onto the printer with the
leading edge of the paper over the roller.
Tab
Figure 12
34788-NI/34788NI-H Rev.B
35
Maintenance
Install a Printer
A printer may be purchased and installed on any
model not containing a printer. All models of the
machine already contain a printer connection
harness that is ready for use. To install a printer:
12.Swivel the control panel back into
place and fasten it using the two
screws removed in Step 4.
1. Turn OFF the machine and disconnect it from
its power source.
13.Assemble the shroud back onto the
machine and install the four screws
removed in Step 2.
2. Remove the four screws holding the shroud.
See Figure 8.
The printer is now ready for use.
3. Hang the shroud on the back of the machine as
shown in Figure 9.
4. Remove the two screws on the top corners of
the control panel, allowing the control panel to
swivel forward.
5. The printer connection harness is fastened
to the back of the cap that is in the printer
location cut-out. Remove the zip tie, freeing
the harness. The harness will be used in a later
step.
6. Remove the cap from the printer location cutout by pressing on the cap’s tabs from the back
of the control panel and pushing the cap out of
the panel.
7. Remove the two locking arms from the printer
by inserting the face of a flathead screwdriver
under each tab near the back of its locking arm.
Pry the tab outward while sliding the entire
arm away from the printer.
8. Place the printer into the cut-out area on the
control panel. Press the face of the printer
flush to the panel, oriented with the paper
coming out at the top of the printer as shown
in Figure 12.
9. Replace the printer locking arms from within
the inside of the control panel. Push them
forward until they come into firm contact with
the inside face of the control panel.
10.Locate the free end of printer connection
harness which was detached from the cap in
Step 5.
11.Attach the two free connectors to the
appropriate connectors on the back of the
printer.
36
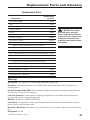
Replacement Parts and Glossary
Replacement Parts
Component
Replacement
Part No.
Calibration Weight
16214
Filter
34724
Oil Drain Bottle
19100
Oil Inject Bottle
19867
Printer
30038
Printer Paper (1 roll)
34214 or 5607069
LP Service Coupler
18190A
HP Service Coupler
18191A
Service Coupler Set (high-side [red] and low-side [blue] couplers)
Hose Set without Couplers
18192
CAUTION: To prevent
personal injury, use only
those repair parts called out
in this parts list. Items found
in this parts list have been
carefully tested and selected
by Robinair.
71788
(high-side [red] and low-side [blue] with filters)
Service Hose without Coupler (low-side, blue with filter) 70018
Service Hose without Coupler (high-side, red with filter) 70019
Hose Set without Couplers
71789
(high-side [red] and low-side [blue] less filters)
Service Hose without Coupler (low-side, blue less filter) 70020
Service Hose without Coupler (high-side, red less filter) 70021
Vacuum Pump Oil (quart)
13203
Vacuum Pump Oil (gallon)
13204
Vinyl Dust Cover (optional)
17499
Glossary
A/C System : The vehicle air conditioning system being serviced.
Evacuation : Moisture and other non-condensables are removed from an A/C system by a
vacuum pump.
Internal Storage Vessel (ISV) : The refillable refrigerant storage tank designed specifically for
this machine; 10 kg (22 lbs) capacity.
Leak Test (Vacuum) : Components containing refrigerant are evacuated and monitored for
pressure rise, which could indicate a leak.
Machine : Model No. 34788NI/34788NI-H.
Leak Check : Components containing refrigerant are pressurized and monitored for pressure
decay, which could indicate a leak.
Recovery / Recycling : Refrigerant is recovered from an A/C system, filtered, and stored in the
ISV.
Refrigerant : R134a.
34788-NI/34788NI-H Rev.B
37
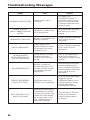
Troubleshooting Messages
Display
Cause
Solution
CALIBRATION CHECK FAILED
Internal scale is out of
calibration.
Press F1 to retry
CALIBRATION CHECK. If
calibration continues to fail,
exit current test and contact
a Robinair authorized service
center for repair.
CHARGE STALLED!
CHECK CONNECTIONS AND
VALVES
Refrigerant is stalled in the
ISV or the machine.
Verify connections are secure
and valves are in correct
position.
DATABASE NOT INSTALLED
Machine is not shipped with
database installed.
Contact a Robinair authorized
service center for more
information.
EXCESS TANK WEIGHT
Overfill safety circuit
tripped. Machine is locked
out because of too much
refrigerant in ISV.
Contact a Robinair authorized
service center for more
information.
FILTER EXHAUSTED
FILTER WEIGHT XXX.XYY
REPLACE FILTER NOW?
150 kg (331 lbs.) or more
refrigerant has been
recovered since last filter
change.
Refer to Filter Maintenance
section of this manual for
instructions to change vacuum
pump oil.
HIGH PRESSURE IN ISV
Machine is locked out
because pressure in ISV is
too high, possibly because
of excessively high tank
temperature.
Allow machine to cool before
performing additional A/C
service. If problem continues,
contact a Robinair authorized
service center for more
information.
IDENTIFY REFRIGERANT
PURITY TEST FAILED
Refrigerant tested is not
R134a or it is contaminated.
Do not recover contaminated
refrigerant into the
34788NI/34788NI-H; use an
external refrigerant recovery
machine dedicated to
contaminated refrigerant.
INLET PRESSURE IS TOO
HIGH FOR VACUUM
Before the machine begins
evacuating the A/C system,
it checks for pressure in the
system that could damage
the vacuum pump. In this
case, system pressure is
above 0.35 bar gauge.
Press F1. Refer to RECOVER
section of this manual to
recover refrigerant before
proceeding.
38
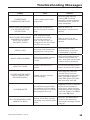
Troubleshooting Messages
Display
Cause
Solution
POWER BOARD
COMMUNICATION FAILED
Failed communication with
relay board.
Reset the relay board by
pressing F2. If problem
continues, contact a Robinair
authorized service center for
more information.
INSUFFICIENT REFRIGERANT.
6.00 KG REQUIRED FOR
SYSTEM FLUSH
Not enough refrigerant in
the ISV to perform a system
flush.
Refer to Tank Fill in
Maintenance section of this
manual.
INSUFFICIENT REFRIGERANT
AVAILABLE FOR CHARGE
SELECTED: XX.XXYY
AVAILABLE: XX.XXYY
After a desired weight
is entered, if the charge
process will leave less
than 1.27 kg (2.8 lbs.) of
refrigerant in ISV, the charge
function will not start.
Refer to Tank Fill in the
Maintenance section of this
manual.
INVALID CODE
Activation code entered into
the machine is not correct.
Verify activation code is
entered exactly as received.
Capitalization is required.
INVALID SERIAL NUMBER!
Filter serial number entered
into the machine is not
correct.
Verify serial number entered
matches serial number on
filter. Verify filter has not been
used on machine previously.
A leak in the vehicle A/C
system.
Exit current test and perform
repairs on vehicle A/C system.
System pressure is below
0.35 bar gauge.
Verify high-side (red) and
low-side (blue) hoses are
connected and coupler valves
open. Press F1 to recover;
press F2 to bypass RECOVER
and proceed to VACUUM.
OIL DRAIN HALTED
Accumulator pressure failed
to rise above 1.10 bar within
the minute before an oil drain
was supposed to occur.
Adequate pressure is required
within the accumulator to
force the oil, which has been
separated from the refrigerant,
out of the system. Press F1 to
retry; press F2 to exit.
OIL LIFE REMAINING XX:XXX
CHANGE OIL NOW?
Display shows filter capacity
remaining until machine locks
down.
Refer to Filter Maintenance
section of this manual for
instructions to change vacuum
pump oil.
LEAK TEST FAILED
NO PRESSURE ON INLETS
CHECK CONNECTIONS
RECOVER ANYWAY?
34788-NI/34788NI-H Rev.B
39
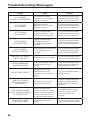
Troubleshooting Messages
Display
Cause
Solution
OUT OF RANGE
ACCUMULATOR PRESSURE
Accumulator pressure
transducer is not reading
pressure correctly.
Exit current test and contact
a Robinair authorized service
center for more information.
OUT OF RANGE
HS PRESSURE
High-side pressure
transducer is not reading
pressure correctly.
Exit current test and contact
a Robinair authorized service
center for more information.
OUT OF RANGE
ISV PRESSURE
Internal storage vessel
pressure transducer is not
reading pressure correctly.
Exit current test and contact
a Robinair authorized service
center for more information.
Internal storage vessel
temperature sensor is
not reading temperature
correctly.
Exit current test and contact
a Robinair authorized service
center for more information.
OUT OF RANGE
LOW SIDE PRESSURE
Low-side pressure transducer
is not reading pressure
correctly.
Exit current test and contact
a Robinair authorized service
center for more information.
PRESSURE TEST FAILED
CHECK FOR LEAKS
A leak in vehicle A/C system.
Exit current test and perform
repairs on vehicle A/C system.
SERIAL NUMBER HAS
ALREADY BEEN USED
Filter serial number entered
into the machine is not
correct.
Filter has already been used
on this machine. Obtain new
Robinair filter No. 34728.
Refrigerant cannot be
transferred to the ISV
because the source tank is
empty.
Exit current test and replace
the source tank.
ISV is too full to recover
additional refrigerant.
Perform a charge process to
remove refrigerant from ISV
before any further recovery
attempts.
Failure to register and
activate the machine within
30 days of initial startup will
cause the machine to lock
out and no longer function.
Press F1 and refer to Unit
Activation section in this
manual to register the
machine.
A leak in the vehicle A/C
system.
Exit current test and perform
repairs on vehicle A/C system.
OUT OF RANGE
ISV TEMPERATURE
SOURCE TANK IS EMPTY
TANK FULL. REMOVE
REFRIGERANT BEFORE
CONTINUING
TRIAL PERIOD EXPIRED
UNIT ACTIVATION REQUIRED
TO CONTINUE USE
VACUUM TEST FAILED.
CHECK FOR LEAKS
40
Storage and Transportation of Equipment
Storage
Never leave the machine live if an immediate use is
not scheduled.
1.Disconnect the machine from its power supply.
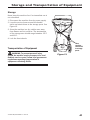
2.Loop the service hoses around the handle
twice and attach them to the storage ports. See
Figure 13.
3.Store the machine in a dry, stable area, away
from flames and hot surfaces. The temperature
of the storage area should range between -25°C
and 60°C.
4.Lock the front wheels.
Hose
couplers
connected
to storage
ports.
Transportation of Equipment
WARNING: To prevent personal injury
should the machine require transport to a local
Robinair service center, follow local government
regulations regarding transportation of
equipment containing R134a.
34788-NI/34788NI-H Rev.B
Figure 13
41
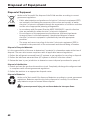
Disposal of Equipment
Disposal of Equipment
At the end of its useful life, dispose of the R134a machine according to current
government regulations.
• Public administration and producers of electrical / electronic equipment (EEE)
are involved in facilitating the processes of the re-use and recovery of waste
electrical / electronic equipment through the organization of collection activities
and the use of appropriate planning arrangements.
• In accordance with European Directive WEEE 2002/96/EC, special collection
sites are available for waste electrical / electronic equipment.
• Do not dispose of this equipment as miscellaneous solid municipal waste.
Arrange to have it collected separately. Unauthorized disposal of waste
electrical / electronic equipment is punishable by law with appropriate
penalties.
• The reuse and correct recycling of electrical / electronic equipment (EEE) is
required for the protection of the environment and the well-being of humans.
Disposal of Recycled Materials
It is the responsibility of the user to determine if a material is a hazardous waste at the time of
disposal. The user must ensure compliance with all applicable laws and regulations.
1.Deliver the refrigerant recovered from A/C systems to gas suppliers for recycling or disposal.
2.Deliver the lubricants extracted from A/C systems to used oil collection centers.
3.Review the laws in your jurisdiction to determine correct disposal procedures for pump oil.
Disposal of the Machine
1.Detach and vent the gas from the machine circuit. Completely discharge the refrigerant tank
in compliance with current government regulations.
2.Deliver the machine to an appropriate disposal center.
Disposal of Batteries
At the end of their useful life, dispose of batteries according to current government
regulations. Batteries must be recycled or disposed of correctly. Do not throw
away batteries as part of normal refuse disposal.
To prevent personal injury, do not throw batteries into open flame.
42
BOSCH AUTOMOTIVE SERVICE SOLUTIONS
SOFTWARE LICENSE NOTICES
BOSCH AUTOMOTIVE SERVICE SOLUTIONS SOFTWARE LICENSE NOTICES
Copyright © 2014 Robert Bosch GmbH. All Rights Reserved.
Bosch Automotive Service Solutions
28635 Mound Road
Warren
MI 48092
USA
Phone numbers
USA 800-533-6127
EMEA +49 (0) 6182 959-225
This Bosch Automotive Service Solutions software is released under the software license agreement
presented at product activation.
All other products or service names are the property of their respective owners.
Registered trademarks of their respective companies and are hereby acknowledged.
The following notices pertain to this Bosch Automotive Service Solutions software license:
1. This product contains IAR Standard libraries. IAR software license agreement is reported
below and located at http://www.iar.com/Global/Products/Software_licenses/SLA_
February_2013.pdf.
IAR standard library includes third party software as declared in the third party licenses
document reported below and located at
http://www.iar.com/Global/Products/Software_licenses/3rdpartyLicenses.html
2. This product contains LibTomCrypt is a fairly comprehensive, modular and portable
cryptographic toolkit that provides developers with a vast array of well known published
block ciphers, one-way hash functions, chaining modes, pseudo-random number
generators, public key cryptography and a plethora of other routines. http://www.libtom.
org. LibTomCrypt is public domain. As should all quality software be. Tom St Denis
3. This product contains Freescale software as part of the Freescale microcontroller BSP.
Refer to the Freescale Semiconductor License Agreements for the use terms below
reported and located at
https://www.freescale.com/webapp/sps/download/license.jsp?colCode=DL-MQX-CX&prodC
ode=MQX&appType=file2&location=null&DOWNLOAD_ID=null&fsrch=1&sr=1&pageNum=1&P
arent_nodeId=&Parent_pageType
February 2013
Rev.5
IAR SOFTWARE LICENSE AGREEMENT
Concerning the Products: IAR Embedded Workbench® and visualSTATE® from IAR Systems AB
PREAMBLE
THIS SOFTWARE LICENSE AGREEMENT (“THE AGREEMENT") APPLIES TO PRODUCTS LICENSED BY
IAR SYSTEMS AB INCLUDING ANY OF ITS SUBSIDIARIES ("IAR SYSTEMS") OR DISTRIBUTORS ("IAR
DISTRIBUTORS"), TO YOU ("THE LICENSEE").
The order confirmation from IAR Systems, or when applicable the agreement between IAR Systems and the
Licensee, will set out, apart from the applicable licensed product and license fee (which will also be stated in
the Invoice), a) if the License in question is a PC-locked License or a Multi-user License, b) in case of a Multi-user
License with the allowed number of simultaneous users, c) if the license includes a time limited Support and
Update Service and in such cases the expiry date of such service. Any opening of a package where these terms
have been stated or referred to, and any use of IAR Systems software, is subject to these terms and conditions.
YOU AS A USER OF THE LICENSED PRODUCTS STATED ABOVE AND ON THE INVOICE, WILL BIND
THE CORPORATION OR ORGANIZATION ALSO SET OUT ON THE INVOICE TO THIS AGREEMENT, BY
OPENING OF A PACKAGE OR INSTALLING SOFTWARE WHERE THIS AGREEMENT HAS BEEN STATED
OR REFERRED TO. IF YOU ARE NOT IN AGREEMENT WITH THE TERMS HEREIN, OR DO NOT HAVE
THE AUTHORITY TO BIND YOUR CORPORATION OR ORGANIZATION TO THESE TERMS, YOU SHALL
IMMEDIATELY CONTACT IAR SYSTEMS AND YOU MAY NOT INSTALL ANY SOFTWARE OR MAKE USE OF
ANY PARTS OF THE PRODUCT.
1. DEFINITIONS
The following terms have the meanings set forth below whenever they are used in this Agreement:
1.1 "Executable Software" means a copy of the executable code version of the software program(s) included
in the enclosed package or otherwise specified in this Agreement or Invoice (including any link-time and
runtime modules), along with templates and other instructions and any Software updates, revisions, and
additional modules and templates (if any) that the Licensee may receive from IAR Systems hereunder from
time to time.
1.2 "Software Source Code" has the meaning set out in section 3.7.
1.3 “Software” is a collective term for Executable Software and Software Source Code as defined above.
1.4 "Documentation" means a copy of the documentation, as provided by IAR Systems together with the
Software for use by the Licensee.
1.5 "Product" means the Software and Documentation licensed to the Licensee under the conditions of
this Agreement.
1.6 "Invoice" means IAR Systems’ or IAR Distributor’s invoice to the Licensee for the Product license
granted hereunder.
1.7 "PC-locked License" has the meaning set out in section 3.2.
1.8 “Mobile License” has the meaning set out in section 3.3.
1.9 “Multi-user License” has the meanings set out in section 3.4.
1.10 "Network License" has the meanings set out in section 3.5.
1.11 “Global Network License” has the meanings set out in section 3.6.
1.12 “Concurrent Users” has the meaning as set out in section 3.7.
1.13 “Commuter license” has the meaning as set out in section 3.8.
1.14 “Evaluation License” has the meanings set out in section 3.12.
1.15 “Site” means the physical premises of the Licensee within the borders of one city.
1.16 “Target Architecture” means the family or group of embedded micro-controller and micro-processor
devices belonging to one processor architecture, as defined by its instruction set, and as specified on the
Invoice.
1.17 “Support and Update Services” means the services set out in section 12.
2. TERM OF AGREEMENT
2.1 This Agreement shall become effective on the latest at the Licensee’s receipt of the Software and shall
remain in effect for an indefinite period in time, subject to the terms and conditions set out below – in
particular the right of IAR Systems to terminate the Agreement upon Licensee’s breach. Registration of the
Licensee as a rightful user of Licensed Products shall be made in accordance with applicable instructions
from IAR Systems.
2.2 For the avoidance of doubt: Also for Software delivered with a temporary license key (for some products
called quick start key) enabling use for a limited time, the Agreement terms have become effective, including
but not limited to its payment terms and use restrictions, already upon the Licensee’s receipt of the Software,
regardless of whether registration is made or not. (Evaluation licenses without obligation to pay license
fees, are available to the extent separately provided by IAR Systems.)
IAR SOFTWARE LICENSE AGREEMENT
3. OWNERSHIP AND LICENSE GRANT
3.1 IAR Systems holds the copyright, trade secrets, and any other intellectual property rights which subsist
in the Licensed Product and all copies thereof. No title or other rights in the Licensed Product (other than
rights expressly granted herein) shall pass to the Licensee.
THE PRODUCT IS LICENSED, NOT SOLD, TO THE LICENSEE FOR USE ONLY UNDER THE TERMS OF
THIS AGREEMENT. THE LICENSEE ACKNOWLEDGES THAT THE PRODUCT CONSISTS OF PROPRIETARY,
UNPUBLISHED PRODUCTS OF IAR SYSTEMS, PROTECTED UNDER INTERNATIONAL COPYRIGHT AND
TRADE SECRET LAWS.
3.2 PC-locked License: To the extent the relevant license granted is a PC-locked License, the terms in 3.2.a
and 3.2.b shall apply.
A PC-locked License is a single-user license, locked to the computer where the software is installed.
3.2.a Subject to the terms and conditions of this Agreement, IAR Systems hereby grants to the Licensee a
personal, non-transferable and non-exclusive PC-locked License to use the Software. The Licensee’s number
of authorized users of the Software under the PC-locked License, if more than one, is stated in the Invoice
or otherwise in writing from IAR Systems.
3.2.b The PC-locked License may be used by the Licensee only on one single, self-contained computer unit
(stationary or portable), designated through its IP number or other means of identification. A switch of
the designated computer to another single computer may be allowed to transfer the license via a transfer
program provided by IAR Systems within the license management system. The Software may not be accessed
by users from other computer units than the unit designated as set forth in this clause; through modem,
Internet or any other means of network or remote access.
3.3 Mobile License: To the extent the relevant license granted is a Mobile License, the terms in 3.3.a and
3.3.b shall apply.
A Mobile License comes with a hardware lock (dongle). A hardware lock is a device to be attached to one
of the computer’s external ports, which allows the Licensee to move the license to another computer. A
hardware lock is part of the product package only to the extent explicitly ordered.
3.3.a Subject to the terms and conditions of this Agreement, IAR Systems hereby grants to the Licensee a
personal, non-transferable and non-exclusive Mobile License to use the Software. The Licensee’s number
of authorized users of the Software under the Mobile License, if more than one, is stated in the Invoice or
otherwise in writing from IAR Systems.
3.3.b The Mobile License may be used by the Licensee only for one single user, but with the right to a switch
of the designated computer to another single computer using a hardware lock. The Software may not be
accessed by users from other computer units than the unit designated as set forth in this clause; through
modem, Internet or any other means of network or remote access.
3.4 Multi-user License: To the extent the Product license granted is a Multi-user License, the terms in this
3.4 shall apply.
Subject to the terms and conditions of this Agreement, IAR Systems hereby grants to the Licensee a
personal, non-transferable and non-exclusive Multi-user License to use the Software. The Licensee’s number
of authorized users of the Software under the Multi-user License, if more than one, is stated in the Invoice
or otherwise in writing from IAR Systems or IAR Distributors.
3.5 A Network License is a Multi-user License, located on a single designated license server and used by
multiple users on a network and on one Site only. The Network License is locked either to the computer
where the license server software runs, or to a hardware lock (dongle). The use of a hardware lock allows
to move the Network License to another server computer, in case of server failure. The Network License
can be used on all client computers on the network where the Software is installed. However, the Network
License is made for a maximum number of concurrent users.
3.6 A Global Network License is a Multi-user License, located on a license server and used by multiple
users on a network that can be accessed from multiple Sites globally. The Global Network License is locked
either to the computer where the license server software runs, or to a hardware lock (dongle). The use of
a hardware lock allows to move the Global Network License to another server computer, in case of server
failure. The Global Network License can be used on all client computers on the network where the Software
is installed. However, the Global Network License is made for a maximum number of concurrent users.
3.7 Concurrent Users: For Products that are Executable Software and licensed as Network Licenses, the
definition of concurrency is given by the license server software, which also keeps track of the number of
current of users. A user session of an Executable Software is always a minimum of thirty (30) minutes, and
is deemed to last for additional thirty (30) minutes after the last license activation by the license server.
For Products including Software Source Code, the software shall be deemed in (concurrent) use on a
computer when it is loaded into temporary memory (i.e. RAM) or installed into permanent memory (e.g.,
hard disk, CD-ROM, or other storage device) of that computer.
3.8 Commuter licensing: For Products released 2012 and later including a new license management system
February 2013
Rev.5
IAR SOFTWARE LICENSE AGREEMENT
(LMS) a commuter license is granted. Commuter licensing permits a temporary use of a network license
on a personal computer not connected to the network for up to 15 days. The commuter license permits
the use of the Product outside the designated Site.
3.9 Source Code License: If the Product Licensee receives hereunder contained software modules or
components in source code format ("Software Source Code"), the following shall apply to such Software
Source Code, in addition to all other provisions of this Agreement:
The Licensee may use such Software Source Code only in conjunction with the Product and the Software
Source Code or any derivative works thereof. The Software Source Code may only be compiled and linked
with products from IAR Systems, and only in accordance with the provisions on such use set out in the
Documentation and/or this Agreement. The Licensee is strictly prohibited to make any other use of the
Software Source Code. Any breach of this Section 3.9 shall be considered a material breach of this Agreement.
THE LICENSEE ACKNOWLEDGES THAT THE SOFTWARE SOURCE CODE EMBEDS COPYRIGHTED
AND PROPRIETY INFORMATION OF IAR SYSTEMS, AND THAT MAKING SOFTWARE SOURCE CODE
ACCESSIBLE TO OTHERS OUTSIDE THE SCOPE OF THIS AGREEMENT, BY THE NATURE OF SOURCE
CODE, SEVERELY DAMAGES THE INTELLECTUAL PROPERTY RIGHTS OF IAR SYSTEMS, AND AGREES
TO COMPENSATE IAR FOR ALL DAMAGE RESULTING FROM SUCH BREACH, THAT CAN BE REASONABLY
SUBSTANTIATED BY IAR.
The Licensee shall keep and protect the Software Source Code with at least the same degree of care as
its own proprietary source code, as further specified in section 5.
3.10 If the Product the Licensee receives hereunder contains Third Party-Owned software, the use of such
Third Party-Owned software may be restricted to a specific Target Architecture. See Section 11.2 below.
3.11 Back-up Copies: The Licensee may make back-up copies of the Software in machine executable code
form, only to be used in the event and to the extent that the copy of the Software received from IAR Systems
fails to function, is lost, damaged, or destroyed. The Licensee warrants that it will make no other copies
of the Software and will not allow, authorize, or assist others to copy any part or all of the Software in any
form without the prior written approval of IAR Systems. There may be no more copies than are necessary
to form part of a reasonable back-up cycle for the Licensee. Back-up copies of the Software may be kept by
the Licensee in a bank deposit or other such secure place as is normally used by the Licensee for storage of
its computer program back-ups. The rights for the Licensee under this section shall not in any case include
any measures to affect or decrease the function of the software protection included in the software.
3.12 An Evaluation License is solely intended for testing and evaluation purposes. Any other use than for
testing and evaluation is prohibited. IAR Systems has no obligation to provide support or related services
and no warranties. IN NO EVENT SHALL IAR SYSTEMS BE LIABLE TO THE OTHER FOR ANY DIRECT,
INDIRECT, INCIDENTAL, SPECIAL, CONSEQUENTIAL, PUNITIVE OR TORT DAMAGES OF ANY NATURE OR KIND
WHATSOEVER, INCLUDING BUT NOT LIMITED TO LOST PROFITS, IN CONNECTION WITH OR ARISING OUT
OF THE USE OR PERFORMANCE OF SOFTWARE, SUPPORT MATERIALS, OR THE PROVISION OF SERVICES,
EVEN IF THE OTHER PARTY HAS BEEN ADVISED OF THE POSSIBILITY OF SUCH DAMAGES.
Section 11 in this Software License Agreement may also apply to an Evaluation License.
4. LICENSE RESTRICTIONS
4.1 The Licensee may not remove, make emulation, reverse engineer, decompile, or disassemble the
Executable Software. Licensee is not allowed to derive the source or assembly code of files provided in
executable or object formats. The Licensee accepts that all information gained about the Software is the
valuable intellectual property of IAR Systems and as such must be treated as confidential as described
under Article 5. The Licensee warrants that it will not sell, license, lease, rent, loan, lend, transmit, network,
communicate, or otherwise distribute or transfer the Software in any manner to any third party whether on
a permanent or temporary basis, except as explicitly stated in this Agreement. Furthermore the Licensee
warrants that it will not use or permit the use of (including without limitation by time sharing or network use)
the Software for the benefit of any entity other than the Licensee; or in a computer service business; make
unauthorized copies of the documentation; make verbal or media translations of the documentation; make
telecommunications data transmissions of the Software; use long-haul gateways on any central processing
unit on which the Software is used. The Licensee is also expressly prohibited from adapting, modifying,
revising, improving, upgrading, enhancing, and creating derivative works of the Executable Software for
any purpose including error correction or any other type of maintenance.
4.2 The Licensee shall keep records of the Licensee’s use of Software. The Licensee shall make the records
available to either IAR Systems or a neutral third party on reasonable notice, as agreed between the parties.
In the case of a neutral third party audit, IAR Systems and Licensee shall in good faith mutually appoint an
auditor. Should such an agreement not be reached within 60 days after IAR Systems notice, then the parties
agree to have Business Software Alliance conduct such an audit, or itself elect an auditor. The Licensee
will permit IAR Systems or a third party, as the case may be, to have access to the Licensee’s records and
computer systems and to use software audit tools on the Licensee’s systems to ensure that the Licensee is
IAR SOFTWARE LICENSE AGREEMENT
using its software in accordance with the applicable license terms. Upon the Licensee’s request, the party
conducting the audit with the Licensee shall enter into a non-disclosure agreement with the Licensee, to
protect the Licensee's propriety and/or confidential information. Information retrieved and/or conveyed
to IAR Systems as a result of such an audit as here described shall be limited as to only ensure that the
Licensee is using its software in accordance with the applicable license terms, or evidence of the contrary.
4.3 Subject to the other terms herein, and with the Licensee as fully responsible for all actions or omissions
of such a consultant, Licensee may let a consultant use the Software for work solely on behalf of the Licensee
for the licensed purpose and provided that the Software is not used for any other purpose or third party.
4.4 Upon each and every breach by the Licensee hereunder a contractual penalty amounting to 200% for
breach under sections 3.2, 3.3, 3.4, 3.5, 3.6, 3.11, 4.1 or 4.3 and 1000% for breach under section 3.8 of
the applicable licensee fee under the relevant Invoice is payable by the Licensee to IAR Systems. In case
IAR Systems’ actual damage due to the breach would exceed this amount, also the remainder shall be paid
by the Licensee, see also Section 3.8.
5. CONFIDENTIALITY
5.1 The Licensee agrees that all material and information relating to the Software is made available for the
use solely under and in accordance with this Agreement. The Licensee has no right at any time during or
after cancellation or termination of this Agreement to disclose such material and/or information relating to
the Software, whether directly or indirectly, to any third party without IAR Systems’ prior written approval.
The Licensee shall hold harmless, defend, and indemnify IAR Systems from and against any and all losses,
costs, damages, and expenses arising out of or in connection with the Licensee’s failure to comply with
requirements of this Article 5. The Licensee’s confidentiality obligations hereunder shall survive cancellation
or termination, for any reason, of this Agreement.
6. PAYMENT TERMS AND CONDITIONS
6.1 In consideration of the rights granted and services rendered by IAR Systems under this Agreement, the
Licensee shall pay the license fees for the Software as specified in the Invoice. Payments are to be made
according to the payment schedule stated in the Invoice, or if not stated, invoices are payable within 30
days of the invoice date.
6.2 If the Licensee fails to effect payment within the stipulated time, IAR Systems or IAR Distributors shall
be entitled to a) charge interest after due date as stated in the Invoice, or if not stated in the invoice, the
interest charged will be the reference rate set by Sweden’s central bank (the Riksbank) + 8%. b) postpone
the fulfilment of any of its own obligations until payment is made, and/or c) terminate the Agreement by
notice in writing to the Licensee and recover from the Licensee any and all loss incurred.
6.3 All prices are exclusive of, and the Licensee is responsible for, all fees and taxes, including custom
duties, importation fees, sales, use, withholding, gross revenue, and like taxes, dues, and charges assessed
or incurred in connection with the provision of goods and services under this Agreement.
7. LIMITED WARRANTY
7.1 IAR Systems warrants that the media on which the Software is recorded upon receipt by the Licensee
will be free from defects in materials and faulty workmanship under normal use for a period of ninety (90)
days from the date of delivery to the Licensee. During this warranty period IAR Systems will, at its option,
after its receipt of the media in return, repair or replace, free of charge, defective media upon which the
Software was supplied and record a copy of the Software on the repaired or replacement media. Said repair
or replacement shall be the Licensee’s exclusive remedy under this media warranty. Notwithstanding the
foregoing, IAR Systems shall have no responsibility to repair or replace a media which, in IAR Systems’ opinion,
has been damaged by the Licensee by accident, abuse, or as a result of attempted self-maintenance service.
7.2 IAR Systems does not warrant that the Software will meet the Licensee’s requirements or that the
operation of the Software will be uninterrupted and error free. The Licensee is solely responsible for the
selection of the Software to achieve its intended results or for the results actually obtained.
7.3 The above warranty does not apply to conditions resulting from improper use, external causes, including
service or modifications not performed by IAR Systems or a contractor appointed by IAR Systems, or operation
outside the specified environmental parameters. IAR Systems will not be responsible for operation of the
Software other than on the host equipment specified in the Invoice and in conjunction with the operating
environment designated for each version of the Software. Minor deviations from the above warranty, which
are of little importance for the intended use of the Software and which do not cause more than minor
inconvenience for the Licensee shall not be considered as breaches of the above warranty.
7.4 THE ABOVE WARRANTY IS IAR SYSTEMS’ ONLY WARRANTY WITH REGARD TO THE SOFTWARE
AND THIS AGREEMENT AND, SAVE AS PROVIDED IN THIS AGREEMENT, NO OTHER WARRANTY OR
CONDITION, EXPRESSED OR IMPLIED, WILL APPLY, AND THE LICENSEE WILL NOT RAISE ANY OTHER
CLAIMS BASED ON THE PERFORMANCE OR LACK OF PERFORMANCE OF THE SOFTWARE. IAR
SYSTEMS SPECIFICALLY EXCLUDES ALL OTHER WARRANTIES, REPRESENTATIONS OR UNDERTAKINGS,
EXPRESS, IMPLIED OR STATUTORY, INCLUDING BUT NOT LIMITED TO ANY IMPLIED WARRANTIES OF
February 2013
Rev.5
IAR SOFTWARE LICENSE AGREEMENT
MERCHANTABILITY OR FITNESS FOR A PARTICULAR PURPOSE, ABILITY TO ACHIEVE A PARTICULAR
RESULT, OR OF ANY OTHER WARRANTY OBLIGATION ON THE PART OF IAR SYSTEMS.
7.5 IAR Systems expressly disclaims any liability for any hardware or software solutions at the Licensee
which may affect the performance of the Software, including but not limited to network configurations.
7.6 The provisions of this Article 7 shall survive any expiration or termination of this Agreement.
8. INTELLECTUAL PROPERTY INFRINGEMENT
8.1 IAR Systems will in the way set out in 8.2, and subject to all limitations therein, act on any action
brought against the Licensee to the extent it is based on a claim that the Software as it exists on the date
of the Invoice infringes any patent or copyright duly issued under the laws of the country under which IAR
Systems or the Licensee is organized.
8.2 IAR Systems shall, in the way set out below, as sole remedy, act on a third-party claim that the Software
infringes the intellectual property rights of such party, provided that IAR Systems is given prompt notice
of such claim and is given information, reasonable assistance, and sole authority to defend or settle the
claim. IAR Systems may at its option obtain the right for the Licensee to continue using the infringing IAR
Product, replace or modify the infringing Product until it becomes non-infringing, or if such replacement or
modification is not reasonably available, terminate this license with respect to the infringing Product and
provide for a reasonable refund of fees paid by the Licensee to IAR Systems for the IAR Product so affected.
8.3 IAR Systems shall not have any liability if the alleged infringement arises out of unauthorized use of the
Software, postdelivery, non-IAR Systems modifications, or the combination with other products or devices
not furnished by IAR Systems. THE OBLIGATIONS STATED IN THIS SECTION ARE IAR SYSTEMS’ SOLE
LIABILITIES AND THE LICENSEE’S SOLE REMEDIES FOR INFRINGEMENT OF PATENTS AND COPYRIGHTS.
FOR THE AVOIDANCE OF DOUBT: THE LIABILITY OF IAR SYSTEMS UNDER THIS SECTION 8 MAY NEVER
EXCEED THE LICENSE FEE PAID BY THE LICENSEE.
9. FORCE MAJEURE
9.1 Either party shall be excused from fulfilment of any obligation under this Agreement only to the extent
that and for so long as such performance is prevented or delayed by an industrial dispute or any other
cause beyond its reasonable control, such as, but not limited to, riots; floods; war; warlike hostilities; fires;
embargo; shortage of labor, power, fuel, means of transportation, or common lack of other necessities.
A party wishing to claim relief under this Article shall forthwith notify the other party in writing on the
intervention and on the cessation of such circumstance.
10. LIMITATION OF LIABILITY
10.1 THE USE OF THE SOFTWARE AND ALL CONSEQUENCES ARISING THEREFROM IS THE SOLE
RESPONSIBILITY OF LICENSEE. IAR SYSTEMS SHALL NOT BE LIABLE TO THE LICENSEE FOR ANY LOSS
OR DAMAGE CAUSED ARISING DIRECTLY OR INDIRECTLY IN CONNECTION WITH THE SOFTWARE, THE USE
OF THE SOFTWARE, OR OTHERWISE.
10.2 IAR SYSTEMS’ LIABILITY VIS-À-VIS THE LICENSEE UNDER THIS AGREEMENT SHALL UNDER ALL
CIRCUMSTANCES BE LIMITED TO FIFTY (50) PER CENT OF THE LICENSE FEE FOR THE SOFTWARE PAID
BY THE LICENSEE HEREUNDER, PROVIDED HOWEVER THAT IF SECTION 8 IS APPLICABLE THE TOTAL
LIABILITY OF IAR SYSTEMS HEREUNDER MAY INSTEAD NEVER EXCEED 100% OF THE LICENSE FEE PAID
BY THE LICENSEE HEREUNDER FOR SUCH SOFTWARE.
10.3 IAR SYSTEMS SHALL IN NO EVENT BE LIABLE TO THE LICENSEE UNDER THIS AGREEMENT FOR ANY
SPECIAL, INDIRECT, INCIDENTAL, OR CONSEQUENTIAL DAMAGES UNDER ANY LEGAL THEORY, SUCH AS
LOSS OF DATA, USE AND/OR PROFITS, BUSINESS INTERRUPTION OR DOWNTIME COSTS AND CAPITAL
COSTS OR CLAIM OF THIRD PARTY, WHETHER ON ACCOUNT OF DEFECTS, PERFORMANCES, NONPERFORMANCES, DELAYS, PERSONAL INJURIES, PROPERTY DAMAGES, OR OTHERWISE, REGARDLESS
WHETHER IAR SYSTEMS HAS BEEN ADVISED OF THE POSSIBILITY OF SUCH DAMAGES.
10.4 NOTHING IN THIS AGREEMENT SHALL EXCLUDE OR LIMIT THE LIABILITY UNDER APPLICABLE
COMPULSORY LAW OF IAR SYSTEMS FOR DEATH OR PERSONAL INJURY RESULTING FROM ITS NEGLIGENCE.
10.5 The provisions of this Article 10 shall survive the cancellation or termination of this Agreement.
11. THIRD PARTY RIGHTS
11.1 The IAR Embedded Workbench for Eclipse includes Eclipse Materials. This License does not apply
to such Eclipse Material and this is not included in the term “Software” under this License. You agree to
comply with all terms and conditions imposed on you in respect of such Eclipse Materials.
11.1.1 The Eclipse Materials are licensed under the terms of the Eclipse Public License (EPL), Version
1.0, a copy of which is included in the Eclipse Materials and also available at http://www.opensource.org/
licenses/eclipse-1.0.php.
11.2 The IAR Embedded Workbench may include Third Party-Owned software. In addition to all other
provisions of this License the Third Party-Owned software shall also be subject to the supplemental terms
and conditions governing such Third Party-Owned software. These supplemental terms add to the terms of
this License and shall supersede any inconsistent or conflicting terms in this License as they pertain to the
IAR SOFTWARE LICENSE AGREEMENT
Third Party-Owned software. If the Product the Licensee receives hereunder contains Third Party-Owned
software the Licensee agree to comply with all terms and conditions imposed on you in respect of such
Third Party-Owned software.
11.2.1 The Third Party-Owned Software is subject to the additional terms of each Third Party and a copy
of these supplemental terms is available at http://www.iar.com/en/products/software-licenses.
12. SUPPORT AND UPDATE AGREEMENT (SUA)
12.1 Excluding what is specified in Section 12.2 and/or Section 7 of this Agreement, this Agreement does
not grant the Licensee any right whatsoever to any improvements, modifications, enhancements or updates
to the Software, or any other support services relating to the Software.
12.2 To the extent that the license granted includes a time-limited Support and Update Service, the Licensee
will be entitled to the services defined in the Support and Update Agreement (“SUA”) attached hereto.
In the case that the license granted does not include Support and Update Services or in the case where
such services have expired, the Licensee may, depending on the nature of the granted license, purchase
additional periods of Support and Update Services
12.3 Use of improvements, modifications, enhancements or updates received by the Licensee under IAR
Systems’ Support and Update Agreement (SUA) or received under Section 7 of this Agreement, shall be
governed by the terms and conditions contained herein.
13. TERMINATION OF THE AGREEMENT
13.1 IAR Systems shall have the right to terminate this Agreement with immediate effect if the Licensee is in
breach of any of its obligations under this Agreement, including, but not limited to (a) use of the Software
in any manner other than pursuant to the rights granted in Article 3 and 4, (b) breach of the confidentiality
provisions of Article 5, or (c) failure of the Licensee to remit payments as provided in Article 6.
13.2 This Agreement will terminate immediately without notice if Licensee suspends its payments, becomes
bankrupt or insolvent or enters into liquidation or otherwise can be regarded as insolvent.
13.3 Upon IAR Systems’ termination of this Agreement, as set out in this Article, then, IAR Systems may, at
its option, and in addition to any other rights hereunder, and in addition to any other remedies available to
IAR Systems under the law, in writing require the Licensee to return or destroy all versions of the Software
and the Documentation and any and all documentation relating thereto on any media and in any form in
Licensee’s possession. Licensee shall give a written confirmation to IAR Systems that all material related
to the Software and its operation has been returned to IAR Systems or destroyed. The provisions of this
Section 13.3 shall survive the cancellation or termination of this Agreement.
14. EXPORT CONTROL REGULATIONS
14.1 The Software and the Documentation is subject to export or import regulations in various countries,
including the regulations of the United States Export Administration Act. The Licensee hereby agrees that
the Licensee will not knowingly (a) export or reexport, directly or indirectly, any product or technical data
or any controlled products restricted by applicable national regulations, including software, received from
IAR Systems under this agreement, (b) disclose such technical data for use in, or (c) export or reexport,
directly or indirectly, any direct product of such technical data or of such other controlled products,
including software, to any destination to which such export or reexport is restricted or prohibited by U.S.
or applicable non-U.S. law, without obtaining prior written consent of IAR Systems.
15. MISCELLANEOUS
15.1 This Agreement shall not in any situation be assignable or transferable in whole or in part by either
party, without the prior written approval of the other party. This notwithstanding, IAR Systems shall be
entitled to assign this Agreement in whole or in part to a company within the IAR Systems Group, and IAR
Systems may assign this Agreement without penalty or detriment to its rights under this Agreement, and
without the Licensee’s prior written consent, in the event of a merger or similar reorganization or sale of
substantially all of IAR Systems’ assets.
15.2 No alteration or amendment to this Agreement shall be valid unless such alteration or amendment is
made in writing and signed by the parties hereto.
15.3 Any notice or other communication under this Agreement shall be made in writing either by hand or by
telefax (confirmed by airmail) or by certified or registered airmail first-class postage prepaid to the parties
at the addresses stated in the Invoice (or at such other address a party may specify by written notice to
the other).
15.4 This Agreement contains the entire understanding between the parties on its subject matter, and
annuls and replaces any other agreements or understandings, whether written or oral, which may exist or
have existed between the parties on the subject matter hereof.
15.5 This Agreement shall be governed by and construed in accordance with the substantive to the courts of
the country in which IAR Systems is incorporated. Any dispute concerning this agreement or the interpretation
or validity thereof, or any other dispute based thereon, shall be submitted to the courts of the country in
which IAR Systems is incorporated.
February 2013
Rev.5
IAR SOFTWARE LICENSE AGREEMENT
15.6 The provisions of this Article 15 shall survive the cancellation or termination of this Agreement.
This document contains Third Party Software Notices and/or Additional Terms and Conditions for licensed
third party software components included within IAR Systems software product IAR Embedded Workbench.
These notices and/or additional terms and conditions are made a part of and incorporated by reference
into the IAR Software License Agreement.
1. Components used internally in IAR Embedded Workbench
Third Party
Software
Notice/Terms
SCINTILLA
License for Scintilla and SciTE
Copyright 1998-2002 by Neil Hodgson. All Rights Reserved.
Permission to use, copy, modify, and distribute this software and its documentation for
any purpose and without fee is hereby granted, provided that the above copyright notice
appear in all copies and that both that copyright notice and this permission notice appear
in supporting documentation.
NEIL HODGSON DISCLAIMS ALL WARRANTIES WITH REGARD TO THIS SOFTWARE,INCLUDING
ALL IMPLIED WARRANTIES OF MERCHANTABILITY AND FITNESS, IN NO EVENT SHALL NEIL
HODGSON BE LIABLE FOR ANY SPECIAL, INDIRECT OR CONSEQUENTIAL DAMAGES OR ANY
DAMAGES WHATSOEVER RESULTING FROM LOSS OF USE, DATA OR PROFITS, WHETHER
IN AN ACTION OF CONTRACT, NEGLIGENCE OR OTHER TORTIOUS ACTION, ARISING OUT
OF OR IN CONNECTION WITH THE USE OR PERFORMANCE OF THIS SOFTWARE
IBM ICU
ICU License - ICU 1.8.1 and later COPYRIGHT AND PERMISSION NOTICE
Copyright (c) 1995-2003 International Business Machines Corporation and others
All rights reserved.
Permission is hereby granted, free of charge, to any person obtaining a copy of this software
and associated documentation files (the “Software”), to deal in the Software without
restriction, including without limitation the rights to use, copy, modify, merge, publish,
distribute, and/or sell copies of the Software, and to permit persons to whom the Software
is furnished to do so, provided that the above copyright notice(s) and this permission notice
appear in all copies of the Software and that both the above copyright notice(s) and this
permission notice appear in supporting documentation.
THE SOFTWARE IS PROVIDED “AS IS”, WITHOUT WARRANTY OF ANY KIND, EXPRESS OR
IMPLIED, INCLUDING BUT NOT LIMITED TO THE WARRANTIES OF MERCHANTABILITY,
FITNESS FOR A PARTICULAR PURPOSE AND NONINFRINGEMENT OF THIRD PARTY RIGHTS.
IN NO EVENT SHALL THE COPYRIGHT HOLDER OR HOLDERS INCLUDED IN THIS NOTICE BE
LIABLE FOR ANY CLAIM, OR ANY SPECIAL INDIRECT OR CONSEQUENTIAL DAMAGES, OR
ANY DAMAGES WHATSOEVER RESULTING FROM LOSS OF USE, DATA OR PROFITS, WHETHER
IN AN ACTION OF CONTRACT, NEGLIGENCE OR OTHER TORTIOUS ACTION, ARISING OUT
OF OR IN CONNECTION WITH THE USE OR PERFORMANCE OF THIS SOFTWARE.
Except as contained in this notice, the name of a copyright holder shall not be used in
advertising or otherwise to promote the sale, use or other dealings in this Software without
prior written authorization of the copyright holder. All trademarks and registered trademarks
mentioned herein are the property of their respective owners
IAR SOFTWARE LICENSE AGREEMENT
Apache
The Apache Software License, Version 1.1
Copyright (c) 1999-2003 The Apache Software Foundation. All rights reserved.
Redistribution and use in source and binary forms, with or without modification, are
permitted provided that the following conditions are met:
1. Redistributions of source code must retain the above copyright notice, this list of
conditions and the following disclaimer.
2. Redistributions in binary form must reproduce the above copyright notice, this list
of conditions and the following disclaimer in the documentation and/or other materials
provided with the distribution.
3. The end-user documentation included with the redistribution, if any, must include the
following acknowledgment: “This product includes software developed by the Apache
Software Foundation (http://www.apache.org/).” Alternately, this acknowledgment may
appear in the software itself, if and wherever such third-party acknowledgments normally
appear.
4. The names “Xerces” and “Apache Software Foundation” must not be used to endorse or
promote products derived from this software without prior written permission. For written
permission, please contact [email protected].
5. Products derived from this software may not be called “Apache”, nor may “Apache”
appear in their name, without prior written permission of the Apache Software Foundation.
THIS SOFTWARE IS PROVIDED ``AS IS’’ AND ANY EXPRESSED OR IMPLIED WARRANTIES,
INCLUDING, BUT NOT LIMITED TO, THE IMPLIED WARRANTIES OF MERCHANTABILITY
AND FITNESS FOR A PARTICULAR PURPOSE ARE DISCLAIMED. IN NO EVENT SHALL THE
APACHE SOFTWARE FOUNDATION OR ITS CONTRIBUTORS BE LIABLE FOR ANY DIRECT,
INDIRECT, INCIDENTAL, SPECIAL, EXEMPLARY, OR CONSEQUENTIAL DAMAGES (INCLUDING,
BUT NOTLIMITED TO, PROCUREMENT OF SUBSTITUTE GOODS OR SERVICES; LOSS OF
USE, DATA, OR PROFITS; OR BUSINESS INTERRUPTION) HOWEVER CAUSED AND ON ANY
THEORY OF LIABILITY, WHETHER IN CONTRACT, STRICT LIABILITY, OR TORT (INCLUDING
NEGLIGENCE OR OTHERWISE) ARISING IN ANY WAY OUT OF THE USE OF THIS SOFTWARE,
EVEN IF ADVISED OF THE POSSIBILITY OF SUCH DAMAGE.
This software consists of voluntary contributions made by many individuals on behalf of
the Apache Software Foundation and was originally based on software copyright (c) 1999,
International Business Machines, Inc., http://www.ibm.com. For more information on the
Apache Software Foundation, please see <http://www.apache.org/>
LLVM
LLVM Release License
University of Illinois/NCSA. Open Source License.
Copyright (c) 2003-2011 University of Illinois at Urbana-Champaign. All rights reserved.
Developed by: LLVM Team University of Illinois at Urbana-Champaign. http://llvm.org
Permission is hereby granted, free of charge, to any person obtaining a copy of this software
and associated documentation files (the “Software”), to deal with the Software without
restriction, including without limitation the rights to use, copy, modify, merge, publish,
distribute, sublicense, and/or sell copies of the Software, and to permit persons to whom
the Software is furnished to do so, subject to the following conditions:
* Redistributions of source code must retain the above copyright notice, this list of conditions
and the following disclaimers. * Redistributions in binary form must reproduce the above
copyright notice, this list of conditions and the following disclaimers in the documentation
and/or other materials provided with the distribution. * Neither the names of the LLVM
Team, University of Illinois at Urbana-Champaign, nor the names of its contributors may
be used to endorse or promote products derived from this Software without specific prior
written permission.
THE SOFTWARE IS PROVIDED “AS IS”, WITHOUT WARRANTY OF ANY KIND, EXPRESS OR
IMPLIED, INCLUDING BUT NOT LIMITED TO THE WARRANTIES OF MERCHANTABILITY,
FITNESS FOR A PARTICULAR PURPOSE AND NONINFRINGEMENT. IN NO EVENT SHALL
THE CONTRIBUTORS OR COPYRIGHT HOLDERS BE LIABLE FOR ANY CLAIM, DAMAGES
OR OTHER LIABILITY, WHETHER IN AN ACTION OF CONTRACT, TORT OR OTHERWISE,
ARISING FROM, OUT OF OR IN CONNECTION WITH THE SOFTWARE OR THE USE OR
OTHER DEALINGS WITH THE SOFTWARE..
February 2013
Rev.5
IAR Third Party Software License/Notices
Boost C++
Libraries
Boost Software License - Version 1.0 - August 17th, 2003
Permission is hereby granted, free of charge, to any person or organization obtaining a copy
of the software and accompanying documentation covered by this license (the “Software”)
to use, reproduce, display, distribute, execute, and transmit the Software, and to prepare
derivative works of the Software, and to permit third-parties to whom the Software is
furnished to do so, all subject to the following: The copyright notices in the Software and
this entire statement, including the above license grant, this restriction and the following
disclaimer, must be included in all copies of the Software, in whole or in part, and all
derivative works of the Software, unless such copies or derivative works are solely in the
form of machine-executable object code generated by a source language processor.
THE SOFTWARE IS PROVIDED “AS IS”, WITHOUT WARRANTY OF ANY KIND, EXPRESS OR
IMPLIED, INCLUDING BUT NOT LIMITED TO THE WARRANTIES OF MERCHANTABILITY,
FITNESS FOR A PARTICULAR PURPOSE, TITLE AND NON-INFRINGEMENT. IN NO EVENT
SHALL THE COPYRIGHT HOLDERS OR ANYONE DISTRIBUTING THE SOFTWARE BE LIABLE
FOR ANY DAMAGES OR OTHER LIABILITY, WHETHER IN CONTRACT, TORT OR OTHERWISE,
ARISING FROM, OUT OF OR IN CONNECTION WITH THE SOFTWARE OR THE USE OR OTHER
DEALINGS IN THE SOFTWARE.
Protocol
Buffers
Protocol Buffers - Google’s data interchange format
Copyright 2008 Google Inc. All rights reserved. http://code.google.com/p/protobuf/
Redistribution and use in source and binary forms, with or without modification, are
permitted provided that the following conditions are met:
* Redistributions of source code must retain the above copyright notice, this list of conditions
and the following disclaimer. * Redistributions in binary form must reproduce the above
copyright notice, this list of conditions and the following disclaimer in the documentation
and/or other materials provided with the distribution. * Neither the name of Google Inc.
nor the names of its contributors may be used to endorse or promote products derived
from this software without specific prior written permission.
THIS SOFTWARE IS PROVIDED BY THE COPYRIGHT HOLDERS AND CONTRIBUTORS “AS
IS” AND ANY EXPRESS OR IMPLIED WARRANTIES, INCLUDING, BUT NOT LIMITED TO, THE
IMPLIED WARRANTIES OF MERCHANTABILITY AND FITNESS FOR A PARTICULAR PURPOSE
ARE DISCLAIMED. IN NO EVENT SHALL THE COPYRIGHT OWNER OR CONTRIBUTORS BE
LIABLE FOR ANY DIRECT, INDIRECT, INCIDENTAL, SPECIAL, EXEMPLARY, OR CONSEQUENTIAL
DAMAGES (INCLUDING, BUT NOT LIMITED TO, PROCUREMENT OF SUBSTITUTE GOODS OR
SERVICES; LOSS OF USE, DATA, OR PROFITS; OR BUSINESS INTERRUPTION) HOWEVER
CAUSED AND ON ANY THEORY OF LIABILITY, WHETHER IN CONTRACT, STRICT LIABILITY,
OR TORT (INCLUDING NEGLIGENCE OR OTHERWISE) ARISING IN ANY WAY OUT OF THE
USE OF THIS SOFTWARE, EVEN IF ADVISED OF THE POSSIBILITY OF SUCH DAMAGE.
2. Components potentially used in customer applications
Third Party
Software
dlmalloc
Notice/Terms
Version of malloc/free/realloc (aka dlmalloc) written by Doug Lea and released to the
public domain, as explained at http://creativecommons.org/publicdomain/zero/1.0/.
IAR SOFTWARE LICENSE AGREEMENT
Dinkum Abridged/C Library Sub license
Definition: The term “Licensed Source” shall mean the Dinkum Abridged Library source
code, the Dinkum C Library source code and the Dinkum Abridged Library Reference, or
a later version of the same products. A Sub license is granted solely in conjunction with,
and for use with IAR C/EC++/C++ Cross Compiler owned by IAR Systems AB. The Sub
Licensee shall supply to Dinkumware Ltd (“Licensor”) with the following protections:
(a)Plauger’s ownership. a.Sub Licensee acknowledges and agrees that: *Title and all
rights of ownership to the Licensed Source, and all copies of all or any part thereof, are
and remain with Plauger; *Sub Licensee shall not lend, sell, lease, hypothecate or otherwise dispose of the Licensed Source. *All copies of the Licensed Source, or any part
thereof, in any form whatsoever, including but not limited to, forms cognizable to the
human eye (directly, or upon enlargement or translation), or to data processing or other
equipment, shall be the sole and exclusive property of Plauger, as described immediately
above; and *Licensor has represented that the Licensed Source may contain Licensor’s
trade secrets and proprietary information, whether or not any portion thereof is or may
be copyrighted or patented. b.Sub Licensee agrees to preserve unchanged all copyright
notices in all copies of the Licensed Source. c.Licensor acknowledges and agrees that
Sub Licensee shall have no obligation to deliver or disclose to Licensor any modifications that Sub Licensee makes to the Licensed Source, ant that Sub Licensee shall own
and have exclusive marketing rights to any such undisclosed modifications. d.Sub Licensee acknowledges and agrees that any modifications that Sub Licensee makes to the
Licensed Source and discloses to Licensor, unless otherwise indicated in writing by Sub
Licensee on or before disclosure (“Disclosed Modifications”), shall become the property
of Plauger. Disclosed Modifications to the Licensed Library Source shall become the
property of Plauger. Sub Licensee hereby assigns to Plauger all of Sub Licensee’s right,
title, and interest in and to such Disclosed Modifications and in and to the copyrights
and all other rights in the Disclosed Modifications. (b) License. a.Licensor hereby grants
Dinkum
to Sub Licensee a personal, non-exclusive, and non-transferable license to use or modify
C++ Library the Licensed Source for its own internal business purposes solely in conjunction with
IAR C/EC++/C++ Cross Compiler owned by IAR Systems. b.Notwithstanding the foregoing, Sub Licensee may make only such copies of the Licensed Source as are reasonably
necessary for it to exercise its right hereunder. Sub Licensee acknowledges that it may
not sell, assign, sublicense, lease or otherwise transfer, or permit others to use or execute the Licensed Source, or any port thereof, or any modification or improvement of the
Licensed Source, or any object code which is derived from the Licensed Source. c.Sub
Licensee agrees to comply with all applicable laws, regulations, rulings, and executive
order from the United States relating to the export or re-export of the Licensed Source,
and with all applicable foreign laws which must be complied with in order to protect or
preserve Licensor’s copyright(s), trade secret(s), and other proprietary rights in and
to the Licensed Source. Sub Licensee agrees that it will not knowingly ship or divert
the Licensed Source for use in any country which has ratified neither the Berne Copyright Convention nor the Universal Copyright Convention without first obtaining written
permission from Licensor. (c)Warranty and Disclaimer of Warranty. a.Licensor warrants
that, at the time of delivery, the Licensed Source will be in good operating condition
and will be Standard Conforming in all essential respects. b.Licensor represents and
warrants that it is not aware that the Licensed Source is created in whole or in part by
violation of the protected trade secret of another or that the Licensed Source infringes
any U.S. patent or copyright.
c.THE FOREGOING LIMITED WARRANTIES ARE THE ONLY WARRANTIES OF LICENSOR
TO SUB LICENSEE AND ARE IN LIEU OF ALL OTHER WARRANTIES, EXPRESS OR IMPLIED, INCLUDING, BUT NOT LIMITED TO, THE IMPLIED WARRANTIES OF MERCHANTABILITY AND FITNESS FOR A PARTICULAR PURPOSE.
(d)Limitation of Liability. a.In no event shall Licensor be liable to Sub Licensee for any
lost profits, incidental, special, exemplary, punitive, indirect or other consequential dam
ages, even if Licensor knows or has been advised of the possibility of such damages,
or for any claim against Sub Licensee by any other person or entity, or for any damage
caused by Sub Licensee’s failure to perform its responsibilities.
Updated: 2013-02-15. IAR Systems AB.
February 2013
Rev.5
Freescale MQX RTOS 4.0.2
IMPORTANT. Read the following Freescale Semiconductor Software License Agreement ("Agreement")
completely. By selecting the "I Accept" button below, you indicate that you accept the terms of this Agreement.
You may then install the software.
FREESCALE SEMICONDUCTOR SOFTWARE LICENSE AGREEMENT
This is a legal agreement between you (either as an individual or as an authorized representative of your
employer) and Freescale Semiconductor, Inc. ("Freescale"). It concerns your rights to use this file and any
accompanying written materials (the "Software"). In consideration for Freescale allowing you to access
the Software, you are agreeing to be bound by the terms of this Agreement. If you do not agree to all of
the terms of this Agreement, do not download the Software. If you change your mind later, stop using the
Software and delete all copies of the Software in your possession or control. Any copies of the Software
that you have already distributed, where permitted, and do not destroy will continue to be governed by this
Agreement. Your prior use will also continue to be governed by this Agreement.
LICENSE GRANT. Exclusively in conjunction with Licensee's development and sale of a product containing a
programmable processing unit (e.g., a microprocessor, microcontroller, or digital signal processor) supplied
directly or indirectly from Freescale ("Freescale System")and listed under "By Products" on the Freescale
MQX website (www.freescale.com/mqx), Freescale grants to you, free of charge, the non-exclusive, nontransferable right (1) to use the Software, (2) to reproduce the Software, (3) to prepare derivative works
of the Software, (4) to distribute the Software and derivative works thereof in object (machine-readable)
form as part of a Freescale System, and (5) to sublicense to others the right to use the distributed Software
as included within the Freescale System. You must prohibit your sublicensees from translating, reverse
engineering, decompiling, or disassembling the Software except to the extent applicable law specifically
prohibits such restriction. If you violate any of the terms or restrictions of this Agreement, Freescale may
immediately terminate this Agreement, and require that you stop using and delete all copies of the Software
in your possession or control.
COPYRIGHT. The Software is licensed to you, not sold. Freescale owns the Software, and United States
copyright laws and international treaty provisions protect the Software. Therefore, you must treat the
Software like any other copyrighted material (e.g. a book or musical recording). You may not use or copy
the Software for any other purpose than what is described in this Agreement. Except as expressly provided
herein, Freescale does not grant to you any express or implied rights under any Freescale or third-party
patents, copyrights, trademarks, or trade secrets. Additionally, you must reproduce and apply any copyright
or other proprietary rights notices included on or embedded in the Software to any copies or derivative
works made thereof, in whole or in part, if any.
SUPPORT. Freescale is NOT obligated to provide any support, upgrades or new releases of the Software. If
you wish, you may contact Freescale and report problems and provide suggestions regarding the Software.
Freescale has no obligation whatsoever to respond in any way to such a problem report or suggestion.
Freescale may make changes to the Software at any time, without any obligation to notify or provide updated
versions of the Software to you.
NO WARRANTY. TO THE MAXIMUM EXTENT PERMITTED BY LAW, FREESCALE EXPRESSLY DISCLAIMS
ANY WARRANTY FOR THE SOFTWARE. THE SOFTWARE IS PROVIDED "AS IS", WITHOUT WARRANTY OF
ANY KIND, EITHER EXPRESS OR IMPLIED, INCLUDING, WITHOUT LIMITATION, THE IMPLIED WARRANTIES
OF MERCHANTABILITY, FITNESS FOR A PARTICULAR PURPOSE, OR NON-INFRINGEMENT. YOU ASSUME
THE ENTIRE RISK ARISING OUT OF THE USE OR PERFORMANCE OF THE SOFTWARE, OR ANY SYSTEMS
YOU DESIGN USING THE SOFTWARE (IF ANY). NOTHING IN THIS AGREEMENT MAY BE CONSTRUED AS
A WARRANTY OR REPRESENTATION BY FREESCALE THAT THE SOFTWARE OR ANY DERIVATIVE WORK
DEVELOPED WITH OR INCORPORATING THE SOFTWARE WILL BE FREE FROM INFRINGEMENT OF THE
INTELLECTUAL PROPERTY RIGHTS OF THIRD PARTIES.
INDEMNITY. You agree to fully defend and indemnify Freescale from any and all claims, liabilities, and costs
(including reasonable attorney's fees) related to (1) your use (including your sublicensee's use, if permitted)
of the Software or (2) your violation of the terms and conditions of this Agreement.
LIMITATION OF LIABILITY. IN NO EVENT WILL FREESCALE BE LIABLE, WHETHER IN CONTRACT, TORT,
OR OTHERWISE, FOR ANY INCIDENTAL, SPECIAL, INDIRECT, CONSEQUENTIAL OR PUNITIVE DAMAGES,
INCLUDING, BUT NOT LIMITED TO, DAMAGES FOR ANY LOSS OF USE, LOSS OF TIME, INCONVENIENCE,
COMMERCIAL LOSS, OR LOST PROFITS, SAVINGS, OR REVENUES TO THE FULL EXTENT SUCH MAY BE
DISCLAIMED BY LAW.
Freescale MQX RTOS 4.0.2
COMPLIANCE WITH LAWS; EXPORT RESTRICTIONS. You must use the Software in accordance with all
applicable U.S. laws, regulations and statutes. You agree that neither you nor your licensees (if any) intend
to or will, directly or indirectly, export or transmit the Software to any country in violation of U.S. export
restrictions.
GOVERNMENT USE. Use of the Software and any corresponding documentation, if any, is provided with
RESTRICTED RIGHTS. Use, duplication or disclosure by the Government is subject to restrictions as set
forth in subparagraph (c)(1)(ii) of The Rights in Technical Data and Computer Software clause at DFARS
252.227-7013 or subparagraphs (c)(l) and (2) of the Commercial Computer Software — Restricted Rights
at 48 CFR 52.227-19, as applicable. Manufacturer is Freescale Semiconductor, Inc., 6501 William Cannon
Drive West, Austin, TX, 78735.
HIGH RISK ACTIVITIES. You acknowledge that the Software is not fault tolerant and is not designed,
manufactured or intended by Freescale for incorporation into products intended for use or resale in on-line
control equipment in hazardous, dangerous to life or potentially life-threatening environments requiring
fail-safe performance, such as in the operation of nuclear facilities, aircraft navigation or communication
systems, air traffic control, direct life support machines or weapons systems, in which the failure of
products could lead directly to death, personal injury or severe physical or environmental damage ("High
Risk Activities"). You specifically represent and warrant that you will not use the Software or any derivative
work of the Software for High Risk Activities.
CHOICE OF LAW; VENUE; LIMITATIONS. You agree that the statutes and laws of the United States and the
State of Texas, USA, without regard to conflicts of laws principles, will apply to all matters relating to this
Agreement or the Software, and you agree that any litigation will be subject to the exclusive jurisdiction of
the state or federal courts in Texas, USA. You agree that regardless of any statute or law to the contrary,
any claim or cause of action arising out of or related to this Agreement or the Software must be filed within
one (1) year after such claim or cause of action arose or be forever barred.
PRODUCT LABELING. You are not authorized to use any Freescale trademarks, brand names, or logos.
ENTIRE AGREEMENT. This Agreement constitutes the entire agreement between you and Freescale
regarding the subject matter of this Agreement, and supersedes all prior communications, negotiations,
understandings, agreements or representations, either written or oral, if any. This Agreement may only be
amended in written form, executed by you and Freescale.
SEVERABILITY. If any provision of this Agreement is held for any reason to be invalid or unenforceable,
then the remaining provisions of this Agreement will be unimpaired and, unless a modification or replacement of the invalid or unenforceable provision is further held to deprive you or Freescale of a material
benefit, in which case the Agreement will immediately terminate, the invalid or unenforceable provision
will be replaced with a provision that is valid and enforceable and that comes closest to the intention
underlying the invalid or unenforceable provision.
NO WAIVER. The waiver by Freescale of any breach of any provision of this Agreement will not operate or
be construed as a waiver of any other or a subsequent breach of the same or a different provision.
February 2013
Rev.5
655 Eisenhower Drive
Owatonna, MN 55060 USA
Technical Services: 1-800-822-5561
Fax: 1-866-259-1241
Customer Service: 1-800-533-6127
Fax: 1-800-322-2890
www.robinair.com
573104 (Rev. B, February 10, 2015)
© Bosch Automotive Service Solutions Inc.