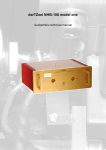
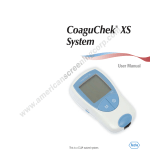
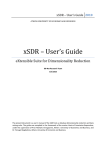
1
Professional Locksmith
Study Unit 4
Lock Mechanisms
This sneak preview of your study material has been
prepared in advance of the book's actual online release.
iii
Preview
Welcome to Study Unit 4 of your Professional Locksmith course! In your last study
unit, you learned all about keys and how to identify them. Now, in this study unit,
you’ll begin learning about lock mechanisms in depth. A lock mechanism is the internal
assembly of a lock that makes it work.
You’ll be learning about a variety of lock mechanisms including key-operated, combination, and electric types. With the assistance of plenty of detailed diagrams and
drawings, you’ll be able to look at the insides of locks. You’ll discover how these
locks are constructed and how they work.
Then, when you’ve gained a solid foundation of knowledge about lock mechanisms,
you’ll learn what types of problems these locks are likely to have and what services
locksmiths will need to perform. We’ll explain how to completely disassemble and reassemble various lock mechanisms. Finally, we’ll tell you how to perform simple
servicing, cleaning, and lubrication on lock mechanisms.
When you complete this study unit, you’ll be able to
• Name the four basic key-operated lock mechanisms
• Identify the basic types of key-operated lock mechanisms by visual inspection
• Name the principal parts of each lock type
• Explain, in simple language, how different types of lock mechanisms work
• Clean, lubricate, and perform simple maintenance on locks
• Disassemble and reassemble each type of lock as needed for servicing
• List the strong and weak points of each type of mechanism
• Explain how high security locks function
• Explain how combination entry locks work
v
Contents
INTRODUCTION . . . . . . . . . . . . . . . . . . . . . . . . . .
1
What is a Lock Mechanism?
Locks vs. Lock Mechanisms
KEY-OPERATED LOCK MECHANISMS . . . . . . . . . . . . . .
3
How Key-Operated Mechanisms Work
The Warded Mechanism
The Lever Tumbler Mechanism
The Disk or Wafer Tumbler Mechanism
The Pin Tumbler Mechanism
High-Security Lock Mechanisms
Interchangeable Cores
Key-Operated Padlocks
COMBINATION LOCK MECHANISMS . . . . . . . . . . . . . . 39
Introduction
Operation
Disassembly
Combination Entry Locks
ELECTRIC LOCK MECHANISMS . . . . . . . . . . . . . . . . . . 44
Applications
Operation
THE KEY TO SUCCESS . . . . . . . . . . . . . . . . . . . . . . . 47
KEY POINTS TO REMEMBER . . . . . . . . . . . . . . . . . . . . 47
LOCKING IT UP! ANSWERS . . . . . . . . . . . . . . . . . . . . 53
EXAMINATION . . . . . . . . . . . . . . . . . . . . . . . . . . 55
COMING ATTRACTIONS . . . . . . . . . . . . . . . . . . . . . 59
1
Lock Mechanisms
Do You Know. . .
What is the most important component of a combination lock?
What are the major parts of a padlock?
What is a ward?
In these pages, you’ll find the answers to these and many more questions about lock
mechanisms.
INTRODUCTION
What is a Lock Mechanism?
A lock mechanism is the assembly of parts inside a lock that
makes it work. In most common locks, the locking mechanism holds or moves a latch, bolt, or shackle into the locked
or unlocked position. Due to the many types of lock designs,
there are many different types of locking mechanisms.
FIGURE 1—This figure
shows a bolt in the
“thrown” position.
For example, a door lock contains a mechanism to operate a
latch or bolt. The latch or bolt is the part that extends into the
strike, anchoring
the door to the door
frame. When the
bolt is thrown, it
moves into the
strike and locks the
door; when the bolt
is retracted back
out of the strike, the
door is free to open
(Figure 1).
2
Lock Mechanisms
FIGURE 2—A padlock
mechanism holds the
shackle inside the lock
case or shell.
In contrast, a padlock contains a mechanism that holds the
shackle in the case or shell of the lock, or that allows the
shackle to release (Figure 2).
Locks vs. Lock Mechanisms
It’s important for you to note the difference between a lock
and a lock mechanism. The word lock is a general term that
refers to any device installed or attached to improve security.
A padlock, a door lock, a car ignition lock—all of these are
locks. A lock mechanism is the inside structure of a lock. For
example, a door lock could contain a warded mechanism, pin
tumbler mechanism, or a disk tumbler mechanism, depending on how it was made.
For our study purposes, all lock mechanisms can be divided
into three basic types: key-operated lock mechanisms, combination
lock mechanisms, and electric lock mechanisms. In this study unit,
we’ll examine each of these different mechanisms in detail.
We’ll look at how they’re constructed and how they operate;
then we’ll examine simple repair techniques for each type. Let’s
start by turning our attention to key-operated lock mechanisms.
Lock Mechanisms
3
KEY-OPERATED LOCK MECHANISMS
How Key-Operated Mechanisms Work
A key-operated lock mechanism is simply any type of lock that’s
opened and closed by inserting and turning a key. (Remember,
as we discussed in Study Unit 2, not all locks are opened by a
key. Some locks are opened by dialing a number combination,
and some contain electrically-operated switches.) However,
key-operated locks are the most common and familiar to us.
Key-operated locks are found in residential doors, cars, and
padlocks.
The four most common types of key-operated lock mechanisms
are the warded mechanism, the lever tumbler mechanism, the disk
tumbler or wafer mechanism, and the pin tumbler mechanism. We’ll
discuss each in turn now.
The Warded Mechanism
The word ward means to guard or guard against; thus, we may
“ward off” a cold by taking vitamin C (or a bowl of chicken
soup). Similarly, a warden is a prison guard. In locksmithing
terms, a ward is a metal barrier inside a lock mechanism that
prevents just any key from opening the lock. The ward ensures that only the proper key will engage the mechanism
and open the lock. The “right” key contains cuts that exactly
match the shape of the wards inside the lock.
The warded lock mechanism is the oldest type still in use today (it was first used by the Romans thousands of years ago).
Bit keys and barrel keys are used to open warded door and
cabinet locks; flat keys are used to operate warded padlocks.
The basic principle behind the warded lock is barrier protection.
This means that the wards create a physical barrier that must
be overcome before the lock can be opened. The security of the
warded mechanism comes from the type and number of
wards it contains. A ward is simply a metal ridge inside the
lock that creates a barrier to the lock bolt. A properly-cut key
will fit around the wards and be free to turn, opening the lock.
4
FIGURE 3—This warded
mechanism contains
two wards.
FIGURE 4—This
complex warded lock
contains several wards
arranged to provide
extra security for the
lock. Note the many
cuts needed on the
key to allow it to clear
the wards.
Lock Mechanisms
A warded lock can
contain any number
of wards. The simplest type contains
only one ward and
is called a singlewarded lock. The interior of a simple
warded lock is
shown in Figure 3.
Note that when the
key is inserted, the
cut corresponds
exactly to the placement of the wards. When the proper key enters the keyhole of
the unlocked door, negotiates the wards, and is turned, it
raises the deadbolt over the obstructions that detain it. The
deadbolt enters the strike, and the door is now effectively
locked.
KEY
Now look at the
lock interior shown
in Figure 4. This
lock contains
several complex
wards. The key for
this lock was elaborately cut to “clear”
the obstructions
caused by the
wards.
Some locks have
wards on the
WARDS
exterior of their
keyways. These
wards are called
case wards. Case wards add a little security to a lock, since an
additional cut must be made on a key just to allow it to slide
into the keyway (Figure 5).
Lock Mechanisms
5
FIGURE 5—Case wards
in the keyway of a
warded lock add a
little security.
A skeleton key is a key that has been
ground down to make it very thin
(Figure 6). The wards of a warded lock
are easily bypassed using a skeleton
key. For this reason, warded locks are
not recommended in circumstances
where a high degree of security is
desired.
Warded Mortise Locks and
Warded Rim Locks
The warded door lock in Figure 7B is
called a warded mortise lock, because it
is installed in a recess in a door called a
mortise. By comparison, the warded rim
lock in Figure 7A is surface-mounted on
(rather than in) the door.
Figure 8 shows the interior mechanism
of a typical warded rim lock. Note
that the lock contains two bolts: a
FIGURE 6—A skeleton
key-operated deadbolt and a latch bolt.
key is designed to
bypass the wards in
The latch is operated by turning the
door-knob. The latch fits securely into a a warded lock.
strike, the metal plate recessed in the
door jamb. When the latch is in place,
the door will be held closed, but not locked,
since no key is required to move it. When the inside latch
6
Lock Mechanisms
FIGURE 7—Part A of this
illustration shows a
warded rim lock; Part B
shows a warded
mortise lock.
button is pressed down, though, it does prevent the latch bolt
from being released by anyone outside the door. The deadbolt
is operated by a key or by turning a turnpiece inside the
door. The door is truly locked when the deadbolt is thrown.
INSIDE
LATCH SPRING
INSIDE
LATCH LOCK
HUB
KNOB
SPINDLE
LATCH
BOLT
SPRING
DEADBOLT
WARDS
LATCH BOLT
SPRING
FIGURE 8—Interior of a
Warded Rim Lock
KEY HOLE
Lock Mechanisms
7
Advantages and Disadvantages of the Warded Lock
Warded locks aren’t generally used on today’s exterior doors.
They have been replaced by pin tumbler or disk tumbler locks
in most cases. This is because warded locks aren’t nearly as secure as pin tumbler locks (which we’ll discuss shortly).
Why isn’t the warded lock secure enough? Well, a lock’s
security depends on the following two things:
1. The complexity of its internal mechanism
2. The ease of looking into the lock to see the mechanism
In both of these cases, the warded lock offers little protection.
Its mechanism is simple and the keyhole is large enough to
view most of the inside of the lock. Because the keyway is so
large, it’s very simple to look inside the lock, bypass the
wards with a pick, and release the locking mechanism to
disengage the latch or bolt and open the door.
The simplest method of picking a warded lock is to use a pick
key. Several pick keys for warded locks are illustrated in
Figure 9. A pick key is a specially ground and cut piece of
flat steel that will fit into the
keyway of a lock. A small
curved projection is left near the
tip of the key pick. The remainder of the key pick is quite narrow. A pick key will open all
but a few warded lock types.
As you can see by the variety
of ward cuts on these pick
keys, it’s a simple matter to
select a pick key and turn it
gently in the lock. If you feel an
internal ward interfering with
the pick key, you simply stop
and try another pick key.
FIGURE 9—Key picks
like the ones shown
here are useful for
opening warded locks.
However, despite the relative
lack of security in warded
locks, note that there are circumstances when the simplicity of the warded lock is an
8
Lock Mechanisms
advantage. For example, warded padlocks are a good choice
for use in wet, sandy, or dusty environments where a more
complex lock would rust or jam easily.
Cleaning, Lubrication, and Repair of Warded Locks
Often, a warded lock will stop working, or will work only
with difficulty. Note that while it’s usually easier and
cheaper to replace a warded lock than repair it, a customer
may want an old lock repaired anyway. This is especially
true in very old homes where the owner may want to keep
the warded lock for its “quaint” appearance.
You may also be called upon to repair small warded locks in
antique furniture (chests, cabinets, clocks, trunks, and so on).
One good suggestion is to keep any old lock parts and any
old bit and barrel keys you can find (at junk shops, yard
sales, and so on). Since these parts and keys aren’t widely
manufactured anymore, keep them on hand for repairs.
One of the most common causes of warded lock failure is the
buildup of dust and debris inside the lock. Paint is one of the
biggest offenders. Repeated painting of a door over the years
can leave a warded lock clogged and can make it impossible
to insert or turn the key.
In such a case, you’ll need to open up the lock to clean it,
lubricate it, or replace worn parts. The warded lock is the
easiest to disassemble of all the lock types we’ll look at. Simply remove the screws on the cover plate, and the “guts” are
exposed. After removing the cover plate, replace any rusted
or worn parts. Then, use a wire brush to clean dirt and old
paint away from the affected lock parts. Unless absolutely necessary, stay away from commercial paint removers: they tend
to attract lint after use.
Next, use a commercial lubricant such as WD-40 (never oil;
we’ll explain why later) to lubricate the lock. You can apply it
using the spray assembly attached to the can.
Lock Mechanisms
9
Locking It Up! 1
At the end of each section in your Professional Locksmith texts, you’ll
be asked to pause and check your understanding of what you’ve just
read by completing a Locking It Up! quiz. Writing the answers to these
questions will help you review what you’ve studied so far. Please complete Locking It Up! 1 now.
Fill in the blanks in the following statements.
1. _______ keys and _______ keys are used to open warded door and
cabinet locks.
2. A _______ is the assembly of parts inside a lock that makes it work.
3. A _______ contains a mechanism that holds or releases a shackle in
the case or shell of the lock.
4. A _______ is simply any type of lock that’s opened and closed by inserting and turning a key.
5. The word _______ means to guard or guard against.
6. Wards on the exterior of the keyway of a lock are called _______.
7. A _______ is a key that has been ground down to bypass the wards
in a warded lock.
8. A _______ lock is mounted on the surface of a door.
Check your answers with those on page 53.
10
Lock Mechanisms
The Lever Tumbler Mechanism
Figure 10 shows an exterior view of a typical lever tumbler lock.
Lever tumbler locks are used on school lockers, cash boxes,
suitcases, mailboxes, and safe-deposit boxes. The slim, flat design of the lever tumbler lock is more appropriate for these applications than a cylinder-type lock. Modern lever tumbler locks
almost always use flat keys, although some European models are
operated with bit or barrel keys. The average lever lock is only
slightly more secure than the warded lock; however, the lever
locks used on safe deposit boxes are very secure.
FIGURE 10—A Lever
Tumbler Lock
Lever tumbler locks
are available in a
wide range of
security levels.
Generally, the lever
tumbler locks you
will encounter will
have between two
and five lever tumblers within the
lock. Some highsecurity lever tumbler locks can have
as many as sixteen lever tumblers. (The more tumblers, the
more difficult it is to invade the lock.) High-security lever
tumbler locks are used on some types of bank safe deposit
boxes and on some types of public lockers. In this section on
picking lever tumbler locks, we’ll look at the medium security lever tumbler locks with two to five lever tumblers.
Now, let’s look at the interior of a lever tumbler mechanism
(Figure 11) to see how it operates. This lock mechanism
contains three lever tumblers. Regardless of the number of
tumblers, however, the operation is essentially the same in all
lever tumbler locks.
Each lever tumbler is a flat metal plate held in place by spring
pressure. Figure 12 shows the parts of one lever tumbler.
Taking a close look at these parts will help you understand
how the lever tumbler lock operates. The lever is the most
important part of the lever lock mechanism, since its movement controls the movement of the bolt. Other important
components of the lever tumbler lock are the gate, the post,
and the saddle.
Lock Mechanisms
11
FIGURE 11—This figure
shows the interior of a
lever tumbler lock
mechanism.
COVER BOSS
COVER
TRUNNION
LEVER TUMBLER
(TOP)
LEVER TUMBLER
(MIDDLE)
BOLT
NOTCH
LEVER TUMBLER
(BOTTOM)
POST
BOLT
BASE
The key enters through the cover boss and trunnion. When the
key is inserted, the key’s cuts will engage the saddle of each
lever tumbler. The saddle must be raised enough to allow the
post that is attached to the bolt to slide into the rear trap.
When this action occurs, the bolt will slide out of the jamb of
the door, opening the door.
In some lever tumbler locks, you may see different colored
levers. The color of the lever will identify the trap-to-saddle
distance. Also, in some lever tumbler locks, the levers themselves will be of different thicknesses. Here the thicker the
lever the greater the distance is between the bottom of the
saddle and the center of the trap.
12
Lock Mechanisms
FIGURE 12—This
illustration shows the
parts of one lever
tumbler.
Disassembly and Servicing
Lever tumbler locks that have been riveted or spot-welded
are generally very inexpensive, and aren’t worth the work
required to disassemble and reassemble them. Instead, they
should just be replaced. Other types of lever locks can be
opened either by removing the cover screws or by prying the
cover off, according to how the cover is attached. Carefully
remove the trunnion, and then the lever tumblers in order.
Reassemble by reversing the procedure.
Once the lever tumblers have been removed, the exposed
base and bolt can be checked for irregularities. If you find
any foreign matter, remove it.
The most probable cause of trouble in a lever tumbler lock is
a broken spring. To correct, remove the broken spring from
the affected lever and replace it.
The Disk or Wafer Tumbler Mechanism
The disk tumbler mechanism (also called the wafer tumbler
mechanism) is commonly used in automobile doors, desks and
cabinets, and vending machines. Disk tumbler locks provide
much better security than warded or lever tumbler locks. Note
that while most disk locks are constructed the same way, their
Lock Mechanisms
13
outward appearances may vary depending on what
the lock is used for.
Figure 13 shows a
familiar example of
a disk tumbler lock.
FIGURE 13—This type of
disk tumbler lock is
commonly used on
desks.
Figure 14 is an exploded drawing of
the principal parts
of a disk tumbler
lock. The main components of a disk tumbler lock are the shell,
the plug, the disks, and the springs. Let’s examine the disks first.
FIGURE 14—Exploded
View of a Disk Tumbler
Lock Mechanism
BOLT
CYLINDER
SHELL
DISK
SLOTS
RETAINING
CLIP
KEY
SPRING
PLUG
DISKS
SPRINGS
SPRINGS
When you first think about a disk tumbler or wafer tumbler
lock, you may think that the disks within the lock are circular. However, this is not the case. The disks or wafers inside
these locks are small, flat, rectangular pieces of steel, each
containing a slot or hole. The key will be inserted into these
slots to operate the lock.
14
Lock Mechanisms
For most disk locks, the disks come in five different slot arrangements (Figure 15). The location of the slot in each disk
will determine the key cut depth needed. In Figure 15, note
that the position of the slot in each disk is a little different.
The distance from the top of each disk varies. You may also
notice that each disk has a number stamped on it. This
number identifies the type of disk you’re working with.
FIGURE 15—The five
different sizes of discs
in a disk tumbler lock
are shown here.
A disk tumbler
lock’s plug will
contain an arrangement of any of
these five disks
(any one of the
disks may appear
more than once, as
well). While the
five disk tumblers inside the disk tumbler lock plug are the
same height and width, the rectangular cuts in the disks vary
in terms of their position on the disks. The key has five cuts
that correspond exactly to these tumbler cuts. The arrangement of the disks forms each lock’s individual combination.
The plug is held inside the shell. The shell contains an upper
and a lower slot. The disks or wafers inside the plug “stick
out” a little and fit into the lower slot in the shell. The disks
or wafers are pressed into the slot by means of small springs.
This keeps the plug from turning inside the shell when
there’s no key in the lock.
FIGURE 16—This
cutaway side view
shows a key inserted in
a disk tumbler plug.
The disks have been
pulled into alignment
by the key, freeing the
plug to turn.
The disks are slotted for key entry. When the proper key is inserted into the lock, the disks are pulled away from the slot in
the shell and centered in the plug.
This action frees the
LOCKING CAM
plug from the shell
DISKS
and allows the plug
to turn with the key.
Figure 16 shows a
view of a key inserted in a disk lock.
KEY
If an improperly
cut key is inserted
into the plug, one
or more of the disks
Lock Mechanisms
15
may not be lifted out of the slot in the shell. This action will
prevent the plug from turning and the lock from opening.
The Side Bar Wafer Lock Mechanism
A side bar wafer lock is a variation of the disk tumbler lock.
Side bar wafer locks provide a greater degree of security than
simple disk tumbler locks because they’re extremely difficult
to pick. Side bar wafer locks will make up a large amount of
your locksmithing work. This is because they’re inexpensive,
and also because they’re widely used for ignition, door, and
trunk or rear hatch locks for General Motors automobiles and
light trucks.
The five types of wafers that you might find inside a side bar
wafer lock are shown in Figure 17. The disks in a side bar
wafer lock are much like those in a standard disk tumbler
lock, but with one change: each disk (or wafer) has a Vshaped notch on one side. These wafers may be identified by
a number (one through five) stamped on the wafer. These
numbers refer to the heights of the position of the V-shaped
notch.
You’ll remember from our previous discussion that a regular
disk lock opens when the disks disengage from a slot in the
shell, allowing the plug to turn. In contrast, in a side bar
wafer lock, the disks release a side bar that disengages from a
slot in the shell.
FIGURE 17—This figure shows the five types of wafers or disks you’ll see inside a side bar wafer lock. Note the V-shaped notches in the sides of the wafers.
16
FIGURE 18—In this
cutaway view of a side
bar wafer lock, you
can see how the disks
must be aligned to
allow the side bar to
disengage from the
shell.
Lock Mechanisms
When the side bar
wafer mechanism is
locked, the side bar
extends into a special slot inside the
shell; as a result, the
plug is held securely
in place. As the key
enters the plug, the
key pushes the disks
upward, causing the
side bar to fall into
the group of Vshaped notches on
the side of the
disks. The side bar
is now clear of the
slot, and the plug is free to turn with the key. The disks can
only be aligned by the proper key. The operation of a typical
side bar wafer arrangement is shown in Figure 18.
The Cam Lock Mechanism
FIGURE 19—This
illustration shows a
typical cam lock.
One variation of the disk tumbler mechanism is the cam lock
shown in Figure 19. Cam locks are used extensively on cabinet doors and desk
drawers. In this
kind of lock, a
moveable cam is attached to the rear
of the lock. The
cam is a flat piece
of metal that rotates when the key
is turned in the
lock. The cam creates a physical barrier that prevents a door or drawer from being pulled open.
When the cam is turned into the “lock” position, the cam will
hold the door or drawer in place. When the cam is turned to
the “unlock” position, the door or drawer will be free to
open.
Lock Mechanisms
17
Disassembly
Disk locks may need to be disassembled for cleaning, repair, or
rekeying. Some disk tumbler locks are easy to take apart, others
are not; it depends on the method used to hold the plug inside
the shell. Some plugs are held with a screw-in retaining plate;
others must be drilled to access the internal retaining clip.
FIGURE 20—A hole has
been drilled in this disk
tumbler lock to allow
access to the retaining
clip.
In the lock shown in
Figure 20, a hole has
been drilled in the
shell to allow access
to the retaining clip
that holds the plug
in place. On some
disk tumbler locks,
this hole may already be present.
To remove the plug
from such a lock, insert a small tool such as a lock pick or thin
awl into the drilled hole. By applying pressure, the retaining
clip for the plug can be compressed. With the key located in the
plug, turn the plug slowly while pulling outward. The plug
should slide from the shell.
Once the plug is removed, you can begin removing the
disks. The disks may lift right out, or they may need to be
“pinched” to allow removal, depending on the type of lock.
As each disk is removed from the lock, place it in order in a
pin tray or other small container. To reassemble the lock,
reload the disks into the plug. Then insert the plug into the
shell, applying only as much pressure as is necessary for the
end of the plug to engage the retainer clip.
Disassembling a Side Bar Wafer Lock. Since most side bar
wafer locks are found in cars, you’ll need to remove it from
the vehicle before you can disassemble the lock itself. In general, ignition and trunk locks are removed by driving out a
retaining pin to release the lock shell. In a door lock, a special
retaining clip may be used to hold the lock shell. (We’ll discuss the exact details on removing locks from automobiles in
a later study unit. If you want more information now, you
can consult any automotive service manual.)
To disassemble this type of lock, you will have to remove the
spring and disk retainer cover. Pry upwards on the cover with
18
Lock Mechanisms
a small screwdriver and it will come free of the shell. (Note:
Very often, this cover will be bent or distorted upon removal
and require replacement after you have moved the discs.
These covers are available through locksmith suppliers.)
With the cover removed, begin lifting the six internal springs
from the lock with a pair of tweezers. Place these springs in
your pin tray or other container.
If you were disassembling the lock for the purpose of rekeying, you would now lift the disks out of the plug and replace
them as needed. Replace the springs and then insert a new
spring retainer cover into the shell.
Disassembling a Cam Lock. To disassemble a cam lock,
remove the nut, lock washer, and cam from the back of the
lock. The core can now be pushed out with finger pressure,
or eased out using the key.
Cleaning and Lubricating
If a disk or spring has broken inside a disk tumbler lock, the
lock is sometimes replaced. This is because it can be cheaper
to replace a malfunctioning disk tumbler lock than to repair
it. However, in many cases, a thorough cleaning and lubrication can quickly and easily correct many lock problems.
One of the first things to check when a disk tumbler lock fails is
the key. When a key gets very worn, it may not lift the disks to
the proper height, keeping the plug from turning. Often when a
key is excessively worn, cutting a new key will correct the problem.
Many disk tumbler locks fail due to dirt or lack of lubrication
(particularly car locks, which are constantly exposed to the
elements). Disk tumbler plugs can be cleaned in a safe and
non-flammable solvent. Spray solvents and other types of
cleaning solutions are available from locksmith supply
houses and hardware stores. If you wish, you can also use
electrical spray cleaners such as those used on volume
controls and other electronic components. A good cleaning
solution should flush any dirt and dust from the lock.
It’s a good idea to lightly lubricate the lock with a commercial
lubricant after cleaning. Never use oil, grease, or any type of
mineral- or paraffin-base lubricants. These types of lubricants
will collect dust and dirt over time, and eventually turn into a
paste inside the lock. This paste will cause the lock to malfunction.
Lock Mechanisms
19
Locking It Up! 2
Indicate whether each of the following statements is True or False.
_____ 1. Modern lever tumbler locks almost always use bit keys.
_____ 2. The disk tumbler mechanism is also called the wafer tumbler
mechanism.
_____ 3. A disk tumbler lock’s springs typically contain an arrangement
of five disks.
_____ 4. Lever lock mechanisms are commonly used as ignition, door,
and trunk or rear hatch locks for General Motors automobiles
and light trucks.
_____ 5. When the side bar wafer lock mechanism is locked, the side
bar extends into a special slot inside the shell; as a result, the
plug is held securely in place.
_____ 6. Cam locks are used extensively on home entry doors and car
ignitions.
_____ 7. All disk tumbler locks are easy to take apart.
_____ 8. It’s generally cheaper to replace a malfunctioning disk
tumbler lock than to repair it.
_____ 9. In a disk tumbler lock, the rectangular cuts in the disks are
always in the same position.
_____10. Disk tumbler locks are seldom used today.
Check your answers with those on page 53.
20
Lock Mechanisms
The Pin Tumbler Mechanism
The pin tumbler lock is the most secure and widely used lock
today. This type of lock is very popular in home entry locks,
padlocks, and other types of locking devices.
A pin tumbler mechanism is contained within a device called
a cylinder. Pin tumbler cylinders can be installed in a variety
of products: in a door knob, in a door surface, or in a car ignition. While each of these locks functions differently from the
outside, the pin tumbler cylinder itself always works the
same way. Pin tumbler lock mechanisms are always operated
with cylinder keys.
Construction
A pin tumbler cylinder contains the following parts: the plug,
the keyway, the top pins, the bottom pins, and the springs.
Let’s start our discussion by examining these parts.
FIGURE 21—Exterior
View of a Pin Tumbler
Cylinder and Plug
Figure 21 shows an
exterior view of a
pin tumbler cylinder and a plug. The
cylinder is the
rounded shell that
surrounds and
holds the plug,
which is the central
assembly of the
mechanism. The
plug is a small
“tube” that contains
the bottom pins
(Figure 22). Note
the five holes that
were drilled along
the length of the
plug, each containing a bottom pin.
(Many pin tumbler
mechanisms contain five pins, but
there are six- and even seven-pin arrangements.) The keyway
is the opening in the plug that allows a key to be inserted.
Lock Mechanisms
FIGURE 22—Plug and
Bottom Pins
21
Now look at
Figure 23, which
shows an interior
view of a pin tumbler cylinder. The
visible components
of the pin tumbler
lock are the plug
and the cylinder.
This view also
shows the internal
components: the
bottom pins, the
top pins, and the
springs.
Note the placement of the plug inside the cylinder. Inside the
cylinder, directly above the five holes in the plug, are five
more drilled holes, each containing a top pin. Above each top
pin is a small metal spring. The spring retainer exerts pressure
on the springs and the top pins to keep them inside the cylinder. The top pins in turn press down on the bottom pins.
FIGURE 23—Here is an
interior view of a
typical pin tumbler
lock.
Notice that when there is no key in the plug, the top pins rest
halfway between the plug and the cylinder, preventing the
plug from rotating inside the cylinder. The plug is “locked”
into place.
22
Lock Mechanisms
Pins and Key Cut Depths
To the average person, a pin may be a piece of jewelry or
something to knock over in a bowling alley. To a locksmith,
however, pins are very important lock components, since the
movement of the pins controls the turning of the lock plug.
Figure 24 shows an enlarged view of a top pin and bottom
pin. A top pin is flat on both ends. A bottom pin, however, is
slightly “rounded” at the end to make the insertion of a key
smoother.
FIGURE 24—Top Pin
and Bottom Pin for a
Pin Tumbler Lock
Some pin tumbler locks contain pins that make the lock
harder to pick. Anti-pick pins are specially formed to jam inside the lock if someone tries to move them with a lockpicking tool. These pins are shaped like mushrooms or spools
(Figure 25).
FIGURE 25—Anti-Pick
Pins
If you attempt to move anti-pick pins with a lockpick, they’ll
jam between the plug and the cylinder (Figure 26).
Lock Mechanisms
23
FIGURE 26—If you
attempt to lift an
anti-pick pin with a
lockpicking tool, the
pin will jam between
the plug and the
cylinder.
In a pin tumbler mechanism, the length of the top pins is
always the same, but the bottom pins vary in length. The
length of the bottom pins must correspond exactly to the
depth of the cuts in the key (Figure 27). The deeper the cut in
the key, the longer the pin.
FIGURE 27—The bottom
pins in a pin tumbler
lock must correspond
exactly to the cut
depths in the key.
Operation
To open the pin tumbler mechanism, we need to move the
bottom pins upward so that they align with the top pins.
When the correct key is inserted into the plug, the bottom
pins are lifted. The bottom pins press against the top pins,
forcing them up into the cylinder. The bottom pins and the
top pins will then line up exactly at the shearline. The
shearline is the straight line formed between the top pins
and bottom pins.
24
Lock Mechanisms
When the top and bottom pins have been aligned exactly at
the shearline, the shearline is free of obstructions, and the key
can be turned. When the key is turned, the plug will turn
freely with it, allowing the lock to open. (Note that a very
thin space exists between the plug and the cylinder. This is
because if the plug were held too tightly in the cylinder, it
couldn’t turn to open the lock.) Refer back to Figure 23 for a
visual aid to understanding this process.
Now, if the wrong key is inserted in this lock (Figure 28) the
pins would not line up exactly at the shearline. Some of the
top pins will be above the shearline, and some will be below
it. This misplacement of the pins will keep the plug from
turning inside the cylinder.
FIGURE 28—The wrong
key was inserted in this
lock, causing the pins
to be misaligned at the
shearline; the plug isn’t
free to turn.
Disassembly
Has it crossed your mind that you could make a “wrong key”
fit in the lock simply by changing the heights of the bottom
pins? Or, you could switch the locations of the bottom pins. If
so, you’re starting to think like a locksmith! This is exactly
what a locksmith does to rekey a lock. By changing the
heights and placement of pins in the lock plug, the locksmith
can make a different key operate the lock.
What kinds of repairs are made on a pin tumbler lock? All
kinds! The pin tumbler mechanism is generally more expensive than other lock mechanisms, and it’s also relatively easy
to disassemble and repair. For these reasons, pin tumbler
mechanisms are often repaired instead of replaced.
Lock Mechanisms
25
Typical problems with a pin tumbler lock include worn pins
and worn or broken springs. Because the pin tumbler mechanism is more complex than the other mechanisms we’ve discussed, it’s more vulnerable to dirt and grime. The small
parts in a pin tumbler lock can easily “freeze up” from a
buildup of dirt or a lack of lubrication. In addition, under the
right weather conditions, a pin tumbler door lock can freeze
from moisture intrusion or corrosion.
To perform repairs on a lock or to rekey it, you’ll need to disassemble the lock. While there are many different types and
sizes of pin tumbler locks, there are some general disassembly techniques that can be applied to most. (Consult the lock
manufacturer’s instructions for guidance whenever they’re
available.) Let’s start by looking at a typical pin tumbler door
lock.
Before you begin, note that a bright light is useful for viewing
the inside of pin tumbler locks. Many locksmiths use lights
called otoscopes to look into locks (Figure 29). (The otoscope is
the same tool that a physician uses to look inside patients’
ears and throats.) This light uses a halogen bulb and lens to
concentrate an extremely bright beam of light into the keyway of the lock being picked.
FIGURE 29—Many
locksmiths use an
otoscope to view the
insides of locks.
Some pin tumbler door locks are made with a spring retainer.
The spring retainer is a small, rectangular metal cover that
fits over the holes where the pins and springs are dropped
into a lock plug. If the spring retainer is removed, you can
gain access to the springs and the pins beneath them.
To disassemble such a lock, simply remove the spring retainer
(you may need to use a pliers to “pinch” the retainer to remove
it). Next, block all but one hole in the cylinder, and dump out
the top and bottom pin from the one open hole. Continue this
operation until all pins are removed from the lock. Set the pins
in a pin tray for storage while you work on the lock. Keep the
26
Lock Mechanisms
top pins together, and keep the bottom pins in the same order
in which you took them out of the lock.
To reassemble the lock, replace the bottom pins in order into
the plug holes. Then, replace the top pins, springs, and spring
retainer. If the spring retainer was damaged during removal,
replace it with a new one.
Now, let’s look at a different method of disassembling a pin
tumbler cylinder. Since most pin tumbler locks don’t contain
spring retainers, it will be necessary to use this second
method in most cases.
Let’s examine a pin tumbler mortise cylinder (Figure 30). (You
may remember from an earlier study unit that a mortise
cylinder is installed directly in the surface of a door.) This
type of lock doesn’t have a spring retainer. In order to gain
access to the pins and springs inside the mechanism, it will
be necessary to remove the plug from the cylinder. To remove the plug, the retainer plate must be removed first. The
plug retainer plate is held by two small machine screws.
FIGURE 30—In this pin
tumbler mortise
cylinder, the plug can
be removed after two
screws are unscrewed
from the shell,
releasing the retainer
plate.
Remove the retainer plate using a small screwdriver. Now,
once the retainer plate has been removed, you could simply
insert the key, turn it one-quarter of a turn, and withdraw the
plug from the lock cylinder. BUT WAIT! If you do that, all the
top pins and springs will pop free of the lock! And, while
these pins and springs can be replaced with a tweezers, it’s
not an easy job!
For this reason, the proper way to remove the plug is to use a
plug follower. A plug follower is a wood, metal, or plastic
dowel that holds the top pins and springs in place in the
cylinder when you withdraw the plug. To use the follower,
Lock Mechanisms
27
simply insert the key to its full depth and turn it one-quarter
of a turn. Now, place the end of the follower at the rear of the
plug. Gently withdraw the plug, and at the same time, push in
the follower. The follower will take the place of the plug
while you’re working on the bottom pins. The use of a plug
follower is shown in Figure 31.
FIGURE 31—To properly
remove a lock plug
from a mortise
cylinder, place a plug
follower against the
plug and push the plug
from the shell.
With the plug out of the cylinder, the bottom pins can now be
removed from the plug. Tip the plug slightly, and carefully
remove the bottom pins in order with a tweezers. Deposit the
pins in a pin tray in order. If you’re only cleaning or lubricating the lock, you must return the bottom pins to their original
positions in the plug; otherwise, the key won’t open the lock
when you put it back together! If the lock is being rekeyed, you
can change the positions of the bottom pins, or replace them as
necessary.
To reassemble the lock, your first task is to test the arrangement of the bottom pins in the plug. With the plug still out of
the cylinder, insert the key into the plug. Check to make sure
that the bottom pins are all lifted exactly to the shearline. If any
pins fall below or stick out above the shearline, you’ve made
an error somewhere. Rearrange the pins as necessary to get
them back to their original order!
This is a very important step. If you have made a mistake in replacing the bottom pins, and you replace the plug in the cylinder
without first checking the key, the plug could lock itself inside
the cylinder. Once this happens, the original key will no longer
work, and you won’t be able to remove the plug again to
28
Lock Mechanisms
change the bottom pins! One option is to try to pick the lock
to get it open again, which is extremely time consuming. Another option is to shim the cylinder open using a piece of
shim stock. In most cases, this is faster. Always remember to
test the plug before you put it back in the cylinder!
Once you’ve made sure that the key still works, you’re ready
to reassemble the lock cylinder. The plug is reinserted from
the front of the cylinder. Place the end of the plug at the front
of the cylinder so that it touches the plug follower. Then,
gently press the plug into the cylinder, and at the same time,
carefully withdraw the follower. The pins should be at a 45
degree angle to the top pins so the cylinder goes in more
easily.
Servicing, Cleaning, and Repair
The disassembled parts of a pin tumbler lock may be cleaned
with an application of WD-40 or a similar silicon-based
solvent. In many cases, a spray cleaner (the kind used on
electronic parts and components) can be used to remove dirt
and grime. The parts may then be lightly lubricated with
WD-40 and replaced in the lock. Never over-lubricate the
parts before reassembly.
Lock Mechanisms
29
Locking It Up! 3
Indicate which of the following are True or False.
_____ 1. A pin tumbler lock requires a special barrel key to open it.
_____ 2. The top pins in a pin tumbler lock are all different sizes.
_____ 3. The bottom pins in a pin tumbler lock are the same size.
_____ 4. A plug follower is a tool used to clean a pin tumbler lock.
_____ 5. Pin tumbler lock mechanisms can only be used in padlocks.
_____ 6. The main parts of a pin tumbler lock are the cylinder, the plug,
the top pins, the bottom pins, and the lever tumblers.
_____ 7. The pin tumbler lock is rapidly being replaced by the warded
lock.
_____ 8. A pin tumbler lock can’t be opened with a key until all the pins
have been aligned along the shearline.
Check your answers with those on page 53.
30
Lock Mechanisms
High-Security Lock Mechanisms
The term high-security lock can refer to any one of a variety of
locking devices. High-security locks contain mechanisms that
make them especially resistant to picking and forced entry. A
number of lock manufacturers include a high-security line in
their catalogs. Medeco Security Locks, Lori Corporation
(Kaba), and Schlage Lock Company are among the bestknown of the many manufacturers that do so.
Most of the high-security locks manufactured by these
companies contain pin tumbler mechanisms. As such, they
function basically in the same fashion as any pin tumbler
lock; a key enters the plug and elevates pins of various
heights to the shearline, after which the lock can be opened.
FIGURE 32—This
high-security lock
contains three sets of
pins.
However, in a high-security lock, the pin tumbler mechanism
is much more complex than in an ordinary lock. It usually
contains two or
more sets of top
and bottom pins.
PIN
For example, in the
PIN
Kaba Gemini brand
PIN
high-security
mechanism, the
lock plug holds
three sets of pins.
The pins enter the
lock cylinder at an
angle, and the key
must be specially
cut to accept the
KEY INSERTED
pins at that angle.
IN LOCK
Figure 32 shows an
end view of this
type of mechanism.
Note the three sets of pins and the angled depressions
needed in the key to make it fit in the lock. Figure 33 shows an
exploded view of the lock plug. Note how the pins and
springs are inserted into the plug.
Now, let’s look at some other special features manufacturers
put into their high-security locks.
Lock Mechanisms
31
SPRINGS
BOTTOM PINS
TOP PINS
SPRINGS
TOP PINS
SHELL
KEYWAY
TOP PINS
PLUG
BOTTOM PINS
SPRINGS
FIGURE 33—This illustration shows an exploded view of a high-security lock plug.
Sidebars. Medeco brand high-security locks incorporate a
sidebar into the lock plug to increase security. As Figure 34
shows, the sidebar has five “legs” that correspond to five vertical slots on the facing bottom pins. When the proper key is
inserted, the pins are raised to the shearline and also rotated
so that the legs of the sidebar slide into the slots of the lower
pins. This double action allows the plug to turn.
FIGURE 34—This type of
mechanism uses a
sidebar in the plug to
add security.
PLUG
PIN HOLES
SPRINGS
KEYWAY
SIDEBAR
32
Lock Mechanisms
Split Keys. Some manufacturers provide a security option
with their locks known as the split key (Figure 35). Two people are required to open the lock—each is given half of the
key. When two people are needed to open a lock, unwanted
single-party access to the lock is effectively ruled out.
FIGURE 35—A split key
requires two people to
operate it.
Multiple Locking Mechanisms. The Schlage company
manufactures a high-security lock (the Primus) that contains
two pin tumbler mechanisms inside. Both mechanisms are
operated simultaneously by one key. However, the patented
key is specially cut to operate both mechanisms. The key
contains two rows of bitting (Figure 36).
FIGURE 36—This
Schlage Primus key
contains two rows of
bitting to operate the
two mechanisms inside
the lock.
SIDE MILLING
Anti-Wrenching Pins. Some lock manufacturers install
anti-wrenching pins in their locksets (Figure 37). An antiwrenching pin acts as an anchor embedded in the door,
resisting attempts to wrench the cylinder loose.
Lock Mechanisms
33
FIGURE 37—An
anti-wrenching pin
anchors a lock
cylinder to a door,
preventing it from
being wrenched or
pried loose.
LOCK
CYLINDER
ANTI-WRECHING
PIN
High-Security Strikes. One of the most popular methods of
forcing entry to a home is kicking in the door. Unless the
door is unusually thick or strong, the wood of the door will
usually splinter around the lock and allow the burglar to get
in. To prevent this, a high-security strike has extra-long
screws that add strength to the door frame, making it very
difficult to kick in a door.
FIGURE 38—A
high-security strike has
extra-long screws that
add strength to the
door frame.
EXTRALONG
SCREWS
34
Lock Mechanisms
Interchangeable Cores
Interchangeable or removable cores are specially-designed lock
cylinders that can be removed from a door lockset without
disassembling the lock or door knob. An interchangeable
core is shown in Figure 39. They can easily be removed and
rekeyed using a special key called a control key. To remove
the core, the control key is inserted and turned, and the core
is then withdrawn.
HOLE PLUGS
RETAINER
PLATE
SPRINGS
PINS
PLUG SLEEVE
SHELL
PLUG
KEY
FIGURE 39—An
Interchangeable Core
Most of these locks are used in commercial installations. The
advantage of the interchangeable core is that if, for example, an
employee loses a key to a store, the locksmith can simply remove the core, rekey it, and replace it. With another type of
lock, the locksmith might have to remove the entire lock from
the door to replace or rekey it, which is much more timeconsuming and costly.
Key-Operated Padlocks
Padlocks are a familiar part of our daily lives. Many of us became familiar with padlocks as children, using them to secure
Lock Mechanisms
35
our school lockers and bicycles. Adults use padlocks to secure garages, outbuildings, toolboxes, trunks, storage units,
and just about any other enclosure that offers a hasp to hang
a padlock from.
There are a number of other padlock varieties. Some padlocks use a plug as a locking mechanism; the plug may hold
pins, discs, or wafers. High-security padlocks are also available. These padlocks feature special laminations, as well as
independent control of the two ends of the shackle.
FIGURE 40—Parts of a
Padlock
We discussed the operation of a padlock in the Practice
Exercise for Study Unit 2. Your Papaiz padlock is illustrated
again for your reference in Figure 40.
Remember that the
main parts of a
padlock are the
shackle, the shell,
and the tangs. The
shackle is held in
two locations by the
locking mechanism
near the top of the
lock. The two tangs
at the top of the
plug, when rotated,
cause the locking
mechanism to retract. This action
causes the shackle
to raise under
spring pressure.
No key is required to lock the padlock. Finger pressure is sufficient to return the shackle to the case, where the bolts catch
the notch and secure it.
Warded Padlocks
Warded padlocks are constructed a little differently from the
warded door lock, but the principle of operation is the same. A
modern warded padlock is constructed from many flat layers
of metal. The flat layers are then stacked up and laminated
together to form the body of the lock. Small cuts are made in
36
Lock Mechanisms
some of the layers to
create wards in the
lock body. When all
the layers are
stacked up, the key
will need to be cut
to correspond to the
lock’s wards. An interior view of a
warded padlock is
shown in Figure 41.
FIGURE 41—Interior
View of a Warded
Padlock
When the correct
key is inserted in a
warded padlock, it
passes through the
wards and can be
turned. As the key
turns, it moves the
bolts out of the
notch and the
shackle is forced upward and out of the case by the nowrelieved pressure of the shackle spring. Flat keys are used
with warded padlocks.
Disassembly
Since most padlocks are inexpensive, they’re more often
replaced than repaired. In addition, many inexpensive
padlocks (and all laminated warded padlocks) can’t be disassembled at all.
Expensive heavy-duty, high-security padlocks, on the other
hand, are well worth disassembly and servicing. The manufacturer’s instructions will tell you how to disassemble a
padlock; for example, some have special pins or rivets that
must be removed to access the locking mechanism. In addition, some high-security padlocks contain interchangeable
cores.
Choosing the Right Padlock
What’s the best padlock to buy? As a locksmith, you’ll hear that
question repeatedly, and there’s no easy answer. Nevertheless,
since you’ll be expected to come up with an answer, do so by
Lock Mechanisms
37
reviewing with the customer the following considerations:
purpose, location, and frequency of use.
Purpose. What is the padlock going to be used to lock? A
child’s bicycle or school locker will obviously require much
less security than the door to a garage or boathouse.
Location. Will the lock be used indoors or outdoors? An
outdoor lock will naturally take more abuse from the weather
than an indoor unit. A shed door that is covered in snow
four or five months of the year presents a real problem for a
cheap padlock. Urge the customer to consider any unusual
circumstances due to location (moisture, sand, dust, extreme
sunlight, and so on).
Frequency of Use. The price of a padlock is to a large extent
dependent on its durability. If the lock is to be operated several times a day, consider a better model.
38
Lock Mechanisms
Locking It Up! 4
Fill in the blanks in each of the following statements.
1. A special key called a _______ key is used to remove an interchangeable core.
2. A _______ key requires two people to open a lock. Each person is
given half of the key.
3. A special type of key that contains two rows of bitting is used in the
_______ lock.
4. A/an _______ acts as an anchor embedded in the door, resisting
attempts to wrench the cylinder loose.
5. A high-security _______ has extra-long screws that add strength to a
door frame, making it very difficult to kick in a door.
6. A/an _______ is a specially-designed lock cylinder that can be removed
from a door lockset without disassembling the lock or door knob.
Check your answers with those on page 53.
Lock Mechanisms
39
COMBINATION LOCK MECHANISMS
Introduction
Let’s stray away from key-operated locks for a short time and
look at a lock that needs no key. This type of lock is called the
combination lock mechanism. Combination lock mechanisms
are used in many types of padlocks, door entry systems,
safes, and vaults. Although combination locks differ in
construction from one make and model to another, they all
operate on the same basic principles.
Combination locks have a practically unlimited number of
applications, from school lockers to trailer hitches to safes.
They’re particularly advantageous over key-operated locks
in situations where several people—lab workers, industrial
inspectors, high-school teachers—need access to the same
equipment at random times. In a manufacturing plant, for
example, six or eight workers may need to use tools or supplies that are too valuable to be left out in the open. Rather
than provide each person with a key (which could be lost or
stolen, requiring immediate rekeying or lock replacement),
each can be given a simple three-digit combination.
Operation
Now, let’s examine the operation of the combination lock
mechanism. First, the combination is a series of numbers (usually three numbers) that is dialed to open the lock. Typically,
the combination is set at the factory. However, a locksmith
can change a padlock combination at a customer’s request.
Inside the lock, the main components are the wheels or tumblers. Outside, the lock has one or more dials. The internal
components of a simple combination padlock are shown in
Figure 42. This lock contains three wheels and a dial on its
face.
The dial is a numbered knob on the outside of the lock which
is used to dial the combination. It can be rotated to the left and
40
FIGURE 42—This
combination lock
mechanism contains
three wheels and a
numbered dial on its
face.
Lock Mechanisms
TENSION
SPRING
WASHER
OR
CLUTCH
PLATES
right. The numbers
on its face start at 0
and are read clockwise. Some locks
read from 0 to 50;
some read from 0 to
100. Locks with
numbers up to 100
usually have a little
more security than
ones reading up to
only 50.
When a combination
lock is locked, the
wheels are positioned in random
TUMBLER
TUMBLER
TUMBLER
relationship to each
#3
#2
#1
other. However, if
the three wheels are
moved in such a
way that the wheels are caused to align, the lock mechanism
will be released. To align the wheels, the dial is turned
clockwise and counterclockwise to reach the numbers in the
combination. As the dial is turned, the wheels inside are
aligned. Each time a correct number from the combination is
dialed, another wheel clicks into place. When all the numbers
have been dialed, the wheels will be completely aligned, freeing the lock to open.
DIAL
KNOB
To see how this works in more detail, let’s say we want to
open a padlock with the combination 18-5-15. First, spin the
dial a couple of times to clear it, and then align the zero under the arrow at the top of the dial. Next, we’d turn the dial
clockwise two full turns, and continue to turn until number
18 is aligned under the arrow. The first wheel inside the
mechanism is now set.
Next, move the dial counterclockwise one full turn, and stop
at number 5. The first and second wheel are now aligned.
Finally, turn the dial clockwise until number 15 is aligned
under the arrow. All three wheels should now be aligned
inside the mechanism, and the shackle should be free to
open. In some models, the shackle will pop up out of the
case, impelled by a spring; in others, you must pull down on
the case to release the shackle.
Lock Mechanisms
41
If you look at a back view of the combination lock, you can see
how the lock releases the shackle. Figure 43 displays this back
view of the lock. Notice how the wheel has a gate cut into it.
When the proper combination is dialed on the lock, each of the
three wheels will line up with their gates open to the locking
pawl. Since the locking pawl is free to pivot, it will enter the
gates on the three tumblers and open the shackle of the lock.
FIGURE 43—This figure
shows how the gates
on the wheels must
align in order to free
the locking
mechanism.
Some combination locks carry code numbers stamped on
their cases. A locksmith can discover the combination by
looking up this number in one of the code books available
only to professional locksmiths.
A slightly different model of combination padlock, the Sesamee padlock, is shown in Figure 44. Note that this lock has
four numbered dials on the bottom of the lock instead of the
face. One of the most useful features of this lock is that the
user can change the combination at will. To do so, a special
key called a change key is inserted into the shackle hole, and a
new four-digit combination rotated into place. Note: Don’t
confuse this combination change key with the change key of
a master key system.
42
Lock Mechanisms
FIGURE 44—Sesamee
Padlock
Disassembly
Most combination padlocks can’t be disassembled without
spending an enormous amount of time and effort to do so. If
the lock is inexpensive, it’s generally replaced rather than repaired. However,
you can expect to
meet customers
who have lost the
combination to a
padlock. In such a
situation, you may
be able to remove
the lock using boltcutters. Otherwise,
it will be necessary
to drill a small hole
in the back of the
lock to try to “see”
the combination.
FIGURE 45—Drill a small
hole as shown here to
see the wheels inside a
combination lock.
Drill a small
( 1 16-inch) hole in the
back of the padlock
case. By looking
inside the mechanism, you can see the position at which all the wheels are
aligned. Figure 45 shows where to drill the hole, which
you can patch with liquid solder or liquid cement when
Lock Mechanisms
43
you’re finished. The exact position of the hole might vary depending on the type and brand of lock.
Combination Entry Locks
The pushbutton combination lock in Figure 46 is a popular type
of combination entry lock used in both home and commercial
applications. These locks are especially common in hotels or
other facilities where many strangers come and go at will. Instead of having to supply each person with a key, a threenumber combination is supplied. The combination can be
changed quickly and easily to maintain security. If desired, a
security shield can be mounted around the lock face to screen
it from curious eyes.
FIGURE 46—A
Pushbutton
Combination Lock
An additional
advantage of the
pushbutton combination entry lock is
that it’s easy to install. In a wooden
door, two drilled
holes are all that is
required. For metal
doors, a surfacemounted strike is
provided, eliminating the need to
mortise the jamb.
Now that you
understand the
basic operation
of the combination lock, let’s take a look at another type of
keyless lock, the electric lock mechanism. (Note: We’ll be discussing the use of combination locks in much more detail
later in your study unit on safes and vaults.)
44
Lock Mechanisms
ELECTRIC LOCK MECHANISMS
Applications
Electric locks are used widely by many types of businesses,
hospitals, and industries. These keyless locks can be used on
rear or side entries of a business to allow employees to enter
and exit the building. Some homes and apartments have keyless entry systems to eliminate the need for keys.
Most modern hotels use electric locks for entry doors and/or
keyless electric locks for the actual room doors. In addition,
many of the hotel’s interior doors may be held open using
electric locks. Then, if a fire is sensed by the alarm system,
these doors close to prevent the fire from spreading.
Operation
The simplest type of electric lock consists of a solenoid-type
plunger that engages in a strike in the door or door jamb.
When an electrical current is applied to the plunger, magnetic
force pulls it out of the strike, opening the door. Another type
of electric lock is operated by remote control. These are often
mortised or key-in-knob locksets, and they’re controlled remotely using push buttons or keyed switches. Keypad or
card-reading keyless entry systems are another popular choice.
Finally, the electromagnetic lock consists of a powerful electromagnet and a steel plate that can hold a door against 2,000 or
more pounds of force.
In the simplest electric lock circuit, a single switch or pushbutton and an electric lock is used to protect one door. The
power supply for this electric lock consists of a fuse and a
transformer. One side of the transformer connects to the
electric lock’s coil, and the opposite side of the transformer
connects to a pushbutton switch. When the pushbutton is
pressed, the circuit is completed and the coil is energized.
When the coil is energized, the coil attracts a plunger that
allows the door to open.
More than one electric lock can be linked to one circuit and controlled with a single switch. In such a system, both locks operate when the pushbutton is depressed. The current flow in this
Lock Mechanisms
45
circuit doubles, since two loads are connected across the
power supply.
Two of the electric circuit devices we’ve been discussing—the
transformer and the electric lock coil—use electromagnetism to
operate. Electromagnetism is created by a magnetic field that
surrounds a conductor when electric current flows through it.
The magnetic field that surrounds a wire is very small. If you
could place a compass very close to the wire, you would see
the needle of the compass deflect slightly. This small deflection serves no real purpose in pulling back an electric lock
solenoid. However, if you loop the wire many times around a
core, the magnetic fields would add together, increasing the
overall field strength. The fields from the many turns of wire
are concentrated in the core when the wire coil is energized.
In fact, the coil has enough strength to pull the plunger out of
the strike box on a typical electric door lock.
This introductory information to electric locks should be
enough to familiarize you with their operation. However,
note that we’ll be discussing these locks (as well as electronic
security systems) in much greater detail in a later study unit.
46
Lock Mechanisms
Locking It Up! 5
Indicate whether each of the following statements is True or False.
_____ 1. Only one electric lock can be connected to a circuit.
_____ 2. A special key called a change key is used to alter the
combination of a Sesamee padlock.
_____ 3. The main components in a combination lock are the dials.
_____ 4. Once a lock’s combination has been set at the factory, it can
never be changed.
_____ 5. Pushbutton combination locks are very difficult to install and
operate.
_____ 6. A padlock combination usually consists of three numbers.
Check your answers with those on page 54.
Lock Mechanisms
47
THE KEY TO SUCCESS
Since the beginning of this study unit, you’ve learned many
of the important concepts and terms relating to lock mechanisms. You’ve learned how lock mechanisms work, in detail.
You’ve also learned how to disassemble and service many
lock mechanisms. Think about how important this valuable
knowledge will be to your future career as a locksmith!
You’ve already mastered many of the basic topics you’ll need
to become qualified as a professional locksmith. Be proud of
your scholastic achievements, and continue to plan for your
future!
Now, when you’re ready, read through the Key Points to Remember that follow. When you’ve reviewed the material and
feel you know it well, proceed to the examination for this
study unit. Good Luck!
KEY POINTS TO REMEMBER
A lock mechanism is the assembly of parts inside a lock that
makes it work. All lock mechanisms can be divided into three
basic types: key-operated lock mechanisms, combination lock
mechanisms, and electric lock mechanisms. A key-operated lock
mechanism is simply any type of lock that’s opened and
closed by inserting and turning a key. Key-operated locks are
found in residential doors, cars, and padlocks.
The warded lock mechanism is the oldest type still in use today.
Bit keys and barrel keys are used to open warded door and
cabinet locks. The word ward means to guard or guard against.
In locksmithing terms, a ward is a metal barrier inside a lock
mechanism that ensures that only the proper key will engage
the mechanism and open the lock. The “right” key contains
cuts that exactly match the shape of the wards inside the lock.
Warded locks aren’t generally used on today’s exterior doors.
They have been replaced by pin tumbler or disk tumbler
locks in most cases. This is because warded locks aren’t
nearly as secure as pin tumbler locks, since the warded lock
has a simple mechanism and the keyhole is large enough to
view most of the lock’s inside.
48
Lock Mechanisms
Lever tumbler lock mechanisms are used on school lockers, cash
boxes, suitcases, mailboxes, and safe-deposit boxes. The slim,
flat design of the lever lock is more appropriate for these
applications than a cylinder-type lock. Modern lever tumbler
locks almost always use flat keys.
The lever tumbler mechanism may contain from one to sixteen lever tumblers, depending on the security of the lock.
Each lever tumbler is a flat metal plate held in place by spring
pressure. When the key is inserted, the lever tumblers are
lifted and aligned inside the lock, allowing the lock to open.
The disk tumbler mechanism (also called the wafer tumbler mechanism) is commonly used in automobile doors, desks and cabinets, and vending machines. The main components of a disk
tumbler lock are the shell, the plug, the disks, and the springs.
The disks or wafers are small, flat, rectangular pieces of steel,
each containing a slot or hole. For most disk locks, the disks
come in five different slot arrangements. The location of the
slot in each disk will determine the key cut depth needed.
A disk tumbler lock’s plug will contain an arrangement of
any of these five disks (any one of the disks may appear more
than once, as well). The arrangement of the disks forms each
lock’s individual combination. The disks are slotted for key
entry. When the proper key is inserted into the lock, the disks
are pulled away from the lock shell and centered in the plug.
This action frees the plug from the shell and allows the plug
to turn with the key.
A side bar wafer lock is a variation of the disk tumbler lock that
is widely used for ignition, door, and trunk or rear hatch
locks for General Motors automobiles.
Another variation of the disk tumbler mechanism is the cam
lock. Cam locks are used extensively on cabinet doors and
desk drawers. In this kind of lock, a moveable cam is attached
to the rear of the lock. The cam rotates when the key is turned
in the lock, creating a physical barrier that prevents a door or
drawer from being pulled open.
The pin tumbler lock is the most secure and widely used lock
today. This type of lock is very popular in home entry locks,
padlocks, and other types of locking devices. Pin tumbler
lock mechanisms are always operated with cylinder keys.
The pin tumbler mechanism is relatively easy to disassemble
and repair.
Lock Mechanisms
49
A pin tumbler mechanism is contained within a device called
a cylinder. A pin tumbler cylinder holds the plug, which is a
small “tube” containing the bottom pins. The heights of the
bottom pins correspond to the cut depths in the key. The top
pins are all the same height, and rest halfway between the
plug and the cylinder, preventing the plug from rotating inside the cylinder.
When the proper key is inserted in the lock, the pins are lifted
to the height necessary to align them along the shearline, freeing the plug to turn. By changing the heights and placement
of pins in the lock plug, the locksmith can make a different
key to operate the lock. This process is called rekeying.
High-security locks are locking devices that are especially
resistant to picking and forced entry. Most high-security locks
contain complex or modified pin tumbler mechanisms. For example, some high-security mechanisms hold more than one
set of pins. The pins enter the lock cylinder at an angle, and
the key must be specially cut to accept the pins at that angle.
Some other features manufacturers add to their high-security
mechanisms are sidebars, split keys, multiple locking mechanisms, anti-wrenching pins, and high-security strikes.
Interchangeable or removable cores are specially-designed lock
cylinders that can be removed from a door lockset without
disassembling the lock or door knob. To remove the core, a
special key called a control key is inserted and turned, and the
core is then withdrawn. Most of these locks are used in commercial installations.
Padlocks are another common type of key-operated lock.
Remember that the main parts of a padlock are the shackle,
the shell, and the tangs. The shackle is held in two locations
by the locking mechanism near the top of the lock. The two
tangs at the top of the plug, when rotated, cause the locking
mechanism to retract. This action causes the shackle to raise
under spring pressure. No key is required to lock the padlock. Finger pressure is sufficient to return the shackle to the
case, where the bolts catch the notch and secure it.
Another type of key-operated padlock is the warded padlock. A
warded padlock is constructed from many flat layers of metal.
The flat layers are then stacked up and laminated together to
form the body of the lock. Small cuts are made in some of the
layers to create wards in the lock body. When all the layers are
50
Lock Mechanisms
stacked up, the key will need to be cut to correspond to the
lock’s wards.
A commercial lubricant such as WD-40 (never oil) should be
used to lubricate lock parts.
Combination lock mechanisms are used in many types of padlocks, door entry systems, safes, and vaults. The combination
is a series of numbers that’s dialed to open the lock. The dial
is a numbered knob on the outside of the lock which is used
to dial the combination. The dial is turned clockwise and counterclockwise to reach the numbers in the combination. As the
dial is turned, the wheels inside are aligned. Each time a correct number from the combination is dialed, another wheel
clicks into place. When all the numbers have been dialed, the
wheels will be completely aligned, freeing the lock to open.
The pushbutton combination lock is a popular type of combination entry lock that is especially common in hotels or other
facilities where many strangers come and go at will. Instead
of having to supply each person with a key, a three-number
combination is supplied. The combination can be changed
quickly and easily to maintain security.
Electric locks are used by many types of businesses, hospitals,
and industries. In the simplest electric lock circuit, a single
switch or pushbutton and an electric lock is used to protect
one door. The power supply for this electric lock consists of a
fuse and a transformer. When a pushbutton is pressed, the
circuit is completed and the coil is energized. When the coil is
energized, the coil attracts a plunger that allows the door to
open.
Lock Mechanisms
Do You Know Now . . .
Below are the answers to the questions asked at the beginning of this study unit.
What is the most important component of a combination lock?
The wheels or tumblers are the most important components of the combination
lock mechanism.
What are the major parts of a padlock?
The major parts of a padlock are the shackle, the case or shell, and the tangs.
What is a ward?
A ward is a metal barrier inside a warded lock that obstructs any key but the
proper one.
51
52
Lock Mechanisms
NOTES
53
Locking It Up! Answers
1
3
1. Bit, barrel
1. F
2. lock mechanism
2. F
3. padlock
3. F
4. key-operated lock mechanism
4. F
5. ward
5. F
6. case wards
6. F
7. skeleton key
7. F
8. rim
8. T
2
4
1. F
1. control
2. T
2. split
3. F
3. Schlage Primus
4. F
4. anti-wrenching pin
5. T
5. strike
6. F
6. interchangeable core
7. F
8. T
9. F
10. F
54
Locking It Up! Answers
5
1. F
2. T
3. F
4. F
5. F
6. T
Examination
55
925 Oak Street
Scranton, Pennsylvania 18515-0001
Lock Mechanisms
EXAMINATION NUMBER:
03100400
Whichever method you use in submitting your exam
answers to the school, you must use the number above.
For the quickest test results, go to
http://www.takeexamsonline.com
When you feel confident that you have mastered the material in this study unit, complete
the following examination. Then submit only your answers to the school for grading,
using one of the examination answer options described in your “Test Materials” envelope.
Send your answers for this examination as soon as you complete it. Do not wait until
another examination is ready.
Questions 1–20: Select the one best answer to each question.
1. A plug follower is used in the disassembly of
A. a combination padlock.
B. all disk tumbler locks.
C. all locks made in the United States.
D. pin tumbler locks.
2. A lock mechanism containing more than two sets of top and bottom pins would be called a
A. high-security mechanism.
B. wafer tumbler mechanism.
C. combination lock.
D. lock plug.
56
Examination
3. Which of the following lock mechanisms is commonly used in General Motors
automobiles?
A. Warded lock
B. Lever tumbler lock
C. Padlock
D. Side bar wafer lock
4. What is a case ward?
A. A warded padlock
B. A special cut in a bit key
C. A ward on a lock’s keyway
D. A lock used on a suitcase or briefcase
5. A cam lock is a type of
A. high-security pin tumbler lock.
B. disk tumbler lock.
C. lever tumbler door lock.
D. warded padlock.
6. Where is a rim lock installed?
A. On a briefcase or suitcase
B. On a safety deposit box
C. On the surface of an automobile door
D. On the surface of an entry door
7. Wheels are essential to the operation of
A. a combination lock.
B. a plug follower.
C. a disk tumbler lock.
D. a warded lock.
8. An anti-wrenching pin is a device that
A.
B.
C.
D.
is found only in warded lock mechanisms.
prevents a lock cylinder from being pulled out of a door.
prevents a lock cylinder from being picked.
protects a lock cylinder from rust and corrosion.
9. A disk tumbler lock may also be called
A. a wafer lock.
B. a lever lock.
C. a warded lock.
D. a high-security lock.
10. The wards of a warded lock may be bypassed using a
A. change key.
B. skeleton key.
C. disk tumbler.
D. plug follower.
11. A typical combination on a combination lock consists of a series of _____ numbers.
A. two
B. three
C. ten
D. no
Examination
57
12. Which of the following are components of a lever tumbler mechanism?
A.
B.
C.
D.
The gate, the post, and the saddle
The cover boss, the trunnion, and the ward
The saddle, the top pins, and the lever
The trunnion, the post, and the milling groove
13. Which of the following are components of a pin tumbler mechanism?
A.
C.
B.
D.
The top pins, the trunnion, and the lever
The plug, the case ward, and the bottom pins
The springs, the top pins, and the wheels
The top pins, the plug, and the bottom pins
14. The top pins in a pin tumbler lock mechanism
A. are all the same size.
B. are welded together.
C. are all different sizes.
D. correspond to the cuts in the key.
15. A warded door lock is usually opened with a
A. cylinder key.
B. flat key.
C. bit or barrel key.
D. tubular key.
16. If you attempt to move anti-pick pins with a lockpick, they’ll
A.
B.
C.
D.
lift up easily to the shearline.
cause the top pins and springs to pop out of the cylinder.
jam between the plug and the cylinder.
cause the lockpick to become wedged inside the cylinder.
17. Which of the following lock types is generally the easiest to disassemble?
A. Pin tumbler
B. Lever tumbler
C. Disk tumbler
D. Warded
18. When an electric lock’s pushbutton is pressed, what happens?
A.
B.
C.
D.
The electrical circuit is completed, and an alarm bell sounds.
The coil is energized, causing a powerful magnet to hold the door shut.
The electrical circuit is completed, and the door opens.
The coil attracts a plunger that locks the door.
19. Which of the following is used to service an interchangeable core?
A. A change key
B. A bit key
C. A control key
D. A flat key
58
Examination
20. A combination lock will open when
A.
B.
C.
D.
all of its wheels have been properly aligned.
the first number in the combination is dialed.
all of its wards have been bypassed by the key.
a small hole is drilled in the back of its case.
Lock Mechanisms
59
COMING ATTRACTIONS
Now that you’ve completed Study Unit 4, your next
information-packed study unit is just around the corner.
Study Unit 5 is entitled Residential Locks, and is designed to
introduce you to the many door and window locks you’ll
see in your career as a locksmith. The most important career
topics you’ll learn about are the construction and operation
of door locks and the practical installation of door locks. With
the help of many illustrations and easy-to-follow, step-bystep instructions, you’ll learn how to install a variety of locking devices—the same locks you’ll be installing profitably
every day in your professional career. Enjoy your continuing
studies!