1
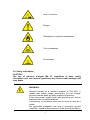
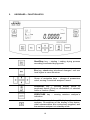
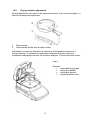
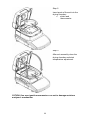
User manual no.:
IMMU-12-03-04-14-ENG
MOISTURE
ANALYZER
MAC
SERIES
BALANCES AND SCALES
RADWAG 26 – 600 Radom, Bracka 28, POLAND
Phone: +48 (0-48) 38 48 800, fax. +48 (0-48) 385 00 10
[email protected]
www.radwag.com
MARCH 2014
2
1.
2.
3.
4.
5.
6.
7.
8.
9.
TECHNICAL DATA .......................................................................... 5
GENERAL SAFETY INFORMATION .............................................. 6
2.1.
2.1.1.
2.1.2.
2.2.
2.3.
2.4.
2.5.
2.6.
2.7.
2.8.
2.9.
2.9.1.
Definitions of signals and warning signs ................................................ 6
Warning descriptions ............................................................................. 6
Warning signs ........................................................................................ 6
Safety information .................................................................................. 7
Intended use .......................................................................................... 9
Inappropriate use ................................................................................. 10
Principles of safety use ........................................................................ 10
Warranty .............................................................................................. 11
Monitoring metrological parameters of the instrument ......................... 11
Data included in this user manual ........................................................ 11
Staff competence ................................................................................. 11
Protective clothing ............................................................................... 12
3.1.
3.2.
Delivery check ..................................................................................... 12
Packaging ............................................................................................ 12
4.1.
4.2.
4.3.
4.4.
4.5.
4.6.
4.7.
6.1.
7.1.
7.2.
9.1.
9.2.
9.3.
9.4.
9.5.
9.6.
10.
10.1.
10.2.
10.3.
10.4.
10.5.
TRANSPORT I STORAGE ............................................................ 12
UNPACKING, ASSEMBLING AND STARTUP.............................. 12
Assembling and place of use ............................................................... 12
Unpacking ............................................................................................ 13
Level setting......................................................................................... 14
Standard delivery components ............................................................ 14
Cleaning .............................................................................................. 14
Plugging to mains ................................................................................ 15
Connecting peripheral equipment ........................................................ 15
KEYBOARD – FUNCTION KEYS .................................................. 16
START-UP ..................................................................................... 17
Moisture analyzer temperature stabilization period.............................. 17
USER MENU.................................................................................. 18
Moving through user menu .................................................................. 18
Return to weighing mode ..................................................................... 21
WEIGHING..................................................................................... 22
MOISTURE ANALYZER MAIN PARAMETERS. ADJUSTING
MOISTURE ANALYZER OPERATION TO AMBIENT
CONDITIONS AT A WORKSTATION ........................................... 22
Setting filtering level............................................................................. 23
Autozero function ................................................................................. 24
Access to library of drying programs.................................................... 25
Backlight of measurement result (display backlight) ............................ 26
Brightness adjustment of display backlight .......................................... 27
“beep” sound – reaction on pressing a function key ............................ 27
MOISTURE ANALYZER ADJUSTMENT ....................................... 28
External adjustment ............................................................................. 29
Adjustment test .................................................................................... 30
Drying chamber adjustment ................................................................. 31
Adjustment report printout ................................................................... 34
Drying process test .............................................................................. 35
3
11.
12.
DETERMINING CONTENT OF A PRINTOUT FOR GLP
PROCEDURES .............................................................................. 37
DATE AND TIME SETTINGS ........................................................ 40
13.
RS 232 FUNCTIONS ..................................................................... 41
14.
DRYING PROCESS WITH USE OF SHORTENED MENU .......... 44
15.
DRYING PROCESS WITH USE OF DRYING PROGRAM
LIBRARY ........................................................................................ 50
12.1.
12.2.
13.1.
13.2.
13.3.
13.4.
14.1.
14.2.
14.3.
15.1.
16.
17.
18.
19.
Setting time .......................................................................................... 40
Setting date.......................................................................................... 41
Baud rate setting.................................................................................. 41
Determining data type sent via RS 232 output..................................... 42
Printout interval .................................................................................... 43
Determining range of data sent during drying process ........................ 43
Setting means of auto switch off mode ................................................ 45
Active drying mode .............................................................................. 46
Type of displayed measurement result ................................................ 49
Sample mass control ........................................................................... 51
DRYING PROCESS ...................................................................... 52
SET OF COMPUTER – MOISTURE ANALYZER COMMANDS ... 56
ERROR MESSAGES ..................................................................... 58
PRINCIPLES OF USE ................................................................... 58
4
1.
TECHNICAL DATA
MAC 50/1
MAC 50
MAC 110
MAC 210
Max capacity
50 g
50 g
110 g
210 g
Readability
0,1 mg
1 mg
1 mg
1 mg
Tare range
- 50 g
- 50 g
- 110 g
- 210 g
Max sample
mass
Readability of
moisture
readout
Repeatability
of moisture
content
reading
Drying
temperature
range
Heating
module
50 g
50 g
110 g
210 g
Type
Drying modes
0,0001%
0,001 %
+/-0,1% (sample ~ 2g), +/-0,02% (sample ~10g)
max. 160 °C
max. 250 °C (WH)
halogen (WH)
infrared emitter
heater in metal cover (NS)
4 drying modes: standard, quick, step, mild
Auto switch off
option
Working
temperature
Power supply
3 modes: automatic, time defined, manual
Display
LCD (backlit)
Pan size
Φ 90 mm, h = 8 mm
Drying
chamber
dimensions
Net weight /
Gross weight
Packaging
dimensions
120 x 120 x 20 mm
+10 °C - +40 °C
230V 50Hz AC / 400W
4,9 / 6,4 kg
470 x 380 x 336 mm
5
Dimensions:
2.
GENERAL SAFETY INFORMATION
2.1. Definitions of signals and warning signs
Safety precautions are marked with special descriptions and warning signs.
They inform and warn a user of possible dangers. Ignoring the safety warnings
may cause injuries, damage of the moisture analyzer, its inappropriate
operation and errors of measurements.
2.1.1. Warning descriptions
WARNING
Dangerous situations of high risk. These
situations can cause serious injuries or death
if the safety precautions are not taken.
CAUTION
Dangerous situations of low risk. These
situations can cause damage of the
instrument or its functions, loss of data as
well as minor or moderate body injuries.
ATTENTION
Important information related to the moisture
analyser.
2.1.2. Warning signs
Electric shock risk
6
Acid / Corrosion
Danger
Flammable or explosive substances
Toxic substances
Hot surfaces
2.2. Safety information
CAUTION!
The use of moisture analyzer MA 3Y regardless of both, safety
information and user manual guidelines may cause health damage and
even death
WARNING:
Nominal voltage for a moisture analyzer is 230 VAC. It
means that safety usage precautions for low voltage
devices must be abide by while operating the device.
Three-core power supply cable with grounding pin comes
standard with a moisture analyzer.
If necessary, an extension cord can be used as long as it
meets
the applicable standards and has a protective ground
conductor. Intended disconnection of the grounding cable is
7
forbidden.
CAUTION:
Drying chamber cannot be opened during operation (drying
process). It is due to the fact that a halogen lamp and its
glass shield may reach the temperature of up to 400 C.
When setting up the moisture analyzer leave enough space
to
prevent heat from building up and to keep your analyzer
from
overheating. Leave about 20 cm around the instrument and
about 1 m above.
Air vents that are located in the housing cannot be covered,
sealed or blocked in any other way.
Do not put any flammable substances on, under or near the
moisture analyzer.
Be particularly careful when removing the sample from the
drying chamber: the sample itself, the drying chamber,
shields
and the pan can still be extremely hot.
In case of any maintenance work (cleaning the inside of the
drying chamber), the moisture analyzer must be switched
off.
Wait until all the components have cooled down. Do not
perform
any modification to the heating module.
Same types of samples require taking particular safety precautions.
They can pose a danger for people and objects. It is always the user who
is liable for possible damages caused by the use of an inappropriate
sample.
CAUTION:
Corrosion
Substances that release aggressive vapours (e.g. acids)
during
the heating process. In this case, it is recommended to
work with
small samples. Otherwise, vapours can condense on cold
housing parts and cause corrosion.
WARNING:
Fire or explosion
8
Flammable or explosive substances, substances containing
solvents or releasing flammable or explosive gases or
vapours.
Perform a risk analysis when in doubt relating to the sample
characteristics before carrying out the procedure.
For this type of samples apply the drying temperatures as
low as possible to prevent flames or explosion. During the
analysis it is
necessary to wear protective glasses and gloves. The
samples
should be relatively small.
Under no circumstances can the instrument be left
Unsupervised!
WARNING:
Substances containing toxic and caustic or corrosive
components
Substances that release toxic gases or vapours can cause
irritations (eyes, skin or respiratory system), illnesses or
even death. Dry such substances only in fume hood.
Under no circumstances should the instrument be used in an area with
any
risk of explosion. The moisture analyzer is not designed to operate in
hazardous areas.
2.3. Intended use
A moisture analyzer MA 3Y series is designed to determine relative moisture
content in small samples of various substances, determine dry mass content in
small samples and determine mass of weighed objects.
MA 3Y ensures fast and precise determination process of water content in a
tested sample, and application of touch screen display considerably simplifies
operation and improves functionality of the moisture analyzer. A moisture
analyzer MA 3Y series can be used to determine humidity content of different
materials.
At the initial stage of measurement, the device precisely determines the mass
of an object placed on instrument’s weighing pan. As the mass reading is
stabilized, the sample is quickly heated by a halogen lamp, an IR emitter or a
metal heater causing humidity evaporation from the tested sample. While
sampling, the moisture analyzer is continuously checking the loss of mass, and
on calculation, it displays current moisture content in a tested sample.
Compared to conventional methods of humidity content determination of
various substances, application of moisture analyzer MA 3Y series
9
considerably shortens measurement time and simplifies testing procedure. MA
3Y series allows for setting multiple parameters which influence the procedure
of moisture content determination in a sample, such as: temperature, time,
drying modes, etc.
2.4. Inappropriate use
CAUTION!
Do not open the drying chamber during drying process. Moisture analyzer
features a halogen lamp which is a very powerful heat source. Thus, user
should pay special attention no to touch those elements of a moisture analyzer
that get hot while drying procedure (i.e.: disposable pan, pan handle, and inner
shields of the drying chamber).
Remember that some of tested samples may become dangerous if heated
(appearance of poisoning vapours, danger of ignition or explosion).
Moisture analyzer MA 3Y series is not intended for dynamic weighing. Even if
small amounts of a sample are added to taken off the weighing pan, the mass
readout should only be taken only on stabilization of measurement result
on the display).
(appearance of stability pictogram
Do not place any magnetic materials on the weighing pan, as this can cause
damage of the measuring system of the instrument. Be sure to avoid impact
shock and overloading the moisture analyzer in excess of the prescribed
maximum measuring range (max capacity), minus any possible tare weight that
has been applied).
Never use the moisture analyzer in an environment endangered by an
explosion!
This moisture analyzer is not adjusted for operation in explosive areas. There
must not be any modification made to the moisture analyzer.
2.5. Principles of safety use
Moisture analyzer is in accord with all binding safety regulations. Nevertheless
there are exceptional circumstances that may cause danger.
It is forbidden to open an instrument housing. Inside there are no parts that
would require maintenance, repair or replacement carried out by a user. In
case of any problems it is recommended to contact RADWAG service or a
distributor. It must be always remembered to use the device in accordance with
this service manual and especially to follow instructions on installation and
configuration of a new device.
Use of a moisture analyzer MA 3Y series conversely to safety principles and
user manual guidelines may be hazardous to operator’s health and life. It is
obligatory to acknowledge the safety principles listed in the user manual:
- use a moisture analyzer only to determine humidity content in
samples and determine mass of a tested sample. Any other use of
the moisture analyzer may be dangerous both to the device and the
user,
- before commissioning the moisture analyzer, make sure that the
nominal power of the device specified on its data plate, is compatible
10
-
with the supply in the mains to which the moisture analyzer will be
plugged in,
replecemant of halogen lamps can only be carried out by
authorized service,
protect moisture analyzer against contacts with liquids, it might lead
to electrocution, fire, emission of substances containing toxic or
caustic vapour, emission of explosive substances.
2.6. Warranty
Warranty does not cover the following cases:
•
•
•
•
•
•
Not observing the regulation listed in user manual,
Using the moisture analyzer conversely to its intended use,
Any modifications of moisture analyzer or cases when its housing is
opened (damaged protective stickers),
Mechanical defects and defects caused by media, liquids, water and
natural wearing off,
Improper placing of defects of electrical network / mains,
Overloading of measuring mechanism of the moisture analyzer.
2.7. Monitoring metrological parameters of the instrument
Metrological characteristics of the moisture analyzer requires periodical
inspection carried out by its operator. Inspection frequency is conditioned by
ambient conditions in which the moisture analyzer is used, types of performed
processes and accepted quality management system in an organization.
2.8. Data included in this user manual
Please read the user manual carefully before instrument’s plugging to mains
and startup, even if the user is experienced with this type of moisture
analyzers.
2.9. Staff competence
Moisture analyzer MA 3Y series should only be operated and maintained by
personnel who is trained and experienced in using this type of instruments.
In order to use the moisture analyzer, first read the user manual. Keep these
instructions for the future reference.
Do not make any structural modifications. Additional equipment, which can be
connected to the moisture analyzer, should be supplied by RADWAG or an
authorized distributor.
11
2.9.1. Protective clothing
The use of protective clothing is highly recommended while working with the
instrument in order to take safety precautions against potential hazards
resulting from tested samples and ingredients.
Use the following while carrying out tests:
•
protective apron,
•
protective glasses,
•
protective gloves (while working
substances).
with
hazardous
chemical
Before the use of the above-mentioned protective clothing, make sure that they
are designed to be used with specific samples and they are not damaged.
3.
TRANSPORT I STORAGE
3.1. Delivery check
Please check the packaging immediately upon delivery and the device during
unpacking for any visible signs of external damage.
3.2. Packaging
Please retain all parts of the original packaging should the moisture analyzer
be transported in the future. Only the original packaging should be used for
dispatching the moisture analyzer. Before packing, disconnect all attached
cables and remove any loose/movable parts (weighing pan, shields, inserts).
Place moisture analyzer and its components in their original packaging, and
protect them against damage during transport.
4.
UNPACKING, ASSEMBLING AND STARTUP
4.1. Assembling and place of use
•
•
•
A moisture analyzer should be stored and used in locations free of
vibrations and shakes, free of air movement and dust, located at the
max altitude of 2000 above sea level,
Moisture analyzer’s place of use should ensure good air circulation
around the instrument (approximately 20 cm fee space around the
moisture analyzer and 1 m free space over it),
Ambient air temperature in the weighing room should not exceed the
range of:
+10 °C ÷ +40 °C,
12
•
•
•
Ambient relative humidity should not exceed 80% in the temperature
up to 31°C, and decrease linearly to 50 % of relative humidity in
temperature 40°C,
A moisture analyzer should be located on a stable wall console desk
or a stable working table which is not affected by vibrations and
distant from heat sources,
Take special safety measures when weighing magnetic objects, as
part of the balance is a strong magnet.
4.2. Unpacking
Carefully remove the moisture analyzer from its packaging, remove the plastic
and foil transport protective elements. Gently place the moisture analyzer in its
intended place of use.
Assembly the components of drying chamber, following guidelines from below
figure:
Assembling moisture analyzer components:
-
Setting drying pan’s supporter (bracket).
13
Assembly insert of the drying
chamber’s basis
Assembly drying chamber
cover,
Assembly drying pan handle,
Assembly drying pan bracket,
Assembly the disposable drying
pan.
When assembling the pan supporter
(bracket) pay special attention to the
correct positioning of its mandrel. The
mandrel features a cut for its unique
positioning against the pan handle, thus
preventing their contact and friction.
Setting pan’s bracket:
On assembling the pan bracket onto
the mandrel, turn the bracket slightly,
so that the cut on the mandrels are
located in their unique and correct
position,
When turning the mandrel use most
gentle movements not to damage
moisture analyzer’s measuring
system.
4.3. Level setting
Before plugging to mains, level the moisture analyzer using
adjustable feet. Turn the feet in a way that the air bubble of
the level is located centrally.
4.4. Standard delivery components
•
•
•
•
•
•
•
•
A moisture analyzer MAC series
Insert of drying chamber basis.
Drying chamber shield.
Drying pan handle.
Drying pan bracket.
Disposable pan.
Power cord.
User manual (CD).
4.5. Cleaning
Remember to unplug the moisture analyzer from mains before any cleaning
activities.
Clean the moisture analyzer using a damp cloth by gentle rubbing
contaminated places. Remember to remove the drying pan from the drying
chamber before its cleaning. If the drying pan assembly is installed while
being clened it may damage instrument’s measuring system, thus
remove it from the bracket.
14
4.6. Plugging to mains
A moisture analyzer can be plugged to mains only by means of original
power cord, which comes standard with the moisture analyzer. Rated
voltage (specified on device’s data plate) must be compatible with mains
rated voltage.
The power cord can be connected only to socket with ground contact. Plug the
power cord to the moisture analyzer. The moisture analyzer’s power plug is
located at the back of instrument’s housing.
On plugging to mains moisture analyzer’s displays software’s name and
number, after which the indication changes to 0.000 g (in case of a moisture
analyzer with measuring accuracy 1 mg) or 0.0000 g (in case of a moisture
analyzer with measuring accuracy 0,1 mg). In mass indication is other than
zero press O/T key located on the overlay.
4.7. Connecting peripheral equipment
The moisture analyzer must be unplugged from the mains before connecting or
disconnecting any peripheral equipment (printer, PC computer). Use only
peripheral equipment recommended by the manufacturer with your moisture
analyzer. These have been ideally coordinated to your moisture analyzer. On
connecting a peripheral device, plug the moisture analyzer to mains.
15
5.
KEYBOARD – FUNCTION KEYS
Start/Stop key – starting / ending drying process
according to selected drying mode.
Esc key, abandoning introduced changes / exit one
level higher in menu structure.
Group of navigation keys – change of parameters
value; moving in moisture analyzer’s menu.
Print/Enter key – sending display status to
peripheral device (Print) or confirmation of selected
value or function (Enter).
ZERO/TARE key – zeroing moisture analyzer’s
indication.
On/Off key – switch on/off display of moisture
analyzer. On switching of the display of the device,
other subassemblies are continuously supplied, and
the moisture analyzer is in standby mode.
16
Display key – changes type of data displayed during
and after drying process.
Setup key – enter to main menu.
Test menu key – function key for selecting drying
modes.
6.
START-UP
On plugging to mains the moisture analyzer carries out a display test (all
pictograms and digits appear on the display). Then the display shows software
name and number, and enters weighing mode.
6.1. Moisture analyzer temperature stabilization period
Before start of measuring processes, it is necessary to wait until the moisture
analyzer is thermally stabilized. It is a period of so called moisture analyzer’s
self-heating.
For moisture analyzer MAC series which before plugging to mains was stored
in room temperature, self-heating period takes approximately 30 minutes. For
moisture analyzers that were stored in much lower temperatures before
plugging to mains (e.g. during winter period) thermal stabilization should last
approximately 4 hours.
During self-heating period the indications on moisture analyzer’s display may
change. Correct operation
of a moisture analyzer is possible within
temperature range specified in the technical parameters, see point 1.
It is recommended that ambient temperature changes at moisture analyzer’s
place of use are very small (slow).
17
7.
USER MENU
User menu is divided into 5 basic function groups.
7.1. Moving through user menu
An operator moves through moisture analyzer’s menu using keys on overlay’s
keyboard:
Setup key. Entering main menu.
Navigating key UP – Selecting group of parameters one by
one upwards / changing parameter value by one value
upwards.
Navigating key DOWN – Selecting group of parameters one
by one downwards / changing parameter value by one value
downwards.
Navigating key RIGHT – Selecting group of parameters for
activating. On pressing the key, the display indicates the
first parameter in a selected group.
Navigating key LEFT – Exit to previous menu level, e.g. to
main menu.
Esc key. Abandon parameter changes.
Print/Enter key. Accept / confirm introduced changes
18
Names of function groups and their content:
P1 CAL
[Adjustment]
P1-01 ECAL |
P1-02 tCAL |
P1-03 tE_CAL |
P1-04 CALr |
P1-05 tSt_Co |
P2 GLP
[external adjustment]
[adjustment test]
[drying chamber adjustment]
[adjustment report printout]
[drying process test]
[Good Laboratory Practice]
P2-01 USr
P2-02 PrJ
P2-03 Ptin
P2-04 PdAt
P2-05 PUSr
P2-06 PPrJ
P2-07 PId
|
|
|
|
|
|
|
_
_
YES/no
YES/no
YES/no
YES/no
YES/no
P2-08 PFr
|
YES/no
P3 tinnE
[name of user]
[name of project]
[printout of measurement time]
[printout of measurement date]
[printout of user name]
[printout of project name]
[printout of moisture analyzer’s factory
no.]
[printout of frames]
[Setting time and date of the moisture analyzer]
P3-01 StinnE |
P3-02 SdAtE |
P4 rEAd
P4-01 AuE
P4-02 Auto
P5 Print
[setting time]
[setting date]
[Main user parameters]
|Stand/SLouu/Fast
|
On/OFF
[filtering level]
[autozero]
[Data transmission – RS 232]
P5-01 bAud | 2400/4800/9600/19200 [baud rate]
P5-02 PStb | YES/no
[measurement result printout: stable / unstable]
P5-03 LinE_t | 1/2/3/5/10/20/30/60/120/180
[printout interval]
P5-04 Prn_Pc | YES/no
[printout to computer]
19
20
[Other functions]
P6 othEr
P6-01 Libr
P6-02 bL
P6-03 bLbA
P6-04 bEEP
P6-05 PrnS
|
YES/no
[access to drying modes library]
|
YES/no
[display backlight]
|no/20/30/40/50/60/70/80/90/100 [display brightness]
|
YES/no
[beep sound on pressing keys]
|
[printout of moisture analyzer
parameters]
P6-06 Preuer |
YES/no
[prior moister analyzer mode]
7.2. Return to weighing mode
CAUTION
Changes introduced in moisture analyzer memory will be permanently
saved on return weighing with procedure of saving changes.
Press Esc key for several times, until the display indicates command
SAuE ?
Then select one of below option:
•
Print/Enter
•
Esc
- key – save (accept) changes
- key – abandon introduced changes, and leave to
balance menu.
21
8.
WEIGHING
Before start of measuring process or in case of essential change of ambient
conditions at a workstation (e.g. ambient temperature change at a workstation)
the moisture analyzer requires adjusting. The procedure of moisture analyzer
adjustment is described further in this user manual.
•
•
•
•
Before start of measuring procedure, it is recommended to load the
moisture analyzer’s pan a few times with mass close to the max
capacity,
Check if unloaded moisture analyzer indicates “precise zero” , if not press ESC/TARE
and whether measurement is stable key,
Place weighed object on moisture analyzer’s weighing pan and read
result only on stabilization of measurement result,
Mass indication of a load placed on moisture analyzer’s weighing pan
can be tarred for multiple times by pressing ESC/TARE key (pay
attention not to exceed maximal capacity of a moisture analyzer by
applying multiple tare function).
During times between carrying out the following measurement series do not
unplug the moisture analyzer from mains. It is recommended to switch off
moisture analyzer’s display by pressing ON/OFF key. On repeated pressing of
the ON/OFF key the moisture analyzer is ready for operation and carrying out
the following measurements.
9.
MOISTURE ANALYZER MAIN PARAMETERS. ADJUSTING MOISTURE
ANALYZER OPERATION TO AMBIENT CONDITIONS AT A
WORKSTATION
•
•
•
•
•
•
Setting filtering level – AuE.
Autozero function – Auto.
Access to library of drying modes – Libr.
Backlight of measurement result - bl.
Display brightness - blbA
“Beep” sound – reaction on pressing a key – bEEP.
22
User of a moisture analyzer can adjust its operation to current ambient
conditions at a workstation (by changing the value of digital filters), or
according to user needs (autozero operation or display backlight) by using
parameters grouped in this function.
9.1. Setting filtering level
- use navigating keys to select desired filter value,
AuE = StAnd
AuE = Slouu
AuE = Fast
- (normal) – normal operation conditions,
- (slow) – harsh operation conditions – vibrations, etc.,
- (fast) – good operation conditions – no vibrations, etc.
23
CAUTION:
The stronger filtering setting the longer weighing time.
9.2. Autozero function
In order to ensure moisture analyzer’s precise mass indication, autozero (Auto)
software parameter has been introduced. The application of this function is
automatic control and correction of zero indication. When function is enabled,
it compares moisture analyzer indications at declared time interval e.g. 1 s, on
conditions that weighing pan is unloaded and display indication is close to zero.
If results vary less than declared AUTOZERO range e.g. one division, the
moisture analyzer will zero automatically, display marker of stable
and precise zero marker
.
measurement result
If AUTOZERO function is enabled, then each weighing process starts from
precise zero point. There are, however, some cases when this function can be
a disturbing factor of measuring process; for instance very slow placing of load
on the weighing pan (e.g. load pouring) – in such case system of zero
indication correction can also correct actual indication of loaded mass.
Auto = On - autozero enabled,
Auto = OFF - autozero disabled.
24
9.3. Access to library of drying programs
In order to use the library of drying programs set parameter <Libr> to value
<YES>:
no
YES
- libraries of drying programs disabled,
- libraries of drying programs enabled.
25
9.4. Backlight of measurement result (display backlight)
The function enables switching on and off backlight of measurement result on
the display.
OFF
On
Aut
- backlight disabled
- backlight enabled
- backlight disabled automatically if measured indication does not
change within 10 seconds.
CAUTION
Moisture analyzer software has implemented option of automatic
backlight switch off bl = Aut. In case of this setting, the backlight is
switched automatically off if measurement results does not change
within 10 seconds. Backlight is automatically activated at the moment of
weighing result change on moisture analyzer’s display.
26
9.5. Brightness adjustment of display backlight
100
20
no
- maximum display brightness
- minimum display brightness
- display brightness disabled
9.6. “beep” sound – reaction on pressing a function key
bEEP = On
bEEP = OFF
- signal of pressing function key enabled,
- signal of pressing function key disabled.
27
10.
MOISTURE ANALYZER ADJUSTMENT
As the gravitational acceleration force has different value at various latitudes
and altitudes, a moisture analyzer should be adjusted to present working
conditions. This process should take place at the first installation of the
instrument on site and at its every re-location – as in case of ambient
temperature changes.
In order to ensure the highest weighing accuracy, it is recommended to
periodically refresh moisture analyzer’s accuracy by carrying out adjustment
process.
Adjustment should be carried out:
-
Before the beginning of measuring process,
If long breaks between following measuring series occur.
Types of adjustment:
-
adjustment with an external weight
Remember to carry out adjustment process only when there is no load on
the weighing pan! In case there is load on the weighing pan, the display will
indicate a command Er1 Hi. It is a command of unloading the pan.
Adjustment process can be aborted if necessary by pressing Esc key!
28
10.1.
External adjustment
External adjustment in moisture analyzer MAC series should be carried out
with an external mass standard / weight class F2 or higher.
Start of external adjustment process,
On selecting CAL mode, the moisture analyzer displays a command unLoAd –
ordering unloading of the weighing pan (the weighing pan must be empty).
When the weighing pan is empty press Print/Enter key. The moisture analyzer
initiates adjustment procedure. In a moment the display indicates mass of a
standard / weight to be loaded on the weighing pan – on loading the mass
standard / weight press Print/Enter key. On completing adjustment process
the moisture analyzer returns to submenu P1-01 ECAL, (if a moisture analyzer
is connected to a printer or a computer, then it automatically sends a report
from adjustment process to be printed – only if corresponding option has been
enabled in moisture analyzer’s settings).
CAUTION
- Press ESC key to abort adjustment process.
- If during adjustment process, weighing pan of a moisture analyzer is
loaded, then moisture analyzer displays an error message Er 1 Hi.
Return to weighing mode
(see point 7.2 – return to weighing mode).
29
10.2.
Adjustment test
Adjustment test is a comparison of mass of an adjustment weight with the
value of last adjustment saved in moisture analyzer’s memory. This process is
automatic and its result is previewed on the display (if a moisture analyzer is
connected to a computer or a printer through RS 232 interface, data on
adjustment test is printout – only if corresponding option has been enabled in
moisture analyzer’s settings). Press Print/Enter key to return to previous
display in moisture analyzer’s menu structure.
30
10.3.
Drying chamber adjustment
Special adjustment set, which is an atypical accessory of a moisture analyzer, is
used for temperature adjustment.
1.
2.
Thermometer
Thermometer holder with a holder shield
Adjustment is a process that aims at calibration of temperature sensor of a
drying chamber. To proceed to temperature adjustment please insert the
temperature adjustment set into the moisture analyzer. Follow instruction below:
Step 1.
Displace:
• disposable drying pan
• drying pan handle
• drying pan bracket
• drying chamber cover
31
Step 2.
Insert parts of the set into the
drying chamber:
• shield and
thermometer
Step 3.
After set assembly close the
drying chamber and start
temperature adjustment.
CUTION: Use most gentle movements so as not to damage moisture
analyzer’s mechanism.
32
Go to menu P1-03 tE_CAL, adjustment process is initiated automatically.
The moisture analyzer displays current temperature in the drying chamber.
After 8 minutes the display indicates (pulsating) temperature value. Use
navigating keys (up and down arrow) on moisture analyzer’s overlay to set
temperature value to be equal to the current temperature displayed on the
control thermometer. Use Print/Enter key to start part two of temperature
adjustment process. The moisture analyzer switches on the halogen lamp and
heats the drying chamber to a defined temperature value. The temperature
value is maintained for 8 minutes, and its value is visible on moisture analyzer’s
display. After 8 minutes the display indicates (pulsating) temperature value.
Use navigating keys (up and down arrow) to set temperature value to be equal
33
to the current temperature displayed on the control thermometer – as in
previous step. On entering the temperature value and accepting it by pressing
Print/Enter key, the software starts the last part of temperature adjustment
process. The moisture analyzer heats the drying chamber to another
temperature value, which is maintained for 8 minutes. Current temperature of
the dying chamber is visible on the display. After 8 minutes the display
indicates pulsating temperature value, which should be changed to be equal to
the one indicated on control thermometer (as in previous steps). On entering
temperature value accept it by pressing Print/Enter key. Temperature
adjustment process is completed, and the display indicates name of the
parameter: P1-03 tE_CAL.
In case of moisture analyzer with maximum heating temperature 250 °C, the
temperature adjustment process is the same, with only difference in higher
temperature values in each part of the process.
Return to weighing mode
(see point 7.2 – return to weighing mode).
10.4.
Adjustment report printout
On completing an adjustment process, the moisture analyzer enables
generating a report from adjustment process. The report can be printed on a
connected printer and sent to a computer and saved in a form of file for future
records.
YES
no
- report is printed.
- report is not printed
34
Remember, that if the parameter is set to YES, then a report is generated and
sent (printed) automatically.
Content of report from adjustment process depends on the settings of GLP
parameters. Any option in the GLP submenu which attribute is YES is included
in a report from adjustment process.
An instance of a report from adjustment process:
10.5.
Drying process test
<Drying process test> parameter allows to control correctness of thermometer
indications. Special adjustment set is used for test procedure of the drying
chamber (thermometer and thermometer holder). The set is an atypical
accessory of a moisture analyser (the same set is used for temperature
adjustment of the drying chamber). See point 10.3 for assembly instruction.
To start the procedure first assembly the adjustment set into the drying
chamber, next enter <CAL> menu and activate process P1-05 tSt_Co, follow
instruction below.
After the thermometer has been assembled, close the drying chamber and
proceed to the test.
35
Enter P1 CAL menu, next start P1-05
tSt_Co procedure. Before the test
activation set its parameters in
accordance with diagram and description,
to be found below.
Use navigating arrows to set specified test
temperature, press ENTER to confirm.
Next, enter tolerable (accepted by the
user) temperature errors.
Use navigating arrows to set specified
error value, press ENTER to confirm.
Next enter serial number of the adjustment
set, which will be used for the test.
Use navigating arrows to set the number,
press ENTER to confirm.
Upon confirmation of the number, program
will automatically start drying process until
the specified temperature is reached.
Time and sensor temperature information
will be displayed.
Temperature will remain unchanged for 8
minutes (like for temperature adjustment
process).
36
After 8 minutes the user will see a window,
where temperature read from the
assembled adjustment set must be
entered. Use navigating arrows to set the
temperature, press ENTER to confirm.
Wait to see the window with temperature
erro related to adjustment set
temperature.
-----------------------Drying chamber test
-----------------------Date:
2013/05/24
Time:
09:21:18 The result of the test may be printed on a printer
Balance Id:
349011
conected to the balance. To do it press PRINT button.
Calibr. Id:
324568
Set temp:
130
End temp:
130 An instance of the report is to be fount on the left.
Measured temp:
129
Acceptable error:
2
Status:
OK
------------------------
Press Esc few times to get back to the main window.
11.
DETERMINING CONTENT OF A PRINTOUT FOR GLP PROCEDURES
Group of parameters P2 GLP enables declaring variables that are present on an
adjustment printout and printout activated after a measurement.
P2 GLP
P2.1
P2.2
P2.3
P2.4
P2.5
P2.6
P2.7
P2.8
USr
PrJ
Ptin
PdAt
PUSr
PPrJ
PId
PFr
|
|
|
|
|
|
|
|
YES
YES
YES
YES
YES
YES
37
•
P2-01 USr
The parameter enables determining name of a operator who works with a
moisture analyzer. User name contains maximally 6 alphanumeric characters.
User name is inserted using moisture analyzer’s keyboard and navigating
arrows Up, Down, Left, Right.
Accessible characters and their equivalents displayed by the moisture analyzer:
An instance of a user name inserted to a moisture analyzer using capital letters
takes below form:
38
WILK
An instance of a user name inserted to a moisture analyzer using small letters takes
below form:
wilk
•
P2-02 Prj
The parameter enables determining name of a project (e.g. related to a specific
type of carried out test).
An instance of project name inserted to a moisture analyzer using capital
letters takes below form:
POLON
An instance of project name inserted to a moisture analyzer using small letters
takes below form:
polon
•
P2-03 Ptin
Option determining presence of measurement time on a printout.
•
P2-04 PdAt
Option determining presence of measurement date on a printout.
•
P2-05 PUSr
Option determining presence of user name on a printout.
•
P2-06 PPrj
Option determining presence of project name on a printout.
•
P2-7 Pld
39
Option determining presence of moisture analyzer’s factory number on a
printout.
•
P2-08 PFr
Option enabling printing frames on a printout.
For above parameters please select one of two available settings:
- variable absent on a printout,
- variable present on a printout
no
YES
Return to weighing mode
(see point 7.2 – return to weighing mode).
12.
DATE AND TIME SETTINGS
12.1.
Setting time
This parameter enables setting time in a moisture analyzer. In order to change
time settings use navigating keys Up, Down, Left, Right.
40
12.2.
Setting date
This parameter enables setting date in a moisture analyzer. In order to change
date settings use navigating keys Up, Down, Left, Right.
13.
RS 232 FUNCTIONS
13.1.
Baud rate setting
Select one of available baud rates:
- 2400 bit/s
- 4800 bit/s
41
- 9600 bit/s
- 19200 bit/s.
Return to weighing mode
(see point 7.2 – return to weighing mode).
13.2.
YES
no
Determining data type sent via RS 232 output
- sending stable measurement result,
- sending stable or temporary (unstable) measurement result.
Return to weighing mode
(see point 7.2 – return to weighing mode).
42
13.3.
Printout interval
Printout interval determines how often data on drying process is sent through
RS 232 port. Available settings: 1, 2, 3, 5, 10, 20, 30, 60, 120, 180 seconds
(setting <---> results in printing only a header and a footer – respectively,
drying process start and drying process end, halfway results are not printed –
line).
13.4.
YES
no
Determining range of data sent during drying process
- data limited to drying process result only (printout of a single
like).
- printout of complete report from drying process: header, line,
footer.
43
Return to weighing mode
(see point 8.2 – return to weighing mode).
14.
DRYING PROCESS WITH USE OF SHORTENED MENU
Menu of drying mode enables setting the following parameters:
- means of drying process auto switch off mode,
- drying mode for carrying out the drying process,
- type of displayed measurement result.
In order to start drying process with use of shortened menu, disable access to
libraries of drying programs – go to menu – P6-01 Libr.
In order to change parameter settings, enter the drying menu by pressing Test
menu key. Marker of submenu group drying process auto switch off mode starts
flashing. Then, using Right navigating key enable menu of changing settings of this
parameter group. Use navigating keys Up and Down to set one of available options
and accept changes (by double pressing of Print/Enter key) or continue parameter
settings (single pressing of Print/Enter key).
44
14.1.
Setting means of auto switch off mode
Parameter switch off mode can take the following values:
1
2
3
4
5
– automatic finish (mass change 1mg / in 10s time)
– automatic finish (mass change 1mg / in 25s time)
– automatic finish (mass change 1mg / in 60s time)
– automatic finish (mass change 1mg / in 90s time)
– automatic finish (mass change 1mg / in 120s time)
- manual finish (on pressing Start/Stop key)
Maximal time interval of the drying process cannot be longer than 9
hours 59 minutes. After this time the process will be automatically
switched off.
- time defined (max time setting 9 hours 59 minutes):
45
In order to accept carried out changes, press Print/Enter key for three (3) times.
14.2.
Active drying mode
46
In order to accept carried out changes, press Print/Enter key for three (3)
times.
Parameter active drying mode can take the following values:
•
Drying mode STANDARD
In standard mode, user should set drying temperature tmP in which a sample
should be tested,
•
Drying mode QUICK
In quick mode, user should set drying temperature tmP in which a sample
should be tested,
Specific feature of this drying mode is fast increase of drying temperature in
short period of time. Drying temperature for the time of 180 seconds is
exceeding the pre-set value by 30 %, after which is drops to temperature value
set in the parameters of the drying mode.
•
Drying mode MILD
In mild mode, user should set drying temperature tmP in which a sample
should be tested, and time t1 in which a moisture analyzer should reach preset temperature value.
47
•
Drying mode STEP
In step mode, user should set drying temperature tmP in which a sample
should be tested, temperature values tmP1 and tmP2 and time values t1 and
t2 between reaching the temperature values in each of the steps.
48
CAUTION:
For drying mode Quick the user must set the drying temperature and time
interval of heating in temperature 30% higher than the specified temperature.
Time interval of heating starts at the moment when the temperature has been
reached.
For drying mode Step the user must set threshold temperature values „1” and
„2”, drying temperature and time intervals of heating for particular intermediate
temperatures (1 and 2). Time interval of heating for a given step starts at the
moment when the temperature has been reached for the given step.
14.3.
Type of displayed measurement result
In order to accept carried out changes, press Print/Enter key for two times.
•
Percent loss of mass
49
Displays mass change recorded during drying process, and expressed in
percent,
•
Part of dry mass obtained in drying process, and expressed in percent
Measurement result is part of mass that is remaining on the drying pan after
humidity content evaporation,
•
Humid / dry ratio obtained as a result of drying process, and expressed in
percent.
Measurement result is part of mass that evaporated from the dried sample in
drying process,
•
Mass change
Measurement result is mass change recorded by the moisture analyzer in the
drying process.
15.
DRYING PROCESS WITH USE OF DRYING PROGRAM LIBRARY
In order to start drying process with use of drying program library, the user has to
enable access to the libraries in moisture analyzer’s menu: parameter – P6-01 Libr
has to be attributed <YES> (see point 9.3. of this user manual). The moisture
analyzer MAC series can comprise up to 20 drying procedures / programs, which
are optionally configured, saved and used by selecting one of them.
Should one of drying procedures / programs be used, follow below guidelines:
50
In order to exit the option of using drying program libraries, disable access to
libraries in moisture analyzer’s menu (see point 9.3. of this user manual).
Changing settings of any drying program (auto switch off mode, drying
mode, drying temperature, data to be displayed and printed) in the library,
requires selecting one of drying programs, and then acting as specified in
point 14: DRYING PROCESS WITH USE OF SHORTENED MENU.
Additionally, each drying procedure stored in the library allows for using an option of
sample mass control. When enabling the option, a moisture analyzer software
informs the user whether the mass to be tested is within set thresholds, regarding
the mass and tolerance values, on condition that the parameters were determined
for the sample. The sample mass control is visualized by displaying pictograms LO,
OK or HI on moisture analyzer display. The option is implemented for information
purpose only and facilitates a user in preparing the same or very similar sample to
be tested, thus increasing repeatability of measurements. If the pre-determined
mass control criteria are not met (i.e. pictograms LO or HI are displayed), the
moisture analyzer still starts the drying process. Settings of mass control option are
provided below.
15.1.
Sample mass control
Sample mass control option is active only in case of enabled access to library
of drying programs – P6-01 Libr (parameter set to YES).
The mass control value and tolerance value are set in the following way:
51
16.
DRYING PROCESS
In order to start the drying process, a user should select a drying mode, and then
act according to below guidelines:
52
Start drying process by pressing Start/Stop key, and on emptying moisture
analyzer’s drying pan, pressing TARE key. Open the drying chamber’s lid,
place test sample on the drying pan, and close the drying chamber’s lid.
53
Changing of displayed data during drying process is carried out by pressing
Display key.
54
In order to abort drying process, press Start/Stop key and accept switch off
mode of drying process by pressing Print/Enter key. An exception from the
above procedure is means of aborting the drying process in manual mode – on
pressing Start/Stop key the moisture analyzer aborts drying process with no
need to confirm the action by pressing Print/Enter key.
55
17.
SET OF COMPUTER – MOISTURE ANALYZER COMMANDS
Function
Command
INTERFACE RESET
R CR LF (zeroing of currently carried out commands, i.e. “tare”
which waits for stable result).
Function
SEND ALL IMPLEMENTED COMMANDS FROM THE
INSTRUMENT
PC CR LF (sends information on all implemented commands in
the program from the instrument)
Command
Function
Command
SEND STABLE RESULT IN BASIC UNIT
S CR LF (sends result in basic unit from the instrument on stable
mass readout)
Function
Command
IMMEDIATELY SEND THE RESULT IN BASIC UNIT
SI CR LF (sends result in basic unit from the instrument)
Function
Command
SEND THE RESULT IN CURRENT UNIT
SU CR LF (sends the result in current used result on stable mass
readout)
56
Function
Command
IMMEDIATELY SEND THE RESULT IN CURRENT UNIT
SUI CR LF (sends the result in current used unit from the
instrument)
Function
Command
ZERO THE INDICATION
Z CR LF (zeroes the indication on stable readout)
Function
Command
TARE WHEN STABLE
T CR LF (TARE the indication on stable readout)
Function
Command
SWITCH OFF CONTINUOUS TRANSMISSION IN BASIC UNIT
C0 CR LF (stops continuous transmission in basic unit)
Function
Command
SWITCH ON CONTINUOUS TRANSMISSION IN BASIC UNIT
C1 CR LF (starts continuous transmission in basic unit)
Function
Command
GIVE SERIAL NUMBER OF THE INSTRUMENT
NB CR LF (sends factory number)
Function
Command
GIVE WEIGHING RANGE
FS CR LF (send instrument’s value of max capacity in basic unit)
Function
Command
GIVE SOFTWARE VERSION
RV CR LF (sends name and version of the instrument’s software)
Function
Command
SEND SETUP
PS CR LF (sends all instrument’s setup – printout of the
parameters)
Caution!
Sending a command to the instrument which is not in the above list or has
an error, and it is finished with CR LF, causes instrument’s response in
format E S CR LF. Spaces provided in the command formats should be
omitted, as they are given for proper legibility of the commands.
57
18.
ERROR MESSAGES
If moisture balance software detects an error a proper error message appears on
the graphic display. The error message contains number of error which informs
about its source.
Error message
Er1 Hi
Er2 nu
Er3 Fu
Er4 ro
Er5 Ad
Er6 to
Er7 ou
19.
Error description
Start mass exceeds permissible range (it refers to start
and adjustment – start mass)
Low limit of converter range exceeded
High limit of converter range exceeded
Value of mass or temperature exceeds permissible range
(it refers to mass or temperature adjustment – final mass
or temperature)
A/D converter error
Operation time exceeded (tarring or printing caused by
lack of stability status in set time)
Inserted value is out of range (reg. setting reference
mass, date, etc.)
PRINCIPLES OF USE
For measurement temperatures ranging from 161°C to 250°C time interval for
temperature meintenance is estimated proportionally as follows, 60 min for 161°C –
20 min for 250°C.
For drying process in temperature 250°C, Max temp is maintained for 20 min, next
the program automatically lowers the temperature to 161°C, without aborting the
drying process.
Time interval for lowering the temperature to 160°C is 20 min.
For drying mode Quick overdriving Max drying temperature is 30% but no more
than Max default temperature.
For drying mode Step time interval for temperature maintenance is limited to 20
minutes for particular steps.
PRIOR VERSION OF MOISTURE ANALYZER
Parameter <P6-06Preuer> must be set to value <YES>.
58
Parameter allowing the moisture analyser to be operated by means of a prior
version of the software (valid since June 2013). Upon setting parameter <P606Preuer> to value <YES > the moisture analyzer operates like its prior version
(produced before June 2013) in terms of drying temperatures and drying process
control (when operating in similar temperature conditions).
This allows using drying process settings the same like for previous moisture
analyzers of this series. Thus the user does not have to set the drying parameters
for a newly purchased product, he may work with already set ones.
User manual no.:
IMMU-12-03-04-14-ENG
59
MANUFACTURER
OF ELECTRONIC WEIGHING INSTRUMENTS
RADWAG BALANCES AND SCALES
POLAND, 26 – 600 Radom, Bracka 28
Phone. +48 48 38 48 800, fax. + 48 48 385 00 10
[email protected]
www.radwag.com
60