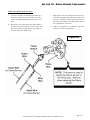
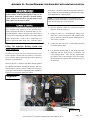
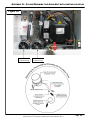
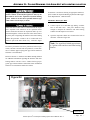
1
AHE-450-DE2 SERVICE MANUAL © 2009 Aqua-Hot Heating Systems Inc. © 2009 Aqua-Hot® 450-D Hydronic Heating System Service Manual—Rev. A — Page 2 — Table of Contents Section 1: Introduction to the Aqua-Hot 450-DE Introduction ............................................................................................................... ..Page 6-7 Danger, Warning, Caution, and Note Box Definitions................................................... ...Page 6 Section 2: Aqua-Hot Hydronic Heating System Overview Technical Information ................................................................................................... ...Page 8 I.D. Label Sample ......................................................................................................... ...Page 9 Component Overview .................................................................................................Page 9-11 Aqua-Hot Operational Flow-Chart .............................................................................. ..Page 12 Antifreeze & Water Heating solution...................................................................... ..Page 13-14 Section 3: Interior Switch Panel Diesel-Burner Switch .................................................................................................. .Page 15 Electric Element Switch .............................................................................................. .Page 15 Engine Preheat Switch ............................................................................................... .Page 15 Pin Label .................................................................................................................... .Page 16 Section 4: Exhaust System Requirements Exhaust System Requirements .................................................................................... .Page 17 Section 5: Aqua-Hot 450-DE Components Interlock Switch ........................................................................................................….Page 18 Fluid Level Sensor .....................................................................................................Page 9-20 Control Thermostat...................................................................................................Page 20-21 A.C. High Limit Thermostat .......................................................................................... Page 22 D.C. High Limit Thermostats ........................................................................................ Page 23 Low Temperature Cut-Off Thermostat ......................................................................Page 24-25 Check Valves ...........................................................................................................Page 25-26 Tempering Valve ......................................................................................................Page 27-28 Circulation Pumps 1 & 2 ...........................................................................................Page 28-30 Stir Pump .................................................................................................................Page 30-32 Electric Heating Element ..........................................................................................Page 33-34 A.C. Relay .................................................................................................................... .Page 35 Section 6: Electronic Controller General Facts ............................................................................................................... .Page 36 Secondary 12 Volt DC battery Connection ................................................................... .Page 37 Terminal Strips with Screw-Type Fasteners ................................................................. .Page 37 Low Voltage Reset Feature .......................................................................................... .Page 38 Replacement Procedure ............................................................................................... .Page 39 Proper Jumper Pin Formation ...................................................................................... .Page 39 © 2009 Aqua-Hot® 450-D Hydronic Heating System Service Manual—Rev. A — Page 3 — Table of Contents Section 7: Electronic Controller Indicator Lights Electric Heating Element Status Indicator Light ........................................................... Page 40 Heating Zones Status Indicator Lights 1-5 ................................................................... Page 40 Low Battery Voltage Fault Indicator Light ..................................................................... Page 40 Low Temp Cutoff Status Indicator Light ....................................................................... Page 40 Low Tank-Level Cutoff Indicator Light .......................................................................... Page 40 Heating Status Indicator Light ...................................................................................... Page 40 Engine Preheat Pump Indicator Light ........................................................................... Page 40 [Circulation] Pump #1 Indicator Light............................................................................ Page 41 [Circulation] Pump #2 Indicator Light............................................................................ Page 41 [Stir] Pump #3 Indicator Light ....................................................................................... Page 41 Diesel-Burner Status Indicator Light ............................................................................. Page 41 Overload Fault Indicator Light ...................................................................................... Page 41 Section 8: Diesel-Burner Overview ...................................................................................................................... Page 42 I.D. Plate ...................................................................................................................... Page 42 Diesel-Burner Overview ............................................................................................... Page 43 Diesel-Burner Operational Flow Chart .......................................................................... Page 44 Diesel-Burner Operational Overview ...................................................................... Page 45-47 Section 9: Detaching and Reattaching the Diesel-Burner Detaching the Diesel-Burner .................................................................................. Page 48-51 Reattaching the Diese-Burner ................................................................................ Page 52-53 Section 10: Diesel-Burner Components and Repair Information Diesel-Burner Component Overview ............................................................................ Page 54 Motor ...................................................................................................................... Page 55-58 Flame Sensor ......................................................................................................... Page 59-60 Ignition Electrodes .................................................................................................. Page 61-62 Fuel Nozzle ............................................................................................................ Page 62-63 Fuel Solenoid ............................................................................................................... Page 64 Fuel Pump .............................................................................................................. Page 65-67 Bearings ................................................................................................................. Page 68-70 Ignition Coil ............................................................................................................ Page 71-72 Controller ................................................................................................................ Page 73-74 © 2009 Aqua-Hot® 450-D Hydronic Heating System Service Manual—Rev. A — Page 4 — Table of Contents Section 11: Troubleshooting If the Aqua-Hot is Black Smoking ................................................................................. Page 75 If the Aqua-Hot is Blue/White Smoking ........................................................................ Page 76 If one of the Aqua-Hot’s Heating Zones will not get hot................................................ Page 77 If there is a lack of domestic continuous hot water ....................................................... Page 78 If there is antifreeze leaking ................................................................................... Page 79-80 Appendix A: Wiring Diagram .............................................................................................. Page 81 Appendix B: Wire Gauge Chart ......................................................................................Page 82-83 Appendix C: Fuel Pressure check and Adjustment .....................................................Page 84-89 Appendix D: Extreme Cold Weather Operation ............................................................Page 90-91 Appendix E: Aqua-Hot Annual Maintenance ..............................................................Page 92-105 Appendix F: Winterization Process .................................................................................. Page 106 Appendix G: Filling/Draining the Aqua-Hot ..............................................................Page 107-110 © 2009 Aqua-Hot® 450-D Hydronic Heating System Service Manual—Rev. A — Page 5 — SECTION 1: INTRODUCTION This service and parts manual is designed to aid trained and qualified service technicians with the process of troubleshooting and servicing the Aqua-Hot 450-DE Hydronic heating system. The Aqua-Hot 450-DE heating system features a 12 Volt-DC powered diesel-burner and a 120 Volt-AC, 1650 Watt electric heating element. These two heating sources are used in conjunction with an FDA-approved ―GRAS‖ (Generally Recognized as Safe) propylene glycol based boiler antifreeze and water heating solution in order to provide a continuous supply of domestic hot water, interior/fresh water tank heating, independent interior zone heating, and engine preheating. Be sure to reference Figures 3 through 5 for a complete component overview. Please note that all Danger, Warning, Caution, and Note boxes, appearing as needed throughout this manual, must be reviewed and adhered to during any service procedure in order to avoid potential hazards, which could result in injury, product damage, or property damage. Should additional assistance be needed, please contact the technical support department at 1-800-685-4298, Monday through Friday, between the hours of 7:00 AM and 4:00 PM Mountain Standard Time. Danger, Warning, Caution, and Note Boxes: Danger, Warning, Caution, and Note boxes appear throughout this manual as a means of alerting the service technician to important information. INDICATES THAT PERSONAL INJURY IS LIKELY OR IMMINENT. Indicates that serious damage to the heater will occur and personal injury is possible as well. Indicates that damage to the heater is possible. NOTE: Indicates information that requires special attention by the service technician TO THE AQUA-HOT 450-DE Understanding the Aqua-Hot 450-DE’s Major Systems: The basis for the Aqua-Hot heating system’s functionality is the antifreeze and water heatng solution, which is comprised of water that is distilled, de-ionized, or soft, as well as FDAapproved ―GRAS‖ propylene glycol based boiler antifreeze. Through this solution’s ability to maintain and transfer heat, the Aqua-Hot’s three major systems: the domestic water system, engine preheat system, and interior heating system, are able to function effectively. This antifreeze and water heating solution is contained within the Aqua-Hot’s boiler tank and is heated by the diesel-burner when its operating criteria are met and/or the electric heating element when its operating criteria are met. In order for the diesel-burner to be considered as a heating source by the Aqua-Hot, it must have an adequate fuel supply, receive power from the electronic controller, and be selected as a heating source from the interior switch panel. In order for the electric heating element to be considered as a heating source by the Aqua-Hot, it must receive power from either a generator or from shore power and be selected as a heating source from the interior switch panel. Once the antifreeze and water heating solution achieves operating temperature (as determined by the AquaHot’s control thermostat), the domestic water system, the engine preheat system, and the interior heating system are permitted to operate as needed. Domestic Hot Water Priority System: The Aqua-Hot 450 is a Hot Water Priority System. Meaning, that the Aqua-Hot 450 cannot heat the interior of the motor home, and produce continuous hot water simultaneously. When Domestic Hot Water is being used, the interior heating system will shut down, until no more Domestic Hot Water is called for. The domestic hot water priority system is responsible for providing hot water whenever a hot water faucet is opened such as with a shower or sink. When hot water is requested, domestic water from the motor home’s fresh water tank is transported through a copper coil in the Aqua-Hot’s boiler tank where heat is transferred from the heated antifreeze and water heating solution to the domestic water flowing through the copper coil. The heated domestic water then flows through the tempering valve to be mixed with cool water from the fresh water tank to achieve an appropriate temperature before it flows to the faucet requesting hot water. © 2009 Aqua-Hot® 450-D Hydronic Heating System Service Manual—Rev. A — Page 6 — SECTION 1: INTRODUCTION Engine Preheat System: The engine preheat system is responsible for heating the motor home’s engine block in order to make it easier to start-up when cool weather conditions exist. When the engine preheat system is activated via the interior switch panel, the motor home’s engine coolant is circulated through a dedicated copper coil in the Aqua-Hot’s boiler tank, where heat from the antifreeze and water heating solution is transferred to the motor home’s engine coolant. The heated engine coolant is then transported back to the engine where it transfers the heat to the engine to gradually warm it. Additionally, the Aqua-Hot 450-DE includes a motoraide feature, which uses the circulation of the motor home’s engine to transport the engine’s coolant from the Aqua-Hot’s boiler tank to the morot home’s warm engine and back to the boiler tank. Through this process, the boiler tank is kept heated, which reduces the time required to bring the tank to operating temperature for interior heat and continuous domestic hot water. This motoraide feature is part of the engine preheating feature and plumbing system, and requires no action on the user’s behalf to function. Interior Heating System: TO THE 450-DE Aqua-Hot’s boiler tank to be re-heated before being sent back through the loop again. This process continues until the pre-set temperature of the interior is reached, and the interior room thermostat signals the electronic controller that heat is no longer required. AC Circuit: Although the diesel-burner is the primary heating source for the Aqua-Hot and is necessary for providing continuous domestic hot water, an alternate heat source exists for moderate temperatures, which functions with an AC circuit. Whenever the motor home is connected to an AC power source plugged into shore power or using a generator, the AquaHot’s electric heating element has the ability to function in order to provide heat for the boiler tank. When the antifreeze and water heating solution falls below operating temperature (as determined by the control thermostat), a signal is sent to the electronic controller requesting heat. Because the electric element switch is activated on the interior switch panel, the DC power from the electronic controller is permitted to flow to the AC relay, which activates the relay in order to allow AC power to flow to the electric heating element. When the electric heating element receives power, it becomes active and supplies heat to the boiler tank until operating temperature is reached. The interior heating system is responsible for providing heat to the motorhome’s interior in order to maintain the temperature at a comfortable level. For interior heating, it is the room thermostats that trigger the Aqua-Hot’s interior heating system. When a thermostat recognizes that heat is required in a particular area, it sends a signal to the Aqua-Hot’s electronic controller calling for heat. The Aqua-Hot responds by activating the circulation pump for that zone, which sends the heated antifreeze and water heating solution through the Heating Loop corresponding to the zone requesting heat. The fans on the heat exchangers in the zone calling for heat are also activated; therefore, as the heated solution flows over the heat exchanger’s fins, the heat is transferred to those fins and dispersed into the interior of the motor home by the fans. Until the thermostat signals that heat is no longer required, the Aqua-Hot will continue to send the heated antifreeze and water solution through the loop, which returns the cooled solution to the © 2009 Aqua-Hot® 450-D Hydronic Heating System Service Manual—Rev. A — Page 7 — SECTION 2: AQUA-HOT 450-DE OVERVIEW Figure 1 Aqua-Hot 450-DE Technical Specifications Diesel-Burner, Heat Input (Firing Rate) ................................................................................................................................................ 56,000 BTU/hr Diesel-Burner, Fuel Consumption (Continuous Operation) ......................................................................................................................0.40 gal/hr Heater, Voltage/Maximum Power Consumption .................................................................................................................... 12 Volt-DC/60 watts Electric Heating Element specifications ................................................................................................................................ 120 Volt-AC/1650 watts Zone Heat Circulation Pump specifications ................................................................................................................ (2) 12 Volt-DC/21 watts each Number of Heating Zones .................................................................................................................................. maximum of 5, plus Engine Preheat Domestic Water Heating Capacity ...........................................................................................................................................continuous/on-demand Antifreeze Type Used ............................................................................................. Generally Recognized as Safe by the FDA - Propylene Glycol Dimensions .................................................................................................................................................................................... 12”H x 18.5”W x 30”L Dry Weight ..................................................................................................................................................................................... approximately 127 lbs. Wet Weight ..................................................................................................................................................................................... approximately 184 lbs. NOTE: All vehicle installations must comply with the requirements listed in the Recreational Vehicle Industry Association’s (RVIA) ANSI/NFPA 1192 Handbook for Recreational Vehicle Standards. To receive a copy of this handbook and other pertinent RVIA Standards, write to: Recreation Vehicle Industry Association, 1896 Preston White Drive, P.O. Box 2999, Reston, VA 22090-0999, call them at (703) 620-6003, or visit them online at www.rvia.org. © 2009 Aqua-Hot® 450-D Hydronic Heating System Service Manual—Rev. A — Page 8 — SECTION 2: AQUA-HOT 450-DE OVERVIEW Figure 2 Figure 3 © 2009 Aqua-Hot® 450-D Hydronic Heating System Service Manual—Rev. A — Page 9 — SECTION 2: AQUA-HOT 450-DE OVERVIEW Figure 4 © 2009 Aqua-Hot® 450-D Hydronic Heating System Service Manual—Rev. A — Page 10 — SECTION 2: AQUA-HOT 450-DE OVERVIEW Figure 5 © 2009 Aqua-Hot® 450-D Hydronic Heating System Service Manual—Rev. A — Page 11 — SECTION 2: AQUA-HOT 450-DE OVERVIEW © 2009 Aqua-Hot® 450-D Hydronic Heating System Service Manual—Rev. A — Page 12 — SECTION 2: AQUA-HOT 450-DE OVERVIEW Antifreeze and Water Heating Solution: As the antifreeze type and mixture ratio is essential to the Aqua-Hot’s performance and ability to comply with regulations, the following information is being supplied to understand various types of antifreeze, the quality of water necessary, and the mixture ratio. Aqua-Hot Heating Systems Inc. recommends CAMCO’s Boiler Antifreeze -100°. tivity characteristics. Although these types of antifreeze products are considered less toxic and safer than ethylene glycol for people, pets, and the environment, they are not ―Generally Recognized as Safe‖ (GRAS) rated by the FDA. Therefore, they must be marked with a ―harmful if swallowed‖ warning. This additional warning is required because these types of antifreeze products contain high levels of chemical inhibitors. Due to their potentially hazardous properties, they should never be used in the Aqua-Hot’s Hydronic Heating System. Antifreeze Types: Antifreeze Mixture Water Quality: The following information addresses the necessary usage of a propylene glycol based ―boiler ― type antifreeze in the Aqua-Hot. Propylene glycol is a safer alternative to the more toxic ethylene glycol antifreeze; however, as mandated by IAPMO (International Association of Plumbing and Mechanical Officials), only those propylene glycol based ―boiler‖ type antifreezes deemed ―Generally Recognized as Safe‖ (GRAS) by the FDA should be utilized. Because of the significant impact various types of antifreeze can have on a Hydronic heating system, including the level of safety provided, it has been recognized that there is a need to provide an explanation regarding two additional prominent types of antifreeze/coolant available. The following information should be utilized as an educational means of ensuring that the proper type of propylene glycol based antifreeze is selected: RV & Marine Antifreeze: These types of propylene glycol based antifreeze products are formulated specifically for ―winterizing‖ applications only. Although RV & Marine antifreeze is often ―Generally Recognized as Safe‖ by the FDA, it should never be used in the Aqua-Hot’s Hydronic Heating System. This type of antifreeze is not formulated to transfer heat, which is essential to the heating system’s functionality and does not contain rust inhibitors. Please note, however, that RV & Marine antifreeze can be utilized to winterize the Aqua-Hot’s domestic water heating system. Automotive Antifreeze/Coolant: These types of propylene glycol based antifreeze products are formulated specifically to protect automotive engines against corrosion, freezing temperatures, and overheating. They also have excellent heat transfer and thermal conduc- In order to ensure maximum performance and longevity of an Aqua-Hot heating system’s boiler tank and associated components, it has been determined that there is a need to use distilled, de-ionized, or soft water in combination with concentrated propylene glycol for the Aqua-Hot’s antifreeze and water heating solution,. Please note that this is only necessary when mixing concentrated propylene glycol antifreeze with water; suppliers of pre-mixed antifreeze are responsible for the use of high-quality (distilled, de-ionized, or soft) water when preparing their antifreeze for sale. Hard water possesses a high-level of calcium and magnesium ions, which deplete the propylene glycol antifreeze’s corrosion inhibitors. This, in turn, causes the antifreeze and water heating solution to begin turning acidic, which can corrode the Aqua-Hot’s boiler tank and associated components prematurely. Therefore, concentrated propylene glycol should be diluted with distilled, de-ionized, or soft water that is 80 PPM or less in total hardness. The local water agency should have up-to-date water quality reports that should indicate if the local tap water is within this guideline. Antifreeze Terms and Mixture Ratio: The following information addresses the process of selecting an antifreeze and water mixture ratio that provides adequate freeze, boiling, and rust/anti-corrosive protection. A 50/50 mixture of propylene glycol / water ratio is recommended, which will result in a freeze point of approximately -28°F and a boil point of approximately 222°F. The following information should be utilized for the purpose of clarifying some terms commonly associated with antifreeze. © 2009 Aqua-Hot® 450-D Hydronic Heating System Service Manual—Rev. A — Page 13 — SECTION 2: AQUA-HOT 450-DE OVERVIEW Freeze Point and Burst Point: Antifreeze lowers the freezing point of any liquid, to which it has been added, by preventing the formation of ice crystals; however, as the ambient temperature continues to decline, the water in the solution will attempt to attain a solid state. The point in which the water begins to solidify is termed the ―Freeze Point.‖ Although the water in the solution has begun to freeze, producing a ―slushy‖ consistency, the antifreeze in the solution will continue to combat the normal expansion of the solution as it freezes. The point in which the solution can begin to expand, due to colder temperatures, is called the ―burst point.‖ Once the solution reaches the burst point, the potential is present for ruptured pipes to exist. The burst point of the antifreeze and water heating solution is dependent upon the brand of propylene glycol employed. Antifreeze is also primarily responsible for heat transfer characteristics. Therefore, as water is an excellent heat conductor, it is added to the mixture. A 50/50 solution of propylene glycol antifreeze and water is recommended to provide the best performance combination of the aforementioned functions. If excess propylene glycol exists within an antifreeze and water heating solution, the water’s heat absorption properties are compromised, which could ultimately inhibit the Aqua-Hot from providing adequate domestic hot water and interior heating. Additionally, if the antifreeze and water heating solution contains over 70 percent antifreeze, the freezing point is actually raised, resulting in less freeze protection. Boiling Point: The Aqua-Hot utilizes the antifreeze and water heating solution as a transportation means for the heat produced from the internal processes. The antifreeze absorbs the heat created until its boiling point is reached; it is at this point that the liquid turns to a gas and is expelled to prevent the heating system from overheating. Each time the boiling point is reached, a loss of efficiency occurs because the heat produced is expelled rather than used for the function of the heating system. Therefore, a higher boiling point is desired in order to combat the loss of efficiency, which allows the antifreeze to transport the heat created from the internal process throughout the motor home where it can be used productively rather than dissipating due to its change from a liquid to a gas. Rust and Anti-Corrosive Inhibitors: Another major function of antifreeze is to provide protection to the internal metal components of the Aqua-Hot Hydronic heating system from corrosion and rust. Antifreeze is able to perform this function by the addition of rust- and anticorrosive inhibitors, which are designed specifically to activate in a water solution. Summary: Antifreeze has three basic functions: freeze protection, boilover protection, and anti-corrosion and rust protection. © 2009 Aqua-Hot® 450-D Hydronic Heating System Service Manual—Rev. A — Page 14 — SECTION 3: INTERIOR SWITCH PANEL The interior switch panel is used to control the two potential heating sources for the Aqua-Hot’s boiler tank, as well as to control the engine preheat feature. When a switch is activated, the indicator light on the switch will illuminate. Diesel-Burner Switch: When the diesel-burner switch is in the on position, any time the control thermostat tells the electronic controller that heat is needed for the boiler tank, the diesel-burner will respond by firing up and providing heat. A cold boiler tank can expect to be brought to operating temperature by the dieselburner in approximately 10 to 20 minutes. In order to obtain continuous hot water, the diesel-burner switch must be activated. NOTE: If the diesel-burner fails to ignite, the diesel burner status light will go out, indicating to the customer the burner has gone into a default. To reset the default, the diesel burner switch must be turned off for 5 seconds and then turned back on. Electric Element Switch: When the motor home is plugged into an AC power source (e.g., shore power, generator, etc.) and the electric element switch is on, the electric heating element will be used to provide heat to the boiler tank if the need arises. A cold boiler tank can expect to be brought to operating temperature by the electric heating element in approximately 1 to 2 hours. The electric element, alone, will not be able to provide continuous hot water. Engine Preheat Switch: The engine preheat switch activates the engine preheat pump, which draws the motor home’s engine coolant through the boiler tank to heat it before returning it to the engine block to transfer the heat there. Either the dieselburner switch or the electric element switch must also be activated in order for the engine preheat feature to function. The engine preheat switch does not need to be activated for the motor-aide feature to work and should be shut off when traveling. Additionally, the diesel-burner switch can be used to reset a low-voltage condition. This is accomplished by turning off the diesel-burner switch for 30 seconds, then turning it back on. Figure 6 © 2009 Aqua-Hot® 450-D Hydronic Heating System Service Manual—Rev. A — Page 15 — SECTION 3: INTERIOR SWITCH PANEL Figure 7 Back of the Interior Switch Panel with the Switches Installed © 2009 Aqua-Hot® 450-D Hydronic Heating System Service Manual—Rev. A — Page 16 — SECTION 4: EXHAUST SYSTEM REQUIREMENTS Because the Aqua-Hot’s exhaust is hot and must be kept away from any heat-sensitive material, the exhaust system should be checked to ensure that it continues to meet the following requirements: The exhaust must not be directed downward as a fire could result when parked in dry, grassy areas. The exhaust must not terminate underneath the vehicle, underneath an open-able window or vent, in the awning area of the motor home (if applicable), or near slide-out areas. The exhaust must be able to freely exit away from the vehicle without any obstructions. Two-inch standard automotive-type exhaust piping should be used with a maximum of two 90-degree pipe bends and should not exceed 20 feet. The 3-inch and 4-inch black-pipe nipples and the exhaust elbow - originally supplied with the Aqua-Hot, must be present. Figure 8 © 2009 Aqua-Hot® 450-D Hydronic Heating System Service Manual—Rev. A — Page 17 — SECTION 5: AQUA-HOT COMPONENTS If continuity is not present with the button pushed in, follow the instructions in this section to replace the interlock switch. This section details various components of the Aqua-Hot that may require troubleshooting and/or replacement in the event of a malfunction. The diesel-burner and its components are detailed in Section 10 of this manual. Replacement Procedure: Replacement parts can be ordered through Aqua-Hot’s Web site at www.aquahot.com or by calling 1-800-6854298. FAILURE TO DISCONNECT ALL POWER SUPPLIES AND/OR If additional assistance is needed, the Technical Support Team can also be reached, Monday through Friday, from 7:00 AM to 4:00 PM Mountain Standard Time at 1-800685-4298. TO ALLOW THE HEATER TO COOL BEFORE SERVICING COULD CAUSE SERIOUS DAMAGE OR PERSONAL INJURY. 1. Disconnect the interlock switch’s wires by pulling the quick connectors from the switch’s spade terminals. 2. Release the interlock switch from the Aqua-Hot cabinet by pushing in on the locking tabs and pulling the interlock switch. 3. The interlock switch is a safety device designed to ensure that the Aqua-Hot’s access cover is securely installed before allowing the diesel-burner to operate. Remove the defective interlock switch from the AquaHot. 4. Install the replacement interlock switch onto the AquaHot ensuring that the locking tabs snap into place. Troubleshoot the interlock switch if the following condition has occurred: 5. Connect the Aqua-Hot’s wires to the replacement interlock switch with yellow wire #24 connected to the terminal labeled ―NO‖ and yellow wire #25 connected to the terminal labeled ―COM.‖ Sensors/Switches Interlock Switch: The diesel-burner fails to operate. The diesel-burner switch light does not illuminate. Troubleshooting: NOTE: The interlock switch will prevent the diesel-burner from operating without the access cover intact; therefore, the switch will need to be manually pressed during testing for the switch’s functionality. 1. Turn the diesel-burner switch on from the interior switch panel and ensure that the boiler tank has sufficiently cooled in order to require heat from the diesel-burner. 2. Verify that the ―Heating Status‖ and ―Diesel-Burner Status‖ indicator lights are illuminated on the electronic controller. 3. Disconnect the two yellow wires from the interlock switch noting that wire #24 is connected to the terminal labeled ―NO‖ and wire #25 is connected to the terminal labeled ―COM.‖ 4. Using an ohmmeter, check the interlock switch for continuity while the button is pushed in. NOTE: If the interlock switch’s wires are reversed, the interlock switch will only allow the diesel-burner to operate when the access cover is removed and the button on the switch is released. Figure 9 © 2009 Aqua-Hot® 450-D Hydronic Heating System Service Manual—Rev. A — Page 18 — SECTION 5: AQUA-HOT COMPONENTS the electronic controller extinguishes when the jumper wire is installed, inspect the wire harness for damaged or severed wires. If no wires are found to be damaged or severed, follow the instructions in this section to replace the fluid-level sensor. Fluid-Level Sensor: The fluid-level sensor monitors the level of antifreeze and water heating solution within the Aqua-Hot’s boiler tank to ensure that an adequate volume exists. If, however, the ―Low Tank-Level Cutoff‖ indicator light continues to illuminate once the jumper wire is installed, follow the instructions in this manual to replace the electronic controller. Troubleshoot the fluid-level sensor if one of the following conditions has occurred: The diesel-burner and/or electric heating element fails to operate. The Aqua-Hot fails to operate and the ―Low Tank-Level Cutoff‖ indicator light on the electronic controller is illuminated. Replacement Procedure: FAILURE TO DISCONNECT ALL POWER SUPPLIES AND/OR TO ALLOW THE HEATER TO COOL BEFORE SERVICING COULD CAUSE SERIOUS DAMAGE OR PERSONAL INJURY. Troubleshooting: 1. Ensure that the Aqua-Hot has been completely shut down and that all power sources have been disconnected. Also, because this replacement procedure will involve the boiler tank and the potential for hot coolant, be sure the heater has adequately cooled. 2. Drain the antifreeze and water heating solution from the Aqua-Hot’s boiler tank using the drain valve. 3. Disconnect the fluid-level sensor’s wires by releasing the clip securing the plug to the sensor and pulling the plug away from the sensor. 4. Using a 7/8‖ wrench, unscrew the fluid-level sensor from the Aqua-Hot’s boiler tank. It may be necessary to use a 7/8‖ Crow’s Foot wrench. 5. Add a liquid thread sealant (such as Loctite®) to the threads of the replacement fluid-level sensor. Verify the functionality of the fluid-level sensor by completing the following: 6. Screw the replacement fluid-level sensor into the port on the Aqua-Hot’s boiler tank and tighten with a wrench. A. Remove the faceplate from the electronic controller. 7. Plug the fluid-level sensor’s wires into the replacement sensor and secure with the clip. 8. Refill the Aqua-Hot’s boiler tank with the antifreeze and water heating solution. 1. Verify that the Aqua-Hot’s boiler tank is full of the antifreeze and water heating solution. 2. Verify that the wire connector is securely plugged into the fluid-level sensor and secured with the attached clip. 3. Verify that the fluid-level sensor’s wires are securely installed in the terminal strip on the wire harness, as well as tightly fastened to the electronic controller. The fluid-level sensor requires power to operate and possesses a third wire for power (#17), which advances from the sensor to join the red #1 wire on the ―PUMP 3+‖ terminal on the electronic controller’s JP3 plug. NOTE: If pump number 3 shorts out, i.e. indicator light is red, it will cause the Low Tank-Level Cutoff light to illuminate red. 4. B. Install a jumper wire on the JP3 plug, between pins 15 and 16 (between ―LWCO-I‖ and ―LWCO-O‖) on the electronic controller in order to bypass the fluilevel sensor. If the ―Low Tank-Level Cutoff‖ indicator light on © 2009 Aqua-Hot® 450-D Hydronic Heating System Service Manual—Rev. A — Page 19 — SECTION 5: AQUA-HOT COMPONENTS Figure 10 Fluid Level Sensor Thermostats Control Thermostat: The control thermostat is installed into the Aqua-Hot’s boiler tank and monitors the temperature of the antifreeze and water heating solution to determine when it is at operating temperature and when it requires heat. The Aqua-Hot is considered to be at operating temperature between 158°F and 190° F. If the ―Heating Status‖ indicator light is not illuminated, check the following: A. Verify that the temperature of the boiler tank has fallen below the 158°F minimum operating temperature by checking with a digital thermometer. B. Disconnect the control thermostat’s wires from their connections, and, using an ohmmeter, check for continuity. Troubleshoot the control thermostat if one of the following conditions has occurred: If there is no continuity, follow the instructions in this section for replacing the control thermostat. If continuity exists, complete the following: There is a lack of hot domestic water and interior heat. The heating Status light does not illuminate on the electronic controller, when the Aqua-Hot is below 158° F. Excessive Blue or white smoke is expelled from the exhaust. Troubleshooting: 1. 2. Turn the diesel-burner and electric element switches on the interior switch panel on and check the electronic controller to ensure that the ―Electric Heating Element Status‖ and ―Diesel-Burner Status‖ indicator lights are illuminated. Verify that the ―Heating Status‖ indicator light on the electronic controller is illuminated as it should be whenever the Aqua-Hot is below the operating temperature range of 158°F. a. Inspect the control thermostat’s wiring and connections. b. Install a jumper wire on the JP3 plug, between pins 13 and 14 (―TSTAT-I‖ and ―TSTAT-O‖) on the electronic controller in order to bypass the control thermostat. NOTE: The diesel-burner and/or electric element switch must be in the on position also for the ―Heating Status‖ indicator light on the electronic controller to illuminate. If the ―Heating Status‖ indicator light on the electronic controller does not illuminate with the jumper wire installed, follow the instructions in this manual to replace the electronic controller. © 2009 Aqua-Hot® 450-D Hydronic Heating System Service Manual—Rev. A — Page 20 — SECTION 5: AQUA-HOT COMPONENTS Control Thermostat Replacement Procedure: 5. Wrap the threads of the replacement control thermostat with Teflon tape. FAILURE TO DISCONNECT ALL POWER SUPLIES AND/OR TO 6. Screw the replacement control thermostat into the port on the Aqua-Hot’s boiler tank and tighten securely with a 7/8 socket. 7. Connect the replacement control thermostat’s wires in the same configuration as the removed control thermostat’s wires. 8. Refill the Aqua-Hot’s boiler tank with the antifreeze and water heating solution. 9. Test the Aqua-Hot for normal operation. ALLOW THE HEATER TO COOL BEFORE SERVICING COULD CAUSE SERIOUS DAMAGE OR PERSONAL INJURY. 1. Ensure that the Aqua-Hot has been completely shut down and that all power sources have been disconnected. Also, because this replacement procedure will involve the boiler tank and the potential for hot coolant, be sure the heater has adequately cooled. 2. Drain the antifreeze and water heating solution from the Aqua-Hot’s boiler tank using the drain valve. 3. Disconnect the defective control thermostat’s wires by separating the quick-disconnect terminals. 4. Using a 7/8 socket, unscrew the control thermostat from the Aqua-Hot’s boiler tank. Figure 11 Control Thermostat © 2009 Aqua-Hot® 450-D Hydronic Heating System Service Manual—Rev. A — Page 21 — SECTION 5: AQUA-HOT COMPONENTS AC High-Limit Thermostat: The AC high-limit thermostat serves as a safety measure in the event that the electric heating element continues to operate after the maximum operating temperature is reached. The high-limit thermostat allows the current for the heating element to pass through it until the boiler tank reaches a temperature of 215°F. Should this temperature be reached, the high-limit thermostat blocks the current to the element, which prevents it from continuing to provide heat to the boiler tank. Troubleshoot the AC high-limit thermostat if the following condition has occurred: Replacement Procedure: FAILURE TO DISCONNECT ALL POWER SUPPLIES AND/OR TO ALLOW THE HEATER TO COOL BEFORE SERVICING COULD CAUSE SERIOUS DAMAGE OR PERSONAL INJURY. 1. Ensure that the Aqua-Hot has been completely shut down and that all power supplies have been disconnected. 2. Remove the AC access cover. 3. If applicable, remove the heat shrink insulation covering the wires and terminals on the defective high-limit thermostat. 4. Remove the two wires from the defective high-limit thermostat by pulling firmly on the wires. 5. Using a 5/8 wrench or socket, remove the defective high -limit thermostat from the Aqua-Hot’s boiler tank. 6. Install the replacement high-limit thermostat into the port on the Aqua-Hot’s boiler tank and finger-tighten only (15 in/lbs). The electric heating element fails to operate. Troubleshooting: 1. Disconnect all power supplies. 2. Remove the AC access cover. 3. Verify that the boiler tank’s temperature is below 215°F. 4. Locate the AC high-limit thermostat and remove its wires. 5. Using an ohmmeter, check the thermostat for continuity. 7. Connect the wires removed from the defective high-limit thermostat to the replacement high-limit thermostat. If there is no continuity, press the white reset button on the thermostat and re-check for continuity. 8. Secure the AC access cover back into place. If continuity is still not present after the reset button has been pressed, follow the instructions in this section to replace the AC high-limit thermostat. Figure 12 9. Test for proper operation. NOTE: If the High-Limit Thermostat is tripped, it is recommended to test the control thermostat, for proper operation. A.C. High Limit Thermostat © 2009 Aqua-Hot® 450-D Hydronic Heating System Service Manual—Rev. A — Page 22 — SECTION 5: AQUA-HOT COMPONENTS B. Disconnect the wires from each thermostat and recheck each thermostat for continuity, as well as each of the thermostats’ individual wires. DC High-Limit Thermostats: The DC high-limit thermostats serve as a safety measure in the event that the diesel-burner continues to operate after the maximum operating temperature is reached. The high-limit thermostats allow the current for the diesel-burner to pass through them until the boiler tank reaches a temperature of 215°F. Should this temperature be reached, the high-limit thermostat blocks the current to the diesel-burner’s fuel solenoid valve, which prevents the diesel-burner from operating. Troubleshoot the DC high-limit thermostat if the following condition has occurred: The fuel solenoid on the diesel-burner fails to operate. If an individual wire does not have continuity, that wire must be replaced. If a thermostat with the wires removed that has been reset does not have continuity, follow the instructions in this section to replace the high-limit thermostat. NOTE: If the high-limit thermostats continue to trip, troubleshoot the control thermostat, and verify the boiler tank is full of the antifreeze-water solution. Replacement Procedure: Troubleshooting: 1. Place a jumper wire between the blue and purple wires on the diesel-burner’s wire harness to bypass the highlimit thermostats. Check the Aqua-Hot for normal operation. FAILURE TO DISCONNECT ALL POWER SUPPLIES AND/OR TO ALLOW THE HEATER TO COOL BEFORE SERVICING COULD CAUSE SERIOUS DAMAGE OR PERSONAL INJURY. NOTE: Bypassing the high-limit thermostats is for testing only and must not be used for the Aqua-Hot’s normal functioning. 1. Ensure that the Aqua-Hot has been completely shut down and that all power sources have been disconnected. Disconnect the DC high-limit thermostats’ wires, then, using an ohmmeter, check each thermostat for continuity. 2. Remove the two wires from the defective high-limit thermostat by pulling firmly on the wires. 3. Using a 5/8 wrench or socket, remove the defective high -limit thermostat from the Aqua-Hot’s boiler tank. 4. Install the replacement high-limit thermostat into the port on the Aqua-Hot’s boiler tank and finger-tighten only (15 in/lbs). 5. Connect the wires removed from the defective high-limit thermostat to the replacement high-limit thermostat. 2. If there is no continuity, complete the following: A. Press the white reset button on the high-limit thermostat, then re-check for continuity. Figure 13 D.C. High Limit Thermostats © 2009 Aqua-Hot® 450-D Hydronic Heating System Service Manual—Rev. A — Page 23 — SECTION 5: AQUA-HOT COMPONENTS C. Disconnect the low-temperature cutoff thermostat’s wires from the Aqua-Hot’s wiring harness, then, jump the wiring harness wires for the thermostat together to bypass the thermostat. Low-Temperature Cutoff Thermostat: The low-temperature cutoff thermostat operates the domestic hot water priority system by blocking the interior heating feature when domestic hot water is being used. This ensures that even heat is provided for domestic hot water, which avoids the possibility of cold water pockets during showers, etc. If the ―Low Temp Cutoff Status‖ indicator light illuminates on the electronic controller with the thermostat bypassed, follow the instructions in this section to replace the low-temperature cutoff thermostat. Troubleshoot the low-temperature cutoff thermostat if the following conditions have occurred: 3. There is a lack of interior heat. There is a lack of hot water and the ―Low Temp Cutoff Status‖ indicator light on the electronic controller continuously remains illuminated, which does not allow the stir pump to operate. Troubleshooting: 1. Determine if the conditions are right for the ―Low Temp. Cutoff Status‖ indicator light on the electronic controller to be illuminated. A. Verify that the Aqua-Hot is at operating temperature - between 158°F and 190°F. B. Verify that the domestic hot water is not being used. 2. If the ―Low Temp Cutoff Status‖ indicator light on the electronic controller is not illuminated after it has been determined that it should be, complete the following: A. Install a jumper wire on the JP3 plug, between pins 9 and 10 (―LTCO-O‖ and ―LTCO-I‖) on the electronic controller. If the indicator light does not illuminate once the jumper wire is installed, follow the instructions in this manual to replace the electronic controller. B. Using a temperature sensor, verify that the lowtemperature cutoff thermostat is above 90°F. If the thermostat is below 90°F, verify that the Aqua -Hot is up to operating temperature and that a hot water faucet is not leaking. If the ―Low Temp Cutoff Status‖ indicator light does not extinguish when domestic hot water is being used or when the Aqua-Hot falls below operating temperature, complete the following: A. Using a temperature sensor, verify that the lowtemperature cutoff thermostat is below 90°F, which is necessary for the indicator light to extinguish. B. Inspect the wiring to ensure that the Aqua-Hot is wired properly and that the low-temperature cutoff thermostat has not been bypassed via jumper wires. C. Disconnect the low-temperature cutoff thermostat’s wires from the Aqua-Hot’s wiring harness. 1. If the ―Low Temp Cutoff Status‖ indicator light on the electronic controller extinguishes, follow the instructions in this section to replace the low-temperature cutoff thermostat. 2. If the light remains illuminated with the lowtemperature cutoff thermostat’s wires disconnected, verify that the jumper pins on the electronic controller are properly positioned. Reference Section 7 for the proper pin jumper con figuration. 3. If the jumper pins are properly positioned, follow the instructions in this manual to replace the electronic controller. Low Temperature Cut-Off Replacement Procedure: FAILURE TO DISCONNECT ALL POWER SUPPLIES AND/OR TO ALLOW THE HEATER TO COOL BEFORE SERVICING COULD CAUSE SERIOUS DAMAGE OR PERSONAL INJURY. © 2009 Aqua-Hot® 450-D Hydronic Heating System Service Manual—Rev. A — Page 24 — SECTION 5: AQUA-HOT COMPONENTS 1. Ensure that the Aqua-Hot has been completely shut down and that all power sources have been disconnected. 2. Locate the low-temperature cutoff thermostat on the cold domestic water inlet pipe at the back of the AquaHot. 3. Disconnect the defective low-temperature cutoff thermostat’s wires by separating the quick-disconnect terminals. 4. Using a 5/8 wrench or socket, remove the defective lowtemperature cutoff thermostat from the Aqua-Hot. 5. Install the replacement low-temperature cutoff thermostat tightening only to 15 in/lbs. Do not overtighten. 6. Connect the replacement low-temperature cutoff thermostat’s wires in the same configuration as the removed thermostat’s wires. Figure 14 Low Temperature Cut-Off Thermostat Valves Check Valve: Check valves are installed into the zone outlet ports for each heating loop to ensure that the antifreeze and water heating solution only flows in one direction. If the heating solution attempts to backflow into the boiler tank, the check valve closes to prevent that from happening. B. Check the circulation pump for operation by visually inspecting it for rotation of the pump. 2. If interior heat is present after tapping the check valve, the check valve was stuck closed and no further action is necessary. Troubleshoot the check valves if the following condition has occurred: There is a lack of interior heat in a particular zone. Troubleshooting: 1. Verify that the heating zone is operating properly by checking the following: A. Check the electronic controller to insure that both the ―Heating Zone Status‖ and corresponding pump status (―Pump #1‖ or ―Pump #2‖) indicator lights are illuminated green. With the circulation pump operating, tap on the check valve and wait five minutes to evaluate if interior heat is now present. 3. Check the Aqua-Hot’s antifreeze and water heating solution’s ratio of water to propylene glycol. The mixture ratio should be approximately 50/50. If the solution is comprised fully of antifreeze (100%), the check valves will continue to stick. NOTE: Storing the motor home for an extended period of time can cause the check valves to stick. If, after the initial release of the stuck check valve, it continues to stick, follow the instructions in this section to replace the check valve. © 2009 Aqua-Hot® 450-D Hydronic Heating System Service Manual—Rev. A — Page 25 — SECTION 5: AQUA-HOT COMPONENTS Replacement Procedure: 5. Unscrew the defective check valve from the Aqua-Hot’s boiler tank. 6. Remove the hose barb and the 1/2 inch coupler from the defective check valve. 7. Clean the hose barb and coupler, then wrap the hose barb and the 1/2 inch coupler pipe threads with Teflon tape. 8. Install the hose barb and 1/2 inch coupler on the replacement check valve, ensuring that they are installed properly with the hose barb on the arrow side of the check valve. Install the replacement check valve onto the Aqua-Hot’s boiler tank. The arrow on the check valve must point away from the boiler tank. FAILURE TO DISCONNECT ALL POWER SUPPLIES AND/OR TO ALLOW THE HEATER TO COOL BEFORE SERVICING COULD CAUSE SERIOUS DAMAGE OR PERSONAL INJURY. 1. Ensure that the Aqua-Hot has been completely shut down and that all power sources have been disconnected. Also, because this replacement procedure will involve the boiler tank and the potential for hot coolant, be sure the heater has adequately cooled. 2. Drain the antifreeze and water heating solution from the Aqua-Hot’s boiler tank using the drain valve. 3. Using constant tension pliers, loosen and slide back the constant tension clamp securing the hose to the defective check valve. 9. 4. Remove the hose from the defective check valve. 10. Slide the hose back onto the replacement pump and set the constant tension clamp back into place. 11. Refill the Aqua-Hot’s boiler tank with the antifreeze and water heating solution. Figure 15 Zone Check Valve © 2009 Aqua-Hot® 450-D Hydronic Heating System Service Manual—Rev. A — Page 26 — SECTION 5: AQUA-HOT COMPONENTS Tempering Valve: 5. Remove the pressure relief valve assembly from the tempering valve assembly as the tempering valve cannot be removed from the Aqua-Hot with the pressure relief valve still attached. 6. Using a back-up wrench, unscrew the tempering valve from the Aqua-Hot. The tempering valve for the Aqua-Hot mixes the heated domestic water from the boiler tank with cold domestic water at a preset ratio to reduce the risk of scalding. Troubleshoot the tempering valve if the following condition has occurred: There is a lack of hot domestic water. Troubleshooting: NOTE: Prior to trouble shooting the tempering valve, it is recommended to review the Lack of Hot Water Trouble Shooting guide in section 11. 1. 2. 3. Inspect the tempering valve to ensure that it is not leaking. Test the temperature of the hot water using a digital thermometer at one of the hot water faucets. Water Temperature should range between 115° F - 123° F. If the proper range cannot be set follow the instructions in this section to replace the tempering valve. A back-up wrench must be used for loosening and removing the tempering valve from the Aqua-Hot. Failure to use the back-up wrench will cause the copper domestic water coil to twist and kink, which will render the domestic water feature unusable. 7. Remove the brass fittings from the defective tempering valve. 8. Install the brass fittings onto the replacement tempering valve. NOTE: Be sure to wrap Teflon tape around the threads of the brass fittings, to prevent domestic water from leaking. Install the replacement tempering valve onto the AquaHot using a back-up wrench to tighten. Test the tempering valve’s functionality by turning the knob. 9. If the tempering valve’s knob does not turn freely, follow the instructions in this section to replace the tempering valve. 10. Install the pressure relief valve onto the replacement tempering valve. Replacement Procedure: 11. Reconnect the pex pipe and fittings to the tempering valve and Aqua-Hot. Be sure to inspect the rubber seals and replace if necessary. FAILURE TO DISCONNECT ALL POWER SUPPLIES AND/OR 12. Reconnect the motor home’s water lines to the tempering valve assembly. TO ALLOW THE HEATER TO COOL BEFORE SERVICING COULD CAUSE SERIOUS DAMAGE OR PERSONAL INJURY. 1. Turn the motor home’s water pump off. 2. Drain the water pressure by opening the faucets and allowing the water to drain. 3. Disconnect the motor home’s water lines from the tempering valve assembly. 4. Disconnect the pex pipe and fittings from the tempering valve assembly. 13. Turn the motor home’s water pump back on and check for leaks and the presence of hot domestic water. 14. Verify that the replacement tempering valve has been set to the proper setting by taking a digital thermometer to a hot water faucet and set the water temperature between 115*F - 123*F. © 2009 Aqua-Hot® 450-D Hydronic Heating System Service Manual—Rev. A — Page 27 — SECTION 5: AQUA-HOT COMPONENTS Figure 16 Pumps Circulation Pumps #1 and #2: The circulation pumps first draw the heated antifreeze and water heating solution from the Aqua-Hot’s boiler tank, then propel it through the Hydronic heating system’s interior heat plumbing. Troubleshoot the circulation pumps if the following condition has occurred: The circulation pump is not operating and the ―Low Temp Cutoff Status‖ indicator light is illuminated on the electronic controller. The Zone Pump indicator light illuminates red on the electronic controller. Troubleshooting: 1. Verify that the ―Low Temp Cutoff Status‖ indicator light on the electronic controller is illuminated, as it will be whenever the boiler tank is at operating temperature and domestic hot water is not being used. 2. Turn on the interior room thermostat corresponding to the circulation pump not operating (heating zones 1 and 5 operate with circulation pump #1 and heating zones 2,3,and 4 operate with circulation pump #2). Check the corresponding ―Heating Zone Status‖ indicator lights on the electronic controller for illumination. If the ―Heating Zone Status‖ indicator light does not illuminate, complete the following: A. Install a jumper wire on the JP1 plug between the pins corresponding to the room thermostat operating the circulation pump that is not operating. Reference the wiring diagram in Appendix A. This will bypass the room thermostat. When the ―Heating Zone Status‖ indicator light illuminates on the electronic controller, the corresponding ―Pump #1‖ and/or ―Pump #2‖ indicator light should illuminate as well. B. With the jumper wire installed, check the indicator light corresponding to the pump not operating. If the indicator light illuminates green, complete the following: © 2009 Aqua-Hot® 450-D Hydronic Heating System Service Manual—Rev. A — Page 28 — SECTION 5: AQUA-HOT COMPONENTS A. Using a voltmeter, check for 12 volts of DC power on the JP3 plug pins corresponding to the pump not operating. If 12 volts of DC power are not present, follow the instructions in this manual to replace the electronic controller. B. Disconnect the circulation pump’s wires from the wiring harness, then, using a voltmeter, check the wires on the wiring harness for 12 volts of DC power. 2. Drain the antifreeze and water heating solution from the Aqua-Hot’s boiler tank using the drain valve. 3. Disconnect the defective circulation pump’s wires by separating the quick-disconnect terminals. 4. Using constant tension pliers, loosen and slide back the constant tension clamps securing the hoses to the circulation pump. 5. Remove the hoses from the defective circulation pump. 6. For ease of replacement pump installation, the defective circulation pump’s mounting bracket should remain fastened to the heater, and only the pump should be removed. Therefore, to detach the defective pump, remove the three screws on the back of the attached mounting bracket. 7. Slide the defective pump out of the bracket and set aside. 8. The replacement pump will arrive complete with a mounting bracket; however, because the existing bracket remains mounted to the heater, the new mounting bracket must be removed by detaching the three screws securing it to the replacement pump. 9. Slide the replacement pump into the existing mounting bracket and secure with the three screws previously removed from the replacement pump. If 12 volts of DC power are present at the wiring harness, follow the instructions in this section to replace the circulation pump. If the indicator light illuminates red, complete the following: A. Disconnect the circulation pump’s wires. If the indicator light turns green with the circulation pump disconnected, follow the instructions in this section to replace the circulation pump. If the indicator light remains red with the circulation pump disconnected, check the wiring for damage. If no damage is found, follow the instructions in this manual to replace the electronic controller. NOTE: The circulation pump can be tested by connecting it to an external 12 Volt-DC source to verify that the pump is defective. 10. Slide the hoses back onto the replacement pump and set the constant tension clamps back into place. 11. Reconnect the wires on the replacement pump to the wire harness on the heater by uniting the red quickdisconnect terminals. Replacement Procedure: FAILURE TO DISCONNECT ALL POWER SUPPLIES AND/OR TO ALLOW THE HEATER TO COOL BEFORE SERVICING 12. Refill the Aqua-Hot’s boiler tank with the antifreeze and water heating solution. COULD CAUSE SERIOUS DAMAGE OR PERSONAL INJURY. 13. Test the Aqua-Hot for normal operation. 1. Ensure that the Aqua-Hot has been completely shut down and that all power sources have been disconnected. Also, because this replacement procedure will involve the potential for hot coolant, be sure the heater is adequately cooled. © 2009 Aqua-Hot® 450-D Hydronic Heating System Service Manual—Rev. A — Page 29 — SECTION 5: AQUA-HOT COMPONENTS Figure 17 Stir Pump / Circulation Pump #3: The stir pump circulates the antifreeze and water heating solution within the Aqua-Hot’s boiler tank in order to ensure even-heating of the solution. To accomplish this, the stir pump draws the solution from the bottom of the tank and immediately deposits it back into the top of the tank. Troubleshoot the stir pump if the following condition has occurred: There is a lack of hot domestic water. Pump #3 indicator light illuminates red. Troubleshooting: NOTE: In order for the stir pump to operate, the dieselburner switch must be on and the indicator light for the ―Low Temp Cutoff Status‖ on the electronic controller must be extinguished. NOTE: Verify the Electronic Controller Proper Jumper Pin formation . Reference Section ?: Electronic Controller, for the proper jumper pin formation. 1. Verify that the ―Pump #3‖ indicator light on the electronic controller is illuminated If the indicator light is not illuminated, check the following: A. Verify that the diesel-burner Status Light is Illuminated, indicating the switch is on. B. Verify that the ―Low Temp Cutoff Status‖ indicator light on the electronic controller is not illuminated. If the diesel-burner switch is on, the ―Low Temp Cutoff Status‖ indicator light is not illuminated, and the stir pump is not operating, follow the instructions in this manual to replace the electronic controller. © 2009 Aqua-Hot® 450-D Hydronic Heating System Service Manual—Rev. A — Page 30 — SECTION 5: AQUA-HOT COMPONENTS 2. Check the color of the illuminated ―Pump #3‖ indicator light on the electronic controller. B. Once it is determined that the pump is active, verify that the pump is operating properly by checking both connected hoses for heat. If the indicator light is illuminated red, the stir pump is experiencing a short; therefore, complete the following: If both hoses are hot, the pump is working properly. A. Disconnect the stir pump’s wires. If one hose is hot, or neither hose is hot, check the cold hose for a blockage. If no blockage exists, follow the instructions in this section to replace the stir pump. If the ―Pump #3‖ indicator light turns green when the stir pump is disconnected, follow the instructions in this section to replace the stir pump. If the ―Pump #3‖ indicator light remains red when the stir pump is disconnected, check the wiring for damage. If no damage is found, follow the instruction in this manual to replace the electronic controller. Replacement Procedure: FAILURE TO DISCONNECT ALL POWER SUPPLIES AND/OR TO ALLOW THE HEATER TO COOL BEFORE SERVICING If the indicator light is illuminated green, complete the following: COULD CAUSE SERIOUS DAMAGE OR PERSONAL INJURY. 1. Ensure that the Aqua-Hot has been completely shut down and that all power sources have been disconnected. Also, because this replacement procedure will involve the potential for hot coolant, be sure the heater has adequately cooled. 2. Drain the antifreeze and water heating solution from the Aqua-Hot’s boiler tank using the drain valve. 3. Disconnect the defective stir pump’s wires by separating the quick-disconnect terminals. 4. Using constant tension pliers, loosen and slide back the constant tension clamps securing the hoses to the stir pump. 5. Remove the hoses from the defective stir pump. 6. Release the pump from the mounting bracket by pulling on each Nylatch Plunger, then remove the defective pump from the Aqua-Hot. 7. Slide the hoses back onto the replacement pump and set the constant tension clamps back into place. A. Using a voltmeter, check for 12 Volts of DC power on the JP3 plug between pins 1 and 2 (―PUMP 3+‖ and ―PUMP 3-‖) on the electronic controller. If 12 Volts of DC power are not present, follow the instructions in this manual to replace the electronic controller. 3. Disconnect the stir pump’s wires from the wiring harness, then, using a voltmeter, check the wires on the wiring harness for 12 Volts of DC power. If 12 Volts of DC power are not present, inspect and test the wires going from the electronic controller to the pump. If 12 Volts of DC power are present at the wiring harness, complete the following: A. Verify that the pump is operating by placing a hand on the pump to feel for vibrations. If no vibrations are felt, follow the instructions in this section to replace the stir pump. © 2009 Aqua-Hot® 450-D Hydronic Heating System Service Manual—Rev. A — Page 31 — SECTION 5: AQUA-HOT COMPONENTS 8. Install the replacement stir pump onto the mounting bracket by aligning the Nylatch Plungers to their respective holes and pushing the plungers in to secure the pump to the bracket. 9. Reconnect the wires on the replacement pump to the wires connected to the heater by uniting the red quickdisconnect terminals. 10. Refill the Aqua-Hot’s boiler tank with the antifreeze and water heating solution. Stir Pump Figure 18 © 2009 Aqua-Hot® 450-D Hydronic Heating System Service Manual—Rev. A — Page 32 — SECTION 5: AQUA-HOT COMPONENTS with the jumper wire installed, follow the instructions in this manual to replace the electronic controller. Electrical - AC Electric Heating Element: If the ―Heating Status‖ indicator light on the electronic controller is not illuminated, complete the following: The electric heating element uses AC power as an alternate power source for heating the Aqua-Hot’s boiler tank. A. Check the temperature of the Aqua-Hot’s boiler tank. Troubleshoot the electric heating element if the following condition has occurred: If the boiler tank temperature is below 158°F, troubleshoot the control thermostat. There is a lack of hot domestic water and interior heat when the electric element is selected as the heating source. If the boiler tank is above 158°F, the Aqua-Hot is at operating temperature and requires no heat. Troubleshooting: NOTE: For continuous domestic hot water to be present, the diesel-burner must be selected also as a heating source. 1. 2. 3. Verify the Electronic Controller is sending 12 Volt DC to the A.C. Relay. A. Using a volt meter check pins 11 & 12 (―AC REL -‖ and ―AC REL +‖) for 12-Volt D.C on the JP3 plug. Verify that the motor home is either plugged into shore power or that the generator is running to provide AC power. If 12 Volts of DC power is not present while the ―Electric Heating Element Status‖ and ―Heating Status‖ indicator lights on the electronic controller are illuminated, follow the instructions in this manual to replace the electronic controller. Verify that both the ―Electric Heating Element Status‖ and the ―Heating Status‖ indicator lights on the electronic controller are illuminated. If the ―Electric Heating Element Status‖ indicator light on the electronic controller is not illuminated, complete the following: 4. If 12 Volts of DC power are present at the relay, complete the following: A. Locate the AC wires connected to the AC relay (pins 2 and 4), and remove the AC wires from the relay. A. Verify that the electric element switch on the interior switch panel is on. B. Using an ohmmeter, check the relay AC pins (2 and 4) for continuity. B. Install a jumper wire on the JP2 plug, between pins 52 and 53 (―ELECT-O‖ and ―ELECT-I‖) on the electronic controller to bypass the electric element switch. If the ―Electric Heating Element Status‖ indicator light illuminates on the electronic controller with the jumper wire installed, check the Electric Element Switch, on the interior switch panel for functionality. If the ―Electric Heating Element Status‖ indicator light does not illuminate on the electronic controller If no continuity exists, follow the instructions in this section to replace the AC relay. 5. Verify that the electric heating element is receiving adequate AC power by completing the following: A. Remove the AC access cover. B. Plug the Coach into shore power/turn generator on. © 2009 Aqua-Hot® 450-D Hydronic Heating System Service Manual—Rev. A — Page 33 — SECTION 5: AQUA-HOT COMPONENTS C. Using an AC voltmeter, verify that 110 volts of AC power are present at the terminal block reference figure 20. If there is not 110 VAC present at the terminal block for the electric element, there is a problem inside the motor home. 4. 1. Ensure that the Aqua-Hot has been completely shut down and that all power sources have been disconnected. Also, because this replacement procedure will involve the boiler tank and the potential for hot coolant, be sure the heater has adequately cooled. D. Using a digital clamp-meter, verify the electric element’s amp draw is between 11.2 to 13 amps. 2. Drain the antifreeze and water heating solution from the Aqua-Hot’s boiler tank using the drain valve. E. Check the electric element’s wires for continuity by completing the following: 3. Remove the AC access cover. a. Disconnect the motor home from shore power/ shut off generator. 4. Remove the two wires secured to the defective electric heating element by releasing the screw terminals. b. Disconnect the wires from the electric heating element. 5. Using a 1-1/2 inch socket, remove the defective electric heating element from the Aqua-Hot’s boiler tank. c. Disconnect the wires from the AC terminal block. 6. Install the replacement 1650-watt electric heating element into the boiler tank ensuring that the ―up‖ lettering on the element is installed in the up position. d. Check the black and white wires at the terminal block for continuity. 7. Connect the wires removed from the defective electric heating element to the replacement electric heating element and tighten the screw terminals. 8. Reinstall the AC access cover. 9. Refill the Aqua-Hot’s boiler tank with the antifreeze and water heating solution. Check the electric heating element for functionality by completing the following: A. Disconnect all power supplies. B. Remove the AC access cover. C. Remove all wires from the electric heating element. D. Using an ohmmeter, check the electric heating element for the proper ohms. The Ohms reading should be between 8.5 - 9.5 ohms. Figure 19 If the ohms reading is not between 8.5 - 9.5 ohms follow the instructions in this section to replace the electric heating element. Replacement Procedure: FAILURE TO DISCONNECT ALL POWER SUPPLIES AND/OR TO ALLOW THE HEATER TO COOL BEFORE SERVICING COULD CAUSE SERIOUS DAMAGE OR PERSONAL INJURY. © 2009 Aqua-Hot® 450-D Hydronic Heating System Service Manual—Rev. A — Page 34 — SECTION 5: AQUA-HOT COMPONENTS AC Relay: A. Locate the AC wires connected to the AC relay (pins 6 and 8), and remove the AC wires from the relay. The AC relay is an electrical device where the DC circuit from the electronic controller determines whether the AC power is permitted to flow to the electric heating element. This allows the electronic controller to switch the electric heating element on and off in conjunction with the interior switch panel and control thermostat even though the electric heating element is on a separate circuit. Troubleshoot the AC relay if the following condition has occurred: The electric heating element fails to operate. B. Using an ohmmeter, check the relay AC pins (6 and 8) for continuity. If no continuity exists, follow the instructions in this section to replace the AC relay. Replacement Procedure: FAILURE TO DISCONNECT ALL POWER SUPPLIES AND/OR TO ALLOW THE HEATER TO COOL BEFORE SERVICING Troubleshooting: COULD CAUSE SERIUOS DAMAGE OR PERSONAL INJURY. 1. Disconnect the AC power source to the motorhome (unplugging from shore power or shutting off the generator). 2. Turn the electric element switch on the interior switch panel on and check the electronic controller to ensure that the ―Electric Heating Element Status‖ and the ―Heating Status‖ indicator lights are illuminated. 3. Using a voltmeter, check pins 11 and 12 (―AC Relay +‖ and ―AC Relay-‖) on the JP3 plug for 12 Volts-DC. 1. Ensure that the Aqua-Hot has been completely shut down and that all power sources have been disconnected. 2. Also, ensure that the motor home is not connected to shore power and that a generator is not connected during this replacement procedure. 3. Remove the AC access cover. 4. If 12 Volts of DC power are not present while the ―Electric Heating Element Status‖ and ―Heating Status‖ indicator lights on the electronic controller are illuminated, follow the instructions in this manual to replace the electronic controller. Release the wires from the defective AC relay by re moving the corresponding screw terminals. 5. Remove the defective relay by drilling the rivets that hold the defective relay in place. 6. Rivet the replacement AC relay to the AC access cover. If 12 Volts of DC power are present, complete the following: 7. Using the wiring diagram in Appendix A, connect the wires previously removed to the replacement AC relay. 8. Reinstall the AC access cover. Figure 20 A.C. Terminal Block © 2009 Aqua-Hot® 450-D Hydronic Heating System Service Manual—Rev. A — Page 35 — SECTION 6: ELECTRONIC CONTROLLER Electronic Controller Overview The electronic controller is an electronic circuit board that controls the electrical functions of the Aqua-Hot heating system. All wiring for the switch panel is connected to the electronic controller, as well as the wiring circuitry from the Aqua-Hot unit. Indicator lights on the front panel will illuminate red if there is a short circuit, overload, or fault condition within the system. It also will indicate when circuits are functioning properly with a green indicator light. Figure 21 Electronic Controller General Facts Nominal input voltage range ............................ 10.6V to 15V Idle current ................................................... Approx. 15mA Low voltage cutoff threshold .......................................10.0V Low voltage lockout delay ....................... Approx. 5 minutes Input Load Currents Output Current Capacity Zone thermostats (each) .................................. Approx. 4mA Diesel-Burner switch ..................................... Approx. 12mA Electric Element switch ................................... Approx. 4mA Engine Preheat switch ..................................... Approx. 4mA Low-level cutoff switch................................. Approx. 10mA Control Thermostat ......................................... Approx. 8mA Low-temperature cutoff switch ....................... Approx. 5mA Zone fans (each) .................................................... 2.0A max. Circulation pumps (each) ...................................... 2.0A max. Engine preheat pump ............................................ 2.0A max. AC relay ............................................................ 500mA max. B4+ burner (Webasto) power ................................ 6.0A max. B1+ burner master control .................................... 2.0A max. C1/C7 burner thermostat control ........................... 1.0A max. © 2009 Aqua-Hot® 450-D Hydronic Heating System Service Manual—Rev. A — Page 36 — SECTION 6: ELECTRONIC CONTROLLER Electronic Controller Features Secondary 12 Volt-DC Battery Connection: The electronic controller is equipped with two 12 Volt-DC power source connections, which allow for a secondary 12 Volt-DC battery connection. This 12 Volt-DC battery connection is a product-safety feature that should be utilized whenever the Aqua-Hot’s main 12 Volt-DC power supply is connected to a battery disconnect switch. This feature will ensure that the Aqua-Hot will be protected in the event that the primary power is interrupted while the diesel-burner is operating (e.g., during a burn-cycle). This secondary 12 Volt -DC battery connection will ensure completion of the required 3-minute ―purge cycle‖ of the Aqua-Hot’s dieselburner. Figure 22 Terminal Strips with Screw-Type Fasteners: Figure 23 The electronic controller uses terminal strips/plugs that are equipped with screw-type fasteners, which are molded directly into the terminal strip/plug, itself. This will ensure a positive mechanical connection between the electronic controller and all wire harnesses attached to it. © 2009 Aqua-Hot® 450-D Hydronic Heating System Service Manual—Rev. A — Page 37 — SECTION 6: ELECTRONIC CONTROLLER Low-Voltage Reset Feature: Whenever the Aqua-Hot’s DC power is interrupted, for longer than 5 minutes, the ―low battery voltage fault‖ red indicator light on the electronic controller will illuminate. Reset the electronic controller by pressing the ―low voltage reset‖ button on the electronic controller (use a thin, straight, nonmetallic object to access the button through the faceplate) or by turning off the diesel-burner switch on the interior switch panel for approximately 30 seconds, then turning the switch back on. Figure 24 © 2009 Aqua-Hot® 450-D Hydronic Heating System Service Manual—Rev. A — Page 38 — SECTION 6: ELECTRONIC CONTROLLER bracket by unsnapping each corner. Replacement Procedure: 6. Snap the replacement electronic controller into the mounting bracket. 7. Ensure that the pin jumpers are properly configured for an Aqua-Hot 450-DE; reference information in this section for proper pin-jumper configuration. 8. Install each terminal strip/plug back onto the electronic controller and tighten the screws on the terminal strips/ plugs to secure them to the board. FAILURE TO DISCONNECT ALL POWER SUPPLIES AND/OR TO ALLOW THE HEATER TO COOL BEFORE SERVICING COULD CAUSE SERIOUS DAMAGE OR PERSONAL INJURY. 1. 2. Ensure that the Aqua-Hot has been completely shut down and that all power sources have been disconnected. Remove the faceplate from the electronic controller by removing the four screws securing it to the mounting bracket. 3. Disconnect the positive, negative, and secondary power (if applicable) wires from the electronic controller. 4. Disconnect the four terminal strips/plugs from the electronic controller by loosening the screws on each strip/ plug and pulling each strip/plug away from the electronic controller. 5. Remove the electronic controller from the mounting Proper Pin Jumper Configuration: 1. Verify that the pin jumpers are configured as in the illustration in this section. If the pin jumpers do not match the illustration, the Aqua-Hot 450 will not function properly. 2. If the jumpers pins need to be reconfigured, simply tug gently on the black cap covering the pins to pull the black cap off. 3. Reseat the cap on the pins appropriately as per the illustration. NOTE: Check the terminal strips/plugs for loose wires and tighten if loose. 9. Connect the ground wire followed by the main 12 VoltDC power wire, then the secondary power wire (if applicable) to the appropriate screw terminals on the replacement electronic controller board. Reference Appendix A for additional wiring information. 10. Reinstall the faceplate onto the electronic controller and secure with the four screws previously removed. Figure 25 © 2009 Aqua-Hot® 450-D Hydronic Heating System Service Manual—Rev. A — Page 39 — SECTION 7: ELECTRONIC CONTROLLER INDICATOR LIGHTS Electric Heating Element Status This indicator light shows the status of the electric heating element by illuminating green for on, red for fault, or by turning off when the element switch is turned off. If the light is off and the electric element switch on the interior switch panel is off, then the system is functioning correctly. If the indicator light is green and the electric element switch on the interior switch panel is on, the system is also functioning correctly. If the light is red and the electric element switch on the interior switch panel is on, then there is a short in the electric element circuit. This could be due to a bad connection, a bad switch on the interior switch panel, or an issue with the AC relay. Heating Zone Status (1-5) These lights indicate the status of each motor home room thermostat and the respective heat exchanger fan(s). The indicator light will illuminate green when the system is on and functioning properly, red when on and not functioning, and the light will be off when the system is off. If a fault condition occurs, this could be due to a wiring issue, a faulty thermostat, or issues with the heat exchanger fans. is up to operating temperature and hot water is not being used. It also indicates that the interior heating zones will operate. When the indicator light is off, it indicates there is a demand for domestic hot water, or the heater is not up to operating temperature, and the interior heat will not operate. Low Tank-Level Cutoff The Low Tank-Level Cutoff senses the level of antifreeze in the boiler tank, and will shut the Diesel-Burner and the Electric Heating element OFF, when the light illuminates red. Under normal operating conditions, this light will not be illuminated because an adequate level of antifreeze and water heating solution within the Aqua-Hot’s boiler tank exists. When illuminated (red only), three possible issues exist - the antifreeze and water heating solution level is inadequate and must be refilled, there is a short in the wiring to the fluid level sensor, or the fluid level sensor is not operating properly. Heating Status This indicator light will illuminate (green only) when the diesel-burner and/or the electric heating element switch on the interior switch panel is on, and the control thermostat is calling for heat. Low Battery Voltage Fault This indicator light illuminates red when the DC voltage is below 10.5 Volts for Longer than 5 minutes, and it will be off when the system has adequate voltage. If the heater is functioning and the light is not illuminated, or the heater is not functioning and the light is illuminated, there is an issue with the wiring or one of the components. Engine Preheat Pump If the light becomes red, the switch may be reset (after restoring voltage) by pressing the Low Voltage Reset Button on the electronic controller with a long, thin, nonmetallic object, or by turning the diesel-burner switch on the interior switch panel off for 30 seconds, then turning it back on. Low-Temp Cutoff Status The Low Temp Cutoff thermostat shuts the interior heat off when domestic hot water is being used, and activates the stir pump in conjunction with the diesel burner switch. When the indicator light is green, it indicates that the heater This indicator light shows the status of the engine preheat pump by illuminating green for on, red for fault, or by turning off when the engine preheat pump is not operating. The system is functioning correctly when the indicator light is green while the engine preheat switch on the interior switch panel is on, the electric element and/or diesel-burner switch is on, and the engine preheat pump is operating. The system is also functioning correctly when the engine preheat switch is off and the engine preheat pump is not operating. © 2009 Aqua-Hot® 450-D Hydronic Heating System Service Manual—Rev. A — Page 40 — SECTION 7: ELECTRONIC CONTROLLER INDICATOR LIGHTS If the red light illuminates when the pump should be functioning, then there is either an issue with the wiring or the engine preheat pump. NOTE: The Low-Temp Cut-Off light must be illuminated for the Engine Preheat pump to be activated. the Diesel-Burner Switch on, or the Diesel-Burner Switch is turned off. The system is functioning if the Stir Pump is operating when the Diesel Burner Status light is illuminated and the Low Temp Cut-Off light is extinguished (i.e. running hot water). The system is also functioning properly if the stir pump and indicator light are off when the Diesel-Burner Status light and the Low Temp Cut-Off status lights are illuminated, or the Diesel Burner Switch is turned off. Pump #1 This indicator light shows the status of the circulation pump that controls the fluid for Heating Zones #1 and #5 by illuminating green for on, red for fault, and by turning off when the system is off. If the light is red under any condition, then there is an issue with either the wiring or the stir pump. Diesel-Burner Status The system is functioning properly if the coach thermostat is calling for heat, the pump is operating, and the light is green. The system is also functioning properly if the pump and light are off and the thermostat is not calling for heat. If the light is red under any condition, then there is either an issue with the wiring or the circulation pump. This indicator light shows the status of the diesel-burner by illuminating green when the diesel-burner is on, red for fault, and by turning off when the diesel-burner switch is turned off. If the diesel-burner switch on the interior switch panel is in the on position , then the indicator light should be illuminated green. Pump #2 This indicator light shows the status of the circulation pump that controls the fluid for Heating Zones #2, #3, and #4 by illuminating green for on, red for fault, and by turning off when the system is off. The system is functioning properly if the motor home interior thermostat is calling for heat, the circulation pump is active, and the indicator light is green. The system is also functioning properly if the circulation pump and indicator light are off and the thermostat is not calling for heat. If the light is red under any condition, there is either an issue with the wiring or the circulation pump. When the Diesel-Burner switch on the interior switch panel is in the off position, the indicator light will not be illuminated. If the indicator light turns red, there is either a short in the wiring or the diesel-burner is in need of servicing. When checking the wiring, be sure to verify that the diesel-burner controller’s harness connectors are completely locked together. Also verify the Photo Eye Wires have not been pinched. Reference section 9 of this manual for additional dieselburner information. Overload Fault This indicator light shows the status of the DC voltage applied to the electronic controller and the Aqua-Hot. Under normal operating conditions, this indicator light is off. Pump #3 - Stir Pump This indicator light shows the status of the stir pump by illuminating green for on, red for fault, and by turning off when either the Low Temp Cut-Off Status light is illuminated, with This light illuminates red when the Aqua-Hot is shut down due to excessive DC voltage (over 14.8 Volts) and/or the electronic controller has overheated. Once the excessive voltage issue is resolved, the electronic controller will reset itself. © 2009 Aqua-Hot® 450-D Hydronic Heating System Service Manual—Rev. A — Page 41 — SECTION 8: DIESEL-BURNER Diesel-Burner Overview The Aqua-Hot’s diesel-burner is a device that ignites a mixture of diesel fuel and air within a controlled setting to serve as a heat source. The flame is established in a combustion chamber within the Aqua-Hot’s boiler tank, and the heat from the flame is transferred to the antifreeze and water heating solution where it can be used for each system of the Aqua-Hot - domestic hot water, interior heat, and engine preheat. Figure 26 Figure 27 Fuel Nozzle Webasto Diesel Burner Diesel-Fuel Return Banjo Diesel-Fuel Supply Banjo Air Intake © 2009 Aqua-Hot® 450-D Hydronic Heating System Service Manual—Rev. A — Page 42 — SECTION 8: DIESEL-BURNER Figure 28 © 2009 Aqua-Hot® 450-D Hydronic Heating System Service Manual—Rev. A — Page 43 — SECTION 8: DIESEL-BURNER Operational Flow-Chart Operation sequence once the Aqua-Hot’s Diesel switch is turned ON NOTE: The Diesel switch’s indicator light will illuminate anytime the Diesel Burner switch is in the ON position The Motor (#2), which turns the Combustion Air Blower (#5) and drives the Fuel Pump (#14), will begin to operate. NOTE: If the Aqua-Hot’s coolant temperature is approximately 190°F (+/5°F) or higher, the Motor (#2) will not operate. Only when the coolant temperature has dropped below 160(+/-5)°F, and the VDC/ VAC Control Thermostat is calling for heat, will the Motor (#2) begin to operate. After approximately 10-25 seconds, the Fuel Solenoid Valve (#6) opens and fuel is sprayed into the Combustion Chamber (#11) through the Fuel Nozzle (#9) Once the ignited air-fuel mixture (FLAME) is observed by the Flame Sensor (#13) the Ignition Coil (#3) will automatically switch OFF. The combustion process now continues to operate unassisted. Once the heater switches OFF, thermostatically or manually, the Fuel Solenoid Valve (#6) closes, which interrupts the supply of diesel fuel to the Fuel Nozzle (#9) The Motor (#2) will continue to run for approximately three (3) additional minutes. This process is referred to as the Purge-Cycle, which cools the heater’s internal components and purges the Combustion Chamber (#11) of any residual exhaust gases. NOTE: The combustion process will continue to operate in this manner until one of the following occurs: A.) The VDC/VAC Control Thermostat, which senses coolant temperature, reaches the preset temperature of approximately 190 (+/-5)° F. NOTE: If process ―A‖ occurs, the AquaHot Heating Status Light on the Electronic Controller will go OFF. When the Aqua-Hot’s Diesel Burner is switched OFF by the VDC/ VAC Control Thermostat, the following process will take place: 1. The Motor (#2) will shut off once the three (3) minute Purge-Cycle has expired. -THEN2. The Aqua-Hot’s Diesel Burner will automatically turn back ON once the coolant reaches the preset temperature of approximately 160 (+/-5) °F B.) the Aqua-Hot’s Diesel Burner Switch is turned OFF. NOTE: After approximately 10-25 seconds, the Fuel Solenoid Valve (#6) opens and fuel is sprayed into the Combustion Chamber (#11) through the Fuel Nozzle (#9) If process ―B‖ occurs, the Diesel Burner switch’s Indicator Light, on the Switch Panel will go OFF along with the Heating Status and Diesel Burner Status lights on the Electronic Controller. Summary: The Aqua-Hot’s Diesel-Burner is operational anytime the operator moves the Diesel Burner Switch to the ON position. The DieselBurner will then automatically maintain the coolant temperature in the Aqua-Hot’s Boiler Tank without additional involvement from the operator. © 2009 Aqua-Hot® 450-D Hydronic Heating System Service Manual—Rev. A — Page 44 — SECTION 8: DIESEL-BURNER Diesel-Burner Operations: The following sequence illustrates how the Diesel-Burner operates once it is activated. Also, if diesel-burner malfunctions are experienced, use this sequence of operating events as a diagnostic tool to determine at what point in the dieselburner’s operation the malfunction is occurring. Use the “KEY” provided to understand each symbol shown. Figure 29 © 2009 Aqua-Hot® 450-D Hydronic Heating System Service Manual—Rev. A — Page 45 — SECTION 8: DIESEL-BURNER Figure 30 © 2009 Aqua-Hot® 450-D Hydronic Heating System Service Manual—Rev. A — Page 46 — SECTION 8: DIESEL-BURNER Figure 31 © 2009 Aqua-Hot® 450-D Hydronic Heating System Service Manual—Rev. A — Page 47 — SECTION 9: DETACHING AND REATTACHING THE DIESEL BURNER Instructions for Detaching the Diesel Burner WARNING! Be sure to move the Diesel-Burner switch on the Interior Switch Panel to the OFF position and disconnect the Diesel-Burner’s power supply before detaching the Diesel-Burner from the Aqua-Hot. Failure to turn off the Diesel-Burner and disconnect power could result in serious bodily injury. CAUTION! Be sure to clamp off the Fuel Supply and Return lines at the ports on top of the Aqua-Hot prior to beginning this replacement procedure. Step 1: Turn Off the Diesel Switch Figure 32 1. Move the Interior Switch Panel’s Diesel-Burner switch to the “OFF” position. Step 2: Remove the Access Cover Figure 33a Figure 33b 1. Remove the Aqua-Hot’s access cover by locating the bolts securing it in place. 2. Unscrew the bolt securing the front of the cover in place. © 2009 Aqua-Hot® 450-D Hydronic Heating System Service Manual—Rev. A — Page 48 — SECTION 9: DETACHING AND REATTACHING THE DIESEL BURNER Step 3: Disconnect the Diesel Burner’s Controller Figure 34 1. Locate the Diesel-Burner’s Controller and disconnect both plugs. Step 4: Remove the fuel lines from the Aqua-Hot Figure 35b Figure 35a 1. Locate where the fuel lines on the diesel burner connect to the Aqua-Hot Bulkhead fittings. 2. Using an 7/16 wrench, loosen the nuts securing each fuel line to the Aqua-Hot. © 2009 Aqua-Hot® 450-D Hydronic Heating System Service Manual—Rev. A — Page 49 — SECTION 9: DETACHING AND REATTACHING THE DIESEL BURNER Step 5: Remove the Diesel Burner from the Aqua-Hot Figure 36a Figure 36b 1. The Diesel-Burner is secured to the Aqua-Hot with two nuts that can be loosened, and swung out of the way by using a 10mm socket wrench with a 10 inch long extension. Figure 36c 2. Carefully pull the Diesel-Burner away from the Aqua-Hot 4 to 5 inches before rotating the burner, and then remove. © 2009 Aqua-Hot® 450-D Hydronic Heating System Service Manual—Rev. A — Page 50 — SECTION 9: DETACHING AND REATTACHING THE DIESEL BURNER Reattaching the Diesel Burner to the Aqua-Hot CAUTION! When reattaching the diesel-burner be sure to properly align the diesel-burner before tightening the eye-bolt nuts. Also, visually inspect all of the rubber grommets on the top and bottom of the diesel-burner’s castaluminum blower casing to ensure they are in place. DO NOT over tighten the eye-bolt nuts. Torque specifications are: approx. 20-40 in. lbs. An improper alignment and/or over tightening of the eye-bolt nuts can cause damage to the diesel-burner’s cast aluminum blower casing. Step 1: Reattaching the Diesel Burner to the Aqua-Hot Figure 37a 1. The Diesel-Burner is secured to the Aqua-Hot with two eye-bolt nuts that can be swung into place, after the diesel burner has been properly aligned and set in place. Figure 37b Figure 37c 2. The eye-bolt nuts can then be tightened by using a 10mm socket wrench with a 10 inch long extension. Use extreme caution when tightening down the eye-bolt nuts, over tightening of the eye-bolt nuts can cause the aluminum blower casing to crack. (Torque Specifications = Approximately 20-40 in. lbs.) © 2009 Aqua-Hot® 450-D Hydronic Heating System Service Manual—Rev. A — Page 51 — SECTION 9: DETACHING AND REATTACHING THE DIESEL BURNER Step 2: Reattach the fuel lines to the Aqua-Hot. Figure 38a Figure 38b 1. Align the fuel lines on the diesel burner with the fittings on the Aqua-Hot, and using a 7/16 inch wrench, tighten down both the supply and return fuel fittings. CAUTION! Be sure to remove the clamps, off of the Fuel Supply and Return lines at the ports on top of the Aqua-Hot prior to starting the diesel burner, or serious damage will occur to the diesel-burner’s fuel pump. Step 3: Plug in the diesel-burner’s controller and mount 3. Locate the Diesel-Burner’s Controller and connect both plugs. Figure 39a Figure 39b NOTE: The Diesel Burner’s Controller might have to be mounted onto the side of the diesel burner, before the plugs are inserted into the control unit, otherwise it might not be possible to mount the control unit. © 2009 Aqua-Hot® 450-D Hydronic Heating System Service Manual—Rev. A — Page 52 — SECTION 9: DETACHING AND REATTACHING THE DIESEL BURNER Step 4: Reinstall the Access Cover NOTE: The access cover must be installed prior to operation as a safety switch exists, which will prevent the Aqua-Hot from operating whenever the access cover is not properly installed. Figure 40b Figure 40a 1. Reinstall the Aqua-Hot’s access cover . 2. Securely tighten the three bolts securing the access cover in place. © 2009 Aqua-Hot® 450-D Hydronic Heating System Service Manual—Rev. A — Page 53 — SECTION 10: DIESEL-BURNER COMPONENTS Figure 41 © 2009 Aqua-Hot® 450-D Hydronic Heating System Service Manual—Rev. A — Page 54 — SECTION 10: DIESEL-BURNER COMPONENTS Diesel-Burner Motor: The motor drives the combustion air blower and the fuel pump. In order to perform the following procedures, it may be necessary to detach the dieselburner head. NOTE: The Aqua-hot 600 Series is equipped with a 20A Fast Blow Fuse, located on the red #20 wire, between the electronic controller and the diesel burner controller’s BPlug, which is the diesel burner motor power wire. If there is no 12 Volts D.C. present on the C-2 pin, continue. 2. Verify the Electronic Controller is sending power to the diesel burner motor. A. Using a volt meter, check for 12 Volt-DC on the JP4 plug, on the B4 + pin (red wire #3). If no power is present verify the electronic controller is receiving power from the batteries. i. Locate the main power terminals on the bottom of the electronic controller. ii. Using a volt Meter, check for 12 Volt D.C. on the JP 8 terminal. If no voltage is present, verify that either the jumper is in place, that connects pins JP5 and JP8 together, or if there is a power wire hooked up to the JP8 terminal verify that it is receiving 12 Volt D.C. from the Motor home’s batteries. iii. If the JP8 pin does have 12 Volt D.C. +, but pin 3, on the JP4 terminal does not have power, replace the electronic controller. Component Test: 1. Locate the diesel-burner controller’s C-Plug and insert the probes of a DC voltmeter into the C-2 (+) and the C-5 (-) locations. A. Turn the diesel switch ON and verify both the diesel burner status light and the heating status lights are illuminated on the electronic controller. If either light is not illuminated, follow the trouble shooting guide for that particular component. B. Observe the voltage level. If a normal voltage registers on the voltmeter and the motor is not operating, inspect the C-Plug Harness for loose or damaged wire connections. If the C-Plug harness and connections are in good condition, but the motor is not operation the motor must be replaced. Figure 42 12 Volt D.C. + / - from coach house batteries. Fuse for Webasto Blower Motor © 2009 Aqua-Hot® 450-D Hydronic Heating System Service Manual—Rev. A — Page 55 — SECTION 10: DIESEL-BURNER COMPONENTS Diesel-Burner Motor (continued) - RPM Test: 1. Disconnect the ignition cables from the ignition electrodes. 7. Connect the motor’s wires directly to a 12 volt DC power supply. 2. Remove the four ignition coil screws that secure the ignition coil to the protection cap. 8. Turn the power supply ON and use a phototachometer to test for a proper RPM reading. 3. Lift the ignition coil and disconnect its wires from the C-Plug harness wires prior to removing. 9. 4. Remove the protection cap from the diesel-burner so that the motor and clutch halves are exposed. At approximately 12 volts DC the RPM reading should be 4500 RPM’s (+/- 300 RPM’s.) If the motor’s RPM reading is not within the above specs, the motor must be replaced. NOTE: It may be necessary to remove the diesel-burner to remove the bottom two screws securing the protection cap in place. Follow the direction on detaching and reattaching the diesel burner in section ? 5. Place a few wraps of black electrical tape around the clutch halves and then place a small piece of reflective tape over the black tape. 6. Disconnect the motor’s black (+) and brown (-) wires from the C-plug harnesses black (+) and brown (-) wires. NOTE: Test the diesel-burner’s bearings prior to reattaching the diesel-burner head or replacing the motor. Worn bearings can cause lower than normal RPM readings and premature motor wear. To properly test for worn bearings, reference the bearings function test section. Figure 43 © 2009 Aqua-Hot® 450-D Hydronic Heating System Service Manual—Rev. A — Page 56 — SECTION 10: DIESEL-BURNER COMPONENTS Motor Replacement Procedure: Be sure to move the Diesel-Burner switch on the Interior Switch Panel to the OFF position and disconnect the Diesel-Burner’s power supply before detaching the Diesel-Burner from the Aqua-Hot. Failure to turn off the Diesel-Burner and disconnect power could result in serious bodily injury. 1. 2. 3. Follow the directions for detaching the diesel burner in section ? Remove the four ignition coil screws that secure the ignition coil to the protection cap. Lift the ignition coil to disconnect its wires from the C-plug harness wires prior to removing. Remove the protection cap from the diesel-burner so that the motor clutch halves are exposed. Remove the three hex head screws that secure the motor and flange assembly to the blower housing. Remove the motor and flange assembly along with the clutch halves. Disconnect the motor’s black (+) and brown (-) wires from the C-plug harness’ wires. NOTE: Inspect the clutch halves for cracks and also ensure that the flat portion in each shaft hole is free of wear and tear. Too much play on the shaft produces a loud clacking noise. If any cracks or wear are detected, the clutch half must be replaced. NOTE: Be sure to test the diesel-burner’s bearings prior to reinstalling the motor. Worn bearings can cause lower than normal RPM readings and premature motor wear. 6. Reinstall a clutch half on both the new motor’s shaft and the combustion air blower shaft. Attach the motor and flange assembly, with the recessed edge of the motor flange in-line with the wiring access slot of the blower casing, to the blower housing with the three hex head screws. NOTE: Inspect the blower casing’s O-ring for damage or wear prior to reinstalling the diesel-burner head’s protection cap. If damage or wear exists, replace the O-ring. 7. Connect the black (+) and the brown (-) wires of the new motor to the C-Plug harness’ yellow (+) and brown (-) wires. Feed the C-plug harness’ yellow and brown wires back through wiring access hole in the protection cap. 8. Reinstall the protection cap. Reconnect the black (+) and brown (-) wires. 9. Reinstall the ignition coil and secure to the protection cap with the four ignition coil screws. 10. Follow the directions for reattaching the diesel burner in section ? 11. Test for proper operation 4. Detach the motor from the motor flange by removing the two Phillips heads screws that fasten the two parts together. 5. The motor must be mounted to the flange with the wires and drain hole pointing downward and the recessed edge of the motor flange pointing upward. This will ensure a proper protection cap fit. © 2009 Aqua-Hot® 450-D Hydronic Heating System Service Manual—Rev. A — Page 57 — SECTION 10: DIESEL-BURNER COMPONENTS Figure 44 Motor Replacement Procedure: (continued) © 2009 Aqua-Hot® 450-D Hydronic Heating System Service Manual—Rev. A — Page 58 — SECTION 10: DIESEL-BURNER COMPONENTS Flame Sensor: The flame sensor is a photo resistive device which supplies the diesel-burner’s controller with a DC voltage signal when it detects a flame. When the flame sensor senses the light of the flame, it will shut the ignition coil off, and send a signal to the diesel burner controller indicating that everything is working properly. If the flame sensor does not sense the flame, it will shut the diesel burner down in a default after 20 seconds. NOTE: In order to perform the following procedures it is necessary to detach and reattach the diesel-burner head. Be sure to review the detaching/attaching instructions. Component Test: Ohms NOTE: Be sure to calibrate your ohmmeter prior to checking the flame sensor to proper resistance values. 1. 2. In order to perform the following procedures it is necessary to detach the diesel-burner. Be sure to review the detaching/attaching instructions in section 9. Once the diesel burner has been removed, Locate and detach the flame sensor’s green and blue wires from the C-plug harness wires. 3. Connect the flame sensor’s green and blue wires to an ohmmeter. 4. Check resistance by placing a shop rag over the flame sensor’s glass surface, to simulate a no flame condition, and then remove the rag and expose to a light source, to simulate a flame condition. 5. If the flame sensor is operating properly, the ohmmeter should register high resistance, over 100K Ω when the glass surface is covered, and less than 200 Ω when exposed to a light source. 6. If these resistance numbers cannot be obtained, verify the flame sensor’s glass surface is clean. If the flame sensor is clean and the resistance numbers cannot be obtained, the flame sensor must be replaced. Flame Sensor Maintenance: 1. For light dirt, dust, and/or carbon deposits, simply wipe off the flame sensor with a soft cloth. 2. Should heavy carbon deposits be present, completely remove the flame sensor from the photo disc and clean with brake cleaner. Figure 45 Flame Sensor Green Wire Blue Wire © 2009 Aqua-Hot® 450-D Hydronic Heating System Service Manual—Rev. A — Page 59 — SECTION 10: DIESEL-BURNER COMPONENTS Flame Sensor Replacement Procedure: 1. In order to perform the following procedures it is necessary to detach diesel-burner head. Be sure to review the detaching/attaching instructions in section ?. 2. Remove the screw that fastens the flame sensor to the photo disc and detach the sensor’s green and blue wires from the C-plug harness’ green and violet wires, and remove flame sensor. 3. Slide the tab of the new flame sensor into the provided slot in the photo disc and secure in place with the screw. Connect the flame sensor’s green wire to the green C-plug harness wire and the blue wire to the C-plug harness’ violet wire. 4. Follow the directions for reattaching the diesel burner, in section 9 of this manual. Figure 46 © 2009 Aqua-Hot® 450-D Hydronic Heating System Service Manual—Rev. A — Page 60 — SECTION 10: DIESEL-BURNER COMPONENTS Ignition Electrodes The diesel-burner’s ignition coil produces a high voltage ignition spark across the ignition electrodes, which ignites the incoming air/fuel mixture. Cleaning and Maintenance: 1. Polish away any carbon deposits that may have baked onto the metal tips of the ignition electrodes with a course sponge. 2. If the ignition electrode’s electrical insulator is cracked or damaged, the ignition electrode must be replaced. NOTE: The electrode adjustment gauge is used to set the gap between the ignition electrodes. The electrode adjustment gauge is located on the outside surface of the diesel-burner head on the left hand side. Ignition Electrode Adjustment Procedure: 1. Follow the directions for detaching/reattaching the diesel burner in section ? Of this manual. 2. Using a 10mm socket, slightly loosen the retaining clamp bolt. 3. Place the electrode adjustment gauge on the nozzle manifold hex and insert the metal tips of the ignition electrodes into the appropriate notches of the electrode adjustment gauge. NOTE: Be sure not to over-tighten the retaining clamp bolt when readjusting the ignition electrodes. Overtightening the retaining clamp bolt will bend the retaining clamp and prevent the photo disc from floating freely. Not allowing the photo disc to float freely will cause poor combustion and result in a smoky exhaust. A bent retaining clamp can be restraightened with a punch and hammer. Lay the clamp’s beveled side down on a solid flat surface and align the thick end of the punch at dead center. Tap the punch lightly until the retaining clamp returns to proper form. 4. Using a 10 mm socket, tighten the retaining clamp bolt. 5. Remove the electrode adjustment gauge and reattach to the diesel-burner head. Replacement Procedure: 1. Using a 10mm socket, loosen and remove the retaining clamp bolt, and the retaining clamp. 2. Slide the electrode out of the photo disc. 3. To remove the electrode, hold onto the orange electrode boot, and pull firmly on the electrode. 4. Once the electrode has been removed Inspect inside the orange electrode boot for the retaining clip, which holds the electrode in place. If it is missing, replace the electrode boot. Figure 47 © 2009 Aqua-Hot® 450-D Hydronic Heating System Service Manual—Rev. A — Page 61 — SECTION 10: DIESEL-BURNER COMPONENTS Ignition Electrodes 2. Replacement Procedure: (continued) Hook the diesel burner up to an alternate fuel source. A. Disconnect the steel fuel lines from the diesel burner. 5. Insert the new electrode into the orange electrode boot, and snap into place. Pull firmly on the electrode to make sure the retaining clip has secured the electrode in place. B. Install the fuel line bypass adapter fitting onto the diesel burner. C. 6. Slide the electrode into the photo disc. 7. Install retaining clamp and retaining clamp bolt and finger tighten. 8. 3. Follow steps 2 - 5 to properly adjust the electrodes. Install rubber fuel lines on both the supply and return fuel pipes, and install the other end of the rubber fuel lines into an adequate supply of diesel fuel. Reference figure ?. Remove both the ignition cables from the ignition electrodes, or connect a jumper wire (with alligator clips) across the metal tips of the electrodes. Failure to connect a jumper wire across the ignition electrodes, or to remove the ignition cables from the ignition electrodes will result in a HIGH VOLTAGE shock and/ or a fire. If the ignition cables are removed, be sure to place a piece of electrical tape on the end of each cable. Fuel Nozzle: The fuel nozzle is simply a fuel atomizer. It reduces the diesel fuel into a fine spray which is mixed with incoming combustion air and is ignited within the combustion chamber. NOTE: In order to perform the following procedures it is necessary to detach and reattach the diesel-burner head. Be sure to review section 9 for detaching and reattaching instructions. 4. Remove the B-plug from the diesel-burner head’s controller. 5. Turn the diesel switch ON and then plug the B-plug back into the diesel-burner controller to activate the diesel-burner. After approx. 20 seconds the fuel solenoid will ―click‖ and a fine mist of fuel should appear from the fuel nozzle in a cone shaped spray pattern. Fuel Nozzle Component Test: 1. Follow the directions for detaching the diesel burner, in section 9, of this manual. © 2009 Aqua-Hot® 450-D Hydronic Heating System Service Manual—Rev. A Figure 48 — Page 62 — SECTION 10: DIESEL-BURNER COMPONENTS Fuel Nozzle: 2. 6. Remove the B-plug from the diesel-burner controller. 7. If the cone shaped spray pattern did not appear, fol low the troubleshooting guides for the following components and verify they are operating properly: A. Fuel Solenoid B. Fuel pump C. D.C. High Limit thermostats NOTE: An adjustment of the ignition electrodes may be necessary after replacing the fuel nozzle. Follow the ignition electrode adjustment procedure found in the ignition electrode section of this manual. 3. 8. If the components listed above are operating properly, and there is still no fuel coming out of the nozzle, replace the fuel nozzle. Fuel Nozzle Cleaning and Maintenance: The fuel nozzle is a precision calibrated part and cannot be cleaned or serviced. A replacement of the fuel nozzle is recommended annually. Use a 3/4 in. wrench to hold the fuel nozzle stand hex while loosening the fuel nozzle with a 5/8 in. wrench and remove. After replacing the fuel nozzle, reattach the dieselburner head. Be sure to reattach the diesel-burner head prior to switching the heater ON. Failure to do so may result in ignition of the diesel-burner and serious bodily injury. 4. Turn ON the diesel switch for 5 seconds, then turn it OFF. This will activate the diesel-burner’s prime-cycle and flush the fuel system of any potential contaminants. Perform this procedure twice. 5. Test for normal operation. Fuel Nozzle Replacement Procedure: 1. When replacing the fuel nozzle, be sure to tighten the nozzle, loosen it a 1/4 turn, and then firmly retighten. This will establish a seated fit and avoid any leaks. NOTE: Be sure to use care when handling the new fuel nozzle. Oils and/or small dust or dirt particles from your hands may plug the nozzle’s small orifice. A partially plugged orifice will restrict fuel flow, which will affect the combustion process of the diesel-burner. Figure 49 © 2009 Aqua-Hot® 450-D Hydronic Heating System Service Manual—Rev. A — Page 63 — SECTION 10: DIESEL-BURNER COMPONENTS stand approximately 1/2‖. Remove the fuel solenoid shaft from the nozzle manifold using a 16mm wrench.. Discard the shaft and valve kit, as replacements are provided with the new fuel solenoid assembly. Fuel Solenoid: The fuel solenoid allows the flow of diesel fuel to the diesel-burner’s fuel nozzle. NOTE: If a long after-smoking condition exists during the diesel-burner’s purge cycle, the fuel solenoid valve kit may need to be replaced. NOTE: In order to perform the following procedures it is necessary to detach and reattach the diesel-burner head. Be sure to review the detaching/attaching instructions. Fuel Solenoid Component Test: NOTE: If the fuel solenoid is not working troubleshoot the diesel burner’s hi-limit thermostats. If they are tripped they will not allow the fuel solenoid to operate. 1. Locate and detach the C-plug harness’ violet (+) and Brown (-) wires from the fuel solenoid. 2. Connect the (-) lead of a 12 volt DC power supply to the fuel solenoid’s (-) electrical terminal. 3. Intermittently apply the (+) lead of the power supply to the fuel solenoid’s (+) electrical terminal. 4. Listen for the fuel solenoid to click (i.e. open and close). 5. If the fuel solenoid does not click, it must be replaced. 3. Insert the contents of the new fuel solenoid valve kit into the new fuel solenoid shaft. Slide the new fuel solenoid onto the fuel solenoid shaft. Thread the new fuel solenoid shaft with fuel solenoid to the fuel nozzle manifold and tighten. Secure the fuel solenoid in place with the new flat washer and lock nut. 4. Connect the C-plug harness’ violet (+) and brown () wires to the fuel solenoid’s (+) and (-) electrical terminals. Figure 50 Fuel Solenoid Replacement Procedure: 1. Disconnect the C-plug harness’ violet (+) and brown (-) wires from the fuel solenoid. 2. Using an 8mm wrench, remove the lock nut and flat washer from the end of the fuel solenoid shaft and then pull the fuel solenoid away from the nozzle © 2009 Aqua-Hot® 450-D Hydronic Heating System Service Manual—Rev. A — Page 64 — SECTION 10: DIESEL-BURNER COMPONENTS Fuel Pump: The fuel pump draws diesel fuel from the vehicle’s fuel tank and creates a preset pressure of 145 PSI, which is required for proper fuel atomization. Reference the illustration below for a basic overview and understanding of how the fuel pump functions. 7. If fuel does flow through the fuel pump when ran off an external source inspect the following in the motor home: A. Check the motor home fuel tank for fuel. If the fuel level is below 1/4 the Aqua-Hot diesel burner will not operate. Fuel Pump Testing Procedure: Do not remove the diesel burner at this time. Failure to do so may result in serious bodily injury. 1. Clamp off and remove the fuel return and fuel supply lines coming into the Aqua-Hot unit. 2. Attach a short piece of fuel line to both the fuel return and fuel supply ports. 3. Submerse the opposite end of the temporary fuel supply line in a container of diesel fuel. 4. Place the opposite end of the temporary fuel return line in an empty container. 5. Turn the diesel switch ON to activate the dieselburner, and wait ten seconds. 6. If fuel does not flow out of the return line into the empty container, the fuel pump must be replaced. NOTE: Prior to replacing the fuel pump, be sure to inspect the screen filter in the supply inlet of the fuel pump for dirt particles. Clean and/or replace if necessary. A plugged screen filter will restrict fuel from entering the fuel pump. B. Inspect the supply fuel line for kinks which would prohibit fuel flow. C. Inspect the supply fuel line for cuts, which would cause the diesel burner to suck air. D. Inspect the fuel filter, to make sure all fittings are tight, including hose clamps. Also, make sure the fuel filter is tight. E. Inspect the Aqua-Hot for loose or cracked fittings. F. Inspect the supply fuel system for loose hose clamps throughout G. Inspect the fuel pick-up tube in the tank., for loose connection and pin holes in the pick-up tube Fuel Pump Cleaning and Maintenance: 1. Check all fuel connections for tightness. 2. Check the screen filter located in the fuel supply inlet of the fuel pump for dirt particles. Clean and/ or replace if necessary. 3. To adjust the fuel pressure refer to Appendix C: Fuel pressure check and adjustment.. Figure 51 © 2009 Aqua-Hot® 450-D Hydronic Heating System Service Manual—Rev. A — Page 65 — SECTION 10: DIESEL-BURNER COMPONENTS Fuel Pump Replacement Procedure: NOTE: To perform the following procedure it will be necessary to remove the diesel burner. Follow the section on detaching and reattaching the diesel burner, section 9 of this manual. 1. 2. 3. 4. 5. 6. Locate and disconnect the C-Plug harness wires that connect to the flame sensor and the fuel solenoid. Also, disconnect the ignition cables from the ignition electrodes. Remove the retaining clip that secures the photo disc in place. Gently lift the photo disc so that it releases from the nozzle stand and the ignition electrodes. Loosen the supply and return banjo bolts to remove the fuel supply and return pipes from the fuel pump. Also, disconnect the high pressure fuel pipe from both the fuel pump and the nozzle stand. Discard the high pressure fuel pipe, gasket rings, and banjo bolts , as replacements are provided in the new fuel pump kit. Remove the four nozzle stand plate screws that secure the nozzle stand plate in place. Remove the nozzle stand plate by pulling on the nozzle stand until the plate releases from the cast-aluminum blower casing. Remove the two pump mounting screws that secure the fuel pump in place. Turn the nozzle stand plate over and remove the snap ring from the fuel pump shaft, using snap ring pliers. Remove the nylon drive gear and then the fuel pump. Attach the new fuel pump to the nozzle stand plate with the two pump mounting screws. Turn the nozzle stand plate over to install the nylon drive gear on the fuel pump’s shaft and secure in place with the snap ring. Dab the teeth of the nylon drive gear with white lithium grease (Isoflex LDS-18 is recommended.) NOTE: Do not adjust the fuel pressure regulator of the new fuel pump, as it has been factory preset. Inspect the nylon drive gear’s cavity inside the cast aluminum blower casting for fuel stains. If fuel stains are present, a replacement of the bearings and/or the entire blower casing may be necessary. Leaking fuel could cause bearing seizure, resulting in potential damage to the internal bore/ bearing of the blower casing. 7. Fit the nozzle stand plate inside the cast-aluminum blower casing and secure in place with the four nozzle stand plate screws. Install the grommets on the fuel return and supply banjo pipes and secure the pipes to the fuel pump with the new banjo bolts and gasket rings. NOTE: Failure to use the new gasket rings or the correct order placement could result in a fuel leak. 8. Reconnect the C-plug harness’ violet (+) and brown (-) wires to the fuel solenoid’s (+) and (-) electrical terminals. 9. Insert both the ignition cables into the rubber grommet and slide into the appropriate notch on the blower casing. 10. Reconnect the ignition cables to the ignition electrodes. 11. Reinstall the photo disc and secure it in place with the retaining clip. 12. Reconnect the flame sensor’s green wire to the green C-plug harness and the blue wire to the Cplug harness’ violet wire. Install rubber grommet around the harness wires, and set into place. NOTE: Check the ignition electrodes for proper adjustment prior to reattaching the diesel burner. 13. Follow the directions for reattaching the diesel burner in section 9 of this manual. © 2009 Aqua-Hot® 450-D Hydronic Heating System Service Manual—Rev. A — Page 66 — SECTION 10: DIESEL-BURNER COMPONENTS Fuel Pump: (continued) Figure 52 © 2009 Aqua-Hot® 450-D Hydronic Heating System Service Manual—Rev. A — Page 67 — SECTION 10: DIESEL-BURNER COMPONENTS Bearings: 5. Remove the three hex head screws that secure the motor and motor flange to the blower housing. Re move the motor and flange assembly along with the clutch halves. Disconnect the motor’s black (+) and brown (-) wires from the C-plug harness’ wires. 6. Remove the four blower housing screws that secure the blower housing to the blower casing. Remove the blower housing so that the combustion air blower is exposed. 7. Spin the combustion air blower by hand. Placing one of the clutch halves to the end of the shaft, assists with the spinning of the bearings. 8. If the combustion air blower rotates smoothly without any friction or noise, the bearings are in proper working condition. If the combustion air blower does not rotate smoothly and/or produces noise, the bearings are worn and must be replaced. The bearings support the combustion air blower’s shaft and allows the blower to turn smoothly. NOTE: In order to perform the following procedures it is necessary to detach and reattach the diesel-burner head. Be sure to review section 9 for detaching and reattaching the diesel burner instructions Bearing Test: 1. 2. In order to perform the following procedure it is necessary to detach and reattach the diesel-burner head. Be sure to review the detaching and reattaching section for detaching and reattaching instructions. Locate and disconnect the C-plug harness wires that connect to the flame sensor and fuel solenoid. Also, disconnect the ignition cables from the ignition electrodes. Replacement: 3. Remove the four nozzle stand plate screws that secure the nozzle stand plate in place. Remove the nozzle stand plate by pulling on the nozzle stand until the plate releases from the cast-aluminum blower casing. 1. In order to perform the following procedure it is necessary to detach and reattach the diesel-burner head. Be sure to review the detaching and reattaching section for detaching and reattaching instructions. 4. Remove the four ignition coil screws that secure the ignition coil to the protection cap. Lift the ignition coil and disconnect its black (+) and brown (-) wires from the C-plug harness wires, prior to removing. Remove the protection cap from the diesel-burner so that the motor and clutch halves are exposed. 2. Locate and disconnect the C-plug harness wires that connect to the flame sensor and fuel solenoid. Also, disconnect the ignition cables from the ignition electrodes. Figure 53 © 2009 Aqua-Hot® 450-D Hydronic Heating System Service Manual—Rev. A — Page 68 — SECTION 10: DIESEL-BURNER COMPONENTS 3. Remove the four nozzle stand plate screws that secure the nozzle stand plate in place. Remove the nozzle stand plate by pulling on the nozzle stand until the plate releases from the cast-aluminum blower casing. NOTE: It is recommended to mark the internal components of the diesel burner prior to disassembling of the burner. Make a mark between the motor flange and the blower housing, and also between the blower housing and the blower casing. If the burner is assembled improperly the protection cap will not go on. 4. 5. Remove the four ignition coil screws that secure the ignition coil to the protection cap. Lift the ignition coil and disconnect its black (+) and brown (-) wires from the C-plug harness wires, prior to removing. Remove the protection cap from the diesel-burner so that the motor and clutch halves are exposed. Remove the three hex head screws that secure the motor and motor flange to the blower housing. Remove the motor and flange assembly along with the clutch halves. Disconnect the motor’s black (+) and brown (-) wires from the C-plug harness’ wires. 6. Remove the four blower housing screws that secure the blower housing to the blower casing. Remove the blower housing so that the combustion air blower is exposed. 7. Hold side-B of the blower casing and loosen the retaining nut located in side-A of the blower casing. Remove the retaining nut, steel drive gear and thick flat washer from the combustion air blower’s shaft. Lightly tap the threaded end of the shaft so that the combustion air blower can be easily removed from the blower casing. NOTE: Be sure to inspect the blower casing’s bore/bearing cavity for signs of damage due to potentially seized bearings. If damage is present, the blower casing must be replaced. 9. Install a new snap ring into side-A of the blower casing. Once the snap ring is in place, insert the remaining contents of the new bearing kit into sideB of the blower casing, starting with the wave washer. Secure the bearing kit assembly in place with the remaining snap ring. 10. Inspect the combustion air blower for warping and/ or damage. If warping or damage is visible, the combustion air blower must be replaced. 11. Reference Figure ?? for exact placement of the three washers that slide over the threaded end of the combustion air blower’s shaft prior to installation. Failure to follow the correct order and direction of the dished surfaces on the washers will result in a restricted rotation of the combustion air blower. 12. Slide the combustion air blower’s shaft (with the three washers) up through the bearing kit assembly until the threaded portion appears on side-A of the blower casing. Place the new thick flat washer and steel drive gear on the threaded end of the combus tion air blower’s shaft. Thread the new retaining nut on the combustion air blower’s shaft until it is finger tight (DO NOT TIGHTEN.) Figure 54 NOTE: Be sure to observe the placement of the three washers of the bearing kit. To ensure proper tension, the same order and direction of the dished surfaces of the washers must be followed when reassembling. 8. With a pair of snap-ring pliers, remove the snap rings from both side-A and side-B of the blower casing. Push all the contents of the bearing kit out of the blower casing’s bore/bearing cavity. Discard the retaining nut, steel drive gear, snap rings, bearings, spacer tube, and washers, as replacements are provided in the new bearing kit. © 2009 Aqua-Hot® 450-D Hydronic Heating System Service Manual—Rev. A — Page 69 — SECTION 10: DIESEL-BURNER COMPONENTS 12. Place a feeler gauge between the combustion air blower and the flat surface of the blower casing. Slowly tighten (or loosen) the retaining nut, holding the combustion air blower, until a .003-.005 gap is achieved. Remove feeler gauge. 13. Spin the combustion air blower to ensure a friction free rotation. NOTE: If the combustion air blower is rubbing, loosen the retaining nut slightly and lightly tap on the combustion air blower’s shaft (opposite side) then readjust the gap. 14. Reattach the blower housing to the blower casing using the four blower housing screws. Reinstall the clutch half on both the motor’s shaft and the combustion air blower’s shaft. Attach the motor and flange assembly, with the recessed edge of the motor flange in-line with the wiring access slot of the blower casing, to the blower housing with the three hex head screws. Reconnect the black (+) and brown (-) wires of the motor to the C-plug harness’ black (+) and brown (-) wires. Feed the C-plug harness’ yellow and brown wires back through the wiring access hole in the protection cap. NOTE: Inspect the clutch halves’ for cracks and also ensure that the flat portion in each shaft hole is free of wear and tear. Too much play on the shaft produces a loud clacking noise. If any cracks or wear are detected, the clutch half must be replaced. 15. Reinstall the protection cap. Reconnect the black (+) and brown (-) wires of the ignition coil to the Cplug harness’ yellow (+) and brown (-) wires. Reinstall the ignition coil and secure to the protection cap with the four ignition coil screws. Reconnect the ignition cables to the ignition electrodes. 16. Fit the nozzle stand plate inside the cast aluminum blower casing and secure in place with the four nozzle stand plate screws. Reattach the fuel supply and return lines to the diesel-burner head. 17. Reconnect the blue (+) and brown (-) wires to the fuel solenoid’s (+) and (-) electrical terminals. Also, reconnect the flame sensor’s green wire to the green C-plug harness wire and the blue wire to the C-plug harness’ violet wire. 18. Follow the instructions for reattaching the diesel burner, in the detaching/reattaching section in this manual. Figure 55 © 2009 Aqua-Hot® 450-D Hydronic Heating System Service Manual—Rev. A — Page 70 — SECTION 10: DIESEL-BURNER COMPONENTS Ignition Coil: The ignition coil produces a high voltage ignition spark (approx. 8000 volts), which is released across the metal tips of the ignition electrodes during the initial diesel-burner start-up. Use extreme care when testing the ignition coil, as a High Voltage Shock may result. NOTE: In order to perform the following procedures it is necessary to detach and reattach the diesel-burner head. Be sure to review the section for detaching and reattaching the diesel burner.. Component Test: 1. Remove the four ignition coil screws that secure the ignition coil in place. 2. Disconnect the ignition coil’s black (+) and brown (-) wires from the C-plug harness’ yellow (+) and brown (-) wires. 3. Connect the ignition coil wires directly to a 12 volt DC power supply (i.e. black (+) wire to (+) lead and brown (-) wire to (-) lead). 4. Turn the power supply ON and watch for a spark to appear across the metal tips of the ignition electrodes. If a spark does not appear, the ignition coil must be replaced. NOTE: Some ignition coils are intermittent and will need to be tested numerously Before replacing the ignition coil: 1. Verify the ignition electrodes are not cracked or broken. 2. Verify that the ignition electrodes are adjusted properly. 3. Ensure the electrode boots are securely holding the electrodes in place. 4. Ensure the electrode boots are not broken inside the ignition coil wires. Figure 56 © 2009 Aqua-Hot® 450-D Hydronic Heating System Service Manual—Rev. A — Page 71 — SECTION 10: DIESEL-BURNER COMPONENTS Ignition Coil: 2. NOTE: In order to perform the following procedures it is necessary to detach and reattach the diesel-burner head. Be sure to review the section for detaching and reattaching the diesel burner.. Replacement Procedure: 1. Disconnect the ignition cables from the ignition electrodes. Remove the four ignition coil screws that secure the ignition coil to the protection cap. Lift the ignition coil and disconnect its wires from the C-plug harness wires, prior to removing. Connect the new ignition coil’s black (+) and brown (-) wires to the C-plug harness’ yellow (+) and brown (-) wires. Attach the ignition coil to the protection cap with the four ignition coil screws, then reconnect the ignition cables to the ignition electrodes. NOTE: If the new ignition coil does not function, check wire connections and ensure they are properly connected. 3. Follow the instructions for reattaching the diesel burner and test for proper operation. Figure 57 © 2009 Aqua-Hot® 450-D Hydronic Heating System Service Manual—Rev. A — Page 72 — SECTION 10: DIESEL-BURNER COMPONENTS Diesel-Burner Controller: The diesel-burner controller operates all the components of the diesel-burner head and safely shuts the heater OFF in the event of an overheat, flameout, and low voltage condition. It also receives dieselburner operation status signals from the flame sensor, VDC control thermostat, and VDC high-limit thermostat. Locate the diesel-burner controller’s B-plug and Cplug. Insert the probes of a DC voltmeter into the C -1 (+) and B-2 (-) locations and turn the diesel switch ON. If a voltage reading does not register on the voltmeter, the diesel-burner controller must be replaced. If voltage is present, proceed to the next circuit test. VDC High-Limit Thermostat Circuit Test: Component Test: The following conditions must exist prior to performing the diesel-burner controller circuit tests on the following page. If one of the conditions below does not exist, please contact our technical support department at 1-800-685-4298 for additional assistance. Locate the diesel-burner controller’s B-plug and Cplug. Insert the probes of a DC voltmeter into the C -4 (+) and B-2 (-) locations and turn the diesel switch ON. If a voltage reading does not register on the voltmeter, the diesel-burner controller must be replaced. If voltage is present, proceed to the next circuit test. Motor Circuit Test: Condition #1 A battery voltage level between 11.5 to 14.0 volts DC must be present at the diesel-burner controller during all testing. It may be necessary to perform a voltage check to ensure that this condition exists. To perform the voltage check, locate the dieselburner controller’s B-plug, and insert the probes of a DC voltmeter into the B-4 (+) and B-2 (-) locations. Locate the diesel-burner controller’s B-plug and Cplug. Use a jumper wire to make a connection from the C-1 location to the C-7 location. Turn the diesel switch ON and insert the probes of a DC voltmeter into the C-2 (+) and C-5 (-) locations. If no voltage reading registers on the voltmeter, the diesel-burner controller must be replaced. If voltage is present, proceed to the next circuit test. Condition #2 A voltage level of between 11.5 to 14.0 volts must be present at the diesel ON/OFF switch circuit of the diesel-burner controller during all testing. It may be necessary to perform a voltage check to ensure that this condition exists. To perform the voltage check, locate the diesel-burner controller’s B-plug, and insert the probes of a DC voltmeter into the B-1 (+) and B-2 (-) locations. Turn the diesel switch ON and observe the voltage level. Ground Circuit Test: Locate the diesel-burner controller’s B-plug and Cplug. Insert the probes of a DC voltmeter into the B -4 (+) and C-5 (-) locations and turn the diesel switch ON. If a voltage reading does not register on the voltmeter, the diesel-burner controller must be replaced. If voltage is present, proceed to the next circuit test. VDC/VAC Control Thermostat Circuit Test: Be sure to remove the jumper wire that was used to make the connection from the C-1 location to the C-7 location. A failure to do so will result in an overheating condition during normal operation. Ignition Coil Circuit Test: Turn the diesel switch OFF and locate the dieselburner controller’s C-plug. Also, locate the VDC high-limit thermostat and disconnect it’s 2-way male plug from the (white plastic) 6-way female connector. Insert the probes of a DC voltmeter into the C-8 (+) and C-5 (-) locations and turn the diesel switch ON. If a voltage reading does not register on the voltmeter 18-25 seconds after the initial start-up the diesel-burner controller must be replaced. NOTE: Be sure to reconnect the VDC high-limit thermostat’s 2-way male plug to the 6-way female plug. The diesel-burner will not ignite during normal operation if the VDC high-limit thermostat is left disconnected. © 2009 Aqua-Hot® 450-D Hydronic Heating System Service Manual—Rev. A — Page 73 — SECTION 10: DIESEL-BURNER COMPONENTS Be sure to remove the jumper wire that was used to make the connection from the C-1 location to the C-7 location. Failure to do so will result in an overheating condition during normal operation. Replacement Procedure: 1. Remove both the B-plug and the C-plug from the diesel-burner controller. Gently pry away each side of the diesel-burner controller bracket from the diesel-burner controller’s locking posts with a flat-head screw driver. Once the locking posts have been released, pull on the diesel-burner controller to remove it from the diesel-burner head. 2. Slide the new diesel-burner controller into the diesel -burner controller bracket. Push down on the diesel -burner controller until the locking posts snap into the bracket slots. 3. Reconnect the B-plug and the C-plug. NOTE: Be sure to install the diesel-burner controller with it’s C-plug and B-plug ports facing downward. Failure to do so, will result in moisture collecting in the ports and potential damage to the diesel-burner controller’s internal circuitry. Figure 58a Figure 58b © 2009 Aqua-Hot® 450-D Hydronic Heating System Service Manual—Rev. A — Page 74 — SECTION 11: TROUBLESHOOTING IF THE AQUA-HOT IS BLACK SMOKING: 1. Things to check before opening up heater 1. Low Voltage - Fire up generator/plug coach into shore power 2. Damaged or Restricted exhaust pipe - Inspect exhaust pipe for damage 2. Access cover must be removed to check the following: 1. 2. 3. 4. Air Intake Closed off - on the bottom of the burner is the air adjustment, set at the half way point. Broken Protection Cap - Check cap for cracks or missing pieces. Worn OUT Grommets – run hands over grommets, on top and bottom, and feel for excessive air Burner not seated properly or Loose - run hands along the seal of the burner, and check for excessive air 5. Air Intake Sleeve collapsed 3. Diesel Burner must be removed to check the following: 1. 2. 3. 4. Photo Disc Bent or Tight – The photo disc must be loose, so it will seal on the combustion chamber properly Combustion Chamber Warped/Melted – Inspect for signs of warping/melted aluminum. Bad Nozzle - If nozzle is spraying poorly, it must be replaced Fuel Pressure not at 145 PSI – Check fuel pressure with fuel pressure gauge 4. Diesel Burner must be torn down to check the following: 1. Slow Motor (Less Than 4500rpms at 12v) - a slow motor acts the same as low voltage. Check motor rpm with an rpm tester, under full load. 2. Bearings are worn out - Bearings should spin freely, and sound smooth. If they are starting to seize up, they will slow the motor down. 3. Impeller Fan Not Gapped Properly – The impeller needs to be gapped at 3-5 thousands or tighten fan down until it rubs, back it off ¼ turn. © 2009 Aqua-Hot® 450-D Hydronic Heating System Service Manual—Rev. A — Page 75 — SECTION 11: TROUBLESHOOTING IF THE AQUA-HOT IS BLUE/WHITE SMOKING: 1. If The Heater Smokes on Start up/Shut down. a. Fuel solenoid - plunger worn out - plastic/metal in the way of plunger - fuel solenoid intermittent. b. Nozzle Tower - cracked - poorly machined c. Short cycling - control t-stat bad - someone turned heater off/on repeatedly d. Return Fuel Check Valve - heaters manufactured before 2001 NOTE: It is normal for the heater to blue/white smoke for 3-5 seconds on start up and shut down. 2. If The Heater Smokes During The Burn Cycle. a. Electrodes out of adjustment b. Air in the fuel system c. Bad nozzle d. Fuel pressure e. Fuel Pump f. Intermittent Ignition Coil - If the coil doesn’t turn on, the fuel sprays for 20 seconds, before the photo eye shuts the fuel off. © 2009 Aqua-Hot® 450-D Hydronic Heating System Service Manual—Rev. A — Page 76 — SECTION 11: TROUBLESHOOTING IF ONE OF THE AQUA-HOT HEATING ZONES WILL NOT GET HOT: 1. General Problems A. Diesel/Electric not operating (antifreeze cold) B. Heater is Not up to operating Temperature (antifreeze is cold) C. Interior Zone Thermostat Not calling for heat D. Zone Circulation Pump Not Operating E. Heat Exchanger Fans Not Operating E. The Low Temp Cut-Off status light is not illuminated on the Electronic Control Board. G. The Electronic Control Board is wired wrong (i.e.) the fans for the bedroom come on but the pump for the living room comes on. 2. If Fans and Pumps are Running A. Stuck Check Valve B. Kinked Line C. No Antifreeze in system © 2009 Aqua-Hot® 450-D Hydronic Heating System Service Manual—Rev. A — Page 77 — SECTION 11: TROUBLESHOOTING IF THERE IS A LACK OF DOMESTIC HOT WATER: 1: General information 1. The heater is only rated for water flow of 1.5 GPM 2. The heater is only rated for a 55*F temperature Rise on the cold water coming into the unit 3. The diesel burner must be on for continuous hot water, the electric element is for limited use only. 2: Things to test for a lack of hot water problem. 1. Aqua-Hot Heater Bypassed 2. Outside Water Faucet is left on. 3. Washing Machine Valve has gone bad 4. Antifreeze Concentration is incorrect. a. 30%-50% antifreeze concentration 5. Operating Range of the heater (I.E. Control Thermostat) is incorrect a. 155° F - 185° F 6. Water Flow is too fast a. Must be 1.5 GPM or Less. 7. Mixer Valve is stuck (knob does not turn freely) 8. Low Temperature Cut-off Thermostat is not functioning properly a. Needs to trip within 1 – 2 Minutes when running hot water b. Needs to turn the stir pump on, if the diesel burner switch is on as well. 9. Stir Pump is not functioning properly a. Needs to be running when the diesel burner switch is on, and the Low Temperature Cut-Off thermostat is Tripped. b. Hold onto both upper and lower hose to make sure both get hot © 2009 Aqua-Hot® 450-D Hydronic Heating System Service Manual—Rev. A — Page 78 — SECTION 11: TROUBLESHOOTING IF THERE IS ANTIFREEZE LEAKING: NOTE: To find an antifreeze leak, the system must be Hot (up to operating temperature) Or pressurized to 15PSI. Inspect the following components on the Aqua-Hot Heating System for Leaks: 1. On the Front-Side of Aqua-Hot 1. Fluid Level Sensor a. It might be necessary to cut away some of the insulation around the fluid level sensor, to locate the leak. 2. Control Thermostat b. It might be necessary to cut away some of the insulation around the Control Thermostat, to locate the leak. 3. Drain Valve and Hose going to the drain valve 4. Electric element 5. Circulation/Stir pump c. Hoses d. Tank ports - It might be necessary to cut away some of the insulation around the tank ports to locate the leak. e. Pump 6. Burn Chamber Leak a. If Antifreeze is running out of the tip of the exhaust pipe remove the burner, and combustion chamber and inspect inside the burn chamber for leaks. © 2009 Aqua-Hot® 450-D Hydronic Heating System Service Manual—Rev. A — Page 79 — SECTION 11: TROUBLESHOOTING IF THERE IS ANTIFREEZE LEAKING: (CONTINUED) 2. On the Top-Side of Aqua-Hot 1. Expansion Tank Connection a. Cracked expansion tank tubing b. Loose air release valve c. Brass hose barb fitting defective or loose 2. Return Ports A. Defective fitting B. Leaking fitting 3. On the Rear-Side of Aqua-Hot 1. Copper Pipes a. The copper pipes come out of the tank, so they are possible points of antifreeze leaks. Either where the brass fittings go into the tank, or at the copper pipes where they go through the brass fittings. Note: If no leaks are found on the Aqua-Hot, it is possible that there is a leak within the motor home. Check all Heat exchangers, connections, and tubing for leaks. © 2009 Aqua-Hot® 450-D Hydronic Heating System Service Manual—Rev. A — Page 80 — APPENDIX A: WIRING DIAGRAM © 2009 Aqua-Hot® 450-D Hydronic Heating System Service Manual—Rev. A — Page 81 — APPENDIX B: WIRE GAUGE INFORMATION Because all Aqua-Hot heating systems are designed to operate only when there is an adequate supply of DC (Direct Current) voltage, it is imperative that the proper wire gauge be determined and used for the DC power supply and ground wires. This bulletin addresses how to determine the DC amperage draw of the heating system, including heat exchangers, then, how to determine the proper wire gauge based upon those findings for a specific application. Determining the DC Amperage Draw of the Heating System: 1. Review the chart below for the amperage draw of each Aqua-Hot heater (excludes heat exchangers). 2. Determine the number of heat exchangers installed with the Aqua-Hot Heating System. NOTE: Each heating zone ―FAN‖ circuit can supply up to 2.0 amps of direct current. 3. Consult the heat exchanger’s manufacturer for amp-draw information. NOTE: Each Aqua-Hot Cozy heat exchanger draws .23 amps of direct current. Each Aqua-Hot Whisper heat exchanger draws .38 amps of direct current. 4. Determine the total amperage draw for all heat exchangers installed. For example, if six Aqua-Hot Cozy heat exchangers have been installed, multiply the amperage draw of each heat exchanger (.23 amps) by the number of heat exchangers (6). The total amperage draw in this scenario would be 1.38 amps. 5. Add the total heat exchanger amperage draw to the amperage of the installed Aqua-Hot. © 2009 Aqua-Hot® 450-D Hydronic Heating System Service Manual—Rev. A — Page 82 — APPENDIX B: WIRE GAUGE INFORMATION For example, an Aqua-Hot 600-D with six Aqua-Hot Cozy heat exchangers has a total amperage draw of 23.38 amps. Determining the Proper Wire Gauge: 1. Measure the total length of the wire required for the distance between the vehicle’s battery and the electronic controller for Aqua-Hot models 450-DE, 450-DM, 525-D, 600-D, and 675-D and the heater itself for the Aqua-Hot 375-D model. 2. Using the determined length and total amperage draw, consult the wire gauge chart included in this bulletin. Round up to the closest amp draw listed on the left, then round up to the closest length at the top of the chart. For example, an Aqua-Hot 600-D heater with six Aqua-Hot Cozy heat exchangers with the electronic controller placed 15 feet from the vehicle’s battery would require an 8-gauge wire. Wire Gauge Chart: © 2009 Aqua-Hot® 450-D Hydronic Heating System Service Manual—Rev. A — Page 83 — APPENDIX C: FUEL PRESSURE CHECK AND ADJUSTMENT Instructions for Checking Fuel Pressure NOTE: A fuel pressure gauge is used to properly check the fuel pump’s pressure setting. The fuel pump is preset to 145 PSI. Perform the following procedures to check for a proper fuel pressure setting. NOTE: In order to perform the following procedure it is necessary to detach and reattach the diesel-burner head. Be sure to review the detaching/attaching instructions. Step 1: Remove the diesel-burner Figure C1 1. Refer to the section on detaching/reattaching the diesel burner, to detach the diesel burner. Step 2: Install fuel line bypass fittings onto the diesel burner. Figure C2 1/4‖ Fuel Tube unions 1. Locate the 1/4 ― fuel tube unions on the bottom side of diesel burner. © 2009 Aqua-Hot® 450-D Hydronic Heating System Service Manual—Rev. A — Page 84 — APPENDIX C: FUEL PRESSURE CHECK AND ADJUSTMENT Instructions for Checking Fuel Pressure Step 2: Install fuel line bypass fittings onto the diesel burner. (continued) Figure C3 2. Using a 13mm and a 9/16‖ wrench remove Steel Fuel lines from the diesel Burner Figure C4 3. Using a 13mm and a 9/16‖ wrench install the fuel bypass fittings onto the diesel Burner © 2009 Aqua-Hot® 450-D Hydronic Heating System Service Manual—Rev. A — Page 85 — APPENDIX C: FUEL PRESSURE CHECK AND ADJUSTMENT Instructions for Checking Fuel Pressure Step 3: Installing the fuel pressure gauge Figure C5 1. Using a 5/8‖ and a 3/4‖ wrench remove the fuel nozzle. Figure C6 2. Using a 5/8‖ and a 3/4‖ wrench install the fuel pressure gauge. © 2009 Aqua-Hot® 450-D Hydronic Heating System Service Manual—Rev. A — Page 86 — APPENDIX C: FUEL PRESSURE CHECK AND ADJUSTMENT Instructions for Checking Fuel Pressure Step 3: Running the burner off of an external fuel source Figure C7 1. Using an external fuel source and rubber fuel line, hook the Webasto burner supply and return fuel lines up to run off of the external fuel source. WARNING! A spark will appear across the ignition electrodes for a brief moment after the diesel burner has been activated. DO NOT attempt to make any fuel pressure adjustments until the spark has disappeared. Failure to do so may result in serious bodily injury. In some installations it may be necessary to shine a light on the flame sensor to simulate a flame condition to shot of the ignition coil. Figure C8 2. Turn the diesel burner switch to the on position. A pressure will register on the fuel pressure gauge once the fuel solenoid opens (after approx. 10-20 seconds. © 2009 Aqua-Hot® 450-D Hydronic Heating System Service Manual—Rev. A — Page 87 — APPENDIX C: FUEL PRESSURE CHECK AND ADJUSTMENT Instructions for Adjusting Fuel Pressure Step 1: Follow the directions for Checking the Fuel Pressure in this section. Figure C9 1. Using an external fuel source and rubber fuel line, hook the Webasto burner supply and return fuel lines up to run off of the external fuel source. WARNING! A spark will appear across the ignition electrodes for a brief moment after the diesel burner has been activated. DO NOT attempt to make any fuel pressure adjustments until the spark has disappeared. Failure to do so may result in serious bodily injury. In some installations it may be necessary to shine a light on the flame sensor to simulate a flame condition to shot of the ignition coil. Figure C10 2. Turn the diesel burner switch to the on position. A pressure will register on the fuel pressure gauge once the fuel solenoid opens (after approx. 10-20 seconds. © 2009 Aqua-Hot® 450-D Hydronic Heating System Service Manual—Rev. A — Page 88 — APPENDIX C: FUEL PRESSURE CHECK AND ADJUSTMENT Instructions for Adjusting Fuel Pressure Step 2: Adjust the Fuel pressure to 145 PSI. Figure C11 1. Once the fuel solenoid has been activated, and the fuel pressure gauge is registering a pressure, the fuel pressure can be adjusted. To increase the fuel pressure turn the pressure adjustment screw clockwise, and to reduce the fuel pressure, turn the pressure adjustment screw counter clockwise. NOTE: If the fuel pressure cannot be adjusted refer to the fuel pump section in section ? Of this manual for troubleshooting tips. © 2009 Aqua-Hot® 450-D Hydronic Heating System Service Manual—Rev. A — Page 89 — APPENDIX D: EXTREME COLD WEATHER OPERATION Diesel-Burner When storing the Motor home: Not winterizing the AquaHot when freezing temperatures are present will result in serious damage to the Aqua-Hot’s Domestic Water Heating System. Also, be sure to use an FDA approved, “GRAS” rated antifreeze for winterization. 1. If the Diesel burner Fails to operate: NOTE: The Aqua-Hot can continue to be used for interior zone heating once the domestic water heating system has been drained and winterized. A. Is the Diesel Fuel in the motor home winter fuel or summer fuel? B. Is the Diesel Fuel liquid or Jelled? C. Are the electrodes properly adjusted? D. When was the last time an Annual Service was performed? 120 Volt-A.C. Electric Heating Element Please note that the 120 Volt-AC Electric Heating Element is the Aqua-Hot’s secondary heat source for heating both the interior and/or the domestic hot water during low heating demand situations (such as when moderate ambient temperatures exist and/or when there is a low demand for domestic hot water). If the 120 Volt-AC Electric Heating Element is not providing enough heat, turn the Diesel-Burner on, in conjunction with the 120 Volt-AC Electric Heating Element. Figure D1 © 2009 Aqua-Hot® 450-D Hydronic Heating System Service Manual—Rev. A — Page 90 — APPENDIX D: EXTREME COLD WEATHER OPERATION If there is a lack of interior Heat: Note: The 120 Volt-AC Electric Heating Element is the Aqua-Hot’s secondary heat source for heating both the interior and/or the domestic hot water during low heating demand situations (such as when moderate ambient temperatures exist and/or when there is a low demand for domestic hot water). If the ambient temperature is ex- 1. Is the Diesel Burner activated? 2. Is the Diesel Burner operating Properly? 3. What is the antifreeze concentration, inside of the Aqua-Hot Boiler Tank? 4. Was the heating system properly installed, following the 450D installation manual? Figure D2 A. Are there at least 5 heat exchangers installed in the Interior of the motor home? B. Are there cold air returns installed for every heat exchanger? Reference Figure ?? C. Are the heat exchangers mounted as close to the hot air outlet grill as possible? Reference Figure ??. Figure D3 © 2009 Aqua-Hot® 450-D Hydronic Heating System Service Manual—Rev. A — Page 91 — APPENDIX E: AQUA-HOT MAINTENANCE Monthly Maintenance: Annual Maintenance: Check the antifreeze and water heating solution to ensure that it is at the proper level by visually checking the solution level in the expansion tank. The level of the antifreeze and water heating solution within the expansion tank should only be checked when the Aqua-Hot is at maximum operating temperature. If additional antifreeze and water heating solution is required, fill the expansion tank to the ―HOT‖ level mark. Be sure to reference Section 2 of this manual to ensure that the proper type of antifreeze is selected and mixed with highquality water at the correct mixture ratio. Additionally, it is recommended that the diesel-burner be fired and allowed to run monthly to keep it in good working order. FAILURE TO DISCONNECT ALL POWER SUPPLIES AND/OR TO ALLOW THE HEATER TO COOL BEFORE SERVICING COULD CAUSE SERIOUS DAMAGE OR PERSONAL INJURY. To keep the Aqua-Hot running smoothly, it is recommended to have the diesel-burner tuned up annually. A tune-up should consist of a new fuel nozzle and fuel filter, along with a thorough cleaning of the combustion chamber. To ensure maximum diesel-burner performance, always use the recommended fuel nozzle and fuel filter when replacing these parts. NOTE: Be sure to use care when handling the fuel nozzle. Oils and/or small dust or dirt particles from the hands may plug the nozzle’s small orifice. A partially plugged orifice will restrict fuel flow, which will affect the combustion process of the dieselburner. Figure E1 © 2009 Aqua-Hot® 450-D Hydronic Heating System Service Manual—Rev. A — Page 92 — APPENDIX E: AQUA-HOT MAINTENANCE Aqua-Hot Maintenance Procedure: Note: Before performing an annual maintenance, it is recommended to test run the Diesel-Burner. While testing inspect exhaust for smoke. Step 1: Test Run the Diesel Burner 1. Turn the Diesel-Burner Switch to the on position. 2. After the Diesel-Burner has ignited, inspect the exhaust for smoke. 3. Shut the Diesel-Burner off, and wait for unit to completely shut off. NOTE: The diesel-burner can either be shut off by: 1. Turning the Diesel Burner switch to the off position. 2. Disconnecting the control thermostat wires 3. Unplugging the diesel burner controller. Reference Figure E3 Step 2: Replace the Fuel Filter 1. Locate Fuel Filter. 2. Using hose pinch off pliers, clamp off both fuel lines going to the fuel filter. Reference figure E2. 3. Replace fuel filter, with proper replacement canister. NOTE: It is recommended that the replacement fuel filter be filled with clean diesel fuel, prior to installation 4. Remove hose pinch off pliers. Step 3: Run the Diesel Burner 1. Turn the Diesel-Burner Switch to the on position. 2. After the Diesel-Burner has ignited, let it burn for 1 - 2 minutes to purge the old fuel out of the nozzle holder, to prevent contamination of the replacement nozzle. 3. Shut the Diesel-Burner off, and wait for unit to completely shut off. NOTE: The diesel-burner can either be shut off by: 1. Turning the Diesel Burner switch to the off position. 2. Disconnecting the control thermostat wires 3. Unplugging the diesel burner controller. Reference Figure E3 Thermostat Connector Figure E3 Figure E2 Diesel Burner Controller Plugs © 2009 Aqua-Hot® 450-D Hydronic Heating System Service Manual—Rev. A — Page 93 — APPENDIX E: AQUA-HOT MAINTENANCE Aqua-Hot Maintenance Procedure: Step 4: Remove The Diesel Burner CAUTION! Be sure to clamp off the Fuel Supply and Return lines at the ports on top of the Aqua-Hot prior to beginning this replacement procedure. Figure E4a Figure E4b 1. Locate the Diesel-Burner’s Controller and disconnect both plugs. Figure E4c 2. Using an 7/16 wrench, loosen the nuts securing each fuel line to the Aqua-Hot. Figure E4d 3. The Diesel-Burner is secured to the Aqua-Hot with two nuts that can be loosened, and swung out of the way by using a 10mm socket wrench with a 10 inch long extension. © 2009 Aqua-Hot® 450-D Hydronic Heating System Service Manual—Rev. A — Page 94 — APPENDIX E: AQUA-HOT MAINTENANCE Aqua-Hot Maintenance Procedure: Step 4: Remove The Diesel Burner (continued) Figure E4e Diesel Burner’s white Thermostat Plug 4. Carefully pull the Diesel-Burner away from the Aqua-Hot 4 to 5 inches before rotating the burner, and then remove. NOTE: To remove the diesel burner, it may be necessary to disconnect the control and hi limit thermostats from the diesel-burner’s white thermostat plug. © 2009 Aqua-Hot® 450-D Hydronic Heating System Service Manual—Rev. A — Page 95 — APPENDIX E: AQUA-HOT MAINTENANCE Step 5: Clean and Inspect the Combustion Chamber and Heat Transfer Tabs. Use caution when handling the combustion chamber, it may be extremely hot, and serious burns could result from touching a hot combustion chamber. Heat Transfer Tabs Figure E5a Figure E5b 1. Remove the combustion chamber by pulling it straight out, approximately 16 inches. 2. Once the combustion chamber has been removed. Use a long handled wire brush, and brush the heat transfer tabs, to loosen soot deposits. Failure to do so will reduce the Aqua-Hot’s heat transfer capabilities. NOTE: If the heat transfer tabs are excessively sooty, it may be necessary to vacuum the soot out of the heat transfer tabs. If there is a minimal amount of soot, it may be left in the heat transfer tabs, and will be evacuated out the exhaust pipe, upon start up of diesel burner. © 2009 Aqua-Hot® 450-D Hydronic Heating System Service Manual—Rev. A — Page 96 — APPENDIX E: AQUA-HOT MAINTENANCE Step 5: Clean and Inspect the Combustion Chamber and Heat Transfer Tabs. Figure E5c Seam on stainless steel tube Back side of Air Swirler Outer ring that the photo disc seats against 3. Inspect the combustion chamber for damage or signs of warping. 1. Inspect the combustion chamber for cracks appearing along the seam of the stainless steel tube. A. If the crack is over 1‖ in length, the combustion chamber must be replaced. 2. Inspect the aluminum Air Swirler for signs of warping. If any part of the Air Swirler is warped the combustion chamber must be replace. A. Inspect the outer ring that the photo disc seats against for signs of warping. B. Inspect the back side of the Air Swirler for signs of warping between screws. © 2009 Aqua-Hot® 450-D Hydronic Heating System Service Manual—Rev. A — Page 97 — APPENDIX E: AQUA-HOT MAINTENANCE Step 6: Reinstall the Combustion Chamber CAUTION! Failure to reinstall the combustion chamber will result in serious damage to the diesel burner. Figure E6 Seam on stainless steel tube 1. Reinstall the combustion chamber into the Aqua-Hot. Please note: the seam on the stainless steel tube must be in the ―up‖ position. Failure to do so could result in premature failure of the combustion chamber. © 2009 Aqua-Hot® 450-D Hydronic Heating System Service Manual—Rev. A — Page 98 — APPENDIX E: AQUA-HOT MAINTENANCE Step 7: Inspect Diesel-Burner Figure E7 Electrode Fuel Nozzle Fuel Pump Grommet Photo Disc Ear Flame Sensor Inspect the following: 1. Electrodes - damaged - improperly adjusted 2. Fuel Pump - leaks 3. Photo disc - warped - bent 4. Harness & Ignition Coil Wires - crack or bare wires - Hard or brittle wires 5. Flame Sensor - cracked - overheated (purple color) - melted wires - dirty 6. Rubber Grommets - hard/brittle - rubber has been cut out - right/left 7. Broken or cracked ―Ears‖ - due to over tightening of eyebolts. © 2009 Aqua-Hot® 450-D Hydronic Heating System Service Manual—Rev. A — Page 99 — APPENDIX E: AQUA-HOT MAINTENANCE Step 8: Clean Ignition Electrodes and Flame Sensor Electrode Tips Figure E8 Flame Sensor 1. Ignition electrodes A. Polish away any carbon deposits that may have baked onto the metal tips of the ignition electrodes with a course sponge. 2. Flame Sensor A. For light dirt, dust, and/or carbon deposits, simply wipe off the flame sensor with a soft cloth. B. Should heavy carbon deposits be present, completely remove the flame sensor from the photo disc and clean with brake cleaner. © 2009 Aqua-Hot® 450-D Hydronic Heating System Service Manual—Rev. A — Page 100 — APPENDIX E: AQUA-HOT MAINTENANCE Step 9: Replace The Fuel Nozzle Figure E9 1. Use a 3/4 in. wrench to hold the fuel nozzle manifold hex, while loosening the fuel nozzle with a 5/8 in. wrench and remove. NOTE: Be sure to use care when handling the new fuel nozzle. Oils and/or small dust or dirt particles from your hands may plug the nozzle’s small orifice. A partially plugged orifice will restrict fuel flow, which will affect the combustion process of the diesel-burner. 2. When replacing the fuel nozzle, be sure to tighten the nozzle, loosen it a 1/4 turn, and then firmly retighten. This will establish a seated fit and avoid any leaks. Be sure to reattach the diesel-burner head prior to switching the heater ON. Failure to do so may result in ignition of the diesel-burner and serious bodily injury. © 2009 Aqua-Hot® 450-D Hydronic Heating System Service Manual—Rev. A — Page 101 — APPENDIX E: AQUA-HOT MAINTENANCE Step 10: Adjust Ignition Electrodes Figure E10 1. Using a 10mm socket, slightly loosen the retaining clamp bolt. 2. Place the electrode adjustment gauge on the nozzle manifold hex and insert the metal tips of the ignition electrodes into the appropriate notches of the electrode adjustment gauge. 3. Using a 10 mm socket, tighten the retaining clamp bolt. NOTE: Be sure not to over-tighten the retaining clamp bolt when readjusting the ignition electrodes. Over-tightening the retaining clamp bolt will bend the retaining clamp and prevent the photo disc from floating freely. Not allowing the photo disc to float freely will cause poor combustion and result in a smoky exhaust. A bent retaining clamp can be re-straightened with a punch and hammer. Lay the clamp’s beveled side down on a solid flat surface and align the thick end of the punch at dead center. Tap the punch lightly until the retaining clamp returns to proper form. 4. Remove the electrode adjustment gauge. © 2009 Aqua-Hot® 450-D Hydronic Heating System Service Manual—Rev. A — Page 102 — APPENDIX E: AQUA-HOT MAINTENANCE Step 11: Inspect Photo Disc Figure E11 Photo Disc 1. If the photo disc is not free floating, the electrode clamp bolt has been over-tightened, and has bent the electrode clamp. Using a 10mm socket remove the electrode clamp, and re-straighten. -Lay the clamp’s beveled side down on a solid flat surface and align the thick end of the punch at dead center. Tap the punch lightly until the retaining clamp returns to proper form. Step 12: Re-Install Diesel Burner Figure E12a Figure E12b NOTE: When reinstalling the diesel burner be careful not to damage the photo disc or bend the electrodes. Also, be careful to not pinch any wires between the burner and the Aqua-Hot Tank. 1. Align the Diesel-Burner with the Aqua-Hot, using the alignment tabs welded on the Aqua-Hot. 2. Swing the Eye Bolts around the “Ears” on the diesel burner and securely tighten, using a 10mm socket with a 10 inch long extension. Use extreme caution when tightening down the eye-bolt nuts, over tightening of the eye-bolt nuts can cause the aluminum blower casing to crack. (Torque Specifications = Approximately 20-40 in. lbs.) © 2009 Aqua-Hot® 450-D Hydronic Heating System Service Manual—Rev. A — Page 103 — APPENDIX E: AQUA-HOT MAINTENANCE Step 13: Reconnect the Fuel Lines Figure E13a Figure E13b 1. Align the fuel lines on the diesel burner with the fittings on the Aqua-Hot, and using a 7/16 inch wrench, tighten down both the supply and return fuel fittings. CAUTION! Be sure to remove the clamps, off of the Fuel Supply and Return lines at the ports on top of the Aqua-Hot prior to starting the diesel burner, or serious damage will occur to the diesel-burner’s fuel pump. Step 14: Plug in the diesel-burner’s controller and mount Figure E14a Figure E14b 1. Locate the Diesel-Burner’s Controller and connect both plugs. NOTE: The Diesel Burner’s Controller might have to be mounted onto the side of the diesel burner, before the plugs are inserted into the control unit, otherwise it might not be possible to mount the control unit. © 2009 Aqua-Hot® 450-D Hydronic Heating System Service Manual—Rev. A — Page 104 — APPENDIX E: AQUA-HOT MAINTENANCE Step 15: Re-Install the Aqua-Hot Access Cover NOTE: The access cover must be installed prior to operation as a safety switch exists, which will prevent the Aqua-Hot from operating whenever the access cover is not properly installed. Figure E15a Figure E15b 1. Reinstall the Aqua-Hot’s access cover . 2. Securely tighten the three bolts securing the access cover in place. Step 15: Test for Normal Operation A. Turn the Diesel-Burner switch on, and let the diesel burner run for a complete cycle, until it shuts off on it’s own.. B. After the Diesel-Burner has shut off, turn on the interior heat/run hot water, until the Diesel Burner cycles back on. When the diesel burner cycles back on, check the exhaust for signs of smoke. © 2009 Aqua-Hot® 450-D Hydronic Heating System Service Manual—Rev. A — Page 105 — APPENDIX F: WINTERIZATION PROCCESS Not winterizing the Aqua-Hot when freezing temperatures are present will result in serious damage to the Aqua-Hot’s Domestic Water Heating System. Also, be sure to use an FDA approved, “GRAS” rated antifreeze for winterization. NOTE: The Aqua-Hot can continue to be used for interior zone heating once the domestic water heating system has been drained and winterized. The Aqua-Hot’s Domestic Water Heating System must be completely drained of domestic water, and properly winterized any time the heater is stored where freezing temperatures may be experienced. Winterizing the Domestic Water Heating System: Please follow these instructions when winterizing the AquaHot’s Domestic Water Heating System; reference Figure F1: Completely drain the fresh water storage tank. 2. Disconnect the domestic water demand pump’s suction line from the fresh water storage tank. 3. Attach an adequate piece of hose onto the suction side of the domestic water demand pump. 4. Place the opposite end of the hose into an adequate supply of FDA-approved ―GRAS‖ RV Antifreeze, and turn on the demand water pump. Open and close all interior and exterior water faucets, one at a time, until only pure RV Antifreeze is present. Perform this procedure for both the hot and cold faucets. 6. Turn off Demand Water pump and remove the hose and reconnect the domestic water demand pump’s suction line to the fresh water storage tank. An FDA approved ―GRAS‖ rated winterization antifreeze must be used. YOU CANNOT BLOW DOMESTIC WATER COIL OUT WITH AIR TO WINTERIZE AQUA-HOT. De-Winterizing the Domestic Water Heating System: For de-winterization, completely fill the fresh water storage tank. Turn on demand water pump and open and close all interior and exterior water faucets, one at a time, until only clear water is present/visible. Reference Figure F1. If disinfecting the potable water system after de-winterizing, be sure to follow RVIA’s ―Instructions for Disinfection of Potable Water Systems on Recreation Vehicles.‖ These instructions can be obtained by contacting the Recreational Vehicle Industry Association at (703) 620-6003, visiting them online at www.rvia.com, or writing to them at the following address: Recreation Vehicle Industry Association 1896 Preston White Drive P.O. Box 2999 Reston, VA 20195-0999 Figure F1 1. 5. © 2009 Aqua-Hot® 450-D Hydronic Heating System Service Manual—Rev. A — Page 106 — APPENDIX G: FILLING/DRAINING Only propylene glycol based “boiler” type antifreeze deemed “GRAS” (Generally Recognized as Safe) by the FDA shall be used in the Aqua-Hot’s hydronic heating system. Failure to use the above specified antifreeze type could result in serious injury or death. Ensure that the overflow tube is connected from the AquaHot’s expansion tank connection to the expansion tank’s bottom connection and from the expansion tank’s top connection through the overflow tube hole in the motor home’s bay floor prior to beginning this antifreeze and water heating solution fill procedure. Failure to do so could result in an antifreeze spill in the motor home’s bay. Reference Figure 30. Filling The Aqua-Hot Heating System with Boiler Antifreeze: In order to provide the best freeze protection, boil-over protection, and anti-corrosion and rust protection, a 50/50 mixture of ―GRAS‖ approved propylene glycol boiler antifreeze and water is recommended. THE AQUA-HOT WITH HEATING SOLUTION If assistance is needed in selecting an appropriate antifreeze, please contact the Aqua-Hot Heating Systems Product Application Department at 1-800-685-4298. NOTE: To Fill the Aqua-Hot it is recommended to use a fluid transfer pump, and pump the antifreeze into the Boiler Tank, thru the drain valve on the Aqua-Hot. 1. Open the Aqua-Hot’s drain valve located at the front of the heater. Reference Figure G1. 2. Connect a piece of 1/2 inch PEX-type tubing to the drain valve. This piece should be long enough to trans port the antifreeze and water heating solution from its source to the Aqua-Hot. 3. Connect the other end of the 1/2 inch PEX-type tubing to the fluid transfer pump. 4. Turn the fluid transfer pump on, and fill the Aqua-Hot completely with the 50/50 mixture of antifreeze and water heating solution. This will take approximately five gallons; look for the solution to enter the overflow tube attached to the expansion tank connection on top of the Aqua-Hot. Reference Section 1: Antifreeze and Water Heating Solution for additional information regarding the antifreeze and water heating solution. Be sure to use a ―GRAS‖ boiler-type propylene glycol based antifreeze rather than an RV and Marine antifreeze or an automotive antifreeze/coolant. Figure G1 Drain Valve © 2009 Aqua-Hot® 450-D Hydronic Heating System Service Manual—Rev. A — Page 107 — APPENDIX G: FILLING/DRAINING 5. 6. When refilling, open the air-release valve located on the expansion tank connection to release air pockets. Reference Figure G2. Hold the valve open until all air is released. Be sure the valve is closed when finished by hand-tightening. Look for the solution to enter the overflow tube attached to the expansion tank connection on top of the Aqua-Hot. Close the drain valve. Purging the System by Grounding the Zone Circulation Pump: 1. Ensure that the boiler tank has been filled with the appropriate 50/50 mixture of antifreeze and water heating solution. 2. Locate the heating zone circulation pumps. Reference Figure G2. 3. Take the circulation pump’s blue (negative) wire and disconnect it from the connector of the opposing wire. Reference Figure G3. 4. Connect an alligator clip to the spade terminal on the circulation pump’s blue (negative) wire and clip the opposite end of the cable to a ground source. Figure G2 THE AQUA-HOT WITH HEATING SOLUTION NOTE: The circulation pump will activate as soon as the pump is connected to a ground source; therefore, disconnect the alligator clip from the ground source during the antifreeze and water heating solution filling procedure. 5. Allow the circulation pump to operate for approximately 1-3 minutes in order to purge the corresponding heating loop, then remove the alligator clip from the ground source. 6. Open the drain valve and completely fill the AquaHot’s boiler tank with additional antifreeze and water heating solution. 7. Repeat steps 5 and 6 for both heating loops until all air has been completely bled from the entire heating system. NOTE: All air is bled from the heating system when both plumbing lines are free of air. 8. Once the systems have been purged, disconnect the alligator clips from the ground source and the circulation pump’s wires. Reconnect the pump’s wires as originally configured. Reference Figure G3. 9. Check the Aqua-Hot’s expansion tank and top it off to the cold level mark with the 50/50 antifreeze and water mixture, if necessary. 10. Ensure that each circulation pump’s wiring has been returned to its original configuration. Reference Figure G3. Pump 1 Pump 2 — Page 108 — © 2009 Aqua-Hot® 450-D Hydronic Heating System Service Manual—Rev. A — Page 108 — APPENDIX G: FILLING/DRAINING THE AQUA-HOT WITH HEATING SOLUTION Figure G3 Zone 1 Circulation Pump Zone 2 Circulation Pump © 2009 Aqua-Hot® 450-D Hydronic Heating System Service Manual—Rev. A — Page 109 — APPENDIX G: FILLING/DRAINING Only propylene glycol based “boiler” type antifreeze deemed “GRAS” (Generally Recognized as Safe) by the FDA shall be used in the Aqua-Hot’s Hydronic heating system. Failure to use the above specified antifreeze type could result in serious injury or death. Ensure that the overflow tube is connected from the AquaHot’s expansion tank connection to the expansion tank’s bottom connection and from the expansion tank’s top connection through the overflow tube hole in the motor home’s bay floor prior to beginning this antifreeze and water heating solution fill procedure. Failure to do so could result in an antifreeze spill in the motor home’s bay. Reference Figure 30. In order to provide the best freeze protection, boil-over protection, and anti-corrosion and rust protection, a 50/50 mixture of ―GRAS‖ approved propylene glycol boiler antifreeze and water is recommended. THE AQUA-HOT WITH HEATING SOLUTION If assistance is needed in selecting an appropriate antifreeze, please contact the Aqua-Hot Heating Systems Product Application Department at 1-800-685-4298. TO DRAIN THE AQUA-HOT 1. Connect a piece of 1/2 inch PEX-type tubing or rubber hose to the drain valve. This piece should be long enough to transport the antifreeze and water heating solution from the Aqua-hot to a bucket. 2. Open the Aqua-Hot’s drain valve located at the front of the heater. Reference Figure G4. Note: The Aqua-Hot 450 holds approximately 5 gallons of the antifreeze and water heating solution. Reference Section 1: Antifreeze and Water Heating Solution for additional information regarding the antifreeze and water heating solution. Be sure to use a ―GRAS‖ boiler-type propylene glycol based antifreeze rather than an RV and Marine antifreeze or an automotive antifreeze/coolant. Figure G4 Drain Valve © 2009 Aqua-Hot® 450-D Hydronic Heating System Service Manual—Rev. A — Page 110 — © 2009 Aqua-Hot® 450-D Hydronic Heating System Service Manual—Rev. A — Page 111 — SERVICE MANUAL 15549 East Highway 52 | Fort Lupton, CO 80621 Toll free: 800.685.4298 | phone: 303.659.8221 | fax:303.857.7881 www.aquahot.com