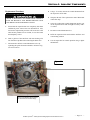
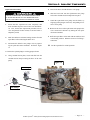
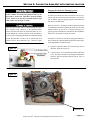
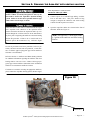
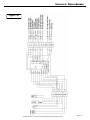
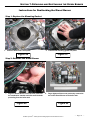
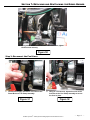
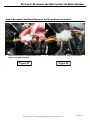
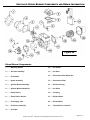
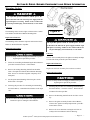
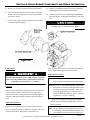
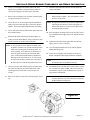
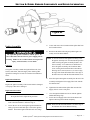
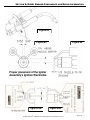
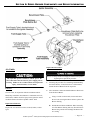
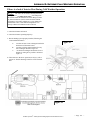
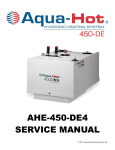
1
SERVICE MANUAL AHE-375-D02 © 2009 Aqua-Hot Heating Systems Inc. Table of Contents General Information Danger, Warning, Caution, and Note Box Definitions ................................................... Page 6 Section 1: Introduction To The Aqua-Hot 375D Technical Information ................................................................................................... Page 7 I.D. Label Sample ........................................................................................................ Page 8 Aqua-Hot Heater Overview........................................................................................... Page 9-11 Aqua-Hot Operational Flow-Chart ................................................................................ Page 12 Antifreeze and Water Heating Solution……………………………………………………..Page 13-14 Section 2: Interior Switch Panel Diesel-Burner Switch .................................................................................................... Page 15 Electric Element Switch ................................................................................................ Page 15 Switch Panel Wiring Schematic .................................................................................... Page 16 Section 3: Exhaust System Exhaust System Requirements .................................................................................... Page 17 Section 4: Aqua-Hot Components Interlock Switch ............................................................................................................ Page 18 Float Switch .................................................................................................................. Page 19 Diesel Burner Control Thermostat ................................................................................ Page 20-21 Electric Element Control Thermostat ............................................................................ Page 22-23 Electric Element High Limit Thermostat ....................................................................... Page 24 Diesel Burner High Limit Thermostat (Left) .................................................................. Page 25 Diesel Burner High Limit Thermostat (Right) ................................................................ Page 26 Low Temperature Cutoff Thermostat ............................................................................ Page 27-28 Interior Heating Zone Check Valve............................................................................... Page 28-29 Domestic Water Tempering Valve ................................................................................ Page 30-31 Interior Heating Zone Circulation Pumps 1 & 2 ............................................................ Page 31-32 Stir Pump (Circulation Pump #2) .................................................................................. Page 33 Electric Heating Element .............................................................................................. Page 34-35 Electric Heating Element A.C. Relay ............................................................................ Page 36-37 Interior Heating Zone Relay.......................................................................................... Page 38 Section 5: Filling/Draining The Aqua-Hot 375D With Heating Solution Filling the Aqua-Hot.…………………………………………………………………………..Page 39-41 Draining The Aqua-Hot………………………………………………………………………..Page 42 © 2009 Aqua-Hot® 375D Hydronic Heating System Service Manual—Rev. A Table of Contents Section 6: Diesel-Burner General Recommended Maintenance .......................................................................... Page 43 General Component Overview ..................................................................................... Page 44 Diesel-Burner Operational Overview ............................................................................ Page 45-46 I.D. Label Sample ......................................................................................................... Page 47 Controller Plug.............................................................................................................. Page 48 Wiring Schematic ......................................................................................................... Page 49 Controller Wiring Schematic…………………………………………………………………Page 50-51 Section 7: Detaching and Reattaching the Diesel-Burner Detaching the Diesel-Burner ........................................................................................ Page 52-55 Reattaching the Diesel-Burner...…………………………………………………………….Page 56-59 Section 8: Diesel-Burner Components and Repair Information Diesel-Burner Component Overview ............................................................................ Page 60 Mounting Gasket .......................................................................................................... Page 61 Air-Tube Assembly ....................................................................................................... Page 61-62 Fuel Nozzle .................................................................................................................. Page 62-63 Igniter Assembly ........................................................................................................... Page 64 Ignition Electrode Adjustment and Cleaning ................................................................. Page 65-66 Ignition Module Assembly ............................................................................................ Page 67 Igniter Gasket Kit .......................................................................................................... Page 68-69 Flame Sensor and Flame Sensor Socket ..................................................................... Page 70-71 Fuel-Supply Tube Assembly......................................................................................... Page 72 Fuel Pump Assembly ................................................................................................... Page 72-74 Cord-Set ....................................................................................................................... Page 75-76 Air Shutter .................................................................................................................... Page 76-77 Air Band ....................................................................................................................... Page 78-79 Escutcheon Plate Spline Nut ........................................................................................ Page 80 Escutcheon Plate ......................................................................................................... Page 81 Air Guide ...................................................................................................................... Page 82-83 Coupling ....................................................................................................................... Page 84 Blower Wheel ............................................................................................................... Page 85 Blower Motor ................................................................................................................ Page 86-89 Diesel-Burner Controller ............................................................................................... Page 90 Section 9: Switch Panel Blinking Fault Indicator Light Diesel-Burner Fault Codes ........................................................................................... Page 91-92 © 2009 Aqua-Hot® 375D Hydronic Heating System Service Manual—Rev. A Table of Contents Section 10: Troubleshooting The Diesel-Burner switch has been turned on; however, the diesel-burner fails to operate ..................................................................................................................... Page 93 The Diesel-Burner switch has been turned on and the diesel-burner’s Blower Motor has begun to operate; however, the diesel-burner does not ignite ............................... Page 94 The Diesel-Burner switch has been turned on; however, multiple attempts are required before the diesel-burner will ignite .................................................................. Page 94 The Aqua-Hot’s exhaust system sputters while the diesel-burner is operating............. Page 94 The Aqua-Hot’s exhaust system produces white smoke after ignition .......................... Page 94 The Aqua-Hot’s exhaust system produced black smoke after ignition ......................... Page 94 The Aqua-Hot is operating, but an interior and/or fresh water tank heating zone is not working….…………………………………………………………..……………………..Page 95 The Aqua-Hot is at operating temperature; however, the interior and/or fresh water tank heat exchanger fans are not operating ....................................................... Page 95 The Aqua-Hot is operating, but the domestic hot water system is not producing hot water ...................................................................................................................... Page 95 The Electric Element switch has been turned on; however, the Aqua-Hot’s 120 Volt-AC electric heating element does not operate ............................................... Page 96 Appendix A: Wiring Diagram .............................................................................................. Page 97 Appendix B: Wire Gauge Chart ........................................................................................... Page 98 Appendix C: Winterization Process.................................................................................... Page 99 Appendix D: Extreme Cold Weather Operation ......................................................Page 100 - 101 Appendix A: Annual Maintenence .............................................................................Page 102-111 © 2009 Aqua-Hot® 375D Hydronic Heating System Service Manual—Rev. A GENERAL INFORMATION: This manual is designed to aid trained and qualified service technicians with the process of troubleshooting and servicing the Aqua-Hot 375D Hydronic Heating System. The Aqua-Hot features a 12 Volt-DC powered Diesel-Burner and a 120 Volt-AC, 1500-Watt Electric Heating Element. These two heating sources are used in conjunction with an FDA approved “GRAS” (Generally Recognized as Safe) propylene glycol based boiler antifreeze and water heating solution in order to provide a continuous supply of domestic hot water, interior/fresh water tank heating, independent interior zone heating. Please note that all Danger, Warning, Caution, and Note boxes, appearing as needed throughout this manual, must be reviewed and adhered to during servicing of the Aqua-Hot in order to avoid potential hazards which could result in injury, death, product damage, and/or property damage. Should additional assistance be needed, please contact the Technical Support Department at 1-800-685-4298, Monday through Friday between the hours of 7:00 AM and 4:00 PM Mountain Standard Time. Danger, Warning, Caution, and Note Box Definitions Danger, Warning, Caution, and Note boxes appear throughout this manual as a means of alerting the service technician to important information. Indicates that personal injury is likely or imminent Indicates that serious damage to the heater will occur and personal injury is possible as well. Indicates that damage to the heater is possible. NOTE: Indicates information that requires special attention by the service technician. © 2009 Aqua-Hot® 375D Hydronic Heating System Service Manual—Rev. A — Page 6 — SECTION 1: INTRODUCTION TO THE AQUA-HOT 375D Figure 1 Diesel Burner, Fuel Consumption (Continuous Operation) .......................................................................................................... 0.40 gal/hr Heater, Voltage/Maximum Power Consumption ...................................................................................................... 12 Volt-DC/245 watts Electric Heating Element specifications .................................................................................................................... 120 Volt-AC/1500 watts Zone Heat Circulation Pump specifications ....................................................................................................(2) 12 Volt-DC/21 watts each Number of Heating Zones ............................................................................................................. Maximum of 2, plus Bay Heat Exchanger Domestic Water Heating Capacity ............................................................................................................................ Continuous/On-Demand Dimensions................................................................................................................................................................... 16.75”H x 18”W x 29.5”L Dry Weight .......................................................................................................................................................................... approximately 155 lbs. Wet Weight .......................................................................................................................................................................... approximately 200 lbs. NOTE: All vehicle installations must comply with the requirements listed in the Recreational Vehicle Industry Association’s (RVIA) ANSI/NFPA 1192 Handbook for Recreational Vehicle Standards. To receive a copy of this handbook and other pertinent RVIA Standards, write to: Recreation Vehicle Industry Association, 1896 Preston White Drive, P.O. Box 2999, Reston, VA 22090-0999, call them at (703) 620-6003, or visit them online at www.rvia.org. © 2009 Aqua-Hot® 375D Hydronic Heating System Service Manual—Rev. A — Page 7 — SECTION 1: INTRODUCTION TO THE AQUA-HOT 375D Minimum Heater Clearances: Front - Open Access Back - 0 inches Top - 6 inches For installation only in a compartment that is completely closed off from living quarters and accessible only from the outdoors. The Exhaust System MUST NOT terminate beneath the vehicle or under an openable window or vent. Combustion Air MUST BE supplied from outside the vehicle. CAUTION: THIS APPLIANCE OPERATE ON BOTH AC AND DC POWER, USE COPPER CONDUCTORS ONLY! Use a 25-Amp fuse for over-current protection for the DC power supply. Use a circuit breaker that cuts power at 20-Amps maximum for over-current protection for the 120-VAC power supply. Mount the Heater near a bay/storage door so that the Access Cover can be easily removed for service. WARNING: DO NOT OPERATE APPLIANCE WITH ACCESS COVERS REMOVED. Minimum Heater Clearances: Front—Open Access Back— 0 inches Top — 6 inches Sides—0 inches Install in strict compliance with local codes, NFPA 1192, and the manufacturer’s instructions — Page 8 — ® © 2009 Aqua-Hot 375D Hydronic Heating System Service Manual—Rev. A SECTION 1: INTRODUCTION TO THE AQUA-HOT 375D Figure 2 © 2009 Aqua-Hot® 375D Hydronic Heating System Service Manual—Rev. A — Page 9 — SECTION 1: INTRODUCTION TO THE AQUA-HOT 375D 120 Volt-AC Relay Figure 3 Zone 1 Relay Zone 2 Relay Fuse Block Ground Strip © 2009 Aqua-Hot® 375D Hydronic Heating System Service Manual—Rev. A — Page 10 — SECTION 1: INTRODUCTION TO THE AQUA-HOT 375D 12 Diesel Burner High-Limit Thermostats 11 Float Switch Figure 4 1 10 Low Temp. Cut-off Thermostat 13 2 Diesel Burner Control Thermostat 9 3 6 4 5 8 7 1 2 3 4 5 6 INTERLOCK SWITCH ZONE-1 RELAY ZONE-2 RELAY FUSE BLOCK CIRCULATION PUMP - ZONE 1 DIESEL-BURNER 7 8 9 10 11 12 13 SYSTEM DRAIN DIESEL-BURNER CONTROLLER DIESEL BURNER CONTROL T HERMOSTAT LOW T EMPERATURE CUT-OFF T HERMOSTAT FLOAT SWITCH DIESEL-BURNER HIGH-LIMIT T HERMOSTATS Electric Element High-Limit Thermostat Electric Element Control Thermostat © 2009 Aqua-Hot® 375D Hydronic Heating System Service Manual—Rev. A — Page 11 — SECTION 1: INTRODUCTION TO THE AQUA-HOT 375D NOTE: The heat exchangers fans will not operate until the Boiler tank reaches a minimum of 150* F Chart 1 © 2009 Aqua-Hot® 375D Hydronic Heating System Service Manual—Rev. A — Page 12 — SECTION 1: INTRODUCTION TO THE AQUA-HOT 375D Antifreeze and Water Heating Solution: As the antifreeze type and mixture ratio is essential to the Aqua-Hot’s performance and ability to comply with regulations, the following information is being supplied to understand various types of antifreeze, the quality of water necessary, and the mixture ratio. Aqua-Hot Heating Systems Inc. recommends CAMCO’s Boiler Antifreeze -100° F. Antifreeze Types: tivity characteristics. Although these types of antifreeze products are considered less toxic and safer than ethylene glycol for people, pets, and the environment, they are not “Generally Recognized as Safe” (GRAS) rated by the FDA. Therefore, they must be marked with a “harmful if swallowed” warning. This additional warning is required because these types of antifreeze products contain high levels of chemical inhibitors. Due to their potentially hazardous properties, they should never be used in the Aqua-Hot’s Hydronic Heating System. Antifreeze Mixture Water Quality: The following information addresses the necessary usage of a propylene glycol based “boiler “ type antifreeze in the Aqua-Hot. Propylene glycol is a safer alternative to the more toxic ethylene glycol antifreeze; however, as mandated by IAPMO (International Association of Plumbing and Mechanical Officials), only those propylene glycol based “boiler” type antifreezes deemed “Generally Recognized as Safe” (GRAS) by the FDA should be utilized. Because of the significant impact various types of antifreeze can have on a Hydronic heating system, including the level of safety provided, it has been recognized that there is a need to provide an explanation regarding two additional prominent types of antifreeze/coolant available. The following information should be utilized as an educational means of ensuring that the proper type of propylene glycol based antifreeze is selected: RV & Marine Antifreeze: These types of propylene glycol based antifreeze products are formulated specifically for “winterizing” applications only. Although RV & Marine antifreeze is often “Generally Recognized as Safe” by the FDA, it should never be used in the Aqua-Hot’s Hydronic Heating System Boiler Tank. This type of antifreeze is not formulated to transfer heat, which is essential to the heating system’s functionality and does not contain rust inhibitors. Please note, however, that RV & Marine antifreeze can be utilized to winterize the Aqua-Hot’s domestic water heating system. Automotive Antifreeze/Coolant: These types of propylene glycol based antifreeze products are formulated specifically to protect automotive engines against corrosion, freezing temperatures, and overheating. They also have excellent heat transfer and thermal conduc- In order to ensure maximum performance and longevity of an Aqua-Hot heating system’s boiler tank and associated components, it has been determined that there is a need to use distilled, de-ionized, or soft water in combination with concentrated propylene glycol for the Aqua-Hot’s antifreeze and water heating solution,. Please note that this is only necessary when mixing concentrated propylene glycol antifreeze with water; suppliers of pre-mixed antifreeze are responsible for the use of high-quality (distilled, de-ionized, or soft) water when preparing their antifreeze for sale. Hard water possesses a high-level of calcium and magnesium ions, which deplete the propylene glycol antifreeze’s corrosion inhibitors. This, in turn, causes the antifreeze and water heating solution to begin turning acidic, which can corrode the Aqua-Hot’s boiler tank and associated components prematurely. Therefore, concentrated propylene glycol should be diluted with distilled, de-ionized, or soft water that is 80 ppm or less in total hardness. The local water agency should have up-to-date water quality reports that should indicate if the local tap water is within this guideline. Antifreeze Terms and Mixture Ratio: The following information addresses the process of selecting an antifreeze and water mixture ratio that provides adequate freeze, boiling, and rust/anti-corrosive protection. A 50/50 mixture ratio is recommended, which will result in a freeze point of approximately -28°F and a boil point of approximately 222°F. The following information should be utilized for the purpose of clarifying some terms commonly associated with antifreeze. © 2009 Aqua-Hot® 375D Hydronic Heating System Service Manual—Rev. A — Page 13 — SECTION 1: INTRODUCTION TO THE AQUA-HOT 375D Freeze Point and Burst Point: Antifreeze lowers the freezing point of any liquid, to which it has been added, by preventing the formation of ice crystals; however, as the ambient temperature continues to decline, the water in the solution will attempt to attain a solid state. The point in which the water begins to solidify is termed the “Freeze Point.” Although the water in the solution has begun to freeze, producing a “slushy” consistency, the antifreeze in the solution will continue to combat the normal expansion of the solution as it freezes. The point in which the solution can begin to expand, due to colder temperatures, is called the “burst point.” Once the solution reaches the burst point, the potential is present for ruptured pipes to exist. The burst point of the antifreeze and water heating solution is dependent upon the brand of propylene glycol employed. Antifreeze is also primarily responsible for heat transfer characteristics. Therefore, as water is an excellent heat conductor, it is added to the mixture. A 50/50 solution of propylene glycol antifreeze and water is recommended to provide the best performance combination of the aforementioned functions. If excess propylene glycol exists within an antifreeze and water heating solution, the water’s heat absorption properties are compromised, which could ultimately inhibit the Aqua-Hot from providing adequate domestic hot water and interior heating. Additionally, if the antifreeze and water heating solution contains over 70 percent antifreeze, the freezing point is actually raised, resulting in less freeze protection. Boiling Point: The Aqua-Hot utilizes the antifreeze and water heating solution as a transportation means for the heat produced from the internal processes. The antifreeze absorbs the heat created until its boiling point is reached; it is at this point that the liquid turns to a gas and is expelled to prevent the heating system from overheating. Each time the boiling point is reached, a loss of efficiency occurs because the heat produced is expelled rather than used for the function of the heating system. Therefore, a higher boiling point is desired in order to combat the loss of efficiency, which allows the antifreeze to transport the heat created from the internal process throughout the motorhome where it can be used productively rather than dissipating due to its change from a liquid to a gas. Rust and Anti-Corrosive Inhibitors: Another major function of antifreeze is to provide protection to the internal metal components of the Aqua-Hot hydronic heating system from corrosion and rust. Antifreeze is able to perform this function by the addition of rust- and anticorrosive inhibitors, which are designed specifically to activate in a water solution. Summary: Antifreeze has three basic functions: freeze protection, boilover protection, and anti-corrosion and rust protection. © 2009 Aqua-Hot® 375D Hydronic Heating System Service Manual—Rev. A — Page 14 — SECTION 2: INTERIOR SWITCH PANEL Figure 5 NOTE: The Diesel-Burner will ignite anytime the DieselBurner switch is turned on, even if it is turned back off before the Diesel-Burner actually ignites. NOTE: This feature is only operational whenever the Motor home is connected to 120 Volt-AC power or when the generator is operating. Diesel Burner Switch: Electric Element Switch: The Diesel-Burner switch activates the Aqua-Hot’s DieselBurner; reference Figure 5. This procedure allows the Diesel -Burner to operate and supply heat to the Aqua-Hot’s Boiler Tank, which will heat the Aqua-Hot’s antifreeze and water heating solution to the maximum operating temperature of 190±5°F in approximately 10-20 minutes. The Electric Element switch activates the Aqua-Hot’s 120 Volt-AC Electric Heating Element; reference Figure 5. This procedure allows the 120 Volt-AC Electric Heating Element to operate and supply heat to the Aqua-Hot’s Boiler Tank, which will heat the Aqua-Hot’s antifreeze and water heating solution to the maximum operating temperature of 190±5°F in approximately 1-2 hours. The indicator light, adjacent to the Diesel-Burner switch, will illuminate whenever the Diesel-Burner switch is in the ON position. This light also incorporates a self-diagnostic Blinking Fault Indicator Light, which by using a series of blinking lights, indicates the particular component of the DieselBurner that failed during operation. Please reference Section 9: Switch Panel Blinking Fault Indicator Light for additional information. Please note that the Diesel-Burner is the Aqua-Hot’s primary heat source for heating both the interior and/or the domestic hot water (such as when cool ambient temperatures exist and/or when there is a high demand for domestic hot water). The indicator light, adjacent to the Electric Element switch, will illuminate whenever the Electric Element switch is in the ON position. Please note that the 120 Volt-AC Electric Heating Element is the Aqua-Hot’s secondary heat source for heating both the interior and/or the domestic hot water during low heating demand situations (such as when moderate ambient temperatures exist and/or when there is a low demand for domestic hot water). © 2009 Aqua-Hot® 375D Hydronic Heating System Service Manual—Rev. A — Page 15 — SECTION 2: INTERIOR SWITCH PANEL Figure 6 © 2009 Aqua-Hot® 375D Hydronic Heating System Service Manual—Rev. A — Page 16 — SECTION 3: EXHAUST SYSTEM REQUIREMENTS Because the Aqua-Hot’s exhaust is hot and must be kept away from any heat-sensitive material, the exhaust system should be checked to ensure that it continues to meet the following requirements: The exhaust must not be directed downward as a fire could result when parked in dry, grassy areas. The exhaust must not terminate underneath the vehicle, underneath an openable window or vent, in the awning area of the motorhome (if applicable), or near slide-out areas. A maximum of one 90° and one 45° exhaust pipe bends are allowed. The total length of the exhaust pipe shall not exceed 11’. The exhaust must be able to freely exit away from the vehicle without any obstructions. Two-inch standard automotive-type exhaust piping should be used with a maximum of two 90-degree pipe bends and should not exceed 20 feet. The 3-inch and 4-inch black-pipe nipples and the exhaust elbow - originally supplied with the Aqua-Hot, must be present. The exhaust should be inspected for excessive bends, excessive length, kinks or any type of restriction. Figure 7 © 2009 Aqua-Hot® 375D Hydronic Heating System Service Manual—Rev. A — Page 17 — SECTION 4: AQUA-HOT COMPONENTS This section details various components of the Aqua-Hot that may require troubleshooting and/or replacement in the event of a malfunction. The diesel-burner and its components are detailed in Section 8 of this manual. If continuity is not present with the button pushed in, follow the instructions in this section to replace the interlock switch. Replacement parts can be ordered through Aqua-Hot’s Web site at www.aquahot.com or by calling 1-800-6854298. Replacement Procedure: If additional assistance is needed, the Technical Support Team can also be reached, Monday through Friday, from 7:00 AM to 4:00 PM Mountain Standard Time at 1-800685-4298. FAILURE Sensors/Switches COULD CAUSE SERIOUS DAMAGE OR PERSONAL INJURY. 1. Disconnect the interlock switch’s wires by pulling the quick connectors from the switch’s spade terminals. 2. Release the interlock switch from the Aqua-Hot cabinet by pushing in on the locking tabs and pulling the interlock switch. 3. Remove the defective interlock switch from the AquaHot. 4. Install the replacement interlock switch onto the AquaHot ensuring that the locking tabs snap into place. 5. Connect the Aqua-Hot’s wires to the replacement interlock switch with yellow wire #31 connected to the terminal labeled “NO” and yellow wire #9 connected to the terminal labeled “COM.” Interlock Switch: The interlock switch is a safety device designed to ensure that the Aqua-Hot’s access cover is securely installed before allowing the diesel-burner to operate. Note: If the cover is removed or the interlock switch is defective the diesel burner switch indicator light will not illuminate. Troubleshoot the interlock switch if the following condition has occurred: The diesel-burner fails to operate. The light on the diesel-burner switch fails to illuminate. TO DISCONNECT ALL POWER SUPPLIES AND/OR TO ALLOW THE HEATER TO COOL BEFORE SERVICING NOTE: If the interlock switch’s wires are reversed, the interlock switch will only allow the diesel-burner to operate when the access cover is removed and the button on the switch is released. Troubleshooting: NOTE: The interlock switch will prevent the diesel-burner from operating without the access cover intact; therefore, the switch will need to be manually pressed during testing for the switch’s functionality. 1. Turn the diesel-burner switch on from the interior switch panel and ensure that the boiler tank has sufficiently cooled in order to require heat from the diesel-burner. 2. Disconnect the yellow and white wires from the interlock switch noting that wire #31 is connected to the terminal labeled “NO” and wire #9 is connected to the terminal labeled “COM.” 3. Using an ohmmeter, check the interlock switch for continuity while the button is pushed in. Figure 8 Connect Wire # 9 “COM” © 2009 Aqua-Hot® 375D Hydronic Heating System Service Manual—Rev. A Connect Wire # 31 “NO” — Page 18 — SECTION 4: AQUA-HOT COMPONENTS Float Switch: Replacement Procedure: The Float Switch monitors the level of antifreeze and water heating solution within the Aqua-Hot’s boiler tank to ensure that an adequate volume exists. Reference Figure 9 for location. FAILURE TO DISCONNECT ALL POWER SUPPLIES AND/OR TO ALLOW THE HEATER TO COOL BEFORE SERVICING COULD CAUSE SERIOUS DAMAGE OR PERSONAL INJURY. 1. Ensure that the Aqua-Hot has been completely shut down and that all power sources have been disconnected. Also, because this replacement procedure will involve the boiler tank and the potential for hot coolant, be sure the heater has adequately cooled. 2. Verify that the Aqua-Hot’s boiler tank is full of the antifreeze and water heating solution. Drain the antifreeze and water heating solution from the Aqua-Hot’s boiler tank using the drain valve, Approximately 2 gallons will need to be drained.. 3. Disconnect the float switch’s wires by separating the quick-disconnect terminals. 2. Verify that the connections for the wires on the float switch are securely plugged into the wiring harness. 4. Using a 7/8 socket, remove the defective float switch from the Aqua-Hot’s boiler tank. 3. Verify Fuse “B”, and the Fuse Block is sending power to the float switch. 5. Wrap the threads of the replacement float switch with Teflon tape. 4. Inspect the wire harness for damaged or severed wires. If no wires are found to be damaged or severed, continue. 6. Screw the replacement float switch into the port on the Aqua-Hot’s boiler tank and tighten securely with a 7/8 socket, ensuring the N.O. stamp in on top. 5. Verify the functionality of the Float Switch by completing the following: 7. Connect the replacement float switch’s wires in the same configuration as the removed float switch’s wires. A. Disconnect the wires from the Float Switch. 8. B. Install a jumper wire between the wires on the harness, #65 & 66, in order to bypass the Float Switch. Refill the Aqua-Hot’s Boiler tank with the proper water/ antifreeze mixture. Reference Section 5 in this manual for instructions on filling and draining unit. 9. Test for proper operation. Troubleshoot the Float Switch if one of the following conditions has occurred: The diesel-burner and/or electric heating element fails to operate. Troubleshooting: 1. If the diesel-burner and/or electric heating element come on when the jumper wire is installed, follow the instructions in this section to replace the float switch NOTE: The Float Switch can be tested by performing a Continuity Test. With the heater full of antifreeze there should be continuity between the wires on the Float Switch. Be sure to install the replacement float switch with the “N.O.” stamp on top, failure to do so, will allow the diesel/electric to come on with no antifreeze in the boiler tank. © 2009 Aqua-Hot® 375D Hydronic Heating System Service Manual—Rev. A — Page 19 — SECTION 4: AQUA-HOT COMPONENTS Figure 9 Thermostats Control Thermostat: Diesel Burner The control thermostat is installed into the Aqua-Hot’s boiler tank and monitors the temperature of the antifreeze and water heating solution to determine when it is at operating temperature and when it requires heat. The Aqua-Hot is considered to be at operating temperature between 158°F and 190° F. Reference Figure 10 for location. B. Disconnect the control thermostat’s wires from their connections, and, using an ohmmeter, check for continuity. If there is no continuity, follow the instructions in this section for replacing the control thermostat. If continuity exists, complete the following: 1. Troubleshoot the control thermostat if one of the following conditions has occurred: The Diesel Burner Fails To operate. There is a lack of hot domestic water and interior heat. Blue or white smoke is expelled from the exhaust, due to a control thermostat short cycling. Troubleshooting: 1. Inspect the control thermostat’s wiring and connections for any signs of damage or corrosion. C. If the diesel-burner does come and run, but there is still a lack of domestic hot water/interior coach heat: 1. Check operational temperature of the control thermostat by using a digital thermometer. Turn the diesel-burner switch on from the interior switch panel and ensure that the boiler tank has sufficiently cooled in order to require heat from the diesel-burner. Note: The operational range of the diesel If the burner does not come on and run, check the following: If the temperature range of the control thermostat is not within specifications, replace the control thermostat. A. Verify that the temperature of the boiler tank has fallen below the 158°F minimum operating temperature by checking with a digital thermometer. burner control thermostat is 158° F - 190° F. © 2009 Aqua-Hot® 375D Hydronic Heating System Service Manual—Rev. A — Page 20 — SECTION 4: AQUA-HOT COMPONENTS Replacement Procedure: FAILURE TO DISCONNECT ALL POWER SUPLIES AND/OR TO . 4. 5. Wrap the threads of the replacement control thermostat with Teflon tape. 6. Screw the replacement control thermostat into the port on the Aqua-Hot boiler tank and tighten securely with a 7/8 socket. 7. Reconnect control thermostat wires. 8. Refill the Aqua-Hot boiler tank with the antifreeze and water heating solution. 9. Test the Aqua-Hot for normal operation using a digital thermometer. ALLOW THE HEATER TO COOL BEFORE SERVICING COULD CAUSE SERIOUS DAMAGE OR PERSONAL INJURY. 1. 2. 3. Ensure that the Aqua-Hot has been completely shut down and that all power sources have been disconnected. Also, because this replacement procedure will involve the boiler tank and the potential for hot coolant, be sure the heater has adequately cooled. Drain 2 gallons of the antifreeze and water heating solution from the Aqua-Hot boiler tank using the drain valve. Disconnect the defective control thermostat’s wires by separating the quick-disconnect terminals. Reference Figure 10 for location. Using a 7/8 socket, unscrew the control thermostat from the Aqua-Hot’s boiler tank. Figure 10 Please note that the Diesel Burner has been removed in this image. © 2009 Aqua-Hot® 375D Hydronic Heating System Service Manual—Rev. A — Page 21 — SECTION 4: AQUA-HOT COMPONENTS Thermostats (continued) If the Electric Element is not within spec check the following: Control Thermostat: Electric Element The control thermostat is installed on the Aqua-Hot’s boiler tank and monitors the temperature of the antifreeze and water heating solution to determine when it is at operating temperature and when it requires heat. The Aqua-Hot is considered to be at operating temperature between 158°F and 190° F. Troubleshoot the electric element control thermostat if one of the following conditions has occurred: The Electric Element Fails To operate. There is a lack of hot domestic water and interior heat. NOTE: For continuous domestic hot water to be present, the diesel-burner must be selected also as a heating source. Troubleshooting: 1. 2. Turn the electric element switch on from the interior switch panel and ensure that the boiler tank has sufficiently cooled in order to require heat from the electricelement. Using a Clamp-on Amp meter, put it around the Black wire, #51, coming off of the electric element. Set the Clamp-on Amp meter to register AC amps. The 1500 Watt electric element should pull 11.5-12.5amps. NOTE: The coach must either be plugged into shore power, or the generator must be on, for there to be 120vac at the heater. FAILURE TO DISCONNECT ALL POWER SUPPLIES AND/OR TO ALLOW THE HEATER TO COOL BEFORE SERVICING COULD CAUSE SERIOUS DAMAGE OR PERSONAL INJURY. A. Verify that the temperature of the boiler tank has fallen below the 158°F minimum operating temperature by checking with a digital thermometer. B. Disconnect the control thermostat’s wires, #52 & 54, from their connections, and, using an ohmmeter, check for continuity on the control thermostat. If there is no continuity, follow the instructions in this section for replacing the control thermostat. 3. If the Electric Element does come and run, but there is still a lack of domestic hot water/interior coach heat: 1. Check operational temperature of the control thermostat by using a digital thermometer. Note: The operational range of the Electric Element control thermostat is 158° F - 190° F. If the temperature range of the control thermostat is not within specifications, replace the control thermostat. Figure 11 185* F Control Thermostat Please note that the Diesel Burner has been removed in this image. © 2009 Aqua-Hot® 375D Hydronic Heating System Service Manual—Rev. A — Page 22 — SECTION 4: AQUA-HOT COMPONENTS Thermostats (continued) Control Thermostat: Electric Element (continued) Replacement Procedure: 1. Ensure that the Aqua-Hot has been completely shut down and that all power sources have been disconnected. 2. Locate the control thermostat for the electric element, reference figure 12. 3. Disconnect the defective control thermostat’s wires by separating the quick-disconnect terminals. 5. Install the replacement control thermostat, tightening only to 15 in/lbs. Do not overtighten. 6. Connect the replacement control thermostat’s wires in the same configuration as the removed thermostat’s wires. 7. Test for proper operation, by using a digital thermometer. 4. Using a 5/8 wrench or socket, remove the defective control thermostat from the Aqua-Hot. NOTE: The coach must either be plugged into shore power, or the generator must be on, for there to be 120vac at the heater. Figure 12 185* F Control Thermostat Please note that the Diesel Burner has been removed in this image. © 2009 Aqua-Hot® 375D Hydronic Heating System Service Manual—Rev. A — Page 23 — SECTION 4: AQUA-HOT COMPONENTS AC High-Limit Thermostat: The AC high-limit thermostat serves as a safety measure in the event that the electric heating element continues to operate after the maximum operating temperature is reached. The high-limit thermostat allows the current for the heating element to pass through it until the boiler tank reaches a temperature of 215°F. Should this temperature be reached, the high-limit thermostat blocks the current to the element, which prevents it from continuing to provide heat to the boiler tank. Replacement Procedure: FAILURE COULD CAUSE SERIOUS DAMAGE OR PERSONAL INJURY. 1. Ensure that the Aqua-Hot has been completely shut down and that all power supplies have been disconnected. 2. If applicable, remove the heat shrink insulation covering the wires and terminals on the defective high-limit thermostat. 3. Remove the two wires from the defective high-limit thermostat by pulling firmly on the wires. 4. Using a 5/8 wrench or socket, remove the defective high -limit thermostat from the Aqua-Hot’s boiler tank. 5. Install the replacement high-limit thermostat into the port on the Aqua-Hot’s boiler tank and finger-tighten only (15 in/lbs). 6. Connect the wires removed from the defective high-limit thermostat to the replacement high-limit thermostat. 7. Test for normal operation. Troubleshoot the AC high-limit thermostat if the following condition has occurred: The electric heating element fails to operate. Troubleshooting: 1. Disconnect all power supplies. 2. Verify that the boiler tank’s temperature is below 215°F. 3. Locate the AC high-limit thermostat and remove its wires. Reference Figure 13 for location 4. Using an ohmmeter, check the thermostat for continuity. If there is no continuity, press the white reset button on the thermostat and re-check for continuity. TO DISCONNECT ALL POWER SUPPLIES AND/OR TO ALLOW THE HEATER TO COOL BEFORE SERVICING If continuity is still not present after the reset button has been pressed, follow the instructions in this section to replace the AC high-limit thermostat. Figure 13 215* Reset Button Please note that the Diesel Burner has been removed in this image. © 2009 Aqua-Hot® 375D Hydronic Heating System Service Manual—Rev. A — Page 24 — SECTION 4: AQUA-HOT COMPONENTS NOTE: If a thermostat with the wires removed, that has been reset does not have continuity, follow the instructions in this section to replace the high-limit thermostat. DC High-Limit Thermostat: Left The left DC high-limit thermostat serve as a safety measure in the event that the diesel-burner continues to operate after the maximum operating temperature is reached. The highlimit thermostats allow the current for the diesel-burner to pass through them until the boiler tank reaches a temperature of 215°F. Should this temperature be reached, the left highlimit thermostat blocks the current to the diesel-burner’s controller, which prevents the diesel-burner from operating. Troubleshoot the Left DC high-limit thermostat if the following condition has occurred: The diesel-burner fails to operate. The diesel-burner switch light flashes a 6 fault code. Replacement Procedure: TO DISCONNECT ALL POWER SUPPLIES AND/OR TO ALLOW THE HEATER TO COOL BEFORE SERVICING COULD CAUSE SERIOUS DAMAGE OR PERSONAL INJURY. Place a jumper wire between the black (#15) and black (#16) wires on the diesel-burner’s wire harness to bypass the high-limit thermostats. Check the Aqua-Hot for normal operation. NOTE: Bypassing the high-limit thermostats is for testing only and must not be used for the Aqua-Hot normal operation. 2. If an individual wire does not have continuity, that wire must be replaced. FAILURE Troubleshooting: 1. B. Disconnect the wires from the thermostat and recheck the thermostat for continuity, as well as the thermostats’ individual wires. Disconnect the Left DC high-limit thermostats’ wires, then, using an ohmmeter, check the thermostat for continuity. 1. Ensure that the Aqua-Hot has been completely shut down and that all power sources have been disconnected. 2. Remove the two wires from the defective high-limit thermostat by pulling firmly on the wires. 3. Using a 5/8 wrench or socket, remove the defective high -limit thermostat from the Aqua-Hot’s boiler tank. 4. Install the replacement high-limit thermostat into the port on the Aqua-Hot’s boiler tank and finger-tighten only (15 in/lbs). 5. Connect the wires removed from the defective high-limit thermostat to the replacement high-limit thermostat. 6. Test for proper operation. If there is no continuity, complete the following: A. Press the white reset button on the high-limit thermostat, then re-check for continuity. Figure 14 © 2009 Aqua-Hot® 375D Hydronic Heating System Service Manual—Rev. A — Page 25 — SECTION 4: AQUA-HOT COMPONENTS NOTE: If a thermostat with the wires removed, that has been reset, does not have continuity, follow the instructions in this section to replace the high-limit thermostat. DC High-Limit Thermostat: Right The DC high-limit thermostats serve as a safety measure in the event that the diesel-burner continues to operate after the maximum operating temperature is reached. The high-limit thermostats allow the current for the diesel-burner to pass through them until the boiler tank reaches a temperature of 215°F. Should this temperature be reached, the right highlimit thermostat blocks the current to the diesel-burner’s fuel solenoid, which prevents the diesel-burner from operating. Troubleshoot the right DC high-limit thermostat if the following condition has occurred: The fuel solenoid on the diesel-burner fails to operate. The diesel-burner switch light flashes an 8 fault code. B. Disconnect the wires from the thermostat and recheck the thermostat for continuity, as well as the thermostats’ individual wires. If an individual wire does not have continuity, that wire must be replaced. Replacement Procedure: FAILURE TO DISCONNECT ALL POWER SUPPLIES AND/OR TO ALLOW THE HEATER TO COOL BEFORE SERVICING COULD CAUSE SERIOUS DAMAGE OR PERSONAL INJURY. Troubleshooting: 1. Place a jumper wire between the black (#8) and black (#21) wires on the diesel-burner’s wire harness to bypass the right high-limit thermostat. Check the AquaHot for normal operation. NOTE: Bypassing the high-limit thermostats is for testing only and must not be used for the Aqua-Hot’s normal functioning. 2. Disconnect the right DC high-limit thermostats’ wires, then, using an ohmmeter, check the thermostat for continuity. If there is no continuity, complete the following: A. Press the white reset button on the high-limit thermostat, then re-check for continuity. 1. Ensure that the Aqua-Hot has been completely shut down and that all power sources have been disconnected. 2. Remove the two wires from the defective high-limit thermostat by pulling firmly on the wires. 3. Using a 5/8 wrench or socket, remove the defective high -limit thermostat from the Aqua-Hot’s boiler tank. 4. Install the replacement high-limit thermostat into the port on the Aqua-Hot’s boiler tank and finger-tighten only (15 in/lbs). 5. Connect the wires removed from the defective high-limit thermostat to the replacement high-limit thermostat. 6. Test for proper operation. Figure 15 © 2009 Aqua-Hot® 375D Hydronic Heating System Service Manual—Rev. A — Page 26 — SECTION 4: AQUA-HOT COMPONENTS Low-Temperature Cutoff Thermostat: The low-temperature cutoff thermostat operates the domestic water priority system by blocking the interior heating feature when domestic hot water is being used. This ensures that even heat is provided for domestic hot water, which avoids the possibility of cold water pockets during showers, etc. 3. A. Using a temperature sensor, verify that the lowtemperature cutoff thermostat is below 90°F, which is necessary for the thermostat to trip. Troubleshoot the low-temperature cutoff thermostat if the following conditions have occurred: There is a lack of interior heat. There is a lack of hot water . B. Inspect the wiring to ensure that the Aqua-Hot is wired properly and that the low-temperature cutoff thermostat has not been bypassed via jumper wires. C. Ensure the Domestic water lines have been plumbed properly into and out of the heater. Troubleshooting: 1. If the “Low Temp Cutoff Thermostat” Does not trip when domestic hot water is being used or when the Aqua-Hot falls below operating temperature, complete the following: Determine if the conditions are right for the “Low Temp Cutoff Thermostat to be reset Replacement Procedure: A. Verify that the Aqua-Hot is at operating temperature between 158°F and 190°F. FAILURE TO DISCONNECT ALL POWER SUPPLIES AND/OR TO ALLOW THE HEATER TO COOL BEFORE SERVICING 2. B. Verify that the domestic hot water is not being used. COULD CAUSE SERIOUS DAMAGE OR PERSONAL INJURY. If the “Low Temp Cutoff ” is not reset (i.e. has continuity) after it has been determined that it should be, complete the following: 1. Ensure that the Aqua-Hot has been completely shut down and that all power sources have been disconnected. Using a temperature sensor, verify that the lowtemperature cutoff thermostat is above 100°F. 2. Locate the low-temperature cutoff thermostat on the cold domestic water inlet pipe on the Aqua-Hot. If the thermostat is below 90°F, verify that the Aqua -Hot is up to operating temperature and that a hot water faucet is not leaking. 3. Disconnect the defective low-temperature cutoff thermostat’s wires by separating the quick-disconnect terminals. B. Disconnect the low-temperature cutoff thermostat’s wires from the Aqua-Hot’s wiring harness, then, jump the wiring harness wires for the thermostat together to bypass the thermostat. Wires 23 &24 4. Using a 5/8 wrench or socket, remove the defective lowtemperature cutoff thermostat from the Aqua-Hot. 5. Install the replacement low-temperature cutoff thermostat tightening only to 15 in/lbs. Do not overtighten. If the Heater works properly with the thermostat bypassed, follow the instructions in this section to replace the low-temperature cutoff thermostat. 6. Connect the replacement low-temperature cutoff thermostat’s wires in the same configuration as the removed thermostat’s wires. 7. Test for proper operation. A. © 2009 Aqua-Hot® 375D Hydronic Heating System Service Manual—Rev. A — Page 27 — SECTION 4: AQUA-HOT COMPONENTS Figure 16 Low Temp Cutoff Thermostat Valves Interior Zone Check Valve: Check valves are installed into the zone outlet ports for each heating loop to ensure that the antifreeze and water heating solution only flows in one direction. If the heating solution attempts to backflow into the boiler tank, the check valve closes to prevent that from happening. B. Check the circulation pump for operation by visually inspecting it for rotation of the pump. 2. If interior heat is present after tapping the check valve, the check valve was stuck closed and no further action is necessary. Troubleshoot the check valves if the following condition has occurred: There is a lack of interior heat in a particular zone. Troubleshooting: 1. Verify that the heating zone is operating properly by checking the following: A. Check the Room Thermostat, to ensure it should be calling for heat. With the circulation pump operating, tap on the check valve and wait five minutes to evaluate if interior heat is now present. 3. Check the Aqua-Hot’s antifreeze and water heating solution’s ratio of water to propylene glycol. The mixture ratio should be approximately 50/50. If the solution is comprised fully of antifreeze (100%), the check valves will continue to stick. NOTE: Storing the motorhome for an extended period of time can cause the check valves to stick. If, after the initial release of the stuck check valve, it continues to stick, follow the instructions in this section to replace the check valve. © 2009 Aqua-Hot® 375D Hydronic Heating System Service Manual—Rev. A — Page 28 — SECTION 4: AQUA-HOT COMPONENTS Replacement Procedure: 6. Clean the 90* hose barb and straight hose barb fittings, then wrap the 90* hose barb and the straight hose barb threads with Teflon tape. 7. Install the 90* hose barb and straight hose barb fittings on the replacement check valve, ensuring that they are installed properly with the 90* hose barb on the arrow side of the check valve. Reference Figure 17. 8. Install the replacement check valve onto the Aqua-Hot’s boiler tank. The arrow on the check valve must point towards the back of the boiler tank. Drain the antifreeze and water heating solution from the Aqua-Hot’s boiler tank using the drain valve. 9. Slide the hoses back onto the replacement check valve and set the constant tension clamp back into place. Using constant tension pliers, loosen and slide back the constant tension clamps securing the hoses to the defective check valve. 10. Refill the Aqua-Hot’s boiler tank with the antifreeze and water heating solution. Reference Section 5. 4. Remove the hoses from the defective check valve. 11. Test for proper operation. 5. Remove both the 90* hose barb and the straight hose barb fittings from the defective check valve. FAILURE TO DISCONNECT ALL POWER SUPPLIES AND/OR TO ALLOW THE HEATER TO COOL BEFORE SERVICING COULD CAUSE SERIOUS DAMAGE OR PERSONAL INJURY. 1. 2. 3. Ensure that the Aqua-Hot has been completely shut down and that all power sources have been disconnected. Also, because this replacement procedure will involve the boiler tank and the potential for hot coolant, be sure the heater has adequately cooled. Figure 17 © 2009 Aqua-Hot® 375D Hydronic Heating System Service Manual—Rev. A — Page 29 — SECTION 4: AQUA-HOT COMPONENTS Tempering Valve: The tempering valve for the Aqua-Hot mixes the heated domestic water from the boiler tank with cold domestic water at a preset ratio to reduce the risk of scalding. 4. Disconnect the pex pipe and fittings from the tempering valve assembly. 5. Remove the pressure relief valve assembly from the tempering valve assembly as the tempering valve cannot be removed from the Aqua-Hot with the pressure relief valve still attached. 6. Using a back-up wrench, unscrew the tempering valve from the Aqua-Hot. Troubleshoot the tempering valve if the following condition has occurred: There is a lack of hot domestic water. Troubleshooting: A back-up wrench must be used for loosening and removing the tempering valve from the Aqua-Hot. Failure to use the back-up wrench will cause the copper domestic water coil to twist and kink, which will render the domestic water feature unusable. 1. Inspect the tempering valve to ensure that it has not been leaking. 2. Test the tempering valve’s functionality by turning the knob. 3. Test the temperature of the hot water using a digital thermometer at one of the hot water faucets. Water Temperature should range between 115° F - 123° F. If the proper range cannot be set follow the instructions in this section to replace the tempering valve. 7. Remove the brass fittings from the defective tempering valve. 8. Install the brass fittings onto the replacement tempering valve. If the tempering valve’s knob does not turn freely, follow the instructions in this section to replace the tempering valve. 9. Install the replacement tempering valve onto the AquaHot using a back-up wrench to tighten. Replacement Procedure: 10. Install the pressure relief valve onto the replacement tempering valve. FAILURE 11. Reconnect the pex pipe and fittings to the tempering valve and Aqua-Hot. TO DISCONNECT ALL POWER SUPPLIES AND/OR TO ALLOW THE HEATER TO COOL BEFORE SERVICING COULD CAUSE SERIOUS DAMAGE OR PERSONAL INJURY. 1. Turn the motorhome’s water pump off. 2. Drain the water pressure by opening the faucets and allowing the water to drain. 3. Disconnect the motorhome’s water lines from the tempering valve assembly. 12. Reconnect the motorhome’s water lines to the tempering valve assembly, ensuring they are plumbed correctly. 13. Turn the motorhome’s water pump back on and check for leaks and the presence of hot domestic water. 14. Verify that the replacement tempering valve has been set to the proper setting by taking a digital thermometer to a hot water faucet and set the water temperature between 115*F - 123*F. © 2009 Aqua-Hot® 375D Hydronic Heating System Service Manual—Rev. A — Page 30 — SECTION 4: AQUA-HOT COMPONENTS Figure 18 Pumps Zone Pumps #1 and #2: The Zone pumps first draw the heated antifreeze and water heating solution from the Aqua-Hot’s boiler tank, then propel it through the hydronic heating system’s interior heat plumbing. Troubleshoot the Zone pumps if the following condition has occurred: The Zone pump is not operating. There is a lack of heat in the coach. Troubleshooting: NOTE: Reference wiring Schematic in Appendix A. 1. Turn on the interior room thermostat corresponding to the Zone pump not operating. A. Using a Volt Meter , Check for voltage on the Fuse Block for the zone pumps, #56(WHT). a. If No voltage, replace the fuse. b. If Yes continue. B. Using a Volt Meter, Check and ensure that the zone relay is sending voltage to the pump at pin 4. a. If No voltage is present troubleshoot the zone relay. b. If Yes continue. C. Check the Zone pump for voltage. a. If there is voltage and the zone pump is not operating, follow the zone pump replacement procedure in this book. NOTE: The zone pump can be tested by connecting it to an external 12 Volt-DC power source to verify that the pump is defective. © 2009 Aqua-Hot® 375D Hydronic Heating System Service Manual—Rev. A — Page 31 — SECTION 4: AQUA-HOT COMPONENTS Replacement Procedure: 6. Remove the hoses from the defective zone pump. 6. Slide the hoses back onto the replacement zone pump and set the constant tension clamps back into place. 7. Install the replacement zone pump onto the heater, by aligning nylatch plungers into holes, and pushing in button to secure pump. FAILURE TO DISCONNECT ALL POWER SUPPLIES AND/OR TO ALLOW THE HEATER TO COOL BEFORE SERVICING COULD CAUSE SERIOUS DAMAGE OR PERSONAL INJURY 1. Ensure that the Aqua-Hot has been completely shut down and that all power sources have been disconnected. Also, because this replacement procedure will involve the potential for hot coolant, be sure the heater is adequately cooled. 8. Reconnect the wires on the replacement zone pump to the wires connected to the heater by uniting the red quickdisconnect terminals. 2. Drain the antifreeze and water heating solution from the Aqua-Hot’s boiler tank using the drain valve. 9. Refill the Aqua-Hot’s boiler tank with the antifreeze and water heating solution. Reference Section 5 for filling instructions. 3. Disconnect the defective zone pump’s wires by separating the quick-disconnect terminals. Reference Figure 19. 10. Test the Aqua-Hot for normal operation. 4. Release the nylatch plungers securing pump to heater. 5. Using constant tension pliers, loosen and slide back the constant tension clamps securing the hoses to the zone pump. Figure 19 Zone Pump 2 Zone Pump 1 © 2009 Aqua-Hot® 375D Hydronic Heating System Service Manual—Rev. A — Page 32 — SECTION 4: AQUA-HOT COMPONENTS Figure 20 Stir Pump (Zone Pump #2): The stir pump circulates the antifreeze and water heating solution within the Aqua-Hot’s boiler tank in order to ensure even-heating of the solution. To accomplish this, the stir pump draws the solution from the bottom of the tank and deposits it back into the top of the tank, after circulation through heating loop number 2. Troubleshoot the stir pump if the following condition has occurred: There is a lack of hot domestic water. Troubleshooting: If diesel burner motor is running, and no volt age is present at the #45 wire, replace controller. B. Using a Volt Meter check the zone 2 relay for voltage on the #4 pin. If there is no voltage at zone 2 relay, check wire #45 for damage. C. Using a Volt Meter check the #2 zone pump for voltage. If voltage is present and the pump still fails to operate follow the circulation pump replacement procedure in this book. 3. If it is determined that the pump is active, verify NOTE: In order for the stir pump to operate, the dieselburner motor must be running. that the pump is operating properly by checking both connected hoses for heat. 1. Verify that the Diesel Burner motor is running. If both hoses are hot, the pump is working properly. 2. If the diesel burner motor is running and the stir pump still is not operating: If one hose is hot, or neither hose is hot, check the cold hose for a blockage. If no blockage exists, follow the instructions in this section to replace the Zone pump #2. A. Using a Volt Meter, test for dc voltage at the diesel burner electronic controller, at the #45 red wire. © 2009 Aqua-Hot® 375D Hydronic Heating System Service Manual—Rev. A — Page 33 — SECTION 4: AQUA-HOT COMPONENTS Electrical - AC If the Electric Switch is on, and operating properly: A. Check the temperature of the Aqua-Hot’s boiler tank. Electric Heating Element: The electric heating element uses AC power as an alternate power source for heating the Aqua-Hot’s boiler tank. If the boiler tank temperature is below 158°F, troubleshoot the control thermostat for the electric element. Troubleshoot the electric heating element if the following condition has occurred: There is a lack of hot domestic water and interior heat when the electric element is selected as the heating source. Troubleshooting: If the boiler tank is above 185°F, the Aqua-Hot is at operating temperature and requires no heat. 4. Check functionality of the A.C. Relay. Refer to A.C. Relay troubleshooting, in this section. 5. Verify that the electric heating element is receiving adequate AC power by completing the following: NOTE: For continuous domestic hot water to be present, the diesel-burner must be selected also as a heating source. 1. 2. 3. A. Remove the AC access cover. B. Using an AC voltmeter, verify that 110 volts of AC power are present. Verify that the motorhome is either plugged into shore power or that the generator is running to provide AC power. C. Using an amp-meter, verify that 11.2 to 13 amps are present at the element’s wires. Verify that the “Electric” Switch is on, inside the motor home. D. Disconnect the coach from shore power/turn off generator and Check the electric element’s wires for continuity by completing the following: Using a Volt Meter, Verify the presence of 12vdc volt age at the terminal block on both the AI (power in from switch) and AO (power out to switch) pins. a. If there is no 12VDC voltage present, complete the following: A. Verify that the electric element switch on the interior switch panel is on. B. Verify heater is full of antifreeze, if the heater is full of antifreeze, trouble shoot Float Switch C. Install a jumper wire on the terminal block, between the AI and AO pins to bypass the electric element switch. If the “Electric Heating Element ” works with the jumper wire installed, replace switch. Disconnect the wires from the electric heating element. b. Disconnect the wires from the AC terminal block. c. 5. Check the black and white wires at the terminal block for continuity. Check the electric heating element for functionality by completing the following: A. Disconnect all power supplies. B. Remove all wires from the electric heating element. C. Using an ohmmeter, check the electric heating element for continuity. © 2009 Aqua-Hot® 375D Hydronic Heating System Service Manual—Rev. A — Page 34 — SECTION 4: AQUA-HOT COMPONENTS If no continuity exists follow the instructions in this section to replace the electric heating element. Replacement Procedure: FAILURE 5. Using a 7/8 inch socket, remove the defective electric heating element from the Aqua-Hot’s boiler tank. 6. Wrap the new electric element threads with Teflon tape. 7. Install the replacement 1500-watt electric heating element into the boiler tank . 8. Connect the wires removed from the defective electric heating element to the replacement electric heating element utilizing crimp terminals. 9. Reinstall the diesel burner. TO DISCONNECT ALL POWER SUPPLIES AND/OR TO ALLOW THE HEATER TO COOL BEFORE SERVICING COULD CAUSE SERIOUS DAMAGE OR PERSONAL INJURY. 1. 2. Ensure that the Aqua-Hot has been completely shut down and that all power sources have been disconnected. Also, because this replacement procedure will involve the boiler tank and the potential for hot coolant, be sure the heater has adequately cooled. Drain the antifreeze and water heating solution from the Aqua-Hot’s boiler tank using the drain valve. 10. Refill the Aqua-Hot’s boiler tank with the antifreeze and water heating solution. Reference Section 5. 11. Test for proper operation. 3. Remove the diesel Burner. Reference Section 7. 4. Remove the two wires secured to the defective electric heating element by cutting them with wire cutters. Figure 21 © 2009 Aqua-Hot® 375D Hydronic Heating System Service Manual—Rev. A — Page 35 — SECTION 4: AQUA-HOT COMPONENTS AC Relay: The AC relay is an electrical device where the DC circuit from the electric switch determines whether the AC power is permitted to flow to the electric heating element. This allows the 12 VDC electric switch to switch the 120 VAC electric heating element on and off in conjunction with the interior switch panel and control thermostat even though the electric heating element is on a separate circuit. Troubleshoot the AC relay if the following condition has occurred: 5. Locate the VAC relay. A. Check pins 1 & 0 for 12 VDC power and ground. 1. Pin 1 is - and Pin 0 is +. If there is no 12VDC + and - present: 1. check wires for damage or loose connections. 2. Follow the instructions in this manual for trouble shoot the Electric element Control thermostat. The electric heating element fails to operate. FAILURE Troubleshooting: 1. 2. 3. TO ALLOW THE HEATER TO COOL BEFORE SERVICING Disconnect the AC power source to the motorhome (unplugging from shore power or shutting off the generator). Turn the electric element switch on the interior switch panel . COULD CAUSE SERIOUS DAMAGE OR PERSONAL INJURY. B. Ensure that all the A.C. power supplies to the coach have been disconnected. 1. Turn the electric switch to the on position and Verify it is sending 12VDC power to the A.C. relay. 2. Locate the AC wires connected to the AC relay (pins 4 and 2), and remove the AC wires from the relay. 3. Using an ohmmeter, check the relay AC pins (4 and 2) for continuity. Using a voltmeter, check pin AI on the terminal block for 12 Volts-DC. If no voltage is present: A. Check the B fuse on fuse block, for power. If no power is present check fuse. B. If fuse is good, follow troubleshooting guide for float switch. 4. TO DISCONNECT ALL POWER SUPPLIES AND/OR Using a Voltmeter check pin A0, on terminal block, for power. A. If no power is present follow troubleshooting guide for the electric element switch. If no continuity exists, follow the instructions in this section to replace the AC relay. B. If 12 Volts of DC power are present, continue: © 2009 Aqua-Hot® 375D Hydronic Heating System Service Manual—Rev. A — Page 36 — SECTION 4: AQUA-HOT COMPONENTS AC Relay: Replacement Procedure: FAILURE TO DISCONNECT ALL POWER SUPPLIES AND/OR TO ALLOW THE HEATER TO COOL BEFORE SERVICING COULD CAUSE SERIUOS DAMAGE OR PERSONAL INJURY. 1. Ensure that the Aqua-Hot has been completely shut down and that all power sources have been disconnected. 2. Also, ensure that the motorhome is not connected to shore power and that a generator is not running during this replacement procedure. 3. Locate the A.C. Relay on side of unit, Reference Figure 22 for location of A.C. Relay. 4. Release the wires from the defective A.C. relay by removing the corresponding screw terminals. 5. Remove A.C. Relay from the side of the heater. 6. Attach the replacement A.C. relay to the side of heater. 7. Using the wiring diagram in Appendix ?, connect the wires previously removed to the replacement AC relay. 8. Test for proper operation. NOTE: The motorhome must be plugged into shore power or the generator must be running for the electric element to be operational. Figure 22 © 2009 Aqua-Hot® 375D Hydronic Heating System Service Manual—Rev. A — Page 37 — SECTION 4: AQUA-HOT COMPONENTS Zone Relay: The Zone relay is an electrical device where the DC circuit from the Interior Room Thermostat determines whether the DC power is permitted to flow to the circulation pump and the heat exchanger fans. This allows the Interior Room Thermostat to switch both the fans and circulation pump on. Troubleshoot the Zone relay if either of the following conditions have occurred: The Interior fans fail to operate. The circulation pump fails to operate 3. On the Fuse block, using a volt meter, check for 12VDC on the C Fuse. If no power is present check fuse. 4. On the zone relay, check pin 6 for 12 VDC +. If no power is present inspect wire #24 for damage. 5. On the Zone relay check pin 1 for 12 VDC + If no power is present check E fuse Troubleshooting: 6. On the Zone Relay check pin 0 for ground. If there is not a ground present, verify that the room thermostat is calling for heat, and that it is sending a ground signal to the relay. Fans: 5. On the zone relay, check pin #8 for 12 VDC +. 1. Turn the corresponding room thermostat on, on the interior of the coach, ensuring the thermostat is set at the maximum heat setting, to ensure they will call for heat. 2. Since the Aqua-Hot 375D is a hot water priority system, make sure the Low Temperature cut-off Thermostat is not tripped, by Making sure the heater is up to operating temperature, and that domestic hot water is not being used. Reference Low Temperature Cut-off thermostat troubleshooting in this section. If no voltage is present follow the replacement procedure for the zone relay in this section. Figure 23 © 2009 Aqua-Hot® 375D Hydronic Heating System Service Manual—Rev. A — Page 38 — SECTION 5: FILLING THE AQUA-HOT WITH HEATING SOLUTION Purging the Hydronic Heating System: Only propylene glycol based “boiler” type antifreeze deemed “GRAS” (Generally Recognized as Safe) by the FDA shall be used in the Aqua-Hot’s hydronic heating system. Failure to use the above specified antifreeze type could result in serious injury or death. Ensure that the overflow tube is connected from the AquaHot’s expansion tank connection to the expansion tank’s bottom connection and from the expansion tank’s top connection through the overflow tube hole in the motorhome’s bay floor prior to beginning this antifreeze and water heating solution fill procedure. Failure to do so could result in an antifreeze spill in the motorhome’s bay. Reference Figure 30. Figure 24 In order to provide the best freeze protection, boil-over protection, and anti-corrosion and rust protection, a 50/50 mixture of “GRAS” approved propylene glycol boiler antifreeze and water is recommended. Reference Section 1: Antifreeze and Water Heating Solution for additional information regarding the antifreeze and water heating solution. Be sure to use a “GRAS” boiler-type propylene glycol based antifreeze rather than an RV and Marine antifreeze or an automotive antifreeze/coolant. If assistance is needed in selecting an appropriate antifreeze, please contact the Aqua-Hot Heating Systems Product Application Department at 1-800-685-4298. 1. Open the Aqua-Hot’s drain valve located at the front of the heater. Reference Figure 25. 2. Connect a piece of 1/2 inch PEX-type tubing to the drain valve. This piece should be long enough to transport the antifreeze and water heating solution from its source to the Aqua-Hot. Figure 25 Drain Valve © 2009 Aqua-Hot® 375D Hydronic Heating System Service Manual—Rev. A ——Page Page3939—— SECTION 5: FILLING THE AQUA-HOT WITH HEATING SOLUTION 3. 4. 5. Fill the Aqua-Hot completely with the 50/50 mixture of antifreeze and water heating solution. This will take approximately five gallons; look for the solution to enter the overflow tube attached to the expansion tank connection on top of the Aqua-Hot. When refilling, open the air-release valve located on the expansion tank connection to release air pockets. Reference Figure 24. Hold the valve open until all air is released. Be sure the valve is closed when finished by hand-tightening. Look for the solution to enter the overflow tube attached to the expansion tank connection on top of the Aqua-Hot. Close the drain valve. 7. Repeat steps 5 and 6 for both heating loops until all air has been completely bled from the entire heating system. NOTE: All air is bled from the heating system when the antifreeze solution enters the overflow tube attached to the expansion tank connection. 8. Once the systems have been purged, disconnect the wire from the ground source and the terminal block. 9. Check the Aqua-Hot’s expansion tank and top it off to the cold level mark with the 50/50 antifreeze and water mixture, if necessary. 10. Ensure that each thermostat’s connection wiring is still in its original configuration. Reference Appendix A. Purging the System by Grounding the Zone Thermostat Connection: 1. Ensure that the boiler tank has been filled with the appropriate 50/50 mixture of antifreeze and water heating solution. 2. Locate Terminal Block for switches, heat exchangers, fans and thermostats. Reference Figure 26. 3. Locate the thermostat connection terminals T1 and T2. Reference Figure 27. 4. Connect a wire to the desired zone terminal and connect the opposite end of the cable to a ground source. Reference Figure 27. NOTE: The circulation pump will activate as soon as the terminal is connected to a ground source; therefore, disconnect the wire from the ground source during the antifreeze and water heating solution filling procedure. 5. Allow the circulation pump to operate for approximately 1-3 minutes in order to purge the corresponding heating loop, then remove the wire from the ground source. 6. Open the drain valve and completely fill the Aqua-Hot’s boiler tank with additional antifreeze and water heating solution. — Page 40 — © 2009 Aqua-Hot® 375D Hydronic Heating System Service Manual—Rev. A — Page 40 — SECTION 5: FILLING THE AQUA-HOT WITH HEATING SOLUTION Figure 26 Terminal Block for Switches, Heat Exchanger Fans and Thermostats Figure 27 Zone 1 Thermostat Connection Terminal Zone 2 Thermostat Connection Terminal © 2009 Aqua-Hot® 375D Hydronic Heating System Service Manual—Rev. A — Page Page 41 41 — — — SECTION 5: DRAINING THE AQUA-HOT WITH HEATING SOLUTION Only propylene glycol based “boiler” type antifreeze deemed “GRAS” (Generally Recognized as Safe) by the FDA shall be used in the Aqua-Hot’s hydronic heating system. Failure to use the above specified antifreeze type could result in serious injury or death. Ensure that the overflow tube is connected from the AquaHot’s expansion tank connection to the expansion tank’s bottom connection and from the expansion tank’s top connection through the overflow tube hole in the motorhome’s bay floor prior to beginning this antifreeze and water heating solution fill procedure. Failure to do so could result in an antifreeze spill in the motorhome’s bay. Reference Figure 30. cation Department at 1-800-685-4298. TO DRAIN THE AQUA-HOT 1. Connect a piece of 1/2 inch PEX-type tubing or rubber hose to the drain valve. This piece should be long enough to transport the antifreeze and water heating solution from the Aqua-hot to a bucket. 2. Open the Aqua-Hot’s drain valve located at the front of the heater. Reference Figure 27. Note: The Aqua-Hot 375 holds approximately 5 gallons of the antifreeze and water heating solution. In order to provide the best freeze protection, boil-over protection, and anti-corrosion and rust protection, a 50/50 mixture of “GRAS” approved propylene glycol boiler antifreeze and water is recommended. Reference Section 1: Antifreeze and Water Heating Solution for additional information regarding the antifreeze and water heating solution. Be sure to use a “GRAS” boiler-type propylene glycol based antifreeze rather than an RV and Marine antifreeze or an automotive antifreeze/coolant. If assistance is needed in selecting an appropriate antifreeze, please contact the Aqua-Hot Heating Systems Product Appli- Figure 28 Drain Valve © 2009 Aqua-Hot® 375D Hydronic Heating System Service Manual—Rev. A — Page 42 — SECTION 6: DIESEL BURNER General Recommended Maintenance Figure 29 Monthly Check the Aqua-Hot’s antifreeze and water heating solution to ensure that it is filled to the proper level. This solution level should be checked in the Aqua-Hot’s Expansion Tank and should only be checked when the Aqua-Hot is at maximum operating temperature (i.e., when the Diesel-Burner cycles OFF at 190±5°F). The antifreeze and water heating solution’s level should be at the “HOT” mark on the Expansion Tank; reference Figure 30. If the antifreeze and water heating solution needs replenishing, fill the Aqua-Hot’s Expansion Tank to the “HOT” level mark. Be sure to reference Section 1: Antifreeze and Water Heating Solution for the proper antifreeze type and mixture. If the antifreeze and water heating solution frequently needs replenishing, please contact the Aqua-Hot Heating Systems Technical Department at 1-800-685-4298 for assistance. Annually The Aqua-Hot operates on both AC and DC power. Be sure to disconnect the 120 Volt-AC power supply prior to cleaning or servicing. Failure to do so could result in serious personal injury, electrical shock, or even death! Figure 30 Operating the Aqua-Hot’s Diesel-Burner or the 120 VoltAC Electric Heating Element without the antifreeze and water heating solution will cause serious damage to the heater. To keep the Aqua-Hot running smoothly, it is ideal to have the Diesel-Burner tuned-up annually. A tune-up should consist of a new Fuel Nozzle and Fuel Filter, along with a thorough cleaning of the Combustion Chamber, if necessary (reference Figure 29). To ensure maximum Diesel-Burner performance, always use the recommended Fuel Nozzle and Fuel Filter (i.e., 10 Micron) when replacing these parts. NOTE: Be sure to use care when handling the Fuel Nozzle; oils and/or small dust or dirt particles from the hands may plug the nozzle’s small orifice. A partially plugged orifice will restrict fuel flow, which will affect the combustion process of the DieselBurner (e.g., excessive smoking, etc.). © 2009 Aqua-Hot® 375D Hydronic Heating System Service Manual—Rev. A — Page 43 — SECTION 6: DIESEL BURNER Figure 31 Figure 31A Figure 31B Figure 31C © 2009 Aqua-Hot® 375D Hydronic Heating System Service Manual—Rev. A — Page 44 — SECTION 6: DIESEL BURNER Chart 2 © 2009 Aqua-Hot® 375D Hydronic Heating System Service Manual—Rev. A — Page 45 — SECTION 6: DIESEL BURNER Chart 2 (Continued) © 2009 Aqua-Hot® 375D Hydronic Heating System Service Manual—Rev. A — Page 46 — SECTION 6: DIESEL BURNER © 2009 Aqua-Hot® 375D Hydronic Heating System Service Manual—Rev. A — Page 47 — SECTION 6: DIESEL BURNER Figure 32 Figure 33 © 2009 Aqua-Hot® 375D Hydronic Heating System Service Manual—Rev. A — Page 48 — SECTION 6: DIESEL BURNER Rear View Figure 34 Pin Number 1 2 3 4 5 6 7 8 9 Wire Color (Yellow) (Yellow) (Orange) (Black) (Red) (Black) (Violet) (White) (Pink) Function Cad Cell Cad Cell Motor SIG Motor Ignition Coil + Ignition Coil Fuel Solenoid + Fuel Solenoid Motor + © 2009 Aqua-Hot® 375D Hydronic Heating System Service Manual—Rev. A — Page 49 — SECTION 6: DIESEL BURNER Figure 35 © 2009 Aqua-Hot® 375D Hydronic Heating System Service Manual—Rev. A — Page 50 — SECTION 6: DIESEL BURNER Figure 36 © 2009 Aqua-Hot® 375D Hydronic Heating System Service Manual—Rev. A — Page 51 — SECTION 7: DETACHING AND REATTACHING THE DIESEL BURNER Instructions for Detaching the Diesel Burner WARNING! Be sure to move the Diesel-Burner switch on the Interior Switch Panel to the OFF position and disconnect the Diesel-Burner’s power supply before detaching the Diesel-Burner from the Aqua-Hot. Failure to turn off the Diesel-Burner and disconnect power could result in serious bodily injury. CAUTION! Be sure to clamp off the Fuel Supply and Return lines at the ports on top of the Aqua-Hot prior to beginning this replacement procedure. Step 1: Turn Off the Diesel Switch Figure 37 1. Move the Interior Switch Panel’s Diesel-Burner switch to the “OFF” position. Step 2: Remove the Access Cover Figure 38 1. Remove the Aqua-Hot’s access cover by locating the bolts securing it in place. 2. Unscrew the bolt securing the front of the cover in place. © 2009 Aqua-Hot® 375D Hydronic Heating System Service Manual—Rev. A — Page 52 — SECTION 7: DETACHING AND REATTACHING THE DIESEL BURNER 3. Unscrew the bolt securing the top of the cover in place. Figure 39 4. Lift the access cover off and set it aside. Figure 39A Step 3: Disconnect the Diesel Burner fro the Diesel Burner Controller 1. Locate the Diesel-Burner’s white, electrical plug connection to the Diesel-Burner Controller. Figure 40 2. Press back on the two tabs securing the connections together Figure 40A © 2009 Aqua-Hot® 375D Hydronic Heating System Service Manual—Rev. A — Page 53 — SECTION 7: DETACHING AND REATTACHING THE DIESEL BURNER Figure 41 3. Pull the two connections completely apart. Step 4: Remove the fuel lines from the Diesel Burner 1. Locate the fuel pump assembly on the dieselburner and the corresponding fuel lines. Figure 42 2. Using an 11/16 wrench, loosen the nuts securing each fuel line to the fuel pump assembly. Figure 42A © 2009 Aqua-Hot® 375D Hydronic Heating System Service Manual—Rev. A — Page 54 — SECTION 7: DETACHING AND REATTACHING THE DIESEL BURNER Step 5: Remove the Diesel Burner from the Aqua-Hot 1. The Diesel-Burner is secured to the Aqua-Hot with three nuts that can be removed by using a 9/16 inch socket wrench with a wobble extension. 2. Carefully lift the Diesel-Burner away from the Aqua-Hot. Figure 44 Figure 43 NOTE: It may be necessary to move the Diesel-Burner’s Ignition Module back out of the way in order to access the top bolt. Reference Section 8 of this manual for instructions. 3. Remove the Mounting Gasket from the boiler tank’s front plate and the Diesel-Burner. Figure 45 © 2009 Aqua-Hot® 375D Hydronic Heating System Service Manual—Rev. A — Page 55 — SECTION 7: DETACHING AND REATTACHING THE DIESEL BURNER Instructions for Reattaching the Diesel Burner Step 1: Replace the Mounting Gasket 1. Clean the boiler tank’s front plate. Figure 46 2. Install a new mounting gasket into place. Figure 47 Step 2: Reinstall the Diesel Burner 1. Align the Diesel-Burner’s front air-tube plate with the combustion chamber and slide onto the bolts protruding from the boiler tank. Figure 48 2. Finger tighten all three nuts previously removed to secure the Diesel-Burner to the boiler tank. Figure 49 © 2009 Aqua-Hot® 375D Hydronic Heating System Service Manual—Rev. A — Page 56 — SECTION 7: DETACHING AND REATTACHING THE DIESEL BURNER 3. Using a 9/16 socket wrench with a wobble extension, tighten the three nuts securely. Figure 50 Step 3: Reconnect the Fuel Lines 1. Connect the Supply and Return Fuel Lines to the Diesel-Burner’s Fuel Pump Assembly. Figure 51 2. Using an 11/16 wrench, tighten the nuts on the fuel lines to the Fuel Pump Assembly to secure the lines in place. Figure 52 © 2009 Aqua-Hot® 375D Hydronic Heating System Service Manual—Rev. A — Page 57 — SECTION 7: DETACHING AND REATTACHING THE DIESEL BURNER Step 4: Reconnect the Diesel Burner to the Diesel Burner Controller 1. Push the Diesel-Burner and Diesel-Burner Controller’s connections together. Figure 53 2. Press down on the tabs to secure them together. Figure 54 © 2009 Aqua-Hot® 375D Hydronic Heating System Service Manual—Rev. A — Page 58 — SECTION 7: DETACHING AND REATTACHING THE DIESEL BURNER Step 5: Reinstall the Access Cover 1. Set the access cover back into place on the Aqua-Hot. Figure 55 2. Insert the bolts in the two locations on the Aqua-Hot to secure the cover in place; tighten the bolts securely. NOTE: The access cover must be installed prior to operation as a safety switch exists, which will prevent the Aqua-Hot from operating whenever the access cover is not properly installed. CAUTION! Be sure to remove the clamps from the Fuel Supply and Return lines prior to starting the Diesel-Burner. Failure to do so could result in serious damage to the Diesel-Burner. © 2009 Aqua-Hot® 375D Hydronic Heating System Service Manual—Rev. A — Page 59 — SECTION 8: DIESEL BURNER COMPONENTS AND REPAIR INFORMATION Figure 56 Diesel Burner Components 1 .......... Mounting Gasket 12 ........ Air Shutter 2 .......... Air-Tube Assembly 13 ........ Air Band 3 .......... Fuel Nozzle 14 ........ Escutcheon Plate Spline Nut 4 .......... Igniter Assembly 15 ........ Escutcheon Plate 5 .......... Ignition Module Assembly 16 ........ Blower Housing 6 .......... Ignition Module Gasket Kit 17 ........ Air Guide 7 .......... Flame Sensor 18 ........ Coupling 8 .......... Flame Sensor Socket 19 ........ Blower Wheel 9 .......... Fuel-Supply Tube 20 ........ Blower Motor 10 ........ Fuel Pump Assembly 21……..Diesel-Burner Controller 11……..Cord-Set © 2009 Aqua-Hot® 375D Hydronic Heating System Service Manual—Rev. A — Page 60 — SECTION 8: DIESEL BURNER COMPONENTS AND REPAIR INFORMATION Mounting Gasket: The Aqua-Hot operates on both AC and DC power. Be sure to disconnect the 120 Volt-AC power supply from the Aqua-Hot prior to servicing. Failure to do so could result in serious personal injury, electrical shock, or even death! Function: The Mounting Gasket creates a tight seal between the Combustion Chamber and the Diesel-Burner Mounting Plate. Figure 57 Air-Tube Assembly: Replacement Indicator: The Mounting Gasket should be replaced each time the DieselBurner is detached from the Aqua-Hot. Replacement Procedure: The Aqua-Hot operates o both AC and DC power. Be sure to disconnect the 120 Volt-AC power supply from the Aqua -Hot prior to servicing. Failure to do so could result in serious personal injury, electrical shock, or even death! Function: Be sure to clamp off the Fuel Supply and Return lines prior to beginning this replacement procedure. 1. Follow the “Detaching and Reattaching the Diesel-Burner” procedure located in Section 7 of this manual. 2. Remove the existing Mounting Gasket from the Boiler Tank’s front plate and from the Diesel-Burner Mounting Plate. Be sure to clean the old gasket completely off of both plates 3. Set the replacement Mounting Gasket into place on the Boiler Tank’s front plate. 4. Following the procedure for “Detaching and Reattaching the Diesel-Burner,” reattach the Diesel-Burner to the Aqua -Hot. Be sure to remove the clamps from the Fuel Supply and Fuel Return lines prior to starting the Diesel-Burner. The Air-Tube Assembly houses the Igniter Assembly and helps to control the flame produced by the Diesel-Burner. Replacement Indicator: Replace the Air-Tube Assembly if it is broken or cracked. Replacement Procedure: Be sure to clamp off the Fuel Supply and Return lines prior to beginning this replacement procedure. 1. Following the procedure for “Detaching and Reattaching the Diesel-Burner,” located in section 7. Detach the Diesel-Burner from the Aqua-Hot. 2. Remove the Mounting Gasket from the Air-Tube Assembly. 3. Remove the Igniter Assembly from the Diesel-Burner; reference the “Igniter Assembly Replacement” procedure located in this section. 4. Remove all screws and bolts securing the Air-Tube Assembly to the Diesel-Burner’s Blower Housing. © 2009 Aqua-Hot® 375D Hydronic Heating System Service Manual—Rev. A — Page 61 — SECTION 8: DIESEL BURNER COMPONENTS AND REPAIR INFORMATION 5. Remove the Air-Tube Assembly from the Diesel-Burner. 8. Install a new Mounting Gasket; reference the “Mounting Gasket Replacement” procedure in this section. 6. Attach the replacement Air-Tube Assembly to the DieselBurner’s Blower Housing and secure all screws and bolts previously removed. 9. Following the procedure for “Detaching and Reattaching the Diesel-Burner,” reattach the Diesel-Burner to the Aqua -Hot. 7. Following the “Igniter Assembly Replacement” procedure, reinstall the Igniter Assembly. Be sure to remove the clamps from the Fuel Supply and Fuel Return lines prior to starting the Diesel-Burner. Figure 58 Label for nozzle information, as well as the Parts Manual in order to ensure that the proper fuel nozzle is used. Fuel Nozzle: The Aqua-Hot operates on both AC and DC power. Be sure to disconnect the 120 Volt-AC power supply from the Aqua-Hot prior to servicing. Failure to do so could result in serious personal injury, electrical shock, or even death! Function: The Fuel Nozzle atomizes the incoming diesel fuel from the Fuel Pump Assembly in order to reduce the fuel into a fine spray, which is mixed with incoming combustion air, and then ignited within the Combustion Chamber to heat the Aqua-Hot’s Boiler Tank. Replacement Indicator: Replace the Fuel Nozzle if it does not properly spray the diesel fuel in a cone-shaped pattern, is damaged or clogged, or as a part of annual maintenance. Reference the Aqua-Hot’s I.D Replacement Procedure: NOTE: The Diesel-Burner does not need to be detached from the Aqua-Hot for this replacement procedure. NOTE: Be sure to use care when handling the replacement Fuel Nozzle as oils and/or small dust particles from the hands may plug the Fuel Nozzle’s small orifice. A partially plugged orifice will restrict fuel flow, which will affect the combustion process of the Diesel-Burner (i.e., excessive smoking). 1. Loosen the Fuel-Supply Tube Assembly’s hexagonal locknut on the Fuel Pump Assembly with a 7/16 inch open-end wrench. NOTE: The Fuel-Supply Tube Assembly does not need to be completely removed from the Fuel Pump Assembly, but must be loosened to rotate out of the way. © 2009 Aqua-Hot® 375D Hydronic Heating System Service Manual—Rev. A — Page 62 — SECTION 8: DIESEL BURNER COMPONENTS AND REPAIR INFORMATION 2. Using a 7/16 inch open-end wrench, remove the FuelSupply Tube Assembly’s hexagonal locknut, which secures the Fuel-Supply Tube to the Igniter Assembly. 3. Remove the Fuel-Supply Tube Assembly from the Igniter Assembly and rotate out of the way. 4. Loosen the two screws securing the Ignition Module Retaining Clips and rotate both clips to release the Ignition Module. Then tilt the Ignition Module back on its hinge. 5. Loosen and remove the Escutcheon Plate Spline Nut from the Escutcheon Plate. 6. Reach into the Blower Housing and pull the Igniter Assembly out of the Diesel-Burner, being careful not to damage the electrodes or insulators while handling. NOTE: To ease the removal of the Igniter Assembly, rotate the Igniter Assembly 180° from the installed position while removing the Igniter Assembly from the AirTube Assembly. If it continues to be difficult to remove the Igniter Assembly, the Escutcheon Plate screw securing the Escutcheon Plate to the Blower Housing can be removed; however, be sure to align the edge of the Escutcheon Plate back to the edge of the label and secure with the Escutcheon Plate screw. 9. Install the replacement Fuel Nozzle onto the Igniter Assembly and tighten. NOTE: Be sure to tighten the Fuel Nozzle, loosen it 1/4 turn, and then firmly retighten. This will establish a seated fit and avoid any leaks. NOTE: The Ignition Electrodes may need to be adjusted after replacing the Fuel Nozzle; reference the Igniter Assembly information in Section 8 for the Ignition Electrode Adjustment procedure. 10. Insert the Igniter Assembly back into the Air-Tube Assembly and align the Fuel-Supply Tube back with the Escutcheon Plate. 11. Tighten the Escutcheon Plate Spline Nut onto the FuelSupply Tube to secure it into place. 12. Close the Ignition Module and secure with the Ignition Module Retaining Clips. 13. Secure the Fuel-Supply Tube Assembly to the DieselBurner and tighten both hexagonal locknuts completely. NOTE: Ensure that the Escutcheon Plate is set to the edge of the indicator label on the Blower Housing. 7. Using a 3/4 inch wrench, hold the Igniter Assembly at the base of the Fuel Nozzle (next to the Static Plate) while loosening the Fuel Nozzle with a 5/8 inch open-end wrench. 14. Turn ON the Interior Switch Panel’s Diesel-Burner switch for 5 seconds, then switch it OFF. This will activate the Diesel-Burner’s prime-cycle and flush the fuel system of any potential contaminants. 8. Remove the defective Fuel Nozzle from the Igniter Assembly. NOTE: The Diesel-Burner will fire anytime the Diesel-Burner switch is turned on, even if it is turned back off before the Diesel-Burner actually fires. Figure 59 © 2009 Aqua-Hot® 375D Hydronic Heating System Service Manual—Rev. A — Page 63 — SECTION 8: DIESEL BURNER COMPONENTS AND REPAIR INFORMATION Figure 60 Igniter Assembly: The Aqua-Hot operates on both AC and DC power. Be sure to disconnect the 120 Volt-AC power supply prior to servicing. Failure to do so could result in serious personal injury, electrical shock, or even death! Function: The Igniter Assembly contains the Ignition Electrodes, Fuel Nozzle, Static Plate, and Fuel-Supply Tube which together ignite the incoming fuel in order to create the Diesel-Burner’s flame. Replacement Indicator: Replace the Igniter Assembly if the Nozzle Holder is damaged or fuel pipe connection is damaged. 3. Loosen and remove the Escutcheon Plate Spline Nut from the Escutcheon Plate. 4. Reach into the Blower Housing and pull the Igniter Assembly out of the Diesel-Burner. NOTE: To ease the removal of the Igniter Assembly, rotate the Igniter Assembly 180° from the installed position while removing the Igniter Assembly from the AirTube Assembly. If it continues to be difficult to remove the Igniter Assembly, the Escutcheon Plate screw securing the Escutcheon Plate to the Blower Housing can be removed; however, be sure to align the edge of the Escutcheon Plate back to the edge of the label and secure with the Escutcheon Plate screw. 5. Insert the replacement Igniter Assembly into the Air-Tube Assembly and align the Fuel-Supply Tube back with the Escutcheon Plate. 6. Tighten the Escutcheon Plate Spline Nut onto the FuelSupply Tube to secure it into place. 7. Close the Ignition Module and secure with the Ignition Module Retaining Clips. Secure the Fuel-Supply Tube to the Diesel-Burner and tighten both hexagonal locknuts completely. Replacement Procedure: NOTE: The Diesel-Burner does not need to be detached from the Aqua-Hot for this replacement procedure. 1. 2. Loosen the hexagonal locknut securing the Fuel-Supply Tube to the Diesel-Burner. Reference Fig. 61. Loosen the two screws securing the Ignition Module Retaining Clips and rotate both clips to release the Ignition Module. Then tilt the Ignition Module back on its hinge. 8. NOTE: Ensure that the Escutcheon Plate is set to the edge of the indicator label on the Blower Housing. © 2009 Aqua-Hot® 375D Hydronic Heating System Service Manual—Rev. A — Page 64 — SECTION 8: DIESEL BURNER COMPONENTS AND REPAIR INFORMATION Figure 61 Ignition Electrode Adjustment and Cleaning: The Ignition Module produces a high-voltage spark across the Ignition Electrodes; therefore, the Ignition Electrodes must be properly adjusted and maintained to ensure that the fuel mixture is ignited when appropriate. Adjusting the Ignition Electrodes: Using the Beckett T-Gauge, verify that the Ignition Electrodes are properly adjusted as in Figure 64. If the Ignition Electrodes are not properly adjusted, perform the following procedure: 1. Slightly loosen the Electrode Clamp retaining screw with a 3/8 inch socket wrench. 2. Referencing Figures 63 and 64, properly align the Ignition Electrodes. 3. Tighten the Electrode Clamp Retaining Screw with a 3/8 inch socket wrench. 4. Following the replacement procedure for the Igniter Assembly, reinstall the Igniter Assembly into the DieselBurner. Cleaning the Ignition Electrodes: Polish away any carbon deposits, which may have baked onto the metal tips of the Ignition Electrodes, with a Scotch Brite® pad (or similar). NOTE: After cleaning the Ignition Electrodes, verify that the Ignition Electrodes are properly adjusted with the Beckett T-Gauge; adjust if needed. © 2009 Aqua-Hot® 375D Hydronic Heating System Service Manual—Rev. A — Page 65 — SECTION 8: DIESEL BURNER COMPONENTS AND REPAIR INFORMATION Figure 62 Figure 63 Figure 63A Figure 64 Figure 64A © 2009 Aqua-Hot® 375D Hydronic Heating System Service Manual—Rev. A — Page 66 — SECTION 8: DIESEL BURNER COMPONENTS AND REPAIR INFORMATION Ignition Module Assembly: 2. The Aqua-Hot operates on both AC and DC power. Be sure to disconnect the 120 Volt-AC power supply prior to servicing. Failure to do so could result in serious personal injury, electrical shock, or even death! 3. 4. Remove the Ignition Module Assembly by loosening the two screws securing it to the Diesel Burner Blower Housing. 4. Secure the replacement Ignition Module Assembly to the Blower housing, using the two screws previously removed. Function: The Ignition Module’s Igniter produces a high-voltage ignition spark (approximately 20,000 volts), which is released across the metal tips of the Igniter Assembly’s Electrodes during the DieselBurner’s initial start-up. This spark ignites the incoming fuel-air mixture, which produces a flame to heat the Aqua-Hot’s Boiler Tank. Replacement Indicator: Replace the Ignition Module Assembly if it becomes cracked or damaged or if the Igniter is unable to produce a spark across the Igniter Assembly’s Electrodes. Replacement Procedure: NOTE: The Diesel-Burner does not need to be detached from the Aqua-Hot for this replacement procedure. 1. Loosen the two screws securing the Ignition Module Retaining Clips and rotate both clips to release the Ignition Module Assembly, then tilt the Ignition Module Assembly back on its hinge. Using a Molex Pin Extractor tool, remove the Igniter Assembly’s two wires from the #5 and the #6 Terminals on the Diesel Burner’s white, electrical plug; reference figure 34. Work the wires out and away from the Diesel-Burner; reference Figure ?. NOTE: It may be necessary to clip off and remove the wire ties bundling the Diesel-Burner components’ wires together in order to free the Cord-Set for removal. 5. Insert the replacement wires thru the Blower Housing and insert the wires into the Diesel-Burner’s white, electrical plug. The red wire should be inserted into the #5 terminal and the black wire should be inserted into the #6 terminal on the Diesel-Burner’s white, electrical plug; reference Figure 34 and Appendix A. 6. Close the Ignition Module Assembly, and secure with retaining clips, previously released. Tighten screws. 7. Test for proper operation. Figure 65 Retaining Clips © 2009 Aqua-Hot® 375D Hydronic Heating System Service Manual—Rev. A — Page 67 — SECTION 8: DIESEL BURNER COMPONENTS AND REPAIR INFORMATION 4. Close the Ignition Module Assembly and secure with the Igniter Gasket Kit Ignition Module Retaining Clips. The Aqua-Hot operates on both AC and DC power. Be sure to disconnect the 120 Volt-AC power supply prior to servicing. Failure to do so could result in serious personal injury, electrical shock, or even death! Flame Sensor Gasket Replacement Procedure: 1. Loosen the two screws securing the Ignition Module Retaining Clips and rotate both clips to release the Ignition Module Assembly. Then tilt the Ignition Module Assembly back on its hinge. 2. Remove the Flame Sensor Socket from the underside of the Ignition Module Assembly by loosening the Flame Sensor Gasket from the tabs and sliding the Flame Sensor’s Mounting Bracket forward until it is free from the clip on the Ignition Module Assembly. 3. Remove the defective Flame Sensor Gasket from the Flame Sensor Socket and slide the replacement Flame Sensor Gasket onto the Flame Sensor Socket ensuring that the flat bottom of the Flame Sensor Gasket is level with the Flame Sensor’s Mounting Bracket. 4. Set the Flame Sensor Socket back into place by tilting the Flame Sensor Socket up at an angle to slide under the clip, then set the Flame Sensor Socket and Mounting Bracket flat against the Ignition Module Assembly. 5. Secure the Flame Sensor Socket into place by gently pressing down on the rear of the Flame Sensor Socket and pushing back toward the clip while wiggling the Flame Sensor Socket slightly until the Flame Sensor Socket moves into place. 6. Place the Flame Sensor Gasket onto the tabs on the underside of the Ignition Module Assembly. 7. Close the Ignition Module and secure with the Ignition Module Retaining Clips. Function: These Gaskets provide a tight seal between the Ignition Module and the Diesel-Burner, as well as protection for the Flame Sensor. Replacement Indicator: 1.The sealing surfaces of each Gasket should be checked and replaced at the first sign of any damage or deterioration. 2. The Heater black smokes or rumbles. Ignition Module Gasket Replacement Procedure: NOTE: The Diesel-Burner does not need to be detached from the Aqua-Hot for this replacement procedure. 1. Loosen the two screws securing the Ignition Module Retaining Clips and rotate both clips to release the Ignition Module Assembly. Then tilt the Ignition Module Assembly back on its hinge. 2. Remove the existing Ignition Module Gasket from the Ignition Module Assembly. 3. Apply the replacement Ignition Module Gasket to the underside of the Ignition Module Assembly. NOTE: Be sure the Ignition Module Gasket is firmly secured in place to avoid fragments of the Gasket interfering with the operation of the Diesel-Burner. Figure 66 © 2009 Aqua-Hot® 375D Hydronic Heating System Service Manual—Rev. A — Page 68 — SECTION 8: DIESEL BURNER COMPONENTS AND REPAIR INFORMATION Figure 67 Figure 68 © 2009 Aqua-Hot® 375D Hydronic Heating System Service Manual—Rev. A — Page 69 — SECTION 8: DIESEL BURNER COMPONENTS AND REPAIR INFORMATION Flame Sensor and Flame Sensor Socket: The Aqua-Hot operates on both AC and DC power. Be sure to disconnect the 120 Volt-AC power supply prior to servicing. Failure to do so could result in serious personal injury, electrical shock, or even death! NOTE: Ensure that the ohmmeter has been calibrated prior to checking the Flame Sensor for resistance. Function: The Flame Sensor and Flame Sensor Socket together create a photo-resistive device, which supplies the Diesel-Burner’s Electronic Controller with a DC voltage signal when it detects a flame (i.e., light-source). Replacement Indicator 2. Supporting the Flame Sensor Socket and the Flame Sensor Gasket, pull the defective Flame Sensor straight out from the Flame Sensor Socket. 3. Insert the replacement Flame Sensor’s pins into the Flame Sensor Socket and push the Flame Sensor firmly into place. 4. Re-test the Flame Sensor for resistance; reference the “Component Test” in this section. NOTE: If the Flame Sensor continues to register resistance when exposed to a light-source, the Flame Sensor and Flame Sensor Socket must be replaced; reference the “Flame Sensor Socket Replacement Procedure” in this section for instructions. Flame Sensor Socket Replacement Procedure: NOTE: The Diesel-Burner does not need to be detached from the Aqua-Hot for this replacement procedure. Cracked Component Test Fails 1. Loosen the two screws securing the Ignition Module Retaining Clips and rotate both clips to release the Ignition Module Assembly. Then tilt the Ignition Module Assembly back on its hinge. 2. Using a Molex Pin Extractor Tool, remove the Flame Sensor Socket’s two wires from the #1 and #2 terminals on the Diesel-Burner’s white, electrical plug; reference Figure 13 and Appendix A. 3. Remove the Flame Sensor Socket from the underside of the Ignition Module Assembly by loosening the Flame Sensor Gasket from the tabs and sliding the Flame Sensor’s Mounting Bracket forward until it is free from the clip on the Ignition Module Assembly. Then, lift the Flame Sensor Socket and the attached Gasket away from the Ignition Module Assembly. 4. Remove the Flame Sensor Gasket from the defective Flame Sensor Socket and slide it onto the replacement Flame Sensor Socket, ensuring that the flat bottom of the Flame Sensor Gasket is level with the Flame Sensor’s Mounting Bracket. Component Test: 1. Remove the Flame Sensor from the Flame Sensor Socket. 2. Using an ohmmeter, test the Flame Sensor by covering the Flame Sensor’s glass surface with a shop rag to simulate a no-flame condition (resistance should be greater than 20,000 ohms), then expose the lens to a light source to simulate a flame condition (resistance should be less than 1,600 ohms). Cleaning Tips/Maintenance: For light dirt, dust, and/or carbon deposits, simply wipe off the Flame Sensor with a soft cloth. Flame Sensor Replacement Procedure: NOTE: The Diesel-Burner does not need to be detached from the Aqua-Hot for this replacement procedure. 1. Loosen the two screws securing the Ignition Module Retaining Clips and rotate both clips to release the Ignition Module Assembly. Then tilt the Ignition Module Assembly back on its hinge. © 2009 Aqua-Hot® 375D Hydronic Heating System Service Manual—Rev. A — Page 70 — SECTION 8: DIESEL BURNER COMPONENTS AND REPAIR INFORMATION 5. Insert one of the Flame Sensor Socket’s wires into Terminal #1 7. and the other wire into Terminal #2 on the Diesel-Burner’s white, electrical plug; reference Figure 34. NOTE: The Flame Sensor Socket’s wires are not polaritysensitive; therefore, either wire can be inserted into Terminals #1 and #2. 8. 6. Set the Flame Sensor Socket back into place by tilting the Flame Sensor Socket up at an angle to slide under the clip, then 9. set the Flame Sensor Socket and Mounting Bracket flat against the Ignition Module Assembly. Secure the Flame Sensor Socket into place by gently pressing down on the rear of the Flame Sensor Socket and pushing back toward the clip while wiggling the Flame Sensor Socket slightly until the Flame Sensor Socket moves into place. Place the Flame Sensor Gasket onto the tabs on the underside of the Ignition Module Assembly. Close the Ignition Module Assembly and secure with the Ignition Module Retaining Clips. Figure 69 Figure 29 © 2009 Aqua-Hot® 375D Hydronic Heating System Service Manual—Rev. A — Page 71 — SECTION 8: DIESEL BURNER COMPONENTS AND REPAIR INFORMATION Fuel-Supply Tube Assembly: Replacement Procedure: NOTE: The Diesel-Burner does not need to be detached from the Aqua-Hot for this replacement procedure. The Aqua-Hot operates on both AC and DC power. Be sure to disconnect the 120 Volt-AC power supply prior to servicing. Failure to do so could result in serious personal injury, electrical shock, or even death! 1. Loosen both hexagonal locknuts on either end of the FuelSupply Tube Assembly with a 7/16 inch open-end wrench. 2. Remove the defective Fuel-Supply Tube Assembly from the Diesel-Burner. 3. Install the replacement Fuel-Supply Tube Assembly onto the Diesel-Burner. 4. Tighten each hexagonal locknut completely. Function: The Fuel-Supply Tube Assembly transports the DieselBurner’s fuel from the Fuel Pump Assembly to the Igniter Assembly Fuel Tube. Replacement Indicator: Replace the Fuel-Supply Tube if it becomes broken, damaged, or experiences leaks. Figure 70 Fuel Pump Assembly: The Aqua-Hot operates on both AC and DC power. Be sure to disconnect the 120 Volt-AC power supply prior to servicing. Failure to do so could result in serious personal injury, electrical shock, or even death! Function: The Fuel Pump Assembly draws diesel fuel from the vehicle’s main fuel tank and creates a preset pressure of 145 PSI (required for proper fuel atomization). Then, when the signal is given, the Fuel Pump Assembly’s Fuel Solenoid Valve opens, which allows the fuel to flow to the Fuel Nozzle, where it is released to mix with the combustion-air and ignited to establish a flame, which heats the Aqua-Hot’s Boiler Tank. © 2009 Aqua-Hot® 375D Hydronic Heating System Service Manual—Rev. A — Page 72 — SECTION 8: DIESEL BURNER COMPONENTS AND REPAIR INFORMATION Replacement Indicator: 3. Replace if the Fuel Pump Leaks, or fails to pump fuel. Remove the Fuel-Supply Tube Assembly: A. Loosen both hexagonal locknuts on either end of the Fuel-Supply Tube Assembly with a 7/16 inch openend wrench. Component Test: 1. Clamp off the Fuel Supply and Return lines at the ports on top of the Aqua-Hot; then, remove these lines completely. 2. Attach short pieces of fuel line to both the Aqua-Hot’s Fuel Return and Fuel Supply ports; reference Figure 31. 4. Using a 3/8 inch socket wrench, remove the two bolts securing the Fuel Pump Assembly to the Blower Housing. Submerse the hose connected to the Fuel Supply port into a container of diesel fuel; reference Figure 31. 5. Pull the Fuel Pump Assembly straight out from the Blower Housing. 3. 4. 5. Place the hose connected to the Fuel Return port into an empty container. Turn the Interior Switch Panel’s Diesel-Burner switch ON to activate the Diesel-Burner. NOTE: If fuel does not flow into the empty container from the Aqua-Hot’s Fuel Return port, and there are no air leaks in the fuel system, the Fuel Pump Assembly must be replaced. Fuel Pressure Check and Adjustment Procedure: For information regarding a Fuel Pressure Test and/or Adjustment Procedure for the Diesel-Burner, please contact the Technical Support Department at 1-800-685-4298. Replacement Procedure: B. Pull the Fuel-Supply Tube Assembly away from the Diesel-Burner. NOTE: The Coupling may remain attached to the Fuel Pump Assembly upon removal from the Diesel-Burner. 6. Insert the replacement Fuel Pump Assembly and attached Coupling, if applicable, into the Blower Housing. NOTE: In order to connect the Fuel Pump Assembly to the Blower Motor with the Coupling, it may be necessary to pull the Ignition Module Assembly back on its hinge and rotate the Blower Wheel slowly until both the Blower Motor and the Fuel Pump Assembly are seated correctly on the Coupling. NOTE: The Mounting Gasket must be replaced each time the Diesel-Burner is detached from the Aqua-Hot; reference the procedure for “Detaching and Reattaching the Diesel-Burner,” located in Section 4 of this manual for instructions. Be sure to clamp off the Fuel Supply and Return lines prior to beginning this replacement procedure. 1. Following the procedure for “Detaching and Reattaching the Diesel-Burner,” located in Section 7 of this manual, detach the Diesel-Burner from the Aqua-Hot. 2. Unplug the Cord-Set from the Fuel Pump Assembly’s Fuel Solenoid Valve. © 2009 Aqua-Hot® 375D Hydronic Heating System Service Manual—Rev. A — Page 73 — SECTION 8: DIESEL BURNER COMPONENTS AND REPAIR INFORMATION 7. Secure the replacement Fuel Pump Assembly to the Blower Housing with the two bolts previously removed. 9. Plug the Cord-Set back into the Fuel Pump Assembly’s Fuel Solenoid Valve. 8. Reattach the Fuel-Supply Tube Assembly to the Escutcheon Plate Fuel Connection and Fuel Pump Assembly and tighten both hexagonal locknuts with a 7/16 inch open-end wrench. 10. Following the procedure for “Detaching and Reattaching the Diesel-Burner” located in Section 7 of this manual, reattach the Diesel-Burner to the Aqua-Hot. Be sure to remove the clamps from the Fuel Supply and Fuel Return lines prior to starting the Diesel-Burner. Failure to do so could result in serious damage to the Diesel-Burner. Figure 71 Figure 72 © 2009 Aqua-Hot® 375D Hydronic Heating System Service Manual—Rev. A — Page 74 — SECTION 8: DIESEL BURNER COMPONENTS AND REPAIR INFORMATION 1. Cord-Set 2. The Aqua-Hot operates on both AC and DC power. Be sure to disconnect the 120 Volt-AC power supply prior to servicing. Failure to do so could result in serious personal injury, electrical shock, or even death! Function: The Cord-Set provides a removable wiring network between the Fuel Solenoid and the Diesel-Burner’s white, electrical plug. 3. 4. Insert the replacement Cord-Set’s wires into the Blower Housing (through the Blower Housing Wiring Access Hole) and insert the Cord-Set’s wires into the DieselBurner’s white, electrical plug. The violet wire should be inserted into the #7 terminal and the white wire should be inserted into the #8 terminal on the Diesel-Burner’s white, electrical plug; reference Figure 34 and Appendix A. 5. Plug the opposite end of the Cord-Set into the Fuel Solenoid Valve. Replace the Cord-Set if the wiring or plug is damaged or malfunctioning. NOTE: The Diesel-Burner does not need to be detached from the Aqua-Hot for this replacement procedure. Work the wires and Cord-Set out and away from the Diesel-Burner; reference Figure 74. NOTE: It may be necessary to clip off and remove the wire ties bundling the Diesel-Burner components’ wires together in order to free the Cord-Set for removal. Replacement Indicator: Replacement Procedure: Unplug the Cord-Set from the Fuel Pump Assembly’s Fuel Solenoid Valve. Remove the Cord-Set’s white and violet wires from the #7 and #8 terminals on the Diesel-Burner’s white, electrical plug. Figure 73 © 2009 Aqua-Hot® 375D Hydronic Heating System Service Manual—Rev. A — Page 75 — SECTION 8: DIESEL BURNER COMPONENTS AND REPAIR INFORMATION Figure 74 Air Shutter: The Aqua-Hot operates on both AC and DC power. Be sure to disconnect the 120 Volt-AC power supply prior to servicing. Failure to do so could result in serious personal injury, electrical shock, or even death! 1. Following the procedure for “Detaching and Reattaching the Diesel-Burner,” located in Section 7 of this manual, detach the Diesel-Burner from the Aqua-Hot. 2. Unplug the Cord-Set from the Fuel Pump Assembly’s Fuel Solenoid Valve. 3. Remove the Fuel-Supply Tube Assembly: Function: A. Loosen both hexagonal locknuts on either end of the Fuel-Supply Tube Assembly with a 7/16 inch openend wrench. The Air Shutter helps control the Diesel-Burner’s combustionair level, which mixes with the diesel fuel spray and is ignited in order to establish a flame to heat the Aqua-Hot’s Boiler Tank. B. Pull the Fuel-Supply Tube Assembly away from the Diesel-Burner. Replacement Indicator: 4. Using a 3/8 inch socket wrench, remove the two bolts securing the Fuel Pump Assembly to the Blower Housing. 5. Pull the Fuel Pump Assembly straight out from the Blower Housing. Replace the Air Shutter if it becomes bent or damaged. Replacement Procedure: Be sure to clamp off the Fuel Supply and Return lines prior to beginning this replacement procedure. NOTE: The Coupling may remain attached to the Fuel Pump Assembly upon removal from the Diesel-Burner. © 2009 Aqua-Hot® 375D Hydronic Heating System Service Manual—Rev. A — Page 76 — SECTION 8: DIESEL BURNER COMPONENTS AND REPAIR INFORMATION 6. Using a 5/16 inch socket wrench, loosen and remove the bolt securing the Air Shutter to the Blower Housing. 7. Remove the damaged Air Shutter from the Diesel-Burner. 8. Install the replacement Air Shutter on the Diesel-Burner and secure with the bolt previously removed. NOTE: Be sure the Combustion-Air Indicator on the Air Shutter falls correctly on the Blower Housing’s Combustion-Air Adjustment Scale once installed. 9. Insert the Fuel Pump Assembly and attached Coupling, if applicable, into the Blower Housing. NOTE: In order to connect the Fuel Pump Assembly to the Blower Motor with the Coupling, it may be necessary to pull the Ignition Module Assembly back on its hinge and rotate the Blower Wheel slowly until both the Blower Motor and the Fuel Pump Assembly are seated correctly on the Coupling. 11. Reattach the Fuel-Supply Tube Assembly to the DieselBurner and Fuel Pump Assembly and tighten both hexagonal locknuts with a 7/16 inch open-end wrench. 12. Plug the Cord-Set back into the Fuel Pump Assembly’s Fuel Solenoid Valve. 13. Following the procedure for “Detaching and Reattaching the Diesel-Burner,” located in Section 7 of this manual, reattach the Diesel-Burner to the Aqua-Hot. NOTE: The Mounting Gasket must be replaced each time the Diesel-Burner is detached from the Aqua-Hot; reference the procedure for “Detaching and Reattaching the Diesel-Burner,” located in Section 7 of this manual for instructions. Be sure to remove the clamps from the Fuel Supply and Fuel Return lines prior to starting the Diesel-Burner. Failure to do so could result in serious damage to the Diesel-Burner. 10. Secure the Fuel Pump Assembly to the Blower Housing with the two bolts previously removed. Figure 75 © 2009 Aqua-Hot® 375D Hydronic Heating System Service Manual—Rev. A — Page 77 — SECTION 8: DIESEL BURNER COMPONENTS AND REPAIR INFORMATION NOTE: The Coupling may remain attached to the Fuel Pump Assembly upon removal from the Diesel-Burner. Air Band: The Aqua-Hot operates on both AC and DC power. Be sure to disconnect the 120 Volt-AC power supply prior to servicing. Failure to do so could result in serious personal injury, electrical shock, or even death! Function: The Air Band, in conjunction with the Air Shutter, helps control the Diesel-Burner’s Combustion-Air level, which mixes with the diesel fuel spray and is ignited in order to establish a flame to heat the Aqua-Hot’s Boiler Tank. Replacement Indicator: Replace the Air Band if it becomes bent or damaged. Replacement Procedure: 1. Following the procedure for “Detaching and Reattaching the Diesel-Burner,” located in Section 7 of this manual, detach the Diesel-Burner from the Aqua-Hot. 2. Unplug the Cord-Set from the Fuel Pump Assembly’s Fuel Solenoid Valve. 3. Remove the Fuel-Supply Tube Assembly: A. Loosen both hexagonal locknuts on either end of the Fuel-Supply Tube Assembly with a 7/16 inch openend wrench. B. Pull the Fuel-Supply Tube Assembly away from the Blower Housing. 5. Using a 5/16 inch socket wrench, loosen and remove the bolt securing the Air Shutter to the Blower Housing. 7. Remove the Air Shutter from the Diesel-Burner. 8. Using a 5/16 socket wrench, loosen and remove the bolt on the Air Band. 9. Remove the defective Air Band from the Diesel-Burner by sliding it off the Blower Housing. 10. Install the replacement Air Band by sliding it onto the Blower Housing and inserting the bolt previously removed onto the Air Band and tightening the bolt. 11. Install the Air Shutter back onto the Blower Housing and secure in place with the bolt previously removed. NOTE: Be sure the Combustion-Air Indicator on the Air Shutter falls correctly on the Blower Housing’s Combustion-Air Adjustment Scale once installed. Be sure to clamp off the Fuel Supply and Return lines prior to beginning this replacement procedure. 4. 6. Using a 3/8 inch socket wrench, remove the two bolts securing the Fuel Pump Assembly to the Blower Housing. Pull the Fuel Pump Assembly straight out from the DieselBurner’s Blower Housing. 9. Insert the Fuel Pump Assembly and attached Coupling, if applicable, into the Blower Housing. NOTE: In order to connect the Fuel Pump Assembly to the Blower Motor with the Coupling, it may be necessary to pull the Ignition Module back on its hinge and rotate the Blower Wheel slowly until both the Blower Motor and the Fuel Pump Assembly are seated correctly on the Coupling. 10. Secure the Fuel Pump Assembly to the Blower Housing with the two bolts previously removed. 11. Reattach the Fuel-Supply Tube Assembly to the DieselBurner and Fuel Pump Assembly and tighten both hexagonal locknuts with a 7/16 inch open-end wrench. 12. Plug the Cord-Set back into the Fuel Pump Assembly’s Fuel Solenoid Valve. 13. Following the procedure for “Detaching and Reattaching the Diesel-Burner,” located in Section 7 of this manual, reattach the Diesel-Burner to the Aqua-Hot. © 2009 Aqua-Hot® 375D Hydronic Heating System Service Manual—Rev. A — Page 78 — SECTION 8: DIESEL BURNER COMPONENTS AND REPAIR INFORMATION NOTE: The Mounting Gasket must be replaced each time the Diesel-Burner is detached from the Aqua-Hot; reference the procedure for “Detaching and Reattaching the Diesel-Burner,,” located in Section 4 of this manual for instructions. Setting the Combustion-Air Level: For information regarding setting the Diesel-Burner’s Combustion-Air level, please contact the Technical Support Department at 1-800-685-4298. Be sure to remove the clamps from the Fuel Supply and Fuel Return lines prior to starting the Diesel-Burner. Failure to do so could result in serious damage to the Diesel-Burner. Figure 76 © 2009 Aqua-Hot® 375D Hydronic Heating System Service Manual—Rev. A — Page 79 — SECTION 8: DIESEL BURNER COMPONENTS AND REPAIR INFORMATION Escutcheon Plate Spline Nut: The Aqua-Hot operates on both AC and DC power. Be sure to disconnect the 120 Volt-AC power supply prior to servicing. Failure to do so could result in serious personal injury, electrical shock, or even death! Function: The Escutcheon Plate Spline Nut secures the Igniter Assembly in place on the Blower Housing. NOTE: The Fuel-Supply Tube Assembly does not need to be completely removed from the Fuel Pump Assembly, but must be loosened to rotate out of the way. 2. Using a 7/16 inch open-end wrench, remove the FuelSupply Tube Assembly’s hexagonal locknut, which secures the Fuel-Supply Tube to the Igniter Assembly. 3. Remove the Fuel-Supply Tube from the Igniter Assembly and rotate out of the way. 4. Using a 3/4 inch open-end wrench, remove the Escutcheon Plate Spline Nut from the Diesel-Burner’s Escutcheon Plate Fuel Connection. 5. Install the replacement Escutcheon Plate Spline Nut on the Igniter Assembly and tighten completely. Replacement Indicator: Replace the Escutcheon Plate Spline Nut if it becomes lost or damaged. Replacement Procedure: NOTE: Verify that the Escutcheon Plate is adjusted to the edge of the label affixed to the Blower Housing. NOTE: The Diesel-Burner does not need to be detached from the Aqua-Hot for this replacement procedure. 6. Reattach the Fuel-Supply Tube to the Igniter Assembly and tighten the hexagonal locknut. 7. Tighten the Fuel-Supply Tube Assembly’s hexagonal locknut to the Fuel Pump Assembly. 1. Loosen the Fuel-Supply Tube Assembly’s hexagonal locknut on the Fuel Pump Assembly with a 7/16 inch open-end wrench. Figure 77 © 2009 Aqua-Hot® 375D Hydronic Heating System Service Manual—Rev. A — Page 80 — SECTION 8: DIESEL BURNER COMPONENTS AND REPAIR INFORMATION Escutcheon Plate: The Aqua-Hot operates on both AC and DC power. Be sure to disconnect the 120 Volt-AC power supply prior to servicing. Failure to do so could result in serious personal injury, electrical shock, or even death! 2. Using a 7/16 inch open-end wrench, remove the FuelSupply Tube Assembly’s hexagonal locknut, which secures the Fuel-Supply Tube to the Igniter Assembly. 3. Remove the Fuel-Supply Tube from the Igniter Assembly and rotate out of the way. 4. Using a 3/4 inch open-end wrench, remove the Escutcheon Plate Spline Nut from the Diesel-Burner’s Escutcheon Plate Fuel Connection. 5. Using a 5/16 inch socket wrench, remove the bolt securing the Escutcheon Plate to the Blower Housing. 6. Remove the Escutcheon Plate from the Diesel-Burner. 7. Install the replacement Escutcheon Plate and align the right edge of the Escutcheon Plate with the edge of the label (or mark, if applicable). 8. Insert and tighten the Escutcheon Plate’s bolt to secure the Escutcheon Plate to the Blower Housing. Function: The Escutcheon Plate assists with the proper placement of the Igniter Assembly when tightened (and can also be loosened to ease the removal of the Igniter Assembly). Replacement Indicator: Replace the Escutcheon Plate if it becomes lost or damaged. Replacement Procedure: NOTE: Prior to beginning this replacement procedure, be sure a label exists on the Blower Housing to indicate where the edge of the Escutcheon Plate should be aligned for proper Igniter Assembly placement. If no label exists, mark the Blower Housing on the right edge of the Escutcheon Plate. NOTE: The Diesel-Burner does not need to be detached from the Aqua-Hot for this replacement procedure. 1. Loosen the Fuel-Supply Tube Assembly’s hexagonal locknut on the Fuel Pump Assembly with a 7/16 inch open-end wrench. NOTE: Verify that the Escutcheon Plate’s right edge is aligned with the edge of the label or mark after it has been tightened. 9. Install the Escutcheon Plate Spline Nut on the Igniter Assembly and tighten completely. 10. Reattach the Fuel-Supply Tube to the Igniter Assembly and tighten the hexagonal locknut. 11. Tighten the Fuel-Supply Tube Assembly’s hexagonal locknut to the Fuel Pump Assembly. NOTE: The Fuel-Supply Tube Assembly does not need to be completely removed from the Fuel Pump Assembly, but must be loosened to rotate out of the way. Figure 78 © 2009 Aqua-Hot® 375D Hydronic Heating System Service Manual—Rev. A — Page 81 — SECTION 8: DIESEL BURNER COMPONENTS AND REPAIR INFORMATION Figure 79 Replacement Procedure: Air Guide: The Aqua-Hot operates on both AC and DC power. Be sure to disconnect the 120 Volt-AC power supply prior to servicing. Failure to do so could result in serious personal injury, electrical shock, or even death! Be sure to clamp off the Fuel Supply and Return lines prior to beginning this replacement procedure. 1. Following the procedure for “Detaching and Reattaching the Diesel-Burner,” located in Section 7 of this manual, detach the Diesel-Burner from the Aqua-Hot. 2. Move the Blower Motor and attached Blower Wheel back from the Diesel-Burner. Function: The Air Guide, in conjunction with the Air Shutter and Air Band, helps control the Diesel-Burner’s Combustion-Air level, which mixes with the diesel fuel spray and is ignited in order to establish a flame to heat the Aqua-Hot’s Boiler Tank. A. Using a 3/8 inch socket wrench, loosen and remove the two bolts securing the Blower Motor’s plate to the Blower Housing. Replacement Indicator: Replace the Air Guide if it becomes cracked, broken, or damaged. B. Pull the Blower Motor and Blower Wheel Assembly out of the Blower Housing and away from the DieselBurner being careful not to dislodge the Blower Motor’s wiring. © 2009 Aqua-Hot® 375D Hydronic Heating System Service Manual—Rev. A — Page 82 — SECTION 8: DIESEL BURNER COMPONENTS AND REPAIR INFORMATION 3. Using a Phillips screwdriver, remove the two screws securing the Air Guide in place on the Blower Housing. NOTE: It may be necessary to remove the nut and bolt from the Air Band and rotate the Air Band slightly in order to access the Air Guide’s screws. 4. Remove the defective Air Guide from the Diesel-Burner. 5. Install the replacement Air Guide onto the Diesel-Burner. 6. Secure the replacement Air Guide to the Blower Housing with the two screws previously removed. 7. If applicable, return the Air Band to its original configuration and secure it in place with the nut and bolt previously removed. 8. Insert the Blower Motor and Blower Wheel Assembly into the Blower Housing and secure it with the two bolts previously removed. NOTE: In order to connect the Fuel Pump Assembly to the Blower Motor with the Coupling, it may be necessary to pull the Ignition Module Assembly back on its hinge and rotate the Blower Wheel slowly until both the Blower Motor and Fuel Pump Assembly are seated correctly on the Coupling. 9. Following the procedure for “Detaching and Reattaching the Diesel-Burner,” located in Section 4 of this manual, reattach the Diesel-Burner to the Aqua-Hot. NOTE: The Mounting Gasket must be replaced each time the Diesel-Burner is detached from the Aqua-Hot; reference the procedure for “Detaching and Reattaching the Diesel-Burner,” located in Section 7 of this manual for instructions. Be sure to remove the clamps from the Fuel Supply and Fuel Return lines prior to starting the Diesel-Burner. Figure 80 © 2009 Aqua-Hot® 375D Hydronic Heating System Service Manual—Rev. A — Page 83 — SECTION 8: DIESEL BURNER COMPONENTS AND REPAIR INFORMATION Coupling: 4. The Aqua-Hot operates on both AC and DC power. Be sure to disconnect the 120 Volt-AC power supply prior to servicing. Failure to do so could result in serious personal injury, electrical shock, or even death! Function: The Coupling creates a bridge between the Blower Motor and Fuel Pump Assembly. Through the Coupling, the Fuel Pump Assembly is activated to pressurize the diesel fuel whenever Combustion-Air is being created by the Blower Motor and Blower Wheel Assembly. Replacement Indicator: Replace the Coupling if it becomes broken, cracked, or is too worn to function properly. NOTE: It may be necessary to rotate the Coupling slowly to properly seat it on the Fuel Pump Assembly’s shaft; once the Coupling is seated properly, the Coupling will slide straight back onto the Fuel Pump Assembly’s shaft. 5. Be sure to clamp off the Fuel Supply and Return lines prior to beginning this replacement procedure. 1. Following the procedure for “Detaching and Reattaching the Diesel-Burner,” located in Section 7 of this manual, detach the Diesel-Burner from the Aqua-Hot. 2. Move the Blower Motor and attached Blower Wheel back from the Diesel-Burner: A. Using a 3/8 inch socket wrench, loosen and remove the two bolts securing the Blower Motor’s plate to the Blower Housing. Insert the Blower Motor and Blower Wheel Assembly into the Blower Housing and secure it with the two bolts previously removed. NOTE: In order to connect the Fuel Pump Assembly to the Blower Motor with the Coupling, it may be necessary to pull the Ignition Module Assembly back on its hinge and rotate the Blower Wheel slowly until both the Blower Motor and the Fuel Pump Assembly are seated correctly on the Coupling. 6. Replacement Procedure: Take the replacement Coupling and insert it into the Blower Housing, under the Air Guide, and slide it onto the Fuel Pump Assembly’s shaft. Following the procedure for “Detaching and Reattaching the Diesel-Burner,” located in Section 7 of this manual, reattach the Diesel-Burner to the Aqua-Hot. NOTE: The Mounting Gasket must be replaced each time the Diesel-Burner is detached from the Aqua-Hot; reference the procedure for “Detaching and Reattaching the Diesel-Burner,” located in Section 4 of this manual for instructions. Be sure to remove the clamps from the Fuel Supply and Fuel Return lines prior to starting the Diesel-Burner. Figure 81 B. Pull the Blower Motor and Blower Wheel Assembly out of the Blower Housing and away from the DieselBurner being careful not to dislodge the Blower Motor’s wiring. 3. Reaching into the Blower Housing, under the Air Guide, pull the defective Coupling straight out away from the Diesel-Burner. © 2009 Aqua-Hot® 375D Hydronic Heating System Service Manual—Rev. A — Page 84 — SECTION 8: DIESEL BURNER COMPONENTS AND REPAIR INFORMATION Blower Wheel: The Aqua-Hot operates on both AC and DC power. Be sure to disconnect the 120 Volt-AC power supply prior to servicing. Failure to do so could result in serious personal injury, electrical shock, or even death! Function: The Blower Wheel creates a combustible air-flow when rotated by the Blower Motor. Replacement Indicator: 3. Loosen the set screw on the Blower Wheel with a hexagonal wrench, then slide the defective Blower Wheel off of the Blower Motor’s shaft. 4. Place a 0.030 (1/32 ± 1/64) inch Feeler Gauge on top of the Blower Motor, then slide the replacement Blower Wheel onto the Blower Motor’s shaft until it contacts the Feeler Gauge. 5. Rotate the Blower Wheel until the set screw is centered on the flat of the Blower Motor’s shaft. 6. Using the hexagonal wrench, tighten the set screw to secure the Blower Wheel in place. 7. Insert the Blower Motor and Blower Wheel Assembly into the Blower Housing and secure it with the two bolts previously removed. Replace the Blower Wheel if it is broken, cracked, or too worn to function properly. Replacement Procedure: Be sure to clamp off the Fuel Return and Supply lines prior to beginning this replacement procedure. 1. 2. Following the procedure for “Detaching and Reattaching the Diesel-Burner,” located in Section 7 of this manual, detach the Diesel-Burner from the Aqua-Hot. Move the Blower Motor and attached Blower Wheel back from the Diesel-Burner: A. Using a 3/8 inch socket wrench, loosen and remove the two bolts securing the Blower Motor to the Blower Housing. B. Pull the Blower Motor and Blower Wheel Assembly out of the Blower Housing and away from the DieselBurner, being careful not to dislodge the Blower Motor’s wiring. NOTE: The Blower Motor and Blower Wheel Assembly connects with the Coupling, which connects to the Fuel Pump Assembly within the Diesel-Burner’s Blower Housing; therefore, it may be necessary to pull the Ignition Module Assembly back on its hinge and rotate the Blower Wheel slowly until the Blower Motor is seated correctly on the Coupling and moves into place. 8. Following the procedure for “Detaching and Reattaching the Diesel-Burner,” located in Section 7 of this manual, reattach the Diesel-Burner to the Aqua-Hot. NOTE: The Mounting Gasket must be replaced each time the Diesel-Burner is detached from the Aqua-Hot; reference the procedure for “Detaching and Reattaching the Diesel-Burner,” located in Section 7 of this manual for instructions. Be sure to remove the clamps from the Fuel Supply and Fuel Return lines prior to starting the Diesel-Burner. Figure 82 © 2009 Aqua-Hot® 375D Hydronic Heating System Service Manual—Rev. A — Page 85 — SECTION 8: DIESEL BURNER COMPONENTS AND REPAIR INFORMATION Blower Motor: The Aqua-Hot operates on both AC and DC power. Be sure to disconnect the 120 Volt-AC power supply prior to servicing. Failure to do so could result in serious personal injury, electrical shock, or even death! Function: The Blower Motor rotates the Blower Wheel, which creates combustion air, while also activating the Fuel Pump Assembly, which creates fuel pressure. Use CAUTION when testing the Diesel-Burner while the Interior Switch Panel’s Diesel-Burner switch is in the ON position as an electrical shock can occur. NOTE: Once the Diesel-Burner switch is activated, the voltmeter should indicate 12 volts of current at the Blower Motor’s positive wire. 3. Using the same voltmeter, insert the positive (+) probe into the #9 terminal on the Diesel-Burner’s white, electrical plug; reference Figure 34 and Appendix A. 4. Remove the voltmeter’s positive probe from the #9 terminal on the Diesel-Burner’s white, electrical plug and reinsert the probe into the #3 terminal to test the voltage at the Blower Motor’s Yellow/Orange signal wire. Twelve volts of current should be present anytime the Aqua-Hot calls for heat. 5. Once it has been verified that 12 volts of current are present at the Blower Motor’s Yellow/Orange signal wire, listen for operational sounds at the Blower Motor. 6. If 12 volts of current are present at both the red positive wire and the yellow/orange signal wire, but no operational sounds are present at the Blower Motor, follow the “Blower Motor Replacement Procedure” in this section of the manual. Replacement Indicator: 1. 2. Motor fails component test Diesel Burner Switch Flashes a fault code 2. Component Test: 1. 2. Verify that the Interior Switch Panel’s Diesel-Burner and Electric Element switches are in the OFF position. Using a voltmeter, insert the negative (-) probe into the #4 terminal of the Diesel-Burner’s white, electrical plug; reference Figure 34 and Appendix A. Figure 83 © 2009 Aqua-Hot® 375D Hydronic Heating System Service Manual—Rev. A — Page 86 — SECTION 8: DIESEL BURNER COMPONENTS AND REPAIR INFORMATION NOTE: If the Blower Motor’s yellow/orange signal wire does not reflect current when the Aqua-Hot’s Control Thermostat is calling for heat, the Diesel-Burner Controller may need to be replaced. B. Rotate the Blower Wheel until the set screw is centered on the flat of the Blower Motor’s shaft. C. Using a hexagonal wrench, tighten the set screw to secure the Blower Wheel in place. Replacement Procedure: 8. Be sure to clamp off the Fuel Supply and Return lines prior to beginning this replacement procedure. 1. Following the procedure for “Detaching and Reattaching the Diesel-Burner,” located in Section 7 of this manual, detach the Diesel-Burner from the Aqua-Hot. 2. Using a Molex Pin Extractor tool, remove the Blower Motor’s three wires from the #3, #4, and #9 terminals on the Diesel-Burner’s white, electrical plug. Reference Figure 34. 3. Pull the Blower Motor’s three wires back through the Blower Housing until the Blower Motor’s wires are free from the Diesel-Burner. NOTE: It may be necessary to clip off and remove the wire ties bundling the Diesel-Burner components’ wires together in order to free the Blower Motor’s wires for removal. 4. Using a 3/8 inch socket wrench, loosen and remove the two bolts securing the Blower Motor to the Blower Housing. 5. Remove the defective Blower Motor and attached Blower Wheel from the Blower Housing. 6. Remove the Blower Wheel from the defective Blower Motor. Insert the Blower Motor and Blower Wheel Assembly into the Blower Housing and secure it with the two bolts previously removed. NOTE: The Blower Motor and Blower Wheel Assembly connects with the Coupling, which connects to the Fuel Pump Assembly within the Blower Housing; therefore, it may be necessary to pull the Ignition Module Assembly back on its hinge and rotate the Blower Wheel slowly until the Blower Motor is seated correctly on the Coupling and moves into place. 9. Thread the Blower Motor’s wires into the Blower Housing through the small hole in the Blower Housing, then back out through the Diesel-Burner’s Wiring Access Hole. 10. Connect the Blower Motor’s Pink (positive) wire to the #9 terminal, yellow/orange (signal) wire to the #3 terminal, and the black (ground) wire to the #4 terminal on the Diesel-Burner’s white, electrical plug; reference Appendix A. 11. Following the procedure for “Detaching and Reattaching the Diesel-Burner,” located in Section 4 of this manual, reattach the Diesel-Burner to the Aqua-Hot. NOTE: The Mounting Gasket must be replaced each time the Diesel-Burner is detached from the Aqua-Hot; reference the procedure for “Detaching and Reattaching the Diesel-Burner,” located in Section 7 of this manual for instructions. 12. Connect the Diesel-Burner and Diesel-Burner Controller’s white, electrical connections together and press down on the tabs to secure them together. A. Loosen the set screw on the Blower Wheel with a hexagonal wrench, then slide the Blower Wheel off of the defective Blower Motor’s shaft. 7. Install the existing Blower Wheel onto the replacement Blower Motor. Be sure to remove the clamps from the Fuel Supply and Fuel Return lines prior to starting the Diesel-Burner. A. Place a 0.030 (1/32 ± 1/64) inch Feeler Gauge on top of the replacement Blower Motor, then slide the Blower Wheel onto the Blower Motor’s shaft until it contacts the Feeler Gauge. © 2009 Aqua-Hot® 375D Hydronic Heating System Service Manual—Rev. A — Page 87 — SECTION 8: DIESEL BURNER COMPONENTS AND REPAIR INFORMATION Figure 84 Figure 85 © 2009 Aqua-Hot® 375D Hydronic Heating System Service Manual—Rev. A — Page 88 — SECTION 8: DIESEL BURNER COMPONENTS AND REPAIR INFORMATION Figure 86 Figure 87 © 2009 Aqua-Hot® 375D Hydronic Heating System Service Manual—Rev. A — Page 89 — SECTION 8: DIESEL BURNER COMPONENTS AND REPAIR INFORMATION Diesel-Burner Controller: NOTE: At this time, both of the Diesel-Burner Controller’s white, electrical plugs should be detached. 2. Locate the white, electrical plug connecting the DieselBurner Controller to the Aqua-Hot’s wiring harness, then press back on the two tabs securing the two connections together. Next, pull the two electrical plug connections completely apart releasing all of the Diesel-Burner Controller’s wires. 3. Remove the two screws securing the Diesel-Burner Controller to the Aqua-Hot. 4. Remove the defective Diesel-Burner Controller from the Aqua-Hot. 5. Align the replacement Diesel-Burner Controller to the Aqua-Hot and reinstall the two screws previously removed, tightening firmly. 6. Connect the Aqua-Hot and Diesel-Burner Controller’s white, electrical connections together and press down on the tabs to secure them together. 7. Connect the Diesel-Burner and Diesel-Burner Controller’s white, electrical connections together and press down on the tabs to secure them together. The Aqua-Hot operates on both AC and DC power. Be sure to disconnect the 120 Volt-AC power supply prior to servicing. Failure to do so could result in serious personal injury, electrical shock, or even death! Function: The Diesel-Burner Controller operates and monitors the DieselBurner’s components and safely shuts the Aqua-Hot off in the event of an overheat, flame-out, or low-voltage condition. Function: Replacement Indicator If the Controller is damaged, or fails to function properly Replacement Procedure: NOTE: The Diesel-Burner does not need to be detached from the Aqua-Hot for this replacement procedure. 1. Locate the Diesel-Burner’s white, electrical plug connection to the Diesel-Burner Controller, then press back on the two tabs securing the two connections together. Next, pull the two electrical plug connections completely apart. Figure 88 © 2009 Aqua-Hot® 375D Hydronic Heating System Service Manual—Rev. A — Page 90 — SECTION 9: SWITCH PANEL BLINKING FAULT INDICATOR LIGHT The Interior Switch Panel incorporates a self-diagnostic Blinking Fault Indicator Light, which by using a series of blinking lights, indicates the particular component of the Diesel-Burner that failed during operation. Should a Diesel-Burner malfunction occur, the Aqua-Hot Hydronic Heating System will cease operation and will activate the appropriate Indicator Light Blinking Fault Sequence. Each series of blinks are active for 0.5 seconds ON and 0.5 seconds OFF with a three-second interval between each fault series. This sequence will repeat continuously until the DieselBurner switch is moved to the OFF position, the 12 Volt-DC power is disconnected from the Diesel-Burner’s Controller, or the access cover is removed from the Aqua-Hot. Once the Diesel-Burner fault has been corrected, the Switch Panel Blinking Fault Indicator Light will need to be manually reset by turning OFF the Diesel-Burner switch for approximately 30 seconds, then turning it back ON. Diesel-Burner Fault Codes NOTE: If the fault codes are not corrected by the checks listed below each specific code, contact the Aqua-Hot Heating Systems Technical Support Department at 1-800-685-4298. Fault Code 0 (Indicator light is not illuminated, but the Diesel-Burner Switch is ON.): 1. Is the Access Cover installed? 2. Is the Interlock Switch’s wiring connected? 3. Does the Interlock Switch have continuity? Fault Code 1: 1. Check the supply voltage - is it above 11.1? 2. Does the voltage remain above 11.1 throughout the Diesel-Burner’s cycle? Fault Code 2: 1. Check the Blower Motor for an external short. Fault Code 3: 1. Check the Fuel Solenoid for an external short. Fault Code 4: 1. Check the Ignition Module for an external short. 2. Check the 15-Pin Connector to the Diesel-Burner Controller for contamination. © 2009 Aqua-Hot® 375D Hydronic Heating System Service Manual—Rev. A — Page 91 — SECTION 9: SWITCH PANEL BLINKING FAULT INDICATOR LIGHT Fault Code 5: 1. Check the Ignition Module for an external short. 2. Check the Blower Motor for an external short. Fault Code 6: 1. Did the left High-Limit Thermostat (connected to wires #15 and #16) trip? 2. Is The insulation, surrounding the Aqua-Hot Boiler Tank, shorting out the thermostat to ground? Fault Code 7: 1. Check the Fuel Solenoid for an external short. 2. Is The insulation, surrounding the Aqua-Hot Boiler Tank, shorting out the thermostat to ground? Fault Code 8: 1. 2. 3. 4. 5. Did the right High-Limit Thermostat (connected to wires #8 and #21) trip? Check the vehicle’s fuel supply. Check the Fuel Solenoid. Check the Fuel Nozzle. Is the insulation, surrounding the Aqua-Hot Boiler Tank, shorting out the thermostat to ground? Fault Code 9: 1. 2. 3. 4. Is the Flame Sensor Lens clean? Is there too much combustion air for the Diesel-Burner? Check the Fuel Nozzle. Is the chassis ground still properly grounded? Fault Code 10: 1. Did the Flame Sensor see light and interpret it as fire? 2. Is the Fuel Valve stuck open? © 2009 Aqua-Hot® 375D Hydronic Heating System Service Manual—Rev. A — Page 92 — SECTION 10: TROUBLE SHOOTING This troubleshooting section has been separated into various Aqua-Hot troubleshooting scenarios, which may be experienced by the heater. This troubleshooting section will begin with the most probable cause of failure and the corresponding remedy and will advance to the least probable cause and remedy in order to expedite the troubleshooting process and pinpoint the problem quickly. If additional assistance is needed, please contact the Aqua-Hot Heating Systems Technical Support Department by phone at 1-800-685-4298 (Monday through Friday, 7:00 AM to 4:00 PM Mountain Standard Time) or through Aqua-Hot Heating Systems’ website by going to www.aquahot.com and clicking on the “Contact Us” link, then filling out the contact information for submittal. The Aqua-Hot operates on both AC and DC power. Be sure to disconnect the 120 Volt-AC power supply from the Aqua-Hot prior to servicing. Failure to do so could result in serious personal injury, electrical shock, or even death! NOTE: Be sure to check the Interior Switch Panel’s DieselBurner switch for a blinking fault code prior to completing the following troubleshooting procedures. NOTE: Please note that, due to the Interlock Safety Switch, the Aqua-Hot will not operate if the access cover is removed. The Diesel-Burner switch has been turned on; however, the diesel-burner fails to operate: 1. Is the Diesel-Burner switch’s indicator light illuminated? A. NO a. Check for 12-Volt power at the B-fuse on the fuse block - does it exist? c. Test the float switch for functionality. d. Check the Diesel-Burner switch for functionality. e. Check the Interlock switch for functionality. B. YES a. Is the Indicator Light flashing a fault code? If so, refer to the “Switch Panel Blinking Fault Indicator Light” section. b. Check the Control Thermostat (The Aqua-Hot’s normal operating range is 160-190°F) for functionality by locating the control thermostat on the heater, disconnecting the wires and placing a jumper wire on the harness between wires #10 & #11. e. Check the Diesel-Burner Controller for functionality. f. Check the Diesel-Burner’s Blower Motor for functionality by placing a direct power and ground source to the motor and checking for operation. © 2009 Aqua-Hot® 375D Hydronic Heating System Service Manual—Rev. A — Page 93 — SECTION 10: TROUBLE SHOOTING The Diesel-Burner switch has been turned on, and the diesel-burner’s Blower Motor has begun to operate; however, the diesel-burner does not ignite: 1. 2. 3. 4. 5. Test both of the Diesel-Burner’s High-Limit Thermostats for continuity; if continuity does not exist, press the reset button on the High-Limit Thermostat. Check the vehicle’s fuel supply to ensure that an adequate amount of fuel exists. Check the Fuel Nozzle for obstructions or contaminants. Check the Diesel-Burner’s Ignition Module for proper functionality. Verify that the Igniter Assembly’s electrodes are properly aligned. The Diesel-Burner switch has been turned on; however, multiple attempts are required before the diesel-burner will ignite: 1. 2. Check the Fuel Nozzle for obstructions or contaminants. Check the Diesel-Burner’s Ignition Module for proper functionality. The Aqua-Hot’s exhaust system sputters while the diesel-burner is operating: 1. 2. 3. Check the Diesel-Burner’s Flame Sensor to ensure that the lens is clean and for proper functionality. Check the Diesel-Burner’s Combustion Chamber for build-up. Check the exhaust pipe for damage or air-flow restrictions. The Aqua-Hot’s exhaust system produces white smoke after ignition: 1. 2. 3. 4. 5. Ensure that air bubbles have not made their way into the fuel system. Check the Fuel Solenoid for proper functionality. Check the Fuel Nozzle for obstructions or contaminants. Check that the Igniter Assembly’s electrodes are properly aligned. Check for fuel leaks. The Aqua-Hot’s exhaust system produced black smoke after ignition: 1. This is a result of the air/fuel mixture being incorrect, thus check the following: A. B. C. D. E. F. G. H. I. Check the Fuel Nozzle for obstructions or contaminants. Check the Diesel-Burner’s Combustion Chamber for build-up. Check the exhaust pipe for damage or air-flow restrictions. Check the Diesel-Burner’s Flame Sensor to ensure that the lens is clean and for proper functionality. Verify that the Combustion-Air is set to the proper level. Check that the Diesel-Burner’s gaskets are properly seated and not creating an obstruction. Check that the Diesel-Burner is firmly attached to the Aqua-Hot. Ensure that the Diesel-Burner’s gaskets are not worn or damaged. Check Diesel-Burner’s Blower motor for proper RPM (3600rpm) © 2009 Aqua-Hot® 375D Hydronic Heating System Service Manual—Rev. A — Page 94 — SECTION 10: TROUBLE SHOOTING The Aqua-Hot is operating, but an interior and/or fresh water tank heating zone is not working. 1. 2. 3. 4. 5. 6. 7. Is the Low Temp Cutoff Thermostat Tripped? A. Unhook Thermostat Wires and using a volt meter, check thermostat for continuity. Verify that the heat exchangers in that zone are working. Check for loose wires. Ensure that the check valve is not stuck in a closed position. While the circulation pump is running, place hand on lines to check for the presence of hot antifreeze and water heating solution. Is the Zone Relay functioning properly? Is the Room Thermostat signaling the Aqua-Hot heater? The Aqua-Hot is at operating temperature; however, the interior and/or fresh water tank heat exchanger fans are not operating: 1. 2. 3. 4. 5. 6. When each particular zone’s room thermostat is turned on, does the corresponding relay activate? Is the Low Temp Cutoff Thermostat tripped? A. Unhook Thermostat Wires and using a volt meter, check thermostat for continuity. Check for power at the relay for the fans, Pin (8). Check the heat exchanger for loose wires. Using a voltmeter, check for 12-Volts at the malfunctioning fan. If applicable, is the switch for the fan on? The Aqua-Hot is operating, but the domestic hot water system is not producing hot water. 1. 2. 3. 4. 5. 6. 7. 8. 9. Reference Section 1, pages 13-14, and ensure that the Aqua-Hot is using the appropriate antifreeze type and mixture ratio. Verify that the water outlet’s domestic hot water flow rate is at or below 1.5 Gallons per Minute (GPM). Verify that the outside water faucet is turned off. Is the diesel-burner operating? Verify that the tempering valve is properly adjusted. Temperature of water coming out of hot water faucet should be between 115° F - 123° F. Ensure that the Low-Temp Cut-Off Thermostat is operating properly. Ensure that the Boiler Tank’s Stir Pump is operating. Check Temperature of the cold water coming in. Make sure the heater has not been bypassed. © 2009 Aqua-Hot® 375D Hydronic Heating System Service Manual—Rev. A — Page 95 — SECTION 10: TROUBLE SHOOTING The Electric Element switch has been turned on; however, the Aqua-Hot’s 120 volt-ac electric heating element does not operate (i.e., lack of hot water and/or interior heat): NOTE: The Aqua-Hot is not designed to provide continuous hot water using the Electric Heating Element only. 1. 2. 3. 4. 5. Ensure that the motorhome is plugged into shore power or has the generator running. Ensure the Aqua-hot is not up to maximum operating temperature, by checking it with a digital thermometer. With the Interior Switch Panel’s Electric Element switch on, locate the Electric Element’s 120VAC relay and check for DC voltage at Pin #0 (+) and Pin #1 (-); reference Appendix A. Ensure that the 12 Volt switch is turned on and that the relay engages. Test the VAC Relay to ensure that it is working properly, using extreme caution. A. With the Electric Element switch on, check for AC voltage at both VAC power supply terminals on the relay (terminals #4 and #2). B. Inspect the VAC Relay and the Relay’s wires for damage. C. Turn the VAC Breaker off and disconnect both VAC power supply wires from the VAC Relay terminals. Turn the Electric Element switch on and off while checking for continuity across the two open terminals on the VAC Relay. If no continuity exists, replace the VAC Relay. 6. Check the Electric Heating Element’s High-Limit Thermostat for continuity; if no continuity, press the reset button on the thermostat. 7. Verify that the 120 Volt-AC Electrical Heating Element is operating properly. A. Disconnect the motorhome from VAC shore power and switch off the motorhome’s generator. B. Detach and remove the Diesel-Burner. C. Check the Electric Heating Element for continuity. If no continuity, replace the Electric Heating Element. © 2009 Aqua-Hot® 375D Hydronic Heating System Service Manual—Rev. A — Page 96 — APPENDIX A: WIRING DIAGRAM © 2009 Aqua-Hot® 375D Hydronic Heating System Service Manual—Rev. A — Page 97 — APPENDIX B: WIRE GAUGE CHART © 2009 Aqua-Hot® 375D Hydronic Heating System Service Manual—Rev. A — Page 98 — APPENDIX C: WINTERIZATION PROCCESS Not winterizing the Aqua-Hot when freezing temperatures are present will result in serious damage to the Aqua-Hot’s Domestic Water Heating System. Also, be sure to use an FDA approved, “GRAS” rated antifreeze for winterization. NOTE: The Aqua-Hot can continue to be used for interior zone heating once the domestic water heating system has been drained and winterized. 5. Open and close all interior and exterior water faucets, one at a time, until only pure RV Antifreeze is present. Perform this procedure for both the hot and cold faucets. 6. Turn off Demand Water pump and remove the hose and reconnect the domestic water demand pump’s suction line to the fresh water storage tank. An FDA approved “GRAS” rated winterization antifreeze must be used. YOU CANNOT BLOW DOMESTIC WATER COIL OUT WITH AIR TO WINTERIZE AQUA-HOT. The Aqua-Hot’s Domestic Water Heating System must be completely drained of domestic water any time the heater is stored where freezing temperatures may be experienced. De-Winterizing the Domestic Water Heating System: Winterizing the Domestic Water Heating System: For de-winterization, completely fill the fresh water storage tank. Turn on demand water pump and open and close all interior and exterior water faucets, one at a time, until only clear water is present/visible. Reference Figure 89. Please follow these instructions when winterizing the AquaHot’s Domestic Water Heating System; reference Figure 89: 1. Completely drain the fresh water storage tank. 2. Disconnect the domestic water demand pump’s suction line from the fresh water storage tank. Attach an adequate piece of hose onto the suction side of the domestic water demand pump. 3. Place the opposite end of the hose into an adequate supply of FDA-approved “GRAS” RV Antifreeze, and turn on the demand water pump. Recreation Vehicle Industry Association 1896 Preston White Drive P.O. Box 2999 Reston, VA 20195-0999 Figure 89 4. If disinfecting the potable water system after de-winterizing, be sure to follow RVIA’s “Instructions for Disinfection of Potable Water Systems on Recreation Vehicles.” These instructions can be obtained by contacting the Recreational Vehicle Industry Association at (703) 620-6003, visiting them online at www.rvia.com, or writing to them at the following address: © 2009 Aqua-Hot® 375D Hydronic Heating System Service Manual—Rev. A — Page 99 — APPENDIX D: EXTREME COLD WEATHER OPERATION Diesel-Burner When storing the Motorhome: Not winterizing the AquaHot when freezing temperatures are present will result in serious damage to the Aqua-Hot’s Domestic Water Heating System. Also, be sure to use an FDA approved, “GRAS” rated antifreeze for winterization. NOTE: The Aqua-Hot can continue to be used for interior zone heating once the domestic water heating system has been drained and winterized. 1. If the Diesel burner Fails to operate: A. The Fuel level in the main diesel fuel tank is below 1/4 tank. B. When was the last time an Annual Service was performed? C. Is the Diesel Fuel liquid or Jelled? D. Are the electrodes properly adjusted? E. Is the Diesel Fuel in the motor home winter fuel or summer fuel? 120 Volt-A.C. Electric Heating Element Please note that the 120 Volt-AC Electric Heating Element is the Aqua-Hot’s secondary heat source for heating both the interior and/or the domestic hot water during low heating demand situations (such as when moderate ambient temperatures exist and/or when there is a low demand for domestic hot water). If the 120 Volt-AC Electric Heating Element is not providing enough heat, turn the Diesel-Burner on, in conjunction with the 120 Volt-AC Electric Heating Element. NOTE: In extreme cold weather it may be necessary to activate the 120 Volt-A.C. Electric Heating Element for 1 - 2 hours prior to activating the burner to preheat the burner, on the initial start up cycle only. Figure 90 © 2009 Aqua-Hot® 375D Hydronic Heating System Service Manual—Rev. A — Page 100 — APPENDIX D: EXTREME COLD WEATHER OPERATION If there is a lack of Interior Heat During Cold Weather Operation: Note: The 120 Volt-AC Electric Heating Element is the Aqua-Hot’s secondary heat source for heating both the interior and/or the domestic hot water during low heating demand situations (such as when moderate ambient temperatures exist and/or when there is a low demand for domestic hot water). If the ambient temperature is extremely cold the Diesel-Burner must be utilized. 1. Is the Diesel Burner activated? 2. Is the Diesel Burner operating Properly? 3. Was the heating system properly installed, following the 375d installation manual? A. B. C. Are there at least 5 heat exchangers installed in the Interior of the motor home? Are there cold air returns installed for every heat exchanger? Refrence Figure 92. Are the heat exchangers mounted as close to the hot air outlet grill as possible? Reference Figure 91. Figure 91 4. If the answers to the above questions are all yes, refer to section 10: Trouble Shooting Guide for a lack of interior heat. Figure 92 © 2009 Aqua-Hot® 375D Hydronic Heating System Service Manual—Rev. A — Page 101 — APPENDIX E: ANNUAL MAINTENANCE PROCEDURE General Recommended Maintenance Figure 93 Annually To keep the Aqua-Hot running smoothly, it is ideal to have the Diesel-Burner tuned-up annually. A tune-up should consist of a new Fuel Nozzle and Fuel Filter, along with a thorough cleaning of the Combustion Chamber, if necessary (reference Figure ?). To ensure maximum Diesel-Burner performance, always use the recommended Fuel Nozzle and Fuel Filter (i.e., 10 Micron) when replacing these parts. NOTE: The Diesel-Burner does not need to be detached from the Aqua-Hot in order to replace the fuel nozzle. The Aqua-Hot operates on both AC and DC power. Be sure to disconnect the 120 Volt-AC power supply prior to cleaning or servicing. Failure to do so could result in serious personal injury, electrical shock, or even death! Operating the Aqua-Hot’s Diesel-Burner or the 120 VoltAC Electric Heating Element without the antifreeze and water heating solution will cause serious damage to the heater. NOTE: Be sure to use care when handling the Fuel Nozzle; oils and/or small dust or dirt particles from the hands may plug the nozzle’s small orifice. A partially plugged orifice will restrict fuel flow, which will affect the combustion process of the DieselBurner (e.g., excessive smoking, etc.). © 2009 Aqua-Hot® 375D Hydronic Heating System Service Manual—Rev. A — Page 102 — APPENDIX E: ANNUAL MAINTENANCE PROCEDURE Note: Before performing an annual maintenance, it is recommended to test run the Diesel-Burner. While testing inspect exhaust for smoke. Step 1: Test Run the Diesel Burner 1. Turn the Diesel-Burner Switch to the on position. 2. After the Diesel-Burner has ignited, inspect the exhaust for smoke. 3. Shut the Diesel-Burner off, and wait for unit to completely shut off. Step 3: Run the Diesel Burner 1. Turn the Diesel-Burner Switch to the on position. 2. After the Diesel-Burner has ignited, let it burn for 1 - 2 minutes to purge the old fuel out of the nozzle holder, to prevent contamination of the replacement nozzle. 3. Shut the Diesel-Burner off, and wait for unit to completely shut off. NOTE: The diesel-burner can either be shut off by: 1. Turning the Diesel Burner switch to the off position. 2. Disconnecting the control thermostat wires 3. Unplugging the diesel burner controller. Reference Figure 94a. NOTE: The diesel-burner can either be shut off by: 1. Turning the Diesel Burner switch to the off position. 2. Disconnecting the control thermostat wires 3. Unplugging the diesel burner controller. Reference Figure 94a. Step 2: Replace the Fuel Filter 1. Locate Fuel Filter. 2. Using hose pinch off pliers, clamp off both fuel lines going to the fuel filter. Reference figure 94. 3. Replace fuel filter, with proper replacement canister. Figure 94a Control Thermostat NOTE: It is recommended that the replacement fuel filter be filled with clean diesel fuel, prior to installation 4. Remove hose pinch off pliers. Diesel Burner Controller Plug Figure 94 © 2009 Aqua-Hot® 375D Hydronic Heating System Service Manual—Rev. A — Page 103 — APPENDIX E: ANNUAL MAINTENANCE PROCEDURE Step 4: Clean the Combustion chamber: 1. Remove The Diesel Burner. NOTE: Before Disconnecting Fuel lines, going to Diesel-Burner, it is recommended to pinch off the fuel lines coming into the heater. Figure 95a Figure 95b A. Unplug Diesel-Burner controller B. Disconnect Fuel Lines Figure 95c Figure 95d C. Remove nuts, securing the Diesel-Burner, and remove. D. Remove Gasket, and inspect for signs of damage. © 2009 Aqua-Hot® 375D Hydronic Heating System Service Manual—Rev. A — Page 104 — APPENDIX E: ANNUAL MAINTENANCE PROCEDURE 2. Remove The Flame Tube. A. Loosen and Remove the four 5/16 - 24 nuts securing the Flame Tube in place. B. Remove the Fame Tube Spacer. C. Remove the Flame Tube. D. Clean and inspect the Flame Tube. E. Clean and inspect the Heat Transfer Tabs welded inside the Aqua-hot, using a long handled wire brush. F. Clean and inspect the Flame Tube Spacer. Figure 96 Flame Tube Spacer Flame Tube Gasket Flame Tube © 2009 Aqua-Hot® 375D Hydronic Heating System Service Manual—Rev. A — Page 105 — APPENDIX E: ANNUAL MAINTENANCE PROCEDURE 3. Reinstall The Combustion Chamber NOTE: The Two Flame Tube Mounting Gaskets should be replaced each time the Flame Tube is detached from the Aqua-Hot. A. Install the 1st Flame Tube Mounting Gasket on to the boiler tank. B. Install the Flame Tube into the Boiler Tank. C. Install the 2nd Flame Tube Mounting Gasket onto the Flame Tube Assembly. D. Install the Flame Tube Spacer. E. Securely Tighten the four 5/16-24 nuts Previously removed. Figure 97 Flame Tube Spacer Flame Tube Gasket Flame Tube © 2009 Aqua-Hot® 375D Hydronic Heating System Service Manual—Rev. A — Page 106 — APPENDIX E: ANNUAL MAINTENANCE PROCEDURE 4. Reinstall The Diesel Burner Figure 98a Figure 98b A. Install New Gasket for Diesel-Burner and install the Diesel-burner. B. Tighten Bolts Securing Diesel-Burner to Heater. Figure 98d Figure 98c C. Tighten Fuel fittings. A. Plug in the Diesel-Burner Controller NOTE: After connecting Fuel lines, going to Diesel-Burner, it is recommended to remove pinch off pliers previously used on the fuel lines coming into the heater. © 2009 Aqua-Hot® 375D Hydronic Heating System Service Manual—Rev. A — Page 107 — APPENDIX E: ANNUAL MAINTENANCE PROCEDURE Step 5: Replace the Fuel Nozzle NOTE: The Diesel-Burner does not need to be detached from the Aqua-Hot in order to replace the fuel nozzle. 1. Remove Igniter Assembly NOTE: Before Removing Igniter Assembly, it is recommended to unplug the control unit, to prevent accidental operation. Figure 99a Figure 99b A. Using a flat head screw driver, loosen the retaining clips securing the ignition coil in place. B. Rotate Ignition Coil back, to gain access to Igniter Assembly. NOTE: Prior to beginning this procedure, be sure a label exists on the Blower Housing to indicate where the edge of the Escutcheon Plate should be aligned for proper Igniter Assembly placement. If no label exists, mark the Blower Housing on the right edge of the Escutcheon Plate. Figure 99c Figure 99d C. Remove the Fuel High Pressure Pipe, Escutcheon Plate Spine Nut, and the Escutcheon Plate D. Rotate Igniter Assembly, and Remove. © 2009 Aqua-Hot® 375D Hydronic Heating System Service Manual—Rev. A — Page 108 — APPENDIX E: ANNUAL MAINTENANCE PROCEDURE 2. Replace Fuel Nozzle 3. Adjust Electrodes Figure 100a Figure 101a A. Inspect Igniter Assembly for any sign of damage A. Adjust the Gap of the Electrodes using the Beckett T-Gauge Figure 100b Figure 101b B. Using a 3/4” and a 5/8” wrench remove and replace the fuel nozzle. B. Adjust the Height of the Electrodes using the Beckett T-Gauge NOTE: Be sure to tighten nozzle completely, to prevent fuel leakage. © 2009 Aqua-Hot® 375D Hydronic Heating System Service Manual—Rev. A — Page 109 — APPENDIX E: ANNUAL MAINTENANCE PROCEDURE 4. Reinstall Igniter Assembly NOTE: Verify that the Escutcheon Plate is adjusted to the edge of the label affixed to the Blower Housing. A. Insert Igniter Assembly into the blower housing B. Install the Escutcheon Plate and Escutcheon Plate Spline Nut, ensuring the Escutcheon Plate is adjusted to the edge of the label affixed to the Blower Housing. Then Securely tighten Fuel High Pressure Pipe. C. Close Ignition Coil. D. Using a flat head screw driver, Securely Tighten the retaining clips securing the ignition coil in place. © 2009 Aqua-Hot® 375D Hydronic Heating System Service Manual—Rev. A — Page 110 — APPENDIX E: ANNUAL MAINTENANCE PROCEDURE 6. Test for proper operation. A. Turn the Diesel-Burner switch on, and let heater run for a complete cycle. B. After the Diesel-Burner has shut off, turn on the interior heat/run hot water, until the Diesel-Burner cycles back on. 10. General Recommendations For The Customer A. Tune up Diesel-Burner Annually 1. Replace Fuel Nozzle and Fuel Filter B. Check antifreeze level, in over flow bottle, monthly. C. Run Diesel-Burner Monthly D. Run Interior Heating zones Monthly. E. If they are going to winterize their motor home, make sure they use the winterization antifreeze. DO NOT BLOW OUT WITH AIR. © 2009 Aqua-Hot® 375D Hydronic Heating System Service Manual—Rev. A — Page 111 — © 2009 Aqua-Hot® 375D Hydronic Heating System Service Manual—Rev. A — Page 112 — © 2009 Aqua-Hot® 375D Hydronic Heating System Service Manual—Rev. A — Page 113 — SERVICE MANUAL 15549 East Highway 52 | Fort Lupton, CO 80621 Toll free: 800.685.4298 | phone: 303.659.8221 | fax:303.857.7881 www.aquahot.com © 2009 Aqua-Hot® 375D Hydronic Heating System Service Manual—Rev. A — Page 114 —