1
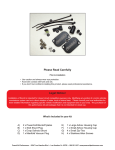
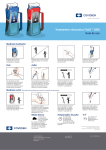
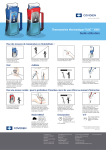
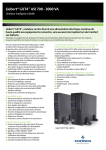
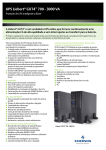
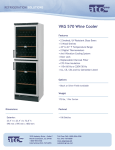
Quick Set-Up Guide
Read Prior to Use
1
Remove the 740SELECT monitor and the accessory box from the shipping carton
1. Remove the plastic bag and monitor screen protector
2. Place the 740SELECT monitor and accessory box on a secure tabletop
3. The 740SELECT is shipped with the Li-ion battery installed
2
Open the 740SELECT standard accessory box and review contents
1. Identify the monitor part number located on the (monitor) rear label
2. Verify packout table below
Part Number
3
NIBP
SpO2
Temp
Standard
01-02-1000
1
4
01-02-1001
1
2
4
01-02-1002
1
2
4
01-02-1003
1
2
3
4
01-02-1004
1
2
3
4
01-02-1009
1
3
4
01-02-1013
2
3
4
01-02-1014
2
3
4
01-02-1015
2
4
01-02-1016
2
4
Pack-Out Description
1-NIBP
BP start-up kit
2-SpO2
• SpO2 patient cable
• SpO2 sensor
• SpO2 sensor start-up kit
3-Temp
• FILAC 3000 isolation
chamber
• FILAC temperature probe
• 1 box of temperature
probe covers
4-Standard
• Power supply
• Power cord
• User manual, addendums,
and field service manual
on CD
• Quick reference guide
(monitor operation)
The following accessory item(s) may be placed in the monitor pack-out if purchased with the monitor
Masimo® CO2
CO2 Analyzer Accessory
• ISA™ CO2 start-up kit
• ISA CO2 holster
• IRMA™ CO2 start-up kit
• ISA CO2 clamp adapter
Note: The Microstream® Micropod™ start-up kit, cradel and clip (or cradle
and VESA mount) may be packaged separate from the monitor.
• ISA CO2 modura holder
4
SpO2
NIBP hose connection CASMED MAXNIBP
The SpO2 connector (left-hand side) and
monitor input panel are keyed to assure
proper orientation.
1. Remove the BP hose from the BP start-up kit.
1. Align the SpO2 connector and push into the
input panel until the connection is seated.
The connector is properly seated when
you hear a click.
2. Complete the cable connection to the SpO2
patient sensor.
2. Align the female NIBP hose connector and push onto the male connector.
You will hear a “click” when the connection is properly seated.
Male NIBP Connector
3. Gently pull on the BP hose to verify proper connection.
Movement between the BP hose and connector is normal.
The connection is designed to allow the hose to move slightly in and
out and rotate while maintaining a secure connection.
4. Press the gray button to release the hose from the NIBP connector.
5
Assemble Covidien™ FILAC 3000 Temperature probe and chamber
2. Position the isolation chamber as shown.
3. Align the top of the temperature probe
L-shaped connector to the slot.
1. Locate the FILAC 3000 Temperature
probe (L-shaped connector).
4. Slide the connector up and into the slot
until fully seated (you will hear a click).
5. Insert the temperature probe into the
temperature probe well as shown.
FILAC 3000
isolation chamber
6
Insert isolation chamber (and probe) into the side car / 740SELECT models: 01-02-1003 and 1004
Isolation chamber
1. Insert the
assembled probe
and isolation
chamber into the
temperature
side car.
Temperature
side car
7
2
1
2. Align the probe
well and slide into
the side car.
3. Three alignment tabs
should be engaged
and seated into the
side car (1, 2, 3).
4. Push the isolation
chamber down into
the side car until
you hear a click.
Well for
temperature probe
Isolation chamber
5. Verify that the
isolation chamber is fully seated
all around.
Insert temperature probe covers into the isolation chamber / 740SELECT models: 01-02-1003 and 1004
1. Position the probe covers with
the temperature probe access
cover opening toward the front
of the monitor.
Arrow icon on probe box
8
3
2. Insert the box of probe covers into
the slot until you hear a click.
Connect the 740SELECT power supply and power cord
Power cord connected to power supply
1. Connect the power cord to the
power supply by fully inserting
into the power supply.
2. Connect the barrel connector to
the monitor.
Power cord
Turn the 740SELECT monitor on
1. Press the On/Off power button located on the
front panel to turn the monitor on.
• The On/Off switch illuminates when the
monitor is turned on.
• During boot-up a configuration setup test
and POST is performed automatically
(20-25 seconds).
• Completion of the test and POST is
confirmed by a two beep audio alert.
44 East Industrial Road, Branford, CT 06405 USA
800.227.4414 | www.casmed.com
2. Verify the monitor battery charging LED is lit
(when plugged into wall outlet).
• Recommend fully charging battery before
entering into service.
• Reference 740SELECT user manual for
operating instructions.
FILAC is a trademark of Covidien AG or an affiliate. Masimo is a registered trademark of Masimo Inc. ISA, and IRMA are Masimo, Inc. trademarks.
Microstream is a registered trademark of Covidien Medical 1987 Ltd. Micropod is a trademark of a Covidien company registered in the U.S. and
foreign countries. MAXNIBP is a registered trademark and 740SELECT a trademark of CAS Medical Systems, Inc. CASMED reserves the right to
make changes to this document without notice.
21-03-0340 Rev01
9
Barrel connector
3. Connect the power cord plug to
a wall outlet.