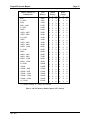
1
For Authorized Service Personnel Only: Eagle 450 Service Manual DSM-00217-00 FIRST EDITION: October 1998 To re-order this document, request part number DSO-00217-00 FCC Notice This equipment has been tested and found to comply with the limits for a Class A digital device, pursuant to Part 15 of the FCC Rules. These limits are designed to provide reasonable protection against harmful interference when the equipment is operated in a commercial environment. This equipment generates, uses and can radiate radio frequency energy and, if not installed and used in accordance with the instruction manual, may cause harmful interference to radio communications. Operation of this equipment in a residential area is likely to cause harmful interference in which case the user will be required to correct the interference at his own expense. Canadian Department of Communications Compliance Statement This equipment does not exceed Class A limits per radio noise emissions for digital apparatus set out in the Radio Interference Regulations of the Canadian Department of Communications. Operation in a residential area may cause unacceptable interference to radio and TV reception requiring the owner or operator to take whatever steps are necessary to correct the interference. Avis de Conformité aux Normes du Ministère des Communications du Canada Cet équipment ne deapsse pas les limits de Classe A d'émission de bruits radioélectriques pour les appareils numeriques tels que prescrites par le Règlement sur le brouillage radioélectrique établi par le ministère des Communications du Canada. L'exploitation faite en milleu résidential peut entrainer le brouillage des réceptions radio et tele, ce qui obligerait le propriétaire ou l'opératour à pendre les dispositions nécessaires pour en éliminer les causes. Battery Warning CAUTION: Danger of explosion if battery is incorrectly replaced. Replace only with the same or equivalent type recommended by the manufacturer. Discard used batteries according to the manufacturer's instructions. ATTENTION: Il y a danger d'explosion s'il y a replacement incorrect de la batterie. Remplacer uniquement avec une batterie du même type ou d'un type recommandé par le constructeur. Mettre au rébut les batteries usagées conformément aux instructions du fabricant. For AM-3500-E100, -E200, -E300, -E400, -E500 and AM-990-01 systems replace battery with Panasonic or Ray-O-Vac BR2325 only. For AM-3500-E550, AM-3500-6000, and AM-990-04 systems, replace batteries with Panasonic or Ray-O-Vac BR1225 only. Use of other batteries may present a risk of fire or explosion. Replacement batteries may be ordered from your authorized Alpha Micro reseller. Safety Warning This computer contains no user-configurable components that require opening the computer case. Because the power supply in this computer is capable of outputting high current levels hazardous to your safety, the computer case should only be opened by an authorized service technician. Cet ordinateur ne contient aucune pièce configurable par l’utilisateur qui nécessite l’ouverture du boitier. L’alimentation de cet ordinateur peut preduire des nivaeux de tensions dangereux, le boitier ne devrait donc être ouvert que par un technician autoriaé. SOFTWARE SECURITY DEVICE IDENTIFICATION NUMBER: _________________ The Alpha Micro Software Security Device (SSD) is a customized integrated circuit that personalizes the computer, providing identity verification for it. Certain Alpha Micro and non-Alpha Micro software may require that your computer contain an SSD in order to run software that has been customized to run only on your computer. Please enter the identification of your SSD above. The SSD identification number should be on your computer ID label under "SSD Serial No." (Another way of finding the number is to look at the SSD itself. The SSD is located in an integrated circuit location on the CPU board; its identification number is printed on the SSD itself.) Software vendors may ask you for the SSD number if they are customizing software to run only on your computer. This document may contain references to products covered under the following U.S. Patent Number(s): 4,530,048 ALPHA MICROSYSTEMS 2722 S. Fairview Street P. O. Box 25059 Santa Ana, CA 92704 Table of Contents INTRODUCTION.....................................................................................................................................1 OTHER EAGLE 450 DOCUMENTS.......................................................................................................1 ACCESSING YOUR COMPUTER..........................................................................................................1 ELECTRONIC EQUIPMENT HANDLING PRECAUTIONS................................................................3 HARDWARE CONFIGURABLE OPTIONS ..........................................................................................3 Printed Circuit Board Configuration.....................................................................................................4 AM-138 Jumpers...................................................................................................................................6 AM-138 Connectors..............................................................................................................................7 Remote Reset Capability.......................................................................................................................8 Replacing the Time and Date Battery ...................................................................................................8 SSD and PROM Chip Removal ..........................................................................................................10 AM-966-10 CONNECTIONS.................................................................................................................11 Front Panel Display Wires for Upgrades ............................................................................................12 UPGRADING EAGLE 450 ON-BOARD MEMORY............................................................................12 Removing Memory SIMMs ................................................................................................................12 Installing the External Cache SIMM Module .....................................................................................13 Installing Memory ...............................................................................................................................14 INSTALLING I/O BOARDS..................................................................................................................16 PERIPHERAL MOUNTING ..................................................................................................................16 Additional Documentation ..................................................................................................................18 Table of Figures Figure 1: Chassis Top Cover Screws ........................................................................................................2 Figure 2: Chassis Top Cover Removal .....................................................................................................2 Figure 3: Static Protection Wrist Strap .....................................................................................................3 Figure 4: AM-138 Board...........................................................................................................................5 Figure 5: AM-138 Backup Battery Removal ............................................................................................9 Figure 6: SSD Chip Removal Tools........................................................................................................10 Figure 7: AM-966-10 Board Layout .......................................................................................................11 Figure 8: AM-138 SIMM Module Installation .......................................................................................13 Figure 9: JP7 Memory Jumpers ..............................................................................................................14 Figure 10: Peripheral Bay Positions........................................................................................................17 Rev. A00 Eagle 450 Service Manual Page 1 INTRODUCTION The instructions in this document are intended only for authorized service personnel. Eagle 450 computers contain a high-output power supply, which produces current levels high enough to make it unsafe for unauthorized persons to perform work inside the chassis. This document describes the following procedures and topics for the Eagle 450 computer: • Removing your computer's cover and electronic equipment handling precautions • Hardware configuration options: jumpers and connectors on the AM-138 board, replacing the time/date battery, enabling remote reset, and replacing the SSD and PROM chips • Connections to the AM-966-10 front panel display • Installing memory • Installing I/O boards • Peripheral installation OTHER EAGLE 450 DOCUMENTS Besides this Service Manual, these other documents contain information on the Eagle 450: • Eagle 450 Owner’s Manual, DSO-00215-00: the end user’s guide to daily operation and maintenance of the computer. • Eagle 450 Installation and Technical Manual, DSO-00216-00: technical specifications, configuration guidelines, and installation and software setup information. You should not begin any Eagle 450 component replacement or upgrade without this manual. • Upgrade Instructions: AM-1600 or Eagle 100/300/500 to Eagle 450, PDI-03500-21: detailed instructions for replacing the CPU or any of these computers with the AM-138 board to create an Eagle 450 computer. All of these manuals are available on-line at our Web site, www.amos-online.com. ACCESSING YOUR COMPUTER When adding additional equipment or servicing your computer, you will need to remove your computer's top cover. The top cover is held in place with four Phillips-head screws on the computer's rear panel. To remove the top cover, remove all four screws from the locations indicated in Figure 1. Once the screws have been removed, you can slide back and remove the top cover, as shown in Figure 2. (Your computer’s front panel may not look like the one in Figure 2—the cover removal procedure is still the same.) Rev. A00 Page 2 Eagle 450 Service Manual TOP COVER SCREWS 0 SCSI 115 Cover plate over PCI bus connectors. PCI bus devices not supported on first release. 6 7 4 5 2 3 0 0 1 1 2 3 4 5 6 7 Figure 1: Chassis Top Cover Screws Figure 2: Chassis Top Cover Removal Rev. A00 Eagle 450 Service Manual Page 3 ELECTRONIC EQUIPMENT HANDLING PRECAUTIONS With the AC power cord unplugged and the top cover removed, the components inside your computer are vulnerable to damage caused by static discharge. Your body and clothing can store an electrical charge that can damage or destroy unprotected electronic components. Before handling any computer hardware, make sure your work area is properly protected against static discharge. There are a number of commercially available static protection devices, like the wrist strap shown in Figure 3, designed specifically to protect your equipment from harmful static discharge. Figure 3: Static Protection Wrist Strap HARDWARE CONFIGURABLE OPTIONS The following sections show the jumpers and connectors on the AM-138 board, then describe the configuration options available to let you tailor your hardware to your needs. These options require access to the main circuit boards inside the computer, and should be performed only by qualified technical personnel. Contact your VAR if you need assistance. Rev. A00 Page 4 Eagle 450 Service Manual Printed Circuit Board Configuration The AM-138 board is shown in Figure 4. Your board has been factory tested and shipped with its configuration jumpers set in their standard default positions. There are only two areas on the board which may require you to change jumper settings: • Memory size select (JP7) • Enabling or disabling the supply of SCSI bus termination voltage (JP5)—default set at enabled. All other jumpers should be left in their factory-installed positions. The jumper setting table following Figure 4 will help you check the board to make sure all jumpers are properly installed. Rev. A00 Eagle 450 Service Manual Page 5 Remote reset jumper (JP1) Batteries go here. On-board serial ports Wide SCSI connector Narrow SCSI connector Serial I/O expansion slots Memory jumpers P8: Remote reset adapter attaches here First memory SIMM Cache SIMM goes here. Second memory SIMM Figure 4: AM-138 Board Rev. A00 Page 6 Eagle 450 Service Manual AM-138 Jumpers Jumper Number JP1 Jumper Name RR-EN Default Setting out JP2 Level7 Select UPS JP3 20 16 TERMPWR IN out EN DISC Memory Size Select 32 16 25 20 33 33 50 66 SP Cache enable IN See Table 4. JP5 JP6 JP7 JP8 JP9 JP12 out out out out IN out out IN out IN Notes When IN, enables remote reset through serial port 0 (this is not supported through AM-90 card); when out, allows remote reset cable attachment at P8. See page 8. 3-pin jumper; set to two pins at UPS side. When set to FP, front panel Turbo switch enables Level7 diagnostic. Not user configurable. Ethernet bus clock select. Not user configurable. SCSI bus termination voltage, EN = Enabled, DS = Disabled. User may change. Not user configurable Memory size configuration. Installer must configure. Not user configurable. Not user configurable. Enables board cache when IN Table 1: Jumper Configuration for the AM-138 Board Rev. A00 Eagle 450 Service Manual Page 7 AM-138 Connectors The following table provides a brief overview of the connectors on the AM-138 board. Connector Number Connector Name Connector Type J1 J2 J3 UPS Parallel port Ethernet 9-pin 25-pin AUI J4 J5 J6 J7 J8 J9 J10 J11 J12 J13 Ethernet PCI expansion PCI expansion Ports 10-17 Ports 20-27 Ports 30-37 Bank 0 Bank 1 Cache SIMM SCSI-2 Wide TPI 120-pin PCI 120-pin PCI 42-pin 42-pin 42-pin SIMM SIMM SIMM 68-pin P1 P2 P3 P4 P5 40-pin 40-pin Molex Molex P6 P7 Ports 0 - 3 Ports 4 - 7 Power Power Option Connector Program SCSI-2 P8 Run Disk 2-pin 2-pin Power 2-pin Reset 2-pin 26-pin 20-pin P9 P10 50-pin Cable Description and How to Use Cable pin-1 up, use keyed cable Cable pin-1 up, use keyed cable Cable pin-1 up, use keyed cable. Cannot use both this and J4. RJ-45. Cannot use both this and J3. Future use Future use Serial expansion Serial expansion Serial expansion First memory SIMM Second memory SIMM AM-701 cache board Cable pin-1 down, use keyed cable. Cannot use both this and P7. First four on-board ports Second four on-board ports For +5V, +12V, -12V and GND For +5V and GND FOR FUTURE USE FOR FACTORY USE ONLY Cable pin-1 down, use keyed cable. Cannot use both this and J13. Run light if using 20-pin front panel display at P10 Disk activity light if using 20-pin front panel display at P10 Power light if using 20-pin front panel display at P10 Optionally, connect PDB-10323-00 to inner pin. Front panel status display (AM-966-10) Front panel status Table 2: AM-138 Connectors Rev. A00 Page 8 Eagle 450 Service Manual Remote Reset Capability The AM-138 board has an option to enable remote hardware reset, either through serial port 0, or by using the Remote Reset Adapter, PDB-10323-00. You cannot use remote reset through port 0 if port 0 uses an AM-90 card for its back panel connection; the AM-90 does not support this feature. If you use an AM-90, which is standard on newly-purchased Eagle 450s and recommended for upgrades, you must use the Remote Reset Adapter if you want remote reset ability. To enable remote reset through serial port 0, you must do two things: 1. Install the JP1 jumper. The factory default is not installed. 2. Connect a push-button switch between pin-1 and pin-7 (signal ground) at the terminal end of the terminal cable attached to serial port 0. Once you’ve enabled remote reset, you can reset the computer by activating the push-button switch. The remote reset adapter allows you to reboot the computer from anywhere in your facility by wiring an external switch to the location you want. To install the remote reset adapter, follow the instructions in PDI-10323-00. The JP1 jumper must not be installed. Attach the adapter’s single-wire connector to the connector labeled RESET at location P8. Attach it to the pin away from the edge of the board. Replacing the Time and Date Battery When replacing the backup batteries, always be sure to power-down the system first! DO NOT replace the batteries with the power on! As always when opening your computer chassis, take proper precautions against electrostatic discharge, which can seriously damage system components. The AM-138 board uses two 3-volt lithium batteries (BR-1225) to provide power to its time/date circuit. The batteries are no bigger than a dime (1.2 cm), and are secured side-by-side in a plastic holder at location U17, as shown in Figure 5. The batteries need to be replaced when the status panel displays B1 or B0. You must replace both batteries at the same time. For battery replacement, please follow these steps: Before turning off your computer, write down the current CMOS settings. Removing the batteries will erase all CMOS data. 1. Insert a knife with a thin blade (such as a small scribe or Xacto™ knife) from the top, down through the square hole between the right edge of the battery and the plastic holder's top piece. (The right side is the side toward C31.) 2. Gently pry the right side of the battery so it slides to the left and pushes against the left side spring contacts. Rev. A00 Eagle 450 Service Manual Page 9 3. As you slide the battery to the left and it clears the plastic top hole, pry the right edge of the battery upward and out through the hole in the top. The battery will typically "pop" up and out. U17 + C31 C31 + U17 + + Figure 5: AM-138 Backup Battery Removal 4. Inspect the battery contacts and be sure they are clean before installing the new batteries. Use alcohol and a cotton swab to clean them, if necessary. 5. To install a new battery, insert the edge of the battery down through the square hole and under the left side of the plastic top. Be sure to install the new batteries with the (+) positive side up. 6. Use your finger to slide the battery to the left and down, until the right edge of the battery slips under the right side of the plastic top. Release the battery and it should spring to the right, securing itself under the holder's top piece. Restoring Your CMOS Settings The AM-138’s batteries also maintain the boot routine data stored in its CMOS chip. Therefore, when you replace the batteries, your CMOS settings will be lost. After you install the new batteries and turn system power on, you need to access the CMOS Configuration menu and restore your settings. Refer to the Eagle 450 Installation and Technical Manual for detailed instructions. If you do not use the CMOS configuration menu to restore your settings, the system will drop into a standard default boot routine: it will look first for a warm-boot streamer tape on SCSI device ID 3, then for AMOS32.MON and AMOS32.INI on SCSI disk drive 0. Once the system is up and running, log to OPR: and enter the current time and date. Reboot the system to initialize the system up time. Rev. A00 Page 10 Eagle 450 Service Manual SSD and PROM Chip Removal The type of socket used for the boot PROM and SSD chips in your Eagle 450 requires a special tool for chip removal. If you ever need to remove and replace either of these chips, be sure to use the correct tool, as shown in Figure 6. WARNING! The SSD chip and boot PROM on the AM-138 board require a specialized tool for their removal. If you attempt to remove the SSD chip or boot PROM using a screwdriver or pocketknife, you could easily damage both the chip and the socket. This type of chip extraction tool is available at retail stores specializing in electronic components. Figure 6: SSD Chip Removal Tools Rev. A00 Eagle 450 Service Manual Page 11 AM-966-10 CONNECTIONS The Eagle 450 uses the AM-966-10 front panel display board, which connects to the AM-138. In most cases, you should not need to connect any wires to or disconnect any wires from the AM-966. However, if any of your front panel display lights stop working, or if one or more wires come loose from the AM966, you can refer to the picture and list below to check and, if necessary, remake any connections. CABLE FROM AM-138 CONNECTOR P9 PLUGS IN HERE PIN 1 JP2 DWB0966-10 Rev xxx RESET U2 EN26 TURBO SW TURBO RUN JP5 DISK J2 JP3 EN20 U3 JP4 SPKR/PWR JP1 J1 JP6 THIS JUMPER MUST BE IN THE TOP POSITION Figure 7: AM-966-10 Board Layout The AM-966-10 board uses the following connections and jumpers: Location J1 JP1 JP2 JP3 JP4 JP5 JP6 Description 26-pin cable to AM-138. Notice pin 1 orientation on Figure 7. Connects to Turbo switch. Connects to Reset switch. In an Eagle 450, this jumper must be on the upper two pins (those closest to J1). To speaker and front panel power. Connects to system activity (Turbo) light. Place connector on left two pins (white goes on center pin). Connects to disk activity (H.D.D.) light. Place connector on left two pins (white goes on center pin). Wire Order* Black-yellow-white Green-black or black-green Red-black Yellow-white Red-white Table 3: AM-966-10 Connectors * Wires should be in this order, from top to bottom or left to right, depending on jumper orientation. In some cases, wires may be reversed; if connection doesn’t work in this orientation, try reversing the connector. If all front panel lights stop working, check the JP4 connection first. If it is loose, none of the lights will work. Rev. A00 Page 12 Eagle 450 Service Manual Front Panel Display Wires for Upgrades Computers which were upgraded to an Eagle 450 from AM-1600 or older Eagle computers may not use the AM-966-10. If not, the 20-pin connector from the front panel attaches at P10, and additional front panel wires attach at P8 as indicated: Board Label Run Wires Yellow/White Disk Power Reset Red/White Green/White Green/Black Purpose/Notes Run light; white wire goes toward edge of board.* Disk activity light; white wire toward edge.* Power light; white wire toward edge* Reset switch UPGRADING EAGLE 450 ON-BOARD MEMORY The AM-138 has two on-board SIMM (single inline memory module) expansion slots, which support 60ns DRAMs; you can install either one or two memory SIMMs. Because the memory is located onboard, it can be accessed much faster than memory accessed over the VME bus—i.e., AM-730 and AM740 memory boards used with earlier CPU boards. The AM-138 also supports one 64KB cache SIMM (the AM-701). This SIMM is installed in the same way as the memory SIMMs. The following procedures describe how to remove and install the cache and memory SIMMs, and set the memory size jumpers. Removing Memory SIMMs To remove a memory or cache SIMM from its connector: 1. Power down the computer. Remove the chassis cover and access the AM-138 board. 2. Press out on the metal retainer clips and gently tilt the top of the SIMM module, so it is free of the metal retainer clips. 3. Lift the SIMM out of the connector Rev. A00 Eagle 450 Service Manual Page 13 Installing the External Cache SIMM Module The external cache SIMM must only be installed in the J12 slot, labeled CACHE SIMM. Never install memory expansion SIMMs in J12, or the cache SIMM at any other location. See Figure 4 for the location of J12. To install the 64KB external cache SIMM (PDB-00701-00) on the AM-138 board: 1. Align pin-1 on the external cache SIMM module with pin-1 on connector at J12. Pin-1 on the SIMM module is on the notched end of the module (see Figure 8 below). 2. Insert the cache SIMM module into the J12 connector at a slight angle. 3. Rotate into the upright position. MAKE SURE THIS CURVE IN THE SIMM CARD ALIGNS WITH PIN-1 IN THE SIMM CONNECTOR. SIMM (SINGLE INLINE MEMORY MODULE) RETAINER CLIP RETAINER CLIP SIMM CONNECTOR PIN-1 INDICATOR Figure 8: AM-138 SIMM Module Installation The cache SIMM will engage the metal retainer clips and click into position, locking in place. When properly installed, the components on the cache SIMM module will be facing away from the other memory SIMMs. To enable the cache, make sure the jumper at location JP12 is installed. This is the factory default. Rev. A00 Page 14 Eagle 450 Service Manual Installing Memory The Eagle 450 supports from 4MB to 256MB of main memory: either one or two memory SIMMs of 4MB, 8MB, 16MB, 32MB, 64MB, or 128MB. Use 60ns SIMMs only; 70ns SIMMs will not work. Unlike the AM-6000, SIMMs do not have to be installed in pairs: you can use either one or two SIMMs; if you use two, they do not have to be of equal size. For example, you can install one 32MB SIMM and one 16MB SIMM for a total of 48MB of memory. The memory SIMMs install in connectors J10 and J11. See Figure 4 for the location of these connectors. If you’re installing only one SIMM, it goes in J10. If you’re installing two SIMMs of unequal capacity, the larger one goes in J10. To install memory expansion SIMMs on the AM-138 board, use this procedure: 1. Insert one SIMM (the larger if the SIMMs aren’t of equal capacity) in connector J10. Align pin-1 at the notched end of the SIMM module with pin-1 on the connector, as in Figure 8. 2. Insert the SIMM module into the connector at a slight angle. Rotate into the upright position. The SIMM will engage the metal retainer clips and click into position, locking the SIMM in place. 3. If you are using two SIMMs, repeat steps 1 and 2 for the second one, at connector J11. Setting Memory Jumpers 1 2 4 1 2 4 BANK1 BANK0 JP7 After installing the SIMMs, set the jumpers at location JP7 on the AM-138 board according to the table below. As you turn on the computer, AMOS will automatically make the memory available. See Figure 4 for the location of the JP7 jumpers. Figure 9: JP7 Memory Jumpers The Bank 0 jumpers apply to the SIMM in J10; the Bank1 jumpers apply to the SIMM, if any, in JP11. The correct jumper settings for each possible memory combination are shown in Table 4, below. Rev. A00 Eagle 450 Service Manual Memory Module Size Combinations: 4MB 2 x 4MB 8 MB 8MB + 4MB 2 x 8MB 16MB 16MB + 4MB 16MB + 8MB 2 x 16MB 32MB 32MB + 4MB 32MB + 8MB 32MB + 16MB 2 x 32MB 64MB 64MB + 4MB 64MB + 8MB 64MB + 16MB 64MB + 32MB 2 x 64MB 128MB 128MB + 4MB 128MB + 8MB 128MB + 16MB 128MB + 32MB 128MB + 64MB 2 x 128MB Page 15 Total Memory 4MB 8MB 8 MB 12MB 16MB 16MB 20MB 24MB 32MB 32MB 36MB 40MB 48MB 64MB 64MB 68MB 72MB 80MB 96MB 128MB 128MB 132MB 136MB 144MB 160MB 192MB 256MB Bank0 Settings 1 2 4 X X X X X X O X X O X X O X X X O X X O X X O X X O X O O X O O X O O X O O X O O X X X O X X O X X O X X O X X O X X O O X O O X O O X O O X O O X O O X O O X O Bank1 Settings 1 2 4 O O O X X X O O O X X X O X X O O O X X X O X X X O X O O O X X X O X X X O X O O X O O O X X X O X X X O X O O X X X O O O O X X X O X X X O X O O X X X O O X O X = Jumper installed; O = Jumper not installed Table 4: AM-138 Memory Module Jumper (JP7) Settings Rev. A00 Page 16 Eagle 450 Service Manual INSTALLING I/O BOARDS I/O boards containing additional serial ports plug into the connectors at J7, J8, and J9 on the AM-138. As discussed in the Eagle 450 Installation and Technical Manual, you should add boards starting with J7 and working up to J9. For detailed installation instructions for any serial I/O board, please refer to the documentation accompanying the board. This section merely contains some cautions and issues to keep in mind when adding a serial I/O board to an Eagle 450 computer. The plastic connectors on the AM-138 are fragile, and can break if you are not careful when removing or installing I/O boards. To minimize the chance of damage: • Never apply excessive pressure or attempt to force a board into the connector. If aligned properly, the board should install easily. • Attach the cable that will go from the I/O board to the back panel before you insert the board into the connector on the AM-138. Attaching the cable after the board is installed puts a sideways pressure on the connector and could crack it. • Similarly, do not unplug the cable to the back panel while the board is in the connector. Carefully remove the board from the connector, then unplug the cable. Most Eagle 450s include a small brace designed to support the I/O boards and prevent damage during shipping. You can adjust this brace for the number of I/O boards currently in the computer. We recommend you leave the brace in place to help prevent possible damage if the computer is jostled or moved. See PDI-20791-00, Notice: Shipping Brace for I/O SIMM Boards, for instructions on removing and adjusting the brace. PERIPHERAL MOUNTING Your Eagle 450 computer can hold six half-height peripherals, in three 3.5” and three 5.25” mounting bays. One of the 3.5” bays and all of the 5.25” bays are accessible through the computer’s front panel after you remove the appropriate filler panels. 3.5" hard disk drives can be mounted in the 5.25" bays using special mounting brackets. The 3.5” SCSI floppy drive requires a 5.25” mounting bay. Figure 10 shows all six peripheral mounting positions. We strongly recommend turning off system power before attaching or detaching any SCSI peripheral. Attaching any device, internal or external, while there may be activity on the bus can severely damage the peripheral or the SCSI controller. Rev. A00 Eagle 450 Service Manual Page 17 1 5.25 mounting bays; all are accessible from front panel 2 3 4 Used for front panel display 3.5 mounting bays; only #4 is accessible from front panel 5 6 NOTE: With the proper adapter, you can mount a 3.5" device in a 5.25” drive bay. Figure 10: Peripheral Bay Positions The following paragraphs give general instructions for mounting peripherals in the Eagle 450 cabinet. For detailed instructions on configuring a particular device, see the installation instructions shipped with that device. A peripheral is installed in a drive bay using four Phillips-head screws. To install the screws, you need access to both sides of the drive bay. On one side of the cabinet, all six of the bays are easily accessible. However, on the other side, the AM-138 mounting panel blocks access to all but the top two bays. To ease the installation process, Alpha Micro installs peripherals starting at the top and working down. If your computer includes one disk drive and one tape drive, the two peripherals will be in bays 1 and 2, which are easily accessible from both sides of the chassis. To install peripherals in bays 3 through 6, you need to remove the mounting panel from the right side of the chassis (looking from the front). To install peripherals in these locations: Rev. A00 Page 18 Eagle 450 Service Manual 1. Since the AM-138 is attached to the panel, you need to detach it from the computer’s back panel before removing the mounting panel. Remove the screws near the UPS status port and parallel port on the back panel. 2. Remove the two Phillips-head screws attaching the mounting panel to the chassis. Notice how the panel is positioned over the two alignment tabs on the bottom of the chassis. When you reinstall the panel, you must make sure it is properly positioned over both tabs; if not, you won’t be able to reinstall the two screws. 3. Move the panel forward slightly so the AM-138 connectors clear the back panel, then tilt the top of the panel away from the chassis and remove it. 4. With the mounting panel out of the way, you can access both sides of the peripheral mounting bracket and have complete access to all six drive bays. 5. To install a peripheral, simply slide it into one of the available bays and install the four screws (two on each side) that hold the device in place. 6. Don't forget to attach the appropriate power and interface cables to your new peripheral. 7. After you have completed your peripheral installation, you can reinstall the side mounting panel and AM-138 by reversing the steps above. The mounting panel is an integral part of the chassis assembly. With it removed, the chassis may shift slightly, either forward or backward. To reinstall the panel, you can realign the chassis by placing one hand on the top of the chassis and applying pressure either forward or backward. With the chassis properly aligned, the panel will slide into place. Additional Documentation Each peripheral device sold by Alpha Micro is covered by its own set of installation instructions. The installation instructions include information on jumper settings, termination, and cabling. Before installing a peripheral, make sure you read the documentation pertaining to the device. If the documentation was not included with your peripheral device, it is probably contained on the AlphaCD which is distributed to all Alpha Micro Value Added Resellers on a quarterly basis, and on our Web site at www.amos-online.com. Rev. A00