1
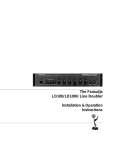
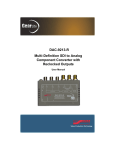
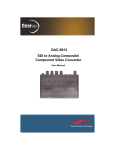
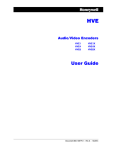
SERVICE MANUAL
TIME BASE CORRECTOR
FA-145
(1ST EDITION)
FOR-A COMPANY LIMITED
Contents
1. Prior to Starting ...........................................................................................................................1
1-1. General ...............................................................................................................................1
1-2. Test Equipment ...................................................................................................................1
2. Test Equipment Connection ........................................................................................................2
3. Before Adjustment.......................................................................................................................3
4. Adjustments / Alignments ............................................................................................................4
4-1. Genlock Adjustment ............................................................................................................4
4-2. Video Input Output Adjustment ...........................................................................................5
4-3. Final Check (UNITY Settings) .............................................................................................7
4-4. MAIN CARD Settings..........................................................................................................8
5. Block Diagram ..........................................................................................................................10
6. Circuit Diagram
7. Parts List
1. Prior to Starting
1-1. General
This service manual is intended for use only by qualified service engineers who are familiar with
FOR.A products. Maintenance procedures and/or adjustments explained herein should not be
attempted by unqualified personnel.
1-2. Test Equipment
FA-145 units should be configured as shown in sec. 2 “Test Equipment Connection” prior to
performing adjustments using the test equipment listed below. (Or equipment having equivalent
or better capability.)
1
2
3
Equipment
Composite monitor
SDI monitor
Black Burst signal
4
Test signal generator
5
Oscilloscope
Waveform monitor
(Tektronix)
Waveform monitor
(Tektronix)
6
7
Type
For analog signal
For digital signal (SD SDI)
Reference signal
The signal generator should be directly connected to
the unit without using an amplifier.
Composite (NTSC, PAL), D1 (NTSC, PAL)
100MHz or higher
1765
WFM601
1
2. Test Equipment Connection
A connection example of FA-145 for alignment and adjustment is given below.
COMPOSITE
SD-SDI
SD-SDI 1
INPUT
Signal
Generator
SD-SDI 2
MONITOR
OUTPUT
GENLOCK IN
AC100-240V
~ 50/60Hz IN
SER.NO.
AC 100V-240V
UFM-145DFS
COMPOSITE
SD SDI
BNC Cable
Composite Monitor
SDI Monitor
REF
WFM601
REF
1765
BB
BB
2
3. Before Adjustment
Dipswitch and jumper operational settings are made at the factory and should not need to be
changed during normal operation. If changes have to be made during the course of these
adjustments, refer to the figure below and sec. 4-4 “MAIN CARD Settings” to remake original
settings.
Switches
JP1
JP2
JP3
JP4
SW1
1-8
SW2
1-8
Settings
Open
1-2 short
1-2 short
1-2 short
All OFF
All OFF
2
JP1
MAIN CARD
1
JP3
SW1
JP4
3
1
Short settings
3
1
3
JP2
SW2
ON
1
1
ON
8
1
8
※The all dipswitches (SW1,2) are set to OFF positions.
3
4. Adjustments / Alignments
IMPORTANT
Warm up your unit for at least 30 minutes before making following adjustments.
When performing following adjustments, all switches on the front panel should be set
to UNITY.
4-1. Genlock Adjustment
No
1
Item
Input
Free-running
frequency
①Input signal
(Composite)
②Input signal
(SDI)
③Genlock signal
④Equipment
Test point
①75% color bars
②None
③BB
④Monitor
①75% color bars
②None
③None
④1765
MONITOR
OUT
2
Genlock
Adjust
①75% color bars
②None
③BB
④1765
MONITOR
OUT
4
VR18
(R5)
Procedure
Waveform
Verify that INPUT
and GENLOCK
LED on the front
are lit.
Genlock LED goes to
lit.
Input external
reference signal
to1765. While
FA-145 is
free-running,
adjust signal
rotation speed to
minimum.
(5 rotations per
sec. or less.)
Input BB and
verify that the
signal is locked.
4-2. Video Input Output Adjustment
No
Item
①Input signal
(Composite)
②Input signal
(SDI)
③Genlock signal
④Equipment
Test point
Adjust
Procedure
Verify that
SDI_OUT1and
SDI_OUT2 are
both set to:
Y: 700mV
B-Y, R-Y: 525mV
SDI
input/output
①None
②75% color bars
③BB
④WFM601
SDI
OUT
1, 2
SDI input/
composite
output level
①None
②75% color bars
③BB
④1765
MONITOR
OUT
VR19
(T5)
Verify that the
output signal of
MONITOR OUT
is set to 714mV.
VC3
(T5)
Set SW1-7
(B&W) to ON,
adjust so that
4.2MHz and
WHITE of
MONITOR OUT
have the same
amplitude levels
(within ±5%).
*After the
adjustment, set
SW1-7 back to
OFF
VR5
(D3)
Verify that
SDI_OUT1and
SDI_OUT2 are
both set to:
Y: 700mV
B-Y, R-Y: 525mV
VR6
(F2)
Verify that the
output signal of
MONITOR OUT
is set to 714mV.
If not, use VR6 to
adjust.
3
SDI input/
composite
output
frequency
response
①None
②75% multiburst
③BB
④1765
Composite
input/
SDI output
level
①75% color bars
②None
③BB
④WFM601
Composite
input/
composite
output level
①75% color bars
②None
③BB
④1765
MONITOR
OUT
Composite
input/
SDI output
frequency
response
①75% multiburst
②None
③BB
④WFM601
SDI
OUT
1, 2
Composite
input/
composite
output
frequency
response
①75% multiburst
②None
③BB
④1765
MONITOR
OUT
SC lock
①75% color bars
②None
③BB
④Oscilloscope
TP26
(F4)
MONITOR
OUT
SDI
OUT
1, 2
Waveform
0.7Vp-p
0.525Vp-p
0.714Vp-p
WHITE
0.7Vp-p
4.2MHz
0.525Vp-p
0.714Vp-p
4
5
Verify that
SDI_OUT1and
SDI_OUT2 are
both flat.
VR20
(D3)
5
Verify that
4.2MHz and
WHITE of
MONITOR OUT
have the same
amplitude levels
(within ±5%).
Adjust so that
amplitude of
TP26 is
minimized as a
straight line.
(Set VD of input
signal as a
trigger.)
Flat
WHITE
4.2MHz
No
6
Item
Chroma
phase
①Input signal
(Composite)
②Input signal
(SDI)
③Genlock signal
④Equipment
①75% color bars
②None
③BB
④WFM601
Test point
SDI
OUT
1, 2
Adjust
Procedure
Dipswitch
SW2-8
(D3)
Toggle
Switch
SW4
(D3)
Set SW2-8 to ON.
Adjust the toggle
switch SW4 so
that the
chrominance
vectors are
located in each
4-box 田 mark.
* After the
adjustment, set
SW2-8 back to
OFF.
VR10
(D1)
7
8
9
H jitter
(HVCO)
VTR
(HVCO)
H
phase
①75% multiburst
②None
③BB
④1765
①VTR
②None
③BB
④Oscilloscope
①75% color bars
②None
③BB
④Oscilloscope
MONITOR
OUT
TP3
(F2)
TP8
(D1)
MONITOR
OUT
VR20
(D3)
VR9
(D1)
VR11
(D1)
Toggle
Switch
SW4
(D3)
6
If there is chroma
jitter, adjust jitter to
minimum using
VR10.
If jitter level is
high, use VR20 to
adjust jitter to
minimum. In that
case adjust the
chroma phase
again so that the
vectors are
located in each
4-box 田 mark.
Connect TP3
(trigger) to CH1
and TP8 to CH2 of
oscilloscope to
observe TP8
signal with V-rate.
Use VR9 and
VR11 to adjust the
waveform of TP8
as shown in the
figure at right.
Zoom to enlarge
image around
where the
reference signal
falls. Align H
phase using the
toggle switch on
the front panel.
(Set HD of
reference signal
as a trigger.)
Waveform
76µ s
DC2.0V
0.5Vp-p
B.B In
Monitor Out
4-3. Final Check (UNITY Settings)
*The settings bellow should be verified on both NTSC and PAL signals.
No
Item
①Input signal
(Composite)
②Input signal
(SDI)
③Genlock signal
④Equipment
①75% color bars
(NTSC, PAL)
②None
③BB
④1765
Test point
Adjust
MONITOR
OUT
Verify that the
output signal of
MONITOR OUT
has the same
amplitude level
(within ±1%) as
the input signal.
SDI
OUT
1, 2
Verify that the
output signals
of both
SDI_OUT1 and
SDI_OUT2
have the same
amplitude
levels (within
±1%) as the
input signal.
MONITOR
OUT
Verify that the
signal is
symmetrical as
shown in the
figure at right.
SDI
OUT
1, 2
Verify that the
signal is
symmetrical as
shown in the
figure at right.
Level
①None
②75% color bars
(NTSC, PAL)
③BB
④WFM601
Y/C Delay
(Composite
input)
10
Y/C Delay
(SD_SDI
input)
UNITY /
OPERATE
①2T pulse
(NTSC, PAL)
②None
③BB
④1765
①None
②Bowtie
(NTSC, PAL)
③BB
④WFM601
①75% color bars
(NTSC, PAL)
②None
③BB
④1765
Procedure
MONITOR
OUT
7
Front
Volume
Adjust the front
volume to make
the UNITY and
OPERATE
settings
(VIDEO
LEVEL,
CHROMA
LEVEL,SET
UP,CHROMA
PHASE)
consistent while
switching
UNITY and
OPERATE by
the toggle
switch on the
front panel.
Waveform
Same level as input signal
0.7Vp-p
0.525Vp-p
4-4. MAIN CARD Settings
Jumper and dipswitch settings on the Main card are factory made as below. They should not
need to be changed. Simply verify settings are as shown.
Dipswitch SW1 (card address:H1)
Setting
Pin No.
Function
1
FACTORY SET
2
TEST SIGNAL
3
4
5
6
7
8
FREEZE MODE SELECT
FIELD SELECT
AUTO FREEZE
FORCED FIELD
B/W
VITS
ON
OFF
Factory Default
--COLOR
BAR
Field
EVEN
ON
ON
ON
ON
---
OFF
OFF
OFF
Frame
ODD
OFF
OFF
OFF
OFF
OFF
OFF
OFF
OFF
OFF
OFF
Dipswitch SW2 (card address:J1)
Pin No.
Function
1
2
3
4
5
6
7
8
REMOTE
SET UP
SYNCHRO MODE
EDH
REF SEL MODE
REF SEL
NTSC/PAL
ADJUSTMENT
Setting
ON
OFF
Factory Default
REMOTE
ON
LINE
ON
MANUAL
REAR BNC
GENLOCK
ADJUST
LOCAL
OFF
FRAME
OFF
AUTO
SYSTEM
INPUT
OPERATE
OFF
OFF
OFF
OFF
OFF
OFF
OFF
OFF
Jumper Settings
JP
No.
Card
Address
JP1
B6
JP2
T4
JP3
T4
Resets CPU
Selects MONITOR
OUT or
GENLOCK_THRU
Sets GENLOCK
termination
JP4
C2
Adjusts input
signal sync
Settings
Function
Setting 1
Setting 2
Factory Default
---
---
Open
MONITOR OUT
(1-2 short)
GENLOCK_THRU
(2-3 short)
MONITOR OUT
(1-2 short)
75Ω terminated
(1-2 short)
No termination
(open)
75Ω terminated
(1-2 short)
Default
(1-2 short)
Variable
(2-3 short)
Default
(1-2 short)
8
Switches and volumes on the front panel
Factory Default
PROCESS CONTROL
H PHASE
INPUT SELECT
FREEZE
Toggle switch
VIDEO LEVEL
CHROMA LEVEL
SETUP/BLACK
UNITY
Center
Center
Center
CHROMA PHASE
Toggle switch
COMPOSITE/D1
ON/OFF
Center
Center
COMPOSITE
OFF
9
5. Block Diagram
Process Control, PLD CONFIG
CPU
(3052)
Composite IN
RS422/485
Mother Board
Monitor OUT
A/D
(ADC10030)
PLD
PLD
Y/C
Separation
Decode
SDI DETECT
PLD
Encode
Frame
Memory
Memory
Control
2 Field
FIFO
Selector
H lock circuit
BB lock circuit
D/A
(CXD1171)
Memory
Control
Selector
P/S
(GS7032)
SD SDI IN
EQ
(GS7025)
S/P
(GS9020)
Genlock IN
GENLOCK
(H lock circuit)
10