1
OPERATING MANUAL
PARTISOL®-PLUS MODEL 2025
SEQUENTIAL AIR SAMPLER
May 1999
Revision B
R&P Part Number 42-004773
Rupprecht & Patashnick Co., Inc.
25 Corporate Circle
Albany, NY 12203 USA
phone 518/452-0065
fax 518/452-0067
the new microweighing technology
Revision B.005
Operating Manual, Partisol-Plus Model 2025 Sequential Air Sampler
U.S. EPA Reference Method Designations
RFPS-0498-118 and RFPS-1298-127
Notice is hereby given that the U.S. Environmental Protection Agency (EPA) in
accordance with 40 CFR 40 Part 53 has designated a reference method for measuring
mass concentrations of particulate matter as PM-2.5 in ambient air. The reference
method is a gravimetric method which uses a specially designed PM-2.5 sampler for
particle collection. The designated method is as follows:
RFPS-0498-118 “Rupprecht & Patashnick Company, Incorporated Partisol-Plus Model 2025 PM-2.5 Sequential Air
Sampler” operated with software version 1.003 or 1.100, for
continuous sample periods, in accordance with the Model
2025 Instruction Manual and with the requirements and
sample collection filters specified in 40 CFR Part 50 Appendix L.
Notice is hereby given that the U.S. Environmental Protection Agency (EPA) in
accordance with 40 CFR Part 50 has designated a new reference method for measuring
mass concentrations of particulate matter as PM-10 in ambient air. The new reference
method is a gravimetric method which uses a specially designed PM-10 inlet,
configured as a PM-10 reference method, for particle collection. The designated
method is as follows:
RFPS-1298-127 “Rupprecht & Patashnick Company PartisolPlus Model 2025 PM-10 Sequential Air Sampler” with
PM-10 inlet, configured as a PM-10 reference method, and
operated for 24-hour continuous sample periods in accordance with the Model 2025 Instruction Manual and with the
requirements specified in 40 CFR Part 50, Appendix J or
Appendix M.
These methods are available from Rupprecht & Patashnick Company, Inc. (R&P), 25
Corporate Circle, Albany, New York 12203.
PAGE I
Revision B.005
Operating Manual, Partisol-Plus Model 2025 Sequential Air Sampler
Patents, Copyrights and Trademarks
This instrumentation from Rupprecht & Patashnick Co., Inc. (R&P) is covered by
pending patents in the United States of America and other countries.
This documentation contains trade secrets and confidential information proprietary to
R&P. The software supplied with the instrumentation, documentation and any
information contained therein may not be used, duplicated or disclosed to anyone, in
whole or in part, other than as authorized in a fully executed R&P End User License
Agreement or with the express written permission of R&P.
© 1999 Rupprecht & Patashnick Co., Inc. All rights reserved throughout the world.
Partisol® and the “rp” logo are registered trademarks of Rupprecht & Patashnick Co.,
Inc. Other trademarks are the property of their respective holders.
StreamlineTM is a trademark of Chinook Engineering, LLC.
PAGE II
Revision B.005
Operating Manual, Partisol-Plus Model 2025 Sequential Air Sampler
Safety Notice
Repair of instrumentation manufactured by Rupprecht & Patashnick Co., Inc. (R&P)
should only be attempted by properly trained service personnel, and should only be
conducted in accordance with R&P system documentation. Do not tamper with this
hardware. High voltages may be present in all instrument enclosures. Use established
safety precautions when working with this instrument. Instrument is supplied with a
grounded three-prong plug designed for outdoor use. When operating the instrument
outdoors, be sure that it is plugged into a properly rated exterior (outdoor) outlet.
The Partisol-Plus stand must be anchored when installed outdoors to prevent tipping
of the sampler and/or stand in high winds.
Some assembly of the inlet and WINS impactor is required for installation and regular
maintenance. Be careful to avoid pinching your fingers between the assembly parts
when assembling the WINS impactor or inlet.
Never place your hands or fingers in the filter exchange mechanism. Refer to the
Partisol-Plus Model 2025 Sequential Air Sampler Service Manual (September 1998,
Revision B) for instructions on clearing a filter jam.
The seller cannot foresee all possible modes of operation in which the user may
attempt to utilize this instrumentation. The user assumes all liability associated with
the use of this instrumentation. The seller further disclaims any responsibility for
consequential damages. Use of this product in any manner not intended by the
manufacturer will void the safety protection provided by the equipment, and may
damage the equipment and subject the user to injury.
PAGE III
Revision B.005
Operating Manual, Partisol-Plus Model 2025 Sequential Air Sampler
Warranty (U.S.)
Unless otherwise agreed upon in writing by authorized personnel of Rupprecht &
Patashnick Co., Inc. (R&P) and the purchaser, the following warranty shall be in force
for equipment sold and operated in the United States of America.
R&P warrants that the R&P-supplied equipment shall be free from defects in material
or workmanship for a period of three-hundred and sixty-five (365) days after the date
of shipment. Subject to the conditions of this provision, R&P agrees to repair or
replace, free of charge, any components of the equipment found to be defective in
material or workmanship during the warranty period. Purchaser shall notify R&P of
any detected defects and shall return any equipment believed to be defective to R&P,
suitably insured and at the purchaser’s expense. In the event R&P determines the
equipment returned for warranty correction is not defective within the terms of the
warranty, purchaser shall be responsible for all costs of handling and return transportation. R&P’s sole responsibility under the warranty shall be, at R&P’s option, to
either repair or replace any component that fails during the warranty period due to a
defect in workmanship and/or material, provided purchaser has promptly reported
same to R&P and R&P has, upon inspection, found such components to be defective.
The above warranty is contingent upon the proper use of the equipment (i.e., operation
and maintenance in accordance with the procedures set forth in the provided operation
manual(s)) and does not cover equipment that has been modified without R&P’s
approval, or which has been subjected to abuse or unusual physical or electrical stress.
This warranty does not cover any optional personal computer equipment or operating
system software supplied with the equipment beyond the warranty period provided by
the manufacturer of the computer or software. The customer is responsible for
obtaining a local, third-party service agreement for computer service requirements
beyond the warranty term of the computer.
THE ABOVE IS A LIMITED WARRANTY AND IS THE ONLY WARRANTY
MADE BY R&P. R&P DISCLAIMS ALL OTHER WARRANTIES, EXPRESS OR
IMPLIED, INCLUDING ALL WARRANTIES OF MERCHANTABILITY AND
FITNESS FOR A PARTICULAR PURPOSE. THE STATED EXPRESS WARRANTY IS IN LIEU OF ALL LIABILITIES OR OBLIGATIONS OF R&P FOR
DAMAGES ARISING OUT OF OR IN CONNECTION WITH THE DELIVERY,
USE OR PERFORMANCE OF THE EQUIPMENT. IN NO EVENT SHALL R&P
BE LIABLE FOR ANY SPECIAL, CONSEQUENTIAL, EXEMPLARY OR INDIRECT DAMAGES EVEN IF IT HAS BEEN ADVISED OF THE POSSIBILITY OF
SUCH DAMAGES.
PAGE IV
Revision B.005
Operating Manual, Partisol-Plus Model 2025 Sequential Air Sampler
Equipment Rating
The following information can be used to determine the power service requirements
of this product:
Line Voltage
115 V ~ 60 Hz
230 V ~ 50 Hz
3.0 Amp
1.5 Amp
PAGE V
Revision B.005
Operating Manual, Partisol-Plus Model 2025 Sequential Air Sampler
Electrical & Safety Conformity
This product as been tested by ETL Testing Laboratories, and has been documented
to be in compliance with the following U.S. and Canadian standards:
UL Standard 3101-1
CAN/CSA C22.2 NO. 1010.1
Rupprecht & Patashnick Co., Inc. certifies that this product operates in compliance
with the EC Directive 89/336/EEC with reference to electrical emissions and
immunity. Specifically, the equipment meets the requirements of EN55011 Group 1,
Class B (Emissions) and EN55082-1 (Immunity).
The hardware has been tested for personal or fire safety hazards, and meets the
requirements of EN61010-1 (Safety) in fulfillment of EC Directive 73/23/EEC.
PAGE VI
Revision B.005
Operating Manual, Partisol-Plus Model 2025 Sequential Air Sampler
U. S. EPA Quality Assurance Specifications
This operating manual includes references to the U.S. Environmental Protection
Agency (EPA) 2.12 Quality Assurance Handbook, Volume II, Part II. Partisol-Plus
Model 2.25 Air Samplers that are installed as part of a U.S. EPA monitoring network,
or which must meet U.S. EPA monitoring requirements, should refer to the procedures
found in the 2.12 Quality Assurance Handbook. The 2.12 Quality Handbook provides
general EPA-recommended guidance and, in some cases, may provide additional,
more detailed or more recent guidance.
A copy of the U.S. EPA 2.12 Quality Assurance Handbook can be obtained from the
AMTIC web site: http://www.epa.gov/ttn/amtic/pmqa.html, the QC coordinator at
any EPA Regional Office, or from the Monitoring and Quality Assurance Group (MD14), U.S. EPA, Research Triangle Park, NC 27711.
PAGE VII
Revision B.005
Operating Manual, Partisol-Plus Model 2025 Sequential Air Sampler
Section Revision List
As R&P instrumentation changes, so do our Operating and Service manuals. However, these changes may effect only one aspect of an instrument, while leaving the
instrument as a whole unchanged. To explain these individual changes to our
customers, R&P will update only those sections of its Operating and Service manuals
that are effected by the instrument updates or improvements. As each manual section
changes, so does its revision number, which is located at the top right corner of each
page of each section.
To help our customers keep track of the changes to the Partisol-Plus Model 2025
Sequential Air Sampler and its operating manual, following is a list of the manual
sections with their respective revision numbers:
Section Number and Description
Revision Number
Section 1: Introduction
B.004
Section 2: Hardware Installation
B.004
Section 3: Filter Handling and Exchange
B.003
Section 4: Software Overview
B.003
Section 5: Software Setup and Operation
B.005
Section 6: Sampler Operation
B.003
Section 7: Operating Information
B.003
Section 8: Viewing Stored Data
B.004
Section 9: Data Input and Output
B.003
Section 10: Direct Communications Using RPComm
B.001
Section 11: Password Protection
B.003
Section 12: Routine Verification and Maintenance
Procedures
B.004
Section 13: Resetting the Sampler
B.003
Section 14: Service Menu
B.003
PAGE VIII
Revision B.005
Operating Manual, Partisol-Plus Model 2025 Sequential Air Sampler
Section Number and Description
Revision Number
Appendix A: Overview of Partisol-Plus Software
Screens
B.004
Appendix B: Program Register Codes
B.003
Appendix C: Two-Way Serial Communication
B.003
Appendix D: Installing New System Software
B.004
Appendix E: Consumables and Parts
B.004
Appendix F: Filter Log
B.002
Appendix G: Maintenance of Inlets
B.003
Appendix H: Inlet Conversion
B.000
Appendix I: Using the Palmtop
B.000
Appendix J: Modem Communications
B.001
Appendix K: Overview of RPComm Software
Screens
B.000
PAGE IX
Revision B.005
Operating Manual, Partisol-Plus Model 2025 Sequential Air Sampler
Table of Contents
SECTION 1: INTRODUCTION ............................................................................ 1-1
1.1.
Advanced Features .................................................................. 1-2
1.2.
Organization of Manual ............................................................ 1-4
1.3.
Flow Schematic ........................................................................ 1-7
1.4.
System Configuration ............................................................ 1-10
SECTION 2: HARDWARE INSTALLATION AND MAINTENANCE .................................. 2-1
2.1.
Standard Hardware Configuration ........................................... 2-1
2.2.
Setting Up the Sampler ............................................................ 2-1
2.3.
Partisol Stand ........................................................................... 2-4
2.4.
Hardware Considerations ........................................................ 2-7
2.5.
Adjusting the Liquid Crystal Display (LCD) .............................. 2-7
SECTION 3: FILTER HANDLING AND EXCHANGE ................................................. 3-1
3.1.
Filter Handling and Initial Inspection ........................................ 3-1
3.2.
Pre-Sampling Filter Equilibration ............................................. 3-2
3.3.
Pre-Sampling Filter Weighing .................................................. 3-2
3.4.
Preparing the Filter Cassette Magazine .................................. 3-5
3.5.
Filter Transportation ................................................................. 3-5
3.5.1.
Installing a Filter Cassette Magazine ............................... 3-6
3.5.2.
Removing a Filter Cassette Magazine ............................. 3-8
3.6.
Removing Filter Cassettes from a Magazine ........................... 3-8
3.7.
Post-Collection Equilibration .................................................. 3-10
3.8.
Post-Collection Weighing ...................................................... 3-11
3.9.
Computation of Mass Concentration ..................................... 3-12
SECTION 4: SOFTWARE OVERVIEW ................................................................ 4-1
4.1.
Turning On the Partisol-Plus Sampler ..................................... 4-1
4.2.
Title Screen .............................................................................. 4-2
4.3.
Main Screen ............................................................................. 4-2
4.4.
Navigating Among Screens ..................................................... 4-5
4.5.
Master Menu ............................................................................ 4-7
4.6.
Edit Mode ................................................................................. 4-8
SECTION 5: SOFTWARE SETUP AND OPERATION ............................................... 5-1
5.1.
Modes of Operation ................................................................. 5-1
5.2.
Setup Screens ......................................................................... 5-5
5.2.1.
Sample Setup Screen ...................................................... 5-5
PAGE X
Revision B.005
Operating Manual, Partisol-Plus Model 2025 Sequential Air Sampler
Table of Contents (continued)
5.2.2.
System Setup Screen ....................................................... 5-8
5.2.3.
Site Identification Screen ................................................ 5-10
5.2.4.
System Information Screen ............................................ 5-11
5.3.
Filter Setup Screens .............................................................. 5-12
5.3.1.
Basic Filter Setup Screen ............................................... 5-13
5.3.2.
Time Base Filter Setup Screen ...................................... 5-14
5.3.3.
Time 2 Base Sampling Screen ....................................... 5-17
5.3.4.
Advanced Filter Setup Screen ........................................ 5-18
5.3.5.
Episodic Sampling Setup Screen ................................... 5-21
5.3.6.
RS232 Program Mode .................................................... 5-23
5.3.7.
Filter List Setup Screen .................................................. 5-23
5.4.
Turning Off the Partisol-Plus Sampler ................................... 5-25
5.5.
Automatic Switching of Edit Modes and Screens .................. 5-25
5.6.
Operation After Power Failure ............................................... 5-26
SECTION 6: SAMPLER OPERATION .................................................................. 6-1
6.1.
Sampling Verification ............................................................... 6-1
6.2.
Programming the Sampler ....................................................... 6-5
6.3.
Post-Sampling Verification and Data Retrieval ........................ 6-6
SECTION 7: OPERATING INFORMATION ............................................................ 7-1
7.1.
Status Codes ........................................................................... 7-1
7.2.
Operating Statistics Screens ................................................... 7-4
7.2.1.
Temperature and Pressure Statistics Screen................... 7-4
7.2.2.
Sample Statistics Screen ................................................. 7-5
7.2.3.
User I/O Statistics Screen ................................................ 7-6
7.2.4.
Wind Statistics Screen ..................................................... 7-7
7.2.5.
System Statistics Screen .................................................. 7-8
SECTION 8: VIEWING STORED DATA ............................................................... 8-1
8.1.
Filter Data ................................................................................ 8-2
8.1.1.
Filter Data Times Screen .................................................. 8-2
8.1.2.
Filter Data Screen ............................................................. 8-4
8.1.3.
Filter Data Status Codes Screen ...................................... 8-5
8.1.4.
Filter Data Averages Screen ............................................ 8-6
8.1.5.
Power Failures Screen ..................................................... 8-8
8.2.
Interval Data Screen ................................................................ 8-8
8.3.
Input Data Screen .................................................................... 8-9
SECTION 9: DATA INPUT AND OUTPUT ............................................................ 9-1
9.1.
System I/O Screen ................................................................... 9-1
PAGE XI
Revision B.005
Operating Manual, Partisol-Plus Model 2025 Sequential Air Sampler
Table of Contents (continued)
9.2.
Downloading Stored Data ........................................................ 9-2
9.2.1.
RS232 Setup Screen ........................................................ 9-2
9.2.2.
Downloading Data from the Sampler ............................... 9-5
9.2.3.
Download Data Screen ..................................................... 9-7
9.3.
Format of Filter Data Records ................................................. 9-9
9.4.
Format of Interval Data Records ............................................ 9-10
9.5.
Format of Input Data Records ............................................... 9-10
9.6.
Analog Input Conversions ...................................................... 9-11
9.7.
Analog Voltage Output ........................................................... 9-12
9.8.
RS485 Input/Output ............................................................... 9-14
9.9.
Logic Level Output ................................................................. 9-15
SECTION 10: DIRECT COMMUNICATIONS USING RPCOMM ............................... 10-1
10.1. Instrument Setup for Direct Communication .......................... 10-1
10.2. Using RPComm ..................................................................... 10-4
10.2.1. Executing RPComm ....................................................... 10-4
10.2.2. Creating a New Connection............................................ 10-7
10.2.3. Downloading Stored Data ............................................. 10-12
10.2.3.1. Setting the Storage Pointer Positions ..................... 10-12
10.2.3.2. Downloading Data .................................................. 10-15
10.2.4. Manipulating Downloaded Data .................................... 10-17
10.2.4.1. Copying Data to the Clipboard ............................... 10-17
10.2.4.2. Graphing Downloaded Data ................................... 10-21
10.2.4.3. Storing Data to a File .............................................. 10-24
10.2.5. Scheduling Data Downloads ........................................ 10-24
10.2.6. Viewing Instrument Operation ...................................... 10-27
10.2.6.1. Viewing System Registers ...................................... 10-27
10.2.6.2. Viewing Instrument Keypad .................................... 10-29
10.2.7. Creating a Real-Time Graph ........................................ 10-30
10.2.8. Managing A Filter List ................................................... 10-33
SECTION 11: PASSWORD PROTECTION ......................................................... 11-1
11.1. Password Protection .............................................................. 11-2
11.2. Resetting Low and High Passwords ...................................... 11-4
SECTION 12: ROUTINE MAINTENANCE AND VERIFICATION PROCEDURES .............. 12-1
12.1. Verification Procedures .......................................................... 12-1
12.1.1. Verifying the Ambient Air Temperature .......................... 12-3
12.1.2. Verifying the Filter Temperature ..................................... 12-4
12.1.3. Verifying the Ambient Pressure ...................................... 12-5
12.1.4. Verifying the Ambient Relative Humidity ........................ 12-5
PAGE XII
Revision B.005
Operating Manual, Partisol-Plus Model 2025 Sequential Air Sampler
Table of Contents (continued)
12.1.5. External Leak Check ...................................................... 12-5
12.1.6. Flow Verification ............................................................. 12-7
12.1.7. Internal Leak Check ....................................................... 12-8
12.2. Routine Maintenance Procedures .......................................... 12-9
SECTION 13: RESETTING THE SAMPLER ........................................................ 13-1
13.1. Resetting Operating Parameters ........................................... 13-1
13.2. Sampler Default Settings ....................................................... 13-1
13.3. Resetting Data Storage ......................................................... 13-2
13.4. Resetting Low and High Passwords ...................................... 13-3
13.5. Resetting All Instrument Parameters ..................................... 13-3
SECTION 14: SERVICE MENU ...................................................................... 14-1
14.1. Entering the Service Mode .................................................... 14-1
14.2. Leaving the Service Mode ..................................................... 14-2
APPENDIX A: OVERVIEW OF PARTISOL-PLUS SOFTWARE SCREENS .................... A-1
APPENDIX B: PROGRAM REGISTER CODES .................................................... B-1
B.1.
Program Register Codes ........................................................ B-2
B.2.
PRC Values Defined by Codes ............................................. B-17
B.3.
Deciphering Hexadecimal Status Codes .............................. B-23
B.3.1.
Place Holders ................................................................ B-24
B.3.2.
Converting Decimal Numbers to Hexadecimal .............. B-24
B.3.2.1. Converting Large Decimal Numbers to HexadecimalB-25
B.3.3.
Converting Small Hexadecimal Numbers to Decimal .... B-28
B.3.4.
Converting Large Hexadecimal Numbers to Decimal ... B-29
B.3.5.
Adding Small Hexadecimal Numbers ............................ B-32
B.3.6.
Adding Large Hexadecimal Numbers ............................ B-33
B.3.7.
Deciphering Status Codes ............................................. B-35
APPENDIX C: TWO-WAY SERIAL COMMUNICATION ........................................... C-1
C.1.
AK Protocol ............................................................................. C-1
C.2.
German Ambient Network Protocol ...................................... C-10
APPENDIX D: INSTALLING NEW SYSTEM SOFTWARE ......................................... D-1
D.1.
Loading Software Into Flash Memory Without RPComm ....... D-1
D.2.
Installing RPComm ................................................................. D-5
D.2.1.
Obtaining RPComm Installation Files .............................. D-5
D.2.2.
Installing RPComm Onto a Computer ........................... D-11
D.3.
Loading Software Into Flash Memory With RPComm .......... D-20
PAGE XIII
Revision B.005
Operating Manual, Partisol-Plus Model 2025 Sequential Air Sampler
Table of Contents (continued)
D.4.
Updating the List of Program Register Codes in RPComm . D-24
APPENDIX E: CONSUMABLES AND PARTS ........................................................ E-1
E.1.
Consumables .......................................................................... E-1
E.2.
Instrument Parts ..................................................................... E-2
APPENDIX F: FILTER LOG ............................................................................. F-1
APPENDIX G: MAINTENANCE OF INLETS .......................................................... G-1
G.1.
Cleaning the R&P 1st Stage and PM-10 Inlets ....................... G-1
G.2.
Maintenance of the R&P PM-1 Cyclone Inlet ........................ G-4
G.3.
Maintenance of the WINS PM-2.5 Impactor ........................... G-5
G.3.1.
Removing the WINS Impactor ......................................... G-5
G.3.2.
Cleaning the WINS Impactor ........................................... G-6
G.3.3.
Replacing the WINS Impactor ......................................... G-8
APPENDIX H: INLET CONVERSION .................................................................. H-1
H.1.
Partisol-Plus WINS PM-2.5 Components ............................... H-1
H.2.
PM-10 Components ................................................................ H-2
H.3. Converting from a WINS PM-2.5 Sampler to a PM-10 Sampler . H-3
H.4.
Partisol-Plus PM-2.5 and PM-10 Inlet Configuration .............. H-6
APPENDIX I: USING THE PALMTOP ................................................................... I-1
I.1.
Commercially Available Handheld PC Requirements ............... I-1
I.2.
H/PC Compilation Package ...................................................... I-2
I.3.
Setting Up Your Palmtop .......................................................... I-2
I.4.
Installing RPComm and RPData for Windows CE ................... I-4
I.5.
Using RPComm for Windows CE ............................................. I-6
I.6.
Before You Begin ...................................................................... I-7
I.7.
Downloading Data ..................................................................... I-8
I.8.
Viewing Your Data .................................................................... I-9
I.9.
Managing Filter Identifiers ...................................................... I-12
I.10. Transferring Data to Your Desktop Computer ........................ I-13
I.11. Using RPData for Windows CE on your Palmtop ................... I-15
APPENDIX J: MODEM COMMUNICATIONS .......................................................... J-1
J.1.
Installing the Internal Modem ................................................... J-2
J.2.
Setting up a Standard Commercial External Modem ............... J-7
J.3.
Setting up RPComm for use Through a Modem ..................... J-9
PAGE XIV
Revision B.005
Operating Manual, Partisol-Plus Model 2025 Sequential Air Sampler
Table of Contents (continued)
J.4.
Setting up the Serial Switching Device .................................. J-14
J.4.1.
Multiple R&P Instruments of the Same Model ................ J-15
J.4.2
Multiple R&P Instruments of Different Models ................ J-17
J.4.2.1
Connecting a Series 1400a and Model 2025 ........... J-17
J.4.2.2
Connecting a Model 2000-FRM and Model 2025 ..... J-22
APPENDIX K: OVERVIEW
OF
RPCOMM SOFTWARE SCREENS ............................ K-1
INDEX .............................................................................................................
I
PAGE XV
Revision B.005
Operating Manual, Partisol-Plus Model 2025 Sequential Air Sampler
This page left intentionally blank.
PAGE XVI
Revision B.003
Operating Manual, Partisol-Plus Model 2025 Sequential Air Sampler
Section 1: Introduction
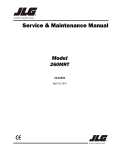
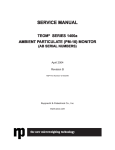
The Partisol-Plus Model 2025 Sequential Air Sampler (Figure 1-1) is designed to meet
the regulatory monitoring requirements for PM-2.5 (40 CFR Part 50 Appendix L) and
PM-10 (40 CFR Part 50 Appendix J or Appendix M) and other particulate sampling
methods in the U.S., Europe and other countries.
✔ The Partisol-Plus
Sampler builds upon
features first introduced
with the original Partisol
PM-10 Air Sampler.
This sampling platform holds the U.S. Environmental Protection Agency (EPA)
reference designation for the sampling of PM-10. Many of the design features adopted
by the U.S. EPA in the PM-2.5 Federal Reference Method were first introduced in a
reference-designated air sampling method designed by Rupprecht & Patashnick Co.,
Inc. in its original Partisol Sampler. These include the following:
• A flow rate of 1 m³/h through a single filter
• The use of standard 47 mm sample filters with a filter exchange mechanism
• Full microprocessor control and data handling
• Active volumetric flow control.
The Partisol-Plus Sampler can be configured to operate with a variety of inlet systems,
including the U.S. EPA WINS inlet-based reference PM-2.5 method, and PM-10, PM-
Figure 1-1. Partisol-Plus
Model 2025 Sequential Air
Sampler.
SECTION 1: INTRODUCTION
PAGE 1-1
Revision B.003
Operating Manual, Partisol-Plus Model 2025 Sequential Air Sampler
2.5 (using a cyclone inlet), PM-1 and TSP (total suspended particulate matter) inlets.
A filter storage and exchange system allows the unit to operate for up to 16 days of
daily sampling between site visits. The Partisol-Plus system samples particulate matter
onto 47 mm diameter filters that are available in a wide variety of materials, many of
which are suitable for post-collection analysis.
Internal data storage and data input and output features allow meteorological data and
information from other external sources to be averaged and stored. Built-in sensors
measure ambient conditions, including temperature, atmospheric pressure and relative
humidity.
The Partisol-Plus Sampler allows users to define various sampling programs, in addition
to the standard 24-hour, midnight-to-midnight implementation. Conditional sampling
can be based upon information received from external sources in the form of analog
input levels.
The sampler records information by exposed filter (filter data), 5-minute period
(interval data) and by meteorological values and information received from other
sources (input data) at user-defined intervals.
The unit computes sampled volumes in both volumetric and standard terms to comply
with different regulations around the world.
1.1.
ADVANCED FEATURES
The following is a list of some of the advanced features contained in the Partisol-Plus
Sampler:
✔ Filter cassette magazines simplify filter
exchange and transportation, and minimize the
chances of contamination.
SECTION 1: INTRODUCTION
•
Automatic filter changing system with a capacity of up to 16 filters
between site visits.
•
Operational simplicity, performance audits and stored data retrieval are
made possible through an embedded microprocessor and menu-driven
software.
•
An active, volumetric flow-control system maintains a constant volumetric flow rate at the level specified by the user (default of 16.7 l/min) by
incorporating a mass flow controller and ambient temperature and
pressure sensors. Sampled volumes are reported in volumetric and
standard terms. The sampler uses a reliable sample pump.
PAGE 1-2
Revision B.003
Operating Manual, Partisol-Plus Model 2025 Sequential Air Sampler
SECTION 1: INTRODUCTION
•
The sampler uses standard 47 mm filters housed in reusable cassettes.
These cassettes are loaded in magazines to ease handling and minimize the
possibility of contamination.
•
The temperature of the collection filter is maintained within 5° C of the
outdoor ambient temperature by a continuous filter compartment ventilation system.
•
Interval data are stored every 5 minutes, and include the 5-minute
averages of the filter temperature, ambient temperature, ambient pressure
and average flow rate. Data storage continues during and after the
exposure of the collection filter. The sampler has a sampling capacity of
16 days of 5-minute interval data.
•
A record of filter data is stored for each filter used in the sampler and
includes all U.S. EPA-specified values such as error condition flagging,
and average temperatures and pressures. Filter data records also include
sampled volume in volumetric and standard terms, and meteorological and
analog input data averaged over the collection period. The sampler can
store 50 filter data records.
•
The sampler stores records of input data every 30 minutes by default.
These include the averages over the data storage interval of meteorological inputs and information received in analog form from other sources. The
sampler can store 32 days of input data records, which are recorded every
30 minutes.
•
Inputs received from external sources in analog voltage form are converted to engineering units through user-defined formulas.
•
Automatic calibration of analog input and output channels.
•
The sampler is easily transported due to its compact form and lightweight
design. Its low noise level makes it appropriate for indoor monitoring.
•
A bidirectional RS232 interface for data transfer to or from a personal
computer (PC) or other digital device allows interval, filter and input data
to be retrieved conveniently. The sampler’s standard configuration
includes basic PC-based communication software for bidirectional information exchange with the system.
•
Automatic leak check.
PAGE 1-3
Revision B.003
Operating Manual, Partisol-Plus Model 2025 Sequential Air Sampler
•
1.2.
Low maintenance requirements due to durable components and a long-life
vacuum pump.
ORGANIZATION OF MANUAL
This manual is divided into fourteen sections, eleven appendixes and an index which
discuss different topics. The first sections explain how to setup the system’s hardware
and software, while the later sections describe the advanced features of the PartisolPlus Sampler. The user should read and implement the procedures discussed in the
earlier sections before using the advanced functions explained later in the manual. The
following list provides an overview of the topics handled in each section of the manual:
Section 1: Introduction
This section introduces the user to the advanced features of the Partisol-Plus Sampler
and describes the flow and sampling configurations of the system. It also discusses the
flow control scheme used in the unit.
Section 2: Hardware Installation
This section contains the instructions for setting up the sampling hardware and its stand.
Section 3: Filter Handling and Exchange
This section explains how to handle the 47 mm collection filters used in the Partisol
system, from the initial conditioning of the filter, to the installation of magazines in the
sampling system, to the post-collection conditioning and weighing of the filter. This part
also describes how to compute the average particulate concentration based upon the
initial and ending filter weights, and the total volume drawn through the filter.
Section 4: Software Overview
This section provides an overview of the hierarchy of system’s software screens, and
explains how to navigate around the software and change the values of parameters.
Section 5: Software Setup and Operation
This section describes the operation of the Partisol-Plus Sampler, including the
definition of its sampling program.
Section 6: Sampler Operation
This section describes the steps involved in verifying the sampler’s performance
characteristics prior to starting a sampling run, programming a sampling run and
retrieving data after a sampling run.
Section 7: Operating Information
The Partisol-Plus Sampler displays a variety of information regarding the state of the
SECTION 1: INTRODUCTION
PAGE 1-4
Revision B.003
Operating Manual, Partisol-Plus Model 2025 Sequential Air Sampler
system, ranging from status codes to screens that display the current values of
operating parameters. This section describes the type of diagnostic information
available to the user.
Section 8: Viewing Stored Data
Interval and filter data stored internally may be viewed on the sampler’s screen. This
section describes the type of operational information stored internally and how to view
the data.
Section 9: Data Input and Output
Data may be downloaded through the Partisol-Plus Sampler’s RS232 bidirectional
port. This section describes how to transmit internally stored operational information
to external devices. The unit also can receive and transmit analog voltage information,
and output user-defined digital information as logic level outputs. This section describes
these input/output capabilities.
Section 10: Direct Communications Using RPComm
RPComm is a communications software package developed for Windows 9x/NT to
provide interactive remote communications with R&P instrumentation. This section
describes how to set up a Partisol-Plus Sampler for direct communication with a PC
and how to use RPComm.
Section 11: Password Protection
This section describes the instrument’s password protection functions.
Section 12: Routine Verification and Maintenance Procedures
This section explains how to verify the sampler’s performance and describes hardware
maintenance procedures.
Section 13: Resetting the Sampler
This section describes how to reset the instrument’s parameter set points and internal
data storage.
Section 14: Service Menu
This Partisol-Plus Sampler contains software support for low-level diagnostics and
troubleshooting. This section describes the screens that the user may access for these
types of activities. Many of the routines exercised from the service menu are described
in Sections 11 and 12, and in the Partisol-Plus Model 2025 Service Manual.
Appendix A: Overview of Partisol-Plus Software Screens
This appendix contains the software menu tree of the Partisol-Plus Sampler, and all
display screens of the software.
SECTION 1: INTRODUCTION
PAGE 1-5
Revision B.003
Operating Manual, Partisol-Plus Model 2025 Sequential Air Sampler
Appendix B: Program Register Codes
All important system variables, parameters and current results are stored in “Program
Register Codes.” These codes, which are listed in this appendix, are important when
communicating with the sampler through its RS232 interface.
Appendix C: Two-Way Serial Communication
This appendix describes the two-way serial communication capabilities of the hardware.
Appendix D: Installing New System Software
This appendix explains how to download the unit’s operating software and RPComm
software into the Partisol-Plus Sampler.
Appendix E: Consumables and Parts
This appendix contains a list of consumables and spare parts for the Partisol-Plus
Sampler.
Appendix F: Filter Log
This appendix contains a filter log that can be used as a quality assurance tool to track
the history of each filter used in the sampler.
Appendix G: Maintenance of Inlets
This appendix describes the maintenance procedures for the R&P 1st stage inlet,
WINS PM-2.5 impactor and other size-selective inlets available from Rupprecht &
Patashnick.
Appendix H: Inlet Conversion
This appendix describes the components of the PM-2.5 Wins inlet sampler configuration and the PM-10 sampler configuration and the procedures for converting the
Partisol-Plus from a PM-2.5 to a PM-10 particulate air sampler.
Appendix I: Using the Palmtop
This appendix explains how to use the palmtop to communicate with the Partisol-Plus
Sampler.
Appendix J: Modem Communications
This appendix explains how to install the sampler’s internal modem kit or an external
commercial modem. It also describes how to set up the RPComm software program
to communicate with the modem, and how to set up a serial switching device for
communicating with several instruments through one modem.
Appendix K: Overview of RPComm Software Screens
This appendix contains the display screens of the RPComm software program.
SECTION 1: INTRODUCTION
PAGE 1-6
Revision B.003
Operating Manual, Partisol-Plus Model 2025 Sequential Air Sampler
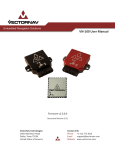
Figure 1-2. System flow
schematic.
First S tage
Inlet
K ey:
S am ple P ath
P ressure Lines
V alve Port is V ented
V alve Port is C losed
S am ple A ir
P M-2.5
W INS
Impactor
Cassette
Cassette
Cassette
E xit
Magazine
Cassette
Cassette
Blue
Cassette
Red
S upply
Magazine
S huttle
Cylinder
S am ple F ilter
P iston
Cassette
Filter
P iston
A mbient A ir
Mass Flow
Controller
A ssem bly
5 psi
Relief
V alve
Lift
Cylinder
P ush
Cylinder
Green
P ressure
Transducer
Mass
Flow
Meter
Leak Check
V alve
Y ellow
2
1
2
1
2
Needle
V alve
S
1
V alve
Manifold
S
P roportional
V alves
P ressure V ent Valve
V acuum V ent V alve
A ccum ulator
P um p
1.3.
P ressure R elief
V alve
(230V AC U nits O nly)
FLOW SCHEMATIC
The system flow schematic provides an overview of the unit’s basic flow and electronic
connections (Figure 1-2). The schematic shows an inlet system consisting of a firststage inlet that is followed by a down tube and WINS PM-2.5 impactor. For reference
U.S. EPA PM-2.5 sampling, the WINS impactor is located inside the sampler
enclosure. For sampling other particle size cut points, the first stage inlet is replaced
with a PM-10, PM-2.5 (cyclonic), PM-1 or TSP inlet, and the WINS impactor is
substituted with a pass through adapter tube.
✔ The Partisol-Plus
Sampler actively maintains
a constant volumetric flow
rate at the user-defined set
point (16.7 l/min by default).
SECTION 1: INTRODUCTION
A 47 mm filter is housed in a filter cassette that the user installs with other cassettes
in a supply cassette magazine, that has a capacity of up to 16 filters. A storage magazine
holds the exposed filters. The U.S. EPA prescribes the use of Teflon® filter material
for reference PM-2.5 sampling, while PM-10 measurements are generally accom-
PAGE 1-7
Revision B.003
Operating Manual, Partisol-Plus Model 2025 Sequential Air Sampler
Figure 1-3. The PartisolPlus Sampler’s filter
exchange mechanism.
plished using TX40 (Teflon-coated glass fiber), quartz fiber or Teflon materials. A
range of other materials can be used in the 47 mm format for special applications.
The use of filter cassette magazines simplifies filter exchange and transport, and
minimizes the risk of contamination during these procedures. Filter cassette magazines
may be exchanged while the unit is sampling. The supply magazine contains preweighed, preconditioned filters used for collection, and the storage magazine receives
exposed filters (Figure 1-3). During filter exchange, the sampler pushes unexposed
filter cassettes contained in the supply magazine upward and to the right, while the
already-exposed filter is moved to the storage magazine. For sensitive speciation
applications, every second-loaded filter can be a separator, forming a complete seal
between filter cassettes contained in the storage magazine.
SECTION 1: INTRODUCTION
PAGE 1-8
Revision B.003
Operating Manual, Partisol-Plus Model 2025 Sequential Air Sampler
An inline particle trap filter downstream of the sample filter protects the mass flow
controller from any particles that may remain in the air flow. The mass flow controller
operates under the control of the sampler’s microprocessor, and maintains the sample
stream at a constant volumetric flow rate (16.7 l/min default) through the use of
ambient temperature and pressure sensors. The accumulator minimizes pulsations
caused by the vacuum pump.
The Partisol-Plus Sampler maintains a constant volumetric flow rate at the set point
entered by the user (usually 16.7 l/min), and reports sampled volumes (m³) in volumetric
or standard terms. The sampling system determines the ambient temperature and
pressure for flow rate calculations through the use of sensors that provide continually
updated information to the microprocessor system.
The mass flow controller in the Partisol-Plus Sampler is calibrated at a temperature of
0° C and pressure of 1 Atmosphere (1013.2 millibars or 760 mm Hg). The instrument
uses the measured ambient temperature and pressure to sample at the correct
volumetric flow rate. Using this information, the microprocessor calculates the correct
mass flow set point (Flow RateSTP) required to achieve the desired volumetric flow
setting:
273.15
Ave Pres
Flow RateSTP = Flow RateVol x ––––––––––––––––– x ––––––––
Ave Temp + 273.15
760
where:
Flow RateSTP = Control set point of the mass flow meter (equivalent
flow at 0° C and 1 Atmosphere).
Flow RateVol = Volumetric flow rate set point (l/min) as entered by
the user in the Setup screen (Section 5). This value
is 16.7 l/min (1 m3/h) for most applications.
Ave Temp = The current temperature (°C) as measured by the
temperature sensor mounted on the down tube of the
sampler.
Ave Pres
= The current pressure (mm Hg) as measured by the
pressure transducer in the sampler’s enclosure.
Mass concentration data reported to the U.S. EPA must be in volumetric m³, which
simply involves the integration of the above volumetric flow rate over the sampling
period, without any further adjustment.
The Partisol-Plus Sampler automatically determines the sampled volume in volumetric
or standard m³ for each filter exposed, and stores this information internally for later
viewing or downloading (Sections 8-10).
SECTION 1: INTRODUCTION
PAGE 1-9
Revision B.003
Operating Manual, Partisol-Plus Model 2025 Sequential Air Sampler
To report volumes in standard terms, the user must ensure that the standard
temperature and standard pressure parameters in the Setup screen (Section 5) are set
to their proper values. In many countries, standard volumes are defined in terms of 760
mm Hg pressure and 25° C temperature. Flow volumes referenced internally by the
sampler to 0° C are converted to standard conditions using the following computation:
Std Temp + 273.15
760 mm Hg
VolumeEPA = VolumeSTP x ––––––––––––––––– x –––––––––––
273.15
760 mm Hg
1.4.
SYSTEM CONFIGURATION
The Partisol-Plus Sampler consists of a single flow directed through a 47 mm filter. The
air stream that passes through the inlet system passes through a single 47 mm filter that
is housed in the filter platform (Figure 1-4).
Figure 1-4. Flow configuration.
SECTION 1: INTRODUCTION
PAGE 1-10
Revision B.004
Operating Manual, Partisol-Plus Model 2025 Sequential Air Sampler
Section 2: Hardware Installation and Maintenance
This section describes the installation of the Partisol-Plus Sampler, along with the setup
of its support stand. This section also covers a number of operational considerations.
2.1.
STANDARD HARDWARE CONFIGURATION
The following is a list of the standard components (compilation package) provided with
a Partisol-Plus Sampler:
Partisol-Plus enclosure with WINS PM-2.5 impactor or pass through
adapter tube
Inlet system for size-selective sampling
3 Rainhoods and associated hardware
Sample tube
Partisol-Plus stand
Ambient temperature sensor and cable
10 Partisol-Plus filter cassettes
Solid filter leak check/separator disk
3 Filter cassette magazines
Magazine transport container
Flow audit adapter
Box of 25 glass filters, 37 mm diameter (with WINS PM-2.5 systems)
Bottle of WINS impactor oil, 30 ml (with WINS PM-2.5 systems)
Operating software diskette
9-to-9 pin computer cable
2 Operating manuals
2 Service manuals
1 Quick Start guide
2.2.
SETTING UP THE SAMPLER
Follow these steps to set up the unit for use as a Federal Reference
Method sampler:
1) Cut any tie wraps and remove any transport restraints from inside
the sampler enclosure.
2) Install the large rainhood on the right side of the enclosure
(Figure 2-1). The rainhood should cover both air filters.
a) Peel back the paper facing of the larger gasket and apply it to the larger
rainhood.
b) Place the large rainhood, with its gasket attached, on the enclosure.
SECTION 2: HARDWARE INSTALLATION
PAGE 2-1
Revision B.004
Operating Manual, Partisol-Plus Model 2025 Sequential Air Sampler
Figure 2-1 (Left). PartisolPlus Sampler with a large
rainhood installed on the
right side panel of the unit.
Figure 2-2 (Right). PartisolPlus Sampler with two
small rainhoods installed
on the back panel of the
unit.
c) Secure the rainhood to the unit using four (4) #10-32 x 1/2" slot bind head
screws.
3) Install the two small rainhoods (Figure 2-2). Both rainhoods are
installed on the back panel of the enclosure.
a) Peel back the paper facing of one of the smaller gaskets and apply it to one
of the smaller rainhoods.
b) Place the small rainhood, with its gasket attached, on the enclosure.
c) Secure the rainhood to the unit using four (4) #10-32 x 1/2" slot bind head
screws.
d) Repeat this procedure for the other small rainhood.
4) Install the sample tube and first stage inlet (Figure 2-3).
a) Insert the end of the sample tube, with the 5 cm (2 inches) machined section,
into the bulkhead of the sampler. Ensure that the tube is pushed into the enclosure
through the final O-ring until it stops.
b) Turn the dome connector on the bulkhead to ensure a tight grip.
c) Place the first stage inlet on the end that has 3 cm (1.25 inches) of machining.
Ensure that the tube is pushed past the inlet’s two O-rings (which provide some
resistance) until it stops.
In its final sampling configuration, the entrance to the inlet must be approximately
2 m (±.0.2m) above the ground (6 to 7 feet). The stand (57-004644) that comes
with the sampler provides a convenient means of installing the sampler to the
correct height requirements.
SECTION 2: HARDWARE INSTALLATION
PAGE 2-2
Revision B.004
Operating Manual, Partisol-Plus Model 2025 Sequential Air Sampler
5) Connect the unit to the electric supply. Be sure to fulfill all safety
and regulatory requirements for the hardware.
The wires inside the power cord are defined by the following colors, which are
different for 115 and 230 VAC configurations:
Line
Neutral
Common Ground
115 VAC
Black or Brown
White or Blue
Green or Green/Yellow
230 VAC
Brown
Blue
Green/Yellow
For 115 VAC configurations of the Partisol-Plus system, the standard threepronged U.S. plug is provided at the end of the power cord. The unit is properly
grounded and use of a ground fault interrupter is not necessary.
In the case of 230 VAC configurations of the Partisol-Plus system, no electrical
plug is provided at the end of the power cord. This line must be wired in
accordance with safety codes.
6) Install the ambient temperature sensor.
a) Locate the two screws on the left side of the enclosure.
b) Remove the two screws. Be sure to retain the washers. This will expose two
holes.
c) Locate the ambient temperature probe assembly in the compilation package
(Section 2.1).
d) Secure the assembly to the enclosure using the screws and washers previously
removed (Figure 2-3).
IMPORTANT: Place the washers between the ambient
temperature bracket and the enclosure – not under the head
of the screw – to keep water from leaking into the electronics
compartment.
Figure 2-3 (Left). Ambient
temperature probe assembly mounted on the
enclosure.
Figure 2-4 (Right). Ambient
temperature probe plugged
into the “ambient temperature” connector.
SECTION 2: HARDWARE INSTALLATION
PAGE 2-3
Revision B.004
Operating Manual, Partisol-Plus Model 2025 Sequential Air Sampler
e) Plug the ambient temperature probe into the connector on the back panel of
the sampler labeled “Ambient Temperature” (Figure 2-4).
7) Prepare the WINS PM-2.5 impactor for use, as described in Appendix G.3.
8) Install a 47 mm filter in the manner described in Section 3, but
without turning on the sampler.
2.3.
PARTISOL STAND
The Partisol stand (57-004644) keeps the Partisol-Plus Sampler’s inlet at the appropriate height. Figure 2-5 shows the unit mounted on the stand.
WARNING: If the Partisol-Plus is mounted on a stand, it
could fall or tip over in high wind conditions if the stand is not
properly anchored.
Figure 2-5. Partisol-Plus
Sampler mounted on
optional stand.
SECTION 2: HARDWARE INSTALLATION
PAGE 2-4
Revision B.004
Operating Manual, Partisol-Plus Model 2025 Sequential Air Sampler
Figure 2-6. Assembly
information for the
Partisol-Plus stand.
A
B
C
D
E
F
G
H
SECTION 2: HARDWARE INSTALLATION
(2)
(4)
(4)
(2)
(4)
(20)
(24)
(24)
Top front and top back
Top right and top left
Legs
Bottom front and bottom back
Hex head bolt 1/4-20 x 3/8"
Hex head bolt 1/4-20 x 3/4"
Flat washer, 1/4"
Split ring washer, 1/4"
36-005479
36-005476
36-005478
36-005477
21-001291-0006
21-001291-0012
21-001275
21-000848
PAGE 2-5
Revision B.004
Operating Manual, Partisol-Plus Model 2025 Sequential Air Sampler
Follow these steps to assemble the Partisol-Plus Sampler’s stand:
NOTE: Figure 2-6 contains a list of parts and assembly
information for the stand. Put this hardware together in
accordance with the diagram shown in this figure. IMPORTANT: Always remember to place the split ring washer
between the head of the bolt and the washer.
1) Assemble the bottom of the stand by laying out the front, back and
sides.
2) Place one leg on each inside corner, fasten with F, G and H
hardware.
3) Attach the top front and back to the outside of the legs with F, G
and H hardware. Do not tighten.
4) Fasten the right and left rails to the legs and top front and back
rails with F, G and H hardware.
5) Tighten all hardware.
6) Place the Partisol-Plus Sampler onto the stand and secure using
E, G, and H hardware.
Figure 2-7. Partisol-Plus
stand components
SECTION 2: HARDWARE INSTALLATION
PAGE 2-6
Revision B.004
Operating Manual, Partisol-Plus Model 2025 Sequential Air Sampler
2.4.
HARDWARE CONSIDERATIONS
A number of internal systems of the Partisol-Plus Sampler are designed to maintain
acceptable operating conditions within the hardware.
✔ A fan and heater provide
cooling and heating for the
sampler.
The sample pump is always running when sampling takes place. If the filter
compartment temperature exceeds 15° C, and the sample pump is running, the pump
fan in the pump compartment initiates. The pump fan stops running once the
temperature falls below 15° C. However, the pump fan will not initiate if the sample
pump is not running, regardless of the temperature measured in the filter compartment.
When the device is not sampling, the sample pump initiates only if the ambient
temperature falls below 7.5° C for 30 seconds. If the sample pump does initiate due
to low temperatures, it stops running when the ambient temperature exceeds 7.5° C.
In this case, the flow through the pump enters the system through the vacuum vent
valve. This does not effect the filter that is in sampling position.
If the temperature measured on the interface board drops below 10° C for 30 seconds,
the heater in the electronics compartment initiates and runs until the temperature
exceeds 10° C.
2.5.
ADJUSTING THE LIQUID CRYSTAL DISPLAY (LCD)
A knob on the right side of the display/keypad adjusts the contrast of the sampler’s liquid
crystal display (LCD) (Figure 2-9). This knob may be turned clockwise and counterclockwise.
Figure 2-8. LCD contrast
adjustment knob on right
side of display/keypad.
SECTION 2: HARDWARE INSTALLATION
PAGE 2-7
Revision B.004
Operating Manual, Partisol-Plus Model 2025 Sequential Air Sampler
This page left intentionally blank.
SECTION 2: HARDWARE INSTALLATION
PAGE 2-8
Revision B.003
Operating Manual, Partisol-Plus Model 2025 Sequential Air Sampler
Section 3: Filter Handling and Exchange
This section explains how to perform the initial inspection and the equilibrium and
weighing (before and after sampling) of the 47 mm filters used in the Partisol-Plus
Sampler. This section also describes how to insert and remove the filter cassette
magazines in the sampler, and calculate the 24-hour mass concentration average of
PM-2.5, as found in the U.S. EPA 2.12 Quality Assurance Handbook, Volume II Part
II Section 7: Filter Preparation and Analysis, Section 8 Field Operation and Section 11:
Calculations, Validation and Reporting of PM-2.5 Monitoring Data. Use the filter log
in Appendix F for record keeping.
3.1.
FILTER HANDLING AND INITIAL INSPECTION
The only filter media currently approved by the U. S. EPA for reference method
sampling of PM-2.5 is a 47 mm diameter, 2 µm pore-size Teflon® filter. These filters
can be purchased from R&P in the following form:
PTFE (Teflon) filters, 2.0 µm pore size, box of 50 (10-002322-0050)
You may use other filters or materials for other types of sampling, depending upon local
regulations. For example, the U.S. EPA allows the use of Pallflex TX40 (Teflon-coated
glass fiber) filters, quartz fiber filters and Teflon material for PM-10 sampling.
✘ Do not touch filters with
your fingers. Use nonserrated forceps to handle
the filters.
Ensure that your filters are clean and do not touch them with your fingers. Filters should
be stored at the laboratory in petri dishes or some other protective housing, and should
be transported to and from the sampling site in a capped filter cassette magazine
enclosed in a metal transport container. Use non-serrated forceps to handle the 47 mm
filters.
Inspect each filter visually for integrity before use. Check for the following:
•
•
•
•
•
Pinholes
Chaff or flashing
Loose material
Discoloration
Non-uniformity.
SECTION 3: FILTER HANDLING AND EXCHANGE
PAGE 3-1
Revision B.003
Operating Manual, Partisol-Plus Model 2025 Sequential Air Sampler
3.2.
PRE-SAMPLING FILTER EQUILIBRATION
Follow these steps to equilibrate the 47 mm filters before use. Refer to
the U.S. EPA 2.12 Quality Assurance Handbook, Section 7. Use petri
dishes to store filters in the laboratory.
1) Place a label on the cover of each petri dish and number each
dish.
2) Place the petri dish cover under the bottom half of the dish.
3) Place each inspected filter into a separate petri dish.
4) Record the filter number, relative humidity, temperature, date and
time at the beginning of equilibration.
5) Equilibrate each filter for at least 24 hours under the following
conditions:
The equilibration room must be held at a constant relative humidity between 30%
and 40% relative humidity, with a variability of not more than ±5% relative
humidity. The equilibration room must be held at a constant temperature between
20° C and 23° C with a variability of not more than ±2° C.
3.3.
PRE-SAMPLING FILTER WEIGHING
Follow these steps to weigh the 47 mm collection filters (tare weight)
before sampling, refer to 2.12 Quality Assurance Handbook, Section 7:
✔ Record the initial filter
weight as Wi.
✔ The pre-sampling
weighing must take place
within 30 days of the
sampling period.
1) Ensure that each filter has been equilibrated for at least 24 hours
before weighing.
2) Filters must be weighed on a microbalance with a resolution of at
least 1 µg (0.001 mg). Be sure to warm up the balance before
weighing filters.
3) Weigh each filter at least once (three times recommended),
recording the mass in grams (Figure 3-1). The average mass
reading is the initial filter weight, Wi (g). Use appropriate techniques to neutralize static charges on the filter. This
pre-sampling weighing must take place within 30 days of the
sampling period.
4) Immediately place each weighed filter into an open filter cassette
(59-004648-0001) (Figure 3-2) that has a serial number etched on
the screen. These filter cassettes also are referred to as having
SECTION 3: FILTER HANDLING AND EXCHANGE
PAGE 3-2
Revision B.003
Operating Manual, Partisol-Plus Model 2025 Sequential Air Sampler
Figure 3-1. Positioning a
47 mm filter on a balance.
Figure 3-2. 47 mm filter
placed in bottom section of
cassette. Top part of
cassette shown on right.
“serialized” screens. Close the filter cassette by snapping its
top part onto its bottom section. Ensure that the top and bottom
pieces of the cassette are pushed completely together.
5) Record the serial number of the filter cassette.
6) Remove the orange cap from the top of the filter cassette magazine.
7) Insert the filter cassettes into a filter cassette magazine (59005569) that will be installed in the field (Figure 3-3). Place the
first filter cassette on top of the magazine’s piston and push
downward.
SECTION 3: FILTER HANDLING AND EXCHANGE
PAGE 3-3
Revision B.003
Operating Manual, Partisol-Plus Model 2025 Sequential Air Sampler
IMPORTANT: If the piston is not located at the top of the magazine when you
begin inserting the filter cassettes into the magazine, follow the instructions in
Section 3.4 to move the piston into place.
8) Stack each successive filter cassette on top of the first filter
cassette (one on top of the other). As you place each cassette in
the magazine, press down to move the piston downward, making
room for the next cassette. Note the order of the filter cassette
serial numbers as they are inserted in the magazine.
NOTE: If using separator disks for speciation work, the filter cassette order from
top to bottom must be as follows: separator disk cassette, filter cassette, separator
disk cassette, filter cassette, etc.
9) After you have inserted all of the filter cassettes into the magazine, replace the orange cap (Figure 3-4) back on the end of the
magazine to hold the filter cassettes in place and to prevent
filter contamination.
10) Document the relative humidity, temperature, date and time of the
initial weighing.
11) The “zero” reading of the microbalance should be verified between each filter weighing.
Figure 3-3 (Left). Inserting
filter cassettes into a filter
cassette magazine.
Figure 3-4 (Right). Capped
magazine.
SECTION 3: FILTER HANDLING AND EXCHANGE
PAGE 3-4
Revision B.003
Operating Manual, Partisol-Plus Model 2025 Sequential Air Sampler
3.4.
PREPARING THE FILTER CASSETTE MAGAZINE
Follow these steps to move the filter cassette magazine’s piston to the
top of the magazine:
1) Attach the bulb pump hose (59-004733) to the magazine’s air
connector fitting with the quick connect fitting on the end of the
hose (Figure 3-5).
2) Squeeze the bulb gently until the piston reaches the top of the
magazine.
Figure 3-5. Attach bulb
pump hose to magazine air
connector.
3.5.
FILTER TRANSPORTATION
The capped filter cassette magazines should be inserted into the metal transport
container (20-004997) (Figure 3-6). The filter cassette magazine’s caps must be
secure during transport to avoid contaminating the filters. Collection filters must be
transported carefully in the metal transport containers to and from the sampling site as
specified in the U.S. EPA 2.12 Quality Assurance Handbook, Section 8.
SECTION 3: FILTER HANDLING AND EXCHANGE
PAGE 3-5
Revision B.003
Operating Manual, Partisol-Plus Model 2025 Sequential Air Sampler
Figure 3-6 (Right). Magazine in metal transport
container.
3.5.1.
INSTALLING A FILTER CASSETTE MAGAZINE
Filter cassette magazines may be exchanged in any of the sampler’s operating modes.
IMPORTANT: Filter cassette magazines containing new
filters must be installed on the left (supply) side, while empty
magazines for receiving exposed filters must reside on the
right (storage) side.
Perform these steps to install a filter cassette magazine:
NOTE: The piston should always be at the top of the (empty) storage magazine
prior to installing the magazine into the sampler. Otherwise, exposed filters will not
seat properly in the empty magazine when the filters are transferred, and
particulate on the filter may become dislodged. Use the bulb pump hose described
in Section 3.4 to position the piston at the top of the magazine.
1) Open the enclosure of the Partisol-Plus Sampler.
2) Identify the appropriate mounting position for the filter cassette
magazine to be installed (left side for supply and right side for
storage).
3) Remove the orange cap from the top of the filter cassette magazine.
4) With the air connection of the filter cassette magazine facing
toward the user, line up the grooves at the top of the filter cas-
SECTION 3: FILTER HANDLING AND EXCHANGE
PAGE 3-6
Revision B.003
Operating Manual, Partisol-Plus Model 2025 Sequential Air Sampler
Figure 3-7 (Left). Positioning the filter cassette
magazine into its mounting
location.
Figure 3-8 (Right). Rotating
the filter cassette magazine
into its locked position.
sette magazine with the mounting studs on the metal ring that
holds the magazine in place (Figure 3-7).
5) Push the filter cassette magazine upward and rotate it to the right
to lock it into place (Figure 3-8).
6) Attach the air pressure supply tube to the air connection at the
base of the supply filter cassette magazine (Figures 3-9 and 310). The storage filter cassette magazine does not have an air
pressure supply tube.
NOTE: R&P recommends that the serial number of the topmost filter cassette,
or a user-defined batch number, be entered in the Filter List screen (Section 5.3.7)
each time the user exchanges the filter cassette supply magazine. If the filter
cassette magazine is installed when the sampler is not running, you should enter
the topmost filter cassette serial number in the proper screen once you have turned
the sampler on.
Figure 3-9 (Left). Positioning the pressurized air tube
toward the air connector on
the filter cassette magazine.
Figure 3-10 (Right).
Attaching the tube to the
connector.
SECTION 3: FILTER HANDLING AND EXCHANGE
PAGE 3-7
Revision B.003
Operating Manual, Partisol-Plus Model 2025 Sequential Air Sampler
3.5.2.
REMOVING A FILTER CASSETTE MAGAZINE
Perform these steps to remove a filter cassette magazine:
NOTE: The supply magazine (containing unused filters) is on the left-hand side,
and the storage magazine (containing exposed filters) is on the right-hand side.
1) Open the enclosure of the Partisol-Plus Sampler.
2) Rotate the magazine to the left and pull it down.
3) Place the orange cap over the open end of the filter cassette
magazine to protect its contents during transport. Place the
capped magazine into a metal transport container (Figure 3-6).
3.6.
REMOVING FILTER CASSETTES FROM A MAGAZINE
The most convenient means of removing filter cassettes from a filter cassette
magazine is to use the R&P cassette removal sleeve (36-004733) (Figure 3-12).
Follow these steps to remove filter cassettes from a filter cassette
magazine:
1) Remove the magazine’s cap.
2) Line up the four pins on the inner surface of the metal cap of the
cassette removal sleeve with the four slots at the top of the filter
cassette magazine. Slide the cassette removal sleeve onto the
top of the filter cassette magazine.
3) Attach the bulb pump hose to the magazine’s air connector fitting
with the quick connect fitting on the end of the hose (Figure 3-5).
4) Squeeze the bulb gently until the topmost filter cassette is positioned in the slot of the metal cap (Figure 3-11).
5) Slide the filter cassette out of the slot (Figure 3-12). Continue to
push the filter cassettes into the slot by squeezing gently on the
bulb. When all filter cassettes have been removed from the
magazine, remove the cassette removal sleeve from the top of
the magazine and disconnect the hose from the magazine air
connector. The filter cassette magazine is now ready to be
loaded with unused filters.
6) Insert new filter cassettes (loaded with unused filters) into the
SECTION 3: FILTER HANDLING AND EXCHANGE
PAGE 3-8
Revision B.003
Operating Manual, Partisol-Plus Model 2025 Sequential Air Sampler
magazine one at a time, recording the serial numbers of each
filter and cassette screen. Push down on each filter cassette so
that the topmost filter is just below the top of the magazine.
Either install the loaded magazine in the sampler, or cap the
magazine to protect the filter cassettes from contamination.
Figure 3-11. Squeeze
gently on the bulb to push
filter cassettes to the top of
the cassette removal
sleeve.
Figure 3-12. Sliding
cassette through slot.
SECTION 3: FILTER HANDLING AND EXCHANGE
PAGE 3-9
Revision B.003
Operating Manual, Partisol-Plus Model 2025 Sequential Air Sampler
3.7.
POST-COLLECTION EQUILIBRATION
Follow these steps to equilibrate the 47 mm filters after sampling:
1) Separate the filter from the cassette with the filter cassette
separator tool (38-004892) as shown in Figure 3-13.
2) Remove the 47 mm filter from the filter cassette and set the filter
in its petri dish. The cassette can then be used to hold other
filters once it has been cleaned. Refer to Section 12.2 for the
filter cassette cleaning procedure.
3) Examine the filter for defects that may have occurred during
sampling, and for evidence of leaks in the filter cassette. To
check for leaks in the filter cassette, check the filter for pronounced radial streaks that extend beyond the exposed area of
the filter.
4) Place the petri dish cover under the bottom half of the dish.
5) Place a paper towel over the open petri dish during equilibration.
6) Record the filter number, relative humidity, temperature, date and
time at the beginning of this post-collection equilibration.
7) Equilibrate each filter for at least 24 hours under the following
conditions:
The equilibration room must be held at a constant relative humidity between 30%
and 40%, with a variability of not more than ±5% relative humidity.
Figure 3-13. Filter cassette
separator tool.
SECTION 3: FILTER HANDLING AND EXCHANGE
PAGE 3-10
Revision B.003
Operating Manual, Partisol-Plus Model 2025 Sequential Air Sampler
The equilibration room must be held at a constant temperature between 20° C and
23° C, with a variability of not more than ±2° C.
3.8.
POST-COLLECTION WEIGHING
Follow these steps to weigh the 47 mm collection filters after sampling:
1) Ensure that the filters have been equilibrated for at least 24
hours before weighing.
✔ Record the final filter
weight as Wf.
2) Filters must be weighed on a microbalance with a resolution of at
least 1 µg (0.001 mg). Ensure that the balance has been allowed
to warm up before weighing filters.
3) Remove the filter from its petri dish.
4) Weigh each filter at least once (three times recommended),
recording the mass in grams (Figure 3-14). The average mass
reading is the final filter weight, Wf (g).
5) Return the filter to its petri dish, place the petri dish cover over it
and store it for archival purposes.
6) Document the relative humidity, temperature, date and time of the
post-collection weighing as specified in the U.S. EPA 2.12 Quality
Assurance Handbook, Section 7.
7) The “zero” reading of the microbalance should be verified between each filter weighing.
8) Determine the net mass filter loading (DW) by subtracting the
average initial filter weight (Wi computed in Step 3 of Section 3.3)
Figure 3-14. Placing a
used 47 mm filter on a
balance.
SECTION 3: FILTER HANDLING AND EXCHANGE
PAGE 3-11
Revision B.003
Operating Manual, Partisol-Plus Model 2025 Sequential Air Sampler
from the final filter weight (Wf computed in Step 4 above). Ensure
that the figures used in this computation were obtained from the
same filter and balance.
3.9.
COMPUTATION OF MASS CONCENTRATION
NOTE: Refer to the U.S. EPA 2.12 Quality Assurance
Handbook, Section 11.
Compute the average mass concentration (MC) of particulate matter during the
sampling period using the following formula with the information previously assembled:
DW x 10 6
MC = ––––––––––
V
where:
DW = the net change in the mass (g) of the 47 mm filter
between the initial weighing and the post-collection weighing,
as computed in Step 8 of Section 3.8.
106 = Conversion factor from grams (g) to micrograms (µg).
V = the volume drawn through the filter, as obtained from
the sampler. For U.S. EPA PM-2.5, this must be volumetric
m³. Other sampling standards require that the standard
volume be used. The Partisol-Plus Sampler can furnish either
the actual or standard volume.
For 24-hour PM-2.5 concentration averages to be valid without adjustment for U.S.
EPA reporting purposes, the total sampling time must be between 23 and 25 hours, and
other requirements must also be met, as referenced in the U.S. EPA 2.12 Quality
Assurance Handbook, Section 8. The sampler also indicates to the user which, if any,
status conditions were encountered during sampling.
SECTION 3: FILTER HANDLING AND EXCHANGE
PAGE 3-12
Revision B.003
Operating Manual, Partisol-Plus Model 2025 Sequential Air Sampler
Section 4: Software Overview
This section describes the steps involved in turning on the Partisol-Plus Sampler,
navigating through its basic screens and interacting with the unit. The sampler’s
software menu structure and a complete list of screens may be found in Appendix A.
4.1.
TURNING ON THE PARTISOL-PLUS SAMPLER
Follow the procedures outlined in Sections 2 and 3 before attempting to operate the
Partisol-Plus Sampler. Once the sampling system has been wired to a main electrical
source of the proper voltage in accordance with local standards, power can be applied
to the unit.
✔ Ensure that all applicable
safety standards are met
before applying power to
the hardware.
Follow these steps to turn on the sampler:
1) Install a loaded supply and empty storage filter cassette magazine
into the filter exchange mechanism of the sampler (Section 3).
2) Press the power switch on the main panel (lower left) to its “on”
(1) position to activate the sampler (Figure 4-1).
3) If necessary, turn the adjustment knob, located to the right of the
keypad/display, to adjust the contrast of the liquid crystal display
(LCD).
Once the power switch is pressed, the pump in the sampler may turn on momentarily.
This is the default setting of the unit for operating in extremely cold environmental
conditions where heat is necessary to warm the electronics.
Figure 4-1. Press "1" on the
"on/off" switch (left) to turn
on the sampler.
SECTION 4: SOFTWARE OVERVIEW
PAGE 4-1
Revision B.003
Operating Manual, Partisol-Plus Model 2025 Sequential Air Sampler
Figure 4-2. Title screen.
Partisol-Plus
Model 2025 Sequential Air Sampler
Version: 1.202
Date: 8-Dec-98
Copyright 1998
Rupprecht & Patashnick Co., Inc.
RDfault
4.2.
RData
Reset
TITLE SCREEN
The Title screen momentarily appears on the sampler’s display to identify the model
number of the unit and the revision number of the installed software (Figure 4-2).
During the time that the sampler displays this screen, the user has a chance to reset the
unit by pressing the appropriate keys on the keypad (Section 13).
4.3.
MAIN SCREEN
After a few seconds, the Title screen is automatically replaced by the Main screen
(Figure 4-3). This screem shows summary information regarding the sampling
program currently defined by the user, the current operating mode, the existence of
any status conditions and certain operational information. The sampler displays the
following fields on the Main screen:
SECTION 4: SOFTWARE OVERVIEW
Status Code
The value of the status code in the upper left-hand
corner of the Main screen (next to Stat) indicates
whether the unit is operating properly (Section 7). A
value of “OK” indicates that all functions are proceeding normally.
Operating Mode
The sampler displays the current operating mode in
the upper right-hand corner of the Main screen (next
to Mode). Press <RUN/STOP> to switch between
the Stop and Wait Operating Modes (Section 5.1).
PAGE 4-2
Revision B.003
Operating Manual, Partisol-Plus Model 2025 Sequential Air Sampler
Figure 4-3. Main screen.
Stat:OK
Partisol 2025
Mode:Stop
Current Time: 09:27 98/07/23
Start Sample: 00:00 98/07/24
Stop Sample: 00:00 98/07/25
Filter ID:
Flow:
Volume:
Help
SECTION 4: SOFTWARE OVERVIEW
123456
0.0 l/min
000.00 m^3
Stats
FiltSet
Data
Setup
Current Time/Date
The local time and date are displayed next to Current
Time on the second line of the Main screen. Press
<F5: Setup> from the Main screen to enter the
Sample Definition Setup screen (Section 5.2). From
the Sample Definition screen, press <F5: System> to
reach the System Setup screen. While in the System
Setup screen, input the local time and date before
initiating a sampling program. The Partisol-Plus
Sampler expresses time as “hh:mm” and dates as
“yy/mm/dd” by default. Users may change these
formats in the System Setup screen (Section 5.2).
Start Sample
The start time displayed next to Start Sample indicates the time and date at which the sampler is
currently programmed to begin sample collection
(hh:mm yy/mm/dd by default). Press <F5: Setup>
from the Main screen to enter the Sample Definition
Setup screen (Section 5.2). With the unit in the Stop
Operating Mode (Section 5.1), the user can change
the start sample time and date from this screen.
Stop Sample
The stop time displayed next to Stop Sample indicates the time and date at which the sampler is
currently programmed to stop sample collection
(hh:mm yy/mm/dd by default). Press <F5: Setup>
from the Main screen to enter the Sample Definition
Setup screen (Section 5.2). With the unit in the Stop
Operating Mode (Section 5.1), the user can change
PAGE 4-3
Revision B.003
Operating Manual, Partisol-Plus Model 2025 Sequential Air Sampler
the stop sample time and date from this screen by
changing or editing the Default Sample Duration
field.
Filter ID
This field displays the filter identification number for
the filter that is in the sampling position. The filter
number displayed at the top of the screen will
automatically track the Filter IDs in the sequence
entered in the Filter List screen.
Flow
This field displays the current sample flow rate.
Press <F5: Setup> from the Main screen to enter the
Sample Definition Setup screen (Section 5.2). With
the unit in the Stop Operating Mode (Section 5.1), the
user can change the flow rate from this screen.
Volume
This field displays an automatic calculation of the
volume of air drawn through the sampler. The
volume calculation depends upon how long the sampler has run.
Figure 4-4. The PartisolPlus Sampler's display/
keypad.
SECTION 4: SOFTWARE OVERVIEW
PAGE 4-4
Revision B.003
Operating Manual, Partisol-Plus Model 2025 Sequential Air Sampler
The function keys (soft keys) labeled “F1” to “F5” activate the commands shown on
the bottom line of almost every screen in the system. The following parts of this section
describe how to navigate among the system’s software screens, and how to switch
between the “Browse Mode” and “Edit Mode” to change the system’s parameters.
4.4.
✔ Use the function keys to
drop down by one layer in
the structure of screens.
Pressing <ESC> returns the
user to the next highest
level.
NAVIGATING AMONG SCREENS
The system software allows the user to navigate easily through the use of soft function
keys (<F1> to <F5>) and the <ESC> key (Figure 4-4). From the Main screen, press
<F1: Help>, <F2: Stats>, <F3: FiltSet>, <F4: Data> or <F5: Setup> to drop down one
level in the screen structure (Figure 4-6). Pressing the <ESC> key causes the current
display to be replaced by the next higher screen in the hierarchy. For example, pressing
<ESC> when in the Filter Setup screen returns the user to the Main screen. The
definition of the soft function keys changes as different screens appear on the display
and different functions are required. Appendix A contains an overview of all screens
included in the Partisol-Plus software.
Many screens allow the user to change the value of system parameters. The <EDIT>
key causes the sampler to leave the Browse Mode and enter the Edit Mode. This
interaction with the sampler is described in the following parts of this section. Press
<ESC> to exit the Edit Mode while in any screen.
Figure 4-5. Time Base
Filter Setup screen with two
menu lines in the browse
mode.
Stat:OK
Filter: 01
Mode:STOP
Current Time: 15:34 98/07/23
Start Sample: 00:00 98/07/24
Stop Sample: 12:00 98/07/24
Filter ID: P 123456
Cassette ID: RP100123
Blank: No
Help
Prev
Next
FiltLst
*More*
Function Keys in Browse Mode
Help
Prev
Reset
Next
+ Hour
FiltLst
+ Day
*More*
*Back*
Function Keys in Edit Mode
-List
SECTION 4: SOFTWARE OVERVIEW
+List
Bksp
PAGE 4-5
Revision B.003
Operating Manual, Partisol-Plus Model 2025 Sequential Air Sampler
Title Screen
Main Screen
Temperature
Pressure
Stats Screen
Help
Filter Setup
Screen
Filter Times
Screen
Status Code
Stats Screen
Sample Stats
Screen
User I/O
Stats Screen
Filter Data
Times Screen
System Setup
Screen
Filter List
Setup Screen
Wind
Stats Screen
Sample Setup
Screen
System
Stats Screen
Filter Data
Screen
Interval Data
Screen
Filter Data
Status Codes
Screen
Input Data
Screen
Download Data
Screen
Filter Data
Averages
Screen
Power Failure
Data Screen
I/O Menu
Analog Input
Setup Screen
Analog Output
Setup Screen
RS232 Setup
Screen
Site ID Menu
RS485 Setup
Screen
Password
Menu
System Info
Menu
Contact
Closure Setup
Screen
RS232 Real
Time Data
Screen
Figure 4-6. Hierarchy of
screens.
SECTION 4: SOFTWARE OVERVIEW
PAGE 4-6
Revision B.003
Operating Manual, Partisol-Plus Model 2025 Sequential Air Sampler
Certain displays such as the Time Base Filter Setup screen (Figure 4-5) contain the
contain the <F5: *More*> key, which indicates that additional options exist for this
screen. Pressing <F5: *More*> causes the additional (extended) menu options to
appear on the bottom line of the display shown as a second line of options in Figure 45. To distinguish between the selections available from the main and second lines of
the menu, the function keys in the first line are designated by <F1> to <F5> in this
manual’s instructions, while the second line contains the titles <F6> to <F10>. Press
<F10: *Back*> when in the second menu line to return to the main menu line.
4.5.
MASTER MENU
The Master Menu provides another means of gaining access to other screens in the
unit’s software. It can sometimes provide a more direct route to other program screens
than negotiating the hierarchy of screens using regular soft function keys.
Press <MENU> to display the Master Menu screen (Figure 4-7). This screen does not
contain any fields that can be changed or edited. Press the arrow keys (<↓> and <↑>)
to view the soft function key options available for the categories listed. Press the
desired soft function key to make a selection, or <ENTER> in the absence of any soft
function key definitions. Refer to Appendix A for the soft function key choices and the
screens that you can access from the Master Menu.
Do not select “Service Mode” from the Master Menu unless you need to access this
operating mode (Section 14).
Press <ESC> to return to the Main screen from the Master Menu screen without
making any selection.
Figure 4-7. Master menu.
Master Menu
> Status Codes
System Status
Sampling Setup
Data Storage
System Setup
Service Mode
StCode
SECTION 4: SOFTWARE OVERVIEW
PAGE 4-7
Revision B.003
Operating Manual, Partisol-Plus Model 2025 Sequential Air Sampler
4.6.
EDIT MODE
The unit is normally in the Browse Mode, which allows the user to move from screen
to screen with ease. In a number of screens, however, the user may want to change
the unit’s operating parameters. In such a case, the user must enter the Edit Mode.
Press <EDIT> to enter the Edit Mode from the Browse Mode. If the current screen
does not contain any fields that can be changed or edited in the current operating mode,
the unit displays a message to inform the user. In such a case, the user must return the
sampler to the Stop Operating Mode by pressing <RUN/STOP> before attempting to
enter the Edit Mode in the desired screen.
Appendix B contains a complete list of program register codes (PRCs). These codes
describe the unit’s parameters and variables that are available for viewing and
retrieval. The column labeled “Edit Modes” indicates the operating modes in which the
user may edit the value of a specific parameter. Many operating parameters such as
Current Time and Date can only be changed when the monitor is not sampling, i.e.,
when it is in the Stop Operating Mode. The “Range” column indicates the allowable
range of the program register code.
The System Setup screen contains a number of fields that can be changed (Figure 48). Press <F5: Setup> twice when in the Main screen to enter the System Setup screen.
Because the System Setup screen contains fields that can be changed or “edited,”
Figure 4-8. System Setup
screen.
System Setup
Average Temp: 99
Standard Temp: 99
Average Pres: 999
Standard Pres: 999
Date Form: YY/MM/DD
Time Form:
Average Time: 30
:
Filter Fan: ON
Curr Time: 05:00:00
Auto Run: ON
Curr Date: 98/04/10
Help
I/O
Site ID
Passwd
SysInfo
Function Keys in Browse Mode
Help
I/O
Site ID
Passwd
SysInfo
Function Keys in Edit Mode
-List
SECTION 4: SOFTWARE OVERVIEW
+List
Bksp
ChSign
PAGE 4-8
Revision B.003
Operating Manual, Partisol-Plus Model 2025 Sequential Air Sampler
Figure 4-8 displays a second set of soft function key definitions that are active only
when the unit is in the Edit Mode.
✔ The cursor changes
shape when the sampler
enters the Edit Mode.
✔ Use the arrow keys to
move from one field to
another while remaining in
the Edit Mode.
After pressing <EDIT> to enter the Edit Mode, the cursor changes shape; it changes
from an underline when it is in the Browse Mode to a large square shape when the
monitor is in the Edit Mode.
Press the arrow keys (<↑>, <↓>, <←> and <→>) to select the field to be edited.
In the Edit Mode, many screens, such as the System Setup screen (Figure 4-8), contain
soft function keys that will decrease (<-List>) and increase (<+List>) the value of the
parameter currently being edited. These keys repeat when held down, and also
accelerate to a faster decrementing or incrementing speed when depressed for a longer
period of time.
Users may also enter numeric values directly from the keypad. The <Bksp> (backspace) soft function key erases the previously typed character when in the Edit Mode.
To change the sign of numeric values (to make a positive number, negative or a
negative number, positive), use the “ChSign” key that is available on many screens in
the Edit Mode. To use this feature, first input the required number and then press the
<ChSign> soft function key.
Times are expressed as “hours:minutes:seconds” by default, and can be edited using
the <-List> and <+List> keys, or through direct keypad entry. For the purposes of
editing, the time variable is split into three separate fields: hours, minutes, and
seconds. Use the arrow keys on the keypad (<←> and <→>) to move from one part
of the time variable to another.
✔ Leave the Edit Mode by
pressing <ENTER> to save
changes, or <ESC> to
disregard changes.
Dates are expressed as “year/month/day” by default, and are edited as three separate
parts using the <-List> and <+List> soft function keys or through direct keypad entry.
Use the arrow keys on the keypad (<←> and <→>) to move from one part of the date
variable to another.
To edit multiple parameters while remaining in the Edit Mode, press the arrow keys
on the keypad after making each change. This moves the cursor to a new field and
keeps the Partisol-Plus Sampler in its Edit Mode.
The following two keystrokes cause the software to leave the Edit Mode and return
to the Browse Mode:
<ENTER>
Changes made while in the Edit Mode are retained,
and the monitor returns to the Browse Mode.
<ESC>
Changes made while in the Edit Mode are not
retained, and the monitor returns to the Browse
Mode.
The cursor reverts to its underline shape when the unit returns to the Browse Mode.
SECTION 4: SOFTWARE OVERVIEW
PAGE 4-9
Revision B.003
Operating Manual, Partisol-Plus Model 2025 Sequential Air Sampler
This page left intentionally blank.
SECTION 4: SOFTWARE OVERVIEW
PAGE 4-10
Revision B.005
Operating Manual, Partisol-Plus Model 2025 Sequential Air Sampler
Section 5: Software Setup and Operation
This section describes the parameter settings in the software screens that affect the
sampler’s basic operation and sample programming. It also describes the unit’s
operational modes. Do not attempt the procedures described in this section until
carrying out the steps in Sections 2, 3 and 4. Appendix A contains all of the sampler’s
screens, and Appendix B provides a listing of the unit’s program register codes (PRCs).
5.1.
MODES OF OPERATION
The Partisol-Plus Sampler displays its current operating mode in the upper right-hand
corner of the Main screen (Figure 4-3), and certain other screens. Press <RUN/STOP>
to switch between the non-sampling Stop Operating Mode and the sampling program
execution modes (Wait, Sampling, Audit, Done, Error). In certain cases, the user must
select <STOP> after pressing <RUN/STOP> to re-enter the Stop Operating Mode.
The unit’s operating modes are defined as follows (Figure 5-1):
Stop Mode
In the Stop Operating Mode (STOP), the user defines the
sampling program using the Sampling Setup screen and the Filter
Setup screens (Sections 5.3.1-5.3.5). Because this is the only
non-operational mode, all user-definable system parameters may
be edited with the sampler in this state.
NOTE: It is not necessary to return to this mode to exchange
filter cassette magazines. They can be swapped while the
device is sampling.
Pressing <RUN/STOP> with the unit in this mode causes the
sampler to advance to the Wait or Sampling Operating
Modes.
Wait Mode
The Partisol-Plus Sampler resides in the Wait Operating Mode
(WAIT) until the user-defined sampling conditions are met for the
next filter to be exposed. At that point, the unit automatically
enters the Sampling Operating Mode and begins sample collection.
When the sampler moves from the Stop Mode to the Wait
Mode, it does not automatically exchange filters. The sampler
will wait until the Start Sampling Time occurs and then just
before it begins sampling, it will exchange filter cassettes and
begin sampling. However, when the unit completes a sample
and transfers to the Wait or Done Mode, it will exchange
filters just as it moves from the Sampling Mode to the Wait
or Done Mode.
SECTION 5: SOFTWARE SETUP AND OPERATION
PAGE 5-1
Revision B.005
Operating Manual, Partisol-Plus Model 2025 Sequential Air Sampler
Figure 5-1. Overview of operating
modes.
Define Sampling Program
Select the sampling program in the
Sample Setup screen. Identify and
define the sampling program in the
Filter Setup screen. Install the
supply and storage magazines prior
to sampling.
Stop (STOP)
Operating Mode
Note: After leaving the Stop
Mode and moving to the Wait
Operating Mode, the sampler
will exchange filters just
before it enters the Sampling
Mode and begins sampling.
Initiate Sampling Program
Press <RUN/STOP>
in Main screen
After defining the sampling
program, press <RUN/STOP> in
the Main screen to initiate the
program. The system then enters
the Wait or Sampling Operating
Modes.
Wait to Begin Collection
Sampler enters the Wait
Operating Mode after the
current filter is exposed. It then
exchanges the filter and waits
for the next sampling period.
Wait (WAIT)
Operating Mode
The sampler stays in the Wait
Operating Mode until the sampling
conditions for the next filter are met.
In the Wait Mode (when entering
from the Stop Mode) the sampler
exchanges filters just before the
sampling period begins.
Sample Collection
Sampling (SAMP)
Operating Mode
Note : To suspend the current
system operation in the Wait or
Sampling Operating Modes for
inlet exchange or cleaning,
press <RUN/STOP> and select
<Audit>. To resume sampling
press <RUN/STOP>.
The sampler remains in the
Sampling Operating Mode with the
current filter until the next Stop
Time is reached. The sampler then
enters the Wait Operating Mode
when exchanging the filter.
Press <RUN/STOP>
in Main screen
Audit (Audit)
Operating Mode
Pause in Sampling
Press <RUN/STOP> when
in the Sampling Mode to
enter the Audit Mode. The
sampler stops sampling.
When maintenance or
verification is complete,
press <RUN/STOP> to
resume sampling.
Termination Conditions
Done (DONE)
Operating Mode
Error (ERR)
Operating Mode
Press <RUN/STOP>
in Main screen
Press <RUN/STOP>
in Main screen
SECTION 5: SOFTWARE SETUP AND OPERATION
Done Operating Mode: The
sampler attempts a filter
exchange with no additional
cassettes in the supply tube.
Error Operating Mode:
1) The sampler encounters
status conditions S1 or S2
(flow deviation error) during
sampling.
2) Unsuccessful filter
exchange.
Return to Stop Op Mode
Press <RUN/STOP> to
return to the Stop Operating
Mode.
PAGE 5-2
Revision B.005
Operating Manual, Partisol-Plus Model 2025 Sequential Air Sampler
Pressing <RUN/STOP> when in the Wait Operating Mode
offers the user the choice of entering the Audit Operating
Mode (for exchanging or cleaning the WINS impactor) or the
Stop Operating Mode.
Sampling Mode
While in the Sampling Operating Mode (SAMP), the sampler is
currently in a user-defined sampling interval. Except in the case
of Advanced or Episodic sampling with conditions, the unit will
draw a continuous air flow through the sample path when the
proper sampling conditions are met. The unit controls the sample
stream at the volumetric flow rate specified by the user (16.7 l/
min by default). Unless the sample flow rate deviates from its set
point by 10% for more than 5 minutes, the sampler remains in this
mode until the stop sampling conditions are met. If the sample
flow rate deviates from this set point, the unit will enter the Error
Mode (ERR) and it will stop sampling. The software will register
an “S1” Status Code and the light on top of the unit will turn on and
remain on until the user resets the unit.
Pressing <RUN/STOP> when in the Sampling Operating
Mode offers the user the choice of entering the Audit
Operating Mode (for exchanging or cleaning the WINS
impactor) or the Stop Operating Mode.
Once the stop sampling conditions are met, the sampler
attempts to exchange filter cassettes. If no additional filter
cassettes are present in the filter cassette supply magazine,
it switches to the Done Operating Mode; otherwise, the
hardware returns to the Wait Operating Mode prior to
initiating the next sample.
Done Mode
The sampler enters the Done Operating Mode (DONE) if the
filter cassette supply magazine runs out of filter cassettes.
Pressing <RUN/STOP> with the unit in this mode causes the
sampler to return to the Stop Operating Mode.
The unit will continue to sample until all filter cassettes are
used, except when a critical error condition is encountered
(Section 7).
SECTION 5: SOFTWARE SETUP AND OPERATION
PAGE 5-3
Revision B.005
Operating Manual, Partisol-Plus Model 2025 Sequential Air Sampler
Error Mode
The sampler proceeds to the Error Mode (ERR) under two status
conditions:
• The measured flow deviates from its set point by 10% for
5 minutes, causing the unit to break off sampling and display
status code “S1” (Section 7.1).
• The sampler detects a hardware error in attempting a filter
exchange, signified by status code “X” (Section 7.2).
Pressing <RUN/STOP> with the unit in the Error Operating
Mode causes the sampler to return to the Stop Operating
Mode.
Audit Mode
The Audit Operating Mode takes the unit off line and allows the
user to exchange or clean components in the sampling train, such
as the WINS impactor. Leak checks and flow verifications
(Section 12) can also be done with the sampler in the Audit Mode.
When in the Wait or Sampling Modes, press <RUN/STOP> and select <F1: Audit>.
At this point, the sampler will suspend all regular operations until you complete your
audit. After the audit is complete, press <RUN/STOP> to resume regular operations.
To prepare for an audit, remove the supply magazine containing sampled filters and
replace it with a clean audit magazine. After you have pressed <RUN/STOP> and then
selected <F1: Audit>, the unit will display its Main screen. While in the Main screen,
press the <MENU> key. This will bring you to the Master Menu screen. From the
Master Menu screen, press <F3:Audit> and then <F2: FiltAdv> to advance the
sampling filter out of the sampling position. The magazine containing the single current
sampling filter should be moved to the supply magazine position and an empty storage
magazine installed in the storage position. Once you have completed your exchanging
or cleaning procedures, press <F2: FiltAdv> to move the sampling filter back into the
sampling position. Remember to install new sampling filters in the supply magazine and
remove the audit filter cassette from the storage magazine. Press <RUN/STOP> to
resume sampling. Press <ESC> to display the Main screen. Section 12 describes the
maintenance and verification procedures in detail.
NOTE: Fundamentally, filter cassette magazines may be
exchanged when the sampler in any operating mode because
the exchange procedure does not affect the sampling train.
But if the unit is about to perform a filter cassette exchange
SECTION 5: SOFTWARE SETUP AND OPERATION
PAGE 5-4
Revision B.005
Operating Manual, Partisol-Plus Model 2025 Sequential Air Sampler
or if it is performing episodic sampling, it is advisable to enter
the Audit Operating Mode when exchanging magazines.
5.2.
SETUP SCREENS
The unit’s Setup screens set the global default sampling parameters for the numerous
programming options available. The Sample Setup screen allows the user to set
default sampling parameters. The System Setup screen defines whether the sampler
uses the default Ambient Temperature and Pressure settings, or Standard Temperature and Pressure settings for maintaining and reporting flow rates in volumetric or
standard terms. The System Setup screen also can be used to set the sampler to the
current local time and date.
5.2.1.
SAMPLE SETUP SCREEN
The Sample Setup screen allows the user to define global sampling parameters for the
operation of the Partisol-Plus Sampler, such as the sample definition method (default
programming method), the default sample start time and duration, the default repeat
time and filter type and the default sample flow rate and flow error mode.
The parameters in this screen can be edited while the unit is sampling. However, the
changes that are inputted while the unit is sampling will not take effect until the user
presses the <ENTER> button. At this point, the system is no longer in Edit Mode, the
changes are saved and the unit begins to sample using the changed parameters.
Press <F5: Setup> when in the Main screen (Figure 4-3) to enter the Sample Setup
screen (Figure 5-2). All of the fields in the Sample Setup screen can be edited when
the sampler is in the Stop Operating Mode. Pressing <F2: Set EPA> will display a
screen prompt, “Do you want to set up default sample conditions to USEPA standard?”
Pressing <F1: Yes> in this screen will automatically set up the sampler’s defaults in the
Basic sampling program to EPA network requirements for continuous sampling. At this
point, if you press <ESC> to return to the Sample Setup screen, you will see that the
unit’s default parameters will all be set to EPA sampling requirements.
The following fields make up the Sample Setup screen:
Sample Definition Method
SECTION 5: SOFTWARE SETUP AND OPERATION
This parameter allows the user to select the type of
sampling program. Basic, Time Base, Time2 Base,
Advanced, Episodic and RS232. Basic 24-hour
continuous sampling is the unit’s default setting.
Press <+List> or <-List> in the Edit Mode to access
the sampling program selections. Sampling programs are described in Section 5.3.
PAGE 5-5
Revision B.005
Operating Manual, Partisol-Plus Model 2025 Sequential Air Sampler
Figure 5-2. Sample Setup
screen.
Default Sample Start
The Default Sample Start time is used to set the
default starting time for the selected sampling program in hh:mm. 00:00 is the system default for this
parameter. When editing this parameter, treat each
part of the time as a separate field.
Default Sample Duration
This parameter allows the user to select the sampling duration for the selected sampling program in
hhh:mm. The default for this parameter is 024:00.
When editing this parameter, treat each part of the
time as a separate field.
Default Sample Repeat Time
The Default Sample Repeat Time parameter will
allow you to pause the unit while it is running in the
continuous operation mode, offsetting the sample
start time. For example, if you wanted the unit to
sample for 24 hours every three days, you would set
this field to 72 hours. The unit will then sample 24
hours, wait 48 hours and then sample again for 24
hours. This cycle will repeat each time a filter is
advanced into sampling position. If you don’t want
to offset the sample start time, you would set this
parameter equal to the Default Sample Duration.
For example, if you wanted the unit to sample for 24
Sample Definition Method:
Basic
Default Sample Start Time:
00:00
Default Sample Duration:
024:00
Default Sample Repeat Time:
024:00
Default Filter Type:
P
Sample Flow Rate:
16.7
Flow Error Mode: Err
Separators: No
Help
Set EPA
System
Function Keys in Browse Mode
Help
Set EPA
System
Function Keys in Edit Mode
-List
SECTION 5: SOFTWARE SETUP AND OPERATION
+List
Bksp
ChSign
PAGE 5-6
Revision B.005
Operating Manual, Partisol-Plus Model 2025 Sequential Air Sampler
hours, advance to the next filter and then sample for
another 24 hours, you would set the Default Sample
Repeat Time and the Default Sample Duration to
024:00.
Default Filter Type
This parameter allows the user to identify the filter
type. The default for this parameter is “P” (EPA
Filter). The user can select another alphabetic character by pressing <+List> or <-List> while in the
Edit Mode to identify another filter type as the
default filter.
Sample Flow Rate
The default flow rate parameter determines the
sample flow rate (volumetric l/min). Typically 16.7
l/min is entered in this field.
Flow Error Mode
The Flow Error Mode parameter has two modes:
WAIT and ERR. If the Flow Error Mode parameter
is set in the WAIT Mode and the sampler shuts down
automatically because of a critical flow error S1
(Section 7.1), the sampler will exchange a filter and
resume sampling at the next programmed sample
start time. If the Flow Error Mode parameter is set
to the ERR Mode and the sampler shuts down
because of a critical flow error, the sampler will not
exchange a filter or resume sampling. ERR is the
default condition for this parameter.
Separators
If you want to do speciation sampling, you would
use the Separators field. The “No” value in this field
will select all filters as either sampling filters or
blanks (Section 5.3.7). A “Yes” value will exchange
a filter cassette before each sampling filter in a
sampling run. If you choose the “Yes” value, you
should install a solid filter leak check/separator disk
(36-004768) in each filter cassette that is intended to
be used as a separator. Cassettes should be stacked
in the supply magazine so that the topmost filter
cassette, and then every other filter cassette, has a
separator disk. Do not use sampling filters as separators.
SECTION 5: SOFTWARE SETUP AND OPERATION
PAGE 5-7
Revision B.005
Operating Manual, Partisol-Plus Model 2025 Sequential Air Sampler
NOTE: When in the Edit Mode, use the arrow keys (<↑>,
<↓>, <←> and <→>) to select the field that you want to edit.
After you have finished editing the fields, press <ENTER> to
save your changes.
.
5.2.2.
SYSTEM SETUP SCREEN
The System Setup screen allows the user to define global parameters for the operation
of the Partisol-Plus Sampler, such as the current time and date, and default time and
date formats, and to set up the sampler for remote RS232 operation. Most of the
parameters in this screen can be edited only in the sampler’s Stop Operating Mode
(Section 5.1).
Press <F5: Setup> when in the Sample Setup screen (Figure 5-2) to enter the System
Setup screen (Figure 5-3). All of the fields in the System Setup screen can be edited
when the sampler is in the Stop Operating Mode.
The following fields make up the System Setup screen:
Average Temp
Figure 5-3. System Setup
screen.
The Average Temperature (°C) is used by the sampler to
maintain the proper volumetric sample flow rate. The default
value of Average Temperature is 99, indicating that the
System Setup
Average Temp: 99
Standard Temp: 99
Average Pres: 999
Standard Pres: 999
Date Form: YY/MM/DD
Time Form:
Average Time: 30
:
Filter Fan: ON
Curr Time: 05:00:00
Auto Run: ON
Curr Date: 98/04/10
Help
I/O
Site ID
Passwd
SysInfo
Function Keys in Browse Mode
Help
I/O
Site ID
Passwd
SysInfo
Function Keys in Edit Mode
-List
SECTION 5: SOFTWARE SETUP AND OPERATION
+List
Bksp
ChSign
PAGE 5-8
Revision B.005
Operating Manual, Partisol-Plus Model 2025 Sequential Air Sampler
unit should use the reading from the external temperature
sensor to maintain a constant volumetric flow rate.
Standard Temp
The Standard Temperature (°C) is used by the sampler to
report flow rate results in standard terms. The default setting
for Standard Temperature is 99, which may need to be
changed to match conventions in different parts of the world.
The default setting for Standard Temperature does not have
any effect on the volumetric flow rate and actual volume
calculations by the unit.
Average Pres
The Average Pressure (mm Hg) is used by the sampler to
maintain the proper volumetric sample flow rate. The default
value of Average Pressure is 999, indicating that the unit
should use the reading from the sampler’s ambient pressure
sensor to maintain a constant volumetric flow rate.
Standard Pres
The Standard Pressure (mm Hg) is used by the sampler to
report the flow rate results in standard terms. The default
setting of Standard Pressure is 999. The default setting for
Standard Pressure does not have any effect on the volumetric
flow rate and actual volume calculations by the unit.
Date Form
The Date Form determines the form in which the sampler
displays dates. The default value is yy/mm/dd. The Partisol
Plus Sampler makes the following choices available:
yy/mm/dd (default)
mm/dd/yy
dd/mm/yy
Average Time
The Average Time parameter defines the sample averaging
and storage interval (min) for the input data records (Section
8.3). The default value of this parameter is 30 minutes,
meaning that input data values are averaged over 30 minute
periods and stored every 30 minutes.
Time Form
The Time Form determines the form in which the sampler
displays time. The default is hh:mm:ss. The unit also allows
time to be displayed as hh.mm.ss.
Filter Fan
This parameter controls the filter fan. If this field is set to
“ON,” the filter fan will run continously. If this field is set to
“AUTO,” the filter fan will only initiate if the temperature of
SECTION 5: SOFTWARE SETUP AND OPERATION
PAGE 5-9
Revision B.005
Operating Manual, Partisol-Plus Model 2025 Sequential Air Sampler
the filter and ambient air differs by 2° C. If the Filter Fan field
is set to “OFF,” the filter fan will not initiate at all. When you
set this field to “OFF,” the filter temperature range error code
(that initiates the filter fan in the “AUTO” setting) will be
disabled.
Curr Time
The Curr Time parameter is the current local time (or other
standard time selected by the user) expressed by default as
hh:mm:ss. When editing this parameter, treat each part of the
time as a separate field.
Auto Run
If no keys are pressed for 3 hours and the Auto Run feature
is “ON,” the unit will automatically enter the Wait or Sampling
Mode.
Curr Date
The Curr Date parameter is the current local date expressed
by default as yy/mm/dd. When editing this parameter, treat
each part of the date as a separate field.
The System Setup screen also provides access to the sampler’s input and output
capabilities, password protection settings (Section 11), site identification information
and system information.
5.2.3.
SITE IDENTIFICATION SCREEN
The Site Identification screen (Figure 5-4) has two 32-character fields. The user can
enter site identification numbers using one or both fields. If no entry is made in these
fields then no site identification numbers will appear in the sampler’s data output from
this screen.
Remote operation of the sampler and data download is programmed from the System
Setup screen (Figure 5-3). While in the System Setup screen press <F2: I/O> which
takes you to the A/I Setup screen. In this screen, press <F3: RS232> to display the
RS232 Setup screen. Pressing <F3:SetPRC> (program register code) from the RS232
Setup screen displays the RS232 Real Time Data screen. Setting up the sampler with
the correct parameters for RS232 communication is discussed in Section 9.
SECTION 5: SOFTWARE SETUP AND OPERATION
PAGE 5-10
Revision B.005
Operating Manual, Partisol-Plus Model 2025 Sequential Air Sampler
Figure 5-4. Site Identification screen.
Site Identification
ID1: 00000012000000000000000000000112
ID2: 45000345486790000000000000000000
Function Keys in Edit Mode
Bksp
5.2.4.
A<--
A-->
SYSTEM INFORMATION SCREEN
The only field that can be edited in the System Information screen (Figure 5-5) is the
sampler serial number. This screen displays the following configuration information:
Software Version
The revision of the operating software currently loaded in
the sampler.
Software Date
The revision date (dd-mm-yy) of the operating software
currently loaded in the sampler.
Serial Number
The serial number of the Partisol-Plus Sampler. The user
may edit this field.
Filter Exchange
The type of filter exchange mechanism built into the PartisolPlus Sampler. The unit’s system software automatically
determines the type of installed sampling system. The possible values of this parameter are as follows:
MANUAL
SINGLE
DICHOT
SECTION 5: SOFTWARE SETUP AND OPERATION
PAGE 5-11
Revision B.005
Operating Manual, Partisol-Plus Model 2025 Sequential Air Sampler
Figure 5-5. System
Information screen.
System Information
Software Version:
1.202
Software Date: 8-Dec-98
Serial Number:
10019
Filter Exchange: SINGLE
Int Board Rev:
Flow Type 1:
1
20
Function Keys in Browse Mode
Function Keys in Edit Mode
-List
+List
Bksp
Int Board Rev
This field contains the revision level of the interface board
installed in the Partisol-Plus Sampler. The system’s software
automatically detects the value of this parameter.
Flow Type 1
This field contains the type of flow controller installed in flow
channel 1. The value of this parameter is 20 for a 0-20 l/min
flow controller.
5.3.
FILTER SETUP SCREENS
The Sample Definition Method selected in the Sampling Setup screen (Figure 5-2)
provides a straightforward means of defining the sampling program. Available
programs are Basic, Time, Time2, Advanced, Episodic and RS232 Sampling. All of
these sampling programs except the RS232 displays a filter setup screen accessed
from the Main screen, which includes the default parameters set in the Sample Setup
screen. The RS232 sampling program does not have a filter setup screen.
If RS232 is selected as the sampling method, the filter list will display when <F3:
FiltSet> is pressed from the Main screen. Section 9.2 describes setting up the sampler
for remote RS232 operation.
SECTION 5: SOFTWARE SETUP AND OPERATION
PAGE 5-12
Revision B.005
Operating Manual, Partisol-Plus Model 2025 Sequential Air Sampler
Press <F3: FiltSet> when in the Main screen (Figure 4-3) to enter the Filter Setup
screen. Only one of the Filter Setup screens described in Sections 5.3.1-5.3.5 will
display depending on the Sample Definition Method selected by the user in the Sample
Setup screen (Section 5.2.1). For example, if Basic was selected in the Sample
Definition field, then the Basic Filter Setup screen will display when you press <F3:
FiltSet> from the Main screen. The Filter List screen (Section 5.3.7) is accessible from
all of the Filter Setup screens. The parameters in this screen can be edited while the
unit is sampling. However, the changes that are inputted while the unit is sampling will
not take effect until the user presses the <ENTER> button. At this point, the system
is no longer in Edit Mode, the changes are saved and the unit will begin to sample using
the changed parameters with the next filter. The changed parameters will not effect
the filter that is currently in sampling position.
5.3.1.
BASIC FILTER SETUP SCREEN
The Basic Filter Setup program is the most commonly used sampling program. In this
program, the sampler changes filter cassettes and samples continuously for the same
duration with each filter until there are no more filter cassettes available in the supply
magazine.
Figure 5-6. Basic Filter
Setup screen.
Stat:OK
Filter Setup Mode:STOP
Start Date: 98/07/24
The Current Time is: 15:34 98/07/23
Sample will start at: 00:00 98/07/24
Each sample will collect for 024:00 hours
Times
+ Day
NextDay
FiltLst
Next Hr
Function Keys in Browse Mode
Times
+ Day
NextDay
FiltLst
Next Hr
Function Keys in Edit Mode
-List
+List
SECTION 5: SOFTWARE SETUP AND OPERATION
Bksp
PAGE 5-13
Revision B.005
Operating Manual, Partisol-Plus Model 2025 Sequential Air Sampler
The Basic Filter Setup screen (Figure 5-6) uses the following fields to define the Basic
sampling program of the Partisol-Plus Sampler:
Start Date
The Start Date parameter determines the date (yy/
mm/dd by default) on which sampling on the first
filter sample will begin. The first filter sample is the
topmost filter in the supply magazine. When editing
this parameter, treat each part of the date as a
separate field.
The Current Time
The current time and date is displayed in this field.
Sample will start at
This parameter defines the time of day that the
Partisol-Plus will begin sampling on each individual filter cassette. This start time by default is the
time selected in the Sample Setup screen.
Each sample will collect
This parameter displays the sampling duration in
hours. The sampler will use the default duration
from the Sample Setup screen.
Sampling is always continuous in Basic Filter Setup unless a Repeat Time offset was
selected in the Sample Setup screen. The Partisol-Plus will automatically begin and end
sampling according to the start time and sample collection time displayed in the Basic
Filter Setup screen. During sampling, the screen will show the conditions for the next
filter that is waiting to be moved into sampling position. The screen will not show the
conditions for the filter that is currently in the sampling position.
In this screen, the <F5: Next Hr> soft key allows the user to quickly start a 24-hour
sample at the top of the next hour.
5.3.2.
TIME BASE FILTER SETUP SCREEN
The Time Base Filter Setup screen (Figure 5-7) will display if the Sample Definition
Method in the Sample Setup screen was entered as “Time.” The Time Base Sequential
Sampling program allows the user to set a time interval for sequential sampling. For
example, if the user selected 00:00 for Start Sample and 12:00 as End Sample times as
shown in Figure 5-8 for filter #1, the sampler would start sampling at midnight and stop
at noon. You must program the Start Sample and End Sample times for each filter in
the filter cassette magazine or the unit will sample according to the default settings that
are entered in the Sample Setup screen (Figure 5-2).
SECTION 5: SOFTWARE SETUP AND OPERATION
PAGE 5-14
Revision B.005
Operating Manual, Partisol-Plus Model 2025 Sequential Air Sampler
Figure 5-7. Time Base
Filter Setup screen.
Stat:OK
Filter: 01
Mode:STOP
Current Time: 15:34 98/07/23
Start Sample: 00:00 98/07/24
Stop Sample: 12:00 98/07/24
Filter ID: P 123456
Cassette ID: RP100123
Blank: No
Help
Prev
Next
FiltLst
*More*
Function Keys in Browse Mode
Help
Prev
Reset
Next
+ Hour
FiltLst
+ Day
*More*
*Back*
Function Keys in Edit Mode
-List
+List
Bksp
The Time Base Filter Setup screen contains the following fields to define the Time Base
sampling program of the Partisol-Plus Sampler:
Filter
The Filter field identifies the filter that is in sampling position
by default. Pressing <F3:Next> will allow the user to program
each filter in the magazine with a unique Time Base start and
end time.
Current Time
The current time and date are displayed in this field.
Start Sample
The Start Sample parameter defines the time and date that the
Partisol-Plus will begin sampling for the filter number displayed in the Filter field at the top of the screen. When
editing, treat each part of the time and date as a separate field.
Stop Sample
The Stop Sample parameter defines the time and date that the
unit will stop sampling for the filter number displayed in the
Filter field. When editing, treat each part of the time and date
as a separate field.
Filter ID
This field displays the Filter ID (filter identification) number
for the filter that is in sampling position. The Filter number
displayed at the top of the screen will automatically track the
SECTION 5: SOFTWARE SETUP AND OPERATION
PAGE 5-15
Revision B.005
Operating Manual, Partisol-Plus Model 2025 Sequential Air Sampler
Filter ID numbers in the sequence entered in the Filter List
screen. The Filter ID number also can be entered for each
sampling and blank filter in this screen.
Cassette ID
This field displays the Cassette ID (cassette identification)
number for the filter that is in sampling position. The Filter
number displayed at the top of the screen will automatically
coincide with the Cassette ID numbers in the sequence
entered in the Filter List screen. The Cassette ID number also
can be entered for each sampling and blank filter in this
screen.
Blank
This parameter is either “Yes” or “No,” and it defines
whether the Filter number at the top of the screen is intended
to be used as a sampling filter or a blank filter. The sequence
for sampling filter and blank filter cassettes can be most
conveniently set in the Filter List screen. The sequence also
can be selected in this screen by pressing <+List> while in
the Edit Mode to change this parameter from “No” to “Yes.”
If you set this parameter to “Yes” in the Time Base Sequential Sampling screen, the first filter will be a blank filter and
the next filter advanced by the sampler will be the sampling
filter.
In the Browse Mode, the soft function keys <F2: Prev> and <F3: Next> are used to
move to the previous or next filter number. The <F4: FiltLst> key displays the Filter
List screen (Section 5.3.7). Pressing <F5: *More*> will access the <F6> to <F10>
function keys. The <F7: Reset> key will reset current settings for all filters to their
default settings as defined in the Sample Setup screen. The <F8: +Hour> and <F9:
+Day> keys are used to increment the Start Sample or Stop Sample times by one hour
or one day respectively. Pressing <F10: *Back*> will restore the original <F1> to <F5>
functions. In the Edit Mode, the soft function keys are <F1: +List>, <F2: -List> and <F3:
Bksp>.
NOTE: If the Partisol-Plus has been programmed for fewer
sampling cycles than available filter cassettes in the supply
magazine, the unit will continue to sample using the entered
program(s) and then revert to the default sampling program. Sampling will continue with any additional filter cassettes
using the default program settings as entered in the Sample
Setup screen.
SECTION 5: SOFTWARE SETUP AND OPERATION
PAGE 5-16
Revision B.005
Operating Manual, Partisol-Plus Model 2025 Sequential Air Sampler
5.3.3.
TIME 2 BASE SAMPLING SCREEN
The Time 2 Base Sampling screen (Figure 5-8) will display if “Time 2” was selected
as the Sample Definition Method in the Sample Setup screen (Figure 5-2). Selecting
this program allows the user to sample for two different scheduled intervals on the same
sampling filter. This feature will turn the sampling flow on at the beginning of the
sample run, stop sampling for the programmed period of time, and resume sampling
on the same filter for another programmed interval.
The Time 2 Base Sampling screen contains the following fields to define the sampling
program of the Partisol-Plus Sampler:
Figure 5-8. Time 2 Base
Setup screen.
Filter
The Filter field identifies the filter that is in sampling
position. Pressing <F3: Next> will allow the user to program
each filter in the magazine with a unique Time 2 Base
program.
Current Time
The current time and date are displayed in this field.
Start Time 1
The Start Time 1 parameter defines the time and date that the
Partisol-Plus will begin sampling for the filter number
displayed in the Filter field at the top of the screen. When
editing, treat each part of the time and date as a separate field.
Stat:OK
Filter: 01 Mode:STOP
Current Time: 15:34 98/07/23
Start Time
Stop Time
1: 00:00 98/07/15 06:00 98/07/15
2: 12:00 98/07/15 18:00 98/07/15
Filter ID: P 123456 Blank: No
Cass ID: RP100123
Help
Prev
Next
FiltLst *More*
Function Keys in Browse Mode
Help
Prev
Reset
Next
+ Hour
FiltLst
+ Day
*More*
*Back*
Function Keys in Edit Mode
-List
+List
SECTION 5: SOFTWARE SETUP AND OPERATION
Bksp
PAGE 5-17
Revision B.005
Operating Manual, Partisol-Plus Model 2025 Sequential Air Sampler
Stop Time 1
The Stop Time 1 parameter defines the time and date that the
unit will stop sampling for the filter number displayed in the
filter field. The sampler will not exchange a filter at Stop
Time 1, but will stop sampling until Start Time 2. When
editing, treat each part of the time and date as a separate field.
Start Time 2
The Start Time 2 parameter defines the time and date that the
Partisol-Plus will resume sampling on the filter number
displayed in the filter field at the top of the screen. When
editing, treat each part of the time and date as a separate field.
Stop Time 2
The Stop Time 2 parameter defines the time and date that the
unit will stop sampling for the filter number displayed in the
filter field. The Stop Time 2 instructs the sampler to end the
sampling run, exchange a filter and advance to the program
for the next filter number. When editing, treat each part of the
time and date as a separate field.
Filter ID
The Filter ID in this screen has the same definition as in the
Time Base Filter Setup screen (Section 5.3.2).
Cass ID
The Cass ID in this screen has the same definition as in
the Time Base Filter Setup screen (Section 5.3.2).
Blank
The Blank in this screen has the same definition as in the
Time Base Filter Setup screen (Section 5.3.2)
In the Time 2 Base Sampling program, Start Time 1 and Stop Time 1 must always be
less than Start Time 2 and Stop Time 2. The Time 2 Base Sampling screen has the same
<F1> to <F10> function keys as the Time Base Filter Setup screen. The sampler will
continue to sample on all filter cassettes in the supply magazine using the programmed
parameters.
5.3.4.
ADVANCED FILTER SETUP SCREEN
The Advanced Filter Setup screen will display if “ADV” was selected as the Sample
Definition Method in the Sample Setup screen. The Advanced Filter Setup screen
(Figure 5-9) provides access to additional sample programming parameters beyond the
standard time-based sampling capabilities of the Partisol-Plus Sampler. The user can
select up to three conditions that must be met for sampling to take place. The unit will
flow ambient air through the filter if the conditions are met, and discontinue the flow
if the conditions are not met without advancing a filter during the programmed sampling
duration.
SECTION 5: SOFTWARE SETUP AND OPERATION
PAGE 5-18
Revision B.005
Operating Manual, Partisol-Plus Model 2025 Sequential Air Sampler
The Advanced Filter Setup screen contains the following parameters:
Figure 5-9. Advanced Filter
Setup screen.
Filter
The Filter field identifies the filter in the sampling position.
Pressing <F3:Next> will allow the user to program each
filter in the magazine with a unique Advanced sampling
program.
Current Time
The current time and date are displayed in this field.
Start Sample
The Start Sample parameter defines the time and date that the
Partisol-Plus will begin sampling for the filter number
displayed in the Filter field at the top of the screen. When
editing, treat each part of the time and date as a separate field.
Stop Sample
The Stop Sample parameter defines the time and date that the
unit will stop sampling for the filter number displayed in the
Filter field. When editing, treat each part of the time and date
as a separate field.
Cond, Min, Max
The Partisol-Plus Sampler allows you to use the values of up
to three input variables to control conditional
sampling. These three terms (Condition, Minimum and
Maximum) are joined together as “and” functions to form
Stat:OK
Filter: 01
Mode:STOP
Current Time: 15:34 98/07/23
Start Sample: 00:00 98/07/24
Stop Sample: 00:00 98/07/25
Cond: TEMP %RH ----- l ID: P 1234556
Min: 25.00 40.00 0.00 l Cass: RPxxxxxx
Max: 55.00 85.00 0.00 l Blank:
No
Help
Prev
Next
FiltLst
*More*
Function Keys in Browse Mode
Help
Prev
Reset
Next
+Hour
FiltLst
+ Day
*More*
*Back*
Function Keys in Edit Mode
-List
+List
SECTION 5: SOFTWARE SETUP AND OPERATION
Bksp
PAGE 5-19
Revision B.005
Operating Manual, Partisol-Plus Model 2025 Sequential Air Sampler
the circumstances under which sampling takes place. A
value of “------” for the Condition parameter indicates that a
particular term is not used.
The permissible values of the Condition parameter are as follows:
-----TEMP
PRES
%RH
WNDSPD
WNDDIR
AI1 Current
AI2Current
AI3Current
AI1AVE
AI2AVE
AI3AVE
%FLOW
Condition not used
Current ambient temperature (°C)
Current ambient pressure (mm Hg)
Current relative humidity (%)
Current wind speed (km/h)
Current wind direction (deg)
A/I 1 (engineering units)
A/I 2 (engineering units)
A/I 3 (engineering units)
Average A/I 1 (engineering units)
Average A/I 2 (engineering units)
Average A/I 3 (engineering units)
Sample flow rate (l/min)
The Minimum and Maximum parameters define the range for
each condition during which sampling should take place.
No conditional sampling takes place if the value of all three
Condition parameters is “------.”
(Filter) ID
This field displays the Filter ID numbers for the available
filters as entered in the Filter List screen (Section 5.3.7). The
Filter number displayed at the top of the screen will automatically track the Filter ID numbers in the sequence entered
in the Filter List screen. The Filter ID number also can be
entered for each sampling and blank filter in this screen.
Cassette ID
The Cassette ID in this screen has the same definition as in
the Time Base Filter Setup screen (Section 5.3.2).
Blank
The Blank in this screen has the same definition as in the
Time Base Filter Setup screen (5.3.2).
With the values entered in the Advanced Filter Setup screen as shown in Figure 5-9,
sampling on Filter 01 will begin any time after midnight on July 24, 1998, when the
ambient temperature is between 25° and 55° C and the relative humidity is between
SECTION 5: SOFTWARE SETUP AND OPERATION
PAGE 5-20
Revision B.005
Operating Manual, Partisol-Plus Model 2025 Sequential Air Sampler
40% and 85%. The sampler will continue to flow ambient air through the sampling filter
as long as both conditions are met. The sampler will stop the flow through the filter at
any time that either condition is not met. The sampler will cycle the ambient air flow
through the filter on and off for the duration of the sampling run depending upon the
ambient conditions. The filter will be exchanged at the programmed Stop Sample time
regardless of the sampling conditions at that moment. The filter also will be exchanged
regardless of the sampling conditions that occurred during the last programmed
sampling duration.
It is possible that a filter will not have ambient air flowing through it at all during its
programmed sampling duration. If the sampling conditions are not met during a
programmed sampling duration, and the filter does not have any ambient air flowing
through it, the filter will still be exchanged at the programmed Stop Sample time.
Press <F7: Reset> in the Advanced Filter screen to reset the conditional sampling
parameters to their “off” values (“------” for Condition, and “0” for minimum and
maximum values). All other function keys in the Advanced Filter Setup screen have
the same function as those keys in the Time Base Sampling screen.
5.3.5.
EPISODIC SAMPLING SETUP SCREEN
The Episodic Sampling Setup screen will display if “EPISOD” is selected as the Sample
Definition Method in the Sample Setup screen (Figure 5-2). The Episodic Filter Setup
screen (Figure 5-10) provides access to additional conditional sample programming
parameters. The user can select up to three conditions that must be met for sampling
to take place. The unit will sample if the conditions are met, and then stop sampling and
exchange a filter when those conditions are no longer met. Sampling will begin on the
new sampling filter only when conditions are again met. With Episodic sampling, there
is no set sampling cycle for a given filter, rather the sampler itself is given a duration
during which the sampling on an undetermined number of filters will take place.
The Episodic Sampling Setup screen contains the following parameters:
Current Time
The current time and date are displayed in this field.
Start Event Capture
The Start Event Capture parameter is the start time for the
sampler to determine if conditions met. The air flow through
the sampling filter will start as soon as the conditions are met.
Stop Event Capture
The unit will stop sampling and enter the Done Mode when
the current time equals the Stop Event Capture time.
SECTION 5: SOFTWARE SETUP AND OPERATION
PAGE 5-21
Revision B.005
Operating Manual, Partisol-Plus Model 2025 Sequential Air Sampler
Cond, Min, Max
The unit allows you to use the values of up to three input
variables to control conditional sampling. These three terms
(Condition, Minimum and Maximum) are joined together as
“and” functions to form the circumstances under which
sampling takes place. A value of “------” for the Condition
parameter indicates that a particular term is not used.
The permissible values of the Condition parameter are identical to the conditions found
in the Advanced Filter Setup screen (Section 5.3.4). With the values entered in the
Episodic Sampling screen shown in Figure 5-10, the sampler will begin sampling at
midnight if the ambient temperature is between 25° and 55° C and the RH is between
40% and 75%. The unit will continue to sample on this filter as long as these conditions
are met, until the Stop Event Capture time. If either of these conditions are not met
during the interval between the Start Event Capture and Stop Event Capture times, the
sampler will enter the Wait Mode and advance a new filter into the sampling chamber.
Sampling will begin again only if the temperature and relative humidity conditions are
within the Min and Max values. This sampling and filter exchange cycle will continue
until the supply magazine is empty or until the Stop Event Capture time. The unit will
then enter the Done Mode until reprogrammed.
Figure 5-10. Episodic
Sampling Setup screen.
Stat:OK
Episodic Setup
Mode:STOP
Current Time: 15:34 98/07/23
Start Event Capture: 00:00 98/07/24
Stop Event Capture: 00:00 98/07/25
Cond: TEMP
%RH
-----
Min: 25.00 40.00 0.00
Max: 55.00 75.00 0.00
Help
+Hour
+Day
List A
Reset
Function Keys in Browse Mode
Help
+Hour
+Day
List A
Reset
Function Keys in Edit Mode
-List
+List
SECTION 5: SOFTWARE SETUP AND OPERATION
Bksp
PAGE 5-22
Revision B.005
Operating Manual, Partisol-Plus Model 2025 Sequential Air Sampler
5.3.6.
RS232 PROGRAM MODE
If you select “RS232” as the Sample Definition Method in the Sample Setup Screen
(Figure 5-2), the unit will not display a Filter Setup screen. When RS232 is selected
in the Sample Setup screen, the <F3: FiltSet> soft function key in the Main screen will
display the Filter List Setup screen (Figure 5-11). In the RS232 program, the sampler
operates according to the present value of Program Register Code 319 (Appendix B).
Program Register Code 319 will transmit the following values to the sampler:
0
1
2
5.3.7.
Stop Sampling (Sampling Not Active)
Exchange Cassette and Start Sampling
Activate Sampling (Sampling Active)
FILTER LIST SETUP SCREEN
The Filter List Setup screen is accessible from any of the Filter Setup screens (Figures
5-6 to 5-10) by pressing <F4: FiltLst>. The Filter List Setup screen (Figure 5-11) allows
the user to enter the serial numbers of the filters and the cassettes used for sampling
and to identify which filters in the series are to be used as blank filters. Although Filter
ID numbers and Cassette ID numbers can be entered in the Filter Setup screens, the
Filter List Setup screen is the most convenient means of entering a series of Filter and
Cassette ID numbers. This screen also allows the user to select filters as blank filters.
EPA monitoring network filters have serial numbers imprinted on the filter. R&P
Figure 5-11. Filter List
Setup screen.
Type Filt ID
Cassette ID Blank
1: P
001123
RP 100001
No
2: P
001124
RP 100002
No
3: P
001125
RP 100003
Yes
X: P
001126
RP 100004
No
X: P
001127
RP 100005
No
16: P
001138
RP 100016
No
FiltSet
Copy
Insert
/\
\/
Delete
Function Keys in Browse Mode
FiltSet
Copy
Insert
Delete
Function Keys in Edit Mode
-List
+List
SECTION 5: SOFTWARE SETUP AND OPERATION
Bksp
PAGE 5-23
Revision B.005
Operating Manual, Partisol-Plus Model 2025 Sequential Air Sampler
cassette screens are serialized (have serial numbers imprinted on them) for cassette
identification.
The Filter List Setup screen includes the following parameters:
Filter Number
The filter numbers 1-16 in this field identify the filter
cassette according to all of the parameters listed below.
Type
This parameter identifies the filter type such as P for an EPA
supplied filter. The user can select another alphabetic character to identify different filter types. The default parameter
for this field is “P.”
Filt ID
This parameter is used to enter the filter’s serial number.
Press <EDIT> to edit the Filter ID field. Scroll down to the
first number in the series to be edited and enter the serial
number of the filter in the Filter ID column, press <ENTER>.
Press <F3: Copy> and follow the instructions in the display.
This will automatically increment the entered number for the
remaining 15 filters in the series. Press <F4: Insert> to insert
a number in the series, or <F5: Delete> to delete a filter serial
number. If the ID number is “0,” the sampler will automatically assign a filter identifier.
NOTE: If you select <F5: Delete> to delete a filter, the unit
will display a Warning/Confirmation screen that will ask
you to confirm the filter deletion.
Cassette ID
This parameter is used to enter the filter cassette screen
serial number. Scroll down to the first number in the series to
be edited and enter the serial number of the filter cassette
screen in the filter cassette. Cassette ID numbers are
entered, incremented and edited in the manner described
above for Filter ID numbers.
Blank
The Blank field indicates whether the filter is to be used as
a blank filter. If this parameter is set to “Yes,” at the end of
the previous sampling cycle the filter will advance from the
supply magazine to the storage magazine. The next filter in
the series after the blank filter will advance to the sampling
position for sampling. Blank filters can be used as the EPA
required storage filter.
SECTION 5: SOFTWARE SETUP AND OPERATION
PAGE 5-24
Revision B.005
Operating Manual, Partisol-Plus Model 2025 Sequential Air Sampler
Filter cassettes should be loaded into the magazine from top to bottom to match the
sequence of Filter and Cassette ID numbers entered in the Filter List Setup screen.
When the separator field in the Sample Setup screen is selected, the sampler only
counts sampling filters in the Filter field at the top of many of the Filter Setup screens.
There is no filter ID or cassette ID associated with separator cassettes. Blanks on the
other hand will have either the user or sampler assigned filter and cassette ID numbers.
The Filter field tracks blank filters and sampling filters.
5.3.8.
FILTER TIMES SCREEN
The Filter Times screen is accessible from the Basic Filter Setup screen (Figure 5-6)
only if “BASIC” is selected as the Sample Definition Method in the Sample Setup
screen (Figure 5-2). Press <F1: Times> while in the Filter Setup screen to enter the
Filter Times screen (Figure 5-12). This screen is used mainly as a troubleshooting
screen to help users know when their unit actually will begin and end sampling on each
of the filters in the supply magazine. However, you may use the screen as a basic
reference tool (while your unit is functioning properly) to be sure that your unit is
correctly programmed to sample at the times that were set in the Sample Setup screen
(Section 5.2.1).
To view all of the starting and ending times for each filter in the filter list, press the <↓>
arrow.
The Filter Times screen contains the following parameters:
Start
Figure 5-12. Filter Times
screen.
This column displays the beginning sampling times for each
filter in the filter list.
Start
Stop
Cur 17:15 99/06/08 17:16 99/06/08
1.
17:15 99/06/08 17:16 99/06/08
2.
17:18 99/06/08 17:19 99/06/08
3.
17:21 99/06/08 17:22 99/06/08
4.
17:24 99/06/08 17:25 99/06/08
5.
17:27 99/06/08 17:28 99/06/08
SECTION 5: SOFTWARE SETUP AND OPERATION
\/
PAGE 5-25
Revision B.005
Operating Manual, Partisol-Plus Model 2025 Sequential Air Sampler
Stop
This column displays the ending sampling times for each filter
in the filter list.
Curr
This row contains the beginning and ending times that the unit
is scheduled to sample on the filter that is in the sampling
position.
1-16
These rows contain the beginning and ending times that the
unit is scheduled to sample on the filters in the filter cassette
magazine.
5.4.
TURNING OFF THE PARTISOL-PLUS SAMPLER
Follow the steps below to turn off the hardware:
5.5.
•
If the device is not in the Stop Operating Mode, press <RUN/STOP> to
enter the Stop Operating Mode.
•
Press the power switch on the front panel of the Partisol-Plus Sampler into
its “off” (0) position (Figure 4-1).
AUTOMATIC SWITCHING OF EDIT MODES AND SCREENS
The Partisol-Plus Sampler takes a number of actions automatically during periods of
inactivity:
•
Any time more than 15 minutes pass since the last keystroke was entered
on the keypad, the backlighting of the LCD (liquid crystal display) dims.
When this occurs, press any key to reactivate the screen’s backlighting.
•
If the sampler is left in the Edit Mode for more than 5 minutes without any
user keystrokes, it automatically reverts to the Browse Mode.
•
Whenever the sampler remains in a screen other than the Main screen for
longer than 15 minutes without any user keystrokes, the unit automatically
reverts to the Main screen.
•
If no keys are pressed for 3 hours and the Auto Run feature (in the System
Setup screen) is “ON,” the unit will automatically enter the Wait or
Sampling Mode.
SECTION 5: SOFTWARE SETUP AND OPERATION
PAGE 5-26
Revision B.005
Operating Manual, Partisol-Plus Model 2025 Sequential Air Sampler
5.6.
OPERATION AFTER POWER FAILURE
The Partisol-Plus Sampler performs the following actions upon resumption of power
if a power failure occurs while the sampler is in its Sampling Operating Mode:
•
If the power outage is longer than 60 seconds, the hardware registers a
“Z” status condition (Section 7.1) and stores the starting time and date of
the power failure in the current record of filter data (Section 8.1).
•
If ending sampling conditions are not yet reached for the filter that is in
sampling position upon resumption of the power supply, the sampler
continues its sampling program in the Sampling Operating Mode. The “Z”
status condition will be retained in the filter data record. Otherwise,
depending upon how much time has passed, the unit will perform a filter
exchange until it reaches the next filter scheduled to sample. It then either
begins sampling or enters the Wait Operating Mode to await the start of
the next sequential sample. If the unit begins sampling, the “Z” status
condition will be retained in the current record of filter data. However, if
the unit enters the Wait Operating Mode, the unit will automatically clear
the “Z” status condition.
SECTION 5: SOFTWARE SETUP AND OPERATION
PAGE 5-27
Revision B.005
Operating Manual, Partisol-Plus Model 2025 Sequential Air Sampler
This page left intentionally blank.
SECTION 5: SOFTWARE SETUP AND OPERATION
PAGE 5-28
Revision B.003
Operating Manual, Partisol-Plus Model 2025 Sequential Air Sampler
Section 6: Sampler Operation
This section explains how to verify your sampler’s performance characteristics prior
to starting a sampling run, programming a sampling run for midnight-to-midnight, 24hour continuous sampling, and retrieving data after a sampling run in the field. Users
who will not be sampling on a continuous 24-hour cycle should refer to Section 5.3
for programming instructions. Read Sections 7 through 12 prior to field operation.
6.1.
Empt y
Cassette
Filter
Cassette
Solid
DiskCassette
SAMPLING VERIFICATION
R&P recommends that the tests described below be performed after every four weeks
of routine operation. However, individual monitoring organizations may abide by
different standards. Refer to the U.S. EPA 2.12 Quality Assurance Handbook, Section
8 for EPA verification schedule requirements. Refer to Section 12 of this manual for
more detailed information on sampler performance verification.
Piston
Follow these steps to verify sampler performance characteristics prior
to starting, or during, a sampling run:
1)
Figure 6-1. Loaded audit
magazine.
Figure 6-2. Audit Confirmation screen.
Create an audit magazine (Figure 6-1). Install a supply magazine
with an empty cassette (no screen), an external leak check cassette (with a 47mm filter) and an internal leak check cassette
(with a solid filter leak check/separator disk) into an empty supply magazine. The empty cassette should be in the topmost
position as shown in Figure 6-1. Install the audit magazine in the
left side of the enclosure and a clean empty storage magazine on
the right side of the enclosure to collect the partially exposed
sampling filter (Section 3).
Stat: OK
Partisol-Plus
Mode: WAIT
Do you want to AUDIT or STOP?
Please choose:
Audit
SECTION 6: SAMPLER OPERATION
Stop
Resume
PAGE 6-1
Revision B.003
Operating Manual, Partisol-Plus Model 2025 Sequential Air Sampler
Figure 6-3. Partisol-Plus
Audit screen.
Audit
Filt Temp: 22.5
l
Set Flow: 16.7
Amb Temp: 22.6
l
Cur Flow: 16.68
Amb Pres: 752
l
FTS Pres: 0.00
Amb %RH:
l
FTS Flow:
l
FTS Const m: 0.000
75
Timer: 00:00:00
Pump
✘ Be sure to select <F1:
Audit> in the Audit Confirmation screen if you are
performing an audit from the
Sampling Mode.
Valve
0.00
FTS Const b: 0.000
FiltAdv
LeakChk
2) WINS impactor maintenance and performance verification can be
performed while in the Stop, Wait or Sampling Modes. If the unit
is in the Stop Mode, press <RUN/STOP> twice to enter the Audit
Mode. If the unit is in the Wait or Sampling Modes, press <RUN/
STOP> once to enter the Audit Mode. The unit then will display
the Audit Confirmation screen (Figure 6-2). Press <F1: Audit>,
and then press any key to continue.
NOTE: The Audit Confirmation screen also will give you the option to select
<F2: Stop> or <F5: Resume>, in addition to <F1: Audit>.
IMPORTANT: If you are performing an audit from the Sampling Mode and you
choose <F2: Stop> in the Audit Confirmation screen, the unit will not resume
sampling (after your audit procedures are finished) at the set points that you
previously entered. The unit will advance its sampling cycle to the next day and
then enter the Wait Mode.
Press <MENU>, make sure that “>Audit” is selected and then
press <ENTER>. This will display the Audit screen (Figure 6-3).
Press <F4: FiltAdv> and wait for the filter exchange to occur. If
the Partisol-Plus was previously in the sampling mode, a partially
exposed sampling filter will advance into the empty storage
magazine, and the empty cassette will move into the sampling
chamber.
2)
Remove the 1st stage inlet and the sample tube by pulling
straight up on the sample tube. Unlatch and open the sampler’s
top cover. Pull straight up to remove the WINS impactor (Figure
6-4).
3)
Verify the sampler’s filter temperature by inserting an external
SECTION 6: SAMPLER OPERATION
PAGE 6-2
Revision B.003
Operating Manual, Partisol-Plus Model 2025 Sequential Air Sampler
Figure 6-4 (Left). Removing
the WINS Impactor.
Figure 6-5 (Right). Inserting
the temperature probe into
the sampling chamber.
thermometer into the sampling chamber as shown in Figure 6-5.
Compare the measured temperature (°C) with the Filt Temp
displayed in the Audit screen. If the measured temperature and
Filt Temp readings are not within ± 2° C of each other, perform
the filter temperature calibration procedure described in the
Service Manual.
4)
Verify the sampler’s ambient temperature by measuring the
current temperature (°C) at the ambient temperature sensor using
an external thermometer. Compare the measured temperature
(°C) with the Amb Temp displayed in the Audit screen. If the
measured temperature and Amb Temp readings are not within
± 2°C of each other, perform the ambient temperature calibration
procedure described in the Service Manual.
5)
Verify the sampler’s ambient pressure by measuring the current
ambient station pressure in mm Hg with an external measurement device. Verify that the value for ambient pressure displayed
in the Audit screen is within ±10 mm Hg of the measured barometric pressure. If this is not the case, the sampler requires
recalibration. Refer to the Service Manual.
6)
Unscrew the middle section of the WINS impactor to expose the
impactor assembly. Remove the impactor assembly, and replace
it with a clean, oiled impactor assembly (Figure 6-6). Place the
impactor assembly into the bottom section of the WINS impactor,
and screw the top onto the bottom of the WINS impactor. Ensure
that the WINS impactor remains in an upright orientation, and
reinstall the impactor in the sampler by pressing downward.
SECTION 6: SAMPLER OPERATION
PAGE 6-3
Revision B.003
Operating Manual, Partisol-Plus Model 2025 Sequential Air Sampler
Figure 6-6. Upper and
lower sections of the
impactor assembly.
Lower the top cover and re-latch it. Install the downtube, pressing down until it hits a stop.
7)
Perform an external leak check. Install the flow audit adapter on
the sample downtube, and close the valve on the flow audit
adapter. Press <F5: LeakChk>, <F2: Start>, and follow the instructions displayed on the screen. A “Pass” or “Fail” message
will display at the end of the leak check cycle. If a “Fail” message
is displayed, refer to Section 10.1.6.
8)
Verify the sampler’s flow. If you are using a Streamline FTS Flow
Transfer Standard, remove the flow audit adapter and install the
FTS on the sample tube. Confirm that the FTS “m” and “b” calibration constants are entered in the Audit screen. Other flow
meters may require the use of the flow audit adapter (valve open)
to measure flow.
Press <F5: Audit> to enter the Audit screen. Confirm that 16.7 l/
min is the set flow in the Set Flow field. Press <F1: Pump> and
then <F2: Valve>. Wait for the flow rate displayed in the Cur Flow
column to stabilize. If you are using the FTS, press <EDIT>, enter
the pressure drop (inches H2O) from the FTS display, and then
press <ENTER>. The sampler will calculate and display the FTS
volumetric flow. Press <F2: Valve> and then <F1: Pump> to turn
off the pump. The measured flow should be within ± 5% of the
displayed Cur Flow. If this is not the case, the sampler requires
calibration (see Service Manual).
9)
SECTION 6: SAMPLER OPERATION
Perform an internal leak check. Press <F4:FiltAdv> to move the
cassette with the solid filter leak check/separator disk into the
sampling position. Press <F2: Start>, and follow the instructions
PAGE 6-4
Revision B.003
Operating Manual, Partisol-Plus Model 2025 Sequential Air Sampler
on the screen. A “Pass” or “Fail” message will display at the end
of the leak check cycle. If a “Fail” message is displayed, refer to
section 12.1.8.
10) Remove the audit magazine from the supply position. Place the
partially exposed sampling cassette (from the audit magazine) in
the topmost position of a loaded supply magazine. Connect the
air hose to the supply magazine. Press <F4: FiltAdv> to move the
partially exposed sampling filter into the sampling position. The
internal leak check cassette will advance to the storage magazine. Remove this cassette from the storage magazine and install
an empty storage magazine as described in Section 3.4.1.
11) Replace the 1st stage inlet on the sample tube by pressing down
until it hits a stop. Press <ESC> twice to return to the Main
screen. Press <RUN/STOP> to resume sampling.
6.2.
PROGRAMMING THE SAMPLER
This section describes the procedures for programming the sampler for a sampling
run. A supply magazine with the desired number of conditioned 47 mm filters in
cassettes (including blank filter cassettes or separator disk cassettes) should be
installed in the left side of the enclosure and a clean empty storage magazine should
be installed on the right side of the enclosure. Refer to Section 5 for more detailed
information on programming the sampler.
Follow these steps to program the sampler for a sampling run:
1)
Press <F3: FiltSet> to display the Basic Filter Setup screen then
press <F4: FiltLst>. Press <EDIT>, then enter the filter ID numbers and the cassette (screen) ID numbers in the appropriate
fields (Section 5.3.7). A blank (storage filter) can also be selected
in the Filter List Setup screen. When you are finished inputting all
filter and cassette ID numbers, press <ENTER> to save your
changes.
2)
If the sampler was programmed for 24-hour, midnight-to-midnight, continuous sampling as the default program, it is not
necessary to reprogram the sampler. If this is the case, go to step
4. If it was not programmed for 24-hour, midnight-to-midnight,
continuous sampling as the default program, go to step 3.
3)
The sampler must be in the Stop Mode to enter a new sampling
program. In the Main screen, press <F5> twice to display the
SECTION 6: SAMPLER OPERATION
PAGE 6-5
Revision B.003
Operating Manual, Partisol-Plus Model 2025 Sequential Air Sampler
System Setup screen. Confirm that the sampler is set to the
correct time and date. If not, press <EDIT>, enter the correct data
and press <ENTER>. Confirm that the Site ID is correct by pressing <F3: SiteID>. Edit and enter the site ID if necessary. Press
<ESC> twice to display the Sample Setup screen. EPA default
conditions (midnight-to-midnight, continuous, 24-hour sampling)
can be set by pressing <F2: Set EPA>, and following the instructions in the display.
4)
If the sampler is in Stop Mode, press <RUN/STOP>. The sampler
will enter the Wait Mode. A filter cassette will advance automatically into the sampling chamber and begin the sampling run at
the programmed start time. If the sampler was in the Wait or
Sampling Mode, it will continue in that mode according to the
programmed sampling cycle. At the end of the 24-hour sampling
run, the Partisol-Plus Sampler will move the sampled filter into
the storage magazine, and advance a new filter into the sampling
chamber. The sampler will continue to move filters and sample
until there are no more filter cassettes in the supply magazine.
When the supply magazine is empty, the sampler will enter the
Done Operating Mode.
NOTE: There are two critical sampling conditions that will cause the sampler to
change from the Sampling Mode into the Error Mode: 1) If the measured flow
rate deviates from its set point by ≥10% for more than 5 minutes (status condition
“S1”), the sampler will shut down and enter the Error Mode, and 2) Should a filter
exchange error occur due to an error in the exchange process (status condition
“X”), the sampler will display ERR in the upper right-hand corner of the Main
screen. The Error Mode causes the sampler to shut down until the user presses
<RUN/STOP> and enters a new sampling program. Any time either of these
conditions occurs during a sampling run, the status light on the outside of the
enclosure will flash continuously to alert the user to a critical status condition.
Refer to Section 7 for a more complete description of error codes.
6.3.
POST-SAMPLING VERIFICATION AND DATA RETRIEVAL
This section explains how to verify the sampling run status and retrieve the sampling
run data. Refer to Sections 8, 9 and 10 for more complete information on verification
and data retrieval.
SECTION 6: SAMPLER OPERATION
PAGE 6-6
Revision B.003
Operating Manual, Partisol-Plus Model 2025 Sequential Air Sampler
Follow these steps to verify the sampling run status and retrieve the
sampling run data:
1)
Data can be displayed on the screen or downloaded to a personal
computer (PC) while in the Stop, Sampling, Done, Error or Audit
Modes. Cassette magazines can be changed in any mode (except
at the time selected for a filter change).
2)
If the sampler has not been previously set up for data transfer to
a PC, check the RS232 setup in the System Setup screen. Press
<F5:Setup> twice from the Main screen to display the System
Setup screen.
3)
In the System Setup screen, press <F2: I/O>, and then <F3:
RS232>. Make sure that the parameter in the Protocol field is set
correctly for the file transfer software installed in the PC (refer to
Section 9 for setting RS232 parameters). Press <ESC> three
times to return to the Main screen.
4)
Connect the PC to the sampler with the 9-to-9 pin RS232 cable.
Use RPComm or any other data transfer program to transfer data
from the sampler to the PC. Refer to Appendix D for instructions
on how to load the RPComm software into your PC, and refer to
Section 10 for instructions on how to use RPComm to transfer
data from the unit to your PC.
5)
Check the sampling run status on the Main screen, and note any
status code other than “OK.” Press <F4: Data> to view the filter
data from the sampling run. Record data from the Filter Data
screen onto a sampling run log sheet if desired. If there were any
status codes other than “OK,” verify the validity of the sampling
run by pressing <F3: MoreDat>, until the Filter Data Status Codes
screen appears. Press <ESC> until you return to the Main screen.
6)
Press <F5: Setup> twice from the Main screen to display the
System Setup screen. Press <F2: I/O>, then <F3: RS232> to enter
the RS232 Setup screen. Set the Protocol field to “Storage.” To
save this change, press <ENTER>. Press <ESC> until you return
to the Main screen. Press <F4: Data> to display the FIlter Data
screen. The record from the last sampling run is displayed in the
upper right-hand corner of the Filter Data screen. Press <F5:
DwnLoad> to display the Download Data screen. Scroll to the
Last Rec Field, and use the <F4: Last> key to select the last data
record. Press <F1: First> to acccess the first Rec Field and use
the <F2: -Ptr> or <F3: +Ptr> to select the first data record you
want to download. Once the PC communications software is
SECTION 6: SAMPLER OPERATION
PAGE 6-7
Revision B.003
Operating Manual, Partisol-Plus Model 2025 Sequential Air Sampler
ready to receive the records, press <F5: Start>. The sampler will
download all data from the currently displayed record to the last
record in the data file. If you need to download output for Interval
data, Status Codes or any of the other screens accessed from the
Filter Data screen, display the screen and repeat the download
process.
7)
If any Status Code conditions occurred, press <ESC> to return to
the Main screen. From the Main screen, press <F2: Stats>, then
<F1: StCode> to reach the Status Codes screen. While in this
screen, press <F3: MoreDat> to display the Status Codes screen.
Press <F1: Reset> to reset the Status condition for the next run
to “OK.”
8)
Remove and cap the storage magazine containing the sampled
filters. Place the capped magazine in a metal transport container.
Make sure that a loaded supply magazine and empty storage
magazine are installed in the sampler before the scheduled start
of the next sampling run.
SECTION 6: SAMPLER OPERATION
PAGE 6-8
Revision B.003
Operating Manual, Partisol-Plus Model 2025 Sequential Air Sampler
Section 7: Operating Information
This section describes the status codes generated by the Partisol-Plus Sampler, and the
operating information contained in the Operating Statistics screens. Refer to Appendix A for a detailed hierarchy of screens.
7.1.
✔ The sampler displays the
current status code in the
upper left-hand corner of
the Main screen and several
other screens.
✔ The current status code
is made up of one or more
single- or double-letter
abbreviations, or “OK.”
STATUS CODES
The sampler displays operational status codes in the upper left-hand corner of the
Main screen (Figure 4-3), and on several other screens. The unit shows a status of
“OK” if no current status conditions exist. The sampler resets the status code to “OK”
when it exchanges filter cassettes.
With the occurrence of any status conditions, the unit will display the single- or
double-letter abbreviation for the situation that applies. The sampler also provides
secondary indicators of the unit’s current status conditions through the use of two
status lights. One light is located next to the I/O connectors inside the unit’s enclosure.
The other light is mounted on the outside enclosure, and located on the top left side
of the unit. If the unit’s current status code is “OK,” the indicator lights do not light
up. If the unit reports a noncritical status code, it will turn on the lights. If the unit
reports a critical status code, the lights will blink on and off continuously.
The Status Codes screen (Figure 7-1) displays a list and description of the currently
active status conditions. When in the Main screen, press <F2: Stat> and then <F1:
StCode> to enter the Status Codes screen.
Figure 7-1. Status Codes
screen.
OK
Status Codes
STOP
>OK No Status Conditions
Reset
SECTION 7: OPERATING INFORMATION
PAGE 7-1
Revision B.003
Operating Manual, Partisol-Plus Model 2025 Sequential Air Sampler
Figure 7-2. Filter Exchange
screen.
Filter Exchange
Valves
Stat:
Step: -----Ok
1
Pressure: OFF Pump:OFF
Shuttle: OFF
2
NewFilt: OFF OFF
LiftUp:
ON
OFF
MagPres: OFF
Shuttle LiftDn: OFF OFF
LiftPush: OFF
Rdy:ON
PushDn:
ON
OFF
Ext:OFF PushUp: OFF OFF
ON/OFF
AmbFilt FlowVal
Start
Misc
Function Keys in Browse Mode
ON/OFF
AmbFilt FlowVal
Start
Misc
Function Keys in Edit Mode
-List
+List
Bksp
The following list details the system’s status codes and definitions:
SECTION 7: OPERATING INFORMATION
OK
No current status conditions.
M
Flash Memory. The sampler detected an error in its flash memory.
C
Calibration. A failure occurred in the sampler’s automatic analog
input calibration routine.
Y
System Reset. The system performed an unanticipated reset.
Z
Power Failure. A power outage occurred during sampling on the
current filter. Power outage events of less than 60 seconds are not
logged by the sampler.
F
Flow Out of Range. The measured sample flow rate through the flow
channel deviated by ±5% from its set point for more than 5 minutes.
S1
Flow Stop. The measured sample flow rate through the flow channel
deviated by ±10% from its set point for more than 5 minutes. This is
a critical status condition, causing the sampler to enter the Error or
Wait Operating Mode (Section 5.2.2) and the status lights to blink
continuously.
PAGE 7-2
Revision B.003
Operating Manual, Partisol-Plus Model 2025 Sequential Air Sampler
✔ A heater in the sampler's
electronics compartment
ensures that the control
zone stays within limits
under cold temperature
conditions.
SECTION 7: OPERATING INFORMATION
A
Ambient Sensors. The ambient temperature sensor was not installed
correctly or indicated an invalid value. For ambient temperature, this
corresponds to a reading of less than -60° C or greater than 70° C.
T
Filter Temperature. One of the filter compartment temperature
sensors was not installed correctly or was out of range, i.e., less than
-60° C or greater than 70° C.
E
Electronics Temperature. The temperature of the unit’s electronics
compartment was outside of its usual operating range, i.e., less than
0° C or greater than 70° C.
R1
Filter Temperature Range. The measured temperature of the filter
exceeded the measured ambient temperature by more than 5° C for
more than 30 consecutive minutes.
X
Filter Exchange Failed. The sampler encountered a mechanical
problem in attempting to exchange a filter cassette. This is a critical
status condition, causing the sampler to enter the Error Operating
Mode (Section 5.1) and the status lights to blink continuously.
O1
Coefficient of Variation 1. The coefficient of variation of the sample
flow rate, expressed as a percentage, was greater than 2 (2%) during
the exposure of a filter.
P
Elapsed Sample Period. For sampling programs of ≥12 hour duration
without conditional sampling, the sampler issues this status code if
the elapsed time of a sample differed by ±1 hour from the selected
duration. Sampling programs of less than 12 hours will not indicate
an elapsed time error.
L
Leak Check Failed. This error code will appear if the leak check
failed. A leak check fails if the vacuum created in the sampling
system leaks at a rate of 25 mm Hg or greater, which is equal to the
maximum leak rate of 80 ml/min that is indicated as acceptable by the
U.S. EPA.
D
Audit Performed. This status condition indicates to the user that an
audit was performed during sampling. It does not indicate an error.
It is for information purposes only. This status code appears only in
the filter data screen.
N
No filters. This status condition indicates that there are no filters left
in the supply magazine.
PAGE 7-3
Revision B.003
Operating Manual, Partisol-Plus Model 2025 Sequential Air Sampler
In the case of multiple status conditions, the sampler displays the single- or double-letter
codes for each status condition in the status field of the Main screen, and other screens
that have a status condition field. For example, the sampler would display “ZR1” in the
status condition field if a power outage occurred and if its filter temperature was outside
of the acceptable range.
The unit stores all status conditions that apply to each exposed filter in the filter data
storage buffer (Section 8.1).
7.2.
OPERATING STATISTICS SCREENS
The Partisol-Plus Sampler contains five screens that display operating statistics: the
Temperature and Pressure Statistics screen, User I/O Statistics screen, Sample
Statistics screen, Wind Statistics screen and the System Statistics screen. These can
be accessed from the Main screen (Figure 4-3) by pressing <F2: Stats> to enter the
Temperature and Pressure Statistics screen. From this screen, you can access the
Sample Statistics screen by pressing <F2: Sample>, the User I/O Statistics screen by
pressing <F3: User IO>, the Wind Statistics screen by pressing <F4: Wind>, and the
System Statistics screen by pressing <F5: System>.
7.2.1.
TEMPERATURE AND PRESSURE STATISTICS SCREEN
The Temperature and Pressure Statistics screen (Figure 7-3) displays information on
various current and average temperatures, and the current and average pressure and
relative humidity. Press <F2: Stats> when in the Main screen, or <F1: TmpPres > when
in any of the other statistics screens, to enter the Temperature and Pressure Statistics
screen.
Figure 7-3. Temperature
and Pressure Statistics
screen.
Stat:OK
Temp/Pressure
Mode:SAMPLE
Current Average
25.8
21.2 C
Filter Temp:
21.1 C
Filter Comp Temp: 25.4
25.8
21.1 C
Ambient Temp:
751
748 mmHg
Ambient Pres:
72
68%
Ambient %RH:
StCode
SECTION 7: OPERATING INFORMATION
Sample
User IO
Wind
System
PAGE 7-4
Revision B.003
Operating Manual, Partisol-Plus Model 2025 Sequential Air Sampler
The Temperature and Pressure Statistics screen contains the following information:
Filter Temp
This field contains the current and latest averaged
values of the filter temperature (°C).
Filter Comp Temp
This field contains the current and latest averaged
temperature (°C) in the sampler’s filter compartment.
Ambient Temp
This field contains the current and latest averaged
values of the ambient temperature (°C), as measured
by the external temperature sensor.
Ambient Pres
This field contains the current and latest averaged
values of the ambient pressure (mm Hg), as measured by a sensor located inside the sampler enclosure.
Ambient %RH
This field contains the current and latest averaged
values of the ambient relative humidity (%), as
measured by a sensor located in the ventilated filter
compartment.
Press <ESC> to return to the Main screen from the Temperature and Pressure
Statistics screen.
7.2.2.
SAMPLE STATISTICS SCREEN
The Sample Statistics screen (Figure 7-4) provides information about the flow, volume
and sampling time through the currently installed sampling filter in the Partisol-Plus
Sampler. The Filter and Cassette ID numbers for this filter are also displayed. Press
<F2> twice from the Main screen, or <F2: Sample> from the Temperature and
Pressure Statistics screen, to enter the Sample Statistics screen.
The Sample Statistics screen contains the following information:
SECTION 7: OPERATING INFORMATION
Flow Setpoint
This field contains the flow rate set point (volumetric l/min).
Current Flow
This field contains the current flow rate (volumetric
l/min).
PAGE 7-5
Revision B.003
Operating Manual, Partisol-Plus Model 2025 Sequential Air Sampler
Volume
This field contains the sample volume (volumetric
m3) drawn through the currently installed filter.
Elapsed Sample Time
This field contains the elapsed sample time in hh:mm
of the currently installed filter.
Current Filter ID
This field contains the serial number of the currently
installed filter as entered into the Filter List Setup
screen or as assigned by the Partisol-Plus.
Current Cassette ID
This field contains the serial number of the currently
installed filter cassette screen as entered in the Filter
List Setup screen or assigned by the Partisol-Plus.
Press <ESC> to return to the Main screen from the Sample Statistics screen.
Figure 7-4. Sample
Statistics screen.
Stat:OK
Sample Stats
Mode:SAMP
Flow Setpoint: 16.7 l/min
Current Flow: 16.7 l/min
Volume: 004.30 m^3
Elapsed Sample Time: 4:18
Current Filter ID: P 123456
Current Cassette ID: RP100123
TmpPres
User IO Wind
7.2.3.
System
USER I/O STATISTICS SCREEN
The User I/O Statistics screen (Figure 7-5) displays the analog inputs and the digital
outputs of the Partisol-Plus. The averages correspond to the values computed over the
latest completed averaging/storage interval, as defined by the Average Time parameter in the System Setup screen (Section 5.2).
Press <F3> from any of the statistics screens to enter the User I/O Statistics screen.
The User I/O Statistics screen contains the following information:
Analog Inputs 1, 2, 3
SECTION 7: OPERATING INFORMATION
This field contains the current and latest averaged
values of user defined analog inputs 1, 2 and 3
PAGE 7-6
Revision B.003
Operating Manual, Partisol-Plus Model 2025 Sequential Air Sampler
(engineering units). Refer to Section 9 for additional
information.
Logic Outputs 1, 2
This field contains the current values of user-de
fined logic outputs 1 and 2 (VDC). Refer to Section
9.4 for additional information on logical output
settings.
Press <ESC> to return to the Main screen from the User I/O Statistics screen.
Figure 7-5. User I/O
Statistics screen.
Stat:OK
Analog Input 1:
Analog Input 2:
Analog Input 3:
Logic Output 1:
Logic Output 2:
TmpPres
7.2.4.
User I/O
Current
+0000.00
+000.00
+0000.00
000
000
Sample
Mode:SAMP
Average
+0000.00
+0000.00
+0000.00
Wind
System
WIND STATISTICS SCREEN
The Wind Statistics screen (Figure 7-6) displays the wind speed, wind velocity and
wind direction values. The averages correspond to the values computed over the latest
completed averaging/storage interval as defined by the Average Time parameter in the
System Setup screen (Section 5.2). These values only have meaning if an optional wind
vane/anemometer (59-004953) is attached to the sampler.
The Wind Statistics screen contains the following information:
Wind Speed
This field contains the current and latest averaged values of
the wind speed (km/h. This value only has meaning if an
optional wind vane/anemometer is attached to the sampler.
Wind Velocity
This field contains the latest vector-based average of the
wind velocity (km/h). This value only has meaning if an
optional wind vane/anemometer is attached to the sampler.
SECTION 7: OPERATING INFORMATION
PAGE 7-7
Revision B.003
Operating Manual, Partisol-Plus Model 2025 Sequential Air Sampler
Wind Direction
This field contains the current and latest vector-based aver
aged values of the wind direction (degrees), as derived from
an optional, externally mounted, wind vane/anemometer.
This value only has a meaning if an optional wind vane
anemometer is attached to the sampler.
Press <ESC> to return to the Main screen from the Wind Statistics screen.
Figure 7-6. Wind Statistics
screen.
Stat:OK
Wind Stats
Mode:SAMP
Current
Wind Speed: 000.0
Average
000.0 km/h
Wind Velocity:
N/A
000.0 km/h
Wind Direction:
000
000 deg
TmpPres Sample
User IO
7.2.5.
System
SYSTEM STATISTICS SCREEN
The System Statistics screen (Figure 7-7) provides a general overview of the sampler’s
operation. Press <F5: System> from any of the other statistics screens to display the
System Statistics screen.
The System Statistics screen contains the following information:
SECTION 7: OPERATING INFORMATION
Elec Temp
This field contains the current temperature (°C) of
the sampler’s electronics compartment.
Elec Heat
This field indicates whether the heater in the electronics compartment is currently switched “on” or
“off.”
Filter Num
This field contains the sequential filter number since
the user last changed the value of the Filter ID
parameter in the Filter List Setup screen (Section
5.2.7).
PAGE 7-8
Revision B.003
Operating Manual, Partisol-Plus Model 2025 Sequential Air Sampler
Figure 7-7. System
Statistics screen.
Filt Comp Fan
This field contains the current operational status of
the filter compartment fan.
Filt Total
This field contains the total number of filters used in
the Partisol-Plus Sampler.
Pump Fan
This field contains the current operational status of
the pump compartment fan.
FXCHG Step
If the sampler is in the midst of performing a filter
exchange, this value represents the current step of
the filter exchange process. A value of “-----”
indicates that a filter is not currently being exchanged. The steps that make up the filter exchange
process are PRESS, MAGPR, LPON, SHUTH,
LPOFF, SHUTB and DONE.
Pump
This field contains the current operational status of
the sample pump.
FXCHG Stat
This parameter indicates the filter exchange step
that has failed when a filter exchange was unsuccessful. If the filter exchange was successful, the
status will be “OK.” If a filter exchange failure
occurs, one of the filter exchange status code descriptions (NEWFILT, LIFTDN, PUSHUP,
SHUTRDY, LIFTUP, PUSHDN or SHUTEXT)
will be displayed. Refer to the Partisol-Plus Service
Manual for details on filter exchange status codes.
Stat:OK
System Stats
Mode:SAMP
Elec Temp: +25.8 C Elec Heater: ON
Filter Num: 02
Filt Comp Fan: ON
Filt Total: 328
Pump Fan: OFF
FXCHG Step: MAGPR
Pump: OFF
FXCHG Stat: ---TmpPres
SECTION 7: OPERATING INFORMATION
Sample User IO
Wind
PAGE 7-9
Revision B.003
Operating Manual, Partisol-Plus Model 2025 Sequential Air Sampler
This page left intentionally blank.
SECTION 7: OPERATING INFORMATION
PAGE 7-10
Revision B.004
Operating Manual, Partisol-Plus Model 2025 Sequential Air Sampler
Section 8: Viewing Stored Data
✔ The Partisol-Plus
Sampler has a capacity of
50 filter data records, 16
days of interval data records
and 32 days of input data
records. Data are stored in
a circular buffer on a “first
in, first out” basis.
The Partisol-Plus Sampler stores three types of data in its internal data logger: filter
data, interval data and input data. This information is stored in three separate circular
buffers whose contents can be viewed on the screen of the sampler and/or downloaded
through the RS232 port. Once these buffers are filled, the oldest data points are
replaced with the most recent information (“first in, first out”). The following
describes the three types of data stored internally in the hardware:
✔ The unit stores one
record of filter data for each
collection filter exposed.
✔ The Partisol-Plus
Sampler stores one record
of interval data every 5
minutes whenever the unit
is turned on.
SECTION 8: VIEWING STORED DATA
Filter Data
Each record in this buffer contains information for
a different collection filter exposed to the sample
stream. The sampler displays records from this
buffer in the Filter Data Time screen and its
subscreens (Figures 8-1 to 8-5). These screens
contain information about the operation and status of
the sampler while each filter was exposed, calculated averages of filter data recorded by the sampler
and a list of the unit’s recorded power failures during
sampling. The Partisol-Plus Sampler has a capacity
of 50 records of filter data.
Interval Data
The sampler writes a new record of interval data
every 5 minutes. Each record contains the latest 5minute average of the filter temperature, ambient
temperature, ambient pressure and average flow
rate. The unit displays records from this buffer in the
Interval Data screen (Figure 8-6). The Partisol-Plus
Sampler has a capacity of 16 days of interval data.
Input Data
The sampler stores calculated averages of meteorological data and other information received through
its analog input channels at the rate specified by the
user in the Average Time field of the System Setup
screen (Section 5.1). The unit displays these stored
values in the Input Data screen (Figure 8-7). The
sampler has a data storage interval of 30 minutes and
a 32-day capacity of input data.
PAGE 8-1
Revision B.004
Operating Manual, Partisol-Plus Model 2025 Sequential Air Sampler
8.1.
✔ Press <F1: -Rec> and
<F2: +Rec> to move among
stored records of information. Hold down these keys
to repeat and accelerate the
movement.
FILTER DATA
Data for each filter exposed in the Partisol-Plus Sampler are stored as a separate record
of filter data. For readability, the sampler splits the display of filter data records among
five screens: the Filter Data Times screen (Figure 8-1), Filter Data screen (Figure 82), Filter Data Status Codes screen (Figure 8-3), Filter Data Averages screen (Figure
8-4) and the Power Failures screen (Figure 8-5).
Press <F4: Data> when in the Main screen (Figure 4-3) to access the Filter Data Times
screen (Figure 8-1). From this screen, press <F3: MoreDat> repeatedly to view its
subsidiary screens in the following order:
Filter Data screen (Figure 8-2)
Filter Data Status Codes screen (Figure 8-3)
Filter Data Averages screen (Figure 8-4)
Power Failures screen (Figure 8-5).
To switch among filter data, interval data and input data, press <F4> repeatedly. With
the exception of the subsidiary filter data screens, the sampler displays the last
database record when the user enters the screens. The fields in these screens can not
be edited.
To navigate among records of stored information, press <F1: -Rec> to move backward
and <F2: +Rec> to move forward when in any of the filter data screens, the Interval
Data screen and the Input Data screen. Holding down these keys repeats and
accelerates these actions. The current record number is in the upper right-hand
corner.
8.1.1.
FILTER DATA TIMES SCREEN
Press <F4: Data> when in the Main screen (Figure 4-3) to enter the Filter Data Times
screen (Figure 8-1). The sampler displays the following filter data fields in this screen:
Stat
SECTION 8: VIEWING STORED DATA
The Stat field in the upper left-hand corner of the
screen shows the status conditions encountered during sampling. A value of “OK” indicates that the
sampler did not encounter any status conditions.
Press <F3: MoreDat> twice to view the Filter Data
Status Codes screen (Figure 8-2) for an explanation
of the status codes recorded. Section 7.1 contains a
complete listing of the single- and double-letter
status codes that may be displayed in this field.
PAGE 8-2
Revision B.004
Operating Manual, Partisol-Plus Model 2025 Sequential Air Sampler
Figure 8-1. Filter Data
Time screen.
Rec
This field contains the number of the current record,
which is displayed in the upper right-hand corner of
the screen.
Set Sample Start
The Set Sample Start field is the time and date
(hh:mm yyyy/mm/dd by default) set by the user as
the start time in the Filter Setup screen (Section 5.2).
Set Sample Stop
The Set Sample Stop field is the time and date
(hh:mm yyyy/mm/dd by default) set by the user as
the sample ending time in the Filter Setup screen.
Actual Sample Start
This field shows the actual starting time/date (hh:mm
yyyy/mm/dd by default) at which the unit began
sampling.
Actual Sample Stop
This field indicates the actual ending time/date
(hh:mm yyyy/mm/dd by default) at which the system
stopped sampling.
Valid Elapsed Time
The Valid Elapsed Time field shows the elapsed
sampling time (hh:mm by default) during which the
sampler operated normally, i.e., without any status
conditions.
Total Elapsed Time
The Total Elapsed Time field shows the total sampling time (hh:mm by default) during which the
sampler drew a sample stream through its filter.
Power outages will cause this figure to be smaller
than the programmed sample duration time.
Stat:OK
Filter Data Times
Rec: 7
Set Sample Start: 00:00 1998/06/01
Set Sample Stop: 00:00 1998/06/02
Actual Sample Start: 00:00 1998/06/01
Actual Sample Stop: 00:00 1998/06/02
Valid Elapsed Time: 24:00
Total Elapsed Time: 24:00
-Rec
SECTION 8: VIEWING STORED DATA
+Rec
MoreDat
IntvDat
DwnLoad
PAGE 8-3
Revision B.004
Operating Manual, Partisol-Plus Model 2025 Sequential Air Sampler
Press <F3: MoreDat> to display the Filter Data screen. Press <ESC> to return to the
Main screen.
8.1.2.
FILTER DATA SCREEN
The Filter Data screen ( Figure 8-2) provides information on the Filter ID, Cassette
ID and Site ID numbers to identify the filter and the cassette used for the displayed
record number and to identify the site where the sampler is located. Other data
included on this screen are the flow volume, the percent coefficient of variation and
the maximum temperature difference between the sampler’s ambient and filter
temperature sensor measurements.
The sampler displays the following filter data fields in this screen:
Figure 8-2. Filter Data
screen.
Stat
The Stat field in the upper left-hand corner of the
screen shows the status conditions encountered
during exposure of the sample filter.
Rec
The Rec field in the upper right-hand corner of the
screen contains the number of the current record.
Filt ID
This field displays the Filter ID number for the
record number that is displayed in the upper righthand corner of the screen.
Volume
The Volume field indicates the total sample volume (volumetric m3) that has passed through the
filter.
Stat:OK
Filter Data
Rec: 7
Filt ID: P 123456
Volume: 006.00
Cass ID: RP100123
% CV: 0.1
Max Temp Diff: 0.8 at 15:38 1998/06/01
Id1: "01230000010032819970721160000"
Id2: "
-Rec
SECTION 8: VIEWING STORED DATA
"
+Rec
MoreDat IntvDat
Dwnload
PAGE 8-4
Revision B.004
Operating Manual, Partisol-Plus Model 2025 Sequential Air Sampler
Cass ID
This field displays the Cassette ID number for the
record number that is displayed in the upper righthand corner of the screen.
%CV
The coefficient of variation is equal to the standard
deviation of the 5-minute flow rate averages divided
by the average flow rate (16.7 l/min by default). This
value is then multiplied by 100 to yield the percent
(%) CV value. If the figure is greater than 2 (2%),
the sampler displays the “O1” status code (Section
7.1).
Max Temp Diff
The Max Temp Diff field shows the maximum
difference (°C) between the filter and ambient
temperatures during sample collection, and the time/
date (hh:mm yyyy/mm/dd by default) at which the
sampler recorded the deviation.
Id1, Id2
The Id1 and Id2 fields are the site identification
numbers as entered in the Site Identification screen
(Section 5.1).
Press <F3: MoreDat> to display the Filter Data Status Codes screen. Press <ESC>
to return to the Main screen.
8.1.3.
FILTER DATA STATUS CODES SCREEN
Press <F3: MoreDat> when in the Filter Data screen to enter the Filter Data Status
Codes screen (Figure 8-3). The sampler remains in the same record of filter data when
Figure 8-3. Filter Data
Status Codes screen.
Status Codes
Rec: 7
>OK No Status Conditions
-Rec
SECTION 8: VIEWING STORED DATA
+Rec
MoreDat IntvDat
PAGE 8-5
Revision B.004
Operating Manual, Partisol-Plus Model 2025 Sequential Air Sampler
switching among filter data-related screens.
The Filter Data Status Codes screen displays descriptions of all status codes recorded
in the present record of filter data.
8.1.4.
FILTER DATA AVERAGES SCREEN
Press <F3: MoreDat> when in the Filter Data Status Codes screen to enter the Filter
Data Averages screen (Figure 8-4). The sampler remains in the same record of filter
data when switching among filter data-related screens.
The Filter Data Averages screen displays the following information:
Figure 8-4. Filter Data
Averages screen.
Stat
The Stat field in the upper left-hand corner of the
screen shows the status conditions encountered
during exposure of the sample filter.
Rec
The Rec field in the upper right-hand corner of the
screen contains the number of the current record.
Flow
This field contains the minimum, average and maximum flow rate (l/min).
WSpd
This field contains the average wind speed (km/h)
recorded during the filter exposure period. This value
has meaning only if an optional wind vane/anemometer is attached to the Partisol-Plus Sampler.
Stat:OK
Averages
Rec: 7
Min Ave
Max
Averag
Flow: 16.6 16.7 16.7 WDSpd: 00.0
FltT: +22.2 +22.5 +22.7 WVel: 00.0
AmbT: +22.3 +22.5 +22.7 WDir:
0
Pres: 751
752
752
AI1: 000.0
%RH: 65
69
72
AI2: 000.0
-Rec
SECTION 8: VIEWING STORED DATA
+Rec
MoreDat
IntvDat
PAGE 8-6
Revision B.004
Operating Manual, Partisol-Plus Model 2025 Sequential Air Sampler
SECTION 8: VIEWING STORED DATA
FltT
This field contains the minimum, average and maximum temperature (°C) of the filter recorded during
the filter exposure period.
WVel
This field contains the vector-based average of the
wind velocity (km/h) recorded during the filter exposure period. This value has meaning only if an
optional wind vane/anemometer is attached to the
Partisol-Plus Sampler.
AmbT
This field contains the minimum, average and maximum ambient temperature (°C) recorded during the
filter exposure period.
WDir
This field contains the vector-based average of the
wind direction (degrees) recorded during the filter
exposure period. This value has meaning only if an
optional wind vane/anemometer is attached to the
Partisol-Plus Sampler.
Pres
This field contains the minimum, average and maximum ambient pressure (mm Hg) recorded during the
filter exposure period.
AI1
This field contains the average of analog input 1
(engineering units) recorded during the filter exposure period.
%RH
This field contains the minimum, average and maximum relative humidity (%) recorded during the filter
exposure period.
AI2
This field contains the average of analog input 2
(engineering units) recorded during the filter exposure period.
PAGE 8-7
Revision B.004
Operating Manual, Partisol-Plus Model 2025 Sequential Air Sampler
8.1.5.
POWER FAILURES SCREEN
Press <F3: MoreDat> when in the Filter Data Averages screen to enter the Power
Failures screen (Figure 8-5). The sampler remains in the same record of filter data
when switching among filter data-related screens.
The Power Failures screen (Figure 8-5) displays the starting time/date (hh:mm yyyy/
mm/dd by default) of up to 10 power outages, of durations longer than 60 seconds, that
occurred during the filter exposure period of the current filter data record.
Figure 8-5. Power Failures
screen.
Power Failures
Rec: 7
2:24 1998/05/26
6:43 1998/05/26
-Rec
8.2.
+Rec
MoreDat
IntvDat
INTERVAL DATA SCREEN
The Partisol-Plus Sampler stores 5-minute, averaged ambient temperature, filter
temperature, ambient pressure and flow rate measurements as interval data. It writes
a new record of interval data every 5 minutes on a continuous basis, and has a capacity
of 16 days before it overwrites the oldest records. The unit displays interval data
records in the Interval Data screen (Figure 8-6).
Press <F4: IntvDat> from one of the filter data screens or <F4> twice from the Main
screen (Figure 4-3) to enter the Interval Data screen (Figure 8-6). The Interval Data
screen contains the following information:
Rec
SECTION 8: VIEWING STORED DATA
This field contains the number of the current interval
record, which is displayed in the upper right-hand
corner of the screen.
PAGE 8-8
Revision B.004
Operating Manual, Partisol-Plus Model 2025 Sequential Air Sampler
Time
This field contains the ending time/date (hh:mm
yyyy/mm/dd by default) of the 5-minute interval
being displayed.
Filt Temp
The Filt Temp field displays the 5-minute average of
the ambient temperature (°C).
Ambient Temp
The Ambient Temp field displays the 5-minute
average of the ambient temperature (°C).
Ambient Pres
The Ambient Pres field displays the 5-minute average of the ambient pressure (mmHg).
Flow
The Flow field displays the 5-minute average of the
flow rate (l/min).
Figure 8-6. Interval Data
screen.
Interval Data
Rec: 1108
Time: 15:15 1998/05/26
Filt Temp: 20.7 C
Ambient Temp: 21.9 C
Ambient Pres: 751 mm Hg
Flow: 16.7 l/min
-Rec
8.3.
+Rec
InptDat
DwnLoad
INPUT DATA SCREEN
The Partisol-Plus Sampler stores averaged meteorological and input data at the interval
specified by the user in the Average Time field of the Setup screen (Section 5.1). The
default averaging/storage interval is 30 minutes. The sampler has the capacity to retain
32 days of input data before it overwrites the oldest records. The unit displays input data
records in the Input Data screen (Figure 8-7).
Press <F4: InptDat> from the Interval Data screen (Figure 8-6) to enter the Input Data
screen (Figure 8-7).
The Input Data screen contains the following information:
SECTION 8: VIEWING STORED DATA
PAGE 8-9
Revision B.004
Operating Manual, Partisol-Plus Model 2025 Sequential Air Sampler
Figure 8-7. Input Data
screen.
Stat:OK
Input Data
Rec: 185
Record Time: 15:30 1998/05/26
Valid:
023:55
Total:
024:00
WSpd:
0 Km/h
AmbT:
+22.7
WVel:
0 Km/h
Pres:
762 mmHg
WDir:
0 deg
%RH:
-Rec
+Rec
SECTION 8: VIEWING STORED DATA
FiltT:
+22.5
FCompT: +24.0
StCode
65%
FiltDat DwnLoad
Stat
The Stat field in the upper left-hand corner of the
screen shows the status conditions encountered
during exposure of the sample filter.
Rec
This field contains the number of the current record,
which is displayed in the upper right-hand corner of
the screen.
Record Time
This field contains the time/date (hh:mm yyyy/mm/
dd by default) at which the sampler stored the
current record of input data.
Valid
This field contains the elapsed sampling time within
the averaging/storage interval (hh:mm by default)
during which the sampler operated normally, i.e.,
without any status conditions.
FiltT
This field contains the average filter temperature
(°C) recorded during the averaging/storage interval.
Total
This field contains the total sampling time within
the averaging/storage interval (hh:mm by default)
during which the sampler drew a sample stream
through its filter(s). Power outages result in this
figure being smaller than anticipated.
FCompT
This field contains the average filter compartment
PAGE 8-10
Revision B.004
Operating Manual, Partisol-Plus Model 2025 Sequential Air Sampler
temperature (°C) recorded during the averaging/
storage interval.
SECTION 8: VIEWING STORED DATA
WSpd
This field contains the average wind speed (km/h)
recorded during the averaging/storage interval. This
value has meaning only if an optional wind vane/
anemometer is attached to the Partisol-Plus Sampler.
AmbT
This field contains the average ambient temperature
(°C) recorded during the averaging/storage interval.
WVel
This field contains the vector-based average wind
velocity (km/h) recorded during the averaging/storage interval. This value has meaning only if an
optional wind vane/anemometer is attached to the
Partisol-Plus Sampler.
Pres
This field contains the average ambient pressure
(mm Hg) recorded during the averaging/storage
interval.
WDir
This field contains the vector-based average wind
direction (degrees) recorded during the averaging/
storage interval. This value has meaning only if an
optional wind vane/anemometer is attached to the
Partisol-Plus Sampler.
%RH
This field contains the average relative humidity
(%) recorded during the averaging/storage interval.
PAGE 8-11
Revision B.004
Operating Manual, Partisol-Plus Model 2025 Sequential Air Sampler
This page left intentionally blank.
SECTION 8: VIEWING STORED DATA
PAGE 8-12
Revision B.003
Operating Manual, Partisol-Plus Model 2025 Sequential Air Sampler
Section 9: Data Input and Output
The Partisol-Plus Sampler provides various capabilities for transmitting data to other
devices in digital and analog form. It can also receive information in the form of analog
voltages from other hardware, allowing the user to convert these inputs to engineering
units. This section describes how to access these features.
Data input and output is accessed from the System Setup screen (Figure 5-3). The
contents of the System Setup screen are reviewed in Section 5.2. This section
describes how to use the <F2: I/O> function.
9.1.
SYSTEM I/O SCREEN
Pressing <F2: I/O> while in the System Setup screen displays the System I/O screen
(Figure 9-1). The function keys available at the bottom of the System I/O screen
provide access to specialized screens for analog input (<F1: A/I>) and analog output
(<F2: A/O>), and RS232 (<F3: RS232>), RS485 (<F4: RS485>) and Contact Closure
(<F5: Contact>) output capabilities. By selecting these function keys, the user can
move from one type of I/O screen to another without having to backtrack to the System
Setup screen.
Figure 9-1. System I/O
screen with the I/O menu
available on the bottom of
the screen.
System Setup
Average Temp: 99
Standard Temp: 99
Average Pres: 999
Standard Pres: 999
Date Form: yy/mm/dd
Time Form:
Average Time: 30
:
Curr Time: 05:00:00
Filter Fan: ON
Auto Run: ON
Curr Date: 98/12/10
A/I
A/O
RS232
RS485
Contact
Function Keys in Browse Mode
A/I
A/O
RS232
RS485
Contact
Function Keys in Edit Mode
-List
SECTION 9: DATA INPUT
AND
OUTPUT
-List
Bksp
ChSign
PAGE 9-1
Revision B.003
Operating Manual, Partisol-Plus Model 2025 Sequential Air Sampler
9.2.
DOWNLOADING STORED DATA
R&P supplies the Partisol-Plus Sampler with RPComm software and a 9-to-9 pin
computer cable (07-000587) to enable the creation of data files containing stored
information on a personal computer (PC). Alternately, other commercially available
software may be used to receive and store transferred information on a PC.
9.2.1.
RS232 SETUP SCREEN
Set up the sampler for downloading data in the System Setup screen. Press <F5:
Setup> twice from the Main screen to display the System Setup screen. Press <F2:
I/O>, then <F3: RS232> to enter the RS232 Setup screen (Figure 9-2). Ensure that the
parameters displayed in the RS232 Setup screen match the settings of your PC’s
RS232 port settings. Edit these if necessary.
The RS232 Setup screen defines the configuration of the RS232 port on the front panel
of the Partisol-Plus Sampler (Figure 9-4). Depending upon the definition of the
parameters in this screen, the RS232 port can be used either for advanced two-way
Figure 9-2. RS232 Setup
screen.
RS232 Setup
Baud Rate:
9600 Protocol:
Data Bits:
Parity:
8
RS-Para1:
52
None
RS-Para2:
75048
1
RS-Para3:
13010
Stop Bits:
Flow Ctrl:
A/O
AK
None RS-Para4:
A/I
SetPRC
0
RS485
Contact
Function Keys in Browse Mode
A/O
A/I
SetPRC
RS485
Contact
Function Keys in Edit Mode
-List
SECTION 9: DATA INPUT
AND
OUTPUT
+List
Bksp
PAGE 9-2
Revision B.003
Operating Manual, Partisol-Plus Model 2025 Sequential Air Sampler
serial communication (AK Protocol or German Ambient Network Protocol) or oneway transmission from the instrument to another device. The following parameters
define the operation of the RS232 port:
NOTE: For the fields described below, press <F1: -List> or
<F2: +List> when in the Edit Mode to scroll through the list
of choices.
Baud Rate
This field contains the data transmission rate (baud), which
may be set to 1200, 2400, 4800, 9600, 19200 or 38400 baud
(9600 is the default).
Data Bits
This field contains the word length (bits), which may be
either 5, 6, 7, or 8 bits (8 is the default).
Parity
This field contains the parity of data transmission, which can
be defined as “None,” “Even” or “Odd” (None is the default).
Stop Bits
This field contains the number of stop bits for each character
transmitted, ranging from 1 to 2 (1 is the default).
Flow Ctrl
This field contains the type of communication flow control,
which may be either “None” or “Xon/Xoff” (None is the
default).
Protocol
This field contains the manner in which the RS232 port is
used, according to the following categories:
None. The serial port is not currently defined for any
communication. The unit must reside in this mode to download a new version of the system operating software into its
Flash memory (Appendix D).
AK. With the unit in this protocol, the RS232 serial port is
configured for two-way serial communication using the AK
communication protocol (Appendix C). This selection makes
use of RS232 parameters 1 to 3 listed in the RS232 Setup
screen (Figure 9-2).
Storage. With the unit in this protocol, the user can download
information from the sampler’s data storage buffers. This
protocol allows only one-way transmission from the unit to
another device. To retrieve data from the unit in this protocol,
you must have a software program, such as Hyper Terminal
SECTION 9: DATA INPUT
AND
OUTPUT
PAGE 9-3
Revision B.003
Operating Manual, Partisol-Plus Model 2025 Sequential Air Sampler
or Pro Comm Plus, already installed on your PC that will
capture the data.
RealTime. When in this protocol, the unit downloads userdefined, comma-delimited records of information defined by
time intervals. The user defines the program register codes
(PRCs) (Appendix B) of the variables to be downloaded in
the RS232 RealTime Data screen (Figure 9-3) in the “Data
1” to “Data 8” fields. To reach this screen, press <F2:
SetPRC> when in the RS232 Setup screen. To input your
required data time interval, you would change the value of
the “Intv” field in the RS232 RealTime Data screen. This
field will accept values ranging from “0” (no data transmission) to “3,600” seconds. Each transmitted record is date
and time stamped. For example, if you entered “10” in the
Intv field, during sampling the unit will output one line of data
(the actual data values are defined by the user in the Data
1 to Data 8 fields) every 10 seconds. This protocol allows
only one-way transmission from the unit to another device,
such as a PC. To retrieve data from the unit in this protocol,
you must have a software program, such as Hyper Terminal
or Pro Comm Plus, already installed on your PC that will
capture the data.
Figure 9-3. RS232 Real
Time Data screen.
RS232 RealTime Data
Intv:
0
Data 1: StatCode Data 5: AmbP Cur
Data 2: CurFlow1 Data 6: AmbRHCur
Data 3: CurFlow2 Data 7: WDir Cur
Data 4: AmbT Cur Data 8: WSpd Cur
Function Keys in Browse Mode
Function Keys in Edit Mode
-List
SECTION 9: DATA INPUT
AND
OUTPUT
+List
Bksp
PAGE 9-4
Revision B.003
Operating Manual, Partisol-Plus Model 2025 Sequential Air Sampler
Cycle. When in this protocol, the instrument downloads userdefined, comma-delimited records of information at the end
of a sampling period. The user defines the PRCs of
variables to be downloaded in the RS232 Real Time Data
screen (Figure 9-3) in the “Data 1” to “Data 8” fields. To
reach this screen, press <F2: SetPRC> when in the RS232
Setup screen. This protocol allows only one-way transmission from the unit to another device, such as a PC. To retrieve
data from the unit in this protocol, you must have a software
program, such as Hyper Terminal or Pro Comm Plus, already
installed on your PC that will capture the data.
German. The serial port is set up for basic communication
functions using the German Ambient Network Protocol
(Appendix C).
The correct setting for the Protocol field is dependent upon the user’s transfer
software.
9.2.2.
DOWNLOADING DATA FROM THE SAMPLER
Follow these steps to download data from the unit using commercially
available data capture software:
NOTE: See Section 10 for instructions on how to download data using the
RPComm software program.
1) Go to the RS232 Setup screen (Figure 9-2) and set the Protocol
field to “Storage,” “RealTime” or “Cycle,” depending on how
you want your data formatted. To change the value of this field,
press <EDIT> and then press <F2: +List> until the correct protocol appears in the field. To save this change, press <ENTER>.
2) Attach the ends of the 9-to-9 pin computer cable to the RS232
port of the Partisol-Plus Sampler and the RS232 connector of
your PC to link the two devices (Figure 9-4).
3) Initiate your commercially available data capture software program such as Hyper Terminal or Pro Comm Plus.
4) Ensure that your data capture software program is set for the
same communications parameters as the Partisol-Plus Sampler.
The default settings of the unit is 9600 baud, 8 bit word length, 1
stop bit and no parity. Refer to Appendix C, if you suspect that
the unit’s parameters have been changed.
SECTION 9: DATA INPUT
AND
OUTPUT
PAGE 9-5
Revision B.003
Operating Manual, Partisol-Plus Model 2025 Sequential Air Sampler
Figure 9-4. Connector
panel on front panel of
Partisol-Plus Sampler.
1: RS485 connector.
2: RS232 connector.
3: User I/O connector.
5) Set the communications software into the appropriate mode, such
as the “Data Capture” mode or another similar downloading
command.
6) On the sampler, define your data output parameters, depending
on which protocol that you are using, as follows:
a) Storage protocol. Go to the screen that identifies the storage buffer that you
want to download. You can select the Filter Data screen (Figure 8-2), Interval
Data screen (Figure 8-6) or the Input Data screen (Figure 8-7). Each screen has
the <F5: DwnLoad> button. If you want to download data from all three storage
buffers, you must perform the data download from each screen. For example, if
you want to download from the Filter Data screen, press <F5: DwnLoad> while
in that screen. In the Download Data screen (Figure 9-5), the Storage field will
indicate that the storage buffer being downloaded is the “Filter” storage buffer.
Choose the record at which you would like the unit to begin downloading. To
select the beginning record, press <F2: -Ptr> or <F3: +Ptr>. This will change the
Current Pointer field. Once the correct beginning record is indicated in the
Current Pointer field, press <F5: Start>. The unit will download all the data in
filter storage buffer beginning at the record number indicated in the Current
Pointer field.
4 Pressing <F5:
DwnLoad> while in the
Filter Data, Interval Data or
Input Data screen is a
convenient way to download stored information.
b) RealTime protocol. From the RS232 Setup screen, press <F3: SetPRC> to
go to the RS232 RealTime Data screen (Figure 9-3). In this screen, select the time
interval at which you want the data to download during sampling. For example,
if you want the unit to download data every 10 seconds, you would input “10” in
the Intv field. This field will accept values ranging from “0” (no data transmission)
to “3,600” seconds. Then select the program register codes (PRCs) (Appendix
SECTION 9: DATA INPUT
AND
OUTPUT
PAGE 9-6
Revision B.003
Operating Manual, Partisol-Plus Model 2025 Sequential Air Sampler
B) of the variables that you want to download and input them in the Data 1 through
Data 8 fields. To change the PRCs, press <EDIT> and then <F1: -List> and <F2:
+List>. When you are finished entering the correct PRCs, press <ENTER> to
save your changes. At this point, the unit should automatically begin downloading
to your PC.
c) Cycle protocol. This protocol is similar to the RealTime protocol except the
time interval (when the data is recorded) is limited to the filter sampling duration.
For example, if your sampler is set to sample on each filter for 24 hours, then data
will be recorded once every sampling cycle, or once every 24 hours. You must
set your PRCs in the RS232 RealTime Data screen, but the unit will disregard any
time interval you set in the Intv field. As soon as you set your PRCs and press
<ENTER> to save your changes, the unit will then automatically download to
your PC.
To download data from your Partisol-Plus Sampler using RPComm software, go to
Section 10 for further instructions.
For two-way communication via modems, an optional 9-to-25 pin modem cable (51002814) is required to attach the sampler’s 9-pin RS232 port to a modem’s 25-pin
connector. Refer to the Service Manual for a listing of the pin assignments on the
RS232 connector. For further instructions on connecting the unit to a modem, go to
Appendix J.
9.2.3.
DOWNLOAD DATA SCREEN
The Filter Data Time screen (Figure 8-1), Filter Data screen, (Figure 8-2), Interval
Data screen (Figure 8-6) and the Input Data screen (Figure 8-7), contain the <F5:
DwnLoad> key to download stored data through the sampler’s RS232 port to another
serial device. Press <F5:DwnLoad> from the Filter Data Time screen to display the
Download Data screen (Figure 9-5).
The <F5: Start> keystroke allows the user to download records from the current
position, or current record being displayed, to the last record recorded by the unit.
Pressing <F5> again prior to completing the download cancels the data transfer.
The Download Data screen provides information on the current position, or current
record being displayed, and other available records.
The Data Download screen contains the following information:
Storage
SECTION 9: DATA INPUT
AND
OUTPUT
This field contains the data type being downloaded:
Filter Data, Interval Data or Input Data.
PAGE 9-7
Revision B.003
Operating Manual, Partisol-Plus Model 2025 Sequential Air Sampler
First Record
This field contains the time and date of the first
record of stored data.
Current Pointer
This field shows the time and date of the record at the
position of the current pointer. Data will be downloaded starting at this record number. Pressing
<F2: +Ptr> or <F3: -Ptr> will increment or decrement the current pointer record number. Pressing
<F1: First> will move the pointer to the first record
number.
Last Record
This field indicates the time and date of the last
record of stored data. An uninterrupted data download will transfer all data records from the position of
the current pointer to the last stored record.
Pressing <F5: Start> from this screen will download the selected data type (Filter,
Interval or Input data) from the position of the current pointer to the last record of stored
data.
Figure 9-5. Download Data
screen.
Download Data
Storage: _____
Filter
First Record: 14:51 1998/12/17
AND
64
Current Pointer: 14:41 1998/12/17
212
Last Record: 14:29 1998/12/17
343
First
SECTION 9: DATA INPUT
Rec #
OUTPUT
-Ptr
+Ptr
Last
Start
PAGE 9-8
Revision B.003
Operating Manual, Partisol-Plus Model 2025 Sequential Air Sampler
9.3.
FORMAT OF FILTER DATA RECORDS
Each record of filter data contains the comma-delimited data fields shown below.
Records are separated from each other by the “carriage return” (ASCII 013) and “line
feed” (ASCII 010) characters.
Each filter data record contains:
Filter ID (32-character string)
Cassette ID (32 character string)
Set Start Date (“yyyy/mm/dd”)
Set Start Time ( hh:mm)
Actual Start Date (“yyyy/mm/dd”)
Actual Start Time ( hh:mm)
Actual Stop Date (“yyyy/mm/dd”)
Set Stop Time (hh:mm)
Total Sampling Time (hh:mm)
Average Flow (volumetric l/min)
Flow Coef of Variation (%)
Sampled Volume (m3)
Minimum Ambient Temperature (°C)
Average Ambient Temperature (°C)
Maximum Ambient Temperature (°C)
Minimum Filter Temperature (°C)
Average Filter Temperature (°C)
Maximum Filter Temperature (°C)
Minimum Ambient Pressure (mm Hg)
Average Ambient Pressure (mm Hg)
Maximum Ambient Pressure (mm Hg)
Maximum Temperature Difference (°C)
Date of Max Temp Diff (“yyyy/mm/dd”)
Time of Max Temp Diff (hh:mm)
Site ID1 (32-character string)
Site ID2 (32-character string)
Status Codes (hexadecimal summation)
Valid Sampling Time (hh:mm)
Minimum Flow (volumetric l/min)
Maximum Flow (volumetric l/min)
Average Wind Speed (km/h)
Average Wind Velocity (km/h)
Average Wind Direction (degrees)
Minimum Ambient RH (%)
Average Ambient RH (%)
SECTION 9: DATA INPUT
AND
OUTPUT
PAGE 9-9
Revision B.003
Operating Manual, Partisol-Plus Model 2025 Sequential Air Sampler
4 The sampler includes
these power interruption
fields only for the number of
events that occurred (up to
10).
Maximum Ambient RH (%)
Average Analog Input 1 (engineering units)
Average Analog Input 2 (engineering units)
Average Analog Input 3 (engineering units)
Total Sampling Time (mmmm)
Valid Sampling Time (mmmm)
Power Failure Date (“yyyy/mm/dd”)
Power Failure Time (hh:mm)
The number of fields in each record of filter data varies, depending upon the number
of power interruptions recorded. If the sampler did not experience any power
interruptions during sampling, the unit omits all of the power interruptions fields shown
above. Otherwise, filter data records contain fields for only the number of power
interruptions encountered.
9.4.
FORMAT OF INTERVAL DATA RECORDS
Each record of interval data contains the comma-delimited data fields shown below.
Records are separated from each other by the “carriage return” (ASCII 013) and “line
feed” (ASCII 010) characters.
Each interval data record contains:
Date at End of 5-Minute Period (“yyyy/mm/dd”)
Time at End of 5-Minute Period (hh:mm)
5-Minute Average Ambient Temperature (°C)
5-Minute Average Filter Temperature (°C)
5-Minute Average Ambient Pressure (mm Hg)
5-Minute Average Flow (volumetric l/min)
9.5.
FORMAT OF INPUT DATA RECORDS
Each record of input data contains the comma-delimited data fields shown below.
Records are separated from each other by the “carriage return” (ASCII 013) and “line
feed” (ASCII 010) characters.
Each input data record contains:
Storage Date of Input Data Record (“yyyy/mm/dd”)
Storage Time of Input Data Record (hh:mm)
Valid Sampling Time (hh:mm)
SECTION 9: DATA INPUT
AND
OUTPUT
PAGE 9-10
Revision B.003
Operating Manual, Partisol-Plus Model 2025 Sequential Air Sampler
Total Sampling Time (hh.mm or hh:mm)
Average Filter Temperature (°C)
Average Filter Compartment Temperature (°C)
Average Ambient Temperature (°C)
Average Ambient Pressure (°C)
Average Ambient RH (%)
Average Wind Speed (km/h)
Average Wind Velocity (km/h)
Average Wind Direction (degrees)
Average Analog Input 1 (engineering units)
Average Analog Input 2 (engineering units)
Average Analog Input 3 (engineering units)
Status Codes (hexadecimal summation)
9.6.
ANALOG INPUT CONVERSIONS
The User I/O connector on the front panel of the Partisol-Plus Sampler (Figure 9-4)
allows the unit to receive three 0-5 VDC analog inputs from external sources. The pin
assignments of these inputs are as follows:
Input Channel 1
Input Channel 2
Input Channel 3
Positive Pin 14
Positive Pin 3
Positive Pin 17
Ground Pin 1
Ground Pin 15
Ground Pin 4
Refer to the Service Manual for a complete listing of pin assignments in the external
connectors of the Partisol-Plus Sampler.
The Analog Input Setup screen (Figure 9-6) allows the user to convert the input voltage
levels into engineering units for display, averaging and storage. From the Main screen,
press <F5: Setup>, <F5: System>, <F2: I/O>, <EDIT> and <F1: A/I> to display the
Analog Input Setup screen.
The sampler uses the following formulas to convert voltage level inputs (0-5 VDC)
to engineering units, where “x” is the voltage being received:
Calculated Value = A + Bx + Cx2
The Analog Input Setup screen allows the user to enter unique values for constants A,
B and C for each channel of analog input. The calculated values shown at the bottom
of the screen are the current results computed by the sampler using the A, B and C
constants entered by the user.
SECTION 9: DATA INPUT
AND
OUTPUT
PAGE 9-11
Revision B.003
Operating Manual, Partisol-Plus Model 2025 Sequential Air Sampler
For example, the user would assign a value of 0 to constant A, 200 to constant B, and
0 to constant C to convert a 0-5 VDC analog input voltage corresponding to an ozone
concentration of 0-1,000 ppb (analog input 1 in Figure 9-6). The sampler shows results
from implementing these constants on the bottom line of the Analog Input Setup
screen, 19.63 ppb in this example.
The logic level outputs of 0 or 5 VDC are transmitted through the user I/O connector
on the front panel of the Partisol-Plus Sampler (Figure 9-4). The two channels have
the following pin assignments (consult the Service Manual for a complete listing of
connector definitions):
Channel 1
Channel 2
Figure 9-6. Analog Input
Setup screen.
Logic Output Pin 11
Logic Output Pin 25
Ground Pin 13
Ground Pin 24
A/I Setup
Const A
Const B
Const C
1:
0.0000 200.0000
0.0000
2:
0.0000 200.0000
0.0000
3:
0.0000 100.0000
0.0000
Calculated Values:
A/I Mode: SING
1: 19.6294 2: 8.7125 3: 1.1384
A/O
RS232
RS485
Contact
Function Keys in Browse Mode
A/O
RS232
RS485
Contact
Function Keys in Edit Mode
-List
9.7.
+List
Bksp
ChSign
ANALOG VOLTAGE OUTPUT
The User I/O connector on the front panel of the Partisol-Plus Sampler (Figure 9-4)
provides the hardware connections to analog voltage output (described below), analog
voltage input and to user-defined logic level outputs described in Sections 9.3 and 9.6.
SECTION 9: DATA INPUT
AND
OUTPUT
PAGE 9-12
Revision B.003
Operating Manual, Partisol-Plus Model 2025 Sequential Air Sampler
The Analog Output screen (Figure 9-7) allows the user to define the output of three
voltage signals through the User I/O port. For each channel of output, the user specifies
the following parameters in the Edit Mode:
Variable
This field contains the program register code (PRC) (Appendix B) of the variable whose current value is to be transmitted.
To enter the desired variable, the user may press either the
<F1: -List> and <F2: +List> soft function keys while in the
Edit Mode, or may enter the numeric PRC itself. Pressing
<F3: Bksp> allows the user to “backspace” over previously
typed characters.
MinVal
This field contains the value of the PRC variable that
corresponds to the minimum analog voltage output (0% of full
scale output).
MaxVal
This field contains the value of the variable that corresponds
to the maximum analog voltage output (100% of full scale
output).
Format
This field contains the type of analog or current output
selected. The range of choices includes 0-1, 0-2, or 0-5 VDC.
Press <F1: -List> and <F2: +List> when in the Edit Mode to
Figure 9-7. Analog Output
Setup screen.
A/O Setup
Variable MinVal MaxVal Format
1 OpMode
0.00
5.00
0-5 VDC
2 CurFlow1 0.00
20.00
0-5 VDC
3 None
0.00
0-5 VDC
RS232
RS485
0.00
A/I
Contact
Function Keys in Browse Mode
A/I
RS232
RS485
Contact
Function Keys in Edit Mode
-List
SECTION 9: DATA INPUT
AND
OUTPUT
+List
Bksp
ChSign
PAGE 9-13
Revision B.003
Operating Manual, Partisol-Plus Model 2025 Sequential Air Sampler
choose the desired output format. The default setting for
output format is 0-5 VDC.
For voltage output, the minimum input impedance is 10 KΩ.
The pin assignments on the User I/O connector for analog output are as follows (see
the Service Manual for complete listing of pin-out definitions):
Output Channel 1
Output Channel 2
Output Channel 3
Positive Pin 9
Positive Pin 20
Positive Pin 6
Ground Pin 21
Ground Pin 7
Ground Pin 18
Pressing <F2: RS232>, <F3: RS485>, or <F5: Contact> allows the user direct access
to the other output-related screens without having to return to the Setup screen.
9.8.
RS485 INPUT/OUTPUT
An RS485 port on the front panel of the Partisol-Plus Sampler (Figure 9-4) provides
future connection options with other R&P instrumentation. The RS485 Setup screen
(Figure 9-8) contains one user-definable field, defined as follows:
Station
Figure 9-8. RS485 Setup
screen.
This field contains the address of the ChemSpec sampler for
the purpose of RS485 communication.
RS485 Setup
Station: 11
A/I
A/O
RS232
Contact
Function Keys in Browse Mode
A/I
A/O
RS232
Contact
Function Keys in Edit Mode
-List
SECTION 9: DATA INPUT
AND
OUTPUT
+List
Bksp
PAGE 9-14
Revision B.003
Operating Manual, Partisol-Plus Model 2025 Sequential Air Sampler
9.9.
LOGIC LEVEL OUTPUT
The Partisol-Plus Sampler provides two user-definable, logic level outputs on the User
I/O connector on the front panel of the sampler (Figure 9-4) with a voltage level of
either 0 or 5 VDC. The user defines the conditions in the Contact Closure Setup screen
(Figure 9-9) under which each of these channels reads 0 or 5 VDC. This programmability provides the user with the ability to tailor the outputs to a variety of alarm
conditions that may vary from site to site.
For each output channel defined in the Contact Closure Setup screen, the unit performs
an evaluation of a program register code’s (PRC) current value. This test can include
a bit-wise operator (“AND” or “OR”) for integer variables such as the current status
condition, a comparison operator (<, <=, =, >=, > and <>), and a constant with which
the unit compares the resulting value of the left-hand operations. If the result of the
comparison for an output channel is “true” the unit transmits 5 VDC; otherwise,
the voltage transmitted by an output channel is 0 VDC.
The screen contains the following user-definable fields for each channel of logic level
output:
NOTE: When in the Edit Mode, press <F1: -List> and <F2:
+List> to select from a list of predefined settings for Variable,
BitOp and Comp.
SECTION 9: DATA INPUT
AND
OUTPUT
Variable
This is the PRC (Appendix B) of the variable whose current value
is to be tested by the unit. In Figure 9-9, the PRC is 5, which is
“StatCode” (Appendix B).
BitOp
If the variable selected is an integer, the user can apply a bit-wise
“AND” or “OR” mask to its value. For example, if the user would
like to test for a filter temperature range 1 or 2 error (H800 and
H1000, PRC 5), the values of the contact closure parameters
would be:
Variable
5
Program register code for “StatCode” (Ap
pendix B).
BitOp
AND
Use the bit-wise “AND” operator to mask
the variable.
BitVal
6144
The sum of status codes 2048 and 4096 (R1
and R2).
PAGE 9-15
Revision B.003
Operating Manual, Partisol-Plus Model 2025 Sequential Air Sampler
Comp
=
Equal to
CompVal
0
The value of the left-hand side is equal to
“0” if neither status code 2048 (H800) nor
4096 (H1000) is currently active.
In this case, the TTL output level is 5 VDC if neither status
condition is currently active, and 0 VDC if either status code
occurs. Refer to the Service Manual for a definition of the pins in
the User I/O connector.
✔ Select “OR” as the BitOp
and “0” as the BitVal if no
masking is desired. Masking
is only performed with
integer program register
codes (PRCs).
BitVal
Figure 9-9. Contact Closure
Setup screen.
The value that is masked against the variable using the “AND”
or “OR” operator. Select “OR” as the BitOp and “0” as the
BitVal if no masking is desired.
Contact Closure Setup
Variable BitOp BitVal Comp CompVal
1 StatCode
OR
0
=
0.00
2 OpMode
OR
0
=
2.00
A/I
A/O
RS232
RS485
Function Keys in Browse Mode
A/I
A/O
RS232
RS485
Function Keys in Edit Mode
-List
Comp
+List
Bksp
ChSign
The type of comparison performed between the result of the lefthand operations and the constant entered at the right. The
comparison operator is defined as one of the following:
< Less than
<= Less than or equal to
SECTION 9: DATA INPUT
AND
OUTPUT
PAGE 9-16
Revision B.003
Operating Manual, Partisol-Plus Model 2025 Sequential Air Sampler
=
>=
>
<>
CompVal
SECTION 9: DATA INPUT
AND
OUTPUT
Equal to
Greater than or equal to
Greater than
Not equal to.
The constant against which the result of the left-hand operations
are compared to determine a value of true (0 VDC) or false (5
VDC). In Figure 9-9, the value of the left-hand side is equal to 0
if neither status code 2048 (H800) nor 4096 (H1000) is currently
active. In this case, the TTL output is 5 VDC; otherwise, it is 0
VDC.
PAGE 9-17
Revision B.003
Operating Manual, Partisol-Plus Model 2025 Sequential Air Sampler
This page left intentionally blank.
SECTION 9: DATA INPUT
AND
OUTPUT
PAGE 9-18
Revision B.001
Operating Manual, Partisol-Plus Model 2025 Sequential Air Sampler
Section 10: Direct Communications Using RPComm
RPComm is a communications software package developed for Windows 9x/NT to
provide interactive remote communications with R&P instrumentation. RPComm
also comes in a version for palmtop computers/Windows CE (Appendix I). Refer to
Appendix K for a complete list of RPComm software screens.
RPComm enables the user to:
•
•
•
•
•
•
Download the data stored within the unit’s data logger
Schedule automatic data downloads
View and graph downloaded data
View a real-time graph of selected variables
Remotely operate the unit using a virtual keypad
Make multiple connections.
RPComm has two communication modes — direct and modem. Direct communication is accomplished when the unit has a direct cable connection with a personal
computer (PC). Modem communication is accomplished when the unit has a connection with a PC through the use of a modem and phone line (Appendix J). Before modem
communication is attempted, direct communication must be successfully completed.
This will ensure that the PC and unit have been set up properly for communications.
10.1. INSTRUMENT SETUP
FOR
DIRECT COMMUNICATION
To set up the sampler for direct communication with a PC, you must use the 9-to-9 pin
cable (07-000587) that is included in the compilation package.
Follow these steps to set up the unit for direct communication:
1) Connect the female end of the 9-to-9 pin cable to one of your PC’s
serial (COM) ports. Be sure to note which serial port the cable is
connected to.
2) Connect the male end of the 9-to-9 pin cable to the unit’s RS232
connector that is located on the front of the unit (Figure 10-1).
3) From the unit’s Main screen (Figure 10-2), press <F5:Setup> to
enter the Sample Setup screen, then press <F5: System> to
display the System Setup screen. From the System Setup screen,
press <F2: I/O> to display the System I/O screen (Figure 10-3).
From the System I/O screen, press <F1: A/I> to display the Analog Input Setup screen (Figure 10-4). Press <F3: RS232> to enter
the RS232 Setup screen (Figure 10-5).
SECTION 10: DIRECT COMMUNICATIONS USING RPCOMM
PAGE 10-1
Revision B.001
Operating Manual, Partisol-Plus Model 2025 Sequential Air Sampler
Figure 10-1. Connector
panel on front panel of
Partisol-Plus Sampler.
1: RS485 connector.
2: RS232 connector.
3: User I/O connector.
Figure 10-2. Partisol-Plus
Main screen.
Stat:OK
Partisol 2025
Mode:Stop
Current Time: 09:27 98/07/23
Start Sample: 00:00 98/07/24
Stop Sample: 00:00 98/07/25
Filter ID:
Flow:
Volume:
Help
123456
0.0 l/min
000.00 m^3
Stats
SECTION 10: DIRECT COMMUNICATIONS USING RPCOMM
FiltSet
Data
Setup
PAGE 10-2
Revision B.001
Operating Manual, Partisol-Plus Model 2025 Sequential Air Sampler
Figure 10-3. System I/O
screen.
System Setup
Average Temp: 99
Standard Temp: 99
Average Pres: 999
Standard Pres: 999
Date Form: yy/mm/dd
Time Form:
Average Time: 30
:
Filter Fan: ON
Curr Time: 05:00:00
Auto Run: ON
Curr Date: 98/12/10
A/I
A/O
RS232
RS485
Contact
Function Keys in Browse Mode
A/I
A/O
RS232
RS485
Contact
Function Keys in Edit Mode
-List
Figure 10-4. Analog Input
Setup screen.
-List
Bksp
ChSign
A/I Setup
Const A
Const B
Const C
1:
0.0000 200.0000
0.0000
2:
0.0000 200.0000
0.0000
3:
0.0000 100.0000
0.0000
Calculated Values:
A/I Mode: SING
1: 19.6294 2: 8.7125 3: 1.1384
A/O
RS232
RS485
Contact
Function Keys in Browse Mode
A/O
RS232
RS485
Contact
Function Keys in Edit Mode
-List
+List
SECTION 10: DIRECT COMMUNICATIONS USING RPCOMM
Bksp
ChSign
PAGE 10-3
Revision B.001
Operating Manual, Partisol-Plus Model 2025 Sequential Air Sampler
Figure 10-5. RS232 Setup
screen.
RS232 Setup
Baud Rate:
9600 Protocol:
Data Bits:
Parity:
8
RS-Para1:
52
None
RS-Para2:
75048
1
RS-Para3:
13010
Stop Bits:
Flow Ctrl:
A/O
AK
None RS-Para4:
A/I
SetPRC
0
RS485
Contact
Function Keys in Browse Mode
A/O
A/I
SetPRC
RS485
Contact
Function Keys in Edit Mode
-List
+List
Bksp
4) On the RS232 Setup screen, ensure that the Protocol is set to
“AK.” This is necessary for RPComm to operate properly. The
default values for the remaining settings on this screen are
shown in Figure 10-5. R&P does not recommend changing the
settings from their default values.
5) The unit is now set up for direct communication with a PC.
10.2. USING RPCOMM
NOTE: This section assumes that RPComm was installed in
the default locations when the installation program was
executed (Appendix D).
10.2.1.
EXECUTING RPCOMM
NOTE: The Windows operating system screens shown in
this section are from the Windows 95 operating system.
These screens may vary slightly from your computer’s
screens if you are operating RPComm under the Windows 98
or Windows NT operating systems.
SECTION 10: DIRECT COMMUNICATIONS USING RPCOMM
PAGE 10-4
Revision B.001
Operating Manual, Partisol-Plus Model 2025 Sequential Air Sampler
Follow these steps to execute RPComm:
1) Initiate the RPComm software by selecting the “Start” button on
your PC’s screen, highlighting “Programs,” and then highlighting
“RPComm.” Choose the RPComm icon to begin executing the
RPComm program (Figure 10-6).
Figure 10-6. Executing
RPComm.
SECTION 10: DIRECT COMMUNICATIONS USING RPCOMM
PAGE 10-5
Revision B.001
Operating Manual, Partisol-Plus Model 2025 Sequential Air Sampler
2) When RPComm begins executing, two screens are always displayed: the R&P Communicator Main screen and the Connect List
screen (Figure 10-7).
Figure 10-7. Connect List
screen.
SECTION 10: DIRECT COMMUNICATIONS USING RPCOMM
PAGE 10-6
Revision B.001
Operating Manual, Partisol-Plus Model 2025 Sequential Air Sampler
10.2.2.
CREATING A NEW CONNECTION
A connection is the hardware, software and proper settings that enables information
to travel between your PC and unit. The hardware part of the connection is accomplished with the use of a 9-to-9 pin cable (Section 10.2.1). The software part of the
connection is accomplished when RPComm is executed. The proper settings must be
set within RPComm to complete the connection.
NOTE: The Windows operating system screens shown in
this section are from the Windows 95 operating system.
These screens may vary slightly from your computer’s
screens if you are operating RPComm under the Windows 98
or Windows NT operating systems.
Follow these steps to create a new connection:
1) With the Connect List screen displayed (Figure 10-7), select the
New Connection icon on the toolbar.
The Connection Type
screen will then be displayed (Figure 10-8).
Figure 10-8. Connection
Type screen.
2) From the Connection Type screen, select the “2025” button and
choose “Settings” to display the AK Protocol Setup screen (Figure 10-9).
SECTION 10: DIRECT COMMUNICATIONS USING RPCOMM
PAGE 10-7
Revision B.001
Operating Manual, Partisol-Plus Model 2025 Sequential Air Sampler
Figure 10-9. AK Protocol
Setup screen.
3) For a direct connection, the connection description box should
read “Direct to Com x,” where “x” is the serial (COM) port on
your PC that the unit is connected to (Section 10.2.1).
4) The Station Setup portion of the screen lists a Station Number
(default = 4, 052) and Channel Number (Default = 075, 048). These
values must match those entered into the unit on its RS232 Setup
screen. R&P recommends that these be left at their default values.
5) The description boxes for Phone Number, Dialing String and
Connection Command are not used for a direct connection. The
Modem Setup and Dialing Setup buttons also are not needed for
a direct connection.
6) Select “OK” when the proper settings have been confirmed.
7) Choose “OK” from the Connection Type screen to finish the
connection setup. “New Connection” will now be displayed in the
Connect List screen. This name can be edited by highlighting the
words “New Connection” and then selecting the words again.
When the blinking cursor appears, the user can type the desired
name. To save this new file name, press the Enter key on your
PC’s keyboard.
8) The connection should now be ready for use. However, because
different instruments require different RS232 port settings, these
values must sometimes be changed. To check these values, from
the Connect List screen, select the “Setup” pull down menu and
choose “RS232.” The Communication Port Setup screen will
SECTION 10: DIRECT COMMUNICATIONS USING RPCOMM
PAGE 10-8
Revision B.001
Operating Manual, Partisol-Plus Model 2025 Sequential Air Sampler
appear (Figure 10-10). For the 2025, the settings should be: baud
rate = 9600, data bits = 8, parity = none, stop bits = 1, flow control
= none.
NOTE: If you are using multiple connections to different instrument types and
one instrument being used is a TEOM Series 1400 Ambient Particulate Monitor,
the flow control setting should be RTS.
Figure 10-10. Communication Port Setup screen.
9) If desired, additional connections can be defined using the above
procedure. These new connections can connect various instrument types. When all new connections have been defined, they
can be saved in a connection group. From the R&P Communicator Main screen (Figure 10-12), select the “File” pull down menu
and choose “Save Group.” The next time RPComm is executed,
the connection group can be restored by choosing “Open Group”
from the “File” pull down menu of the R&P Communicator Main
screen. A list of saved connection groups will be displayed in the
Save Connection Group screen (Figure 10-11). Choose the desired group and select “OK.”
SECTION 10: DIRECT COMMUNICATIONS USING RPCOMM
PAGE 10-9
Revision B.001
Operating Manual, Partisol-Plus Model 2025 Sequential Air Sampler
Figure 10-11. Save
Connection Group screen.
10) To connect to an instrument, highlight the desired connection and
select the Connection icon on the tool bar.
This will display
the 2025 Main screen (Figure 10-12).
NOTE: If the connection is successful, the instrument’s serial number will be
displayed at the top of the screen. If the connection is not successful, or if there
is no instrument attached, then the serial number area will be blank or will display
“99999.”
SECTION 10: DIRECT COMMUNICATIONS USING RPCOMM
PAGE 10-10
Revision B.001
Operating Manual, Partisol-Plus Model 2025 Sequential Air Sampler
Figure 10-12. 2025 Main
screen.
SECTION 10: DIRECT COMMUNICATIONS USING RPCOMM
PAGE 10-11
Revision B.001
Operating Manual, Partisol-Plus Model 2025 Sequential Air Sampler
10.2.3.
DOWNLOADING STORED DATA
There are three types of data stored in the unit’s internal data logger: filter data,
interval data and input data.
NOTE: The Windows operating system screens shown in
this section are from the Windows 95 operating system.
These screens may vary slightly from your computer’s
screens if you are operating RPComm under the Windows 98
or Windows NT operating systems.
10.2.3.1.
SETTING THE STORAGE POINTER POSITIONS
A storage pointer is a place marker in the internal data logger. When data is
downloaded from a unit, the downloading begins at the storage pointer location and
continues to the last written record. Once data has been downloaded, the storage
pointer position is set to the end of the storage buffer so that the next time data is
downloaded, only new data are output. However, if the user wishes to download data
only from a particular date, for example, then the position of the storage pointer will
need to be set. There are three storage pointers used in the Partisol-Plus Sampler, one
for each type of data (filter, interval and input).
To set the storage pointer positions, go to the R&P Communicator Main screen
(Figure 10-12) and select the Storage Pointer tab. On the Storage Pointer screen
(Figure 10-13), the storage pointer location for each data type will be displayed. Refer
to Figure 10-14 for a compete description of the control buttons displayed on the
Storage Pointer screen.
SECTION 10: DIRECT COMMUNICATIONS USING RPCOMM
PAGE 10-12
Revision B.001
Operating Manual, Partisol-Plus Model 2025 Sequential Air Sampler
Figure 10-13. Storage
Pointer screen.
SECTION 10: DIRECT COMMUNICATIONS USING RPCOMM
PAGE 10-13
Revision B.001
Operating Manual, Partisol-Plus Model 2025 Sequential Air Sampler
Figure 10-14. Control
buttons on the Storage
Pointer screen.
Moves the storage pointer for all data types.
Moves the storage pointer for only the filter data. The storage positions
of the other two pointers will not change.
Moves the storage pointer for only the input data. The storage positions
of the other two pointers will not change.
Moves the storage pointer for only the interval data. The storage
positions of the other two pointers will not change.
Moves the selected storage pointer(s) to the first record in the buffer.
The displayed position of the selected storage pointer(s) will change,
unless the pointer was already at the beginning of the buffer.
Moves the selected storage pointer(s) to the last record in the buffer.
The displayed position of the selected storage pointer(s) will change,
unless the pointer was already at the end of the buffer. This is useful if
the user wishes to download only the last 10 records, for example. Once
the end of the buffer is reached, the pointer can be stepped back 10
records using the Move Back icon.
Moves the selected storage pointer(s) back “x” number of records,
where “x” is defined in the Change Record Step box. The displayed
position of the selected storage pointer(s) will change, unless the
pointer was already at the beginning of the buffer.
Moves the selected storage pointer(s) forward “x” number of records,
where “x” is defined in the Change Record Step box. The displayed
position of the selected storage pointer(s) will change, unless the
pointer was already at the end of the buffer.
Change Record Step box. The step size can be 1, 5, 10, 100
or 1000.
SECTION 10: DIRECT COMMUNICATIONS USING RPCOMM
PAGE 10-14
Revision B.001
Operating Manual, Partisol-Plus Model 2025 Sequential Air Sampler
10.2.3.2.
DOWNLOADING DATA
Follow these steps to download data from the internal data logger:
1) Before data are downloaded, the user should ensure that the
storage pointer position(s) are correct. Set the storage pointer
positions according to Section 10.2.3.1, if necessary.
2) From the 2025 Main screen (Figure 10-12), select the Download
Data tab. Refer to Figures 10-15 and 10-16 for a complete description of the Download Data screen.
Figure 10-15. Download
Data screen.
SECTION 10: DIRECT COMMUNICATIONS USING RPCOMM
PAGE 10-15
Revision B.001
Operating Manual, Partisol-Plus Model 2025 Sequential Air Sampler
Figure 10-16. Control
buttons on the Download
Data screen.
Downloads all three type of data.
Downloads filter data only. Interval and input data will not be downloaded.
Downloads interval data only. Filter and input data will not be downloaded.
Downloads input data only. Filter and interval data will not be downloaded.
Downloads all stored data in the data buffer for the selected data types. After the
data are downloaded, the storage pointer for the selected data type(s) will move
to the end of the buffer. Once the data have been downloaded, each data type can
be viewed by selecting the appropriate tab (Figures 10-17, 10-18 and 10-19).
Downloads data from the current storage pointer position(s) to the end of the data
buffer for the selected data type(s). After the data are downloaded, the storage
pointer for the selected data type(s) will move to the end of the buffer. Once the
data have been downloaded, each data type can be viewed by selecting the
appropriate tab (Figures 10-17, 10-18 and 10-19).
Aborts download. This action will set the storage pointer for the selected data
type(s) to the record location where the download was aborted.
Copies selected data to the Windows clipboard. The data can then be imported and
used in other programs (Section 10.2.4.1).
Sends selected data to the Download Graph tab. NOTE: Filter data cannot be
graphed (Section 10.2.4.2).
Stores desired data to a file. The file is saved in a comma-delimited ASCII format
(Section 10.2.4.3).
Opens a data file that has been previously saved to disk for display and graphing.
Clears data currently being displayed.
When the download has been
successfully completed, a message will appear in the Dialog box indicating how many records were downloaded.
If multiple types of data were downloaded, the user can select the down arrow on
the right of the Dialog box to see the results of each download type.
SECTION 10: DIRECT COMMUNICATIONS USING RPCOMM
PAGE 10-16
Revision B.001
Operating Manual, Partisol-Plus Model 2025 Sequential Air Sampler
10.2.4.
MANIPULATING DOWNLOADED DATA
Once data has been downloaded, it can be manipulated for different uses. All data
manipulation procedures listed in this section can be performed within RPComm
without being connected to the unit.
NOTE: The Windows operating system screens shown in
this section are from the Windows 95 operating system.
These screens may vary slightly from your computer’s
screens if you are operating RPComm under the Windows 98
or Windows NT operating systems.
10.2.4.1.
COPYING DATA TO THE CLIPBOARD
Once data have been downloaded and displayed in RPComm, a selection of these data
can be copied to the Windows clipboard for use in other applications.
Follow these steps to copy data to the Windows clipboard:
1) From the 2025 Main screen (Figure 10-12), select the Filter Data,
Interval Data or Input Data tab to display the desired data screen
(Figures 10-17, 10-18 or 10-19).
2) To select data, point your mouse cursor at the data cell where you
wish to begin the selection. Press and hold down the left mouse
button and drag the cursor until all the desired data is selected.
3) An alternate way to select data is to point the mouse cursor at the
column heading where you wish to begin the selection. Press
and hold down the left mouse button and drag the cursor across
the columns until all the desired data is selected. This will
choose all the data in the selected columns.
4) When the proper selection has been made, press the Copy icon.
This will copy the selected data to the Windows clipboard.
The data can then be pasted into another application.
NOTE: When data are copied to the clipboard, it includes the heading information, even if the entire column was not selected.
SECTION 10: DIRECT COMMUNICATIONS USING RPCOMM
PAGE 10-17
Revision B.001
Operating Manual, Partisol-Plus Model 2025 Sequential Air Sampler
Figure 10-17. Downloaded
filter data.
SECTION 10: DIRECT COMMUNICATIONS USING RPCOMM
PAGE 10-18
Revision B.001
Operating Manual, Partisol-Plus Model 2025 Sequential Air Sampler
Figure 10-18. Downloaded
interval data.
SECTION 10: DIRECT COMMUNICATIONS USING RPCOMM
PAGE 10-19
Revision B.001
Operating Manual, Partisol-Plus Model 2025 Sequential Air Sampler
Figure 10-19. Downloaded
input data.
SECTION 10: DIRECT COMMUNICATIONS USING RPCOMM
PAGE 10-20
Revision B.001
Operating Manual, Partisol-Plus Model 2025 Sequential Air Sampler
10.2.4.2.
GRAPHING DOWNLOADED DATA
Follow these steps to graph downloaded data:
1) From the 2025 Main screen (Figure 10-12), select the Interval Data
or Input Data tab to display the desired data (Figures 10-18 or 1019).
NOTE: Filter data cannot be graphed.
2) To select data, point the mouse cursor at the data cell where you
wish to begin the selection. Press and hold down the left mouse
button and drag the cursor until all the desired data is selected.
3) An alternate way to select data is to point the mouse cursor at the
column heading where you wish to begin the selection. Press
and hold down the left mouse button and drag the cursor across
the columns until all the desired data is selected. This will
choose all the data in the selected columns.
4) When the desired selection has been made, select the Graph icon.
This will send the selected data to the Download Graph tab.
5) From the 2025 Main screen (Figure 10-12), select the Download
Graph tab. The data that were selected should now be graphed
and will appear in the Download Graph screen (Figure 10-20). The
color key on the right portion of the Download Graph screen
shows the variables being graphed and their corresponding
colors.
6) To display only one of the selected sets of data, choose the desired data set from the color key. To display all selected sets of
data again, choose each data set from the color key while holding
down the Shift key on the computer.
7) Refer to Figure 10-21 for a complete description of the control
buttons on the Download Graph screen.
SECTION 10: DIRECT COMMUNICATIONS USING RPCOMM
PAGE 10-21
Revision B.001
Operating Manual, Partisol-Plus Model 2025 Sequential Air Sampler
Figure 10-20. Download
Graph screen.
SECTION 10: DIRECT COMMUNICATIONS USING RPCOMM
PAGE 10-22
Revision B.001
Operating Manual, Partisol-Plus Model 2025 Sequential Air Sampler
Figure 10-21. Control
buttons on the Download
Graph screen.
Clears all data listed on the right portion of the Download Graph screen.
This includes data being displayed.
Decreases the scale of the x- and y-axis concurrently. With this icon
selected, press and hold down the left mouse button and make a box around
the area that you want to zoom into. Once the box is finished, let go of the
mouse button. The graph will be resized according to the box dimensions.
Decreases the scale of the x-axis. With this icon selected, press and hold
down the left mouse button at the beginning of the area that you want to
zoom into. Drag the cursor to the end of the zoom area and let go of the
mouse button. The graph will be resized according to the new x-axis
dimensions.
Decreases the scale of the y-axis. With this icon selected, press and hold
down the left mouse button at the beginning of the area that you want to
zoom into. Drag the cursor to the end of the zoom area and let go of the
mouse button. The graph will be resized according to the new y-axis
dimensions.
Enables panning. Panning allows the user to move the graph area so that
a different section of the x- or y-axis will be displayed without effecting
the scale of either axis. With this icon selected, place the mouse cursor
somewhere within the graph area and hold down the left mouse button.
Move the mouse so that the desired section of the graph is displayed.
Selecting this icon will undo the last zoom or panning step.
Rescales the x- and y-axis so that all the graphs for the selected data are
displayed.
Toggles between the two possible x-axis scales: date and time, and time
only. This does not effect the way the data are displayed on the graph.
Sends the graph currently being displayed to the Windows default printer.
These two boxes define the number of axis divisions on the
graph. The box on the left refers to the x-axis and the right box
refers to the y-axis. The number of divisions can be set to 5, 10, 15 or 20
divisions. Increasing the number of divisions results in a finer axis grid.
Decreasing the number of divisions results in a courser axis grid. This does
not effect the way the data are displayed on the graph.
SECTION 10: DIRECT COMMUNICATIONS USING RPCOMM
PAGE 10-23
Revision B.001
Operating Manual, Partisol-Plus Model 2025 Sequential Air Sampler
10.2.4.3.
STORING DATA TO A FILE
Follow these steps to save data to a file:
1) From the 2025 Main screen (Figure 10-12), select the Filter Data,
Interval Data or Input Data tab (Figures 10-17, 10-18 or 10-19).
2) Select the Save icon.
The Save Dialog box will appear and
prompt the user for a file name. The default file name is:
nnnnnxyy.txt
where: nnnnnn = the unit’s serial number
x
= data type (f = filter, i = interval, p = input)
yy
= file number (01, 02, etc.)
3) Once you have chosen a file name, select the “Save” button If
more than one type of data has been downloaded, the Save
Dialog box will appear again prompting the user for a file name
for the next type of data. This will continue until all downloaded
data have been saved.
4) These files will be saved in a comma-delimited ASCII format
which can be imported into any spreadsheet program. The data
include all column heading information.
10.2.5.
SCHEDULING DATA DOWNLOADS
One useful feature of RPComm is its automatic download capability. This feature
allows the user to schedule automatic data downloads from a unit up to four times a
day.
NOTE: The Windows operating system screens shown in
this section are from the Windows 95 operating system.
These screens may vary slightly from your computer’s
screens if you are operating RPComm under the Windows 98
or Windows NT operating systems.
Follow these steps to schedule an automatic data download:
1) With the Connect List screen displayed (Figure 10-7), select the
Schedule Download icon.
This will display the Schedule
Downloads screen (Figure 10-22).
SECTION 10: DIRECT COMMUNICATIONS USING RPCOMM
PAGE 10-24
Revision B.001
Operating Manual, Partisol-Plus Model 2025 Sequential Air Sampler
Figure 10-22. Schedule
Downloads screen.
2) Check the box next to the day(s) of the week that you want the
data to be downloaded. You may choose a single day each week
or any other combination of days.
3) Select the time(s) on the chosen day(s) that the data are to be
downloaded. The data can be downloaded up to 4 times a day.
4) Select the directory location where you want the downloaded data
to be stored. R&P recommends that a separate directory be set
up for data downloads and that the files be removed from this
directory on a regular basis because the file serial number can
track only 100 files. The data file will be saved under a file name
according to the following convention:
nnnnnxyy.txt
where: nnnnnn = the unit’s serial number
SECTION 10: DIRECT COMMUNICATIONS USING RPCOMM
PAGE 10-25
Revision B.001
Operating Manual, Partisol-Plus Model 2025 Sequential Air Sampler
x
yy
= data type (f = filter, i = interval, p = input)
= file number (01, 02, etc.).
5) Select whether all of the data stored in the storage buffer will be
downloaded at each scheduled time or if the download will begin
at the storage pointer position.
6) Select which data files are to be downloaded. All three types of
data can be chosen, if desired.
7) When the schedule has been completed, select “OK” to save your
changes. The scheduled downloads for the next 24 hours are
listed in the scheduled download list on the Connect List screen.
For example, Figure 10-23 shows a scheduled download for
12/7/1998 at 10:00 for unit 2025, site #1.
Figure 10-23. Example of a
scheduled download from
the Connect List screen.
8) Data downloads can be scheduled for each connection listed in
the connection list. If more than one download is scheduled for
the same time, the downloads will occur in the order that they are
listed in the Scheduled Download box.
During a scheduled download, RPComm assigns file numbers or names to the
downloaded data according to the file numbers that already exist in the download
directory. RPComm increments the file numbers by a value of one more than the
largest file number that already exists in the download directory.
For example, if the download directory has one file in it with the number 20114f01.txt,
at the next scheduled filter data download RPComm will assign the file name
20114f02.txt to the new downloaded data. The number “02” was the next available file
number.
The new file numbers will always be incremented (by a value of one) during scheduled
downloads regardless of file type. For example, if the download directory has three
files in it with the numbers 20114i01.txt, 20114f02.txt and 20114p03.txt, at the next
scheduled filter data download, RPComm will assign the file name 20114f04.txt to the
new downloaded data. The number “04” was the next available file number.
If all three types of data (filter, interval and input) are downloaded at the same time,
RPComm will give all three files the same number. If the download directory is empty
and you schedule a download of all three types of data, RPComm will assign the
SECTION 10: DIRECT COMMUNICATIONS USING RPCOMM
PAGE 10-26
Revision B.001
Operating Manual, Partisol-Plus Model 2025 Sequential Air Sampler
following file names to the data: nnnnnf01.txt, nnnnni01.txt and nnnnnp01.txt
(“nnnnn” is your unit’s serial number).
If the download directory already has files in it and you schedule a download of all
three types of data, RPComm will increment the file numbers using the next highest
available number. For example, if the download directory has two files in it with the
names 31005f02.txt and 31005p04.txt, and you schedule a download of all three types
of data, then RPComm will assign the following file names to the downloaded data:
31005f05.txt, 31005p05.txt and 31005i05.txt. The number “05” was the next available file number.
10.2.6.
VIEWING INSTRUMENT OPERATION
NOTE: The Windows operating system screens shown in
this section are from the Windows 95 operating system.
These screens may vary slightly from your computer’s
screens if you are operating RPComm under the Windows 98
or Windows NT operating systems.
10.2.6.1.
VIEWING SYSTEM REGISTERS
A system register is a value entered into, calculated by, or measured by the unit.
Examples of system registers are the unit’s serial number (entered into), the calibration constants (calculated by), and the ambient temperature (measured by). Every
system register can be displayed by RPComm.
Follow these steps to view system registers:
1) From the 2025 Main screen (Figure 10-12), select the Registers tab
to display the Registers screen (Figure 10-24).
2) On the right portion of the Registers screen is a list of all the
system registers. Using the scroll bar, examine the list of registers and place a checkmark next the registers that you wish to
view. Or, if desired, select the Select All Registers icon
to
choose all the registers. As registers are selected, they will
appear on the left side of the screen.
3) Select the Read Registers icon
to read the selected registers
from the unit. All the current values will appear in the list on the
SECTION 10: DIRECT COMMUNICATIONS USING RPCOMM
PAGE 10-27
Revision B.001
Operating Manual, Partisol-Plus Model 2025 Sequential Air Sampler
left side of the screen next to their corresponding label.
4) To save the register list to a file, select the Save icon.
The
user will then be prompted to select a location and file name.
This list can be useful for troubleshooting.
Figure 10-24. Registers
screen.
SECTION 10: DIRECT COMMUNICATIONS USING RPCOMM
PAGE 10-28
Revision B.001
Operating Manual, Partisol-Plus Model 2025 Sequential Air Sampler
10.2.6.2.
VIEWING INSTRUMENT KEYPAD
A virtual keypad is available for use through RPComm. This keypad looks exactly like
the keypad on the unit and shows what is currently being displayed on the unit’s
display.
Follow these steps to view the virtual keypad:
1) From the 2025 Main screen (Figure 10-12), select the Keypad tab
to display the virtual keypad (Figure 10-25).
NOTE: If the virtual display shows a number line as the top line and does not
show the proper display, RPComm is not communicating with the unit properly.
Figure 10-25. Virtual
keypad.
SECTION 10: DIRECT COMMUNICATIONS USING RPCOMM
PAGE 10-29
Revision B.001
Operating Manual, Partisol-Plus Model 2025 Sequential Air Sampler
2) Operate the virtual keypad as you would the keypad on the unit.
NOTE: The Partisol-Plus Sampler has a built-in feature that allows the display
backlight to turn off if a key has not been pressed within a set amount of time.
Because of this, a key can be pressed on the virtual keypad and nothing may
appear to change on the display. This could occur because the key stroke may
have caused the display backlight to turn on. Therefore, the key may have to be
pressed twice.
10.2.7.
CREATING A REAL-TIME GRAPH
RPComm can display any system register(s) in a real-time graph. Each register value
is updated and graphed every second.
NOTE: The Windows operating system screens shown in
this section are from the Windows 95 operating system.
These screens may vary slightly from your computer’s
screens if you are operating RPComm under the Windows 98
or Windows NT operating systems.
Follow these steps to create a real-time graph:
1) From the 2025 Main screen (Figure 10-12), select the Real-Time
Graph tab to display the Real-Time Graph screen (Figure 10-26).
2) In the lower-right corner of the screen is a list of system registers.
Using the scroll bar, examine the list of registers and place a
checkmark next to the registers that you wish to graph. As registers are chosen, the values will appear on the graph. The color
key on the upper-right portion of the screen shows the variables
being graphed and their corresponding colors.
3) Refer to Figure 10-27 for a complete description of the control
buttons on the Real-Time Graph screen.
SECTION 10: DIRECT COMMUNICATIONS USING RPCOMM
PAGE 10-30
Revision B.001
Operating Manual, Partisol-Plus Model 2025 Sequential Air Sampler
Figure 10-26. Real-Time
Graph screen.
SECTION 10: DIRECT COMMUNICATIONS USING RPCOMM
PAGE 10-31
Revision B.001
Operating Manual, Partisol-Plus Model 2025 Sequential Air Sampler
Figure 10-27. Control
buttons on the Real-Time
Graph screen.
Clears all data listed on the right side of the Real-Time Graph screen. This
includes data being displayed.
Decreases the scale of the x- and y-axis concurrently. With this icon selected,
press and hold down the left mouse button and make a box around the area
that you want to zoom into. Once the box is finished, let go of the mouse
button. The graph will be resized according to the box dimensions.
Decreases the scale of the x-axis. With this icon selected, press and hold down
the left mouse button at the beginning of the area that you want to zoom into.
Drag the cursor to the end of the zoom area and let go of the mouse button.
The graph will be resized according to the new x-axis dimensions.
Decreases the scale of the y-axis. With this icon selected, press and hold down
the left mouse button at the beginning of the area that you want to zoom into.
Drag the cursor to the end of the zoom area and let go of the mouse button.
The graph will be resized according to the new y-axis dimensions.
Enables panning. Panning allows the user to move the graph area so that a
different section of the x- or y-axis is being displayed without effecting the
scale of either axis. With this icon selected, place the mouse cursor somewhere within the graph area and hold down the left mouse button. Move the
mouse so that the desired section of the graph is displayed.
Selecting this icon will undo the last zoom or panning step.
Rescales the x- and y-axis so that all the graphs for the selected data are
displayed.
Toggles between the two possible x-axis scales: date and time, and time only.
This does not effect the way the data are displayed on the graph.
These two boxes define the number of axis divisions on the
graph. The left box refers to the x-axis and the right box refers
to the y-axis. The number of divisions can be set to 5, 10, 15 or 20 divisions.
Increasing the number of divisions results in a finer axis grid. Decreasing the
number of divisions results in a courser axis grid. This does not effect the way
the data are displayed on the graph.
SECTION 10: DIRECT COMMUNICATIONS USING RPCOMM
PAGE 10-32
Revision B.001
Operating Manual, Partisol-Plus Model 2025 Sequential Air Sampler
10.2.8.
MANAGING A FILTER LIST
Maintaining the filter list from the unit’s keypad can be tedious and difficult.
RPComm allows you to create, modify, save, retrieve and upload the unit’s filter list
from your PC.
NOTE: The Windows operating system screens shown in
this section are from the Windows 95 operating system.
These screens may vary slightly from your computer’s
screens if you are operating RPComm under the Windows 98
or Windows NT operating systems.
Follow these steps to manage a filter list:
1) From the 2025 Main screen (Figure 10-12), select the Filter List tab
to display the Filter List screen (Figure 10-28).
2) Select your unit’s maximum filter capacity by using the Filter icon.
Standard Partisol-Plus Samplers have a 16-filter capacity
(one filter exchanger), while the Dichotomous Partisol-Plus Model
2025 Samplers have a 32-filter capacity (two filter exchangers).
3) To retrieve the filter list currently loaded in the unit, select the
Retrieve icon.
4) To load a filter list previously saved, select the Load icon.
5) Modify the filter list as desired. For 32-filter capacity systems,
filters 1 through 16 are installed in the front filter exchanger, and
17 through 32 are installed in the rear filter exchanger.
NOTE: For 32-filter capacity systems, a blank filter cassette must be in the same
position for both filter exchangers. Therefore, if the position 1 filter is set as a
blank, RPComm automatically sets the position 17 filter as a blank.
6) Once the filter list has been modified as desired, upload the list to
the unit by selecting the Send icon.
SECTION 10: DIRECT COMMUNICATIONS USING RPCOMM
PAGE 10-33
Revision B.001
Operating Manual, Partisol-Plus Model 2025 Sequential Air Sampler
Figure 10-28. Filter List
screen.
SECTION 10: DIRECT COMMUNICATIONS USING RPCOMM
PAGE 10-34
Revision B.003
Operating Manual, Partisol-Plus Model 2025 Sequential Air Sampler
Section 11: Password Protection
Access to program features of the Partisol-Plus Sampler can be restricted through the
use of passwords. This section describes how to access this feature.
Password protection is accessed from the System Setup screen. The contents of this
screen are reviewed in Section 5.1, while this section describes how to use the <F5:
Passwd> function.
While in the System Setup screen (Figure 11-1), press the <F4: Passwd> key to display
the Password Setup screenThe user may redefine the low and high level passwords
while in this screen.
Figure 11-1. System Setup
screen.
System Setup
Average Temp: 99
Standard Temp: 99
Average Pres: 999
Standard Pres: 999
Date Form: YY/MM/DD
Time Form:
Average Time: 30
:
Filter Fan: ON
Curr Time: 05:00:00
Auto Run: ON
Curr Date: 98/04/10
Help
I/O
Site ID
Passwd
SysInfo
Function Keys in Browse Mode
Help
I/O
Site ID
Passwd
SysInfo
Function Keys in Edit Mode
-List
SECTION 11: PASSWORD PROTECTION
+List
Bksp
ChSign
PAGE 11-1
Revision B.003
Operating Manual, Partisol-Plus Model 2025 Sequential Air Sampler
11.1. PASSWORD PROTECTION
The Password Setup screen (Figure 11-2) is displayed by pressing <F4: Passwd> while
in the System Setup screen. The Partisol-Plus Sampler offers two levels of password
protection to guard against unauthorized use of the unit. Under normal conditions, the
unit operates with password protection turned off. The two levels of password
protection are defined as follows:
Low
When in the low protection state, the sampler prevents the user
from entering the Edit Mode. Execute the following keystrokes
while in the Browse Mode to initiate or disable the low protection
state:
<ENTER>, <ENTER>, LoPassword, <ENTER>
If the password protection is successfully invoked or revoked,
the unit will beep twice. An “L” in the field farthest to the right
of the soft function key line (Figure 11-3) in the Main screen
indicates that the unit is in the low protection state.
Figure 11-2. Password
Setup screen.
Password Setup
Cur Lo Psw: ****** Cur Hi Psw: ******
New Lo Psw: ****** New Hi Psw: ******
Confirm Lo: ****** Confirm Hi: ******
Function Keys in Browse Mode
Function Keys in Edit Mode
Bksp
SECTION 11: PASSWORD PROTECTION
PAGE 11-2
Revision B.003
Operating Manual, Partisol-Plus Model 2025 Sequential Air Sampler
Figure 11-3. Main screen
with low password protection turned on.
Stat:OK
Partisol 2025
Mode:Done
Current Time: 09:27 98/07/23
Start Sample: 00:00 98/07/24
Stop Sample: 00:00 98/07/25
Filter ID: 123456
Cassette ID: 100123
Blank: No
StCode
Stats
High
FiltSet
Data
Setup
L
When in the high protection state, the sampler prevents the user
from editing values and changing screens. Execute the following
keystrokes while in the Browse Mode to initiate or disable the high
protection state:
<ENTER>, <ENTER>, <ENTER>, HiPassword, <ENTER>
If the password protection is successfully invoked or revoked,
the unit will beep three times. An “H” in the farthest field to the
right of the soft function key line (Figure 11-4) indicates that the
unit is in the high protection state.
Figure 11-4. Main screen
with high password protection turned on.
Stat:OK
Partisol 2025
Mode:Done
Current Time: 09:27 98/07/23
Start Sample: 00:00 98/07/24
Stop Sample: 00:00 98/07/25
Filter ID: 123456
Cassette ID: 100123
Blank: No
StCode
SECTION 11: PASSWORD PROTECTION
Stats
FiltSet
Data
Setup
H
PAGE 11-3
Revision B.003
Operating Manual, Partisol-Plus Model 2025 Sequential Air Sampler
The initial passwords for both low and high protection is “100000.” The user may move
from low to high protection using the keystrokes above for the high protection state.
When the user turns off high protection, the unit always reverts to its unprotected state.
The user may change the low and high passwords in the Password Setup screen (Figure
11-4). To reach this screen from the Main screen, press <F5: Setup>, <F5: System>
and then <F4: Passwd>. After entering this screen, the user can move the cursor only
to the fields labeled “Cur Lo Psw” and “Cur Hi Psw.”
To change the low password, enter the value of the current low password in the Cur
Lo Psw field while in the Edit Mode. The unit then provides access to the New Lo Psw
and Confirm Lo fields, in which the user must now enter the new low password twice.
Press <ENTER> to leave the Edit Mode and to save your new low password. The
sampler should beep twice to indicate that the password has been successfully
changed.
If you do not enter a new low password correctly, the unit will not beep when you press
<ENTER> and the cursor will move back to the line labeled “New Lo Psw.” Press
<ESC> to leave the Password Setup screen in case of difficulties.
To change the high password, enter the value of the current high password in the Cur
Hi Psw field while in the Edit Mode. The unit then provides access to the New Hi Psw
and Confirm Hi fields, in which the user must now enter the new high password twice.
Press <ENTER> to leave the Edit Mode and to save your new high password. The
sampler should beep three times to indicate that the password has been successfully
changed.
If you do not enter a new high password correctly, the unit will not beep when you press
<ENTER> and the cursor will move back to the line labeled “New Hi Psw.” Press
<ESC> to leave the Password Setup screen in case of difficulties.
NOTE: Password protection can be turned on or off from any
screen.
11.2. RESETTING LOW AND HIGH PASSWORDS
SECTION 11: PASSWORD PROTECTION
PAGE 11-4
Revision B.003
Operating Manual, Partisol-Plus Model 2025 Sequential Air Sampler
If you misplace or forget the low and high passwords, you can reset both high and low
passwords to “100000” by pressing <F4> when the unit displays the Title screen
(Figure 11-5). Note that <F4> is not labeled with any text – this is a precaution taken
to guard against unwanted use of this feature. Resetting the low and high passwords
does not affect the current protection state of the unit , and does not change any of the
sampler’s other parameters.
Figure 11-5. Title screen.
Partisol-Plus
Model 2025 Sequential Air Sampler
Version: 1.202
Date: 8-Dec-98
Copyright 1998
Rupprecht & Patashnick Co., Inc.
RDfault
SECTION 11: PASSWORD PROTECTION
RData
Reset
PAGE 11-5
Revision B.003
Operating Manual, Partisol-Plus Model 2025 Sequential Air Sampler
This page left intentionally blank.
SECTION 11: PASSWORD PROTECTION
PAGE 11-6
Revision B.004
Operating Manual, Partisol-Plus Model 2025 Sequential Air Sampler
Section 12: Routine Maintenance and Verification
Procedures
This section describes the procedures involved in verifying the calibration of the
Partisol-Plus Sampler and in maintaining the consistent operation of the hardware.
U.S. EPA monitoring network requirements for maintenance and verification can be
found in the U.S. EPA 2.12 Quality Assurance Handbook, Section 8.
12.1. VERIFICATION PROCEDURES
The following verification procedures use the sampler’s Audit screen (Figure 12-1),
which is accessed through the Service Mode when the sampler is in the Stop Mode,
or by pressing <RUN/STOP> when the sampler is in the Wait or Sampling Mode.
Figure 12-1. Audit screen.
Audit
Filt Temp: 22.5
l
Set Flow: 16.7
Amb Temp: 22.6
l
Cur Flow: 16.68
Amb Pres: 752
l
FTS Pres: 0.00
Amb %RH:
l
FTS Flow:
l
FTS Const m: 0.000
75
Timer: 00:00:00
Pump
Empt y
Cassette
Filter
Cassette
Solid
DiskCassette
Piston
Valve
0.00
FTS Const b: 0.000
FiltAdv
LeakChk
Follow these steps to verify the sampler’s performance characteristics
while in the Stop Mode:
1) Create an audit magazine (Figure 12-2). Install a supply magazine
with an empty cassette (no screen), an external leak check cassette (with a 47mm filter) and an internal leak check cassette
(with a solid filter leak check/separator disk) into an empty supply magazine. The empty cassette should be in the topmost
position as shown in Figure 12-2. Install the audit magazine in the
left side of the enclosure and a clean empty storage magazine on
the right side of the enclosure to collect the partially exposed
sampling filter (Section 3).
2) Press <MENU> to display the Master menu. Scroll to the “>Service
Mode” and press <ENTER>.
Figure 12-2. Loaded audit
magazine.
3) Press <F1: Audit> to display the Audit screen.
SECTION 12: ROUTINE MAINTENANCE AND VERIFICATION PROCEDURES
PAGE 12-1
Revision B.004
Operating Manual, Partisol-Plus Model 2025 Sequential Air Sampler
4)
When the audit is complete, remove the audit magazine from the
supply position. Place the partially exposed sampling cassette,
that was previously in the sampling position befure you installed
the audit magazine, in the topmost position of a loaded supply
magazine. Connect the air hose to the supply magazine. Press
<F4: FiltAdv> to move the partially exposed sampling filter into
the sampling position. Any leak check cassette remaining in the
sampling position that was used during the audit will advance to
the storage magazine. Remove this cassette from the storage
magazine and install an empty storage magazine as described in
Section 3.4.1.
5) Replace the 1st stage inlet on the sample tube by pressing down
until it hits a stop. Press <ESC> twice to return to the Main
screen. Press <RUN/STOP> to begin sampling.
Follow these steps to verify the sampler’s performance characteristics
while in the Sampling or Wait Modes:
✘ If you are performing an
audit from the Sampling
Mode and you choose <F2:
Stop> in the Audit Confirmation screen, the unit WILL
NOT resume sampling
(after your audit procedures
are finished) at the set
points that you previously
entered.
1)
Create an audit magazine (Figure 12-2). Install a supply magazine
with an empty cassette (no screen), an external leak check cassette (with a 47mm filter) and an internal leak check cassette
(with a solid filter leak check/separator disk) into an empty supply magazine. The empty cassette should be in the topmost
position as shown in Figure 12-2. Install the audit magazine in the
left side of the enclosure and a clean empty storage magazine on
the right side of the enclosure to collect the partially exposed
sampling filter (Section 3).
2)
Press <RUN/STOP> once to enter the Audit Mode. The unit then
will display the Audit Confirmation screen (Figure 12-3). Press
<F1: Audit>, and then press any key to continue.
NOTE: The Audit Confirmation screen also will give you the option to select
<F2: Stop> or <F5: Resume>, in addition to <F1: Audit>.
IMPORTANT: If you are performing an audit from the Sampling Mode and you
choose <F2: Stop> in the Audit Confirmation screen, the unit will not resume
sampling (after your audit procedures are finished) at the set points that you
previously entered. The unit will advance its sampling cycle to the next day and
then enter the Wait Mode.
3) Press <MENU>, make sure that “>Audit” is selected and then
press <ENTER>. This will display the Audit screen (Figure 12-1).
SECTION 12: ROUTINE MAINTENANCE AND VERIFICATION PROCEDURES
PAGE 12-2
Revision B.004
Operating Manual, Partisol-Plus Model 2025 Sequential Air Sampler
Figure 12-3. Audit Confirmation screen.
Stat: OK
Partisol-Plus
Mode: WAIT
Do you want to AUDIT or STOP?
Please choose:
Audit
4)
Stop
Resume
When the audit is complete, remove the audit magazine from the
supply position. Place the partially exposed sampling cassette,
that was previously in the sampling position before you installed
the audit magazine, in the topmost position of a loaded supply
magazine. Connect the air hose to the supply magazine. Press
<F4: FiltAdv> to move the partially exposed sampling filter into
the sampling position. Any leak check cassette remaining in the
sampling position that was used during the audit will advance to
the storage magazine. Remove this cassette from the storage
magazine and install an empty storage magazine as described in
Section 3.4.1.
5) Replace the 1st stage inlet on the sample tube by pressing down
until it hits a stop. Press <ESC> twice to return to the Main
screen. Press <RUN/STOP> to resume sampling.
12.1.1.
VERIFYING THE AMBIENT AIR TEMPERATURE
Follow these steps to verify the ambient air temperature:
1)
Determine the current temperature (°C) at the ambient temperature sensor using an external thermometer, [°C = 5/9 x (°F - 32)].
2)
Verify that the value of Amb Temp displayed in the Audit screen
is within ± 2° C of the measured temperature. If this is not the
case, perform the ambient temperature calibration procedure
described in the Service Manual.
SECTION 12: ROUTINE MAINTENANCE AND VERIFICATION PROCEDURES
PAGE 12-3
Revision B.004
Operating Manual, Partisol-Plus Model 2025 Sequential Air Sampler
12.1.2.
VERIFYING THE FILTER TEMPERATURE
Follow these steps to verify the filter temperature:
1)
Remove the 1st stage inlet and the sample tube by pulling
straight upward on the sample tube. Unlatch and open the
sampler’s top cover. Pull straight upward to remove the WINS
impactor (Figure 12-4). Perform the WINS impactor maintenance
as described in Appendix G.
2)
Verify the sampler filter temperature by inserting an external
thermometer into the sampling chamber as shown in Figure 12-5.
Compare the measured temperature (°C) with the Filt Temp
displayed in the Audit screen. If the measured and Filt Temp
readings are not within ± 2° C [°C = 5/9 x (°F - 32)] perform the
filter temperature calibration procedure described in the Service
Manual.
3)
Install the WINS impactor by pressing down until it hits a stop.
Insert the adapter on the WINS impactor and press down until it
hits a stop.
Figure 12-4 (Left). Removing WINS impactor.
Figure 12-5 (Right).
Inserting an external
temperature probe into the
sampling chamber.
SECTION 12: ROUTINE MAINTENANCE AND VERIFICATION PROCEDURES
PAGE 12-4
Revision B.004
Operating Manual, Partisol-Plus Model 2025 Sequential Air Sampler
12.1.3.
VERIFYING THE AMBIENT PRESSURE
Follow these steps to verify the ambient pressure:
1)
Determine the current ambient station pressure in mm Hg (absolute pressure, not corrected to sea level). Verify the sampler’s
ambient pressure by measuring the current ambient station
pressure in mm Hg with an external measurement device.
• To convert from Atmospheres @ 0° C to mm Hg, multiply by 760.
• To convert from millibars to mm Hg, multiply by 0.75012.
• To convert from inches Hg @ 32° F to mm Hg, multiply by 25.4.
2)
Verify that the value for Amb Pres in the Audit screen is within
±10 mm Hg of the measured ambient pressure. If this is not the
case, perform the ambient pressure calibration procedure described in the Service Manual.
12.1.4.
VERIFYING THE AMBIENT RELATIVE HUMIDITY
Follow these steps to verify the ambient relative humidity:
1)
Determine the current ambient relative humidity (%).
2)
Verify that the value for Amb %RH in the Audit screen is within
±1.5 percentage points of the measured ambient relative humidity. If this is not the case, perform the ambient relative humidity
calibration procedure described in the Service Manual.
12.1.5.
EXTERNAL LEAK CHECK
Follow these steps to perform an external leak check:
NOTE: To ensure leak tightness, a filter cassette containing a new 47 mm filter
must be installed in the sampling position of the sampler.
1)
Attach the flow audit adapter to the sample tube (Figure 12-6) and
close the valve on the flow audit adapter.
2)
While in the Audit screen, press <F5: LeakChk> to display the
Leak Check screen (Figure 12-7). Press <F2: Start>, and follow
the instructions displayed on the screen.
SECTION 12: ROUTINE MAINTENANCE AND VERIFICATION PROCEDURES
PAGE 12-5
Revision B.004
Operating Manual, Partisol-Plus Model 2025 Sequential Air Sampler
NOTE: If you press <F2: Start> but fail to follow the instructions on the screen,
the unit will abort the leak check after waiting 5 minutes. To initiate another leak
check, you must again press <F2: Start>.
3)
A “Pass” or “Fail” message will display at the end of the leak
check cycle. A pressure drop of 25 mm Hg or less is the
sampler’s leak check pass criteria.
4)
If a “Fail” message is displayed, insert a new 47 mm filter into a
filter cassette and place it in the topmost position of the audit
magazine. Press <F4: FiltAdv> to move the new filter into sampling position. Repeat the leak check procedure.
5)
If a “Fail” message is again displayed, perform the troubleshooting procedures detailed in the Service Manual.
6)
If a “Pass” message is displayed, slowly open the valve on the
flow audit adapter.
Figure 12-6. Flow audit
adapter with valve in closed
position .
SECTION 12: ROUTINE MAINTENANCE AND VERIFICATION PROCEDURES
PAGE 12-6
Revision B.004
Operating Manual, Partisol-Plus Model 2025 Sequential Air Sampler
Figure 12-7. Leak Check
screen.
Leak Check
Leak valve: OFF l
Cur Flow: 0.00 l/min
Vacuum Valve: OFF l Pressure: 769 mmHg
Pump: OFF
l
Timer: 00:00:00
l
l
ON/OFF
12.1.6.
Start
FiltAdv
Audit
FLOW VERIFICATION
Perform the temperature verification (Sections 12.1.1 and 12.1.2), pressure verification (Sections 12.1.3 and 12.1.4) and external leak check (Section 12.1.5) before
executing the flow verification procedure.
Follow these steps to verify the flow rate:
NOTE: Ensure that the filter cassette previously installed in the sampler (which
was used to perform the external leak check) remains in the unit for the flow
verification.
1)
If you are using a Streamline FTS Flow Transfer Standard, remove the flow audit adapter and install the FTS on the sample
tube (Figure 12-8). Confirm that the FTS “m” and “b” calibration
constants are entered in the Audit screen. Other flow meters may
require the use of the flow audit adapter (valve open) to measure
Figure 12-8. Streamline
FTS Flow Transfer Standard
installed on external sample
tube.
SECTION 12: ROUTINE MAINTENANCE AND VERIFICATION PROCEDURES
PAGE 12-7
Revision B.004
Operating Manual, Partisol-Plus Model 2025 Sequential Air Sampler
flow.
2)
Press <F5: Audit> to enter the Audit screen. Confirm that 16.7 l/
min is the set flow in the Set Flow field. Press <F1: Pump> and
then <F2: Valve>. Wait for the flow rate displayed in the Cur Flow
column to stabilize.
3)
If using the FTS, press <EDIT>, enter the pressure drop (inches
H2O) from the Digital Manometer display, and then press <ENTER>. The sampler will calculate and display the FTS volumetric
flow.
4) Press <F2: Valve> and then <F1: Pump> to turn off the pump. The
measured flow should be within ± 5% of the displayed Cur Flow.
If this is not the case, perform the flow rate calibration procedure
described in the Service Manual.
12.1.7.
INTERNAL LEAK CHECK
Follow these steps to perform an internal leak test:
NOTE: To ensure leak tightness , a filter cassette containing a 47 mm solid filter
leak check/separator disk (36-004768) must be installed in the unit. The leak
check disk cassette should be assembled by placing a solid filter leak check/
separator disk into a cassette, without a screen or filter.
1)
While in the Audit screen, press <F4: FiltAdv> to move the cassette with the leak check disk into the sampling position. Press
<F5: LeakChk> to display the Leak Check screen (Figure 12-7).
Press <F2: Start>, and follow the instructions displayed on the
screen.
NOTE: If you press <F2: Start> but fail to follow the instructions on the screen,
the unit will abort the leak check after waiting 5 minutes. To initiate another leak
check, you must again press <F2: Start>.
2)
The Partisol-Plus Sampler will run an automatic leak check, and
report either a “Pass” or “Fail” message at the end of the leak
check cycle. A pressure drop of 140 mm Hg or less is the
sampler’s leak check pass criteria.
3)
Press <F4: FiltAdv> to move the leak check cassette to the storage magazine.
4)
If the unit displays a “Fail” message, clean the cassette and leak
check disk carefully. Examine the cassette and disk for any
SECTION 12: ROUTINE MAINTENANCE AND VERIFICATION PROCEDURES
PAGE 12-8
Revision B.004
Operating Manual, Partisol-Plus Model 2025 Sequential Air Sampler
external nicks or scratches. Discard any damaged cassette or
disks, and re-run the test with a clean, undamaged cassette and
leak check disk.
5)
If the leak check still fails after replacing the cassette and leak
check disk, perform the troubleshooting procedures detailed in
the Service Manual.
6)
If the unit displays a “Pass” message, the internal leak check is
complete. Remove the audit magazine from the supply position.
7)
Place the partially exposed sampling cassette, that was previously in the sampling position before you installed the audit
magazine, in the topmost position of a loaded supply magazine.
8)
Connect the air hose to the supply magazine.
9)
Press <F4: FiltAdv> to move the partially exposed sampling filter
into the sampling position. Any leak check cassette remaining in
the sampling position that was used during the audit will advance to the storage magazine. Remove this cassette from the
storage magazine and install an empty storage magazine as
described in Section 3.4.1.
10) Prior to installing a clean storage magazine, make sure that the
magazine piston has been moved to the top of the magazine as
described in Section 3.4.1
11) Replace the 1st stage inlet on the sample tube by pressing down
until it hits a stop. Press <ESC> twice to return to the Main
screen. Press <RUN/STOP> to resume sampling.
12.2. ROUTINE MAINTENANCE PROCEDURES
The routine maintenance of the Partisol-Plus Sampler consists of the
following procedures performed at the indicated intervals:
NOTE: Refer to the U.S. EPA 2.12 Quality Assurance Handbook, Section 8 for
EPA required maintenance intervals.
Filter cassettes
Inspect filter cassettes for contamination or damage
after every use. Discard any damaged cassettes. Wipe
with a clean dry cloth as required. Additional filter
cassettes can be ordered from R&P (59-005923-0001).
SECTION 12: ROUTINE MAINTENANCE AND VERIFICATION PROCEDURES
PAGE 12-9
Revision B.004
Operating Manual, Partisol-Plus Model 2025 Sequential Air Sampler
Filter cassette magazines
R&P has designed the Partisol-Plus Sampler’s filter
cassette magazines to function for long periods of time
without needing cleaning or maintenance. R&P does not
recommend cleaning or disassembling the filter cassette
magazines unless there is visible residue or contamination inside the magazine’s tube or on its manifold or
piston O-rings, or unless the manifold or piston O-rings
are worn or damaged. When it becomes necessary to
clean the filter cassette magazines see the Service Manual
for instructions.
WINS PM-2.5 impactor
Clean the greased impactor section of the WINS PM-2.5
impactor after each complete sampling cycle according
to the instructions in Appendix G. The impactor must be
cleaned when the unit is not sampling.
External leak check
Perform an external leak check after every 4 weeks of
use.
1st stage inlet
Clean the 1st stage inlet after every 14 days of use
according to the instructions in Appendix G.
Particle trap filter
Exchange the particle trap filter (32-000393) in the
sampler once a year, or as necessary. Turn off the
sampler to replace this filter (see Service Manual).
“V” seals
Check the “V” seals (see Service Manual) every
month. Replace, if necessary.
Rainhoods
Clean the air screens located under the sampler’s
rainhoods every 6 months, or as necessary.
Batteries
Check the voltage level of the batteries on the main
computer board in the electronics compartment every 6
months.
Pump
The pump in the Partisol-Plus Sampler has a lifetime of
approximately 12-18 months. If the pump’s performance deteriorates, it should be rebuilt using the Partisol
Pump Rebuild Kit (32-002642) (two kits are required for
each rebuild), or replaced with a new pump (refer to
Appendix E for a parts list).
SECTION 12: ROUTINE MAINTENANCE AND VERIFICATION PROCEDURES
PAGE 12-10
Revision B.003
Operating Manual, Partisol-Plus Model 2025 Sequential Air Sampler
Section 13: Resetting the Sampler
The Partisol-Plus Sampler’s operating parameters can be easily reset to their default
values. This section reviews the different types of reset capabilities available to the
user.
The Title screen (Figure 13-1) provides the user access to the unit’s reset functions
(also see Section 4 for a discussion of the Title screen). With this screen displayed,
the user can press one of the soft function keys to implement the desired type of reset.
The user should use these capabilities with care, because information can be
inadvertently lost if you select the incorrect reset key.
13.1. RESETTING OPERATING PARAMETERS
Pressing <F1: RDfault> while in the Title screen (Figure 13-1) causes the sampler to
reset most of its operating parameters to their default settings. Refer to Appendix B
for a list of the sampler’s parameters and their corresponding program register codes
(PRCs) and default values. If you choose this selection, it does not clear the sampler’s
data storage or channel definitions.
Figure 13-1. Title screen.
Partisol-Plus
Model 2025 Sequential Air Sampler
Version: 1.202
Date: 8-Dec-98
Copyright 1998
Rupprecht & Patashnick Co., Inc.
RDfault
RData
Reset
13.2. SAMPLER DEFAULT SETTINGS
The following list is an example of some of the sampler’s default settings. A complete
description of all Partisol-Plus default settings is found in Appendix B.
Standard temperature
Standard pressure
SECTION 13: RESETTING THE SAMPLER
99
999
PAGE 13-1
Revision B.003
Operating Manual, Partisol-Plus Model 2025 Sequential Air Sampler
Average temperature
Average pressure
Comm baud rate
Comm word length
Comm stop bits
Comm parity
Comm flow control
Comm protocol
Current low password
Current high password
Current password protection
Flow calibration reading
# points in flow calibration
Flow calibration minimum
Flow calibration maximum
FTS pressure
FTS constant m
FTS constant b
Flow set point
Input data averaging period
Date format
Time format
Default start time
Default duration
Default repeat time
Default filter type
Sampling type
Sampling start time
Sampling stop time
Sample blank
Site ID 1
Site ID 2
Separators
Flow mode
99
999
9600
8
1
none
none
AK
100000
100000
none
0 l/min
3
15 l/min
18.4 l/min
0" H2O
0
0
16 l/min
30 min
yy/mm/dd
hh:mm
00:00
24:00
24:00
P
Basic
00:00
00:00
No
0
0
No
Err
13.3. RESETTING DATA STORAGE
Pressing <F2: RData> while in the Title screen (Figure 13-1) causes the sampler to
clear the filter data, interval data and input data storage buffers. If you choose this
selection, it does not clear the sampler’s operating parameters or channel definitions.
SECTION 13: RESETTING THE SAMPLER
PAGE 13-2
Revision B.003
Operating Manual, Partisol-Plus Model 2025 Sequential Air Sampler
13.4. RESETTING LOW AND HIGH PASSWORDS
If you misplace the low and high passwords, you can reset both of these to “100000”
by pressing <F4> when the unit displays the Title screen (Figure 13-1). Note that <F4>
is not labeled with any text – this is a precaution taken to guard against unwanted use
of this feature. Resetting the low and high passwords does not affect the current
protection state of the unit and does not change any other instrument parameters.
13.5. RESETTING ALL INSTRUMENT PARAMETERS
NOTE: Extreme care must be used when exercising this
command. Pressing <F5: Reset> will erase all of the sampler’s
calibration constants. Record all calibration constants (offset and span) from the samplers calibration screens (Sensor
Calibration, Filter Calibration and Flow Calibration screens)
before pressing <F5: Reset>.
Pressing <F5: Reset> while in the Title screen (Figure 13-1) causes the unit to reset
all of its operating parameters to their default conditions. This also clears the system’s
data storage buffers, including the calibration constants.
After resetting the sampler, calibration constants can be re-entered in the appropriate
calibration screen by pressing <EDIT>, entering the offset and span (where applicable) and pressing <ENTER>.
The sampler will require re-calibration only if the calibration constants have not been
re-entered by the user.
SECTION 13: RESETTING THE SAMPLER
PAGE 13-3
Revision B.003
Operating Manual, Partisol-Plus Model 2025 Sequential Air Sampler
This page left intentionally blank.
SECTION 13: RESETTING THE SAMPLER
PAGE 13-4
Revision B.003
Operating Manual, Partisol-Plus Model 2025 Sequential Air Sampler
Section 14: Service Menu
The Service menu provides the user with access to a large number of screens used for
operational, verification, calibration, diagnostic and informational purposes.This
menu is only available when the unit is in the Service Mode.
14.1. ENTERING
THE
SERVICE MODE
To enter the Service Mode, press <MENU> on the display/keypad when the sampler
is in the Stop Operating Mode (Section 5.1). This causes the Master Menu screen
(Figure 14-1) to be displayed. Then use the arrow keys (↓ and ↑) to move the screen’s
selection indicator to the line labeled “Service Mode.” With the pointer in this
position, press <ENTER>. The unit then displays a Warning/Confirmation screen that
asks the user to confirm entry into the Service Mode.
Figure 14-1. Master Menu
screen.
Master Menu
> Status Codes
System Status
Sampling Setup
Data Storage
System Setup
Service Mode
StCode
The unit displays “SVC” as the current operating mode in the top right-hand corner
of the Main screen (Section 4) when in the Service Mode. Refer to Section 5.1 for a
description of the unit’s operating modes. Press <MENU> to display the Service
Menu screen (Figure 14-2), which provides complete access to the unit’s audit/
calibration, diagnostic and service capabilities. Refer to Appendix A for a complete
list of screens available through the Service Menu.
Upon entering the Service Mode, the sampler turns off most of its routine control
systems. The Model 2025 Service Manual contains maintenance and calibration
routines that can be performed while in Service Mode.
SECTION 14: SERVICE MENU
PAGE 14-1
Revision B.003
Operating Manual, Partisol-Plus Model 2025 Sequential Air Sampler
14.2. LEAVING THE SERVICE MODE
To leave the Service Mode and return to the normal operation of the sampler, press
<MENU>. This causes the Service Menu screen to be displayed (Figure 14-2). Then
use the arrow keys (↓ and ↑) to move the screen’s selection indicator to the line labeled
“Exit Service Mode.” With the pointer in this position, press <ENTER>. The unit then
returns to its usual operating configuration, re-establishing the usual control over its
functions.
Figure 14-2. Service Menu
screen.
Service Menu
> System Maintenance Routines
Manual Motion Tests
Calibration/Audit
Low Level System Info
Exit Service Mode
Audit
SECTION 14: SERVICE MENU
Leakchk
PAGE 14-2
Revision B.004
Operating Manual, Partisol-Plus Model 2025 Sequential Air Sampler
Appendix A: Overview of Partisol-Plus Software
Screens
Figure A-1. Hierarchy of
screens.
This appendix contains all the software screens displayed by the Partisol-Plus
Sampler, along with the hierarchy of screens. The later part of this appendix shows
the menu structure and screens contained in the unit’s Service Mode.
Title Screen
Main Screen
Help
Temperature
Pressure
Stats Screen
Filter Setup
Screen
Filter Times
Screen
Status Code
Stats Screen
Sample Stats
Screen
User I/O
Stats Screen
Filter Data
Times Screen
System Setup
Screen
Filter List
Setup Screen
Wind
Stats Screen
Sample Setup
Screen
System
Stats Screen
Filter Data
Screen
Interval Data
Screen
Filter Data
Status Codes
Screen
Input Data
Screen
Download Data
Screen
Filter Data
Averages
Screen
Power Failure
Data Screen
I/O Menu
Analog Input
Setup Screen
Analog Output
Setup Screen
RS232 Setup
Screen
Site ID Menu
RS485 Setup
Screen
Password
Menu
System Info
Menu
Contact
Closure Setup
Screen
RS232 Real
Time Data
Screen
APPENDIX A: OVERVIEW OF SCREENS
PAGE A-1
Revision B.004
Operating Manual, Partisol-Plus Model 2025 Sequential Air Sampler
Figure A-2. Title screen.
Partisol-Plus
Model 2025 Sequential Air Sampler
Version: 1.202
Date: 8-Dec-98
Copyright 1998
Rupprecht & Patashnick Co., Inc.
Figure A-3. Main screen.
RDfault
RData
Reset
Stat:OK
Partisol 2025
Mode:Stop
Current Time: 09:27 98/07/23
Start Sample: 00:00 98/07/24
Stop Sample: 00:00 98/07/25
Filter ID:
Flow:
Volume:
Help
123456
0.0 l/min
000.00 m^3
Stats
FiltSet
Figure A-4. Help screen.
Data
Setup
Help
> - Setting up your Sample
> - Operating Mode descriptions
> - Status codes
> - Downloading Data
> - Performing an Audit
> - Calibration
> - Filter Exchange
APPENDIX A: OVERVIEW OF SCREENS
PAGE A-2
Revision B.004
Operating Manual, Partisol-Plus Model 2025 Sequential Air Sampler
Figure A-5. Temperature
and Pressure Statistics
screen.
Stat:OK
Mode:SAMPLE
Current Average
25.8
21.2 C
Filter Temp:
21.1 C
Filter Comp Temp: 25.4
25.8
21.1 C
Ambient Temp:
751
748 mmHg
Ambient Pres:
72
68%
Ambient %RH:
StCode
Figure A-6. Status Codes
screen.
Temp/Pressure
OK
Sample
User IO
Wind
Status Codes
System
STOP
>OK No Status Conditions
Reset
Figure A-7. Sample
Statistics screen.
Stat:OK
Sample Stats
Mode:SAMP
Flow Setpoint: 16.7 l/min
Current Flow: 16.7 l/min
Volume: 004.30 m^3
Elapsed Sample Time: 4:18
Current Filter ID: P 123456
Current Cassette ID: RP100123
TmpPres
User IO Wind
APPENDIX A: OVERVIEW OF SCREENS
System
PAGE A-3
Revision B.004
Operating Manual, Partisol-Plus Model 2025 Sequential Air Sampler
Figure A-8. User I/O
Statistics screen.
Stat:OK
Analog Input 1:
Analog Input 2:
Analog Input 3:
Logic Output 1:
Logic Output 2:
TmpPres
Figure A-9. Wind Statistics
screen.
Stat:OK
User I/O
Current
+0000.00
+000.00
+0000.00
000
000
Sample
Wind
Wind Stats
Current
Wind Speed: 000.0
Figure A-10. System
Statistics screen.
Mode:SAMP
Average
+0000.00
+0000.00
+0000.00
System
Mode:SAMP
Average
000.0 km/h
Wind Velocity:
N/A
000.0 km/h
Wind Direction:
000
000 deg
TmpPres Sample
User IO
Stat:OK
System Stats
System
Mode:SAMP
Elec Temp: +25.8 C Elec Heater: ON
Filter Num: 02
Filt Comp Fan: ON
Filt Total: 328
Pump Fan: OFF
FXCHG Step: MAGPR
Pump: OFF
FXCHG Stat: ---TmpPres
APPENDIX A: OVERVIEW OF SCREENS
Sample User IO
Wind
PAGE A-4
Revision B.004
Operating Manual, Partisol-Plus Model 2025 Sequential Air Sampler
Figure A-11. Basic Filter
Setup screen.
Stat:OK
Filter Setup Mode:STOP
Start Date: 98/07/24
The Current Time is: 15:34 98/07/23
Sample will start at: 00:00 98/07/24
Each sample will collect for 024:00 hours
Times
+ Day
NextDay
FiltLst
Next Hr
Function Keys in Browse Mode
Times
+ Day
NextDay
FiltLst
Next Hr
Function Keys in Edit Mode
-List
Figure A-12. Filter Times
screen.
+List
Start
Bksp
Stop
Cur 17:15 99/06/08 17:16 99/06/08
1.
17:15 99/06/08 17:16 99/06/08
2.
17:18 99/06/08 17:19 99/06/08
3.
17:21 99/06/08 17:22 99/06/08
4.
17:24 99/06/08 17:25 99/06/08
5.
17:27 99/06/08 17:28 99/06/08
APPENDIX A: OVERVIEW OF SCREENS
\/
PAGE A-5
Revision B.004
Operating Manual, Partisol-Plus Model 2025 Sequential Air Sampler
Figure A-13. Filter List
Setup screen.
Type Filt ID
Cassette ID Blank
1: P
001123
RP 100001
No
2: P
001124
RP 100002
No
3: P
001125
RP 100003
Yes
X: P
001126
RP 100004
No
X: P
001127
RP 100005
No
16: P
001138
RP 100016
No
FiltSet
Copy
Insert
/\
\/
Delete
Function Keys in Browse Mode
FiltSet
Copy
Insert
Delete
Function Keys in Edit Mode
-List
Figure A-14. Filter Data
Times screen.
Stat:OK
+List
Bksp
Filter Data Times
Rec: 7
Set Sample Start: 00:00 1998/06/01
Set Sample Stop: 00:00 1998/06/02
Actual Sample Start: 00:00 1998/06/01
Actual Sample Stop: 00:00 1998/06/02
Valid Elapsed Time: 24:00
Total Elapsed Time: 24:00
-Rec
APPENDIX A: OVERVIEW OF SCREENS
+Rec
MoreDat
IntvDat
DwnLoad
PAGE A-6
Revision B.004
Operating Manual, Partisol-Plus Model 2025 Sequential Air Sampler
Figure A-15. Filter Data
screen.
Stat:OK
Filter Data
Rec: 7
Filt ID: P 123456
Volume: 006.00
Cass ID: RP100123
% CV: 0.1
Max Temp Diff: 0.8 at 15:38 1998/06/01
Id1: "01230000010032819970721160000"
Id2: "
-Rec
"
+Rec
Figure A-16. Filter Data
Status Codes screen.
MoreDat IntvDat
Status Codes
Dwnload
Rec: 7
>OK No Status Conditions
-Rec
Figure A-17. Filter Data
Averages screen.
+Rec
MoreDat IntvDat
Stat:OK
Averages
Rec: 7
Min Ave
Max
Averag
Flow: 16.6 16.7 16.7 WDSpd: 00.0
FltT: +22.2 +22.5 +22.7 WVel: 00.0
AmbT: +22.3 +22.5 +22.7 WDir:
0
Pres: 751
752
752
AI1: 000.0
%RH:
-Rec
APPENDIX A: OVERVIEW OF SCREENS
65
69
72
+Rec
MoreDat
AI2: 000.0
IntvDat
PAGE A-7
Revision B.004
Operating Manual, Partisol-Plus Model 2025 Sequential Air Sampler
Figure A-18. Power
Failures screen.
Power Failures
Rec: 7
2:24 1998/05/26
6:43 1998/05/26
-Rec
+Rec
Figure A-19. Interval Data
screen.
MoreDat
IntvDat
Interval Data
Rec: 1108
Time: 15:15 1998/05/26
Filt Temp: 20.7 C
Ambient Temp: 21.9 C
Ambient Pres: 751 mm Hg
Flow: 16.7 l/min
-Rec
+Rec
Figure A-20. Download
Data screen.
InptDat
DwnLoad
Filter
Rec #
Download Data
Storage: _____
First Record: 14:51 1998/12/17
64
Current Pointer: 14:41 1998/12/17
212
Last Record: 14:29 1998/12/17
343
First
APPENDIX A: OVERVIEW OF SCREENS
-Ptr
+Ptr
Last
Start
PAGE A-8
Revision B.004
Operating Manual, Partisol-Plus Model 2025 Sequential Air Sampler
Figure A-21. Input Data
screen.
Stat:OK
Input Data
Rec: 185
Record Time: 15:30 1998/05/26
Figure A-22. Sample Setup
screen.
Valid:
023:55
FiltT:
+22.5
Total:
024:00
WSpd:
0 Km/h
AmbT:
+22.7
WVel:
0 Km/h
Pres:
762 mmHg
WDir:
0 deg
%RH:
-Rec
+Rec
FCompT: +24.0
StCode
65%
FiltDat DwnLoad
Sample Definition Method:
Basic
Default Sample Start Time:
00:00
Default Sample Duration:
024:00
Default Sample Repeat Time:
024:00
Default Filter Type:
P
Sample Flow Rate:
16.7
Flow Error Mode: Err
Separators: No
Help
Set EPA
System
Function Keys in Browse Mode
Help
Set EPA
System
Function Keys in Edit Mode
-List
APPENDIX A: OVERVIEW OF SCREENS
+List
Bksp
ChSign
PAGE A-9
Revision B.004
Operating Manual, Partisol-Plus Model 2025 Sequential Air Sampler
Figure A-23. When the
Sample Definition Method is
set in the Time mode, the
Filter Setup screen (Figure
A-11) will change to the
Time Base Filter Setup
screen.
Stat:OK
Filter: 01
Mode:STOP
Current Time: 15:34 98/07/23
Start Sample: 00:00 98/07/24
Stop Sample: 12:00 98/07/24
Filter ID: P 123456
Cassette ID: RP100123
Blank: No
Help
Prev
Next
FiltLst
*More*
Function Keys in Browse Mode
Help
Prev
Reset
Next
+ Hour
FiltLst
+ Day
*More*
*Back*
Function Keys in Edit Mode
-List
Figure A-24. When the
Sample Definition Method is
set in the Time2 mode, the
Filter Setup screen (Figure
A-11) will change to the
Time 2 Base Sampling
screen.
+List
Bksp
Stat:OK
Filter: 01 Mode:STOP
Current Time: 15:34 98/07/23
Start Time
Stop Time
1: 00:00 98/07/15 06:00 98/07/15
2: 12:00 98/07/15 18:00 98/07/15
Filter ID: P 123456 Blank: No
Cass ID: RP100123
Help
Prev
Next
FiltLst *More*
Function Keys in Browse Mode
Help
Prev
Reset
Next
+ Hour
FiltLst
+ Day
*More*
*Back*
Function Keys in Edit Mode
-List
APPENDIX A: OVERVIEW OF SCREENS
+List
Bksp
PAGE A-10
Revision B.004
Operating Manual, Partisol-Plus Model 2025 Sequential Air Sampler
Figure A-25. When the
Sample Definition Method is
set in the Advanced mode,
the Filter Setup screen
(Figure A-11) will change to
the Advanced Filter Setup
screen.
Stat:OK
Filter: 01
Mode:STOP
Current Time: 15:34 98/07/23
Start Sample: 00:00 98/07/24
Stop Sample: 00:00 98/07/25
Cond: TEMP
%RH ----- l ID: P 1234556
Min: 25.00 40.00 0.00
l Cass: RPxxxxxx
Max: 55.00 85.00 0.00
l Blank:
No
Help
Prev
Next
FiltLst
*More*
Function Keys in Browse Mode
Help
Prev
Reset
Next
+Hour
FiltLst
+ Day
*More*
*Back*
Function Keys in Edit Mode
-List
Figure A-26. When the
Sample Definition Method is
set in the Episodic mode,
the Filter Setup screen
(Figure A-11) will change to
the Episodic Sampling
Setup screen.
+List
Stat:OK
Bksp
Episodic Setup
Mode:STOP
Current Time: 15:34 98/07/23
Start Event Capture: 00:00 98/07/24
Stop Event Capture: 00:00 98/07/25
Cond: TEMP
%RH
-----
Min: 25.00 40.00 0.00
Max: 55.00 75.00 0.00
Help
+Hour
+Day
List A
Reset
Function Keys in Browse Mode
Help
+Hour
+Day
List A
Reset
Function Keys in Edit Mode
-List
APPENDIX A: OVERVIEW OF SCREENS
+List
Bksp
PAGE A-11
Revision B.004
Operating Manual, Partisol-Plus Model 2025 Sequential Air Sampler
Figure A-27. System Setup
screen.
System Setup
Average Temp: 99
Standard Temp: 99
Average Pres: 999
Standard Pres: 999
Date Form: YY/MM/DD
Time Form:
Average Time: 30
:
Filter Fan: ON
Curr Time: 05:00:00
Auto Run: ON
Curr Date: 98/04/10
Help
I/O
Site ID
Passwd
SysInfo
Function Keys in Browse Mode
Help
I/O
Site ID
Passwd
SysInfo
Function Keys in Edit Mode
-List
Figure A-28. System I/O
screen.
+List
Bksp
ChSign
System Setup
Average Temp: 99
Standard Temp: 99
Average Pres: 999
Standard Pres: 999
Date Form: yy/mm/dd
Time Form:
Average Time: 30
:
Curr Time: 05:00:00
Filter Fan: ON
Auto Run: ON
Curr Date: 98/12/10
A/I
A/O
RS232
RS485
Contact
Function Keys in Browse Mode
A/I
A/O
RS232
RS485
Contact
Function Keys in Edit Mode
-List
APPENDIX A: OVERVIEW OF SCREENS
-List
Bksp
ChSign
PAGE A-12
Revision B.004
Operating Manual, Partisol-Plus Model 2025 Sequential Air Sampler
Figure A-29. Analog Input
Setup screen.
A/I Setup
Const A
Const B
Const C
1:
0.0000 200.0000
0.0000
2:
0.0000 200.0000
0.0000
3:
0.0000 100.0000
0.0000
Calculated Values:
A/I Mode: SING
1: 19.6294 2: 8.7125 3: 1.1384
A/O
RS232
RS485
Contact
Function Keys in Browse Mode
A/O
RS232
RS485
Contact
Function Keys in Edit Mode
-List
Figure A-30. Analog Output
screen.
+List
Bksp
ChSign
A/O Setup
Variable MinVal MaxVal Format
1 OpMode
0.00
5.00
0-5 VDC
2 CurFlow1 0.00
20.00
0-5 VDC
3 None
0.00
0-5 VDC
RS232
RS485
0.00
A/I
Contact
Function Keys in Browse Mode
A/I
RS232
RS485
Contact
Function Keys in Edit Mode
-List
APPENDIX A: OVERVIEW OF SCREENS
+List
Bksp
ChSign
PAGE A-13
Revision B.004
Operating Manual, Partisol-Plus Model 2025 Sequential Air Sampler
Figure A-31. RS232 Setup
screen.
RS232 Setup
Baud Rate:
9600 Protocol:
Data Bits:
Parity:
8
RS-Para1:
52
None
RS-Para2:
75048
1
RS-Para3:
13010
Stop Bits:
Flow Ctrl:
A/O
AK
None RS-Para4:
A/I
SetPRC
0
RS485
Contact
Function Keys in Browse Mode
A/O
A/I
SetPRC
RS485
Contact
Function Keys in Edit Mode
-List
+List
Figure A-32. PRC Settings
Warning/Confirmation
screen.
Bksp
RS232 Setup
RS232 protocol needs to be set to
"RealTime" or "Cycle" for the
PRC settings to work.
Press any key to continue
A/I
APPENDIX A: OVERVIEW OF SCREENS
A/O
Set PRC
RS485
Contact
PAGE A-14
Revision B.004
Operating Manual, Partisol-Plus Model 2025 Sequential Air Sampler
Figure A-33. RS232
RealTime Data screen.
RS232 RealTime Data
Intv:
0
Data 1: StatCode Data 5: AmbP Cur
Data 2: CurFlow1 Data 6: AmbRHCur
Data 3: CurFlow2 Data 7: WDir Cur
Data 4: AmbT Cur Data 8: WSpd Cur
Function Keys in Browse Mode
Function Keys in Edit Mode
-List
Figure A-34. RS485 Setup
screen.
+List
Bksp
RS485 Setup
Station: 11
A/I
A/O
RS232
Contact
Function Keys in Browse Mode
A/I
A/O
RS232
Contact
Function Keys in Edit Mode
-List
APPENDIX A: OVERVIEW OF SCREENS
+List
Bksp
PAGE A-15
Revision B.004
Operating Manual, Partisol-Plus Model 2025 Sequential Air Sampler
Figure A-35. Contact
Closure Setup screen.
Contact Closure Setup
Variable BitOp BitVal Comp CompVal
1 StatCode
OR
0
=
0.00
2 OpMode
OR
0
=
2.00
A/I
A/O
RS232
RS485
Function Keys in Browse Mode
A/I
A/O
RS232
RS485
Function Keys in Edit Mode
-List
Figure A-36. Site Identification screen.
+List
Bksp
ChSign
Site Identification
ID1: 00000012000000000000000000000112
ID2: 45000345486790000000000000000000
Function Keys in Edit Mode
Bksp
APPENDIX A: OVERVIEW OF SCREENS
A<--
A-->
PAGE A-16
Revision B.004
Operating Manual, Partisol-Plus Model 2025 Sequential Air Sampler
Figure A-37. Password
Setup screen.
Password Setup
Cur Lo Psw: ****** Cur Hi Psw: ******
New Lo Psw: ****** New Hi Psw: ******
Confirm Lo: ****** Confirm Hi: ******
Function Keys in Browse Mode
Function Keys in Edit Mode
Bksp
Figure A-38. System
Information screen.
System Information
Software Version:
1.202
Software Date: 8-Dec-98
Serial Number:
10019
Filter Exchange: SINGLE
Int Board Rev:
Flow Type 1:
1
20
Function Keys in Browse Mode
Function Keys in Edit Mode
-List
APPENDIX A: OVERVIEW OF SCREENS
+List
Bksp
PAGE A-17
Revision B.004
Operating Manual, Partisol-Plus Model 2025 Sequential Air Sampler
Figure A-39. Master Menu
with status code options.
Master Menu
> Status Codes
System Status
Sampling Setup
Data Storage
System Setup
Service Mode
StCode
Figure A-40. Master menu
with system status options.
Master Menu
Status Codes
> System Status
Sampling Setup
Data Storage
System Setup
Service Mode
TmpPres
Figure A-41. Master menu
with sampling setup options.
Sample
User IO
Wind
System
Master Menu
Status Codes
System Status
> Sampling Setup
Data Storage
System Setup
Service Mode
FiltSet
APPENDIX A: OVERVIEW OF SCREENS
FiltLst
IncFilt
PAGE A-18
Revision B.004
Operating Manual, Partisol-Plus Model 2025 Sequential Air Sampler
Figure A-42. Master menu
with data storage options.
Master Menu
Status Codes
System Status
Sampling Setup
> Data Storage
System Setup
Service Mode
FiltDat
Figure A-43. Master menu
with system setup options.
InptDat
IntvDat
Master Menu
Status Codes
System Status
Sampling Setup
Data Storage
> System Setup
Service Mode
Setup
Figure A-44. Master menu
with service menu option.
A/I
A/O
RS232
RS485
Master Menu
Status Codes
System Status
Sampling Setup
Data Storage
System Setup
> Service Mode
APPENDIX A: OVERVIEW OF SCREENS
PAGE A-19
Revision B.004
Operating Manual, Partisol-Plus Model 2025 Sequential Air Sampler
Master Menu
Screen
Status Codes
Status Codes
Screen
System Status
Filter
T e m pStatus
Pres
Stats
Screen
Screen
Sample Stats
Screen
User I/O Stats
Screen
Filter List
Screen
Increment
Filter Screen
Input Data
Screen
Interval Data
Screen
Analog Input
Setup Screen
Analog Output
Setup Screen
Wind Stats
Screen
System Stats
Screen
RS232 Setup
Screen
RS485 Setup
Screen
Sampling Setup
Filter Setup
Screen
Data Storage
Filter Data
Screen
System Setup
Setup Screen
Service Mode
Exit to
Service Mode
Figure A-45. Hierarchy of screens available through the Master menu.
(Access the Master menu by pressing <MENU> when in a non-service
operating mode.)
APPENDIX A: OVERVIEW OF SCREENS
PAGE A-20
Revision B.004
Operating Manual, Partisol-Plus Model 2025 Sequential Air Sampler
Figure A-46. Service menu
with system maintenance
routine options.
Service Menu
> System Maintenance Routines
Manual Motion Tests
Calibration/Audit
Low Level System Info
Exit Service Mode
Audit
Figure A-47. Service menu
with manual motion test
options.
Leakchk
Service Menu
System Maintenance Routines
> Manual Motion Tests
Calibration/Audit
Low Level System Info
Exit Service Mode
AmbFilt
Figure A-48. Service menu
with calibration/audit
options.
FlowVal
FiltChg
Misc
Service Menu
System Maintenance Routines
Manual Motion Tests
> Calibration/Audit
Low Level System Info
Exit Service Mode
Audit I/O Cal
APPENDIX A: OVERVIEW OF SCREENS
SensCal
FiltCal
FlowCal
PAGE A-21
Revision B.004
Operating Manual, Partisol-Plus Model 2025 Sequential Air Sampler
Figure A-49. Service menu
with low level system
information options.
Service Menu
System Maintenance Routines
Manual Motion Tests
Calibration/Audit
> Low Level System Info
Exit Service Mode
A/D
Figure A-50. Service menu
with exit service mode
option.
D/A
Discrte
TPIC
RTC
Service Menu
System Maintenance Routines
Manual Motion Tests
Calibration/Audit
Low Level System Info
> Exit Service Mode
APPENDIX A: OVERVIEW OF SCREENS
PAGE A-22
Revision B.004
Operating Manual, Partisol-Plus Model 2025 Sequential Air Sampler
Service Menu
Screen
System Maintenance Routines
Leak Check
Screen
Audit
Screen
Manual Motion Tests
Ambient/Filter
Screen
Flow/Valves/
Pump Screen
Filt Exchange
Screen
User/Misc
Screen
I/O Calib
Screen
Sensor Calib
Screen
Filt Temp Calib
Screen
Flow1 Calib
Screen
DAC Channels
Screen
Discrete I/O
Screen
TPIC Channels
Screen
Real Time
Clock Screen
Calibration/Audit
Audit Screen
Low Level System Info
ADC Channels
Screen
Exit Service Mode
Re-Enter
Regular Mode
Figure A-51. Hierarchy of screens available through Service menu. (Access the Service menu by pressing <MENU> with the sampler in its service
operating mode.)
APPENDIX A: OVERVIEW OF SCREENS
PAGE A-23
Revision B.004
Operating Manual, Partisol-Plus Model 2025 Sequential Air Sampler
Figure A-52. System
Maintenance screen
(Service Mode) with audit
option.
System Maintenance
>Audit
Leak Check
Figure A-53. System
Maintenance screen
(Service Mode) with leak
check option.
System Maintenance
Audit
>Leak Check
Audit
Figure A-54. Audit screen
(Service Mode).
Filt Temp: 22.5
l
Set Flow: 16.7
Amb Temp: 22.6
l
Cur Flow: 16.68
Amb Pres: 752
l
FTS Pres: 0.00
l
FTS Flow:
l
FTS Const m: 0.000
Amb %RH:
75
Timer: 00:00:00
Pump
APPENDIX A: OVERVIEW OF SCREENS
Valve
0.00
FTS Const b: 0.000
FiltAdv
LeakChk
PAGE A-24
Revision B.004
Operating Manual, Partisol-Plus Model 2025 Sequential Air Sampler
Figure A-55. Leak Check
screen (Service Mode).
Leak Check
Leak valve: OFF l
Cur Flow: 0.00 l/min
Vacuum Valve: OFF l Pressure: 769 mmHg
l
Pump: OFF
Timer: 00:00:00
l
l
ON/OFF
Figure A-56. Ambient Filter
screen in manual motion
tests (Service Mode).
Start
FiltAdv
Audit
Ambient/Filter
Filters
Ambient
C: 24.4 C
Temp: 22.4 C
1: 24.0 C
Pres: 767 mmHg Heat: OFF
2: 0.0C
%RH: 42.0 %
WSpd: 0.0
WDir:
ON/OFF
Elec T: 27.9
FltFan: OFF
PumpFan: OFF
0
FlowVal
FiltChg
Misc
Function Keys in Browse Mode
ON/OFF
FlowVal
FiltChg
Misc
Function Keys in Edit Mode
-List
APPENDIX A: OVERVIEW OF SCREENS
+List
Bksp
PAGE A-25
Revision B.004
Operating Manual, Partisol-Plus Model 2025 Sequential Air Sampler
Figure A-57. Flows/Valves/
Pumps screen in manual
motion tests (Service
Mode).
Flows/Valves/Pump
SetFlow CurFlow 5/20 ID Vacuum
1: 0.0
0.0
ON
Leak
OFF
OFF
FiltChg
Misc
Pump: OFF
ON/OFF
AmbFilt
Function Keys in Browse Mode
ON/OFF
AmbFilt
FiltChg
Misc
Function Keys in Edit Mode
-List
Figure A-58. Filter Exchange screen in manual
motion tests (Service
Mode).
+List
Bksp
Filter Exchange
Valves
Stat:
Step: -----Ok
1
Pressure: OFF Pump:OFF
Shuttle: OFF
2
NewFilt: OFF OFF
LiftUp:
ON
OFF
MagPres: OFF
Shuttle LiftDn: OFF OFF
LiftPush: OFF
Rdy:ON
PushDn:
ON
OFF
Ext:OFF PushUp: OFF OFF
ON/OFF
AmbFilt FlowVal
Start
Misc
Function Keys in Browse Mode
ON/OFF
AmbFilt FlowVal
Start
Misc
Function Keys in Edit Mode
-List
APPENDIX A: OVERVIEW OF SCREENS
+List
Bksp
PAGE A-26
Revision B.004
Operating Manual, Partisol-Plus Model 2025 Sequential Air Sampler
Figure A-59. User/Misc
screen in manual motion
tests (Service Mode).
User/Misc
A/I A/O | Misc
|Analog Calib
1: 0.000 0.000| Stat: OFF
| InRly: OFF
2: 0.000 0.000| LCD: ON
| RefIN: 0.025
3: 0.000 0.000| Spkr: OFF
| OutRly: OFF
Discrete |Hardware ID | PoleRly: OFF
1: ON 2: ON
ON/OFF
|OFF OFF OFF |
AmbFilt
FlowVal
FiltChg
Function Keys in Browse Mode
ON/OFF
AmbFilt
FlowVal
FiltChg
Function Keys in Edit Mode
-List
Figure A-60. I/O Calibration
screen in calibration/audit
(Service Mode).
+List
Bksp
Calibrating... I/O Calib
Input
User
Analog
Outputs
Offset: -0.0076 0.0000 -0.0059
Span:
Set:
Relay:
Actual:
ON/OFF
0.0022
1.0028
1.0023
0.9966
0.9978
0.025
0.000
0.000
0.000
OFF
A/O Calib Relay OFF OFF
0.025
Start
0.007
SensCal
0.007
FiltCal
0.007
FlowCal
Function Keys in Browse Mode
ON/OFF
Start
SensCal
FiltCal
FlowCal
Function Keys in Edit Mode
-List
APPENDIX A: OVERVIEW OF SCREENS
+List
Bksp
ChSign
PAGE A-27
Revision B.004
Operating Manual, Partisol-Plus Model 2025 Sequential Air Sampler
Figure A-61. Sensor
Calibration screen in
calibration/audit (Service
Mode).
Sensor Calibration
Current Actual Offset
Amb Temp (C) : 22.4
Amb Pres(mmHg): 767
Amb RH (%) : 40.9
0.0
0.15
0
1.0
0.0
0.23
I/O Cal
FiltCal
FlowCal
Function Keys in Browse Mode
I/O Cal
FiltCal
FlowCal
Function Keys in Edit Mode
-List
Figure A-62. Filter Temperature Calibration screen
in calibration/audit (Service
Mode).
+List
Bksp
ChSign
Filter Temp Calibration
Current Actual Offset
Filter : 20.8
0.0
0.00
Filt Comp: 21.9
0.0
0.00
I/O Cal
SensCal
FlowCal
Function Keys in Browse Mode
I/O Cal
SensCal
FlowCal
Function Keys in Edit Mode
-List
APPENDIX A: OVERVIEW OF SCREENS
+List
Bksp
ChSign
PAGE A-28
Revision B.004
Operating Manual, Partisol-Plus Model 2025 Sequential Air Sampler
Figure A-63. Flow Calibration screen in calibration/
audit (Service Mode).
Flow1 Calibration
Range: 15.0 - 18.3 | Cur Flow: 00.00 l/min
(Mass: 14.3 - 17.4 )| Set Flow: 00.0 l/min
Num Points: 2
| Act Flow: 00.00 l/min
For Streamline FTS:| Pressure: 0.00 inH2O
Const m: 0.0000
| Offset: 0.000
Const b: 0.0000
| Span: 1.000
I/O Cal
SensCal
FiltCal *More*
Function Keys in Browse Mode
FlowMin
I/O Cal
SensCal
FlowMax
EPA Cal
FiltCal *More*
Start
*Back*
Function Keys in Edit Mode
-List
Figure A-64. ADC Channels screen in low level
system info (Service Mode).
+List
Bksp
ChSign
ADC Channels
MFC 1 0: 1.007
FltComp T 8: 2.971/\
MFC 2 1: 1.001
Humidity 9: 2.148
MFC 3 2: 3.003
Amb Pres 10: 4.123
FiltT 1 3: 2.943
Cal Ref 11: 0.025
FiltT 2 4: 0.000
Elec T 12: 0.000
Amb T 5: 2.955
D/A
APPENDIX A: OVERVIEW OF SCREENS
User 1 13: 0.000\/
Discrte
TPIC
RTC
PAGE A-29
Revision B.004
Operating Manual, Partisol-Plus Model 2025 Sequential Air Sampler
Figure A-65. DAC Channels screen in low level
system info (Service Mode).
DAC Channels
MFC 1 0: 1.000
4: 0.000
MFC 2 1: 0.000
User 1 5: 0.000
MFC 3 2: 0.000
User 2 6: 0.000
3: 0.000
User 3 7: 0.000
A/D
Discrte TPIC
RTC
Function Keys in Browse Mode
A/D
Discrte TPIC
RTC
Function Keys in Edit Mode
-List
Figure A-66. Discrete I/O
screen in low level system
info (Service Mode).
+List
Bksp
Discrete I/O
G1:ON Mux1:ON Spkr:OFF MFC1:OFF
G2:OFF Mux2:ON AORly:OFF MFC2:OFF
SRIN:ON Mux3:ON AIRly:OFF MFC3:OFF
SCLR:ON Mux4:ON Pole:OFF ID3:OFF
RCK:OFF In1:OFF User1:OFF ID2:OFF
SRCK:OFF In2:ON User2:OFF ID1:OFF
A/D
APPENDIX A: OVERVIEW OF SCREENS
D/A
MUX
TPIC
ON/OFF
PAGE A-30
Revision B.004
Operating Manual, Partisol-Plus Model 2025 Sequential Air Sampler
Figure A-67. Multiplexed
Inputs screen in low level
system info (Service Mode).
Multiplexed Inputs
FXCHGid1: OFF PushUp1: ON
LiftDn2: ON
FXCHGid2: ON
ShutRdy: OFF PushDn2: ON
NewFilt1: ON
ShutExt: ON PushUp2: ON
LiftUp1: OFF
: ON
: ON
LiftDn1: ON NewFilt2: ON
PushDn1: OFF LiftUp2: ON
A/D
Figure A-68. TPIC Channels screen in low level
system info (Service Mode).
D/A
Discrte TPIC
ON/OFF
TPIC Channels
LdcLight: ON
Vacuum: OFF
Leak 1: OFF
: OFF
Leak 2: OFF
Pump : OFF Shuttle: OFF
Leak 3: OFF
Modem : ON LiftPush: OFF
Vac 2: OFF
ElecHeat: OFF
: OFF MagPres: OFF
Status : OFF Pressure: OFF
A/D
Figure A-69. Real Time
Clock screen in low level
system info (Service Mode).
D/A
Discrte
: OFF
Vac 3: OFF
ON/OFF
RTC
Real Time Clock
Cur Time: 13:57:44
New Time: 13:57:00
Cur Date: 98/12/30
New Date: 98/12/30
RTC Adjustment: 4.0 seconds/day
Set New Time and New Date to a time in
the future, then press "SetTime" when
the actual real time equals new time.
A/D
APPENDIX A: OVERVIEW OF SCREENS
D/A
Discrte
TPIC
SetTime
PAGE A-31
Revision B.004
Operating Manual, Partisol-Plus Model 2025 Sequential Air Sampler
This page left intentionally blank.
APPENDIX A: OVERVIEW OF SCREENS
PAGE A-32
Revision B.003
Operating Manual, Partisol-Plus Model 2025 Sequential Air Sampler
Appendix B: Program Register Codes
This appendix contains a listing of the program register codes (PRCs) used in the
operating software of the Partisol-Plus Sampler. These codes come into play when the
unit’s two-way serial communication capability (Appendix C) is employed to request
the current value of variables, to change the value of certain system parameters, and
to download data from the system’s internal data logger.
Because the sampler uses the hexadecimal number system for some of its status codes,
this section also explains how to add and subtract hexadecimal numbers, and how to
decipher the sampler’s hexadecimal status codes.
APPENDIX B: LISTING OF PROGRAM REGISTER CODES
PAGE B-1
Revision B.003
Operating Manual, Partisol-Plus Model 2025 Sequential Air Sampler
B.1.
PROGRAM REGISTER CODES
MAIN PROGRAM REGISTER CODES
Code
Description
Units
Range
Default
Edit Modes
N/A
N/A
N/A
NotRun
003 Operating Mode (Internal)
Code*
0-6
N/A
None
005 Status Code (Internal)
Code*
see code desc
0
None
031 Storage Download Type
Code*
0-2
0
Anytime
133 Current Flow 1 (Volumetric)
l/min
N/A
0
None
134 Current Flow 2 (Volumetric)
l/min
N/A
0
None
135 Current Flow 3 (Volumetric)
l/min
N/A
0
None
139 Current Electronics Compart Temperature
°C
N/A
0
None
140 Current Ambient Temperature
°C
N/A
0
None
mmHg
N/A
0
None
144 Current Ambient Relative Humidity
%
N/A
0
None
146 Current Filter 1 Temperature
°C
N/A
0
None
147 Current Filter 2 Temperature
°C
N/A
0
None
148 Current Filter Compartment Temperature
°C
N/A
0
None
151 Current Wind Direction
deg
N/A
0
None
153 Current Wind Speed
km/h
0 - 180
0
None
319 Sampling Action Under Serial Control
N/A
0-2
0
Run
002 Serial Number
141 Current Ambient Pressure
* Codes are described later in this Appendix.
APPENDIX B: LISTING OF PROGRAM REGISTER CODES
PAGE B-2
Revision B.003
Operating Manual, Partisol-Plus Model 2025 Sequential Air Sampler
LISTING OF PROGRAM REGISTER CODES (000-024)
Code
Description
Units
Range
Default
Edit Modes
000 Null
N/A
N/A
N/A
N/A
001 Software Version
N/A
N/A
N/A
None
002 Serial Number
N/A
N/A
N/A
NotRun
003 Operating Mode (Internal)
Code*
0-6
0
None
004 Status Type (Internal)
Code*
0-2
0
None
005 Status Code (Internal)
Code*
see code desc
0
None
006 Current Time/Date (Internal)
sec
N/A
N/A
None
007 New Time/Date
sec
0 - 2.15E9
0
Anytime
008 Standard Temperature
°C
-50 - 50, 99
99
NotRun
mmHg
500 - 900, 999
999
NotRun
°C
-50 - 50, 99
99
NotRun
011 Average Pressure
mmHg
500 - 900, 999
999
NotRun
012 Comm Baud Rate
Code*
0-5
3
Anytime
013 Comm Word Length
Code*
0-3
3
Anytime
014 Comm Stop Bits
Code*
0-1
0
Anytime
015 Comm Parity
Code*
0-2
0
Anytime
016 Comm Flow Control
Code*
0-1
0
Anytime
017 Comm Protocol
Code*
0-5
1
Anytime
018 Comm Parameter 1
N/A
0 - 1E10
52
Anytime
019 Comm Parameter 2
N/A
0 - 1E10
75048
Anytime
020 Comm Parameter 3
N/A
0 - 1E10
13010
Anytime
021 Comm Parameter 4
N/A
0 - 1E10
0
Anytime
022 Comm PRC 1
PRC
PRC
0
Anytime
023 Comm PRC 2
PRC
PRC
0
Anytime
024 Comm PRC 3
PRC
PRC
0
Anytime
009 Standard Pressure
010 Average Temperature
* Codes are described later in this Appendix.
APPENDIX B: LISTING OF PROGRAM REGISTER CODES
PAGE B-3
Revision B.003
Operating Manual, Partisol-Plus Model 2025 Sequential Air Sampler
LISTING OF PROGRAM REGISTER CODES (025-049)
Code
Description
Units
Range
Default
Edit Modes
025 Comm PRC 4
PRC
PRC
0
Anytime
026 Comm PRC 5
PRC
PRC
0
Anytime
027 Comm PRC 6
PRC
PRC
0
Anytime
028 Comm PRC 7
PRC
PRC
0
Anytime
029 Comm PRC 8
PRC
PRC
0
Anytime
030 Comm Interval
sec
0, 1 - 3600
0
Anytime
*Code
0-2
0
Anytime
N/A
10 - 99
11
Anytime
033 Printer Status [not used]
Code*
0
0
None
034 Printer Protocol [not used]
Code*
0-3
0
Anytime
035 Printer Interval [not used]
sec
0, 1 - 3600
0
Anytime
036 Printer PRC 1 [not used]
PRC
PRC
0
Anytime
037 Printer PRC 2 [not used]
PRC
PRC
0
Anytime
038 Printer PRC 3 [not used]
PRC
PRC
0
Anytime
039 Printer PRC 4 [not used]
PRC
PRC
0
Anytime
040 Printer PRC 5 [not used]
PRC
PRC
0
Anytime
041 Printer PRC 6 [not used]
PRC
PRC
0
Anytime
042 Printer PRC 7 [not used]
PRC
PRC
0
Anytime
043 Printer PRC 8 [not used]
PRC
PRC
0
Anytime
Code*
0-2
0
Anytime
045 Analog Input 1, Constant A
N/A
-1E10 - 1E10
0
Anytime
046 Analog Input 2, Constant A
N/A
-1E10 - 1E10
0
Anytime
047 Analog Input 3, Constant A
N/A
-1E10 - 1E10
0
Anytime
048 Analog Input 1, Constant B
N/A
-1E10 - 1E10
0
Anytime
049 Analog Input 2, Constant B
N/A
-1E10 - 1E10
0
Anytime
031 Storage Download Type
032 RS485 Instrument ID
044 Printer Storage ID [not used]
* Codes are described later in this Appendix.
APPENDIX B: LISTING OF PROGRAM REGISTER CODES
PAGE B-4
Revision B.003
Operating Manual, Partisol-Plus Model 2025 Sequential Air Sampler
LISTING OF PROGRAM REGISTER CODES (050-074)
Cod
Description
Units
Range
Default
Edit Modes
050 Analog Input 3, Constant B
N/A
-1E10 - 1E10
0
Anytime
051 Analog Input 1, Constant C
N/A
-1E10 - 1E10
0
Anytime
052 Analog Input 2, Constant C
N/A
-1E10 - 1E10
0
Anytime
053 Analog Input 3, Constant C
N/A
-1E10 - 1E10
0
Anytime
054 Current Analog Input 1
N/A
N/A
0
None
055 Current Analog Input 2
N/A
N/A
0
None
056 Current Analog Input 3
N/A
N/A
0
None
057 Average Analog Input 1
N/A
N/A
0
None
058 Average Analog Input 2
N/A
N/A
0
None
059 Average Analog Input 3
N/A
N/A
0
None
060 Analog Output PRC 1
PRC
PRC
0
Anytime
061 Analog Output PRC 2
PRC
PRC
0
Anytime
062 Analog Output PRC 3
PRC
PRC
0
Anytime
063 Analog Output Minimum 1
N/A
-1E12 - 1E12
0
Anytime
064 Analog Output Minimum 2
N/A
-1E12 - 1E12
0
Anytime
065 Analog Output Minimum 3
N/A
-1E12 - 1E12
0
Anytime
066 Analog Output Maximum 1
N/A
-1E12 - 1E12
0
Anytime
067 Analog Output Maximum 2
N/A
-1E12 - 1E12
0
Anytime
068 Analog Output Maximum 3
N/A
-1E12 - 1E12
0
Anytime
069 Analog Output Type 1
Code*
0-2
2
Anytime
070 Analog Output Type 2
Code*
0-2
2
Anytime
071 Analog Output Type 3
Code*
0-2
2
Anytime
072 Contact Closure PRC 1
PRC
PRC
0
Anytime
073 Contact Closure PRC 2
PRC
PRC
0
Anytime
Code*
0-1
0
Anytime
074 Contact Closure Logic Type 1
* Codes are described later in this Appendix.
APPENDIX B: LISTING OF PROGRAM REGISTER CODES
PAGE B-5
Revision B.003
Operating Manual, Partisol-Plus Model 2025 Sequential Air Sampler
LISTING OF PROGRAM REGISTER CODES (075-099)
Code
Description
Units
Range
Default
Edit Modes
075 Contact Closure Logic Type 2
Code*
0-1
0
Anytime
076 Contact Closure Mask 1
N/A
0 - 1E10
0
Anytime
077 Contact Closure Mask 2
N/A
0 - 1E10
0
Anytime
078 Contact Closure Comparison 1
Code*
0-5
0
Anytime
079 Contact Closure Comparison 2
Code*
0 -5
0
Anytime
080 Contact Closure Comparison Value 1
N/A
-1E10 - 1E10
0
Anytime
081 Contact Closure Comparison Value 2
N/A
-1E10 - 1E10
0
Anytime
082 Current Low Password
N/A
0 - 999999
100000
Anytime
083 New Low Password
N/A
0 - 999999
0
None
084 New Low Password Confirmation
N/A
0 - 999999
0
None
085 Current High Password
N/A
0 - 999999
100000
Anytime
086 New High Password
N/A
0 - 999999
0
None
087 New High Password Confirmation
N/A
0 - 999999
0
None
088 Current Password Protection
Code*
0
0
None
089 Analog Input Offset (Internal)
VDC
-0.2 - 0.2
0
Service
090 Analog Input Span (Internal)
N/A
0.95 - 1.05
1
Service
091 Analog Output Offset 1
VDC
-0.2 - 0.2
0
Service
092 Analog Output Offset 2
VDC
-0.2 - 0.2
0
Service
093 Analog Output Offset 3
VDC
-0.2 - 0.2
0
Service
094 Analog Output Span 1
N/A
0.95 - 1.05
1
Service
095 Analog Output Span 2
N/A
0.95 - 1.05
1
Service
096 Analog Output Span 3
N/A
0.95 - 1.05
1
Service
097 Flow Offset 1
l/min
-0.5 - 0.5
0
Service
098 Flow Offset 2
l/min
-0.5 - 0.5
0
Service
099 Flow Offset 3
l/min
-0.5 - 0.5
0
Service
* Codes are described later in this Appendix.
APPENDIX B: LISTING OF PROGRAM REGISTER CODES
PAGE B-6
Revision B.003
Operating Manual, Partisol-Plus Model 2025 Sequential Air Sampler
LISTING OF PROGRAM REGISTER CODES (100-124)
Code
Description
Units
Range
Default
Edit Modes
100 Flow Span 1
N/A
0.925 - 1.075
1
Service
101 Flow Span 2
N/A
0.925 - 1.075
1
Service
102 Flow Span 3
N/A
0.925 - 1.075
1
Service
103 Flow Calibration Reading
l/min
0 - 20
0
Service
104 Number of Points in Flow Calibration
N/A
2-5
3
Service
105 Flow Calibration Minimum 1
l/min
0 - 20
15
Service
106 Flow Calibration Minimum 2
l/min
0 - 20
15
Service
107 Flow Calibration Minimum 3
l/min
0 - 20
15
Service
108 Flow Calibration Maximum 1
l/min
5 - 20
18.4
Service
109 Flow Calibration Maximum 2
l/min
5 - 20
18.4
Service
110 Flow Calibration Maximum 3
l/min
5 - 20
18.4
Service
111 Volumetric Flow Minimum
l/min
0-25
15
Service
112 Volumetric Flow Maximum
l/min
0-25
18.4
Service
inchH2O
0 - 20
0
Service/Audit
114 Streamline FTP Constant m
N/A
-1 - 1
0
Service/Audit
115 Streamline FTP Constant b
N/A
-1 - 1
0
Service/Audit
116 Ambient Temperature Calibration Reading
°C
-50 - 80
0
Service
117 Ambient Temperature Offset
°C
-10 - 10
0
Service
118 Ambient Pressure Calibration Reading
mmHg
500 - 900
0
Service
119 Ambient Pressure Offset
mmHg
-15 - 15
0
Service
120 Ambient Rel Humidity Calibration Reading
%RH
0 - 100
0
Service
121 Ambient Rel Humidity Offset
%RH
-15 - 15
0
Service
122 Filter Temperature 1 Calibration Reading
°C
-50 - 80
0
Service
123 Filter Temperature 2 Calibration Reading
°C
-50 - 80
0
Service
124 Compartment Temperature Cal Reading
°C
-50 - 80
0
Service
113 FTS Pressure
* Codes are described later in this Appendix.
APPENDIX B: LISTING OF PROGRAM REGISTER CODES
PAGE B-7
Revision B.003
Operating Manual, Partisol-Plus Model 2025 Sequential Air Sampler
LISTING OF PROGRAM REGISTER CODES (125-149)
Code
Description
Units
Range
Default
Edit Modes
125 Filter Temperature 1 Offset
°C
-10 - 10
0
Service
126 Filter Temperature 2 Offset
°C
-10 - 10
0
Service
127 Compartment Temperature Offset
°C
-10 - 10
0
Service
128 Filter Exchange Type
Code*
0-3
0
None
129 Current Filter Exchange Step
Code*
0 -8
0
None
130 Set Point: Flow 1
l/min
0 - 20
0
Service
131 Set Point: Flow 2
l/min
0 - 20
0
Service
132 Set Point: Flow 3
l/min
0 - 20
0
Service
133 Current Flow 1 (Volumetric)
l/min
N/A
0
None
134 Current Flow 2 (Volumetric)
l/min
N/A
0
None
135 Current Flow 3 (Volumetric)
l/min
N/A
0
None
136 Current Flow 1 (Standard)
l/min
N/A
0
None
137 Current Flow 2 (Standard)
l/min
N/A
0
None
138 Current Flow 3 (Standard)
l/min
N/A
0
None
139 Current Electronics Compartment Temp
°C
0 - 70
0
None
140 Current Ambient Temperature
°C
-60 - 70
0
None
141 Average Ambient Temperature
°C
N/A
0
None
142 Current Ambient Pressure
mmHg
10 - 950
0
None
143 Average Ambient Pressure
mmHg
N/A
0
None
144 Current Ambient Relative Humidity
%
0 - 100
0
None
145 Average Ambient Relative Humidity
%
N/A
0
None
146 Current Filter Temperature 1
°C
-60 - 70
0
None
147 Current Filter Temperature 2
°C
-60 - 70
0
None
148 Current Filter Compartment Temperature
°C
-60 - 70
0
None
149 Average Filter Temperature 1
°C
N/A
0
None
* Codes are described later in this Appendix.
APPENDIX B: LISTING OF PROGRAM REGISTER CODES
PAGE B-8
Revision B.003
Operating Manual, Partisol-Plus Model 2025 Sequential Air Sampler
LISTING OF PROGRAM REGISTER CODES (150-174)
Code
Description
Units
Range
Default
Edit Modes
150 Average Filter Temperature 2
°C
N/A
0
None
151 Current Wind Direction
deg
N/A
0
None
152 Average Wind Direction
deg
N/A
0
None
153 Current Wind Speed
km/h
0 - 180
0
None
154 Average Wind Speed
km/h
N/A
0
None
155 Wind Velocity
km/h
0 - 180
0
None
156 Input Data Averaging Period
min
5 - 1440
30
Anytime
157 Date Format
Code*
0-2
0
NotRun
158 Time Format
Code*
0-1
0
NotRun
159 Default Start Time
sec
0 - 86399
0
NotRun
160 Default Duration
sec
60 - 1209600
86400
NotRun
161 Defalt Repeat Time
sec
60 - 1209600
86400
NotRun
162 Default Filter Type
Code*
1 - 26
16
NotRun
163 Sample Flow Rate Set Point 1
l/min
1 -20
0
NotRun
164 Sample Flow Rate Set Point 2
l/min
1 - 20
0
NotRun
Code*
0 -5
0
NotRun
166 Sample Filter Edit
N/A
0 - 16
1
None
167 Sampling Start
sec
0 - 2.14E9
0
NotRun
168 Sampling Mid Stop
sec
0 - 2.14E9
0
NotRun
169 Sampling Restart
sec
0 - 2.14E9
0
NotRun
170 Sampling Stop
sec
0 - 2.14E9
0
NotRun
171 Sample Filter Type A
N/A
0 - 26
0
Anytime
172 Sample Filter Type B
N/A
0 - 26
0
Anytime
173 Sample Filter ID A
N/A
0 - 9999999
0
Anytime
174 Sample Filter ID B
N/A
0 - 9999999
0
Anytime
165 SampleType
* Codes are described later in this Appendix.
APPENDIX B: LISTING OF PROGRAM REGISTER CODES
PAGE B-9
Revision B.003
Operating Manual, Partisol-Plus Model 2025 Sequential Air Sampler
LISTING OF PROGRAM REGISTER CODES (175-199)
Code
Description
Units
Range
Default
Edit Modes
175 Sample Cassette ID A
N/A
0 - 9999999
0
Anytime
176 Sample Cassette ID B
N/A
0 - 9999999
0
Anytime
177 Sample Blank
Code*
0-1
0
Anytime
178 Sampling Condition 1
Code*
0 - 11
0
NotRun
179 Sampling Condition 2
Code*
0 - 11
0
NotRun
180 Sampling Condition 3
Code*
0 - 11
0
NotRun
181 Conditional Sampling Minimum 1
N/A
-1E10 - 1E10
0
NotRun
182 Conditional Sampling Minimum 2
N/A
-1E10 - 1E10
0
NotRun
183 Conditional Sampling Minimum 3
N/A
-1E10 - 1E10
0
NotRun
184 Conditional Sampling Maximum 1
N/A
-1E10 - 1E10
0
NotRun
185 Conditional Sampling Maximum 2
N/A
-1E10 - 1E10
0
NotRun
186 Conditional Sampling Maximum 3
N/A
-1E10 - 1E10
0
NotRun
187 Sample Filter Type 01A
N/A
0 - 26
16
Anytime
188 Sample Filter Type 02A
N/A
0 - 26
16
Anytime
189 Sample Filter Type 03A
N/A
0 - 26
16
Anytime
190 Sample Filter Type 04A
N/A
0 - 26
16
Anytime
191 Sample Filter Type 05A
N/A
0 - 26
16
Anytime
192 Sample Filter Type 06A
N/A
0 - 26
16
Anytime
193 Sample Filter Type 07A
N/A
0 - 26
16
Anytime
194 Sample Filter Type 08A
N/A
0 - 26
16
Anytime
195 Sample Filter Type 09A
N/A
0 - 26
16
Anytime
196 Sample Filter Type 010A
N/A
0 - 26
16
Anytime
197 Sample Filter Type 11A
N/A
0 - 26
16
Anytime
198 Sample Filter Type 12A
N/A
0 - 26
16
Anytime
199 Sample Filter Type 13A
N/A
0 - 26
16
Anytime
* Codes are described later in this Appendix.
APPENDIX B: LISTING OF PROGRAM REGISTER CODES
PAGE B-10
Revision B.003
Operating Manual, Partisol-Plus Model 2025 Sequential Air Sampler
LISTING OF PROGRAM REGISTER CODES (200-224)
Code
Description
Units
Range
Default
Edit Modes
200 Sample Filter Type 14A
N/A
0 - 26
16
Anytime
201 Sample Filter Type 15A
N/A
0 - 26
16
Anytime
202 Sample Filter Type 16A
N/A
0 - 26
16
Anytime
203 Sample Filter Type 01B
N/A
0 - 26
16
Anytime
204 Sample Filter Type 02B
N/A
0 - 26
16
Anytime
205 Sample Filter Type 03B
N/A
0 - 26
16
Anytime
206 Sample Filter Type 04B
N/A
0 - 26
16
Anytime
207 Sample Filter Type 05B
N/A
0 - 26
16
Anytime
208 Sample Filter Type 06B
N/A
0 - 26
16
Anytime
209 Sample Filter Type 07B
N/A
0 - 26
16
Anytime
210 Sample Filter Type 08B
N/A
0 - 26
16
Anytime
211 Sample Filter Type 09B
N/A
0 - 26
16
Anytime
212 Sample Filter Type 10B
N/A
0 - 26
16
Anytime
213 Sample Filter Type 11B
N/A
0 - 266
16
Anytime
214 Sample Filter Type 12B
N/A
0 - 26
16
Anytime
215 Sample Filter Type 13B
N/A
0 - 26
16
Anytime
216 Sample Filter Type 14B
N/A
0 - 26
16
Anytime
217 Sample Filter Type 15B
N/A
0 - 26
16
Anytime
218 Sample Filter Type 16B
N/A
0 - 26
16
Anytime
219 Sample Filter ID01A
N/A
0 - 9999999
0
Anytime
220 Sample Filter ID02A
N/A
0 - 9999999
0
Anytime
221 Sample Filter ID03A
N/A
0 - 9999999
0
Anytime
222 Sample Filter ID04A
N/A
0 - 9999999
0
Anytime
223 Sample Filter ID05A
N/A
0 - 9999999
0
Anytime
224 Sample Filter ID06A
N/A
0 - 9999999
0
Anytime
* Codes are described later in this Appendix.
APPENDIX B: LISTING OF PROGRAM REGISTER CODES
PAGE B-11
Revision B.003
Operating Manual, Partisol-Plus Model 2025 Sequential Air Sampler
LISTING OF PROGRAM REGISTER CODES (225-249)
Code
Description
Units
Range
Default
Edit Modes
225 Sample Filter ID07A
N/A
0 - 9999999
0
Anytime
226 Sample Filter ID08A
N/A
0 - 9999999
0
Anytime
227 Sample Filter ID09A
N/A
0 - 9999999
0
Anytime
228 Sample Filter ID10A
N/A
0 - 9999999
0
Anytime
229 Sample Filter ID11A
N/A
0 - 9999999
0
Anytime
230 Sample Filter ID12A
N/A
0 - 9999999
0
Anytime
231 Sample Filter ID13A
N/A
0 - 9999999
0
Anytime
232 Sample Filter ID14A
N/A
0 - 9999999
0
Anytime
233 Sample Filter ID15A
N/A
0 - 9999999
0
Anytime
234 Sample Filter ID16A
N/A
0 - 9999999
0
Anytime
235 Sample Filter ID01B
N/A
0 - 9999999
0
Anytime
236 Sample Filter ID02B
N/A
0 - 9999999
0
Anytime
237 Sample Filter ID03B
N/A
0 - 9999999
0
Anytime
238 Sample Filter ID04B
N/A
0 - 9999999
0
Anytime
239 Sample Filter ID05B
N/A
0 - 9999999
0
Anytime
240 Sample Filter ID06B
N/A
0 - 9999999
0
Anytime
241 Sample Filter ID07B
N/A
0 - 9999999
0
Anytime
242 Sample Filter ID08B
N/A
0 - 9999999
0
Anytime
243 Sample Filter ID09B
N/A
0 - 9999999
0
Anytime
244 Sample Filter ID10B
N/A
0 - 9999999
0
Anytime
245 Sample Filter ID11B
N/A
0 - 9999999
0
Anytime
246 Sample Filter ID12B
N/A
0 - 9999999
0
Anytime
247 Sample Filter ID13B
N/A
0 - 9999999
0
Anytime
248 Sample Filter ID14B
N/A
0 - 9999999
0
Anytime
249 Sample Filter ID15B
N/A
0 - 9999999
0
Anytime
* Codes are described later in this Appendix.
APPENDIX B: LISTING OF PROGRAM REGISTER CODES
PAGE B-12
Revision B.003
Operating Manual, Partisol-Plus Model 2025 Sequential Air Sampler
Listing of Program Register Codes (250-274)
Code
Description
Units
Range
Default
Edit Modes
250 Sample Filter ID16B
N/A
0 - 9999999
0
Anytime
251 Sample Cassette ID 01A
N/A
0 - 9999999
0
Anytime
252 Sample Cassette ID 02A
N/A
0 - 9999999
0
Anytime
253 Sample Cassette ID 03A
N/A
0 - 9999999
0
Anytime
254 Sample Cassette ID 04A
N/A
0 - 9999999
0
Anytime
255 Sample Cassette ID 05A
N/A
0 - 9999999
0
Anytime
256 Sample Cassette ID 06A
N/A
0 - 9999999
0
Anytime
257 Sample Cassette ID 07A
N/A
0 - 9999999
0
Anytime
258 Sample Cassette ID 08A
N/A
0 - 9999999
0
Anytime
259 Sample Cassette ID 09A
N/A
0 - 9999999
0
Anytime
260 Sample Cassette ID 10A
N/A
0 - 9999999
0
Anytime
261 Sample Cassette ID 11A
N/A
0 - 9999999
0
Anytime
262 Sample Cassette ID 12A
N/A
0 - 9999999
0
Anytime
263 Sample Cassette ID 13A
N/A
0 - 9999999
0
Anytime
264 Sample Cassette ID 14A
N/A
0 - 9999999
0
Anytime
265 Sample Cassette ID 15A
N/A
0 - 9999999
0
Anytime
266 Sample Cassette ID 16A
N/A
0 - 9999999
0
Anytime
267 Sample Cassette ID 01B
N/A
0 - 9999999
0
Anytime
268 Sample Cassette ID 01B
N/A
0 - 9999999
0
Anytime
269 Sample Cassette ID 01B
N/A
0 - 9999999
0
Anytime
270 Sample Cassette ID 01B
N/A
0 - 9999999
0
Anytime
271 Sample Cassette ID 01B
N/A
0 - 9999999
0
Anytime
272 Sample Cassette ID 01B
N/A
0 - 9999999
0
Anytime
273 Sample Cassette ID 01B
N/A
0 - 9999999
0
Anytime
274 Sample Cassette ID 01B
N/A
0 - 9999999
0
Anytime
* Codes are described later in this Appendix.
APPENDIX B: LISTING OF PROGRAM REGISTER CODES
PAGE B-13
Revision B.003
Operating Manual, Partisol-Plus Model 2025 Sequential Air Sampler
Listing of Program Register Codes (275-299)
Code
Description
Units
Range
Default
Edit Modes
275 Sample Cassette ID 09B
N/A
0 - 9999999
0
Anytime
276 Sample Cassette ID 10B
N/A
0 - 9999999
0
Anytime
277 Sample Cassette ID 11B
N/A
0 - 9999999
0
Anytime
278 Sample Cassette ID 12B
N/A
0 - 9999999
0
Anytime
279 Sample Cassette ID 13B
N/A
0 - 9999999
0
Anytime
280 Sample Cassette ID 14B
N/A
0 - 9999999
0
Anytime
281 Sample Cassette ID 15B
N/A
0 - 9999999
0
Anytime
282 Sample Cassette ID 16B
N/A
0 - 9999999
0
Anytime
283 Sample Blank 01
N/A
0-1
0
Anytime
284 Sample Blank 02
N/A
0-1
0
Anytime
285 Sample Blank 03
N/A
0-1
0
Anytime
286 Sample Blank 04
N/A
0-1
0
Anytime
287 Sample Blank 05
N/A
0-1
0
Anytime
288 Sample Blank 06
N/A
0-1
0
Anytime
289 Sample Blank 07
N/A
0-1
0
Anytime
290 Sample Blank 08
N/A
0-1
0
Anytime
291 Sample Blank 09
N/A
0-1
0
Anytime
292 Sample Blank 10
N/A
0-1
0
Anytime
293 Sample Blank 11
N/A
0-1
0
Anytime
294 Sample Blank 12
N/A
0-1
0
Anytime
295 Sample Blank 13
N/A
0-1
0
Anytime
296 Sample Blank 14
N/A
0-1
0
Anytime
297 Sample Blank 15
N/A
0-1
0
Anytime
298 Sample Blank 16
N/A
0-1
0
Anytime
299 Site ID1
N/A
0
0
Anytime
* Codes are described later in this Appendix.
APPENDIX B: LISTING OF PROGRAM REGISTER CODES
PAGE B-14
Revision B.003
Operating Manual, Partisol-Plus Model 2025 Sequential Air Sampler
Listing of Program Register Codes (300-324)
Code
Description
Units
Range
Default
Edit Modes
300 Site ID2
N/A
0
0
Anytime
301 Separators
N/A
0-1
0
NotRun
302 Current Sample Start
N/A
0
0
None
303 Current Sample MidStop
N/A
0
0
None
304 Current Sample Restart
N/A
0
0
None
305 Current Sample Stop
N/A
0
0
None
306 Current Filter Type1
N/A
0
0
None
307 Current Filter Type2
N/A
0
0
None
308 Current Filter ID1
N/A
0
0
None
309 Current Filter ID2
N/A
0
0
None
310 Current Cassette ID1
N/A
0
0
None
311 Current Cassette ID2
N/A
0
0
None
312 Current Sample Blank
N/A
0
0
None
313
Volume 1
N/A
0
0
None
314
Volume 2
N/A
0
0
None
315
Valid Time
N/A
0
0
None
316
Total Time
N/A
0
0
None
N/A
0
N/A
None
Total Filter Count
N/A
0
N/A
None
319 Sampling Serial Control
Code*
0-2
0
Anytime
N/A
0-1
Single
Anytime
321 Flow Mode
N/A
0-1
ERR
NotRun
322 Filter Exchange Status
N/A
0 - 20
0
None
323
N/A
0
0
None
N/A
0
N/A
None
317 Filter Count
318
320
AI Mode
Audit Elapsed Time
324 Real Time Clock Reference Time
* Codes are described later in this Appendix.
APPENDIX B: LISTING OF PROGRAM REGISTER CODES
PAGE B-15
Revision B.003
Operating Manual, Partisol-Plus Model 2025 Sequential Air Sampler
Listing of Program Register Codes (325-349)
Code
Description
Units
Range
Default
Edit Modes
sec/day
-60 - 60
4
Service
325
Real Time Clock Adjustment
326
Filter Fan Control
N/A
0-2
2
NotRun
327
Flow Configuration
N/A
0-2
0
NotRun
328
Auto Run
N/A
0-1
0
Anytime
329
330
331
332
333
334
335
336
337
338
339
340
341
342
343
344
345
346
347
348
349
* Codes are described later in this Appendix.
APPENDIX B: LISTING OF PROGRAM REGISTER CODES
PAGE B-16
Revision B.003
Operating Manual, Partisol-Plus Model 2025 Sequential Air Sampler
B.2.
PRC VALUES DEFINED BY CODES
Some of the Partisol-Plus Sampler’s program register codes (PRC) have values that
are defined by codes. These codes are defined in this section.
PRC 3: Operating Mode
0
STOP
1
WAIT
2
SAMP
3
DONE
4
ERR
5
SVC
6
PAUS
Stop
Wait
Sample
Done
Error
Service
Pause
PRC 4: Status Type
0
OK
1
WARN
2
CRIT
OK
Status Warning
Critical Warning (see PRC 5 below)
PRC 5: Status Code
0
OK
No Status Conditions
(H)1
M
Flash Memory
(H)2
C
Automatic System Calibration Failed
(H)4
Y
System Reset Occurred
(H)8
Z
Power Failure
(H)10
F1
Flow 1 Out of Range
(H)20
F2
Flow 2 Out of Range
(H)40
F3
Flow 3 Out of Range
(H)80
S1
Flow 1 Stopped Due to 10% Dev for 5 minutes*
(H)100
S2
Flow 2 Stopped Due to 10% Dev for 5 minutes*
(H)200
S3
Flow 3 Stopped Due to 10% Dev for 5 minutes*
(H)400
A
Ambient Sensor Out of Range
(H)800
T
Filter or Compartment Temp Sensor Out of Range
(H)1000
E
Electronics Temperature Out of Range
(H)2000
R1
Diff of Filter Temp 1 and Ambient Temp > ± 5 °C
(H)4000
R2
Diff of Filter Temp 2 and Ambient Temp > ± 5 °C
(H)8000
X
Filter Exchange Mechanism Failure*
(H)10000
N
Out of Filters
(H)20000
O1
Coeff of Variation for Flow 1 Too High
(H)40000
O2
Coeff of Variation for Flow 2 Too High
(H)80000
O3
Coeff of Variation for Flow 3 Too High
* Critical warning, see PRC 4 above.
NOTE: The current status code is the sum of all conditions that currently apply.
APPENDIX B: LISTING OF PROGRAM REGISTER CODES
PAGE B-17
Revision B.003
Operating Manual, Partisol-Plus Model 2025 Sequential Air Sampler
PRC 5: Status Code (continued)
(H)100000
P
Elapsed Sample Period Out of Range
(H)200000
L
Leak Check Failed
(H)400000
D
Audit Performed in Middle of Sample
(H)800000
B
Blank Filter
(H)1000000
S
Stop Key Pressed
NOTE: The current status code is the sum of all conditions that currently apply.
PRC 12: Comm Baud Rate
0
1200
1
2400
2
4800
3
9600
4
19200
5
38400
PRC 13: Comm Word Length
0
5
1
6
2
7
3
8
PRC 14: Stop Bits
0
1
1
2
PRC 15: Comm Parity
0
None
1
Even
2
Odd
PRC 16: Comm Flow Control
0
None
1
Xon/Xoff
APPENDIX B: LISTING OF PROGRAM REGISTER CODES
PAGE B-18
Revision B.003
Operating Manual, Partisol-Plus Model 2025 Sequential Air Sampler
PRC 17: Comm Protocol
0
None
1
AK
2
Storage
3
RealTime
4
Cycle
5
German
PRC 31: Storage Download Type
0
Filter Data
1
Interval Data
2
Input Data
PRC 33: Printer Status [not used]
0
ONLINE
1
BUSY
2
OFFLINE
3
NO PAPER
4
ERROR
PRC 34: Printer Protocol [not used]
0
None
1
Storage
2
RealTime
3
Cycle
PRC 44: Printer Storage ID [not used]
0
Set Point Information
2
Carbon Concentration Information
4
Calibration/Audit Data
PRC 69, 70, 71: Analog Output Type 1, 2, 3
0
0-1 VDC
1
0-2 VDC
2
0-5 VDC
APPENDIX B: LISTING OF PROGRAM REGISTER CODES
PAGE B-19
Revision B.003
Operating Manual, Partisol-Plus Model 2025 Sequential Air Sampler
PRC 74, 75: Contact Closure Logic Type 1, 2
0
AND
1
OR
PRC 78, 79: Contact Closure Comparison 1, 2
0
<
Less Than
1
<=
Less Than or Equal
2
=
Equal
3
>=
Greater Than or Equal
4
>
Greater Than
5
<>
Not Equal
PRC 88: Current Password Protection
0
No Protection Enabled – Regular Operation
1
Low Password Protection Enabled
2
High Password Protection Enabled
PRC 128: Filter Exchange Type
0
MANUAL
1
SINGLE
2
DICHOT
3
MODULE
Manual Filter Exchange [not used]
Single Flow Path
Dual Flow Path
Single Flow Path with Speciation Modules
PRC 129: Current Filter Exchange Step
0
----Filter Exchange Not Active
1
PRESS
End Sampling, Build Pressure
2
MAGPR
Magazine Pressure Lifts New Cassette
3
LPON
Lower Sample Platform, Raise Plunger
4
SHUTH
Shuttle Pushes Cassettes to New Positions
5
LPOFF
Lift Sampling Platform, Lower Plunger
6
SHUTB
Retract Shuttle for New Cassette
7
DONE
Turn Off Pressure; Exchange Complete
APPENDIX B: LISTING OF PROGRAM REGISTER CODES
PAGE B-20
Revision B.003
Operating Manual, Partisol-Plus Model 2025 Sequential Air Sampler
PRC 157: Date Format
0
yy/mm/dd
1
mm/dd/yy
2
dd/mm/yy
PRC 158: Time Format
0
.
1
:
Uses “.” as Separator
Uses “:” as Separator
PRC 162: Default Filter Type
0
Space
1
A
2
B
3
C
4
D
5
E
6
F
7
G
8
H
9
I
10
J
11
K
12
L
13
M
14
N
15
O
16
P
17
Q
18
R
19
S
20
T
21
U
22
V
23
W
24
X
25
Y
26
Z
APPENDIX B: LISTING OF PROGRAM REGISTER CODES
PAGE B-21
Revision B.003
Operating Manual, Partisol-Plus Model 2025 Sequential Air Sampler
PRC 165: Sample Type
0
BASIC
1
TIME
2
TIME2
3
ADV
4
EPISOD
5
RS232
PRC 178, 179, 180:
0
1
2
3
4
5
6
7
8
9
10
11
24-hour Based Sampling
Time Base Continuous Sampling
Time Base Cont. Samp/ two intervals
Conditional Sampling
Episodic Conditional Sampling
Sampler Operation to PRC
Sampling Conditions 1, 2, 3
-----None
TEMP
Ambient Temperature (°C)
PRES
Ambient Pressure (mmHg)
%RH
Ambient Relative Humidity (%)
WNDSPD
Wind Speed (km/h)
WNDDIR
Wind Dir (deg)
AI1
Analog Input 1 (Engineering Units)
AI2
Analog Input 2 (Engineering Units)
AI3
Analog Input 3 (Engineering Units)
AI1AVE
Ave Analog Input 1 (Engineering Units)
AI2AVE
Ave Analog Input 2 (Engineering Units)
AI3AVE
Ave Analog Input 3 (Engineering Units)
PRC 177: Filter Blank Operation
0
No
1
Yes
PRC 301: Separators
0
No
1
Yes
PRC 319: Sampling Action Under Serial Control
0
Stop Sampling (Sampling Not Active)
1
Exchange Cassette, Goes to State 2 (Sampling Active)
2
Activate Sampling (Sampling Active)
APPENDIX B: LISTING OF PROGRAM REGISTER CODES
PAGE B-22
Revision B.003
Operating Manual, Partisol-Plus Model 2025 Sequential Air Sampler
PRC 321: Flow Mode
0
Err
1
Wait
B.3.
Error Mode
Wait Mode
DECIPHERING HEXADECIMAL STATUS CODES
When the Partisol-Plus Sampler’s PRC 5: Status Codes are downloaded, they are
displayed as hexadecimal numbers. This section describes hexadecimal numbers,
shows you how to do simple addition and subtraction with these numbers and explains
how they relate to the sampler’s status codes.
Generally, in our everyday lives, we use the decimal number system, which is a base10 number system. It uses 10 symbols (0, 1, 2, 3, 4, 5, 6, 7, 8 and 9) to represent number
values. The hexadecimal number system is a base-16 number system that uses 16
symbols (0, 1, 2, 3, 4, 5, 6, 7, 8, 9, A, B, C, D, E and F) (Figure B-1) to represent number
values. This can make simple addition and subtraction a bit confusing.
Figure B-1. The decimal
number system and its
hexadecimal equivalent.
Decimal
0
1
2
3
4
5
6
7
8
9
10
11
12
13
14
15
16
17
Hexadecimal
0
1
2
3
4
5
6
7
8
9
A
B
C
D
E
F
10
11
APPENDIX B: LISTING OF PROGRAM REGISTER CODES
PAGE B-23
Revision B.003
Operating Manual, Partisol-Plus Model 2025 Sequential Air Sampler
B.3.1.
PLACE HOLDERS
In the hexadecimal number system, when the value of a number exceeds 15 (which is
represented by “F”), you must pay attention to the number’s “place holder.” A “place
holder” is the number or symbol that is placed in front of a base number to represent
larger numerical values (Example B-1).
Example B-1.
place holders
↓
↓
00
10
01
11
02
12
03
13
↓
20
21
22
23
In the decimal number system, place holders increase by a value of 10. If we use the
decimal number system in Example B-1, the numerical values of the place holders will
increase by a value of 10. In the first row of Example B-1, the place holder is “0,” which
makes the decimal numerical value of the first number in that row: 0·10+0 = 0. In the
second row, the place holder is “1,” so the decimal numerical value of the first number
in that row is 1·10+0 = 10. The place holder in the third row is “2,” which makes the
decimal numerical value of the first number in that row: 2·10+0 = 20.
However, place holders in the hexadecimal number system increase by a value of
16.This changes the values of the numbers in Example B-1. In the first row of Example
B-1, the place holder is “0,” which makes the hexadecimal numerical value of the first
number in that row: 0·16+0 = 0. In the second row, the place holder is “1,” so the
hexadecimal numerical value of the first number in that row is 1·16+0 = 16. The place
holder in the third row is “2,” which makes the hexadecimal numerical value of the
first number in that row: 2·16+0 = 32.
B.3.2.
CONVERTING DECIMAL NUMBERS TO HEXADECIMAL
Converting the decimal numbers 0, 1, 2, 3, 4, 5, 6, 7, 8 and 9 to hexadecimal numbers
is easy, because they hold the same value in the hexadecimal number system. The
decimal numbers 10, 11, 12, 13, 14 and 15, convert to the letters A, B, C, D, E and F
(Figure B-1), respectively, in the hexadecimal number system.
APPENDIX B: LISTING OF PROGRAM REGISTER CODES
PAGE B-24
Revision B.003
Operating Manual, Partisol-Plus Model 2025 Sequential Air Sampler
B.3.2.1.
CONVERTING LARGE DECIMAL NUMBERS TO HEXADECIMAL
To convert large decimal numbers, such as 74 or 2045, to hexadecimal form, you must
divide the decimal number by 16 repeatedly until you reach 0, while placing each
remainder in a back-to-front sucession until you reach the beginning of the hexadecimal number (Examples B-2 and B-3).
NOTE: In the following examples, hexadecimal numbers
will be designated by an (H) in front of the number.
APPENDIX B: LISTING OF PROGRAM REGISTER CODES
PAGE B-25
Revision B.003
Operating Manual, Partisol-Plus Model 2025 Sequential Air Sampler
Example B-2.
Convert 74 to hexadecimal form.
74 = (H)_ _ _
First, divide 16 into 74:
74 ÷ 16 = 4 with a remainder of 10
Convert the 10 to hexadecimal form (Figure B-1):
10 = (H)A
and place it at the end of the hexadecimal number:
74 = (H)_ _ A
Now, continue to divide by 16:
4 ÷ 16 = 0 with a remainder of 4
Place these numbers in the following place holders:
74 = (H)0 4 A
Therefore:
74 = (H)4A
APPENDIX B: LISTING OF PROGRAM REGISTER CODES
PAGE B-26
Revision B.003
Operating Manual, Partisol-Plus Model 2025 Sequential Air Sampler
Example B-3.
Convert 2045 to hexadecimal form.
2045 = (H)_ _ _ _
First, divide 16 into 2045:
2045 ÷ 16 = 127 with a remainder of 13
Convert the 13 to hexadecimal (Figure B-1):
13 = (H)D
and place it at the end of the hexadecimal number:
2045 = (H)_ _ _ D
Now, continue to divide by 16:
127 ÷ 16 = 7 with a remainder of 15
Convert the 15 to hexadecimal:
15 = (H)F
and place it in the next place holder:
2045 = (H)_ _ F D
Now, continue to divide by 16:
7 ÷ 16 = 0 with a remainder of 7
Place these numbers in the following place holders:
2045 = (H)0 7 F D
Therefore:
2045 = (H)7FD
APPENDIX B: LISTING OF PROGRAM REGISTER CODES
PAGE B-27
Revision B.003
Operating Manual, Partisol-Plus Model 2025 Sequential Air Sampler
B.3.3.
CONVERTING SMALL HEXADECIMAL NUMBERS TO DECIMAL
To convert small hexadecimal numbers to decimal, multiply each place holder by 16
and then add the sum to the actual number in each place holder (Example B-4).
Example B-4.
Convert (H)5C to decimal form.
First, multiply 5 by 16:
5·16 = 80
Then, convert (H)C to decimal form:
H(C) = 12
Now add 80 and 12:
80 + 12 = 92
Therefore:
(H)5C = 92
APPENDIX B: LISTING OF PROGRAM REGISTER CODES
PAGE B-28
Revision B.003
Operating Manual, Partisol-Plus Model 2025 Sequential Air Sampler
B.3.4.
CONVERTING LARGE HEXADECIMAL NUMBERS TO DECIMAL
To convert hexadecimal numbers to decimal, you need to understand the concept of
“16 to the power of...”which coincides with the number of place holders in the
hexadecimal number. As you work your way from the beginning to the end of the
hexadecimal number, you must multiply each number in each place holder by the
correct power of 16, except in the “one’s” place holder (Section B.3.3.1). Then you
must add these sums together to find the decimal equivalent of the original hexadecimal number (Examples B-5 and B-6).
B.3.4.1.
UNDERSTANDING THE POWERS OF 16
Each place holder in a hexadecimal number coincides with a “power of 16.”
In the “one’s” place (the place holder furthest to the right) of a hexadecimal number,
the power of 16 is zero. This is represented as 160, and its numerical value is 16·0 =
0. For example, in the number (H)742, the number “2” is in the one’s place. The
numerical value of the number “2” is expressed as 16·0+2 = 2.
In the “ten’s” place (the place holder directly to the left of the one’s place) of a
hexadecimal number, the power of 16 is “1.” This is represented as 161, and its
numerical value is 16·1 = 16. For example, in the number (H)742, the number “4” is
in the ten’s place. The numerical value of the number “4” is expressed as 16·1·4 = 64.
In the “100’s” place (the place holder directly to the left of the ten’s place) of a
hexadecimal number, the power of 16 is “2.” This is represented as 162, and its
numerical value is 16·16 = 256. For example, in the number (H)742, the number “7”
is in the 100’s place. The numerical value of the number “7” is expressed as 16·16·7
= 1,792.
In the “1,000’s” place (the place holder directly to the left of the 100’s place) of a
hexadecimal number, the power of 16 is “3.” This is represented as 163, and its
numerical value is 16·16·16 = 4,096. For example, in the number (H)32B7, the number
“3” is in the 1,000’s place. The numerical value of the number “3” is expressed as
16·16·16·3 = 12,288.
APPENDIX B: LISTING OF PROGRAM REGISTER CODES
PAGE B-29
Revision B.003
Operating Manual, Partisol-Plus Model 2025 Sequential Air Sampler
Example B-5.
Convert (H)2B4A to decimal form.
First, multiply 2 by 163:
(163 represents the place holder occupied by the number 2)
2·163 = 8,192
Next, convert (H)B to decimal form:
(H)B = 11
Next, multiply 11 by 162:
(162 represents the place holder occupied by the letter B)
11·162 = 2,816
Now add 8,192 and 2,816:
8,192 + 2,816 = 11,008
Next, multiply 4 by 161:
(161 represents the place holder occupied by the number 4)
4·161 = 64
Now add 11,008 and 64:
11,008 + 64 = 11,072
Next, convert (H)A to decimal form:
(H)A = 10
Add 10 and 160:
(160 represents the place holder occupied by the letter A)
10+160 = 10
Now add 11,072 and 10:
11,072 + 10 = 11,082
Therefore:
(H)2B4A = 11,082
APPENDIX B: LISTING OF PROGRAM REGISTER CODES
PAGE B-30
Revision B.003
Operating Manual, Partisol-Plus Model 2025 Sequential Air Sampler
Example 5 can also be expressed in the following form (Example 6):
Example B-6.
(H)2B4A
160 = 16·0+10 = 10 {(H)A = 10}
161 = 16·1·4 = 64
162 = 16·16·11 = 2,816 {(H)B = 11}
3
16 = 16·16·16·2 = 8,192
10 + 64 + 2,816 + 8,192 = 11,082
Therefore:
(H)2B4A = 11,082
APPENDIX B: LISTING OF PROGRAM REGISTER CODES
PAGE B-31
Revision B.003
Operating Manual, Partisol-Plus Model 2025 Sequential Air Sampler
B.3.5.
ADDING SMALL HEXADECIMAL NUMBERS
To add small hexadecimal numbers, simply convert them to decimal numbers and add
them together. When you find the decimal sum, convert it into a hexadecimal number
(Example B-7).
Example B-7.
(H)5
+(H)4
?
converts to
5
+4
9
When you convert the decimal sum, 9, into a hexadecimal number, you have (H)9
(Figure B-1).
(H)5
+(H)4
(H)9
converts to
5
+4
9
To add hexadecimal numbers with sums larger than 9, you will need to pay attention
to their place holders. Similar to Example B-7, convert the hexadecimal numbers to
decimal numbers and add them together (Example B-8).
Example B-8.
(H)A
+(H)D
?
converts to
APPENDIX B: LISTING OF PROGRAM REGISTER CODES
10
+13
23
PAGE B-32
Revision B.003
Operating Manual, Partisol-Plus Model 2025 Sequential Air Sampler
At this point, you should convert 23 into hexadecimal form by dividing it by 16. When
you divide 16 into 23, you will find that 16 goes into 23 one time with remainder of
7 . Therefore, the hexadecimal equivalent of 23 is (H)17, where (H)17 = 1·16+7 = 23.
(H)A
+(H)D
(H)17
B.3.6.
converts to
10
+13
23
ADDING LARGE HEXADECIMAL NUMBERS
To add large hexadecimal numbers, such as numbers that are 3 or more digits in length,
you can use simple linear addition (Example B-9).
APPENDIX B: LISTING OF PROGRAM REGISTER CODES
PAGE B-33
Revision B.003
Example B-9.
(H)24B
+ (H)355
(H) ?
First, convert (H)B to decimal form:
(H)B = 11
Next, add 11 and 5:
11 + 5 = 16
Now convert 16 to hexadecimal form:
16 = (H)10
In the original equation, place the zero under the right-hand column
of numbers and carry the 1 over to the middle column:
1
(H)24B
+ (H)355
(H) 0
Now, add 1, 4 and 5:
1 + 4 + 5 = 10
Now convert 10 to hexadecimal form:
10 = (H)A
In the original equation, place the A under the middle column:
(H)24B
+ (H)355
(H) A0
Now, add 2 and 3:
2+3=5
In the original equation, place the 5 under the left-hand column:
(H)24B
+ (H)355
(H)5A0
APPENDIX B: LISTING OF PROGRAM REGISTER CODES
PAGE B-34
Revision B.003
Operating Manual, Partisol-Plus Model 2025 Sequential Air Sampler
B.3.7.
DECIPHERING STATUS CODES
When downloaded, the Partisol-Plus Sampler’s PRC 5: Status Codes are displayed in
hexadecimal form. The sampler may display more than one code at at time. When the
unit does show more than one status code, it adds the codes together and displays them
as a hexadecimal sum.
For example, if the unit displays the Flash Memory status code (hexadecimal number
“(H)1”) (Section B.2) and the System Reset Occurred status code (hexadecimal
number “(H)4”) at the same time, the two status codes (when downloaded) will be
displayed as the hexadecimal number “5.”
In Section B.2, the PRC 5: Status Code table has only two status codes that would add
up to a value of 5. By looking at this table and breaking down the downloaded status
codes, you will be able to decipher which status codes the unit has displayed.
To properly use the PRC 5: Status Code table, you must separate the status codes on
the table into place holders: the “one’s,” “ten’s,” “100’s,” “1,000’s,” “10,000’s,” and
“100,000’s” and the “1,000,000’s” place. To break down the downloaded status
codes, you must match each section of the status code with these place holders. See
Examples B-10 and B-11 for assistance with deciphering hexadecimal status codes.
APPENDIX B: LISTING OF PROGRAM REGISTER CODES
PAGE B-35
Revision B.003
Example B-10.
Decipher the following downloaded status code: 20C30
First, look at the PRC 5: Status Code table in Section B.2, and break down the status code into
its different place holders:
1) There are no status codes displayed in the “one’s” place of the original status code.
2) In the “ten’s” place of the original status code, a status code of “30” is displayed. Because
there are no status codes in the table that match this number, you will need to break down this
number further.
In the “ten’s” place of the table, there are only two status codes that, when added together, will
amount to 30: (H)10 “Flow 1 Out of Range” and (H)20 “Flow 2 Out of Range.” These are two
of the status codes that the unit is displaying in its original status code.
At this point, you must subtract “30” from the original status code: 20C30 - 30 = 20C00. Now,
continue to break down the resulting status code to decipher the rest of the status codes
displayed in this number.
3) In the “100’s” place of the new status code (20C00), a status code of “C00 ” is displayed.
Because there are no status codes in the table that match this number, you will need to break
down this number further.
First, convert C00 to a decimal number. From the table in Figure B-1, you see that “C” is 12,
which converts “C00” to “1200.”
Next, look at the PRC 5: Status Code table to decipher the “1200” status code. In the “100’s”
place of the table, there are only two status codes that, when added together, will amount to
1200: (H)400 “Ambient Sensor Out of Range” and (H)800 “Filter or Compartment Temp
Sensor Out of Range.” These are two more of the status codes that the unit is displaying in its
original status code.
Now, subtract “C00” from “20C00”: 20C00 - C00 = 20,000. Continue to break down this status
code to decipher the rest of the status codes displayed in this number.
4) In the “10,000’s” place of the PRC 5: Status Code table, the status code (H)20000 “Coeff
of Variation for Flow 1 Too High” matches the “20,000” status code. This is the last status code
that the unit is displaying in its original status code.
Therefore, the downloaded status code, “20C30,” breaks down into the following status codes,
according to the PRC 5: Status Code table:
(H)10 “Flow 1 Out of Range”
(H)20 “Flow 2 Out of Range”
(H)400 “Ambient Sensor Out of Range”
(H)800 “Filter or Compartment Temp Sensor Out of Range”
(H)20000 “Coeff of Variation for Flow 1 Too High.”
APPENDIX B: LISTING OF PROGRAM REGISTER CODES
PAGE B-36
Revision B.003
Operating Manual, Partisol-Plus Model 2025 Sequential Air Sampler
Example B-11.
Decipher the following downloaded status code: 70B002
First, look at the PRC 5: Status Code table in Section B.2, and break down the
status code into its different place holders:
1) In the “one’s” place of the original status code, a status code of “2” is
displayed. In the “one’s” place of the PRC 5: Status Code table, the “2” status
code matches the (H)2 “Automatic System Calibration Failed” status code.
This is one of the status codes that the unit is displaying in its original status
code.
Now, subtract “2” from “70B002”: 70B002 - 2 = 70B000. Continue to break
down this status code to decipher the rest of the status codes displayed in this
number.
2) In the “ten’s” place of the new status code, there are no status codes
displayed.
3) In the “100’s” place of the new status code, there are no status codes
displayed.
4) In the “1,000’s” place of the new status code (70B000), a status code of
“B000 ” is displayed. Because there are no status codes in the PRC 5: Status
Code table that match this number, you will need to break down this number
further.
First, convert “B000” to a decimal number. From the table in Figure B-1, you
see that “B” is 11, which converts “B000” to “11,000.”
Next, look at the PRC 5: Status Code table to decipher the “11,000” status
code. In the “1,000’s” place of the table, there are three status codes that, when
added together, will amount to 11,000: (H)1000 “Electronics Temperature
Out of Range,” (H)2000 “Diff of Filter Temp 1 and Ambient Temp > ±5° C”
and (H)8000 “Filter Exchange Mechanism Failure.” These are three more of
the status codes that the unit is displaying in its original status code.
Now, subtract “B000” from “70B000”: 70B000 - B000 = 700000. Continue
to break down this status code to decipher the rest of the status codes displayed
in this number.
(Example 11 continued on page B-38)
APPENDIX B: LISTING OF PROGRAM REGISTER CODES
PAGE B-37
Revision B.003
Operating Manual, Partisol-Plus Model 2025 Sequential Air Sampler
(Example 11 continued from page B-37)
4) In the “10,000’s” place of the new status code, there are no status codes
displayed.
5) In the “100,000’s” place of the new status code (700000), a status code of
“700000” is displayed. Because there are no status codes in the PRC 5: Status
Codes table that match this number, you will need to break down this number
further.
In the “100,000’s” place of the PRC 5: Status Code, there are three status
codes that, when added together, will amount to “700,000”: (H)100000
“Elapsed Sample Period Out of Range,” (H)200000 “Leak Check Failed”
and (H)400000 “Audit Performed in Middle of Sample.” These are three
more status codes that the unit is displaying in its original status code.
Therefore, the downloaded status code, “70B002,” breaks down into the
following status codes, according to the PRC 5: Status Code table:
(H)2 “Automatic System Calibration Failed”
(H)1000 “Electronics Temperature Out of Range”
(H)2000 “Diff of Filter Temp 1 and Ambient Temp > ±5° C”
(H)8000 “Filter Exchange Mechanism Failure”
(H)100000 “Elapsed Sample Period Out of Range”
(H)200000 “Leak Check Failed”
(H)400000 “Audit Performed in Middle of Sample.”
APPENDIX B: LISTING OF PROGRAM REGISTER CODES
PAGE B-38
Revision B.003
Operating Manual, Partisol-Plus Model 2025 Sequential Air Sampler
Appendix C: Two-Way Serial Communication
The Partisol-Plus Sampler supports two serial communication protocols: the AK
Protocol and the German Ambient Network Protocol. These permit a locally or
remotely located computer to obtain information digitally from the unit, and are
described in this appendix.
C.1.
AK PROTOCOL
The AK Protocol is the most powerful RS232 mode in the Partisol-Plus Sampler. It
not only allows the user to query the present value of any system variable remotely,
but also permits the user to change the values of system variables and download
information from the internal data logger. The RPComm software supplied with the
unit uses this protocol for two-way communication directly to a computer or through
a modem. The following commands of the AK Protocol are presented in detail in the
following pages:
AREG
Ask Register Command. This allows the user to query the
Partisol-Plus Sampler for the current value of any system variable (Program Register Code, Appendix B).
EREG
Enter Register Command. This allows the user to assign a new
value to any system variable. Great care must be exercised in
using this command, as the value of variables should be changed
only when the monitor is in the appropriate operating mode.
SFxx
Set Function xx Command. This allows the user to send
commands such as <RUN/STOP> to the unit. Each command is
designated with a two-digit code, xx.
ASTO
Ask Storage Command. This allows the user to download a
specified number of records from the internal data logger from
the current position of the AK storage pointer. The location of
this storage pointer may be defined by the SSTO command. The
values on each line of output are delimited by commas.
SSTO
Set Storage Command. This allows the user to change the
location of the AK storage pointer in the internal data logger, and
is used in conjunction with the ASTO command described
above. The AK storage pointer is always located just following
the last record transmitted through the RS232 port via the AK
Protocol. If the circular buffer overwrites this location or if the
ASTO or SSTO commands have not been used, the AK storage
pointer resides at the oldest record in the internal data logger.
APPENDIX C: TWO-WAY SERIAL COMMUNICATION
PAGE C-1
Revision B.003
Operating Manual, Partisol-Plus Model 2025 Sequential Air Sampler
IMPORTANT NOTE: The Partisol-Plus Sampler contains
three internal databases: filter data, interval data and input
data (Section 7). When downloading stored information
using the ASTO and SSTO commands of the AK Protocol,
the user must specify which database is to be accessed by
setting the value of Program Register Code 31 (Appendix B)
to either 0 for filter data, 1 for interval data, or 2 for input
data.
The following pages detail the format of the transmission and response messages of
the commands listed above.
APPENDIX C: TWO-WAY SERIAL COMMUNICATION
PAGE C-2
Revision B.003
Operating Manual, Partisol-Plus Model 2025 Sequential Air Sampler
AK Protocol
Ask Register Command (AREG)
COM 2-WAY SETTINGS
52 ASCII code for the 1-digit Station Number (for example "4": 052). The Station Number is always 1 digit in
RS-Para 1
length.
RS-Para 2
75048 ASCII code representation of the 2-digit Channel Number (for example: "K0": 075, 048). The Channel
RS-Para 3
13010 Optional: Up to 3 ASCII codes can be added to response from instrument. In this case, <CR> and <LF>
Number is always 2 digits in length.
(ASCII codes 013 and 010) are appended to the response. Enter 0 if nothing is to be appended.
0 Not used.
RS-Para 4
Transmission to Instrument
Response from Instrument
B
No Err
Error
ASCII code 002.
1
<STX>
<STX>
1-digit Station Number, RS-Para 1.
2
4
4
3
A
A
4
R
R
5
E
E
6
G
G
7
<space>
8
0
9
<space>
Space.
10
1
S
Program Register Code of the
variable whose value is being
requested. The PRC may be up to
3 digits long. Do not right-fill if the
PRC is less than 3 characters long.
11
2
E
12
2
<ETX>
Program Register Code of the
variable whose value is being
requested. The PRC may be 1 to 3
characters long, and is not
right-filled in the response.
13
<space>
<CR>
Space.
ASCII code 003.
14
1
<LF>
15
15
6
16
16
.
17
17
6
18
18
9
19
19
4
Byte
Example
1
<STX>
2
4
3
A
4
R
5
E
6
G
7
<space>
8
K
9
0
10
<space>
11
1
12
2
13
2
14
<ETX>
Description
Ask Register command. Enter the
Program Register Code of the
desired variable in bytes 21 to 23
below.
Space.
2-digit Channel Number, as defined
by RS-Para 2.
APPENDIX C: TWO-WAY SERIAL COMMUNICATION
Description
ASCII code 002.
1-digit Station Number, RS-Para 1.
4-digit Ask Register command.
<space> Space.
0
Number of current status conditions.
<space> Space.
Current value of the variable
referenced by the Ask Register
command.
NOTE: This value can be of varying
length.
PAGE C-3
Revision B.003
Operating Manual, Partisol-Plus Model 2025 Sequential Air Sampler
AK Protocol
Ask Register Command (AREG) (continued)
Transmission to Instrument
Byte
Example
Description
Response from Instrument
Error
B
No Err
20
20
<ETX>
ASCII code 003.
21
21
<CR>
22
22
<LF>
23
23
Up to 3 digits appended to the
end of the response
transmission, according to the
entry for RS-Para 3.
24
24
25
25
26
26
27
27
28
28
29
29
30
30
31
31
32
32
33
33
34
34
35
35
36
36
37
37
38
38
39
39
40
40
41
41
42
42
43
43
44
44
45
45
46
46
APPENDIX C: TWO-WAY SERIAL COMMUNICATION
Description
PAGE C-4
Revision B.003
Operating Manual, Partisol-Plus Model 2025 Sequential Air Sampler
AK Protocol
Enter Register Command (EREG)
COM 2-WAY SETTINGS
52 ASCII code for the 1-digit Station Number (for example "4": 052). The Station Number is always 1 digit in
RS-Para 1
length.
RS-Para 2
75048 ASCII code representation of the 2-digit Channel Number (for example: "K0": 075, 048). The Channel
RS-Para 3
13010 Optional: Up to 3 ASCII codes can be added to response from instrument. In this case, <CR> and <LF>
Number is always 2 digits in length.
(ASCII codes 013 and 010) are appended to the response. Enter 0 if nothing is to be appended.
0 Not used.
RS-Para 4
Transmission to Instrument
Byte
Example
1
<STX>
2
4
3
E
4
R
5
E
6
G
7
<space>
8
K
9
0
10
<space>
11
3
12
1
13
14
<space>
15
1
16
17
19
B
No Err
Error
ASCII code 002.
1
<STX>
<STX>
1-digit Station Number, RS-Para 1.
2
4
4
3
E
E
4
R
R
5
E
E
6
G
G
7
<space>
8
0
9
<space>
Space.
10
3
S
Program Register Code of the
variable whose value is being
entered. The PRC may be up to 3
digits long. Do not right-fill if the
PRC is less than 3 characters long.
11
1
E
13
Space.
New value to be entered for variable
referenced by Program Register
Code in bytes 11 to 13 above.
Description
Enter Register command. Enter the
Program Register Code in bytes 21
to 23 below, and the new value of
the variable in bytes
Space.
2-digit Channel Number, as defined
by RS-Para 2.
NOTE: The value entered may be
of varying length.
18
<ETX>
Response from Instrument
ASCII code 003.
APPENDIX C: TWO-WAY SERIAL COMMUNICATION
Description
ASCII code 002.
1-digit Station Number, RS-Para 1.
4-digit Enter Register command.
<space> Space.
0
Number of current status conditions.
<space> Space.
<ETX>
Program Register Code of the
variable whose value was entered.
The PRC may be 1 to 3 characters
long, and is not right-filled in the
response.
<ETX>
<CR>
ASCII code 003
14
<CR>
<LF>
15
<LF>
12
16
Up to 3 digits appended to the end
of the response transmission,
according to the entry for RS-Para
3.
17
18
19
PAGE C-5
Revision B.003
Operating Manual, Partisol-Plus Model 2025 Sequential Air Sampler
AK Protocol
Set Function Command (SFxx)
COM 2-WAY SETTINGS
52 ASCII code for the 1-digit Station Number (for example "4": 052). The Station Number is always 1 digit in
RS-Para 1
length.
RS-Para 2
75048 ASCII code representation of the 2-digit Channel Number (for example: "K0": 075, 048). The Channel
RS-Para 3
13010 Optional: Up to 3 ASCII codes can be added to response from instrument. In this case, <CR> and <LF>
Number is always 2 digits in length.
(ASCII codes 013 and 010) are appended to the response. Enter 0 if nothing is to be appended.
0 Not used.
RS-Para 4
Transmission to Instrument
Byte
Example
1
<STX>
2
4
3
S
4
F
5
x
6
x
7
<space>
8
K
9
0
10
<ETX>
B
No Err
Error
ASCII code 002.
1
<STX>
<STX>
1-digit Station Number, RS-Para 1.
2
4
4
3
S
S
4
F
F
5
x
x
6
x
x
7
<space>
8
0
9
<ETX>
10
<CR>
S
11
<LF>
E
Description
Set Function command, where xx
represents a 2-digit code. These
codes are defined below.
Space.
2-digit Channel Number, as defined
by RS-Para 2.
ASCII code 003.
LISTING OF FUNCTION CODES (xx)
01
02
10
11
50
Response from Instrument
Run
Stop
Set Time
Set Date
Switch to "None" RS232 Mode
Description
ASCII code 002.
1-digit Station Number, RS-Para 1.
4-digit Set Function command, with
the 2-digit xx code corresponding to
the function that was set.
<space> Space.
0
Number of current status conditions.
<space> Space.
12
<ETX>
13
<CR>
14
<LF>
Up to 3 digits appended to the end
of the response transmission,
according to the entry for RS-Para
3.
15
16
17
18
19
APPENDIX C: TWO-WAY SERIAL COMMUNICATION
PAGE C-6
Revision B.003
Operating Manual, Partisol-Plus Model 2025 Sequential Air Sampler
AK Protocol
Ask Storage Command (ASTO)
COM 2-WAY SETTINGS
52 ASCII code for the 1-digit Station Number (for example "4": 052). The Station Number is always 1 digit in
RS-Para 1
length.
RS-Para 2
75048 ASCII code representation of the 2-digit Channel Number (for example: "K0": 075, 048). The Channel
RS-Para 3
13010 Optional: Up to 3 ASCII codes can be added to response from instrument. In this case, <CR> and <LF>
Number is always 2 digits in length.
(ASCII codes 013 and 010) are appended to the response. Enter 0 if nothing is to be appended.
0 Not used.
RS-Para 4
Transmission to Instrument
Byte
Example
1
<STX>
2
4
3
A
4
S
5
T
6
O
7
<space>
8
K
9
0
10
<space>
11
5
12
0
B
No Err
Error
ASCII code 002.
1
<STX>
<STX>
1-digit Station Number, RS-Para 1.
2
4
4
3
A
A
4
S
S
5
T
T
6
O
O
7
<space>
8
0
9
<space>
Space.
10
3
S
The number of records to be
downloaded from the instrument's
storage. Downloading begins at the
storage marker, which can be set
using the SSTO command.
11
8
E
13
ASCII code 003.
Description
Ask Storage command. Enter the
number of records to be
downloaded from storage in bytes
11 to 13 below.
Space.
2-digit Channel Number, as defined
by RS-Para 2.
Description
ASCII code 002.
1-digit Station Number, RS-Para 1.
4-digit Ask Storage command.
<space> Space.
0
Number of current status conditions.
<space> Space.
<ETX>
Records to be downloaded from
storage. This can be smaller than
requested number due to end of file.
Storage marker moved to after last
record transmitted. Not right-filled.
<ETX>
<CR>
ASCII code 003.
14
<CR>
<LF>
SET CURRENT DATA STORAGE BUFFER
15
<LF>
0 in PRC 31
1 in PRC 31
2 in PRC 31
16
Up to 3 digits appended to the end
of the response transmission,
according to the entry for RS-Para
3.
13
14
Response from Instrument
<ETX>
Filter Data
Interval Data
Input Data
APPENDIX C: TWO-WAY SERIAL COMMUNICATION
12
The instrument then transmits the number of storage
records shown in response bytes 10 to 12 above. Each
record is followed by <CR><LF>.
PAGE C-7
Revision B.003
Operating Manual, Partisol-Plus Model 2025 Sequential Air Sampler
AK Protocol
Set Storage Marker Command (SSTO)
COM 2-WAY SETTINGS
52 ASCII code for the 1-digit Station Number (for example "4": 052). The Station Number is always 1 digit in
RS-Para 1
length.
RS-Para 2
75048 ASCII code representation of the 2-digit Channel Number (for example: "K0": 075, 048). The Channel
RS-Para 3
13010 Optional: Up to 3 ASCII codes can be added to response from instrument. In this case, <CR> and <LF>
Number is always 2 digits in length.
(ASCII codes 013 and 010) are appended to the response. Enter 0 if nothing is to be appended.
0 Not used.
RS-Para 4
Transmission to Instrument
Byte
Example
1
<STX>
2
4
3
S
4
S
5
T
6
O
7
<space>
8
K
9
0
10
<space>
11
B
12
13
14
15
16
<ETX>
Response from Instrument
B
No Err
Error
ASCII code 002.
1
<STX>
<STX>
1-digit Station Number, RS-Para 1.
2
4
4
3
S
S
4
S
S
5
T
T
6
O
O
7
<space>
8
0
9
<ETX>
Space.
10
<CR>
S
New location of the Storage Marker.
B: move to beginning of storage
buffer, E: move to end of storage
buffer. Enter positive numbers such
as 250 to move forward by n
records, and negative numbers
such as -1000 to move backwards
by n records. Do not right-fill.
11
<LF>
E
ASCII code 003.
16
Description
4-digit Set Storage Marker
command.
Space.
2-digit Channel Number, as defined
by RS-Para 2.
ASCII code 002.
1-digit Station Number, RS-Para 1.
4-digit Set Storage Marker
command.
<space> Space.
0
Number of current status conditions.
<space> ASCII code 003.
12
<ETX>
13
<CR>
14
<LF>
Up to 3 digits appended to the end
of the response transmission,
according to the entry for RS-Para
3.
15
17
17
18
18
19
19
APPENDIX C: TWO-WAY SERIAL COMMUNICATION
Description
PAGE C-8
Revision B.003
Operating Manual, Partisol-Plus Model 2025 Sequential Air Sampler
AK Protocol
Response if Command Addressed to Instrument is Unrecognizable
COM 2-WAY SETTINGS
A SCII code for the 1-digit S tation Number (for example "4"; 052). The S tation Number is always 1 digit
in length.
RS -P ara 1
52
RS -P ara 2
75048
A SCII code representation of the 2-digit C hannel Number (for example "KO"; 075, 048). The C hannel
Number is always 2 digits in length.
RS -P ara 3
13010
Optional: Up to 3 A SC II codes can be added to response from instrument. In this case, <C R> and <LF >
(AS CII codes 013 and 010 are appended to the response. Enter 0 if nothing is to be appended.)
RS -P ara 4
0
Not used.
Transmission to Instrument
Byte
Example
Description
Response from Instrument
Byte
No Err
Error
Description
ASCII CODE 002.
1
1
<STX>
2
2
4
1-digit Station Number, RS-Para 1.
3
3
?
Question marks inserted in place of
unrecognized command.
4
4
?
Question marks inserted in place of
unrecognized command.
5
5
?
Question marks inserted in place of
unrecognized command.
6
6
?
Question marks inserted in place of
unrecognized command.
7
7
8
8
9
9
10
10
S
Syntax error.
11
11
E
Syntax error.
12
12
<ETX>
ASCII code 003.
13
13
<CR>
Up to 3 digits appended to the end of the
response transmission, according to the entry
for RS-Para 3.
14
14
<LF>
Up to 3 digits appended to the end of the
response transmission, according to the entry
for RS-Para 3.
15
15
16
16
17
17
18
18
19
19
APPENDIX C: TWO-WAY SERIAL COMMUNICATION
<space> Space.
0
Number of current status conditions.
<space> Space.
PAGE C-9
Revision B.003
Operating Manual, Partisol-Plus Model 2025 Sequential Air Sampler
C.2.
GERMAN AMBIENT NETWORK PROTOCOL
The German Network Protocol, as implemented in the Partisol-Plus Sampler, provides basic capabilities to obtain the current values of one to three pre-determined
Program Register Codes. Due to the definition of this protocol, it is not possible to
select from a remote location which system variable (Program Register Code,
Appendix A) is to be queried.
The following pages show the manner in which RS-Para 1 to RS-Para 4 are defined
in the German Ambient Network Protocol, and also detail the format of the transmission and response messages.
APPENDIX C: TWO-WAY SERIAL COMMUNICATION
PAGE C-10
Revision B.003
Operating Manual, Partisol-Plus Model 2025 Sequential Air Sampler
German Network Protocol
COM 2-WAY SETTINGS
RS-Para 1
56052053 ASCII codes for 3-digit Instrument Identifier (for example "845": 056, 052, 053). The Instrument
RS-Para 2
48048049 ASCII codes for 3-digit Location ID (for example "001": 048, 048, 049). The Location ID must be 3
RS-Para 3
RS-Para 4
Identifier must be 3 bytes in length.
bytes in length.
122127133 PRC of the variable to be transmitted by the instrument. Up to 3 PRC's may be designated for
transmission by the instrument (for example Flow 1, Amb Temp and Filt 1 Temp: 122, 127, 133).
13010 Optional: Up to 3 ASCII codes can be added to response from the instrument. In this case <CR> and
<LF> (ASCII codes 013 and 010) are appended to the reponse. Enter 0 if nothing is to be appended.
Transmission to Instrument
Byte
Example
1
<STX>
2
D
3
A
4
8
5
4
6
5
7
<ETX>
8
<CRC>
9
<CRC>
Response from Instrument
B
No Err
Error
ASCII code 002.
1
<STX>
<STX>
The DA command signifies a
request for data from the
instrument.
2
M
M
3
D
D
4
0
0
5
1
1
6
<space>
7
8
Description
3-digit Instrument Identifier, as
defined by RS-Para 1. These
three bytes are optional.
ASCII code 003.
High byte followed by low byte of
CRC. The CRC's may be
replaced by a single <CR>
character.
DEFINITION OF CRC BYTES
The CRC bytes above (bytes 8 and 9) are the hexidecimal
representation of the "exclusive or" of bytes 1 to 7. The
high byte of the CRC is transmitted as byte 8 and the low
byte is sent as byte 9.
APPENDIX C: TWO-WAY SERIAL COMMUNICATION
Description
ASCII code 002.
Response identifier to the DA
command.
Number of variables transmitted
by the instrument, as specified by
RS-Para 3. May be 01, 02 or 03.
<space> Space.
8
8
4
4
9
5
5
10
<space>
11
+ or -
+
12
n
0
13
n
0
14
n
0
15
n
0
16
+ or -
+
17
e
0
18
e
0
19
<space>
3-digit Instrument Identifier, as
defined by RS-Para 1. This code
ncrements by one for each
variable transmitted.
<space> Space.
Value of variable being
transmitted, in the format
+NNNN+EE.
For example, a value of 63.7 is
represented as +0637-01.
If a syntax error exists or the value
of the variable is 0, the instrument
returns +0000+00.
<space> Space.
PAGE C-11
Revision B.003
Operating Manual, Partisol-Plus Model 2025 Sequential Air Sampler
German Network Protocol (continued)
Transmission to Instrument
Response from Instrument
B
No Err
Error
Description
20
1
1
CURRENT OPERATING MODE (Bytes 20, 21)
21
0
0
2-digit hexidecimal representation of
current instrument operating mode
(see description at left).
The current operating mode is determined as follows:
22
<space>
23
0
0
24
0
0
25
<space>
26
0
0
27
0
0
28
1
1
29
<space>
30
1
9
31
2
9
32
2
9
33
<space>
<space>
34
<space>
<space> German Protocol, and are reserved
35
<space>
<space>
36
<space>
<space> Space.
37
<ETX>
<ETX>
ASCII code 003.
38
<CRC>
<CRC>
39
<CRC>
<CRC>
High byte and low byte of CRC.
The CRC's are replaced by a single
<CR> if transmit byte 8 was <CR>.
40
<CR>
<CR>
41
<LF>
<LF>
Byte
0
1
2
3
5
6
Example
STOP
WAIT
SAMP
DONE
ERR
SVC
Description
Stop
Wait
Sample
Done
Error
Service
CURRENT STATUS CONDITION (Bytes 23, 24)
The contents of bytes 23 and 24 indicate the existence of
any status conditions in the monitor.
<space> Space.
2-digit hexidecimal representation of
current instrument status condition
(see description at left).
<space> Space.
3-digit Location ID, as defined by
RS-Para 2.
<space> Space.
3-digit PRC of the variable being
transmitted, zero-filled from the left.
These bytes are not defined in the
German Protocol, but are included
for informational purposes.
These bytes are not defined in the
for future definition.
00
01
02
OK
Error
Crit Err
No current status conditions
Error Condition Exists
Critical Error Exists
DEFINITION OF CRC BYTES
The CRC information in bytes 38 and 39 is the hexidecimal
representation of the "exclusive or" of all response bytes.
The high byte of the CRC is transmitted as byte 38 and the
low byte is sent as byte 39.
APPENDIX C: TWO-WAY SERIAL COMMUNICATION
42
Up to 3 digits appended to the end
of the response transmission,
according to the entry for RS-Para
4.
NOTE ABOUT MULTIPLE PRC CODES
If more than 1 Program Register Code is specified in
RS-Para 3, byte 5 of the reponse transmission is either 2 or
3, and bytes 7 to 36 are repeated for each Program
Register Code.
PAGE C-12
Revision B.004
Operating Manual, Partisol-Plus Model 2025 Sequential Air Sampler
Appendix D: Installing New System Software
This appendix describes the steps involved in loading new system software into the
Partisol-Plus Sampler with and without RPComm software. This section also explains
how to obtain and load RPComm onto your personal computer (PC). The Partisol-Plus
is equipped with flash memory, which allows its operating program to be downloaded
from a PC.
NOTE: Be sure to check R&P’s website (www.rpco.com)
before uploading new software to ensure that you have the
latest software version for either the unit’s operating software or RPComm.
System requirements for running RPComm software include a Pentium processor and
32 megabytes (MB) of random access memory (RAM). This amount of RAM is
necessary for users who have multiple instrument connections.
Before updating the software, record the values of calibration constants stored in the
I/O Calibration, Sensor Calibration, Filter Temperature Calibration and Flow Calibration screens in the sampler’s Service Mode (Section 14).
Some of the sampler’s operational settings also may need to be reentered as a result
of the software download.
D.1.
LOADING SOFTWARE INTO FLASH MEMORY WITHOUT RPCOMM
The software that operates the Partisol-Plus Sampler is stored in flash memory. It is
not necessary to make any hardware changes to revise the software. Rather, the
operating program is loaded into the sampler’s RS232 port from a personal computer
(PC).
✔ Record system calibration constants before
upgrading the software.
Follow the procedure below to download new system software into the
device without RPComm software:
1) Record all of your unit’s calibration constants (offset and span)
from its calibration screens (Sensor Calibration and Flow Calibration screens). Record all required operating parameters.
IMPORTANT: After the new system software has been downloaded, you must
do a total reset of the unit. This resets all of the unit’s parameters to their default
conditions and clears the system’s data storage buffers, including the calibration
constants. Be sure to record your operating parameters and calibration constants
before uploading the new software and resetting your unit.
APPENDIX D: INSTALLING NEW SYSTEM SOFTWARE
PAGE D-1
Revision B.004
Operating Manual, Partisol-Plus Model 2025 Sequential Air Sampler
2) Return the sampler to the Stop Operating Mode (Section 5.1).
NOTE: This action can be performed remotely if the instrument is in the AK
Protocol (Appendix C) by executing the appropriate SFxx command(s).
3) Using the 9-to-9 pin cable (07-000587) supplied with the sampler,
connect the unit’s RS232 port to your PC’s RS232 port.
NOTE: Alternately, the sampler can be connected to a remote computer by
modem and telephone lines. You can attach a modem to the RS232 port on the
sampler using the 9-to-25 pin serial modem cable (51-002814) supplied with the
unit (Appendix J).
4) Set the sampler’s current RS232 Protocol to “None” in the RS232
Setup screen (Section 9). In the same screen, confirm that the
RS232 communication is set up for 8 data bits, 1 stop bit and no
parity. The downloading software supports a baud rate of 9600.
5) Load the following software provided with the system onto a PC
(preferably all in the same directory) to perform the software
download:
RPLOAD.EXE
Executable program for local or remote downloading.
RPLOAD.CFG
Configuration file containing the download parameters.
2025.BIN
Model 2025 operating program to be downloaded.
6) Using an ASCII text editor such as WindowsTM Notepad, review
the contents of the self-documenting RPLOAD.CFG file. Change
the values of the listed download parameters, if necessary, to
match the desired downloading operation:
COM=1
The communication port number. If a non-standard commport is being used, specify the correct port and IRQ values in
the following lines.
PORT=3F8
This line is only used by the download program if the setting
for COM above is 3. In this case, enter the port address (in
hexidecimal) of the comm port being used. Otherwise, the
download program disregards the value entered for PORT.
IRQ=4
This line is only used by the download program if the setting
for COM above is 3. In this case, enter the interrupt request
line of the comm port being used. Otherwise, the download
program disregards the value entered for IRQ.
APPENDIX D: INSTALLING NEW SYSTEM SOFTWARE
PAGE D-2
Revision B.004
Operating Manual, Partisol-Plus Model 2025 Sequential Air Sampler
BAUD=9600
The baud rate of the program download. This value must
match the setting entered in the sampler’s RS232 Setup
screen (Section 9). Permissible entries are 2400, 4800, 9600,
19200 and 38400 baud.
SETAK=1
Determines whether the sampler’s RS232 mode changes to
the AK Protocol after the download. A value of “0” causes
the instrument to remain in the “None” mode, while a “1”
instructs the sampler to enter the AK Protocol after the
download.
7) Download the instrument control software according to the parameters in RPLOAD.CFG by issuing the following command
from the PC:
RPLOAD 2025.BIN
As the software executes, it indicates and updates the current stage of the
software transmission.
8) Perform a complete reset of your unit. Pressing <F5: Reset>
(Figure D-1) while in the Title screen causes the unit to reset all
of its operating parameters to their default conditions. This also
clears the system’s data storage buffers, including the calibration constants.
Figure D-1. Title screen.
Partisol-Plus
Model 2025 Sequential Air Sampler
Version: 1.202
Date: 8-Dec-98
Copyright 1998
Rupprecht & Patashnick Co., Inc.
RDfault
RData
APPENDIX D: INSTALLING NEW SYSTEM SOFTWARE
Reset
PAGE D-3
Revision B.004
Operating Manual, Partisol-Plus Model 2025 Sequential Air Sampler
9) Re-enter your required operating parameters and the calibration
constants that you recorded before loading the new software.
Calibration constants can be reentered in the appropriate calibration screens by pressing <EDIT>, entering the offset and
span (where applicable) and pressing <ENTER>.
10) If performing a direct program download, disconnect the 9-to-9
pin computer cable from the unit to the PC.
APPENDIX D: INSTALLING NEW SYSTEM SOFTWARE
PAGE D-4
Revision B.004
Operating Manual, Partisol-Plus Model 2025 Sequential Air Sampler
D.2.
D.2.1.
INSTALLING RPCOMM
OBTAINING RPCOMM INSTALLATION FILES
The RPComm installation files can be downloaded from the R&P home page on the
World Wide Web. The R&P home page address is: www.rpco.com.
Follow these steps to obtain the RPComm installation files:
1) Access the R&P home page on the World Wide Web at:
www.rpco.com (Figure D-2).
Figure D-2. R&P’s home
page on the World Wide
Web.
APPENDIX D: INSTALLING NEW SYSTEM SOFTWARE
PAGE D-5
Revision B.004
Operating Manual, Partisol-Plus Model 2025 Sequential Air Sampler
2) Go to the Customer Area of the website by selecting “Customer
Area” at the bottom of the home page (Figure D-3).
NOTE: A password is required to access the Customer Area of the R&P website.
Contact R&P for password assignments.
Figure D-3. Bottom of
R&P’s home page.
APPENDIX D: INSTALLING NEW SYSTEM SOFTWARE
PAGE D-6
Revision B.004
Operating Manual, Partisol-Plus Model 2025 Sequential Air Sampler
3) Go to the Ambient Monitoring Products area of the website by
selecting “Ambient” while in the Customer Area (Figure D-4).
“Ambient” is located beneath the picture of the city.
Figure D-4. Customer Area
of R&P’s website.
APPENDIX D: INSTALLING NEW SYSTEM SOFTWARE
PAGE D-7
Revision B.004
Operating Manual, Partisol-Plus Model 2025 Sequential Air Sampler
4) Go to the Data Management Software area of the website by
selecting “RPCOMM for Windows and Windows CE, RPDATA”
while in the Ambient Monitoring Products area (Figure D-5).
Figure D-5. Ambient
Monitoring Products area of
R&P’s website.
APPENDIX D: INSTALLING NEW SYSTEM SOFTWARE
PAGE D-8
Revision B.004
Operating Manual, Partisol-Plus Model 2025 Sequential Air Sampler
Figure D-6. Data Management Software area of
R&P’s website.
5) Go to the Software to Download area of the website by selecting
“RPCOMM for Windows 9x/NT” while in the Data Management
Software area (Figure D-6).
APPENDIX D: INSTALLING NEW SYSTEM SOFTWARE
PAGE D-9
Revision B.004
Operating Manual, Partisol-Plus Model 2025 Sequential Air Sampler
6) While in the Software to Download area, select “rpcomm.exe” and
save to a file (Figure D-7).
NOTE: Be sure to remember what folder the file is saved in.
7)
If desired, the “changelog.txt” file can be downloaded and saved
to a file. The changelog.txt file gives a description of the
changes made by R&P with each revision of its RPComm program.
8) The “packagelist.txt” file also can be downloaded and saved to a
file. The packagelist text file contains a list of all the files needed
to run RPComm. These files will be transferred to your computer
when rpcomm.exe is downloaded to your computer and executed.
9) After downloading is complete, exit the World Wide Web.
Figure D-7. Software to
Download area of R&P’s
website.
APPENDIX D: INSTALLING NEW SYSTEM SOFTWARE
PAGE D-10
Revision B.004
Operating Manual, Partisol-Plus Model 2025 Sequential Air Sampler
D.2.2.
INSTALLING RPCOMM ONTO A COMPUTER
Perform the following steps to install RPComm onto a computer:
1) Exit all Windows programs. The RPComm installation and setup
programs may not run properly if other programs are running.
2) The software program “rpcomm.exe,” as downloaded from the
R&P website, is a self-executable file and will install itself onto
the computer when executed. Select the “Start” button on your
PC and highlight the “Run...” option (Figure D-8).
Figure D-8. Accessing the
Run Program screen.
APPENDIX D: INSTALLING NEW SYSTEM SOFTWARE
PAGE D-11
Revision B.004
Operating Manual, Partisol-Plus Model 2025 Sequential Air Sampler
3) When the Run screen appears, enter the file name (including the
directory path) and press “OK” (Figure D-9). An RPComm Installation Confirmation screen will be displayed (Figure D-10). Press
“OK.”
Figure D-9. Run screen.
Figure D-10. RPCOMM
Installation Confirmation
screen.
4) The WinZip Self-Extractor screen will be displayed (Figure D-11).
This shows the PC’s directory where the RPComm installation
files will be saved (the default directory is “C:\RPDisks”). R&P
does not recommend modifying this directory path. This will allow
the setup program to run after the software installation is complete. Ensure that the two check boxes are checked and select
“Unzip.”
NOTE: If the user wishes, the files be installed in a directory different from the
default and the path can be modified. However, if you choose to do so, you must
not check the second check box, “When done unzipping run:
C:\RPDisks\Disk1\Setup.” The setup routine will not run after installation is
complete and must be executed manually.
APPENDIX D: INSTALLING NEW SYSTEM SOFTWARE
PAGE D-12
Revision B.004
Operating Manual, Partisol-Plus Model 2025 Sequential Air Sampler
Figure D-11. WinZip SelfExtractor screen.
5) The RPComm setup files will now be copied to the directory
named “RPDisks” on the “C:\” drive. Under the “C:\RPDisks”
directory, several subdirectories will be created: Disk1, Disk2,
Disk3, etc. These directories are organized so that the RPComm
setup files can be copied onto floppy disks (1.44 MBytes). RPComm can then be installed onto other computers from those
disks. When all files have been successfully copied to the PC’s
hard drive, the WinZip Self-Extractor Completion screen will be
displayed (Figure D-12). Select “OK.”
NOTE: When copying RPComm files to floppy disks, copy only the individual files
under each Disk directory to the disk, not the directory itself. If the directory itself
is copied, there may not be enought room on the floppy disk for all the required
files.
Figure D-12. WinZip SelfExtractor Completion
screen. The number of
unzipped files will vary
depending on the version of
RPComm that you are
loading.
APPENDIX D: INSTALLING NEW SYSTEM SOFTWARE
PAGE D-13
Revision B.004
Operating Manual, Partisol-Plus Model 2025 Sequential Air Sampler
6) Press the “Next >” button when the RPComm Welcome screen
appears (Figure D-13).
Figure D-13. RPComm
Welcome screen.
APPENDIX D: INSTALLING NEW SYSTEM SOFTWARE
PAGE D-14
Revision B.004
Operating Manual, Partisol-Plus Model 2025 Sequential Air Sampler
7) Enter a user and company name into the RPComm User Information screen and select “Next >” (Figure D-14).
Figure D-14. RPComm
User Information screen.
APPENDIX D: INSTALLING NEW SYSTEM SOFTWARE
PAGE D-15
Revision B.004
Operating Manual, Partisol-Plus Model 2025 Sequential Air Sampler
8) The RPComm Destination Location screen (Figure D-15) shows
the directory that RPComm will be installed into (the default
directory is “C:\Program Files\RPComm”). R&P does not recommend modifying the directory path. However, the directory can
be modified by selecting “Browse” and by choosing the desired
directory. Select “Next >.”
Figure D-15. RPComm
Destination Location
screen.
APPENDIX D: INSTALLING NEW SYSTEM SOFTWARE
PAGE D-16
Revision B.004
Operating Manual, Partisol-Plus Model 2025 Sequential Air Sampler
9) While in the RPComm Select Program Folder screen, choose the
desired program folder for installation and press “Next >” (Figure D-16).
Figure D-16. RPComm
Select Program Folder
screen.
APPENDIX D: INSTALLING NEW SYSTEM SOFTWARE
PAGE D-17
Revision B.004
Operating Manual, Partisol-Plus Model 2025 Sequential Air Sampler
Figure D-17. RPComm
Start Copying Files screen.
10) While in the RPComm Start Copying Files screen, verify that the
setup information is correct and press “Next >” (Figure D-17).
The RPComm files will now be copied to the specified directory.
APPENDIX D: INSTALLING NEW SYSTEM SOFTWARE
PAGE D-18
Revision B.004
Operating Manual, Partisol-Plus Model 2025 Sequential Air Sampler
11) When setup is complete, the user may be prompted to restart the
computer. If prompted, it is recommended that you restart your
PC before running RPComm (Figure D-18). If the setup program
does not prompt you to restart your PC, it will instead ask you if
you would like to start the RPComm program now.
Figure D-18. RPComm
Setup Complete screen.
APPENDIX D: INSTALLING NEW SYSTEM SOFTWARE
PAGE D-19
Revision B.004
Operating Manual, Partisol-Plus Model 2025 Sequential Air Sampler
D.3.
LOADING SOFTWARE INTO FLASH MEMORY WITH RPCOMM
RPComm can be used as a vehicle through which new revisions of the unit’s software
can be uploaded. R&P recommends that this be done only when a direct connection
is being used and not through a modem connection.
NOTE: When uploading new sampler operating software
with RPComm, it is not necessary to record your operating
parameters and calibration constants and reset the unit.
RPComm retains all of the unit’s parameters to their default
conditions and the system’s data storage buffers, including
the calibration constants, and then reinserts them into the
operating software program after the upload.
APPENDIX D: INSTALLING NEW SYSTEM SOFTWARE
PAGE D-20
Revision B.004
Operating Manual, Partisol-Plus Model 2025 Sequential Air Sampler
Follow these steps to upload the system software with RPComm:
1) Select the “Start” button on your PC’s screen and highlight
“Programs,” and then “RPComm.” Choose the RPComm icon to
begin executing the RPComm program (Figure D-19).
Figure D-19. Executing
RPComm.
APPENDIX D: INSTALLING NEW SYSTEM SOFTWARE
PAGE D-21
Revision B.004
Operating Manual, Partisol-Plus Model 2025 Sequential Air Sampler
2) When RPComm begins executing, two windows are always displayed: the 2025 Main screen (Figure D-20) and the Connection
List screen.
Figure D-20. 2025 Main
screen.
APPENDIX D: INSTALLING NEW SYSTEM SOFTWARE
PAGE D-22
Revision B.004
Operating Manual, Partisol-Plus Model 2025 Sequential Air Sampler
3) From the 2025 Main screen, select the “Upload Software” tab to
display the Upload Software screen (Figure D-21).
Figure D-21. Upload
Software screen.
APPENDIX D: INSTALLING NEW SYSTEM SOFTWARE
PAGE D-23
Revision B.004
Operating Manual, Partisol-Plus Model 2025 Sequential Air Sampler
4) While in the Upload Software screen, move your cursor to the
white circle to the left of “First time installation” and click once.
A black circle should appear inside the white circle. Then select
the “Start Upload” button. RPComm will prompt the user for the
location of the program. Select the program and choose the
“Open” button to begin the software download.
5) If you are upgrading your unit’s software, move your cursor to the
white circle to the left of “Upgrade system software” and click
once. A black circle should appear inside the white circle. Then
select the “Start Upload” button. RPComm will prompt the user
for the location of the program. Select the program and choose
the “Open” button to begin the software download.
If your unit has very old operating software that does not contain the appropriate PRCs,
if you have installed a new motherboard or if your unit has simply lost its program, you
may need to do a “First time installation” even though operating software is already
installed on your unit.
When doing a “First time installation” through RPComm, you will need to re-enter your
unit’s calibration constants. However, when doing a “Upgrade system software,”
RPComm will retain all calibration constants and, after the upload is complete, will reinsert them into your unit’s software program. Whether you are doing a first time
installation or upgrading existing operating software, all filter, interval and input data will
be lost.
D.4.
UPDATING THE LIST OF PROGRAM REGISTER CODES IN RPCOMM
All R&P instrumentation have a list of system variables that is specific to that type of
monitor. A system variable is any value that is entered into, calculated by, or measured
by the instrument. This list is called the Program Register Code (PRC) list.
When the sampler’s software is modified, the PRC list often is affected; usually, new
PRCs must be added for software enhancement. If there are new PRCs, then the PRC
list must be updated within the RPComm software program. This can be accomplished
by:
1) The entire RPComm program can be downloaded from the R&P website
(www.rpco.com) and installed on the computer, as described in Section
D.2. However, this is necessary only if the revision number of the
RPComm software program has changed. Changes to the unit’s operating
software do not always require that you update the RPComm program.
APPENDIX D: INSTALLING NEW SYSTEM SOFTWARE
PAGE D-24
Revision B.004
Operating Manual, Partisol-Plus Model 2025 Sequential Air Sampler
2) A new PRC list can be downloaded from R&P’s website and installed on
your computer. This will update the PRC list within RPComm without
having to reinstall the entire program.
Follow these steps to update the PRC list within RPComm:
1) Go to the RPComm directory on your computer’s hard drive and
look at the files. The PRC lists are located in this directory.
Determine which PRC list revision you have in your RPComm
directory. The file name for the PRC lists have the following
format:
Rp{instrument}n.nnn
where:
{instrument} = instrument model (2000FRM, 2025 or 1400)
n.nnn = PRC list revision
2) Go to the Software to Download area of the R&P website as
described in Section D.2.1 (Figure D-7). If there is a new PRC list
available for the Partisol-Plus Sampler, it will be listed on this
web page.
3) There may be multiple PRC lists on this page, one for each instrument that RPComm supports. Determine if there is an updated
PRC list for the Partisol-Plus Sampler. Select the appropriate
PRC list and save it to a file.
NOTE: Be sure to remember what folder the PRC list file is saved in.
4) Disconnect from the World Wide Web.
5) If RPComm is running, exit the program.
6) Copy the downloaded PRC list to the RPComm directory on your
computer’s hard drive. The next time you execute RPComm, the
program will automatically use the new PRC list in its operations.
APPENDIX D: INSTALLING NEW SYSTEM SOFTWARE
PAGE D-25
Revision B.004
Operating Manual, Partisol-Plus Model 2025 Sequential Air Sampler
This page left intentionally blank.
APPENDIX D: INSTALLING NEW SYSTEM SOFTWARE
PAGE D-26
Revision B.004
Operating Manual, Partisol-Plus Model 2025 Sequential Air Sampler
Appendix E: Consumables and Parts
This appendix lists the consumables and parts available for the Partisol-Plus Sampler.
E.1.
CONSUMABLES
R&P offers the following types of 47 mm filters and related accessories for the
Partisol-Plus Sampler under the following part numbers:
Filter Cassettes and Accessories
Partisol-FRM/Plus Filter Cassette
Pkg of 10 Partisol-FRM/Plus Filter Cassettes
Pkg of 25 Partisol-FRM/Plus Filter Cassettes
Pkg of 50 Partisol-FRM/Plus Filter Cassettes
Pkg of 5 Filter Cassette Screens
Anti-Static 3x5-inch Zip Lock Bags (1,000)
Tweezers
Filter Cassette Magazine
Filter Cassette Removal Kit
Filter Cassette Separator Tool
Magazine Transport Container
Solid Filter Leak Check/Separator Disk
59-004648-0001
59-004648-0010
59-004648-0025
59-004648-0050
30-005147-0005
20-003772-1000
30-002566
55-005569
59-004733
38-004892
20-004997
36-004768
Filter Media
PTFE Filters, 2.0 µm, Box of 50
Pallflex TX40 Filters, Box of 100
Quartz Fiber Filters, Box of 100
Nylon 47 mm Filters, 1.2 µm, Box of 100
47 mm Anti-Stick Rings, Box of 100
10-002322-0050
10-002387-0100
10-002647-0100
10-002544-0100
32-003519
Hardware Items
Particle Trap Filter
Foam Fan Covers, Pkg of 5
Partisol Pump Rebuild Kit (2 req'd per pump)
AA Batteries (pack of 3)
Upper Cassette Seal
Lower Cassette/Adapter Seal
Partisol-Plus O-Ring/Seal Package
32-000393
10-003092
32-002642
06-003113-0003
22-005958
22-005957
59-005515
APPENDIX E: CONSUMABLES AND PARTS
PAGE E-1
Revision B.004
Operating Manual, Partisol-Plus Model 2025 Sequential Air Sampler
E.2.
INSTRUMENT PARTS
The following is a listing of major parts in the Partisol-Plus Sampler, along with their
R&P part numbers:
Sampling Hardware
Stand for Partisol Sampler
Wind Vane/Anemometer & 15 m Cable
Pass Through Adapter Tube
Dichotomous Splitter Assembly
50/50 Splitter Assembly
57-004644
59-004953
57-005052
55-005507
55-005613
Inlets and Accessories (16.7 l/min, 1 1/4" ID)
R&P First Stage FRM Inlet
• O-Ring 1 1/4-inch ID
• O-Ring 2 3/8-inch ID
WINS PM-2.5 Impactor
• O-Ring, 2 3/8-inch ID
Impactor Well Assembly
• O-Ring, 1 5/8-inch ID
• Box of 25 Glass Fiber Filters, 37 mm
• Bottle of WINS Impactor Oil, 30 ml
• Bottle of WINS Impactor Oil, 100 ml
57-004742
22-002853-3026
22-002853-3036
57-004006
22-002853-3036
55-004289
22-002853-3030
32-004294
32-004292
32-004292-0100
R&P PM-10 Inlet
Japanese PM-10 Inlet
• O-Ring, 1 1/4-inch ID
• O-Ring, 2 3/8-inch ID
• Glass Jar for PM-10 Inlet
• Plastic Jar for PM-10 Inlet
• PM-10 Screw, #6-32 x 1/4-inch
• PM-10 Standoff
US TSP Inlet
German TSP Inlet
R&P PM-1 Inlet
57-000596
57-004307
22-002853-3026
22-002853-3036
32-000625
32-001574
21-003721-0004
12-000620-0020
10-002929
57-002269
10-003056
Hardware Components
CPU Board
Partisol Pump, 60 Hz/120 VAC
Partisol Pump, 50 Hz/240 VAC
10-003137
54-005666-0120
56-005666-0240
Connectors and Cables
9-to-9 Pin RS232 Cable
07-000587
APPENDIX E: CONSUMABLES AND PARTS
PAGE E-2
Revision B.004
Operating Manual, Partisol-Plus Model 2025 Sequential Air Sampler
9-to-25 Pin Serial Adapter
9-to-25 Pin Modem Cable
9-Pin Null Modem Adapter
Null Modem (25-to-25 Pin)
6-Pin Cable Connector
25-Pin Wiring Adapter
51-001079
51-002814
10-005671
10-002661
06-002454
06-004521-0025
Flow Audit/Calibration
1-Flow Streamline FTS, 12-20 l/min
1-Flow Streamline FTS w/10-inch H2O Manometer
Additional High Flow Cell, 12-20 l/min
10-inch H2O Manometer
APPENDIX E: CONSUMABLES AND PARTS
57-004506
57-004506-0001
10-004684
10-004373-0010
PAGE E-3
Revision B.004
Operating Manual, Partisol-Plus Model 2025 Sequential Air Sampler
This page left intentionally blank
APPENDIX E: CONSUMABLES AND PARTS
PAGE E-4
Revision B.002
Operating Manual, Partisol-Plus Model 2025 Sequential Air Sampler
Appendix F: Filter Log
This appendix contains a filter log to keep track of all important readings associated
with each exposed filter. R&P encourages users to make photocopies of the form or
to use a similar format.
APPENDIX F: FILTER LOG
PAGE F-1
APPENDIX F: FILTER LOG
Filter
Number
W1:
W2:
W3:
W(I):
W1:
W2:
W3:
W(I):
W1:
W2:
W3:
W(I):
W1:
W2:
W3:
W(I):
W1:
W2:
W3:
W(I):
W1:
W2:
W3:
W(I):
W1:
W2:
W3:
W(I):
W1:
W2:
W3:
W(I):
RH:
Temp:
Date:
Time:
RH:
Temp:
Date:
Time:
RH:
Temp:
Date:
Time:
RH:
Temp:
Date:
Time:
RH:
Temp:
Date:
Time:
RH:
Temp:
Date:
Time:
RH:
Temp:
Date:
Time:
RH:
Temp:
Date:
Time:
RH:
Temp:
Date:
Time:
RH:
Temp:
Date:
Time:
RH:
Temp:
Date:
Time:
RH:
Temp:
Date:
Time:
RH:
Temp:
Date:
Time:
RH:
Temp:
Date:
Time:
RH:
Temp:
Date:
Time:
Conditions
Initial Weighing
Weights
RH:
Temp:
Date:
Time:
Conditions
Initial
Conditioning
Exposure
Period
Val Time:
Tot Time:
Volume:
Val Time:
Tot Time:
Volume:
Val Time:
Tot Time:
Volume:
Val Time:
Tot Time:
Volume:
Val Time:
Tot Time:
Volume:
Val Time:
Tot Time:
Volume:
Val Time:
Tot Time:
Volume:
Val Time:
Tot Time:
Volume:
Exposure Stats
Filter Exposure
RH:
Temp:
Date:
Time:
RH:
Temp:
Date:
Time:
RH:
Temp:
Date:
Time:
RH:
Temp:
Date:
Time:
RH:
Temp:
Date:
Time:
RH:
Temp:
Date:
Time:
RH:
Temp:
Date:
Time:
RH:
Temp:
Date:
Time:
Conditions
Post-Collection
Conditioning
W1:
W2:
W3:
W(F):
W1:
W2:
W3:
W(F):
W1:
W2:
W3:
W(F):
W1:
W2:
W3:
W(F):
W1:
W2:
W3:
W(F):
W1:
W2:
W3:
W(F):
W1:
W2:
W3:
W(F):
W1:
W2:
W3:
W(F):
Weights
RH:
Temp:
Date:
Time:
RH:
Temp:
Date:
Time:
RH:
Temp:
Date:
Time:
RH:
Temp:
Date:
Time:
RH:
Temp:
Date:
Time:
RH:
Temp:
Date:
Time:
RH:
Temp:
Date:
Time:
RH:
Temp:
Date:
Time:
Conditions
Post-Collection Weighing
R&P Partisol Plus Model 2025 Sequential Air Sampler
Filter Log
W(F)-W(I)
DW
DWx10^6/Volume
Concentration
Revision B.002
Operating Manual, Partisol-Plus Model 2025 Sequential Air Sampler
PAGE F-2
Revision B.003
Operating Manual, Partisol-Plus Model 2025 Sequential Air Sampler
Appendix G: Maintenance of Inlets
R&P recommends that users clean their size-selective inlets every 1 to 3 months to
prevent contamination and to maintain proper performance. This appendix explains the
procedures involved in cleaning the R&P first stage inlet (57-004742), R&P PM-10
inlet (57-000596), R&P PM-1 cyclone inlet (10-003056) and the WINS PM-2.5
impactor (57-004006).
G.1.
CLEANING THE R&P 1ST STAGE AND PM-10 INLETS
Supplies and tools recommended for maintenance:
Ammonia-based, general-purpose cleaner
Cotton swabs
Small soft-bristle brush
Paper towels
Distilled water
Silicone-based stopcock grease
Small screwdriver
Small crescent wrench
Pocket knife
R&P recommends cleaning and maintaining the PM-10 inlet every 1 to 3 months of
continuous operation. This includes removing the inlet from the unit, cleaning it and
checking its O-ring for signs of damage or wear.
Follow these steps to remove and disassemble the inlets:
1) To remove the inlet, lift the entire inlet assembly upward off the
1-1/4-inch OD sample tube.
2) Disassemble the upper and lower inlet halves by unscrewing
counterclockwise the top acceleration assembly from the lower
collector assembly (Figure G-1).
Follow these steps to clean and maintain the top acceleration assembly:
1) Mark the top plate deflector cone and lower plate with a pencil
scribe to facilitate proper orientation when reassembling the
assembly after cleaning and maintenance.
2) Using a Phillips-blade screwdriver, remove the four pan head
screws from the top of the top plate. Lift the top plate off the
four, threaded, spacer standoffs and set aside.
APPENDIX G: MAINTENANCE OF INLETS
PAGE G-1
Revision B.003
Operating Manual, Partisol-Plus Model 2025 Sequential Air Sampler
Figure G-1. R&P PM-10
inlet.
APPENDIX G: MAINTENANCE OF INLETS
PAGE G-2
Revision B.003
Operating Manual, Partisol-Plus Model 2025 Sequential Air Sampler
3) Inspect the insect screen for contamination. Clean the screen by
lifting it off the lower plate rain deflector and brushing or rinsing
it with water until it is clean. Dry and reinstall.
4) Using a general-purpose cleaner and paper towel, clean the top
plate deflector cone and internal wall surface of the acceleration
assembly.
NOTE: Be sure that after cleaning the assembly the acceleration nozzle is clean.
If not, use a cotton swab and cleaner to remove any contamination.
5) Inspect the large diameter, impactor nozzle O-ring for damage or
wear. Replace it, if necessary. If the O-ring is still in good condition, apply a thin film of silicone grease to the O-ring. Also, apply
a light coating of silicone grease to the aluminum threads of the
acceleration assembly.
6) After reinstalling the bug screen, align the top plate markings with
the lower plate markings. The four holes in the top plate should
align with the four spacer standoffs. Insert the top plate into the
lower plate and tighten the four pan-head screws.
Follow these steps to clean and maintain the lower collector assembly:
NOTE: Most of the contamination in the inlet is usually found on the collector
plate.
1) Using a general-purpose cleaner with a paper towel, clean the
collector assembly walls and three vent tubes. You may need to
use a cotton swab to clean these vent tubes. Also, clean the
bottom side of the collector assembly.
2) Using a cotton swab, clean the weep hole in the collector plate
where the moisture runs out to the moisture trap. Remove the
rain jar and clean it. Inspect the rain jar’s brass nipple fitting to
ensure that it is secure and free from blockages. When reinstalling the rain jar, place a light coating of silicone grease on the
gasket inside the cap of the rain jar. This will ensure a leak-free
fit.
3) Inspect the two inlet-to-inlet, tube sealing O-rings for damage or
wear. Replace, if necessary. Apply a light coating of silicone
grease to these O-rings to ensure that a seal is made when they
are reinstalled on the 1-1/4-inch OD sample tube.
4) Clean the lower collector assembly’s threads to ensure a tight
seal when the two halves are reassembled.
APPENDIX G: MAINTENANCE OF INLETS
PAGE G-3
Revision B.003
Operating Manual, Partisol-Plus Model 2025 Sequential Air Sampler
Follow these steps to re-assemble and re-install the PM-10 inlet:
1) Reassemble the top and bottom inlet assemblies until the threads
tighten. Hand-tighten only.
2) Replace the inlet on the 1-1/4-inch OD sample tube. Take care not
to damage the internal O-rings.
G.2.
MAINTENANCE OF THE R&P PM-1 CYCLONE INLET
The PM-1 inlet (Figure G-2) must be cleaned periodically to prevent buildup of
particulate matter and contaminants. R&P recommends cleaning the inlet every 1 to
3 months. The frequency for routine maintenance may depend upon the average
concentration of the particulate matter and/or the species being sampled.
Follow these steps to maintain the PM-1 cyclone inlet:
1) Disassemble the inlet and its bottom from the main body.
Figure G-2. Construction of
R&P PM-1 inlet.
APPENDIX G: MAINTENANCE OF INLETS
PAGE G-4
Revision B.003
Operating Manual, Partisol-Plus Model 2025 Sequential Air Sampler
2) Soak the inlet in soapy water (any non-organic laboratory detergent). Do not scrub the interior of the inlet. Scrubbing may
damage the Teflon® coating.
3) Rinse the inlet several times with deionized water. The last rinse
may be with acetone to facilitate drying. The inlet can also be
dried with air.
4) Resemble and cap until ready for re-use, or reinstall the inlet on
the 1 1/4-inch OD sample tube.
G.3.
MAINTENANCE OF THE WINS PM-2.5 IMPACTOR
These procedures explain how to remove, clean and reinstall the WINS PM-2.5
impactor.
G.3.1.
REMOVING THE WINS IMPACTOR
Follow these steps to remove the WINS PM-2.5 impactor:
1) WINS impactor maintenance and performance verification can be
performed while in the Stop, Wait or Sampling Modes. If the unit
is in the Stop Mode, press <RUN/STOP> twice to enter the Audit
Mode. If the unit is in the Wait or Sampling Modes, press <RUN/
STOP> once to enter the Audit Mode. The unit then will display
the Audit Confirmation screen (Figure 6-2). Press <F1: Audit>,
and then press any key to continue.
Figure G-3. Partisol-Plus
Sampler with top panel
elevated.
APPENDIX G: MAINTENANCE OF INLETS
PAGE G-5
Revision B.003
Operating Manual, Partisol-Plus Model 2025 Sequential Air Sampler
Figure G-4 (Left). WINS
impactor in upper section of
Partisol-Plus enclosure.
Figure G-5 (Right). Removing the WINS impactor
from the sampler.
NOTE: The Audit Confirmation screen also will give you the option to select <F2:
Stop> or <F5: Resume>, in addition to <F1: Audit>. IMPORTANT: If you are
performing an audit from the Sampling Mode and you choose <F2: Stop> in the
Audit Confirmation screen, the unit will not resume sampling (after your audit
procedures are finished) at the set points that you previously entered. The unit will
advance its sampling cycle to the next day and then enter the Wait Mode.
Press <MENU>, make sure that “>Audit” is selected and then
press <ENTER>. This will display the Audit screen (Figure 6-3).
Press <F4: FiltAdv> and wait for the filter exchange to occur. If
the Partisol-Plus was previously in the sampling mode, a partially
exposed sampling filter will advance into the empty storage
magazine, and the empty cassette will move into the sampling
chamber.
2) Unlatch and open the top cover of the Partisol-Plus Sampler with
the down tube and first stage inlet attached to gain access to the
WINS impactor (Figure G-3).
3) Lift the WINS impactor out of the upper part of the sampler enclosure (Figures G-4 and G-5).
4) The WINS impactor is connected on its top side to an adapter that
makes contact with the external down tube. Separate the WINS
impactor from its adapter.
Figure G-6. Upper and
lower sections of the
impactor assembly (on left
and right sides of figure).
G.3.2.
APPENDIX G: MAINTENANCE OF INLETS
CLEANING THE WINS IMPACTOR
PAGE G-6
Revision B.003
Operating Manual, Partisol-Plus Model 2025 Sequential Air Sampler
Figure G-7. Coating the 37
mm glass filter with oil.
Follow these steps to clean the WINS impactor:
1) Unscrew the middle section of the WINS impactor to separate its
top piece from its bottom section. This exposes the impactor
assembly.
2) Remove the impactor assembly from the bottom section of the
WINS impactor (Figure G-6).
3) With a dry paper towel, wipe off the inside surfaces of the WINS
impactor. A general-purpose cleaner can be used, if necessary.
4) Inspect all O-rings in the top and bottom sections of the WINS
impactor for damage and replace them, if necessary. Apply a thin
coating of O-ring lubricant onto the O-rings, if necessary.
5) Remove the top of the impactor assembly by lifting upward.
6) Remove any filters that may have been previously installed, and
clean the top and bottom of the impactor assembly using a dry
paper towel. A general-purpose cleaner can be used, if necessary.
7) Inspect the O-ring in the top section of the impactor assembly for
damage and replace it, if necessary. Apply a thin coating of Oring lubricant onto the O-ring, if necessary.
8) Place a new 37 mm borosilicate, glass-fiber filter (32-004294) onto
the bottom of the impactor assembly.
9) Place 42 to 44 drops of impactor oil (59-004292) onto the filter
(Filter G-7).
APPENDIX G: MAINTENANCE OF INLETS
PAGE G-7
Revision B.003
Operating Manual, Partisol-Plus Model 2025 Sequential Air Sampler
10) Place the top of the impactor assembly onto the bottom section.
11) Place the impactor assembly into the bottom section of the WINS
impactor.
12) Screw the top of the WINS impactor back onto the bottom section.
Ensure that the WINS impactor remains in the upright orientation
so that the oil in the impactor assembly does not spill.
13) Multiple WINS impactors can be prepared in this manner at one
time and kept for later use.
G.3.3.
REPLACING THE WINS IMPACTOR
Follow these steps to reinstall the WINS impactor:
1) Attach the upper adapter to the WINS impactor by pressing the
two pieces together.
2) Reinsert the WINS impactor into the upper section of the PartisolPlus Sampler’s enclosure (Figure G-4) by pressing downward.
3) Lower the top cover and re-latch it (Figure G-3).
4) Press <ESC> twice to return to the Main screen. Press <RUN/
STOP> to resume sampling.
APPENDIX G: MAINTENANCE OF INLETS
PAGE G-8
Revision B.000
Operating Manual, Partisol-Plus Model 2025 Sequential Air Sampler
Appendix H: Inlet Conversion
The Partisol-Plus Sampler can be configured with a variety of inlet systems. This
appendix describes the components of the PM2.5 WINS inlet sampler configuration
and the PM-10 sampler configuration and the procedures for converting the PartisolPlus from a PM-2.5 to a PM-10 Particulate Air Sampler.
H.1.
PARTISOL-PLUS WINS PM-2.5 COMPONENTS
The following components comprise the WINS PM-2.5 inlet configuration as shown
in Figures H-1 and H-2:
Figure H-1. WINS impactor,
WINS adapter, sample tube
and 1st stage inlet.
A)
B)
C)
D)
WINS adapter
WINS impactor
Sample tube
1st stage inlet
Figure H-2. Partisol-Plus
Sampler with 1st stage inlet
and WINS impactor
installed.
SECTION H: INLET CONVERSION
PAGE H-1
Revision B.000
Operating Manual, Partisol-Plus Model 2025 Sequential Air Sampler
H.2.
PM-10 COMPONENTS
The following components comprise the PM-10 inlet configuration as shown in Figure
H-3:
Figure H-3. Sample tube,
pass through adapter tube
and PM-10 inlet.
A) Sample tube
B) Pass through adapter tube
C) PM-10 inlet
Figure H-4. Partisol-Plus
Samler with pass through
adapter tube and PM-10
inlet installed.
SECTION H: INLET CONVERSION
PAGE H-2
Revision B.000
Operating Manual, Partisol-Plus Model 2025 Sequential Air Sampler
H.3. CONVERTING FROM A WINS PM-2.5 SAMPLER TO A PM-10 SAMPLER
Follow these steps to convert the Partisol-Plus PM-2.5 Sampler to a
Partisol-Plus PM-10 Sampler:
1) Unlatch and open the top cover of the Partisol-Plus Sampler, with
the sample tube and 1st stage inlet attached, to gain access to
the WINS impactor (Figure H-5).
2) Lift the WINS impactor out of the upper part of the sampler enclosure (Figures H-6 and H-7 ). The WINS impactor is connected to
an adapter that makes contact with the external down tube.
3) Remove the 1st stage inlet from the sample tube by pulling
straight upward.
Figure H-5 (Left). Open top
cover to access the WINS
impactor and WINS
adapter.
Figure H-6 (Upper Right).
Partisol-Plus Sampler with
WINS impactor installed.
Figure H-7 (Lower Right).
Removing WINS impactor
and adapter.
SECTION H: INLET CONVERSION
PAGE H-3
Revision B.000
Operating Manual, Partisol-Plus Model 2025 Sequential Air Sampler
4) Install the pass through adapter tube in the sampler as shown in
Figure H-8.
Figure H-8. Installation of
the pass through adapter
tube.
Figure H-9. Partisol-Plus
with pass through adapter
tube installed.
SECTION H: INLET CONVERSION
PAGE H-4
Revision B.000
Operating Manual, Partisol-Plus Model 2025 Sequential Air Sampler
5) Close and relatch the top cover. Install the PM-10 inlet on the
sample tube by pressing straight downward until it hits a stop
(Figure H-10).
6) The Partisol-Plus is now configured as a PM-10 Sampler. There
is no difference in sampler programming or operation with the
PM-10 inlet installed.
NOTE: Make sure that filter cassettes, magazines, transport containers and data
sheets are clearly labeled as PM-10 sampling filters or sampling data when the
PM-10 inlet and pass through adapter tube are installed in the Partisol-Plus
Sampler.
Figure H-10. Installing the
PM-10 inlet.
SECTION H: INLET CONVERSION
PAGE H-5
Revision B.000
Operating Manual, Partisol-Plus Model 2025 Sequential Air Sampler
H.4.
PARTISOL-PLUS PM-2.5 AND PM-10 INLET CONFIGURATION
The Partisol-Plus Sampler can be easily converted from a PM-2.5 Sampler to a PM10 Sampler (as described in Section H-3). It also can be converted from a PM-10
Sampler into a WINS PM-2.5 Sampler by removing the PM-10 inlet and pass through
adapter tube and installing the WINS impactor with adapter, sample tube and 1st stage
inlet. Figures H-11 and H-12 illustrate the correct sampler configuration for the WINS
PM-2.5 and the PM-10, respectively.
Figure H-11 (Left). WINS
PM-2.5 Partisol-Plus
configuration.
Figure H-12 (Right). PM-10
Partisol-Plus configuration.
SECTION H: INLET CONVERSION
PAGE H-6
Revision B.000
Operating Manual, Partisol-Plus Model 2025 Sequential Air Sampler
Appendix I: Using the Palmtop
This appendix explains how to use the palmtop, which is also referred to in this section
as the “handheld personal computer,” “handheld PC” or “H/PC.” This section
describes how to install and use RPComm and RPData for Windows CE onto your
palmtop, and explains how to use the software. These applications are designed to run
on handheld PCs running the Windows CE operating system version 2.0 with service
pack SP1 installed. R&P uses this software on the HP360LX, the handheld PC that
R&P recommends that you use with its instrumentation.
When purchased from R&P, the HP360LX has RPData and RPComm software
already installed on it. Although the following instructions were written with the
HP360LX in mind, they also should apply to any handheld PC.
I.1.
COMMERCIALLY AVAILABLE HANDHELD PC REQUIREMENTS
If you wish to purchase your own handheld PC it must meet the following requirements:
•
•
•
•
It must be able to run the Windows CE operating system 2.0 or greater.
It must be based on the Hitachi SH3 or MIPS processor.
It must have at least 8MB of RAM in its base memory.
The screen size must be at least 640 x 240 pixels. Whether the display is
color, is optional. However, you should test the handheld PC under the
lighting conditions in which you expect to be using it, to make sure that
the display is clear and readable. Some handheld PC color displays can
be difficult to read in direct sunlight.
There is another class of handheld devices running the Windows CE operating system
that Microsoft designates as “Palm-sized PCs.” These devices are typically smaller
than handheld PCs and have no alphanumeric keypad. None of these devices are
compatible with R&P software.
The terms “handheld PC” and “H/PC” mean the same thing. They are both Microsoft
terms to describe a class of handheld computer with a keypad and a serial port that are
capable of running Windows CE. Hewlett Packard uses the brand name “Palmtop” in
the model names of their 300 and 600 series of H/PCs, nevertheless these computers
are not Palm-sized PCs, they are H/PCs.
SECTION I: USING THE HANDHELD PC
PAGE I-1
Revision B.000
Operating Manual, Partisol-Plus Model 2025 Sequential Air Sampler
I.2.
H/PC COMPILATION PACKAGE
If you ordered your H/PC directly from R&P, you should receive a package consisting
of the following:
One HP360LX palmtop computer with stylus tool
HP CD-ROM(s)
Synch cable/mounting plate (RS232 cable)
AC/DC power adapter
2 Disk R&P software package
1 Null modem adapter
Instruction sheet and packet
The software packet includes RPComm for Windows CE (RPCommCE) and RPData
on Disk 1. Windows CE service pack SP1 for Hewlett Packard palmtops is on Disk
2. The null modem adapter must be used to connect the H/PC with R&P instruments.
NOTE: If you did not order your palmtop from R&P, you
will need to obtain a null modem adapter from R&P to
properly communicate with R&P instruments.
All H/PC packages ordered from R&P will come preloaded with RPCommCE and
RPData. Both programs will be configured and ready for use with R&P particulate
monitors. If you misplace your batteries, or if you purchase your palmtop from another
source, the following section will assist you in installing RPComm and RPData onto
your palmtop.
I.3.
SETTING UP YOUR PALMTOP
Before you can install R&P’s Windows CE software, you need to set up communications between your palmtop and desktop computer. Much of this section has been
taken from HP’s Getting Started guide. Please refer to HP’s operating manuals for
additional guidance.
Follow these steps to set up a communications link between your
palmtop and desktop computer:
1) Open the main battery compartment and insert two “AA” alkaline
or rechargeable batteries. Be sure to pay attention to polarity.
Insert the batteries before installing the 3-volt CR2032 cell battery.
SECTION I: USING THE HANDHELD PC
PAGE I-2
Revision B.000
Operating Manual, Partisol-Plus Model 2025 Sequential Air Sampler
2) If you are using rechargeable batteries, connect the power
adapter to the palmtop and plug the adapter into an AC outlet.
3) Remove the backup battery cover and install the 3-volt CR2032
cell battery that came with the palmtop. Again, be sure to pay
attention to polarity.
4) Ensure that all battery compartments are closed.
5) Slide the stylus tool (it looks like a fake plastic pen or pointer) out
from the base of the palmtop and proceed through the H/PC
Setup Wizard. Proceed through the calibration of the stylus, and
enter the time/date, location and your personal information in the
Owner Properties screen when it is displayed.
6) After completing the H/PC Setup Wizard, use your stylus tool to
tap on the “Start” button, “Settings” and then select “Control
Panel” (Figure I-1).
Figure I-1. Selecting the
Control Panel.
7) On the Control Panel screen, use your stylus tool to double-tap on
the Power icon to reach the Power Properties screen (Figure I-2).
If you are using alkaline batteries, be sure that “Alkaline” is
selected. If you are using rechargeable batteries, select “NiCd /
NiMH” and then choose “Enable charging.”
NOTE: HP recommends that you wait 9 hours to allow the batteries to fully
charge. You do not have to wait for recharging to complete before you can use
your palmtop.
SECTION I: USING THE HANDHELD PC
PAGE I-3
Revision B.000
Operating Manual, Partisol-Plus Model 2025 Sequential Air Sampler
Figure I-2. Power Properties
screen.
You now need to set up your desktop computer with Microsoft Windows CE Services
software from the CD-ROM that came with your palmtop. Follow the documentation
included with your palmtop for setting up your desktop computer.
Once you have your desktop computer configured and you have successfully established communication between your palmtop and your desktop computer using the
synch cable (RS232 cable) that came with your palmtop, you must install service pack
SP for Windows CE onto your palmtop.
Follow these steps to install service pack SP for Windows CE onto your
palmtop:
1) Insert the SP1 disk into your desktop PC drive.
2) Execute the file: SP1.EXE.
3) Follow the online screen instructions and then reboot your
palmtop. Your palmtop is now initialized and ready to be loaded
with RPComm and RPData for Windows CE.
NOTE: See the Microsoft Windows CE Services online help reference for any
problems you may encounter in getting a connection established.
I.4.
INSTALLING RPCOMM AND RPDATA FOR WINDOWS CE
There is only one file distributed for each program. The RPCOMM distribution file
is called: RPCommCE.exe, and the RPData distribution file is called: RPDataCE.exe.
If you downloaded the software from the Internet, or if you received the software on
a disk from R&P, you should have the appropriate file for the program you want to
install.
SECTION I: USING THE HANDHELD PC
PAGE I-4
Revision B.000
Operating Manual, Partisol-Plus Model 2025 Sequential Air Sampler
Follow these steps to install RPComm and RPData for Windows CE onto
your palmtop:
1) Establish a connection between your desktop and your palmtop
computer using the synch cable that came with your palmtop.
See the Microsoft Windows CE Services online help reference for
troubleshooting procedures if you have any problems establishing a connection.
2) From your desktop computer, run RPCommCE.exe either from
Windows Explorer (double click on the file: RPCommCE.exe) or
by clicking the “Start” button at the bottom of your screen then
selecting “Run.” The RPComm for Windows CE start-up screen
will be displayed (Figure I-3).
Figure I-3. Executing
RPComm for Windows CE.
3) Assuming you have a connection established, press the “Setup”
button. A few more informational windows will appear. Proceed
through them by pressing “OK.” While the setup program is
copying files over, you will see the Loading Files screen (Figure I4).
Figure I-4. Loading Files
screen.
SECTION I: USING THE HANDHELD PC
PAGE I-5
Revision B.000
Operating Manual, Partisol-Plus Model 2025 Sequential Air Sampler
4) When all the files have been copied over, your palmtop will display the Installation Confirmation screen (Figure I-5). Press “OK.”
The palmtop should now display its Main screen (Figure I-6). You
should see an icon for RPComm for Windows CE.
Follow the same procedures for installing RPData onto your palmtop.
Figure I-5. Installation
Confirmation screen.
Figure I-6. The palmtop’s
Main screen.
I.5.
USING RPCOMM FOR WINDOWS CE
RPComm for Windows CE is a program designed by R&P to make your infield data
acquisition and review tasks as simple as possible. By using the AK communications
protocol available in most R&P products and connecting the palmtop to the serial port,
you can perform the following tasks:
•
•
Download new data from a Partisol-Plus Sampler into files to be stored
on your palmtop. These files can remain on your palmtop or on the builtin PC Card socket on a flash/SRAM card. When you get back to the office,
you can then easily transfer all the files collected that day to your desktop
computer.
View and modify the current data storage pointer.
SECTION I: USING THE HANDHELD PC
PAGE I-6
Revision B.000
Operating Manual, Partisol-Plus Model 2025 Sequential Air Sampler
•
•
•
View downloaded data files in a graph or in a raw data format.
View instrument variables, or program register codes (PRCs), such as
various temperatures or flow rates in real-time.
Edit and upload filter and cassette identifiers.
Start the RPComm software by using your stylus tool to double-tap the RPComm for
Windows CE icon on the Main screen (Figure I-6). RPComm’s Main screen is
displayed in Figure I-7.
Figure I-7. RPComm’s Main
screen.
I.6.
BEFORE YOU BEGIN
Before you begin, you must be sure that your communication parameters between the
palmtop and the R&P instrument that you are communicating with both agree. To
view or modify the communication settings on your palmtop, select “Setup” from the
Main screen, then “Setup Communications.” This will bring you to the Setup
Communications screen (Figure I-8).
Follow these steps to ensure that your palmtop and R&P instrument are
communicating properly:
1) On the Setup Communications screen (Figure I-8), select the
instrument that you are currently connected to.
2) Select the baud rate that you wish to use.
3) For flow control, select “None.
NOTE: If the palmtop is connected to R&P’s TEOM Series 1400 Ambient
Particulate Monitor, select “RTS/CTS” for the flow control.
SECTION I: USING THE HANDHELD PC
PAGE I-7
Revision B.000
Operating Manual, Partisol-Plus Model 2025 Sequential Air Sampler
Figure I-8. Setup Communications screen.
4) AK settings are very important. All R&P instruments default to the
AK settings of Station: 4 and Channel: K0. If you have not modified the settings on your R&P instrument, then you probably do
not need to do anything with these settings. However, if you wish
to verify the settings on your instrument, go to the instrument’s
RS232 Setup screen, and you will see its RS232 parameters
entered here. You should see “52” for AK Station (sometimes
called RS Parameter 1) and “75048” for AK Channel (RS Parameter 2). Please consult your instrument’s Operating Manual for
more details.
NOTE: You must use a null modem adapter and a gender changer hooked to the
synch cable to allow the palmtop to communicate with the R&P instrument.
Some commercially available null modem adapters are not standard. R&P has a
standard null modem/gender changer in one adapter that you may purchase if you
experience problems (Appendix E).
I.7.
DOWNLOADING DATA
To download data, from the Main screen (Figure I-7) select “File,” and then
“Download Data.” At this point, the palmtop will ask you whether you would like to
use the serial number of the R&P instrument for the file name. If you choose “Yes,”
RPComm can set up default file names for you. If you want to choose your own file
name, then select “No” and then select a file name to use for storing the data. RPComm
uses “.txt” as a default file extension. The Download Data screen (Figure I-9) will now
be displayed.
If your sampler has more than one type of data storage, select which type of data
storage you would like to download. Your unit has an internal storage pointer that
SECTION I: USING THE HANDHELD PC
PAGE I-8
Revision B.000
Operating Manual, Partisol-Plus Model 2025 Sequential Air Sampler
Figure I-9. Download Data
screen.
points to the next record that is to be downloaded. If you want to select the first record
that will be received, select “Set Start Record.” If you want to download all available
records from the storage pointer to the end of all data records, select “Download all
records.” Otherwise, deselect the “Download all records” option and then select how
many records you would like to download. If you want to change the name of the file
that will store the downloaded data, choose “Select File…”
NOTE: You may use RPComm to capture data from any
device that outputs data to a RS232 serial port. If you want
to simply capture any data coming in on the serial port, select
the “Data Capture” button.
When you are satisfied with your download parameters, press “Start Download” to
start the downloading process. If you are capturing data, press “Start Download”
before triggering the data output option on your sampler. You will see the current
download progress on screen. Your Partisol-Plus Sampler and/or palmtop will display
a screen to notify you when the download process is complete.
I.8.
VIEWING YOUR DATA
Follow these steps to view data:
1) From the Main screen (Figure I-7), select “File,” and then “Open
File...” Select the file you would like to display.
2) The palmtop will display the Data File Format screen (Figure I-10),
which will ask you to select the instrument that the data was
downloaded from and the type of data that was downloaded from
it. As long as you are viewing data files that were downloaded by
RPComm, the palmtop will always prompt you with the correct
instrument and file format. Press “OK.”
SECTION I: USING THE HANDHELD PC
PAGE I-9
Revision B.000
Operating Manual, Partisol-Plus Model 2025 Sequential Air Sampler
Figure I-10. Data File
Format screen.
3) Depending on the size of the file, it may take up to 30 seconds or
more to read and parse the entire file. When the palmtop’s hourglass cursor disappears, your file has been read into RPComm
successfully. The left side of the screen will now show the current program register codes (PRCs) that are available for viewing.
RPComm can display two variables at a time. With the stylus tool,
tap on the PRC that you would like to view in your graph. An
example of a graph of interval data from a Partisol-Plus Sampler
is displayed in Figure I-11.
Figure I-11. Interval data
graph.
SECTION I: USING THE HANDHELD PC
PAGE I-10
Revision B.000
Operating Manual, Partisol-Plus Model 2025 Sequential Air Sampler
Follow these steps to adjust the x- and y-axis on your graphed data, and
to view raw data:
1) To adjust the x-axis: Use the zoom buttons on the toolbar on the
top of your screen to zoom in and out of your graph. You can use
the zoom buttons only for adjusting the time scale. Use the arrow
buttons to jump back and forth in the data that you are viewing.
2) To adjust the y-axis: With your stylus tool, tap on any one of the
numbers on the y-axis. A window will appear that will allow you
to manually adjust the values for your scale. You also can press
“Auto Scale,” which will automatically adjust the scale so that the
majority of the data will be centered on the graph.
3) To view raw data: To view your data in the format that it was
downloaded from your sampler, from the palmtop’s Main screen
(Figure I-7), press the “View Raw Data” button on the toolbar at
the top of the screen. Figure I-12 contains an example of the
screen you would see if you were viewing interval data downloaded from a Partisol-Plus Sampler. Use the scrollbar at the
right side of the screen to go through the data.
Figure I-12. Interval Data
screen.
SECTION I: USING THE HANDHELD PC
PAGE I-11
Revision B.000
Operating Manual, Partisol-Plus Model 2025 Sequential Air Sampler
I.9.
MANAGING FILTER IDENTIFIERS
Entering filter and cassette identifiers using the Partisol-Plus Sampler’s keypad can
be cumbersome, especially if your unit is not located in a shelter. With the RPComm
program, filter numbers can be loaded into the palmtop prior to the site visit. Once you
are at the site and the palmtop is connected to the Partisol-Plus, the palmtop with
RPComm can do the work of entering filter and cassette identifiers into the unit’s
memory.
Follow these steps to enter, modify, download or upload filter and
cassette identifiers:
1) From the Main screen (Figure I-7), select “Setup,” and then “Filter
Identifiers.” The palmtop will display the Filter Identifiers screen
(Figure I-13).
2) To view all 16 filters, use the stylus tool to tap the “<<Prev” and
“Next>>” buttons.
Figure I-13. Filter Identifiers
screen.
SECTION I: USING THE HANDHELD PC
PAGE I-12
Revision B.000
Operating Manual, Partisol-Plus Model 2025 Sequential Air Sampler
3) To load your filter identifiers from a file, use the stylus tool to tap
“Load File…” If you did not save your current identifiers first, the
palmtop will now prompt you to do so.
4) To save your current filter identifier settings to a file, use the
stylus tool to tap “Save File…”
5) To retrieve the filter identifiers currently entered in the unit, use
the stylus tool to tap “Retrieve IDs.” If you did not save your
current identifiers first, the palmtop will now prompt you to do
so.
6) To upload the filter identifiers from the palmtop to the unit, use
the stylus tool to tap “Send IDs.”
I.10.
TRANSFERRING DATA TO YOUR DESKTOP COMPUTER
Storing your data permanently on the palmtop is not recommended because of its
storage limitations and the potential for losing data due to battery failure.
Follow these steps to copy your files from your palmtop to your desktop
computer:
1) Establish a connection between your palmtop and desktop computer. Remove the null modem adapter if it is still attached. Open
the Windows CE Services program on your desktop computer.
Select “Mobile Devices.”
2) From the Mobile Devices screen, double-click on the palmtop icon
to open the Explorer screen for the palmtop.
3) From the Explorer screen (Figure I-14), double-click on the icon
that represents your palmtop. This icon is most likely called “My
Handheld PC.” You should now see the data files in the Explorer
screen. If you are not storing the files in the root directory on the
palmtop, locate the directory where you are storing your files.
4) Start the Windows Explorer program on your desktop computer.
5) To copy a file, select the file in the Explorer screen for the
palmtop and drag it to the desired directory in the Explorer
screen for your desktop computer.
SECTION I: USING THE HANDHELD PC
PAGE I-13
Revision B.000
Operating Manual, Partisol-Plus Model 2025 Sequential Air Sampler
Figure I-14. Desktop
computer’s Explorer
screen.
SECTION I: USING THE HANDHELD PC
PAGE I-14
Revision B.000
Operating Manual, Partisol-Plus Model 2025 Sequential Air Sampler
I.11.
USING RPDATA FOR WINDOWS CE ON YOUR PALMTOP
RPData has only one purpose: It easily retrieves all data from your Partisol-Plus
Sampler. When you initiate your RPData program, only one screen with one option
will be displayed and available. The RPData Main screen (Figure I-15) will be
displayed when you initiate your RPData program. To retrieve your data, use the
stylus tool to tap “Retrieve Data.” Status messages will be displayed for every step that
RPData performs.
Figure I-15. RPData’s Main
screen.
To select your unit, use your stylus tool to tap on the list in the upper right-hand corner
of the PRData Main screen (Figure I-16).
Figure I-16. RPData Main
screen with instrument type
highlighted.
Instrument type
SECTION I: USING THE HANDHELD PC
PAGE I-15
Revision B.000
Operating Manual, Partisol-Plus Model 2025 Sequential Air Sampler
To select the type of data you wish to download, select or deselect the checkboxes
located beneath the sampler’s name on the RPData Main screen (Figure I-17).
Figure I-17. RPData Main
screen with data type
highlighted.
Data type
To configure the RS232 setting for the program, use the stylus tool to tap on the
“Setup” button on the RPData Main screen. This will display the Setup Communications screen (Figure I-18).
Figure I-18. RPData’s
Setup Communications
screen.
To configure the proper AK protocol settings, use your stylus tool to tap on the
“Advanced” button in the Setup Communications screen. This will display the Setup
AK Protocol Parameters screen (Figure I-19).
SECTION I: USING THE HANDHELD PC
PAGE I-16
Revision B.000
Operating Manual, Partisol-Plus Model 2025 Sequential Air Sampler
Figure I-19. RPData’s
Setup AK Protocol Parameters screen.
Data files loaded onto the palmtop will be named in the following manner:
SSSSSTNN.txt
where:
SSSSS = the instrument serial number
T = the type of data that was downloaded
NN = the file number(s).
The type of data downloaded will be represented by “F” for filter data, “I” for interval
data, and “P” for input data.
Each data file is stored just as the sampler outputs it. See Section 10 for the proper
formatting of data files. To view the files, you can use RPComm for Windows CE,
RPComm for Windows 95/NT, or you can load the files into a spreadsheet program.
SECTION I: USING THE HANDHELD PC
PAGE I-17
Revision B.000
Operating Manual, Partisol-Plus Model 2025 Sequential Air Sampler
This page left intentionally blank.
SECTION I: USING THE HANDHELD PC
PAGE I-18
Revision B.001
Operating Manual, Partisol-Plus Model 2025 Sequential Air Sampler
Appendix J: Modem Communications
This section describes how to connect the Partisol-Plus Sampler to a modem for offsite
communications and how to set up a serial switching device for use with multiple
instruments.
Modem communications can be used to remotely download data from the unit, check
instrument operation and to change system variables. All R&P instrumentation can be
connected to a standard external modem for communications. However, R&P
recommends that you use the modem available from R&P as part of the internal
modem kit (59-005707) be used rather than a standard commercial model for the
following reasons:
•
The R&P modem is a heavy-duty industrial model with a rated temperature range of -40° to 85° C. This temperature range is important because
the temperatures inside the Partisol-Plus Sampler can vary greatly. Most
standard commercial modems are designed to operate at room temperature and will not operate properly at the extreme temperature ranges that
the unit is subjected to.
•
The R&P modem is factory-configured to operate properly with R&P
instrumentation. Most standard commercial modems can be configured
to operate with R&P instrumentation. However, because command codes
are not standard among different modem manufacturers, it is the user’s
responsibility to determine the correct codes to configure the modem.
•
The R&P modem can be purchased as part of the internal modem kit (59005707) which provides all the parts needed to install the modem inside
the Partisol-Plus Sampler. Commercially available modems can not be
simply placed inside the unit’s enclosure due to temperature concerns
(see above) and because placing the modem on one of the unit’s
components (such as the pump or power supply) may cause the unit to
malfunction. Also, because commercial modems have varying electrical
requirements, these modems can not receive power from the sampler.
R&P recommends that you place your commercial modem in a separate,
environmentally controlled enclosure with a separate power source.
APPENDIX J: MODEM COMMUNICATIONS
PAGE J-1
Revision B.001
Operating Manual, Partisol-Plus Model 2025 Sequential Air Sampler
Figure J-1. Internal modem
assembly.
6
2
3
4
8
1
5
7
J.1.
INSTALLING
THE INTERNAL
MODEM
The following parts are included with this kit (Figure J-1):
Item #
1
2
3
4
5
6
7
8
Qty
1
1
1
1
1
1
1
1
Part Number
07-005708
06-005709
07-005710
51-005711
38-005712
38-005713
10-005671
07-005601
Description
Double-shielded data cable, 9-pin M-F
Panel-mounted modular coupler
Flat modular data cable, 4 conductors
Modem power cord
Modem mounting bracket
Pump compartment cover
Null modem adapter, 9-to-9 pin
Modem, 14.4 kbs
Follow these steps to install the internal modem:
1)
Turn off the power to the Partisol-Plus Sampler. Unplug the unit’s
power cord from the AC power outlet.
2)
Remove the pump compartment cover (Figure J-2).
APPENDIX J: MODEM COMMUNICATIONS
PAGE J-2
Revision B.001
Operating Manual, Partisol-Plus Model 2025 Sequential Air Sampler
Figure J-2. Removing the
pump cover.
3)
Locate the modem power cord on the modem assembly. Plug the
modem power cord into the connector labeled “Pump 2” in the
pump compartment. Slide the metal clip over the connector to
secure it in place (Figure J-3).
4)
Locate the 9-pin serial cable on the modem assembly. Place the
serial cable through the notch on the left side of the cover so that
it extends out of the pump compartment (Figure J-4).
5)
Replace the pump compartment cover into the correct position
and secure.
6)
Plug the serial cable into the connector labeled “RS-232” on the
front of the unit (Figure J-5).
7)
Plug the unit’s power cord into the AC power outlet. Turn on
power.
8)
Plug an outside telephone line into the RJ-11 connector on the
front of the pump compartment cover (Figure J-6).
9)
The modem is now ready for communications. Communications
can be accomplished using RPComm software which is available
from R&P.
APPENDIX J: MODEM COMMUNICATIONS
PAGE J-3
Revision B.000
Operating Manual, Partisol-Plus Model 2025 Sequential Air Sampler
Figure J-3. Location of
"Pump 2" connector.
APPENDIX J: MODEM COMMUNICATIONS
PAGE J-4
Revision B.001
Operating Manual, Partisol-Plus Model 2025 Sequential Air Sampler
Figure J-4. Installing the
internal modem assembly.
Serial Cable
Figure J-5. Detail of serial
connection from PartisolPlus to modem and RJ-11
jack to outside telephone
line.
Outside
Telephone Line
Serial Cable
APPENDIX J: MODEM COMMUNICATIONS
PAGE J-5
Revision B.001
Operating Manual, Partisol-Plus Model 2025 Sequential Air Sampler
Figure J-6. Front view of a
Partisol-Plus Sampler with
an internal modem installed.
APPENDIX J: MODEM COMMUNICATIONS
PAGE J-6
Revision B.001
Operating Manual, Partisol-Plus Model 2025 Sequential Air Sampler
J.2.
SETTING UP
A
STANDARD COMMERCIAL EXTERNAL MODEM
R&P recommends that you use the R&P modem, as part of the internal modem kit (59005707), rather than a standard commercial model for the following reasons:
•
The temperatures inside the Partisol-Plus Sampler can vary greatly. Most
standard commercial modems are designed to operate at room temperature and will not operate properly at the extreme temperature ranges that
the unit is subjected to.
•
Most standard commercial modems can be configured to operate with
R&P instrumentation. However, because command codes are not standard among different modem manufacturers, it is the user’s responsibility
to determine the correct codes to configure the modem.
•
Commercially available modems can not be simply placed inside the
unit’s enclosure due to temperature concerns (see above) and because
placing the modem on one of the unit’s components (such as the pump or
power supply) may cause the unit to malfunction. Also, because commercial modems have varying electrical requirements, these modems can not
receive power from the sampler. R&P recommends that you place your
commercial modem in a separate, environmentally controlled enclosure
with a separate power source.
Required parts:
9M-to-9F pin straight-through serial cable (07-000587)
9M-to-9F pin null modem adapter (10-005671)
9-to-25 pin serial adapter (06-005895-0925)
Commercial external modem.
Follow these steps to set up an external commercial modem:
1)
Connect your computer directly to the modem (follow the instruction manual that came with the modem).
2)
Begin executing any communication software which will allow
direct communications with the modem. Communication software is included with most modems. If no software program was
included, Hyper Terminal (which is included with the Windows
operating system) can be used.
APPENDIX J: MODEM COMMUNICATIONS
PAGE J-7
Revision B.001
Operating Manual, Partisol-Plus Model 2025 Sequential Air Sampler
3)
Set the modem’s communication parameters to work with the
Partisol-Plus Sampler. A typical command string to send to the
modem to configure it for use is:
AT &F0 &C0 &D0 S0=1 &K0 &W0 &Y0
where:
AT
&F0
&C0
&D0
S0=1
&K0
&W0
&Y0
Command prefix
Software reset; restore default parameters
Force DCD (Data Carrier Detect) “ON” at all times
Ignore DTR (Data Terminal Ready) from instrument
Set auto answer to one ring
Disable local flow control
Store settings in profile “0”
Use stored settings in profile “0” on power up.
Various commercial (especially older) modems may have different commands
for the functions listed above. Consult your modem’s instruction manual for the
proper commands. Also, some modems limit the length of the command string
that may be sent. The command string can be broken into two or more segments
and sent individually.
4)
Disconnect your computer from the modem.
5)
Open the door to the sampler. Attach the male end of the 9-to-9
pin cable to the RS232 connector on the front of the unit. Close
the unit’s door ensuring that the 9-to-9 pin cable is placed in one
of the slots on the bottom of the door to allow it to close properly.
6)
Attach the null modem adapter to the female end of the 9-to-9 pin
cable.
NOTE: Not all null modem adapters can be used in this application because pin
connections are not standard. The null modem adapter (10-005671) that is
available from R&P is acceptable for use with the Partisol-Plus Sampler. The
schematic of this adapter can be found in the Service Manual.
7)
If your modem is equipped with a 9-pin connector, attach the
cable and null modem adapter to the modem. If your modem is
equipped with a 25-pin connector, attach a 9-to-25 pin serial
adapter to the null modem adapter and plug it into the modem.
NOTE: Not all 9-to-25 pin serial adapters can be used in this application because
pin connections are not standard. The 9-to-25 pin serial adapter (06-0058950925) that is available from R&P is acceptable for use with the sampler. The
schematic of this adapter can be found in the Service Manual.
APPENDIX J: MODEM COMMUNICATIONS
PAGE J-8
Revision B.001
Operating Manual, Partisol-Plus Model 2025 Sequential Air Sampler
8)
J.3.
Attach a phone line to the modem. The modem is now ready to
communicate with the unit.
SETTING UP RPCOMM FOR USE THROUGH A MODEM
NOTE: The Windows operating system screens shown in
this section are from the Windows 95 operating system. The
screens may vary slightly if you are operating RPComm
under the Windows 98 or Windows NT operating systems.
The first two steps of this procedure describe setting up the unit for direct communications. Direct communications must be successfully completed before modem
communications are attempted. This will verify that RPComm and the unit have been
configured properly.
Follow these steps to set up RPComm for use through a modem:
1)
Set up the Partisol-Plus Sampler for direct communications
(Section 10.1).
2)
Create a new connection according to Section 10.2.2 and verify
that the unit is communicating properly.
NOTE: If the connection is successful, the unit’s serial number will be displayed
at the top of the screen. If the connection is not successful or if there is no unit
attached, then the serial number area will be blank or will display “99999.”
3)
Disconnect the direct connection.
4)
Set up the unit for modem communications according to Section
J.1 or J.2.
NOTE: R&P recommends that the modem connections be tested before the unit
is placed in the field. The test will require the use of two phone lines.
5)
With the RPComm Connect List screen displayed (Figure J-7),
select the name of the connection used to verify the direct connection above and choose the Edit Selected Connection icon.
The Connection Type screen will then be displayed (Figure
J-8).
6)
From the Connection Type screen, ensure that the correct instrument type is selected and select “Settings” to display the AK
Protocol Setup screen (Figure J-9).
APPENDIX J: MODEM COMMUNICATIONS
PAGE J-9
Revision B.001
Operating Manual, Partisol-Plus Model 2025 Sequential Air Sampler
Figure J-7. Connect List
screen.
Figure J-8. Connection
Type screen.
APPENDIX J: MODEM COMMUNICATIONS
PAGE J-10
Revision B.001
Operating Manual, Partisol-Plus Model 2025 Sequential Air Sampler
7)
Place your cursor in the small white box located to the left of
“Connect using Modem” and click once with your mouse. A
checkmark should appear in the box.
8)
To set up the unit for a modem connection, the Connection
Description box (in the top left corner) should be set to your
modem’s description. In Figure J-9, the modem description is
“U.S. Robotics 56K Voice INT PhP.” The description will vary
depending on factors such as your modem type, whether it is an
internal or external modem and which COM port the modem is
connected to.
9)
The Station Setup portion of the screen should have been set
when you established your direct connection (steps 1 and 2). Do
not modify these settings.
Figure J-9. AK Protocol
Setup screen.
10) Select the “Modem Setup >>” button to display the Modem Properties screen (Figure J-10).
11) Generally, the values that your system chooses for variables on
this screen are appropriate for a proper connection. However, if
your unit and modem experience communication difficulties,
these setting may need to be altered. Contact your modem’s
APPENDIX J: MODEM COMMUNICATIONS
PAGE J-11
Revision B.001
Operating Manual, Partisol-Plus Model 2025 Sequential Air Sampler
Figure J-10. Modem
Properties screen.
manufacturer for more information, if necessary.
12) Select “OK” to exit the Modem Properties screen. The AK Protocol Setup screen (Figure J-9) will now appear as the active
screen on your computer.
13) In the AK Protocol Setup screen, enter the phone number to be
called in the “Phone Number” box at the bottom of the screen. Do
not enter anything in the “Dialing String” box. This setting will be
automatically configured by the system.
14) Select the “Dialing Setup >>” button to display the Dialing Properties screen (Figure J-11).
15) Fill in the required information on the Dialing Properties screen.
Verify that the “Number to be dialed” shown at the bottom of the
screen matches the phone number as it should be dialed. If the
phone number is not correct, there is an error on this screen or
you may have incorrectly entered the phone number on the AK
Protocol Setup screen.
16) Select “OK” when the proper settings have been confirmed. This
APPENDIX J: MODEM COMMUNICATIONS
PAGE J-12
Revision B.001
Operating Manual, Partisol-Plus Model 2025 Sequential Air Sampler
Figure J-11. Dialing
Properties screen.
will return you to the AK Protocol Setup screen.
17) Select “OK” while in the AK Protocol Setup screen. This will
return you to the Connection Type screen. To finish the connection setup, select “OK” while in the Connection Type screen.
18) To connect to your Partisol-Plus Sampler through the modem,
highlight the connection name on the Connection List screen
(Figure J-7) and then select the Connection icon on the tool bar.
The modem connection will now be initiated. When communication is established, the 2025 Main screen will be displayed
(Figure J-12).
NOTE: If the connection is successful, the unit’s serial number will be displayed
APPENDIX J: MODEM COMMUNICATIONS
PAGE J-13
Revision B.001
Operating Manual, Partisol-Plus Model 2025 Sequential Air Sampler
Figure J-12. 2025 Main
screen.
at the top of the screen. If the connection is not successful or if there is no
instrument attached, then the serial number area will be blank or will display
“99999.” If the modem loses its connection, wait at least 1 minute before trying
to establish another connection. This allows the modem to reset itself.
19) RPComm can now be used as described in Section 10.
J.4.
SETTING UP
THE
SERIAL SWITCHING DEVICE
For applications where two or more R&P instruments are installed at the same
APPENDIX J: MODEM COMMUNICATIONS
PAGE J-14
Revision B.001
Operating Manual, Partisol-Plus Model 2025 Sequential Air Sampler
location, a serial switching device can be installed to help with communications. The
serial switching device enables communication to occur with multiple instruments
(including non-R&P serial devices) with the use of only one phone line. Command
codes can be sent over the phone line to trigger a particular serial port and, therefore,
allow communication with the connected instrument. RPComm can be configured to
operate with these devices and send the required command codes.
J.4.1.
MULTIPLE R&P INSTRUMENTS OF THE SAME MODEL
Refer to this section if you are connecting two or more R&P instruments of the same
model to a serial switching device.
Follow these steps to set up a serial switching device:
1)
Set up the unit for modem communications (Section J.1 or J.2).
Verify that modem communications to each instrument are successful before adding the serial switching device.
2)
Obtain a serial switching device from a commercial manufacturer. R&P has found that devices manufactured by Black Box
Corp. work properly with its instrumentation, although other
devices should function properly. The part number and cost of
the device will vary depending on how many serial devices the
user wishes to connect to it.
3)
From the serial switching device’s instruction manual, determine
the command codes required to trigger activation of each serial
port being used.
4)
Unplug the serial cable and its adapter(s) from the modem and
then plug the cable assembly into the serial switching device.
Follow the instructions provided with the serial switching device
and connect it to the modem.
NOTE: R&P recommends that the serial device’s connections be tested before
the unit is placed in the field. This test will require the use of two phone lines.
5)
With the RPComm Connect List screen displayed (Figure J-7),
select the name of the connection used to verify the modem
connection above and then choose the Edit Selected Connection
icon.
The Connection Type screen will then be displayed
(Figure J-8).
6)
From the Connection Type screen, ensure that the correct instrument type is selected and select “Settings” to display the AK
APPENDIX J: MODEM COMMUNICATIONS
PAGE J-15
Revision B.001
Operating Manual, Partisol-Plus Model 2025 Sequential Air Sampler
Protocol Setup screen (Figure J-9).
7)
From the list of command codes on the right side of the AK
Protocol Setup screen, select the correct series of command
codes needed to trigger the desired instrument. As codes are
chosen, they will appear on the bottom of the screen in the Connection Command box. If a code is entered incorrectly, it can be
deleted by selecting the code in the Connection Command box
and pressing the Delete key on your computer’s keyboard.
8)
The remaining portions of the screen should have been set while
establishing the modem connection (step 1). Do not modify these
settings.
9)
Select “OK” to exit the AK Protocol Setup screen. This will display the Connection Type screen.
10) Choose “OK” from the Connection Type screen to finish the
connection setup.
11) To initiate a modem connection to a selected instrument, highlight the connection name on the Connect List screen (Figure J-7)
and select the Connection icon on the tool bar.
The connec-
tion to the instrument will be initiated and the proper command
codes sent. When communication is established, the 2025 Main
screen will be displayed (Figure J-12).
NOTE: If the connection is successful, the unit’s serial number will be displayed
at the top of the screen. Ensure that the correct serial number is displayed to verify
that the proper command codes were sent and that the serial port trigger is
functioning properly. If the connection is not successful or if there is no
instrument attached, then the serial number area will be blank or will display
“99999.” If the modem loses its connection, wait at least 1 minute before trying
to establish another connection. This allows the modem to reset itself.
12) RPComm can now be used as described in Section 10.
13) To connect to a different instrument through the serial switching
device, the current connection must be terminated. Enter the
proper command codes for the desired instrument as described
in step 7 and initiate the modem connection as explained in step
11. If the modem loses its connection, wait at least 1 minute
before trying to establish another connection. This allows the
modem to reset itself.
APPENDIX J: MODEM COMMUNICATIONS
PAGE J-16
Revision B.001
Operating Manual, Partisol-Plus Model 2025 Sequential Air Sampler
J.4.2
MULTIPLE R&P INSTRUMENTS OF DIFFERENT MODELS
Refer to this section if two or more R&P instruments of different models are being
connected to a serial switching device. The following combinations can be supported
at this time:
Series 1400a and a Model 2025
Partisol Model 2000-FRM and a Model 2025
Although RPComm supports both the Series 1400a monitor and the Partisol Model
2000-FRM sampler, it is not possible to connect these instruments to a single serial
switching device. This is because the Series 1400a monitor requires the local
communication flow control to be set to “RTS/CTS” and the Partisol Model 2000FRM sampler does not support any local communication flow control. If a Series
1400a monitor and a Partisol Model 2000-FRM sampler are co-located, two modems
and phone lines must be used for communications.
J.4.2.1
CONNECTING A SERIES 1400A AND MODEL 2025
Follow these steps to connect a Series 1400a monitor and a Model 2025
sampler to a serial switching device:
1)
Set up the 1400a monitor and Model 2025 sampler for direct
communications (Section 10.1).
2)
Create a new connection to each instrument according to Section
10.2.2 and verify that the units are communicating properly.
NOTE: If the connection is successful, the unit’s serial number will be displayed
at the top of the screen. If the connection is not successful or if there is no unit
attached, then the serial number area will be blank or will display “99999.”
3)
Once the RPComm software and instrument configurations have
been verified, disconnect the direct connection.
4)
Connect your computer directly to the modem that will be connected to the serial switching device.
5)
Begin executing any communication software which will allow
direct communications with the modem. Communication software is usually included with most standard commercial
modems. If no software program was included with your standard commercial modem, Hyper Terminal (which is included with
the Windows operating system) can be used.
6)
Set the modem’s communication parameters to work with the
Series 1400a monitor. The following list contains the commands
APPENDIX J: MODEM COMMUNICATIONS
PAGE J-17
Revision B.001
Operating Manual, Partisol-Plus Model 2025 Sequential Air Sampler
that should be set and their corresponding command codes.
Various commercial (especially older) modems may have different command codes for the functions listed. Consult your
modem’s instruction manual for the proper commands.
Communication Parameter
Command Code
Software reset; restore default parameters
&F0
Force DCD (Data Carrier Detect) “ON” at all times
&C0
Ignore DTR (Data Terminal Ready) from instrument
&D0
Set auto answer to one ring
S0=1
Set local flow control to “RTS/CTS”
{varies}
Store settings in profile “0”
&W0
Use stored settings in profile “0” on power up.
&Y0
7)
Disconnect your computer from the modem.
8)
Attach the male end of the 9-to-9 pin cable to the RS232 connector on one of the instruments.
9)
Attach the null modem adapter to the female end of the 9-to-9 pin
cable.
NOTE: Not all null modem adapters can be used in this application because pin
connections are not standard. The null modem adapter (10-005671) that is
available from R&P is acceptable for use with the sampler. The schematic of this
adapter can be found in the Service Manual.
10) If your modem is equipped with a 9-pin connector, attach the
cable and null modem adapter to the modem. If your modem is
equipped with a 25-pin connector, attach a 9-to-25 pin serial
adapter to the null modem adapter and plug it into the modem.
NOTE: Not all 9-to-25 serial pin adapters can be used in this application because
pin connections are not standard. The 9-to-25 serial pin adapter (06-0058950925) that is available from R&P is acceptable for use with the sampler. The
schematic of this adapter can be found in the Service Manual.
11) Attach a phone line to the modem.
12) With the RPComm Connect List screen displayed (Figure J-7),
select the name of one of the connections used to verify the
direct connection above and choose the Edit Selected Connection icon.
The Connection Type screen will then be
displayed (Figure J-8).
13) From the Connection Type screen, ensure that the correct instrument type is selected and select “Settings” to display the AK
Protocol Setup screen (Figure J-9).
APPENDIX J: MODEM COMMUNICATIONS
PAGE J-18
Revision B.001
Operating Manual, Partisol-Plus Model 2025 Sequential Air Sampler
14) Place your cursor in the small white box located to the left of
“Connect using Modem” and click once with your mouse. A
checkmark should appear in the box.
15) To set up the unit for a modem connection, the Connection
Description box (in the top left corner) should be set to your
modem’s description. In Figure J-9, the modem description is
“U.S. Robotics 56K Voice INT PhP.” The description will vary
depending on factors such as your modem type, whether it is an
internal or external modem and which COM port the modem is
connected to.
16) The Station Setup portion of the screen should have been set
when you established your direct connection. Do not modify
these settings.
17) Select the “Modem Setup >>” button to display the Modem Properties screen (Figure J-10).
18) Generally, the values that your system chooses for variables on
this screen are appropriate for a proper connection. However, if
your unit and modem experience communication difficulties,
these setting may need to be altered. Contact your modem’s
manufacturer for more information, if necessary.
19) Select “OK” to exit the Modem Properties screen. The AK Protocol Setup screen (Figure J-9) will now appear as the active
screen on your computer.
20) In the AK Protocol Setup screen, enter the phone number to be
called in the “Phone Number” box at the bottom of the screen. Do
not enter anything in the “Dialing String” box. This setting will be
automatically configured by the system.
21) Select the “Dialing Setup >>” button to display the Dialing Properties screen (Figure J-11).
22) Fill in the required information on the Dialing Properties screen.
Verify that the “Number to be dialed” shown at the bottom of the
screen matches the phone number as it should be dialed. If the
phone number is not correct, there is an error on this screen or
you may have incorrectly entered the phone number on the AK
Protocol Setup screen.
23) Select “OK” when the proper settings have been confirmed. This
will return you to the AK Protocol Setup screen.
24) Select “OK” while in the AK Protocol Setup screen. This will
return you to the Connection Type screen. To finish the connec-
APPENDIX J: MODEM COMMUNICATIONS
PAGE J-19
Revision B.001
Operating Manual, Partisol-Plus Model 2025 Sequential Air Sampler
tion setup, select “OK” while in the Connection Type screen.
25) From the R&P Communicator Main screen (which is located just
behind the Connect List screen), select the “Setup” pull down
menu and choose “RS232.” The Communication Port Setup
screen will appear. The settings on this screen should match the
Series 1400a settings as shown in Figure J-13. Select “OK” to
verify these settings.
Figure J-13. Communication Port Setup screen
configured for a 1400a
monitor.
26) Connect to one of the instruments through the modem by highlighting the connection name on the Connect List screen (Figure
J-7) and then select the Connection icon on the tool bar.
The
modem connection will now be initiated. When communication is
established, the instrument’s main screen will be displayed.
NOTE: If the connection is successful, the unit’s serial number will be displayed
at the top of the screen. If the connection is not successful or if there is no
instrument attached, then the serial number area will be blank or will display
“99999.” If the modem loses its connection, wait at least 1 minute before trying
to establish another connection. This allows the modem to reset itself.
APPENDIX J: MODEM COMMUNICATIONS
PAGE J-20
Revision B.001
Operating Manual, Partisol-Plus Model 2025 Sequential Air Sampler
27) Once you have verified the connection, disconnect the modem
connection to the instrument.
28) Attach the male end of the 9-to-9 pin cable to the RS232 connector on the other instrument.
29) Repeat steps 12 through 27 for the other instrument.
30) Disconnect from the instrument.
31) Obtain a serial switching device from a commercial manufacturer. R&P has found that devices manufactured by Black Box
Corp. work properly with its instrumentation, although other
devices should function properly. The part number and cost of
the device will vary depending on how many serial devices the
user wishes to connect to it.
32) From the serial switching device’s instruction manual, determine
the command codes required to trigger activation of each serial
port being used.
33) Unplug the serial cable and its adapter(s) from the modem and
then plug the cable assembly into the serial switching device.
Follow the instructions provided with the serial switching device
and connect it to the instruments and the modem.
34) With the RPComm Connect List screen displayed (Figure J-7),
select the name of one of the connections used to verify the
modem connection above and then choose the Edit Selected
Connection icon.
The Connection Type screen will then be
displayed (Figure J-8).
35) From the Connection Type screen, ensure that the correct instrument type is selected and select “Settings” to display the AK
Protocol Setup screen (Figure J-9).
36) From the list of command codes on the right side of the AK
Protocol Setup screen, select the correct series of command
codes needed to trigger the desired instrument. As codes are
chosen, they will appear on the bottom of the screen in the Connection Command box. If a code is entered incorrectly, it can be
deleted by selecting the code in the Connection Command box
and pressing the Delete key on your computer’s keyboard.
37) The remaining portions of the screen should have been set while
establishing the modem connection. Do not modify these settings.
APPENDIX J: MODEM COMMUNICATIONS
PAGE J-21
Revision B.001
Operating Manual, Partisol-Plus Model 2025 Sequential Air Sampler
38) Select “OK” to exit the AK Protocol Setup screen. This will display the Connection Type screen.
39) Choose “OK” from the Connection Type screen to finish the
connection setup.
40) Connect to one of the instruments by highlighting the connection
name on the Connect List screen (Figure J-7) and select the
Connection icon on the tool bar.
The connection to the
instrument will be initiated and the proper command codes sent.
When communication is established, the instrument’s main
screen will be displayed.
NOTE: If the connection is successful, the unit’s serial number will be displayed
at the top of the screen. Ensure that the correct serial number is displayed to verify
that the proper command codes were sent and that the serial port trigger is
functioning properly. If the connection is not successful or if there is no
instrument attached, then the serial number area will be blank or will display
“99999.” If the modem loses its connection, wait at least 1 minute before trying
to establish another connection. This allows the modem to reset itself.
40) RPComm can now be used as described in Section 10.
41) To connect to the other instrument through the serial switching
device, the current connection must be terminated. Enter the
proper command codes for the desired instrument as described
above and initiate the modem connection. If the modem loses its
connection, wait at least 1 minute before trying to establish
another connection. This allows the modem to reset itself.
J.4.2.2
CONNECTING A MODEL 2000-FRM AND MODEL 2025
Follow these steps to connect a Partisol Model 2000-FRM sampler and
a Model 2025 sampler to a serial switching device:
1)
Set up the Partisol 2000-FRM sampler and the Model 2025 sampler for direct communications (Section 10.1).
2)
Create a new connection to each instrument according to Section
10.2.2 and verify that the units are communicating properly.
NOTE: If the connection is successful, the unit’s serial number will be displayed
at the top of the screen. If the connection is not successful or if there is no unit
attached, then the serial number area will be blank or will display “99999.”
APPENDIX J: MODEM COMMUNICATIONS
PAGE J-22
Revision B.001
Operating Manual, Partisol-Plus Model 2025 Sequential Air Sampler
3)
Once the RPComm software and instrument configurations have
been verified, disconnect the direct connection.
4)
Connect your computer directly to the modem that will be connected to the serial switching device (Section J.1 or J.2).
5)
Begin executing any communication software which will allow
direct communications with the modem. Communication software is usually included with most standard commercial
modems. If no software program was included with your standard commercial modem, Hyper Terminal (which is included with
the Windows operating system) can be used.
6)
Set the modem’s communication parameters to work with the
Partisol-Plus Sampler. A typical command string to send to the
modem to configure it for use is:
AT &F0 &C0 &D0 S0=1 &K0 &W0 &Y0
where:
AT
&F0
&C0
&D0
S0=1
&K0
&W0
&Y0
Command Prefix
Software reset; restore default parameters
Force DCD (Data Carrier Detect) “ON” at all times
Ignore DTR (Data Terminal Ready) from instrument
Set auto answer to one ring
Disable local flow control
Store settings in profile “0”
Use stored settings in profile “0” on power up.
7)
Disconnect your computer from the modem.
8)
Attach the male end of the 9-to-9 pin cable to the RS232 connector on one of the instruments.
9)
Attach the null modem adapter to the female end of the 9-to-9 pin
cable.
NOTE: Not all null modem adapters can be used in this application because pin
connections are not standard. The null modem adapter (10-005671) that is
available from R&P is acceptable for use with the sampler. The schematic of this
adapter can be found in the Service Manual.
10) If your modem is equipped with a 9-pin connector, attach the
cable and null modem adapter to the modem. If your modem is
equipped with a 25-pin connector, attach a 9-to-25 pin serial
adapter to the null modem adapter and plug it into the modem.
NOTE: Not all 9-to-25 pin serial adapters can be used in this application because
pin connections are not standard. The 9-to-25 pin serial adapter (51-001079) that
APPENDIX J: MODEM COMMUNICATIONS
PAGE J-23
Revision B.001
Operating Manual, Partisol-Plus Model 2025 Sequential Air Sampler
is available from R&P is acceptable for use with the sampler. The schematic of
this adapter can be found in the Service Manual.
11) Attach a phone line to the modem.
12) With the RPComm Connect List screen displayed (Figure J-7),
select the name of one of the connections used to verify the
direct connection above and choose the Edit Selected Connection icon.
The Connection Type screen will then be
displayed (Figure J-8).
13) From the Connection Type screen, ensure that the correct instrument type is selected and select “Settings” to display the AK
Protocol Setup screen (Figure J-9).
14) Place your cursor in the small white box located to the left of
“Connect using Modem” and click once with your mouse. A
checkmark should appear in the box.
15) To set up the unit for a modem connection, the Connection
Description box (in the top left corner) should be set to your
modem’s description. In Figure J-9, the modem description is
“U.S. Robotics 56K Voice INT PhP.” The description will vary
depending on factors such as your modem type, whether it is an
internal or external modem and which COM port the modem is
connected to.
16) The Station Setup portion of the screen should have been set
when you established your direct connection. Do not modify
these settings.
17) Select the “Modem Setup >>” button to display the Modem Properties screen (Figure J-10).
18) Generally, the values that your system chooses for variables on
this screen are appropriate for a proper connection. However, if
your unit and modem experience communication difficulties,
these setting may need to be altered. Contact your modem’s
manufacturer for more information, if necessary.
19) Select “OK” to exit the Modem Properties screen. The AK Protocol Setup screen (Figure J-9) will now appear as the active
screen on your computer.
20) In the AK Protocol Setup screen, enter the phone number to be
called in the “Phone Number” box at the bottom of the screen. Do
not enter anything in the “Dialing String” box. This setting will be
automatically configured by the system.
APPENDIX J: MODEM COMMUNICATIONS
PAGE J-24
Revision B.001
Operating Manual, Partisol-Plus Model 2025 Sequential Air Sampler
21) Select the “Dialing Setup >>” button to display the Dialing Properties screen (Figure J-11).
22) Fill in the required information on the Dialing Properties screen.
Verify that the “Number to be dialed” shown at the bottom of the
screen matches the phone number as it should be dialed. If the
phone number is not correct, there is an error on this screen or
you may have incorrectly entered the phone number on the AK
Protocol Setup screen.
23) Select “OK” when the proper settings have been confirmed. This
will return you to the AK Protocol Setup screen.
24) Select “OK” while in the AK Protocol Setup screen. This will
return you to the Connection Type screen. To finish the connection setup, select “OK” while in the Connection Type screen.
25) From the R&P Communicator Main screen (which is located just
behind the Connect List screen), select the “Setup” pull down
menu and choose “RS232.” The Communication Port Setup
screen will appear. The settings on this screen should match the
Model 2025 settings as shown in Figure J-14.
26) Connect to one of the instruments through the modem by highlighting the connection name on the Connection List screen
(Figure J-7) and then select the Connection icon on the tool bar.
Figure J-14. Communication Port Setup screen
configured for a 2025
monitor.
APPENDIX J: MODEM COMMUNICATIONS
PAGE J-25
Revision B.001
Operating Manual, Partisol-Plus Model 2025 Sequential Air Sampler
The modem connection will now be initiated. When communication is established, the instrument’s main screen will be
displayed.
NOTE: If the connection is successful, the unit’s serial number will be displayed
at the top of the screen. If the connection is not successful or if there is no
instrument attached, then the serial number area will be blank or will display
“99999.” If the modem loses its connection, wait at least 1 minute before trying
to establish another connection. This allows the modem to reset itself.
27) Once you have verified the connection, disconnect the modem
connection.
28) Attach the male end of the 9-to-9 pin cable to the RS232 connector on the other instrument.
29) Repeat steps 12 through 27 for the other instrument.
30) Disconnect from the instrument.
31) Obtain a serial switching device from a commercial manufacturer. R&P has found that devices manufactured by Black Box
Corp. work properly with its instrumentation, although other
devices should function properly. The part number and cost of
the device will vary depending on how many serial devices the
user wishes to connect to it.
32) From the serial switching device’s instruction manual, determine
the command codes required to trigger activation of each serial
port being used.
33) Unplug the serial cable and its adapter(s) from the modem and
then plug the cable assembly into the switching device. Follow
the instructions provided with the serial switching device and
connect it to the instruments and the modem.
34) With the RPComm Connect List screen displayed (Figure J-7),
select the name of one of the connections used to verify the
modem connection above and then choose the Edit Selected
Connection icon.
The Connection Type screen will then be
displayed (Figure J-8).
35) From the Connection Type screen, ensure that the correct instrument type is selected and select “Settings” to display the AK
Protocol Setup screen (Figure J-9).
APPENDIX J: MODEM COMMUNICATIONS
PAGE J-26
Revision B.001
Operating Manual, Partisol-Plus Model 2025 Sequential Air Sampler
36) From the list of command codes on the right side of the AK
Protocol Setup screen, select the correct series of command
codes needed to trigger the desired instrument. As codes are
chosen, they will appear on the bottom of the screen in the Connection Command box. If a code is entered incorrectly, it can be
deleted by selecting the code in the Connection Command box
and pressing the Delete key on your computer’s keyboard.
37) The remaining portions of the screen should have been set while
establishing the modem connection. Do not modify these settings.
38) Select “OK” to exit the AK Protocol Setup screen. This will display the Connection Type screen.
39) Choose “OK” from the Connection Type screen to finish the
connection setup.
40) Connect to one of the instruments by highlighting the connection
name on the Connect List screen (Figure J-7) and select the
Connection icon on the tool bar.
The connection to the
instrument will be initiated and the proper command codes sent.
When communication is established, the instrument’s main
screen will be displayed.
NOTE: If the connection is successful, the unit’s serial number will be displayed
at the top of the screen. Ensure that the correct serial number is displayed to verify
that the proper command codes were sent and that the serial port trigger is
functioning properly. If the connection is not successful or if there is no
instrument attached, then the serial number area will be blank or will display
“99999.” If the modem loses its connection, wait at least 1 minute before trying
to establish another connection. This allows the modem to reset itself.
41) RPComm can now be used as described in Section 10.
42) To connect to the other instrument through the serial switching
device, the current connection must be terminated. Enter the
proper command codes for the desired instrument as described
above and initiate the modem connection. If the modem loses its
connection, wait at least 1 minute before trying to establish
another connection. This allows the modem to reset itself.
APPENDIX J: MODEM COMMUNICATIONS
PAGE J-27
Revision B.001
Operating Manual, Partisol-Plus Model 2025 Sequential Air Sampler
This page left intentionally blank.
APPENDIX J: MODEM COMMUNICATIONS
PAGE J-28
Revision B.000
Operating Manual, Partisol-Plus Model 2025 Sequential Air Sampler
Appendix K: Overview of RPComm Software Screens
This appendix contains all the software screens displayed by the RPComm software
program.
Figure K-1. Connect List
screen.
APPENDIX K: OVERVIEW
OF
RPCOMM SOFTWARE SCREENS
PAGE K-1
Revision B.000
Operating Manual, Partisol-Plus Model 2025 Sequential Air Sampler
Figure K-2. Control
buttons on the Connect
List screen.
Displays the instrument connections on the screen as large icons.
Displays the instrument connections on the screen as small icons.
Displays the instrument connections on the screen as a list.
Displays the instrument connections on the screen as a list with details such
as instrument type and status.
Creates a new instrument connection.
Edits the settings of the instrument connection currently selected.
Deletes the instrument connection currently selected.
Establishes a connection to the selected instrument.
Disconnects from the instrument connection.
Displays the AK Protocol screen showing the connection properties for the
selected instrument.
Displays the Schedule Download screen which allows the user to schedule
automatic data downloads of the selected instrument.
Contains a list of the data downloads currently scheduled.
APPENDIX K: OVERVIEW
OF
RPCOMM SOFTWARE SCREENS
PAGE K-2
Revision B.000
Operating Manual, Partisol-Plus Model 2025 Sequential Air Sampler
Figure K-3. Download Data
screen - filter data.
APPENDIX K: OVERVIEW
OF
RPCOMM SOFTWARE SCREENS
PAGE K-3
Revision B.000
Operating Manual, Partisol-Plus Model 2025 Sequential Air Sampler
Figure K-4. Download Data
screen - interval data.
APPENDIX K: OVERVIEW
OF
RPCOMM SOFTWARE SCREENS
PAGE K-4
Revision B.000
Operating Manual, Partisol-Plus Model 2025 Sequential Air Sampler
Figure K-5. Download Data
screen - input data.
APPENDIX K: OVERVIEW
OF
RPCOMM SOFTWARE SCREENS
PAGE K-5
Revision B.000
Operating Manual, Partisol-Plus Model 2025 Sequential Air Sampler
Figure K-6. Control
buttons on the Download
Data screen.
Downloads all three types of data.
Downloads filter data only. Interval and input data will not be downloaded.
Downloads interval data only. Filter and input data will not be downloaded.
Downloads input data only. Filter and interval data will not be downloaded.
Downloads all stored data in the data buffer for the selected data type(s).
After the data are downloaded, the storage pointer for the selected data
type(s) will move to the end of the buffer. Once the data have been
downloaded, each data type can be viewed by selecting the appropriate tab.
Downloads data from current storage pointer position(s) to the end of the
data buffer for the selected data type(s). After the data are downloaded, the
storage pointer for the selected data type(s) will move to the end of the buffer.
Once the data have been downloaded, each data type can be viewed by
selecting the appropriate tab.
Aborts download. This action will set the storage pointer for the selected
data type(s) to the record location where the download was aborted.
Copies selected data to the Windows clipboard. The data can then be
imported and used in other programs.
Sends selected data to the Download Graph tab. NOTE: Filter data cannot
be graphed.
Stores desired data to a file. The file is saved in a comma-delimited ASCII
format.
Opens a data file that has been previously saved to disk for display and
graphing.
Clears data currently being displayed.
When the download has been
successfully completed, a message will appear in the Dialog box indicating how many records
were downloaded. If multiple types of data were downloaded, the user can
select the down arrow on the right of the Dialog box to see the results of each
download type.
APPENDIX K: OVERVIEW
OF
RPCOMM SOFTWARE SCREENS
PAGE K-6
Revision B.000
Operating Manual, Partisol-Plus Model 2025 Sequential Air Sampler
Figure K-7. Download
Graph screen.
APPENDIX K: OVERVIEW
OF
RPCOMM SOFTWARE SCREENS
PAGE K-7
Revision B.000
Operating Manual, Partisol-Plus Model 2025 Sequential Air Sampler
Figure K-8. Control
buttons on the Download
Graph screen.
Clears all data listed on the right portion of the Download Graph screen. This
includes data being displayed.
Decreases the scale of the x- and y-axis concurrently. With this icon selected,
press and hold down the left mouse button and make a box around the area
that you want to zoom into. Once the box is finished, let go of the mouse
button. The graph will be resized according to the box dimensions.
Decreases the scale of the x-axis. With this icon selected, press and hold
down the left mouse button at the beginning of the area that you want to zoom
into. Drag the cursor to the end of the zoom area and let go of the mouse
button. The graph will be resized according to the new x-axis dimensions.
Decreases the scale of the y-axis. With this icon selected, press and hold
down the left mouse button at the beginning of the area that you want to zoom
into. Drag the cursor to the end of the zoom area and let go of the mouse
button. The graph will be resized according to the new y-axis dimensions.
Enables panning. Panning allows the user to move the graph area so that a
different section of the x- or y-axis is being displayed without effecting the
scale of either axis. With this icon selected, place the mouse cursor
somewhere within the graph area and hold down the left mouse button. Move
the mouse so that the desired section of the graph is displayed.
Selecting this icon will undo the last zoom or panning step.
Rescales the x- and y-axis so that all the graphs for the selected data are
displayed.
Toggles between the two possible x-axis scales: date and time, and time only.
This does not effect the way the data are displayed on the graph.
Sends the graph currently being displayed to the Windows default printer.
These two boxes define the number of axis divisions on the
graph. The box on the left refers to the x-axis and the right box
refers to the y-axis. The number of divisions can be set to 5,
10, 15 or 20 divisions. Increasing the number of divisions results in a finer
axis grid. Decreasing the number of divisions results in a courser axis grid.
This does not effect the way the data are displayed on the graph.
APPENDIX K: OVERVIEW
OF
RPCOMM SOFTWARE SCREENS
PAGE K-8
Revision B.000
Operating Manual, Partisol-Plus Model 2025 Sequential Air Sampler
Figure K-9. Storage Pointer
screen.
APPENDIX K: OVERVIEW
OF
RPCOMM SOFTWARE SCREENS
PAGE K-9
Revision B.000
Operating Manual, Partisol-Plus Model 2025 Sequential Air Sampler
Figure K-10. Control
buttons on the Storage
Pointer screen.
Moves the storage pointer for all data types.
Moves the storage pointer for only the filter data. The storage positions of
the other two pointers will not change.
Moves the storage pointer for only the interval data. The storage positions
of the other two pointers will not change.
Moves the storage pointer for only the input data. The storage positions of
the other two pointers will not change.
Moves the selected storage pointer(s) to the first record in the buffer. The
displayed position of the selected storage pointer(s) will change, unless the
pointer was already at the beginning of the buffer.
Moves the selected storage pointer(s) to the last record in the buffer. The
displayed position of the selected storage pointer(s) will change, unless the
pointer was already at the end of the buffer. This is useful if the user wishes
to download only the last 10 records, for example. Once the end of the buffer
is reached, the pointer can be stepped back 10 records using the Move Back
icon.
Moves the selected storage pointer(s) back “x” number of records, where “x”
is defined in the Change Record Step box. The displayed position of the
selected storage pointer(s) will change, unless the pointer was already at the
beginning of the buffer.
Moves the selected storage pointer(s) forward “x” number of records, where
“x” is defined in the Change Record Step box. The displayed position of the
selected storage pointer(s) will change, unless the pointer was already at the
end of the buffer.
Change Record Step box. The step size can be 1, 5, 10, 100 or
1000.
APPENDIX K: OVERVIEW
OF
RPCOMM SOFTWARE SCREENS
PAGE K-10
Revision B.000
Operating Manual, Partisol-Plus Model 2025 Sequential Air Sampler
Figure K-11. Registers
screen.
Reads selected register values from the unit.
Figure K-12. Control
buttons on the Registers
screen.
Selects all registers.
Saves register data to a file.
APPENDIX K: OVERVIEW
OF
RPCOMM SOFTWARE SCREENS
PAGE K-11
Revision B.000
Operating Manual, Partisol-Plus Model 2025 Sequential Air Sampler
Figure K-13. Real-Time
Graph screen.
APPENDIX K: OVERVIEW
OF
RPCOMM SOFTWARE SCREENS
PAGE K-12
Revision B.000
Operating Manual, Partisol-Plus Model 2025 Sequential Air Sampler
Figure K-14. Control
buttons on the Real-Time
Graph screen.
Clears all data listed on the right portion of the Real-Time Graph screen. This
includes data being displayed.
Decreases the scale of the x- and y-axis concurrently. With this icon selected,
press and hold down the left mouse button and make a box around the area
that you want to zoom into. Once the box is finished, let go of the mouse
button. The graph will be resized according to the box dimensions.
Decreases the scale of the x-axis. With this icon selected, press and hold
down the left mouse button at the beginning of the area that you want to zoom
into. Drag cursor to the end of the zoom area and let go of the mouse button.
The graph will be resized according to the new x-axis dimensions.
Decreases the scale of the y-axis. With this icon selected, press and hold
down the left mouse button at the beginning of the area that you want to zoom
into. Drag cursor to the end of the zoom area and let go of the mouse button.
The graph will be resized according to the new y-axis dimensions.
Enables panning. Panning allows the user to move the graph area so that a
different section of the x- or y-axis is being displayed without effecting the
scale of either axis. With this icon selected, place the mouse cursor
somewhere within the graph area and hold down the left mouse button. Move
the mouse so that the desired section of the graph is displayed.
Selecting this icon will undo the last zoom or panning step.
Rescales the x- and y-axis so that all the graphs for the selected data are
displayed.
Toggles between the two possible x-axis scales: date and time, and time only.
This does not effect the way the data are displayed on the graph.
These two boxes define the number of axis divisions on the
graph. The left box refers to the x-axis and the right box refers
to the y-axis. The number of divisions can be set to 5, 10, 15
or 20 divisions. Increasing the number of divisions results in
a finer axis grid. Decreasing the number of divisions results in a courser axis
grid. This does not effect the way the data are displayed on the graph.
APPENDIX K: OVERVIEW
OF
RPCOMM SOFTWARE SCREENS
PAGE K-13
Revision B.000
Operating Manual, Partisol-Plus Model 2025 Sequential Air Sampler
Figure K-15. Virtual
keypad.
APPENDIX K: OVERVIEW
OF
RPCOMM SOFTWARE SCREENS
PAGE K-14
Revision B.000
Operating Manual, Partisol-Plus Model 2025 Sequential Air Sampler
Figure K-16. Filter List
screen.
APPENDIX K: OVERVIEW
OF
RPCOMM SOFTWARE SCREENS
PAGE K-15
Revision B.000
Operating Manual, Partisol-Plus Model 2025 Sequential Air Sampler
Figure K-17. Control
buttons on the Filter List
screen.
Retrieves the filter list currently loaded in the unit.
Sends the filter list to the unit.
Saves the filter list to a file.
Opens a filter list previously saved to a file.
Displays the maximum filter capacity of the unit (16 or 32). Standard
Partisol-Plus Model 2025 Sequential Air Samplers have a 16-filter capacity
(one filter exchanger) while the Dicot Series 2025 Monitors have a 32-filter
capacity (two filter exchangers).
APPENDIX K: OVERVIEW
OF
RPCOMM SOFTWARE SCREENS
PAGE K-16
Revision B.000
Operating Manual, Partisol-Plus Model 2025 Sequential Air Sampler
Figure K-18. Upload
Software screen.
APPENDIX K: OVERVIEW
OF
RPCOMM SOFTWARE SCREENS
PAGE K-17
Revision B.000
Operating Manual, Partisol-Plus Model 2025 Sequential Air Sampler
This page left intentionally blank.
APPENDIX K: OVERVIEW
OF
RPCOMM SOFTWARE SCREENS
PAGE K-18
Revision B.002
Operating Manual, Partisol-Plus Model 2025 Sequential Air Sampler
Index
Symbols
120 VAC operation 2-3
240 VAC operation 2-3
9-to-9 pin cable 6-7, 9-2, 9-5, 10-1, D-2
A
advanced features 1-2
advanced mode 5-18
AK protocol 9-3, C-1
ambient
pressure 6-3, 12-5
temperature 6-3, 12-3
temperature sensor 2-3, 6-3
analog inputs 7-6, 8-7, 9-11
analog voltage 1-3
analog voltage output 9-12
anemometer/wind vane 7-7
arrow keys 4-9
audit magazine 6-1, 6-5, 12-1, 12-2, 12-9
audit mode 5-4, 6-2, G-5
audit procedures 12-1
ambient air temperature 12-3
ambient pressure 12-5
ambient relative humidity 12-5
external leak check 6-4, 12-5
filter temperature 12-4
flow rate 12-7
internal leak check 6-4, 12-8
sampling mode 12-2
stop mode 12-1
wait mode 12-2
auto run 5-10, 5-26
average pressure 1-9, 8-7, 8-11
average temperature 1-9, 8-7, 8-10
B
Back key 4-7
basic mode 5-13
batteries, palmtop I-2
baud rate 9-3
Bksp key 4-9
blank cassettes 5-23, 6-5
bulb pump hose 3-5, 3-6, 3-8
C
calibration, routine
INDEX
6-1, 12-1
I
Revision B.002
Operating Manual, Partisol-Plus Model 2025 Sequential Air Sampler
cassettes
blank 5-23, 6-5
filter 1-7, 3-2
removal 3-8
removal sleeve 3-8
separator tool 3-10
ChSign key 4-9
codes, hexadecimal B-23, B-35
codes, status 7-1, B-17
compilation package 2-1, I-2
consumables E-1
Cycle protocol 9-5, 9-7
D
data
bits 9-3
downloading 6-7, 9-2, 9-5, 9-7, 10-12, I-8, I-13
format 9-9, 9-10
graphing 10-21
input 1-3, 9-1
interval 1-3
logger 8-1
output 9-1
viewing 6-7, 8-1, 10-17, I-9
default settings 13-1
display/keypad 2-7, 10-29
done mode 5-3
downloading data 6-7, 9-2, 9-5, 9-7, 10-12, I-8, I-13
E
EC
compliance VI
EDIT key 4-5
edit mode 4-5, 4-7, 4-8
editing 4-7, 4-8
electric supply 2-3
ENTER key 4-9
EPA
Quality Assurance Handbook 3-1, 3-2, 3-5, 3-11, 3-12, 6-1
reference designation 1-1
reference method I, 1-1, 2-1, 3-1, 6-6
sampling standard 3-12
specified values 1-3
episodic mode 5-21
equipment rating V
error mode 5-4, 6-6
ESC key 4-5
INDEX
II
Revision B.002
Operating Manual, Partisol-Plus Model 2025 Sequential Air Sampler
external leak check 6-1, 6-4, 12-5
F
filter 1-2, 1-3, 1-7, 3-1
cassette magazines 1-7, 1-8, 3-1, 3-5, 3-8
cassettes 1-7, 3-2
data 1-3, 7-4, 7-5, 8-1, 8-2, 8-4, 8-5, 8-6, 8-8, 8-9
equilibrium 3-1, 3-2, 3-10
exchange 1-8, 3-1
exchange mechanism 5-11
handling 3-1
inspection 3-1
list 5-23
log F-1
removal 3-8
setup screens 5-12
temperature 6-2
transportation 3-1, 3-5
weighing 3-1, 3-2, 3-11
first stage inlet 2-2, 6-2, 6-5, 12-2, 12-3, 12-4, 12-9, G-1
flash memory D-1, D-20
flow
audit adapter 6-4, 12-5
rate 1-9, 7-5
schematic 1-7
function keys 4-5
G
German Ambient Network Protocol
C-10
H
H/PC I-1
handheld PC I-1
hardware configuration 2-1
hardware considerations 2-7
hardware installation 2-1
hardware, stand 2-6
hexadecimal codes B-23, B-35
home page, R&P website D-1, D-5
HP360LX I-1
hub setup 2-1
I
inlet conversion H-1
inlet, first stage 2-2, 6-2, 6-5, 12-2, 12-3, 12-4, 12-9, G-1
inlet maintenance G-1
INDEX
III
Revision B.002
Operating Manual, Partisol-Plus Model 2025 Sequential Air Sampler
inlet systems 1-1, 1-7
input data 1-3, 8-1, 8-9
installing software D-1, D-20
instrument parts E-1
internal leak check 6-1, 6-4, 12-8
interval data 1-3, 8-1, 8-8
K
keypad/display 2-7, 10-29
L
leak check
external 6-1, 6-4, 12-5
internal 6-1, 6-4, 12-8
lights, status 7-1
line voltage V
List keys 4-9
logic level output 7-7, 9-12, 9-15
M
magazines
audit 6-1, 6-5, 12-1, 12-2, 12-9
filter cassette 1-7, 1-8, 3-1, 3-5, 3-8
installation 3-6
piston 3-3, 3-5, 3-6
removal 3-8
storage 1-8, 3-6, 6-5
supply 1-8, 3-6, 6-5
transport container 3-5, 3-8
maintenance, inlets G-1
maintenance, routine 12-1, 12-9, G-1
mass concentration, calculation 3-12
mass concentration data 1-9
mass flow controller 1-2, 1-9
Master Menu screens 4-7, A-20
Master Menu, sampling setup options A-18
Master Menu, service menu options 14-1, A-19
Master Menu, status code options A-18
Master Menu, system setup options A-19
Master Menu, system status options A-18
modem 9-7, 10-1
modes 5-1
advanced 5-18
audit 5-4, 6-2, G-5
basic 5-13
browse 5-26
INDEX
IV
Revision B.002
Operating Manual, Partisol-Plus Model 2025 Sequential Air Sampler
done 5-3
edit 5-26
episodic 5-21
error 5-4, 6-6
RS232 5-23
sampling 5-3
service 14-1
stop 5-1
switching 5-1, 5-26
time 5-14
time 2 5-17
wait 5-1
More key 4-7
N
Next key 5-16
None protocol 9-3
null modem adapter I-2, I-8
O
operating manual
1-4, I-8
P
palmtop I-1
parity 9-3
particle trap filter 1-9, 12-10
parts, instrument E-1
password protection 11-1
passwords
high 11-3
low 11-2
petri dish 3-1, 3-2, 3-10
PM-1 inlet G-1, G-4
PM-10 inlet G-1, H-2
PM-2.5 inlet H-1
power failures 5-27, 8-8
power switch 4-1
Prev key 5-16
program register codes (PRC) 9-13, 9-15, B-1, D-24
programming the sampler 5-1, 6-5
protocol, RS232 9-3, D-2
pump 2-7, 4-1, 7-9, 12-10
pump fan 2-7, 7-9
R
R&P website
INDEX
D-1, D-5
V
Revision B.002
Operating Manual, Partisol-Plus Model 2025 Sequential Air Sampler
rainhood 2-1, 2-2
rating, equipment V
RealTime protocol 9-4, 9-6
resetting
data storage 13-2
instrument parameters 13-1, 13-3
operating parameters 13-1, 13-3
passwords, high 11-5, 13-3
passwords, low 11-5, 13-3
routine maintenance 12-9
RPComm 9-7, 10-1, 10-4, D-1, D-5, J-9, K-1
RPCommCE I-1
RPData I-1, I-15
RPLoad D-2
RS232 mode 5-23
RS232 port 1-3, 9-2, 9-7
RS232 protocol 9-3, D-2
RUN/STOP key 5-1
S
safety notice
electrical & safety conformity VI
filter exchange mechanism III
stand III, 2-4
voltage III
WINS impactor assembly III
sample tube 2-2, 6-2
sampler setup 2-1, 5-12, 5-13, 5-14, 5-17, 5-18, 5-21, 5-23, 6-1
sampling mode 5-3
sampling modes 5-12, 5-13, 5-14, 5-17, 5-18, 5-21, 5-23
sampling verification 6-1
screens, software A-1, K-1
Advanced Filter Setup screen 5-18, A-11
Analog Input Setup screen 9-11, A-13
Analog Output screen 9-13, A-13
Basic Filter Setup screen 5-13, 6-5, A-5
Contact Closure Setup screen 9-15, A-15
Download Data screen 9-7, A-8
Episodic Sampling Setup screen 5-21, A-11
Filter Data Averages screen 8-6, A-7
Filter Data screen 8-4, A-7
Filter Data Status Codes screen 8-5, A-7
Filter Data Times screen 8-2, A-6
Filter List Setup screen 5-23, A-6
Filter Times screen 5-25, A-5
Help screen A-2
Input Data screen 8-9, A-9
INDEX
VI
Revision B.002
Operating Manual, Partisol-Plus Model 2025 Sequential Air Sampler
Interval Data screen 8-8, A-8
Main screen 4-2, A-2
Master Menu, sampling setup options A-18
Master Menu screen hierarchy A-20
Master Menu, service menu options A-19
Master Menu, status code options 4-7, A-18
Master Menu, system setup options A-19
Master Menu, system status options A-18
Password Setup screen 11-2, A-17
Power Failures screen 8-8, A-8
PRC Settings Warning/Confirmation screen A-14
RealTime Data screen 9-4
RS232 RealTime Data screen A-15
RS232 Setup screen 9-2, A-14
RS485 Setup screen 9-14, A-15, A-16
Sample Setup screen 5-5, 6-6, A-9
Sample Statistics screen 7-5, A-3
Service Menu, calibration/audit options A-21
Service Menu, exit service mode options 14-2, A-22
Service Menu, low level system information options A-22
Service Menu, manual motion test options A-21
Service Menu screen hierarchy A-23
Service Menu, system maintenance routine options 14-1, A-21
Site Identification screen 5-10, 6-6, A-16
Status Codes screen 7-1, A-3
System I/O screen 9-1, A-12
System Information screen 5-11, A-17
System Setup screen 4-8, 5-8, 6-6, 11-1, A-12
System Statistics screen 7-8, A-4
Temperature and Pressure Statistics screen 7-4, A-3
Time 2 Base Sampling screen 5-17, A-10
Time Base Filter Sequential Sampling screen 5-14
Time Base Filter Setup screen 4-5, A-10
Title screen 4-2, A-2
User I/O Statistics screen 7-6, A-4
Wind Statistics screen 7-7, A-4
separators 5-7
serial numbers
cassettes 3-2, 3-7, 3-9, 5-23, 6-5
filters 3-9, 5-23, 6-5
serial switching device J-14
service manual 6-3, 6-4, 7-9, 9-7, 9-11, 9-14, 14-1
Service Menu screens 14-1, A-23
ADC Channels screen A-29
Ambient Filter screen A-25
Audit screen 6-2, 12-1, A-24
DAC Channels screen A-30
Discrete I/O screen A-30
INDEX
VII
Revision B.002
Operating Manual, Partisol-Plus Model 2025 Sequential Air Sampler
Filter Exchange screen A-26
Filter Temperature Calibration screen A-28
Flow Calibration screen A-29
Flows/Valves/Pumps screen A-26
I/O Calibration screen A-27
Leak Check screen 12-7, A-25
Multiplexed Inputs screen A-31
Real Time Clock screen A-31
Sensor Calibration screen A-28
Service Menu, calibration/audit options A-21
Service Menu, exit service mode options A-22
Service Menu, low level system information options A-22
Service Menu, manual motion test options A-21
Service Menu, system maintenance routine options A-21
System Maintenance screen, audit options A-24
System Maintenance screen, leak check options A-24
TPIC Channels screen A-31
User/Misc screen A-27
service mode 14-1
software 4-1, 5-1, 10-1, D-1, I-1, J-9, K-1
software, loading D-1, D-20
software overview 4-1, A-1, K-1
stand 2-2, 2-4
stand hardware 2-6
status codes 7-1, B-17
status lights 7-1
stop bits 9-3, B-18
stop mode 5-1
storage 8-1, 9-1, 9-3, 10-1
storage magazines 1-8, 3-6, 6-5
Storage protocol 9-3, 9-6
Streamline FTS Flow Transfer Standard 6-4, 12-7
stylus tool I-3
supply magazines 1-8, 3-6, 6-5
switching modes 5-1, 5-26
system configuration 1-10
T
temperature sensor 12-3
time 2 mode 5-17
time mode 5-14
turning off 5-26
turning on 4-1
INDEX
VIII
Revision B.002
Operating Manual, Partisol-Plus Model 2025 Sequential Air Sampler
V
V seals 12-10
ventilation system 1-3
view data mode 4-5
viewing data 6-7, 8-1, 10-17, I-9
voltage 9-11
voltage, line V
volume 1-9, 3-12, 7-5, 8-4
W
wait mode 5-1
warranty, U.S. IV
wind vane/anemometer 7-7
Windows CE service pack SP I-4
WINS impactor
assembly 6-3
maintenance 6-2, 12-10, G-5
removal G-5
replacing 6-3, G-8
WINS PM-2.5 impactor 12-10, G-5
World Wide Web, R&P home page D-1, D-5
INDEX
IX
Revision B.002
Operating Manual, Partisol-Plus Model 2025 Sequential Air Sampler
This page left intentionally blank.
INDEX
X