1
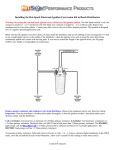
Dual Port Engine Kit Instructions
Part number 111 198 700 and 111 198 700A
1. A few notes before you begin the installation of this kit
A reasonable amount of mechanical ability is necessary to successfully install this engine kit. If there is any hesitation with regards to
knowledge of engine tear down and engine tuning, a competent
professional should be hired.
Using the Wolfsburg West dual port 36hp engine kit will increase
the horsepower a considerable amount. This increase is very
significant, and therefore you must insure the engine is able to
perform at this advanced level. As a starting point, we recommend
replacing the rod bearings for engines with 50,000 or more miles.
If the engine has greater than 75,000 miles, a complete tear down
and inspection is necessary. Consult your factory service manual
for other technical specifications to ensure your engine is within
tolerance.
Orders 888.965.3937 Technical Support 951.549.0525
© Wolfsburg West 2009
www.wolfsburgwest.com
As noted previously, these instructions assume that you have
experience with the Volkswagen air-cooled engine. These instructions are not intended to provide a step-by-step process of installing this engine kit. We will cover the aspects not covered in the
factory workshop manual. Don’t have one? We highly suggest that
you get your hands on one. They are worth every penny. Not to
belabor the point, but if you have never disassembled a VW aircooled engine before, you should consider hiring a competent
mechanic to perform the job. At bare minimum you should have
the carburetion checked by an expert. We will discuss this in detail
later.
We estimate a full day and a half to complete the installation of
this kit, including the R and R of the engine. The installation procedures should not be done hastily, so don’t be in a rush. Invariably,
and unexpected problem or glitch arises to cause a delay. Expect
it, and consider yourself lucky if you move through the installation
unhitched.
If you will be installing this kit on a Single cab, Double cab, Karmann Ghia or convertible Beetle, you will have issues with the air
filters clearing the body. At this point we do not have a solution
that is aesthetically appealing. Call if you need some ideas on what
can be done.
2. With that out of the way, let’s get started!
First, remove the kit from the box and do a quick inventory to insure everything is present. Use the inventory checklist to the right
to complete this step.
There are some items that will be necessary to complete the
© Wolfsburg West 2009
Orders 888.965.3937 Technical Support 951.549.0525
www.wolfsburgwest.com
YOUR VOLKSWAGEN RESTORATION
PARTNER FOR OVER 20 YEARS
1
1
2
3
3
4
10
5
6
7
Item
1
2
3
4
5
6
7
8
9
10
11
Qty
2
1
2
1
1
1
2
4
1
1
1
Description
Air Filter
Balance tube assembly
Carburetors
Fuel line assembly
Left intake manifold
Right intake manifold
Complete cylinder head with valves
Head studs with washers and nuts
Misc. hardware kit
Manifold gaskets
Preheat block off plates
11
8
9
© Wolfsburg West 2009
Orders 888.965.3937 Technical Support 951.549.0525
www.wolfsburgwest.com
installation of this kit, please find the listing below:
• Engine gasket kit, Wolfsburg West part # 111198003
• Flywheel seal (not necessary, but a good idea), Wolfsburg West
part # 111105245
• Sealing compounds, available at any auto part store
• You will also need a centrifugal advance distributor such as
the Bosch 010, 019 or 009 version. A vacuum takeoff is not
provided on the carburetors.
Note: Something that may throw the backyard mechanic a curve.
You will need a 10mm Allen head socket wrench that can be attached to your torque wrench.
With all of this in check, remove the engine from the vehicle.
3. Engine disassembly
We like working with a clean engine, so now is a good time to employ the use of your favorite toxic chemical concoction to remove
the road grime. Remove all necessary components, including the
cylinder heads. If your car still has the thermostat and fan-housing ring, remove this, as it will not be used in conjunction with this
engine kit.
With the old cylinder heads removed, inspect the cylinders for
wear. Inspect the deck height and measure accordingly. A stock
engine will most likely fall in the .040” - .045” range. The cylinder
head combustion chambers contained in this kit will measure 43
cc’s +/- 1 cc.You will find many compression ratio calculators on
the Internet. We like the version found at http://www.race-cars.
net/calculators/compression_calculator.html
© Wolfsburg West 2009
Orders 888.965.3937 Technical Support 951.549.0525
www.wolfsburgwest.com
YOUR VOLKSWAGEN RESTORATION
PARTNER FOR OVER 20 YEARS
Next, remove the upper two (2) inner cylinder head studs from
your engine, and replace these with the shorter version studs
supplied with the kit. If you don’t have one of those handy dandy
stud removal tools, use the double-nut trick for removal. Install
the new short studs accordingly, leaving a thread at most showing
from the point in which it enters the engine case.
Install the new cylinder heads, refer to your workshop manual for
the tightening sequence and torque setting. Use the Allen head
nuts and washers supplied with the kit to secure the cylinder head
onto the short studs. Do not use your original hex nuts and washers for these studs. Use the standard .006” valve backlash for both
exhaust and intake valve settings.
Double nut the head studs for replacement.
With the heads installed and torqued to spec, tape closed the
intake ports on the cylinder heads. Use the template found at the
back page of this instruction manual to trim the engine tin.Your
cylinder head tin will need to be trimmed in order to properly
clear the intake manifold. We use spray glue to hold the pattern in
place. After trimming the tin you will need to slightly bend the tin
© Wolfsburg West 2009
Orders 888.965.3937 Technical Support 951.549.0525
www.wolfsburgwest.com
Trimming the cylinder tin.
in the areas shown to clear the manifold.
Installation of the manifolds requires both the engine tin and manifold be installed as an assembly. Before you do this, inspect the
inner surfaces of the manifolds to insure they are clean. To protect
the paint finish of the manifolds during the installation process,
wrap masking tape around the manifolds as shown in the illustration. Additionally, apply tape to the top flange to fully cover the
inlet as to prevent objects from entering the combustion chamber
during the balance of the assembly.
On your first attempt, you may find that you need to trim or
adjust slightly the shape of the tin surrounding the manifold to allow it to properly seat against the engine. Make the adjustments as
necessary.
Now that the tin is fitting correctly, remove the masking tape
covering the intake ports and install the supplied manifold gaskets.
Use the supplied nuts and tighten each nut to 18 foot-pounds.
© Wolfsburg West 2009
Orders 888.965.3937 Technical Support 951.549.0525
www.wolfsburgwest.com
YOUR VOLKSWAGEN RESTORATION
PARTNER FOR OVER 20 YEARS
Bend cylinder head tin inward around the spark plug opening.
Shown with arrow.
With both manifolds and upper cylinder tin mounted, install the
black balance tube into the manifolds using the supplied red hose
and band style clamps. The package containing the red hoses and
band clamps contains instructions for installing the clamps, however for your convenience we have also noted the instructions
below:
If you purchased a kit with the original style carburetor linkage
system, the balance tube should be routed underneath the generator. If you purchased a kit with the updated CSP linkage, the
balance tube should be positioned behind the fan shroud. The
© Wolfsburg West 2009
Orders 888.965.3937 Technical Support 951.549.0525
www.wolfsburgwest.com
updated CSP linkage kit does not use the spark plug wire conduit.
At this point, the engine is ready to be installed back into the vehicle. Carburetor, fuel line, and linkage installation will be performed
with the engine installed in the vehicle. We suggest that you test
fit these components before the engine installation.
Install the carburetors onto the manifolds using the supplied bolts,
nuts and gaskets. The carburetors will work on either side.
•
•
•
A few important notes before finishing up the installation.
The air filters are supplied with a foam element. We offer a
K&N filter to replace this under the part number 111 129 511.
If you disassemble the air filter you must pay attention to the
integrity of the ny-lock nut that holds the two halves together
during re-assembly.
Do not exceed the recommended 2.5 psi fuel pump pressure.
Doing so can override the float valves.
Please refer to the instructions for the carburetor linkage included
with your kit to finish installation.
© Wolfsburg West 2009
Orders 888.965.3937 Technical Support 951.549.0525
www.wolfsburgwest.com
YOUR VOLKSWAGEN RESTORATION
PARTNER FOR OVER 20 YEARS
4. Carburetor Adjustments
Before starting engine, adjust the static timing. Adjust the mixture
screw of the carburetor to a base setting of 2 turns, and the idle
speed screws to 1 to 1.5 turns. Start the engine, and don’t worry
if the engine idles too slowly as long as it will stay running. Check
the fittings and fuel lines for possible leaks.
The first step in adjusting the carburetors is to establish the
mixture. Turn each mixture screw inward until the engine runs
worse, then back it out ¼ turn at a time. Continue turning the
screw outward until you hear no change in idle speed or smoothness. Perform this for each carburetor as least twice until you are
comfortable with the mixture setting.
Next is the adjustment of the idle speed screws. Using a carburetor synchronization tool, such as a Uni-Sync, adjust the idle speed
screws to an equal flow @ 800-900 rpm. The linkage should be
disconnected from the carburetors when establishing the idle
speed.
Finish by adjusting the linkage ball joint fittings.You should be able
to snap the ball joint onto the bell crank ball joint without changing the idle speed or bell crank position.
Note!
A sure fire way to kill an air-cooled Volkswagen engine is to run
the mixture too lean. If you are hesitant or unsure how to properly adjust the carburetors as outlined above, hire an experienced
mechanic to check and or adjust the air fuel ratio.
© Wolfsburg West 2009
Orders 888.965.3937 Technical Support 951.549.0525
www.wolfsburgwest.com
5. What To Expect
We used a data logger to capture and log the engine performance
data throughout our testing. Many variables can cause your readings to be different from our results. Instrument quality, sending
unit locations and ambient air temperatures are just a few examples.
When measuring the cylinder head temperature, we sampled the
temperature from two locations: Underneath the #3 spark plug
and under the top of the inner #4 head stud.
When measuring the oil temperature, we employed the use of a
VDO sender, which we mounted near the inlet of the oil pump.
We found that heat from the muffler and engine case caused erroneous readings, and therefore the location was moved to a dip
stick sender.
Oil pressure sending unit
© Wolfsburg West 2009
Orders 888.965.3937 Technical Support 951.549.0525
10
www.wolfsburgwest.com
YOUR VOLKSWAGEN RESTORATION
PARTNER FOR OVER 20 YEARS
Oil pressure was measured by using a VDO combo oil pressure
sending unit mounted in the stock oil pressure switch outlet.
We tested our prototype engines in a 1957 single cab truck, with
stock gearing and reduction boxes. All measurements shown below were taken using a stock kit, without any modifications. Ambient air temperatures ranged from 80 – 100 degrees F.
· Oil temperatures averaged between 170 – 200 degrees F in
normal driving surfaces, and increased to 220 degrees F in steep
driving grades.
· Cylinder head temperatures never exceeded 285 degrees F, and
averaged about 250 degrees F.
Please note that the 36hp Bus models have a top speed of 50mph
at 3000 rpm’s. If you wish to increase this rate, a gearing change
should be considered. The Volkswagen engineers had reason for
for not exceeding 3000 rpm’s for extended periods.
6. Break In
Our dual port 36hp engine kit is a reproduction of the original
Gerhard Oettinger design. Gerhard Oettinger founded the Oettinger Company in 1951. A brilliant engineer, he was a pioneer of
early Volkswagen performance products.
Mr. Oettinger made the following recommendations for engine
break in, for which we agree:
The first 2000 miles, do not exceed 3000 rpm’s or 62 miles per
hour.
© Wolfsburg West 2009
Orders 888.965.3937 Technical Support 951.549.0525
11
www.wolfsburgwest.com
Do not exceed the shift points marked on your original speedometer.
Do not exceed 194 degrees F oil temperature (after 2000 miles,
do not exceed 240 degrees F).
If you are not looking to solely rely on the “seat of your pants”
method to gauge the health of your engine, we recommend using
an oil temperature gauge. The reason being is that even in our
desert testing, we found the cylinder head temperature to be low.
Although oil temperature never reached a point of concern, the
gauges did provide for us a better indication. Of course a good
head temperature is also nice. The Gene Berg oil temperature
dipstick is a great product, and is accurate in providing oil temperature. This device is simple to install, and will illuminate your oil
pressure light in the event your oil reaches the 220 – 225 degrees
F range. Better yet, this device is not voltage dependent and will
run at 6 of 12 volts.
© Wolfsburg West 2009
Orders 888.965.3937 Technical Support 951.549.0525
12
www.wolfsburgwest.com
YOUR VOLKSWAGEN RESTORATION
PARTNER FOR OVER 20 YEARS
Engine crankcase ventilation is a common problem with early
engines. We found in our testing a more that expected oil vapor
making its way out of the breather tube. Installing this zig-zag plate
cleared the nagging drip on the garage floor. We offer this plate
separately under the part number 111 115 450
W
id
ee
nd
Narrow
end
Location of baffle in generator stand.
© Wolfsburg West 2009
Orders 888.965.3937 Technical Support 951.549.0525
13
www.wolfsburgwest.com
1. 2.
3.
4.
5.
6.
7.
8.
9.
10.
Air filter element
Ny-lock nut
Rebuild kit
Hollow bolt
Air correction jet
Pilot air bleed jet
Main jet
Pilot jet
Pump jet
Plug
Note; All parts called out
with black balloons are
included in the rebuild kit.
© Wolfsburg West 2009
Orders 888.965.3937 Technical Support 951.549.0525
14
www.wolfsburgwest.com
Align these two sloted holes and this edge to your original tin.
YOUR VOLKSWAGEN RESTORATION
PARTNER FOR OVER 20 YEARS
ere
rd h
d ti
ni
n
w
a
rd her
e
Be
n
a
n inw
Bend ti
Cylinder head tin trim template.
© Wolfsburg West 2009
Orders 888.965.3937 Technical Support 951.549.0525
15
www.wolfsburgwest.com
© Wolfsburg West 2009
Orders 888.965.3937 Technical Support 951.549.0525
16
www.wolfsburgwest.com