1
Safeguard User’s Guide
Abstract
This manual describes the Safeguard product, the use of the command interpreter
SAFECOM, and the basic security tasks performed by all users.
The manual is intended for security administrators, system managers, and general
users of HP NonStop™ systems.
Product Version
Safeguard G07, H05
Supported Release Version Updates (RVUs)
This publication supports J06.03 and all subsequent J-series RVUs, H06.08 and all
subsequent H-series RVUs, and G06.29 and all subsequent G-series RVUs, until
otherwise indicated by its replacement publications. Additionally, all considerations for
H-series throughout this manual will hold true for J-series also, unless mentioned
otherwise.
Part Number
Published
422089-020
February 2014
Document History
Part Number
Product Version
Published
422089-013
Safeguard G07, H04
August 2009
422089-014
Safeguard G07, H04
November 2009
422089-015
Safeguard G07, H04
February 2010
422089-016
Safeguard G07, H04
August 2010
422089-017
Safeguard G07, H04
February 2011
422089-019
Safeguard G07, H04
August 2011
422089-020
Safeguard G07, H05
February 2014
Legal Notices
© Copyright 2014 Hewlett-Packard Development Company L.P.
Confidential computer software. Valid license from HP required for possession, use or copying.
Consistent with FAR 12.211 and 12.212, Commercial Computer Software, Computer Software
Documentation, and Technical Data for Commercial Items are licensed to the U.S. Government under
vendor's standard commercial license.
The information contained herein is subject to change without notice. The only warranties for HP
products and services are set forth in the express warranty statements accompanying such products
and services. Nothing herein should be construed as constituting an additional warranty. HP shall not be
liable for technical or editorial errors or omissions contained herein.
Export of the information contained in this publication may require authorization from the U.S.
Department of Commerce.
Microsoft, Windows, and Windows NT are U.S. registered trademarks of Microsoft Corporation.
Intel, Itanium, Pentium, and Celeron are trademarks or registered trademarks of Intel Corporation or its
subsidiaries in the United States and other countries.
Java® is a U.S. trademark of Oracle and/or its affiliates.
Motif, OSF/1, UNIX, X/Open, and the "X" device are registered trademarks and IT DialTone and The
Open Group are trademarks of The Open Group in the U.S. and other countries.
Open Software Foundation, OSF, the OSF logo, OSF/1, OSF/Motif, and Motif are trademarks of the
Open Software Foundation, Inc.
OSF MAKES NO WARRANTY OF ANY KIND WITH REGARD TO THE OSF MATERIAL PROVIDED
HEREIN, INCLUDING, BUT NOT LIMITED TO, THE IMPLIED WARRANTIES OF
MERCHANTABILITY AND FITNESS FOR A PARTICULAR PURPOSE.
OSF shall not be liable for errors contained herein or for incidental consequential damages in
connection with the furnishing, performance, or use of this material.
© 1990, 1991, 1992, 1993 Open Software Foundation, Inc. This documentation and the software to
which it relates are derived in part from materials supplied by the following:
© 1987, 1988, 1989 Carnegie-Mellon University. © 1989, 1990, 1991 Digital Equipment Corporation.
© 1985, 1988, 1989, 1990 Encore Computer Corporation. © 1988 Free Software Foundation, Inc.
© 1987, 1988, 1989, 1990, 1991 Hewlett-Packard Company. © 1985, 1987, 1988, 1989, 1990, 1991,
1992 International Business Machines Corporation. © 1988, 1989 Massachusetts Institute of
Technology. © 1988, 1989, 1990 Mentat Inc. © 1988 Microsoft Corporation. © 1987, 1988, 1989,
1990, 1991, 1992 SecureWare, Inc. © 1990, 1991 Siemens Nixdorf Informationssysteme AG. © 1986,
1989, 1996, 1997 Sun Microsystems, Inc. © 1989, 1990, 1991 Transarc Corporation.
This software and documentation are based in part on the Fourth Berkeley Software Distribution
under license from The Regents of the University of California. OSF acknowledges the following
individuals and institutions for their role in its development: Kenneth C.R.C. Arnold,
Gregory S. Couch, Conrad C. Huang, Ed James, Symmetric Computer Systems, Robert Elz. © 1980,
1981, 1982, 1983, 1985, 1986, 1987, 1988, 1989 Regents of the University of California.
Printed in the US
Safeguard User’s Guide
Glossary
Index
Figures
Tables
Legal Notices
What’s New in This Manual vii
Manual Information vii
New and Changed Information
About This Manual xi
Notation Conventions
vii
xii
1. Introduction to the Safeguard Subsystem
Subjects and Objects 1-1
What Can the Safeguard Subsystem Do? 1-1
User Authentication 1-2
Object Authorization 1-2
Auditing 1-4
The Safeguard Subsystem and Standard Security
Components of the Safeguard Subsystem 1-7
Who Can Use the Safeguard Subsystem? 1-7
1-4
2. Safeguard Logon Dialog
The Logon Prompt 2-1
Using the LOGON Command 2-2
Logging On With a Blind Password 2-2
Changing Your Password With Blind Passwords 2-3
Logging On With an Expired Password 2-3
Logging On With Displayable Passwords 2-4
Changing Your Password With Displayable Passwords
Logging On With -STOP Option 2-5
Logging On to a Remote System 2-5
3. Securing Disk Files
Getting Started 3-3
Adding a Disk File to the Safeguard Subsystem
Controlling Default Attributes 3-5
3-3
Hewlett-Packard Company — 422089-020
i
2-4
3. Securing Disk Files (continued)
Contents
3. Securing Disk Files (continued)
Working With Access Control Lists 3-7
Establishing a Default Access Control List 3-7
Specifying Access With the ADD DISKFILE Command 3-8
Specifying Access With the ALTER DISKFILE Command 3-9
Deleting an Access Control List Entry 3-11
Using One Authorization Record to Define Another 3-11
Freezing and Thawing an Access Control List 3-12
Specifying Auditing Conditions 3-13
Specifying Ownership 3-14
Other Disk-File Security Features 3-15
The CLEARONPURGE Attribute 3-15
The PERSISTENT Attribute 3-16
The LICENSE Attribute 3-17
The PROGID Attribute 3-18
The TRUST Attribute 3-19
The PRIV-LOGON { ON | OFF} Attribute 3-20
Removing a File From Safeguard Control 3-20
4. Securing Subvolumes
General Procedure for Protecting a Subvolume
Access Authorities for Subvolumes 4-2
Commands Used With Subvolumes 4-2
4-1
5. Securing Processes and Subprocesses
Protection of Process and Subprocess Names
Protecting Processes 5-2
5-1
6. Obtaining User and Alias Information
About Your User Authentication Record 6-1
Viewing Your User Authentication Record 6-2
What the INFO USER Display Tells You 6-4
About Alias Authentication Records 6-5
Viewing an Alias Authentication Record 6-6
What the INFO ALIAS Display Tells You 6-7
7. Working With SAFECOM
Using SAFECOM in Interactive Mode 7-1
SAFECOM Session-Control Commands
Checking Your Progress 7-3
7-2
Safeguard User’s Guide — 422089-020
ii
7. Working With SAFECOM (continued)
Contents
7. Working With SAFECOM (continued)
Entering More Than One Command on a Line 7-3
Continuing Commands From One Line to the Next 7-4
Redirecting Output for a Single Command 7-5
Getting Online Help 7-5
Displaying and Editing Previous Commands 7-7
Leaving SAFECOM Without Losing Defaults (Using the Break Key) 7-10
Exiting a Long Report Display (Break Key Handling) 7-10
Exiting SAFECOM 7-10
Using SAFECOM in Execute-and-Quit Mode 7-11
Using SAFECOM in Batch Mode 7-11
Placing Comments in a Command File 7-12
Executing a Command File During an Interactive Session 7-13
Using Command Files to Set Up Default Access Control Lists 7-13
Error Handling in Command Files 7-14
Using Wild-Card Characters in SAFECOM Commands 7-14
Examples 7-15
Restrictions 7-16
Abbreviating SAFECOM Commands 7-16
Running Other Programs From SAFECOM 7-17
Checking Command Syntax Only 7-17
8. Changing Display Options
Editing Your SAFECOM Prompt 8-1
Controlling INFO Report Warnings 8-3
Controlling INFO Report Headings 8-4
Controlling the INFO DETAIL Option for a Session
Displaying User IDs or User Names 8-6
Displaying INFO Output as Commands 8-7
Specifying a DISPLAY Command List 8-8
8-5
9. Working with Patterns
Background 9-1
Introduction 9-1
What is a Pattern? 9-1
How do Patterns Differ From What was Used Before?
Pattern Examples 9-2
Pattern Generality 9-3
One-Dimensional Search 9-4
Safeguard User’s Guide — 422089-020
iii
9-2
9. Working with Patterns (continued)
Contents
9. Working with Patterns (continued)
Multi-Dimensional Search 9-4
Safeguard Pattern Configuration 9-5
SAFECOM Diskfile-Pattern Commands 9-11
ADD DISKFILE-PATTERN 9-12
ALTER DISKFILE-PATTERN 9-13
DELETE DISKFILE-PATTERN 9-13
FREEZE DISKFILE-PATTERN 9-13
INFO DISKFILE-PATTERN 9-13
RESET DISKFILE-PATTERN 9-15
SET DISKFILE-PATTERN 9-15
SHOW DISKFILE-PATTERN 9-16
THAW DISKFILE-PATTERN 9-16
A. Guardian File Security
File Security String A-1
Displaying Default Security A-2
Changing Default Security A-2
Displaying File Security A-3
Changing a File's Security String A-3
Sample Procedures A-3
Using the DEFAULT Program to Set the Security String
Changing the Security String Through FUP A-4
A-3
B. Protecting Your Terminal
Protecting Your Password
Logging Off B-1
B-1
C. SAFECOM Command Syntax
Common Syntax Elements C-1
SAFECOM Command Syntax C-2
Glossary
Index
Figures
Figure 1-1.
Safeguard Object Authorization
1-3
Tables
Table 1-1.
Comparing Guardian Security and Safeguard Security
Safeguard User’s Guide — 422089-020
iv
1-5
Tables (continued)
Contents
Tables (continued)
Table 3-1.
Table 3-2.
Table 7-1.
Table 8-1.
Table 8-2.
Table 9-1.
Table 9-2.
Table 9-3.
Table 9-4.
Table A-1.
Disk-File Commands 3-1
Disk-File Attributes 3-2
SAFECOM Session-Control Commands 7-2
DISPLAY Commands 8-1
Prompt Items for the DISPLAY PROMPT Command 8-2
CHECK-DISKFILE-PATTERN settings 9-7
CHECK-DISKFILE-PATTERN settings when value is MID and Direction
Diskfile is Filename-First 9-8
CHECK-DISKFILE-PATTERN settings when value is MID and Direction
Diskfile is Volume-First 9-9
Diskfile-Pattern Commands 9-12
Guardian File Security Settings A-2
Safeguard User’s Guide — 422089-020
v
Contents
Safeguard User’s Guide — 422089-020
vi
What’s New in This Manual
Manual Information
Safeguard User’s Guide
Abstract
This manual describes the Safeguard product, the use of the command interpreter
SAFECOM, and the basic security tasks performed by all users.
The manual is intended for security administrators, system managers, and general
users of HP NonStop™ systems.
Product Version
Safeguard G07, H05
Supported Release Version Updates (RVUs)
This publication supports J06.03 and all subsequent J-series RVUs, H06.08 and all
subsequent H-series RVUs, and G06.29 and all subsequent G-series RVUs, until
otherwise indicated by its replacement publications. Additionally, all considerations for
H-series throughout this manual will hold true for J-series also, unless mentioned
otherwise.
Part Number
Published
422089-020
February 2014
Document History
Part Number
Product Version
Published
422089-013
Safeguard G07, H04
August 2009
422089-014
Safeguard G07, H04
November 2009
422089-015
Safeguard G07, H04
February 2010
422089-016
Safeguard G07, H04
August 2010
422089-017
Safeguard G07, H04
February 2011
422089-019
Safeguard G07, H04
August 2011
422089-020
Safeguard G07, H05
February 2014
New and Changed Information
Changes to 422089-020 Manual:
•
•
Updated the Using the LOGON Command on page 2-2.
Updated the Error Handling in Command Files on page 7-14.
Safeguard User’s Guide — 422089-020
vii
Changes to 422089-019 Manual:
What’s New in This Manual
Changes to 422089-019 Manual:
•
Added new example on page 3-10.
Changes to the H06.22/J06.11 Manual:
•
•
•
Updated the Safeguard product version on page -1.
Updated the description of PRIV-LOGON ^ in Table 3-2 on page 3-3.
Updated the SAFECOM screen display on page 7-14.
Changes to the H06.21/J06.10 Manual
•
•
•
Added Safeguard Helper Process to the Components of the Safeguard Subsystem
on page 1-7.
Added Granting or Denying Access to an ACL section on page 3-12.
Added SAFECOM Saved-Diskfile-Pattern Commands section containing the
following:
°
Table 9-5, Saved-Diskfile-Pattern Commands, on page 9-16 describing the
Saved Diskfile-Pattern Commands.
°
Examples on how to use the following Saved Diskfile-Pattern Commands:
°
°
°
°
°
°
°
°
°
ADD SAVED-DISKFILE-PATTERN on page 9-17.
ALTER SAVED-DISKFILE-PATTERN on page 9-17.
DELETE SAVED-DISKFILE-PATTERN on page 9-18.
FREEZE SAVED-DISKFILE-PATTERN on page 9-18.
INFO SAVED-DISKFILE-PATTERN on page 9-18.
RESET SAVED-DISKFILE-PATTERN on page 9-19.
SET SAVED-DISKFILE-PATTERN on page 9-19.
SHOW SAVED-DISKFILE-PATTERN on page 9-20.
THAW SAVED-DISKFILE-PATTERN on page 9-20.
Changes to the H06.20/J06.09 Manual
•
•
Added Logging On With -STOP Option on page 2-5.
Updated the Logging On to a Remote System section with the -STOP option on
page 2-6.
Changes to the 422089-014 Manual
•
Updated notes in the following sections to include support for G-series RVUs:
Safeguard User’s Guide — 422089-020
viii
Changes to the H06.19/J06.08 Manual
What’s New in This Manual
•
•
°
°
DISK-FILE-ATTRIBUTES Table 3-2 on page 3-2.
°
°
°
Viewing an Alias Authentication Record section on page 6-7.
AUDIT-PRIV-LOGON attribute on pages 3-5, 3-6, 3-8, 3-16, 3-17, 3-18, 3-19,
3-20, 3-22, and C-7.
CREATION_TIME of User on page 6-2.
Viewing Your User Authentication Record section on page 6-4.
Updated the DISKFILE display with OBJECT-TEXT-DESCRIPTION on page 7-4
and 7-14.
Added a note to the CHECK-DISKFILE-PATTERN settings section to include Hseries and J-series support on pages 9-8 and 9-10.
Changes to the H06.19/J06.08 Manual
•
•
•
•
•
•
•
•
Updated the About Your User Authentication Record section on page 6-2.
Added the following to the display of INFO USER command:
°
°
°
°
CREATION-TIME on page 6-3.
CREATOR-USER-NAME on page 6-3.
CREATOR-USER-TYPE on page 6-3.
CREATOR-NODENUMBER on page 6-3.
Updated What the INFO USER Display Tells You on page 6-4.
Added the following to the display of INFO ALIAS command:
°
°
°
°
CREATION-TIME on page 6-6.
CREATOR-USER-NAMEon page 6-6.
CREATOR-USER-TYPE on page 6-6.
CREATOR-NODENUMBER on page 6-6.
Updated What the INFO ALIAS Display Tells You on page 6-7.
Added MID option on page 9-5.
Added Table 9-2, CHECK-DISKFILE-PATTERN settings when value is MID and
Direction Diskfile is Filename-First, on page 9-7.
Added Table 9-3, CHECK-DISKFILE-PATTERN settings when value is MID and
Direction Diskfile is Volume-First, on page 9-8.
Safeguard User’s Guide — 422089-020
ix
What’s New in This Manual
Changes to the H06.19/J06.08 Manual
Safeguard User’s Guide — 422089-020
x
About This Manual
This user's guide is intended for all Safeguard users. It is intended especially for the
general user who needs to use the Safeguard software to secure disk files,
subvolumes, and processes. The manual describes the basic features of the
Safeguard distributed security management facility and its command interpreter,
SAFECOM. This manual does not cover those Safeguard features normally reserved
for privileged users.
The first section of the manual introduces Safeguard security and compares it to the
standard security mechanisms provided by the operating system.
The remainder of the manual covers the following topics:
•
•
•
•
•
•
•
•
•
•
•
Logging on from a terminal controlled by the Safeguard subsystem
Securing disk files, working with access control lists, and specifying auditing
conditions
Securing subvolumes
Securing processes and subprocesses
Obtaining information about your user ID and any user aliases you may have
Working with SAFECOM, the Safeguard command interpreter, in three different
modes: interactive mode, execute-and-quit mode, and batch mode
Changing the standard SAFECOM prompt and changing the format of the INFO
command report
Section 9 discusses using patterns to secure diskfiles.
Appendix A summarizes standard Guardian file security.
Appendix B provides basic guidelines for protecting your terminal from
unauthorized use.
Appendix C summarizes the syntax of the SAFECOM commands presented in this
manual.
This manual is designed to teach you how to use the Safeguard software to secure
your disk files, subvolumes, and processes. This information applies to all users. If you
are a security administrator, system administrator, or group manager, you will also
need to read the Safeguard Administrator's Manual to learn how to secure volumes
and devices and how to add users to the Safeguard security database.
For information on all SAFECOM commands, see the Safeguard Reference Manual.
Before reading this manual, you should be familiar with the NonStop Systems
Introduction and the Guardian User's Guide.
Safeguard User’s Guide — 422089-020
xi
Notation Conventions
About This Manual
Notation Conventions
Hypertext Links
Blue underline is used to indicate a hypertext link within text. By clicking a passage of
text with a blue underline, you are taken to the location described. For example:
This requirement is described under Backup DAM Volumes and Physical Disk
Drives on page 3-2.
General Syntax Notation
The following list summarizes the notation conventions for syntax presentation in this
manual.
UPPERCASE LETTERS. Uppercase letters indicate keywords and reserved words; enter
these items exactly as shown. Items not enclosed in brackets are required. For
example:
MAXATTACH
lowercase italic letters. Lowercase italic letters indicate variable items that you supply.
Items not enclosed in brackets are required. For example:
file-name
computer type. Computer type letters within text indicate C and Open System Services
(OSS) keywords and reserved words; enter these items exactly as shown. Items not
enclosed in brackets are required. For example:
myfile.c
italic computer type. Italic computer type letters within text indicate C and Open
System Services (OSS) variable items that you supply. Items not enclosed in brackets
are required. For example:
pathname
[ ] Brackets. Brackets enclose optional syntax items. For example:
TERM [\system-name.]$terminal-name
INT[ERRUPTS]
A group of items enclosed in brackets is a list from which you can choose one item or
none. The items in the list may be arranged either vertically, with aligned brackets on
Safeguard User’s Guide — 422089-020
xii
General Syntax Notation
About This Manual
each side of the list, or horizontally, enclosed in a pair of brackets and separated by
vertical lines. For example:
FC [ num ]
[ -num ]
[ text ]
K [ X | D ] address
{ } Braces. A group of items enclosed in braces is a list from which you are required to
choose one item. The items in the list may be arranged either vertically, with aligned
braces on each side of the list, or horizontally, enclosed in a pair of braces and
separated by vertical lines. For example:
LISTOPENS PROCESS { $appl-mgr-name }
{ $process-name }
ALLOWSU { ON | OFF }
| Vertical Line. A vertical line separates alternatives in a horizontal list that is enclosed in
brackets or braces. For example:
INSPECT { OFF | ON | SAVEABEND }
… Ellipsis. An ellipsis immediately following a pair of brackets or braces indicates that you
can repeat the enclosed sequence of syntax items any number of times. For example:
M address [ , new-value ]…
[ - ] {0|1|2|3|4|5|6|7|8|9}…
An ellipsis immediately following a single syntax item indicates that you can repeat that
syntax item any number of times. For example:
"s-char…"
Punctuation. Parentheses, commas, semicolons, and other symbols not previously
described must be entered as shown. For example:
error := NEXTFILENAME ( file-name ) ;
LISTOPENS SU $process-name.#su-name
Quotation marks around a symbol such as a bracket or brace indicate the symbol is a
required character that you must enter as shown. For example:
"[" repetition-constant-list "]"
Item Spacing. Spaces shown between items are required unless one of the items is a
punctuation symbol such as a parenthesis or a comma. For example:
CALL STEPMOM ( process-id ) ;
If there is no space between two items, spaces are not permitted. In the following
example, there are no spaces permitted between the period and any other items:
$process-name.#su-name
Safeguard User’s Guide — 422089-020
xiii
Notation for Messages
About This Manual
Line Spacing. If the syntax of a command is too long to fit on a single line, each
continuation line is indented three spaces and is separated from the preceding line by
a blank line. This spacing distinguishes items in a continuation line from items in a
vertical list of selections. For example:
ALTER [ / OUT file-spec / ] LINE
[ , attribute-spec ]…
!i and !o. In procedure calls, the !i notation follows an input parameter (one that passes data
to the called procedure); the !o notation follows an output parameter (one that returns
data to the calling program). For example:
CALL CHECKRESIZESEGMENT ( segment-id
, error
) ;
!i
!o
!i,o. In procedure calls, the !i,o notation follows an input/output parameter (one that both
passes data to the called procedure and returns data to the calling program). For
example:
error := COMPRESSEDIT ( filenum ) ;
!i:i.
!i,o
In procedure calls, the !i:i notation follows an input string parameter that has a
corresponding parameter specifying the length of the string in bytes. For example:
error := FILENAME_COMPARE_ (
filename1:length
, filename2:length ) ;
!i:i
!i:i
!o:i. In procedure calls, the !o:i notation follows an output buffer parameter that has a
corresponding input parameter specifying the maximum length of the output buffer in
bytes. For example:
error := FILE_GETINFO_ (
filenum
, [ filename:maxlen ] ) ;
!i
!o:i
Notation for Messages
The following list summarizes the notation conventions for the presentation of
displayed messages in this manual.
Bold Text. Bold text in an example indicates user input entered at the terminal. For
example:
ENTER RUN CODE
?123
CODE RECEIVED:
123.00
The user must press the Return key after typing the input.
Safeguard User’s Guide — 422089-020
xiv
Notation for Messages
About This Manual
Nonitalic text. Nonitalic letters, numbers, and punctuation indicate text that is displayed or
returned exactly as shown. For example:
Backup Up.
lowercase italic letters. Lowercase italic letters indicate variable items whose values are
displayed or returned. For example:
p-register
process-name
[ ] Brackets. Brackets enclose items that are sometimes, but not always, displayed. For
example:
Event number = number [ Subject = first-subject-value ]
A group of items enclosed in brackets is a list of all possible items that can be
displayed, of which one or none might actually be displayed. The items in the list might
be arranged either vertically, with aligned brackets on each side of the list, or
horizontally, enclosed in a pair of brackets and separated by vertical lines. For
example:
proc-name trapped [ in SQL | in SQL file system ]
{ } Braces. A group of items enclosed in braces is a list of all possible items that can be
displayed, of which one is actually displayed. The items in the list might be arranged
either vertically, with aligned braces on each side of the list, or horizontally, enclosed in
a pair of braces and separated by vertical lines. For example:
obj-type obj-name state changed to state, caused by
{ Object | Operator | Service }
process-name State changed from old-objstate to objstate
{ Operator Request. }
{ Unknown.
}
| Vertical Line. A vertical line separates alternatives in a horizontal list that is enclosed in
brackets or braces. For example:
Transfer status: { OK | Failed }
% Percent Sign. A percent sign precedes a number that is not in decimal notation. The
% notation precedes an octal number. The %B notation precedes a binary number.
The %H notation precedes a hexadecimal number. For example:
%005400
%B101111
%H2F
P=%p-register E=%e-register
Safeguard User’s Guide — 422089-020
xv
Notation for Management Programming Interfaces
About This Manual
Notation for Management Programming Interfaces
The following list summarizes the notation conventions used in the boxed descriptions
of programmatic commands, event messages, and error lists in this manual.
UPPERCASE LETTERS. Uppercase letters indicate names from definition files; enter these
names exactly as shown. For example:
ZCOM-TKN-SUBJ-SERV
lowercase letters. Words in lowercase letters are words that are part of the notation,
including Data Definition Language (DDL) keywords. For example:
token-type
!r.
The !r notation following a token or field name indicates that the token or field is
required. For example:
ZCOM-TKN-OBJNAME
!o.
token-type ZSPI-TYP-STRING.
!r
The !o notation following a token or field name indicates that the token or field is
optional. For example:
ZSPI-TKN-MANAGER
token-type ZSPI-TYP-FNAME32.
!o
Change Bar Notation
Change bars are used to indicate substantive differences between this edition of the
manual and the preceding edition. Change bars are vertical rules placed in the right
margin of changed portions of text, figures, tables, examples, and so on. Change bars
highlight new or revised information. For example:
The message types specified in the REPORT clause are different in the COBOL
environment and the Common Run-Time Environment (CRE).
The CRE has many new message types and some new message type codes for
old message types. In the CRE, the message type SYSTEM includes all messages
except LOGICAL-CLOSE and LOGICAL-OPEN.
HP Encourages Your Comments
HP encourages your comments concerning this document. We are committed to
providing documentation that meets your needs. Send any errors found, suggestions
for improvement, or compliments to [email protected].
Include the document title, part number, and any comment, error found, or suggestion
for improvement you have concerning this document.
Safeguard User’s Guide — 422089-020
xvi
1
Introduction to the Safeguard
Subsystem
The Safeguard subsystem extends the security features of the Guardian environment
to provide more comprehensive security for your system. The Safeguard subsystem
works with the Guardian environment and allows you to apply more extensive and
specific security controls. A comparison of Guardian security features and the
extended features of the Safeguard software is presented later in this section.
Although the Safeguard subsystem can be used to secure access to various system
resources, its primary benefit to the general user is extended protection for disk files,
subvolumes, and processes. Other Safeguard features, which are reserved for
privileged users, are described in the Safeguard Administrator's Manual. Only
privileged users can add other users to the Safeguard database and, typically, control
the security of volumes and devices.
Subjects and Objects
With the Safeguard subsystem, logged-on users are referred to as subjects, and
system resources such as disk files and subvolumes are referred to as objects. An
individual user can own an object, such as a disk file. Object owners can use the
Safeguard software to allow others to share their resources.
To manage your system's subjects and objects, the Safeguard subsystem maintains
both subject and object databases. The subject database contains authentication
records for users and aliases. (Aliases are alternate user names with their own
authentication records.) Object databases contain authorization records for system
resources such as disk files, processes, and volumes.
General users can create and alter the authorization records stored in the object
databases for disk files, subvolumes, and processes. The authorization records for
other types of objects and the authentication records for users are under the control of
your system's security administrator and security team.
For convenience in this manual, authorization records and authentication records are
referred to collectively as protection records.
What Can the Safeguard Subsystem Do?
The Safeguard subsystem provides three major security capabilities to protect the
general user's disk files, subvolumes, and processes:
•
Authentication—Verifying a user name and password when a user requests access
to the system. As a general user, you can change your password, but you have no
Safeguard User’s Guide — 422089-020
1 -1
Introduction to the Safeguard Subsystem
User Authentication
additional control over the authentication process, even though it provides the first
line of defense against intrusion into your files and the entire system.
•
•
Authorization—Checking access control lists to determine whether another user
has authority to access your disk files, subvolumes, and processes. You can
designate the specific access authorities that another user may have to your
objects.
Auditing—Recording attempts to access your disk files, subvolumes, and
processes. The Safeguard subsystem can record attempts to access your objects
or to change the protection records associated with them.
User Authentication
The Safeguard subsystem, like Guardian security, authenticates users by ensuring that
only persons who enter a valid user name and associated password can access the
system.
When the Safeguard software is installed, it takes over the existing USERID files,
which contain user records for each user on the system. The Safeguard software
expands user records by adding unique security attributes to them. The security
administrator controls user authentication by modifying these attributes. For example,
the security administrator can use the PASSWORD-MUST-CHANGE attribute to
require that users change their passwords every 30 days. Similarly, the security
administrator can temporarily suspend a user ID so the user with that ID cannot access
the system.
As a general user, you need to be aware of how the security administrator has defined
your user authentication record. This is particularly important if you are required to
change your password at regular intervals or if your disk files have been assigned
some default security protection. Section 6, Obtaining User and Alias Information,
describes how you can check your user authentication record.
Object Authorization
Disk files, subvolumes, and processes are objects. To specify Safeguard protection for
an object, you add a protection record for that object to the Safeguard database. When
you add an object to the Safeguard database, that object is no longer subject to
Guardian security settings. The Safeguard software creates an authorization record
that contains the security attributes pertaining to that object. You (or whoever owns the
authorization record) can modify these attributes with SAFECOM commands.
SAFECOM is the Safeguard command interpreter.
You protect an object by defining an access control list with the ACCESS attribute.
Access control lists specify who can access an object and what authorities they have.
The authorities assigned to a disk file or subvolume—READ, WRITE, EXECUTE,
PURGE, CREATE, and OWNER—indicate the functions a user can perform on that
object.
Safeguard User’s Guide — 422089-020
1-2
Object Authorization
Introduction to the Safeguard Subsystem
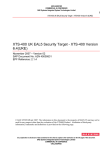
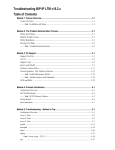
Figure 1-1 shows the Safeguard object databases and depicts the process of the
Safeguard software checking an object authorization record to authorize use of an
object. This figure is representational. For simplicity, it omits certain technical details
regarding the object databases.
Figure 1-1. Safeguard Object Authorization
System Objects
Safeguard Authorization Records
File 1
File 1 Authorization Record
File 2
File 2 Autorization Record
File n
File n Authorization Record
Subvolume 1
Subvolume 1 Authorization Record
Subvolume 2
Subvolume 2 Autorization Record
Subvolume n
Subvolume n Authorization Record
Process 1
Process 2
Process 1 Authorization Record
Process 2 Autorization Record
Process n
Process n Authorization Record
Volume 1
Volume 1 Authorization Record
Volume 2
Volume 2 Autorization Record
Volume n
Volume n Authorization Record
Device 1
Device 1 Authorization Record
Device 2
Device 2 Autorization Record
Device n
Device n Authorization Record
File2
Last Mod 11/23/93
Owner 2, 8
Thawed
2, 8 RWEPCO
2, * RW
14, 2 RWEP
Persistent On
Clearonpurge On
Audit-Access-Fail All
VST001.vsd
Safeguard User’s Guide — 422089-020
1-3
Introduction to the Safeguard Subsystem
Auditing
Auditing
At your request, the Safeguard subsystem can create audit records of attempts to
access your objects. When a user attempts to access an object for which auditing is
specified, the Safeguard software records the attempt in an audit file. Records in the
audit files contain information such as the name of the object, the date and time of the
access attempt, and the user ID of the user attempting the access.
Security administrators can use the audit files to detect any attempts to access an
object. The Safeguard software can also audit attempts to access or change the
authorization records for subjects or objects. In addition, the Safeguard subsystem can
be configured for systemwide auditing of all objects or specific types of objects, such
as disk files. Auditing is fully described in the Safeguard Audit Service Manual.
The Safeguard Subsystem and Standard
Security
The Safeguard subsystem does not completely replace the standard security
mechanisms of the Guardian environment. Working with Guardian, the Safeguard
subsystem enforces the additional security controls established by system managers,
security administrators, and general users.
Table 1-1 compares the standard security features to the extensions offered by the
Safeguard subsystem. This table summarizes commonly used Safeguard security
features, including those reserved for privileged users. The table does not provide a
complete list of all Safeguard security features.
The basic differences between Safeguard security and standard security are:
•
In the Guardian environment, users control their own security attributes (that is,
logon password and disk-file security).
In the Safeguard database, each user is represented by a user authentication
record, and the owner of the authentication record controls the security attributes
for that user. Typically, privileged users own the user authentication records.
Similarly, each object protected by the Safeguard software is represented by an
object access authorization record, and the owners of that authorization record
control the security attributes for that object. General users usually own the
authorization records for their own files and subvolumes. Privileged users own the
authorization records for other object types such as volumes and devices.
•
The Guardian environment can control access to only one object type: disk files.
File access is permitted according to the security string associated with the file.
The file owner can specify that access to the file be limited to the owner or to users
in the owner's group, or that access be granted to all users.
In addition to disk files, the Safeguard software controls access to several other
types of objects, such as volumes, subvolumes, and devices. With the Safeguard
software, the owner of the authorization record for any protected object can create
Safeguard User’s Guide — 422089-020
1-4
Introduction to the Safeguard Subsystem
The Safeguard Subsystem and Standard Security
and modify an access control list (ACL) for that object. The ACL specifies which
individual users and specific user groups can access the object and what access
authorities those users have to the object.
Without the Safeguard subsystem installed, the Guardian environment provides basic
security controls for users and disk files. The Safeguard subsystem extends and
complements this basic set of security controls for users and for protected objects.
To achieve the extra control over user authentication that the Safeguard software
provides, a security administrator can specify values for the user attributes that are
unique to the Safeguard subsystem.
Table 1-1. Comparing Guardian Security and Safeguard Security (page 1 of 2)
Guardian
Security
Safeguard
Security
User authentication
Yes
Yes
Remote password authentication
Yes
Yes
Password expiration
-
Yes
Password expiration grace period
-
Yes
Password expiration warning
-
Yes
Password change during logon
-
Yes
User expiration
-
Yes
Audit of logon and logoff
+
Yes
Audit of attempts to manage a Safeguard record
N.A.
Yes
Audit of a specific user's actions
-
Yes
Minimum password length
-
Yes
One-way password encryption
-
Yes
Prompt for old password before allowing a password
change
-
Yes
Password history
-
Yes
Password required
-
Yes
Maximum password length
-
Yes
Password compatibility mode
-
Yes
RWEP
RWEPCO
Security Feature
Users
Disk Files and Diskfile Patterns
ACL authorities
ACL Access control list.
*
Offered by extensions to the PASSWORD program.
+
Offered by the $CMON interface of TACL.
Codes for access authorities in ACL:
R - Read
E - Execute
C - Create
W - Write
P - Purge
O - Owner
Safeguard User’s Guide — 422089-020
1-5
Introduction to the Safeguard Subsystem
The Safeguard Subsystem and Standard Security
Table 1-1. Comparing Guardian Security and Safeguard Security (page 2 of 2)
Security Feature
Guardian
Security
Safeguard
Security
LICENSE, CLEARONPURGE, PROGID
Yes
Yes
PERSISTENT protection
-
Yes
Audit of attempts to access a file
-
Yes
Audit of attempts to manage a Safeguard record
N.A.
Yes
ACL authorities
-
RWEPCO
Audit of attempts to access a volume or subvolume
-
Yes
Audit of attempts to manage a Safeguard record
N.A.
Yes
ACL authorities
-
RWPCO
Audit of attempts to access process name
-
Yes
Audit of attempts to manage s Safeguard record
N.A.
Yes
Control of NAMED or UNNAMED as a group
-
Yes
ACL authorities
-
RWO
Audit of attempts to access device
-
Yes
Audit of attempts to manage a Safeguard record
N.A.
Yes
ACL authorities
N.A.
CO
Audit of attempts to add objects of a certain type
-
Yes
Audit of attempts to manage an OBJECTTYPE record
N.A.
Yes
Disk Volumes And Subvolumes
Processes And Subprocesses
Devices And Subdevices Other Than Disks
OBJECTTYPE
ACL Access control list.
*
Offered by extensions to the PASSWORD program.
+
Offered by the $CMON interface of TACL.
Codes for access authorities in ACL:
R - Read
E - Execute
C - Create
W - Write
P - Purge
O - Owner
Similarly, to achieve the extra control over object-access authorization, objects must
first be given Safeguard protection. For example, until a disk file is added to the
Safeguard database, the Guardian disk-file security mechanism remains in effect. For
your convenience, Appendix A, Guardian File Security, describes how to specify
Guardian security for your disk files.
Because the Safeguard subsystem works with the security of the Guardian
environment, you have complete and selective control over the level of file security. For
example, you can place a single disk file under Safeguard control and leave the rest of
your database and program files under Guardian security. At the other extreme, you
can place every database and program file under Safeguard protection.
Safeguard User’s Guide — 422089-020
1-6
Introduction to the Safeguard Subsystem
Components of the Safeguard Subsystem
The relationship between the Safeguard subsystem and the Guardian environment can
extend to a network of HP systems. Depending on your security requirements, you can
install the Safeguard software on a single node in your network, on a few nodes, or on
every node.
Components of the Safeguard Subsystem
The Safeguard subsystem consists of three major processes and several security
database files. The following Safeguard components reside on every system on which
the Safeguard software is installed:
•
•
•
•
•
•
A subject database, which contains a user authentication record for every user and
alias on the system
Object databases, which contain object authorization records for every object
under control of the Safeguard software
SAFECOM, the Safeguard command interpreter, which allows you to communicate
with the Safeguard subsystem
SMON, the Security Monitor, which authorizes all attempts to access protected
objects
SMP, the Security Manager Process, which is responsible for managing all
changes to the subject and object databases and for authenticating user logon
attempts
SHP, the Safeguard Helper Process, which assists SMP in identifying and updating
process attributes whenever the following user attributes in user database files are
modified:
°
°
°
°
°
AUDIT-USER-ACTION-PASS
AUDIT-UER-ACTION-FAIL
Primary group
Supplementary group list
Group count
Who Can Use the Safeguard Subsystem?
To use the Safeguard command interpreter, you must have EXECUTE authority for the
SAFECOM program. Your security administrator can limit this authority to certain users
by creating an access control list for the SAFECOM program file. This manual
assumes that you have execute authority for the SAFECOM program.
Initially, SAFECOM limits what certain classes of users can do. Normally, general users
can protect their own disk files, subvolumes, and processes with the Safeguard
software. General users can also manage the access control lists associated with their
disk files, subvolumes, and processes.
Safeguard User’s Guide — 422089-020
1-7
Introduction to the Safeguard Subsystem
Who Can Use the Safeguard Subsystem?
The security administrator can decide to limit or expand any user's authorities to suit
the company's security policy. In certain instances you might be given additional
authority. For example, your system administrator could add an object such as a printer
to the Safeguard database and then grant owner authority to you as a general user.
With owner authority, you can manage the access control list for that printer.
Safeguard User’s Guide — 422089-020
1-8
2
Safeguard Logon Dialog
This section explains how to log on and how to change your password on systems
where the Safeguard subsystem is running. If the Safeguard subsystem is not running
on your system, see the Guardian User’s Guide for logon instructions.
To gain access to your system, use the LOGON command. To do so, you must have a
user name and user ID assigned to you. In addition, you should be given a password.
Typically, a user name, user ID, and password are assigned to a new user by the
user’s group manager or the system security administrator. You must enter your user
name and password when you log on to your system.
If you have been assigned an alias, use it as a user name. However, be aware that
aliases are case-sensitive. Uppercase and lowercase letters are recognized exactly as
you type them. User names, on the other hand, are recognized as uppercase,
regardless of how you type them. For more information about aliases, see About Alias
Authentication Records on page 6-5.
The Logon Prompt
The type of logon prompt you see depends on whether your terminal is a Safeguard
terminal. A Safeguard terminal is defined by a member of the security staff with the
ADD TERMINAL command. If your terminal is a Safeguard terminal, the logon prompt
looks like this:
SAFEGUARD 1>
If your terminal is not a Safeguard terminal, the TACL logon prompt appears on your
screen:
TACL 1>
In either case, the logon dialog described in this section applies to your terminal as
long as the Safeguard subsystem is running on your system. For the purposes of the
examples in this section, the logon prompt for a Safeguard terminal is shown.
The logon prompt accepts only three commands: LOGON, PAUSE, and TIME. If you
enter any other command, the terminal displays the following message:
Expecting:
LOGON, PAUSE or TIME
The TIME command returns the current date and time:
SAFEGUARD 1> TIME
20 MAY 1993, 13:47:22
SAFEGUARD 2>
The PAUSE command suspends the logon prompting and allows other processes to
interact with the terminal:
SAFEGUARD 1> PAUSE
To restore the logon prompt, press the Break key.
Safeguard User’s Guide — 422089-020
2-1
Using the LOGON Command
Safeguard Logon Dialog
You can also terminate the LOGON command at any time by pressing Ctrl/Y or Break.
Using the LOGON Command
The LOGON command accepts your user name and password in several different
formats, as the following examples shows.
From H06.28/J06.17 RVU onwards, the PASSWORD-ERROR-DETAIL global attribute
is supported for password change during LOGON also. A detailed error message is
displayed when the following conditions are met:
•
•
•
If this attribute is set to ON
The Authentication and Password Event Exit Processes are not enabled, and
The password provided does not meet the complexity criteria
For example, the detailed error message can be in the following form based on which
all password quality attributes are set to ON:
* ERROR *
The password provided does not meet one or more of the
following complexity requirements:
Has atleast <n1> Alphabets,
Has atleast <n2> Uppercase Characters [A-Z],
Has atleast <n3> Lowercase Characters [a-z],
Has atleast <n4> Numerals [0-9],
Has atleast <n5> Special Characters(Such As !, $, *)
Note. n1, n2, n3, n4 and n5 are the integer numbers.
Logging On With a Blind Password
In the standard Safeguard configuration, passwords are blind. They are not displayed
when typed at the password prompt. If you attempt to enter your password on the
same line as your user name, it is displayed but not accepted. You must type it on the
following line at the password prompt. The standard Safeguard configuration also
requires that you use your user name (group name.member name) or alias when
logging on. You cannot log on using your user ID (group number,member number).
The following example shows how a user with the user name support.jane logs on to
the system. The user’s password is alpha4. The password appears in this example
even though it does not appear on the screen when support.jane types it.
SAFEGUARD 1> LOGON support.jane
Password: alpha4
*WARNING* Password Expires: 4 Jan 1995, 12:00
Last Logon: 18 DEC 1994, 11:23
Last Unsuccessful Attempt: 18 Dec 1994, 11:20 Total Failures: 5
Good Morning. Welcome to \SFO
The terminal displays a series of messages after a successful logon. The first logon
confirmation message tells the user when her current password expires. This message
Safeguard User’s Guide — 422089-020
2-2
Safeguard Logon Dialog
Changing Your Password With Blind Passwords
appears only if the password has an expiration date and the user is allowed to change
the password at this time. Another message indicates the date and time of the last
successful logon for this user. Most systems also display a greeting message that
typically includes the name of the system being accessed.
Another message describes failed logon attempts. Safeguard counts the number of
times a login fails, for example, when you mistype your password. Safeguard also
remembers the time that the last failure took place. The logon dialog message shows
the time of the last failed logon, and the total number of failures for your account since
it was created. If the message with this information changes unexpectedly, notify your
security administrator.
The following example shows how support.jane could log on if the Safeguard
configuration is altered to accept a user ID for logging on. This example assumes that
the user ID for support.jane is 12,115:
SAFEGUARD 1> LOGON 12,115
Password: alpha4
*WARNING* Password Expires: 4 Jan 1995, 12:00
Last Logon: 18 DEC 1994, 11:23
Last Unsuccessful Attempt: 18 Dec 1994, 11:20 Total Failures: 5
Good Morning. Welcome to \SFO
Changing Your Password With Blind Passwords
You can change your password as part of the logon sequence. Initially, the logon dialog
is the same as a normal logon. However, to indicate that you want to change your
password, type a comma at the end of your password. The system prompts you for a
new password and then requests reentry of the new password to verify it. The following
dialog shows a sequence in which support.jane changes her password from alpha4 to
BigTop:
SAFEGUARD 1> LOGON support.jane
Password: alpha4,
Enter new password: BigTop
Reenter new password: BigTop
The password for support.jane has been changed.
Last Logon: 18 DEC 1994, 11:23
Last Unsuccessful Attempt: 18 Dec 1994, 11:20 Total Failures: 5
Good Morning. Welcome to \SFO
Passwords are case-sensitive, so the Safeguard software recognizes uppercase and
lowercase letters exactly as you type them. Each time support.jane uses her new
password, she must remember to capitalize the letters B and T.
An alternative method of changing an unexpired password is to enter the current
password, the new password, and the verification of the new password on the same
line. The following dialog shows this type of password change. The passwords must be
separated by commas:
SAFEGUARD 1> LOGON support.jane
Password: alpha4,BigTop,BigTop
The password for support.jane has been changed.
Safeguard User’s Guide — 422089-020
2-3
Logging On With an Expired Password
Safeguard Logon Dialog
Last Logon: 18 DEC 1994, 11:23
Last Unsuccessful Attempt: 18 Dec 1994, 11:20 Total Failures: 5
Good Morning. Welcome to \SFO
Another option for changing the password is to enter the current and new passwords
on one line and the verification of the new password on the next line:
SAFEGUARD 1> LOGON support.jane
Password: alpha4,BigTop
Reenter new password: BigTop
The password for support.jane has been changed.
Last Logon: 18 DEC 1994, 11:23
Last Unsuccessful Attempt: 18 Dec 1994, 11:20 Total Failures: 5
Good Morning. Welcome to \SFO
Note. If the PASSWORD program is available on your system, you can use it to change your
password after you log on. For instructions on the use of the PASSWORD program, refer to the
Guardian User’s Guide.
Logging On With an Expired Password
Your password can have an extension or grace period during which it can be changed
after expiration. If you have ignored warnings of a pending password expiration date
and allowed your password to expire, you can change your password during the grace
period. The following example shows how support.jane can change her expired
password during the grace period:
SAFEGUARD 1> LOGON support.jane
Password: alpha4
Password expired
Enter new password: BigTop
Reenter new password: BigTop
The password for support.jane has been changed.
Last Logon: 18 DEC 1994, 11:23
Last Unsuccessful Attempt: 18 Dec 1994, 11:20 Total Failures: 5
Good Morning. Welcome to \SFO
Similarly, support.jane could enter the new password and verification on the same line:
SAFEGUARD 1> LOGON support.jane
Password: alpha4
Password expired
Enter new password: BigTop,BigTop
The password for support.jane has been changed.
Last Logon: 18 DEC 1994, 11:23
Last Unsuccessful Attempt: 18 Dec 1994, 11:20 Total Failures: 5
Good Morning. Welcome to \SFO
Logging On With Displayable Passwords
In the standard Safeguard configuration, passwords are not accepted if entered on the
LOGON command line. If the Safeguard configuration has been changed so that
passwords are allowed on the LOGON command line, you can use the following
Safeguard User’s Guide — 422089-020
2-4
Changing Your Password With Displayable
Passwords
Safeguard Logon Dialog
procedure. With displayable passwords, you type your user name and password on the
same line, separated by a comma:
SAFEGUARD 1> LOGON support.jane,alpha4
*WARNING* Password Expires: 4 Jan 1995, 12:00
Last Logon: 18 DEC 1994, 11:23
Last Unsuccessful Attempt: 18 Dec 1994, 11:20 Total Failures: 5
Good Morning. Welcome to \SFO
Changing Your Password With Displayable Passwords
With displayable passwords, you can change your password by typing your user name,
current password, and new password on the same line:
SAFEGUARD 1> LOGON support.jane,alpha4,BigTop
The password for support.jane has been changed.
Last Logon: 18 DEC 1994, 11:23
Last Unsuccessful Attempt: 18 Dec 1994, 11:20 Total Failures: 5
Good Morning. Welcome to \SFO
Logging On With -STOP Option
The Safeguard LOGON program terminates after you log off. However, you can use
the -STOP option to terminate the LOGON program after the username and password
authentication is complete.
The following example shows how to use -STOP option:
SAFEGUARD 1> LOGON -STOP support.jane
Password: alpha4
*WARNING* Password Expires: 4 Jan 1995, 12:00
Last Logon: 18 DEC 1994, 11:23
Last Unsuccessful Attempt: 18 Dec 1994, 11:20 Total Failures: 5
Good Morning. Welcome to \SFO
If you enter an option other than -STOP, Safeguard issues the following message:
Error: BAD OPTION SPECIFIED
Note.
•
•
•
The -STOP option is not case-sensitive.
It is recommended that you avoid using the -STOP option when the Safeguard LOGON
program is launched through a command-line interpreter because stopping a LOGON
program causes more than one command-line interpreter to be active on a terminal. This
might generate an incorrect output for any command.
The -STOP option is supported only on systems running J06.09 and later J-series RVUs
and H06.20 and later H-series RVU.
Safeguard User’s Guide — 422089-020
2-5
Logging On to a Remote System
Safeguard Logon Dialog
Logging On to a Remote System
To access a remote system using the Safeguard logon dialog, you must use the
Safeguard LOGON program. To run this program, you must already be logged on to
your local system, and the Safeguard software must be running on the remote system.
The program initiates the logon prompt from the Safeguard software on the remote
system so that you can log on to that system from your local terminal.
The following example shows how to use the LOGON program to log on to the remote
system named \STL:
4> \STL.LOGON
SAFEGUARD 1>
When you receive the logon prompt, you log on in the usual manner. You can also use
the -STOP option, as described previously in this section.
Type your user name on the same line as the LOGON command. When you initiate the
remote logon in this manner, the Safeguard software responds by prompting you for
your password as in the normal logon dialog.
The following example shows the start of such a remote logon sequence:
4> \STL.LOGON -STOP support.jane
Password:
If the remote system is configured to allow displayable passwords, you can follow your
user name with a comma and your password:
4> \STL.LOGON support.jane,BigTop
You can also change your password during a remote logon in the same manner as you
do during a local logon.
To log on to a remote system, your user ID must have been added to the remote
system, and you must have remote passwords established to allow network access.
Your security administrator handles these functions.
Safeguard User’s Guide — 422089-020
2-6
3
Securing Disk Files
This section acquaints you with the process of securing disk files with the Safeguard
subsystem. When you secure a disk file, you can:
•
•
•
•
•
•
•
•
Specify an access control list and the associated access authorities
Temporarily freeze an access control list so users on the list cannot access the file
Thaw the access control list so users on the list can once again access the file
Specify auditing conditions for the file
Give control of the file to someone else (change or share ownership)
Retain an authorization record for a disk file if that file is purged
Set special security features for disk files that contain program object code
Erase the data stored in a disk file when the file is purged
Normally, the PURGE command releases the space allocated for the file but does
not erase the data.
You can also use diskfile patterns to secure disk files. For more information, see
Section 9, Working with Patterns.
Table 3-1 lists the SAFECOM disk-file commands. The examples in this section
illustrate the use of these commands. For the detailed syntax of the disk-file security
commands, see the Safeguard Reference Manual.
Table 3-1. Disk-File Commands (page 1 of 2)
Command
Action
ADD DISKFILE
Adds a disk file to the Safeguard database by creating an
authorization record for the file.
ALTER DISKFILE
Changes one or more of the security attributes in the disk-file
authorization record.
DELETE DISKFILE
Removes a disk file from the Safeguard database by deleting
the disk-file authorization record. The disk file is returned to
Guardian protection.
FREEZE DISKFILE
Suspends access authority to a disk file. No one except an
owner, the primary owner's group manager, and the super ID
can gain access to the frozen file.
INFO DISKFILE
Displays the security attributes of the disk-file authorization
record.
RESET DISKFILE
Resets one or more default disk-file attributes to values
predefined by the Safeguard software. Any subsequent ADD
DISKFILE commands use these predefined defaults for
attributes not specified in the ADD DISKFILE command.
Safeguard User’s Guide — 422089-020
3-1
Securing Disk Files
Table 3-1. Disk-File Commands (page 2 of 2)
Command
Action
SET DISKFILE
Establishes default disk-file attributes that you specify. Any
subsequent ADD DISKFILE commands use these defaults for
attributes not specified in the ADD DISKFILE command.
SHOW DISKFILE
Displays the current default attributes for disk files. Any
subsequent ADD DISKFILE commands use these defaults for
attributes not specified in the ADD DISKFILE command.
THAW DISKFILE
Restores disk-file access authorities for users on the access
control list.
Note. The disk-file commands can be entered with either DISKFILE or DISCFILE because
SAFECOM accepts either spelling. The examples in this book use DISKFILE.
Table 3-2 shows the disk-file security attributes you can control. This section describes
these attributes and explains how to set them using the commands listed in Table 3-1.
The audit attributes are explained in detail in the Safeguard Audit Service Manual.
You can abbreviate any SAFECOM command, attribute, or keyword. Usually, any such
reserved word can be abbreviated to its first three characters. Some abbreviations
must be more than three characters so that the Safeguard software can distinguish
between similar reserved words, such as DISKFILE and DISPLAY. The shortest
abbreviation allowed for DISKFILE is DISK. The shortest abbreviation for DISPLAY is
DISP. When a reserved word is hyphenated, do not omit any hyphens. Each
component of a hyphenated word must have at least its first three characters. The
shortest possible abbreviation for AUDIT-MANAGE-PASS is AUD-MAN-PAS.
Table 3-2. Disk-File Attributes (page 1 of 2)
Attribute
Function
OWNER
Transfers ownership or gives another user OWNER authority to
a file.
ACCESS
Grants users access authority to a file.
AUDIT-ACCESS-PASS
Specifies auditing of successful attempts to access a file.
AUDIT-ACCESS-FAIL
Specifies auditing of unsuccessful attempts to access a file.
AUDIT-MANAGE-PASS
Specifies auditing of successful attempts to change a file's
authorization record.
AUDIT-MANAGE-FAIL
Specifies auditing of unsuccessful attempts to change a file's
authorization record.
CLEARONPURGE
Specifies that null characters are to be written over the space
allocated to a purged file.
^
Supported only on systems running H06.11 and later H-series RVUs and G06.32 and later G-series RVUs.
^^
Supported only on systems running J06.05 and later J-series RVUs, H06.16 and later H-series RVUs, and
G06.32 and later G-series RVUs.
Safeguard User’s Guide — 422089-020
3-2
Getting Started
Securing Disk Files
Table 3-2. Disk-File Attributes (page 2 of 2)
Attribute
Function
PERSISTENT
Specifies that the authorization record for a file is to be retained
if the file is purged.
PROGID
Applicable only to files that contain object code; sets the
process access ID (PAID) to the user ID of the file's primary
owner.
TRUST
Specifies whether or not the file can be trusted to not access I/O
buffers during execution. Applies only to program files. Only the
super ID can set this attribute. This attribute is valid only on
systems running H-series RVUs.
LICENSE
Applicable only to files that contain privileged object code;
specifies that nonprivileged users can execute the code.
OBJECT-TEXTDESCRIPTION^^
Allows comments on authorization records to be associated with
objects.
PRIV-LOGON ^
Specifies whether the program file (object disk file) added in
Safeguard protection can request additional logon-related
sensitive features and whether delay should be imposed for
failed authentication attempts.
^
Supported only on systems running H06.11 and later H-series RVUs and G06.32 and later G-series RVUs.
^^
Supported only on systems running J06.05 and later J-series RVUs, H06.16 and later H-series RVUs, and
G06.32 and later G-series RVUs.
Getting Started
You must use SAFECOM, the Safeguard command interpreter, to enter commands. As
described in Section 7, Working With SAFECOM, you can choose different operating
modes and options when you run SAFECOM.
For simplicity, the examples in this section assume that you are running SAFECOM in
interactive mode. To start SAFECOM in interactive mode, type the following command
at the TACL prompt:
1> SAFECOM
In response to this command, SAFECOM displays its program banner and an equal
sign (=). The equal sign is the SAFECOM command prompt. It indicates SAFECOM is
ready to accept commands.
To end an interactive session, type EXIT at the SAFECOM command prompt.
Adding a Disk File to the Safeguard
Subsystem
You must own a disk file or be owner’s group manager or a super user to secure a disk
file with the Safeguard subsystem. The ADD DISKFILE command puts a file under
Safeguard User’s Guide — 422089-020
3-3
Adding a Disk File to the Safeguard Subsystem
Securing Disk Files
Safeguard control by creating an authorization record for the file. You can define the
security for a file by setting the file's attributes in the authorization record. One of these
attributes is the OWNER attribute. Unless you change the OWNER attribute, you are
the owner, and only you (or a privileged user, namely, owner’s group manager and
super user) can make changes to the authorization record. You can also specify
multiple owners by giving other users OWNER authority on an access control list entry.
Any user with OWNER authority (or a privileged user, namely, owner’s group manager
and super user) can change the authorization record for the file. For additional details,
see Specifying Ownership on page 3-16.
You can use diskfile patterns to add disk files to the Safeguard subsystem. For more
information, see Section 9, Working with Patterns.
The following exercise acquaints you with the process of adding a disk file to the
Safeguard database. The exercise assumes your user ID is 2,1, that you have a file
named report1, and that your default subvolume is $data.sales. The exercise further
assumes that you have started an interactive session by typing SAFECOM at the
TACL prompt.
Add the file named report1 to the Safeguard database using the following SAFECOM
command:
=ADD DISKFILE report1,OBJECT-TEXT-DESCRIPTION ‘‘Record created &
on April 04’’
This command creates an authorization record for report1 and associates the object
text description as comments of the authorization record. At this point, you can no
longer access the file because you have not specified an access control list. However,
because you are the file's owner, you can create an access control list that includes
your user ID. Only users specified on the access control list can access the file.
To see the authorization record for report1:
=INFO DISKFILE report1
The display shows:
$DATA.SALES
REPORT1
LAST-MODIFIED
OWNER
STATUS
WARNING-MODE
18JUL05, 11:00
2,1
THAWED
OFF
NO ACCESS CONTROL LIST DEFINED!
The INFO display tells you that no access control list is defined.
Specify a simple access control list that gives you all authorities:
=ALTER DISKFILE report1, ACCESS 2,1 *
The asterisk (*) specifies READ, WRITE, EXECUTE, PURGE, and OWNER authorities
for user ID 2,1. It does not grant CREATE authority for disk files. CREATE is a special
type of authority that you use in conjunction with the PERSISTENT attribute. For
details, see The PERSISTENT Attribute on page 3-18.
Safeguard User’s Guide — 422089-020
3-4
Controlling Default Attributes
Securing Disk Files
Once again, display the authorization record:
=INFO DISKFILE report1
The display shows:
$DATA.SALES
REPORT1
002,001
LAST-MODIFIED
OWNER
STATUS
18JUL05, 11:03
2,1
THAWED
WARNING-MODE
OFF
R,W,E,P, O
The file report1 is protected by the Safeguard software with a simple access control list
that consists of only your user ID. To modify or expand the access control list, see
Working With Access Control Lists on page 3-7.
Note. If you display the Guardian security string with the FUP INFO command or the TACL
FILEINFO command, the value of the RWEP field appears as four asterisks ("****") for the file
that is placed under Safeguard protection through the ADD DISKFILE command. But if the file
is placed under Safeguard control through the use of a DEFAULT-PROTECTION or
PERSISTENT PROTECTION record FUP INFO and FILEINFO will display Guardian security
string in the RWEP column though the file will be placed under Safeguard protection.
Controlling Default Attributes
When you add a file to the Safeguard database, any unspecified attributes take on the
default attributes for a disk file. As the previous examples showed, when report1 was
initially added to the Safeguard database, it did not have an access control list. This
occurred because the default disk-file attributes do not include an access control list.
To see the default values for disk files:
=SHOW DISKFILE
The display shows:
TYPE
DISKFILE
OWNER
2,1
WARNING-MODE
OFF
OBJECT-TEXT-DESCRIPTION =
AUDIT-ACCESS-PASS = NONE
AUDIT-ACCESS-FAIL = NONE
AUDIT-MANAGE-PASS = NONE
AUDIT-MANAGE-FAIL = NONE
AUDIT-PRIV-LOGON = OFF
LICENSE = OFF
TRUST = OFF
PROGID = OFF
CLEARONPURGE = OFF
PRIV-LOGON = OFF
PERSISTENT = OFF
NO ACCESS CONTROL LIST DEFINED!
Note. The attributes, AUDIT-PRIV-LOGON and PRIV-LOGON, are supported only on systems
running H06.11 and later H-series RVUs and G06.32 and later G-series RVUs. The OBJECTTEXT-DESCRIPTION attribute is supported only on systems running J06.05 and later J-series
RVUs and H06.16 and later H-series RVUs.
Safeguard User’s Guide — 422089-020
3-5
Controlling Default Attributes
Securing Disk Files
The display shows the default attributes for a disk file that are in effect when you start a
SAFECOM session. No access control list is defined.
You can change any of the default attributes at any time during the session, and the
changes remain in effect until you exit SAFECOM. The default attributes return to their
original state when you exit SAFECOM.
To change any of the default attributes, use the SET DISKFILE command. To set a
default access control list:
=SET DISKFILE ACCESS
2,1 (R,W,E,P) ; 2,* (R,E)
This access control list gives you READ, WRITE, EXECUTE, and PURGE authority
and gives all other users in group 2 READ and EXECUTE authority. Use the semicolon
(;) to separate access control list entries.
Enter:
=SHOW DISKFILE
The display shows:
TYPE
DISKFILE
OWNER
2,1
WARNING-MODE
OFF
OBJECT-TEXT-DESCRIPTION =
AUDIT-ACCESS-PASS = NONE
AUDIT-ACCESS-FAIL = NONE
AUDIT-MANAGE-PASS = NONE
AUDIT-MANAGE-FAIL = NONE
AUDIT-PRIV-LOGON = OFF
LICENSE = OFF
TRUST = OFF
002,001
002,*
PROGID = OFF
CLEARONPURGE = OFF
PRIV-LOGON = OFF
PERSISTENT = OFF
R,W,E,P
R, E
Note. The attributes, AUDIT-PRIV-LOGON and PRIV-LOGON, are supported only on systems
running H06.11 and later H-series RVUs and G06.32 and later G-series RVUs. The OBJECTTEXT-DESCRIPTION attribute is supported only on systems running J06.05 and later J-series
RVUs and H06.16 and later H-series RVUs.
The default attributes include an access control list. Any files you add to the Safeguard
database during this SAFECOM session will have this access control list unless you
specify otherwise. You can specify additional access control list entries when you add
files. See Working With Access Control Lists.
To reset the default attributes to the original Safeguard defaults:
=RESET DISKFILE
The default attributes also assume their original values when you start SAFECOM.
Safeguard User’s Guide — 422089-020
3-6
Working With Access Control Lists
Securing Disk Files
Working With Access Control Lists
You can define access control lists in three ways:
•
•
•
By setting a default access control list for a SAFECOM session (with the SET
DISKFILE command)
By specifying an access control list when you add the file to the Safeguard
database (with the ADD DISKFILE command)
By altering the authorization record (with the ALTER DISKFILE command)
In every case, the access control list for a disk file defines the users and user groups
who can access the file. Only the primary owner of the authorization record for a disk
file, the primary owner's group manager, the local super ID, and users with OWNER
authority on the access control list can modify the access control list. For more
information about ownership, see Specifying Ownership on page 3-16.
An access control list for a disk file can grant or deny any combination of the following
access authorities:
READ
The authority to read a disk file
WRITE
The authority to write to a disk file
EXECUTE
The authority to execute a program file as a process
PURGE
The authority to purge a disk file
CREATE
The authority to create a disk file
OWNER
The authority to change the authorization record for a disk file
Establishing a Default Access Control List
If you are adding several disk files to the Safeguard database during one SAFECOM
session, you might want to create a default access control list. Then, if you want to use
the same access control list for each file, you do not need to respecify it each time you
add a file to the Safeguard database.
To establish a default access control list, use the SET DISKFILE command. Consider
the following set of commands:
=RESET DISKFILE ACCESS
=SET DISKFILE ACCESS 2,1 (R,W,E,P)
=SET DISKFILE ACCESS 2,18 (R,W,E,P)
=SET DISKFILE ACCESS 2,* (R,W)
=SET DISKFILE ACCESS admin.* R ; admin.bill DENY R
Once again, assume you are user 2,1. The RESET command clears the current default
access control list. This preliminary step ensures that no default access control list
entries remain from previous SET DISKFILE commands. Then use SET commands to
establish a new default access list.
Safeguard User’s Guide — 422089-020
3-7
Specifying Access With the ADD DISKFILE
Command
Securing Disk Files
Parentheses enclose multiple access authorities in three of the commands. You can
include more than one access specification in a single SET command, as in the last
command, by separating the specifications with a semicolon.
There are two ways to specify users—by name or by number. In the last command, the
user name admin.bill corresponds to user ID 8,4. The DENY keyword in the last
command specifically denies admin.bill a certain access, in this case R, which is READ
access. A specific denial such as this takes precedence over the access granted to
admin.bill as a group member. All other members of the admin group retain READ
access.
Next, use the SHOW command to make sure that the default access list is correct:
=SHOW DISKFILE
The display shows:
TYPE
DISCFILE
OWNER
2,1
WARNING-MODE
OFF
OBJECT-TEXT-DESCRIPTION =
AUDIT-ACCESS-PASS = NONE
AUDIT-ACCESS-FAIL = NONE
AUDIT-MANAGE-PASS = NONE
AUDIT-MANAGE-FAIL = NONE
AUDIT-PRIV-LOGON = OFF
LICENSE = OFF
TRUST = OFF
PROGID = OFF
CLEARONPURGE = OFF
PRIV-LOGON = OFF
PERSISTENT = OFF
002,001
R,W,E,P
002,018
R,W,E,P
008,004 DENY R
002,*
R,W
008,*
R
Note. The attributes, AUDIT-PRIV-LOGON and PRIV-LOGON, are supported only on systems
running H06.11 and later H-series RVUs and G06.32 and later G-series RVUs. The OBJECTTEXT-DESCRIPTION attribute is supported only on systems running J06.05 and later J-series
RVUs and H06.16 and later H-series RVUs.
If you add files to the Safeguard database without specifying an access control list, the
files acquire the default access control list. The default access control list stays in
effect for the current SAFECOM session unless you change it.
Specifying Access With the ADD DISKFILE Command
If you specify access control list entries with the ADD DISKFILE command, those
entries plus the default entries make up the access control list for the added file.
Assume you want to use the default access control list for a file named quarter1 and
you also want to add user 4,12 with only READ access. If you have not exited
SAFECOM since the defaults were defined:
=ADD DISKFILE quarter1, ACCESS 4,12 R
Safeguard User’s Guide — 422089-020
3-8
Specifying Access With the ALTER DISKFILE
Command
Securing Disk Files
To see the settings for quarter1:
=INFO DISKFILE quarter1
The display shows:
$DATA.SALES
QUARTER1
LAST-MODIFIED
OWNER
STATUS
23JUL05, 15:00
2,1
THAWED
WARNING-MODE
OFF
002,001
R,W,E,P
002,018
R,W,E,P
004,012
R
008,004 DENY R
002,*
R,W
008,*
R
The access control list includes both the new entry with READ authority for user 4,12,
and the entries specified in the default access control list.
Specifying Access With the ALTER DISKFILE Command
You can use the ALTER DISKFILE command to add, delete, and change entries in an
access control list. To do so, specify the ACCESS attribute in the ALTER command.
For example, you can grant read, write, execute, and purge privileges to user
OAKLAND.ADMIN:
=ALTER DISKFILE $data.log02, ACCESS \OAKLAND.ADMIN (R,W,E,P)
After changing the access control list, make sure the modified access control list is
correct:
=INFO DISKFILE $data.log02
The display shows:
LAST-MODIFIED
$DATA.AUDIT5
LOG02
19SEP05, 15:11
TESTER.USER1
SECURITY.ADMIN
\TEST.PROD.OPER
\OAKLAND.ADMIN
DENY
R
R,W,E,P
R
R,W,E,P
OWNER
STATUS
SECURITY.ADMIN THAWED
WARNING-MODE
OFF
O
For example, you can grant user 9,23 both READ and WRITE authority to quarter1:
=ALTER DISKFILE quarter1, ACCESS 9,23 (R,W)
After changing the access control list, make sure the modified access control list is
correct:
=INFO DISKFILE quarter1
Safeguard User’s Guide — 422089-020
3-9
Specifying Access With the ALTER DISKFILE
Command
Securing Disk Files
The display shows:
$DATA.SALES
QUARTER1
LAST-MODIFIED
OWNER
STATUS
23JUL05, 15:08
2,1
THAWED
WARNING-MODE
OFF
002,001
R,W,E,P
002,018
R,W,E,P
004,012
R
008,004 DENY R
009,023
R,W
002,*
R,W
008,*
R
An entry for user ID 9,23 has been added.
When you specify a new access control list entry, that entry does not replace the
existing entries. It is added to them. Similarly, if you specify an access authority for a
user ID that is already on the list, the new authority is added to the entry for that user
ID. The new authority does not replace the existing authorities.
You can also use the ALTER DISKFILE command to deny access authorities to users
already on the access control list. For example, as a member of group 2, user 2,6 has
READ and WRITE authority to the file quarter1. Suppose you want to limit this user's
authority to READ only. To deny the user's WRITE authority:
=ALT DISK quarter1, ACCESS 2,6 DENY W
To verify the denial:
=INFO DISKFILE quarter1
The display shows:
$DATA.SALES
QUARTER1
LAST-MODIFIED
OWNER
STATUS
WARNING-MODE
23JUL05, 15:15
2,1
THAWED
OFF
002,001
R,W,E,P
002,006 DENY W
002,018
R,W,E,P
004,012
R
008,004 DENY R
009,023
R,W
002,*
R,W
008,*
R
User ID 2,6 has been denied WRITE authority.
Assume you want to use the default PROCESS-ACCESS control list for a file named
TEST and you also want to add user 2,1 with only execute process-access
=ALTER DISKFILE TEST,PROCESS-ACCESS 2,1 E
To see the settings for TEST.
=INFO DISKFILE TEST
Safeguard User’s Guide — 422089-020
3 - 10
Deleting an Access Control List Entry
Securing Disk Files
The display shows:
LAST-MODIFIED
OWNER
STATUS
WARNING-MODE
14JUL11, 17:34
255,255
THAWED
OFF
$SYSTEM.SFGD TEST
NO ACCESS CONTROL LIST DEFINED!
PROCESS-ACCESS LIST =
2,1
E
.
Note. A denial of authorities for a user takes away only those authorities specifically denied.
Any other authorities granted to that user or that user's group are still valid for the user.
A grant of authorities for a specific user is not cumulative even if that user's group also
appears on the access control list. Furthermore, the authorities required for any
specific transaction must appear in a single entry on the access control list.
For instance, assume that user 2,5 has only READ access to a file and that group 2,*
has WRITE access to the file. In this case, user 2,5 could either read the file or write to
it but could not perform an operation such as editing that requires both READ and
WRITE access.
You can specify up to 50 access control list entries. To remove an access authority
from an entry, use the minus sign (-), as described in the next subsection.
Deleting an Access Control List Entry
You can revoke access authorities previously granted to a user or group of users by
using a minus sign (-). If you revoke all authorities granted to a user or group of users,
the access control list entry is deleted.
For example, suppose you no longer want user ID 9,23, to have access to quarter1. To
remove the entry on the access control list:
=ALTER DISKFILE quarter1, ACCESS 9,23 - (R,W)
Because you removed all the authorities granted to user 9,23 the entry is deleted. To
display the modified access control list:
=INFO DISK quarter1
$DATA.SALES
QUARTER1
LAST-MODIFIED
OWNER
STATUS
23JUL05, 15:15
2,1
THAWED
002,001
R,W,E,P
002,006 DENY W
002,018
R,W,E,P
004,012
R
008,004 DENY R
002,*
R,W
008,*
R
Safeguard User’s Guide — 422089-020
3 - 11
WARNING-MODE
OFF
Granting or Denying Access to an ACL
Securing Disk Files
The entry for user ID 9, 23 has been removed from the access control list.
Note. If you are attempting to remove a deleted user from an access control list, you must
specify the user ID, not the user name. A deleted user is one whose user authentication
record has been deleted from the Safeguard database.
Granting or Denying Access to an ACL
You can grant or deny access to entries in an ACL.
Granting Access
The rules for granting access are:
•
•
A local super ID is granted all access to a Safeguard object, unless specifically
denied.
The primary owner of a Safeguard object is granted owner access (“O”), unless
specifically denied.
Note. This rule does not apply to remote access.
•
•
Except for the above two rules, any form of access is denied unless an ACL
specifically grants it.
Attempts to open a file for read/write access are not granted unless both accesses
are granted on the same ACL entry. For example, consider that the following ACL
is protecting a file:
001,255
R
*.*
W
If user ID 1, 255 attempts to open the file for read/write access, the open will be
rejected with error 48.
The read and write access authorities must be listed in a single access entry for
read/write access to be granted.
Denying Access
You can deny access to ACLs using the DENY clause to:
•
•
Counteract cases where Safeguard grants access by default.
Address situations where a group is allowed access, but certain individual
members are denied access.
The following examples illustrate different scenarios in which the DENY clause is used.
Safeguard User’s Guide — 422089-020
3 - 12
Using One Authorization Record to Define Another
Securing Disk Files
Example 1:
DENY
040,002
R
040,004
R
040,006
R
040,*
R
In this example, the owner of the object wants to allow read access to only specific
users in group 40. However, the DENY statement overrides the other ACLs.
Example 2:
DENY
040,002
R
DENY
040,004
R
DENY
040,006
R
040,*
R
In this example, read access is granted to all group 40 users except those specified in
the DENY statements. An alternative method is to grant access to specific
users in group 40.
Example 3:
DENY
DENY
030,030
O
200,200
R,O
255,255
*
(owner is 030,030)
In this example, the DENY clause is used to deny access to the super ID (255, 255)
and to the owner (030, 030).
Note. In this example, user (200,200) has owner (O) access and can change the record.
Using One Authorization Record to Define Another
Managing long access control lists can be time consuming. To save time, you can use
an existing disk file authorization record to define another when you are adding a new
disk file. Use the keyword LIKE. You can use this keyword with the ADD DISKFILE or
SET DISKFILE command to specify the attributes and access control list of one file as
the base authorization record of another file.
Safeguard User’s Guide — 422089-020
3 - 13
Freezing and Thawing an Access Control List
Securing Disk Files
For example, suppose you want to use the same authorization record you defined for
quarter1 for another disk file called quarter2. To add quarter2 to the Safeguard
database, using the same security attributes and access control list as quarter1:
=ADD DISK quarter2, LIKE quarter1
Note. The LIKE keyword sets all the security attributes of one file (not just the access control
list) to those of another file. LIKE sets all the attributes listed in Table 3-2, but it does not alter
the THAWED or FROZEN status of the file being added or altered.
You can also use LIKE with the ALTER DISKFILE command. However, with the ALTER
DISKFILE command, the access control list designated by LIKE does not replace the
existing access control list. The new list is added to the existing access control list.
LIKE does replace the other security attributes, such as auditing specifications,
CLEARONPURGE, and LICENSE.
Freezing and Thawing an Access Control List
The FREEZE DISKFILE command temporarily suspends the access control list for a
disk file. Only the primary owner (specified by the OWNER attribute), the primary
owner's group manager, the local super ID, and the users with OWNER authority on
the access control list can freeze or thaw an access control list. Also, only these users
can access the file while the access control list is frozen. No other users can read the
file, change it, execute it (if it is a program object file), or purge it.
For example, because you own quarter1, you can freeze access to the file with this
command:
=FREEZE DISKFILE quarter1
Use the INFO DISKFILE command to verify that the access control list is frozen:
=INFO DISK quarter1
$DATA.SALES
QUARTER1
LAST-MODIFIED
OWNER
STATUS
WARNING-MODE
23JUL05, 15:25
2,1
FROZEN
OFF
002,001
R,W,E,P
002,006 DENY W
002,018
R,W,E,P
004,012
R
008,004 DENY R
002,*
R,W
008,*
R
Note. Freezing an access control list has no effect on processes that already have the file
open.
To restore a frozen access control list, use the THAW DISKFILE command. Any user
who can freeze an access control list can also thaw it.
Safeguard User’s Guide — 422089-020
3 - 14
Specifying Auditing Conditions
Securing Disk Files
For example, the owner of the disk file (user ID 2,1) can restore the access control list
for quarter1 by entering:
=THAW DISKFILE quarter1
The STATUS field of the INFO display shows that the access control list is thawed:
=INFO DISKFILE quarter1
$DATA.SALES
QUARTER1
LAST-MODIFIED
OWNER
STATUS
WARNING-MODE
23JUL05, 15:33
2,1
THAWED
OFF
002,001
R,W,E,P
002,006 DENY
W
002,018
R,W,E,P
004,012
R
008,004 DENY R
002,*
R,W
008,*
R
Specifying Auditing Conditions
The Safeguard subsystem provides facilities for auditing attempts to access a disk file
or its corresponding authorization record. For detailed information on auditing, see the
Safeguard Audit Service Manual.
You can specify four auditing attributes in a disk-file authorization record. They are:
•
•
•
•
AUDIT-ACCESS-PASS
AUDIT-ACCESS-FAIL
AUDIT-MANAGE-PASS
AUDIT-MANAGE-FAIL
You can set these attributes to ALL, LOCAL, REMOTE, or NONE. The default value for
the auditing attributes is NONE, which indicates no auditing.
As with other security attributes, you can specify auditing conditions with the ADD
DISKFILE, ALTER DISKFILE, or SET DISKFILE commands.
The attribute, AUDIT-PRIV-LOGON can also be specified in a disk-file authorization
record.
The following command causes the Safeguard software to audit all unsuccessful
remote attempts to access quarter1:
=ALTER DISKFILE quarter1, AUDIT-ACCESS-FAIL REMOTE
Similarly, the following command specifies auditing of all unsuccessful attempts (local
and remote) to manage the authorization record for the file quarter1:
=ALT DISK quarter1, AUDIT-MANAGE-FAIL ALL
Safeguard User’s Guide — 422089-020
3 - 15
Specifying Ownership
Securing Disk Files
To display the audit settings for quarter1:
=INFO DISKFILE quarter1, DETAIL
The DETAIL option shows an expanded version of the INFO display:
$DATA.SALES
QUARTER1
LAST-MODIFIED
OWNER
STATUS
WARNING-MODE
23JUL05, 15:38
2,1
THAWED
OFF
002,001
R,W,E,P
002,006 DENY
W
002,018
R,W,E,P
004,012
R
008,004 DENY R
002,*
R,W
008,*
R
OBJECT-TEXT-DESCRIPTION =
AUDIT-ACCESS-PASS = NONE
AUDIT-ACCESS-FAIL = REMOTE
AUDIT-MANAGE-PASS = NONE
AUDIT-MANAGE-FAIL = ALL
AUDIT-PRIV-LOGON = OFF
LICENSE = OFF
TRUST = OFF
PROGID = OFF
CLEARONPURGE = OFF PERSISTENT = OFF
PRIV-LOGON = OFF
Note. The attributes, AUDIT-PRIV-LOGON and PRIV-LOGON, are supported only on systems
running H06.11 and later H-series RVUs and G06.32 and later G-series RVUs. The OBJECTTEXT-DESCRIPTION attribute is supported only on systems running J06.05 and later J-series
RVUs and H06.16 and later H-series RVUs.
AUDIT-ACCESS-PASS is set to REMOTE, and AUDIT-MANAGE-PASS is set to ALL.
Specifying Ownership
Normally, when you add a disk file to the Safeguard database, you must be the
Guardian owner of the file. Unless you specify otherwise, the Safeguard subsystem
recognizes you as the owner of the authorization record for the file (your user ID is
specified for the OWNER attribute). Your group manager or the super ID can be the
owner of the authorization record if either of them adds one of your files to the
Safeguard database.
Ownership allows you to change the authorization record. In fact, you can even change
the OWNER attribute of the authorization record, thereby giving control of the file to
someone else.
You can specify ownership in two ways: with the OWNER attribute or with OWNER
authority in an access control list. You can use OWNER authority to establish multiple
owners. Both forms of ownership provide the ability to change the authorization record.
However, if the disk file is removed from the Safeguard database, the primary owner
(specified by the OWNER attribute) becomes the Guardian owner. Also, only the
primary owner can set the PROGID attribute to protect program code. See The
PROGID Attribute on page 3-20.
Safeguard User’s Guide — 422089-020
3 - 16
Other Disk-File Security Features
Securing Disk Files
In the previous examples in this section, you are the only owner of quarter1. Assume
you want user ID 2,18 to own quarter1 also. You could change the OWNER attribute,
but then you would no longer own the file. Instead, you might want to grant user ID
2,18 OWNER authority in an access control list.
To give user ID 2,18 OWNER authority:
=ALTER DISK quarter1, ACC 2,18 O
The INFO display now shows an O in the entry for user ID 2,18:
=INFO DISK quarter1, DETAIL
$DATA.SALES
QUARTER1
LAST-MODIFIED
OWNER
STATUS
23JAN05, 15:43
2,1
THAWED
002,001
R,W,E,P
002,006 DENY
W
002,018
R,W,E,P,
004,012
R
008,004 DENY R
002,*
R,W
008,*
R
WARNING-MODE
OFF
O
OBJECT-TEXT-DESCRIPTION =
AUDIT-PRIV-LOGON = OFF
AUDIT-ACCESS-PASS = NONE
AUDIT-ACCESS-FAIL = REMOTE
LICENSE = OFF
TRUST = OFF
PROGID = OFF
AUDIT-MANAGE-PASS = NONE
AUDIT-MANAGE-FAIL = ALL
CLEARONPURGE = OFF PERSISTENT = OFF
PRIV-LOGON = OFF
Note. The attributes, AUDIT-PRIV-LOGON and PRIV-LOGON, are supported only on systems
running H06.11 and later H-series RVUs and G06.32 and later G-series RVUs. The OBJECTTEXT-DESCRIPTION attribute is supported only on systems running J06.05 and later J-series
RVUs and H06.16 and later H-series RVUs.
Other Disk-File Security Features
The Safeguard subsystem provides five special attributes for disk files:
CLEARONPURGE, PERSISTENT, LICENSE, PROGID, and, in H-series RVUs only,
TRUST. Like other security attributes, these attributes can be specified with the ADD
DISKFILE, ALTER DISKFILE, or SET DISKFILE commands.
The CLEARONPURGE Attribute
Normally, a disk process purges a disk file by removing the file entry from the volume
directory, thereby releasing the space occupied by the file. However, the data is not
physically erased from the disk and is vulnerable to intruders until it is overwritten by
another file. If you purge a file with CLEARONPURGE ON, however, the disk process
writes null characters over all space allocated to the file.
Safeguard User’s Guide — 422089-020
3 - 17
The PERSISTENT Attribute
Securing Disk Files
To set the CLEARONPURGE attribute for the file quarter1, used in the previous
examples:
=ALTER DISKFILE quarter1, CLEARONPURGE ON
To verify that the CLEARONPURGE attribute is on:
=INFO DISKFILE quarter1, DETAIL
$DATA.SALES
QUARTER1
LAST-MODIFIED
OWNER
STATUS
WARNING-MODE
23JUL05, 15:48
2,1
THAWED
OFF
002,001
R,W,E,P
002,006 DENY
W
002,018
R,W,E,P,
004,012
R
008,004 DENY R
002,*
R,W
008,*
R
O
OBJECT-TEXT-DESCRIPTION =
AUDIT-PRIV-LOGON = OFF
AUDIT-ACCESS-PASS = NONE
AUDIT-ACCESS-FAIL = REMOTE
LICENSE = OFF
TRUST = OFF
PROGID = OFF
AUDIT-MANAGE-PASS = NONE
AUDIT-MANAGE-FAIL = ALL
CLEARONPURGE = ON
PRIV-LOGON = OFF
PERSISTENT = OFF
Note. The attributes, AUDIT-PRIV-LOGON and PRIV-LOGON, are supported only on systems
running H06.11 and later H-series RVUs and G06.32 and later G-series RVUs. The OBJECTTEXT-DESCRIPTION attribute is supported only on systems running J06.05 and later J-series
RVUs and H06.16 and later H-series RVUs.
The PERSISTENT Attribute
The PERSISTENT attribute causes the disk file authorization record to be retained
even if the file itself is purged. That is, if you purge a file with PERSISTENT ON and
later create a file with that name, the new file assumes the authorization record
associated with the old file.
For example, to set the PERSISTENT attribute to ON and give user 2,18 CREATE
authority for the file quarter1:
=ALTER DISK quarter1, ACCESS 2,18 C, PERSISTENT ON
Safeguard User’s Guide — 422089-020
3 - 18
The LICENSE Attribute
Securing Disk Files
To verify the setting:
=INFO DISKFILE quarter1, DETAIL
$DATA.SALES
QUARTER1
LAST-MODIFIED
OWNER
STATUS
23JUL05, 15:48
2,1
THAWED
WARNING-MODE
OFF
002,001
R,W,E,P
002,006 DENY
W
002,018
R,W,E,P,C,O
004,012
R
008,004 DENY R
002,*
R,W
008,*
R
OBJECT-TEXT-DESCRIPTION =
AUDIT-PRIV-LOGON = OFF
AUDIT-ACCESS-PASS = NONE
AUDIT-ACCESS-FAIL = REMOTE
LICENSE = OFF
TRUST = OFF
PROGID = OFF
AUDIT-MANAGE-PASS = NONE
AUDIT-MANAGE-FAIL = ALL
CLEARONPURGE = ON PERSISTENT = ON
PRIV-LOGON = OFF
Note. The attributes, AUDIT-PRIV-LOGON and PRIV-LOGON, are supported only on systems
running H06.11 and later H-series RVUs and G06.32 and later G-series RVUs. The OBJECTTEXT-DESCRIPTION attribute is supported only on systems running J06.05 and later J-series
RVUs and H06.16 and later H-series RVUs.
The PERSISTENT attribute is set to ON, and user 2,18 can create this file with the
same access control list if it is purged.
Note. If a file with persistent protection is purged, the PROGID and LICENSE attributes are
set to OFF.
The PERSISTENT attribute is associated with a file name. Because of this, persistent
protection is lost when you rename a file. The persistent protection record remains
associated with the original file name, which refers to a file that no longer exists.
The LICENSE Attribute
The LICENSE attribute applies only to disk files that contain object code.
Normally, only the super ID can run programs containing privileged code. By setting
the LICENSE attribute to ON, the super ID can license a file containing privileged code
so other users can run it. Only the super ID can license a file, but any owner of the file
can revoke the license.
You can use the special WHERE LICENSE option with most disk file commands to
select only licensed files. For example, the following command lists licensed files on
$DATA:
=INFO DISKFILE $data.*.*, WHERE LICENSE
Safeguard User’s Guide — 422089-020
3 - 19
The PROGID Attribute
Securing Disk Files
You can also use the WHERE LICENSE option with the ALTER, DELETE, FREEZE,
and THAW commands.
The PROGID Attribute
The PROGID attribute applies only to disk files that contain object code.
The PROGID attribute is used to determine the process access ID (PAID) when a
program file is run as a process. When PROGID is set to ON, the PAID is set to the
user ID of the primary owner of the program file, thereby giving the program all the
privileges associated with the primary owner's ID. Only the primary owner can set
PROGID to ON. When PROGID is set to OFF, the PAID is set to the user ID of the user
running the program.
If the primary owner of a file is changed, PROGID is automatically set to OFF.
Assume that you have a program file called progfile, which is already protected by the
Safeguard software. As the primary owner, you issue the following command to set the
PROGID attribute to ON:
=ALTER DISKFILE progfile, PROGID ON
To verify the setting:
=INFO DISK progfile, DET
$DATA.SALES
PROGFILE
005,005
004,*
005,*
LAST-MODIFIED
OWNER
STATUS
WARNING-MODE
24JUL05, 11:38
5,5
THAWED
OFF
R,W,E,P
R,E
R,W
OBJECT-TEXT-DESCRIPTION=
AUDIT-PRIV-LOGON = OFF
AUDIT-ACCESS-PASS = NONE
AUDIT-ACCESS-FAIL = NONE
LICENSE = OFF
TRUST = OFF
PROGID = ON
AUDIT-MANAGE-PASS = NONE
AUDIT-MANAGE-FAIL = NONE
CLEARONPURGE = OFF PERSISTENT = OFF
PRIV-LOGON = OFF
Note. The attributes, AUDIT-PRIV-LOGON and PRIV-LOGON, are supported only on systems
running H06.11 and later H-series RVUs and G06.32 and later G-series RVUs.The attribute,
OBJECT-TEXT-DESCRIPTION is supported only on systems running J06.05 and later J-series
RVUs and H06.15 and later H-series RVUs.
You can use the special WHERE PROGID option with most disk file commands to
select only PROGID files. For example, the following command lists PROGID files on
$DATA:
=INFO DISKFILE $data.*.*, WHERE PROGID
You can also use the WHERE PROGID option with the ALTER, DELETE, FREEZE,
and THAW commands.
Safeguard User’s Guide — 422089-020
3 - 20
The TRUST Attribute
Securing Disk Files
The TRUST Attribute
The TRUST attribute enables the operating system to optimize I/O performance and
applies only to object files. It is available only in H-series RVUs and can be set only by
the super ID.
On systems running H-series RVUs, these two types of user I/O buffer access should
not be performed:
•
•
Reading from a nowaited I/O buffer that has an ongoing read operation
Writing to an I/O buffer that has any type of ongoing operation
These actions are detected and prevented by the operating system. The prevention
mechanism detects the access, suspends the process until the I/O operation has
completed, and then resumes the process. This suspend/resume behavior can
significantly affect process performance.
The TRUST attribute informs the operating system that the process can be “trusted”
not to access I/O buffers in the preceding manner. The system will bypass the
checking behavior, thus improving performance.
The TRUST attribute has three settings:
•
•
•
TRUST OFF specifies that the program is not to be trusted. The initial value of the
TRUST attribute is OFF.
TRUST ME specifies that the program can be trusted not to access I/O buffers
private to the process before I/O completion.
TRUST SHARED specifies that the program can be trusted not to access buffers
private to the process, or shared with another process that also has TRUST
SHARED set, before I/O completion.
To set the TRUST attribute of the program file progfile used in the previous example:
=ALTER DISKFILE progfile, TRUST SHARED
Safeguard User’s Guide — 422089-020
3 - 21
The PRIV-LOGON { ON | OFF} Attribute
Securing Disk Files
To verify the setting:
=INFO DISK progfile, DET
$DATA.SALES
PROGFILE
005,005
004,*
005,*
LAST-MODIFIED
OWNER
STATUS
WARNING-MODE
24JUL05, 11:38
5,5
THAWED
OFF
R,W,E,P
R,E
R,W
OBJECT-TEXT-DESCRIPTION =
AUDIT-PRIV-LOGON = OFF
AUDIT-ACCESS-PASS = NONE
AUDIT-ACCESS-FAIL = NONE
LICENSE = OFF PROGID = ON
TRUST = SHARED
AUDIT-MANAGE-PASS = NONE
AUDIT-MANAGE-FAIL = NONE
CLEARONPURGE = OFF PERSISTENT = OFF
PRIV-LOGON = OFF
Note. The attributes, AUDIT-PRIV-LOGON and PRIV-LOGON, are supported only on systems
running H06.11 and later H-series RVUs and G06.32 and later G-series RVUs. The OBJECTTEXT-DESCRIPTION attribute is supported only on systems running J06.05 and later J-series
RVUs and H06.16 and later H-series RVUs.
The PRIV-LOGON { ON | OFF} Attribute
The PRIV-LOGON { ON | OFF } attribute specifies whether the programfile (object disk
file) can request additional logon-related sensitive features and impose a delay for
failed authentication attempts.
The initial value is OFF.
PRIV-LOGON may also be used in the WHERE expression of a command to restrict
the scope of that command to files with PRIV-LOGON ON.
Note. This attribute is supported only on systems running H06.11 and later H-series RVUs.
Removing a File From Safeguard Control
The DELETE DISKFILE command removes a file from the Safeguard database by
deleting the authorization record for the file. DELETE DISKFILE does not purge the file
itself.
When you remove a file from the Safeguard database, the file is no longer subject to
Safeguard authorization checks and auditing. The file is returned to Guardian security,
and it receives the security settings it had before being added to the Safeguard
database. Only the primary owner of a file, the primary owner's group manager, the
super ID, and users with OWNER authority on the access control list can use DELETE
DISKFILE to remove a file from Safeguard protection.
Safeguard User’s Guide — 422089-020
3 - 22
Removing a File From Safeguard Control
Securing Disk Files
When a file is removed from the Safeguard database, the user specified by the
OWNER attribute becomes the Guardian owner. Users who had OWNER authority on
the access control list no longer own the file.
Removing a disk file from the Safeguard database does not change the setting of the
CLEARONPURGE, LICENSE, or PROGID attributes. These settings remain in effect
with Guardian security.
You can remove more than one file at a time from the Safeguard database. For
example, to remove the files report1 and quarter1 from the Safeguard database:
DELETE DISKFILE (report1, quarter1)
The Safeguard software sends a message informing you that the files are returned to
Guardian protection.
Safeguard User’s Guide — 422089-020
3 - 23
Securing Disk Files
Removing a File From Safeguard Control
Safeguard User’s Guide — 422089-020
3 - 24
4
Securing Subvolumes
The Safeguard subsystem allows you to secure disk subvolumes in generally the same
manner as you secure disk files. The same principles apply when you add, change, or
delete authorization records for subvolumes. You use the same basic set of
commands—ADD, ALTER, DELETE, FREEZE, INFO, RESET, SET, SHOW, and
THAW. For example, to add a subvolume to the Safeguard database, use the ADD
SUBVOLUME command.
You can also use the same security attributes to specify auditing for subvolumes.
Additionally, you can freeze and thaw an access control list for a subvolume.
Any user can add a subvolume authorization record. However, to manage the record,
the user must be the owner of the record, or the owner’s group manager, or have a
super ID. The authority to add and manage subvolumes can be restricted with the
appropriate OBJECTTYPE authorization, as described in the Safeguard
Administrator's Manual.
The security attributes and access authorities for subvolumes are the same as those
for disk files. You can also use LIKE, DENY, and the minus sign (-) to control attributes
of subvolumes in the same manner you use them with disk files.
As with disk files, you can transfer ownership of a subvolume by changing the OWNER
attribute. You can also designate additional owners by specifying OWNER authority in
an access control list. Both forms of ownership allow you to modify the authorization
record for the subvolume.
You can also use diskfile patterns to secure subvolumes. For more information, see
Section 9, Working with Patterns.
General Procedure for Protecting a Subvolume
As with other objects, the general procedure for protecting a subvolume with the
Safeguard software is:
1. Establish default attributes using the SET SUBVOLUME or RESET SUBVOLUME
commands.
2. Verify the default settings with the SHOW SUBVOLUME command.
3. Add the subvolume to the Safeguard database with the ADD SUBVOLUME
command. Doing this creates an authorization record for the subvolume.
4. Verify the attributes in the authorization record with the INFO SUBVOLUME
command.
5. Make any necessary changes to the authorization record with the ALTER
SUBVOLUME command.
Safeguard User’s Guide — 422089-020
4-1
Access Authorities for Subvolumes
Securing Subvolumes
Access Authorities for Subvolumes
By default, anyone can protect a subvolume by adding it to the Safeguard database
and specifying the access authorities for the subvolume. The valid access authorities
for a subvolume are:
READ
The authority to read disk files on a protected subvolume
WRITE
The authority to write to disk files on a protected subvolume
EXECUTE
The authority to execute program files on a protected subvolume
PURGE
The authority to purge disk files on a protected subvolume
CREATE
The authority to create disk files on a protected subvolume
OWNER
The authority to change the authorization record for a subvolume
Commands Used With Subvolumes
All the Safeguard commands described for disk files in Section 3, Securing Disk Files,
are also valid for subvolumes. You can add, alter, delete, and freeze or thaw a
subvolume just as you do a disk file. You can also display and change the defaults for
subvolumes.
For example, the following command adds an authorization record for the subvolume
xdata, allows to enter OBJECT-TEXT-DESCRIPTION, gives CREATE authority to
group number 24, and gives ownership of the SUBVOLUME authorization record to
user 24,9:
=ADD SUBVOLUME xdata, OBJECT-TEXT-DESCRIPTION ‘‘Record created &
on April 04’’, OWNER 24,9, ACCESS 24,* C
The Safeguard software always checks subvolumes for CREATE authority, but it must
be configured to check for the other ACCESS authorities at the subvolume level. For
example, if you have created an authorization record for a subvolume that restricts
certain users from purging files on that subvolume, those users are still allowed to
purge files unless the Safeguard software has been configured to check access control
lists at the subvolume level.
Your system administrator is responsible for configuring the Safeguard software, as
described in the Safeguard Administrator's Manual.
You can also specify auditing for a subvolume in the same manner as you do for a disk
file. For example, this command causes all successful attempts to access the
subvolume xdata to be audited:
=ALTER SUBVOL xdata, AUDIT-ACCESS-PASS ALL
Safeguard User’s Guide — 422089-020
4-2
5
Securing Processes and
Subprocesses
You secure processes and subprocesses in generally the same manner as disk files
and subvolumes. You use the same set of commands: ADD, ALTER, DELETE,
FREEZE, INFO, RESET, SET, SHOW, and THAW. Also, except for EXECUTE
authority, the same access authorities—READ, WRITE, PURGE, CREATE, and
OWNER—apply to individual processes and subprocesses. There is no EXECUTE
authority for processes and subprocesses.
You can also use the same security attributes to specify auditing for processes and
subprocesses. Additionally, you can freeze and thaw an access control list for a
process or subprocess.
For additional information about protecting processes and subprocesses, refer to the
Safeguard Reference Manual.
Protection of Process and Subprocess Names
Until a process name is added to the Safeguard database, any user can create a
process with that name and access a process running with that name. Unless your
security administrator has restricted process protection, any user can add a process or
subprocess name to the Safeguard database and create an access control list for it.
An access control list for a process or subprocess name grants users (and processes
running on behalf of those users) any combination of the following access authorities:
READ
The authority to open a process or subprocess with a protected name for input
operations.
WRITE
The authority to open a process or subprocess with a protected name for output
operations.
CREATE
The authority to create a process with a protected name. (A user must also
have EXECUTE authority for the program object disk file.) CREATE authority
does not apply to subprocesses.
PURGE
The authority to stop a process with a protected name. PURGE authority does
not apply to subprocesses.
OWNER
The authority to change the authorization record for the process or subprocess.
The following command creates an authorization record for the process name $add,
associates the object text description as comments of the authorization record, gives
READ and WRITE authority to all members of group 33, and gives all authorities to
user ID 33,12:
=ADD PROCESS $add, OBJECT-TEXT-DESCRIPTION ‘‘Record created’’,
ACCESS 33,* (R,W); 33,12 *
Safeguard User’s Guide — 422089-020
5-1
Securing Processes and Subprocesses
Protecting Processes
Protecting Processes
Process descriptors contain a sequence number. Because this sequence number is
not part of SAFECOM syntax, do not include it when protecting process names with
the Safeguard subsystem.
Upon creation of a process, you have the option of naming the process. You can either
name the process yourself or allow the system to generate a name. However, to
enable protection of a process, you should name the process yourself and create a
protection record for that name.
Safeguard User’s Guide — 422089-020
5-2
6
Obtaining User and Alias
Information
As a general user, you can obtain security information about your disk files,
subvolumes, and processes, as well as information about your own user authentication
record. As discussed in previous sections of this manual, you use the SHOW
command to display default security attributes for a session and the INFO command to
display current security attributes for an existing file, subvolume, or process.
This section introduces the INFO USER command, which allows you to view the
security attributes in your user authentication record. You can examine these
attributes, but you cannot change them. Because your user authentication record is
owned by a privileged user, only that individual can change the security attributes.
If any aliases have been defined for your ID, you can also use the INFO ALIAS
command to display the attributes of an alias authentication record.
About Your User Authentication Record
Your user authentication record contains important information about the status of your
password and your user ID. With the INFO USER command, you can display the
attributes of your user authentication record and determine:
•
The primary and secondary owners of the record.
Note. The secondary owner attribute is supported only on systems running G06.27 and
later G-series RVUs and H06.07 and later H-series RVUs.
•
•
•
•
•
•
•
•
•
•
•
The expiration date, if any, for your user ID.
How often you must change your password.
The expiration date, if any, for your password.
The date when you are allowed to change your password.
If you have a grace period for changing your password after expiration.
Your Guardian default subvolume.
The Guardian default security string for disk files that you create.
The file-sharing groups to which you belong.
If any aliases are defined for your user ID.
If Safeguard default protection is defined for disk files that you create.
The last logon time. If this time is not consistent with the last time you logged on,
someone else might have learned your password and logged on with your user ID.
Safeguard User’s Guide — 422089-020
6-1
Obtaining User and Alias Information
•
Viewing Your User Authentication Record
CREATION-TIME of the user.
Note. The CREATION-TIME attribute is supported only on systems running J06.04 and
later J-series RVUs, H06.15 and later H-series RVUs and G06.32 and later G-series
RVUs.
•
Creator details specifying name, type, user ID, and node number where user was
created.
Note. This information is supported only on systems running J06.04 and later J-series
RVUs, H06.15 and later H-series RVUs, and G06.32 and later G-series RVUs.
The user authentication record also contains information that is of primary interest to
your security administrator or the owner of your authentication record.
The INFO USER command has several display options. The DETAIL option used in
the following example selects all of the attributes. You can use other options to select
specific portions of the record. For example, you can use the AUDIT option to select
the audit attributes. For information on other INFO USER display options, see the
Safeguard Reference Manual.
Viewing Your User Authentication Record
The following command produces a display of your user authentication record. It
assumes that your user ID is 8,54 and that you are using SAFECOM in execute-andquit mode. Use the DETAIL option of the INFO USER command to view your record:
Safeguard User’s Guide — 422089-020
6-2
Viewing Your User Authentication Record
Obtaining User and Alias Information
1> SAFECOM INFO USER 8,54, DETAIL
GROUP.USER
STATUS
ACCTS.JOAN
THAWED
USER-ID
OWNER
8,54
8,255
LAST-MODIFIED
23JUN05,
UID
USER-EXPIRES
PASSWORD-EXPIRES
PASSWORD-MAY-CHANGE
PASSWORD-MUST-CHANGE EVERY
PASSWORD-EXPIRY-GRACE
LAST-LOGON
LAST-UNSUCCESSFUL-ATTEMPT
LAST-MODIFIED
CREATION-TIME
FROZEN/THAWED
STATIC FAILED LOGON COUNT
STATIC-FAILED-LOGON-RESET
GUARDIAN DEFAULT SECURITY
GUARDIAN DEFAULT VOLUME
=
=
=
=
=
=
=
=
=
=
=
=
=
=
=
CREATOR-USER-NAME
CREATOR-USER-TYPE
CREATOR-NODENUMBER
= SUPER.SUPER
= USER (255,255)
= 86
8:11
LAST-LOGON
24JUN05, 15:31
2102
* NONE *
23JUL05, 0:00
* NONE *
30 DAYS
10 DAYS
24JUN05, 15:31
24JUN05, 15:30
23JUN05, 8:11
15JUN05, 2:03
THAWED
1
NONE
NUNU
$DATA.JOAN
{
{
AUDIT-AUTHENTICATE-PASS
AUDIT-AUTHENTICATE-FAIL
AUDIT-USER-ACTION-PASS
AUDIT-USER-ACTION-FAIL
=
=
=
=
NONE
NONE
NONE
NONE
AUDIT-MANAGE-PASS
AUDIT-MANAGE-FAIL
TEXT-DESCRIPTION =
BINARY-DESCRIPTION-LENGTH =
CI-PROG = * NONE
CI-LIB
= * NONE
CI-NAME = * NONE
CI-SWAP = * NONE
CI-CPU
= * NONE
CI-PRI
= * NONE
CI-PARAM-TEXT =
INITIAL-PROGTYPE
INITIAL-PROGRAM
INITIAL-DIRECTORY
PRIMARY-GROUP
GROUP
0
*
*
*
*
*
*
=PROGRAM
=
=
=ACCTS
=ACCTS
ALIAS = J-Brown
ALIAS = userD54
SUBJECT DEFAULT-PROTECTION SECTION
OWNER=
8,54
AUDIT-ACCESS-PASS = NONE
AUDIT-ACCESS-FAIL = NONE
008,054
008, *
\100.8,1
R,W,E,P,
R, E
AUDIT-MANAGE-PASS = NONE
AUDIT-MANAGE-FAIL = NONE
O
R,W
SUBJECT OWNER-LIST SECTION
\TEST.PROJ.DBA
\ABC.PROJ.USR5
Safeguard User’s Guide — 422089-020
6-3
= NONE
= NONE
Obtaining User and Alias Information
What the INFO USER Display Tells You
Note. The TEXT-DESCRIPTION attribute is supported only on systems running G06.27 and
later G-series RVUs and H06.06 and later H-series RVUs.
The CREATION-TIME, CREATOR-USER-NAME, CREATOR-USER-TYPE and CREATORNODENUMBER attributes are supported only on systems running J06.04 and later J-series
RVUs, H06.15 and later H-series RVUs, and G06.32 and later G-series RVUs.
What the INFO USER Display Tells You
Assuming you are the user in the preceding example, the INFO USER display shows
that your user ID has no expiration date, that you must change your password every 30
days, and that your current password will expire on July 23, 2005. You can change
your password as often as you want because no value is defined in the PASSWORDMAY-CHANGE field. If the PASSWORD-MAY-CHANGE field contains a date, you can
change your password beginning on that date. The display also indicates that you have
a grace period of 10 days during which to change your password if you allow it to
expire. To change your expired password during the grace period, you use the LOGON
command, as described in Section 2, Safeguard Logon Dialog.
The OWNER-LIST section shows that two secondary owners have been defined for
your user authentication record.
The default Guardian security string for disk files that you create is "NUNU." Your
default Guardian subvolume is $DATA.JOAN.
The INFO USER display also shows the creation time of the user and the name, type,
user ID, and node number of the creator.
Additionally, the INFO USER display also shows that you have two aliases: J-Brown
and userD54. An alias is an alternate name that you can use to log on to the system.
To obtain information about an alias, use the INFO ALIAS command, as described later
in this section.
Default protection has been established for you. With default protection, every disk file
you create is automatically added to the Safeguard database with the specified access
and audit settings. The display shows that you are the owner of every file you create
and you have all access authorities. All other members of your group have READ and
EXECUTE authority. No auditing is specified. If Safeguard protection is removed from
an individual file after you create it, the Guardian default security string applies.
The last logon time appears at the top of the display. If you are concerned that
someone might have learned your password, check LAST-LOGON to determine if it
matches the last time you logged on. If you suspect a problem, change your password
and notify your security administrator. Your last logon time is also displayed as part of
the Safeguard logon dialog.
If you are concerned that someone might be trying to guess your password, check
STATIC FAILED LOGON COUNT. Each logon attempt that fails, for example if you
mistype your password, increases the failed logon count and sets the LASTUNSUCCESSFUL-ATTEMPT time. If you find these values have changed
Safeguard User’s Guide — 422089-020
6-4
Obtaining User and Alias Information
About Alias Authentication Records
unexpectedly, notify your security administrator. The failed logon count and last failed
logon time also appear as a part of the Safeguard logon dialog.
About Alias Authentication Records
You can have one or more user aliases. An alias is an alternate name that you can use
to log on to the system. An alias has its own authentication record with attributes that
can differ from those in your user authentication record. For example, your alias can
have a different password and password expiration date.
When you are logged on using an alias, the Safeguard software makes access
decisions based on your underlying user ID. For example, if you log on as J-Brown,
your ability to access protected objects is based on the access authorities of user ID
8,54.
If you have an alias, you can view the alias authentication record with the INFO ALIAS
command. The INFO ALIAS command has several display options. The DETAIL option
in the following example selects all attributes. You can use other options to select
specific portions of the record. For example, you can use the AUDIT option to select
the audit attributes. For information on other INFO ALIAS options, see the Safeguard
Reference Manual.
Safeguard User’s Guide — 422089-020
6-5
Viewing an Alias Authentication Record
Obtaining User and Alias Information
Viewing an Alias Authentication Record
The following example shows how to check the authentication record for the user alias
J-Brown. To view your record, use the DETAIL option of the INFO ALIAS command:
1> SAFECOM INFO ALIAS J-Brown, DETAIL
NAME
STATUS
J-Brown
THAWED
USER-ID
8,54
UID
USER-EXPIRES
PASSWORD-EXPIRES
PASSWORD-MAY-CHANGE
PASSWORD-MUST-CHANGE EVERY
PASSWORD-EXPIRY-GRACE
LAST-LOGON
LAST-UNSUCESSFUL-ATTEMPT
LAST-MODIFIED
CREATION-TIME
=
2102
= 30SEP05, 0:00
=
* NONE *
=
* NONE *
=
* NONE *
=
* NONE *
=
* NONE *
=
* NONE *
= 12AUG94, 17:43
= 11JUN94, 2:03
FROZEN/THAWED
STATIC FAILED LOGON COUNT
STATIC-FAILED-LOGON-RESET
GUARDIAN DEFAULT SECURITY
GUARDIAN DEFAULT VOLUME
=
=
=
=
=
CREATOR-USER-NAME
CREATOR-USER-TYPE
CREATOR-NODENUMBER
OWNER
8,255
THAWED
0
NONE
NUNU
$DATA.JBROWN
= SUPER.SUPER
= USER (255,255)
= 86
AUDIT-AUTHENTICATE-PASS
AUDIT-AUTHENTICATE-FAIL
AUDIT-USER-ACTION-PASS
AUDIT-USER-ACTION-FAIL
=
=
=
=
NONE
NONE
ALL
ALL
AUDIT-MANAGE-PASS
AUDIT-MANAGE-FAIL
TEXT-DESCRIPTION =
BINARY-DESCRIPTION-LENGTH =
CI-PROG = * NONE
CI-LIB
= * NONE
CI-NAME = * NONE
CI-SWAP = * NONE
CI-CPU
= * NONE
CI-PRI
= * NONE
CI-PARAM-TEXT =
INITIAL-PROGTYPE
INITIAL-PROGRAM
INITIAL-DIRECTORY
PRIMARY-GROUP
GROUP
0
*
*
*
*
*
*
=PROGRAM
=
=
=ACCTS
=ACCTS
SUBJECT DEFAULT-PROTECTION SECTION UNDEFINED
SUBJECT OWNER-LIST SECTION UNDEFINED
Safeguard User’s Guide — 422089-020
6-6
= NONE
= NONE
Obtaining User and Alias Information
What the INFO ALIAS Display Tells You
Note. The TEXT-DESCRIPTION attribute is supported only on systems running G06.27 and
later G-series RVUs and H06.06 and later H-series RVUs.
The CREATION-TIME, CREATOR-USER-NAME, CREATOR-USER-TYPE and CREATORNODENUMBER attributes are supported only on systems running J06.04 and later J-series
RVUs, H06.15 and later H-series RVUs, and G06.32 and later G-series RVUs.
What the INFO ALIAS Display Tells You
An INFO ALIAS display contains most of the same attributes as an INFO USER
display. However, the values can differ from those of the underlying user ID.
The INFO ALIAS display for J-Brown shows that the alias expires on September 30,
2005, and that the Safeguard software audits all attempted actions by the alias
J-Brown. The display also shows that there are no special requirements for changing
the alias password.
Safeguard default protection is not defined for this alias. Therefore, the default
Guardian security string "NUNU" is applied to disk files that J-Brown creates.
The last logon time and failed logon count are also important for aliases. For example,
if LAST-LOGON for J-Brown does not match the last time you logged on as J-Brown,
someone else might have learned the alias password and logged on as J-Brown.
The INFO ALIAS display also shows the creation time of the alias, the name, type,
user ID, and node number of the creator.
Safeguard User’s Guide — 422089-020
6-7
Obtaining User and Alias Information
What the INFO ALIAS Display Tells You
Safeguard User’s Guide — 422089-020
6-8
7
Working With SAFECOM
SAFECOM is the Safeguard command interpreter. You can use SAFECOM to enter
commands in any of the following modes of operation:
•
•
•
Interactive mode
Execute-and-quit mode
Batch mode
Interactive mode allows you to enter any number of commands and verify the results
before proceeding. For the general user, this mode is simple to use yet flexible enough
to handle routine Safeguard tasks.
Execute-and-quit mode is most useful for entering one or two commands. In this mode,
SAFECOM returns to the TACL prompt after executing the command.
Batch mode allows you to execute a series of SAFECOM commands stored in a disk
file. This mode is useful when you are adding a large number of disk files to the
Safeguard database. For example, batch mode is especially useful when a system
administrator is initially installing the Safeguard software.
This section describes how to run SAFECOM in these three modes of operation. The
examples in this section illustrate the most simple and basic ways to use the modes of
operation. Additional options are available, as described in the Safeguard Reference
Manual. The commands used as examples in this section are more thoroughly
described in the previous sections of this manual.
Using SAFECOM in Interactive Mode
When you have many SAFECOM commands to enter and you want to monitor your
progress, use SAFECOM in the interactive mode. To start interactive mode, type
SAFECOM at the TACL prompt. SAFECOM opens your home terminal for both input
and output, and displays its program header and equal-sign (=) command prompt.
From TACL, for example, this command begins an interactive SAFECOM session:
6> SAFECOM
SAFEGUARD COMMAND INTERPRETER - T9750CD30
=
After the SAFECOM command prompt appears, you can enter SAFECOM commands.
When you are finished, type EXIT at the command prompt to end the SAFECOM
session.
The equal sign is the normal SAFECOM prompt. It is used in all examples in this
manual. If you want to customize this prompt, use the DISPLAY PROMPT command,
which is described in Section 8, Changing Display Options.
SAFECOM keeps track of the command lines you enter during an interactive session.
Each line is numbered sequentially and retained in a history buffer. This approach
Safeguard User’s Guide — 422089-020
7-1
SAFECOM Session-Control Commands
Working With SAFECOM
allows you to use the HISTORY, ?, !, and FC session-control commands to recall, edit,
and execute commands entered earlier in the same session.
SAFECOM Session-Control Commands
After you start an interactive SAFECOM session, you can enter either of two types of
commands: session-control commands, which manage your interactive session, and
security commands, which specify the security controls for your disk files and
subvolumes. The session-control commands are listed in Table 7-1. This section
demonstrates the use of most of the session-control commands. A special sessioncontrol command, the DISPLAY command, is described in Section 8, Changing Display
Options.
All session-control commands are described in detail in the Safeguard Reference
Manual. The session-control commands manage your SAFECOM session, but they do
not apply security controls.
Security commands are also shown in the examples in this section. These commands
are described in detail in the previous sections of this manual.
Table 7-1. SAFECOM Session-Control Commands (page 1 of 2)
Command
Meaning
ASSUME
Establishes a default object type for subsequent SAFECOM commands. For
the general user, the object types are DISKFILE, SUBVOLUME, PROCESS,
and SUBPROCESS.
ENV
Displays the current default values of the environmental parameters
(SYSTEM, VOLUME, OUT, LOG, ASSUME, and DISPLAY options).
EXIT
Stops an interactive SAFECOM session. Control of your terminal is returned
to your command interpreter. You can also use Ctrl/Y for this purpose.
FC
(Fix Command) Displays and allows you to edit a previously entered
SAFECOM command.
HELP
Displays help screens describing the SAFECOM commands.
HISTORY
Displays a specified number of your most recently entered SAFECOM
commands. Also clears last or all commands in the history buffer.
LOG
Defines a log file in which SAFECOM writes a record of the current
SAFECOM session.
OBEY
Specifies a command file containing SAFECOM commands for batch
execution.
OUT
Directs SAFECOM to write its output to a specified file. (SAFECOM output
text includes both input commands and responses to those commands.)
SYNTAX
Directs SAFECOM to check the syntax of commands only but not to execute
them.
SYSTEM
Establishes a default system name for file-name expansion.
VOLUME
Establishes a default disk-volume name and a default subvolume name for
the file-name expansion of disk files.
Safeguard User’s Guide — 422089-020
7-2
Checking Your Progress
Working With SAFECOM
Table 7-1. SAFECOM Session-Control Commands (page 2 of 2)
Command
Meaning
?
(Question mark) Displays a specified command that you previously entered
during the current SAFECOM session.
!
(Exclamation point) Displays and executes a specified command that you
previously entered during the current SAFECOM session.
--
(Two hyphens) Delimits comments in SAFECOM command lines.
&
(Ampersand) Indicates that the command is continued on the next line.
Checking Your Progress
In an interactive command session, SAFECOM executes each complete command as
you enter it. It is advisable to check your progress periodically and verify the results of
the commands executed during the session. Three commands—the ENV sessioncontrol command, and the SHOW and INFO security commands—allow you to check
your progress. Use ENV at the start of a session to check the default environment. Use
SHOW to check the current default attributes for specific types of objects. Use INFO
during a session to verify the results of a previous command. The examples in this
section illustrate the use of these commands. SHOW and INFO are discussed more
thoroughly in Section 4, Securing Subvolumes, and Section 6, Obtaining User and
Alias Information.
Entering More Than One Command on a Line
To enter more than one SAFECOM command on a single command line, separate the
commands with a semicolon:
=LOG logfile; ASSUME diskfile; ENV
This display shows:
SYSTEM
VOLUME
OUT
LOG
ASSUME
\LA
$DATA.SALES
\LA.$TIM
$DATA.SALES.LOGFILE
DISKFILE
-- Interactive, OUT = IN --
The command line in this example contains these three SAFECOM session-control
commands:
•
•
•
The LOG command opens a log file named logfile and sends a copy of the input
and output of this SAFECOM session to that file.
The ASSUME command defines DISKFILE as the default object type.
The ENV (environment) command verifies the results of the previous two
commands.
Safeguard User’s Guide — 422089-020
7-3
Continuing Commands From One Line to the Next
Working With SAFECOM
The comments "Interactive, OUT = IN" in the display indicate an interactive session.
(The OUT file is the same as the IN file.)
Note. Do not put a semicolon within a comment because it terminates the line and causes the
remainder of the comment to be treated as a SAFECOM command.
Continuing Commands From One Line to the Next
A single SAFECOM command or multiple commands separated by semicolons can
span two or more command lines if you end each continued line with an ampersand
(&). The ampersand is the command-line continuation character.
You can use the ampersand to enter a single command string across any number of
command lines, but the total number of characters in the entire command string cannot
exceed 528.
You can break a command at any point. In the following example, the ADD DISKFILE
command uses two ampersands to span three command lines. The first ampersand
falls between two disk-file attributes (AUDIT-ACCESS-FAIL and ACCESS). The
second ampersand is embedded in the ACCESS specification.
For example:
=ADD DISKFILE $data.sales.report1, AUDIT-ACCESS-FAIL all,&
=ACCESS 8,7 *; (mkt.jane, software.blane, software.karl)&
=(read, write)
=INFO DISKFILE $data.sales.report1, DETAIL
This display shows:
$DATA.SALES
REPORT1
001,069
001,098
008,007
033,104
LAST-MODIFIED
OWNER
STATUS
15JUL05, 14:46
8,7
THAWED
WARNING-MODE
OFF
R,W
R,W
R,W,E,P, O
R,W
OBJECT-TEXT-DESCRIPTION=
AUDIT-ACCESS-PASS = NONE
AUDIT-ACCESS-FAIL = ALL
AUDIT-MANAGE-PASS = NONE
AUDIT-MANAGE-FAIL = NONE
LICENSE = OFF PROGID = OFF CLEARONPURGE = OFF
TRUST = OFF (assumes H-series system)
PERSISTENT = OFF
In this example, the ADD command adds an authorization record for the disk file
$data.sales.report1 to the Safeguard object database. The ADD DISKFILE command
includes an AUDIT-ACCESS-FAIL specification and four access control list entries.
Semicolons separate the elements of the ACCESS specification. Commas separate
other command elements.
The INFO DISKFILE command displays a detailed report for the disk file
$data.sales.report1. The display includes the access control list for this file, the four
auditing specifications, and four special disk-file attributes.
Safeguard User’s Guide — 422089-020
7-4
Redirecting Output for a Single Command
Working With SAFECOM
Redirecting Output for a Single Command
Usually, with SAFECOM operating in interactive mode, output is displayed on the
home terminal because the home terminal is the default OUT file. However, SAFECOM
can be directed to report to an EDIT file or to list a SAFECOM report on a printer. To do
this, include an OUT option to redirect SAFECOM output for a single command.
Specify the OUT option immediately following the command and enclose it in slashes
as follows.
For example, this command redirects the output of the SAFECOM HELP command to
a spooler location:
=HELP / OUT $s.#lp1 / ALL
This command prints all the SAFECOM help screens on the printer defined for the
spooler location $S.#LP1.
To save a SAFECOM report in an EDIT file, enter a disk-file name. If the file already
exists, SAFECOM opens the file and appends the INFO report to the file. If the file
does not exist, SAFECOM creates an EDIT file with the specified name and then writes
the output report to that file.
The next example writes an INFO report for all the files on the subvolume named
report3 to the file named $data.report3.myfiles. First, establish a default disk volume
and subvolume:
=VOLUME $data.report3
Then request the report:
=INFO / OUT myfiles / DISKFILE *,DETAIL
Using the OUT option with a SAFECOM command redirects output for only that
command. After the command completes, SAFECOM again directs its output to the
session OUT file, which is your terminal. To keep a complete record of a SAFECOM
session, use the LOG command. The LOG command sends a copy of the session
input and output to a log file but does not change the current IN and OUT files.
Getting Online Help
In interactive mode, you can use the SAFECOM help facility to find the answer to
syntax questions. The help facility supports all SAFECOM commands, including those
reserved for your security administrator.
Safeguard User’s Guide — 422089-020
7-5
Getting Online Help
Working With SAFECOM
To display a list of the commands at the SAFECOM prompt:
=HELP
HELP is available for the following SAFECOM commands:
ADD
FC
OBEY
SHOW
!
ALTER
FREEZE
OUT
STOP
ASSUME
HELP
RELEASE
SYNTAX
DELETE
HISTORY
RESET
SYSTEM
DISPLAY
INFO
RUN
THAW
ENV
LOG
SELECT
VOLUME
EXIT
NEXTFILE
SET
?
Enter HELP COMMANDS for brief descriptions of all SAFECOM commands.
Enter HELP GRAMMAR for the complete syntax of all SAFECOM commands.
Enter HELP command-name for a detailed description of the syntax
and function of any specific SAFECOM command.
Enter HELP ALL for detailed descriptions of the function and syntax
for all SAFECOM commands, attributes, and lists.
HELP is also available for each keyword, individually, and you can
enter HELP * for help on all keywords.
HELP is also available for the following attributes and lists:
ALIAS-LIST, EVENT-EXIT-PROCESS-ATTR, GROUP-ATTR, GROUP-LIST,
OBJECT-ATTR, OBJECT-LIST, SAFEGUARD-ATTR, TERMINAL-ATTR,
USER-ATTR, and USER-LIST.
All command names may be followed by [ / OUT fname / ] to define
a command-specific OUT file which is distinct from an out file that
might have been established by any LOG or OUT session commands.
As the previous help screen describes, you can also use the HELP command to
display the syntax of a particular command. For example, to display the syntax for the
ASSUME command:
=HELP ASSUME
ASSUME [ object-type ]
The ASSUME command establishes a default object-type so that it
need not be repeatedly entered for commands that require it. This
command also clears any previously established object-type.
object-type is [ VOLUME | SUBVOLUME | DISKFILE | TERMINAL
]
[ DEVICE | SUBDEVICE | PROCESS | SUBPROCESS ]
[ USER
| ALIAS
| EVENT-EXIT-PROCESS
]
When object-type is omitted, any previously established value is
cleared. Note that object-types GROUP, OBJECTTYPE, SAFEGUARD, and
SECURITY-GROUP can never be established or cleared with this command.
ASSUME OBJECTTYPE is also a parameter to the DISPLAY PROMPT command,
which causes the current assumed objecttype to be displayed in the
command line prompt.
Safeguard User’s Guide — 422089-020
7-6
Displaying and Editing Previous Commands
Working With SAFECOM
Displaying and Editing Previous Commands
SAFECOM provides four commands that allow you to display, change, and execute
commands that you previously entered during the current session. These commands
and their functions are:
HISTORY
Displays a designated number of the most recent commands entered during
the current session; also can clear the last command or all commands from
the history buffer.
?
Displays a single previously entered command that you specify by line
number, relative line number, or text string.
!
Functions like the ? command except that it also executes the displayed
command.
FC
Functions like the ? command except that it also provides a command-line
template on which you can edit the displayed command
The examples that follow highlight the main features of these commands. For complete
details, refer to the command descriptions in the Safeguard Reference Manual.
Displaying Previous Commands
Because SAFECOM retains the commands you enter during an interactive session,
you can use the HISTORY command to retrieve a specified number of the most recent
commands. If you enter the HISTORY command without specifying the number of
commands, the last 10 commands appear.
For example, the following command displays the last five commands entered during
your current session. The example assumes that the HISTORY command is the
seventh command you executed in this session.
=HISTORY 5
3=VOLUME $DATA.REPORT3
4=INFO / OUT MYFILES / DISKFILE *, DETAIL
5=HELP
6=HELP ASSUME
7=HISTORY 5
The HISTORY command adds line numbers to the commands even if your normal
SAFECOM prompt does not include them. However, the ?, !, and FC commands do not
display these line numbers unless your normal SAFECOM prompt includes a line
number.
The HISTORY command also allows you to delete all commands in the SAFECOM
history buffer and to reset line numbering to line 1:
=HISTORY RESET ALL
Safeguard User’s Guide — 422089-020
7-7
Displaying and Editing Previous Commands
Working With SAFECOM
Displaying a Specific Command
The ? command allows you to display a specific command entered earlier in the
current session. You can specify the command to be displayed by entering a line
number, a relative line number, or a text string, as the following examples show.
For example, this ? command requests the display of command line number 18:
=? 18
=ALTER DISKFILE PROGFILE, PROGID ON
=
You can also specify a minus (-) line number to search for a command line number
relative to the current line number. For example, if your current command line number
is 23, the following ? command displays the command at line 20. For clarity, the
following examples assume that you used the DISPLAY PROMPT command to specify
that your normal SAFECOM prompt is to include a line number. The command line
number does not change until you execute a command other than ?, !, or FC.
23=? -3
23=INFO DISKFILE PROGFILE, DETAIL
23=
There are two ways to request a search for a command that contains a specific text
string. If you do not enclose the string in quotes, the ? command searches for the most
recent command that starts with the designated string. The following ? command
illustrates this type of search:
23=? add
23=ADD DISKFILE QUARTER1, ACC 2,18 O
23=
If you enclose the text string in quotes, the ? command searches the most recent
command that contains that string anywhere within the command. The following ?
command performs this type of search:
23=? "quarter2"
23=ALTER DISKFILE QUARTER2, LIKE QUARTER1
23=
Executing a Specific Command
The ! command functions like the ? command except that the specified command is
executed when it is displayed. For example, the following ! command displays and
executes the most recent command that contains the text string “quarter2”:
23=! "quarter2"
23=ALTER DISKFILE QUARTER2, LIKE QUARTER1
24=
SAFECOM increments the command line number because the ALTER DISKFILE
command was executed.
Safeguard User’s Guide — 422089-020
7-8
Displaying and Editing Previous Commands
Working With SAFECOM
Correcting Mistakes Using the FC Command
The FC command allows you to display and edit a command you entered previously in
the current session. This feature is handy for correcting typographical errors or for
executing several similar commands.
FC supports the same search options as the ? and ! commands. You can request a
command line by line number, relative line number, or text string. If you enter FC by
itself, the last command line you entered is displayed.
When you execute FC, the specified command line is displayed, and the cursor is
positioned below that command on a command-editing line. You can then use the
displayed command line as a guide for creating a new command.
Note. On the command-editing line, use only the spacebar and backspace key to move the
cursor. Do not use the arrow keys.
FC has four subcommands that you can use in the command-editing line. Enter these
subcommands on the editing line to modify the characters directly above them in the
redisplayed command line. FC supports these subcommands:
d
deletes the character directly above d.
istring
inserts string before the character directly above i.
rstring
replaces the characters in the command line with string. The first character
replaced is the character directly above r.
string
replaces the characters in the command line directly above the string characters
with string. This is an implicit replace subcommand. It works the same as the r
subcommand.
// (2 backslashes)
ends the current string and allows you to enter another subcommand in the editing
template.
Note. FC recognizes any string in the editing template line that does not begin with d, i, or r as
an implicit replacement string.
The following example illustrates use of the FC command. In this example, the FC
command retrieves the command at line number 18 and then displays the editing
template on the next line. The d subcommand is then used to delete the characters
PROG, and the i subcommand is used to insert the characters 03 so that the file name
Safeguard User’s Guide — 422089-020
7-9
Leaving SAFECOM Without Losing Defaults (Using
the Break Key)
Working With SAFECOM
PROGFILE is changed to FILE03. After the command has been altered to your
satisfaction, press the Return key on the editing line to execute the edited command:
=FC 18
=ALTER DISKFILE PROGFILE, PROGID ON
.
dddd
.ALTER DISKFILE FILE, PROGID ON
.
i03
.ALTER DISKFILE FILE03, PROGID ON
.
=
Leaving SAFECOM Without Losing Defaults (Using the Break
Key)
You can return to TACL without losing your current SAFECOM default settings by
pressing the Break key at the SAFECOM prompt. Break pauses SAFECOM and
returns control to TACL. After pausing SAFECOM, you can enter any number of
commands at the TACL prompt.
To return to your interrupted SAFECOM session, enter the PAUSE command at the
TACL prompt. This pauses TACL and returns control of the terminal to SAFECOM.
For example:
=BREAK
5> time
June 21, 1992
6> pause
=
8:56:30
Exiting a Long Report Display (Break Key Handling)
You can stop a long report that SAFECOM is displaying by using the BREAK key.
When you press BREAK, SAFECOM stops executing the command and displays its
command prompt.
Exiting SAFECOM
When the SAFECOM session is completed, return to TACL with the EXIT command:
=EXIT
7>
Another way to exit SAFECOM is to press the CTRL and Y keys at the same time.
SAFECOM interprets CTRL/Y as an end-of-file character (EOF). When SAFECOM
reads an EOF from its input file (in this case, your terminal), it closes the input file and
stops executing.
Safeguard User’s Guide — 422089-020
7 - 10
Using SAFECOM in Execute-and-Quit Mode
Working With SAFECOM
Using SAFECOM in Execute-and-Quit Mode
If you need to enter only a few SAFECOM commands, you can use the execute-andquit mode from TACL. To run SAFECOM in this mode, type "SAFECOM," followed by
one or more security commands.
SAFECOM executes the commands and immediately returns control to TACL. If you
want to execute another SAFECOM command, you must begin that command by
retyping SAFECOM at the TACL prompt.
For example, assume user 3,7 is running TACL and wants to change the access
control list for the disk file named $data.sales.report6. The following commands display
the status of the protected disk file and grant READ authority to another user:
2> VOLUME $data.sales
3> SAFECOM INFO DISKFILE report6
$DATA.SALES
REPORT6
003,007
LAST-MODIFIED
OWNER
STATUS
15JUL05, 13:36
3,7
THAWED
WARNING-MODE
OFF
R,W,E,P
4> SAFECOM ALTER DISKFILE report6, ACCESS mkt.jane READ
5> SAFECOM INFO DISKFILE report6
$DATA.SALES
REPORT6
003,007
033,104
LAST-MODIFIED
OWNER
STATUS
22JUL05, 11:57
3,7
THAWED
WARNING-MODE
OFF
R,W,E,P
R
In this example, the TACL VOLUME command (prompt 2) establishes the default
volume and subvolume. (The current defaults are passed to SAFECOM when it is run.
SAFECOM then uses these default names to expand the partially qualified disk-file
name report6 to $data.sales.report6.)
The first SAFECOM command (prompt 3) requests an INFO report on the file
$data.sales.report6. After the access list for report6 is displayed, an ALTER DISKFILE
command adds a new access control list entry to grant READ authority to the local
user MKT.JANE, with user ID 33,104. The last SAFECOM command (INFO DISKFILE
at prompt 5) shows that the access control list for report6 was changed correctly.
For additional information about access control lists, see Section 3, Securing Disk
Files.
Using SAFECOM in Batch Mode
Batch mode is useful when you want to perform a number of security management
tasks more than once. To use SAFECOM in batch mode, you must first create an EDIT
file that contains the sequence of SAFECOM commands you want to execute. To
Safeguard User’s Guide — 422089-020
7 - 11
Placing Comments in a Command File
Working With SAFECOM
execute the commands in the EDIT file, run SAFECOM and, using the IN option, name
the EDIT file as the input file.
For example, suppose this sequence of commands is in an EDIT file called
$system.secmgt.saleinfo:
INFO
INFO
INFO
INFO
INFO
INFO
INFO
VOLUME
SUBVOLUME
DISKFILE
SUBVOLUME
DISKFILE
SUBVOLUME
DISKFILE
$data
$data.sales1
$data.sales1.*
$data.sales2
$data.sales2.*
$data.sales3
$data.sales3.*
,
,
,
,
,
,
,
DETAIL
DETAIL
DETAIL
DETAIL
DETAIL
DETAIL
DETAIL
These commands produce detailed INFO reports on the $data volume; on the $data
subvolumes sales1, sales2, and sales3; and on all the disk files residing on those
subvolumes.
The following example uses the INFO command to produce a report:
22> VOLUME $system.secmgt
23> SAFECOM /IN saleinfo, OUT $s.#lp1, NOWAIT/
24>
Specifying $system.secmgt.saleinfo as the input file directs SAFECOM to open the
saleinfo file, execute the commands in the file, and stop after executing the last
command. SAFECOM lists the INFO reports on the printer $S.#LP1. Because this
example does not use your terminal for input or output, you can use the NOWAIT
option to instruct TACL to start SAFECOM and then return to your terminal.
You can include several options in one command. To do so, enclose the option string in
slashes and separate each option from the next with a comma.
Placing Comments in a Command File
To place a comment in a command file, use a double hyphen (--) to delimit the
comment. The following comments begin lines in a command file:
-- Establish the default subvolume for file-name expansion
-VOLUME $system.secmgt
--- Assume DISKFILE as the default object type for the
-- next set of commands
-ASSUME DISKFILE
You can also place comments at the end of a command line:
VOLUME $system.secmgt
OBEY listuser
-- LISTUSER is on this subvol
-- reports on all system users
Safeguard User’s Guide — 422089-020
7 - 12
Executing a Command File During an Interactive
Session
Working With SAFECOM
You can embed comments within a command by including double hyphens at the
beginning and end of the comment:
ALTER DISKFILE report1, ACCESS 2,78 -- give ted jones -- READ
When SAFECOM encounters a double hyphen (--), it ignores all following characters
until it reaches either the end of the line or the next double hyphen.
Do not put a semicolon within a comment because it terminates the line and causes
the remainder of the comment to be treated as a SAFECOM command.
Executing a Command File During an Interactive Session
You can execute a command file during an interactive session by entering an OBEY
command. OBEY directs SAFECOM to execute the commands stored in a specific file.
For example, this command is equivalent to the first batch mode example in this
subsection:
=OBEY / OUT $s.#lp1 / saleinfo
After executing the commands in the file saleinfo, SAFECOM returns control to your
terminal in the interactive mode of SAFECOM. However, the SAFECOM OBEY
command does not support the NOWAIT option, so executing an OBEY command
might result in a delay in getting back control at your terminal.
Using Command Files to Set Up Default Access Control Lists
Command files are useful for establishing default access control lists for disk files or
other objects. For example, suppose the following commands are placed in an EDIT
file called $system.mgr.tight:
ASSUME DISKFILE
RESET
SET ACCESS 255,254 (r,w)
SET ACCESS 3,255
r
SET ACCESS 255,8 (r,w,e,p)
SET AUDIT-ACCESS-FAIL ALL
SHOW
--------
Build default ACL for DISKFILE
Clear all current settings
255,254 is security admin
Company auditor can read
I can do anything
Audit failed access attempts
Display current defaults
Using this command file, you can easily apply tight security constraints to any number
of disk files. The following SAFECOM screen display shows an interactive session in
Safeguard User’s Guide — 422089-020
7 - 13
Error Handling in Command Files
Working With SAFECOM
which a batch operation uses the command file $system.mgr.tight to set up current
default values for disk-file attributes:
=VOLUME $system.mgr
=OBEY tight
=ASSUME DISKFILE
.
.
.
=SHOW
TYPE
DISKFILE
-- Build default ACL for DISKFILE
-- Display current defaults
OWNER
255,8
OBJECT-TEXT-DESCRIPTION=
AUDIT-ACCESS-PASS = NONE
AUDIT-ACCESS-FAIL = ALL
LICENSE = OFF
TRUST = OFF
003,255
255,008
255,254
PROGID = OFF
AUDIT-MANAGE-PASS = NONE
AUDIT-MANAGE-FAIL = NONE
CLEARONPURGE = OFF
PERSISTENT = OFF
R
R,W,E,P
R,W
=ADD $data.sales3.q3report
Only three commands are entered interactively: VOLUME, OBEY, and ADD. The
VOLUME command sets the default volume and subvolume. OBEY executes the
commands stored in $system.mgr.tight. The ADD command adds a disk file to the
Safeguard database and gives it the security settings set up in $system.mgr.tight.
Error Handling in Command Files
When SAFECOM encounters an error while processing a command file, it redisplays
the erroneous command and displays an error or warning message describing the
nature of the error.
If it is a syntax error, then SAFECOM aborts the processing and causes ABEND. If the
error does not cause the OBEY processing to abort, SAFECOM continues processing
the command file and causes ABEND at the end. As a result, TACL returns -6 as the
MESSAGECODE and a non-zero value as the COMPLETIONCODE.
SAFECOM error and warning messages are described in the Safeguard Reference
Manual.
Note. ABEND (on any error while processing either OBEY file or IN file) is supported only on
systems running H06.28 and later H-series RVUs and J06.17 and later J-series RVUs.
Safeguard User’s Guide — 422089-020
7 - 14
Working With SAFECOM
Using Wild-Card Characters in SAFECOM
Commands
Using Wild-Card Characters in SAFECOM
Commands
In most SAFECOM commands, you can use wild-card characters to match characters
in an object name. In certain instances, you can also specify wild-card characters in
user names. The following wild-card characters are supported:
*
Use an asterisk (*) to match any number of characters (zero, one, or more).
? Use a question mark (?) to match a single character.
Wild-card characters make it easy for you to execute commands on sets of objects
with similar names, as shown in the following examples. Typical uses of wild-card
characters include adding disk files with similar names to the Safeguard database or
displaying information about files with similar names.
Wild-card characters differ from pattern wild-card characters. Pattern wild-card
characters are specified when you use the diskfile-pattern objecttype. For more
information, see Section 9, Working with Patterns.
Examples
The following examples illustrate the use of wild-card characters in SAFECOM
commands. It is assumed that the DISPLAY HEADERS ONCE and DISPLAY
WARNINGS OFF options are used as described in Section 8, Changing Display
Options.
Safeguard User’s Guide — 422089-020
7 - 15
Restrictions
Working With SAFECOM
The following command displays attributes of all disk files in the current subvolume
whose names begin with the letters ACCT:
=INFO DISKFILE acct*
$DATA.SALES
ACCT
LAST-MODIFIED
OWNER
STATUS
WARNING-MODE
08MAY05, 12;54
2,1
THAWED
OFF
LAST-MODIFIED
OWNER
STATUS
WARNING-MODE
18JUN92, 09:22
2,1
THAWED
OFF
LAST-MODIFIED
OWNER
STATUS
WARNING-MODE
18JUL92, 09:26
2,1
THAWED
OFF
LAST-MODIFIED
OWNER
STATUS
WARNING-MODE
08MAY05, 13:37
2,1
THAWED
OFF
LAST-MODIFIED
OWNER
STATUS
WARNING-MODE
15JUL05, 11:00
2,1
THAWED
OFF
LAST-MODIFIED
OWNER
STATUS
WARNING-MODE
22JUL05, 10:34
2,1
THAWED
OFF
NO ACCESS CONTROL LIST DEFINED
$DATA.SALES
ACCTPAY
NO ACCESS CONTROL LIST DEFINED
$DATA.SALES
ACCTOUT
NO ACCESS CONTROL LIST DEFINED
$DATA.SALES
ACCT12
NO ACCESS CONTROL LIST DEFINED
$DATA.SALES
ACCT4
NO ACCESS CONTROL LIST DEFINED
$DATA.SALES
ACCT9
NO ACCESS CONTROL LIST DEFINED
Similarly, this command displays the attributes of all disk files whose names are five
characters long and whose first four characters are ACCT:
=INFO DISK acct?
$DATA.SALES
ACCT4
LAST-MODIFIED
OWNER
STATUS
WARNING-MODE
15JUL05, 11:00
2,1
THAWED
OFF
LAST-MODIFIED
OWNER
STATUS
WARNING-MODE
22JUL05, 10:34
2,1
THAWED
OFF
NO ACCESS CONTROL LIST DEFINED
$DATA.SALES
ACCT9
NO ACCESS CONTROL LIST DEFINED
Restrictions
These important points apply to the use of wild-card characters:
Safeguard User’s Guide — 422089-020
7 - 16
Abbreviating SAFECOM Commands
Working With SAFECOM
•
Wild cards in ADD commands for disk files, volumes, and subvolumes affect only
objects that already exist. For example, the following command protects only files
that currently exist on volume $VOL1 and subvolume DATA:
=ADD DISKFILE $VOL1.DATA.*
•
•
•
You cannot use wild cards in ADD commands for devices, subdevices, processes,
subprocesses, and terminals.
If you are a security administrator, wild cards are allowed in only two instances
when you specify a user ID in its number form. The forms group-number,* and *,*
are valid. All other forms, such as *,124, are invalid.
Except for two instances, you cannot use wild cards in user names when you alter
an access control list. The forms group-name.* and *.* are the only valid forms.
Abbreviating SAFECOM Commands
You can abbreviate any SAFECOM reserved word, including commands, attributes,
and keywords. In most instances, a reserved word can be abbreviated to its first three
characters. You can use more than three characters for clarity, but three is the
minimum required.
Some abbreviations must be longer than three characters so that the Safeguard
software can distinguish between similar reserved words, such as SUBVOLUME and
SUBPROCESS.
When a reserved word is hyphenated, do not omit any hyphens. Each component of a
hyphenated word must have at least its first three characters.
To understand the use of abbreviations, consider the following command:
=ALTER SUBVOLUME star, OWNER 12,8, AUDIT-ACCESS-PASS LOCAL
The same command, using abbreviated reserved words, is as follows:
=ALT SUBV star, OWN 12,8, AUD-ACC-PAS LOC
The following three pairs of reserved words represent a special case in which you can
use the same three-character abbreviation for either reserved word:
Reserved Words
Abbreviation
ALL
ALLOCATE
ALL
NAME
NAMED
NAM
REMOTE
REMOTEPASSWORD
REM
Running Other Programs From SAFECOM
You can run another program without exiting from SAFECOM. To do so, execute the
RUN command at the SAFECOM prompt. The command syntax and run options of the
Safeguard User’s Guide — 422089-020
7 - 17
Checking Command Syntax Only
Working With SAFECOM
SAFECOM RUN command are the same as those of the TACL RUN command. For
further details regarding this command, refer to the Safeguard Reference Manual.
For example, the following command runs the program TRACKER that resides in the
current default subvolume:
=RUN TRACKER / IN TRACK1, OUT TRACK2, NOWAIT /
This command specifies that the file TRACK1 is the input file for the program, and the
file TRACK2 is the output file for the program. The NOWAIT option instructs
SAFECOM to redisplay its prompt without pausing for the program TRACKER to
complete execution.
Checking Command Syntax Only
SAFECOM allows you to select a syntax-only mode, in which commands are simply
checked for syntax and not executed. To select this mode of operation, use the
following command:
=SYNTAX ON
In this mode, SAFECOM reports any syntax errors found in commands as you enter
them. The only SAFECOM commands that can be executed in syntax-only mode are
ASSUME, EXIT, OBEY, and SYNTAX. Other commands are merely checked for syntax
errors.
If you enter a command with correct syntax, SAFECOM issues the following message
to remind you that it is in syntax-only mode:
* WARNING * SAFECOM IS IN SYNTAX ONLY MODE; COMMAND NOT EXECUTED.
If you issue a command with incorrect syntax, SAFECOM issues the following
message:
ILLEGAL SYNTAX; COMMAND NOT EXECUTED.
To return to the normal mode of operation, in which SAFECOM executes commands,
use the following command:
=SYNTAX OFF
Safeguard User’s Guide — 422089-020
7 - 18
8
Changing Display Options
SAFECOM provides a DISPLAY command that allows you to customize your
SAFECOM prompt and to control various INFO command options during an interactive
session. With the DISPLAY command, you can perform the following actions to alter
the characteristics of the INFO command report:
•
•
•
•
•
Turn warning messages on and off
Turn column headings on and off
Set the DETAIL option of the INFO command on or off for an entire session
Identify users by either user IDs or user names
Display the output of an INFO command as SAFECOM commands
Table 8-1 lists the DISPLAY command options. The examples in this section illustrate
the use of these options. For additional details regarding the DISPLAY command, see
the Safeguard Reference Manual.
Table 8-1. DISPLAY Commands
Command Option
Description
DISPLAY PROMPT
Controls text displayed in your SAFECOM prompt.
DISPLAY WARNINGS
Controls the display of warnings about unprotected files.
DISPLAY HEADERS
Controls the display of column headings in INFO command
reports.
DISPLAY DETAIL
Controls the DETAIL option of the INFO command for an entire
session.
DISPLAY USER
Displays the identities of users as either user IDs or user names.
DISPLAY COMMANDS
Displays the output of an INFO command as SAFECOM
commands.
You can use the ENV command at any time during a SAFECOM session to check the
current state of the DISPLAY options.
Editing Your SAFECOM Prompt
The standard SAFECOM prompt is an equal sign (=). With the DISPLAY PROMPT
command, you can specify text or predefined items to be included in your SAFECOM
prompt. For example, a typical item you might want to include in your SAFECOM
prompt is the current command line number.
Like the other DISPLAY commands described in this section, DISPLAY PROMPT
remains in effect only during your current session. When you exit SAFECOM, the
custom prompt is cleared and replaced by the standard SAFECOM prompt.
Table 8-2 lists the prompt items you can specify in a DISPLAY PROMPT command.
Safeguard User’s Guide — 422089-020
8-1
Editing Your SAFECOM Prompt
Changing Display Options
Table 8-2. Prompt Items for the DISPLAY PROMPT Command
Item
Description
string
Displays a user-supplied text string in the prompt.
ASSUME OBJECTTYPE
Displays the currently assumed object type. If no object type is
assumed, nothing additional is displayed
COMMAND NUMBER
Displays the current command line number.
CPU
Displays the number of the CPU in which SAFECOM is running.
DATE
Displays the current date.
END
Suppresses display of the equal sign in the SAFECOM prompt.
PROCESS NAME
Displays the current process name.
PROCESS NUMBER
Displays the current process number.
SUBVOLUME
Displays the current subvolume.
SYSTEM NAME
Displays the current system name.
SYSTEM NUMBER
Displays the current system number.
TIME
Displays the current time.
USER NAME
Displays your user name.
USER NUMBER
Displays your user ID.
VOLUME
Displays the current volume.
To understand the use of DISPLAY PROMPT, consider the following examples. The
first example shows how to change the prompt so that it includes the command line
number:
=DISPLAY PROMPT COMMAND NUMBER
2=
You can also combine several prompt items in sequence by enclosing them within
parentheses. The following example shows how to specify your user name, a space,
and the command line number:
2=DISPLAY PROMPT (USER NAME, “ ”, COMMAND NUMBER)
SUPPORT.JANE 3=
If you do not want the equal sign to be included in your prompt, enter END as the last
prompt item in the DISPLAY PROMPT command:
SUPPORT.JANE 3=DISPLAY PROMPT (COMMAND NUMBER, “ ”, END)
4
To reset your prompt to the standard SAFECOM prompt, execute the DISPLAY
PROMPT command with no prompt items specified:
4 DISPLAY PROMPT
=
Safeguard User’s Guide — 422089-020
8-2
Controlling INFO Report Warnings
Changing Display Options
Controlling INFO Report Warnings
SAFECOM normally displays a warning message if you issue an INFO DISKFILE
command for a file that has not been added to the Safeguard database. You can inhibit
the display of this message for an entire SAFECOM session by using the DISPLAY
WARNINGS command. This feature can be convenient if you are requesting
information on all files in a subvolume.
DISPLAY WARNINGS has three forms:
DISPLAY WARNINGS
OFF
turns off warning messages for the session.
DISPLAY WARNINGS ON
turns on warning messages for the session.
DISPLAY WARNINGS
turns on warning messages for the session.
For example, assume that the subvolume named sales contains three files, and two of
them have not been added to the Safeguard database. To check the authorization
records for these files:
=INFO DISKFILE $data.sales.*
The display shows:
$DATA.SALES
REPORT1
LAST-MODIFIED
OWNER
STATUS
18JUL92, 11:00
2,1
THAWED
WARNING-MODE
OFF
NO ACCESS CONTROL LIST DEFINED!
* WARNING * RECORD FOR DISKFILE $DATA.SALES.REPORT2 NOT FOUND
* WARNING * RECORD FOR DISKFILE $DATA.SALES.REPORT3 NOT FOUND
To turn off the warning messages:
=DISPLAY WARNINGS OFF
Then issue the same INFO command:
=INFO DISKFILE $data.sales.*
When the warnings are off, the display shows:
$DATA.SALES
REPORT1
LAST-MODIFIED
OWNER
STATUS
18JUL92, 11:00
2,1
THAWED
WARNING-MODE
OFF
NO ACCESS CONTROL LIST DEFINED!
The INFO DISKFILE command also has a WARNINGS option that allows you to turn
warnings on or off for a single INFO command.
Safeguard User’s Guide — 422089-020
8-3
Controlling INFO Report Headings
Changing Display Options
The INFO command WARNINGS option has three forms:
WARNINGS
OFF
turns off warning messages for this command.
WARNINGS ON
turns on warning messages for this command.
WARNINGS
turns on warning messages for this command.
For example, even if you turn off warnings for the session, you can use the following
INFO command to turn on warnings for the command:
=INFO DISKFILE $data.sales.*, WARNINGS ON
The display shows:
$DATA.SALES
REPORT1
LAST-MODIFIED
OWNER
STATUS
18JUL92, 11:00
2,1
THAWED
WARNING-MODE
OFF
NO ACCESS CONTROL LIST DEFINED!
* WARNING * RECORD FOR DISKFILE $DATA.SALES.REPORT2 NOT FOUND
* WARNING * RECORD FOR DISKFILE $DATA.SALES.REPORT3 NOT FOUND
Controlling INFO Report Headings
SAFECOM normally displays a heading line above each object reported on by an
INFO command. You can control the display of this heading line for an entire session
with the DISPLAY HEADERS command. This option allows you to either inhibit the
display of the heading line or specify that it should appear only once in an INFO report.
This feature can be convenient if you are requesting information on many objects in a
single INFO command.
DISPLAY HEADERS has four forms:
DISPLAY HEADERS OFF
turns off the heading line for the session.
DISPLAY HEADERS ON
turns on the heading line for the session.
DISPLAY HEADERS
turns on the heading line for the session.
DISPLAY HEADERS
ONCE
causes the heading line to appear once at the start of
the INFO report.
For example, assume that the subvolume sales contains three files that have been
added to the Safeguard database. To check the authorization records for these files:
=INFO DISKFILE $data.sales.*
Safeguard User’s Guide — 422089-020
8-4
Controlling the INFO DETAIL Option for a Session
Changing Display Options
The display shows:
$DATA.SALES
REPORT1
LAST-MODIFIED
OWNER
STATUS
WARNING-MODE
18JUL92, 11:00
2,1
THAWED
OFF
LAST-MODIFIED
OWNER
STATUS
WARNING-MODE
18JUL92, 11:02
2,1
THAWED
OFF
LAST-MODIFIED
OWNER
STATUS
WARNING-MODE
18JUL92, 11:05
2,1
THAWED
OFF
NO ACCESS CONTROL LIST DEFINED!
$DATA.SALES
REPORT2
NO ACCESS CONTROL LIST DEFINED!
$DATA.SALES
REPORT3
NO ACCESS CONTROL LIST DEFINED!
To eliminate the multiple heading lines and make the report more legible:
=DISPLAY HEADERS ONCE
Then issue the same INFO command:
=INFO DISKFILE $data.sales.*
The display shows:
$DATA.SALES
REPORT1
LAST-MODIFIED
OWNER
STATUS
WARNING-MODE
18JUL92, 11:00
2,1
THAWED
OFF
2,1
THAWED
OFF
2,1
THAWED
OFF
NO ACCESS CONTROL LIST DEFINED!
$DATA.SALES
REPORT2
18JUL92, 11:02
NO ACCESS CONTROL LIST DEFINED!
$DATA.SALES
REPORT3
18JUL92, 11:05
NO ACCESS CONTROL LIST DEFINED!
Controlling the INFO DETAIL Option for a
Session
Most INFO commands provide additional detail when you specify the DETAIL option.
This option applies to the current command only, not to the entire SAFECOM session.
To set the DETAIL option on for the entire session, use the DISPLAY DETAIL
command.
Safeguard User’s Guide — 422089-020
8-5
Displaying User IDs or User Names
Changing Display Options
DISPLAY DETAIL has three forms:
DISPLAY DETAIL
OFF
turns off the DETAIL option for the session.
DISPLAY DETAIL ON
turns on the DETAIL option for the session.
DISPLAY DETAIL
turns on the DETAIL option for the session.
If you use the DISPLAY DETAIL OFF command to turn off the detail option for a
session, you can override it for a single INFO command by specifying the DETAIL
option in that command. For example, assume you execute the following SAFECOM
commands:
=DISPLAY DETAIL OFF
=INFO DISKFILE report1, DETAIL
Even if you turn off the detail option for the session, the DETAIL option in the INFO
command causes details to be displayed by that command.
Displaying User IDs or User Names
By default, SAFECOM identifies users by their user IDs. To identify users by their user
names, use the DISPLAY USER command. This command gives you the option of
viewing users by either their user IDs or user names for a session.
DISPLAY USER has two forms:
DISPLAY USER AS NAME
identifies users by their user names (group
name.member name) during the current session.
DISPLAY USER AS
NUMBER
identifies users by their user IDs (group
number,member number) during the current
session.
The word AS is optional in these commands. You can include it to improve readability
of the command.
For example, assume that you use the following INFO command at the start of a
SAFECOM session to display the authorization record for the disk file quarter1:
=INFO DISKFILE quarter1
The display shows:
$DATA.SALES
QUARTER1
008,006
008,012
008,*
LAST-MODIFIED
OWNER
STATUS
23JUL92, 15:00
8,6
THAWED
R,W,E,P,C,O
R,W
R
Safeguard User’s Guide — 422089-020
8-6
WARNING-MODE
OFF
Displaying INFO Output as Commands
Changing Display Options
By default, the INFO report identifies users by their user IDs. To view user names
instead of user IDs, execute the following SAFECOM commands:
=DISPLAY USER AS NAME
=INFO DISKFILE quarter1
The display shows:
LAST-MODIFIED
$DATA.SALES
QUARTER1
ADMIN.BILL
ADMIN.LYNN
ADMIN.*
23JUL92, 15:00
OWNER
ADMIN.BILL
STATUS
THAWED
WARNING-MODE
OFF
R,W,E,P,C,O
R,W
R
Note. If a report contains a deleted user, that user is identified by user ID even if you are
displaying users as user names.
To return to the default setting of identifying users by their user IDs during this session:
=DISPLAY USER AS NUMBER
Displaying INFO Output as Commands
The DISPLAY AS COMMANDS command allows you to specify that the output of an
INFO command be displayed as SAFECOM commands rather than as a report.
DISPLAY AS COMMANDS has three forms:
DISPLAY AS COMMANDS
OFF
displays the output of an INFO command in report
form. This is the SAFECOM default setting.
DISPLAY AS COMMANDS ON
displays the output of an INFO command as
SAFECOM commands during the current session.
DISPLAY AS COMMANDS
displays the output of an INFO command as
SAFECOM commands during the current session.
For example, assume you execute the following INFO command at the start of a
SAFECOM session to display the authorization record for the disk file rpt01:
=INFO DISKFILE rpt01, DETAIL
Safeguard User’s Guide — 422089-020
8-7
Specifying a DISPLAY Command List
Changing Display Options
The display shows:
$DATA.SALES
RPT01
002,005
002,*
LAST-MODIFIED
OWNER
STATUS
26JUL92, 13:04
2,5
THAWED
R,W,E,P,
R
WARNING-MODE
OFF
O
OBJECT-TEXT-DESCRIPTION = ‘’Record Created’’
AUDIT-ACCESS-PASS = NONE
AUDIT-ACCESS-FAIL = NONE
LICENSE = OFF
PROGID = OFF
AUDIT-MANAGE-PASS = NONE
AUDIT-MANAGE-FAIL = NONE
CLEARONPURGE = OFF
PERSISTENT = OFF
By default, the INFO command output is displayed in report form. To view this output
as SAFECOM commands, rather than as a report:
=DISPLAY AS COMMANDS ON
=INFO DISKFILE rpt01, DETAIL
The display shows:
ADD
ALTER
DISKFILE
$DATA.SALES.RPT01
DISKFILE
$DATA.SALES.RPT01
ACCESS
002,005
(R,W,E,P,
ALTER DISKFILE
$DATA.SALES.RPT01
,&
ACCESS
002,*
(R
ALTER DISKFILE
$DATA.SALES.RPT01
ALTER DISKFILE $DATA.SALES.RPT01,&
OBJECT-TEXT-DESCRIPTION ’’Record Created’’
,&
0)
)
,OWNER
2,5
To return to the default setting of displaying the INFO command output in report form:
=DISPLAY AS COMMANDS OFF
Specifying a DISPLAY Command List
The DISPLAY command options described in this section can be executed as separate
commands or specified in a single command list. The command list is convenient if you
want to change several default settings at the start of a session. The following
examples show how to specify display options in a single command list.
Assume that you want to turn warnings off, display only a single heading, and list users
by their user names:
=DISPLAY WARNINGS OFF, HEADERS ONCE, USER AS NAME
Similarly, to turn off headings and turn on the detail option for the current session:
=DISPLAY HEADERS OFF, DETAIL
Safeguard User’s Guide — 422089-020
8-8
9
Working with Patterns
Background
The NonStop operating system groups files into subvolumes and volumes. Safeguard
provides three levels of access control to files using the volume, subvolume, and file
name. If all the files in a subvolume can have the same access requirements, then one
subvolume protection record will meet the requirements for many files. Similarly one
volume protection record would suffice if all the files and subvolumes on a single
volume have the same access requirements. However, as the size of disks increase,
the less likely a single volume protection record would suffice. As a result, the number
of protection records tends to increase as the capacity of disk drives increase, and the
potential number of disk files increases.
A common practice is to use a naming convention for volumes, subvolumes and file
names to distinguish domains (application A versus application B), roles (production
versus test versus support) and contents (such as hourly or daily log files and queues
versus databases versus control files versus support files.)
A naming convention introduces a discernible pattern of characters into the name of a
volume, subvolume, or file. As the number of volumes, subvolumes, and file names
that require distinct access controls increase, so does the administrative burden
required to create and manage the corresponding access control lists.
Patterns reduce administrative burden by allowing one pattern to match many
subvolumes or filenames. That is, a pattern will be a template that represents a fully
qualified file name. Thus there is no concept of the three levels of searching done with
normal protection records: volume, subvolume, and filename.
Searching can involve scanning many patterns, and may result in more than one
match. Thus we categorize patterns as to their degree of generality.
Introduction
What is a Pattern?
In the G06.25 release of patterns, a pattern must contain at least one wildcard in either
or both the subvolume or filename. A pattern cannot contain a wildcard in the volume
name.
Since patterns contain wildcards as part of their name, they do not represent a specific
file. Patterns are metadata. When a wildcard is encountered in a pattern, the intent of
the command has to be distinguished between using that wildcard as part of the
pattern and using the wildcard as a search character.
Safeguard User’s Guide — 422089-020
9-1
How do Patterns Differ From What was Used
Before?
Working with Patterns
How do Patterns Differ From What was Used Before?
There are now two types of protection records that can secure disk files:
•
•
Diskfile protection records
Diskfile-pattern protection records
Diskfile protection records represented a one to one mapping of a protection record to
a disk file, or subvolume, or volume. Furthermore, for that diskfile protection record to
be legally entered into Safeguard, the disk file or subvolume was required to exist, or at
least the PERSISTENT option used.
Diskfile-pattern protection records have a one to many mapping of protection records
to diskfiles. Diskfile pattern protection records only represent fully qualified disk file
names, and cannot represent just subvolumes or volumes. However, patterns can be
used that will match all filenames in a subvolume ($DATA.SUBVOL.*), or all filenames
in all subvolumes in a volume ($DATA.*.*).
Pattern Examples
The following examples show some patterns that can be used on a G06.25 system,
and some illegal patterns that are not allowed.
Legal Protection Record Patterns
$D0201.*.*
A very general protection record that covers all diskfiles on $D0201.
$D0201.APP*.*
A pattern protection record that secures all diskfiles in subvolumes on $D0201 that
begin with APP.
$D0201.APPLOG.D*
A pattern protection record that secures diskfiles in $D0201.APPLOG that begin
with D.
$D0201.APPLOG.D???
A protection record that secures diskfiles with names that begin with D and are
exactly four characters long.
$D0201.SRC*.*H
A protection record that secures diskfiles on $D0201 that are in subvolumes that
begin with SRC, and filenames that have an H as the last letter.
Illegal Protection Record Patterns
$D0???.*.*
Safeguard User’s Guide — 422089-020
9-2
Pattern Generality
Working with Patterns
Not a legal pattern protection record because it has wildcards in the volume name.
$D0201.*
Not a legal pattern because there is only a subvolume component, and not a
diskfile component. However, when adding this pattern into Safecom, the current
subvolume will be taken from the environment. The pattern will be translated into a
legal pattern: $D0201.subvol.*.
$SYSTEM.SYS00.OSIMAGE
Not a legal pattern because it contains no wildcards.
SYS??.OSIMAGE
Not a legal pattern because it does not contain a volume component. However,
when adding this pattern into Safecom, the current volume will be taken from the
environment.
Pattern Generality
Given a pattern, the farther left a wildcard is in that pattern, the more general it is. Also,
the asterisk (*) is more general than the question mark (?).
HP uses that principal to decide which pattern to use when more than one pattern
describes a file; for example, $DATA1.A*.* is more general than $DATA1.A*.B*.
Consider these files:
1. $DATA1.APPLPROD.SERVER1
2. $DATA1.APPLTEST.SERVER1
3. $DATA1.APPLCNTL.STARTUP
4. $DATA1.APPLDEVL.BUILD
Files 1,2,3 and 4 all match pattern “$DATA1.A*.*”. However, file 4 is the only match for
pattern $DATA1.A*.B*.
Which pattern would be used for file 4?
1. $DATA1.A*.*
2. $DATA1.A*.B*
Since both patterns have the same first 10 characters “$DATA1.A*.”, only look at what
is left. “*” and “B*”. The wildcard in “B*” is further to the right, it is more specific and will
be the one chosen.
Consider these patterns:
1. $DATA1.APPL*.SERVER?
2. $DATA1.APPL????.SERVER?
Safeguard User’s Guide — 422089-020
9-3
One-Dimensional Search
Working with Patterns
Both of these patterns match files 1 and 2. However, only one protection record can be
used to protect these files. The more specific pattern is used, which in this case is
pattern 2, because the APPL? is more specific than the APPL*.
One-Dimensional Search
A one-dimensional search is a search using the volume only, the subvolume only, or
the filename only. A multi-dimensional search is one in which any two or three
dimensions are searched. Since patterns contain wildcards as part of their name, they
do not represent a specific file. Patterns are metadata. When a wildcard is encountered
in a pattern, the intent of the command has to be distinguished between using that
wildcard as part of the pattern and using the wildcard as a search character. Since a
pattern cannot have a wildcard in the volume name, when a wildcard is encountered in
the volume name a one-dimensional search is implied. When you use SAFECOM or
SPI to find protection records that have already been added, searches are used with
the other commands. When you use the INFO DISKFILE-PATTERN command,
wildcards can be interpreted as either pattern characters, or search characters. The
application of these wildcards depends on the context of the wildcard, and whether or
not the ALL option is used.
Consider the command INFO DISKFILE-PATTERN $DATA*.PROD?.DB*. Safeguard
treats the volume wildcard as a search character, and the wildcards in the subvolume
and filename as pattern characters. Safeguard will search each volume that matches
$DATA* for the specific pattern PROD?.DB*. This search is referred to as a onedimensional search. At most, one pattern per volume would be returned.
Multi-Dimensional Search
Using the command modifier ALL implies that a multi-dimensional search is requested.
It is possible for more than one pattern per volume to be returned. Multi-dimensional
searching of patterns can present a problem. How do you indicate which wildcards in
“$DATA*.B*.C*” are meant to be used to search for patterns that contain a wildcard?
For example, if it is desired to list all patterns that start with the letter C in the filename;
for example “C*”, how would the user tell Safeguard that “C*” is a search string and not
part of the pattern? The G06.25 release implements a simple command attribute “ALL”,
that tells Safeguard that all of the wildcards in the pattern are to be treated as search
characters.
For example, “INFO DISKFILE-PATTERN $DATA*.B*.C*,ALL” tells Safeguard to look
for all patterns that match “B*.C*” on all volumes that match “$DATA*”. This is a multidimensional search, because it is searching multiple volumes, and looking on each
volume for multiple patterns that match "B*.C*". On the other hand, "INFO DISKFILEPATTERN $DATA*.B*.C*" tells Safeguard to look for the pattern "B*.C*" on all volumes
that match "$DATA*". This is a one-dimensional search.
Consider the command INFO DISKFILE-PATTERN $DATA*.PROD?.DB*, ALL. The
presence of the command modifier ALL tells Safeguard that all the wildcards are to be
treated as search characters. Safeguard will search each volume that matches $DATA*
for all patterns that can be described by PROD?.DB*.
Safeguard User’s Guide — 422089-020
9-4
Safeguard Pattern Configuration
Working with Patterns
Safeguard Pattern Configuration
Use the Safeguard configuration attribute CHECK-DISKFILE-PATTERN to enable,
disable, and control the search order for pattern and non-pattern protection records.
•
OFF
Specifies no pattern searches will occur. This configuration is equivalent to
Safeguard versions prior to G06.25.
•
LAST
Specifies that non-pattern searching will occur first, using non-pattern based
protection records, as in Safeguard versions prior to G06.25. If that search returns
NORECORD then pattern based protection records will be searched.
•
FIRST
Specifies that pattern based protection records will be searched first. If that search
returns NORECORD then non-pattern based protection records will be searched.
•
ONLY
Specifies that only pattern based protection records will be searched. Non-pattern
protection records will be ignored.
•
MID
Specifies that pattern based protection records will be searched:
°
After the diskfile protection record search returns NORECORD when DirectionDiskfile is set to Filename-First.
°
Before the diskfile protection record search, when the Direction-Diskfile is set
to VOLUME-FIRST, and the VOLUME and SUBVOLUME protection record
search returns NORECORD.
Note. The MID option is supported only on systems running J06.08 and later J-series
RVUs and H06.19 and later H-series RVUs.
Safeguard searches patterns so that the most specific pattern is used, and behaves
similar to Direction-Diskfile = Filename-First and Combination-Diskfile = First-ACL.
Introducing a new method to determine access control impacts the multilevel method
used today. Rather than try to merge the pattern method into each level, you will make
each method mutually exclusive, but able to coexist. You will provide a global control
that will specify which method is to be used first. Only when the primary method
returns NORECORD will the secondary method be used. This access result will be
combined with the result returned from the SEEP in accordance with existing policy. To
maintain backwards compatibility, this control will also disable pattern matching
entirely.
Safeguard User’s Guide — 422089-020
9-5
Safeguard Pattern Configuration
Working with Patterns
The pattern protection records are stored in a new file in each volume’s SAFE
subvolume. The file name is SAFE.PATGUARD.
The integrity of the existing SAFE.GUARD files must be maintained. Therefore, the
existing rules for managing non-pattern protection records will be maintained, even
though the access result would be satisfied using a pattern protection record.
Therefore, when a file is created, renamed, or deleted, the existing legacy logic will be
employed to manage the appropriate SAFE.GUARD file. The exception to this rule is
the ONLY option.
Setting CHECK-DISKFILE-PATTERN to ONLY implies that maintaining the integrity of
the SAFE.GUARD files is not desired. This would be used by installations that have no
need to fall back to using the SAFE.GUARD files, such as installations that have not
used SAFEGUARD protection records prior to patterns; for example, installations that
required only authentication services. The use of ONLY is not recommended for
installations that have a substantial number of non-pattern protection records.
In order to avoid operational issues for installations that do have non-pattern protection
records, HP recommends you backup the SAFE.GUARD files, set the configuration to
FIRST, add pattern protection records and delete non-pattern protection records,
examine the audit trail, and when no accesses have been determined by non-patterns,
change the configuration to ONLY.
When ONLY is specified, you should limit use of ADD, ALTER, DELETE, FREEZE, or
THAW DISKFILE, SUBVOL, and VOLUME commands. This will preserve the content
of the SAFE.GUARD files. If the recommended approach is used, then the
SAFE.GUARD files will continue to be empty.
To fall back from ONLY, HP recommends you set the configuration to LAST, add
VOLUME, SUBVOL, and DISKFILE protection records, examine the audit trail, and
when no accesses have been determined by patterns, change the configuration to
OFF. Alternatively, the configuration can change from ONLY to FIRST or LAST rather
than OFF, depending upon the user requirements for mixing patterns and non-patterns.
Table 9-1 describes CHECK-DISKFILE-PATTERN settings. The 2 columns Normal and
Pattern indicate intermediate results returned from lookups of normal and pattern
protection records. The columns OFF, FIRST, LAST, and ONLY indicate the final
outcome after considering both outcomes from normal and pattern lookups, based on
the CHECK-DISKFILE-PATTERN setting.
Safeguard User’s Guide — 422089-020
9-6
Safeguard Pattern Configuration
Working with Patterns
Table 9-1. CHECK-DISKFILE-PATTERN settings
Result from:
CHECK-DISKFILE-PATTERN value
Normal
Pattern
OFF
FIRST
LAST
ONLY
Y
Y
Y1
Y4
Y3
Y6
Y
N
Y1
N4
Y3
N6
Y
NR
Y1
Y2
Y3
NR6
N
Y
N1
Y4
N3
Y6
N
N
N1
N4
N3
N6
N
NR
N1
N2
N3
NR6
NR
Y
NR1
Y4
Y5
Y6
NR
N
NR1
N4
N5
N6
NR
NR
NR1
NR2
NR5
NR6
N the request is denied (NO)
Y the request is granted (YES)
NR no norecord was found (NORECORD)
Check-Diskfile-Pattern OFF searches only for normal protection records.
Check-Diskfile-Pattern FIRST searches for a pattern protection record, and if the result is NORECORD, then
searches for a normal protection record.
Check-Diskfile-Pattern LAST searches for a normal protection record, and if the result is NORECORD, then
searches for a pattern protection record.
Check-Diskfile-Pattern ONLY searches only for a pattern protection record.
1
2
3
4
5
6
PATTERNOFF Check-Diskfile-Pattern is OFF and the OUTCOME is determined by only searching for a
normal protection record.
NORMALFIRST Check-Diskfile-Pattern is FIRST and the OUTCOME is determined by a normal protection
record because the pattern search resulted in norecord.
NORMALLAST Check-Diskfile-Pattern is LAST and the OUTCOME is determined by a normal protection
record.
PATTERNFIRST Check-Diskfile-Pattern is FIRST and the OUTCOME is determined by a pattern protection
record.
PATTERNLAST Check-Diskfile-Pattern is LAST and the OUTCOME is determined by a pattern protection
record because the normal search resulted in norecord.
PATTERNONLY Check-Diskfile-Pattern is ONLY and the OUTCOME is determined by only search for a
pattern protection record.
Table 9-2 describes CHECK-DISKFILE-PATTERN settings when it is set to MID and
the Direction-Diskfile is set to Filename-First. In this case DISKFILE-PATTERN ACL
gets evaluated after the DISKFILE ACL evaluation. If the DISKFILE-PATTERN ACL
evaluation results in NORECORD, Normal ACL evaluates SUBVOLUME and VOLUME
ACL. The first column indicates the DISKFILE ACL setting and the second column
indicates the DISKFILE PATTERN setting. Last three columns indicate the final
Safeguard User’s Guide — 422089-020
9-7
Safeguard Pattern Configuration
Working with Patterns
access evaluation based on the Safeguard global configuration attribute
COMBINATION-DISKFILE values FIRST-ACL, FIRST-RULE, and ALL.
Table 9-2. CHECK-DISKFILE-PATTERN settings when value is MID and Direction
Diskfile is Filename-First
Configuration
Direction Diskfile:Filename-First
Evaluation (Combination Diskfile)
DISKFILE ACL
DISKFILE PATTERN ACL
FIRST-ACL
FIRST-RULE
ALL
Y
Y
Permit
Permit
Permit
Y
N
Permit
Permit
Deny
Y
NR
Permit
Permit
Normal
N
Y
Deny
Deny
Deny
N
N
Deny
Deny
Deny
N
NR
Deny
Deny
Deny
NM
Y
Deny
Permit
Deny
NM
N
Deny
Deny
Deny
NM
NR
Deny
Normal
Deny
NR
Y
Permit
Permit
Permit
NR
N
Deny
Deny
Deny
NR
NR
Normal
Normal
Normal
Y - ACL evaluates a YES
N - ACL evaluates a NO
NR - No ACL exists (NORECORD)
NM - ACL contains no mention
Permit - Access permitted
Deny - Access Denied
Normal - Normal ACL evaluation for SUBVOL and VOLUME
Note. The MID option is supported only on systems running J06.08 and later J-series RVUs
and H06.19 and later H-series RVUs.
Table 9-3 describes CHECK-DISKFILE-PATTERN settings when it is set to MID and
the Direction-Diskfile is set to Volume-First. In this case DISKFILE-PATTERN ACL is
evaluated after VOLUME and SUBVOLUME ACL evaluation. If the DISKFILEPATTERN ACL evaluation results in NORECORD, Normal ACL evaluates DISKFILE
ACL. The first column indicates the VOLUME ACL setting, the second column
indicates the SUBVOLUME ACL setting, and the third column indicates the DISKFILE
PATTERN setting. The last three columns depict the final access evaluation based on
Safeguard User’s Guide — 422089-020
9-8
Safeguard Pattern Configuration
Working with Patterns
the Safeguard global configuration attribute COMBINATION-DISKFILE values FIRSTACL, FIRST-RULE, and ALL.
Table 9-3. CHECK-DISKFILE-PATTERN settings when value is MID and Direction
Diskfile is Volume-First
Configuration
Direction Diskfile: Volume-First
Evaluation (Combination Diskfile)
VOLUME ACL
SUBVOLUME ACL
DISKFILE
PATTERN ACL
FIRST-ACL
FIRST-RULE
ALL
Y
Y
Y
Permit
Permit
Permit
Y
Y
N
Permit
Permit
Deny
Y
Y
NR
Permit
Permit
Normal
Y
N
Y
Permit
Permit
Deny
Y
N
N
Permit
Permit
Deny
Y
N
NR
Permit
Permit
Deny
Y
NM
Y
Permit
Permit
Deny
Y
NM
N
Permit
Permit
Deny
Y
NM
NR
Permit
Permit
Deny
Y
NR
Y
Permit
Permit
Permit
Y
NR
N
Permit
Permit
Deny
Y
NR
NR
Permit
Permit
Normal
N
Y
Y
Deny
Deny
Deny
N
Y
N
Deny
Deny
Deny
N
Y
NR
Deny
Deny
Deny
N
N
Y
Deny
Deny
Deny
N
N
N
Deny
Deny
Deny
N
N
NR
Deny
Deny
Deny
N
NM
Y
Deny
Deny
Deny
N
NM
N
Deny
Deny
Deny
N
NM
NR
Deny
Deny
Deny
N
NR
Y
Deny
Deny
Deny
N
NR
N
Deny
Deny
Deny
N
NR
NR
Deny
Deny
Deny
NM
Y
Y
Deny
Permit
Deny
Y - ACL evaluates a YES
N - ACL evaluates a NO
NR - No ACL exists (NORECORD)
NM - ACL contains no mention
Permit - Access permitted
Deny - Access Denied
Normal - Normal ACL evaluation for DISKFILE
Safeguard User’s Guide — 422089-020
9-9
Safeguard Pattern Configuration
Working with Patterns
Table 9-3. CHECK-DISKFILE-PATTERN settings when value is MID and Direction
Diskfile is Volume-First
Configuration
Direction Diskfile: Volume-First
Evaluation (Combination Diskfile)
VOLUME ACL
SUBVOLUME ACL
DISKFILE
PATTERN ACL
FIRST-ACL
FIRST-RULE
ALL
NM
Y
N
Deny
Permit
Deny
NM
Y
NR
Deny
Permit
Deny
NM
Y
Y
Deny
Deny
Deny
NM
N
N
Deny
Deny
Deny
NM
N
NR
Deny
Deny
Deny
NM
N
Y
Deny
Permit
Deny
NM
NM
N
Deny
Deny
Deny
NM
NM
NR
Deny
Normal
Deny
NM
NM
Y
Deny
Permit
Deny
NM
NR
N
Deny
Deny
Deny
NM
NR
NR
Deny
Normal
Deny
NR
NR
Y
Permit
Permit
Permit
NR
Y
N
Permit
Permit
Deny
NR
Y
NR
Permit
Permit
Normal
NR
Y
Y
Deny
Deny
Deny
NR
N
N
Deny
Deny
Deny
NR
N
NR
Deny
Deny
Deny
NR
N
Y
Deny
Permit
Deny
NR
NM
N
Deny
Deny
Deny
NR
NM
NR
Deny
Normal
Deny
NR
NM
Y
Permit
Permit
Permit
NR
NR
N
Deny
Deny
Deny
NR
NR
NR
Normal
Normal
Normal
Y - ACL evaluates a YES
N - ACL evaluates a NO
NR - No ACL exists (NORECORD)
NM - ACL contains no mention
Permit - Access permitted
Deny - Access Denied
Normal - Normal ACL evaluation for DISKFILE
Note. The MID option is supported only on systems running J06.08 and later J-series RVUs
and H06.19 and later H-series RVUs.
Safeguard User’s Guide — 422089-020
9 - 10
Working with Patterns
SAFECOM Diskfile-Pattern Commands
Examples
•
To set diskfile pattern searches to be performed after NORECORD is returned for
non-pattern checking:
ALTER SAFEGUARD, CHECK-DISKFILE-PATTERN LAST
•
To set diskfile pattern searches to be performed first, if the result is NORECORD
non-pattern checking will be done:
ALTER SAFEGUARD, CHECK-DISKFILE-PATTERN FIRST
•
To disable diskfile pattern searches (that is, perform only non-pattern checking):
ALTER SAFEGUARD, CHECK-DISKFILE-PATTERN OFF
•
To set diskfile pattern searches to be the only search (that is, to disable non-pattern
checking for diskfile protection records):
ALTER SAFEGUARD, CHECK-DISKFILE-PATTERN ONLY
SAFECOM Diskfile-Pattern Commands
The ALTER, DELETE, FREEZE, INFO, and THAW commands search for existing
protection records. Both one-dimensional and multi-dimensional searches are
supported for these commands. The ADD command on the other hand, cannot perform
a multi-dimensional search. That is, if all of the wildcards were expanded during an
ADD operation, the resultant pattern would have no wildcards, which, for the G06.25
release, is an illegal pattern. Therefore, it is illegal to specify “ALL” on the ADD
command. However, the ADD command does support one-dimensional searches when
wildcards are used in the volume name.
Patterns can be extremely powerful so protection record level warning mode on the
patterns are implemented so that they may be tested. Patterns do not represent actual
files so they are implicitly “persistent”, that is, they do not go away when a file is
deleted because the pattern could possibly represent another file that does exist.
Since pattern protection records are persistent and describe multiple objects they are
not deleted when a file is deleted or renamed, nor will a pattern protection record be
created when a file is created or renamed. This follows the existing logic of how a
persistent non-pattern protection record is managed. A pattern cannot be specified on
a Default-Protection-Record.
Table 9-2 lists the SAFECOM diskfile-pattern commands. The examples in this section
illustrate the use of these commands. For the detailed syntax of the diskfile pattern
Safeguard User’s Guide — 422089-020
9 - 11
ADD DISKFILE-PATTERN
Working with Patterns
security commands, see the Safeguard Reference Manual. Patterns may be used in
SPI also.
Table 9-4. Diskfile-Pattern Commands
Command
Action
ADD DISKFILE-PATTERN
Adds a diskfile pattern to the Safeguard database by creating
an authorization record for the file.
ALTER DISKFILEPATTERN
Changes one or more of the security attributes in the diskfilepattern authorization record.
DELETE DISKFILEPATTERN
Removes a diskfile pattern from the Safeguard database by
deleting the disk-file authorization record.
FREEZE DISKFILEPATTERN
Suspends access authority to diskfiles described by the
diskfile pattern. No one except a diskfile owner, the primary
owner's group manager, and the super ID can gain access to
the diskfiles described by the frozen pattern.
INFO DISKFILE-PATTERN
Displays the security attributes of the diskfile-pattern
authorization record.
RESET DISKFILEPATTERN
Resets one or more default diskfile-pattern attributes to values
predefined by the Safeguard software. Any subsequent ADD
DISKFILE-PATTERN commands use these predefined
defaults for attributes not specified in the ADD DISKFILEPATTERN command.
SET DISKFILE-PATTERN
Establishes default diskfile-pattern attributes that you specify.
Any subsequent ADD DISKFILE-PATTERN commands use
these defaults for attributes not specified in the ADD
DISKFILE command.
SHOW DISKFILEPATTERN
Displays the current default attributes for diskfile-patterns. Any
subsequent ADD DISKFILE-PATTERN commands use these
defaults for attributes not specified in the ADD DISKFILEPATTERN command.
THAW DISKFILEPATTERN
Restores access authorities to diskfiles described by the
diskfile pattern for users on the access control list.
ADD DISKFILE-PATTERN
ADD DISKFILE-PATTERN Examples
•
To add a protection record that describes all production data base files that reside
on $DATA with subvolume names that begin with PROD:
ADD DISKFILE-PATTERN $DATA.PROD*.*, &
ACCESS PROD.* (R,W)
•
To add a diskfile pattern for all files in subvolume $A.B:
ADD DISKFILE-PATTERN $A.B.*, ACCESS *.* (R,W)
Safeguard User’s Guide — 422089-020
9 - 12
ALTER DISKFILE-PATTERN
Working with Patterns
ALTER DISKFILE-PATTERN
ALTER DISKFILE-PATTERN Examples
•
To alter a diskfile pattern to give SUPER.SUPER read and write access:
ALTER DISKFILE-PATTERN $DATA.APLOGS.LOG*, &
ACCESS SUPER.SUPER (R,W)
•
To alter all diskfile pattern that match $DATA*.APLOGS.LOG*:
ALTER DISKFILE-PATTERN $DATA*.APLOGS.LOG*, ALL, &
ACCESS SUPER.SUPER (R,W)
DELETE DISKFILE-PATTERN
DELETE DISKFILE-PATTERN Examples
•
To delete the diskfile pattern $ABC.*.*:
DELETE DISKFILE-PATTERN $ABC.*.*
•
To delete all diskfile patterns that match the search pattern $ABC.*.*:
DELETE DISKFILE-PATTERN $ABC.*.*, ALL
•
To delete all diskfile patterns that match the search pattern $AB*.D*.*F
DELETE DISKFILE-PATTERN $AB*.D*.*F, ALL
FREEZE DISKFILE-PATTERN
FREEZE DISKFILE-PATTERN Example
•
To freeze all diskfiles that match all patterns that specify a subvolume name
beginning with the characters TEST:
FREEZE DISKFILE-PATTERN $*.TEST*.*, ALL
It is valid in a search pattern to have a wildcard in the volume portion of a diskfile
name.
INFO DISKFILE-PATTERN
Finding Added Patterns
For example, if you had the following patterns:
1. $DATA1.A*.*
2. $DATA1.A*.B*
3. $DATA2.A*.*
Safeguard User’s Guide — 422089-020
9 - 13
INFO DISKFILE-PATTERN
Working with Patterns
4. $DATA3.A*.B*
INFO DISKFILE-PATTERN $DATA1.A*.* would return pattern 1.
INFO DISKFILE-PATTERN $DATA1.A*.*, ALL would return patterns 1 and 2.
INFO DISKFILE-PATTERN $DATA*.A*.* would return patterns 1 and 3 (one
dimensional search).
INFO DISKFILE-PATTERN $DATA*.A*.*, ALL would return patterns 1, 2, 3, & 4 (a
multi-dimensional search).
If you added this pattern, ADD DISKFILE-PATTERN $*.*.*, to the above patterns, a
one-dimensional search that will add the pattern “*.*” to every volume that matches
“$*”.
If you had volumes $DATA1, $DATA2, and $DATA3, the following patterns would
be added:
5. $DATA1.*.*
6. $DATA2.*.*
7. $DATA3.*.*
If you now did INFO DISKFILE-PATTERN $*.*.*, which patterns would be
returned? Patterns 1, 2, 3, 4, 5, 6, and 7 are wrong. The answer is 5, 6, and 7.
That command is a one dimensional search. It is asking for the specific pattern “*.*”
on all volumes that match “$*”.
If you use INFO DISKFILE-PATTERN $*.*.*, ALL, you get all patterns. This is a multidimensional search, that is asking for any patterns that match “*.*” from all volumes
that match “$*”.
“ALL” directs Safeguard to treat all wildcards as search characters. If you omit “ALL”,
the wildcards in the subvolume and filename are the actual characters you are looking
for.
INFO DISKFILE-PATTERN Examples
•
To display the diskfile pattern $DATA.*TEST.* (that is, display a single diskfile
pattern) using display user as name:
=DISPLAY USER AS NAME
=INFO DISKFILE-PATTERN $DATA.*TEST.*
This output appears:
LAST-MODIFIED OWNER STATUS WARNING-MODE
$DATA.*TEST
* 28SEP04, 5:44 MLH1.MGR THAWED OFF
\KONA.PROD.CARLY R
\KONA.TEST.JIMMY R,W
Safeguard User’s Guide — 422089-020
9 - 14
RESET DISKFILE-PATTERN
Working with Patterns
GROUP TEST R,W,E,P,C
GROUP \KONA.TEST R
\*.*.*
•
To display the diskfile pattern $A.B.*:
INFO DISKFILE-PATTERN $A.B.*
•
To display all diskfile patterns that match the search pattern $A.B.*:
INFO DISKFILE-PATTERN $A.B.*, ALL
A multi-dimensional search ignores the setting of WARNINGS. Therefore no
warning message is displayed.
•
To display all diskfile patterns that match the search pattern $A.B.* and suppress
warning/error messages:
INFO DISKFILE-PATTERN $A.B.*, ALL, WARNINGS OFF
A multi-dimensional search ignores the setting of WARNINGS. Therefore no
warning message is displayed.
•
To display all diskfile patterns that match the search pattern $A.B.*:
INFO DISKFILE-PATTERN $A.B.*, WARNINGS OFF
A warning message will be displayed if no matching pattern is found.
•
To display all diskfile patterns that have the volume name starting with the letter A
(that is, display multiple patterns):
INFO DISKFILE-PATTERN $A*.*.*, ALL, DETAIL
•
To display multiple diskfile patterns that have warning-mode enabled:
INFO DISKFILE-PATTERN $*.*.*, ALL, WHERE WARNING-MODE
RESET DISKFILE-PATTERN
RESET DISKFILE-PATTERN Example
To reset WARNING-MODE to its predefined value (OFF) for diskfile patterns:
RESET DISKFILE-PATTERN WARNING-MODE
SET DISKFILE-PATTERN
SET DISKFILE-PATTERN Example
To set the default owner to be PROD.DBA:
SET DISKFILE-PATTERN OWNER PROD.DBA
Safeguard User’s Guide — 422089-020
9 - 15
SHOW DISKFILE-PATTERN
Working with Patterns
SHOW DISKFILE-PATTERN
SHOW DISKFILE-PATTERN Example
To show the current default values for the diskfile pattern:
SHOW DISKFILE-PATTERN
THAW DISKFILE-PATTERN
THAW DISKFILE-PATTERN Example
To thaw all diskfile patterns that have a volume name ending in the letter P:
THAW DISKFILE-PATTERN $*P.*.*, ALL
SAFECOM Saved-Diskfile-Pattern Commands
Table 9-5 lists the SAFECOM saved-diskfile-pattern commands. The examples in this
section illustrate the use of these commands. For the detailed syntax of the SAFECOM
saved-diskfile-pattern security commands, see the Safeguard Reference Manual.
Patterns may be used in SPI also.
Note. Use the SYNC command to create diskfile-pattern protection records on a volume using
the saved-diskfile-pattern protection records. For information on the SYNC command, see the
Safeguard Reference Manual.
Table 9-5. Saved-Diskfile-Pattern Commands (page 1 of 2)
Command
Action
ADD SAVED-DISKFILEPATTERN
Adds a saved-diskfile-pattern record.
ALTER SAVED-DISKFILEPATTERN
Changes one or more security attributes in the saved-diskfilepattern record.
DELETE SAVEDDISKFILE-PATTERN
Removes a pattern record for a saved-diskfile-pattern.
FREEZE SAVEDDISKFILE-PATTERN
Suspends access authority to patterns described by the diskfile pattern. Only the pattern owner, primary owner’s group
manager, and the local super ID can access the frozen pattern.
INFO SAVED-DISKFILEPATTERN
Displays the current attribute values of the specified saved-diskfile-pattern.
RESET DISKFILEPATTERN
Resets the current saved-diskfile-pattern attribute values to
values predefined by the Safeguard software. Any subsequent
ADD SAVED-DISKFILE-PATTERN commands use these predefined defaults for attributes not specified in the ADD SAVEDDISKFILE-PATTERN command.
Safeguard User’s Guide — 422089-020
9 - 16
ADD SAVED-DISKFILE-PATTERN
Working with Patterns
Table 9-5. Saved-Diskfile-Pattern Commands (page 2 of 2)
Command
Action
SET DISKFILE-PATTERN
Establishes default diskfile-pattern attributes that you specify.
Any subsequent ADD SAVED-DISKFILE-PATTERN
commands use these defaults for attributes not specified in
the ADD SAVED-DISKFILE-PATTERN command.
SHOW DISKFILEPATTERN
Displays the current default attributes for the attributes
associated with object type. Any subsequent ADD SAVEDDISKFILE-PATTERN commands use these defaults for
attributes not specified in the ADD SAVED-DISKFILEPATTERN command.
THAW DISKFILEPATTERN
Restores a frozen saved-diskfile-pattern protection record.
ADD SAVED-DISKFILE-PATTERN
ADD SAVED-DISKFILE-PATTERN Examples
1. To add a saved-diskfile-pattern record that describes all files that reside on $DATA
with subvolume names that begin with PROD:
ADD SAVED-DISKFILE-PATTERN $DATA.PROD*.*, &
ACCESS PROD.* (R,W)
2. To add a saved-diskfile-pattern record for all files in subvolume $A.B:
ADD SAVED-DISKFILE-PATTERN $A.B.*, ACCESS *.* (R,W)
3. To add a saved-diskfile-pattern record for every disk file named FILE followed by
one alphanumeric character that is in a subvolume REPORT on every volume
beginning with $DATA:
ADD SAVED-DISKFILE-PATTERN $DATA*.REPORT.FILE?
ALTER SAVED-DISKFILE-PATTERN
ALTER SAVED-DISKFILE-PATTERN Examples
1. To alter a saved-diskfile-pattern record to enable read and write access for super
ID:
ALTER SAVED-DISKFILE-PATTERN $DATA.APLOGS.LOG*, &
ACCESS SUPER.SUPER (R,W)
2. To alter all the saved-diskfile-pattern records that match $DATA*.APLOGS.LOG*:
ALTER SAVED-DISKFILE-PATTERN $DATA*.APLOGS.LOG*, ALL, &
ACCESS SUPER.SUPER (R,W)
Safeguard User’s Guide — 422089-020
9 - 17
DELETE SAVED-DISKFILE-PATTERN
Working with Patterns
This command alters the saved-diskfile-pattern for all matching patterns. For
example, if the following patterns exist, they are altered:
$DATA01.APLOGS.LOGAPR*
$DATA1.APLOGS.LOG*
$DATA123.APLOGS.LOG?
$DATA.APLOGS.LOG????
$DATABLE.APLOGS.LOGON?1A
DELETE SAVED-DISKFILE-PATTERN
DELETE SAVED-DISKFILE-PATTERN Examples
1. To delete the saved-diskfile-pattern $ABC.*.*:
DELETE SAVED-DISKFILE-PATTERN $ABC.*.*
2. To delete all saved-diskfile-patterns that match the search pattern $ABC.*.*:
DELETE SAVED-DISKFILE-PATTERN $ABC.*.*, ALL
3. To delete all saved-diskfile-patterns that match the search pattern $AB*.D*.*F:
DELETE DISKFILE-PATTERN $AB*.D*.*F, ALL
FREEZE SAVED-DISKFILE-PATTERN
FREEZE SAVED-DISKFILE-PATTERN Example
To freeze all saved-diskfile-pattern protection records that specify a subvolume name
beginning with the characters TEST:
FREEZE SAVED-DISKFILE-PATTERN $*.TEST*.*, ALL
INFO SAVED-DISKFILE-PATTERN
INFO SAVED-DISKFILE-PATTERN Examples
1. To display the saved-diskfile-pattern $DATA.*TEST.*:
=INFO SAVED-DISKFILE-PATTERN $DATA.*TEST.*
The display appears as:
LAST-MODIFIED
$DATA.*TEST
*
OWNER
STATUS
255,255
WARNING-MODE
28SEP04, 5:44 THAWED OFF
\KONA.PROD.CARLY R
\KONA.TEST.JIMMY R,W
GROUP TEST
R,W,E,P,C
Safeguard User’s Guide — 422089-020
9 - 18
RESET SAVED-DISKFILE-PATTERN
Working with Patterns
GROUP \KONA.TEST R
\*.*.*
R
2. To display the saved-diskfile-pattern $DATA.*TEST.*, DETAIL:
=INFO SAVED-DISKFILE-PATTERN $DATA.*TEST.*,DETAIL
The display appears as:
LAST-MODIFIED
OWNER
STATUS WARNING-MODE
$DATA.*TEST
* 28SEP04, 5:44 255,255 THAWED
\KONA.PROD.CARLY
\KONA.TEST.JIMMY
GROUP TEST
GROUP \KONA.TEST
\*.*.*
R
R,W
R,W,E,P,C
R
R
AUDIT-ACCESS-PASS = NONE
AUDIT-ACCESS-FAIL = NONE
CREATION
USER NAME
USER TYPE
USER NODE
TIMESTAMP
OFF
AUDIT-MANAGE-PASS = NONE
AUDIT-MANAGE-FAIL = NONE
LAST-MODIFIED
SUPER.SUPER
testman
USER (ID 255,255)
ALIAS (ID 164,255)
LOCAL
LOCAL
28SEP2004, 05:28:48.870 28SEP2004, 05:44:22.588
3. To display the saved-diskfile-pattern protection records for all volumes starting with
“$DATA” with subvolumes starting with “PROD”:
INFO SAVED-DISKFILE-PATTERN $DATA*.PROD*.*, ALL
4. To display multiple saved-diskfile-pattern protection records with warning-mode
enabled:
INFO SAVED-DISKFILE-PATTERN $*.*.*, ALL, WHERE WARNING-MODE
RESET SAVED-DISKFILE-PATTERN
RESET SAVED-DISKFILE-PATTERN Example
To reset WARNING-MODE to its predefined value (OFF) for saved-diskfile- patterns:
RESET SAVED-DISKFILE-PATTERN WARNING-MODE
SET SAVED-DISKFILE-PATTERN
SET SAVED-DISKFILE-PATTERN Example
To set the default owner to PROD.DBA:
SET SAVED-DISKFILE-PATTERN OWNER PROD.DBA
Safeguard User’s Guide — 422089-020
9 - 19
SHOW SAVED-DISKFILE-PATTERN
Working with Patterns
SHOW SAVED-DISKFILE-PATTERN
SHOW SAVED-DISKFILE-PATTERN Example
To display the current default values for the diskfile pattern:
SHOW SAVED-DISKFILE-PATTERN
THAW SAVED-DISKFILE-PATTERN
THAW SAVED-DISKFILE-PATTERN Example
To thaw all the saved-diskfile-pattern records that have a volume name ending in the
letter P:
THAW SAVED-DISKFILE-PATTERN $*P.*.*, ALL
Safeguard User’s Guide — 422089-020
9 - 20
A
Guardian File Security
The Guardian environment automatically provides a basic level of security for all disk
files. You can manipulate Guardian file security through TACL and FUP. In particular,
you can:
•
•
•
•
Display your default security string with the TACL WHO command
Change your default security string with the DEFAULT program
Display the security string for a specific file with the TACL FILEINFO command or
the FUP INFO command
Change the security string for a file you own with the FUP SECURE command
You cannot change the security string for files that are protected by the Safeguard
subsystem.
This appendix summarizes Guardian security for disk files and reviews the methods
you can use to verify and change that security. For complete details on these subjects,
refer to the Guardian User's Guide.
File Security String
Each disk file has an owner and a Guardian security string. You are the owner of a file
if you create that file. When you create a file, it is automatically given the default
security string defined for you. You can change your default security string or specify a
different security string for an individual file. In addition, you can transfer ownership of
a file to another user.
The security string specifies a level of security for each of four types of access to a disk
file: read (R), write (W), execute (E), and purge (P). These types of access are similar
to the Safeguard authorities defined in an access control list. However, there is no
owner authority in a security string. Although you can transfer ownership of a disk file
under Guardian security, you cannot share ownership.
The security string consists of four characters. Each position in the string sets the
security for one of four disk file operations:
RWEP
•
•
•
•
The first position (R) specifies who can read the file.
The second position (W) specifies who can write to the file.
The third position (E) specifies who can execute the file.
The fourth position (P) specifies who can purge the file.
In each position, you can use one of the seven codes shown in Table A-1 to specify
who can perform the associated operation. These codes typically designate groups of
users, unlike Safeguard file security, in which individual users can be given specific
levels of security.
Safeguard User’s Guide — 422089-020
A-1
Displaying Default Security
Guardian File Security
Table A-1. Guardian File Security Settings
Code
Access
O
Only the owner of the file on the local system can access the file.
U
Only the owner of the file on the local system or on the network can access the
file.
G
Any member of the owner's group on the local system can access the file.
C
Any member of the owner's group, either on the local system or on the network,
can access the file.
A
Any user on the local system can access the file.
N
Any user on the local system or on the network can access the file.
–
Only the local super ID can perform the designated operation.
For example, a security string of AUAU specifies that any local user can read and
execute the file, but only the owner, anywhere on the network, can write to or purge the
file.
Displaying Default Security
To display your current default security string, enter WHO at the TACL prompt:
For example, the following command produces a display that includes your default
security string:
3> WHO
Unless you change this default security string, it applies to all files you create.
Changing Default Security
You can change your default security string with the DEFAULT program. When you
specify a new default security string, you must enclose it in quotes. For example, the
following DEFAULT command changes the default security string to AGOG:
4> DEFAULT, "AGOG"
When you change your default security string or any default, you are changing the
default that will be saved at the end of your current session. Under normal
circumstances, the new default value does not take effect until you log off and then log
on again to start a new session. If you want the new values to take effect immediately,
enter the VOLUME command with no parameters:
5> VOLUME
Safeguard User’s Guide — 422089-020
A-2
Displaying File Security
Guardian File Security
Displaying File Security
You can examine the security string for a specific file or all files in your current
subvolume. Both the TACL FILEINFO command and the FUP INFO command display
security strings for your files.
For example, enter the following command to examine the security string for every file
in your current subvolume:
6> FILEINFO
Another way to examine the security string for every file is to use the FUP INFO
command:
7> FUP INFO *
Similarly, you can display the security string for a specific file by including the file
name:
8> FILEINFO ACCT4
You can also include a file name in the FUP INFO command:
9> FUP INFO ACCT4
If you use these commands to examine the security string for a file that has been
added to the Safeguard database, the security string appears as "****" (four asterisks).
Changing a File's Security String
After you have created a file, you can change its security string with the FUP SECURE
command. For example, to change the security setting for the file acct4 to NUNU:
10> FUP SECURE ACCT4, "NUNU"
If a file has been added to the Safeguard database, you cannot change its security
string because the Safeguard software controls access to the file.
Sample Procedures
The following procedures illustrate two different ways to set the security string to
GOGO for two disk files named acct4 and acct5. These procedures are intended to
serve as basic examples. You could use other combinations of commands and
techniques, as described in the Guardian User's Guide.
Using the DEFAULT Program to Set the Security String
The first method creates two new files using the default security string. It assumes that
you must change the default string before creating the new files.
Safeguard User’s Guide — 422089-020
A-3
Changing the Security String Through FUP
Guardian File Security
1. Use the TACL WHO command to check your current default security string:
1> WHO
Home terminal: $HOLDEN
TACL process: \MEL.$G633
Primary CPU: 8 (TXP)
Backup CPU: 9 (TXP)
Default Segment File: $BILLS.#5582
Pages allocated: 12 Pages Maximum: 1024
Bytes Used:18924 (0%) Bytes Maximum: 2097152
Current volume: $BILLS.HOLDEN
Saved volume:
$BILLS.HOLDEN
Userid: 7,124 Username: PAY.HOLDEN Security: "NUNU"
2>
2. Execute the DEFAULT command to change the default security string:
2> DEFAULT, "GOGO"
THE DEFAULT <file-security> HAS BEEN CHANGED TO "GOGO"
3>
3. Log off to save the new default and then log on again. (Or enter a VOLUME
command with no parameters.)
4. Create the new files:
1> FUP CREATE ACCT4
CREATED - $BILLS.HOLDEN.ACCT4
2> FUP CREATE ACCT5
CREATED - $BILLS.HOLDEN.ACCT5
3>
5. Verify the security string for each file.
3> FILEINFO ACCT4
$BILLS.HOLDEN
Code
ACCT4
0
4> FILEINFO ACCT5
EOF Last Modification
Owner
RWEP
PExt SExt
0
5-May-93 10:41:02
7,124 "GOGO"
2
2
$BILLS.HOLDEN
ACCT4
5>
Code
0
EOF Last Modification
Owner
RWEP
PExt SExt
0
5-May-93 10:41:02
7,124 "GOGO"
2
2
Changing the Security String Through FUP
This method uses FUP to create the files and change their security strings. It does not
alter the default string.
Safeguard User’s Guide — 422089-020
A-4
Changing the Security String Through FUP
Guardian File Security
1. Create the new files:
1> FUP
File Utility Program - T9074C31 - (02AUG93)
System \MEL
Copyright Tandem Computers Incorporated 1981, 1983, 1985-1993
-CREATE ACCT4
CREATED - $BILLS.HOLDEN.ACCT4
-CREATE ACCT5
CREATED - $BILLS.HOLDEN.ACCT4
-
2. Change the security string for each file:
-SECURE ACCT4, "GOGO"
-SECURE ACCT5, "GOGO"
-
3. Verify the security strings and then exit from FUP:
-INFO ACCT4
CODE
BLOCK
$BILLS.HOLDEN
ACCT4
-INFO ACCT5
0
CODE
BLOCK
$BILLS.HOLDEN
ACCT5
-EXIT
2>
EOF
EOF
0
LAST MODIF
10:52
TYPE
REC
TYPE
REC
7,124 GOGO
LAST MODIF
10:52
OWNER RWEP
OWNER RWEP
7,124 GOGO
Safeguard User’s Guide — 422089-020
A-5
Guardian File Security
Changing the Security String Through FUP
Safeguard User’s Guide — 422089-020
A-6
B
Protecting Your Terminal
As a general user, you need to take certain precautions to protect your terminal and
prevent unauthorized access to your system. Namely, you must ensure the secrecy of
your password, and you should log off or lock your terminal if you plan to leave it
unattended.
Protecting Your Password
To log on to your system, you identify yourself by entering your user name (or user ID)
and password. If someone else tries to log on with your user ID or user name, that
person must also enter the correct password. Because your user ID and user name
are not private, it is important for you to protect the secrecy of your password.
When you are given your initial password, you should change it immediately. If you do
not have an initial password, you should create one for yourself. If the Safeguard
subsystem is running on your system, you can change your password when you log
on. To change a password or create an initial one after you log on, use the
PASSWORD program as described in the Guardian User's Guide.
With the Safeguard software, you might also be required to change your password at
regular intervals. In addition, there might be a restriction on the frequency with which
you can change your password. To check for these conditions, display your user
authentication record as described in Section 6, Obtaining User and Alias Information.
If the Safeguard subsystem is running on your system, you are notified of your
password expiration date when you log on.
In general, when you change your password, select one that is easy for you to
remember but difficult for someone else to guess. To minimize the risk of discovery,
avoid writing down your password.
When you choose a password, do not select a word that could be easily associated
with you, such as your nickname. Long passwords are usually better than short
passwords, but passwords cannot exceed eight characters. Good passwords
frequently contain a mixture of uppercase and lowercase characters.
Logging Off
Always log off or lock your terminal when you plan to leave it unattended. If you do not
log off and someone uses your terminal to manipulate sensitive files, an audit trail
might implicate you as the intruder.
In addition, you should log off before you allow someone else to use your terminal.
TACL allows someone else to log on to your terminal even if you are not logged off.
Even though this second log on causes you to be logged off automatically, TACL
retains your currently defined variables, such as macros and function-key definitions.
Also, several pages of previously displayed screen information might still be available
to the new user. This situation might present a potential security breach.
Safeguard User’s Guide — 422089-020
B-1
Logging Off
Protecting Your Terminal
As a final precaution in logging off, always clear your screen. Usually, TACL is
configured to handle this automatically. If your terminal screen is not cleared
automatically when you log off, be sure that no sensitive data is left on the screen.
Safeguard User’s Guide — 422089-020
B-2
C
SAFECOM Command Syntax
This appendix summarizes the syntax of the SAFECOM commands presented in this
manual. The commands are listed in alphabetical order.
In every command that manages a system object, object-type can be omitted if it is
the current assumed object type.
Remember that SAFECOM reserved words can be abbreviated. Typically, a reserved
word can be abbreviated to its first three characters unless a longer abbreviation is
necessary to distinguish between similar reserved words.
For a more thorough coverage of syntax, including examples, see the Safeguard
Reference Manual.
Common Syntax Elements
The following syntax elements are common to many SAFECOM commands:
user-spec
can be any of the following:
group-name . member-name
group-name . *
* . *
group-num , member-num
group-num , *
* , *
net-user-spec
can be any of the following:
[\node-spec.]group-name . member-name
[\node-spec.]group-name . *
[\node-spec.]* . *
[\node-spec.]group-num , member-num
[\node-spec.]group-num , *
[\node-spec.]* , *
node-spec
has the form:
* | node-name
node-name
specifies the system name.
Safeguard User’s Guide — 422089-020
C-1
SAFECOM Command Syntax
SAFECOM Command Syntax
object-type
can be any of the following:
DISKFILE
DISKFILE-PATTERN
SUBVOLUME
PROCESS
SUBPROCESS
(DISKFILE can also be spelled as DISCFILE.)
object-list
has the following form:
{
object-spec
}
{ ( object-spec [ , object-spec ] ... ) }
object-spec
for disk files, can be either a fully or a partially qualified disk-file name or a
disk-file set.
for diskfile patterns, can be fully qualified diskfile-pattern name or set.
for subvolumes, can be either a fully or a partially qualified subvolume name or
a subvolume set.
for processes, can be either a fully or a partially qualified process name.
for subprocesses, can be either a fully or a partially qualified subprocess name.
object-name
is the name of an existing protected object of the same type as object-type. It is
used in the LIKE clause.
object-attribute
is any valid security attribute for the appropriate object type of the command. A
complete list of object attributes appears under the SET object-type command.
SAFECOM Command Syntax
The following diagrams show the syntax of each SAFECOM command presented in
this manual.
ADD
object-type
object-list [ , ]
[ LIKE object-name | object-attribute ]
[ , object-attribute
] ...
Safeguard User’s Guide — 422089-020
C-2
SAFECOM Command Syntax
SAFECOM Command Syntax
ALTER
object-type
object-list [ , ]
{ LIKE object-name | object-attribute }
[ , object-attribute ] ...
ASSUME [ object-type ]
DELETE
object-type
object-list
DISPLAY command [ , command ] ...
command is one of the following DISPLAY commands:
[ AS ] COMMANDS [ ON | OFF ]
DETAIL [ ON | OFF ]
HEADERS [ ON | OFF | ONCE ]
PROMPT [ prompt-item ]
[ ( prompt-item [ , prompt-item ] ) ... ]
USER [ AS ] { NAME | NUMBER }
WARNINGS [ ON | OFF ]
prompt-item can be:
“string”
ASSUME OBJECTTYPE
COMMAND NUMBER
CPU
DATE
END
PROCESS NAME
PROCESS NUMBER
SUBVOLUME
SYSTEM NAME
SYSTEM NUMBER
TIME
USER NAME
USER NUMBER
VOLUME
ENV [ / OUT listfile / ] [ env-parm [ , env-parm ] ... ]
env-parm is one of the following:
SYSTEM
VOLUME
OUT
LOG
ASSUME
WARNINGS
USER
HEADERS
Safeguard User’s Guide — 422089-020
C-3
SAFECOM Command Syntax
SAFECOM Command Syntax
DETAIL
SUMMARY
EXIT
FC [
[
[
[
string
“string”
linenum
-linenum
FREEZE
]
]
]
]
object-type
object-list
HELP [ / OUT listfile / ]
[
[
[
[
[
command-name
keyword
COMMANDS
ALL
*
]
]
]
]
]
HISTORY [ lines
]
[ RESET LAST ]
[ RESET ALL ]
INFO [ / OUT listfile / ]
{ alias
ALIAS
| ( alias [ , alias ] ... ) }
[ [ , ] option ] [ , option ] ...
option is one of the following:
GENERAL
DETAIL
AUDIT
CI
OSS
REMOTEPASSWORD
DEFAULT-PROTECTION
GROUP
OWNER-LIST
TEXT-DESCRIPTION
WHERE expression
Note. The OWNER-LIST attribute is supported only on systems running G06.27 and later
G-series RVUs and H06.07 and later H-series RVUs.
Note. The TEXT-DESCRIPTION attribute is supported only on systems running G06.27 and
later G-series RVUs and H06.06 and later H-series RVUs.
Safeguard User’s Guide — 422089-020
C-4
SAFECOM Command Syntax
SAFECOM Command Syntax
INFO [ / OUT listfile / ]
object-type
object-list [ , ]
[ display-option ] [ , display-option ]
INFO [ / OUT listfile / ]
{ user-spec
USER
| ( user-spec [ , user-spec ] ... ) }
[ [ , ] option ] [ , option ] ...
option is one of the following:
GENERAL
DETAIL
AUDIT
CI
OSS
REMOTEPASSWORD
DEFAULT-PROTECTION
GROUP
OWNER-LIST
TEXT-DESCRIPTION
WHERE expression
Note. The OWNER-LIST and TEXT-DESCRIPTION attributes are supported only on systems
running H06.06 and later H-series RVUs and G06.27 and later G-series RVUs.
LOG [ logfile ]
O[BEY] [ / OUT listfile / ] command-file
OUT [ listfile ]
RESET
object-type
[ [ , ] object-attribute-keyword ]
[ , object-attribute-keyword ] ...
SET
}
]
object-type [ , ] { LIKE object-name | object-attribute
[ , object-attribute ] ...
object-attribute is one of the following:
OWNER [owner-id]
OWNER-LIST [[-]user-list]
ACCESS access-spec [ ; access-spec ] ...
AUDIT-ACCESS-PASS [audit-spec]
Safeguard User’s Guide — 422089-020
C-5
SAFECOM Command Syntax
SAFECOM Command Syntax
AUDIT-ACCESS-FAIL [audit-spec]
AUDIT-MANAGE-PASS [audit-spec]
AUDIT-MANAGE-FAIL [audit-spec]
OBJECT-TEXT-DESCRIPTION "[text]"
Disk files also have the following attributes:
LICENSE
{ ON | OFF }
PROGID
{ ON | OFF }
CLEARONPURGE { ON | OFF }
PERSISTENT
{ ON | OFF }
TRUST
{ ME | SHARED | OFF } (H-series only)
AUDIT-PRIV-LOGON { ON | OFF}
access-spec has the following form:
user-list [-] [DENY] authority-list
user-list is one of the following:
{
net-user-spec
}
{ ( net-user-spec [ , net-user-spec ] ... ) }
authority-list is one of the following:
{
authority
}
{ ( authority [ , authority ] ... ) }
{
*
}
authority is one of the following:
for disk files
R[EAD], W[RITE],
E[XECUTE],P[URGE], C[REATE],
O[WNER]
for diskfile patterns
R[EAD], W[RITE],
E[XECUTE],P[URGE], C[REATE],
O[WNER]
for subvolumes
R[EAD], W[RITE],
E[XECUTE],P[URGE], C[REATE],
O[WNER]
for processes
R[EAD], W[RITE], C[REATE],P[URGE],
O[WNER]
for subprocesses
R[EAD], W[RITE], O[WNER]
audit-spec is one of the following:
ALL
LOCAL
REMOTE
NONE
SHOW [ / OUT listfile / ]
object-type
Safeguard User’s Guide — 422089-020
C-6
SAFECOM Command Syntax
SAFECOM Command Syntax
SYNTAX [ ONLY ] ON | OFF
SYSTEM [ \system-name ]
THAW
object-type
object-list
VOLUME [ $volume
]
[ $volume.subvolume ]
[
subvolume ]
? [
[
[
[
!
string
“string”
linenum
-linenum
[
[
[
[
]
]
]
]
string
“string”
linenum
-linenum
]
]
]
]
Note. The OWNER-LIST attribute is supported only on systems running G06.27 and later
G-series RVUs and H06.07 and later H-series RVUs.
Note. The TEXT-DESCRIPTION attribute is supported only on systems running G06.27 and
later G-series RVUs and H06.06 and later H-series RVUs.
Note. The AUDIT-PRIV-LOGON attribute is supported only on systems running H06.11 and
later H-series RVUs and G06.32 and later G-series RVUs.
Safeguard User’s Guide — 422089-020
C-7
SAFECOM Command Syntax
SAFECOM Command Syntax
Safeguard User’s Guide — 422089-020
C-8
Glossary
access control list. A list associated with an object that itemizes the subjects authorized to
access that object and shows the access authorities granted to each subject.
ACL. See access control list.
alias. An alternate name for logging on to the system.
attribute. A security characteristic assigned to an object to apply special protection to that
object. Examples are CLEARONPURGE and LICENSE.
audit. The Safeguard function that records attempts by subjects to access objects or gain
access to the system and attempts by subjects to manage object authorization records.
audit trail. A series of audit records used in tracing the origin of audited events.
authentication. The process of verifying the identity of a user.
authentication record. A type of record maintained by the Safeguard software to validate a
user's identity.
authority. An access privilege granted to a subject to access an object. Examples are
READ authority and WRITE authority.
authorization. A function performed by the Safeguard software to allow a subject access to
an object.
authorization record. A type of record maintained by the Safeguard software to determine
the subjects granted access to an object and the security attributes to be applied to the
object.
CLEARONPURGE attribute. A security attribute for disk files that causes null characters to
be written over a file's residue after the file is purged.
LICENSE attribute. A security attribute for disk files that licenses nonprivileged users to run
program files that contain privileged object code.
object. A system resource to which access is controlled by the Safeguard software.
Examples are volumes, subvolumes, disk files, diskfile patterns, devices, and
processes.
password. A character string associated with a user ID or user name and used to
authenticate a user's identity.
PERSISTENT attribute. A Safeguard security attribute for disk files that causes the
authorization record for a file to be retained if the file itself is purged.
Safeguard User’s Guide — 422089-020
Glossary - 1
primary owner
Glossary
primary owner. The owner of a Safeguard protection record whose user ID appears as the
OWNER attribute in the record.
PROGID attribute. A security attribute for disk files that contain object code. When
PROGID is ON, the user running the process obtains the privileges of the file's primary
owner.
SAFECOM. The Safeguard command interpreter.
Secondary owners. The owners of a Safeguard user or alias authentication record, in
addition to the primary owner, whose user IDs appear as the OWNER-LIST attribute in
the record.
subject. A logged-on user.
TRUST attribute. A performance attribute for program files. Setting TRUST to ME or
SHARED indicates Safeguard that the program file can be trusted to not access I/O
buffers during process execution, resulting in improved performance. The TRUST
attribute is valid only on H-series systems.
Safeguard User’s Guide — 422089-020
Glossary - 2
Index
A
C
Abbreviating reserved words 3-2, 7-17
ACCESS attribute 1-2
ACCESS authorities
for disk files 3-7
for disk volumes and subvolumes 4-2
for processes and subprocesses 5-1
Access control lists 3-7
deleting an entry 3-11
freezing and thawing 3-14
modifying 3-9
specifying 3-7, 3-8
using one to define another 3-13
ADD DISKFILE command 3-1, 3-4, 3-8
ADD DISKFILE-PATTERN command 9-12,
9-16
ADD PROCESS command 5-1
ADD SAVED-DISKFILE-PATTERN
command 9-16, 9-17
ADD SUBVOLUME command 4-2
Alias name 2-1
ALTER DISKFILE command 3-1, 3-4, 3-9
ALTER DISKFILE-PATTERN
command 9-12, 9-16
ALTER SAVED-DISKFILE-PATTERN
command 9-16, 9-17
ASSUME command 7-2
Attributes
default 3-5
for disk files 3-15
Auditing
defined 1-4
for disk files 3-15
CLEARONPURGE disk-file attribute 3-17
Command files (SAFECOM)
adding comments 7-12
executing 7-13
to set up default access control
lists 7-13
using 7-11
Command interpreter
See SAFECOM
Command syntax (SAFECOM) C-2
Commands
abbreviating 3-2, 7-17
for controlling DISPLAY options 8-1
for disk files 3-1
for diskfile patterns 9-12, 9-16
session-control 7-2
Comments
in SAFECOM command files 7-12
in SAFECOM command lines 7-2
Continuing SAFECOM commands 7-4
Controlling default attributes 3-5
Correcting mistakes in a SAFECOM
command line 7-9
CTRL/Y, equivalent to EXIT command 7-2,
7-10
B
Batch mode (SAFECOM) 7-11
Blind password 2-2
BREAK key 7-10
D
Default attributes
displaying 3-5, 3-8
restoring to original values 3-6
setting for disk files 3-6
DELETE DISKFILE command 3-1, 3-22
DELETE DISKFILE-PATTERN
command 9-12, 9-16
DELETE SAVED-DISKFILE-PATTERN
command 9-16, 9-18
Deleting an access control list entry 3-11
Safeguard User’s Guide — 422089-020
Index - 1
E
Index
DETAIL option of INFO DISKFILE
command 3-16
Direction Diskfile Filename first note 9-8
Direction Diskfile Volume First note 9-9
Disk file
attributes, setting defaults 3-6
authorization record 3-4
commands 3-1
OWNER attribute 3-4
removing from Safeguard control 3-22
securing 3-1
valid ACCESS authorities 3-7
Diskfile pattern
commands 9-12, 9-16
DISPLAY commands 8-1
DISPLAY options
AS COMMANDS 8-7
DETAIL 8-5
HEADERS 8-4
in a command list 8-8
PROMPT 8-1
USER AS NAME 8-6
USER AS NUMBER 8-6
WARNINGS 8-3
Displaying default attributes 3-5, 3-8
E
ENV command 7-2, 8-1
Errors in SAFECOM command files 7-14
Establishing a default access list 3-7
Execute-and-quit mode (SAFECOM) 7-11
Executing a SAFECOM command file 7-13
EXIT command 7-2, 7-10
Exiting SAFECOM 7-1, 7-10
Expired password 2-4
F
FC command 7-2, 7-9
File security string A-1
FREEZE DISKFILE command 3-1, 3-14
FREEZE DISKFILE-PATTERN
command 9-12, 9-16
FREEZE SAVED-DISKFILE-PATTERN
command 9-16, 9-18
Freezing access control lists 3-14
FUP commands A-1
G
Getting alias information 6-6
Getting help 7-5
Getting user information 6-1
Grace period for password change 2-4, 6-4
H
HEADERS option 8-4
HELP command 7-2, 7-5
HISTORY command 7-7
I
INFO ALIAS command 6-1, 6-4, 6-6
INFO DISKFILE command
description 3-1
DETAIL option 3-16, 8-5
example 3-4, 3-9
INFO DISKFILE-PATTERN command
description 9-12, 9-16
INFO SAVED-DISKFILE-PATTERN
command 9-16, 9-18
INFO USER command, display options
for 6-2
Interactive mode (SAFECOM) 7-1
L
Last logon message 2-2
Leaving SAFECOM 7-1, 7-10
LICENSE disk-file attribute 3-19
LIKE keyword 3-14
Line termination within comments 7-4, 7-13
LOG command 7-2, 7-5
Logging off B-1
Safeguard User’s Guide — 422089-020
Index - 2
M
Index
Logging on 2-2
Logon dialog 2-2
Logon prompt 2-1
RESET DISKFILE-PATTERN
command 9-12, 9-16
RESET SAVED-DISKFILE-PATTERN
command 9-19
Restoring default attributes 3-6
RUN command 7-17
M
Managing a SAFECOM session 7-2
S
O
OBEY command 7-2
Object authorization 1-2
OUT option (SAFECOM) 7-2, 7-5
Output from SAFECOM, directing 7-5
OWNER attribute for disk file authorization
record 3-4, 3-16
Ownership 3-16
P
Password 2-2
changing 2-5, B-1
changing with blind passwords 2-3
expired 2-4
grace period for change 2-4, 6-4
protecting B-1
PRIV-LOGON -viii, 3-3
PRIV-LOGON { ON | OFF} 3-22
Processes
securing 5-1
valid ACCESS authorities 5-1
PROGID disk-file attribute 3-20
PROMPT option 8-1
Protecting an object 4-1
R
Redirecting SAFECOM output 7-5
Remote system logon 2-6
Removing a disk file from Safeguard
control 3-22
Reserved words, abbreviating 3-2, 7-17
RESET DISKFILE command 3-1, 3-6, 3-7
SAFECOM
batch mode 7-11
command
files 7-11, 7-12
line length 7-4
prompt 7-1, 8-1
syntax C-2
command abbreviation 3-2, 7-17
comments 7-2, 7-12
description 1-7, 7-1
execute-and-quit mode 7-11
executing a command file 7-13
exiting 7-1, 7-10
interactive mode 7-1
LOGON command 2-1
modes of operation 7-1
multiple-line commands 7-4
online help 7-5
OUT option 7-5
preserving defaults when leaving 7-10
prompt 8-1
redirecting output 7-5
running other programs 7-17
session-control commands 7-2
starting 7-1
syntax elements C-1
syntax-checking mode 7-18
Safeguard capabilities
auditing 1-1
object authorization 1-1
user authentication 1-1
Safeguard User’s Guide — 422089-020
Index - 3
T
Index
Safeguard, compared to standard
security 1-4
Securing disk files 3-1
Securing disk subvolumes 4-2
Securing processes 5-1
Securing subprocesses 5-1
Semicolon and line termination 7-4, 7-13
Session-control commands
(SAFECOM) 7-2
SET DISKFILE command 3-1, 3-6, 3-7
SET DISKFILE-PATTERN command 9-12,
9-16, 9-17
SET SAVED-DISKFILE-PATTERN
command 9-19
Setting default attributes 3-6
SHOW DISKFILE command 3-1, 3-5, 3-8
SHOW DISKFILE-PATTERN
command 9-12, 9-16, 9-17
SHOW SAVED-DISKFILE-PATTERN
command 9-20
SMON (Security Monitor) 1-7
SMP (Security Manager Process) 1-7
Special considerations for subvolumes 4-2
Specifying access
when adding a disk file 3-8
with default access control list 3-8
with the ALTER DISKFILE
command 3-9
Specifying ownership of disk file
authorization record 3-16
Standard security, compared to
Safeguard 1-4
Starting SAFECOM 7-1
STATUS field of INFO display 3-15
Subprocesses
securing 5-1
valid ACCESS authorities 5-1
Subvolumes
securing 4-2
valid ACCESS authorities 4-2
Syntax-checking mode 7-18
SYSTEM command 7-2
T
TACL commands A-1
THAW DISKFILE command 3-1, 3-15
THAW DISKFILE-PATTERN
command 9-12, 9-16, 9-17
THAW SAVED-DISKFILE-PATTERN
command 9-20
Thawing access control lists 3-14
TIME command 2-1
TRUST disk file attribute 3-3, 3-21
U
User alias 2-1
User authentication 1-2
User ID 2-1, 8-6
User name 2-1, 8-6
V
VOLUME command 7-2
W
WARNINGS option 8-3
WHERE LICENSE option 3-20
WHERE PROGID option 3-20
Wild-card characters 7-15
Working with access control lists 3-7
Special Characters
! (exclamation point) command
executes a previous command 7-8
& (ampersand)
continuation character 7-4
- (minus sign)
deletes an access control list
entry 3-11
- - (two hyphens)
for comments 7-12
; (semicolon)
causing line termination 7-4, 7-13
Safeguard User’s Guide — 422089-020
Index - 4
Special Characters
Index
= (equal sign)
SAFECOM command prompt 7-1
? (question mark) command
displays a previous command 7-8
Safeguard User’s Guide — 422089-020
Index - 5
Special Characters
Index
Safeguard User’s Guide — 422089-020
Index - 6