1
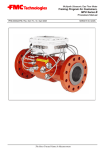
Smith Meter® Rotary Vane Meters
PRIME 4
Service
Issue/Rev. 0.4 (7/11)
Bulletin MN01041
Contents
Trouble Shooting ......................................................................................................................................... Page 2
Genuine Smith Meter Parts . ....................................................................................................................... Page 2
Special Tools and Fixtures ......................................................................................................................... Page 2
Disassembly and Inspection ...................................................................................................................... Page 3
Reassembly ................................................................................................................................................. Page 5
Service Records .......................................................................................................................................... Page 7
The Most Trusted Name In Measurement
General
Genuine Smith Meter Parts
To insure the best performance of the PRIME Meter, the
step-by-step procedures outlined in this manual should
be followed. Review the entire manual prior to disassembly or repair of the meter to fully understand
the requirements.
The PRIME Meter is approved by several weights
and measures authorities including NIST and CCA. In
order to maintain these approvals, it is essential that all
replacement parts are genuine Smith Meter Parts.
Trouble Shooting
No Pulses Generated
Preset Configuration
Check that the AccuLoad (electronic preset counter)
is configured for contact input.
No Power
Check to see if there is power at the sensor. To do this,
put the common lead of a voltmeter on the terminal
to which the black wire of the sensor is connected.
Measure the voltage on the red wire of the sensor.
If it is not plus 12 or 24 Vdc ± 10%, check the power
supply.
Debris on Sensor Tip
If pulse failure occurred right after having the sensor
out of the housing, look for debris at the tip of the
sensor. The sensor must be completely seated in
the housing. If it is just 0.020" away from seating, no
pulses will be generated.
Broken Blade
Whenever the meter has been drained, there is the
danger of hydraulic shock breaking a blade during
the subsequent start-up. If there is flow through the
meter and it is not making a light tapping sound (it
may be necessary to place your ear on the meter to
hear this sound), there is probably a broken blade
and the rotor is not rotating. It will be necessary to
drain the meter and remove the cover to inspect for
a broken blade (see instructions below).
If there is no broken blade and the rotor turns freely,
the lack of pulses is probably due to a faulty sensor.
Be sure to replace with the proper sensor (Part No.
646592-4-01 is for single pulse output, 646596-4-01
is for dual pulse output).
Excessive Noise
The PRIME Meter makes very little noise when operating, especially at flow rates under 750 gpm. If the
meter is making a noticeable rapid tapping sound, the
cam following sections of the blades may be worn.
It will be necessary to drain the meter and remove
the cover to inspect for blade wear (see instructions
below).
With the cover removed, rotate the rotor until one
blade is horizontal. Try to move the blade in and out
of the rotor. If there is a noticeable amount of free play
(more than 0.020"), the blade is excessively worn
and needs to be replaced (see instructions below).
Page 2 • MN01041
Special Tools and Fixtures
In addition to ordinary hand tools, the following tools and
fixtures will be useful.
An assortment of leaf-type Feeler Gauges soldered
to a 15" extension rod
Part Number
Thickness
515252-1
0.0015"
515252-2
0.002"
515252-3
0.003"
515252-4
0.004"
515252-5
0.005"
515252-6
0.006"
515252-7
0.007"
515252-8
0.008"
515252-9
0.009"
Spider (Part No. 554109-0-01) to center the shaft
during assembly and clearance verification.
Ball end Allen Wrench (3/16")
Platform for the rotor assembly that is at least 1.5"
thick and 10" in diameter or square with a 7.5" diameter hole through. The top surface should be smooth
(Figure 1).
Internal retaining ring pliers.
Two 0.375-16 NC X 1.5" long eyebolts for cover
removal.
Thread locking compound (Part No. 643917-4-01)
for the rotor cover screws.
10"
(253)
10"
(253)
1.5"
(38)
7.5" Dia.
Figure 1 – Platform
Issue/Rev. 0.4 (7/11)
Disassembly and Inspection
Caution: Disconnect power (12 Vdc) before working
on the meter.
The following clearance table can be used to judge
the degree of wear on various parts of the meter. It is
a good idea to measure and record the clearances as
the meter is disassemble.
Clearance Table
Measurement
Blade Slot
Blade End Play
Blade Tip to Housing
Blade Cam Followers Over Cam
Rotor to Block
Rotor Axial End Play (Rotor End Faces
vs. Housing Bosses)
Minimum
0.0025"
0.0065"
0.0055"
0.001"
0.0035"
0.0015"
Maximum
0.0055"
0.0095"
0.0045"
0.004"
0.0055"
0.0065"
Remove Meter from Line
Drain the meter thoroughly prior to disconnecting the
J-box wiring. The 1/4 NPT pipe plug on the meter cover
is used to drain the meter. Depending upon the system
piping, draining may take several minutes.
To lift the meter, use the eyebolt threaded into the boss
on the housing (vertical installation) or the hole in the
gusset (horizontal installation).
It is possible to examine the internals of the meter while
it is installed in the line as mentioned in the Trouble
Shooting section. This is done by removing the pulse
sensor housing from the cover then removing the cover
from the meter. However, service is not recommended
without the complete removal of the meter from the line.
This is because it is difficult to test spin the rotor.
Remove the hex socket head pipe plug and retainer ring.
The socket head pipe plug can be found under the warning tag located on the sensor housing (Figures 3 and 4).
Caution: The sensor is magnetized and can attract
small pieces of metal at the tip. Be certain the sensor
tip and sensor housing are absolutely clean prior
to reinstalling the sensor. The slightest bit of debris
can increase the distance between the sensor and
the pulse target gear inside the meter and prevent
the sensor from producing pulses.
Figure 3
WARNING!
Do not remove the sensor housing from the meter without first draining the meter. See warning tag
on the sensor housing.
Remove Pulse Sensor and Sensor Housing
The pulse sensor is located in the sensor housing and
can be replaced without the need of draining the meter
and removing it from the line. This is accomplished
by disconnecting all wiring connections (be sure and
mark the wire locations) and disconnecting the union
or unscrewing the conduit box from the sensor housing
(Figure 2).
Figure 4
Pull the sensor out by the wires (Figure 5).
Pull the sensor out by the wires (Figure 5).
Figure 5
Figure 2
Issue/Rev. 0.4 (7/11)
WARNING!
Do not proceed with following steps unless meter
has been blocked, depressurized and drained of
product.
MN01041 • Page 3
Lift the cover and rotate slightly to separate it from the
shaft (Figure 9). Lay the cover so that the inside faces
upward. Remove the O-ring.
Loosen Shaft
Before the rotor can be removed, it is necessary to
loosen the shaft from the socket in the meter body. This
is done by loosening the shaft locking nut until it is flush
with the end of the threaded rod. Give the nut a sharp
blow with a soft hammer. This will free the locking cone
at the other end of the shaft (Figure 10).
Figure 6
Figure 7
To remove the sensor housing, remove the two socket
head screws. A ball end hexagonal wrench works best.
Remove the o-ring (Figures 6 and 7).
Note: When reinstalling the sensor housing be sure
to install the o-ring and the socket head pipe plug.
Be sure that the housing is installed with the socket
head pipe plug facing out.
Figure 10 – Loosening Locking Cone
Remove Rotor
Carefully lift the rotor, shaft and blades from the meter
body. If the shaft does not come free, it may be necessary to jar it loose with the momentum of the rotor. Once
removed from the meter body, set the rotor assembly
on the platform with a 7-1/2" diameter hole, rotor cover
end up.
Disassemble Rotor
Remove the eight (8) socket head screws (Figure 11).
Use four (4) of the screws as jack screws to evenly lift
the rotor cover from the rotor. Even though the dowel
pins allow for proper orientation of the rotor cover, a
chock mark across the rotor and rotor cover will speed
the orientation during reassemble.
Figure 8 – Remove the Cover Bolts
Figure 11 – Remove Rotor Cover
Figure 9 – Remove Cover
Page 4 • MN01041
With the cover removed, use a three cornered file to
file one notch in the outer blade and rotor slot (Figure
12). On reassembly, it is important that the blades be
positioned the same way in their original slot. Remove
the outer blade.
Issue/Rev. 0.4 (7/11)
Figure 12 – Notch Out Blade and Rotor Slot
Figure 14 – Press Shaft into Cam
Lift the shaft and cam assemble out of the rotor.
Notch the inner blade and rotor slot with two notches
and remove.
Inspect the rotor for hairline cracks, particularly the slot
bridges on the end opposite of the cover.
Assemble Rotor
Place the rotor on the platform and install the inner blade,
shaft assembly and the outer blade. If these are the original
blades, be sure they are located properly in their slots according to the notches filed at disassembly (Figure 15).
Pressing off the Cam
Press the shaft out of the cam using an arbor press.
Note the step on the shaft and that the shaft can only
be pressed in one direction (Figure 13). Before pressing
off the cam, place a washer under the cam, so that the
cam is not supported at the edges.
Figure 15 – Locate Blades into their Respective Slots
Figure 13 – Press Shaft Out of Cam
Inspection of Parts
Prior to reassembly, all parts should be inspected for excessive wear, corrosion or damage. Generally, all parts
that affect meter clearances, e.g., blades, rotor, etc. that
show measurable wear patterns should be replaced.
It is essential that the contact surfaces between the
rotor and rotor cover be absolutely clean. The slightest
amount of debris trapped here will result in an increase
in the distance between the rotor bearing ends and
may not allow the rotor to rotate freely once inside the
meter.
Rotate the rotor cover so that the dowel pin in the rotor
match the hole pattern in the cover. Use thread locking
compound (Part No. 643917-4-01) on rotor cover screws
and evenly tighten to 48+/- 5 in-lbs torque (Figure 16).
Reassembly
Shaft Assembly
Before pressing on the cam, place a washer under the
cam, so that the cam is not supported at the edges.
Place the key into the groove of the shaft and use an
arbor press to press the shaft into the cam until it seats
on the step (Figure 14).
Figure 16 – Replace Rotor Cover
Issue/Rev. 0.4 (7/11)
MN01041 • Page 5
The shaft should rotate freely moving the blades in and
out of the rotor.
Assemble Rotor to Body
Install the cone and shaft locking key into the shaft
socket in the meter body (Figure 17).
Blade Tip Clearances
Position the spider over the shaft and onto the body. The
spider centers the shaft so that proper measurements
can be taken.
If the blades are being replaced, it may be necessary to
slightly file them to obtain the proper tip clearances.
Use feeler gages to check each blade tip when it is
extended into the measuring chamber. It is necessary
to push the blade against the small radius of the cam
in order to properly measure this clearance (Figure 20).
Use chalk to mark the areas of the blade tips that are
to tight.
Figure 17 – Cone and Shaft Locking Key in Shaft Socket
Rotate the shaft so that both blades are fully extended.
Lift the rotor assembly and place it into the body so that
the extended blades are opposite the block (Figure 18).
Figure 20 – Measure Blade Tip Clearance
Remove the rotor from the body and place on a smooth
jawed vise, clamping down lightly on the opposite
paddle to the one that will be filed. Coat the end of the
paddle with bluing compound to aid in identifying the
filing pattern. Use care not to remove to much stock
(Figure 21).
Figure 18 – Place Rotor into Body
The shaft should slide easily into the socket. Check that
the shaft is fully engaged in the socket and will not rotate.
It should be possible to rotate the rotor.
Thread the tie rod into the cone at least eight (8) turns.
Place the washer and nut on the tie rod but do not tighten
(Figure 19).
Figure 21 – File Blade to Increase Blade Tip Clearance
Repeat as necessary until all blade tip clearances are
between 0.0025" and 0.0045".
With the rotor in the body and the spider in place, check
that the blade ends are no higher than the rotor. File
down if necessary.
Figure 19 – Thread Tie Rod into the Cone
Page 6 • MN01041
Issue/Rev. 0.4 (7/11)
Tighten Shaft Locking Nut
With the rotor in the body and the spider in place, tighten
the shaft locking nut on the end of the tie rod to 23-26
ft-lbs torque (Figure 22).
Start-Up Procedures
Install Meter Into Line
When the meter is first installed in the line there is air
inside the rotor. The air takes some time to work out.
If the meter is subjected to hydraulic shock during this
vulnerable time, the rotor can pinch down on the blades
and cause blade breakage or cam shaft rotation. By following the specified start-up procedure, the likelihood
of meter damage will be greatly reduced.
Note: Refer to PRIME 4 Installation/Operation Manual,
Publication No. MN01038, for Start-Up Procedures.
Service Records
Figure 22 – Tighten Shaft Locking Nut
Install O-Ring and Cover
Use petroleum jelly or grease to lubricate the cover
O-Ring and place in the grove on the body. Locate the
cover so that the drain hole will be at the bottom of the
meter when installed in the line. Evenly tighten the cover
bolts using a criss-cross pattern to 260 ±10 ft-lbs torque.
It is a good idea to keep records of all proving data
on each meter. Significant shifts in accuracy between
proving is normally an indicator that the meter requires
service. Maintaining service records on the meter is
also a good idea and may aid in trouble shooting future
problems. The following Meter Clearance Record and
Meter Proving Record forms are supplied for maintaining
accurate service records.
Install Sensor Housing, O-ring and Pulse Sensor
Use grease to lubricate the sensor housing O-Ring and
place on the sensor housing. Install the sensor housing into the cover so that the notch in the threaded end
of the sensor faces toward the drain in the cover. Use
thread locking compound (Part Number 643917-4-01)
on two socket head screws and tighten to 48+/- 5 in-lbs
torque.
Install the drain plug into the cover.
Issue/Rev. 0.4 (7/11)
MN01041 • Page 7
Page 8 • MN01041
Issue/Rev. 0.4 (7/11)
Date Date Item Blade
Slot
Blade
End
Play
Blade
Tip to
Housing
Blade Cam
Followers
Over Cam
Rotor
to Block
Rotor
Axial End
Play
Item Blade
Slot
Blade
End
Play
Blade
Tip to
Housing
Blade Cam
Followers
Over Cam
Rotor
to Block
Rotor
Axial End
Play
As Found As Assembled
_
As Found As Assembled
_
Meter & Model _________________________________ Date Date _
As Found As Assembled
_
As Found As Assembled
Date Date Serial Number _____________________________________
Meter Clearance Record
As Found As Assembled _
As Found As Assembled _
Issue/Rev. 0.4 (7/11)
MN01041 • Page 9
Temp. Pressure Meter Factor
Flow Rate
Temp. Pressure Meter Factor
Flow Rate
Temp. Pressure Meter Factor
Temp. Pressure Meter Factor
Flow Rate
Temp. Pressure Meter Factor
Flow Rate
Temp. Pressure Meter Factor
Flow Rate
Temp. Pressure Meter Factor
Flow Rate
Temp. Pressure Meter Factor
Flow Rate
Temp. Pressure Meter Factor
Date: _______ Product ___________________ Date: _______ Product ___________________- Date: _______ Product ___________________
Flow Rate
Date: _______ Product ___________________- Date: _______ Product ___________________- Date: _______ Product ___________________-
Flow Rate
Date: _______ Product ___________________- Date: _______ Product ___________________- Date: _______ Product ___________________
Meter Proving Record
Revisions included in MN01041 Issue/Rev. 0.4 (7/11):
Page 7: Install O-Ring and Cover torque specification revised to 260 ± 10 ft-lbs torque.
The specifications contained herein are subject to change without notice and any user of said specifications should verify from the manufacturer that the specifications are currently
in effect. Otherwise, the manufacturer assumes no responsibility for the use of specifications which may have been changed and are no longer in effect.
Contact information is subject to change. For the most current contact information, visit our website at www.fmctechnologies.com/measurementsolutions and click on the
“Contact Us” link in the left-hand column.
Headquarters:
500 North Sam Houston Parkway West, Suite 100, Houston, TX 77067 USA, Phone: +1 (281) 260 2190, Fax: +1 (281) 260 2191
Measurement Products and Equipment:
Erie, PA USA +1 (814) 898 5000
Ellerbek, Germany +49 (4101) 3040
Barcelona, Spain +34 (93) 201 0989
Beijing, China +86 (10) 6500 2251
Buenos Aires, Argentina +54 (11) 4312 4736
Burnham, England +44 (1628) 603205
Dubai, United Arab Emirates +971 (4) 883 0303
Los Angeles, CA USA +1 (310) 328 1236
Melbourne, Australia +61 (3) 9807 2818
Moscow, Russia +7 (495) 5648705
Singapore, +65 6861 3011
Integrated Measurement Systems:
Corpus Christi, TX USA +1 (361) 289 3400
Kongsberg, Norway +47 (32) 286700
Dubai, United Arab Emirates +971 (4) 883 0303
Visit our website at www.fmctechnologies.com/measurementsolutions
Printed in U.S.A. © 7/11 FMC Technologies Measurement Solutions, Inc. All rights reserved. MN01041 Issue/Rev. 0.4 (7/11)