1
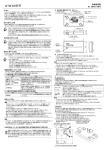
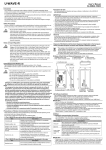
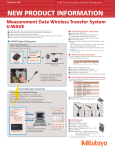
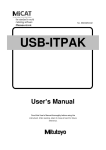
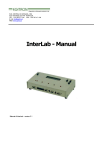
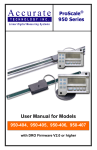
User’s Manual
No. 99MAL110B5
U-WAVE Quick Manual
Introduction
Thank you for your purchasing our U-WAVE-R.
The U-WAVE-R in conjunction with a Mitutoyo U-WAVE-T (available separately) allows
wireless communication of the measurement data from Digimatic-output interfaced tool to
load it to a personal computer for data display. Go through this Quick Manual to properly use
the U-WAVE-R and U-WAVE-T.
Also for the proper use, be sure to go through both the “U-WAVE-R User’s Manual” and
“U-WAVE-T User’s Manual”. After reading, keep this manual safely in place.
5) After selecting C:\Program Files\Mitutoyo\UWAVEPAK\Drivers\CDM_U-WAVE\, press the
[OK] button, and on the dialog in step 4), press the [Next] button.
Press the [OK] button.
1. System Configuration
The U-WAVE is comprised of the following system components illustrated below.
6)
Although a warning about Windows XP logo
authentification will appear, press the
[Continue Anyway] button.
Digimatic-output interfaced tool
Connecting cable
U-WAVE-T
Wireless communication
U-WAVEPAK
(Setting Up/Data
collecting software)
7) “Completing the Found New Hardware Wizard” will be displayed. Then, press the [Finish] button.
8) The dialog in step 2) will appear again. Then, repeat procedures 2) through 7).
Now, the driver installation is complete. Upon the completion of the driver installation, the
green LED and red one on the U-WAVE-R blink alternately.
For Windows Vista, Windows 7 / 8 / 8.1:
1) Connect the U-WAVER-R to a personal computer with a USB cable.
2) For Windows Vista, after a while, the following dialog will be displayed.
Personal computer
USB cable
U-WAVE-R (main unit)
2. Software Installation
2.1. Installing the U-WAVEPAK
The U-WAVEPAK contained in the supplied CD is software necessary for data
communications between the U-WAVE-R and U-WAVE-T. Firstly, install the U-WAVEPAK in
a personal computer.
CAUTION
・ Log in to Windows by 'Administrator'.
・ Do not connect the U-WAVE-R to a personal computer before completing the
U-WAVEPAK installation.
Additionally, for details on U-WAVEPAK operation, refer to the “U-WAVEPAK User’s
Manual” in the “PDF_Manual” folder in the supplied CD.
“Adobe Reader” of Adobe Systems Inc. needs to be installed to read the User’s Manual.
1) Boot a personal computer and load the supplied CD.
2) Using Windows Explorer or the like, run the “Setup.exe” in the “Setup” folder.
(For Windows Vista, press [Allow] button on “User Account Control”.)
(For Windows 7 / 8 / 8.1, press [Yes] button on “User Account Control”.)
Press the [Cancel] button.
3) Open [Control panel]-[Hardware and Sound] of Windows.
4) Open [Hardware and Sound]-[Device Manager] of Windows.
5)
Click [Other devices].
Point the cursor to [Mitutoyo U-WAVE].
Right-click in the mouse and select
[Update Driver Software].
If [Mitutoyo U-WAVE] or [USB Serial Port] is not displayed in [Other devices],
the device driver has already been installed.
3)
Therefore, close [Device Manager] and end the installation of the device driver.
a) Select the language to be used.
b) Press the [OK] button.
6)
4) “Welcome to the U-WAVEPAK Setup Wizard” will boot. Then, press the [Next] button.
5) Go through the “License Agreement” and select [I accept the agreement] if you agree, and
press the [Next] button.
6) “Select Destination Location” appears. Then, press the [Next] button.
7) “Select Start Menu Folder” appears. Then, press the [Next] button.
8)
Select “Browse my computer for
driver software”.
7)
a) Select “Create a desktop icon".
Press the [Browse] button.
b) Press the [Next] button.
9) “Ready to Install” appears. Then, press the [Install] button.
10) “Completion the U-WAVEPAK Setup Wizard” appears. Then, press the [Finish] button.
Now, the U-WAVEPAK installation is complete.
8) Select C:\Mitutoyo\UWAVEPAK\Drivers\CDM_U-WAVE\, press the [OK] button, and then
press the [Next] button on the dialog in step 7).
2.2. Driver Installation
Next, connect the U-WAVE-R to the personal computer and install the USB driver.
Procedures differ between Windows XP, Windows Vista(Windows 7 / 8 / 8.1) and Windows
2000. Follow procedures according to the personal computer used.
For Windows XP:
1) Connect the U-WAVE-R to the personal computer with a USB cable.
2) After a while, the following dialog will be displayed.
9)
Press the [Install] button.
a) Select “No, not this time”.
b) Press the [Next] button.
10) Then, press the [Close] button after ending the installation.
11) The dialog of 5) is displayed again.
3)
Click [Other devices].
Point the cursor to [USB Serial Port ].
a) Select “Install from a list or specific
location [Advanced].”
b) Press the [Next] button.
4)
a) Select “Search for the best driver in these
locations.”
b) Select “Include this location in the search.”
c) Press the [Browse] button.
Right-click in the mouse and select
[Update Driver Software].
And, re-operate from 6) to 10).
Now, driver installation is complete. Upon the completion of the driver installation,
the green LED and red one on the U-WAVE-R blink alternately.
For Windows 2000:
4) The U-WAVEPAK menu dialog appears.
1) Connect the U-WAVER-R to a personal computer with a USB cable.
2) After a while, “Welcome to the Found New Hardware Wizard” will appear. Then, press the
[Next] button.
3)
Press the [Setup start] button.
a) Select “Search for a suitable driver for my
device [recommended].”
b) Press the [Next] button.
5) “Confirm processing” will appear. Then, press the [Yes] button.
6) After a while, the following dialog will be displayed.
4)
Press the [OK] button.
Setup is made to the default conditions
(Group ID: 00, Band ID: 11).
Refer to the U-WAVEPAK User’s Manual when
a) Select “Specify a location”.
altering the group ID and/or band ID.
b) Press the [Next] button.
7) “Confirm processing” will appear. Then, press the [Yes] button.
8) After a while, the following setup dialog will be displayed and the green LED on the
U-WAVE-R lights up. Now, the U-WAVE-R setup is complete.
5)
Press the [Browse] button.
6) Select C:\Program Files\Mitutoyo\UWAVEPAK\Drivers\CDM_U-WAVE\, press the [Open]
button, and then press the [OK] button on the dialog in step 5).
7) “Driver File Search Results” will appear. Then, press the [Next] button.
8) “Completing the Found New Hardware Wizard” will appear. Then, press the [Finish] button.
9) The dialog in step 2) appears again. Then, repeat steps 2) through 8).
Now, driver installation is complete. Upon the completion of the driver installation, the green
LED and red one on the U-WAVE-R blink alternately.
3.3. U-WAVE-T Information Registration
Proceed to register the U-WAVE-T information in the U-WAVE-R.
1)
3. Setup
3.1. U-WAVE-T Setup
Use the 0-size screwdriver, a standard accessory of the U-WAVE-T, to mount and remove
screws and fasten them with a torque of about 5-8N•cm.
a) Select the number
you want to register.
b) Press the [Add] button.
Battery setting
1) Remove the set screws on the rear of the U-WAVE-T and remove the battery lid.
2) With the plus side of the battery facing toward the lid, insert the battery edge into the “+”
battery terminal of the U-WAVE-T and slide the other side of the battery into the battery
retaining lug.
3) Ensure that the battery lid packing (circular type) is fitted in place.
4) Replace the battery lid into position and fix it by tightening screws.
(1)、(4)
(2)
Here, register the U-WAVE-T
(Device ID: 0000000001) as No.1.
2)
a) Enter the Device ID given on the side of
the U-WAVE-T concerned.
b) Press the [OK] button.
Connecting the connecting cable
CAUTION
When connecting a connecting cable to the U-WAVE-T, ensure that the black
marked connector of the connecting cable is connected to the U-WAVE-T.
3)”Confirm processing” will appear. Then, press the [Yes] button.
DATA switch
Black
Measuring tool side
The U-WAVEPAK status turns into that:
U-WAVE-T side
“S (status) = r (U-WAVE-T registered).”
(The connector differs in shape and color depending on the measuring tool to be mated.)
1)
2)
3)
4)
Remove the connector cover set screws of the U-WAVE-T and take off the connector cover.
Ensure that a packing is fitted in place in the connector.
Connect the connecting cable to the U-WAVE-T.
Holding the edges of the connecting cable down by the fingers and ensuring that there will
be no gap between the lid and the main body, fasten them with screws.
5) Put the removed connector cover and screws in place for safekeeping.
(1)
(4)
4) Press the DATA switch on the U-WAVE-T already set up.
(After blinking in orange color, the U-WAVE-T blinks in green upon connection.)
Please connect the DATA switch pushing long (Push-down time: 5sec <t,
Orange blinking 0.3 sec interval ) when it is not possible to communicate and red blinks.
Now, the U-WAVE-T setup is complete.
3.2. U-WAVE-R Setup
Next, set up the U-WAVE-R with the U-WAVEPAK.
1) Connect the U-WAVE-R to a personal computer with a USB cable.
The green LED and red one on the U-WAVE-R blink alternately.
2) Boot the U-WAVEPAK with the desktop icon.
3) “Driver for Virtual COM port” will appear. Then, press the [OK] button.
The U-WAVEPAK status turns into that:
“S (status) = c (U-WAVE-T connected).”
5) Connect the measuring tool to be used to the U-WAVE-T.
6) Press the DATA switch on the U-WAVE-T with the measuring tool in counting state.
Here, the measurement data is indicated as
“DT1 00 00 +0000010.000M”.
Group ID
5. Inputting Measurement Data into the Specified Cell of Microsoft Excel
Measurement data input into the specified cell is possible by using the data collection
macro appended to the U-WAVEPAK. Here is how to input measurement data into the
specified cells from two units of U-WAVE-T using this macro.
1) Firstly, register the two units of U-WAVE-T in the U-WAVE-R referring to section 3.3.
Measured data
Channel
U-WAVE-T Setup
Whether data transmission has been properly performed to the U-WAVE-R can be confirmed
by the LED (buzzer) of the U-WAVE-T. The LED (buzzer) status implies as follows.
Information
Wireless transmission
completed properly
・Wireless transmission failed.
・Error occurred.
LED
Buzz (only with buzzer type)
Green LED blinks
Buzzes shortly twice
Red LED blinks.
Buzzes long once.
CAUTION
・ Log in to Windows by 'Power Users' or above.
・ The green LED blinks on the U-WAVE-T if communication has been made properly
with the U-WAVE-R on which the green LED stays on even without having booted the
U-WAVEPAK.
No.
Channel
Measuring tool A
1
00
Measuring tool B
2
01
Group ID
Device ID
0000000001
00
0000000002
2) Press the [Exit setup] button.
3) Press the [Exit] button in the U-WAVEPAK menu dialog to exit the U-WAVPAK.
4) Boot [Data Collection Macro for U-WAVE] from Windows programs menu.
5) Press [Data File] and select [Data Input].
6) “NEWUW.RPX” will open. Press [Data Input] and select [Edit].
Now, information registration is complete, allowing wireless communication to be performed.
4. Measurement Data Input Into Microsoft Excel
Proceed to input the measurement data into Excel from a measuring tool.
The “Measure mode” and “Edit
1)
mode” are in the measurement
data input screen.
The mode selected is identified
here.
7) Specify in the “Edit Mode” the cell into which data input is made for each channel of the U-WAVE-T.
Press the [Exit setup] button.
The following editing is possible
2)
in the “Edit Mode”.
・Comments editing
・Nominal data editing
・Upper/lower tolerance value
editing
Press the [Data I/F start] button.
3)
”U-WAVEPAK Data I/F” contained in Windows task
bar will boot.
4) Boot Microsoft Excel.
5) Measurement data input takes place as shown below at the press of the DATA switch.
Here, edit a table which allows measurement data to be input as shown below.
Measurement
item 1
Measurement
item 2
Measurement
item 3
Measurement
item 4
Measurement
item 5
Measurement
item 6
Work-1
Work-2
Work-3
Work-4
Work-5
Measuring tool B
(Channel 01)
Measuring tool A
(Channel 00)
Work-6
8) Press [Data Input] and select [Edit Sheet]-[Delete Input Area Size].
6) To exit, click “U-WAVEPAK Data I/F” after saving the measured data.
Click “U-WAVEPAK Data I/F” to display the “Data
I/F” dialog.
7)
a) Press the “Stop data I/F” button.
9)
a) Enter the column/row number to be deleted.
b) Press the “Exit data I/F” button.
8)
b) Press the [OK] button.
10) Press [Data Input] and select [Data Collection Configuration].
Items 7 and 8 and Work-7 and -8
Press the [Exit] button to exit the U-WAVEPAK.
CAUTION
The U-WAVEPAK automatically transmits the measurement data to the active
application software (such as Microsoft Excel or Microsoft Word). Before booting
multiple application software simultaneously, be sure to activate Microsoft Excel.
will be deleted from measurement
items and work labels, respectively.
11)
23) Quit the data collecting macro by selecting [Exit this program] from [Data File].
For detailed procedures of “Data Collection Macro”, refer to the “U-WAVEPAK User’s
Manual” in the “PDF_Manual” folder contained in the supplied CD.
a) Select “Grouping Items and
“Adobe Reader” supplied by Adobe Systems Inc. is required to view the manual.
Specify Each Group”.
b) Press the [OK] button.
6. Communication over the Virtual COM Port
With the connection of the U-WAVE-R to a personal computer, a virtual COM port appears
allowing the U-WAVE-R to be used as an RS-232C interfaced device connected to an
12) Set in the “Item Assign Table” the group IDs and channel, and then press the [OK] button.
ordinary COM port is used.
Here is how to communicate with the PC’s Hyper Terminal over the virtual COM port.
1) Boot the U-WAVEPAK with the desktop icon.
2)
a) Select “Use the driver for Virtual COM port.”
b) Press the [OK] button.
3)
Measuring tool A assignment
Measuring tool B assignment
a) Select the COM port of the U-WAVE-R.
b) Press the [Add] button.
c) ”COMXX,57600,0,8,1,1” appears.
13) Press [Data Input] and select [U-WAVE Port]-[Open Port].
d) Press the [OK] button.
4) Press the [Setup start] button on the U-WAVEPAK menu dialog.
5)
a) Confirm the COM port No. of
the U-WAVE-R.
14) “Driver for Virtual COM port” appears. Then, press the [OK] button.
15) Click “U-WAVEPAK Data I/F” to display the “Data I/F” dialog.
16)
a) Press the [Stop data I/F] button.
b) Press the [Environment] button.
17)
b) Press the [Exit setup] button.
6) Press the [Exit] button on the U-WAVEPAK menu dialog to exit the U-WAVEPAK.
7) Boot [Hyper Terminal] from Windows programs menu.
a) Select “ENTER”.
b) Select “All data”.
a) Enter a desired “Name”.
c) Select “Collects”
d) Press the [OK] button.
b) Press the [OK] button.
18)
Press the [Start data I/F] button.
8)
a) Select the COM port No. confirmed in step 5).
19) The system turns into the “Data collection” state, allowing measurement data to be
collected as shown below.
b) Press the [OK] button.
9)
a) Set up the port according to the table below.
Bits per second
Data bits
Party
Stop bits
Flow control
Measuring tool B data
57600
8
None
1
Hardware
Measuring tool A data
Red cells indicate “Tolerance judgment: NG” and green ones indicate “Tolerance
judgment: GO”.
20) To quit, press [Data Input] and select [U-WAVE Port]-[Close Port]. Proceed to press [Data
Input] and select [Return to File Menu] from the menu.
21) Select [Save Data File(RPX)] from [Data File].
22) Enter a desired file name (RPX) and press the [Save] button.
b) Press the [OK] button
10) The system turns into the Communication state, showing measurement data as in the
figure below.