1
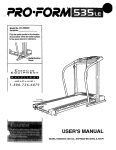
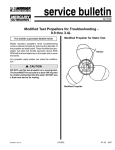
Argo Service Manual Vehicle Body SECTION VB Vehicle Body Table of Contents General Instructions............................................................................. VB-2 Removing the Firewall (Conquest, Response, Bidfoot, Van2)...........VB-3 Installing the Firewall........................................................................... VB-4 Removing the Firewall (6x6 Vanguards)............................................. VB-4 Installing the Firewall (6x6 Vanguards).............................................. VB-5 Removing the Floor Pans......................................................................VB-7 Installing the Floor Pans.......................................................................VB-7 Removing the Rear Seats ( 8x8 models).............................................. VB-8 Installing the Rear Seats ( 8x8 models)............................................... VB-8 Removing the Rear Seats (6x6 models)............................................... VB-8 Installing the Rear Seats (6x6 models)................................................ VB-9 Replacing the Backrest Pad..................................................................VB-9 Removing the Backrest Handrail Assembly....................................... VB-9 Installing the Backrest Handrail Assembly........................................ VB-9 Removing the Drain Plugs....................................................................VB-10 Installing the Drain Plugs..................................................................... VB-10 Upper Body Removal............................................................................ VB-11 Upper Body Installation........................................................................VB-12 Lower Body Removal............................................................................VB-13 Lower Body Installation....................................................................... VB-14 Frame Inspection...................................................................................VB-15 Ontario Drive & Gear Limited PH.(519)- 662-2840 FAX (519)- 662-2421 www.odg.com VB-1 Vehicle Body Argo Service Manual General Instruction Detailed information on standard workshop and safety procedures, and general servicing operations is not included in this manual, which has been prepared to assist qualified service personnel. ODG assumes no responsibility or liability for PERSONAL INJURY or VEHICLE DAMAGE which results from any servicing procedure performed, including those instructions outlined in this manual. Before performing a servicing operation, an individual must have determined to his/her satisfaction that a personal injury or vehicle damage will not result from the servicing procedure or tools selected. Ontario Drive & Gear Limited PH.(519)- 662-2840 FAX (519)- 662-2421 VB-2 www.odg.com Argo Service Manual Vehicle Body Removing the Firewall (Conquest, Response, Bigfoot & Vanguard2) All Conquest, Response, Bigfoot and Vanguard2 models utilize a quick release firewall assembly. The firewall may be removed quickly and easily with little effort and no tools required. If replacing the firewall, when ordering, the same part number covers all the above models. 1. Pull the throttle cable free of the firewall at the rubber grommet. Photo VB-1 The front floor pan need not be removed when pulling the firewall from the vehicle. 2. Locate the wing stud fastener at the central lower portion of the firewall. Photo VB-2 3. Turn the wing stud fastener to release the firewall from the clip that secures it to the lower frame. VB-1 VB-2 4. There are 4 “finger” access holes in the bottom part of the firewall. This provides a place to grab the firewall while pulling it out towards the driver's compartment. Photo VB-3 5. Pull the firewall into the drivers compartment. VB-3 Ontario Drive & Gear Limited PH.(519)- 662-2840 FAX (519)- 662-2421 www.odg.com VB-3 Vehicle Body Argo Service Manual Installing the Firewall(Conquest, Response, Bigfoot & Vanguard2) 1. Place the firewall into the drivers compartment and temporarily route the throttle cable into the area provided for the cable grommet. Photo VB-4 2. Slip the top of the firewall between the upper body plastic and the metal dash brace. Photo VB-5 VB-4 VB-5 3. Push the firewall in at the bottom and snap in securely with the wing fastener. 4. Assemble the throttle cable grommet to the firewall. Removing the Firewall (6x6 Vanguards) On 6x6 Vanguards produced prior to S8131: 1. Remove the front floor pan assembly. Pull the clevis pin from each side of the floor pan and pull the floor pan up and out from the vehicle. 2. Unthread the shift knob from the lever & remove the twist grip throttle from the right steering lever. 3. Remove the 2 steering adjustment locknuts and lay the steering levers back against the driver's seat. 4. Remove the fasteners on each side of the firewall at the lower frame assembly. Refer to your illustrated parts manual for firewall design and hardware breakdown. 5. Remove the 2 fasteners securing the firewall into the T nuts at the lower body. 6. Remove the firewall. On 6x6 Vanguards produced from S8131 and prior to S10769: 1. Remove the front floor pan assembly. Pull the clevis pin from each side of the floor pan and pull the floor pan up and out from the vehicle. Ontario Drive & Gear Limited PH.(519)- 662-2840 FAX (519)- 662-2421 VB-4 www.odg.com Argo Service Manual Vehicle Body 2. Unthread the shift knob from the lever & remove the twist grip throttle from the right steering lever. 3. Remove the 2 steering adjustment locknuts and lay the steering levers back against the driver's seat. 4. Remove the fasteners securing the firewall to each side of the lower frame assembly. Refer to your illustrated parts manual for firewall design and hardware breakdown. 5. Pull the firewall from the vehicle grabbing from the bottom of the firewall and pulling into the drivers compartment. 6. Lift up and out from the vehicle. On 6x6 Vanguards produced from S10769: 1. Remove the front floor pan assembly. Pull the clevis pin from each side of the floor pan and pull the floor pan up and out from the vehicle. 2. Loosen off the 2 steering adjustment locknuts to allow enough steering handle travel for the firewall to be pulled up and out from the vehicle. 3. Undo the firewall at the dash support. The firewall is secured by 2 quick release wingstuds. 4. Remove the firewall from the vehicle. Installing the Firewall(6x6 Vanguards) On 6x6 Vanguards produced prior to S8131: 1. With the steering levers pulled back against the drivers seat, install the firewall into the vehicle aligning the mounting holes of the firewall, with those in the lower frame assembly, and the T nuts in the lower body. 2. Fasten the firewall at 4 locations as shown in the appropriate illustrated parts manual using the listed hardware. 3. Reconnect the steering levers at the brake cams and re-thread the nylon locknuts to the steering rods. 4. Reinstall the twist grip assembly to the right hand steering lever. 5. Perform the servicing procedure, Steering Lever Adjustment, in section BR of this service guide. 6. 7. Install the shift knob. Install the floor pan. Ontario Drive & Gear Limited PH.(519)- 662-2840 FAX (519)- 662-2421 www.odg.com VB-5 Vehicle Body Argo Service Manual On 6x6 Vanguards produced from S8131 and prior to S10769: 1. With the steering levers pulled back against the driver's seat, install the firewall into the vehicle aligning the mounting holes of the firewall, with those in the lower frame assembly. The top of the firewall should be slipped between the upper body and metal dash brace assembly, similar to the quick release firewalls of other models. See Photo VB-5 on page VB-4. The outside edge of the firewall is also inserted behind the upper body plastic. Photo VB-6 2. 3. VB-6 Fasten the firewall at the lower frame assembly. Refer to your lllustrated parts manual for the appropriate hardware and location. Reconnect the steering levers at the brake cams and re-thread the nylon locknuts to the steering rods. 4. Reinstall the twist grip assembly to the right hand steering lever. 5. 6. Perform the servicing procedure, Steering Lever Adjustment, in section BR of this service guide. Install the shift knob. 7. Install the floor pan. On 6x6 Vanguards produced from S10769: 1. Pull the steering levers back towards the driver seat far enough to allow the firewall to be slipped in behind. 2. Slip the firewall into position and clip securely at the 2 wingstuds. Photo VB-7 SEE ABOVE NOTE 3. Perform the servicing procedure, Steering Lever Adjustment, in section BR of this service guide. 4. VB-7 Install the floor pan. Ontario Drive & Gear Limited PH.(519)- 662-2840 FAX (519)- 662-2421 VB-6 www.odg.com Argo Service Manual Vehicle Body Removing the Floor Pans Draining water from the lower body, or any servicing of the Argo drive train, will require the removal of the floor pan assemblies. Removing the Front Floor Pan 1. Perform the servicing procedure, Removing the Firewall, in this section of the service guide (Conquest, Response, Vanguard2 and Bigfoot only). 2. Locate and remove the 2 hitch pin clips securing the front floor pan and remove. 3. Pull up at the front of the floor pan and remove from the vehicle Photo VB-8 Installing the Front Floor Pan 1. Place the floor pan in rear first and drop in at the front. Align the holes in the floor pan with the clevis pins and secure the pan with the hitch pin clips. VB-8 IMPOR TANT IMPORT When installing the front floor pan into vehicles manufactured prior to CB16049, RB16104, SN10191 or S10178, be sure to raise the floorpan high enough at the rear of the pan, to avoid it catching and flipping the mid front chain tensioner block upside down. Removing the Rear Floor Pan 1. Locate and remove the 2 (6 wheel) or 4 (8 wheel) hitch pin clips securing the rear floor pan and pull the floor pan out of the vehicle. Photo VB-9 Installing the Rear Floor Pan 1. Insert the rear floor pan into the vehicle. Align the holes in the floor pan with the clevis pins and secure the pan with the hitch pin clips. Ontario Drive & Gear Limited PH.(519)- 662-2840 FAX (519)- 662-2421 VB-9 www.odg.com VB-7 Vehicle Body Argo Service Manual Removing the Rear Seat (All 8x8 Models) Rear seats on all 8x8 models are quick release and require no tools to remove. 1. Grab the rear seat and raise it high enough for the plastic bumper fastened to the underside of the seat cushion, to clear the hole in the upper body below. Photo VB-10 2. Push the seat towards the inside of the cargo department and lift up and out. Photo VB-11 VB-10 VB-11 Installing the Rear Seats (8x8 models) 1. Place the rear seat into position aligning the larger routed area with the large lower seat washer. Photo VB-12 2. Pull the seat towards yourself until the 2 plastic bumpers clip into the holes that are drilled in the upper body. Photo VB-13 VB-12 VB-13 Removing the Rear Seats (6x6 models) The rear seats of 6x6 models are fastened by a single bolt, fender washer and large plastic washer. These are threaded into an insert within the seat cushion. Ontario Drive & Gear Limited PH.(519)- 662-2840 FAX (519)- 662-2421 VB-8 www.odg.com Argo Service Manual Vehicle Body 1. 2. Lift up on the plastic at the rear seat cushion. Using a ratchet wrench and socket, unthread the bolt from the seat. 3. Remove the seat. Installing the Rear Seats (6x6 models) 1. Place the seat into the rear compartment. 2. Thread the bolt, along with washers, through the upper body and into the bottom of the seat cushion. Replacing the Backrest Pad (Conquest, Response, Bigfoot, Vanguard2 & Vanguard) There are (4) 1/4X20 fasteners and lockwashers securing the back rest to the handrail assembly. Older Model Vanguards 6x6 Vanguards prior to S7304 use (3) 1/4X20 fasteners securing the back rest to the upper body. To access these bolts you must first remove the 3 plug caps located behind the backrest along the upper body. Refer to the appropriate illustrated parts manual. Removing the Backrest Handrail Assembly The Backrest handrail assembly is adjustable to 2 settings. This allows the backpad to be adjusted to the drivers preference of either closer, or farther away from his/her back. 1. Remove the backrest pad. 2. Remove the fastener on each side of the handrail assembly. 3. Pull the handrail from the upper body. Installing the Backrest Handrail Assembly 1. Install the backpad to the handrail assembly. 2. Place the handrail to the upper body aligning one of the two T- nut positions available, with the mounting holes in the handrail. 3. Secure the handrail assembly with the appropriate hardware as listed in your illustrated parts manual. 6x6 Vanguards manufactured prior to S7447, utilize a backrest handrail that is secured to the seat frame assembly by a single set screw on each side of the vehicle. See your illustrated parts manual for component breakdown. To remove the set screws you must raise the drivers seat to access the set screw heads. Once the set screws are removed, pull Ontario Drive & Gear Limited PH.(519)- 662-2840 FAX (519)- 662-2421 www.odg.com VB-9 Vehicle Body Argo Service Manual the handrail up and out of the seat frame below. Backrest handrails of this design are no longer available. If a replacement is required, the vehicle will need to be updated to the newer style backrest assembly. Removing the Drain Plugs There are 2 drain plugs installed into the lower body. These drain plugs provide a means of removing any water that may have found its way into the lower part of the vehicle drive train. To access the plugs you will need to perform the servicing procedure, Removing the Rear Floor Pan. See Photo VB-14 VB-14 Exact location of drain plug depends on year and model of Argo 1. Locate the plug and lift the lever upwards to loosen the plug. 2. Pull the plug from the lower body hole. Installing the Drain Plugs 1. Seat the rubber portion of the drain plug properly in the lower body hole and push the lever down to lock plug in place. Photo VB-15 To tighten the drain plug, lift the lever up and turn the lever clockwise until it is snug when the lever is pushed back down. Photo VB-16 Relace worn or inoperative drain plugs immediately. VB-15 Ontario Drive & Gear Limited PH.(519)- 662-2840 FAX (519)- 662-2421 VB-10 VB-16 www.odg.com Argo Service Manual Vehicle Body Upper Body Removal 1. Remove the floorpans and firewall as outlined in this section of the service guide. 2. Lift off the engine access cover. 3. Remove and disconnect all accessories from the upper body. 4. Slide the rubber bumper free of the vehicle. 5. Using a 3/16" drill bit, remove all the rivets holding the upper and lower bodies together. Be careful not to damage the body plastic during this drilling procedure. 6. 6x6 Vanguards manufactured prior to S7447 will require the backrest/handrail to be removed from the seat frame assembly. 7. Remove the exhaust system and air intake assemblies as outlined in the Ducting and Exhaust section of this service guide. 8. Disconnect all wiring from the battery, headlights, ignition switch and solenoid. 9. If applicable, disconnect the choke cable and wiring running to the headlamp switch. 10. Remove the gas cap and plug the fuel filler tube to prevent any foreign material from entering the tank. 11. Cautiously lift the upper body from the lower body paying attention to anything that still may need to be disconnected. 12. Disconnect the tank venting tube at the filler neck assembly and at the male connector located on the lower body at the rear of the vehicle. If further disassembly is required: 13. Remove the headlights from the upper body as outlined in section ES of this service guide. 14. Remove the vehicle wire harness, all gauges, indicator lights and any remaining accessory wiring from the upper body. 15. 6x6 Vanguards manufactured prior to S7304 require the back rest pad to be removed from the upper body. See Replacing the Backpad in this section of the service guide. 16. Remove the rear seats and all trim. 17. Unclip the fuel tank vent tubing that runs from the fuel neck hole, to the rear of the vehicle. Ontario Drive & Gear Limited PH.(519)- 662-2840 FAX (519)- 662-2421 www.odg.com VB-11 Vehicle Body Argo Service Manual Upper Body Installation 1. Install the rear seats and all trim to the upper body. 2. Install the headlamps. 3. Install all gauges and indicator lights. 4. Install the vehicle wire harness. 5. On 6x6 Vanguards manufactured prior to S7304, fasten the back rest pad to the upper body. See Replacing the Backpad in this section of the service guide. 6. Route and secure the fuel tank vent tubing to the nylon clips that are riveted to the upper body. The vent tube runs from the filler neck hole, to the rear of lower body. 7. Install a new vinyl sealing strip around the entire perimeter of the lower body before placing the top into position. 8. Place the upper body onto the vehicle. Connect the vent tubing to the filler neck and insert the filler neck through the upper body. Ensure that the vent line is not pinched, or becomes kinked anywhere along the length between filler neck and rear outlet fitting. Vehicle performance can be drastically affected when fuel tank venting becomes restricted. The vent tubing for the fuel system is attached to the metal filler neck. Caution should be observed as not to damage the outlet nipple that is welded to the metal neck assembly on older model Argos (See IMPORTANT below). Any bending or kinking of this small tube will prevent the tank from venting, causing serious performance issues later on. IMPOR TANT IMPORT Vehicles manufactured prior to CB14963, RB14945, BF10092, SN10111 & S10112, have a small metal vent tube welded to the filler neck at which the vent tube is crimped. Vehicles manufactured from the above serial numbers have the vent tube inserted directly into a hole punched through the filler neck. 9. If the upper body is a new replacement: • center the upper body on the lower body. secure into place with several sets of clamps around the entire perimeter of the vehicle. • Ontario Drive & Gear Limited PH.(519)- 662-2840 FAX (519)- 662-2421 VB-12 www.odg.com Argo Service Manual Vehicle Body • Using a 3/16" drill bit, drill upward through the upper body, using the existing holes in the lower body as guides. • place body rivets through each hole. Hold a washer over the end of each rivet and fasten using a rivet gun. Refer to your illustrated parts manual for correct hardware description. using a jigsaw, trim the upper body to match the lower body. • 10. If the upper body is NOT a new replacement: • align the existing holes in the upper and lower bodies and secure with several sets of clamps around the entire perimeter of the vehicle. • place rivets through each hole. Hold a washer over the end of each rivet and fasten with a rivet gun. Refer to your illustrated parts manual for correct hardware description. 11. Remove the plug from the filler neck and install the gas cap. 12. Reinstall the choke cable 13. Connect all wiring to ignition switch, solenoid, engine harness and battery. 14. Install the exhaust system and air intake assemblies as outlined in the Ducting and Exhaust section of this service guide. 15. Install the vinyl bumper 16. Install floorpans and firewall as outlined in this section of the service guide. 17. Reconnect any accessories to the upper body. 18. Install the engine access cover. Lower body Removal 1. Perform the servicing procedure, Upper Body Removal, on the previous pages. 2. Perform the servicing procedure, Removing the Fuel Tank, as outlined in section FS of this service guide 3. Remove all drive chains according to the servicing procedure, Drive Chain Removal, in section WA of this service guide. 4. Perform the servicing procedure, Idler Chain Removal, in section WA of this service guide. 5. Remove the power pack assembly as outlined in the Engine System section of this service guide. Ontario Drive & Gear Limited PH.(519)- 662-2840 FAX (519)- 662-2421 www.odg.com VB-13 Vehicle Body Argo Service Manual 6. 7. Remove the the wheels from the vehicle. Perform the servicing procedure, Removing an Axle (with bearing extension) and/or Removing an axle (without bearing Extension) in section WA of this service guide. 8. Remove the battery. 9. Attach an overhead hoist and lift the frame from the vehicle lower body. Lower Body Installation All lower bodies ordered as replacement parts are not predrilled. Holes for axles, trailer hitches etc., should be drilled using the vehicle’s original frame as a jig. Position the frame into the new lower body and drill as required from the inside out. Refer to the original body being replaced to calculate the correct hole-saw size for axles, and drill bit sizes for mounting hardware. If the vehicle is equipped with front or rear bearing extensions, temporarily fasten the extension at the appropriate axle hole with the 4 mounting carriage bolts and use the 6 holes of the extension as a guide to locate the new holes in the lower body. Due to variations in the properties of High Density Polyethylene Plastic, it is more accurate and precise to use the original frame of the vehicle as the guide to locate the new axle dimensions rather than to depend on a predrilled factory version. The original frame may also have done some changing (bending, twisting etc.) over time under application and may have become unique to the previous lower body. 1. Attach an overhead hoist to the vehicle frame and place it into the lower body. 2. Align the axle mounting holes in the vehicle frame and lower body. 3. Perform the servicing procedure, Installing an Axle (with bearing extensions) and/ or Installing an Axle (without extensions) in section WA of this service guide. 4. Install the wheels. 5. Install the power pack assembly as outlined in the Engine System section of this service guide. 6. 7. Install the fuel tank assembly as outlined in section FS of this service guide. Perform the servicing procedure, Upper Body Installation, in this section of the service guide. Ontario Drive & Gear Limited PH.(519)- 662-2840 FAX (519)- 662-2421 VB-14 www.odg.com Argo Service Manual Vehicle Body Frame Inspection 1. Inspect the vehicle frame, seat support assembly and power pack frame thoroughly for: • cracks or breakage in the welding joints • cracked or broken mounting lugs or inserts • rusted through or bent frame members If any of these conditions are noted, remove from the vehicle and attempt repair. If damage to the frame cannot be repaired, replace immediately. Ontario Drive & Gear Limited PH.(519)- 662-2840 FAX (519)- 662-2421 www.odg.com VB-15