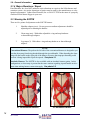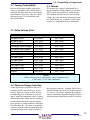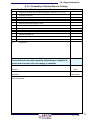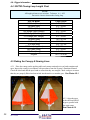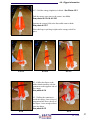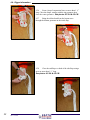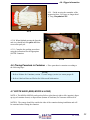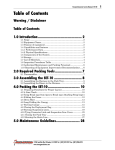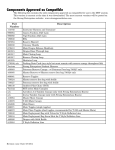
1
OWNER’S MANUAL AND PACKING INSTRUCTIONS Para-Phernalia, Inc. 19018 59th Drive N.E. Arlington, WA 98223 Voice: 360-435-7220 * Fax: 360-435-7272 www.softieparachutes.com THIS PAGE INTENTIONALLY LEFT BLANK WARNING ! 1. Training and/or experience are required to lower the risk of serious bodily injury or death. NEVER use this equipment unless you have: A. Read the warning label and completed a “controlled program of instruction” in the use of this parachute assembly. - OR - B. Read the warning label and all appropriate owners / flight manuals, packing instructions. 2. Lower the risk of death, serious injury, canopy damage and hard openings by never exceeding the limits shown on the TSO label. Warning labels, serial numbers, and placard information may be found in the following locations: Ram-air parachute- center cell top skin at trailing edge. Circular reserve canopies- rear panel. Harness/container system- TSO label. Rev. 2.0 8/09 DISCLAIMER - NO WARRANTY Because of the unavoidable danger associated with the use of the parachute system, the manufacturer makes NO WARRANTY, either expressed or implied. The system is sold with all faults and without any warranty of fitness for any purpose. Manufacturer also disclaims any liability in tort of damages, direct or consequential, including personal injuries resulting from a defect in design, material, workmanship or manufacturing whether caused by negligence on the part of the manufacturer or otherwise. By using this system, or allowing it to be used by others, the buyer WAIVES any liability of or by the manufacturer for personal injuries or other damages arising from such use. If the buyer declines to waive liability on the part of the manufacturer, buyer may obtain a full refund of the purchase price by returning the system, before it is used, to the manufacturer within 15 days of the date of the original receipt of said system with a letter stating the reason for its return. WARNING ! You can substantially reduce risk by assuring that each component of the system has been assembled and packed in strict compliance with the manufacturer’s instructions, by obtaining proper instruction in the use of this system, and by operating each component of the system in strict compliance with owner’s manual. However, parachute systems sometimes fail to operate properly even when properly designed, assembled, packed and operated so that you risk serious injury or death each time you use the system. Do Not Purchase or use any parachute equipment designed, manufactured or sold by Para-Phernalia, Inc. unless you fully understand and voluntarily accept these risks. Do Not Purchase or use any parachute equipment designed, manufactured or sold by Para-Phernalia, Inc. unless you agree to read completely, understand and follow all manufacturers instructions, recommendations, requirements and limitations. Do Not Purchase or use any parachute equipment designed, manufactured or sold by Para-Phernalia, Inc. unless you have fully read , understand and accept this “Disclaimer - No Warranty - Waiver” ******** Rev. 2.0 8/09 Owner’s Record Name:___________________________________________ Street:___________________________________________ City, State, Zip:____________________________________ Country:_________________________________________ Softie Model:_____________________________________ Serial Number:____________________________________ Date of Manufacture:________________________________ Date of Purchase:__________________________________ Canopy Mfg. Model and Serial Number:___________________________ Date of Manufacture:_______________________________ Date of Purchase:__________________________________ Note: 1. Serial numbers for both Softie and Canopy can be found as described in the Warning Placard found on page 1 of this manual. 2. If you receive your Softie assembled and packed by either the manufacturer or a properly licensed Parachute Rigger, you will find the appropriate information listed on the Packing Data Card located in the pocket on the TSO label in the open area between the backpad and the top of the Softie container just behind the wearers neck. 3. The Packing Data card is your key to properly planning your repack schedule and requirements. Refer to Section 2.1.3 of this manual, for further information regarding these requirements. 4. A separate copy of this page should be kept on file by the owner. Do not complete the form above until you have fully read and understand the instructions, policies and limitations contained in this manual. Rev. 2.0 8/09 Table of Contents Warning Placard ------------------------------------------------------------------------------------ 1 Disclaimer - No Warranty- Warning------------------------------------------------------------ 2 Waiver ------------------------------------------------------------------------------------------------ 2 Owner’s Record ------------------------------------------------------------------------------------ 3 Table of Contents ---------------------------------------------------------------------------------- 4 Customer Service Policy and Limits ---------------------------------------------------------- 5 1.0 General Information ---------------------------------------------------------------- 6 1.1 Ally in the Sky ------------------------------------------------------------- 7 1.2 SOFTIE letter of TSO authorization --------------------------------- 9 1.3 SOFTIE TSO authorization ------------------------------------------- 10 1.4 Service Life --------------------------------------------------------------- 10 1.5 Rigger qualifications ---------------------------------------------------- 10 1.6 SOFTIE parts list -------------------------------------------------------- 11 2.0 User Information ------------------------------------------------------------------- 12 2.1 Pre-flight procedures ---------------------------------------------------- 13 2.1.3 180 day maintenance ------------------------------------------------- 13 2.2 Wearing the SOFTIE ---------------------------------------------------- 14 2.3 Rig cleaning --------------------------------------------------------------- 16 3.0 Compatibility of Components --------------------------------------------------- 18 3.1 Canopy compatibility ---------------------------------------------------- 19 3.2 Volume ---------------------------------------------------------------------- 19 3.3 SOFTIE volume chart --------------------------------------------------- 19 3.4 Optimum canopy selection -------------------------------------------- 19 3.5 Canopy volume chart --------------------------------------------------- 20 3.6 Deployment type --------------------------------------------------------- 21 3.7 Deployment bag and bridle -------------------------------------------- 21 3.8 Industry weight / deployment speed limitations ------------------ 22 4.0 Rigger Information ----------------------------------------------------------------- 24 4.1 Parachute assembly inspection forms ------------------------------ 25-27 4.2 Round canopy packing instructions --------------------------------- 28 4.3 Assembly ------------------------------------------------------------------- 29 4.4 SOFTIE closing loop lengths ------------------------------------------ 30 4.5 Flaking and folding the canopy --------------------------------------- 30-33 4.6 Placing parachute in container ---------------------------------------- 33 4.7 SOFTIE Back -------------------------------------------------------------- 33 4.8 SOFTIE Wedge ----------------------------------------------------------- 33-45 4.9 SOFTIE Seat (Standard Flat) ----------------------------------------- 45-50 4.10 SOFTIE Seat Pack (Wedge) ---------------------------------------- 51-55 4.11 SOFTIE Seat Pack (S-1 Wedge) ------------------------------------ 56-60 © 2009 Para-Phernalia, Inc. Rev. 2.0 8/09 Para-Phernalia, Inc. Customer Service Policy and Limits Harness and Containers Para-Phernalia, Inc. (PPI) will provide at no charge, repair service for repairs determined to be the resultant from defects in material or workmanship for a period of SIX MONTHS from the DATE OF RECEIPT OF PRODUCT. Date of receipt and proof of purchase must be supplied to PPI by the customer with the item in order to be repaired free of charge. Service Bulletins PPI will perform all MANDATED Service Bulletins repairs or modifications due to SAFETY concerns free of charge. A fair market charge will be made for recommended Service Bulletin repairs or modifications. Unauthorized Modifications/Alterations PPI will charge for repair service when the damage is determined to be caused by unauthorized assembly, packing, modification, alteration or shipping of PPI products. PPI also reserves the right to refuse to repair any product so handled. Improper Use or Abuse PPI will charge for repairs that result from improper use, or from abuse such as exposure to chemicals, saltwater, improper washing, improper packing, excessive exposure to sunlight, or negligence on the part of the user. Product Limitations PPI reserves the right to refuse to service equipment for which material and / or manufacturing patterns and specifications no longer exist. Shipping of Returns for Repairs Articles sent in for repair should be sent in with all original components as purchased from PPI. PPI may request and require additional information pertaining to the components sent. PPI will not be responsible for compatibility of components not sent with system for repair and or evaluation. Replacement Parts - Recommendations PPI will recommend replacement of harness and container component parts based on inspection when safety is a factor due to normal wear and tear or maintenance of the product. Product Improvement Product improvements are available as a cost option to customers. Rev. 2.0 8/09 1.0 - General Information 1.0 General Information Rev. 2.0 8/09 1.0 - General Information 1.1 Ally in the Sky: Your Pilot Emergency Parachute by: Dan Tarasievich President, Para-Phernalia, Inc. There is no question that a parachute can save your life during an emergency bailout situation. But, before you strap on that life-saving device, you need to familiarize yourself with your system. It is important to insure the proper fit of a system, know how to store the system, familiarize yourself with riggers who will maintain your system on the ground, and understand how to use the system in an emergency situation. The size of a parachute is very important. Your parachute system should be a size that can handle your weight, and not specifically the stated size of the parachute canopy. Some of today’s 24’ and 26’ canopies will descend at a slower rate than the older and larger military parachutes. The correct size is absolutely mandatory when insuring safety. Another important factor in familiarizing yourself with your system is knowing how to store the parachute. The longevity of your parachute is your responsibility and is almost entirely dependent on the proper maintenance and storage. When not in use store the parachute in a bag in a well ventilated area away from direct exposure to sunlight, oils, and or acids. If you find that your parachute has come in contact with any unsafe conditions including wetness, have it inspected by a qualified riggerr immediately While on the ground, besides good storage habits, get to know your parachute rigger. If you don’t have a local rigger get referrals from a fellow pilot or the manufacturer of your system. Make sure that the rigger is familiar with your parachute system and has the proper packing and instructions manual before having it repacked. At the time of the repack ask your rigger to go over your parachute with you. Put it on and pull the ripcord. This will insure your awareness of the force it requires. (A 22 pound pull is all that the TSO allows.) Establish a preflight routine of inspecting your parachute. The condition of the parachute can be directly related to your safety. A small oversight could create a safety hazard. Check the fabric for stains or wear and mildew. Inspect the hardware to be sure snaps function properly and check for corrosion. Look for fraying or knicks in the webbing and inspect for broken or missing stitches. Do a pin check on the ripcord by lifting the pin protector flap and making sure the pins are straight, and extend through the closing loop at least 1/2” inch. Make sure that the handle extracts from the pocket easily. There should be no kinks or dents in the housing. Finally inspect the packing data card. Check the last date of the inspection and repack. FAA regulations require a parachute in use to have been packed within the last 180 days. This preflight routine is mandatory to maintain the safety of your parachute. During an emergency is not a good time to start thinking about emergency procedures. Plan in advance and know the three most important variables in the decision to leave your aircraft: attitude, altitude, and airspeed. Attitude is not only the attitude of your aircraft but also your personal attitude can effect your egress. A tumbling aircraft can be difficult to exit. Altitude is important because a higher altitude means a better chance of having a fully deployed parachute before impact. A general rule of thumb is if you have pack opening above 1000 ft. AGL, you will have a fully deployed parachute before hitting the ground. Airspeed will also determine your exit. 100 MPH is ideal for a fast parachute opening, however if you can trade off airspeed for altitude do so. (continued next page) Rev. 2.0 8/09 1.0 - General Information (continue Ally in the Sky) The primary cause of most unsuccessful bailouts are waiting too long to make the decision to bailout and not being prepared. Using your parachute is most obviously your last option. Be familiar with your particular aircraft escape procedures and practice them often until they are second nature. You must be able to react instantly to save valuable time, altitude, and your life. If you don’t have an emergency egress procedure for your aircraft the best time to develop one is before your next flight. Once you have exited the aircraft, you will most likely be tumbling. The most important thing to do is pull the ripcord immediately and throw it away. It takes approximately 2-3 seconds for the parachute to fully deploy. Altitude used for complete deployment at terminal velocity is approximately 300-500 feet. That is not the altitude to initiate emergency procedures, but the distance required for deployment and opening. Once the parachute is open, it is time to think about steering. Guiding an open parachute safely to the ground is a two fold operation. The newer parachutes on the market today are steerable and they have control toggles installed on each riser. To turn left, pull down on the left toggle and to turn right pull down on the right toggle. The forward speed of a round parachute is approximately 3-5 MPH and the 360 degree turn rate is about 6-10 seconds. First, use this forward speed and control of heading to maneuver away from any life threatening obstacles such as power lines or water hazards. Second, use the forward speed of the canopy to reduce ground speed at landing; by facing the canopy into the wind. Your rate of decent will increase during a turn, be careful not to make radical turns below 100 ft. AGL. Make only small corrections below that altitude to maintain heading. Square parachutes have a much higher turn rate, faster forward speed and are more manuverable. They require that you face into the wind and flare (similar to an aircraft) for landing. Handled properly they land much softer than a round parachute. Rev. 2.0 8/09 Landing is the final act in the bailout and it is important to follow these instructions in order to avoid injury. Steer into the wind and don’t attempt any radical turns below 100ft. Look out towards the horizon and hold your knees and feet together tightly. Keep your knees slightly bent with your toes pointed down. Put your arms above your head holding on to the risers and as you contact the ground, roll in the direction you are moving when you land. Try to avoid obstacles if possible. If you are going to land in a tree or power lines keep your knees and feet together and present the smallest possible profile to the obstacle. Also, turn your face to the side. In the event of a water landing, prepare for a regular landing except land downwind so your parachute will land out in front of you and not on top of you. Unfasten the leg and chest straps and swim upwind away from the parachute so as not to get entangled in the lines. If you land during high winds, after landing roll onto your back and deflate the parachute by pulling in one; or two adjacent lines hand over hand to spill the air from and collapse the canopy. Also jettison the parachute harness and cover the parachute as to not re-inflate it. There is a lot to remember in a bailout so it is important that you plan ahead and review your plan of action in case of an emergency. Parachute systems may seem like expensive cushions that we carry needlessly on our back or sit on without regard. That cushion, however is a highly specialized life saving device and is vitally important to your air safety. Get to know your parachute system and soon you will realize what an ally that cushion can be and why you should never leave the ground without it. ***** 1.0 - General Information 1.2 Softie Letter of TSO Authorization Rev. 2.0 8/09 1.0 - General Information 1.3 SOFTIE TSO Certification The SOFTIE harness and container systems are approved under FAA TSO-C23b, Standard Category and certified for use in a variety of weight and speed combinations. Use limitations will depend on the canopy weight and speed limitations and the TSO category under which canopy certification was achieved. See section 3.8 for information concerning limitations of the canopy which has been assembled with the users SOFTIE. For questions regarding limitations and certifications consult a qualified FAA Rigger or call Para-Phernalia, Inc. at 360-435-7220 or FAX at 360-435-7272. Monday - Thursday 07:00 - 17:00 Pacific Time (GMT -8). 1.4 SERVICE LIFE Independent testing of aged nylon materials has proven that its strength degrades over time, therefore, Para-Phernalia, Inc. and Free Flight Enterprises have established a 20-year service life from the date of component manufacture for the Softie Pilot Emergency System and the Preserve line of emergency parachutes. 1.5 Rigger Qualifications In order to pack and maintain this parachute system, the FAA Senior or Master Rigger - or foreign equivalent - must possess an appropriate rating endorsement to their certificate. All SOFTIE models require a Back rating except the Seat model which requires a Seat rating endorsement. Because the Back models are also certified compatible with ramair parachutes when assembled with the Para-Phernalia ramair parachute deployment bag, the Rigger should be appropriately trained in the assembly and packing of these canopies prior to certifying the Softie for emergency use. FAR 65.129 - No certificated parachute rigger may (e) Pack, maintain, or alter a parachute in any manner that deviates from the procedures approved by an FAA administrator OR the manufacturer of the parachute; or (f) Exercise the privileges of his certificate and type rating unless he understands the current manufacturer’s instructions for the operation involved. Note: ANYONE who circumvents Para-Phernalia, Inc., assembly and packing instructions, or the packing instructions of the manufacturer of any of the component parts assembled with the Softie harness and container system, is in violation of FAR Part 65.129 and is therefore performing an illegal procedure. 10 Rev. 2.0 8/09 1.0 - General Information 1.6 SOFTIE Parts list QUANTITY DESCRIPTION 1 HARNESS/CONTAINER ASSEMBLY 1 SOFTIE RIPCORD - BACK (OR) 1 SOFTIE RIPCORD - SEAT 1 FREEBAG AND BRIDLE (SQUARE CANOPY ONLY) 1 PILOT CHUTE BRIDLE 2 STEERING LOOPS - (OR) 2 SQUARE CANOPY STEERING LOOPS (SQUARE CANOPY ONLY) 1 SAFETY STOW LOOP (SQUARE CANOPY ONLY) 1 CLOSING LOOP 1 PILOT CHUTE GROMMET STRAP 1 OWNER’S MANUAL AND PACKING INSTRUCTIONS 1 PILOT CHUTE - SUPPLIED ONLY WITH SOFTIE PURCHASED COMPLETE WITH PARACHUTE DIRECT FROM MANUFACTURER. PARA-PHERNALIA SUPPLIES COMPLETE SOFTIES WITH THE NATIONAL PARACHUTE INDUSTRIES - 357 MAGNUM PILOT CHUTE (OR EQUIVELENT). ONLY PILOTCHUTES WITH SIX (6) INCH DIAMETER BASE AND CAP ARE COMPATIBLE WITH THE SOFTIE SYSTEM. NO SUBSTITUTION OF COMPONENT PARTS IS AUTHORIZED 11 Rev. 2.0 8/09 2.0 - General Information 2.0 User Information 12 Rev. 2.0 8/09 2.0 - General Information 2.1 Pre-flight Procedures The Softie harness and container system is designed, tested, manufactured and delivered according to the highest possible industry standards. It is up to the owner to maintain it in top condition. Below are certain areas that you and/or your rigger should check on a regular basis to ensure proper operation and long life of your equipment. 2.1.1 Before Each Flight You Should Check: 1. Ripcord and housing for tackings, damage, proper seating and / or obstructions. 2. Ripcord pins, cable, handle and pocket for proper seating, wear and / or damage. 3. All harness webbing and hardware for wear or damage. Note: If any wear or unusual condition is found, consult Para-Phernalia, Inc. or a qualified parachute rigger immediately! 2.1.2 After Putting Your Rig On, Check: 1. 2. 3. Ripcord handle secure in its pocket. Chest strap is properly threaded and running end secured Leg straps are properly threaded and running ends are stowed. 2.1.3 180 Day Maintenance FAA Regulations require that: If you wear a parachute while operating an aircraft in US airspace or allow a passenger to wear a parachute while you are operating an aircraft in US airspace; which has not been certified as airworthy by an appropriately certificated FAA Senior or Master Rigger, you are in violation of the pertinent FAA Regulations. NOTE: In countries other than the United States the routine maintenance and repack interval shall be in accordance with the pertinent regulations or 1 year (whichever is shortest). During original assembly and packing and / or recertification, your rigger should thoroughly inspect your Softie to ensure that all components are in airworthy condition. This inspection should include but is not limited to: 1. Pilot chute, grommet strap, bridle and tackings, (deployment bag and safety stow if square canopy is employed), 2. Canopy fabric and lines (including orientation and continuity check). 3. Connector links tight. 4. Ripcord pocket secure. 5. Harness and container (including ripcord housing and tackings, and ripcord assembly) in good airworthy condition. 13 Rev. 2.0 8/09 2.0 - General Information 2.1.4 Major Alterations / Repair Para-Phernalia, Inc. does NOT authorize major alterations or repairs to the Softie harness and container system. Any major alterations or repairs must be made by the manufacturer or a designated representative. Contact Para-Phernalia, Inc. at 360-435-7220 for the name of a properly certificated FAA Master Rigger in your area. 2.2 Wearing the SOFTIE There are five points of adjustment on the SOFTIE harness 1. Shoulder adapters (two): Factory preset at medium adjustment. should be adjusted prior to donning the harness. 2. Chest strap (one): With either adjustable v-ring and snap hardware or thread through adapters. 3. Leg straps (2): With either v-ring and snap hardware or thread through adapters. Note: Conventional Harness: The pad on the left side of the conventional harness is designed to prevent the chest strap from being threaded through the ripcord handle. When threading the chest strap with the buckle on the right side of the harness, be aware that improper threading could result in it being impossible to pull the ripcord. See photo 2.1 Aerobatic Harness: The SOFTIE is also available with an Aerobatic harness option. In this configuration, no chest strap is present but the same cautions regarding ripcord handle involvement when making harness connections apply. See photo 2.2 2.1 Conventional Harness 14 Rev. 2.0 8/09 2.2 Aerobatic Harness 2.0 - General Information 2.2.1 Fit Your SOFTIE should be, above all else, comfortable. But, the real reason any pilot or passenger in an aircraft is wearing a parachute is in case an emergency bailout becomes necessary. If that should happen, the person using the parachute will reduce the risk of problems during egress and opening if the harness is worn snugly around the body. Take the time to properly adjust the fit of your Softie whether for yourself or for a less experienced passenger. The following steps should be taken to insure proper fit. Putting on the Conventional Harness 1. Place the harness over the shoulders and hold each of the two (2) leg strap snaps snugly at each hip. If the main lift webbing is correctly adjusted, the shoulder adapters will sit just in front of the shoulder below the collarbone. The wearer should be able to stand erect and the container should not sit low on the back. 2. If necessary, remove the SOFTIE to make any adjustments to the shoulder adapters and be sure to stow any additional riser exposed during adjustment. 3. With the SOFTIE back on your shoulders bend forward and grasp the bottom of the container; raising the container so that it rests high on the back. 4. Reach between your legs and take hold of one of the leg straps. 5. Identify that it is either left or right. Remove any twists and fasten the leg strap v-ring adapter to the appropriate snap. The snap should “Snap” shut. Be sure that no clothing or other obstructions are caught in the snap. 6. Repeat steps 4 and 5 with the opposite leg strap. 7. Now stand erect and fasten the chest strap; either with the thread through buckle or with snap and adjustable v-ring. Tighten the chest strap but not so much as to distort the main lift webbing. Stow any free-end excess in the elastic band. 8. Reach down and grasp both leg strap free ends and tighten the leg straps. Stow any excess leg strap free-end in the elastic keeper. Snug while standing erect is sufficient. When you sit down in the aircraft the harness will now feel loose and comfortable. Putting on the “A” Harness 1. Place the harness over your shoulders and hold each of the leg strap loops at each hip. If the main lift webbing is adjusted correctly, the shoulder adapters will sit in front of your shoulder just under the collarbone. 2. If necessary, remove the SOFTIE to make any adjustment to the shoulder adapters. To make the main lift web longer - pull about 1” of the riser webbing out of the riser protector (velcro) flap and extend it thru the shoulder adapters. To make the main lift web shorter - run the main lift webbing up thru the shoulder adapters and stow the excess in the riser protector (velco) flaps. 3. With the SOFTIE back on your shoulders bend forward and grasp the bottom of the container, raising the container so that it rests high on the back. 4. Reach between your legs and take hold of the left leg strap, remove any twists. 5. Bring the left leg strap between your legs and thread it thru the loop on your left hip (inside to out), then continue across your chest to the snap on the right side of your chest. 6. Repeat steps 4 & 5 with the right leg strap. The harness configuration should look as it does in Photo 2.2 (cont.) 15 Rev. 2.0 8/09 2.0 - General Information Putting on the “A” Harness (cont.) 2.3 Rig Cleaning - CORDURA® 7. Stand erect and tighten the harness by pulling on the ends of the harness webbing. Stow any excess webbing in the elastic keepers. 8. When you sit down the harness will feel much looser due to the geometry of the “A” harness. When seated in the aircraft snug up the harness and restow the excess webbing. If you have any questions regarding proper fit consult a qualified rigger or parachute dealer or call Para-Phernalia, Inc. at 360-435-7220. Or FAX at 360-435-7272. Note: These cleaning tips are for container only and are to be used for spot cleaning only. Para-Phernalia, Inc. does not recommend attempting to clean major stains without the assistance of a qualified rigger. Furthermore Para-Phernalia, Inc. does not in any way recommend the end user attempt to clean the harness or the parachute components of the Softie system. Table IV - CORDURA Recommended Stain Removal Methods* STAIN Coffee, Fruit Juice, Milk, Soft Drinks, Tea, Tabasco Sauce, Wine, Urine Detergent1 /blot/water/blot Ketchup, Chocolate, Blood Mustard Detergent/blot/ammonia2/blot/water/blot Detergent/blot/vinegar3/blot/water/blot Spicy mustard (turmeric), Kool-Aid® Solvent4/blot/detergent/blot/vinegar/blot/water/ blot Solvent4/blot/detergent/blot/vinegar/blot/water/ blot Freeze with ice cube/ scrape/solvent/blot/ detergent/blot/ water/blot Paint remover5/blot/solvent/blot/detergent/blot/ ammonia/blot/vinegar/blot/water/blot Seek the help of a professional upholstery cleaner Cooking oil, Crayon, Lipstick, Mayonnaise, Motor oil, Shoe polish Chewing gum Furniture polish, Permanent Ink Furniture polish, Shoe polish 16 Rev. 2.0 8/09 REMOVAL METHOD 2.0 - General Information Notes on Cleaning Agents The following procedures should be used with all cleaning agents. A clean, white cloth dampened with the recommended cleaning agent should be used in an inconspicuous place to test for colorfastness. Optimum cleaning will be achieved by not overwetting the cloth and by turning it frequently to keep it clean. Rings can be avoided by working from the outer edge of the spot toward the center. This process should be repeated until the spot is removed or there is no further transfer to the cloth. Detergent - One teaspoon neutral powder detergent (e.g. Tide or All) in 1 pint warm water. Note: Oily and greasy stains — In addition to the recommended method, some stains (e.g. perspiration/body oils) respond well to dry cleaners such as “HOST” (Racine Industries), “CAPTURE” (Milliken) and “K2R” (Texize). Carefully follow directions on the label. * Recommendations based on fabrics finished with Du Pont Teflon® WBC Soil and Stain Repellent for CORDURA®. The methods were effective on stains that were allowed to sit untreated overnight. Removal is usually easier when stains are cleaned immediately. Ammonia - A 3% solution. 2 Vinegar - White vinegar or a 10% acetic acid solution 3 Solvent - Dry cleaning fluid - preferably 1.1.1 trichlorethane 4 Paint remover - Paint remover with no oil in it. 5 17 Rev. 2.0 8/09 3.0 - Compatibility of Components 3.0 Compatibility of Components 18 Rev. 2.0 8/09 3.0 - Compatibility of Components 3.1 Canopy Compatibility In order to determine whether a particular canopy is compatible with a Softie harness/ container assembly, there are several requirements that have to be met. They are volume, deployment type, TSO certification, and placard limitations. 3.2 Volume The volume of a canopy is determined by using the standard Parachute Industry Association (PIA) volume measurement as determined by PIA technical standard 104 in its most current edition. By cross referencing this measurement to Para-Phernalia, Inc. Container Volume chart, section 3.5, compatibility may be determined. 3.3 Softie Volume Chart SOFTIE Model Minimum Volume Maximum Volume 180 Back (Micro) 275 / 4506400 / 6555 240 Back (Mini)375 / 6145525 / 8603 275 Back (Mini)475 / 7784700 / 11471 180 Wedge (Micro Wedge) 275 / 4506400 / 6555 240 Wedge (Mini Wedge)375 / 6145525 / 8603 275 Wedge (Mini Wedge475 / 7784700 / 11471 180 Seat (Seat)375 / 6145525 / 8603 240 Seat (Seat)375 / 6145525 / 8603 275 Seat (Seat)475 / 7784700 / 11471 180 Chair (Long Micro) 275 / 4506400 / 6555 240 Chair (Long)375 / 6145525 / 8603 275 Chair (Long)475 / 7784700 / 11471 Original550 / 9013 825 / 13520 Note: Volume references are in cubic inches / cubic centimeters (cm) 1 cubic inch = 16.387 cubic centimeters 3.4 Optimum Canopy Selection A large percentage of Softies are delivered complete, packed, and ready to use in your aircraft. However because an FAA licensed Parachute Rigger is authorized to “mix and match” approved components, there are many different parachutes which may be assembled with and which will fit in each of the many styles and sizes of Softie containers offered by Para-Phernalia, Inc. The name of each Softie container is based on the maximum allowable suspended weight of the canopy which best fits in that style and size. Example: Back 240 assembled and packed with a Free Flight Enterprises - Preserve 1A provides optimum pack density and has a maximum suspended weight of 240 lbs with a maximum deployment speed of 150 knots. 19 Rev. 2.0 8/09 3.0 - Compatibility of Components 3.5 Canopy Volume Chart Note: The volume references in this table are furnished by voluntary testing on the part of members of the Parachute Industry Association in accordance with PIA Technical Standard 104. Due to variations in materials and design, these volumes are subject to change without notice and can in no way guarantee any accuracy in regards to your specific canopy. Generally speaking these volumes will be accurate only to within about 20%. Manufacturer Free Flight Enterprise Flight Concepts International/ Glide Path International National Parachute Industries Para-Flite Performance Designs Precision Aerodynamics Strong Enterprises 20 Rev. 2.0 8/09 Model Amigo 134 Amigo 152 Amigo 172 Amigo 206 Preserve 1A Preserve III Preserve V Firelite Reserve Fury Reserve Maverick Reserve Sharpchuter Reserve Phantom/Aerostar 24 Phantom/Aerostar 26 Phantom/Aerostar 28 Swift Reserve Swift Plus 145 Main Swift Plus 175 Reserve Swift Plus 225 Reserve PD-126R Reserve PD-143R Reserve PD-160R Reserve PD-176R Reserve PD-193R Reserve PD-218R Reserve PD-235R Reserve PD-253R Reserve Microraven 120 Microraven 135 Microraven 150 Super Raven 1 Super Raven 2 Super Raven 3 Super Raven 4 Lopo Lite Lopo Mid-lite Lopo (Military) Volume 365 380 408 481 440 384 550 426 538 468 503 386 435 472 413 330 410 524 296 363 388 447 470 496 521 551 268 308 375 401 429 515 570 405 443 487 3.0 - Compatibility of Components 3.6 Deployment Type There are currently 5 different canopy deployment methods in common use. The following is a list of these types with a description and examples. (See Note) Type 1: Canopy first deployment. Lines are stowed vertically / horizontally in the container. Example: T-7A chest pack. Type 2: 2 bite diaper, Strong diaper, half diaper: Split line group - one or two stows lock diaper, compensated by off-setting stows of other line group in ontainer with remainder of lines stowed in the container. Example: Early Strong Lopo Diaper, Pioneer “K” series reserves. Type 3: Ascuitto diaper, Piglet diaper: Full diaper with line stows horizontally across diaper left to right, perpendicular to radial seams. Example: Piglet Featherlite, Phantom Series Reserves. NOTE: Para-Phernalia, Inc does not support the use of Type 1 or Type 2 deployment devices in the SOFTIE container system. Type 4 diapers are recommended and supplied with round parachutes from Para-Phernalia, Inc. These packing instructions assume a Type 4 diapered round canopy to be installed in the SOFTIE. 3.7 Deployment Bag and Bridle Only Para-Phernalia, Inc. or Free Flight Enterprises deployment bags and bridle assemblies of the correct size and that are properly labeled for volume are compatible with the SOFTIE . No other deployment bags are approved for use with the SOFTIE system. Type 4: Handbury, Preserve or Strong Full Diaper: Wraps around skirt of canopy with two or three locking stows and remainder of line stowed vertically, parallel with radial seams. Example: Preserve 1 & 3, Strong Lopo Lite, and Hobbit Reserves. Type 5: Free Bag: Canopy stowed in bag and lines stowed on/in bag. Example: PD reserve Canopies, Super Raven M series, Tempo, Preserve V. 21 Rev. 2.0 8/09 3.0 - Compatibility of Components Note: The following data, section 3.8 Industry Weight/Deployment Speed Limitations, covers only current production parachutes and only those manufacturers who placard their products. For those canopies not listed, it is suggested that you contact the canopy manufacturer directly or Para-Phernalia, Inc. for an update to this list. 3.8 Parachute Industry Weight / Deployment Speed Limitations Manufacturer Model Free Flight Enterprise Amigo 134 Amigo 152 Amigo 172 Amigo 206 Preserve 1A Preserve III Preserve V Flight Concepts International/ Firelite Reserve Glide Path International Fury Reserve Maverick Reserve Sharpchuter Reserve National Parachute Industries Phantom/Aerostar 24 Phantom/Aerostar 26 Phantom/Aerostar 28 North American Aerodynamics NAA 22 NAA 26 Swift Main Swift Reserve Swift Plus Reserve Safety Flyer Safety Star Performance Designs PD-126R Reserve PD-143R Reserve PD-160R Reserve PD-176R Reserve PD-193R Reserve PD-218R Reserve PD-235R Reserve PD-253R Reserve Precision Aerodynamics Microraven 120 Microraven 135 Microraven 150 Super Raven 1 Super Raven 2 Super Raven 3 Super Raven 4 Strong Enterprises Lopo Lite Lopo Mid-lite Lopo (Military) 22 Rev. 2.0 8/09 Max. Deployment Speed (knots) 150 150 150 150 150 150 150 150 150 150 150 140 140 140 130 130 130 130 150 130 130 150 150 150 150 150 150 150 150 130 150 130 130 130 130 130 140 140 140 Max. Gross Weight (lbs.) 145 164 185 225 240 180 275 190 200 195 235 145 180 200 190 250 180 180 200 160 180 151 171 192 211 232 254 254 254 131 137 153 185 222 254 254 175 225 225 3.0 - Compatibility of Components THIS PAGE LEFT BLANK INTENTIONALLY 23 Rev. 2.0 8/09 4.0 - Rigger Information 4.0 Rigger Information 24 Rev. 2.0 8/09 4.0 - Rigger Information 4.1 - Parachute Assembly Inspection Forms ! Note: Count all Tools Before Starting Assembly Manufacturer: Model: Date of manufacture: Qty: 4.1.1 - Harness and Container Inspection Checklist Serial No. Initial After Each Item If No Discrepancies Are Found Initials 1. Main lift web and Risers 2. Chest, diagonal and leg straps 3. Harness hardware and connectors 4. Ripcord, handle pocket, cable housing and tacking 5. Container flaps and grommets 6. Closing loop length 7. Grommet strap 8. Comments: 4.1 - Parachute Assembly Inspection Form ! Note: Count all Tools Before Starting Assembly Manufacturer: Model: Date of manufacture: Qty: 4.1.2 - Round Canopy and Pilot chute Inspection Checklist Serial No. Initial After Each Item If No Discrepancies Are Found Initials 1. Connector links 2. Suspension lines 3. Steering lines and Toggles 4. Canopy 5. Diaper and rubber bands 6. Apex lines 7. Bridle and tacking 8. Pilot chute and grommet strap tacking 9. Packing card and information 10. Comments Rev. 2.0 8/09 25 4.0 - Rigger Information 4.1.3 - Assembly of Round Canopy Inital After Each Item If No discrepancies Are Found Initals 1. Inspection of canopy and Container completed (sections 4.1.1 & 4.1.2) 2. Continuity of all lines 3. Connector links tightened properly 4. Steering lines tied to toggles on mark 5. Steering line length equal to each other 6. Packing card filled out 7. Pilot Chute and grommet strap 8. Packed according to manufacturers instructions 9. Ripcord pin sealed 10. Comments: Manufacturer: Model: Date of manufacture: Serial No. Initial After Each Item If No Discrepancies Are Found Initials 1. Risers 2. Connector links 3. Sliders & Grommets 4. A-lines and attachment points 5. B-lines and attachment points 6. C-lines and attachment points 7. D-lines and attachment points 8. Steering lines and toggles 9. Canopy cells and cross ports 10. Slider stops (on canopy) 11. Deployment bag and safety stow 12. Bridle line 13. Pilot chute and grommet strap 14. Packing card and information 15. Comments: 26 4.1.4 - Square Reserve Canopy, Bag and Pilot Chute Inspection Checklist Rev. 2.0 8/09 4.0 - Rigger Information 4.1.5 - Assembly of Square Reserve Canopy Inital After Each Item If No discrepancies Are Found Initals 1. Inspection of canopy and Container completed (Sections 4.1.1 & 4.1.2) 2. Continuity of all lines 3. Slider on correctly 4. Rapide link barrels tightened properly 5. Steering lines tied to toggles on mark 6. Steering line length equal to each other 7. Safety stow on deployment bag installed 8. Pilot chute and grommet strap attached and tacked 9. Packing card filled out 10. Packed according to manufacturers instructions 11. Ripcord pin sealed 12. Comments: Note: Recount all tools used after assembly and packing is completed to ensure that none were left in the canopy or container. Signature: Print Name Qty: Date: Seal Symbol: General Comments: Rev. 2.0 8/09 27 4.0 - Rigger Information 4.2 Round Canopy Packing Instructions Prior to installing and packing any canopy into the Softie, the rigger must thoroughly read and understand these instructions. The Rigger must also make the determination of proper compatibility regarding volume, deployment type and placard information. Only those canopies that have been assigned a weight and speed limitation by the manufacturer are approved for use in the Softie. Refer to Section 3.3 - Softie Volume Chart and Section 3.8 - Parachute Industry Weight / Deployment Speed Limitations for installation of proper canopy for customer needs. If you should have any questions as to compatibility or weight and speed limitations, call Para-Phernalia, Inc. at (360) 435-7220 or FAX (360) 435-7272. Note: Minimum qualification; FAA Senior or Master Parachute Rigger or foreign equivalent. 4.2.1 Inspect the Canopy (Preserve I or Preserve III) A. Check for any damage to canopy material or suspension lines. Check for any stains or possible soiling by chemicals. Check to make sure there are no foreign objects inside the canopy or entangled with the suspension lines. Assure that the canopy is assembled properly, in accordance with Section 4.1.3. Check the connector links for proper tightness. Make sure that the steering toggles are installed. B. It is mandatory that the pilot chute bridle be installed through both of the positioning loops on two vent lines and around all of the other vent lines. It must be secured with either a bowline knot or stitching at least equal to the strength of the bridle material. The loop must be adequate too prevent the bridle from tightening on the vent lines. 2. Repairs A. No major repairs or alterations are authorized. Any repairs accomplished in the field must be of a nature that no dis-assembly of any portion of the canopy is required. ANY SUCH MAINTENANCE MUST BE RETURNED TO THE FACTORY. B. Repairs such as a small patch (less than 9” dimension of the largest damaged area) may be accomplished by an appropriately certified senior or master parachute rigger with the facilities to do so. The repairs must be accomplished in accordance with the procedures in the “Poynter’s Parachute Manual” . Any damage with a maximum dimension of ½” or less may be repaired using a single inside patch with MIL-C-44378 or equivalent. The patch to be a minimum of 2”, sewn with a single needle sewing machine, a single row of 301 stitch, 7-11 S.P.I., with VT-295 T/2, C/A, Size “E”. C. Both repairs identified in section 2B limited to 1 per gore, 3 per canopy. 4.2.2 Softie and Components Inspect according to checklist, section 4.1.1 4.2.3 Parachute Inspect according to checklist section 4.1.2 (Round) 4.1.4 (Square) 28 Rev. 2.0 8/09 4.0 - Rigger Information 4.3 Assembly - Assemble an approved type and size parachute to the Softie harness and container system ensuring the following: 4.3.1 Canopy and container are face down on an appropriately sized and surfaced packing table. 4.3.2 Line continuity is correct. 4.3.3 Connector links assembled and tightened according to manufacturer’s instructions. If Maillon links are used, tight is usually considered to be finger tight plus one quarter turn of the barrel. WARNING: If Maillon Rapide links are too tight, barrels will crack. 4.3.4 You may mark connector links with a “tell tale” dot of nail polish or equivalent. 4.3.5 Steering lines are routed correctly. 4.3.6 Insert steering lines through guide rings on backside of rear risers. 4.3.7 Attach steering toggles to end of steering line. 4.3.8 Tack steering toggles to rear risers with double strand of seal thread and tie with surgeons knot. 4.3.9 Check closing loop length. (See section 4.4.). 4.3.10 Insert closing loop through grommets in pack tray stiffener plate. 4.3.11 Install ripcord. Insert ripcord into ripcord housing at left main lift web. Secure ripcord handle in ripcord pocket located on the left main lift web above the rip cord housing. 4.3.12 Install rubber bands on canopy diaper. 4.3.13 Straighten apex of canopy. 4.3.14 Attach upper end of bridle (small loop) to loop at base of pilot chute with larks head knot. No tacking is required at upper end of bridle. 4.3.15 Attach long loop end of bridle to apex of canopy with larks head knot and tack with five (5) wraps single strand of heavy duty tacking thread . Tack at center of large loop with single (1) wrap double strand of tacking thread. 4.3.16 If square parachute is being assembled, attach Pilot chute to large loop at top of bridle (opposite deployment bag). Tack at center of large loop with single (1) wrap double strand of tacking thread. 4.3.17 Install grommet strap (provided) on pilot chute cap. Be sure the grommet strap is centered and one end is on Pilot chute canopy reinforcement tape nearest the spring swage located on the top coil of the spring. Use double wrap, double strand of heavy duty tacking thread four (4 ) places. Note: Tacking thread may be nylon 5 cord coated with beeswax or resin coated braided tacking thread or equivalent. Rev. 2.0 8/09 29 4.0 - Rigger Information 4.4 SOFTIE Closing Loop Length Chart Note: All length references are in inches. Tolerance is +/- 0.25 Do not tie a knot to shorten the closing loop SOFTIE Model 180 Back (Micro) 240 Back (Mini) 270 Back (Mini) 180 Wedge (Micro Wedge) 240 Wedge (Mini Wedge) 275 Wedge (Mini Wedge) 180 Seat (Seat) 240 Seat (Seat) 275 Seat (Seat 180 Chair (Long Micro) 240 Chair (Long) 275 Chair (Long) Original Loop Length 8.5” / 22 cm 8.5” / 22 cm 8.5” / 22 cm 8.5” / 22 cm 8.5” / 22 cm 8.5” / 22 cm 10.5” /27 cm 10.5” / 27 cm 10.5” / 27 cm 8.5” / 22 cm 8.5” / 22 cm 8.5” / 22 cm 10.0” / 25.4 cm 4.5 Flaking the Canopy & Stowing Lines 4.5.1 Place the canopy on the packing table and connect tension devices at both container and apex. Inspect the canopy in accordance with procedures from the Poynter’s Parachute Manual. Check the skirt band and the apex band to assure that they are straight. Check each gore to assure that they are properly flaked and not tucked into themselves or another gore. See Photo 4.5.1 4.5.2 Align the tapes at the skirt and fold 45 degrees, parallel with the main seams. See Photo 4.5.2 4.5.1 30 Rev. 2.0 8/09 4.5.2 4.0 - Rigger Information 4.5.3 Fold the canopy lengthwise in thirds. See Photo 4.5.3 Fold the canopy once more to the center ( into fifths). See photos 4.5.3 A & 4.5.3 B Separate the canopy folds at the first radial seam to thirds. See photo 4.5.3 C. Place shot bags or packing weights on the canopy to hold in place. 4.5.3 4.5.3 A 4.5.3 B 4.5.3 C 4.5.4 Offset the diaper so the rubber bands match up with the grommets on the opposite side of the canopy. See photo 4.5.4 4.5.5 Pulling the container towards the canopy, form a loop of suspension lines above the top of the diaper. Leave enough room to close the diaper. See photo 4.5.5 4.5.4 4.5.5 Rev. 2.0 8/09 31 4.0 - Rigger Information 4.5.6 Form a loop of suspension lines, no more than 1 ½” long. Close the diaper, starting with the top grommet, then close the center grommet. See photos 4.5.6 A & 4.5.6 B 4.5.7 Bring the rubber band from the bottom stow through the bottom grommet on the inside flap. 4.5.6 A 4.5.6 B 4.5.8 Close the end flap over both of the side flaps using a stow no more than 1 ½” long. See photos 4.5.8 A & 4.5.8 B 4.5.8 A 4.5.8 B 32 Rev. 2.0 8/09 4.0 - Rigger Information 4.5.9 Finish stowing the remainder of the suspension lines. Use stows no longer than 1 ½” long. See photo 4.5.9 4.5.9 4.5.10 When finished stowing the lines the end view should look like photo 4.5.10 to create a flat pack job. 4.5.11 Complete the packing procedures using the instructions for the appropriate SOFTIE Container. \ 4.5.10 4.6 Placing Parachute in Container - Place parachute in container according to the following steps: Note: 1. Refer to Volume for Container (section 3.3) and Canopy (section ) to ensure proper fit. 2. Refer to Label on Data card Pocket for Softie model information. 4.7 SOFTIE BACK (MINI, MICRO & LONG) NOTE A: The MINI & MICRO can be packed left to right (shown) right to left (opposite) diaper up (top of container shown) or diaper down (bottom of container) for customer comfort & fit. NOTE B: The canopy should lay outside the sides of the container during installation and will be contained when closing the container. Rev. 2.0 8/09 33 4.0 - Rigger Information 4.7.1 Lay the risers in and along the side of the container See photo 4.7.1 4.7.1 4.7.2 Insert pull-up cords into each end of the closing loop (two required). Turn the diaper end of the canopy 90 degrees and lay the edge of the diaper even with the top edge of the container inside the pack tray. See photo 4.7.2 4.7.2 4.7.3 Holding the canopy fabric at the top right corner, fold the canopy down the right side of the container to the bottom edge. See photo 4.7.3 4.7.3 4.7.4 Make a short fold (W) up to the bottom grommet and back down to the lower left corner. NOTE: The circumferential seam will lay into the lower left corner of the pack tray. See photo 4.7.4 4.7.4 34 Rev. 2.0 8/09 4.0 - Rigger Information 4.7.5 Take the canopy up to the lower edge of the diaper (The next radial seam will lay even with the “W” fold and lower grommet) See photo 4.7.5 A & 4.7.5 B 4.7.5 A 4.7.5 B 4.7.6 Make a short “S” fold back down even with the lower grommet and back up to the diaper. (The next radial seam will nest just below the diaper) See photo 4.7.6 4.7.6 4.7.7 The final folds go to the bottom left of the container, across to the bottom right, finishing just under the diaper on the right side. This will even the pack thickness on both sides of the container and create a pocket for the pilot chute to nestle. There should be no canopy fabric underneath the pilot chute spring! See photo 4.7.7 4.7.7 Rev. 2.0 8/09 35 4.0 - Rigger Information 4.7.8 Pull out the canopy protector flaps (type 12) to keep the canopy fabric away from the grommets & closing loop. See photo 4.7.8 4.7.8 4.7.9 Thread the pull up cords through the top flap & bottom flap grommets. See photo 4.7.9 4.7.9 4.7.10 Before closing the left top flap assure the diaper & lines extend about 1” beyond the side of the container. Close the Velcro over the diaper & lines. See photo 4.7.10 4.7.10 4.7.11 On the right side at the top of the container roll the canopy fabric of the first fold in toward the lines of the diaper. See photo 4.7.11 4.7.11 36 Rev. 2.0 8/09 4.0 - Rigger Information 4.7.12 Containing the canopy fabric, close the Velcro of the right top flap, then velcro close the left bottom flap. See photo 4.7.12 A & 4.7.12 B 4.7.12 A 4.7.12 B 4.7.13 Assuring the top radial band is even with the lower left side of the container Velcro close the right bottom flap. See photo 4.7.13 4.7.13 4.7.14 Pull out all canopy protector flaps around the closing loops. See photo 4.7.14 4.7.14 Rev. 2.0 8/09 37 4.0 - Rigger Information 4.7.15 Close the pilot chute kicker flap, temp pin the lower closing loop, and “S”fold the bridle between grommets. See photo 4.7.15 4.7.15 4.7.16 Center the pilot chute between the grommets & side bumpers. Compress the pilot chute taking care to keep the pilot chute canopy fabric from being pinched between spring coils. Wrap pilot chute canopy fabric protectors (Type 12) around the pilot chute canopy fabric and between the spring coil. See photo 4.7.16 4.7.16 4.7.17 Continue compressing the pilot chute See photo 4.7.17 4.7.17 4.7.18 Temp pin the pilot chute. See photo 4.7.18 4.7.18 38 Rev. 2.0 8/09 4.0 - Rigger Information 4.7.19 Stow the remainder of pilot chute canopy fabric between the spring coils. See photo 4.7.19 4.7.20 This is a good time to turn the container over and check for pilot comfort (dead ant test). 4.7.19 4.7.21 Close the right side flap and temp pin. See photos 4.7.21 A & 4.7.21 B 4.7.21 A 4.7.21 B 4.7.22 Close the left side flap, insert bottom ripcord pin first. See photo 4.7.22 4.7.22 Rev. 2.0 8/09 39 4.0 - Rigger Information 4.7.23 Set the top ripcord pin. See photo 4.7.23 4.7.23 4.7.24 Carefully remove pull-up cords and seal the top pin with red seal thread & riggers seal. See photo 4.7.24 4.7.25 Make appropriate entries into packing data card and rigger log book. 4.7.24 4.7.26 * * * * * COUNT YOUR TOOLS * * * * * 8888 4.8 SOFTIE Wedge NOTE: For pilot comfort, pay attention to place the radial seams near the sides of the container where practical. 4.8.1 Lay the risers in and along the side of the container, close the riser covers on the yoke and shoulder pads. See photo 4.8.1 4.8.1 40 Rev. 2.0 8/09 4.0 - Rigger Information 4.8.2Insert pull-up cords into each end of the closing loop (two required). Temp pin the upper closing loop at the pack tray stiffener. See photo 4.8.2 4.8.3Turn the container 90 degrees so the top of the container is toward you and the bottom of the container is away. Place the diaper so the line stows are face up and at the bottom of the container. See photo 4.8.2 4.8.2 4.8.4 Make two (2) “S”-folds back & forth across the container below the bottom grommet. The first fold should extend 2+ “ beyond the side of the container, the second fold should be even with the edge of the container. This will provide a dense lumbar support for the pilot’s comfort. See photo 4.8.4 4.8.4 4.8.5 Pull out the lower canopy protector flap (Type12), close the bottom flap with the pull-up cord and temp pin the closing loop. See photo 4.8.5 4.8.5 4.8.6 Fold 3 should extend about 4” beyond the right side flap (Note the location of the first radial seam) Fold 4 will be between the grommets and extend about 4” beyond the left side flap. See photo 4.8.6 4.8.6 Rev. 2.0 8/09 41 4.0 - Rigger Information 4.8.7Continue “S” folding the remainder of the canopy to fill the upper portion of the container. These folds should be even with the sides of the container. See photo 4.8.7 4.8.7 4.8.8 Fold the canopy fabric extending beyond the container (between the grommets) on top of itself forming a pocket for the pilot chute. Pull out the canopy protector flaps (Type 12). See photo 4.8.8 4.8.8 4.8.9Roll the canopy fabric at bottom of container (fold #1) to be as thick as the diaper. See photo 4.8.9 4.8.9 4.8.10 Velcro close the bottom right side flap, Velcro close the bottom left side flap See photo 4.8.10 4.8.10 42 Rev. 2.0 8/09 4.0 - Rigger Information 4.8.11 Velcro close the top and bottom flaps and temp pin the closing loops. See photo 4.8.11 4.8.11 4.8.12 Close the pilot chute kicker flap, temp pin the lower closing loop, and “S”fold the bridle between grommets. See photo 4.8.12 4.8.12 4.8.13 Center the pilot chute between the grommets & side bumpers. Compress the pilot chute taking care to keep the pilot chute canopy fabric from being pinched between spring coils. Wrap pilot chute canopy fabric protectors (Type 12) around the pilot chute canopy fabric and between the spring coil. See photo 4.8.13 4.8.13 4.8.14 Continue compressing the pilot chute See photo 4.8.14 4.8.14 Rev. 2.0 8/09 43 4.0 - Rigger Information 4.8.15 Temp pin the pilot chute. See photo 4.8.15 4.8.16 Stow the remainder of pilot chute canopy fabric between the spring coils. See photo 4.8.16 4.8.17 This is a good time to turn the container over and check for pilot comfort (dead ant test). 4.8.16 4.8.18 Close the right side flap and temp pin. See photo 4.8.18 A & 4.8.18B 4.8.18 A 4.8.18 B 44 Rev. 2.0 8/09 4.0 - Rigger Information 4.8.19 Close the left side flap - bottom ripcord pin first. See photo 4.8.19 4.8.19 4.8.20 Set the top ripcord pin. See photo 4.8.20 4.8.20 4.8.21 Carefully remove pull-up cords and seal the top pin with red seal thread & riggers seal. See photo 4.8.21 4.8.22 Make appropriate entries into packing data card and rigger log book. 4.8.21 4.8.23 * * * * * COUNT YOUR TOOLS * * * * * Rev. 2.0 8/09 45 4.0 - Rigger Information SOFTIE SEAT PACKS The Container flaps will be named as determined by position on the pilot (wearers) body. 1. Front Flap, 2. Back Flap, 3. Left Side Flap (ripcord housing side), 4. Right Side Flap There are various SOFTIE SEAT PACK configurations that are designed for different pilot/aircraft seat specifications. The wedge shapes must be packed softer and thinner in the back area to help a tall pilot sit lower in the cockpit. The soft back-flap area should not have any lumps in the tailbone area from the circumferential bands of the canopy. 4.9 SOFTIE SEAT PACK (Standard Flat) 4.9.1 Lay risers in channels along backpad & into the container. Close riser covers on the yoke & shoulder pads. 4.9.2 Close riser channels along backpad. 4.9.3 Insert proper size closing loop (See Section 4.4) Insert pull-up cords into both ends of the closing loop. 4.9.4 Fold “back area” under the container (optional) See photo 4.9.4 4.9.4 4.9.5 Turn container 90 degrees 4.9.6Place diaper across bottom (front) of container, lines up, and flat approximately 1½” beyond the left side of container. See photo 4.9.6 4.9.7 4.9.7 The first fold should lay approximately 4” beyond the right side of the container and between the grommets of the pack tray stiffener extending 4” beyond the left side of the container. See photo 4.9.7 46 Rev. 2.0 8/09 4.9.6 4.0 - Rigger Information 4.9.8 “S”-fold the remainder of the canopy along the back wall, leaving enough of the apex material to route back through the grommets. See photo 4.9.8 4.9.9 Pull out canopy protector flaps (Type 12). See photo 4.9.8 NOTE: The excess canopy material outside the container perimeter will be used as bulk to fill the corners and allow the pilot chute to nest flat. 4.9.8 4.9.10 Route and temp pin the pull-up cords through the top & bottom closing flaps (top flap must lay under the bottom (pilot chute kicker flap). See photo 4.9.10 4.9.10 4.9.11 Fold-roll canopy fabric up and in – filling line stow gap in the front right corner. See photo 4.9.11 4.9.11 4.9.12 Fold the remaining fabric on the right side to nestle the pilot chute & fill the rear right corner. See photo 4.9.12 4.9.13 Repeat Instruction 4.9.12 for the left side of container. See photo 4.9.13 4.9.12 4.9.13 Rev. 2.0 8/09 47 4.0 - Rigger Information 4.9.14 The container is now ready to compress the pilot chute. See photo 4.9.14 4.9.14 4.9.15 Center the pilot chute between the grommets & side bumpers. Compress the pilot chute taking care to keep the pilot chute canopy fabric from being pinched between spring coils. Wrap pilot chute canopy fabric protectors (Type 12) around the pilot chute canopy fabric and between the spring coil. See photo 4.9.15 4.9.15 4.9.16Continue compressing the pilot chute. See photo 4.9.16 4.9.16 4.9.17 Temp pin the pilot chute. See photo 4.9.17 4.9.17 48 Rev. 2.0 8/09 4.0 - Rigger Information 4.9.18 Stow the remainder of pilot chute canopy fabric between the spring coils. See photo 4.9.18 4.9.18 4.9.19 Contain the canopy fabric, route, and temp pin the pull-up cords through the grommets on the right side flap. See photo 4.9.19 4.9.19 4.9.20 Using the same technique close the left side flap, temp pinning the second (front) closing loop first. See photo 4.9.20 4.9.20 Rev. 2.0 8/09 49 4.0 - Rigger Information 4.9.21 Install the in-line ripcord pin in the first (back) closing loop. See photo 4.9.21 4.9.22 Install end ripcord pin into second (front) closing loop. See photo 4.9.22 4.9.21 4.9.22 4.9.23 Dress and snap the four corners of the container. See photo 4.9.23 4.9.23 4.9.24 Carefully remove pull-up cords and seal the top pin with red seal thread & riggers seal. See photo 4.9.24 4.9.25 Make appropriate entries into packing data card and rigger log book. 4.9.24 4.9.26 50 Rev. 2.0 8/09 * * * * * COUNT YOUR TOOLS * * * * * 4.0 - Rigger Information 4.10 SOFTIE SEAT PACK (WEDGE) 4.10.1 Lay risers in channels along backpad & into the container. Close riser covers on the yoke & shoulder pads. 4.10.2 Close riser channels along backpad 4.10.3 Insert proper size closing loop (See Section 4.4) Insert pull-up cords into both ends of the closing loop. 4.10.4 4.10.4 Fold “back area” under the container (optional). See photo 4.10.4 4.10.5 Turn container 90 degrees. 4.10.6 Place diaper across bottom (front) of container, on its side lines in, and approximately 1½” beyond the left side of container. See photo 4.10.6 4.10.6 4.10.7 The first fold should lay approximately 4” beyond the right side of the container and between the grommets of the pack tray stiffener extending 4” beyond the left side of the container (there should be two passes between the gromets). See photo 4.10.7 4.10.7 4.10.8 “S”-fold the remainder of the canopy along the back wall. See photo 4.10.8 NOTE: The excess canopy material outside the container perimeter will be used as bulk to fill the corners and allow the pilot chute to nest into flat. 4.10.8 Rev. 2.0 8/09 51 4.0 - Rigger Information 4.10.9 Pull out canopy protector flaps (Type 12) See photo 4.10.9 4.10.9 4.10.10 Route and temp pin the pull-up cords through the top & bottom closing flaps (top flap must lay under the bottom (pilot chute kicker flap). See photo 4.10.10 4.10.10 4.10.11 Fold-roll canopy fabric up and in – filling line stow gap in the front right corner. See photo 4.10.11 4.10.11 4.10.12 Fold the remaining fabric on the right side to nestle the pilot chute & fill the rear right corner. See photo 4.10.12 4.10.13 Repeat Instruction 4.10.12 for the left side of container. See photo 4.10.13 4.10.12 52 Rev. 2.0 8/09 4.10.13 4.0 - Rigger Information 4.10.14 The container is now ready to compress the pilot chute. See photo 4.10.14 4.10.14 4.10.15 Center the pilot chute between the grommets & side bumpers. Compress the pilot chute taking care to keep the pilot chute canopy fabric from being pinched between spring coils. Wrap pilot chute canopy fabric protectors (Type 12) around the pilot chute canopy fabric and between the spring coil. See photo 4.10.15 4.10.15 4.10.16 Continue compressing the pilot chute. See photo 4.10.16 4.10.16 4.10.17 Temp pin the pilot chute. See photo 4.10.17 4.10.17 Rev. 2.0 8/09 53 4.0 - Rigger Information 4.10.18 Stow the remainder of pilot chute canopy fabric between the spring coils. See photo 4.10.18 4.10.18 4.10.19 Contain the canopy fabric, route and temp pin the pull-up cords through the grommets on the right side flap. See photo 4.10.19 A & 4.10.19 B 4.10.19 A 4.10.19 B 4.10.20 Using the same technique close the left side flap temp pinning the second (front) closing loop first. See photo 4.10.20 4.10.20 54 Rev. 2.0 8/09 4.0 - Rigger Information 4.10.21 Install the in-line ripcord pin in the first (back) closing loop. See photo 4.10.21 4.10.22 Install end ripcord pin into second (front) closing loop. See photo 4.10.22 4.10.21 4.10.22 4.10.23 Dress and snap the four corners of the container. See photo 4.10.23 4.9.23 4.10.24 Carefully remove pull-up cords and seal the top pin with red seal thread & riggers seal. See photo 4.10.24 4.10.25 Make appropriate entries into packing data card and rigger log book. 4.10.24 4.10.26 * * * * * COUNT YOUR TOOLS * * * * * Rev. 2.0 8/09 55 4.0 - Rigger Information SOFTIE SEAT PACK (S-1 WEDGE) 4.11.1 Lay risers in channels along backpad & into the container. Close riser covers on the yoke & shoulder pads. 4.11.2 Close riser channels along backpad 4.11.3 Insert proper size closing loop (See Section 4.4) Insert pull-up cords into both ends of the closing loop. 4.11.4 Fold “back area” under the container (optional). See photo 4.11.4 4.11.4 4.11.5 Turn container 90 degrees. 4.11.6 Place diaper across bottom (front) of container, on its side lines in, and approximately 1½” beyond the left side of container See photo 4.11.6 4.11.6 4.11.7 The first fold should lay approximately 4” beyond the right side of the container and on top of and between the diaper and the first grommet extending 4” beyond the left side of the container. See photo 4.11.7 4.11.7 4.11.8 The next two folds should be between the grommets of the pack tray stiffener extending approximately 4” beyond the sides of the container. See photo 4.11.8 56 4.11.8 Rev. 2.0 8/09 4.0 - Rigger Information 4.11.9 S”-fold the remainder of the canopy flat along the back wall. See photo 4.11.9 4.11.10 Pull out canopy protector flaps (Type 12). See photo 4.11.9 NOTE: A: The excess canopy material outside the container perimeter will be used as bulk to fill the corners and allow the pilot chute to nest flat. B: The circumferential bands do not lie in the center! 4.11.9 4.11.11 Route and temp pin the pull-up cords through the top & bottom closing flaps (top flap must lay under the bottom (pilot chute kicker flap). See photo 4.11.11 4.11.11 4.11.12 Prior to setting the pilot chute in place, shift the canopy fabric running between the pack tray grommets toward the diaper creating a smooth wedge shape. See photo 4.11.12 4.11.12 4.11.13 Fold-roll canopy fabric up and in, filling line stow gap in the front right corner. See photo 4.11.13 4.11.13 Rev. 2.0 8/09 57 4.0 - Rigger Information 4.11.14 Fold the remaining fabric on the right side to nestle the pilot chute & fill the rear right corner. See photo 4.11.14 4.11.15 Repeat for the left side of container. See photo 4.11.15 4.11.14 4.11.15 4.11.16 The container is now ready to compress the pilot chute. See photo 4.11.16 4.11.16 4.11.17 Center the pilot chute between the grommets & side bumpers. Compress the pilot chute taking care to keep the pilot chute canopy fabric from being pinched between spring coils. Wrap pilot chute canopy fabric protectors (Type 12) around the pilot chute canopy fabric and between the spring coil. See photo 4.11.17 4.11.17 4.11.18 Continue compressing the pilot chute. See photo 4.11.18 4.11.18 58 Rev. 2.0 8/09 4.0 - Rigger Information 4.11.19 Temp pin the pilot chute. See photo 4.11.19 4.11.19 4.11.20 Stow the remainder of pilot chute canopy fabric between the spring coils. See photo 4.11.20 4.11.20 4.11.21 Contain the canopy fabric, route and temp pin the pull-up cords through the grommets on the right side flap. See photo 4.11.21 4.11.21 4.11.22 Using the same technique close the left side flap, temp pinning the second (front) closing loop first. See photo 4.11.22 4.11.22 Rev. 2.0 8/09 59 4.0 - Rigger Information 4.11.23 Install the in-line ripcord pin in the first (back) closing loop. See photo 4.11.23 4.11.24 Install end ripcord pin into second (front) closing loop. See photo 4.11.24 4.11.23 4.11.24 4.11.25 Dress and snap the four corners of the container. See photo 4.11.25 4.11.26 Carefully remove pull-up cords and seal the top pin with red seal thread & riggers seal. See photo 4.11.26 4.11.25 4.11.26 4.11.27 Make appropriate entries into packing data card and rigger log book. 4.11.28 When complete the S-1 Seat Wedge should have a radical wedge shape. See photo 4.11.28 4.11.29 60 COUNT YOUR TOOLS ! Rev. 2.0 8/09 4.10.28 4.0 - Rigger Information End of Manual Rev. 2.0 8/09 61