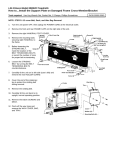
1
Models 9100, 9500HR, 9700HR,
and 9700HR w/Decline Treadmills
Customer Support Services
SERVICE MANUAL
Life Fitness Models 9100, 9500HR, 9700HR, and 9700HR w/Decline Treadmills
INTRODUCTION
HOW TO USE SERVICE MANUAL AND CONTACT CUSTOMER SUPPORT SERVICES
This service manual is applicable to Treadmill Models TR 9100, TR 9500HR, TR 9700HR, and TR 9700HR
w/Decline. Note: Information represents typical configuration and may differ slightly from actual equipment.
The Service Manual provides recommendations of safe and efficient approaches to problem situations. This
manual is separated into six sections.
INTRODUCTION
TABLE OF CONTENTS
Section I
TROUBLESHOOTING GUIDES
Section II
DIAGNOSTIC MODE
Section III
"How To..." SERVICE AND REPAIR GUIDES
Section IV
ELECTRONIC OVERVIEW
WIRING BLOCK DIAGRAMS
Section V
PARTS IDENTIFICATION
Section VI
MISCELLANEOUS INFORMATION
Refer to TABLE OF CONTENTS for section topics.
When an operating problem occurs, refer to trouble shooting guides and diagnostic mode to isolate cause . When
applicable, guides are listed by problem symptom followed with suggestions of probable cause(s) .
Once source of problem is identified, consult "How To..." guides for recommended repair procedures. "How To..."
sub-sections are organized by replaceable part or assembly name. For convenience, sub-section lists
recommended “Tools Required” to complete specific function. Refer to PARTS IDENTIFICATION to identify proper
name and number of part to order for repair of equipment.
A reproducible FAX order claim form is given in COMMUNICATING BY TELEFACSIMILE for convenient ordering of
service parts.
To order, contact Life Fitness Customer Support Services.
Via FAX - 24 hrs. /day, 7 days/week.
Via telephone - Monday through Friday from 8:00 AM to 7:00 PM ( CST).
Via post - At address cited.
To speed Life Fitness Customer Support Services response to your needs, please provide the following information.
1. Model number
2. Serial number
3. Symptom of problem
4. Part name and number to order (if known)
Before installing part, review "How To..." and follow step by step procedures recommended to install part safely and
efficiently. If you have questions or comments please telephone, FAX or, write us. We are:
LIFE FITNESS - CUSTOMER SUPPORT SERVICES
10601 Belmont Avenue; Franklin Park, IL 60131; U.S.A.
Telephone: 847.451.0036
Toll-free: 800.351.3737
FAX: 847.288.3702
Toll-free: 800.216.8893
Life Fitness Models 9100, 9500HR, 9700HR, and 9700HR w/Decline Treadmills
TABLE OF CONTENTS
SECTION I TROUBLESHOOTING GUIDES
PAGE
STRIDING BELT SLIPS DURING FOOTFALL ..................................................................... 2
MAXIMUM SPEED IS REDUCED......................................................................................... 2
KNOCKING SOUND AT REAR OF MACHINE ..................................................................... 2
KNOCKING SOUND COMING FROM DECK....................................................................... 2
RUBBING SOUND FROM UNDERNEATH MACHINE......................................................... 2
SQUEAKING NOISE............................................................................................................. 3
LOUD GROANING SOUND FROM FRONT OF MACHINE ................................................. 3
LOUD GROANING SOUND ON FOOTFALL........................................................................ 3
DISPLAY DOES NOT ILLUMINATE WHEN POWERED ON............................................... 3
DISPLAY OVERLAY KEYS ARE NOT RESPONDING WHEN PRESSED .......................... 4
UNIT RESETS RANDOMLY OR PAUSES ........................................................................... 4,5
NO POWER .......................................................................................................................... 5,6
WAX LEAK ............................................................................................................................ 6
STRIDING BELT IS TRAVELING BEYOND TRACKING LIMITS......................................... 6,7
STRIDING BELT NOT CENTERED...................................................................................... 7
STRIDING BELT MISALIGNMENT....................................................................................... 7
LIFEPULSE HEART RATE DOES NOT RESPOND ............................................................ 7
DISPLAY READS HEART RATE WITH HANDS REMOVED............................................... 8
NO CHEST STRAP DETECTED .......................................................................................... 8
ERRATIC HEART RATE READINGS ................................................................................... 8
MOTOR CONTROLLER COMM BAD: CHECK HARNESS BETWEEN LIFT
AND CONTROLLER –P9/P3 ........................................................................................... 9
MOTOR CONTROLLER COMM BAD: CHECK POWER TO MOTOR CONTROLLER....... 9
WAX AND LIFT BOARD COMM BAD: CHECK POWER ON LIFT ...................................... 9
BOTH LIFT AND CONTROLLER COMM BAD: CHECK HARNESS BETWEEN
CONSOLE AND LIFT –P1 AND P1 ................................................................................. 9
SYSTEM CONFIGURED TWO WIRED................................................................................ 9
INCLINE INOPERATIVE ....................................................................................................... 9
HOME SWITCH ERROR ...................................................................................................... 10
NEGATIVE SWITCH ERROR............................................................................................... 10
NO AC POWER ERROR ...................................................................................................... 10
WAXER UNPLUGGED ......................................................................................................... 10
WAXER NO AC POWER...................................................................................................... 10
SMART STOP UNPLUGGED ............................................................................................... 10
FRAME CLOCK COMM BAD................................................................................................ 11
FRAME TAG UNPLUGGED.................................................................................................. 11
SCI ERROR .......................................................................................................................... 11
DYNAMIC CURRENT TRIP .................................................................................................. 11
STATIC CURRENT TRIP...................................................................................................... 11
CHECKSUM ERROR XXXX ................................................................................................. 11
NOTIFY MAINTENANCE MOTOR CONTROLLER ERROR................................................ 11
NOTIFY MAINTENANCE INCLINE TIMEOUT ERROR ....................................................... 12
NOTIFY MAINTENANCE HOME SWITCH ERROR............................................................. 12
NOTIFY MAINTENANCE NEGATIVE SWITCH ERROR ..................................................... 12
NOTIFY MAINTENANCE FRAME TAG UNPLUGGED ........................................................ 12
UNABLE TO ATTAIN TARGET SPEED ............................................................................... 12
NOTIFY MAINTENANCE SPEED SENSOR ERROR........................................................... 12
NOTES .................................................................................................................................. 13
Life Fitness Models 9100, 9500HR, 9700HR, and 9700HR w/Decline Treadmills
TABLE OF CONTENTS - Continued
SECTION II DIAGNOSTIC MODES
DISPLAY CONSOLES .......................................................................................................... 2
INITIAL SETTING OF REAL TIME CLOCK .......................................................................... 4
DIAGNOSTIC ENTRY........................................................................................................... 5
MAINTENANCE CONFIGURATION-QUICK ENTRY REFERENCE.................................... 6
DIAGNOSTICS: SUB-CATEGORIES ................................................................................... 7
DIAGNOSTICS: SYSTEM COMMUNICATION (COMM) TEST ........................................... 8
DIAGNOSTICS: SYSTEM TEST MENU ............................................................................... 10
DIAGNOSTICS: SYSTEM TEST – SPEED AUTOMATIC MODE ........................................ 11
DIAGNOSTICS: SYSTEM TEST – SPEED MANUAL MODE............................................... 12
DIAGNOSTICS: SYSTEM TEST – CONTROLLER ERRORS MODE.................................. 13
DIAGNOSTICS: SYSTEM TEST – INCLINE AUTOMATIC MODE ...................................... 14
DIAGNOSTICS: SYSTEM TEST – INCLINE MANUAL MODE ............................................ 15
DIAGNOSTICS: SYSTEM TEST – INCLINE ERROR MODE .............................................. 16
DIAGNOSTICS: SYSTEM TEST – WAXER AUTOMATIC MODE ....................................... 17
DIAGNOSTICS: SYSTEM TEST – WAXER MANUAL MODE ............................................. 18
DIAGNOSTICS: SYSTEM TEST – WAXER ERROR MODE ............................................... 19
DIAGNOSTICS: SYSTEM TEST – BELT / DECK MODE..................................................... 20
DIAGNOSTICS: SYSTEM TEST – LIFE PULSE MODE ...................................................... 21
DIAGNOSTICS: SYSTEM TEST – TELEMETRY MODE ..................................................... 22
DIAGNOSTICS: SYSTEM TEST – SMART STOP MODE ................................................... 23
DIAGNOSTICS: SYSTEM TEST – DISPLAY TEST MODE ................................................. 24
DIAGNOSTICS: SYSTEM TEST – REAL TIME CLOCK MODE .......................................... 25
DIAGNOSTICS: SYSTEM TEST – FRAME TAG EEPROM MODE ..................................... 26
DIAGNOSTICS: SYSTEM TEST – DISPLAY CONSOLE EEPROM TEST MODE .............. 27
DIAGNOSTICS: SYSTEM TEST – LIFECENTER TEST MODE .......................................... 28
DIAGNOSTICS: SYSTEM TEST – FITLINXX TEST MODE ................................................ 29
DIAGNOSTICS: INFORMATION MENU............................................................................... 30
DIAGNOSTICS: INFORMATION – SYSTEM STATISTICS MODE...................................... 31
DIAGNOSTICS: INFORMATION – SOFTWARE VERSION MODE..................................... 32
DIAGNOSTICS: INFORMATION – MAIN MOTOR INFO MODE ......................................... 33
DIAGNOSTICS: INFORMATION – LIFT MOTOR INFO MODE........................................... 34
DIAGNOSTICS: INFORMATION – WAX MOTOR INFO MODE.......................................... 35
DIAGNOSTICS: INFORMATION – CLOCK INFO MODE .................................................... 36
DIAGNOSTICS: INFORMATION – SYSTEM ERROR MODE.............................................. 37
DIAGNOSTICS: INFORMATION – MAINTENANCE INFO MODE....................................... 38
DIAGNOSTICS: MAINTENANCE MENU.............................................................................. 39
DIAGNOSTICS: CONFIGURATION MENU.......................................................................... 40
DIAGNOSTICS: CONFIGURATION – MANAGER CONFIGURATION MODE.................... 41
DIAGNOSTICS: CONFIGURATION – MANUFACTURER CONFIGURATION MODE........ 43
DIAGNOSTICS: CONFIGURATION – CLOCK CONFIGURATION MODE.......................... 44
NOTES .................................................................................................................................. 45
Life Fitness Models 9100, 9500HR, 9700HR, and 9700HR w/Decline Treadmills
TABLE OF CONTENTS - Continued
SECTION III HOW TO..REPLACE…
STRIDING BELT AND DECK................................................................................................ 2
ADJUST STRIDING BELT TRACKING ............................................................................... 4
ADJUST STRIDING BELT TENSION ................................................................................... 5
DRIVE BELT ......................................................................................................................... 6
DRIVE MOTOR ..................................................................................................................... 7
FRONT ROLLER................................................................................................................... 8
REAR ROLLER ..................................................................................................................... 9
LIFESPRING ABSORBERS.................................................................................................. 10
ANTI-STATIC TINSEL .......................................................................................................... 11
ANTI-SCUFF PADS .............................................................................................................. 12
WAX MOTOR........................................................................................................................ 13
POWER MODULE ................................................................................................................ 14
WAX BAG ............................................................................................................................. 15
LIFT MOTOR......................................................................................................................... 17
MOTOR CONTROLLER ....................................................................................................... 18
WAX AND LIFT PCB............................................................................................................. 19
FRAME BOARD .................................................................................................................... 20
LEVELER ASSEMBLY .......................................................................................................... 21
ACCESSORY CUP HOLDERS ............................................................................................. 22
LINE CORD .......................................................................................................................... 23
DISPLAY BOARD PCB ......................................................................................................... 24
STOP SWITCH ..................................................................................................................... 25
TELEMETRY RECEIVER AND JACK................................................................................... 26
MAIN WIRE HARNESS......................................................................................................... 27
DISPLAY CONSOLE CONTROL PANEL ............................................................................ 28
OVERLAY BEZEL ................................................................................................................. 29
SMART STOP SYSTEM ....................................................................................................... 30
HANDLEBAR ASSEMBLY .................................................................................................... 31
DIGITAL HEART RATE SENSORS ...................................................................................... 32
CLEAN THE WAX NOZZLE.................................................................................................. 34
NOTES .................................................................................................................................. 35
Life Fitness Models 9100, 9500HR, 9700HR, and 9700HR w/Decline Treadmills
TABLE OF CONTENTS - Continued
SECTION IV ELECTRONIC OVERVIEW
ELECTRONIC OVERVIEW – DISPLAY CONSOLE PCB .................................................... 2
ELECTRONIC OVERVIEW – MOTOR CONTROLLER PCB ............................................... 5
ELECTRONIC OVERVIEW – POWER FACTOR CONTROL PCB...................................... 7
ELECTRONIC OVERVIEW – WAX LIFT PCB ..................................................................... 8
ELECTRONIC OVERVIEW – SMART STOP PCB............................................................... 11
ELECTRONIC OVERVIEW – FRAME TAG PCB ................................................................. 12
WIRING BLOCK DIAGRAM.................................................................................................. 13
NOTES .................................................................................................................................. 14
SECTION V – PARTS INDENTIFICATION
MODEL AND SERIAL NUMBER IDENTIFICATION ............................................................. 2
TR9100.................................................................................................................................. 3
TR9500HR ............................................................................................................................ 6
TR9700HR ............................................................................................................................ 9
TR9700HR W/DECLINE ....................................................................................................... 12
NOTES .................................................................................................................................. 15
SECTION VI – MISCELLANEOUS INFORMATION
PREVENTATIVE MAINTAINENCE TIPS.............................................................................. 2
UNPACKAGING INSTRUCTIONS........................................................................................ 3
INSTALLATION INSTRUCTIONS......................................................................................... 4
COMMUNICATING BY FAX ................................................................................................. 9
FAX FORM............................................................................................................................ 10
NOTES .................................................................................................................................. 11
©1999 Brunswick Corporation. All rights reserved. Life Fitness is a registered trademark of Brunswick Corporation.
Zone Trainer and Heart Rate Zone Training are trademarks of Brunswick Corporation. Any use of these trademarks, without the express
written consent of Brunswick Corporation, is forbidden.
M051-00K58-A008
12-99
Life Fitness Models 9100, 9500HR, 9700HR, and 9700HR w/Decline Treadmills
Section I
TROUBLESHOOTING GUIDE
SECTION I
TROUBLESHOOTING GUIDE
1
Life Fitness Models 9100, 9500HR, 9700HR, and 9700HR w/Decline Treadmills
TROUBLESHOOTING GUIDE
Malfunction
Probable Cause
Corrective Action
Striding Belt slips during
footfall.
Striding belt slips on front roller
during stall test.
Check striding belt & re-tension as necessary.
See How…To Adjust Belt Tension.
Maximum speed is
reduced.
User is pushing striding belt.
Instruct users not to push striding belt in either
direction.
Wax system malfunction.
Inspect spray pattern between 8" (200mm) and
16" (400mm).
If not, verify wax nozzle is clean, hoses are not
kinked, wax bag is not empty, or wax is
contaminated.
Striding belt/deck malfunction.
The deck laminate worn
through or the underside of
striding belt glazed over (hard,
glossy).
Replace belt and deck. See How To…Replace
Striding Belt.
Insufficient power source.
Plug treadmill into a dedicated 20amp circuit.
Refer to the Operations Manual.
Faulty rear roller bearings.
Replace rear roller assembly.
Wax build up on rear roller.
Run unit for 10 hours to break-in the treadmill.
Knocking sound coming
from deck.
Life Springs not positioned
correctly and/or loose mounting
hardware.
Reposition or tighten life springs.
Rubbing sound from
underneath machine.
Foreign objects may be stuck
underneath the machine.
Inspect underneath striding belt and machine.
Remove any debris or objects that may cause
interference with the treadmill.
Tinsel is installed incorrectly.
Reposition tinsel on the outside of the striding
belt.
Knocking sound at rear of
machine.
2
Life Fitness Models 9100, 9500HR, 9700HR, and 9700HR w/Decline Treadmills
TROUBLESHOOTING GUIDE
Probable Cause
Corrective Action
Drive motor belt tensioning pin
may be squeaking.
Spray pin with lubricant.
Drive motor belt may be worn
or damaged.
Replace drive motor belt. See How To…
Replace Drive Motor Belt.
Lift mechanism pivot points are
dry.
Lubricate pivot points.
Faulty lift motor.
Replace the lift motor. See How To…Replace
Lift Motor.
Loud groaning on footfall.
High friction between deck and
striding belt.
Refer to Slowdown Section.
Display does not illuminate
when machine is powered
on.
Insufficient power source.
Plug treadmill into a dedicated amp circuit.
Refer To The Operations Manual.
Loose 10 pin connection at
display console or wax/lift
control board.
Check all electrical connections for proper
attachment.
Damaged main harness wire
connection.
Replace wire harness. See How To…Replace
Main Wire Harness.
Faulty display console or Wax/
Lift Board.
Verify if 8VDC is present at P1 pin, 3-4 and
12VDC at P1 pin 9.
Squeaking noise.
Loud groaning sound
heard from front of
machine while elevating.
Section I
Malfunction
If yes, replace Display Console. See How To…
Replace Display Console PCB.
If no, replace Wax/Lift Board. See How To…
Replace Wax/Lift PCB.
3
Life Fitness Models 9100, 9500HR, 9700HR, and 9700HR w/Decline Treadmills
TROUBLESHOOTING GUIDE
Malfunction
Display overlay keys are
not responding when
depressed.
Probable Cause
Loose ribbon connection(s).
Corrective Action
Verify that the two ribbon connections are
attached to the display PCB.
If attached, reseat the connection and verify the
operation.
Unit resets randomly or
pauses.
4
Worn or defective overlay
assembly.
Replace overlay assembly. See How To…
Replace Overlay Assembly.
Smart Stop Sensor.
Refer to diagnostics to verify the operation of
the smart stop sensor.
Insufficient power source.
Plug treadmill into a dedicated amp circuit.
Refer to the Operations Manual.
Damaged ground prong on line
cord.
Replace line cord. See How To… Replace Line
Cord.
Line cord improperly seated in
electrical outlet.
Inspect power connection at electrical outlet
and at machine for proper contact.
Emergency stop magnet not
engaged.
Re-engage the emergency stop magnet.
Towel or magazine may be
making contact with stop
switch while user is running.
Move all possible obstructions off display
console and handlebar.
Loose connections at display
console.
Secure all connections at display console PCB.
Stop switch is activated with
very light pressure or returns
slowly after being pressed.
Replace stop switch. See How To…Replace
Stop Switch.
Life Fitness Models 9100, 9500HR, 9700HR, and 9700HR w/Decline Treadmills
TROUBLESHOOTING GUIDE
Unit resets randomly or
pauses.
No Power.
Probable Cause
Corrective Action
Section I
Malfunction
Stop switch cable not making
proper contact.
Re-seat cable from stop switch and verify the
operation.
Pinched main wire harness.
Replace the main wire harness. See How
To…Replace Main Wire Harness.
Open ground path.
Using voltmeter, check all points for continuity:
console pan screws, console mounting screws,
handlebar screws, and handrail mounting
screws to frame with respect to ground. Ground
must be a non-painted surface.
Inspect Smart Stop system.
Disconnect the 4 pin connector and verify if
problem exists. If no, replace smart stop PCB.
See How To…Replace Smart Stop PCB.
On/Off switch.
Turn the switch to the ON position.
Insufficient power source.
Plug treadmill into a dedicated amp circuit.
Refer to the Operations Manual.
Using a voltmeter, verify power at outlet. If no
power exists, reset circuit breaker at panel.
Damaged line cord.
Replace line cord. See How To…Replace Line
Cord.
Line cord improperly seated in
socket.
Inspect power connection at wall outlet and at
machine for proper contact.
Power module.
Verify 120VAC at wax/lift board 3 pin
connector. If no, replace power entry module
See How To…Replace Power Entry Module.
If yes, verify 8 VDC at P1 pins 3 and 4, and
12VDC at P1 pin 9. If voltage is present,
replace display console PCB. If not, replace
wax /lift PCB.
See How To…Replace Display Console PCB
and/or Wax /Lift PCB.
5
Life Fitness Models 9100, 9500HR, 9700HR, and 9700HR w/Decline Treadmills
TROUBLESHOOTING GUIDE
Malfunction
No Power.
Wax Leak.
The Striding Belt is
traveling beyond the
tracking limits.
Probable Cause
Corrective Action
3 Amp Circuit breaker.
Verify that circuit breaker is not open. If open,
reset circuit breaker.
Faulty display console.
Refer to Display Console Symptom.
Loose hose connections.
Inspect hose connections and secure as
necessary, replace if necessary.
Faulty connection at bag.
Replace wax bag and plastic coupling.
Wax bag is torn.
Replace wax bag. See How To…Replace Wax
Bag.
Wax pump does not shut off.
Replace wax/lift PCB. See How To…Replace
Wax/Lift PCB.
Wax passes through pump
and slowly drips from nozzle.
Replace wax motor. See How To…Replace
Wax Motor.
Striding belt needs to be retensioned or tracking needs
adjustment.
Refer to belt tensioning or tracking adjustment
procedure in operation or service manual.
Worn striding belt or user
pushing belt.
Center striding belt according to belt centering
technique. See How To...Adjust And Tension
The Striding Belt.
Striding belt folded over.
Verify wax in bag. Replace if necessary. See
How To…Replace Wax Bag.
Verify the wax is not contaminated (lumpy).
Replace wax bag and wax if contaminated. See
How To…Replace Wax Bag.
Verify the wax nozzle is not clogged. Clean
nozzle if clogged. See How To…Replace Wax
Nozzle.
6
Life Fitness Models 9100, 9500HR, 9700HR, and 9700HR w/Decline Treadmills
TROUBLESHOOTING GUIDE
The Striding Belt is traveling
beyond the tracking limits.
Probable Cause
Striding belt folded over.
Corrective Action
Section I
Malfunction
Refer to “Wax Manual” in the diagnostics
section of this manual to verify if the wax
pump is functioning properly. Replace if
necessary. See How To…Replace Wax
Pump.
Replace the belt and deck. See How To…
Replace Striding Belt.
Striding belt not centered.
Striding belt tension or tracking
needs to be adjusted.
Adjust striding belt . See How To…Adjust And
Tension The Striding Belt.
Striding belt mis-alignment,
but properly tensioned.
Improper walking/running.
Notify Club Manager.
Lifepulse Heart Rate System
does not respond or
improper heart rate reading
or "Reading Heart Rate"
appears in the message
center for more than 2
minutes without giving heart
rate reading.
Dirty handlebar sensors.
Wipe sensors with a clean soft cloth.
Inadequate contact with all four
sensors.
Verify a firm grip of all four sensors (two on
top, two on bottom of handlebar).
User running over 4.5 mph
(7.5kph).
For accurate heart rate reading, user must
slow down to less than 4.5 mph (7.5kph).
User may have an unusual
heart condition.
Have different people grasp sensors to detect
any variance.
Loose connections at display
console and handlebar.
Secure connections at display console and
handlebar.
Faulty heart rate sensors..
Replace handlebar sensors. See How To…
Replace Heart Rate Kit.
Faulty display console PCB.
Replace display console PCB. See How To…
Replace Display Console PCB.
7
Life Fitness Models 9100, 9500HR, 9700HR, and 9700HR w/Decline Treadmills
TROUBLESHOOTING GUIDE
Malfunction
Probable Cause
Corrective Action
Display reads a continuous
heart rate reading when
hands are removed.
Harness wires pinched at
handlebar or handrail.
Replace handlebar assembly if the wires are
damaged. See How To…Replace Handlebar
Assembly.
No Chest Strap detected.
Chest strap sensors not making
good contact with body of user.
Adjust chest strap and moisten sensors to
make better contact with skin.
User is out of monitoring range.
Move within 3 ft (1 meter) of receiver
Loose connection at receiver.
Check connection on receiver. See How
To...Replace Telemetry Receiver.
Faulty chest strap.
Replace chest strap.
Faulty receiver.
Verify 5VDC at P6 pin 1. If yes, replace
transmitter. If no, replace display console
PCB.
Telemetry turned OFF.
Enter Manager’s Configuration mode and turn
telemetry to ON.
Receiver is turned slightly
sideways.
Position receiver so it’s horizontal with the
console. See How To...Replace the Telemetry
Receiver.
Bad connection at Telemetry
cable and receiver.
Check cable jack and receiver connection.
Treadmills are located less than
8” (203 mm) apart.
Position treadmills to recommended
distances. Refer to the Operations Manual.
Erratic Heart Rate readings.
8
Life Fitness Models 9100, 9500HR, 9700HR, and 9700HR w/Decline Treadmills
TROUBLESHOOTING GUIDE
Display reads:
MOTOR CONTROLLER
COMM BAD: CHECK
POWER TO MOTOR
CONTROLLER.
Probable Cause
Corrective Action
Loose wire harness.
Reset connections at wax/lift PCB connector
P9 and motor controller PCB connector P3.
Bad power entry module or
motor controller.
Verify line voltage at P1 on the Motor
Controller. If voltage exists, replace motor
controller. See How To Replace… Motor
Controller.
Section I
Malfunction
Display reads:
MOTOR CONTROLLER
COMM BAD: CHECK
HARNESS BETWEEN LIFT &
CONTROLLER -P9/P3
If no voltage exists, replace power entry
module. See How To Replace…Power Entry
Module.
Display reads:
WAX/LIFT BOARD COMM
BAD: CHECK POWER ON
LIFT
Display reads:
BOTH LIFT and
CONTROLLER COMM BAD:
CHECK HARNESS
BETWEEN CONSOLE & LIFT
-P1/P1
Display reads:
SYSTEM CONFIGURED TWO
WIRED
Display reads:
INCLINE INOPERATIVE –
CONTINUE IF DESIRED
Bad Wax/ Lift PCB.
Verify if the LED 7 (Green) and LED 8 (Red)
is lit on the Wax/Lift PCB. If no, replace
Wax/Lift PCB. See How To Replace…Wax
/Lift PCB.
Loose wire harness.
Reset connection at Wax/Lift PCB
connectorP1 and Display Console PCB
connector P1.
Motor Controller is not jumped
correctly.
Reset jumper at JM1 on both pins.
Level or negative switch.
Refer to the Diagnostics section “incline” to
verify the operation. If replacement is
required. See How To Replace…Level or
Negative Switch.
Inspect wire harness for damage, replace if
needed.
Lift motor adjustment incorrect.
See “How To…Replace the Lift Motor” and
refer to the step in the procedure that
describes 13-3/4” tube adjustment.
Lift Motor.
Cycle motor in incline manual and verify
120VAC at P7 on Wax/Lift PCB. If not,
replace lift motor. See How To Replace…Lift
Motor.
9
Life Fitness Models 9100, 9500HR, 9700HR, and 9700HR w/Decline Treadmills
TROUBLESHOOTING GUIDE
Malfunction
Display reads:
HOME SWITCH ERROR
Display reads:
NEGATIVE SWITCH ERROR
Display reads:
NO AC POWER ERROR
Display reads:
WAXER UNPLUGGED
Probable Cause
Corrective Action
Lift switches wire harnesses
are backward (applies only to
TR97).
Switch the wire harnesses on the negative
and level switches.
Lift switches wire harnesses
are backward (applies only to
TR97HR Decline).
Switch the wire harnesses on the negative
and level switches.
Wax/Lift PCB.
Replace Wax/Lift PCB.
Defective wire harness or Wax
Motor.
Cycle motor in waxer manual mode in
diagnostics and verify 120VAC at P6 on
Wax/Lift PCB.
If voltage exists, verify that the cable from the
wax/lift PCB to wax motor has continuity. If
continuity exists replace wax motor. See How
To Replace… Wax Motor. No continuity,
replace wire harness. If no voltage exists,
replace wax/lift PCB. See How To
Replace…Wax/Lift PCB.
Display reads:
WAXER NO AC POWER
Broken, damaged or unplugged
harness or Defective Wax/Lift
PCB.
Reset or replace waxer harness.
Wax Motor or wire harness.
Cycle motor in waxer manual mode in
diagnostics and verify 120VAC at P6 on
Wax/Lift PCB.
If voltage exists, verify that the cable from the
wax/lift PCB to wax motor has continuity. If
continuity exists replace wax motor. See How
To Replace…Wax Motor. No continuity,
replace wire harness. If no voltage exists,
replace wax/lift PCB. See How To Replace…
Wax/Lift PCB.
Display reads:
SMART STOP UNPLUGGED
(TR9500HR and TR9700HR
are equipped)
10
Broken, damaged, or
unplugged harness.
Reset or replace smart stop harness.
Life Fitness Models 9100, 9500HR, 9700HR, and 9700HR w/Decline Treadmills
TROUBLESHOOTING GUIDE
Display reads:FRAME
CLOCK COMM BAD
Probable Cause
Frame board or bad wire
harness
Corrective Action
Verify continuity on wire harness. If continuity
exists, replace frame tag PCB. See How To…
Replace Frame Tag PCB.
If continuity does not exist, replace wire
harness.
Display reads:
FRAME TAG UNPLUGGED
Disconnected wire harness.
Reconnect wire harness.
Display reads:
SCI ERROR
Bad wire harness connection.
Bad wire harness or noise. Reseat connection
and verify operation. If problem exists,
reconnect your connection at the display
console to wax/lift PCB
Display reads:
DYNAMIC CURRENT TRIP
Motor Controller, striding belt or
deck.
When verifying striding belt tension, an error
can be caused when performing a stall test.
This can result in the following message:
“Cannot Obtain Speed Error”.
Display reads:
STATIC CURRENT TRIP
During power-up only, an error
occurs.
Replace motor controller. See How
To…Replace Motor Controller.
Display reads:
CHECKSUM ERROR XXXX
Display Console
Replace Display Console
Motor Controller
Enter diagnostics and enter Speed Errors.
See what current errors are listed that caused
the error:
Display reads:
NOTIFY MAINTENANCE
MOTOR CONTROLLER
ERROR
“MAX TEMPERATURE TRIP”
“MAXIMUM VOLTAGE TRIP”
“FAULT LINE 1 ERROR”
If any exist, replace motor controller. See
How To… Replace Motor Controller.
11
Section I
Malfunction
Life Fitness Models 9100, 9500HR, 9700HR, and 9700HR w/Decline Treadmills
TROUBLESHOOTING GUIDE
Malfunction
Display reads:
NOTIFY MAINTENANCE
INCLINE TIMEOUT ERROR
Probable Cause
Lift Motor.
Corrective Action
Cycle motor in incline manual and verify
120VAC at P7 on Wax/Lift PCB. Replace lift
motor.
Level switch, negative switch or
wire harness is defective.
In incline manual in diagnostics, verify the
operation of the switches. Replace switches if
defective. See How To…Replace Switches.
Verify the wire for continuity, replace wire
harness if defective.
Display reads:
NOTIFY MAINTENANCE
HOME SWITCH ERROR
Lift switches wire harnesses
are backward. This applies only
to TR97.
Switch the wire harnesses on the negative
and level switches.
Display reads:
NOTIFY MAINTENANCE
NEGATIVE SWITCH ERROR
Lift switches wire harnesses
are backward. This applies only
to TR97.
Switch the wire harnesses on the negative
and level switches.
Display reads:
NOTIFY MAINTENANCE
FRAME TAG UNPLUGGED
Broken, damaged or unplugged
harness.
Re-seat the frame tag wire harness.
Display reads:
UNABLE TO OBTAIN
TARGET SPEED
Incorrect power requirements.
Refer to the Operations Manual
Striding belt/deck malfunction.
Is the deck laminate is worn
through or the underside of
striding belt is glazed over
(hard, glossy).
Replace belt and deck. See How To…
Replace Striding Belt.
Motor Controller.
Display reads:
NOTIFY MAINTENANCE
SPEED SENSOR ERROR
Speed sensor or disconnected
wire harness.
Replace motor controller.
See How To… Replace Motor Controller.
This error will appear after a workout, but the
unit will continue to function. Enter
diagnostics, Speed Manual, and look for a
RPM reading.
If no reading exists, check continuity on the
wire harness. No continuity, replace wire
harness.
If continuity exists, replace speed sensor. See
How To …Replace Speed Sensor.
12
Life Fitness Models 9100, 9500HR, 9700HR, and 9700HR w/Decline Treadmills
Section I
NOTES:
13
Life Fitness Models 9100, 9500HR, 9700HR, and 9700HR w/Decline Treadmills
Section II
SECTION II
DIAGNOSTIC MODES
1
Life Fitness Models 9100, 9500HR, 9700HR, and 9700HR w/Decline Treadmills
DISPLAY CONSOLES
Use the following to aid you in control and message locations:
Display LEDs for
TR97 Models
Workout Profile
Information Decal
Message Center
WORKOUT PROFILES
Random
CAUTION: CONSULT
A PHYSICIAN BEFORE
USING THIS
Fat Burn
Hill
Distance
Time
Incline
Speed
Cardio
ATTENTION :
CONSULTEZ UN
MÉDECIN AVANT
READ AND FOLLOW ALL INSTRUCTIONS AND WARNINGS. O BTAIN PROPER INSTRUCTION PRIOR
TO USING THIS EQUIPMENT. FAILU RE TO USE APPROPRIATE CAUTION CO ULD RESULT IN SERIOUS
INJURY. KEEP CHILDREN AWAY FROM THIS EQUIPMENT.
Clear
Manual
Fat
Burn
Cardio
Random
Hill
Custom
Plus
Heart Rate
1 2 3
4 5 6
7 8 9
0
Fit Test
WAR NING
Heart Rate
Quick
Start
Fit
Test
Pause
Enter
Cool
Down
Time in Zone
®
HEART RATE
Calories
Manual or
Quick Start
179170
162
153145
136
128
119
111102
85%
120117
114
111108
105
102 99
80%
96
65%
93 60%
10 20 30 40 50 60 70 80 90 100
AGE
Life Fitness USA: 1-800-735-3867
Life Fitness International: (+1) 847-288-3300
Life Fitness UK: (+44) (0)1353-66617
Quick Keys
TR95/97 Models
2
Profile
Window
Numeric Pad for
TR95/97HR Models
Up/down arrows
TR91 Model
Zone Training Decal
Life Fitness Models 9100, 9500HR, 9700HR, and 9700HR w/Decline Treadmills
DISPLAY CONSOLES - Continued
WORKOUT PROFILES
Fat Burn
Cardio
Random
Hill
Fit Test
CAUTION: CONSULT A PHYSICIAN
BEFORE USING THIS EQUIPMENT.
STOP EXERCISING IF YOU FEEL PAIN,
FAINT, DIZZY OR SHORT OF BREATH
Distance
Time
Incline
Speed
Heart Rate
¨
H EE AA RR TT RR AA TT EE
H
Calories
Manual or
Quick Start
Select
ATTENTION : CONSULTEZ UN
MÉDECIN AVANT D’UTILISER CET
APPAREIL. ARRÊTEZVOUS SI VOUS
AVEZ DES DOULEURS, SI VOUS VOUS
SENTEZ FAIBLE, ÉTOURDI OU À COURT
Clear
Enter
170166
162157
153149
145140
136132
85%
120117
114
111108
105102
80%
65%
99 96
93 60%
20 25
25 30 35
35 40 45
45 50 55
55 60
60 65
AGE
WARNING
Quick
Start
READ AND FOLLOW ALL INSTRUCTIONS AND WARNINGS. OBTAIN PROPER INSTRUCTION PRIOR
TO USING THIS EQUIPMENT. FAILURE TO USE APPROPRIATE CAUTION COULD RESULT IN SERIOUS
INJURY. KEEP CHILDREN AWAY FROM THIS EQUIPMENT.
Pause
Cool
Down
Section II
Life Fitness USA: 1-800-735-3867
Life Fitness Atlantic: (+31) 010-294 50 11
TR9100 Treadmill
WORKOUT PROFILES
Fat Burn
Cardio
Random
Hill
Fit Test
CAUTION: CONSULT A PHYSICIAN
BEFORE USING THIS EQUIPMENT.
STOP EXERCISING IF YOU FEEL PAIN,
FAINT, DIZZY OR SHORT OF BREATH
Distance
Time
Incline
Speed
Heart Rate
1 2 3
4 5 6
7 8 9
0
ATTENTION : CONSULTEZ UN
MÉDECIN AVANT D’UTILISER CET
APPAREIL. ARRÊTEZVOUS SI VOUS
AVEZ DES DOULEURS, SI VOUS VOUS
SENTEZ FAIBLE, ÉTOURDI OU À COURT
READ AND FOLLOW ALL INSTRUCTIONS AND WARNINGS. OBTAIN PROPER INSTRUCTION PRIOR
TO USING THIS EQUIPMENT. FAILURE TO USE APPROPRIATE CAUTION COULD RESULT IN SERIOUS
INJURY. KEEP CHILDREN AWAY FROM THIS EQUIPMENT.
Clear
Fat
Burn
Manual
WARNING
Random
Hill
Cardio
Custom
Plus
¨
Quick
Start
Fit
Test
Pause
H EE AA R
R TT R
R AA TT EE
H
Calories
Manual or
Quick Start
170166
162157
153149
145
140136
120117
114111
108105
102
132
85%
80%
99 96
65%
9360%
20 25 30 35
35 40
40 45 50 55 60
60 65
Enter
AGE
AGE
Cool
Down
Life Fitness USA: 1-800-735-3867
Life Fitness Atlantic: (+31) 010-294 50 11
TR9500HR Treadmill
WORKOUT
WORKOUT PROFILES
PROFILES
Distance
Calories
Random
CAUTION: CONSULT A PHYSICIA N
BEFORE USING THIS EQUIPMENT.
STOP EX ERCISING IF YOU FEEL PA IN,
FAINT, DIZZY OR SHORT OF BREATH
Fat Burn
Hill
Time
Incline
Heart Rate
Speed
Time in Zone
Cardio
1 2 3
4 5 6
7 8 9
0
Fit Test
ATTENTION : CONSULTEZ UN
MÉDECIN AVANT D’UTILISER CET
APPAREIL. ARRÊTEZVOUS SI VOUS
AVEZ DES DOULEURS, SI VOUS VOUS
SENTEZ FA IBLE, ÉTOURDI OU À COURT
WARNING
REA D A ND FOL LO W A L L IN STR UCTIO NS AN D W AR NIN GS. O B TA IN PR OPER IN STRUC TIO N PRIOR
TO U SIN G THIS EQU IPME N T. FA ILUR E TO U SE APPR OPRIATE CAU TION CO U LD R ESULT IN SERIO US
INJU RY. KE EP CH ILDREN AWAY F ROM TH IS EQ U IPM ENT.
Clear
Manual
Fat
Burn
Cardio
Random
Hill
Custom
Plus
Fit
Test
Quick
Start
Pause
Cool
Down
Enter
¨
H EE AA R
R TT R AA TT EE
H
Manual or
Quick Start
170166
162157
153149
145
140
136
13285%
120117
114 111
108105
80%
102 99
96
65%
93 60%
20 25 30 35 40
40 45 50 55 60
60 65
AGE
Life Fitness USA: 1-800-735-3 867
Life Fitness Atlantic : (+31) 01 0-294 50 11
TR9700HR and TR9700HR w/Decline
3
Life Fitness Models 9100, 9500HR, 9700HR, and 9700HR w/Decline Treadmills
INITIAL SETTING OF THE REAL TIME CLOCK
As part of the initial installation of the treadmill, the real time clock may be configured to the local time. Initially the
real time clock is set to Greenwich meantime (GMT) which is the mean solar time for the meridian at Greenwich,
England, used as a basis for calculating time throughout most of the world. Upon powering up the unit the following
message will be displayed:
WOULD YOU LIKE TO CHANGE THE CLOCK FROM GMT TO LOCAL TIME
IF YES PRESS ENTER
IF NO PRESS CLEAR
If the user wants to set the real time clock to the local time, the user must press the ‘ENTER’ key.
The user will be asked to set the display mode. The two display modes are 12-hour mode with AM/PM or 24 hour
mode with no am/pm. displayed. The message will be:
CHOOSE CLOCK DISPLAY MODE BY USING ARROW KEYS
By pressing any of the arrow keys, the user toggles between the two modes. Once the mode is set, press the
‘ENTER’ key to continue.
After the display mode is set the user will now be asked to set the local time. The following message will appear:
“CLOCK SET TO GMT”,
“USE ARROW KEYS TO ”
“CHANGE SYSTEM CLOCK”,
“TIME KEYS - HOURS”,
“INCLINE KEYS-MINUTES”,
“SPEED KEYS – SECONDS”
By pressing the specific arrow key, the user can set the real time clock to the local time.
After setting the local time, press the ‘CLEAR’ key to exit the real time clock setting mode.
The message “UPDATING CLOCK” will appear in the message center. The unit will then continue with the normal
powering up sequence.
If the user does not want to set up the real time clock at this time, a ‘CLEAR’ key can be pressed to clear the initial
message. The unit will continue with it’s normal powering up sequence. The unit will ask a total of 5 times upon
powering up if the real time clock wants to be set. After the 5th time the message will no longer appear. Refer to
clock configuration to change the clock settings.
4
Life Fitness Models 9100, 9500HR, 9700HR, and 9700HR w/Decline Treadmills
DIAGNOSTIC ENTRY
Distance
Time
Incline
Speed
1 2 3
4 5 6
7 8 9
0
Clear
Manual
Fat
Burn
Cardio
Random
Hill
Custom
Plus
Fit
Test
Quick
Start
Pause
Enter
Section II
Calories
Cool
Down
Diagnostics is entered by holding the ‘PAUSE’ key when power is applied or by holding the
‘PAUSE’ key and pressing the ‘CLEAR’ key twice from any state.
The unit will take approx. 3 to 4 seconds to enter Diagnostics.
On entry to this state, the message:
SERVICE MENU
Followed by:
I
USE ARROW KEY TO SCROLL THROUGH LIST
Using any of the arrow keys will allow you to scroll through the four main categories.
SYSTEM TEST
INFORMATION
MAINTENANCE
CONFIGURATION
5
Life Fitness Models 9100, 9500HR, 9700HR, and 9700HR w/Decline Treadmills
MAINTENANCE CONFIGURATION – QUICK ENTRY REFERENCE
Diagnostics selections can also be made on the TR9700HR
and TR9500HR by pressing a combination ‘-of program keys.
The following is the list of diagnostic tests and their program
key combination. All blank fields in the chart are considered
“OFF” for that program key.
Manual
Fat
Burn
Cardio
Random
Hill
Custom
Plus
Fit
Test
SERVICE MENU
DIAGNOSTIC TESTS
SPEED AUTO
SPEED MANUAL
SPEED ERROR
SPEED INFO
MANUAL
ON
FAT
CARDIO RANDOM
BURN
MAIN MOTOR MODULE
ON
ON
ON
ON
ON
HILL
CUSTOM FIT TEST
ON
LIFT MOTOR MODULE
INCLINE AUTO
INCLINE MANUAL
INCLINE ERROR
INCLINE INFO
ON
ON
ON
ON
ON
ON
ON
WAXER MOTOR MODULE
WAXER AUTO
WAXER MANUAL
WAXER ERROR
WAXER INFO
ON
ON
ON
ON
ON
ON
ON
SYSTEM TESTS
ON
BELT/DECK TEST
LIFEPULSE TEST
TELEMETRY TEST
SMART STOP TEST
DISPLAY TEST
COMM TEST
TAG EEPROM TEST
CONSOLE EEPROM TEST
LIFECENTER TEST
FITLINXX TEST
STATISTICS
SOFTWARE VERSION
CLOCK INFO
SYSTEM ERROR INFO
SYSTEM REPAIR INFO
MAINTENANCE
6
ON
ON
ON
ON
ON
ON
ON
ON
ON
ON
ON
ON
ON
ON
ON
ON
INFORMATION
ON
ON
ON
ON
ON
ON
ON
ON
ON
ON
ON
SYSTEM COMM
TEST
MAIN MOTOR
MODULE
SPEED
AUTOMATIC
SPEED MANUAL
LIFT MOTOR
MODULE
INCLINE
AUTOMATIC
INCLINE MANUAL
WAXER MOTOR
MAODULE
WAXER
AUTOMATIC
BELT/DECK
TEST
VOLT/TEMP
TEST
WAXER MANUAL
SPEED CONTROL
ERRORS
INCLINE ERROR
STATISTICS
REPLACING BELT
AND DECK
SOFTWARE
VERSIONS
REPLACING
WAXER BAG
MAIN MOTOR
INFORMATION
WAXER ERROR
LIFT MOTOR
INFORMATION
WAX MOTOR
INFORMATION
LIFEPULSE TEST
POLAR TEST
SMART TEST
STOP
DISPLAY TEST
REAL TIME
CLOCK TEST
MAINTENANCE
CLOCK
INFORMATION
SYSTEM ERRORS
MAINTENANCE
INFORMATION
REPLACING
CONSOLE
REPLACING MOTOR
CONTROLLER
CONFIGURATION
MANAGER'S
MENU
MANUFACTURE'S
MENU
ACCESS RESTRICTED*
LANGUAGE=XXXX
MAXIMUM PROGRAM TIME
CLOCK
CONFIGURAATION
ENGLISH METRIC UNITS
CUSTOM WORKOUT ENTRY
REPLACING WAX
LIFT BOARD
*
ACCESS RESTRICTED*
REPLACING
STOP SWITCH
TELEMETRY ON/OFF
SET DAY
SMART STOP ON/OFF
REPLACING
OVERLAY BEZEL
SET DATE
MAXIMUM SPEED
REPLACING MAIN
MOTOR
SET TIME
PAUSE TIMEOUT DURATION
WATTS DISPLAY ON/OFF
REPLACING LIFT
MOTOR
METS DISPLAY ON/OFF
REPLACING WAX
MOTOR
PACE DISPALY ON/OFF
CALORIE PER HR. DISPLAY
ON/OFF
FRAME TAG
EPROM TEST
DISTANCE DISPLAY
ON/OFF
CONSOLE EPROM
TEST
* A special PASSWORD must be entered to proceed
LIFECENTER
TEST
CODE VERSION 34.1
WAX RENINDER ON/OFF
ACCEL RATE 3
DECCEL RATE 3
FITLINXX TEST
7
Section II
Life Fitness Models 9100, 9500HR, 9700HR, and 9700HR w/Decline Treadmills
INFORMATION
DIAGNOSTICS: SUB-CATEGORIES
SYSTEM TEST
Life Fitness Models 9100, 9500HR, 9700HR, and 9700HR w/Decline Treadmills
DIAGNOSTICS: SYSTEM COMMUNICATION(COMM) TEST
Upon entry into this category, a SYSTEM COMMUNICATION (COMM) TEST will be performed automatically.
This test will attempt to communicate with all of the modules within the treadmill unit. If a module does not respond
to the console processor an ERROR message will be displayed.
If all the modules communicate, the message is:
SYSTEM COMM OK
If the motor controller module does not communicate, the initial message will display:
MOTOR CONTROLLER COMM BAD
If the harness is disconnected the message is:
CHECK HARNESS BETWEEN LIFT AND CONTROLLER-P9/P3
If the motor controller has no power, the message is:
CHECK POWER TO THE MOTOR CONTROLLER
If the wax/lift board module does not communicate, the message is:
CHECK POWER TO WAX/LIFT BOARD
If both the motor controller module and the wax/lift board module do not communicate, the message is:
BOTH LIFT AND CONTROLLER COMM BAD
If the wax/lift and motor controller has no power, the message is:
CHECK POWER ON LIFT AND CONTROLLER
If the main harness from the console to the wax/lift board is disconnected, the message is:
CHECK HARNESS BETWEEN CONSOLE AND LIFT - P1/P1
8
Life Fitness Models 9100, 9500HR, 9700HR, and 9700HR w/Decline Treadmills
DIAGNOSTICS: SYSTEM COMMUNICATION(COMM) TEST
If both the motor controller module and the wax/lift board module do communicate, but the console cannot perform
a loop-back test, the message is:
SYSTEM CONFIGURED TWO WIRE
If SYSTEM COMM OK is displayed it will advance to the system test category.
Section II
Press the ‘CLEAR’ key to return to the MAIN DIAGNOSTIC CATEGORIES.
Press the ‘ENTER’ key to advance to the SYSTEM TEST SUB-CATEGORIES.
9
Life Fitness Models 9100, 9500HR, 9700HR, and 9700HR w/Decline Treadmills
DIAGNOSTICS: SYSTEM TEST MENU
Upon entry the, the message is:
SYSTEM TEST MENU
“USE ARROW KEYS TO SCROLL THROUGH THE LIST”
Using any of the arrow keys will allow you to scroll through the thirteen system tests.
MAIN MOTOR TEST
LIFT MOTOR TEST
WAXER MOTOR TEST
BELT/DECK TEST
LIFEPULSE TEST
TELEMETRY TEST
SMART STOP TEST
Press the ‘ENTER’ key to access the sub-category.
10
DISPLAY TEST
FRAME TAG REAL TIME CLOCK TEST
FRAME TAG EEPROM TEST
DISPLAY CONSOLE EEPROM TEST
LIFECENTER TEST
FITLINX TEST
Life Fitness Models 9100, 9500HR, 9700HR, and 9700HR w/Decline Treadmills
DIAGNOSTICS: SYSTEM TEST – SPEED AUTOMATIC MODE
SPEED AUTOMATIC
Calories
Distance
Time
Incline
Speed
Heart Rate
SA
Clear
Manual
Fat
Burn
Cardio
Random
Hill
Custom
Plus
Fit
Test
Quick
Start
Pause
Section II
1 2 3
4 5 6
7 8 9
0
Enter
Cool
Down
Upon entry into this test the letters SA (speed automatic) will be in the profile window. This test allows the user to
test the main drive motor and controller controlling the target speed. The user can select a target speed by using
the speed arrow keys. The actual speed as calculated by the speed feedback sensor is shown in the actual portion
of the message center.
The incline system can be activated in this test as well. However, the display will only show the target incline for two
seconds while the incline keys are being pressed. It will then return to showing the speed information.
Press the ‘CLEAR’ key to exit the Speed Automatic test and return to the System Test Menu.
Press the ‘ENTER’ key to advance to the Speed Manual test.
11
Life Fitness Models 9100, 9500HR, 9700HR, and 9700HR w/Decline Treadmills
DIAGNOSTICS: SYSTEM TEST – SPEED MANUAL MODE
SPEED MANUAL
Calories
Distance
Time
Incline
Speed
1 2 3
4 5 6
7 8 9
0
SM
Manual
Random
Heart Rate
Clear
Fat
Burn
Cardio
Hill
Custom
Plus
Fit
Test
Quick
Start
Pause
Enter
Cool
Down
Upon entry into this test the letters SM (Speed Manual) will be in the profile window. This test allows the user to
test the main drive motor and controller controlling the motor rpm. The user can select a target motor rpm by using
the speed arrow keys. The actual motor rpm as calculated by the speed feedback sensor is shown in the actual
portion of the message center.
The incline system can be activated in this test as well. However, the display will only show the target incline for two
seconds while the incline keys are being pressed. It will then return to showing the speed information.
Press the ‘CLEAR’ key to exit the Speed Manual test and return to the Speed Automatic test.
Press the ‘ENTER’ key to advance to the Controller Errors test.
12
Life Fitness Models 9100, 9500HR, 9700HR, and 9700HR w/Decline Treadmills
DIAGNOSTICS: SYSTEM TEST – CONTROLLER ERRORS MODE
CONTROLLER ERRORS
Calories
Distance
Time
Incline
Speed
Heart Rate
SE
Clear
Manual
Fat
Burn
Cardio
Random
Hill
Custom
Plus
Fit
Test
Quick
Start
Pause
Section II
1 2 3
4 5 6
7 8 9
0
Enter
Cool
Down
Upon entry into this test the letters SE (speed errors) will be in the profile window. This test allows seeing the
current motor controller error conditions that are being displayed on the motor controller display. The following is a
list of the current motor error conditions. If an error is displayed, refer to the troubleshooting section for corrective
action.
CURRENT MOTOR ERROR CONDITIONS
POWER UP RESET ERROR
STATIC CURRENT TRIP
MAX TEMPERATURE TRIP
MAXIMUM VOLTAGE TRIP
DYNAMIC CURRENT TRIP
FAULT LINE 1 ERROR
SCI ERROR
SPEED SENSOR ERROR
Press the ‘CLEAR’ key to exit the Speed Controller Errors test and return to the Speed Manual test.
13
Life Fitness Models 9100, 9500HR, 9700HR, and 9700HR w/Decline Treadmills
DIAGNOSTICS: SYSTEM TEST – INCLINE AUTOMATIC MODE
INCLINE AUTOMATIC
Calories
Distance
Time
Incline
Speed
Heart Rate
1 2 3
4 5 6
7 8 9
0
IA
Clear
Manual
Fat
Burn
Cardio
Random
Hill
Custom
Plus
Fit
Test
Quick
Start
Pause
Enter
Cool
Down
Upon entry into this test the letters IA (incline automatic) will appear in the profile window. This test allows the user
to test the lift motor and switches controlling the target incline. The user can select a target incline by using the
incline arrow keys. The actual incline as calculated by the time count is shown in the actual portion of the message
center.
For non-decline units: The state of the level switch will be displayed in the profile window. A zero “0” displayed in
the profile window shows the level switch in the closed position. As the unit is inclined the zero “0” displayed should
disappear to indicate that the level switch is functioning.
For decline units: The state of the level switch will be displayed in the profile window. A zero “0” displayed in the
profile window shows the level switch in the closed position. As the unit is inclined the zero “0” displayed should
disappear to indicate that the level switch is functioning.
The speed system can be activated in this test as well. However, the display will only show the target speed for two
seconds while the speed keys are being pressed. It will then return to showing the incline information.
Press the ‘CLEAR’ key to exit the Incline Automatic test and return to the System Test Menu.
Press the ‘ENTER’ key to advance to the Incline Manual test.
14
Life Fitness Models 9100, 9500HR, 9700HR, and 9700HR w/Decline Treadmills
DIAGNOSTICS: SYSTEM TEST – INCLINE MANUAL MODE
INCLINE MANUAL
Calories
Distance
Time
Incline
Speed
Heart Rate
IM
Clear
Manual
Fat
Burn
Cardio
Random
Hill
Custom
Plus
Fit
Test
Quick
Start
Pause
Section II
1 2 3
4 5 6
7 8 9
0
Enter
Cool
Down
Upon entry into this test the letters IM (incline manual) will be in the profile window. This test allows the user to
bypass the electromechanical switches that normally control the target incline. The user moves incline by pressing
the incline arrow keys. The actual incline is calculated by the time count is shown in the actual portion of the
message center. The state of the level and negative incline switches will be displayed in the profile window.
For non-decline units: The state of the level switch will be displayed in the profile window. A zero “0” displayed in
the profile window shows the level switch in the closed position. As the unit is inclined the zero “0” displayed should
disappear to indicate that the level switch is functioning.
For decline units: The state of the level and negative incline switches will be displayed in the profile window. A zero
“0” displayed in the profile window shows the level switch in the closed position. As the unit is declined the zero “0”
displayed should disappear and a “–4” should appear in the profile window. This verifies that the negative switch is
functioning (the “–4” will only appear in incline manual mode).
The speed system can be activated in this test as well. However, the display will only show the target speed for two
seconds while the speed keys are being pressed. It will then return to show the incline information.
Press the ‘CLEAR’ key to exit the Incline Manual test and return to the Incline Automatic test.
Press the ‘ENTER’ key to advance to the Incline Errors test.
15
Life Fitness Models 9100, 9500HR, 9700HR, and 9700HR w/Decline Treadmills
DIAGNOSTICS: SYSTEM TEST – INCLINE ERROR MODE
Calories
Distance
INCLINE ERRORS
Time
Incline
Speed
Heart Rate
1 2 3
4 5 6
7 8 9
0
IE
Clear
Manual
Fat
Burn
Cardio
Random
Hill
Custom
Plus
Fit
Test
Quick
Start
Pause
Enter
Cool
Down
Upon entry into this test the letters IE (incline errors) will be in the profile window. This test allows seeing the
current lift motor error conditions. The following is a list of the current lift motor error conditions. If an error is
displayed, refer to the troubleshooting section for corrective action.
CURRENT LIFT MOTOR ERROR CONDITIONS
INCLINE TIMEOUT ERROR
HOME SWITCH ERROR
NEGATIVE SWITCH ERROR
NO AC POWER ERROR
Press the ‘CLEAR’ key to exit the Incline Errors test and return to the Incline Manual test.
16
Life Fitness Models 9100, 9500HR, 9700HR, and 9700HR w/Decline Treadmills
DIAGNOSTICS: SYSTEM TEST – WAXER AUTOMATIC MODE
WAXER AUTOMATIC
Calories
Time
Incline
Speed
Heart Rate
1 2 3
4 5 6
7 8 9
0
A
Clear
Manual
Fat
Burn
Cardio
Random
Hill
Custom
Plus
Fit
Test
Quick
Start
Pause
Section II
W
Distance
Enter
Cool
Down
Upon entry into this test the letters WA (waxer automatic) will be in the profile window. This test allows the user to
see information concerning the waxer motor. The waxer information will scroll automatically every 3 seconds.
The following is a list of the current information that can be seen. The following is a list of the current information
that is displayed. If an error is displayed, refer to the troubleshooting section for corrective action.
ERROR CONDITION
DISPLAYED INFORMATION
WAXER UNPLUGGED
WAXER FIRED – XXX
WAXER - XX/100 FULL
MANUAL WAX- XX TIMES
NEXT WAX - XX HOURS
INITIAL WAX- XX MINS
WAX INTERVAL XX MINS
MIN WAX SPEED- X.X
The speed system and incline systems can be activated in this test as well. However, the display will only show the
target speed or incline for two seconds while the speed/incline keys are being pressed. It will then return to showing
the waxer information.
Press the ‘CLEAR’ key to exit the Waxer Automatic test and return to the System Test Menu.
Press the ‘ENTER’ key to advance to the Waxer Manual test.
17
Life Fitness Models 9100, 9500HR, 9700HR, and 9700HR w/Decline Treadmills
DIAGNOSTICS: SYSTEM TEST – WAXER MANUAL MODE
WAXER MANUAL
Calories
Distance
Time
Incline
Speed
1 2 3
4 5 6
7 8 9
0
WM
Manual
Random
Heart Rate
Clear
Fat
Burn
Cardio
Hill
Custom
Plus
Fit
Test
Quick
Start
Pause
Enter
Cool
Down
Upon entry into this test the letters WM (waxer manual) will be in the profile window. This test allows the user to
manually fire the waxer system. It allows the user to see information concerning the waxer motor as well. The
waxer information will scroll automatically every 3 seconds.
The following is a list of the current information that can be seen. If an error is display refer to the troubleshooting
section for corrective action.
ERROR CONDITION
DISPLAYED INFORMATION
WAXER FIRE TEST
WAXER UNPLUGGED
WAXER FIRED – XXX
WAXER - XX/100 FULL
MANUAL WAX- XX TIMES
NEXT WAX - XX HOURS
INITIAL WAX- XX MINS
WAX INTERVAL XX MINS
MIN WAX SPEED- X.X
TO FIRE WAXER PRESS THE
QUICK START KEY
The speed system and incline systems can be activated in this test as well. However, the display will only show the
target speed or incline for two seconds while the speed/incline keys are being pressed. It will then return to showing
the waxer information.
Press the ‘CLEAR’ key to exit the Waxer Manual test and return to the Waxer Automatic test.
Press the ‘ENTER’ key to advance to the Waxer Errors test.
18
Life Fitness Models 9100, 9500HR, 9700HR, and 9700HR w/Decline Treadmills
DIAGNOSTICS: SYSTEM TEST – WAXER ERROR MODE
WAXER ERRORS
Calories
Distance
Time
Incline
Speed
Heart Rate
WE
Clear
Manual
Fat
Burn
Cardio
Random
Hill
Custom
Plus
Fit
Test
Quick
Start
Pause
Section II
1 2 3
4 5 6
7 8 9
0
Enter
Cool
Down
Upon entry into this test the letterw WE (waxer errors) will be in the profile window. This test allows you to see the
current wax motor error conditions.
The following is a list of the current waxer motor error conditions. If an error has occurred, refer to your
troubleshooting section for corrective action.
WAXER MOTOR ERROR CONDITIONS
WAXER UNPLUGGED
WAXER NO AC POWER
Press the ‘CLEAR’ key to exit the Waxer Errors test and return to the Waxer Manual test.
19
Life Fitness Models 9100, 9500HR, 9700HR, and 9700HR w/Decline Treadmills
DIAGNOSTICS: SYSTEM TEST – BELT / DECK MODE
This test allows the user to test the belt and deck condition. This test acts as a wattage meter. It will give the user
the percentage of power, wattage, bus voltage, and temperature readings.
The following messages will scroll:
The initial information displayed will be:
Where XXX will indicate real values.
PERCENT is the percentage of available power. It will range from 0 to 100%.
WATT is the wattage measured by the motor controller to move the belt ranging from 340 to 1200 watts.
By pressing the ‘COOL-DOWN’ key, the display will toggle to the information displayed below.
Where XXX will indicate real values.
VOLTAGE is the bus voltage of the motor controller. It is not the input line voltage.
TEMP is the temperature measure of the motor controller heat sink in Celsius.
The display will lock on the current information if the ‘PAUSE’ key is pressed.
The speed system and incline systems can be activated in this test. However, the display will only show the target
speed or incline for two seconds while the speed/incline keys are being pressed. It will then return to showing the
belt/deck information.
Press the ‘CLEAR’ key to exit the Belt/Deck test and return to the System Test Menu.
20
Life Fitness Models 9100, 9500HR, 9700HR, and 9700HR w/Decline Treadmills
DIAGNOSTICS: SYSTEM TEST – LIFE PULSE MODE
LIFEPULSE ON/OFF
Calories
Random
Time
Incline
Speed
Heart Rate
1 2 3
4 5 6
7 8 9
0
Clear
Fat
Burn
Cardio
Hill
Custom
Plus
Fit
Test
Quick
Start
Pause
Section II
Manual
Distance
Enter
Cool
Down
Upon initial entry to this test, a message concerning the configuration of the lifepulse system being On or Off. This
test will allow the user to test the lifepulse heart rate system.
Following this message, the lifepulse system can be manually tested. A heart will be in the profile window.
The system will show when the user has placed their hands on the lifepulse sensors. When the left sensor detects
hands on condition, a ‘L’ will be placed in the profile window with the heart. When the right sensor detects hands on
condition, a ‘R’ will be placed in the profile window with the heart.
A timer will start counting from the time when a both left and right hands on condition occurs to when the lifepulse
system can reliable give the user their heart rate. This timer will stop when the heart rate is given.
The gain value of the heart rate signal is shown. The confidence level of the heart rate value is displayed. The
value ranges from 0 to 9. A value of 9 is considered to be high confidence. A value of 0 is considered to be low
confidence.
The speed system and incline systems can be activated in this test. However, the display will only show the target
speed or incline for two seconds while the speed/incline keys are being pressed. It will then return to showing the
lifepulse information.
Press the ‘CLEAR’ key to exit the Lifepulse test and return to the System Test Menu.
21
Life Fitness Models 9100, 9500HR, 9700HR, and 9700HR w/Decline Treadmills
DIAGNOSTICS: SYSTEM TEST – TELEMETRY MODE
HEART RATE = XXX
Calories
Distance
Time
Incline
Speed
Heart Rate
1 2 3
4 5 6
7 8 9
0
Clear
Manual
Fat
Burn
Cardio
Random
Hill
Custom
Plus
Fit
Test
Quick
Start
Pause
Enter
Cool
Down
Upon initial entry to this test, a message concerning the telemetry system on/off will occur. This test will allow the
user to test the telemetry heart rate system. If the telemetry heart rate system is OFF, no heart rate value will be
given.
If the system is enabled, a telemetry heart rate signal can be provided and a heart rate value will be shown. The
signal will also generate the ‘ENTER’ led to flash at the heart rate pulse frequency.
Press the ‘CLEAR’ key to exit the Telemetry Heart Rate test and return to the System Test Menu.
22
Life Fitness Models 9100, 9500HR, 9700HR, and 9700HR w/Decline Treadmills
DIAGNOSTICS: SYSTEM TEST – SMART STOP MODE
SMART STOP ON
Calories
Distance
Time
Incline
Speed
Heart Rate
Clear
Manual
Fat
Burn
Cardio
Random
Hill
Custom
Plus
Fit
Test
Quick
Start
Pause
Section II
1 2 3
4 5 6
7 8 9
0
Enter
Cool
Down
Upon entry into the test, if the smart stop PCB is not plugged in, a message will be displayed “Smart Stop
Unplugged”. This test will allow the user to test the Smart Stop System. If the smart stop system detects a user it
will scroll the profile window from empty to full depending on the percentage of detection that is occurring. Other
smart stop information will scroll automatically every 3 seconds.
The following is a list of the current information that can be seen. If an error has occurred, refer to the
troubleshooting section for corrective action.
ERROR CONDITION
DISPLAYED INFORMATION
SMART STOP UNPLUGGED
SMART STOP ON
SMART STOP OFF
USER DETECTED
USER NOT DETECTED
SMART STOP ADJUST-XX
The smart stop system can be turned ON/OFF in this test. When the message “SMART STOP ON” is placed on the
message center, an arrow key will toggle it to “SMART STOP OFF”.
The display can be put into a locked mode by pressing the ‘PAUSE’ key. This will prohibit the scrolling of the smart
stop information.
Pressing the ‘CLEAR’ key to exit the smart stop test and return to the System Test Menu.
23
Life Fitness Models 9100, 9500HR, 9700HR, and 9700HR w/Decline Treadmills
DIAGNOSTICS: SYSTEM TEST – DIPLAY TEST MODE
This test will light each individual segment per character until complete. It will then light each character separately
until all characters have been lit. Each individual led will be tested also. If the ‘PAUSE’ key is pressed, the
sequence will halt and remain there until the ‘PAUSE’ is pressed again.
Pressing the ‘PAUSE’ key can LOCK the display. This will prohibit the scrolling of the LED’s.
Pressing the ‘CLEAR’ key to exit the Walking Led test and return to the Keypad test.
Calories
Distance
DISPLAY TEST
Time
Incline
Speed
Heart Rate
1 2 3
4 5 6
7 8 9
0
Clear
Manual
Fat
Burn
Cardio
Random
Hill
Custom
Plus
Fit
Test
Quick
Start
Pause
Enter
Cool
Down
Upon entry to this test, all lights will be turned ON. This test will allow the user to test the display console.
Pressing keys will result in a beep sound and, for all but the ‘ENTER’ and
‘CLEAR’ keys, a character will be repeated across the message center display.
KEYS
0
1
2
3
4
5
6
7
8
9
MANUAL
FAT BURN
CARDIO
RANDOM
HILL
CUSTOM
DISPLAYED CHARACTER
‘0’
‘1’
‘2’
‘3’
‘4’
‘5’
‘6’
‘7’
‘8’
‘9’
‘C’
‘D’
‘E’
‘H’
‘J’
‘K’
KEYS
FIT TEST
TIME UP
INCLINE UP
SPEED UP
TIME DOWN
INCLINE DOWN
SPEED DOWN
QUICK
PAUSE
COOL DOWN
STOP
DOWN
UP
DISPLAYED CHARACTER
‘L’
‘N’
‘P’
‘Q’
‘R’
‘T’
‘U’
‘V’
‘W’
‘X’
‘Y’
‘Z’
‘S’
Pulling the Emergency Stop switch will result in the message:
‘REPLACE EMERGENCY STOP SWITCH’.
Pressing the ‘CLEAR’ key to exit the Display test and return to the System Test Menu.
Pressing the ‘ENTER’ key will advance to Walking Led test.
24
Life Fitness Models 9100, 9500HR, 9700HR, and 9700HR w/Decline Treadmills
DIAGNOSTICS: SYSTEM TEST – REAL TIME CLOCK MODE
CLOCK SET TO XXXX
Calories
Distance
Time
Incline
Speed
Heart Rate
Clear
Manual
Fat
Burn
Cardio
Random
Hill
Custom
Plus
Fit
Test
Quick
Start
Pause
Section II
1 2 3
4 5 6
7 8 9
0
Enter
Cool
Down
This test allows the user to see the current time set on the frame tag real time clock. If the communication is bad or
the frame tag is unplugged the following messages will appear. Refer to the troubleshooting section for corrective
action.
FRAME CLOCK COMM BAD
FRAME TAG UNPLUGGED
If there are no errors, a message concerning whether the clock is set the local time or default “Greenwich Mean
Time”. Either message may appear:
“CLOCK SET TO LOCAL” or
“CLOCK SET TO GMT”
The message will be followed by the current real time clock information.
Press the ‘CLEAR’ key to exit the Frame Tag Real Time Clock test and return to the System Test Menu.
25
Life Fitness Models 9100, 9500HR, 9700HR, and 9700HR w/Decline Treadmills
DIAGNOSTICS: SYSTEM TEST – FRAME TAG EEPROM MODE
TESTING EEPROM XXX
Calories
Manual
Fat
Burn
Cardio
Random
Hill
Custom
Plus
Distance
Time
Incline
Speed
Heart Rate
1 2 3
4 5 6
7 8 9
Clear
0 Enter
Fit
Test
Quick
Start
Pause
Cool
Down
This test allows the user to test the frame tag EEPROM. This test will read/write/replace all used locations in the
frame tag EEPROM. If there is an error, the bad location will be displayed. The following is a list of current
information that can be seen. If an error has occurred, refer to the troubleshooting section for corrective action.
ERROR CONDITION
DISPLAYED INFORMATION
FRAME EEPROM COMM BAD
FRAME TAG UNPLUGGED
TESTING FRAME EEPROM
EEPROM TESTED GOOD
EEPROM BAD AT XX
Press the ‘CLEAR’ key to exit the Frame TagEEPROM test and return to the System Test Menu.
26
Life Fitness Models 9100, 9500HR, 9700HR, and 9700HR w/Decline Treadmills
DIAGNOSTICS: SYSTEM TEST – DISPLAY CONSOLE EEPROM TEST MODE
TESTING LOCAL EEPROM XXX
Distance
Time
Incline
Speed
Heart Rate
1 2 3
4 5 6
7 8 9
0
Clear
Manual
Fat
Burn
Cardio
Random
Hill
Custom
Plus
Fit
Test
Quick
Start
Pause
Section II
Calories
Enter
Cool
Down
This test allows the user to test the display console EEPROM. This test will read/write/replace all used locations in
the display console EEPROM. The EEPROM location being tested will be displayed in the heart rate window. If
there is an error, the bad location will be displayed.
The following is a list of current information that can be seen. In an error has occurred, refer to the troubleshooting
section for corrective action.
DISPLAYED INFORMATION
ERROR CONDITION
TESTING LOCAL EEPROM
EEPROM TESTED GOOD
EEPROM BAD AT XX
Press the ‘CLEAR’ key to exit the Display Console EEPROM test and return to the System Test Menu.
27
Life Fitness Models 9100, 9500HR, 9700HR, and 9700HR w/Decline Treadmills
DIAGNOSTICS: SYSTEM TEST – LIFECENTER TEST MODE
LIFECENTER TEST
Calories
Manual
Fat
Burn
Cardio
Random
Hill
Custom
Plus
Distance
Time
Incline
Speed
Heart Rate
1 2 3
4 5 6
7 8 9
Clear
0 Enter
Fit
Test
Quick
Start
Pause
Cool
Down
This test will give information concerning whether there is a lifecenter system connected to the treadmill. The
following is a list of the current information that can be seen:
NONE
NULL OFF ON WAIT -
T-XX
T-XX
T-XX
T-XX
R-XX
R-XX
R-XX
R-XX
The “T-XX” is the last transmitted message to the lifelink card.
The “R-XX” is the last received message from the lifelink card.
Press the ‘CLEAR’ key to exit the Lifecenter test and return to the System Test Menu.
28
Life Fitness Models 9100, 9500HR, 9700HR, and 9700HR w/Decline Treadmills
DIAGNOSTICS: SYSTEM TEST – FITLINXX TEST MODE
Calories
Distance
FITLINX TEST
Time
Incline
Speed
Heart Rate
Clear
Manual
Fat
Burn
Cardio
Random
Hill
Custom
Plus
Fit
Test
Quick
Start
Pause
Section II
1 2 3
4 5 6
7 8 9
0
Enter
Cool
Down
This test will give information concerning whether there is a Fitlinx system connected to the treadmill. The following
is a list of the current information that can be seen:
NONE
NULL OFF ON WAIT -
T-XX
T-XX
T-XX
T-XX
R-XX
R-XX
R-XX
R-XX
The “T-XX” is the last transmitted message to the C-safe card.
The “R-XX” is the last received message from the C-safe card.
Press the ‘CLEAR’ key to exit the Fitlinx test and return to the System Test Menu.
29
Life Fitness Models 9100, 9500HR, 9700HR, and 9700HR w/Decline Treadmills
DIAGNOSTICS: INFORMATION MENU
Upon entry into the area, the message is:
Calories
Manual
Fat
Burn
Cardio
Random
Hill
Custom
Plus
Distance
SYSTEM INFO MENU
Time
Incline
Speed
Heart Rate
1 2 3
4 5 6
7 8 9
Clear
0 Enter
Fit
Test
Quick
Start
Pause
Cool
Down
Followed by,
Using any of the arrow keys will allow you to scroll through the eight system information areas.
SYSTEM STATISTICS
SOFTWARE VERSIONS
MAIN MOTOR INFORMATION
LIFT MOTOR INFORMATION
Press the ‘ENTER’ key to enter the desired category.
30
WAX MOTOR INFORMATION
REAL TIME CLOCK INFORMATION
SYSTEM ERRORS
SYSTEM MAINTENANCE
Life Fitness Models 9100, 9500HR, 9700HR, and 9700HR w/Decline Treadmills
DIAGNOSTICS: INFORMATION – SYSTEM STATISTICS MODE
SYSTEM STATISTICS
Calories
Fat
Burn
Cardio
Random
Hill
Custom
Plus
Time
Incline
Speed
Heart Rate
1 2 3
4 5 6
7 8 9
Clear
0 Enter
Fit
Test
Quick
Start
Pause
Section II
Manual
Distance
Cool
Down
This area will allow the user to see system information concerning the following areas:
DISPLAYED INFORMTION
TOTAL HOURS
TOTAL MILES
BELT HOURS
BELT MILES
LIFT MINUTES
HILL PROGRAM SELECTIONS
RANDOM PROGRAM SELECTIONS
MANUAL PROGRAM SELECTIONS
FAT BURN PROGRAM SELECTIONS
CARDIO PROGRAM SELECTIONS
FIT TEST PROGRAM SELECTIONS
QUICK START PROGRAM SELECTIONS
CUSTOM PROGRAM SELECTIONS
The information will automatically scroll every 3 seconds or using any of the arrow keys will allow you to scroll
through the system statistics.
Pressing the ‘PAUSE’ key can LOCK the display. This will prohibit the scrolling of the information.
Press the ‘CLEAR’ key to exit the System Statistics and return to the System Info Menu.
31
Life Fitness Models 9100, 9500HR, 9700HR, and 9700HR w/Decline Treadmills
DIAGNOSTICS: INFORMATION – SOFTWARE VERSION MODE
SOFTWARE VERSIONS
Calories
Manual
Random
Distance
Time
Incline
Speed
Heart Rate
1 2 3
4 5 6
7 8 9
0
Clear
Fat
Burn
Cardio
Hill
Custom
Plus
Fit
Test
Quick
Start
Pause
Enter
Cool
Down
This area will allow the user to see system information concerning the following areas:
DISPLAYED INFORMATION
CONSOLE SOFTWARE VERSION
MOTOR CONTROLLER SOFTWARE VERSION
WAX/LIFT BOARD SOFTWARE VERSION
LIFEPULSE SOFTWARE VERSION
The information will automatically scroll every 3 seconds or using any of the arrow keys will allow you to scroll
through the system information.
Press the ‘CLEAR’ key to exit the Software Versions and return to the System Info Menu.
32
Life Fitness Models 9100, 9500HR, 9700HR, and 9700HR w/Decline Treadmills
DIAGNOSTICS: INFORMATION – MAIN MOTOR INFO MODE
Calories
Distance
MAIN MOTOR INFO
Time
Incline
Speed
Heart Rate
Clear
Manual
Fat
Burn
Cardio
Random
Hill
Custom
Plus
Fit
Test
Quick
Start
Pause
Section II
1 2 3
4 5 6
7 8 9
0
Enter
Cool
Down
This area will allow the user to see the current information about the main motor and motor controller. The
information will cover the following areas:
DISPLAYED INFORMATION
MOTOR MINUTES
NUMBER OF POWER UP RESETS
NUMBER OF HARDWARE CURRENT ERRORS
NUMBER OF STATIC CURRENT TRIP
NUMBER OF MAX TEMPERATURE TRIP
NUMBER OF MAXIMUM VOLTAGE TRIP
NUMBER OF DYNAMIC CURRENT TRIP
MAXIMUM STATIC CURRENT VALUE
MAXIMUM TEMPERATURE VALUE
MAXIMUM VOLTAGE VALUE
MAXIMUM DYNAMIC CURRENT VALUE
NUMBER OF SPEED SENSOR ERROR
The information will automatically scroll every 3 seconds or using any of the arrow keys will allow you to scroll
through the main motor information.
Pressing the ‘PAUSE’ key can LOCK the display. This will prohibit the scrolling of the information.
Press the ‘CLEAR’ key to exit the Main Motor Info and return to the System Info Menu.
33
Life Fitness Models 9100, 9500HR, 9700HR, and 9700HR w/Decline Treadmills
DIAGNOSTICS: INFORMATION – LIFT MOTOR INFO MODE
Calories
Distance
LIFT MOTOR INFO
Time
Incline
Speed
Heart Rate
1 2 3
4 5 6
7 8 9
0
Clear
Manual
Fat
Burn
Cardio
Random
Hill
Custom
Plus
Fit
Test
Quick
Start
Pause
Enter
Cool
Down
This area will allow the user to see the current information about the lift motor. The information will cover the
following areas:
DISPLAYED INFORAMTION
1. UNIT CONFIGURATION – NEGATIVE OR NON-NEGATIVE
2. CURRENT LIFT ON TIME IN MINUTES
3. BUCKET (Refer to table)
BUCKET - INCLINE AT PERCENTAGE OF RANGE
BUCKET 0
-3.0 TO -2.1 PERCENT
BUCKET 10
7.0 TO 6.1 PERCENT
BUCKET 1
-2.0 TO - 1.1 PERCENT
BUCKET 11
8.0 TO 7.1 PERCENT
BUCKET 2
-1.0 TO –0.1 PERCENT
BUCKET 12
9.0 TO 8.1 PERCENT
BUCKET 3
0.0 PERCENT
BUCKET 13
10.0 TO 9.1 PERCENT
BUCKET 4
1.0 TO 0.1 PERCENT
BUCKET 14
11.0 TO 10.1 PERCENT
BUCKET 5
2.0 TO 1.1 PERCENT
BUCKET 15
12.0 TO 11.1 PERCENT
BUCKET 6
3.0 TO 2.1 PERCENT
BUCKET 16
13.0 TO 12.1 PERCENT
BUCKET 7
4.0 TO 3.1 PERCENT
BUCKET 17
14.0 TO 13.1 PERCENT
BUCKET 8
5.0 TO 4.1 PERCENT
BUCKET 18
15.0 TO 14.1 PERCENT
BUCKET 9
6.0 TO 5.1 PERCENT
The information will automatically scroll every 3 seconds or using any of the arrow keys will allow you to scroll
through the wax motor information.
Pressing the ‘PAUSE’ key can LOCK the display. This will prohibit the scrolling of the information.
Press the ‘CLEAR’ key to exit the Wax Motor Info and return to the System Info Menu.
34
Life Fitness Models 9100, 9500HR, 9700HR, and 9700HR w/Decline Treadmills
DIAGNOSTICS: INFORMATION – WAX MOTOR INFO MODE
Calories
Distance
WAX MOTOR INFO
Time
Incline
Speed
Heart Rate
Clear
Manual
Fat
Burn
Cardio
Random
Hill
Custom
Plus
Fit
Test
Quick
Start
Pause
Section II
1 2 3
4 5 6
7 8 9
0
Enter
Cool
Down
This area will allow the user to see the current information about the wax motor. The information will cover the
following areas:
DISPLAYED INFORMATION
WAXER UNPLUGGED
WAXER FIRED – XXX
WAXER - XX/100 FULL
MANUAL WAX- XX TIMES
NEXT WAX - XX HOURS
INITIAL WAX- XX MINS
WAX INTERVAL XX MINS
MIN WAX SPEED- X.X
The information will automatically scroll every 3 seconds or using any of the arrow keys will allow you to scroll
through the wax motor information.
Pressing the ‘PAUSE’ key can LOCK the display. This will prohibit the scrolling of the information.
Press the ‘CLEAR’ key to exit the Wax Motor Info and return to the System Info Menu.
35
Life Fitness Models 9100, 9500HR, 9700HR, and 9700HR w/Decline Treadmills
DIAGNOSTICS: INFORMATION – CLOCK INFO MODE
Calories
Manual
Fat
Burn
Cardio
Random
Hill
Custom
Plus
Distance
CLOCK INFO
Time
Incline
Speed
Heart Rate
1 2 3
4 5 6
7 8 9
Clear
0 Enter
Fit
Test
Quick
Start
Pause
Cool
Down
This area will allow the user to see the current information about the real time clock. The information will cover the
following areas:
DISPLAYED INFORMATION
FRAME CLOCK COMM BAD
FRAME TAG UNPLUGGED
CURRENT SETTING FOR REAL TIME CLOCK
Press the ‘CLEAR’ key to exit the Real Time Clock Info and return to the System Info Menu.
36
Life Fitness Models 9100, 9500HR, 9700HR, and 9700HR w/Decline Treadmills
DIAGNOSTICS: INFORMATION – SYSTEM ERROR MODE
Calories
Distance
SYSTEM ERRORS
Time
Incline
Speed
Heart Rate
Clear
Manual
Fat
Burn
Cardio
Random
Hill
Custom
Plus
Fit
Test
Quick
Start
Pause
Section II
1 2 3
4 5 6
7 8 9
0
Enter
Cool
Down
This area will allow the user to see the last 25 logged system errors. The error information will be displayed from
the most recently logged to the oldest. Each system error will be displayed in the following format.
This format allows the user to scroll through all logged system errors without seeing any error details. The system
errors will be scrolled automatically every 3 seconds or can be scrolled by using any of the arrow keys.
If the user wants to see the details about an error condition, the user must press the ‘ENTER’ key when the error
title is displayed on the message center.
When the ‘ENTER’ key is pressed, all of the error log details will begin to display. These error details will scroll
automatically every 3 seconds or can be scrolled by using any of the arrow keys.
Press the ‘CLEAR’ key to go back to just seeing the error titles.
Press the ‘CLEAR’ key to exit the System Errors and return to the System Info Menu.
37
Life Fitness Models 9100, 9500HR, 9700HR, and 9700HR w/Decline Treadmills
DIAGNOSTICS: INFORMATION – MAINTENANCE INFO MODE
MAINTENANCE INFO
Calories
Distance
Time
Incline
Speed
Heart Rate
1 2 3
4 5 6
7 8 9
0
Clear
Manual
Fat
Burn
Cardio
Random
Hill
Custom
Plus
Fit
Test
Quick
Start
Pause
Enter
Cool
Down
This area will allow the user to see the last 12 logged system repairs. The repair information will be displayed from
the most recently logged to the oldest. Each system repair will be displayed in the following format.
This format allows the user to scroll through all logged system repairs without seeing any repair details. The system
repairs will be scrolled automatically every 3 seconds or can be scrolled by using any of the arrow keys.
If the user wants to see the details about a repair procedure, the user must press the ‘ENTER’ key when the repair
title is displayed on the message center.
When the ‘ENTER’ key is pressed, all of the repairs procedure details will begin to display. These repair details will
scroll automatically every 3 seconds or can be scrolled by using any of the arrow keys.
Press the ‘ENTER’ key to view system repair procedure. Detail repair log as needed.
Press the ‘CLEAR’ key to exit the System Repair and return to the System Info Menu.
38
Life Fitness Models 9100, 9500HR, 9700HR, and 9700HR w/Decline Treadmills
DIAGNOSTICS: MAINTENANCE MENU
Upon entry into the area, the message is:
Calories
Random
MAINTENANCE MENU
Time
Incline
Speed
Heart Rate
1 2 3
4 5 6
7 8 9
0
Clear
Fat
Burn
Cardio
Hill
Custom
Plus
Fit
Test
Quick
Start
Pause
Section II
Manual
Distance
Enter
Cool
Down
Followed by,
Using any of the arrow keys will allow you to scroll through the ten system maintenance procedures.
REPLACING BELT AND DECK
REPLACING WAXER BAG
REPLACING CONSOLE
REPLACING MOTOR CONTROLLER
REPLACING WAX LIFT BOARD
REPLACING STOP SWITCH
REPLACING OVERLAY BEZEL
REPLACING MAIN MOTOR
REPLACING LIFT MOTOR
REPLACING WAX MOTOR
Press the ‘ENTER’ key to choose the desire procedure.
Upon the selection of the desired procedure, the system will gather all-important information concerning that
procedure and log the procedure and details to the frame tag EEPROM. Upon successful completion of the log, the
message “REPAIR LOGGED” will be displayed.
Press the ‘CLEAR’ key to exit the System Maintenance and return to the Service Menu.
39
Life Fitness Models 9100, 9500HR, 9700HR, and 9700HR w/Decline Treadmills
DIAGNOSTICS: CONFIGURATION MENU
Upon entry into the area, the message is:
CONFIGURATION MENU
Calories
Manual
Fat
Burn
Cardio
Random
Hill
Custom
Plus
Distance
Time
Incline
Speed
Heart Rate
1 2 3
4 5 6
7 8 9
Clear
0 Enter
Fit
Test
Quick
Start
Pause
Cool
Down
Followed by,
Using any of the arrow keys will allow you to scroll through the three system configuration areas.
MANAGER CONFIG
MANUFACTURE CONFIG
CLOCK CONFIG
Press the ‘ENTER’ key to choose the desire area.
Press the ‘CLEAR’ key to exit the Configuration Menu and return to the Service Menu.
40
Life Fitness Models 9100, 9500HR, 9700HR, and 9700HR w/Decline Treadmills
DIAGNOSTICS: CONFIGURATION – MANAGER CONFIGURATION MODE
Manual
Fat
Burn
Cardio
Random
Hill
Custom
Plus
MANAGER CONFIGURATION
Distance
Time
Incline
Speed
Heart Rate
1 2 3
4 5 6
7 8 9
Clear
0 Enter
Fit
Test
Quick
Start
Pause
Section II
Calories
Cool
Down
The information will automatically scroll every 3 seconds or using the ‘TIME UP’ or ‘TIME DOWN’ arrow keys will
allow you to scroll through the configuration items.
The information can be changed when the item is displayed in the message center by using any of the remaining
arrow keys to change the value.
41
Life Fitness Models 9100, 9500HR, 9700HR, and 9700HR w/Decline Treadmills
DIAGNOSTICS: CONFIGURATION - MANAGER CONFIGURATION MODE
(Continued)
This area will allow the user to see the current configuration about the system. The information will cover the
following areas:
TOPIC
DESCRIPTION
LANGUAGE = XXXXX
Eight different languages can be selected: English, Dutch, Italian and
Portuguese, German, French, Japanese, and Spanish.
MAXIMUM PROGRAM TIME
The maximum duration of a workout. The range of this option is 10 to
99 minutes.
ENGLISH/METRIC UNITS
The units of measure used by the equipment (i.e. miles or kilometers,
pounds or kilograms).
CUSTOM WORKOUT ENTRY
The trainer can define up to 6 different workouts consisting of a
series of intervals (up to 30), of a fixed duration in seconds, each
containing a pre-defined incline, target heart rate percentage, or
speed.
TELEMETRY ON/OFF
Telemetry allows the product to use the Polar compatible Heart Rate
Zone Training exercise chest strap to monitor the heart rate.
SMART STOP ON/OFF
Controls user detection mode.
MAXIMUM SPEED
Highest speed available to the user is 12 MPH, optional 15 MPH
TR9700 models.
MINIMUM SPEED
Lowest speed available to the user is .5 MPH.
PAUSE TIMEOUT DURATION
Number of minutes user can pause a workout.
WATTS DISPLAY ON/OFF
The expression of the rate of work (power output/power
consumption) for a device, such as a cardiovascular machine.
METS DISPLAY ON/OFF
The expression of the rate of work (power output) for the human body
at rest, or a metabolic equivalent. One MET is approximately equal
to a person’s metabolism when seated and relaxed.
®
PACE DISPLAY ON/OFF
CALORIE PER HOUR DISPLAY ON/OFF
It is a measurement of work to express the amount of energy
expended (used) in physical activity (also expressed in terms of kcal;
1000 cal = 1 kcal).
DISTANCE DISPLAY ON/OFF
Expersion of the amount of distance travel in a numerical value.
WAX REMINDER ON/OFF
After the first 100 hours, then every 168 hours, message will appear
”Maintenance Reminder - Clean the nozzle”.
ACCEL RATE 3
Rate of acceleration to user-chosen speed, range 1 to 5 (fastest).
DECCEL RATE 3
Rate of deceleration to user-chosen speed, range 1 to 5 (fastest).
Pressing the ‘PAUSE’ key can LOCK the display. This will prohibit the scrolling of the information.
All changed items will be saved to the memory upon exiting of the manager’s configuration.
Press the ‘CLEAR’ key to exit the Manager’s Config and return to the Configuration Menu.
42
Life Fitness Models 9100, 9500HR, 9700HR, and 9700HR w/Decline Treadmills
DIAGNOSTICS: CONFIGURATION – MANUFACTURER CONFIGURATION MODE
Section II
The following message is for factory use only.
43
Life Fitness Models 9100, 9500HR, 9700HR, and 9700HR w/Decline Treadmills
DIAGNOSTICS: CONFIGURATION – CLOCK CONFIGURATION MODE
To view the information in this area, a special password must be entered to go into the configuration area.
Hold the ‘PAUSE’ key and hit the ‘ENTER’ key to proceed.
This area will allow the user to set the clock configuration in the system. The information can be obtained by using
the ‘ENTER’ key to scroll the day, date, and time.
In this area, the user will be prompted to set the current day for the real time clock. The following is the message
that will appear: “USE ARROW KEYS TO CHANGE DAY”
By pressing any of the arrow keys the user will set the current day for the real time clock.
Press the ‘CLEAR’ key to exit and save data. It will return to the Clock Configuration Menu.
In this area, the user will be asked to set the current date for the real time clock. The following message will appear:
“ARROW KEYS TO CHANGE”: “TIME KEYS = MONTH”, “INCLINE KEYS = DATE”, “SPEED KEYS = YEAR”
Press the ‘CLEAR’ key to exit and save data. It will return to the Clock Configuration Menu.
In this area, the user will be prompted to set the display mode of the real time clock. There are two modes that can
be chosen by using the ‘ARROW KEYS’ to scroll and the ‘ENTER’ key to set local time:
Standard time = 12 hours or Military time = 24 hours
After the selection of the display mode, the user will be prompted to set the current time. The following message will
appear:
“ARROW KEYS TO CHANGE”: “TIME KEYS = HOURS”, “INCLINE KEYS = MINUTES”, “SPEED KEYS =
SECONDS”
Press the ‘CLEAR’ key to exit the Set Time menu and return to the Clock Configuration Menu.
44
Life Fitness Models 9100, 9500HR, 9700HR, and 9700HR w/Decline Treadmills
Section II
NOTES:
45
Life Fitness Models 9100, 9500HR, 9700HR, and 9700HR w/Decline Treadmills
SECTION III
Section III
HOW TO…
SERVICE AND REPAIR GUIDE
1
Life Fitness Models 9100, 9500HR, 9700HR, and 9700HR w/Decline Treadmills
How To... Replace The Striding Belt and Deck
Tools Required: Hex key wrench set, socket and ratchet set, and Phillips screwdriver
Step 1
Turn the unit power OFF at the switch, then unplug
the line cord at the wall outlet.
Motor Shroud
Cover
Step 2
Remove four Phillip screws from the MOTOR
SHROUD COVER, and remove the motor shroud
cover.
Step 3
Remove four Phillips screws from the REAR
ROLLER GUARDS and remove the REAR
ROLLER GUARDS.
Step 4
Remove two tension bolts from the REAR ROLLER
by turning counterclockwise.
Step 5
Lift out the REAR ROLLER.
Step 6
Remove the four DECK SCREWS, and remove the DECK.
Step 7
Remove two Phillip screws from the RIGHT
ACCESS PANEL, and remove the ANTI-STATIC
TINSEL .
Deck
Striding Belt
Step 8
Remove the WAX BRACKET and lay it on top of
the LIFESPRINGS on the users left side of the
unit.
Step 9
Release the tension on the IDLER ARM
BRACKET PULLEY and slip the DRIVE BELT off
the FRONT ROLLER PULLEY.
Step 10
Remove the FRONT ROLLER mounting bolt and
lift out the FRONT ROLLER.
Step 11
Remove the STRIDING BELT.
Step 12
Install new STRIDING BELT and make sure the
deck is flipped (if unused) or replace DECK, and
that the arrow, on the inside the belt, is pointing in
the direction of rotation.
2
Front Roller
Rear Roller
Tensioning
Bolt
Wax Bracket
Assembly
Pinch
Guards
Tensioning
Bolt
Anti-Static
Tinsel
Right
Access
Panel
Life Fitness Models 9100, 9500HR, 9700HR, and 9700HR w/Decline Treadmills
How To... Replace The Striding Belt (Continued)
Tools Required: Hex key wrench set, socket and ratchet set, and Phillips screwdriver
INSTALL THE STRIDE BELT IN THE REVERSE ORDER EXCEPT AS FOLLOWS:
Step 14
Center the STRIDE BELT between the FRONT and REAR ROLLERS. Tighten the BELT TENSIONING BOLTS up
to the location marks made prior to removal, or if not marked, until the center span of the belt is taut between rollers.
Step 15
After installing new STRIDING BELT, but prior to tensioning, place two pieces of tape 50” inches apart on BOTH the
right and left edges of the STRIDING BELT.
Section III
50”
Step 16
Alternately tighten the two tensioning bolts 1/4 turn clockwise each until the distance between the tape is 50.25”
which is the equivalent of a quarter inch or .55% stretch.
Step 17
Adjust the Tracking. See How To...Adjust Striding Belt Tracking in this section.
Step 18
Refer to diagnostics section to log maintenance repair of the striding belt.
3
Life Fitness Models 9100, 9500HR, 9700HR, and 9700HR w/Decline Treadmills
How To... Adjust Striding Belt Tracking
Tools Required: Hex key wrench set
IMPORTANT: It is CRITICAL that the treadmill
be correctly leveled prior to any tracking
adjustments. An unstable unit can cause
Striding Belt misalignment. To level and
stabilize the unit, refer to instructions on
“How To…Replace The Leveler Assembly” in
this section.
Step 1
After the treadmill has been installed and leveled,
the belt must be checked fo confirm proper
tracking. First, plug the power cord into an
appropriate outlet and turn the treadmill ON.
Step 2
Refer to the SPEED AUTOMATIC test procedure under MOTOR TEST MODULE in DIAGNOSTICS: SYSTEM
TEST to achieve a 4.0 mph (6.4 kph) motor speed.
Step 3
With the belt running, note its tracking. If the belt
moves to the right, turn the right tensioning bolt
1/4 turn counterclockwise to bring the belt back to
center. If the belt moves to the left, turn the left
tensioning bolt 1/4 turn clockwise and then turn
the right tension bolt 1/4 turn counterclockwise to
bring the belt back to center.
If the STRIDING BELT has moved to the right,
turn the right TENSION BOLT 1/4 turn clockwise
and the left TENSION BOLT 1/4 turn counterclockwise to start the STRIDING BELT tracking
back to the center of the REAR ROLLER.
If the STRIDING BELT has moved to the left, turn
the left TENSION BOLT 1/4 turn clockwise and the
right TENSION BOLT 1/4 turn counterclockwise to
start the STRIDING BELT tracking back to the
center of the REAR ROLLER.
Step 4
Repeat this adjustment until the striding belt appears centered. Allow the unit to operate for several minutes to see
that the belt remains centered.
NOTE: During the adjustment above, DO NOT exceed one full turn of the adjusting screws in either direction.
4
Life Fitness Models 9100, 9500HR, 9700HR, and 9700HR w/Decline Treadmills
How To… How To Adjust Striding Belt Tension
Tools Required: Hex key wrench set, Phillips screwdriver
Step 1
Locate the two BELT TENSIONING
BOLTS on each side of the REAR
ROLLER MOUNTING BRACKETS. The
TENSIONING BOLTS are accessible from
the holes provided in the REAR ROLLER
GUARDS.
Step 2
Enter the Manual program and run unit for
five minutes at 5.0 mph (8.0 kph). DO NOT
run on the BELT.
Section III
Step 3
Using the speed decrease button ∇, bring the
STRIDING BELT speed down to 2 mph (3.2
kph). With the STRIDING BELT speed at 2
mph (3.2 kph), begin walking on the treadmill.
Tightly grasp the HANDRAILS and attempt to
stall the STRIDING BELT. If the STRIDING
BELT slips, continue to Step 4. if it does not
slip, the tension is correct.
Step 4
Stop the treadmill and alternately turn the
STRIDING BELT TENSIONING BOLTS 1/4
turn clock-wise to tension (See Tracking
(Centering) an Existing or New Striding
Belt on previous page). Repeat Step 3 and
Step 4 until slipping is eliminated. DO NOT
EXCEED ONE FULL TURN!
5
Life Fitness Models 9100, 9500HR, 9700HR, and 9700HR w/Decline Treadmills
How To... Replace The Drive Belt
Tools Required: Hex key wrench set, socket and ratchet set, and Phillips screwdriver
Step 1
Turn the unit power OFF at the switch, then unplug the
line cord at the wall outlet.
Motor Shroud
Cover
Step 2
Remove four Phillips screws from the MOTOR
SHROUD COVER, and remove the motor shroud.
Step 3
Remove tension bolts from the REAR ROLLER.
Step 4
To relieve drive belt tension, insert the end of a flat
blade screwdriver in the slot of the IDLER ARM, then
raise the idler arm and fix it in the raised position by
installing an Allen wrench in the idler arm hole as shown.
CAUTION: DO NOT RAISE THE IDLER ARM HIGHER
THAN REQUIRED TO INSTALL THE ALLEN
WRENCH INTO THE IDLER ARM HOLE.
Step 5
Remove the FRONT ROLLER mounting bolt and lift out
the FRONT ROLLER.
Step 6
Remove the MOTOR DRIVE BELT from its pulley and
discard.
Step 7
Install the new MOTOR DRIVE BELT in reverse order.
Make sure to align the new motor drive belt on the motor
pulley and front roller pulley. Refer to “HOW
TO…Replace Striding Belt” for proper belt adjustment
and tensioning.
Screwdriver
Front Roller
Drive Belt
Idler Pulley
Idler Arm
Allen Wrench
6
Life Fitness Models 9100, 9500HR, 9700HR, and 9700HR w/Decline Treadmills
How To... Replace The Drive Motor
Tools Required: Hex key wrench set, socket and ratchet set, spring hook, and Phillips screwdriver
Step 1
Turn the unit power OFF at the switch, then unplug the line cord
at the wall outlet.
Step 2
Remove the Phillip screws from the MOTOR SHROUD COVER,
and remove the motor shroud cover.
Screwdriver
Step 3
Disconnect the MOTOR CABLE CONNECTORS (3 and 6 Pins).
Step 4
To relieve drive belt tension, insert the end of a flat blade
screwdriver in the slot of the IDLER ARM, then raise the idler
arm and fix it in the raised position by installing an Allen wrench
in the idler arm hole as shown.
Front Roller
Drive Belt
Idler Pulley
Idler Arm
Allen Wrench
Step 5
Remove the four MOTOR MOUNTING BOLTS and lift out the
motor.
INSTALL THE DRIVE MOTOR BELT IN THE REVERSE ORDER
EXCEPT AS FOLLOWS:
Section III
CAUTION: DO NOT RAISE THE IDLER ARM HIGHER THAN
REQUIRED TO INSTALL THE ALLEN WRENCH.
Drive Belt
Motor
Step 6
Install the motor in the unit securing it with four(4) nuts. Check to
see that the outer pulley faces of the motor and front roller (towards
user right side of unit) are aligned with each other. Use a straight
edge to check for proper alignment. If necessary, loosen the set
screws(2) in the motor pulley and move it in or out until alignment is
achieved, then tighten the set screws(2).
Step 7
With the motor pulley properly aligned, secure the idler arm bracket
in the raised position and reinstall DRIVE BELT around the pulley and lower the IDLER ARM. Test the unit prior to
reinstalling covers and end cap to insure belt doesn’t jump.
Step 8
Refer to diagnostics section to log maintenance repair of the drive motor.
7
Life Fitness Models 9100, 9500HR, 9700HR, and 9700HR w/Decline Treadmills
How To... Replace The Front Roller
Tools Required: Hex key wrench set, socket and ratchet set, and Phillips screwdriver
Step 1
Turn the unit power OFF at the switch, then unplug the
line cord at the wall outlet.
Motor Shroud
Cover
Step 2
Remove the MOTOR SHROUD.
Step 3
Remove tension bolts from the REAR R0LLER and set
aside.
Step 4
Raise the IDLER ARM PULLEY to relieve belt tension,
and remove the DRIVE MOTOR BELT off the pulley.
Step 5
Remove the FRONT ROLLER mounting bolt and lift out
the FRONT ROLLER.
Step 6
Install the new front roller making sure the motor drive belt
is centered on both the drive motor and front roller pulleys.
Refer to “HOW TO…Replace Striding Belt” for proper belt
adjustment and tensioning.
Screwdriver
Front Roller
Drive Belt
Idler Pulley
Idler Arm
Allen Wrench
8
Life Fitness Models 9100, 9500HR, 9700HR, and 9700HR w/Decline Treadmills
How To... Replace The Rear Roller
Tools Required: Hex key wrench set, socket and ratchet set, and Phillips screwdriver
Step 1
Turn the unit power OFF at the switch,
then unplug the line cord at the wall
outlet.
Rear Roller
Step 2
Remove the REAR ROLLER GUARDS.
Step 3
Remove tension
ROLLER.
bolts
from
Step 4
Remove the REAR ROLLER.
REAR
Striding Belt
Tension Bolts
Rear Roller Guards
Section III
Step 5
Install the new rear roller making sure the striding belt is properly adjusted and tensioned. Refer to “HOW
TO…Replace Striding Belt” for proper belt adjustment and tensioning.
9
Life Fitness Models 9100, 9500HR, 9700HR, and 9700HR w/Decline Treadmills
How To... Replace The Lifespring Absorbers
Tools Required: Hex key wrench set, socket and ratchet set, and Phillips screwdriver
Step 1
Turn the unit power OFF at the switch, then
unplug the line cord at the wall outlet.
Step 2
Loosen the rear roller TENSIONING BOLTS(2).
Striding Belt
Removal
Not Required
(For Illustration
Purposes Only)
1/4-20” Screw
Lifespring
Step 3
Remove the four DECK SCREWS.
Step 4
Remove the DECK being careful of its waxed
side.
Deck
Step 5
Remove the MOUNTING BOLT from the
LIFESPRING.
Step 6
Remove the 1/4-20” screws from the
LIFESPRING(S) and lift off the lifespring and
discard. Note the tinnerman clips in the four(4)
corners of the life spring.
Step 7
Install new Life Spring(s) in reverse order.
Rear Roller
Tensioning Bolts
NOTE: Notch in Life Spring to face inside of
the frame.
Step 8
Refer to “HOW TO…Replace Striding Belt” for proper belt adjustment and tensioning.
10
Life Fitness Models 9100, 9500HR, 9700HR, and 9700HR w/Decline Treadmills
How To... Replace The Anti-Static Tinsel
Tools Required: Hex key wrench set, socket and ratchet set, and Phillips screwdriver
Step 1
Turn the unit power OFF at the switch, then
unplug the line cord at the wall outlet.
Step 2
Remove both ACCESS PANELS at the side
of the unit frame. At this point you can
access the ANTI-STATIC TINSEL through
the access opening or tilt the unit on the side
where the access panel was removed.
NOTE: To avoid damaging the access cover,
make sure to remove the access cover
before tilting the unit on its side.
Step 3
Remove the ANTI-STATIC TINSEL and
discard.
Anti-Static
Tinsel
Section III
Step 4
Install new ANTI-STATIC TINSEL in reverse order.
Right
Access
Panel
Anti-Static
Tinsel
11
Life Fitness Models 9100, 9500HR, 9700HR, and 9700HR w/Decline Treadmills
How To... Replace The Anti-Scuff Pads
Tools Required: Pencil, non-abrasive cleaner, paper towels
Step 1
Remove the worn ANTI-SCUFF PAD from the
FRAME.
Step 2
Clean off adhesive residue with a non-abrasive
cleaner.
Step 3
Peel off the protective backing and install the new
ANTI-SCUFF PAD making sure to apply even
pressure while maintaining equal distance
between edges of pad and STRIDING BELT.
12
Life Fitness Models 9100, 9500HR, 9700HR, and 9700HR w/Decline Treadmills
How To... Replace The Wax Motor
Tools Required: Phillips screwdriver and pliers
Step 1
Turn the unit power OFF at the switch, then
unplug the line cord at the wall outlet.
Step 2
Remove the LEFT ACCESS PANEL on the
left side of the unit frame and pull out the
WAX BAG close off HOSE CLAMP and
disconnect wax hoses from the motor.
Step 3
Disconnect the 2-Pin connector from the
WAX MOTOR.
Step 4
Remove two WAX MOTOR MOUNTING
SCREWS which are located on the right
side of the RIGHT ACCESS PANEL.
Wax
Motor
Screw(2)
Section III
Step 5
Remove the WAX MOTOR.
Step 6
Install new wax motor in reverse order, then test for proper operation.
Step 7
Refer to diagnostics section to log maintenance repair of the wax motor.
13
Life Fitness Models 9100, 9500HR, 9700HR, and 9700HR w/Decline Treadmills
How To... Replace The Power Module
Tools Required: Phillips screwdriver
Step 1
Turn the unit power OFF at the switch, then unplug
the line cord at the wall outlet.
Motor Cover
Step 2
Remove four phillip screws from the MOTOR
COVER and four phillip screws from the FRONT
COVER. Remove both covers.
Step 3
Remove the power line cord from under the unit
which is secured by two screws and a bracket.
Step 4
Cut cable ties.
Step 5
Disconnect the 3-Pin Connector from top of the
POWER MODULE.
Step 6
Disconnect 3-Pin
CONTROLLER.
Connector
at
the
MOTOR
Front
Cover
Step 7
Remove LIFT MOTOR ground wire.
Step 8
Remove four mounting screws at the front of the unit
securing the POWER MODULE, then lift out the
power module.
Step 9
Install new POWER MODULE in reverse order.
14
Ground Wire
Power Module
Life Fitness Models 9100, 9500HR, 9700HR, and 9700HR w/Decline Treadmills
How To… Replace the Wax Bag
Tools required: Phillips screwdriver, Side Cutters or Utility Knife
Step 1
Turn the power OFF at the ON/OFF switch and then unplug the unit from the electrical outlet.
Step 2
Remove the two SCREWS securing the WAX BAG ACCESS PANEL located on the user left side of the unit. Remove
the WAX BAG ACCESS PANEL and set it aside.
FOR A FIRST TIME INSTALLATION, SKIP TO STEP 7.
Step 3
Engage the HOSE CLAMP onto the used WAX BAG HOSE.
Step 4
Slide the used WAX BAG HOSE off the BARBED NOZZLE on the WAX PUMP INLET HOSE.
Step 6
Lift the used WAX BAG from the two WINGNUT STUDS. Slide the WAX BAG out of its PROTECTIVE LINER. Discard
the used WAX BAG.
Wax Bag
Protective Liner
Wingnut &
Stud
Wax Bag
Wax Bag
Hose
Wax Bag
Access Panel
Hose
Clamp
Wax Pump
Inlet Hose
Wax Bag
Access Panel
Screw
Step 7
Verify that the WAX BAG PROTECTIVE LINER is open and ready to receive the new WAX BAG. Remove the new
WAX BAG from its packaging and carefully insert the WAX BAG into the access hole as shown with the WAX BAG
HOSE facing the rear of the unit.
Step 8
For first time installations, remove the two WINGNUTS located just inside the access hole.
Step 9
Align the mounting holes located in the WAX BAG FLANGE with the two WINGNUT STUDS. Secure the WAX BAG
with the two WINGNUTS.
CAUTION: BE CAREFUL NOT TO RIP OR OTHERWISE DAMAGE THE WAX BAG ON THE WINGNUT STUDS
OR WINGNUTS WHEN INSERTING NEW WAX BAG.
15
Section III
Step 5
Remove the two WINGNUTS located just inside the access hole.
Life Fitness Models 9100, 9500HR, 9700HR, and 9700HR w/Decline Treadmills
How To… Replace the Wax Bag (Continued)
Step 10
Slide the HOSE CLAMP over the end of the WAX BAG OUTLET HOSE. Position the
HOSE CLAMP approximately three inches from the end of the WAX BAG HOSE and
engage the HOSE CLAMP onto the WAX BAG HOSE.
Engage
Release
Step 11
Cut ½” off the plugged end of the WAX BAG HOSE and slide the WAX BAG HOSE
onto the BARBED NOZZLE on the WAX PUMP INLET HOSE. Be sure to fully seat the
WAX BAG HOSE. Release the HOSE CLAMP.
Step 12
Replace the WAX BAG ACCESS PANEL and secure with the two WAX BAG ACCESS PANEL SCREWS.
FIRST TIME INSTALLATION IS NOW COMPLETE.
IF WAX BAG IS BEING REPLACED, CONTINUE THROUGH STEP 21.
Step 13
Reset the WAX FILL STATISTICS as follows.
Step 14
Press and hold the PAUSE KEY. While holding the PAUSE KEY press the CLEAR KEY twice. Continue to hold the
PAUSE KEY until the DISPLAY reads “ SERVICE MENU.”
Step 15
Press any UP ARROW KEY until you see “MAINTENANCE” in the DISPLAY. Then press ENTER. The DISPLAY
will begin to scroll automatically through available options.
Step 16
When the DISPLAY reads “REFILL WAXER SYSTEM”, press the ENTER KEY. The DISPLAY will read “REPAIR
LOGGED.”
Step 17
Wax replacement is now complete.
Step 18
To verify that the wax refill has been completed correctly, press the CLEAR KEY once to return to the “SERVICE
MENU.”
Step 19
Using any of the UP ARROW KEYS, scroll until “INFORMATION” is displayed. Then press ENTER.
Step 20
Press any of the UP ARROW KEYS until “WAX MOTOR INFO” appears in the DISPLAY. Press ENTER and verify
that the DISPLAY reads “100/100 FULL.”
Step 21
Press the CLEAR KEY three times to exit diagnostic.
16
Life Fitness Models 9100, 9500HR, 9700HR, and 9700HR w/Decline Treadmills
How To... Replace The Lift Motor
Tools Required: Phillips screwdriver, socket set, pliers
Step 1
Turn the unit power OFF at the switch, then unplug the
line cord at the wall outlet.
Step 2
Remove four phillip screws from the MOTOR COVER,
and lift off the MOTOR COVER.
Step 3
Cut-off cable ties.
9/16” Bolt
Step 4
Disconnect the 4-PIN CONNECTOR from the WAX
PCB.
Step 5
Disconnect LIFT MOTOR ground wire from the POWER
MODULE.
Step 7
Remove the 3/8-16” mounting bolt and nut from the LIFT
FRAME.
Clip
Step 8
Remove the clip and pin from the lift motor, and remove the lift
motor.
Step 9
To install the lift motor, make sure that the lift
carriage is activating the level switch on 91/95, and
on the 97 the decline switch. If necessary adjust
THREADED SHAFT TUBE until the mounting bolt
holes are 13-3/4” apart or aligned with the carrier and
lift motor.
Section III
Step 6
Remove the RIGHT ACCESS PANEL on the right side
of the unit, and tilt the unit over on its right side.
Pin
Threaded
Shaft Tube
Lift Motor
Threaded
Shaft Tube
(Turn to adjust
to specified
length)
Lift Motor
Step 10
Refer to diagnostics section to log maintenance
repair of the lift motor.
17
Life Fitness Models 9100, 9500HR, 9700HR, and 9700HR w/Decline Treadmills
How To... Replace The Motor Controller
Tools Required: Phillips Screwdriver
Step 1
The new controller doesn’t have logged stats. Log in
maintenance diagnostic to store in treadmill frame tag
accumulated stats.
Wax Lift Board
Motor Controller
Step 2
Turn the unit power OFF at the switch, then unplug the
line cord at the wall outlet.
Step 3
Remove four phillip screws from the MOTOR COVER and
four phillip screws from the FRONT COVER, then remove
the motor and front covers.
Step 4
Cut the cable ties and disconnect the 6-Pin and 3-Pin
Connector and Power Module Cord from the Motor
Controller.
Step 5
Disconnect all connectors from the Wax Lift Board.
Step 6
Remove two phillip screws securing the controller at the base of the unit and two phillip screws at the front of the
unit. Lift the motor controller out of the unit.
Step 7
With the controller out, remove three phillip screws securing the Wax Lift Board, and remove the wax lift board from
the controller.
Step 8
Install wax lift board on new Motor Controller, and install the motor controller back in the unit in the reverse order.
Step 9
Refer to diagnostics section to log maintenance repair of the lift motor.
18
Life Fitness Models 9100, 9500HR, 9700HR, and 9700HR w/Decline Treadmills
How To... Replace The WAX and LIFT PCB
Tools Required: Phillips Screwdriver
Step 1
Turn the unit power OFF at the switch,
then unplug the line cord at the wall
outlet.
Motor Cover
Step 2
Remove the MOTOR COVER and
FRONT COVER.
Wax/Lift PCB
Step 3
Disconnect all connectors from the
Wax Lift Board.
Step 4
Remove three phillips mounting
screws from the PCB and remove.
Front
Cover
Motor Controller
Section III
Step 5
Install the new PCB in the reverse order.
Step 6
Refer to diagnostics section to log maintenance repair of the lift PCB.
19
Life Fitness Models 9100, 9500HR, 9700HR, and 9700HR w/Decline Treadmills
How To... Replace The Frame Board
Tools Required: Socket Set and Phillips Screwdriver
Step 1
Turn the unit power OFF at the switch, then unplug the
line cord at the wall outlet.
Step 2
Remove the MOTOR COVER.
Step 3
Disconnect the connector at the FRAME BOARD.
Step 4
Detach four(4) spring clips securing the FRAME BOARD
from inside the left frame and lift out.
Step 5
Install new FRAME BOARD in reverse order.
20
Life Fitness Models 9100, 9500HR, 9700HR, and 9700HR w/Decline Treadmills
How To... Replace The Leveler Assembly
Tools Required: Phillips Screwdriver, Wrench and Socket Set
Step 1
Turn the unit power OFF at the switch, then unplug
the line cord at the wall outlet.
Step 2
Remove four 3/8-16 bolts from the LEVELER
ASSEMBLY and remove the leveler.
NOTE: Observe the orientation of hole pattern.
Step 3
Install new leveler assembly in reverse order.
Right Access Panel
Leveler Assembly
Section III
Step 4
After placing the unit where it will be used, check its
stability. If there is even a slight rocking motion or
the unit is not stable, determine which stabilizing
leg is not resting on the floor. To adjust, loosen the
Jam Nut and turn the Stabilizing Leg until the
rocking motion ceases and both stabilizing legs rest
firmly on the floor. Retighten the Jam Nut.
NOTE: It is extremely important that the
stabilizing leg be correctly adjusted for proper
operation. An unbalanced unit may cause
striding belt misalignment. Refer to the Operator
Manual for complete instructions.
Jam
Nut
Stabilizing
Leg
21
Life Fitness Models 9100, 9500HR, 9700HR, and 9700HR w/Decline Treadmills
How To... Replace The Accessory Cup Holders
Tools Required: N/A
Step 1
Depress the CUP HOLDER TABS located behind the
DISPLAY CONSOLE and remove the cup holders.
Step 2
Install new CUP HOLDERS in reverse order. Snap cup
holder firmly into the display console.
22
Cup Holders
Life Fitness Models 9100, 9500HR, 9700HR, and 9700HR w/Decline Treadmills
How To... Replace The Line Cord
Tools Required: Phillips Screwdriver
Step 1
Turn the unit power OFF at the switch, then unplug the
line cord at the wall outlet.
NOTE: If the unit is disabled (damaged electrical
cord), then position the unit on its right side. Make
sure that to remove the right access cover to avoid
damaging it.
Step 2
Raise the front of the unit to access LINE CORD clamp.
Note the routing of the line cord.
Section III
Step 3
Remove two screws and clamp, and replace the LINE
CORD and clamp.
Clamp
Line Cord
23
Life Fitness Models 9100, 9500HR, 9700HR, and 9700HR w/Decline Treadmills
How To... Replace The Display Board PCB
Tools Required: Phillips Screwdriver
Step 1
Turn the unit power OFF at the switch, then unplug
the line cord at the wall outlet.
Display Console
Display Board PCB
Step 2
Remove eight screws from the back of the console.
Step 3
Remove the back cover.
Back Cover
Step 4
Disconnect all cable connectors.
Step 5
Remove eight screws from the DISPLAY BOARD
PCB, and lift the display board PCB.
Step 6
Install new display board in reverse order. Take care not to over-tighten the display board PCB mounting screws.
Step 7
Replace the back cover.
Step 8
Refer to diagnostics section to log maintenance repair of the display board PCB.
24
Life Fitness Models 9100, 9500HR, 9700HR, and 9700HR w/Decline Treadmills
How To... Replace The Stop Switch
Tools Required: Phillips screwdriver, Flat Blade Screwdriver, Adjustable Wench
Step 1
Turn the unit power OFF at the switch, then unplug
the line cord at the wall outlet.
Stop Button
Step 2
Remove four(4) screws from the LOWER BACK
COVER.
Nut
Step 4
Remove the STOP SWITCH.
Step 5
Install new stop switch in reverse order.
Step 6
Refer to diagnostics section to log maintenance
repair of the stop switch.
Lock Washer
Lower Back
Cover
Section III
Step 3
Remove the FAST-ON connected to the microswitch.
25
Life Fitness Models 9100, 9500HR, 9700HR, and 9700HR w/Decline Treadmills
How To... Replace The Telemetry Receiver and Jack
Tools Required: Phillips Screwdriver
Step 1
Turn the unit power OFF at the switch, then
unplug the line cord at the wall outlet.
Step 2
Remove eight(8) screws from BACK COVER, and
remove the cover.
Back Cover
Step 3
Remove four(4) screws from the LOWER BACK
COVER, and remove the cover.
Step 4
Disconnect the 3 Pin connector from the STOP
SWITCH and DISPLAY BOARD.
Telemetry Receiver
Step 5
Remove the TELEMETRY RECEIVER.
Step 6
Unscrew TELEMETRY JACK from the SHIELD
TUBE.
Lower
Back
Cover
Step 7
Install new TELEMETRY RECEIVER and JACK in reverse order. Make sure to orientate the telemetry receiver
properly. It has to be horizontal within the horizontal plane of its housing. See illustration.
Back of Console
Foam
Match Receiver
to its mounting
area.
26
Life Fitness Models 9100, 9500HR, 9700HR, and 9700HR w/Decline Treadmills
How To... Replace The Main Wire Harness
Tools Required:
Step 1
Turn the unit power OFF at the switch,
then unplug the line cord at the wall
outlet.
Step 2
Remove eight screws from the back of
the console.
Step 3
Disconnect all cable connectors from
the circuit board.
Step 5
Remove the left TUBE EXTENSION
from the cables, routing out the cables
from the tube.
Step 6
Section III
Step 4
Remove six mounting screws securing
the display console to the TUBE
EXTENSIONS, then remove the
display console.
Cable
Routing
Remove the eight screws from the HANDLE
BAR, and remove the handle bar.
Step 7
Remove the MOTOR SHIELD and disconnect
the MAIN WIRING HARNESS CONNECTOR
from the WAX LIFT BOARD.
Step 8
Remove three mounting bolts at the base of the
left handrail support.
10-P
Connector
Step 9
Lift off the left handrail while routing out the
cable from the frame.
Step 10
Remove the LEFT HANDLE BAR END CAP and
route out the MAIN WIRING HARNESS and
discard.
Step 11
Install new wire harness in reverse order. With
the left handle bar end cap removed, first route
the cable out the end of the handle bar, then reroute back.
27
Life Fitness Models 9100, 9500HR, 9700HR, and 9700HR w/Decline Treadmills
How To... Replace The Display Console Control Panel
Tools Required: Torx Wrench Set, Phillips Screwdriver
Step 1
Turn the unit power OFF at the switch, then
unplug the line cord at the wall outlet.
Step 2
Remove eight(8) screws from the BACK
COVER.
Display Console
Back Cover
Step 3
Disconnect all cable connectors from the
DISPLAY BOARD.
Step 4
Remove six(6) console mounting screws from
the back of the console, and lift off the
DISPLAY CONSOLE.
Step 5
Install new display console in reverse order.
Step 6
Refer to diagnostics section to log maintenance
repair of the display console control panel.
Display
Console
Display
Console
Screws
28
Life Fitness Models 9100, 9500HR, 9700HR, and 9700HR w/Decline Treadmills
How To... Replace The Overlay Bezel
Tools Required: Phillips Screwdriver, Flat Blade Screwdriver
Step 1
Turn the unit power OFF at the switch, then
unplug the line cord at the wall outlet.
These 2 screws are
not removed to hold
the display board in place
Step 2
Remove eight screws from the back of the
console.
Step 3
Disconnect all cable connectors from the
CIRCUIT BOARD.
Step 4
Remove the outer six screws around the
PCB board, and remove OVERLAY BEZEL..
Step 5
Disconnect the RIBBON CABLE and lift off the OVERLAY BEZEL.
Step 6
Make sure adhesive back is removed from seal strip along the top of the new overlay bezel.
Step 7
Install new OVERLAY BEZEL in reverse order. Press along the top edge of the new overlay bezel to properly seat
the seal strip.
Step 8
Refer to diagnostics section to log maintenance repair of the overlay bezel.
29
Section III
NOTE: Two(2) screws remain to hold
display PCB in place.
Life Fitness Models 9100, 9500HR, 9700HR, and 9700HR w/Decline Treadmills
How To... Replace The Smart Stop for Models TR9500 and TR9700 only
Tools Required: Phillips Screwdriver
Step 1
Turn the unit power OFF at the switch, then unplug
the line cord at the wall outlet.
Step 2
Remove two screws from the PCB COVER between
the handle bars.
Step 3
Disconnect 4 Pin Connector from the PCB board and
discard the board.
Step 4
Install new PCB board in reverse order.
30
Smart Stop
Life Fitness Models 9100, 9500HR, 9700HR, and 9700HR w/Decline Treadmills
How To... Replace The Handlebar Assembly
Tools Required: Phillips Screwdriver
Step 1
Turn the unit power OFF at the switch, then
unplug the line cord at the wall outlet.
Step 2 (Life Pulse Model Only)
Remove eight(8) screws from the BACK
COVER.
Handlebar Assembly
Display Console
Assembly
Step 3 (Life Pulse Model Only)
Disconnect all cable connectors from the
DISPLAY BOARD.
Step 4 (Life Pulse Model Only)
Remove four(4) console mounting screws
from the back of the console, and lift off the
DISPLAY CONSOLE ASSEMBLY.
Step 6
Remove the motor cover.
Section III
Step 5 (Life Pulse Model Only)
Remove the two screws securing the
EXTENSION ARM and guide wire harnesses
out from tube.
Life Pulse Model Shown
Step 7
Loosen (do not remove), six(6) 1/2-13 handrail mounting screws.
Step 8
Remove the (8)eight screws securing the HANDLEBAR
ASSEMBLY and discard. Note: Carefully guide the wire
harness out from the tube on the Life Pulse Models.
Step 9
Install new handlebar assembly in reverse order.
31
Life Fitness Models 9100, 9500HR, 9700HR, and 9700HR w/Decline Treadmills
How To...REMOVE AND REPLACE THE DIGITAL HEART RATE SENSORS
Tools Required: Phillips screwdriver, standard screwdriver, 5/64” hex key wrench
NOTE: The kit you have received will come equipped with either 5/64” hex key button head screws or
Phillips head pan screws. Either can be used for sensor replacement procedures on all models of Life
Fitness exercise equipment equipped with Lifepulse digital heart rate sensors. The treadmill handlebar
shown in the photographs are for demonstration purposes only. Replacement procedures as listed will
remain the same for all applications. ALWAYS REPLACE BOTH SETS OF SENSORS PROVIDED IN THE KIT.
Removing the existing Lifepulse digital heart rate sensors:
Step 1
Turn the power OFF at the switch, then unplug the line cord at the wall outlet.
Step 2
Using a standard flat screwdriver, pry off the stainless steel sensor furthest
away from you as if you were the user gripping the Lifepulse heart rate
monitoring sensors (if screw access holes are already provided in the sensor
you wish to replace, simply remove the two screws and continue to Step 2).
This will be the sensor on which your fingertips rest during use. This sensor
will be referred to as the “ground sensor” (black or green wire) hereafter in
these instructions. The sensor closest to the user, on which the palm rests,
will be referred to as the “signal output sensor” (red or white wire).
Step 3
Pull the ground sensor gently away from the molded plastic housing,
to which it was attached, to reveal a wire harness (black or green
wire) with a Faston connector attached to the back of the sensor.
Unplug the Faston connector from the ground sensor.
Step 4
Loosen and remove the two screws securing the two sensor molded
plastic housings to each other on the assembly. Lift the molded
plastic housings away from each other and unplug the Faston
connector attached to the back of the signal output sensor (red or
white wire).
32
Life Fitness Models 9100, 9500HR, 9700HR, and 9700HR w/Decline Treadmills
How To...REMOVE AND REPLACE THE DIGITAL HEART RATE SENSORS
Tools Required: Phillips screwdriver, standard screwdriver, 5/64” hex key wrench
Step 5
Plug the Faston connector (red or white wire) to the back of the new, pre-assembled signal output sensor
assembly (this will be the assembly without the screw access holes in the sensor) and locate it into position. This
sensor will be the sensor on which the palm rests during use.
Step 6
Plug the Faston connector (black or green wire) to the back of the new, pre-assembled ground sensor assembly
(this will be the assembly with the screw access holes in the sensor) and locate it into position. This is the sensor on
which the fingertips rest during use.
Section III
Step 7
Install the two screws through the access holes in the ground sensor and torque to 5 - 7 In. Lb. .
33
Life Fitness Models 9100, 9500HR, 9700HR, and 9700HR w/Decline Treadmills
How To...CLEAN THE WAX NOZZLE
Tools Required: Phillips screwdriver, medium-to-soft bristle brush, and hot water
Step 1
Turn the unit power OFF at the switch, then unplug
the line cord at the wall outlet.
Step 2
Using a Phillips screwdriver, remove the two(2)
screws from the access panel on the right side of the
unit.
Wax Nozzle
Step 3
Carefully reach inside the unit and locate the wax
nozzle. Push the tip of the wax nozzle inward and
rotate the nozzle 1/4 turn in a clockwise rotation and
remove the nozzle. Note the two(2) flats on the wax
nozzle. These flats must be at a horizontal plane
upon final installation.
Access
Cover
Cover
Screws
Step 4
Place the nozzle in a container of
hot water and let sit for at least 10
minutes or when water has cooled
enough to the touch.
Step 5
Remove the nozzle from the water
and inspect for cleanliness. If
necessary, scrub-clean with a
medium-to-soft bristle brush to
remove any wax residue from
outside and inside the wax nozzle.
Nozzle Flats must
be in a Horizontal
plan for final assembly
To Remove Rotate ¼ turn
clockwise
Step 6
Dry the nozzle off with a lint-free
rag.
Step 7
Reinstall the wax nozzle into its
holder and while pressing in, rotate
the nozzle 1/4 turn counterclockwise.
Wax Nozzle
Holder
To Install Rotate ¼ turn
counter-clockwise
Push in and
rotate for
installation
or removal
Wax Nozzle
IMPORTANT: MAKE ABSOLUTELY SURE, THAT UPON FINAL ASSEMBLY, THE FLATS ON THE WAX
NOZZLE ARE POSITIONED IN A HORIZONTAL PLANE. FAILURE TO DO SO WILL RESULT IN IMPROPER
WAX APPLICATION.
34
Life Fitness Models 9100, 9500HR, 9700HR, and 9700HR w/Decline Treadmills
Section III
NOTES:
35
Life Fitness Models 9100, 9500HR, 9700HR, and 9700HR w/Decline Treadmills
SECTION IV
Section IV
ELECTRONIC OVERVIEW
AND
WIRING BLOCK DIAGRAM
1
Life Fitness Models 9100, 9500HR, 9700HR, and 9700HR w/Decline Treadmills
ELECTRONIC OVERVIEW - DISPLAY CONSOLE PCB
Functional Description
The Display Console PCB is an intelligent display and keypad interface. It works in conjunction with the Wax/Lift
and Motor Control Modules. The console board reads the keypad input port to check for user inputs, updates,
refreshes the status LEDs, data display, profile display matrix, reads analog voltages from the Lifepulse circuitry,
and communicates with the other subsystem modules.
P4
P8
P1
P1 P11 P5 P9 P10
P2
P6
P7
Connector and Pin Functions
Connector
Location
Pin
Functional Description
P1 is a 10 pin connector that
connects to the Wax/Lift PCB
1
2
3
4
5
6
7
8
9
10
GND - ground
GND - ground
+8Vdc - LEDs
+8Vdc - LEDs
Reed Sense - Relay No. 1
TXD – transmit data
RXD – data received
Bus_Req (bus request)
+12Vdc – emergency stop switch
Relay Enable
P2 is a 12 pin ribbon connector
that connects to the Display
Console Overlay
1
2
3
4
5
6
7
8
9
10
11
12
ESD ground
Switch strobe 0
Switch return 0
Switch strobe 1
Switch return 1
Switch strobe 2
Switch return 2
Switch strobe 3
Switch return 3
Switch strobe 4
Switch return 4
ESD ground
2
Life Fitness Models 9100, 9500HR, 9700HR, and 9700HR w/Decline Treadmills
ELECTRONIC OVERVIEW - DISPLAY CONSOLE PCB
Location
Pin
Functional Description
P3 is a 10 pin ribbon connector
that connects to the Display
Console Overlay
1
2
3
4
5
6
7
8
9
10
ESD ground
Switch return 6
Switch strobe 2
Switch return 3
Switch strobe 1
Switch strobe 4
Switch return 5
Switch return 1
Switch return 7
ESD ground
P4 is an 18 pin connector that
connects to the Remote
Console PCB (TR9700 only)
1
2
3
4
5
6
7
8
9
10
11
12
13
14
15
16
17
18
D15 - ‘DP’ Segment Data
D14 - ‘G’ Segment Data
D13 - ‘F’ Segment Data
D12 - ‘E’ Segment Data
D11 - ‘D’ Segment Data
D10 - ‘C’ Segment Data
D9 - ‘B’ Segment Data
D8 - ‘A’ Segment Data
ST5 - Digit Strobe 5
ST6 - Digit Strobe 6
ST7 - Digit Strobe 7
Key
ST8 - Digit Strobe 8
ST9 - Digit Strobe 9
ST10 - Digit Strobe 10
ST11 - Digit Strobe 11
+8Vdc (Not used)
Ground (Not used)
P5 is a 10 pin connector that
connects to the Serial
Peripheral Interface serial
communications port
1
2
3
4
5
6
7
8
9
10
MISO - master-in slave-out
MOSI - master-out slave-in
SCK - serial clock
N/U - not use
GND - ground
PCS1 - peripheral chip select 1
PCS2 - peripheral chip select 2
PCS3 - peripheral chip select 3
Open Collector Output
+8Vdc
P6 is a 6 pin connector that
connects to the Polar Receiver
and end of Session switch
1
2
3
4
5
6
+5Vdc
Polar signal
Ground
Stop Switch +
Stop Switch N/U
Section IV
Connector
3
Life Fitness Models 9100, 9500HR, 9700HR, and 9700HR w/Decline Treadmills
ELECTRONIC OVERVIEW - DISPLAY CONSOLE PCB
Connector
Location
Pin
Functional Description
P7 is a 4 pin connector that
connects to the Lifepulse
electrodes
1
2
3
4
Left +
Left Right Right +
P8 is a 4 pin connector that
connects to the Smart Stop
module
1
2
3
4
Smart Stop Signal
Smart Stop Enable
+8Vdc
Ground
P9 and P10 are 8 pin
connectors that connect to the
CSAFE and Cardio Theater
interface
1
2
3
4
5
6
7
8
N/U - not used
N/U - not used
Receive Data
Transmit Data
+8 Vdc
CTS
Ground
N/U - not used
P11 is a 2 pin connector that
connects to the Emergency
Stop Switch
1
2
Switch (-)
Switch +12Vdc
P14 is a 10 pin connector that
connects to the Background
Debug Mode Signals
1
2
3
4
5
6
7
8
9
10
/DS
/BERR
Ground
/BKPT /DSCLK
Ground
FREEZE/QUOT
/RESET
IPIPE1/DS1
+5 Vdc
IPIPE0/DS0
4
Life Fitness Models 9100, 9500HR, 9700HR, and 9700HR w/Decline Treadmills
ELECTRONIC OVERVIEW – MOTOR CONTROLLER PCB
Functional Description
The Motor Controller PCB is a
single phase AC input PWM
variable frequency three(3)
phase AC output motor
controller. Specifically the
controller input is configured
as a full wave bridge for 230
volt AC input, and as a voltage
doubler for 120 volt AC input.
The resultant DC bus voltage
is processed through a
microprocessor controlled six
switch DC to AC inverter. The
output is three phase power
with pulse width modulation of
both voltage and frequency.
P1
P3
JW1
JW7
P2
JW6
P5
P6
P4
SERVICE
LED
LEDs, Test Points, and Jumpers
Description
Location
Function
Service LED
LED1
LED2
LED3
5 Vdc
14 Vdc
Service LED
Test Point (TP)
TP1
TP2
TP3
TP4
TP5
14 Vdc supplies relay power
5 Vdc system voltage
Ground (GND)
EPROM default
Volts (motor parameters)
Jumper (JW)
JW1
JW6
Serial interface (IN)
Clears continuous error messages and displays
EPPROM data (OUT)
Determines the wave form applied to the motor (IN)
JW7
Section IV
NOTE: The motor controller
design utilizes a ‘hot’ supply.
TP4
This means the entire board
will be at elevated potentials
relative to earth ground any
time the circuit is active. All
LED1 TP1 LED2 TP2 TP3 TP5
measurements should be
conducted with isolated
equipment. Additionally there
is considerable energy stored
within the circuitry for up to 90 seconds after power is removed from the circuit. Personnel working with this
equipment should be trained and adequate precautions should be used whenever working with this equipment.
5
Life Fitness Models 9100, 9500HR, 9700HR, and 9700HR w/Decline Treadmills
ELECTRONIC OVERVIEW – MOTOR CONTROLLER PCB
Connector and Pin Functions
Connector
Location
Pin
Functional Description
P1 is a 3 pin connector that
connects to AC inputs
1
2
3
120/230 Vac input line
120 VAC neutral/230Vac return
Earth ground connection
P2 is a 6 pin connector that
connects to the Output Motor
1
2
3
4
5
6
Earth ground connection.
Motor phase W
Motor phase V
Motor phase U
Power connection: Motor thermal cutout
Power connection: Motor thermal cutout
P3 is a 6 pin connector that
connects to the Control Inputs
1
2
3
4
5
6
8VDC
Ground (Console circuit ground)
Emergency stop switch
Bus request
Data receive
Data transmit
P4 is a 4 pin connector that
connects to the Power Factor
Controller or capacitor board
1
2
3
4
Volt positive (PFC in)
Ground for motor controller circuit
Voltage doubler neutral - no connection for 230Vac or PFC
Volt positive (PFC out)
P5 is a 3 pin connector that
connects to the RPM Input
1
2
3
Ground for Motor Controller circuit
5VDC (VCC)
Speed sense input
P6 is a 10 pin connector that
connects to the Diagnostic
Header Inputs
1
2
3
4
5
6
7
8
9
10
Serial output
Serial input
Secure input to 68HC08 processor
Ground for Motor Controller circuit
Bi-directional serial line
PTC4 input
Programming voltage input
DC voltage (+VD)
5VDC (VCC)
5VDC (VCC)
Note: Pins 1 and 6 are located
closest to P5 on the PCB.
6
Life Fitness Models 9100, 9500HR, 9700HR, and 9700HR w/Decline Treadmills
ELECTRONIC OVERVIEW – POWER FACTOR CONTROL PCB
Functional Description
The Power Factor Control PCB
was designed to improve the
efficiency of power. It is used on
the TR9700HR models, and
Japanese 100, 200V TR9100 and
TR9500.
P1
Red LEDs indicate that power is ON
Connector and Pin Functions
P1 is a 4 pin connector that
connects to Motor Controller
Location
Pin
1
2
3
4
Functional Description
PFC in
Ground for Motor Controller Circuit
NC
PFC out
Section IV
Connector
7
Life Fitness Models 9100, 9500HR, 9700HR, and 9700HR w/Decline Treadmills
ELECTRONIC OVERVIEW - WAX LIFT PCB
Functional Description
The Wax /Lift /Power Supply Board acts as a
junction board which interfaces with the:
SERVICE LEDs
P7
P5
P2
TP6
•
•
•
•
•
Display Console,
Frame Tag,
Home Switch,
Lift Motor,
Wax Motor, and
Power Supply
•
P3
TP5
P4
TP11
TP4
TP8
P8
Tp12
P1
Tp10
LED7
LEDs, Relays, Test Points, and
Jumpers
Description
Location
Service LED
TP3
TP2
LED8
TP1
TP7
TP9
JW1 JW2
Function
LED2
LED3
LED4
LED5
LED6
LED7
LED8
Flashes when the control processor and the main processor
are running
ON when lift motor is going up
ON when lift motor is going down
ON when bottom limit switch is engaged
ON when negative switch is closed
Flashes when Control UP is running
Green indicates that +12V output is ON
Red indicates that +8V output is ON
Relay Switch
Relay 1 and 2
Relay 3 (12Vdc coil)
Relay 4 (12Vdc coil):
Drives Lift Motor
Drives Wax Pump
Relay 4 supplies AC input to the Wax/Lift Circuit
Test Point (TP)
TP1
TP2
TP3
TP4
TP5
TP6
TP7
TP8
TP9
TP10
TP11
TP12
Ground (GND)
8vDC
12vDC
5vDC
Line voltage (neutral)
Line voltage (hot wire)
5vDC (voltage regulator)
Line frequency test (wax motor must be OFF)
N/U - not used
Ground (GND)
Rectifier output (POS)
Rectifier output (NEG)
Jumper (JW)
JW1
JW2
One(1) wire system
Two(2) wire system
8
LED1
P9
Life Fitness Models 9100, 9500HR, 9700HR, and 9700HR w/Decline Treadmills
ELECTRONIC OVERVIEW - WAX LIFT PCB
Connector
Location
Pin
P1 is a 10 pin connector that
connects to the Console
1
2
3
4
5
6
7
8
9
10
Functional Description
Ground
Ground
+8VDC
+8VDC
NC
RXD
TXD
BUS request
+12Vdc
Pin relay
P2 is a 4 pin connector that
connects to the Lift Motor
1
2
3
4
0 position
Ground
Bottom
Ground
P3 is a 3 pin connector that
is not applicable
1
2
3
N/U - not used
N/U - not used
N/U - not used
P4 is a 8 pin connector that
connects to the Frame Tag
PCB
1
2
3
4
5
6
7
8
+5VDC (VCC)
Ground
MISO
MOSI
SCK
NC
CS
CE
Section IV
Connector and Pin Functions
9
Life Fitness Models 9100, 9500HR, 9700HR, and 9700HR w/Decline Treadmills
ELECTRONIC OVERVIEW - WAX LIFT PCB
Connector
P5 is a 3 pin connector that
connects to the AC Input Power
from Entry Module
Location
Pin
1
2
3
Functional Description
Hot (120Vac)
Neutral
Ground
P6 is a 2 pin connector that
connects to the Wax Pump
1
2
Neutral
Hot (120 Vac)
P7 is a 4 pin connector that
connects to the Lift Motor
1
2
3
4
Down
Hot (120Vac)
Up
Ground
P8 is a 5 pin connector that
connects to the
Life Link Board
1
2
3
4
5
+8Vdc
Ground
Bus request
Receive data
Transmit data
P9 is a 6 pin connector that
connects to the Motor Control
Board
1
2
3
4
5
6
+8Vdc
Ground
Pin Relay
Bus Request
Receive data
Transmit data
10
Life Fitness Models 9100, 9500HR, 9700HR, and 9700HR w/Decline Treadmills
ELECTRONIC OVERVIEW – SMART STOP PCB
Functional Description
The Smart Stop PCB, is designed to sense the presence
of a user on the treadmill deck. Infrared light is transmitted
twice a second. It is reflected by the user and then is
detected by the receiver module. The treadmill console
controls the Enable pulse and reads the output of the
receiver module.
P1
Connector and Pin Functions
P1 is a 4 pin connector that
connects to the Display PCB
Location
Pin
1
2
3
4
Functional Description
Ground
+8Vdc
/Enable Input Active
U_Detect Output Pulsed Active Low
Section IV
Connector
11
Life Fitness Models 9100, 9500HR, 9700HR, and 9700HR w/Decline Treadmills
ELECTRONIC OVERVIEW – FRAME TAG PCB
Functional Description
The Frame Tag board identifies the unit track from date of
manufacture and provides a place to record information
significant to the history of the unit.
Connector
P1
Connector and Pin Functions
Connector
P1 is an 8 pin connector that
connects to the Frame Tag
PCB
12
Location
Pin
1
2
3
4
5
6
7
8
Functional Description
VCC - +5 Vdc
GND - ground
MISO - master-in slave-out
MISI - master-in slave-in
SCK - serial clock
NU - not used
CS - chip select
CE - chip enabled
Life Fitness Models 9100, 9500HR, 9700HR, and 9700HR w/Decline Treadmills
Section IV
ELECTRONIC OVERVIEW – BLOCK DIAGRAM
13
Life Fitness Models 9100, 9500HR, 9700HR, and 9700HR w/Decline Treadmills
NOTES:
14
Life Fitness Models 9100, 9500HR, 9700HR, and 9700HR w/Decline Treadmills
SECTION V
Section V
PARTS INDENTIFICATION
1
Life Fitness Models 9100, 9500HR, 9700HR, and 9700HR w/Decline Treadmills
Model and Serial Number Identification
Serial Number
Location
2
Life Fitness Models 9100
TR91-0100-34
Serial number 379000 and up
Overlay Tray Assembly
AK58-00063-0001 Eng/Met
AK58-00063-0003 Ger/Met
AK58-00063-0004 Spn/Met
AK58-00063-0006 Jap/Met
AK58-00063-0007 Frn/Met
AK58-00063-0008 Itl/Met
AK58-00063-0009 Dut/Met
AK58-00063-0010 Por/Met
Console Assembly
AK58-00057-0001
Console Rear Cover
0K58-01009-0000
Decal
0K58-01129-0000
Console Rear Cover Screws(8)
0017-00101-1288
Stop Switch
Workout Decal
0K58-01123-0001 Eng/Met
Zone Decal
0K58-01155-0001 Eng/Met
Stop Key w/Tether
AK58-00091-0000
Decal
0K58-01140-0001
Cup Holder
0K58-01018-0000
Handlebar Assembly
0k58-01051-0000
Handrail - RT
AK58-00017-0001
Decal
0K58-01135-0001
End Cap
0k43-01025-0000
Front Cover
0K58-01016-0000
Front Cover Screws(4)
0017-00101-0658
Handrail - LT
AK58-00017-0002
Decal
0K58-01135-0001
End Cap - LT
0K58-01070-0002
End Cap Screws(2)
0017-00101-1060
Motor Cover
AK58-00095-0000
Motor Cover Screws(4)
0017-00101-1621
Striding Belt
0K58-01180-0000
Deck
0K58-01091-0000
Deck Screws(4)
0017-00101-1299
Roller Guard - LT
0K58-01142-0002
Roller Guard -RT
0K58-01142-0001
End Cap - RT
0K58-01070-0001
End Cap Screws(2)
0017-00101-1060
Access Panel
0K58-01017-0000
Access Panel Screws(4)
0017-00101-0658
3
Life Fitness Models 9100
TR91-0100-34
Serial number 379000 and up
Wax/Lift PCB
A084-92182-A001
A084-92182-A002(220/50)
Lift Motor
0K58-01062-0000
RPM Sensor
AK58-00073-0000
Frame Tag PCB
B084-92187-D000
Frame Tag Cable
AK58-00030-0000
Drive Motor Assembly
AK58-00054-0000
Idler Assembly
AK58-00053-0000
Motor Controller
AK58-00101-0003 Dom.
AK58-00101-0004 Int.
Motor Controller Cable
AK58-00042-0000 Dom.
AK58-00042-0001 Int.
Drive Belt
0K58-01114-0000
Front Roller
AK58-00066-0000
TECS-PAK (8)
0K40-01026-0002
Tinnerman Clip
0017-00103-0198
Anti-Skid Pad
0K58-01101-0000
Tinsel
0K58-01102-0001
Wax Nozzle
0017-00009-0842
Rear Roller
0K58-01002-0000
Power Box
AK58-00049-0000 120/60
AK58-00049-0001 240/50+
AK58-00049-0002 220-230/50-60
AK58-00049-0005 100/50
AK58-00049-0006 200/50
Wax Kit
GK58-00002-0002
Protective Liner
0K58-01080-0000
Wing Nut (2)
0017-00103-0284
Wax Pump
0K58-01074-0000
Wax Cable
AK58-00029-0000
Axis1
Line Cord
0017-00003-0779 Dom.
0017-00003-0781 220/60
0017-00003-0696 Cont.
0017-00003-0890 UK.
Retainer Bracket
0K58-01065-0000
4
Wheel (2)
0K58-01071-0000
Limit Switch
0017-00032-0195
Limit Switch Cable
AK58-00027-0000
Leveler Assembly
AK58-00052-0000
Foot Leveler
0K58-01110-0000
Life Fitness Models 9100
TR91-0100-34
Serial number 379000 and up
Console PCB Multi.
A084-92184-A002
Front Console Shell
0K58-01008-0001
Hardware Package
AK58-00070-0000
Console Cable
AK58-00034-0000
Polar Receiver
SK40-00045-0001
Polar/Stop Cable
AK58-00033-0000
Stop Key Cable Assembly
AK58-00036-0001
Switch Cover w/Tether
AK58-00096-0000
Switch Cover
0K58-01087-0000
Switch Cover Screws
0017-00101-0776
5
Life Fitness Models 9500HR
TR95-0100-34
Serial number 320000 and up
Stop Key w/Tether
AK58-00091-0000
Decal
0K58-01140-0001
Console Assembly
AK58-00056-0001
Console Rear Cover
0K58-01009-0000
Decal
0K58-01129-0000
Console Rear Cover Screws
0017-00101-1288
Zone Decal Eng/Met
0K58-01127-0001
Cup Holder
0K58-01018-0000
Stop Switch
Overlay Tray Assembly
AK58-00062-0001 Eng/Met
AK58-00062-0003 Ger/Met
AK58-00062-0004 Spn/Met
AK58-00062-0006 Jap/Met
AK58-00062-0007 Frn/Met
AK58-00062-0008 Itl/Met
AK58-00062-0009 Dut/Met
AK58-00062-0010 Por/Met
Smart Stop Assembly
AK58-00064-0000
Heart Rate Decal Eng/Met
0K58-01168-0001
Handlebar w/Electrodes
AK58-00018-0000
Handrail - RT
AK58-00016-0001
Decal
0K58-01145-0001
Handrail - LT
AK58-00016-0002
Decal
0K58-01145-0001
Motor Cover
AK58-00095-0000
Motor Cover Screws(4)
0017-00101-1621
Decal (Long)
0K58-01131-0001
Striding Belt
0K58-01180-0000
Roller Guard - LT
0K58-01142-0002
Access Panel
0K58-01017-0000
Access Panel Screws(4)
0017-00101-0658
Roller Guard - RT
0K58-01142-0001
End Cap - RT
0K58-01070-0001
End Cap Screws(2)
0017-00101-1060
6
Decal (Short)
0K58-01131-0002
Deck
0k58-01091-0000
Deck Screws(4)
0017-00101-1299
Section V
End Cap - LT
0K58-01070-0002
End Cap Screws(2)
0017-00101-1060
Front Cover
0K58-01016-0000
Front Cover Screws(4)
0017-00101-0658
Life Fitness Models 9500HR
TR95-0100-34
Serial number 320000 and up
Wax/Lift PCB
A084-92182-A001
A084-92182-A002(220/50)
Lift Motor
0K58-01062-0000
Frame Tag PCB
B084-92187-D000
Frame Tag Cable
AK58-00030-0000
Drive Motor Assembly
AK58-00054-0000
Idler Assembly
AK58-00053-0000
Motor Controller
AK58-00101-0003 Dom.
AK58-00101-0004 Int.
Motor Controller Cable
AK58-00042-0000 Dom.
Ak58-00042-0001 Int.
Drive Belt
0K58-01114-0000
Front Roller
AK58-00066-0000
TECS-PAK (8)
0K40-01026-0002
Tinnerman Clip
0017-00103-0198
Anti-Skid Pad
0K58-01052-0000
Tinsel
0K58-01102-0001
Wax Nozzle
0017-00009-0842
Rear Roller
0K58-01002-0000
Power Box
AK58-00049-0000 120/60
AK58-00049-0001 240/50+
AK58-00049-0002 220-230/50-60
AK58-00049-0005 100/50
AK58-00049-0006 200/50
Wax Kit
GK58-00002-0002
Protective Liner
0K58-01080-0000
Wing Nut (2)
0017-00103-0284
Wax Pump
0K58-01074-0000
Wax Cable
AK58-00029-0000
Axis1
Line Cord
0017-00003-0779 Dom.
0017-00003-0781 220/60
0017-00003-0696 Cont.
0017-00003-0890 UK.
Retainer Bracket
0K58-01065-0000
Wheel
0K58-01071-0000
Limit Switch
0017-00032-0195
Limit Switch Cable
AK58-00027-0000
Leveler Assembly
AK58-00052-0000
Foot Leveler
0K58-01110-0000
7
Life Fitness Models 9500HR
TR95-0100-34
Serial number 320000 and up
Console PCB Eng/Met
A084-92184-A001
Front Console Shell
0K58-01008-0001
Endcap
0K43-01025-0000
Handlebar
Extension - LT
AK58-00065-0002
Hardware Package
AK58-00071-0000
Handlebar
Extension - RT
AK58-00065-0001
Console Cable
AK58-00034-0000
Switch Cover w/Tether
AK58-00096-0000
Switch Cover
0K58-01087-0000
Switch Cover Screws
0017-00101-0776
Section V
Polar Receiver
AK40-00045-0001
Polar/Stop Cable
AK58-00033-0000
Stop Key Cable Assembly
AK58-00036-0001
8
Life Fitness Models 9700HR
TR97-0100-01
Serial number 970000 and up
Zone Decal
0K58-01125-0001 Eng/Met
Console Assembly
AK58-00055-0001
Console Rear Coverl
0K58-01009-0000
Decal
0K58-01129-0000
Console Rear Cover Screws(8)
Stop Key w/Tether
AK58-00091-0000
Decal
0K58-01140-0001
Stop Switch
Cup Holder
0K58-01018-0000
Overlay Tray Assembly
AK58-00061-0001 Eng/Met
AK58-00061-0003 Ger/Met
AK58-00061-0004 Spn/Met
AK58-00061-0006 Jap/Met
AK58-00061-0007 Frn/Met
AK58-00061-0008 Itl/Met
AK58-00061-0009 Dut/Met
AK58-00061-0010 Por/Met
Smart Stop Assembly
AK58-00064-0000
Heart Rate Decal
0K58-01169-0001 Eng/Met
Handlebar w/Electrodes
AK58-00018-0000
Handrail - RT
AK58-00015-0001
Decal
0K58-01147-0001
End Cap - LT
0K58-01070-0002
End Cap Screws(2)
0017-00101-1060
Front Cover
0K58-01016-0000
Front Cover Screws(4)
0017-00101-0658
Motor Cover
AK58-00095-0000
Motor Cover Screws(4)
0017-00101-1621
Section V
Handrail - LT
AK58-00015-0002
Decal
0K58-01147-0001
Decal (Long)
0K58-01131-0001
Striding Belt
0K58-01134-0000
Deck
0K58-01091-0000
Deck Screws(4)
Access Panel
0017-00101-1299
0K58-01017-0000
Access Panel Screws(4)
0017-00101-0658
Finger Guard - LT
0K58-01143-0002
Finger Guard - RT
0K58-01143-0001
End Cap - RT
0K58-01070-0001
End Cap Screws(2)
0017-00101-1060
Decal (Short)
0K58-01131-0002
9
Life Fitness Models 9700HR
TR97-0100-01
Serial number 970000 and up
Frame Tag PCB
B084-92187-D000
Frame Tag Cable
AK58-00030-0000
Lift Motor
0K58-01062-0000
RPM Sensor
AK58-00073-0000
Drive Motor Assembly
AK58-00054-0001
Wax/Lift PCB
A084-92182-A001
A084-92182-A002(220/50)
Idler Assembly
AK58-00053-0000
Motor Controller
AK58-00102-0003
Motor Controller Cable
AK58-00042-0000
Drive Belt
0K58-01115-0000
Front Roller
AK58-00067-0000
TECS PAK - Corners (4)
0K40-01026-0002
Tinnerman Clip
0017-00103-0198
Wax Nozzle
0017-00009-0842
TECS PAK - Centers (4)
0K58-01172-0000
Tinsel
0K58-01102-0001
Anti-Skid Pad
0K58-01052-0000
Rear Roller
0K58-01068-0000
Power Box
AK58-00049-0000 120/60
AK58-00049-0001 240/50+
AK58-00049-0002 220-230/50-60
AK58-00049-0005 100/50
AK58-00049-0006 200/50
Wax Kit
GK58-00002-0002
Protective Liner
0K58-01080-0000
Wing Nut (2)
0017-00103-0284
Wax Pump
0K58-01074-0000
Wax Cable
AK58-00029-0000
Axis1
Line Cord
0017-00003-0779 Dom.
0017-00003-0781 220/60
0017-00003-0696 Cont.
0017-00003-0890 UK.
Retainer Bracket
0K58-01065-0000
10
Wheel
0K58-01071-0000
Limit Switch
0017-00032-0195
Limit Switch Cable
AK58-00027-0000
Leveler Assembly
AK58-00052-0000
Foot Leveler
0K58-01110-0000
Life Fitness Models 9700HR
TR97-0100-01
Serial number 970000 and up
Console PCB Eng/Met
A084-92185-A001
Front Console Shell
0K58-01008-0000
Endcap
0K43-01025-0000
Handlebar
Extension - LT
AK58-00065-0002
Hardware Package
AK58-00071-0000
Handlebar
Extension - RT
AK58-00065-0001
Heart Rate
Display Cable
AK58-00031-0000
Console Cable
AK58-00034-0000
Polar Receiver
AK40-00045-0001
Polar/Stop Cable
AK58-00033-0000
Stop Key Cable Assembly
AK58-00036-0001
Switch Cover w/Tether
AK58-00096-0000
Switch Cover
0K58-01087-0000
Switch Cover Screws
0017-00101-0776
Section V
Heart Rate Display PCB
B084-92186-B000
11
Life Fitness Models 9700HR W/Incline
TR97-0100-02
Serial number 970000 and up
Zone Decal
0K58-01125-0001 Eng/Met
Stop Key w/Tether
AK58-00091-0000
Decal
0K58-01140-0001
Cup Holder
0K58-01018-0000
Console Assembly
AK58-00055-0001
Console Rear Coverl
0K58-01009-0000
Decal
0K58-01129-0000
Console Rear Cover Screws(8)
0017-00101-1288
Overlay Tray Assembly
AK58-00061-0001 Eng/Met
AK58-00061-0003 Ger/Met
AK58-00061-0004 Spn/Met
AK58-00061-0006 Jap/Met
AK58-00061-0007 Frn/Met
Stop Switch
AK58-00061-0008 Itl/Met
AK58-00061-0009 Dut/Met
AK58-00061-0010 Por/Met
Smart Stop Assembly
AK58-00064-0000
Heart Rate Decal
0K58-01169-0001 Eng/Met
Handlebar w/Electrodes
AK58-00018-0000
Handrail - RT
AK58-00015-0001
Decal
0K58-01147-0001
Handrail - LT
AK58-00015-0002
Decal
0K58-01147-0001
End Cap - LT
0K58-01070-0002
End Cap Screws(2)
0017-00101-1060
Front Cover
0K58-01016-0000
Front Cover Screws(4)
0017-00101-0658
Motor Cover
AK58-00095-0000
Motor Cover Screws(4)
0017-00101-1621
Decal (Long)
0K58-01131-0001
Striding Belt
0K58-01134-0000
Finger Guard - LT
0K58-01143-0002
Finger Guard - RT
0K58-01143-0001
12
Deck
0k58-01091-0000
Deck Screws
0017-00101-1299
Access Panel
0K58-01017-0000
Access Panel Screws(4)
0017-00101-0658
Decal (Short)
0K58-01131-0002
End Cap - RT
0K58-01070-0001
End Cap Screws(2)
0017-00101-1060
Life Fitness Models 9700HR W/Incline
TR97-0100-02
Serial number 970000 and up
Frame Tag PCB
B084-92187-D000
Frame Tag Cable
AK58-00030-0000
Lift Motor
0K58-01062-0000
RPM Sensor
AK58-00073-0000
Drive Motor Assembly
AK58-00054-0001
Wax/Lift PCB
A084-92182-A001
A084-92182-A002(220/50)
Idler Assembly
AK58-00053-0000
Motor Controller
AK58-00102-0003
Motor Controller Cable
AK58-00042-0000
Drive Belt
0K58-01115-0000
Front Roller
AK58-00067-0000
TECS-PAK - Corners (4)
0K40-01026-0002
Tinnerman Clip
0017-00103-0198
TECS PAK - Centers (4)
0K58-01172-0000
Wax Nozzle
0017-00009-0842
Anti-Skid Pad
0K58-01052-0000
Tinsel
0K58-01102-0001
Rear Roller
0K58-01068-0000
Wax Kit
GK58-00002-0002
Protective Liner
0K58-01080-0000
Wing Nut (2)
0017-00103-0284
Wax Pump
0K58-01074-0000
Wax Cable
AK58-00029-0000
Section V
Power Box
AK58-00049-0000 120/60
AK58-00049-0001 240/50+
AK58-00049-0002 220-230/50-60
AK58-00049-0005 100/50
AK58-00049-0006 200/50
Axis1
Line Cord
0017-00003-0779 Dom.
0017-00003-0781 220/60
0017-00003-0696 Cont.
0017-00003-0890 UK.
Retainer Bracket
0K58-01065-0000
Wheel
0K58-01071-0000
Limit Switch
0017-00032-0195
Limit Switch Cable
AK58-00027-0000
Leveler Assembly
AK58-00076-0000
Foot Leveler
0K58-01110-0000
13
Life Fitness Models 9700HR W/Incline
TR97-0100-02
Serial number 970000 and up
Console PCB Eng/Met
A084-92185-A001
Front Console Shell
0K58-01008-0000
Endcap
0K43-01025-0000
Handlebar
Extension - LT
AK58-00065-0002
Hardware Package
AK58-00071-0000
Handlebar
Extension - RT
AK58-00065-0001
Heart Rate
Display Cable
AK58-00031-0000
Console Cable
AK58-00034-0000
Heart Rate Display PCB
B084-92186-B000
14
Polar Receiver
AK40-00045-0001
Polar/Stop Cable
AK58-00033-0000
Stop Key Cable Assembly
AK58-00036-0001
Switch Cover w/Tether
AK58-00096-0000
Switch Cover
0K58-01087-0000
Switch Cover Screws
0017-00101-0076
Life Fitness Models 9100, 9500HR, 9700HR, and 9700HR w/Decline Treadmills
Section V
NOTES:
15
Life Fitness Models 9100, 9500HR, 9700HR, and 9700HR w/Decline Treadmills
SECTION VI
Section VI
MISCELLANEOUS INFORMATION
1
Life Fitness Models 9100, 9500HR, 9700HR, and 9700HR w/Decline Treadmills
PREVENTIVE MAINTENANCE TIPS
Preventive Maintenance Schedule
ITEM
WEEKLY
MONTHLY
QUARTERLY
BI-ANNUAL
ANNUAL
DISPLAY CONSOLE ASSEMBLY
Hardware
Overlay
Inspect
Clean
Inspect
Accessory
Cups
Inspect
Stop Switch
Clean
Inspect
Emergency
Switch/Key
Clean
Inspect
HANDLEBAR ASSEMBLY
Hardware
Inspect
Handlebar
Inspect
Side Hand
Rails
Inspect
Lifepulse
Sensors
Clean/Inspect
Smart Stop
Cover
Clean/Inspect
FRAME ASSEMBLY
Hardware
Motor Cover
Inspect
Clean
Vacuum Clean
Motor
Electronic
Compartment
Inspect
Drive Belt
Inspect
Leg Levelers
Inspect/Adjust
Front Roller
Inspect
Rear Roller
Inspect
WAX SYSTEM
Wax Bag
Inspect
Wax System
Wax Nozzle
Inspect
Clean
Every 2 weeks
2
Life Fitness Models 9100, 9500HR, 9700HR, and 9700HR w/Decline Treadmills
UNPACKAGING INSTRUCTIONS
Step 1
Remove all staples from the corrugated shipping container and fold down the four sides of the base tray (A).
Step 2
Lift and open the top flaps of the shipping container sleeve (B). Lift and remove the motor cover protective liner (C).
Lift and remove the two front corner posts (D).
Step 3
With the help of another person, carefully lift the shipping container sleeve (B) up and off of the base tray (A) and
over the treadmill (E). Remove the ship kit box (F) from the treadmill deck and set aside. Remove the remaining
support posts.
Step 4
Remove the plastic sheet covering the
motor cover.
Step 5
Using a screwdriver, remove the front
locator pads (G) from the base tray (A).
B
F
With the help of another person, carefully
lift the rear of the unit and slowly roll the
unit forward off of the base tray.
NOTE: BE SURE NOT TO DAMAGE THE
LINE CORD WHEN MOVING THE
TREADMILL OFF OF THE BASE TRAY.
Step 6
Follow the Installation Instructions included
in the parts bag to complete the assembly
of your Treadmill.
C
D
A
Section VI
E
G
3
Life Fitness Models 9100, 9500HR, 9700HR, and 9700HR w/Decline Treadmills
INSTALLATION INSTRUCTIONS
IMPORTANT SAFETY INSTRUCTIONS !
DO NOT position the rear of the treadmill within 6 feet ( 2 meter ) of the nearest obstruction.
The sides of the treadmill should maintain a minimum clearance of 8 inches ( 20 cm ) from
the nearest treadmill or other obstruction.
DO NOT locate the treadmill outdoors, near swimming pools, or in areas of high humidity.
DO verify the contents of the delivery carton against the accompanying parts listing prior to
setting the cartons and shipping material aside. If any parts are missing, contact Life Fitness
Customer Support Services at the number listed on the back page of this assembly
instruction booklet.
Save the shipping cartons in case of return.
DO read the entire Operation Manual prior to attempting to operate this machine, as this is
essential for proper use. The Manual explains how to properly use the treadmill and helps
you to design an aerobic workout tailored to your personal fitness needs or requirements.
4
Life Fitness Models 9100, 9500HR, 9700HR, and 9700HR w/Decline Treadmills
INSTALLATION INSTRUCTIONS – Continued
TOOLS REQUIRED: Phillips screwdriver (provided), Torx wrench (provided), 3/4” combination wrench, flat blade
screwdriver (or 5/16” nut driver)
PARTS DESCRIPTION
3
5
7
9
USER LEFT HANDRAIL
AK58-00017-0002 (Model 9100)
AK58-00016-0002 (Model 9500)
AK58-00015-0002 (Model 9700)
USER RIGHT HANDRAIL
AK58-00017-0001 (Model 9100)
AK58-00016-0001 (Model 9500)
AK58-00015-0001 (Model 9700)
MOUNTING SCREW (9500HR/9700HR)
MOUNTING SCREW (9100)
1/4 - 20 x 5/8”
0017-00101-1640
USER LEFT HANDRAIL EXTENSION POST
(Models 9500HR and 9700HR only)
AK58-00065-0002
CABLE CLAMP
13
0017-00042-0007
ENDCAP SCREW
#10 - 32 x 1/2” (Slotted)
0017-00101-1060
LEFT REAR ENDCAP
15
OK58-01070-0002
WAX BAG KIT
11
17
GK58-00002-0002
LINE CORD CLIP
0017-00042-0838
Qty: 1
2
HANDRAIL MOUNTING BOLT
1/2 - 13 x 1”
0017-00101-1620
Qty: 5
Qty: 1
4
HANDRAIL MOUNTING BOLT
1/2 - 13 x 1/2”
0017-00101-1630
Qty: 1
Qty: 18
Qty: 14
6
USER RIGHT HANDRAIL EXTENSION POST
(Models 9500HR and 9700HR only)
Qty: 1
Qty: 1
8
Qty: 1
10
Qty: 4
12
Qty: 1
14
Qty: 1
16
Qty: 1
18
AK58-00065-0001
DISPLAY CONSOLE ASSEMBLY
Qty: 1
CABLE CLAMP SCREW
#10 - 32 x 1/2” (Phillips)
0017-00101-1265
RIGHT REAR ENDCAP
Qty: 1
Qty: 1
OK58-01070-0001
FRONT HANDLEBAR ASSEMBLY
OK58-01051-0000 (Model 9100)
AK58-00018-0000 (Model 9500HR/9700HR)
FLAT WASHER
1/2 - 1 x 055
0017-00104-0335
ACCESSORY TRAY
OK58-01018-0000
2
Qty: 1
Qty: 6
Qty: 2
4
5
9
10
16
11
17
Section VI
1
1”
2”
3”
4”
5”
5
Life Fitness Models 9100, 9500HR, 9700HR, and 9700HR w/Decline Treadmills
INSTALLATION INSTRUCTIONS – Continued
18
8
5
14
7
5
6
1
5
3
16
2
13
11
6
4
Section VI
12
Life Fitness Models 9100, 9500HR, 9700HR, and 9700HR w/Decline Treadmills
INSTALLATION INSTRUCTIONS – Continued
IMPORTANT!
DO NOT DISCARD THE SHIP KIT LOCATED ON TOP OF THE DECK AND BELT. ALL NECESSARY
COMPONENTS NEEDED TO COMPLETE THE INSTALLATION ARE LOCATED IN THE SHIP KIT.
F
Step 1
Remove the four SCREWS securing the MOTOR COVER to the FRAME (C). Remove the
MOTOR COVER.
Step 2
Remove the USER LEFT HANDRAIL (#1)(with wire harness) from the ship kit and lay it on
the deck with the rectangular tube end facing the motor compartment and behind the USER
LEFT HANDRAIL MOUNTING BRACKET (D).
G
1
Step 3
Carefully route the 10-PIN CONNECTOR (10-P) leading from the rectangular tube end of the
USER LEFT HANDRAIL (#1) through the opening at the USER LEFT HANDRAIL
MOUNTING BRACKET (D) and through the access hole located at the inside FRAME (C)
wall.
D
C
10-P
NOTE: BE CAREFUL NOT TO DAMAGE THE WIRE HARNESS WHEN ROUTING IT
THROUGH THE FRAME MEMBERS.
Step 4
Raise the USER LEFT HANDRAIL (#1) off the deck and slide the rectangular tube end over
the USER LEFT HANDRAIL MOUNTING BRACKET (D) until it rests on the FRAME (C).
3
CAUTION: BE CAREFUL NOT TO PINCH THE WIRE HARNESS.
Step 5
Install one HANDRAIL MOUNTING BOLT (#2) with one FLAT WASHERS (#16) in the mounting hole
located on the top narrow surface of the USER LEFT HANDRAIL (#1). Tighten the bolt until snug. Install
two HANDRAIL MOUNTING BOLTS (#2) and FLAT WASHERS (#16) into the remaining two mounting
holes located on the inside surface of the USER LEFT HANDRAIL (#1). Leave these two bolts loose at
this time.
1
2
2
16
D
Step 6
Connect the 10-PIN CONNECTOR (E) to the 10-PIN JACK (F) located on the CONTROL BOARD (G).
C
Step 7
Locate the USER RIGHT HANDRAIL (#3) and slide the rectangular tube end over the USER RIGHT
HANDRAIL MOUNTING BRACKET until it rests on the FRAME (C).
Step 8
Install one HANDRAIL MOUNTING BOLT (#2) with one FLAT WASHERS (#16) in the mounting hole
located on the top narrow surface of the USER RIGHT HANDRAIL (#3). Tighten the bolt until snug. Install
two HANDRAIL MOUNTING BOLTS (#2 & #4) and FLAT WASHERS (#16) into the remaining two
mounting holes located on the inside surface of the USER RIGHT HANDRAIL (#3). Leave these two bolts
loose at this time.
3
NOTE: HANDRAIL MOUNTING BOLT #4 SHOULD BE LOCATED IN THE LOWER INSIDE
MOUNTING HOLE OF THE USER RIGHT HANDRAIL
Step 9
Locate the FRONT HANDLEBAR ASSEMBLY (#14). With
the bend facing upward and toward the front of the unit,
align the FRONT HANDLEBAR ASSEMBLY with the
access hole located on the inside of the USER LEFT
HANDRAIL (#1).
K
14
L
5
Models 9500HR / 9700HR Shown
16
C
(Models 9500HR & 9700HR) Feed the HEART RATE
ELECTRODE CABLE (K) and the SMART STOP
SYSTEM CABLE (L) through the access hole and up
4
through the top of the USER LEFT HANDRAIL. Carefully
feed the CABLES (K & L) into the USER LEFT HANDRAIL while aligning the mounting holes of the
FRONT HANDLEBAR ASSEMBLY and the USER LEFT HANDRAIL.
Section VI
1
2
Step 10
Secure the FRONT HANDLEBAR ASSEMBLY (#14) to the USER LEFT HANDRAIL (#1) with four
MOUNTING SCREWS (#5). Repeat the mounting procedure for the user right side of the FRONT
HANDLEBAR ASSEMBLY and USER RIGHT HANDRAIL (#3). Tighten the MOUNTING SCREWS
securely.
7
Life Fitness Models 9100, 9500HR, 9700HR, and 9700HR w/Decline Treadmills
INSTALLATION INSTRUCTIONS – Continued
Step 11 (Models 9500HR & 9700HR Only)
Place the USER RIGHT HANDRAIL EXTENSION POST (#6) over the front end of the
USER RIGHT HANDRAIL (#3). Feed the cables leading from the USER LEFT
HANDRAIL (#1) up through the bottom of the USER LEFT HANDRAIL EXTENSION
POST (#7) and out the CABLE ACCESS HOLE located beneath the MOUNTING
FLANGE (M). Place the USER LEFT HANDRAIL EXTENSION POST over the front
end of the USER LEFT HANDRAIL. Secure the HANDRAIL EXTENSION POSTS to
the HANDRAILS with four MOUNTING SCREWS (#5). Tighten until snug only.
O
10-P
4-P1
4-P2
8
M
CAUTION: BE CAREFUL NOT TO PINCH THE WIRE HARNESSES WHEN SLIDING
THE HANDRAIL EXTENSION POSTS (#5 and #6) AND HANDRAILS (#1 and #3)
TOGETHER.
5
6
Step 12
Locate the DISPLAY CONSOLE ASSEMBLY (#8). Remove the eight SCREWS
securing the DISPLAY CONSOLE BACK PANEL to the DISPLAY CONSOLE
ASSEMBLY. Carefully remove the DISPLAY CONSOLE BACK PANEL and set it aside.
Step 13
Standing at the front of the unit and with the DISPLAY CONSOLE CIRCUIT BOARD
(O) facing the front of the unit, align the DISPLAY CONSOLE ASSEMBLY mounting
holes with those of the HANDRAIL MOUNTING FLANGES (M). Secure the DISPLAY
CONSOLE ASSEMBLY using six MOUNTING SCREWS (#5). Tighten the SCREWS
securely.
(Models 9500HR & 9700HR Only)
Tighten the MOUNTING SCREWS (#5) of the HANDRAIL EXTENSION POSTS (#6
and #7) securely.
5
7
9
10
5
1
3
Models 9500HR / 9700HR Shown
Step 14 (Models 9500HR & 9700HR Only)
Attach the 4-PIN FLAT CONNECTOR (4-P1) to the 4-PIN FLAT JACK located on the DISPLAY CONSOLE CIRCUIT BOARD (O). Attach the 4-PIN
SQUARE CONNECTOR (4-P2) to the 4-PIN SQUARE JACK located on the DISPLAY CONSOLE CIRCUIT BOARD.
Step 15
Attach the 10-PIN CONNECTOR (10-P) to the 10-PIN JACK located on the DISPLAY CONSOLE CIRCUIT BOARD (O).
Step 16
Secure the WIRE HARNESS(ES) to the USER LEFT HANDRAIL MOUNTING FLANGE (M) using the CABLE CLAMP (#9) and CABLE CLAMP
SCREW (#10).
Step 17
Replace the DISPLAY CONSOLE BACK PANEL and re-install the eight DISPLAY CONSOLE BACK PANEL MOUNTING SCREWS.
CAUTION: BE CAREFUL NOT TO PINCH ANY WIRES WHEN REPLACING THE DISPLAY CONSOLE BACK PANEL.
Step 18
Tighten all HANDRAIL MOUNTING BOLTS (#2 & #4) securely.
Step 19
Place the two ACCESSORY TRAYS (#16) into the openings in the DISPLAY CONSOLE ASSEMBLY (#8). Be sure the ACCESSORY TRAYS snap
and lock into position.
16
Step 20
Place the MOTOR COVER back into position and secure it with the four MOTOR COVER
SCREWS.
Step 21
Using two ENDCAP SCREWS (#11), attach
the LEFT ENDCAP (#13) to the user left
FRAME (C) rear. Repeat the process with the
RIGHT ENDCAP (#12) and user right FRAME
rear.
8
Step 22
Locate and open the WAX BAG KIT (#15).
Follow the included instructions to complete
the installation.
Step 23
Refer to the Operation Manual for proper
installation of the LINE CORD CLIPS (#17)
and proper routing of the LINE CORD.
8
C
13
11
Life Fitness Models 9100, 9500HR, 9700HR, and 9700HR w/Decline Treadmills
COMMUNICATING BY FAX
Section VI
If you would like to submit a parts order, or if you need help troubleshooting
a problem, we have included, for your convenience, a FAX form on the
following page. Simply make a copy (or copies) of the FAX sheet and fill in
the necessary information. You may FAX us at any time, 24 hours a day, to
either of the numbers shown. A Life Fitness service representative will
process your order, or respond to your problem, as quickly as possible.
9
CUSTOMER SUPPORT SERVICES
PARTS ORDER
SALE
( IF BOTH
PLEASE INDICATE )
PRODUCT TROUBLESHOOTING
WARRANTY
NAME:
CUSTOMER NO:
DATE:
PHONE:
FAX:
CONTACT NAME:
METHOD OF SHIPMENT:
1 DAY
2 DAY
GROUND
PARTS ORDER FORM
ITEM NO.
1
PART NUMBER
DESCRIPTION
2
3
4
5
6
PRODUCT TROUBLESHOOTING
PRODUCT NAME:
SERIAL NO.
DETAILED DESCRIPTION OF PROBLEM:
PRODUCT NAME:
SERIAL NO.
DETAILED DESCRIPTION OF PROBLEM:
TIME RECEIVED:
TIME COMPLETED:
TECHNICIAN NAME:
CUSTOMER SUPPORT SERVICES
10601 W. Belmont Ave., Franklin Park IL 60131 PHONE (800) 351-3737 Toll Free or (708) 451-0036
FAX (800) 216-8893 Toll-Free or (708) 288-3702
10
QUANTITY
Life Fitness Models 9100, 9500HR, 9700HR, and 9700HR w/Decline Treadmills
Section VI
NOTES:
11