Transcript
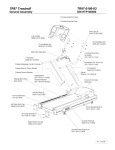
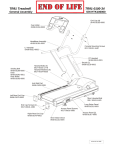
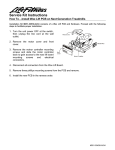
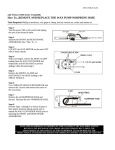
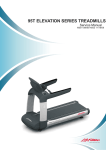
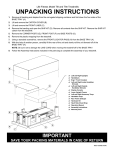
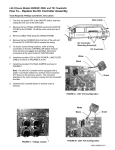
Life Fitness Model TR91/95/97 Series Treadmills
How To… Install The Roller Guard Bracket Kit
Tools required: Hex key wrench set, socket and ratchet set, drillbit set, drill, file,
and Phillips screwdriver
1.
Turn the unit power OFF at the ON/OFF switch, and then
unplug the line cord at the wall outlet.
2.
Remove the REAR ROLLER GUARDS.
3.
Remove tension bolts from REAR ROLLER.
4.
Remove the REAR ROLLER.
5.
Insert the Treadmill Model appropriate TEMPLATE into
user left rear roller channel and mark hole locations on the
FRAME. Flip the template and repeat for the user right
rear roller channel.
6.
Drill a 0.154 hole at each of the four marked locations.
7.
Install a GROMMET into each ROLLER GUARD
BRACKET.
8.
Install each ROLLER GUARD BRACKET using two
supplied short screws.
Note: It may be necessary to file down any weld material that
would prevent the ROLLER GUARD BRACKET from being
mounted flush to the frame.
9.
Re-install the REAR ROLLER. Using the supplied long
screws, re-install the REAR ROLLER GUARDS making
sure the striding belt is properly adjusted and tensioned.
Refer to service manual “HOW TO…Replace Striding Belt”
for proper belt adjustment and tensioning.
Kit # GK58-00002-0008
Rear Roller
Welded Guard
Tab
Rear
Roller
Tension
Bolts
Rear Roller
Guards
Grommet
Bracket
Self-Tapping
Screws
M051-00K58-A026