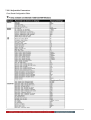
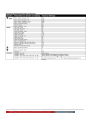
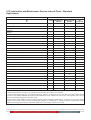
1
Rental
Generating Sets
Manual
John Deere
Yanmar
MTU
1. Safety................................................................................................................... 8
1.1 General Safety Information………………………………………………….….8
1.2 Installation And Transporting Hazards…………………………………………9
1.3 Operational Hazards………………………………………………………….….9
1.4 Maintenance Hazards……………………………………………………….…...9
2. Starting Instructions 702 ........................................................................ 11
2.1 Starting Instructions 702……………………………………………………...11
2.2 Portable Power Quick Start Manual 702……………………………………12
3. Starting Instructions 3110…………………………………………………….14
3.1 Starting Instructions 3110…………………………………………………….14
3.2 Portable Power Quick Start Manual 3110…………………………………..15
4. Starting Instructions 8610…………………………………………………….17
4.1 Starting Instructions 3110…………………………………………………….17
5. Description of Operation……………………………………………………...18
5.1 Description of Operation……………………………………………………...18
5.1.1
Manual Mode Operation……………………………………………………18
5.1.2
Automatic Mode of Operation…………………………………………….18
5.2 Warnings…………………………………………………………………………19
5.3 Shutdowns………………………………………………………………….19
6. 3110 Series Control Panel…………………………………………………….20
6.1 Description of Controls……………………………………………………….20
6.2 Quick start Guide………………………………………………………………..20
6.2.1 Starting the Engine…………………………………………………………..20
6.2.2 Stopping the Engine…………………………………………………………20
6.3 Graphical Display………………………………………………………….20
6.4 Controls………………………………………………………………………….21
6.5 Automatic Mode of Operation………………………………………………. 21
6.5.1 Waiting in Auto Mode………...……………………………………….……21
6.5.2 Starting Sequence……………………………………………………………21
6.5.3 Stopping Sequence………………………………………………………….22
6.6 Manual Operation………………………………………………………………22
6.6.1 Waiting in Manual Mode…………………………………………………….22
6.6.2 Starting Sequence……………………………………………………………22
6.6.3 Stopping Sequence………………………………………………………….22
6.7 Warnings…………………………………………………………………………23
6.8 Shutdowns………………………………………………………………….………23
6.9 Module Display…………………………………………………………………….23
2|Page
6.9.1 Timer Icon…………………………………………………………………………23
6.9.2 Stopped Icon……………………………………………………………………..23
6.9.3 Running Icon……………………………………………………………………..23
6.9.4 USB Icon…………………………………………………………………………..23
6.9.5 Memory Corruption…………………………………………………………23
6.9.6 Backlight…………………………………………………………………………...23
6.10 Fault Icons…………………………………………………………………………24
7. 7300 and 8600 Series Control Panel………………………………………..25
7.0 Description of Controls……………………………………………………….25
7.1 Autostart Control Module……………………………………………………...25
7.2 AMF Control Module……………………………………………………………26
7.3 Quickstart Guide………………………………………………………………..27
7.3.1 Starting the Engine…………………………………………………………...26
7.3.2 Stopping the Engine…………………………………………………………27
7.4
Viewing the Instrument Pages………………………………………………28
7.4.1 Status……………………………………………………………………………29
7.4.2 Engine…………………………………………………………………………..30
7.4.3 Generator……………………………………………………………………….31
7.5
Viewing the Event Log………………………………………………………..32
7.6
Controls…………………………………………………………………………33
7.6.1 ECU Override…………………………………………………………………..34
7.7 Automatic Mode…………………………………………………………………35
7.7.1 Waiting in Auto Mode………………………………………………………...35
7.7.2 Starting Sequence…………………………………………………………….35
7.8
Manual Mode……………………………………………………………………36
7.8.1 Waiting in Manual Mode…………………………………………………….36
7.8.2 Starting Sequence…………………………………………………………….36
7.8.3 Engine Running……………………………………………………………….37
7.8.4 Manual Fuel Pump Control………………………………………………….37
7.8.5 Manual Speed Control……………………………………………………….37
7.8.6 Stopping Sequence…………………………………………………………..38
7.9 Test Mode………………………………………………………………………...38
7.9.1 Waiting in Test Mode…………………………………………………………38
7.9.2 Starting Sequence…………………………………………………………….38
7.9.3 Engine Running……………………………………………………………….39
7.10 Protections……………………………………………………………………..39
7.11 Protections Disabled…………………………………………………………40
7.11.1 Indications/Warnings Alarms……………………………………………..40
7.11.2 Shutdown/Electrical Trip Alarms………………………………………...40
3|Page
7.12 Indications……………………………………………………………………..41
7.13 Warnings………………………………………………………………………..41
7.14 High Current Warning Alarm………………………………………………...43
7.15 Shutdowns……………………………………………………………………...44
7.16 Electrical Trips…………………………………………………………………46
7.17 High Current Shutdown/Electrical Trip Alarm……………………………46
7.17.1 Immediate Warning………………………………………………………….47
7.17.2 IDMT Alarm…………………………………………………………………...47
7.18 ROCOF/Vector Shift…………………………………………………………...48
7.19 Maintenance Alarm……………………………………………………………49
7.20 Scheduler……………………………………………………………………….50
7.20.1 Stop Mode…………………………………………………………………….50
7.20.2 Manual Mode…………………………………………………………………50
7.20.3 Auto Mode…………………………………………………………………….50
7.21 Front Panel Configuration……………………………………………………51
7.22 Accessing the Main Front Panel Configuration Editor………………….52
7.22.1 Editing a Parameter…………………………………………………………53
7.22.2 Adjustable Parameters……………………………………………………...54
7.23 Accessing the 'Running' Configuration Editor……………………………56
7.23.1 Editing A Parameter………………………………………………………...56
7.24 Commissioning………………………………………………………………...57
7.24.1 Pre-Commissioning…………………………………………………………57
7.25 Fault Finding……………………………………………………………………58
10. Routine Maintenance………………………………………………………….60
10.1 Maintenance…………………………………………………………………….60
10.2 Lubrication and Maintenance Service Interval Chart- Standard
Applications…………………………………………………………………………...61
10.3 Lubrication and Maintenance Service Interval Chart- Standby
Applications…………………………………………………………………………...62
11. Alternator………………………………………………………………………..63
11.1 Generator Designation………………………………………………………..63
11.2 Serial Number Location………………………………………………………63
11.3 Rating Plate……………………………………………………………………..63
11.4 Lifting…………………………………………………………………………….63
11.5 Automatic Voltage Regulators……………………………………………….64
11.5.1 Type AS440…………………………………………………………………...64
11.5.2 Type MX341…………………………………………………………………..65
11.5.3 Type SX460…………………………………………………………………...66
4|Page
11.5.4 Type MX321 AVR…………………………………………………………….67
11.6 Electrical Protection…………………………………………………………..67
11.7 Fault Finding…………………………………………………………………….68
11.7.1 SX460 AVR……………………………………………………………………68
11.7.2 SX440 AVR……………………………………………………………………68
11.7.3 SX421 AVR……………………………………………………………………68
11.7.4 Transformer Control………………………………………………………..69
11.7.5 MX341 AVR…………………………………………………………………...69
11.7.6 MX321 AVR…………………………………………………………………...69
11.8 Alternator Maintenance……………………………………………………...70
11.8.1 Winding Condition………………………………………………………….70
11.8.2 Guidance of Typical Insulation…………………………………………..70
11.8.3 Winding Condition Assessment…………………………………………70
11.9
Replacement Parts…………………………………………………………70
12. Specifications John Deere…………………………………………………....71
12.1 Generator Set Models………………………………………………………..71
12.2 UL 2200 Generator Set Models……………………………………………..72
12.3 Engine Models…………………………………………………………………73
12.3.1 4024TF281……………………………………………………………………73
12.3.2 4045TF280……………………………………………………………………73
12.3.3 4045HF-280…………………………………………………………………..74
12.3.4 4045HF285……………………………………………………………………74
12.3.5 4045HF-285…………………………………………………………………..75
12.3.6 4045HF285………………………………………………………………….. 75
12.3.7 6068HF-285…………………………………………………………………..76
12.3.8 6068HF-485…………………………………………………………………. 76
12.3.9 6090HF-484…………………………………………………………………..77
12.3.10 6135HF-485………………………………………………………………….77
13. Specifications Yanmar………………………………………………….…….78
13.1 Engine Models…………………………………………………………………78
13.1.1 4TNV84T……………………………………………………………………...78
13.1.2 4TNV88………………………………………………………………………..78
13.1.3 4TNV98………………………………………………………………………..79
13.1.4 4TNV98T……………………………………………………………………...79
14. Periodic Maintenance Yanmar………………………………………………80
15. SAFETY REGULATIONS
15.1 General safety precautions ............................................................................ 81
15.2 Safety at delivery, storage and unpacking...................................................... 81
5|Page
15.3 Safety during installation and initial startup .................................................... 81
15.4 Safety during operation.................................................................................. 82
15.5 Safety during maintenance ............................................................................ 82
⇒ Engine cooling circuit ............................................................................ 83
⇒ Lubrication circuit .................................................................................. 83
⇒ Fuel circuit............................................................................................. 83
⇒ Exhaust circuit ....................................................................................... 83
⇒ Electric startup system .......................................................................... 83
⇒ Synchronous generator ......................................................................... 84
⇒ Control panel ......................................................................................... 84
15.6 Environmental safety ..................................................................................... 84
15.7 Safety stickers and information ...................................................................... 84
16. INADEQUATE USE WARNINGS .............................................................................. 84
17. WORKING CONDITIONS ......................................................................................... 85
17.1 Standard environmental conditions for reference ........................................... 85
⇒ Diesel engines....................................................................................... 85
⇒ Synchronous generator ......................................................................... 85
17.2 Derating for operative environmental conditions ............................................ 85
17.3 Operational limits ........................................................................................... 86
⇒ Power.................................................................................................... 86
⇒ Rate ...................................................................................................... 86
⇒ Voltage.................................................................................................. 86
⇒ Power factor .......................................................................................... 86
⇒ Single-phase load ................................................................................. 87
⇒ Charge intakes ...................................................................................... 87
⇒ Asynchronous engines start .................................................................. 87
18. GENERAL DESCRIPTION...................................................................................... 87
18.1 Diesel engines ............................................................................................... 88
18.2 Alternator....................................................................................................... 88
18.3 Coupling joint................................................................................................. 88
18.4 Support bed-frame......................................................................................... 88
18.5 Sound-proof bonnet ....................................................................................... 88
18.6 Electrical panel with manual start................................................................... 88
18.7 Electrical panel with automatic start ............................................................... 88
18.8 Control and protection controller .................................................................... 89
19. INSTALLATION ........................................................................................................ 89
19.1 Important warnings ........................................................................................ 89
19.2 Outdoor installations ...................................................................................... 89
19.3. Indoor installations .......................................................................................... 89
⇒ Generator room ........................................................................................... 89
⇒ Foundations ................................................................................................ 90
⇒ Exhaust installation ..................................................................................... 90
A. Exhaust pipes measurement for standard static generators .................... 92
6|Page
⇒
⇒
⇒
⇒
⇒
⇒
⇒
⇒
⇒
⇒
B. Exhaust pipes measurement for soundproof static generators ................ 93
Exhaust silencer.......................................................................................... 93
Ventilation ................................................................................................... 93
Fuel installation ........................................................................................... 94
Electrical connections ................................................................................. 94
Generators of manual intervention .............................................................. 94
Generators of automatic intervention ........................................................... 94
Cable dimensions ....................................................................................... 94
Cable positioning ........................................................................................ 95
Grounding ................................................................................................... 95
Heating ....................................................................................................... 95
20. BEFORE STARTING UP .......................................................................................... 96
21. VOLTAGE CHANGE OVER BOARD (HRMW range) ............................................... 97
21.1 Locating the Change Over Board Panel ......................................................... 97
21.2 277/480V Position ......................................................................................... 97
21.3 120/208V Position ......................................................................................... 97
21.4 How to change the voltage ............................................................................ 98
22. Rear Distribution Panel (Description) ........................................................................ 99
22.1 400 Amps Distribution Panel........................................................................ 100
22.2 800 Amps Distribution Panel........................................................................ 100
22.3 1200 Amps Distribution Panel ...................................................................... 100
23. MTU ENGINE SERVICE MANUAL ......................................................................... 101
7|Page
1. SAFETY
1.1 General Safety Information
This manual provides information and procedures to
safely operate and maintain your Hipower Generator
Set. Read, understand and observe the safety
instructions described in this manual before installing,
operating and servicing the generator.
Battery posts, terminals and related accessories
contain lead and lead compounds, chemicals
known to the State of California to cause cancer
and reproductive harm. Wash hands after
handling.
If you have questions about operation or service,
please contact Hipower Systems. The information
contained in this manual was based on machines in
production at the time of publication. Himoinsa
Power Systems reserves the right to change any
portion of this information without notice.
The safety information in this manual is denoted by
the safety alert symbol:
All rights, especially copying and distribution rights
are reserved. Copyright© 2010 by Himoinsa Power
Systems. No part of this publication may be
reproduced in any form or by any means, electronic
or mechanical, including photocopying, without
express written permission from Himoinsa Power
Systems.
This manual is provided to assist in the maintenance
and operation of the generator and is not to be used
in any manner detrimental to the interests of
Himoinsa Power systems.
Information in this manual represents components
installed when product was manufactured based
upon the best available information. Modifications
made subsequent to initial delivery are not included.
Always verify the parts required with Himoinsa Power
Systems.
If you have any questions, please contact our Parts
and Service Department.
Do not operate generator without an Operators
Manual. Treat the Operators Manual as part of the
generator. Replace the Operators Manual if it is lost,
damaged or becomes unreadable.
All personnel that will be operating, maintaining and
working around the generator must review these
documents before interacting with the generator.
If you have any safety concerns or questions that are
not covered by this manual, please contact Himoinsa
Power Systems at 1-913-495-5557.
California Proposition 65 Warning
Diesel engine exhaust and some of its
constituents are known to the State of California
to cause cancer, birth defects, and some other
reproductive harm.
The level of risk is indicated by the following signal
words:
DANGER
Indicates a hazardous situation, which, if not
avoided, will result in death or serious injury.
WARNING
Indicates a hazardous situation, which, if not
avoided, could result in death or serious injury.
CAUTION
Indicates a hazardous situation, which, if not
avoided, could result in minor or moderate injury.
NOTICE
Indicates a situation that could result in damage
to the equipment or other property.
Never go under raised equipment unless properly
supported.
Use properly rated lifting equipment to lift heavy
objects.
Extinguish all smoking material when adding fuel or
working around generator. Engine must be stopped
before adding fuel.
Clean up fluids and dispose of fluids, contaminated
material etc. in accordance with local regulations.
Disconnect negative (-) battery cable
performing maintenance on generator set.
Allow components
any maintenance.
8|Page
to
cool
before
before
attempting
Do not operate generator set with safety guard(s)
removed.
Seek medical attention immediately if your skin
contacts high pressure fuel.
1.2 Installation And Transporting
Hazards
WARNING
Entanglement hazard.
Loose fitting clothing and long hair can be
come entangled in moving or rotating parts.
Do not wear loose fitting clothing.
Long hair must be tied back or netted.
WARNING
Remove neck ties.
Crushing hazard.
Do not operate generator with a guard removed
or access panel removed.
Generator set is heavy.
You must adhere to local codes and
regulations where your generator is being
used.
Use properly rated lifting devices to move
generator set.
Never enter the area under a raised generator set.
WARNING
The generator lifting points are designed to lift
the generator only.
Do not lift the complete generating set by the
generator lifting points.
Do not smoke while refueling. Do not
refuel near sparks or an open flame.
Clean up fluid spills and contaminated
material in accordance with local
regulations.
WARNING
Ensure that all personnel operating, servicing,
maintaining or working near this equipment are
wearing
appropriate
Personal
Protective
Equipment (PPE) including eye and ear protection
and are fully aware of the emergency procedures
in case of any accidents.
WARNING
Incorrect installation and/or protective systems
can result in injury and/or equipment damage.
Installers must be qualified to perform electrical
installation work.
1.3 Operational Hazards
WARNING
Generators emit noise.
Ensure appropriate ear protection is worn at all
times. Maximum A-weighted emissions levels
may reach 104 db.
WARNING
Risk of death or serious injury.
Do not operate, work on or around this machine
while under the influence of alcohol, drugs or if
feeling ill.
WARNING
Carbon monoxide hazard.
Do not operate the generator in an enclosed
building or confined area.
Avoid actions or areas that expose you and
others to carbon monoxide.
1.4 Maintenance Hazards
Service and maintenance procedures must be
carried out by experienced, qualified
engineers, familiar with the procedures and the
equipment. Before any intrusive procedures are
carried out, ensure that the engine is inhibited and
the generator is electrically isolated.
All electrical equipment can be dangerous if
not operated correctly. Always service and
maintain the generator in accordance with this
9|Page
manual. Always use genuine replacement parts.
California Proposition 65 Warning
WARNING
Hot engine and exhaust system can cause severe
injury.
Do not touch hot engine parts.
Do not perform service or maintenance on
generator until cool to the touch.
Diesel engine exhaust and some of its
constituents are known to the State of California
to cause cancer, birth defects and other
reproductive harm.
Battery posts, terminals and related accessories
contain lead and leads compounds, chemicals
known to the State of California to cause cancer,
birth defects and other reproductive harm. Wash
hands after handling.
WARNING
Risk of severed digits or limbs.
Generator can be started from a remote switch.
Disconnect the negative (-) battery cable from
generator battery before performing service or
maintenance on generator set.
WARNING
Electrical shock can cause injury or death.
Ensure that all personnel operating, servicing,
maintaining or working near this equipment are
fully aware of the emergency procedures in case
of accidents.
WARNING
Do not handle Permanent Magnet Generators
(PMGs) if you have mechanically implanted
devices; ie pacemakers.
WARNING
Service and fault finding procedures present
hazards which can result in injury or death. Only
personnel qualified to perform electrical and
mechanical service should carry out these
procedures. Ensure engine starting circuits are
disabled
before
commencing
service or
maintenance procedures. Isolate any anticondensation heater supply.
10 | P a g e
2. STARTING INSTRUCTIONS 702
2.1 Starting Instructions 702
Check oil and coolant fluids before operating
generator.
1. Turn on battery cut off switch by rotating to vertical
position. Location label on other side front door. To
disconnect rotate to horizontal position. (Located
below battery charging alternator on the left side as
you face the rear of the generator.)
2. Check emergency stops you will find one inside on
the control panel and one located on the housing
exterior. Twist clockwise to release.
3. Turn on rotary power switch located on lower right
of control panel by emergency stop button.
4. Check selector for correct operating voltage before
starting. It is located inside on the front of the
generator, location label on left side vented door. (DO
NOT CHANGE VOLTAGE SELECTOR WHILE SET
IS RUNNING).
5. To start turn key to auto on DSE702 control.
6. Push green button and wait 10 seconds for glow
plugs and engine will start.
7. Check for correct voltage and adjust dial labeled
'Voltage Adjustment Dial', if necessary. Move safety
lock on top to left to release and back to right to lock.
For more information please see laminated
instructions in manual box.
11 | P a g e
2.2 Portable Power Quick Start Manual 702
12 | P a g e
13 | P a g e
3. STARTING INSTRUCTIONS 3110
3.1 Starting Instructions 3110
Please read laminated instructions before
operating generator, located in manual box.
Manual box located inside of door marked
'Manuals' with colored label.
Check oil and coolant fluids before operating
generator.
1. Turn on battery cut off switch by turning to right.
Turn back left to off position (located by the starter
motor).
2. Check emergency stops (twist clockwise to
release). One is located on lower portion of control
panel and one is located on outside of housing.
3. Turn on rotary power switch located on lower right
of control panel by emergency stop button.
4. Check selector for correct operating voltage before
starting. It is located inside on the front of the
generator, location label on left side vented door. (DO
NOT CHANGE VOLTAGE SELECTOR WHILE SET
IS RUNNING).
5. To start push red reset button and then the green
button to start.
6. Check for correct voltage, adjust with voltage
adjustment dial (labeled) if necessary. Move safety
lock to left to release and back to right to lock.
For more information please
instructions in manual box.
see
laminated
14 | P a g e
3.2 Portable Power Quick Start Manual 3110
15 | P a g e
16 | P a g e
4. STARTING INSTRUCTIONS 8610
4.1 Starting Instructions 8610
Manual box is located inside of the door marked with
Orange decal "MANUAL BOX"
1.) Check Oil and Coolant fluids before operating
generator.
2.) Turn ON battery cut off switch by turning lever to
the right hand. Turn lever to the left position of OFF.
Cut off switch is near the starter motor located inside
door marked with Red decal "BATTERY CUT OFF
SWITCH".
3.) Check and reset Emergency stop switches (Twist
clockwise to release). One is located on the lower
portion of control panel and second and third device
is located outside of housing.
4.) Turn on rotary power switch located near the
emergency stop button on the lower right portion of
the control panel.
5.) Check Voltage change over board for the correct
operating voltage before starting equipment. Change
over board located on the end of the generator.
WARNING: DO NOT CHANGE VOLTAGE while
equipment is running.
6.) To start, push RED reset button, the Hand and
then the GREEN button on the DSE 8610 controller.
7.) Once the generator is running, the voltage will
automatically change to correct operating voltage
when breaker is on.
17 | P a g e
5. DESCRIPTION OF OPERATION
5.1 Description of Operation
5.1.1 Manual Mode Operation
5.1.2 Automatic Mode of Operation
18 | P a g e
5.2 Warnings
5.3 Shutdowns
19 | P a g e
6. 3110 SERIES CONTROL PANEL
6.2.2 Stopping The Engine
6.1 Description Of Controls
The following section details the function and
meaning of the various controls on the module.
1. Select Stop/Reset mode (1). The generator is
stopped.
6.3 Graphical Display
1 - Navigation Buttons
3 - Common Alarm Indicator
5 - Select Auto Mode
2 - Main Status Display
4 - Start engine.
6 - Select Stop Mode
6.2 Quickstart Guide
This section provides a quick start guide to the
module’s operation.
6.2.1 Starting The Engine
1. First press Stop/Reset (1).
2. Then, press the Start button to crank the engine.
Depending upon module configuration, two presses
may be required.
A 32x132 pixel LCD (35mm / 1.4”) is available for the
display of generator instrumentation and alarm
conditions. The display is segmented into areas for
instrumentation, unit, alarm icons and for Front Panel
Editor (FPE) use.
When not in the Front Panel Editor (FPE) mode the
FPE area of the display is used to display the
currently active configuration. The letter ‘M’ is
displayed for main configuration active, the letter ‘A’
for alternative configuration active.
VIEWING THE INSTRUMENTS
It is possible to scroll to display the different pages of
information by repeatedly operating the scroll
button.
Once selected the page will remain on the LCD
display until the user selects a different page or after
an extended period of inactivity, the module will revert
to the status display.
When scrolling manually, the display will
automatically return to the Status page if no buttons
are pressed for the duration of the configurable LCD
Page Timer.
If an alarm becomes active while viewing the status
page, the display shows the Alarms page to draw the
operator’s attention to the alarm condition. Page
order:
Engine Speed
Generator Volts
Generator Frequency
Engine Run Time
Battery Volts
20 | P a g e
6.4 Controls
6.5.1 Waiting In Auto Mode
Stop / Reset
This button places the module into its
Stop/ Reset mode. This will clear any
alarm conditions for which the triggering
criteria have been removed. If the engine
is running and the module is in Stop mode, the
module will automatically instruct the changeover
device to unload the generator (‘Close Generator’
becomes inactive (if used)). The fuel supply deenergizes and the engine comes to a standstill.
Should a remote start signal be present while
operating in this mode, a remote start will not occur.
If a starting request is made, the starting sequence will
begin. Starting requests can be from the following
sources:
Activation of an auxiliary input that has been configured
to remote start.
6.5.2 Starting Sequence
Auto
This button places the module into
its ‘Automatic’ mode. This mode allows
the module to control the function of the
generator automatically. The module will
monitor the remote start input and once a
start request is made, the set will be automatically
started and
laced on load. Upon removal of the
starting signal, the module will automatically transfer
the load from the generator and shut the set down
observing the stop delay timer and cooling timer as
necessary. The module will then await the next start
event.
If a start request is still present at the end of the start
delay timer, the fuel relay is energized and the engine
will be cranked.
To allow for ‘false’ start requests, the start delay timer
begins.
Should all start requests be removed during the start
delay timer, the unit will return to a stand-by state.
NOTE: If the unit has been configured for CAN,
compatible ECU’s will receive the start command via
CAN.
If the engine fails to fire during this cranking attempt
then the starter motor is disengaged for the crank rest
duration after which the next start attempt is made.
Should this sequence continue beyond the set number
of attempts, the start sequence will be terminated and
the display shows Fail to Start.
Start
Pressing this button in auto mode will
start the engine and run off load. Pressing
this button in STOP/RESET mode will
turn on the CAN engine ECU (when
correctly configured and fitted to a compatible engine
ECU).
When the engine fires, the starter motor is
disengaged. Speed detection is factory configured to
be derived from the main alternator output frequency
but can additionally be measured from a Magnetic
Pickup mounted on the flywheel (Selected by PC
using the 3000 series configuration software).
Page
Pressing this button scrolls the display to
show the various instruments.
Additionally, rising oil pressure can be used to
disconnect the starter motor (but cannot detect
underspeed or overspeed).
6.5 Automatic Mode Of Operation
NOTE: If the unit has been configured for CAN,
speed sensing is via CAN.
NOTE:- If a digital input configured to panel lock is
active, changing module modes will not be possible.
Viewing the instruments and event logs is NOT
affected by panel lock.
After the starter motor has disengaged, the Safety On
timer activates, allowing Oil Pressure, High Engine
Temperature, Under-speed, Charge Fail and any
delayed Auxiliary fault inputs to stabilize without
triggering the fault.
Activate auto mode by pressing the AUTO
pushbutton. The line/arrow icon around
AUTO is displayed to indicate Auto Mode
operation if no alarms are present.
ENGINE RUNNING
Once the engine is running and all starting timers have
expired, the animated icon is displayed.
Auto mode will allow the generator to operate fully
automatically, starting and stopping as required with
no user intervention.
DSE3110 - The generator will be placed on load if
configured to do so.
NOTE: The load transfer signal remains inactive until
the Oil Pressure has risen. This prevents excessive
21 | P a g e
wear on the engine.
If all start requests are removed, the stopping
sequence will begin.
then the starter motor is disengaged for the crank rest
duration after which the next start attempt is made.
Should this sequence continue beyond the set number
of attempts, the start sequence will be terminated and
the display shows Fail to Start.
6.5.3 Stopping Sequence
The return delay timer operates to ensure that the
starting request has been permanently removed and
isn’t just a short term removal. Should another start
request be made during the cooling down period, the
set will return on load.
If there are no starting requests at the end of the
return delay timer, the load is removed from the
generator to the mains supply and the cooling timer is
initiated.
The cooling timer allows the set to run off load and
cool sufficiently before being stopped. This is
particularly important where turbo chargers are fitted
to the engine.
After the cooling timer has expired, the set is stopped.
When the engine fires, the starter motor is
disengaged. Speed detection is factory configured to
be derived from the main alternator output frequency
but can additionally be measured from a Magnetic
Pickup mounted on the flywheel (Selected by PC
using the 3000 series configuration software).
Additionally, rising oil pressure can be used
disconnect the starter motor (but cannot detect
underspeed or overspeed). NOTE:- If the unit has
been configured for CAN, speed sensing is via CAN.
After the starter motor has disengaged, the Safety On
timer activates, allowing Oil Pressure, High Engine
Temperature, Under-speed, Charge Fail and any
delayed Auxiliary fault inputs to stabilise without
triggering the fault.
Engine Running
6.6 Manual Operation
NOTE:- If a digital input configured to panel lock is
active,
changing module modes will not be possible. Viewing
the instruments and event logs is NOT affected by
panel lock.
Manual mode allows the operator to start and stop
the set manually, and if required change the state of
the load switching devices. Module mode is active
when the button is pressed.
6.6.1 Waiting In Manual Mode
To begin the starting sequence, press the button. If
‘protected start’ is disabled, the start sequence begins
immediately.
If ‘Protected Start’ is enabled, the icon is displayed to
indicate Manual mode and the manual LED flashes.
The button must be pressed once more to begin the
start sequence.
6.6.2 Starting Sequence
NOTE: There is no start delay in this mode of
operation. The fuel relay is energized and the engine
is cranked.
NOTE:- If the unit has been configured for CAN,
compatible ECU’s will receive the start command via
CAN.
If the engine fails to fire during this cranking attempt
In manual mode, the load is not transferred to the
generator unless a ‘loading request’ is made. A loading
request can come from a number of sources.
• Activation of an auxiliary input that has been
configured to remote start on load
• Activation of the exercise scheduler if
configured for ‘on load’ runs.
NOTE: The load transfer signal remains inactive until
the Oil Pressure has risen. This prevents excessive
wear on the engine.
Once the load has been transferred to the generator, it
will not be automatically removed. To manually
transfer the load back to the mains either:
• Press the auto mode button to return to
automatic mode The set will observe all auto
mode start requests and stopping timers
before beginning the Auto mode stopping
sequence.
• Press the stop button
• De-activation of an auxiliary input that has
been configured to remote start on load.
6.6.3 Stopping Sequence
In manual mode the set will continue to run until either:
• The stop button is pressed – The set will
immediately stop.
• The auto button is pressed. The set will
observe all auto mode start requests and
22 | P a g e
stopping timers before beginning the Auto
mode stopping sequence.
Protections
When an alarm is present, the Common alarm LED if
configured will illuminate.
6.9.4 USB Icon
When a USB connection is made to the
module the USB icon
is displayed.
6.9.5 Memory Corruption
If either the config file or
becomes corrupted the unit
will display the icon.
The LCD display will show an icon to indicate the
failure.
6.7 Warnings
Warnings are non-critical alarm conditions and do not
affect the operation of the generator system, they
serve to draw the operators attention to an
undesirable condition.
engine
file
6.9.6 Backlight
The backlight will be on if the unit has sufficient
voltage on the power connection while the unit is
turned on, unless the unit is cranking for which the
backlight will be turned off.
Warning alarms are self-resetting when the fault
condition is removed. The icon will appear steady in
the display.
6.8 Shutdowns
Shutdowns are critical alarm conditions that stop the
engine and draw the operator’s attention to an
undesirable condition.
Shutdown alarms are latching. The fault must be
removed and the button pressed to reset the module.
The icon will appear flashing in the display.
6.9 Module Display
6.9.1 Timer Icon
When the module is controlling the engine
(starting and stopping) an animated timer icon
will be displayed in the icon area to indicate
that a timer is active, for example cranking
time, crank rest etc.
6.9.2 Stopped Icon
When there are no alarms
present, an icon will be displayed
Stop Auto Manual
to indicate the engine is stopped
Mode Mode
Mode
and what mode the unit is in.
The hand is only displayed when the ‘arming options’
is enabled, otherwise the engine starts when entering
the manual mode.
6.9.3 Running Icon
When there are no alarms present, an
animated icon is displayed to indicate the
engine is running.
23 | P a g e
6.10 Fault Icons
ICON
DESCRIPTION
AUXILIARY INPUTS
FAIL TO START
Auxiliary inputs can be user configured and will display the message as written by
the user.
The engine has not fired after the preset number of start attempts
The module has detected a condition that indicates that the engine is running when
it has been instructed to stop.
FAIL TO STOP
NOTE:- ‘Fail to Stop’ could indicate a faulty oil pressure sensor
- If engine is at rest check oil sensor wiring and configuration.
LOW OIL PRESSURE
ENGINE HIGH
TEMPERATURE
UNDERSPEED
OVERSPEED
The module detects that the engine oil pressure has fallen below the low oil
pressure pre-alarm setting level after the Safety On timer has expired.
The module detects that the engine coolant temperature has exceeded the high
engine temperature pre-alarm setting level after the Safety On timer has expired.
The engine speed has fallen below the underspeed pre alarm setting
The engine speed has risen above the overspeed pre alarm setting
CHARGE FAILURE
The auxiliary charge alternator voltage is low as measured from the W/L terminal.
LOW FUEL LEVEL
The level detected by the fuel level sensor is below the low fuel level setting.
BATTERY UNDER
VOLTAGE / BATTERY
OVER VOLTAGE
GENERATOR UNDER
VOLTAGE
GENERATOR OVER
VOLTAGE
GENERATOR UNDER
FREQUENCY
GENERATOR OVER
FREQUENCY
CAN ECU WARNING CAN
ECU SHUTDOWN
CAN DATA FAIL
EMERGENCY STOP
The DC supply has fallen below or risen above the low/high volts setting level.
The generator output voltage has fallen below the pre-set pre-alarm setting after
the Safety On timer has expired.
The generator output voltage has risen above the pre-set pre-alarm setting.
The generator output frequency has fallen below the pre-set pre-alarm setting after
the Safety On timer has expired.
The generator output frequency has risen above the pre-set pre-alarm setting.
The engine ECU has detected an alarm – CHECK ENGINE LIGHT
Contact Engine Manufacturer for support.
The module is configured for CAN operation and does not detect data on the
engine Can datalink.
The emergency stop button has been depressed. This a failsafe (normally closed
to battery positive) input and will immediately stop the set should the signal be
removed.
Removal of the battery positive supply from the emergency stop input will also
remove DC supply from the Fuel and Start outputs of the controller.
NOTE:- The Emergency Stop Positive signal must be present
otherwise the unit will shutdown.
MAGNETIC PICKUP
FAILURE
Pulses are no longer being detected from the magnetic pickup probe (3110-xxx-01
magnetic pickup version only)
INTERNAL MEMORY
ERROR
Either the configuration file or engine file memory is corrupted. Contact your
supplier for assistance.
24 | P a g e
7. 7300 & 8600 SERIES CONTROL PANEL
7.0 Description of Controls
The following section details the function and meaning of the various controls on the module.
7.1 Autostart Control Module
25 | P a g e
7.2 AMF Control Module
26 | P a g e
7.3 Quickstart Guide
This section provides a quick start guide to the module’s operation.
7.3.1 Starting the Engine
7.3.2 Stopping the Engine
27 | P a g e
7.4 Viewing the Instrument Pages
28 | P a g e
7.4.1 Status
29 | P a g e
7.4.2 Engine
30 | P a g e
7.4.3 Generator
31 | P a g e
7.5 Viewing the Event Log
32 | P a g e
7.6 Controls
33 | P a g e
7.6.1 ECU Override
34 | P a g e
7.7 Automatic Mode
7.7.1 Waiting in Auto Mode
7.7.2 Starting Sequence
35 | P a g e
7.8 Manual Mode
7.8.1 Waiting in Manual Mode
7.8.2 Starting Sequence
36 | P a g e
7.8.3 Engine Running
7.8.4 Manual Fuel Pump Control
7.8.5 Manual Speed Control
37 | P a g e
7.8.6 Stopping Sequence
7.9 Test Mode
7.9.1 Waiting In Test Mode
7.9.2 Starting Sequence
38 | P a g e
7.9.3 Engine Running
7.10 Protections
39 | P a g e
7.11 Protections Disabled
User configuration is possible to prevent Shutdown/Electrical Trip alarms from stopping the engine. Under such
conditions, Protective Disabled will appear on the module display to inform the operator of this status.
This feature is provided to assist the system designer in meeting specifications for “Warning only”, “Protections
Disabled”, “Run to Destruction”, “War mode” or other similar wording.
When configuring this feature in the PC software, the system designer chooses to make the feature either
permanently active, or only active upon operation of an external switch. The system designer provides this
switch (not DSE) so its location will vary depending upon manufacturer, however, it normally takes the form of a
key operated switch to prevent inadvertent activation. Depending upon configuration, a warning alarm may be
generated when the switch is operated.
The feature is configurable in the PC configuration software for the module. Writing a configuration to the
controller that has ‘Protections Disabled’ configured, results in a warning message appearing on the PC screen
for the user to acknowledge before the controller’s configuration is changed. This prevents inadvertent
activation of the feature.
7.11.1 Indications/Warning Alarms
Under Indication or Warning alarms:
•
The module operations is unaffected by the Protections Disabled feature.
Indications and Warnings elsewhere in this document.
7.11.2 Shutdown/Electrical Trip Alarms
40 | P a g e
See sections entitled
7.12 Indications
7.13 Warnings
Warnings are non-critical alarm conditions and do not affect the operation of the generator system, the serve to
draw the operators attention to an undesirable condition.
41 | P a g e
42 | P a g e
If the module is configured for CAN and receives an ‘error’ message from the engine control unit, “CAN ECU
Warning” is shown on the module’s display and a warning alarm is generated.
7.14 High Current Warning Alarm
GENERATOR HIGH CURRENT, if the module detects a generator output current in excess of the pre-set trip a
warning alarm initiate. The module shows Alarm Warning High Current. If this high current condition continues
for an excess period, then the alarm escalates to a shutdown condition. For further details of the high current
alarm, please see High Current Shutdown Alarm.
By default, High Current Warning Alarm is self-resetting when the overcurrent condition is removed. However,
enabling ‘all warnings are latched’ will cause the alarm to latch until reset manually. This is enabled using the
7000 series configuration suite in conjunction with a compatible PC.
43 | P a g e
7.15 Shutdowns
44 | P a g e
45 | P a g e
7.16 Electrical Trips
7.17 High Current Shutdown/Electrical Trip Alarm
The overcurrent alarm combines a simple warning trip level with a fully functioning IDMT curve for thermal
protection.
46 | P a g e
7.17.1 Immediate Warning
7.17.2 IDMT Alarm
47 | P a g e
7.18 ROCOF/Vector Shift
48 | P a g e
7.19 Maintenance Alarm
49 | P a g e
7.20 Scheduler
7.20.1 Stop Mode
• Scheduled runs will not occur when the module is in STOP/RESET mode.
7.20.2 Manual Mode
• Scheduled runs will not occur when the module is in MANUAL mode.
• Activation of a Scheduled Run ‘On Load’ when the module is operating OFF LOAD in Manual mode will
have no effect, the set continues to run OFF LOAD.
7.20.3 Auto Mode
•
•
•
•
Scheduled runs will operate ONLY if the module is in AUTO mode with no Shutdown or Electrical Trip
alarm present.
If the module is in STOP or MANUAL mode when a scheduled run begins, the engine will not be started.
However, if the module is moved into AUTO mode during a scheduled run, the engine will be called to
start.
Depending upon configuration by the system designer, an external input can be used to inhibit a
scheduled run.
If the engine is running OFF LOAD in AUTO mode and a scheduled run configured to ‘On Load’ begins,
the set is placed ON LOAD for the duration of the Schedule.
50 | P a g e
7.21 Front Panel Configuration
51 | P a g e
7.22 Accessing the Main Front Panel Configuration Editor
52 | P a g e
7.22.1 Editing a Parameter
53 | P a g e
7.22.2 Adjustable Parameters
54 | P a g e
55 | P a g e
7.23 Accessing the 'Running' Configuration Editor
7.23.1 Editing A Parameter
7.23.2 Adjustable Parameters (Running Editor)
56 | P a g e
7.24 Commissioning
7.24.1 Pre-Commissioning
57 | P a g e
7.25 Fault Finding
58 | P a g e
59 | P a g e
10. ROUTINE MAINTENANCE
Refer to the engine manufacturer’s manual for the
scheduled maintenance on the engine.
10.1 Maintenance
Refer to the alternator manufacturer’s manual for
the scheduled maintenance on the alternator.
WARNING
Hot engine and exhaust system can cause severe
injury.
Standby generator set must be exercised at least
once per month at a minimum of 70% load for one
hour.
Do not touch hot engine parts.
Do not perform service or maintenance on
generator until cool to the touch.
WARNING
Risk of severed digits or limbs.
Generator can be started from a remote switch.
Disconnect the negative (-) battery cable from
generator battery before performing service or
maintenance on generator set.
WARNING
Electrical shock can cause injury or death.
Ensure that all personnel operating, servicing,
maintaining or working near this equipment are
fully aware of the emergency procedures in case
of accidents.
Maintenance must be performed on a regular basis to
ensure the generator set performs properly and to
extend the life of the generator set.
Generator set routine maintenance will depend on the
installed location environment and application for
which the generator set is used. Consider these
factors when planning the maintenance schedule.
Stand-by generator sets installed in a clean and dry
location will require at least a visual inspection once a
month.
Stand-by generator sets installed in a dusty, damp or
humid locations will require inspections and
maintenance more frequently.
60 | P a g e
10.2 Lubrication and Maintenance Service Interval Chart - Standard
Applications
Lubrication and Maintenance Service Intervals
Ite
m
Daily 500 Hour/12
Month
Check Engine Oil and Coolant Level
Check Fuel Filter/Water Bowl
Check Air Cleaner Dust Unloader Valve & Restriction
Indicator
Gaugea
2000 Hour/24
Month
As
Required
•
•
•
•
•
•
•
•
•
•
•
•
•
•
•
•
•
•
•
Visual Walk Around Inspection
Service Fire Extinguisher
Check Engine Mounts
Service Battery
Check Manual Belt Tensioner and Belt Wear
Change Engine Oil And Replace Oil Filter b, c
Check Crankcase Vent System
Check Air Intake Hoses, Connections, & System
Replace Fuel Filter Elements
Check Automatic Belt Tensioner and Belt Wear
Check Engine Electrical Ground Connection
Check Cooling System
Coolant Solution Analysis-Add SCAs as required
Pressure Test Cooling System
Check Engine Speeds
•
•
•
Flush and Refill Cooling Systemd
Test Thermostats
Check and Adjust Engine Valve Clearance
Check Fuses
•
•
•
•
Check Air Compressor (If Equipped)
•
Bleed Fuel System
•
Add Coolant
Replace Air Cleaner Elements
Replace Fan and Alternator Belts
a Replace primary air cleaner element when restriction indicator shows a vacuum of 625 mm (25 in.) H2O.
b During engine break-in, change the oil and filter for the first time before 100 hours of operation.
c If the recommended engine oils, John Deere PLUS-50™, ACEA-E7 or ACEA E6 are not used, the oil and filter change interval
is reduced. (see DIESEL ENGINE OIL AND FILTER INTERVALS chart). If diesel fuel with a sulfur content greater than 0.05% is
used, the oil and filter change interval is also reduce.
d If John Deere COOL-GARD is used, the flushing interval may be extended to 3000 hours or 36 months. If John Deere COOLGARD is used and the coolant is tested annually AND additives are replenished as needed by adding a supplemental coolant
additive, the flushing interval may be extended to 5000 hours or 60 months, whichever occurs first.
61 | P a g e
10.3 Lubrication and Maintenance Service Interval Chart - Standby Applications
Lubrication and Maintenance Service Intervals
It
e
m
Operate Engine at Rated Speed and 50%–70% Load a
Every 2
Weeks
500 Hour/12
Month
2000 Hour/24
Month
As
Required
•
Minimum of 30 Minutes
Check Engine Oil and Coolant Level
Check Fuel Filter/Water Bowl
Check Air Cleaner Dust Unloader Valve & Restriction Indicator
Gaugea
•
•
•
•
Visual Walk Around Inspection
Service Fire Extinguisher
Check Engine Mounts
Service Battery
Check Manual Belt Tensioner and Belt Wear
Change Engine Oil And Replace Oil Filterb, c
Check Crankcase Vent System
Check Air Intake Hoses, Connections, & System
Replace Fuel Filter Elements
Check Automatic Belt Tensioner and Belt Wear
Check Engine Electrical Ground Connection
Check Cooling System
Coolant Solution Analysis-Add SCAs as required
•
•
•
•
•
•
•
•
•
•
•
•
•
•
•
•
Pressure Test Cooling System
Check Engine Speeds
Adjust Variable Speed (Droop)
Add Coolant
•
•
•
•
Replace Air Cleaner Elements
•
Replace Fan and Alternator Belts
•
Check Fuses
•
•
•
Flush and Refill Cooling System
Test Thermostats
Check and Adjust Engine Valve Clearance
Check Air Compressor (If Equipped)
Bleed Fuel System
a Replace primary air cleaner element when restriction indicator shows a vacuum of 625 mm (25 in.) H2O.
b During engine break-in, change the oil and filter for the first time before 100 hours of operation.
c If the recommended engine oils, John Deere PLUS-50™, ACEA-E7 or ACEA E6, are not used, the oil and filter change interval
is reduced (see DIESEL ENGINE OIL AND FILTER INTERVALS chart). If diesel fuel with a sulfur content greater than 0.05% is
used, the oil and filter change interval is also reduced.
62 | P a g e
11. ALTERNATOR
some applications.
11.1 Generator Designation
HC(K) 534C2 (eg)
11. 11.4 Lifting
HC - Standard range Generators
HCK - Dedicated range (HC5 only)
I - Applications, M = Marine I = Industrial,
5 - Frame size, 4, 5, or 6
3 - Separate excitation, PMG
or
4 - Self Excited
4 - Number of poles, 4 or 6
C - Core Size
2 - Number of bearings, 1 or 2
WARNING
The generator lifting points are designed to lift
the generator only.
Do not lift the complete generating set by the
generator lifting points.
When lifting the generator use a spreader bar to
ensure that the angle on the lifting chains are vertical
to the lifting position on the generator
The product is an AVR controlled, separately excited
(by a shaft driven pilot exciter) synchronous ‘ac
generator’ or a self excited (shunt arrangement).
Designed for incorporation into a generating-set. (A
generating-set is defined as ‘machinery’ in European
directives).
11.2 Serial Number Location
Each generator has a unique serial number stamped
into theupper section of the drive end of the frame.
The serial number is also shown on the nameplate.
Two other labels are located inside the terminal box,
both fixed inside of the terminal box, one on the
sheet metal-work and the other on the main frame of
the generator. Neither of these two labels is
considered to be permanently fixed.
11.3 Rating Plate
The generator has been supplied with a selfadhesive rating
plate label to enable fitting after final assembly and
painting. Stick the nameplate to the outside of the
non-drive end of the terminal box. The surface in the
area where a label is to be stuck must be flat, clean,
and any paint finish must be fully dry before
attempting to attach label. Recommended method for
attaching label is peel and fold back sufficient of the
backing paper to expose some 20 mm of label
adhesive along the edge which is to be located
against the sheet metal protrusions. Once this first
section of label has been carefully located and stuck
into position progressively peel off the backing paper
and smooth down with a clean cloth. The adhesive
will achieve a permanent bond in 24 hours.
A factory fitted metal nameplate is available for
63 | P a g e
11.5 Automatic Voltage Regulators
Initial Start Up
To make AVR selections and adjustments remove
the AVR cover and refer to the appropriate section
depending upon type of AVR fitted. Reference to the
generator nameplate will indicate AVR type.
On completion of generating set assembly and
before starting the generating set, ensure that all of
the engine manufacturer’s pre-running procedures
have been completed, and that adjustment of the
engine governor is such that the generator will not be
subjected to speeds in excess of 125% of the rated
speed.
Most of the AVR adjustments are factory set in
positions which will give satisfactory performance
during initial running tests. Subsequent adjustment
may be required to achieve optimum performance of
the set under operating conditions.
Over-speeding the generator during initial setting of
the speed governor can result in damage to the
generator rotating components.
11.5.1 Type AS440
1 - 8& Z2 linked for normal remove for auxiliary
winding
2 - Output Voltage adjustment
3 - Hand trimmer link when not used
4 - Low voltage selection (110v)
5 - Droop adjustment
6 - To optimise analogue input sensitivity
7 - Excitement trip cut off adjustment
8 - Stability control
9 - UFRO adjustment
10 - Stability section
11 - Frequency section
Stability Selection
No.
B-D
A-C
B-C
A-B
Power range
< 100kW
< 100kW
100-550kW
> 550kW
Response
Slow
Fast
Fast
Fast
Voltage Set Up
The voltage is factory set as per the rating plate. If
necessary adjust the voltage to the no load level as
required.
To adjust the voltage remove the AVR access cover
plate, use the insulated tool supplied.
Stability Set Up
The STABILITY control potentiometer is pre-set and
should not normally require adjustment. If adjustment
is necessary proceed as follows:
Run the generating set on no-load and check
that speed is correct and stable.
Turn the STABILITY control potentiometer
clockwise, and then turn slowly anti-clockwise until
the generator voltage starts to become unstable. The
correct setting is slightly clockwise from this position
(i.e. where the machine volts are stable but close to
the unstable region).
64 | P a g e
11.5.2 Type MX341
Initial Start Up
The following ‘jumper’ connections must be in the
correct position for the correct number of poles and
the operating frequency of the generator.
Frequency selection terminals
4 pole 50Hz LINK 2-3
4 pole 60Hz LINK 1-3
Stability selection terminals
LINK A-B
On completion of generating set assembly and
before starting the generating set, ensure that all of
the engine manufacturer’s pre-running procedures
have been completed, and that adjustment of the
engine governor is such that the generator will not be
subjected to speeds in excess of 125% of the rated
speed.
Over-speeding the generator during initial setting of
the speed governor can result in damage to the
generator rotating components.
Voltage Set Up
Excitation Interruption Link
K1-K2
The voltage is factory set as per the rating plate. If
necessary adjust the voltage to the no load level as
required.
To adjust the voltage remove the AVR access cover
plate, use the insulated tool supplied.
Stability Set Up
The STABILITY control potentiometer is pre-set and
should not normally require adjustment. If adjustment
is necessary proceed as follows:
- Run the generating set on no-load and check that
speed is correct and stable.
- Turn the STABILITY control potentiometer
clockwise, and then turn slowly anti-clockwise until
the generator voltage starts to become unstable. The
correct setting is slightly clockwise from this position
(i.e. where the machine volts are stable but close to
the unstable region).
1 - Volts
2 - Indicator led
3 - UFRO
4 - Frequency
5 - Dip
6 - Stability
7 - Excitation trip
8 - Stability section
9 - Droop
10 - Trim
11 - Link (over 550kW)
12 - Isolation link
13 - 2 x pin 2 use either
14 - Std. sensing links
65 | P a g e
11.5.3 Type SX460
The following ‘jumper’ connections on the AVR
should be checked to ensure they are correctly set
for the generating set application.
1. Field and sensing connections
2. Voltage adjustment
3. External hand trimmer selection,
With no external hand trimmer Link 1-2
With external hand trimmer – Remove Link 1-2 and
connect trimmer across terminals 1 and 2.
4. AVR Input Selection
High Voltage (220/240V) Input No Link
Low Voltage (110/120V) Input Link 3-4
5. UFRO adjustment
6. UFRO indication LED
7. Frequency selection
For
50Hz operation Link C-50
For
60Hz operation Link C-60
8. Stability control
engine manufacturer's pre-running procedures have
been completed, and that adjustment of the engine
governor is such that the generator will not be
subjected to speeds in excess of 125% of the rated
speed.
Overspeeding of the generator during initial setting
of the speed governor can result in damage to the
generator rotating components.
In addition remove the AVR access cover (on AVR
controlled generators) and turn volts control fully
anti-clockwise. Start the generating set and run on
no-load at nominal frequency. Slowly turn volts
control potentiometer clockwise until rated voltage
is reached. Refer to Fig. 1, 2 or 3 for control
potentiometer location.
Do not increase the voltage above the rated
generator voltage shown on the generator
nameplate.
The stability control potentiometer should be set to
the midway position (refer to fig 1, 2 or 3 for its
location) and with the stability selection correctly set
should not normally require adjustment. Should
adjustment be required, usually identified by
oscillation of the voltmeter, proceed as follows:
Run the generating set on no-load and check that
speed is correct and stable.
Turn the stability control potentiometer clockwise,
and then turn slowly anti-clockwise until the
generator voltage starts to become unstable. The
correct setting is slightly clockwise from this position
(i.e. where the machine volts are stable but close to
the unstable region).
During testing it may be necessary to remove covers
to adjust controls exposing 'live' terminals or
components. Only personnel qualified to perform
electrical service should carry out testing and/or
adjustments. Refit all access covers after
adjustments are completed.
On completion of generating set assembly and
before starting the generating set ensure that all
66 | P a g e
11.5.4 Type MX321 AVR
The following ‘jumper’ connections on the AVR should
be checked to ensure they are correctly set for the
generating set application.
Overspeeding the generator during initial setting of
the speed governor can result in damage to the
generator rotating components.
Voltage Set Up
MX321 jumper connections
Frequency selection terminals
4 pole 50Hz operation - Link 2-3
4 pole 60Hz operation - Link 1-3
Stability selection terminals UC22 - Link A-B Stability
selection terminals UC27 - Link B-C Excitation
Interruption Link - K1-K2
1 - Volts
2 - Indicator led
3 - I/limit
4 - UFRO
5 - Frequency selector
6 - Dip
7 - rms
8 - Dwell
9 - Stability
10 - Over/v
11 - Exc trip
12 - Stability selector
13 - Droop
14 - Trim
15 - Link (over 550kW)
The voltage is factory set as per the rating plate. If
necessary adjust the voltage to the no load level as
required. To adjust the voltage remove the AVR
access cover plate, use the insulated tool supplied.
Stability Set Up
The STABILITY control potentiometer is pre-set and
should not normally require adjustment. If adjustment
is necessary proceed as follows:
Run the generating set on no-load and check that
speed is correct and stable. Turn the STABILITY
control potentiometer clockwise, then turn slowly anticlockwise until the generator voltage starts to become
unstable.
Note: The correct setting is slightly clockwise from this
position (i.e. where the machine volts are stable but
close to the unstable region).
11.6 Electrical Protection
It is the responsibility of the end user and
contractors/sub- contractors to ensure that the overall
system protection meets the needs of any
inspectorate, local electricity authority or safety rules,
pertaining to the site location.
WARNING
Incorrect installation and/or protective systems
can result in injury and/or equipment damage.
Installers must be qualified to perform electrical
installation work.
Adequate electrical protection must be provided so
that there will be no danger to personnel, danger of
fire or damage to the generator under fault conditions.
Initial Start Up
On completion of generating set assembly and before
starting the generating set, ensure that all of the
engine manufacturer’s pre-running procedures have
been completed, and that adjustment of the engine
governor is such that the generator will not be
subjected to speeds in excess of 125% of the rated
speed.
67 | P a g e
11.7.2 SX440 AVR
11.7 Fault Finding
WARNING
Service and fault finding procedures present
hazards which can result in injury or death. Only
personnel qualified to perform electrical and
mechanical service should carry out these
procedures. Ensure engine starting circuits
are disabled before commencing service or
maintenance procedures. Isolate any anticondensation heater supply.
Important: Before commencing any fault finding
procedure examine all wiring for broken or loose
connections.
Four types of excitation control system, involving four
types of AVR, can be fitted to the range of generators
covered by this manual. The systems can be
identified by a combination of AVR type, where
applicable, and the last digit of the generator frame
size designation. Refer to the generator nameplate
then proceed to the appropriate subsection.
11.7.1 SX460 AVR
No voltage build-up when starting set.
1. Check speed
2. Check residual voltage.
3. Follow Separate Excitation Test Procedure to
check generator and AVR.
Unstable voltage either on no-load or with load.
1. Check speed stability.
2. Check stability setting.
High voltage either on no-load or with load.
1. Check speed.
2. Check that generator load is not capacitive
(leading power factor).
Low voltage, no load.
1. Check speed.
2. Check link 1-2 or external hand trimmer leads for
continuity.
Low voltage on load.
1. Check speed.
2. Check UFRO setting.
3. Follow Separate Excitation Procedure to check
generator and AVR.
No voltage build up when starting set.
1. Check link K1-K2 on auxiliary terminals.
2. Check speed
3. Check residual voltage. Refer to subsection 7.4.7.
4. Follow Separate Excitation Test Procedure to
check generator and AVR. Refer to subsection 7.5.
Unstable voltage either on no-load or with load.
1. Check speed stability.
2. Check stability setting. Refer to subsection 4.6.
High voltage either on no-load or with load.
1. Check speed.
2. Check that generator load is not capacitive
(leading power factor).
Low voltage no load.
1. Check speed.
2. Check link 1-2 or external hand trimmer leads for
continuity.
Low voltage on load.
1. Check speed.
2. Check UFRO setting.
3. Follow Separate Excitation Procedure to check
generator and AVR.
11.7.3 SX421 AVR
No voltage build-up when starting set.
1. Check circuit breaker ON.
2. Check speed.
3. Check residual voltage. Refer to subsection 7.4.7.
4. Follow Separate Excitation Test Procedure to
check generator and AVR.
Unstable voltage either on no-load or with load.
1. Check speed stability.
2. Check stability setting.
High voltage either on no-load or with load.
1. Check speed.
2. Check link 1-2 or external hand trimmers leads for
continuity. Check continuity of leads 7-8 and P3-P2
for continuity.
3. Check that generator load is not capacitive
(leading power factor).
Low voltage no load.
1. Check speed.
2. Check link 1-2 or external hand trimmer leads for
continuity.
68 | P a g e
Low voltage on load.
1. Check speed.
2. Check UFRO setting. Refer to subsection 4.7.1.1.
3. Follow Separate Excitation Procedure to check
generator and AVR.
Excessive voltage/speed dip on load switching.
1. Check governor response.
2. Refer to generating set manual. Check ‘DIP’
setting.
11.7.4 Transformer Control
No voltage build-up when starting set.
1. Check transformers rectifiers.
2. Check transformer secondary winding for open
circuit.
Low voltage.
1. Check speed.
2. Check transformer air gap setting.
Low voltage on load.
1. Check speed.
2. If correct check “UFRO” setting.
Excessive voltage/speed dip on load switching.
1. Check governor response. Refer to generating set
manual. Check “DIP” setting.
Sluggish recovery on load switching.
1. Check governor response. Refer to generating set
manual.
11.7.6 MX321 AVR
No voltage build-up when starting set.
1. Check link K1-K2 on auxiliary terminals. Follow
Separate Excitation Test Procedure to check
machine and AVR.
Voltage very slow to build up.
1. Check setting of ramp potentiometer.
High voltage.
1. Check speed.
2. Check transformer air gap setting.
3. Check transformer secondary winding for open
circuit.
Excessive voltage/speed dip on load switching.
1. Check speed drop on-load.
2. Check transformers rectifiers.
3. Check transformer air gap setting.
Loss of voltage when set running.
1. First stop and restart set. If no voltage or voltage
collapses after short time, follow Separate Excitation
Test Procedure.
Generator voltage high followed by collapse.
1. Check sensing leads to AVR.
2. Refer to Separate Excitation Test Procedure.
11.7.5 MX341 AVR
Voltage unstable, either on no-load or with load.
1. Check speed stability.
2. Check “STAB” setting. Refer to Load Testing
section for procedure.
No voltage build-up when starting set.
1. Check link K1-K2 on auxiliary terminals
2. Follow Separate Excitation Test Procedure to
check machine and AVR.
Low voltage on load.
1. Check speed.
2. If correct check “UFRO” setting.
Loss of voltage when set running.
1. First stop and restart set. If no voltage or voltage
collapses after short time, follow Separate Excitation
Test Procedure.
Excessive voltage/speed dip on load switching.
1. Check governor response. Refer to generating set
manual. Check “DIP” setting.
Sluggish recovery on load switching.
1. Check governor response. Refer to generating set
manual. Check “DWELL” setting.
Generator voltage high followed by collapse.
1. Check sensing leads to AVR.
2. Refer to Separate Excitation Test Procedure.
Voltage unstable, either on no-load or with load.
1. Check speed stability.
2. Check “STAB” setting. Refer to Load Testing
section for procedure.
69 | P a g e
Resistance Temperature Detector (R.T.D.) leads
grounded during this test.
11.8 Alternator Maintenance
NOTICE:
WARNING
The AVR must be disconnected and the
resistance Temperature Detector (R.T.D.) leads
grounded during this test.
Service and fault finding procedures present
hazards which can result in injury or death.
Only personnel qualified to perform electrical
and mechanical service should carry out
these procedures. Ensure engine starting
circuits are disabled before commencing
service or maintenance procedures. Isolate
any anti- condensation heater supply.
The condition of the windings can be assessed by
measurement of insulation resistance [IR] between
phase to phase, and phase to earth.
As part of routine maintenance procedures, periodic
attention to winding condition (particularly when
generators have been idle for a long period) and
bearings is recommended.
When generators are fitted with air filters regular
inspection and filter maintenance is required.
11.8.1 Winding Condition
Warning: Service and fault finding procedures
present hazards which can result in l injury or death.
Only personnel qualified to perform electrical and
mechanical service should carry out these
procedures. Ensure engine starting circuits are
disabled before commencing service or maintenance
procedures. Isolate any anti-condensation heater
supply.
Measurement of winding insulation should be
carried out:
1. As part of a periodic maintenance plan.
2. After prolonged periods of shutdown.
3. When low insulation is suspected, e.g. damp or
wet windings.
Care should be taken when dealing with windings
that are suspected of being excessively damp or
dirty. The initial measurement of the [IR] Insulation
Resistance should be established using a low
voltage (500V) megger type instrument. If manually
powered the handle should initially be turned slowly
so that the full test voltage will not be applied, and
only applied for long enough to very quickly assess
the situation if low values are suspected or
immediately indicated.
Full megger tests or any other form of high voltage
test should not be applied until the windings have
been dried out and if necessary cleaned.
11.8.2 Guidance Of Typical Insulation
Resistance [IR] Values
11.9 Replacement Parts
The following is offered as general information about
IR values and is aimed at providing guidance about
the typical IR values for generators from new through
to the point of refurbishment.
Contact your Himoinsa Power System dealer or
distributor to order parts. Have your genset serial
and model number when ordering parts.
Generators In Service
It is known that a generator will give reliable service
with an IR value of just 1.0 MΩ. For a relatively new
generator to be so low it must have been subjected
to inappropriate operating or storage conditions.
Any temporarily reduction in IR values can be
restored to expected values by following one of the
drying out procedures.
11.8.3 Winding Condition Assessment
The AVR should be disconnected and the
70 | P a g e
12. SPECIFICATIONS JOHN DEERE
12.1 Generator Set Models
Generator Set Model
Voltage
Engine Model
Alternator Model
HJW 30 M6
120/240V 1Ph - 60HZ
4024 TF281-36
PI 144 K
HJW 55 M6
120/240V 1Ph - 60 Hz
4045 TF280-63
UCI 224 G
HJW 70 M6
120/240V 1Ph - 60 Hz
4045 HF280-74
UCI 274 D
HJW 85 M6
120/240V 1Ph - 60 Hz
4045 HF285-94
UCI 274 E
HJW 30 T6
120/208V 3 Ph - 60 Hz
4024TF281 - 36
PI 144 G
HJW 55 T6
120/208V 3 Ph - 60 Hz
4045TF280 - 63
UCI 224 D
HJW 65 T6
120/208V 3 Ph - 60 Hz
4045HF280 - 74
UCI 224 F
HJW 85 T6
120/208V 3 Ph - 60 Hz
4045HF285 - 94
UCI 224 G
HJW 105 T6
120/208V 3 Ph - 60 Hz
4045HF285 - 118
UCI 274 D
HJW 130 T6
120/208V 3 Ph - 60 Hz
4045HF285 - 147
UCI 274 E
HJW 155 T6
120/208V 3 Ph - 60 Hz
6068HF285 - 177
UCI 274 F
HJW 205 T6
120/208V 3 Ph - 60 Hz
6068HF485 - 235
UCI 274 H
HJW 225 T6
120/208V 3 Ph - 60 Hz
6090HF484 - 258
UCDI 274 J
HJW 275 T6
120/208V 3 Ph - 60 Hz
6090HF484 - 315
HCI 444 D
HJW 305 T6
120/208V 3 Ph - 60 Hz
6135HF485 - 345
HCI 444 D
HJW 355 T6
120/208V 3 Ph - 60 Hz
6135HF485 - 401
HCI 444 E
HJW 410 T6
120/208V 3 Ph - 60 Hz
6135HF485 - 460
HCI 444 F
HJW 30 T6
277/480V 3 Ph - 60 Hz
4024TF281 - 36
PI 144 G
HJW 55 T6
277/480V 3 Ph - 60 Hz
4045TF280 - 63
UCI 224 D
HJW 65 T6
277/480V 3 Ph - 60 Hz
4045HF280 - 74
UCI 224 E
HJW 85 T6
277/480V 3 Ph - 60 Hz
4045HF285 - 94
UCI 224 F
HJW 105 T6
277/480V 3 Ph - 60 Hz
4045HF285 - 118
UCI 274 C
HJW 130 T6
277/480V 3 Ph - 60 Hz
4045HF285 - 147
UCI 274 D
HJW 155 T6
277/480V 3 Ph - 60 Hz
6068HF285 - 177
UCI 274 E
HJW 205 T6
277/480V 3 Ph - 60 Hz
6068HF485 - 235
UCI 274 G
HJW 225 T6
277/480V 3 Ph - 60 Hz
6090HF484 - 258
UCI 274 H
HJW 275 T6
277/480V 3 Ph - 60 Hz
6090HF484 - 315
HCI 444 C
HJW 305 T6
277/480V 3 Ph - 60 Hz
6135HF485 - 345
HCI 444 D
HJW 355 T6
277/480V 3 Ph - 60 Hz
6135HF485 - 401
HCI 444 E
HJW 410 T6
277/480V 3 Ph - 60 Hz
6135HF485 - 460
HCI 444 F
HRJW 35 T6
120-480V 1 & 3 Ph - 60 Hz
4024TF281 - 36
PI 144 G
HRJW 60 T6
120-480V 1 & 3 Ph - 60 Hz
4045TF280 - 63
UCI 224 D
HRJW 75 T6
120-480V 1 & 3 Ph - 60 Hz
4045HF280 - 74
UCI 224 F
HRJW 90 T6
120-480V 1 & 3 Ph - 60 Hz
4045HF285 - 94
UCI 224 G
HRJW 115 T6
120-480V 1 & 3 Ph - 60 Hz
4045HF285 - 118
UCI 274 D
HRJW 145 T6
120-480V 1 & 3 Ph - 60 Hz
4045HF285 - 147
UCI 274 E
HRJW 175 T6
120-480V 1 & 3 Ph - 60 Hz
6068HF285 - 177
UCI 274 F
HRJW 235 T6
120-480V 1 & 3 Ph - 60 Hz
6068HF485 - 235
UCI 274 H
HRJW 250 T6
120-480V 1 & 3 Ph - 60 Hz
6090HF484 - 258
UCDI 274 J
HRJW 310 T6
120-480V 1 & 3 Ph - 60 Hz
6090HF484 - 315
HCI 444 D
HRJW 340 T6
120-480V 1 & 3 Ph - 60 Hz
6135HF485 - 345
HCI 444 D
HRJW 400 T6
120-480V 1 & 3 Ph - 60 Hz
6135HF485 - 401
HCI 444 E
HRJW 460 T6
120-480V 1 & 3 Ph - 60 Hz
6135HF485 - 460
HCI 444 F
71 | P a g e
12.2 UL 2200 Generator Set Models
Generator Set Model
Voltage
Engine Model
Alternator Model
HJW 30 M6
120/240V 1Ph - 60HZ
4024 TF281-36
UCI 224 D
HJW 55 M6
120/240V 1Ph - 60HZ
4045 TF280-63
UCI 274 E
HJW 70 M6
120/240V 1Ph - 60HZ
4045 HF280-74
UCI 274 E
HJW 85 M6
120/240V 1Ph - 60HZ
4045 HF285-94
UCI 274 F
HJW 30 T6
120/208V 3 Ph - 60 Hz
4024TF281 - 36
PI 144 J
HJW 55 T6
120/208V 3 Ph - 60 Hz
4045TF280 - 63
UCI 224 F
HJW 65 T6
120/208V 3 Ph - 60 Hz
4045HF280 - 74
UCI 224 G
HJW 85 T6
120/208V 3 Ph - 60 Hz
4045HF285 - 94
UCI 274 D
HJW 105 T6
120/208V 3 Ph - 60 Hz
4045HF285 - 118
UCI 274 E
HJW 130 T6
120/208V 3 Ph - 60 Hz
4045HF285 - 147
UCI 274 F
HJW 155 T6
120/208V 3 Ph - 60 Hz
6068HF285 - 177
UCI 274 G
HJW 205 T6
120/208V 3 Ph - 60 Hz
6068HF485 - 235
UCDI 274 K
HJW 225 T6
120/208V 3 Ph - 60 Hz
6090HF484 - 258
HCI 444 D
HJW 275 T6
120/208V 3 Ph - 60 Hz
6090HF484 - 315
HCI 444 E
HJW 305 T6
120/208V 3 Ph - 60 Hz
6135HF485 - 345
HCI 444 F
HJW 355 T6
120/208V 3 Ph - 60 Hz
6135HF485 - 401
HCI 544 C
HJW 410 T6
120/208V 3 Ph - 60 Hz
6135HF485 - 460
HCI 544 D
HJW 30 T6
277/480V 3 Ph - 60 Hz
4024TF281 - 36
PI 144 J
HJW 55 T6
277/480V 3 Ph - 60 Hz
4045TF280 - 63
UCI 224 F
HJW 65 T6
277/480V 3 Ph - 60 Hz
4045HF280 - 74
UCI 224 G
HJW 85 T6
277/480V 3 Ph - 60 Hz
4045HF285 - 94
UCI 274 D
HJW 105 T6
277/480V 3 Ph - 60 Hz
4045HF285 - 118
UCI 274 E
HJW 130 T6
277/480V 3 Ph - 60 Hz
4045HF285 - 147
UCI 274 F
HJW 155 T6
277/480V 3 Ph - 60 Hz
6068HF285 - 177
UCI 274 G
HJW 205 T6
277/480V 3 Ph - 60 Hz
6068HF485 - 235
UCDI 274 K
HJW 225 T6
277/480V 3 Ph - 60 Hz
6090HF484 - 258
HCI 444 D
HJW 275 T6
277/480V 3 Ph - 60 Hz
6090HF484 - 315
HCI 444 F
HJW 305 T6
277/480V 3 Ph - 60 Hz
6135HF485 - 345
HCI 444 F
HJW 355 T6
277/480V 3 Ph - 60 Hz
6135HF485 - 401
HCI 544 C
HJW 410 T6
277/480V 3 Ph - 60 Hz
6135HF485 - 460
HCI 544 D
72 | P a g e
12.3 Engine Models
12.3.1 4024TF281
Engine Type
In-line 4 Cylinder Diesel Engine
Bore & Stroke
3.4 in. (86 mm) x 4.1 in. (105 mm)
Displacement
149 cu. in. (2.4 L)
Compression Ratio
20.5 : 1
Valves Per Cylinder
1 Intake / 1 Exhaust
Combustion System
Direct Injection
Cooling System
Liquid Cooled
Aspiration
Turbocharged
Oil Pressure At Low Idle
N/A
Oil Pressure At Rated Speed
43 psi (296 kPa)
Rated Horsepower Hp (kW)
Prime - 43 (32) Standby - 49 (36)
Rated Speed rpm
1800
Low Idle
N/A
Dimensions Without Radiator
26.1 x 22.3 x 30.4 in. (662 x 566 x 772 mm)
Weight With Flywheel And Housing (dry)
553 lb (251 kg)
12.3.2 4045TF280
Engine Type
In-line 4 Cylinder Diesel Engine
Bore & Stroke
4.19 in. (106 mm) x 5.0 in. (127 mm)
Displacement
275 cu. in. (4.5 L)
Compression Ratio
19.0 : 1
Valves Per Cylinder
1 Intake / 1 Exhaust
Combustion System
Direct Injection
Cooling System
Liquid Cooled
Aspiration
Turbocharged
Oil Pressure At Low Idle
15 psi (105 kPa)
Oil Pressure At Rated Speed
46 psi (320 kPa)
Rated Horsepower Hp (kW)
Prime - 76 (57) Standby - 85 (63)
Rated Speed rpm
1800
Low Idle
1150
Rated Torque Lb/Ft (N•m)
Prime - 409 (302) Standby - 453 (334)
Dimensions Without Radiator
33.9 x 24.1 x 39.1 in. (860 x 612 x 994 mm)
Weight With Oil, Flywheel And Housing
872 lb (396 kg)
73 | P a g e
12.3.3 4045HF-280
Engine Type
In-line 4 Cylinder Diesel Engine
Bore & Stroke
4.19 in. (106 mm) x 5.0 in. (127 mm)
Displacement
275 cu. in. (4.5 L)
Compression Ratio
19.0 : 1
Valves Per Cylinder
1 Intake / 1 Exhaust
Combustion System
Direct Injection
Cooling System
Liquid Cooled
Aspiration
Intercooled
Charge Air Cooling System
Air-To-Air
Oil Pressure At Low Idle
15 psi (105 kPa)
Oil Pressure At Rated Speed
50 psi (345 kPa)
Rated Horsepower Hp (kW)
Prime - 90 (67) Standby - 99 (74)
Rated Speed rpm
1800
Low Idle
1150
Rated Torque Lb/Ft (N•m)
N/A
Dimensions Without Radiator
33.9 x 24.1 x 40.9 in. (860 x 612 x 1039 mm)
Weight With Flywheel And Housing (dry)
1083 lb (491 kg)
12.3.4 4045HF285
Engine Type
In-line 4 Cylinder Diesel Engine
Bore & Stroke
4.19 in. (106 mm) x 5.0 in. (127 mm)
Displacement
275 cu. in. (4.5 L)
Compression Ratio
19.0 : 1
Valves Per Cylinder
1 Intake / 1 Exhaust
Combustion System
Unit Injection
Cooling System
Liquid Cooled
Aspiration
Turbocharged
Charge Air Cooling System
Air-To-Air
Oil Pressure At Low Idle
15 psi (105 kPa)
Oil Pressure At Rated Speed
46 psi (320 kPa)
Rated Horsepower Hp (kW)
Prime - 115 (86) Standby - 126 (94)
Rated Speed rpm
1800
Low Idle
1150
Rated Torque Lb/Ft (N•m)
Prime - 772 (569) Standby - 849 (626)
Dimensions Without Radiator
33.9 x 24.1 x 40.9 in. (860 x 612 x 1039 mm)
Weight With Oil, Flywheel And Housing
1083 lb (491 kg)
74 | P a g e
12.3.5 4045HF-285
Engine Type
In-line 4 Cylinder Diesel Engine
Bore & Stroke
4.19 in. (106 mm) x 5.0 in. (127 mm)
Displacement
275 cu. in. (4.5 L)
Compression Ratio
19.0 : 1
Valves Per Cylinder
1 Intake / 1 Exhaust
Combustion System
Unit Injection
Cooling System
Liquid Cooled
Aspiration
Turbocharged
Charge Air Cooling System
Air-To-Air
Oil Pressure At Low Idle
15 psi (105 kPa)
Oil Pressure At Rated Speed
46 psi (320 kPa)
Rated Horsepower Hp (kW)
Prime - 144 (107) Standby - 158 (118)
Rated Speed rpm
1800
Low Idle
1150
Rated Torque Lb/Ft (N•m)
Prime - 772 (569) Standby - 849 (626)
Dimensions Without Radiator
33.9 x 24.1 x 40.9 in. (860 x 612 x 1039 mm)
Weight With Flywheel And Housing (dry)
1083 lb (491 kg)
12.3.6 4045HF285
Engine Type
In-line 4 Cylinder Diesel Engine
Bore & Stroke
4.19 in. (106 mm) x 5.0 in. (127 mm)
Displacement
275 cu. in. (4.5 L)
Compression Ratio
19.0 : 1
Valves Per Cylinder
1 Intake / 1 Exhaust
Combustion System
Unit Injection
Cooling System
Liquid Cooled
Aspiration
Turbocharged
Charge Air Cooling System
Air-To-Air
Oil Pressure At Low Idle
15 psi (105 kPa)
Oil Pressure At Rated Speed
46 psi (320 kPa)
Rated Horsepower Hp (kW)
Prime - 179 (134) Standby - 197 (147)
Rated Speed rpm
1800
Low Idle
1150
Rated Torque Lb/Ft (N•m)
Prime - 961 (709) Standby - 1057 (780)
Dimensions Without Radiator
33.9 x 24.1 x 40.9 in. (860 x 612 x 1039 mm)
Weight With Oil, Flywheel And Housing
1083 lb (491 kg)
75 | P a g e
12.3.7 6068HF-285
Engine Type
In-line 6 Cylinder Diesel Engine
Bore & Stroke
4.19 in. (106 mm) x 5.0 in. (127 mm)
Displacement
415 cu. in. (6.8 L)
Compression Ratio
19.0 : 1
Valves Per Cylinder
2 Intake / 2 Exhaust
Combustion System
Unit Injection
Cooling System
Liquid Cooled
Aspiration
Turbocharged
Charge Air Cooling System
Air-To-Air
Oil Pressure At Low Idle
15 psi (105 kPa)
Oil Pressure At Rated Speed
44 psi (300 kPa)
Rated Horsepower Hp (kW)
Prime - 216 (161) Standby - 237 (177)
Rated Speed rpm
1800
Low Idle
1150
Rated Torque Lb/Ft (N•m)
Prime - 1151 (849) Standby - 1266 (934)
Dimensions Without Radiator
44.2 x 25.9 x 40.8 in. (1123 x 657 x 1036 mm)
Weight With Flywheel And Housing (dry)
1340 lb (608 kg)
12.3.8 6068HF-485
Engine Type
In-line 6 Cylinder Diesel Engine
Bore & Stroke
4.19 in. (106 mm) x 5.0 in. (127 mm)
Displacement
415 cu. in. (6.8 L)
Compression Ratio
17.0 : 1
Valves Per Cylinder
2 Intake / 2 Exhaust
Combustion System
Unit Injection
Cooling System
Liquid Cooled
Aspiration
Turbocharged
Charge Air Cooling System
Air-To-Air
Oil Pressure At Low Idle
15 psi (105 kPa)
Oil Pressure At Rated Speed
49 psi (339 kPa)
Rated Horsepower Hp (kW)
Prime - 286 (214) Standby - 315 (235)
Rated Speed rpm
1800
Low Idle
1150
Rated Torque Lb/Ft (N•m)
Prime - 1536 (1133) Standby - 1690 (1247)
Dimensions Without Radiator
45.7 x 24.3 x 44.5 in. (1161 x 616 x 1128 mm)
Weight With Oil, Flywheel And Housing
1495 lb (678 kg)
76 | P a g e
12.3.9 6090HF-484
Engine Type
In-line 6 Cylinder Diesel Engine
Bore & Stroke
4.661 in. (118.4 mm) x 5.354 in. (136 mm)
Displacement
549 cu. in. (9.0 L)
Compression Ratio
16.0 : 1
Valves Per Cylinder
2 Intake / 2 Exhaust
Combustion System
High Pressure Common Rail
Cooling System
Liquid Cooled
Aspiration
Turbocharged
Charge Air Cooling System
Air-To-Air
Oil Pressure At Low Idle
28 psi (190 kPa)
Oil Pressure At Rated Speed
38 psi (260 kPa)
Rated Horsepower Hp (kW)
Prime - 380 (284) Standby - 422 (315)
Rated Speed rpm
1800
Low Idle
1000
Rated Torque Lb/Ft (N•m)
Prime - 2039 (1504) Standby - 2266 (1671)
Dimensions Without Radiator
47.6 x 24.8 x 43.8 in. (1208 x 630 x 1113 mm)
Weight With Flywheel And Housing (dry)
1986 lb (901 kg)
12.3.10 6135HF-485
Engine Type
In-line 6 Cylinder Diesel Engine
Bore & Stroke
5.20 in. (132 mm) x 6.50 in. (165 mm)
Displacement
824 cu. in. (13.5 L)
Compression Ratio
16.0 : 1
Valves Per Cylinder
2 Intake / 2 Exhaust
Combustion System
Unit Injection
Cooling System
Liquid Cooled
Aspiration
Turbocharged
Charge Air Cooling System
Air-To-Air
Oil Pressure At Low Idle
20 psi (138 kPa)
Oil Pressure At Rated Speed
42 psi (287 kPa)
Rated Horsepower Hp (kW)
Prime - 561 (419) Standby - 617 (460)
Rated Speed rpm
1800
Low Idle
900
Rated Torque Lb/Ft (N•m)
Prime - 3011 (2221) Standby - 3309 (2440)
Dimensions Without Radiator
52.5 x 33.7 x 59.5 in. (1334 x 855 x 1512 mm)
Weight With Flywheel And Housing (dry)
3292 lb (1493 kg)
77 | P a g e
13. SPECIFICATIONS YANMAR
13.1 Engine Models
13.1.1 4TNV84T
Engine Type
In-line 4 Cylinder Diesel Engine
Bore & Stroke
3.31 in. (84 mm) x 3.54 in. (90 mm)
Displacement
122 cu. in. (2.0 L)
Compression Ratio
18.9 : 1
Combustion System
Direct Injection
Cooling System
Liquid Cooled
Aspiration
Turbocharged
Rated Horsepower Bhp (kWm)
37.1 (27.7)
Rated Speed rpm
1800
Dimensions, Open Skid
66.9 x 24.4 x 50.4 in. (1700 x 620 x 1280 mm)
Dimensions, Sound Attenuated
88.6 x 43.3 x 52.8 in. (2250 x 1100 x 1340 mm)
Weight, Open Skid With Radiator
917 lb (416 kg)
Weight, Sound Attenuated
2315 lb (1050 kg)
13.1.2 4TNV88
Engine Type
In-line 4 Cylinder Diesel Engine
Bore & Stroke
3.46 in. (88 mm) x 3.54 in. (90 mm)
Displacement
134 cu. in. (2.19 L)
Compression Ratio
19.1 : 1
Combustion System
Direct Injection
Cooling System
Liquid Cooled
Aspiration
Natural
Rated Horsepower Bhp (kWm)
30.2 (22.5)
Rated Speed rpm
1800
Dimensions, Open Skid
57.1 x 24.4 x 50.4 in. (1450 x 620 x 1280 mm)
Dimensions, Sound Attenuated
88.6 x 43.3 x 52.8 in. (2250 x 1100 x 1340 mm)
Weight, Open Skid With Radiator
1003 lb (455 kg)
Weight, Sound Attenuated
975 lb (2150 kg)
78 | P a g e
13.1.3 4TNV98
Engine Type
In-line 4 Cylinder Diesel Engine
Bore & Stroke
3.31 in. (84 mm) x 3.54 in. (90 mm)
Displacement
203 cu. in. (3.32 L)
Compression Ratio
18.5 : 1
Combustion System
Direct Injection
Cooling System
Liquid Cooled
Aspiration
Natural
Rated Horsepower Bhp (kWm)
55.8 (41.6)
Rated Speed rpm
1800
Dimensions, Open Skid
76.8 x 30.7 x 50.4 in. (1950 x 620 x 1340 mm)
Dimensions, Sound Attenuated
88.6 x 43.3 x 52.8 in. (2250 x 1100 x 1340 mm)
Weight, Open Skid With Radiator
1332 lb (604 kg)
Weight, Sound Attenuated
2315 lb (1050 kg)
13.1.4 4TNV98T
Engine Type
In-line 4 Cylinder Diesel Engine
Bore & Stroke
3.86 in. (98 mm) x 4.33 in. (110 mm)
Displacement
203 cu. in. (3.32 L)
Compression Ratio
18.1 : 1
Combustion System
Direct Injection
Cooling System
Liquid Cooled
Aspiration
Turbocharged
Rated Horsepower Bhp (kWm)
68.4 (51.0)
Rated Speed rpm
1800
Dimensions, Open Skid
76.8 x 30.7 x 50.4 in. (1950 x 780 x 1280 mm)
Dimensions, Sound Attenuated
88.6 x 43.3 x 52.8 in. (2250 x 1100 x 1340 mm)
Weight, Open Skid With Radiator
1584 lb (702 kg)
Weight, Sound Attenuated
2513 lb (1140 kg)
79 | P a g e
14. PERIODIC MAINTENANCE YANMAR
O=Check
System
X= Replace
•= Contact your authorized Yanmar dealer or distributor
Check Item
Check and refill engine
coolant
Daily
Every 50 Every 250
Hours
Hours
Electrical
Equipment
Check and adjust
cooling fan V-belt
O 1st
time
O 2nd and
after
•
Adjust intake / exhaust
valve clearance
•
Lap intake / exhaust
valve seats
Check indicators
Check engine oil level
O
O
O
Drain and fill engine oil
X 1st
time
Replace engine oil filter
Engine
Speed
Control
Emission
Control
Warranty
Check and adjust
governor lever and
engine speed control
O
O
•
Inspect turbocharger (if
equipped) (blower wash
as necessary)
•
Inspect crankcase
breather system
•
O
Drain fuel tank
O
Drain fuel / water
separator
Fuel
Hoses
X 2nd and
after
Inspect, clean and test
fuel injectors
Check and refill fuel tank
Check fuel / water
separator
O
O
Clean fuel / water
separator
O
Replace fuel filter
X
•
Replace fuel system and
cooling system hoses
Intake and
Exhaust
Clean or replace air
cleaner element
Complete
Engine
Overall visual inspection
daily
Every 2000
Hours
X or every
year
whichever
comes first
Check battery
Engine Oil
Every
1500
Hours
O
Drain, flush and refill
cooling system with new
coolant
Cylinder
Head
Every
1000
Hours
O
Check and clean
radiator fins
Cooling
System
Every 500
Hours
or every 2
years
O
O
80 | P a g e
X
15. SAFETY REGULATIONS
Before operating the machine, read the following
safety regulations carefully, and find out about the
local requirements in safety.
The installation, operation, maintenance and repairs
must be carried out only by authorized and
competent personnel.
The owner is responsible for maintaining the
generating set in good safety conditions. The parts
and accessories must be replaced if they are not in
good working conditions.
15.1. General safety precautions.
• Do not allow non-authorized people to access
the plant.
• Do not allow people with pacemakers to
access the plant, as it may cause
electromagnetic interferences on these
devices.
• Do not approach the G.S. if you are wearing
loose clothes or objects that may be attracted
by the airflow or by the mobile parts of the
engine.
• It is forbidden to dismantle or disable any
safety devices.
• It is forbidden to lean on the G.S. or to leave
objects on it.
For automatic action generating sets:
• Place a red light that switches on when the
unit is working in a visible place.
• Place a warning sign alerting of the possibility
that an unexpected automatic startup of the
machine may occur.
• Place an obligation sign stating: “All
maintenance operations must be carried out
with the generator in the LOCK position”.
• For the emergency stop of the group, press
the “emergency stop” button, located in the
group, or the emergency push button to be
installed outside the engine room.
15.2. Safety at delivery, storage and unpacking.
• Once you receive the lighting tower, check
that the received goods correspond to those
on the delivery note and that all the goods are
in perfect conditions.
• In order to lift and transport the Tower, lifting
machines of the appropriate capacity must be used.
All loose and pivoting parts must be safely fixed
before lifting it.
When moving the G.S., and especially when lifting it,
it is highly recommendable to use the available points
for this purpose. (1-2)
•
It is totally forbidden to use any other lifting
points located over the engine, alternator or
other components.
• If the G.S. is damaged for any reason during
its transportation, storage, and/or mounting, it
must not be started up before being verified
by our specialized personnel.
• If you want to store the Tower until its
utilization, it is highly recommendable to have
a warehouse properly protected against any
chemical agents that may damage its
components.
• Unpacking must be carried out carefully,
avoiding causing any damages to the goods
during such operation, especially when using
levers, saws or any other metallic tools.
15.3. Safety during installation and initial start-up
• The installation of the generator set and its
respective accessories must be carried out by
specialized personnel. In the event of any
difficulties during the installation, consult with
the Technical Department at Himoinsa.
• You must be familiar with the emergency
procedures concerning the installation to be
followed.
• Always wear a safety helmet, footwear and
safety gloves, protective goggles and dry,
tight clothes.
• Do not modify the original protections, located
on all rotary parts on display, hot surfaces, air
intakes, belts and live parts.
• Do not leave dismantled parts, tools or any
other accessories on the engine, near the
engine or in the area where the generator set
is located.
• Do not leave any flammable liquids or rags
soaked in flammable liquids near the
generator set, electrical devices or any other
parts of the electrical installation (including
lamps)Take extreme caution to avoid risks of
fulguration; make sure there is a grounding
installation and that it has been fitted
according to the regulations.
• Place a sign stating: “DO NOT PERFORM
MANOUVERS” in all sectioning parts that
81 | P a g e
•
•
•
•
•
•
•
•
•
•
•
•
•
•
•
separate the areas of the installation where
you are to work.
Install all the necessary protective measures
required for safety in the parts that complete
the installation.
Insulate all connections and wires that are
disconnected. Do not leave any terminals of
the generator sets unprotected.
Plug all connection points concerning the
generator set and its accessories into the
grounding installation.
Verify and make sure the electrical power
connections and the auxiliary services
connections are correctly made.
Check that the cyclical direction of the phases
matches the one of the power supply.
Isolate the position of the emergency stop
switches, quick-stop fuel valves, switches and
other incidental emergency systems existing
in the installation.
Verify the perfect functionality of the stop
devices of the set, especially those in the
following devices (in case they are standard
supplies): overspeed stop, low oil pressure
stop, high water temperature in the engine
stop, and the user-installed emergency stop
switch, which is usually outside the premises.
Check the correct ventilation of the premises
so that the exhaust gases can be released to
the atmosphere, to the exterior of the
premises, and verify that they are in a safe
position away from doors, windows and air
intakes.
Check that pipes and silencers are installed in
a correct way. They must have expansion
joints and be protected against accidental
contact.
Make sure there are no losses or leaks in the
oil and fuel pipes.
Before the starting-up, make sure the
generator set has the right amount of
lubricant oil, cooling liquid and fuel.
Single out the position of the fire
extinguishers and other protective and
emergency devices, and learn how they work.
Single out the sources of dangers, such as
fuel leaks, lubricant oil, acid solutions,
condensed drippings, high pressures and
other dangers.
Check that the set is clean and the
surrounding area and escape routes are clear
and free of obstacles. Check that there are no
obstructions on grilles, intakes and outlets.
Check that there are staff members working
at other nearby sets, and that those tasks are
not dangerous and may affect the operation
of the system.
15.4. Safety during operation
•
•
•
•
•
•
•
Do not allow people or animals to access the
operating area of the G.S..
Do not touch the generator set, especially
wires and connections to the alternator when
the set is operating, since they are live.
Do not touch any parts in motion, until the
generator set has stopped completely.
When the G.S. is in operation, some parts of
the engine, conduit(s) and exhaust reach high
temperatures. Avoid touching them until they
have cooled down completely.
Always wear ear protectors when the
generator set is in operation, in order to avoid
ear damage.
The labels concerning safety must be kept
clean and on the locations designated by the
manufacturer.
Fuels and lubricants may be flammable, toxic,
explosive and corrosive. We recommend
keeping them in their original containers and
storing them in protected areas.
15.5. Safety during maintenance
82 | P a g e
•
•
•
•
•
•
•
•
All checks and/or maintenance of the
generator set must be always carried out by
specialized personnel.
Maintenance operations must be done when
the engine is not working.
Before operating any components of the
electrical installation, disconnect the poles
from the battery.
Before opening the electrical panel,
specialized personnel must take the following
precautions:
o Stop the generator set if it is in
operation, and set the electric panel in
the LOCK position.
o Disconnect the battery/batteries from
the generator set.
o Disconnect the power input.
o Periodically check both the tightness
and insulation of connections.
The different operations and/or maintenance
procedures which are not specifically
indicated in the user handbooks must be
notified to the manufacturer for their approval.
Do not carry out modifications of the product
without having the knowledge and exclusive
authorization by our technical department.
Follow the recommended manufacturer’s
directions concerning oil changes and fuel
replacements. Do not use oils or fuels that
are not specified by the manufacturer.
Spare parts must conform to the
manufacturer’s standards. Use original
•
•
•
•
•
•
•
•
•
•
•
•
•
•
•
spares only. For spares, contact original
spare suppliers only, or workshops in the
HIMOINSA assistance network. For a correct
determination of the spare parts always refer
to the data indicated on the plate of the set,
the type of engine and/or alternator and their
respective registration numbers.
Periodically control the condition of the
different components of the G.S., especially
of antivibration components, the origin of
eventual vibrations and/or the increase in
noise.
Periodically check if there are any water, oil,
fuel and/or acid leaks in the battery/batteries.
Do not modify the engine or other
components of the generator set to obtain
performances different from those specified
by the manufacturer.
Do not operate the fuel tank or fuel supply
conduits when the engine is hot or in
operation.
Wear protective gloves and goggles:
o When using pressurized air;
o During battery maintenance;
o During the supply of inhibitors or
antifreeze products;
o During the replacement or supply of
lubricant oil (hot engine oil can cause
scalds during emptying). Allow the oil
to cool below 60º C.
Wear protective helmets when operating in an
area with suspended loads or equipment at
head level.
Always wear safety footwear and tight
clothes.
When working with parts that may be live,
always make sure that your hands and feet
are dry. We recommend the use of insulating
flooring to perform maneuvers.
Wet clothes must be replaced immediately.
Keep used rags in containers that are antiflammable or indicated for such effect.
Do not leave rags on the engine.
When starting up an engine that has been
repaired, take precautions in order to prevent
air suction in case there is an excess in
revolutions during the start up.
Always keeps the engine clean, removing
eventual oil stains, gas oil and/or other
cooling liquids.
Never start up the engine when the fan speed
regulator lever has been dismantled.
Do not carry out tasks that need the presence
of several people if you are alone, especially
when moving or operating parts such as
switches, section switches, fuses and/or other
live devices.
Engine cooling circuit
•
Never add coolant to a hot engine; allow the
engine to cool down first.
• Periodically check the level of the coolant,
and if necessary, add product until the
appropriate level is reached. Only use liquids
that are recommended in the use and
maintenance handbook.
• Remove the radiator cap gently. The cooling
conduits are usually pressurized, and
therefore the hot liquid may spout if pressure
is released very quickly.
• Periodically check the tightness and level of
wearing of pump belts/fan.
Lubrication circuit.
• Periodically check the level of the oil in the
crankcase, with a cool engine, and add oil
whenever necessary, according to the
directions found in the use and maintenance
handbook.
• Do not smoke or light fires during the oil
supply.
Fuel circuit
• Do not smoke or light fires during the fuel
supply.
• Do not smoke during the fuel replacement,
and be careful not to spill fuel on the
generator set.
Exhaust circuit
• Watch the exhaust circuit, and in the event
that any eventual gas leaks are detected,
repair immediately. These are possible fire
sources.
• Warning: very hot surfaces. Pre-assembled
installation parts are protected against
accidental contacts. The installer must
insulate and/or protect any other additional
parts, gas evacuation pipes, the silencer
which is supplied separately, etc.
Electric start system
• Disconnect the negative pole from the
battery/batteries before operating the engine,
in order to prevent the automatic start system
of the engine from starting while being
operated.
• Keep joints tight and check that the insulation
of the wires is satisfactory.
• We recommend connecting first the positive
pole to the battery, and next the negative pole
(usually grounding), in order to prevent the
formation of electrical arches.
83 | P a g e
Synchronous Generator.
• Do not manipulate the generator when it is in
operation. Before manipulating, set the
generator to the position of LOCK.
• Ensure the air intakes for the ventilation of the
generator are clean, and in some models,
lubricate the bearings. Also, make sure that
the tightness and the position of the electrical
connections are correct.
Control panel
• Before operating the control panel,
disconnect the power input and set the
generator to the position of LOCK.
• Electrical control panels, as all electrical
devices, are damp and dusty. Verify that the
anti-condensation heaters, if available, are in
good working order and that the air ventilation
intakes are clean.
• Periodically check that the bolts that fix
electrical connections are securely screwed.
15.6. Environmental safety.
• Do not start a G.S. in closed premises, where
there is no exhaust installation with outlets.
• Exhaust gases are harmful and may be lethal.
• Follow the rules and other regulations
concerning acoustic installations.
• Replace the exhaust and/or silencer of the
engine if the humming level is louder than the
allowed by the respective regulation.
• Maintenance operations (oil replacements,
fuel tank cleaning, radiator cleaning, washing,
battery/batteries replacements, etc.), storage
and waste disposals will be carried out
according to the existing regulations in the
country where they are being used.
15.7. Safety stickers and information.
There are some safety stickers and
information all over the generator. Next you
can find a brief explanation of their locations
and information on each of them:
16. INADEQUATE USE WARNINGS
The Generator Set that HIMOINSA supplies is aimed
at the production of electrical energy according to the
conditions and environmental and operating limits
established or agreed in this contract. All
amendments of such conditions and limits must be
notified directly to the manufacturer or made via
authorised workshops in order to achieve an optimal
performance and, if necessary, to perform
modifications and/or new calibrations of the
generator.
The Generator Set is a machine that transforms
potential thermal energy, contained in the fuel, into
electrical energy, and is aimed at supplying
distribution installations that must be carried out by
specialists according to existing regulations. Although
the power in use is much lower than that of a public
supply network, the danger of electrical energy is the
same. The generator set is a production plant that,
apart from the existing dangers of electrical source
from a public supply network, also adds other risks
derived from the existence of flammable substances
(the fuel itself or lubricant oils) of rotatory parts and
secondary waste products (exhaust gases and
irradiation and cooling heats).
Although it is possible to take advantage of the heat
contained in the exhaust gases and the cooling
system in order to boost the thermal efficiency of the
process, this application must be fitted by specialized
84 | P a g e
technicians to achieve a reliable installation and safe
for people and things, and to prevent the expiration of
the warranty.
Any other uses that have not been previously agreed
with HIMOINSA shall be considered as of improper
use and, therefore, they are not acceptable.
•
•
17. WORKING CONDITIONS
17.1 Standard environmental conditions for reference
• Diesel engine.
Important: the power of Diesel engines,
for stationary applications, refers to the
following environmental conditions,
according to the ISO 3046/1 standard:
o Room temperature: 25º C
o Room air pressure: 1000 Mbars (750
mm/Hg.)
o Relative humidity: 30%
• Synchronous generator
The environmental conditions used as a
reference for alternators, stationary
applications, according to the directives
IEC 34-I, ISO 8528-3 and CEI 2-3, are the
following:
o Room temperature: 40°C (30°C
according to NEMA)
o Altitude: 1000m ASL (674 mm/Hg)
•
•
•
•
The user/customer must clearly establish the
effective environmental conditions in which the
Generator Set will operate when placing the order.
Therefore, the derating and declassification must be
fixed at the time of signing the agreement, so that
both the engine and the generator are correctly sized.
Particularly, the user/customer must report on the
following environmental conditions in which the
generator set will operate:
• The upper and lower room temperature limits.
• The altitude above sea level or, preferably the
minimum and maximum values of barometric
pressure in the installation area; in case of
mobile sets, the upper and lower limits of
altitude above sea level.
• The humidity values in relation to the
temperature and air pressure within the
installation, paying special attention to the
85 | P a g e
Dusty and/or sandy environments
Maritime environments
Environments with the possibility of
chemical pollution
o Environments with existence of
radiations.
o Operating conditions with the
presence of great vibration (e.g.
earthquake-prone areas, or subject to
external vibrations caused by nearby
machines).
When the effective conditions are not
specified in the contractual base, the power of
the generator is interpreted according to the
Standard conditions for Diesel engines, as
established.
If the effective environmental conditions
change subsequently, it will be necessary to
contact HIMOINSA, in order to calculate the
new power losses and to carry out the
necessary calibrations.
For Diesel engines, these deratings are
determined by the manufacturers of the
respective engine. In order to become familiar
with them, contact the technical department
at HIMOINSA, or ask your regular supplier.
The alternator derating is not as important as
the one of Diesel engines; therefore, the
general derating of the generator generator
matches the derating of the engine.
Chart 4 is a merely indicative way of
determining the derating of alternators. For a
higher precision, you must refer to the
supplier’s documentation.
o
o
o
17.2. Derating for operative environmental conditions.
For environmental conditions of installation and
operation different from those above specified, it is
necessary to foresee an eventual loss of power, or
'derating', not only in the engine, but also in the
generator that is fitted into it, and therefore, in the
electric power provided by the generator.
humidity value with respect to the maximum
temperature.
The maximum and minimum temperatures of
the cooling water, only in those generators
that are equipped with water-water
interchangers (under special request) instead
of a radiator.
Any other environmental conditions that may
require special solutions or shorter
maintenance cycles, such as:
•
of 500 hours per year. The load factor must
not exceed 90% of the SBY.
Overloads are not allowed.
17.3. Operational limits.
At the stage of placing the order, the
user/customer must report on all the operative
conditions that may affect the working order
of the generator. Along with the
environmental conditions stated above,
special attention must be paid to the
characteristics of the loads the generator is
going to feed, the power, voltage and power
factor. The connection sequence of the loads
must be determined and indicated with high
accuracy.
⇒ Power
The power of the generator is the active
power (expressed in kW), supplied on
generator terminals, to the voltage and
nominal frequency and for the specified
environmental conditions. Below their
respective definitions can be found:
The specified features, with a ± 3% tolerance,
are net and can be obtained after 50 hours of
operation.
Continuous Power (COP)
It is the continuous power that the generator
set can produce continuously for a limited
number of hours per year, performing the
maintenance intervals described by the
manufacturer and in the specified
environmental conditions.
Prime Power (PRP)
It is the maximum power available, for a cycle
with variable power, that the generator set
can produce for a limited number of hours per
year, performing the maintenance intervals
described by the manufacturer and in the
specified environmental conditions. The
average power produced for a period of 24
hours must not exceed 80% of the PRP.
A 10% overload is allowed for 1 hour out of
12 operating hours.
Stand By Power (SBY)
It is the maximum power which, in the
established environmental conditions, the
generator can produce for a maximum period
86 | P a g e
⇒ Rate
HIMOINSA generators are prepared to work
at 1,500 rpm or 1,800 rpm at a rate of 50 or
60 Hz, respectively.
Low-power engines are equipped with a
mechanical rpm regulator, installed in the
injection pump; this is normally adjusted so
that motionlessness is 5% and therefore the
output rate is 52.5 Hz with no load, and 50 Hz
at full load.
In static conditions, the mechanical rpm
regulator usually provides an accuracy of ±
0.5%.
⇒ Voltage
The voltage regulator is usually
ELECTRONIC with features that can control
the voltage of the terminals.
For supercharged engines, it is possible to
apply an instant voltage equivalent to 80% of
the nominal voltage with a transitory fall in
speed within 10%.
The specified values, for both naturally
aspirated engines and supercharged engines,
may vary, as usual, depending on the type of
speed regulator and the generator used.
⇒ Power factor
The power of generators is the active power,
expressed in kW, produced by the terminals
of the generator. The nominal power factor is
cos =0.8; therefore, the apparently nominal
power will be 1.25 times the Nominal Active
Power.
The power factor is a piece of information that
depends on the characteristics of the load;
HIMOINSA generators, equipped with an
alternator, can produce both the active power
and the reactive power required by the load
but, whereas the active power is produced by
the Diesel engine (transforming mechanical
power into electric power by means of the
generator), the reactive power is produced by
the alternator.
Therefore, for a performance with values
different from cos =0.8 we must consider:
Cos 0.8 <> 1 load.
The alternador works perfectly at active
nominal power with the cos values between
0.8 and 1. In order to prevent engine
overload, it is required not to exceed the
active nominal power.
Cos < 0.8 load.
The alternator, for a certain plate value with
reference cos = 0.8, overloads more when the
cos value comes closer to 0. Therefore, the
reactive power to be produced increases as
the cos decreases. The generator reduces its
power according to the directions provided by
the manufacturer.
For reference purposes, Chart 5 is presented
so as to determine these reductions in power.
For a higher accuracy refer to the
documentation provided by the generator’s
manufacturer.
⇒ Start-up of asynchronous engines
The start-up of asynchronous engines by
means of a generator set poses some
problems, as engines with squirrel cage
motors have start-up voltages that are 8 times
higher than the normal intensity of the
generator (Iarr = 8 x In), and a low power
factor.
In these conditions, the current that is
absorbed by the asynchronous engine (or by
the engines that start simultaneously) during
the start-up, must not exceed the maximum
current that the generator can produce in
short times, taking into account a tolerable fall
in voltage and without exceeding overheat
limits.
⇒ Single-phase loads
The generators may be supplied with
unbalanced loads that can reach the nominal
current of each phase. This means that
between two phases (for example, L1 and L2)
you cannot insert more than 0.58 of the threephase nominal power of the set: similarly,
between one phase and the neutral (eg. L3
and neutral) you cannot insert more than 1/3
(that is, 33%) of the three-phase power of the
plate.
It is necessary to take into consideration that
during the single-phase operation, or with
unbalanced loads, the voltage regulator
cannot hold the expected voltage tolerances.
In order to avoid this excessive oversize of
the generator, the following systems can be
used: Several engines: distribute them in
several groups each, according a pre-set
sequence, at time intervals of 30-60 seconds.
One engine: whenever the operating machine
that is fitted allows it, by using a startup
system with reduced voltage (star/triangle or
self-transformer), or, for higher powers,
single-coil rotor engines and rheostat starters.
For star/triangle startups, the voltage of each
phase turns out to be reduced and the startup
voltage (larr) decreases in the same
proportion.
⇒ Charge intakes
When a charge is applied to a generating set,
a series of transitory variations of voltage and
frequency occur. The scope of such variations
depends on the value of the power, both
active (kW) and reactive (kVAR) of the
variations of the load, depending on the
characteristics of the diesel engine and
alternator.
It is evident that, in the case of an engine with
larr=6 x In in direct startup, with a star/triangle
startup, it reduces approximately up to 3.5xIn,
and as a consequence there is a power
request to the generator which is lower than a
6/3.5 ratio.
In all cases, both direct startup and reduced
voltage startups, it is necessary to control the
devices and equipment that are connected to
the circuit in use in order to avoid failures (eg.
the opening of contractors) due to a transitory
fall in voltage at the time of startup.
When charge intake capacity constitutes an
important requirement, the customer/user
must
clearly specify it and must provide HIMOINSA
with all the necessary information related to
the different loads to feed, it’s possible
distribution in groups and the connection
sequence. The former is necessary to obtain
the best dimensions of the generator and to
prevent low-profit oversized generators or
dangerously downsized ones.
18. GENERAL DESCRIPTION
The sets are used for two main types of services:
Continuous service sets: Used for the production of
electrical energy in areas where there is no other
87 | P a g e
source of production and application for several
purposes (motion force, lighting, heating, etc.)
Emergency service sets: They are used to solve
energy interruptions that may cause serious problems
to people, physical and/or financial damage
(hospitals, industrial facilities, airports, etc.) or to face
consumption peaks.
Depending on the assigned destination, the sets are
subdivided into:
Sets for terrestrial use
Sets for maritime use
The sets for terrestrial use, depending on the use
they are aimed at, have been provided with two
types:
Static sets (for fixed installations)
Mobile sets (for mobile installations)
Both types can be subdivided at the same time into a
wide range of models depending on their variety and
user demands:
Manual operation generators
Automatic operation generators
Continuity sets
18.1. Diesel engines
They operate with a four-stroke diesel cycle,
naturally aspirated direct injection,
turbocharged and/or aftercooled. The layout
of the cylinders depends on the engine
model, and it can be in-line or V-type. It is a
water-cooled type of engine.
18.2. Monopalier alternator
Generator with a horizontal shaft,
synchronous without brushes, auto excited
and auto regulated. The alternator has an
automatic voltage regulator. This regulator
has got potentiometers in order to adapt the
functioning to the different conditions in which
the set is used.
to the ground. The fitting to the foundations is
usually made by means of long bolts with
nothing in between.
The fuel tank is located on this support
bedplate which, depending on the model, is
equipped with a filling hole, a flow meter (one
or two signals), an emptying hole and a vent,
and it is connected to the aspiration pipes of
the injection pump by means of flexible
elements, and fuel returns from theinjection
pump and the injectors drain.
Due to the specific needs of our customer, we
can supply high capacity tanks separately.
However, in this handbook we shall only
describe the fuel tanks that are fitted into the
supporting base. Moreover, inside the
supporting base it is possible to find a suitable
housing for the battery/batteries with its
respective fixing iron fittings.
18.5. Soundproof bonnet
Depending on our customers’ demands and
applications, the generator may be equipped
with a protective soundproof bonnet. Such
bonnet is made of steel sheets of a suitable
thickness, accordingly treated in order to
allow a perfect finish.
The bonnet is internally covered with a
fireproof, sound-absorbing material classified
as M-0 material. In air intakes and outlets, the
bonnet is equipped with its respective piping,
designed for driving air without producing the
logical reverberations of a forced air drive.
The engine exhaust is silenced using a highperformance noise-reduction silencer that
guarantees a correct noise reduction level.
The bonnet is equipped with perfectly
soundproof doors covered with fireproof fiber.
The locks are supplied with keys that prevent
an improper use by unauthorized personnel,
even in the control area of the generator.
18.6. Electrical panel with manual start
The HIMOINSA electrical panel is designed to
bring together the electrical control
equipment, the general protections of the
engine and alternator, the alarms and
measure and control equipment.
18.7. Electrical panel with automatic start
The automatic panels are connected to the
power supply and to the set. When the
electrical supply is suitable the power supply
contactors are locked and the supply to the
sets comes from the power supply.
18.4. Support bedplate
When the electric supply is poor the power
The support bedplate or base consists of a
supply contractors unlock and the generator
folded metal sheet with a suitable stiffness,
starts automatically. The generator contactors
which holds the generator set by means of
detect voltage in the terminals and switch in
elastic supports (silentblocks) that remove the
order to make use of the generator.
transmission of vibrations to it, and therefore,
88 | P a g e
18.3. Coupling joint
It is possible to use two-bearing alternators
upon request. The engine and the alternator
are joined by means of elastic coupling and
through a hood coupling in order to guarantee
a correct coaxial position of the assembly.
For standard assemblies it is possible to use
single-bearing alternators, and the connection
is made by means of flexible disks that are
fixed directly to the engine wheel.
19.3. Indoor installations
Please contact our commercial department to
find out about the possibilities that our control
systems can offer.
18.8. Control and protection controller
Specific handbooks and electric diagram are
supplied belong each control panel.
•
Generator room
For the correct installation of a
generator in closed premises, the size
of the room must allow:
o
19. INSTALLATION
o
19.1. Important warnings:
When the generator is delivered it is
advisable to check that the received material
matches the order, and to compare it with the
delivery note that is enclosed with the set.
Also, check that the material is not damaged.
Proceed to open the packaging.
In case any flaws are detected, you must
contact the shipping company immediately in
order to report the incident to the insurance
company.
“Himoinsa specifies that all deliveries are
made at the customer’s complete risk”
During the operations prior to the installation
of the automatically-driven generators, or
when connecting the electrical connections,
or in order to avoid unfortunate startups, etc.
the following precaution measures must be
taken:
Battery/batteries must be
disconnected.
The control panel switch must be set
to the OFF position.
Safety rules for diesel G.S.
The engine room and installations of the set
(foundations, air intake, gas exhaust) must
match the “Safety rules” that exist in the
country where the generator will be installed.
o
Installation
For stationary generators, two types of
installation can be considered:
Outdoors assembly
Indoors assembly
19.2. Outdoor installations.
The generators which are assembled
outdoors (excluding soundproof sets, that are
intended for such applications), must be
located in a place which must be as protected
against weather conditions, dust, etc. as
possible.
For temporary installations, the generator can
rest on a well-levelled surface. For long-time
installations, it is advisable to build a concrete
base.
89 | P a g e
o
o
o
o
The regular operation of the
generator.
An easy access to its components
for maintenance and possible
repairs.
The possibility of introducing the
generator using the available
means of transport. The door
through which the generator will
be introduced must be centered,
so that the set remains centered
once it is inside, and there is no
need of moving it.
The existence of holes that allow
oil replacement.
The installation of the exhaust
pipe with the minimum possible
number of pipe elbows.
The generator to be placed in the
middle of the premises, with
respect to perimeter walls, in
order to facilitate access.
The layout of the command panel
(in case it is an automatic set) to
be in a position that allows the
operator to have complete
visibility over the instruments
when operating it.
The recommended room dimensions are
displayed in the following pictures:
ENCLOSED GENERATOR
1. Generating set.
2. Control panel.
3. Air intake gap.
4. Air outlet tunnel.
5. Cable wire way.
6. Access door.
7. Reinforced concrete base.
8. Exhaust pipe.
9. Flexible pipe.
10. Exhaust silencer.
* May vary depending on the function of
the outlet section of the model (see plans of the
specific model to be installed).
The dimensions showed are in millimeters.
OPEN SET GENERATOR
1. Generating set.
2. Control panel.
3. Air intake gap.
4. Air outlet tunnel.
5. Cable wire way.
6. Access door.
7. Reinforced concrete base.
8. Exhaust pipe.
9. Flexible pipe.
10. Exhaust silencer.
* May vary depending on the function of the outlet
section of the model (see plans of the specific model
to be installed).
r
e
c
o
m
m
e
n
d
e
d
t
h
a
t
t
h
e
The dimensions showed are in millimeters.
f
oundations are approximately 10cm above
the floor level, and covered with gres
industrial sandstone tiles.
The basic elements to be considered are:
• Foundations
• Exhaust installations
• Ventilation
• Fuel installation.
• Electrical connections
• Grounding.
• Heating
⇒ Exhaust installation
Exhaust outlet pipes
The outlet pipes for exhaust gases are usually
made of flat steel, with no welding, or in other
special cases, with asbestos-concrete pipes.
⇒ Foundations
The foundations must be calculated and
dimensioned by experts in civil engineering.
They must prevent the transmission of
vibrations and noise to other parts of the
building. The surface on which the set will
be placed must be leveled in order to allow its
correct operation. For cleaning reasons, it is
90 | P a g e
The pipes must evacuate the gases to those
areas where they cause no danger or
damage, and must end with a protection cap
to protect them from water entry, or with a
similar system. (1) and (2)
In the part where they run through the walls, it is
recommended to perform a thermal insulation of the
pipes, in order to prevent heat expansion to the walls.
(3)
The joints between the different pipe stretches must
be perfectly sealed, so that there are no gas leaks.
The connection between flange and gasket is the
most ideal one. It is also recommended to place a
condensation collector, with faucet, on the bottoms
point of the pipelines.
The connection between the engine’s collector outlet
(or the turbo blower exhaust for supercharged types)
and the pipe must be made by means of a stretch of
flexible tube, so that the actions induced by the
engine and the thermal expansions of the pipe are
absorbed by the engine without damaging any
elements.
The use of flexible element also demands the
placement of flanges in the exhaust pipe,
independent of the generator. Therefore, the
pipelines must be fixed to the walls or ceiling of the
engine room, with supports that can bear the weight
of the pipe to the engine outlet, so that it does not
rest on the parts of the engine (collector, turbo
blower), and allow its expansion.
When dealing with very long pipes, it is necessary to
insert expansion joints made of sealed flexible
elements.
When establishing the trajectory of the exhaust pipe,
it is necessary that the pipe is not near the engine air
filters, in order to prevent the machine from drawing
in hot air. Otherwise, it will be necessary to insulate it.
Whenever there are several generators, it is
advisable that all exhausts do not converge on a
common pipe, as there can be problems when some
generators are in operation and others are not. The
produced exhaust gases can penetrate in the
conduits of the sets that are not in operation and may
cause damage.
91 | P a g e
A. Exhaust pipes measurement for Standard
Static Generators
The engine’s exhaust backpressure has a remarkable
influence on the produced power and on the thermal
charge.
Excessive backpressure values (measured at the
exhaust collector outlet for turbocharged engines,
and at the turbine outlet in case of supercharged
engines) cause reductions in power, rise in
temperature of exhaust gases, fumes, high fuel
consumption, cooling water overheat, lubricant
degradation, and the ensuing consequences on the
engine parts.
The limits that must not be exceeded (referred to the
delivery conditions of maximum power at full throttle)
in HIMOINSA genets must be consulted in the
factory.
Such limits can be observed considering the
dimensions that are suitable for the exhaust
installation, that is, the diameter of the pipe and type
of silencer.
The pipes must be as short as possible, and with as
few pipe elbows as possible. Whenever these are
essential, they must be used with a very wide angle
of curvature (from 2.5 to 3 times the diameter of the
pipe).
Solutions with bends of angles lower than 2.5 times
the diameter pose difficulties so they must be
avoided.
In order to calculate the total length of the pipe (which
is crucial for the exhaust’s backpressure), the
following considerations must be taken into account:
The rectified length of the pipe elbows must be
determined according to the chart and pictures:
In order to calculate the diameter of the exhaust
gases pipe it is possible to use the nomogram that
can be found below:
•
The backpressure values due to the exhaust
silencers may vary within a wide range, depending on
the type of building, dimensions and noise abatement
characteristics:
•
- If it is the one supplied by HIMOINSA, the length
must be multiplied by a coefficient of safety, so that
the total length to be considered due to backpressure
will be: L=2xl.
- If it has been provided by another supplier, it is
recommended to check the value of backpressure
derived from the silencer with the supplier.
92 | P a g e
For calculation purposes, in this nomogram
we will use the following backpressure
values:
- 800 mm H2O, for aspirated engines.
- 400 mm H2O, for supercharged
engines.
Exhaust gases airflow in kg/h. In order to
convert into m3/h, the data must be divided
by the exhaust gases density. Request these
data to the manufacturer.
silencer can be altered, by reducing the length of the
The exhaust pipe cannot have a lower diameter than
the collector pipe of the engine exhaust, and also, the
straight stretches must have a slight inclination in
order to prevent the return of condensates, as shown
on the location plan of the generator in the room.
When the diameter of the pipe is higher, the engine
joint must have a conic connection element with a
conicity below 30º in order to avoid excessive load
losses.
B. Exhaust pipes measuring for Soundproof
Static Generators
Check with the HIMOINSA engineering department.
There is backpressure in the outlet of the generator
which is caused by the internal pipes. It is necessary
to know this value so as not to exceed the
recommended backpressure when designing the rest
of the installation.
⇒ Exhaust silencer
The exhaust silencer is usually attached to the stretch
of pipe that remains inside the room where the
generator is located. Whenever possible, it can be
separated from the generator.
The silencer used in industrial applications performs
a 15 to 20 decibels noise reduction.
In order to reduce the noise caused by the
resonances of gas pulses in pipes, the position of the
tube that goes into the engine. For example, for a
10m long pipe, the optimal position would be half-way
through the distance in relation to the outlet.
In the cases of private installations, such as hospitals
or residential areas, where a higher noise reduction is
required, special silencers can be used, with a
reduction of 25 to 30 decibels, and whenever
possible, using special quiet chambers.
⇒ Ventilation
The ventilation of the engine room where the G.S. is
installed is of vital importance for a correct operation
and durability of the generator.
The engine room must have the following features:
- Allow the dissipation of the heat produced
when the generator is in operation by
irradiation and convection.
- Guarantee the correct supply airflow, and in
the right amount for the engine combustion.
- Allow the engine cooling by means of the
radiator, keeping the operating room
temperature within the safety limits in order to
guarantee a good aspiration of the supply air.
A good ventilation solution applicable to most cases
is the one indicated in the charts of the sections of
the installation, in which the engine fan draws in the
cooling air from the engine room, whereas the hot air
93 | P a g e
is expelled through the expulsion tunnel placed
between the radiator and the room window.
The expulsion window must have a bigger or same
size as the radiator in case of standard static
generators, and bigger or same as the expulsion grid
in case of soundproof sets.
We must prevent the radiator exhaust hot air from
coming back to the engine room, making sure the
expulsion conducts are leak-proof. Therefore, the air
in the engine room is constantly renovated, and the
dimensions of intake grilles must be big enough for
the cooling and combustion.
In order to achieve a correct air flow, the cool air must
be introduced through the grilles that are located on
the lower part of the engine room wall. This wall
should be the one located opposite the radiator, so
that the air flows all over the set before being
expelled through the fan.
Make sure there are no areas in the engine room
where the air is deposited. This usually happens in
rooms with several engines. In those cases, and
whenever possible, each group should have its own
air intake grille.
In case you need more details about the air flow
required for the different types of HIMOINSA
generators, please refer to the manufacturer.
For safety reasons, in those premises where there
are sets in continuous operation, or in those areas
where the room temperature is high, it is advisable to
use an auxiliary extractor fan that has enough power
to achieve suitable ventilation. Such extractor fan
must be located on top of the room, as close to the
radiator as possible.
⇒ Fuel installation
Generator sets supplied by HIMOINSA include a
complete fuel installation, since the fuel tank is
located on the bedplate of the generator.
The fuel tank is connected through flexible tubes in
order to guarantee their operating durability,
depending on the model. For longer durability, and in
order to satisfy special demands, it is necessary to
use a special tank that is fitted separately. It will be
necessary to connect the engine to the new tank, and
previously perform the placing of the flexible
connections and new suitable pipes that must be
firmly fixed. The new fuel tank must be located
according to the following criteria, so that the engine
injection pump is able to draw in fuel from the new
tank:
• Closer than 20m from the engine, in case
they are both at the same level.
• Less than 5m deep.
The usual connections are:
• For fuel injections to the engine injection
pump.
•
•
For fuel excess returns from the injection
pump.
For drain return of the injectors.
The pipes must not have any welds. They can be
made of steel, iron or cast iron. Galvanized steel
pipelines must not be used.
Flexible connections must be fitted in order to isolate
the static parts of the plant from the new fuel tank, in
order to avoid the possible vibrations caused by the
engine. Depending on the type of engine, these can
be made using the following:
Stretches with a suitable length made of reinforced
rubber pipes with flexible insertions that are resistant
to gas oil. For the connections with the terminal
rubber holders with edges and screw clamps.
Flexible low-pressure type tubes, suitable for gas oil,
protected with metal mesh and with screwed
terminals for tightly-sealing.
Synthetic resins must be avoided.
In complementary areas of the plant, maximum
attention must be paid to the following issues:
- Fix pipes by means of holders, at regular
intervals in a way that vibrations and
inflexions caused by pipes weight are
avoided, especially those made of copper
tube.
- Couplings must be avoided. In case of using
them they must be tightly-sealed, especially in
depression conditions parts (fuel aspiration
intake), in order to avoid air filtrations that
make the startup more difficult.
- Aspiration pipes below the fuel level must be
placed at a distance of 20-30mm from the
bottom, in order to avoid a possible
deactivation of the circuit due to air
insufflations. Also, these must be
conveniently separated from each other, in a
way that the fuel return flow does not block
the supply due to the gas oil impurities from
the bottom of the tank or mixed air.
- Thorough cleaning of the used pipes.
- Avoid abrupt variations in the tube section
and the use of elbows with wide angles in
pipes.
⇒ Electrical connections
The generators are ready for user connections.
When making the connections, you must comply with
the conditions specified in the diagrams enclosed
with the generator.
Generator of manual intervention
The user cables must be connected to
the line terminals which, for standard
static generators, are located inside
the electrical panel, on the rail
terminals or at the bottom of the
magneto thermal switch, either inside
94 | P a g e
the panel or in the molded box (check
the electrical diagrams included in the
manual of the panel). For soundproof
sets, the connection to the grounding
terminals is easily accessible, as they
are prepared for such effect and
protected with a methacrylate sheet.
Generator for automatic intervention
The cables that come from the
generator, the external power supply
and user shall be connected to their
respective terminals, located in the
command panel. The power cables of
the generator shall be connected
directly to alternator terminals of the
generator.
values in case a sudden start or power input may
damage the engine.
The connection to auxiliary services
between the set and the command
panel shall be made with a multiple
cable and using the multiple
connectors plugs provided with the
set.
Cable dimensions
The choice and dimensions of the
cables is responsibility of the person
who carries out the installation.
Cable positioning
Power cables, for both manual and
automatic sets, must be placed in
suitable channeling, tunnels or
protective conduct-holder. Do not
include 400V and 12V (or 24V) cables
in the same channeling.
⇒ Grounding
Metal parts of installations which are exposed to
human contact, and due to an insulation flaw or other
reasons, may get in contact with voltage, must be
connected to land-dispersion device. The generators
and panels have been equipped with their respective
grounding terminals. The connection of these to the
land-dispersion must be made with bare copper wires
conductors with a minimum section of 16mm2, or if
not available, galvanized iron with a 50 mm2 section.
The resistance of such conductor, including the
contact resistance, must not exceed 0.15 Ohm.
⇒ Heating
For automatic start generators, the engine room
where they are installed must be conveniently
conditioned during the cold season, in a way that the
room temperature is not below 10-15º C, a required
condition for a quick engine start.
Electric heaters with thermostatic controls ranging
from 500 to 1500W, depending on the generator,
have also been supplied with those sets. They
maintain the water temperature within acceptable
95 | P a g e
Once the batteries are settled and cool, check that
the level of liquid is between the maximum and
minimum levels.
20. BEFORE OPERATION
These operations must be performed in the following
situations:
• Before the startup.
• After the installation of the set.
• After a general check.
• If maintenance operations have been carried
out.
• If the set has been idle for a long time.
During these operations, make sure the set
cannot be started.
Water level in the radiator In case the radiator needs
water, it must be refilled with a mix containing at least
50% of coolant liquid/corrosion inhibitor Paraflu II
type, and the rest with clean water.
Oil lubricant level in the crankcase
The type of oil to be used is: ACEA E3/API CF4/MIL
L2104E/F for supercharged engines and ACEA
E2/API CJ4/MIL L2104E/F for aspirated engines. Fill
up the crankcase with oil, up to the top mark of the
graduated dipstick, but without exceeding it. With the
cool engine, and after a short time in operation,
recheck the lubricant oil, and if necessary, add the
amount that is missing.
Fuel tank level
If the fuel level is below the minimum required for the
startup of the generator, it is necessary to add fuel
until the tank is full.
Electrical regulations
Before starting up the generator, all electrical
connections, startup batteries and earth connections
must be checked. The terminals must be firmly
connected and all switches must be set to their
unlocked positions.
Cyclical direction of the phases
For generators intervention automatic or in those
auxiliary, hand-operated ones for external production
lines, make sure the cyclical direction of the alternator
phases matches the phases of the external producer
in order to avoid reversals in rotation and other
inconveniences.
Air filter check-up
It must not have obstructions or porosities that
prevent a good air filtering. In case of showing
deterioration you must proceed with the maintenance
operations of the air filter.
Radiator/intercooler (air/air) check-up
Verify that the surface of the radiator air intake is
clean.
Checkup of the liquid level in batteries
96 | P a g e
21. VOLTAGE CHANGE OVER BOARD
(HRMW range)
The HRMW Rental Ready Generator Set is equipped
with a two position voltage Change Over Board. This
system allows the operator to quick swap from
voltage to another without having to touch any of the
internal wiring of the alternator. Changing the position
of the copper buss bars located inside the voltage
reconnect board enable the machine to operate in
277/480V (High Wye) or 120/208V (Low Wye).
21.1
Locating the Change Over Board
Panel.
The voltage quick reconnect panel is located on top of
the generator end enclosure/ Housing. Inside this
panel are the copper bonding bars as known as
“jumpers” that allow the Voltage Change Over Board
(VCOB) to jump the generator winding from Low Wye
to High Wye.
21.2 277/480V Position
When the VCOB is located in upper position the
generator will operate in a STAR CONNECTION
common known as High Wye.
DANGER LIVE VOLTAGE.
Warning risk of electric shock! do not operate this
panel without reading manual or proper training.
For use by qualified personnel only.
21.3 120/208V Position
When the VCOB is located in lower position the
generator will operate in a STAR PARALLEL
CONNECTION common known as Low Wye.
97 | P a g e
For information regarding the electrical wiring diagram
of the VCOB, please see owner’s manual located
inside the generator set.
21.4 How to change the voltage
Step 1
In order to access the VCOB, loosen the six bolts the
hold the access door in place, see RED arrow in the
illustration to locate BOLTS. To remove the door,
slide up about ½” follow by pulling out towards the
back of the engine, see BLUE arrow in the
illustration.
Step 2
Remove the seven nuts [shown in green color] that
hold the front panel of the VCOB, see RED arrow in
the illustration to locate NUTS. Do not remove the rest
of bolts that hold the jumper buss bar assembly.
Step 3
Remove the jumper bar assembly, by pulling out on
the two black handles, see BLACK arrow in the
illustration to locate HANDLES. Reconnect the jumper
bar assembly to desire voltage. To obtain 120/208V
connect the VCOB in the lower position or for
277/480V connect to upper position, see BLUE arrow
in the illustration.
Step 4
Assemble everything back together in the reverse
sequence of the three first steps. If selecting the
277/480V position all unused nuts must be tighten
back to original studs for future use, see RED arrow in
the illustration to locate NUTS.
MORE INSTRUCTIONS ARE LABELED
INSIDE THE CHANGE OVER BOX.
98 | P a g e
22. REAR DISTRIBUTION PANEL
The panel has three, 50 amp twist lock connectors.
It has three, 50 amp breakers for protection for the
twist lock 1 phase 120/240 twist lock plugs.
The panel is equipped with two, 20 amp GFI plugs
120 volts protected by two, 20 amp circuit breakers.
DO NOT USE GFI PLUG WHEN SELECTOR IS IN
480 VOLT 3 PHASE POSITION BECAUSE THE
VOLTAGE IS TOO HIGH 138 VOLTS.
The upper portion of the distribution panel is
protected by the 50 amp and 20 amp breakers in the
front of the panel.
The cam locks and mounting lugs are protected by
the main circuit breaker by the main control panel.
The panel has five cam lock plugs.
⇒ Black A phase or L1
⇒ Red B phase or L2
⇒ Blue C phase or L3
⇒ White Neutral
⇒ Green Ground
The control panel also has mounting lugs for A, B, C,
& neutral and ground.
Amps and the KVA size of the generator determine
the number of connections. If needed, you can also
pull power from the lower panel under the circuit
breaker located by the control panel.
99 | P a g e
400 AMPS REAR DISTRIBUTION PANEL
800 AMPS REAR DISTRIBUTION PANEL
1200 AMPS REAR DISTRIBUTION PANEL
100 | P a g e
101 | P a g e
102 | P a g e
103 | P a g e
104 | P a g e
105 | P a g e
106 | P a g e
107 | P a g e
108 | P a g e
109 | P a g e
110 | P a g e
111 | P a g e
112 | P a g e
113 | P a g e
114 | P a g e
115 | P a g e
116 | P a g e
117 | P a g e
118 | P a g e
119 | P a g e
120 | P a g e
121 | P a g e
122 | P a g e
123 | P a g e
124 | P a g e
125 | P a g e
126 | P a g e