Download Family Dollar

Transcript
Installation & Operations Manual
Master-Bilt Products
908 Highway 15 North
New Albany, MS 38652
Phone: (800) 684-8988
PN 075-90000
Rev 3-6-08
2
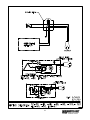
TABLE OF CONTENTS
INTRODUCTION………………………………….…………………………………………………………………... 4
STORE CONDITIONS…………………………….……………….…..…………………………………………….. 4
WARNING LABELS AND SAFETY INSTRUCTIONS………..…..……………………………………………… 5
PRE-INSTALLATION INSTRUCTIONS………………………..…..………………………………….…………… 6
Inspection for Shipping Damage…………………………………………………………….…………….. 6
INSTALLATION INSTRUCTIONS………………………………………………………………………………….. 6
General Instructions…………………………………………………………………………………………. 6
Electrical…………...…………………………………………………………………………………………..6
REPLACING CONDENSATE HEATERS………………………………………………………………………….. 7
TEMPERATURE CONTROL.………………………………………………………………………………………...7
CLEANING INSTRUCTIONS………………………………………………………………………………………...7
SERVICE INSTRUCTIONS………………………………………………………………………………………….. 8
MASTER-BILT PART NUMBERS……………………………………………………………………………………9
DC SERIES OPTIONS.………………………………………………………………………………………………..9
SALE AND DISPOSAL……………………………………………………………………………………………….10
WIRING DIAGRAM………………………………………………………………………………………………..….11
3
INTRODUCTION
Thank you for purchasing a Master-Bilt cabinet. This manual contains important instructions for installing, using and
servicing a Master-Bilt DC/FLR case. A parts list is included in with this manual. Read all these documents carefully
before installing or servicing your equipment.
STORE CONDITIONS
The Master-Bilt DC/FLR cases are designed to operate in the controlled environment of an air-conditioned store.
The store temperature should be at or below 75°F and a relative humidity of 55% or less. At higher temperature or
humidity conditions, the performance of these cases may be affected and the capacity diminished. It is not
uncommon in a newly constructed store for the temperature and humidity to be above design conditions. These
excessive conditions may produce sweating in the case until the store is operational and the ambient environment is
more desirable.
The Master-Bilt DC/FLR should not be positioned where it is directly exposed to rays of sun or near a direct source
of radiant heat or airflow. This will adversely affect the case and will result in poor performance.
If this case is to be located against a wall there should be at least 4” space between the wall and the back of the
case. This space will allow for the circulation of air behind the case, which will prevent condensation on the exterior
surfaces.
NOTICE
Read this manual before installing your cabinet. Keep the manual and refer to it before doing any service
on the equipment. Failure to do so could result in personal injury or damage to the cabinet.
DANGER
Improper or faulty hook-up of electrical components of the refrigeration units can result in severe injury or
death.
All electrical wiring hook-ups must be done in accordance with all applicable local, regional or national
standards.
NOTICE
Installation and service of the refrigeration and electrical components of the cabinet must be performed by
a refrigeration mechanic and/or a licensed electrician.
The portions of this manual covering refrigeration and electrical components contain technical instructions intended
only for persons qualified to perform refrigeration and electrical work.
This manual cannot cover every installation, use or service situation. If you need additional information, call or write
us:
Customer Service Department
Master-Bilt Products
Highway 15 North
New Albany, MS 38652
Phone (800) 684-8988
Fax (866) 882-7629
4
WARNING LABELS AND SAFETY INSTRUCTIONS
This symbol is the safety-alert symbol. When you see this symbol on your cabinet or in this
manual, be alert to the potential for personal injury or damage to your equipment.
Be sure you understand all safety messages and always follow recommended precautions and safe operating
practices.
NOTICE TO EMPLOYERS
You must make sure that everyone who installs, uses or services your cabinet is thoroughly familiar with all
safety information and procedures.
Important safety information is presented in this section and throughout this section and throughout the manual.
The following signal words are used in the warnings and safety messages:
DANGER:
Severe injury or death will occur if you ignore the message.
WARNING: Severe injury or death can occur if you ignore the message.
CAUTION: Minor injury or damage to your cabinet can occur if you ignore the message.
NOTICE:
This is important installation, operation or service information. If you ignore the
message, you may damage your cabinet.
The warning and safety labels shown throughout this manual are placed on your Master-Bilt Products
cabinet at the factory. Follow all warning label instructions. If any warning or safety labels become lost or
damaged, call your customer service department at (800) 684-8988 for replacements.
CAUTION!
GROUND REQUIRED
FOR SAFE OPERATION
This label is located on top of the electrical control
This label is attached to the cabinet power cord
label and on the wiring channel.
on models with a power cord.
5
PRE-INSTALLATION INSTRUCTIONS
INSPECTION FOR SHIPPING DAMAGE
You are responsible for filing all freight claims with the delivering truck line. Inspect all cartons and crates for
damage as soon as they arrive. If damage is noted to shipping crates or cartons or if a shortage is found, note this
on the bill of lading (all copies) prior to signing.
If damage is discovered when the cabinet is uncrated, immediately call the delivering truck line and follow up the call
with a written report indicating concealed damage to your shipment. Ask for an immediate inspection of your
concealed damage item. Crating material must be retained to show the inspector from the truck line.
INSTALLATION INSTRUCTIONS
GENERAL INSTRUCTIONS
1. Be sure the equipment is properly installed by competent service people.
2. Keep the equipment clean and sanitary so it will meet your local sanitation codes.
3. Rotate your stock so that older stock does not accumulate. This is especially important for ice
cream. A "First-In, First-Out" rotation practice will keep the products in good salable condition.
4. Do not place product in the case when it is soft or partially thawed. Also, product should not be put in the case for
at least 6 hours after it is started.
5. Stock cases as quickly as possible, exposing only small quantities to store temperatures for short periods of
time.
6. After removing Power Cord from compressor compartment be sure both power connections to thermostat are
securely in place.z e
NOTICE TO STORE OWNERS / MANAGERS
Moisture or liquid around or under the cabinet is a potential slip/fall hazard for persons walking by or
working in the general area of the cabinet. Any cabinet malfunction or housekeeping problem that creates a
slip/fall hazard around or under the cabinet should be corrected immediately.
If moisture or liquid is observed around or under a Master-Bilt cabinet, an immediate investigation should be made
by qualified personnel to determine the source of the moisture or liquid. The investigation should determine if the
cabinet is malfunctioning or if there is a drainpipe leaking.
6
ELECTRICAL
WARNING
Before servicing electrical components in the case, make sure all power to case is off. Always use a
qualified technician.
To comply with N.S.F. requirements, this cabinet must be mounted on leg (6” high min.), casters or the base must
be sealed to the floor with NSF listed silicone sealant. Optional casters screw into the holes from which the shipping
bolts were removed.
1. Place cabinet in desired location, leaving approximately 4” behind cabinet to allow condenser discharge air to
escape.
2. Check the electrical circuit to see that 115-volt single-phase service is available with sufficient amperage to
carry the load of the cabinet. Electrical codes make it necessary to ship the cabinet with 3 prong plugs.
However, if it is necessary to use an adapter for a 2-prong outlet, care should be taken to see that a grounding
wire is run individually to the cabinet (see wiring diagram).
3. It is unnecessary to remove the grille from your freezer prior to starting of the freezer. All cabinets are equipped
with internal spring mounted compressors. All refrigeration valves are shipped open from the factory to eliminate
the requirement of opening the service valves upon start-up.
4. Each freezer comes with a thermostatic control pre-set for normal operation. When cooler or warmer
temperatures are desired, turn knob in the appropriate direction (clockwise for colder) as indicated on the dial
plate. It is suggested that the freezer be allowed to operate at least 4 hours prior to readjustment of the control.
It is suggested that the cabinet be allowed to pull down to the desired temperature and cycle off on the control at
least three times before product is placed in the freezer.
REPLACING CONDENSATE HEATERS
The cabinet is constructed with a stainless steel top. Directly below the all vinyl collar that encases the openings in
the top of your freezer, there is an anti-sweat heater that helps prevent condensation under extreme humidity
conditions. This heater is easily replaced by merely removing the plastic collar without the need to dismantle the
entire top portion of your freezer.
TEMPERATURE CONTROL
WARNING: KEEP HANDS OR ANY MATERIAL OFF THE FAN
BLADE AS FAN MAY COME ON AUTOMATICALLY.
Dial Plate
The DC/FLR cabinet has a temperature control that is adjustable
#1 (warmest setting) to #9 (coldest setting). Turn the control knob in
with the punch mark to the desired setting. The temperature control
located near the condensing unit.
Punch Mark
7
from
line
is
CLEANING
WARNING: DO NOT REMOVE FROST WITH A KNIFE, PICK, OR SHARP OBJECTS. DO NOT USE ABRASIVE
CLEANERS OR CAUSTIC CLEANERS OR SCOURING PADS
Wipe the cabinet exterior with a mild detergent and warm water. Rinse and wipe dry with a soft cloth. This cabinet
comes with a floor drain to assist in removing excess cleaning solution. When cleaning the cabinet interior, remove
product and place the product in a suitable location. Unplug the power to the cabinet. Remove the garden hosefitting cap and drain plug. Attach a garden hose and route to a floor drain or suitable receptacle and allow cabinet to
defrost. Wash the interior with a mild detergent and warm water solution, rinse and dry with a soft cloth. Remove
garden hose and attach the hose-fitting cap and drain plug. Plug the cabinet power plug into a wall receptacle and
allow the cabinet to reach operating temperature before restocking the product.
SERVICE INSTRUCTIONS (Trouble Shooting Guide)
1.
High head pressure and high back pressure:
A.
B.
C.
D.
2.
Low back pressure and low head pressure:
A.
B.
C.
3.
Low voltage.
Relay defective.
Overload defective.
High head pressure (see #1).
Cabinet sweating:
A.
B.
7.
Low voltage.
Overload protector defective.
High head pressure (see#1).
Compressor will not start – hums, but cycles on overload:
A.
B.
C.
D.
6.
Refrigerant undercharged.
Control set too warm.
Compressor starts and runs – but cycles on overload:
A.
B.
C.
5.
Capillary tube restriction.
Refrigerant undercharged.
Leak in system.
Pressures normal – cabinet warm:
A.
B.
4.
Condenser coil clogged or restricted.
Condenser fan motor defective.
Air in the system.
Refrigeration overcharge.
High ambient humidity.
Defective condensate heater.
Special service situations:
If moisture or liquid is observed around or under a Master-Bilt cabinet, an immediate investigation should be
made by qualified personnel to determine the source of moisture or liquid. The investigation made should
determine if the cabinet is malfunctioning or if there is a simple housekeeping problem.
Moisture or liquid around or under a cabinet is a potential slip/fall hazard for persons walking by or working
in the general area of the cabinet.
Any cabinet malfunction or housekeeping problem that creates a slip/fall hazard around or under a cabinet
should be corrected immediately.
8
MASTER-BILT PART NUMBERS
The table below gives Master-Bilt part numbers. Use this chart when ordering replacement parts for your DC/FLR
cases.
Description
DC-2S
DC-4D
DC-4S
DC-6D
DC-8D
DC-10D
DC-12D
FLR-60
FLR-80
Capillary Tube
11-01305
11-01305
11-01305
11-01305
11-01307
11-01307
11-01307
11-01305
11-01307
Compressor
03-14254
03-14254
03-14254
03-14254
03-14255
03-14255
03-14406
03-14254
03-14255
Condenser coil
07-01180
07-01180
07-01180
07-01180
07-01180
07-01180
07-01180
07-01180
07-01180
Condenser Fan Blade
15-13092
15-13092
15-13092
15-13092
15-13092
15-13092
15-13092
15-13092
15-13092
Condenser Fan Motor
13-13101
13-13101
13-13101
13-13101
13-13101
13-13101
13-13101
13-13101
13-13101
Divider
25-00105
25-00103
25-00105
25-00103
25-00103
25-00103
25-00103
25-00103
25-00103
Drier
09-09309
09-09309
09-09309
09-09309
09-09308
09-09308
09-09308
09-09309
09-09308
Grille
25-00104
25-00104
25-00104
25-00104
25-00104
25-00104
25-00104
25-00104
25-00104
Heater
17-09298
17-09297
17-09293
17-09298
17-09294
17-09299
17-09295
17-09296
17-09298
Lid, Double
N/A
44-00471
N/A
44-00471
44-00471
44-00471
44-00471
N/A
N/A
Lid, Single
44-00470
N/A
44-00470
44-00470
N/A
44-00470
N/A
44-00470
44-00470
Power Cord
21-01201
21-01201
21-01201
21-01201
21-01201
21-01201
21-01201
21-01201
21-01201
Temperature Control
19-13607
19-13607
19-13607
19-13607
19-13607
19-13607
19-13607
19-13607
19-13607
Vinyl Collar,63-1/4”
37-00518
N/A
37-00518
37-00518
N/A
37-00518
N/A
37-00518
37-00518
Vinyl Collar,85-1/4”
Leg Leveler
N/A
37-00516
N/A
37-00516
37-00516
37-00516
37-00516
N/A
N/A
27-00592
27-00592
27-00592
27-00592
27-00592
27-00592
27-00592
27-00592
27-00592
9
DC SERIES Options
PART NO.
SHIP WT.
LB/KG
DESCRIPTION
CASTERS
A039-11140
Set of 4, 2" diameter casters for DC-2S, DC-4S, DC-4D, DC-6D and DC-8D
4/2
A044-11140
Set of 6, 2" diameter for for DC-10D and DC-12D
5/2
LEG KITS
A039-11170
6" leg kit for DC-2S, DC-4S, DC-4D, DC-6D and DC-8D
18/8
A044-11170
6" leg kit for DC-10D and DC-12D
26/12
LID LOCKING KITS - LESS LOCKS
A041-11129
For DC-2S and DC-4D
3/1
A051-11229
For DC-4S
5/2
A043-11129
For DC-6D and DC-8D
5/2
A044-11129
For DC-10D and DC-12D
6/3
LIDS
44-00470
Single lid for DC models
5/2
44-00471
Double lid for DC models
9/4
LOAD LEVEL SHELVES
A039-18127
Load level shelf for DC-2S
*
A040-18127
Load level shelf for DC-4S
*
A041-18127
Load level shelf for DC-4D
16/7
A042-18127
Load level shelf for DC-6D
20/9
A043-18127
Load level shelf for DC-8D
22/10
A044-18127
Load level shelf for DC-10D
24/11
A045-18127
Load level shelf for DC-12D
*
DIPPER WELL
A060-20400
With installation kit for all DC models
4/2
* Contact factory
10
SALE AND DISPOSAL
OWNER RESPONSIBILITY
If you sell or give away your Master-Bilt cabinet you must make sure that all safety labels and the Installation Service Manual are included with it. If you need replacement labels or manuals, Master-Bilt will provide them free.
Contact the customer service department at Master-Bilt at (800) 684-8988.
The customer service department at Master-Bilt should be contacted at the time of sale or disposal of your cabinet
so records may be kept of its new location.
If you sell or give away your Master-Bilt cabinet and you evacuate the refrigerant charge before shipment, MasterBilt recommends that the refrigerant charge be properly recovered in compliance with section 608 of the Clean Air
Act effective November 1995 and in accordance with all applicable local, regional, or national standards.
11
12