1
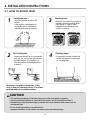
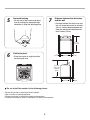
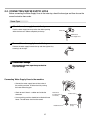
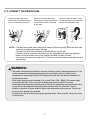
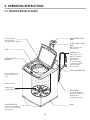
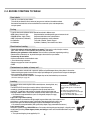
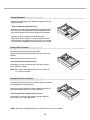
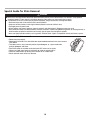
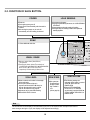
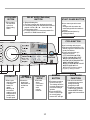
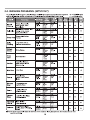
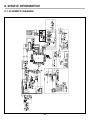
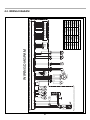
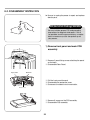
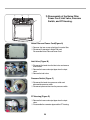
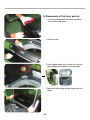
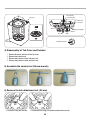
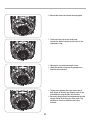
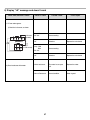
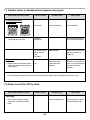
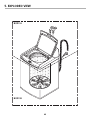
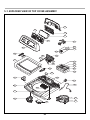
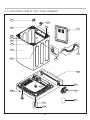
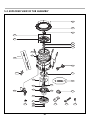
WASHING MACHINE
SERVICE MANUAL
CAUTION
READ THIS MANUAL CAREFULLY TO DIAGNOSE
PROBLEMS CORRECTLY BEFORE SERVICING THE UNIT.
MODEL : 796.2927#0##
SAFETY PRECAUTION!
IMPORTANT SAFETY NOTICE!
This service information is intended for individuals possessing adequate backgrounds of
electrical, electronic, and mechanical experience. Any attempt to repair this appliance may result
in personal injury or property damage. The manufacturer or seller can not be responsible for the
interpretation of this information, nor can it assume any liability in connection with its use.
WARNING: To reduce the risk of fire, electric shock, or personal injury when using this
appliance, follow basic precautions, including the following:
·Disconnect this appliance from the power
·Wear gloves when working.
supply before servicing. Turning the controls to
Failure to do this can result in serious injury.
·The appliance is heavy. Two or more people is
the off position does not disconnect this
appliance from the power supply.
required when moving the appliance.
There is a risk of serious back injury or other injuries. Failure to do this can result in shock.
·Reconnect all grounded devices after servicing.
·Certain internal parts are intentionally not
Failure to do this can result in shock.
grounded and may present a risk of electric
shock only during servicing. Service personnel Do not contact the following parts while the
appliance is energized.
: Pump bracket, rotor and heater
To reduce the risk of fire, electric shock, or personal injury when using this appliance, follow basic precautions,
including the following.
CONTENTS
1. Specifications ............................................................................................................................. 3
2. Installation Instructions
2-1. How to Adjust Level .............................................................................................................4
2-2. Connerting Water Supply Hose .......................................................................................... 5
2-3. Connert the Drain Hose ...................................................................................................... 7
3. Operating Instructions
3-1. Identification of Parts .......................................................................................................... 8
3-2. Before Starting to Wash ...................................................................................................... 9
3-3. Function of Each Button .................................................................................................. 16
3-4. Washing Programs .......................................................................................................... 20
3-5. Care and Maintenance ..................................................................................................... 22
4. Service Information
4-1. Schemetic Diagram .......................................................................................................... 23
4-2. Wiring Diagram ................................................................................................................. 24
4-3. Program Time Chart ......................................................................................................... 25
4-4. Test Operation Without Water ........................................................................................... 32
4-5. Troubleshooting Methods for Common Washing Problems ............................................. 33
4-6. Troubleshooting Methods According to Error Message ................................................... 34
5. Exploded View ......................................................................................................................... 46
6. Replacement Part List .............................................................................................................. 50
2
1. SPECIFICATIONS
Model
2927000
Electrical
120VAC@60Hz.
Inner Tub
Stainless
Inlet Water Pressure
14.5 ~ 116 PSI (100 ~ 800 kPa)
Rating of Fuse
125V, 12A for 100~127V/60Hz
Spin Speed
1100 ±50
Weight
145.5 lbs (66kg)
Cycles
Normal/Casual, Cold Clean, Heavy Duty, Bulky/Bedding, Whitest Whites, Rinse/Spin, Kids Wear,
Towels, Workout Wear, Colors, Express Wash, Handwash/Wool, Delicates
Time Delay
1-19Hr
Lid Interlock Switch
Magnet Sensor
Child Lock
Yes
Softener Dispenser
Yes
Detergent Dispenser
Yes
Bleach Inlet
Yes
Auto Power Off
Yes
Smart Rinse™ with Jet Spray
Yes
Heater
Yes
3
2. INSTALLATION INSTRUCTIONS
2-1. HOW TO ADJUST LEVEL
1
Installation area
2
Set Leveling feet
3
• Install the washer on a firm, flat
surface.
• If the washer is installed on an
unsuitable floor, it could make
considerable noise and vibrate.
4
• Loosen the locknuts on 2 front leveling
feet until you can turn the feet with the
included wrench. Turn clockwise to
raise the washer or counterclockwise
to lower it.
Raise
Checking level
• Open the lid, check if the washer is
correctly leveled by looking down
from the top. If a gap is seen
between the tub and drum, the
washer is not level.
Checking slope
• If installation surface is tilted, the
washer will vibrate. Do not install
on a sloping floor.
Lower
No shims. It would be dangerous. If the
floor is that far from being level, it is a floor
problem and not a washer problem.
CAUTION
• The ventilating openings in the base area must not be obstructed by carpeting.
• Install the washing machine on a level and firm surface, and tilt should be less than 1˚
• Wooden floors may need reinforcing to prevent the normal vibration which occurs with an
unbalanced load.
• Do not install the washer on an inclined floor.
Improper installation of the washer may cause noise and malfunctioning.
4
5
Horizontal setting
6
7
• Lift the front of the washer and adjust
level by turnings the adjustable legs
clockwise or using the adjusting plate.
Raise
Distance between the drain hose
and the wall
• Distance between the drain hose and
the wall should be more than 4 inches
(10 cm), and the distance between any
other part and the wall should be more
than 1 inches (2.5 cm)
45.13/32″
(115.3 cm)
Lower
Confirming level
1″
(2.5 cm)
• Place the washer in original position,
27″
(68.6 cm)
1″
(2.5 cm)
confirming the level.
55.13/16″
(141.7 cm)
(with lid
open)
28.13/64″
(72.1 cm)
Do not install the washer in the following places.
• Where the washer is exposed to direct sunlight.
• Near a heater or heating appliance.
• Where the washer is exposed to freezing temperatures.
• In damp environments such as bathrooms or harmful environments.
5
4″
(10 cm)
2-2. CONNECTING WATER SUPPLY HOSE
Before connecting the Water Supply Hose to the water tap, check the hose type and then choose the
correct instruction here under.
Screw Type
1
Attach the water supply hose to the tap.
Push the water supply hose up so that the rubber packing
within the hose can adhere completely to the tap.
Water tap
Rubber Seal
Water Supply Hose
2
Connect the water supply hose to the tap.
Connect the water supply hose to the tap and then tighten it by
screwing it to the right.
3
Check water leakage.
After connecting the hose, open the tap to check for
any water leakage.
Connecting Water Supply Hose to the machine
Hot
Cold
• Connect the water supply hose to inlet valve of
the washing machine, and then lock it by turning
the hose connecting part.
• Check to see if there is a rubber seal inside the
connector.
Water Hose
(to water inlet
on washer)
Rubber Seal
• A nwe washing machine should be instailed with new
hoses. The old hoses shuld not be reused.
Rubber Seal
6
Water Hose
(to tap)
2-3. CONNECT THE DRAIN HOSE
• Check that the drain hose is hung
up over the edge of the laundry tub.
• Do not use an extension hose.
Cable Tie
39" (99 cm)
• Attach the clip to the drain hose.
And then push it toward the body of
the washing machine as indicated
by the arrow.
39" (99 cm)
• Connect the drain hose to the
outlet of the drain pump located at
the rear of the washing machine.
Cable Tie
NOTE : • The drain hose should always be properly secured. Failure to properly secure the drain hose
can result in flooding and property damage.
• The end of the drain hose should be placed 39" (99 cm) from the floor.
• The drain must be installed in accordance with any applicable local codes and regulations.
• Make sure that the water lines are not stretched, pinched, crushed, or kinked.
• Do not insert the drain hose more than 12” (30 cm) into the drain pipe to avoid siphoning and
odor build-up.
WARNING:
• The washer should never be installed or stored in a location subject to freezing temperatures. If the
washer was exposed to freezing temperatures prior to installation, allow it to stand at room
temperature for several hours before use Damage to the water lines and internal mechanisms of
the washer can result.
• Water supply pressure must be between 14.5 psi and 116 psi (100 ~ 800kPa) If the water supply
pressure is more than 116 psi, a pressure reducing valve must be installed. If you have
uncontrolled water temperature and pressure you should fit a temperature and pressure relief valve
to ensure that wate temperature and water pressure remain within the safe limits. Consult a
plumber or electrician if you are unable to adjust water temperature and or pressure. Failure to do
so can result in damage to the machine.
• Plug the power cord of washer into a properly grounded outlet. Failure to do this can result in shock
or serious injury.
7
3. OPERATING INSTRUCTION
3-1. IDENTIFICATION OF PARTS
HOT WATER SUPPLY
HOSE
Powder detergent
Box for delayed
washing/softener additves box
COLD WATER SUPPLY
HOSE
Make sure the water
does not leak.
TUB
POWER PLUG
If the supply cord is
damaged, it must be
replaced by the
manufacturer
or its service agents
or similarly qualified
person in order to
avoid a hazard.
INLET HOLE FOR
BLEACH
FUNCTION SELECTOR
Clean regularly to stop
linting on the clothes
load.
Multi Clean filter
Washing Wing
(unique with lnner Tub)
DRAIN HOSE
Be sure the drain hose
is properly installed on
the drain before
operating the washer.
BASE
LEVELLING LEGS
Use to level the washing
machine for correct balance
spin operation.
8
3-2. BEFORE STARTING TO WASH
Care Labels
• Look for a care label on your clothes.
This will tell you about the fabric content of your garment and how it should be washed.
Sort clothes into loads that can be washed with the same wash cycle, water temperature,
and spin speed.
Sorting
To get the best results, different fabrics need to be washed in different ways.
• SOIL (Heavy, Normal, Light)
Separate clothes according to the type and amount of soil.
• COLOR (Whites, Lights, Darks)
Separate white fabrics from colored fabrics.
• LINT (Lint producers, Collectors)
Separate lint producers and lint collectors.
Lint Producers
Terry cloth, Chenille, Towels, Diapers
Lint Collectors
Synthetics, Corduroy, Permanent Press, Socks
Check before Loading
• Check all pockets to make sure that they are empty. Things such as nails, hairclips, matches,
pens, coins, and keys can damage both your washer and your clothes.
• Mend any torn garments or loose buttons. Tears or holes may become larger during washing.
• Remove belts, underwires, etc. to prevent damage to the machine or your clothes.
• Pretreat any dirt and stains.
• Make sure the clothes are washable in water.
• Check the washing instructions.
• Remove any paper or tissue in the pockets.
• WIRE
WIRE
Pretreatment on stains or heavy soil
• Pretreat shirt collars and cuffs with a pre-wash product or liquid Detergent when placing them in the washer.
Before washing treat special stains with bar soaps, liquid detergent or a paste of water and granular detergent.
• Use a pretreat soil and stain remover.
Treat stains AS SOON AS POSSIBLE. The longer they are left, the harder they are to remove.
(For more detail refer to page 13)
Loading
WARNING
Do not wash fabrics containing flammable materials(waxes, cleaning fluids, etc.).
Fire Hazard
Never place items in the washer that are
Load Size
dampened with gasoline or other flammable
The WATER LEVEL should just cover the clothes. Adjust the load size
fluids.
accordingly. Loosely load clothes no higher than the top row of holes in the
No washer can completely remove oil.
washer tub. To add items after washer has started, press the Start button and
Do not dry anything that has ever had any type
submerge additional items. Close the lid and press the Start button again to restart. of oil on it (including cooking oils).
※ Do not wash waterproofed fabrics (such as skiing outfits, diapers, or nappy
Doing so can result in death, explosion, or fire.
auto seat covers.)
Light and Large-sized clothing
Clothes like downs and woollens are light weight, large and float easily. Use a nylon net and
wash them in a small amount of water. If the laundry floats during the wash cycle, it may
become damaged. Use dissolved detergent to prevent the detergent from clumping.
※ Do not wash water-proof textilles (Skling outfit, baby diaper, nappy automobile seat covers.)
Long laundry items
Use nylon bag nets for long, DELICATES items. For laundry with long strings or long length, a bag will prevent
tangling during washing. Fasten zippers, hooks, and strings to make sure that these items don't snag on
other clothes.
※ The nylon washing bag is not supplied by LG.
9
Using Water
Water Temperature
• The machine sets the appropriate temperature automatically according to the wash program .
You can override the preset selection by pressing the WASH/RINSE temperature. button.
• The temperature of the water impacts the effectiveness of all laundry additives and therefore, the cleaning results.
• We recommend temperatures of:
- HOT 120°F (120-140°F)
White items, diapers, underclothing and heavily soiled, colorfast items.
- WARM 90°F (85-105°F)
Most items
- COLD 66°F (65-75°F)
Only very bright colors with light soil.
• When washing in COLD water additional steps may be needed:
- Adjust Detergent amount and pre-dissolve Detergent in WARM water
- Pretreat spots and stains
- Soak heavily soiled items
- Use appropriate bleach
* Temperature below 18°C (65°F) will not activate laundry additives and may cause lint, residue, poor cleaning, etc.
In addition, detergent manufactures and care labels define COLD water as 26~29°C...(80-85°F).
If the temperature of the water in the tub is too cold for your hands, the detergent will not activate and clean
effectively.
Note
If iron is present in the water the clothes may become an all-over yellow or they may be stained with brown or
orange spots or streaks. Iron is not always visible. Installation of water softener or an iron filter may be
necessary for severe cases.
10
Using Detergent
Detergent
Follow the detergent package directions. Using too little detergent is a common cause of laundry problems.
Use more detergent if you have hard water, large loads, greasy or oily soils or lower water temperature.
Choosing the right detergent
Your washing machine is designed for use with only High-Efficiency (HE) detergents. HE detergents are
formulated specifically for Top-load washers and contain suds-reducing agents. Always look for the HE symbol
when purchasing detergent. HE detergents produce fewer suds, dissolve more efficiently to improve washing and
rinsing performance, and help to keep the interior of your washer clean. Using a regular detergent will cause
unsatisfactory performance, oversudsing, machine build-up, and could damage the machine.
Using the Liquid Bleach Dispenser
The bleach dispenser automatically dilutes and dispenses
liquid chlorine bleach at the proper time in the wash cycle.
1. Check clothing care labels for special instructions.
2. Measure liquid bleach carefully, following instructions on the
bottle.
• Never pour undiluted liquid chlorine bleach directly onto clothes
or into the wash basket.
• Do not pour powdered bleach into bleach dispenser.
• Avoid overfilling or splashing when adding bleach to the
dispenser. The maximum capacity of the bleach dispenser is
one cup of bleach per wash cycle. Overfilling could result in
premature dispensing of bleach.
3. Before starting the washer, pour measured amount of bleach
directly into bleach dispenser. If you prefer to use powdered
bleach, add it into the wash basket directly before adding clothes.
WARNING:
Do NOT mix chlorine bleach with ammonia or acids, such as vinegar or rust / scale remover.
Mixing chemicals like these can produce irritating and toxic fumes. Put the manufacturer’s recommended amount of
undiluted liquid chlorine bleach into the bleach dispenser. During the final portion of the wash cycle, two sequential flushes
of the dispenser put all the bleach into the wash load and completely flush the dispenser to eliminate the carryover of
bleach to a subsequent load. Any liquid remaining in the bleach dispenser at the end of the cycle is water, not bleach. To
prevent unintentional self-siphoning of the bleach, never fill the dispenser higher than the maximum fill level marked on
the dispenser. When adding bleach to the dispenser, be careful to avoid spilling it into the laundry load or leaving droplets
of bleach around the dispenser. These things will damage your laundry items.
11
Using the Dispenser Drawer
ABOUT THE DISPENSER
The automatic dispenser consists of two
compartments which hold:
• Liquid fabric softener.
• Liquid or powdered detergent.
All laundry products can be added at once in their respective
dispenser compartments. They will be dispensed at the
appropriate time for the most effective cleaning.
After adding the laundry products to the dispenser,
close the dispenser drawer.
Main Wash
Main Wash
Powder Detergent Liquid Detergent
Compartment
Compartment
Liquid Fabric
Softener
Compartment
To add detergent, bleach, and fabric softener
to the automatic dispenser:
❶ Open the dispenser drawer.
❷ Load the laundry products into the appropriate compartments.
❸ Close the lid slowly and smoothly to avoid spilling, splashing, or
premature dispensing of the contents.
NOTE: It is normal for a small amount of water to remain in the
dispenser compartments at the end of the cycle.
NOTE: Do not use powdered or liquid bleach in the dispenser drawer.
12
Adding Detergent
Add measured detergent to the detergent compartment of the
dispenser drawer.
• Do not exceed the maximum fill line.
Detergent is flushed through the dispenser at the beginning of
the wash phase. Either powdered or liquid detergent can be
used, but the drawer insert must be removed to use powder.
Detergent usage may need to be adjusted for water
temperature, water hardness, size and soil level of the load.
Avoid using too much detergent in your washer, as it can lead
to oversudsing and detergent residue being left on the clothes.
Adding Fabric Softener
Pour the recommended amount of liquid fabric
softener into the left-hand compartment. Use only liquid fabric
softener.
Dilute with water to the maximum fill line.
• Do not exceed the maximum fill line.
Overfilling can cause early dispensing of the fabric softener,
which could stain clothes.
NOTE: Do not pour fabric softener directly on the wash load.
It may stain the clothes.
Adding Wash Boost Additives
The Wash Boost dispenser may be used to clean heavily soiled
or stained garments more efficiently.
If desired, place the additives for the wash boost setting in the
right-hand compartment. Use only liquid additives.
• Do not exceed the maximum fill line to avoid
Overfilling can cause early dispensing of presoak additives,
which could result in damaged clothes.
NOTE : Do not pour additives directly on the wash load. It may stain the clothes.
13
Special Guide for Stain Removal
WARNING
Do not use or mix liquid chlorine bleach with other household chemicals such as toilet cleaners, rust removers, acid,or products
containing ammonia. These mixtures can produce dangerous fumes which can cause serious injury or death.
To reduce the risk of fire or serious injury to persons or property, comply with the basic warnings listed below:
• Read and comply with all instructions on stain removal products.
• Keep stain removal products in their original labeled containers and out of children's reach.
• Thoroughly wash any utensil used.
• Do not combine stain removal products, especially ammonia and chlorine bleach. Dangerous fumes may result.
• Never wash items which have been previously cleaned in, washed in, soaked in or spotted with gasoline, dry cleaning solvents, or
other flammable or explosive substances because they give off vapors that could ignite or explode.
• Never use highly flammable solvents, such as gasoline, inside the home. Vapors can explode on contact with flames or sparks.
For successful stain removal:
• Remove stains promptly.
• Determine the kind of stain, then follow the recommended treatment in the stain removal
chart below.
• To pretreat stains, use a prewash product, liquid detergent, or a paste made from
granular detergent and water.
• Use COLD water on unknown stains because HOT water can set stains.
• Check care label instructions for treatments to avoid on specific fabrics.
• Check for colorfastness by testing stain remover on an inside seam.
• Rinse and wash items after stain removal.
14
Stain Removal
STAIN
TREATMENT
Adhesive tape, chewing
gum, rubber cement
Apply ice. Scrape off excess. Place stain face down on paper towels. Saturate with
prewash stain remover or nonflammable dry cleaning fluid.
Baby formula, dairy
products, egg
Use product containing enzymes to pretreat or soak stains.
Beverages (coffee, tea, soda, Pretreat stain. Wash using COLD water and bleach safe for fabric.
juice,alcoholic beverages)
Blood
Candle wax, crayon
Soak the item in a bowl of COLD water for at least 30 minutes. Then launder as usual.
Remove all surface wax. Put the garment in the freezer for a couple of hours, then
remove and break away as much wax as possible. Try a commercial removal product
like Goo-Gone, Goop, or Go-Jo cleaner for the remaining wax stains. DO NOT
ATTEMPT TO REMOVE WITH HEAT!
Chocolate
Pretreat or soak in WARM water using product containing enzymes. Wash using bleach
safe for fabric.
Collar or cuff soil, cosmetics
Pretreat with prewash stain remover or rub with bar soap.
Dye transfer on white fabric
Use packaged color remover. Wash using bleach safe for fabric.
Grass
Pretreat or soak in WARM water using product containing enzymes. Wash using bleach
safe for fabric.
Grease, oil, tar (butter, fats, Scrape residue from fabric. Pretreat. Wash using hottest water safe for fabric. For heavy
salad, dressing, cooking oils, stains and tar, apply nonflammable dry cleaning fluid to back of stain. Replace towels
under stain frequently. Rinse throughly. Wash using hottest water safe for fabric.
car grease, motor oils)
Ink
Some inks may be impossible to remove. Washing may set some inks. Use prewash
stain remover, denatured alcohol, or nonflammable dry cleaning fluid.
Mildew, scorch
Wash with chlorine bleach if safe for fabric. Or, soak in oxygen bleach and HOT water
before washing. Badly mildewed fabrics may be permanently damaged.
Mud
Brush off dry mud. Pretreat or soak with product containing enzymes.
Mustard, tomato
Pretreat with prewash stain remover. Wash using bleach safe for fabric.
Nail polish
May be impossible to remove. Place stain face down on paper towels. Apply nail polish
remover to back of stain.
Repeat, replacing paper towels frequently. Do not use on acetate fabrics.
Paint, varnish
WATER BASED Rinse fabric in cool water while stain is wet. Wash. Once paint is dry, it
cannot be removed,
OIL BASED AND VARNISH Use solvent recommended on can label. Rinse throughly
before washing.
Rust, brown or yellow
discoloration
For spots, use rust remover safe for fabric. For discoloration of an entire load, use
phosphate Detergent and nonchlorine bleach. Do not use chlorine bleach because it
may intensify discoloration.
Shoe polish
LIQUID Pretreat with a paste of granular detergent and water. Paste scrape residue
from fabric. Pretreat with prewash stain remover or nonflammable dry cleaning fluid.
Rub detergent into dampened area. Wash using bleach safe for fabric.
15
3-3. FUNCTION OF EACH BUTTON.
POWER
LOAD SENSING
¥ Power on.
¥ Push again, power goes off
¥Power goes off automatically after the wash is
finished.
¥After turning the power on, the unit will
automatically turn off if nothing is selected.
¥ It operates in all program.
¥During being detected by the sensor, the LOAD SENSING
LED flashes.
¥It automatically sensing the quantity of laundries.
¥During this step, the washing machine select optimized
washing algorithm.
SOAK
¥ Gives additional soak time.
WASH / RINSE
¥Select to select Water (Wash/Rinse)
Temperature.
¥Pressing the button allows The selection of
COLD/COLD ▶ WARM/COLD ▶WARM/WARM
▶HOT/COLD ▶ EXTRA HOT/COLD
respectively. Default setting is Warm/Cold.
SOIL LEVEL
SPIN SPEED
¥Allows a selection to be make for the strength
of the wash action.
¥Power option selections light up in
sequence as follows Normal ▶ Heavy ▶
Light ▶ Normal as the button is pushed.
This can be selected for any program.
¥Adjustment can be made while washing.
¥Default SOIL LEVEL is Normal.
¥Spin speed can
be selected from
No Spin to Extra
high. Default is
Low.
(refer to page 24)
SPECIAL USE
¥The following settings are
indicated as the button is pushed
SOAK ▶ SPIN ONLY ▶
RINSE+SPIN
¥Select COTTON/NORMAL,
HEAVY/DUTY or TOWLES
as the button is pushed SOAK ▶
STAIN CARE ▶ SPIN ONLY ▶
RINSE+SPIN
Note
The time shown on the display is the estimated cycle time. If the sensors and microprocessor elect to
make changes during the cycle, the display will be adjusted accordingly.
16
EXTRA RINSE
BUTTON
¥This includes
an extra rinse
cycle for a
better rinsing
action.
DELAY WASH (Selection)
BUTTON
START/ PAUSE BUTTON
¥ Delayed finishing time.
¥ The time increases when the button is pushed.
¥ The following settings are indicated as the button is
pushed 1 ▶ 2 ▶3 ▶ 4 ▶ ... 12 ▶ 14 ▶ 16▶
▶ Reservation off ▶ 1 ...
¥ To cancel delay time, turn the power switch off or
push DELAY WASH button until off.
¥Use to start or pause the wash
cycle.
Changes while be made to the
wash settings while the machine is
paused.
¥Repeats start and pause by
pushing the button.
CYCLE BUTTON
¥Use for selecting wash program.
¥This button allows the selection of 10
different programs for different kinds of
laundry and dirtiness.
¥Program selections light up in
sequence as follows:
COTTON/NORMALA▶PERM
PRESS CAUAL▶HEAVY DUTY
▶BULKY/BEDDING▶BRIGHT
WHITE▶TUB CLEAN▶SANITARY
▶BABY WEAR▶TOWELS
▶SPORTS WEAR▶PURE COLOR
▶SPEED WASH▶WOOL
▶DELICATES Select the desired
program by ressing the button.
COLDWASH™
¥Runs a cycle
without hot water
or the wash
heater, For
greater
efficiency, we
recommend
washing a small
load (less than 8
pounds) and a
low spin speed.
FABRIC
SOFTENER
¥Causes the
dispensing of
fabric softener in
the final rinse
cycle.
Custom Program
BUTTON
¥This button
allows
you to store a
customized
wash
cycle for
future use .
17
BEEPER
BUTTON
CHILD LOCK
FUNCTION
¥The beeper sounds at
the end of the cycle.
The clothing should be
removed at that time to
prevent the setting of
wrinkles.
¥Touch the BEEPER
button to cycle through
the volume settings
between OFF and high.
¥Use to lock or unlock the
control buttons to prevent
settings from being
changed by a child.
¥To actuate or release the
CHILD LOCK, press and
hold the BEEPER button
until the lock is turned ON or
OFF.
3-4. WASHING PROGRAMS. (WT5101H*)
18
3-5. CARE AND MAINTENANCE
When there is the possibility of freezing temperatures
• Close the water taps and remove the water supply hoses.
• Remove the water which remains in the water supply.
• Lower the drain hose and drain the water in the sump and the drain hose by running a spin cycle.
If frozen
• Remove the water supply hose and immerse it in HOT water. (40° C or 104° F).
• Pour approximately 2 liters (4½ pounds ) of HOT water (40° C or 104° F) into the sump and allow it ti stand for
at least 10 minutes.
• Connect the water supply hose to the water tap run a SPEED WASH cycle to confirm that the machine fills,
drains, and operates properly.
Wash Inner-Tub
Inlet Hoses
Exterior
Long Vacations
Leave the lid open after washing to allow moisture to evaporate. If you
want to clean the inner-tub use a clean soft cloth dampened with liquid
detergent, then rinse. (Do not use harsh or gritty cleaners.)
Hoses connecting washer to faucet should be replaced every 5 years.
Immediately wipe off any spills. Wipe with damp cloth. Avoid hitting surface with sharp objects.
Be sure water supply is shut off at faucets. Drain all water from hoses if weather will be
below freezing.
Cleaning the inside of your washer
If you use fabric softener or do regular COLD water washing, it is very important that you
clean the inside of your washer occasionally as described below.
• Fill your washer with HOT water.
• Add 1 cup of bleach.
• Let it operate for several minutes.
• Stop the washer, open the lid, and leave it to soak overnight.
• After soaking, drain the washer and run it through a normal cycle.
Products that might damage your washing machine
• Concentrated bleaches and diaper sanitizer will cause damage to the paintwork and components of
your washer.
• Hydrocarbon solvents, i.e. petrol, paint thinners and lacquer thinners, etc. can dissolve plastic and
blister paint.
(Be careful when washing garments stained with these solvents as they are flammable, DO NOT put
them in washer or dryer.)
• Some pretreatment sprays or liquids can damage your washer’s control panel.
• Use of dyes in your washer may cause staining of the plastic components. The dye will not damage
the machine but we suggest you thoroughly clean your washer afterwards. We do not recommend
the use of dye strippers in your washer.
• Do not use your washer lid as a work surface.
19
4. SERVICE INFORMATION
4-1. SCHEMETIC DIAGRAM
20
BK
BL
21
HEATER
Thermostat
RD YL
WH
WH
RD
BL
BL
BL
BN(BK)
NOISE
FILTER
JET HOT
BLEACH SOFTNER COLD SPRAY
BL
6 1 2 3 4 5
GY BK BL YL BN OR
BL(WH) GN/YL
(GN)
1 2
2 1
1
RD WH BK YL GN/YL
YL
ATC
3 2 1
HALL SENSOR
WH GY BN BL RD YL
1
2
3
BL RD YL
1 2 3
BL RD YL
YL
WH
GY
BL
3 2 1
DRAIN
PUMP
1 2
CLUTCH
MOTOR
1 2 3
BL BN WH
BL 3 2 1 BL 1 2 3
BL
1 2 3 4 5 6
GY BL
WH BN
OVERFLOW
SENSOR
WH BK
WH 1 2
1 2 3 4
WH BK
YL
MAIN PCB ASSEMBLY
WH 1 2 3
PRESS
S/W
2 1 3
S
K
Y
1 2 3 6 4 5
BN BL RD YL OR VL
BL
WH 6 1 2 4 5 3
1 2 3
WH
GY
YL
WIRING DIAGRAM
WH
1
1 2 3 4 5 6 7 8
CON2
1 2 3 4 5 6 7 8
BLUE
BL
SKY
YL
VL
※ WT5001CW dosen’t have
PINK
PK
GN
BROWN
ORANGE
BN
OR
BK
RD
GY
WHITE
BLACK
WH
LETTERS
COLOR
COLOR CODE
part.
SKY BLUE
YELLOW
VIOLET
GREEN
GYAY
RED
COLOR
DISPLAY PCB ASSEMBLY
1 2 3 4 5 6 7
CON1
1 2 3 4 5 6 7
LETTERS
DOOR
LOCK
2 3 4 5 6
1 2 3 4 5 6
BK BN RD WH GY BL
4-2. WIRING DIAGRAM
4-3. DISASSEMBLY INSTRUCION
▶ Be sure to unplug the power to repair and replace
electric parts.
ESD (ElectroStatic DIscharge) WARNING
Be sure to follow proper ESD and grounding
precautions for diagnosis and repair. If this is
not possible, touch the ground wire on a regular
basis to remove any static charge built up on
your person.
1) Remove front panel and main PCB
assembly
Rear Panel
① Remove 5 panel fixing screws attaching the panel
on the back.
② Disassemble Rear Panel.
Display PCB
Main PCB
③ Pull the front panel forward.
④ Disassemble the protective cover.
⑤ Disconnect the leads from the controller.
Protect cover
⑥ Remove 8 screws on the PCB assembly.
⑦ Disassemble PCB assembly.
22
2) Disassembly of the Noise Filter,
Power Cord, Inlet Valve, Pressure
Switch, and DT Housing.
Noise Filter and Power Cord(Figure A)
① Remove the two screws attaching the noise filter.
② Disconnect 2 connector in Noise Filter and
Disassemble Noise Filter and Power Cord.
Inlet Valve (Figure B)
① Disconnect the leads from the inlet valve and remove
three screws.
② Remove the hoses and output pipes from the input
valve.
③ Remove the inlet valve.
Pressure Switch (Figure C)
① Disconnect the leads from pressure switch and
disassemble pressure switch
② Disconnect pressure tube from the pressure switch .
DT Housing (Figure D)
① Remove the hoses and output pipes from the input
valve.
② Disassemble the connector pipe and the DT housing.
23
3) Disassembly of Top Cover and Lid
① Insert a flat blade between the cabinet and the top
cover to release the latches.
②Lift the top cover.
③Use the blade to push the left hinge out of the way
and to displace the hinge pin to remove the lid.
close
open
④Remove the lid by pulling the right hinge pin out of its
holder.
24
Inner Tub Cap
Hub Fixing Nut
Tub Cover
Outer Tub
Inner Tub
Shaft
Bearing Housing ASM
Rotor
Rotor Nut
Inner
Tub Cap
Stator
Hub Attachment Nut
4) Disassembly of Tub Cover and Pulsator
① Remove 8 screws and take off the tub cover.
② Remove the pulsator cap.
③ Remove the pulsator screws and take it out.
④ Remove the pulsator washer and take it out.
5) Assemble the service tool (38 mm wrench)
6) Remove the hub attachment nut. (38 mm)
① Hit the bar using the hammer.
② Disconnect hub fixing nut and disassemble the inner tub.
25
7) Disassembly of the Back Cover and
Drain Pump
① Remove the screws that attach the back cover and
take it off.
② Disconnect the leads and the drain hose from the
drain pump.
③ Remove the pump attachment screws and the lead
connector. Take the pump assembly out of the
washer.
8) Disassembly of Damper Assembly
① Remove the top cover of the washing machine.
② As shown in the drawing, lift the damper
assembly and remove it along with the outer tub
assembly.
③ Damper assembly shall not be disassembled.
Replace damper as assembly.
9) Disassembly of Rotor and Stator
① Use a wrench (M24) to remove the nut that
connects the rotor to the shaft.
(The torque should be 200 kgf/cm or 88 footpounds.)
② Remove the rotor by pulling it straight off the splined
shaft.
26
⑧ Remove the screws that secure the water guide.
④ Disconnect the hall sensor and stator
connection before removing the stator in the
subsequent step.
⑤ Remove the six screws securing the rotor.
⑥ Check the position of the snap ring, being cure it
faces the rotor and stator.
⑦ To keep from dropping the stator, loosen the six
bolts almost all the way; then hold the stator in one
hand while removing the bolts with the other.
⑧ Be careful during removal and replacement to avoid
cutting, nicking, or pinching any of the wires. This
could cause a short or electrical noise in the
machine.
27
⑨ Remove four screws to release the tub bracket.
⑩ Remove 17 screws to release the bearing
housing. Pull the housing away from the tub, but
do not pry it with a screwdriver to avoid
damage.
10) Disassembly of Door Lock Switch
① Remove the two door lock attachment screws.
② Remove the door switch and remove the attachment tube.
11) Disassembly of Heater
① Remove the three heater attachment screws.
② Loosen the nut at the middle of the heater to relieve
the tension on the clamp. Then pull it out of the case.
28
4-4.
1 TEST RUNNING WITHOUT WATER
1) SAFETY CAUTION
·The main power board assembly has exposed live 120 VAC and live DC voltages. Use care when
disconnecting connectors during troubleshooting and testing. (Wear electrostatic discharge gloves when
handling the board.
·Unplug the power when handling the board assembly. (Wear electrostatic discharge gloves when handling the
board. Store the board in an ESD [ElectroStatic Discharge] plastic bag.)
2) QC TEST MODE
·The washer must be empty and the controls must be in the off state.
·Press and hold the WASH / RINSE and SOIL LEVEL buttons; then press the POWER button. The buzzer will
sound twice.
·Press the Start/Pause button to advance to the subsequent test mode step.
Number of times the
START/PAUSE
button is pressed
Check Pont
Display Status
None
Turns on all LED
T1 and Main Program Version
1 time
Button Check
T2 and Display Program Version
2 time
None
T3
3 time
Inlet valve for Bleach Detergent turns on. (Cold Water)
A and Water level frequency (1~10 Level)
4 time
※ On :67~33(26.7kHz~23.3kHz)
Inlet valve for Softener Dispenser turns on. (Hot Water)
※ The meaning of 67~33 number is 26.7kHz~23.3kHz really
B and Water level frequency (1~10Level)
5 time
Inlet valve for J-Dispenser turns on. (Cold Water)
C and Water level frequency (1~10Level)
6 time
Heater check
T4 and the coefficient of flood sensing
7 time
Wave force check
T5 and the coefficient of load sensing
8 time
Drain pump check
T6 and Water level frequency
9 time
Pulsator operates for 3 minutes.
T7 and the coefficient of load sensing
10 time
High speed spin
T8 and RPM
11 time
Off
. Unlocks the door
. Turns off all LED
None
29
4-5. TROUBLESHOOTING BY COMMON WASHING PROBLEMS
Many washing problems involve poor soil and stain removal, residues of lint and scum, and fabric damage. For
satisfactory washing results, follow these instructions.
NOTE: NEVER use bar soap in the washing machine.
WASHING PROBLEM
Problems
Solutions and Preventive Measures
Possible Causes
Poor soil
removal
·Insufficient detergent
·Wash water temperature too low
·Incorrect wash cycle
·Laundry missorted
·Stains not properly pretreated
·Use correct amount of detergent for load size, amount of soil and
water hardness.
·Use WARM or HOT water for normal soil. Different Water
Temperature may be required according to soil type. (refer to page 12)
·Reduce load size.
·Wash with Heavy or Soak & Heavy wash cycle for heavy soiled
laundry.
·Separate heavily soiled items from lightly soiled ones.
·Pretreat stain and heavy soil according to directions shown on
page 11.
Blue Stains
·Undiluted fabric softener
dispensed directly onto fabric
·Pretreat the stain with detergent or a stain removal agent.
·Do not overfill fabric softener dispenser and do not pour liquid fabric
softener directly onto fabric.
See page 14 for more instructions.
Black or gray
marks on
clothes
·A buildup caused by the interaction ·Keep the recommendations against Scrud (waxy buildup).
of fabric softener and detergent
·Use correct amount of detergent for load size, soil level,
can flake off and mark clothes
and water Hardness.
·Not enough detergent
Yellow or
brown rust
stains
·Iron or manganese in water
supply, water pipes, or water
heater
·To restore discolored load of whites, use rust remover safe for
fabric.
·Install nonprecipitating water softener or an iron filter in your
water supply system for an ongoing problem.
·Before washing, run water for a few minutes to clear lines.
Lint
·Incorrect sorting
·Tissues left in pocket
·Overloading the washer
·Wash lint-producing items, like flannel sheets, towels, and the
like separately from dark fabrics and fabrics that tend to collect
lint. Remove all items, including tissues and papers, from the
pockets of items to be washed. See page 11 for sorting
information.
·Do not overload the washer
Residue or
Detergent
·Overloading the washer
·Undissolved detergent
·Excessive detergent
·Do not overload the washer.
·Some detergents need to be pre-dissolved, check the
detergent instructions. Try pre-dissolving the detergent.
·Increase Water Temperature using HOT water safe for fabric.
·Use proper amount of detergent.
·Incorrect use of chlorine bleach.
·Unfastened zippers, hooks,
buckles
·Ribs, tears and broken threads
·Overloading the washer
·Degradation of fabric
·Never pour chlorine bleach directly on fabric.
See page 13 for adding liquid bleach.
·Fasten zippers, hooks, and buckles.
·Remove objects in pockets. See page 11 for caring before loading.
·Do not overload the washer.
Holes, tears,
or snags
30
4-6. TROUBLE SHOOTING METHODS ACCORIDNG TO ERROR MESSAGE
▶ For more detailed information for trouble shooting refer to page 42 to 51.
ERROR
WATER
SUPPLY
ERROR DECISION
BASIS
·WATER LEVEL
dose not rise to
the set level in within
30 minutes.
NO INLET
lamp blinks
DRAINAGE
·Water is not
completely
within 12 minutes.
UNBALANCE ·Laundry
unbalance during
spin.
LID
OPEN
·LID is opened in
the course of
intermittent spin,
normal spin or
processing
reservation.
CAUSE FOR ERROR
OCCURRENCE
·Water faucet is closed?
·Water supply is interrupted.
·Inlet V/V is clogged with
dirts.
·Connector has bad contact
to the inlet valve.
·BLUE 6-pin connector has
a bad connection at the main
board.
REMEDY
·Open water faucet.
Wait until water supply is
resumed.
·Clean or replace filter.
·Correct the connector
contact.
·Same as above.
·Is the drain hose located
properly?
·Drain hose is folded or
clogged due to freeze or dirt.
·Defective drain pump or the
BLUE 3-pin connector to the
main board has a bad
connection.
·Drain hose properly positioned
at 0.9 ~ 1.2 m (36 ~ 48 inches)
above the floor.
·Make sure the drain hose is not
plugged with a foreign object.
·Check drain pump motor
contact. Replace the pump if
necessary.
·Laundry in the INNER TUB
is filled unevenly.
·Load the washer as evenly as
possible.
·Washer is tilted.
·Adjust the leg.
·Lid is opened during
intermittent spin or normal
spin?
·Lid is opened while
processing reservation?
·Check the connections to the lid
switch and at the WHITE 6-pin
connector at the main board.
·Close the lid.
31
·Close the lid.
·Check the connections.
·If the connection is good, check
the lead wire and replace it if
necessary.
ERROR
ERROR DECISION
BASIS
CAUSE FOR ERROR
OCCURRENCE
PRESSURE ·Pressure switch has a ·Check the connections at the
SENSOR
bad connection or the
pressure switch and at the
switch has failed.
BLUE 4-pin connector at the
main board.
·Test the pressure switch in
TEST MODE. If the initial
reading is less than 60 or more
than 104, the switch has failed
and must be replaced.
REMEDY
·Reseat the connector.
·Replace the switch.
OVER
FLOW
ERROR
·Install the drain hose between
·Check the valves to be sure
0.9 ~ 1.2 m (36 and 48 inches)
there is no input leakage. Then
above the floor.
check the drain hose and make
sure the drain pipe is between
·Replace pressure sensor
0.9 ~ 1.2 m (36 and 48 inches)
switch
above the floor.
·Remove the foreign objects
in pressure sensor switch
·Check for blockages and leaks
in the air hose between the tub
air hose.
and the pressure switch.
·Check and repair any air
leakages at the air hose
connector on the outer tub and
at any connecting parts.
MOTOR
ERROR
·Check the connections at the
hall sensor and at the WHITE
6-pin connector on the main
board.
·Check the connections at the
stator and at the yellow 3-pin or
WHITE 6-pin connector on the
main board. Test the stator to
determine it is not defective.
·Test hall sensor to determine it
is not defective.
·Turn the drum to verify the
bearings are not locked.
32
·Replace the stator if necessary.
·Replace the hall sensor if
necessary.
·Replace the bearings if
necessary.
4-6. HOW TO DIAGNOSE AND REPAIR BY SYMPTOM
1) Washer is not energized.
Where, what, and how to check
Result of Check
Possible Cause
How to repair
Household Power supply
1. Check the cord, plug, and outlet.
Poor
Electrical defect.
Repair or replace as
necessary.
2. Measure the voltage at the outlet.
120 VAC ± 10%
No defect
0V
Defect of household
power supply
Less than 1Ω
No defect
∞Ω
Open circult of the power
supply cord
Change the power supply
cord.
Call for power supply
company
Wiring of the Washer
1. Measure resistance between both ends
of the power supply cord with both the
plug pins short-circuited.
2. Check every connector for a loose
connection.
Male & female
connectors separated
Poor connection
Unplug and re-insert the
connector.
3. Check resistance of every wire to find
out a open wire.
∞Ω
Wire is opened.
Change the lead wire
Electrical component
Less than 0.5Ω
No defect
1. Check resistance with power relay
switch turned on
More than 1.0Ω
Poor contact
2. Check the secondary voltage of the
transfomer.
10~14 V
No defect
0V
Coil is open
Replace the transformer.
Open
Blown fuse
Note: US appliances are
120 VAC except for
stoves, ranges, ovens,
cooktops, and certain air
conditioners.
Change the fuse.
CAUTION
Check the fuse rating.
125 VAC 12 AMPS
3. Check for blown fuse.
Change the AUTO OFF
Switch
Controller
If all the components test good, the defect
is likely the main control board.
Over 120% voltage
than rating check
33
Replace the main board if all
the electrical components
test good.
2) Defects on displaying funcion
When, what, and how to check
Result of Check
Possible Cause
How to repair
Main voltage
1. Measure voltage at wall outlet.
Expect 120 VAC ±
10%. If below 108
VAC, consult an
electrician or your
local power provider.
Controller
Low voltage
If incoming line voltage is
below 108 VAC, consult an
electrician or your local
power provider.
Defective main board.
Replace the main board.
1. Defective LED.
2. Defective LED driver circuit.
3. Defective Microprocessor.
3) Reset During operation
When, what, and how to check
Result of Check
Possible Cause
How to repair
Less than 90% of the
rating.
Input voltage is too low or
the house wiring is
insufficient for the load.
Consult an electrician.
Noise or spurious
signals are introduced to
the controller through the
power input.
This could be caused by
something outside the home.
It is possible that a surge
protector / line filter would
help reduce the incidence.
Main voltage
1. Measure voltage of the outlet that the
washer is plugged into during wash and
spin.
2. The reset event occurs at about the
same time every day.
3. Check for line noise sources inside the
house.
Explain it is a problem of
electric supply
environment.
Controller
1. If the input voltage is correct and the
pump works properly, the main board is
probably defective.
Replace the main board.
34
4) Water doesn’t come into the wash tub.
When, what, and how to check
Result of Check
Possible Cause
How to repair
Inlet Valve
1. If you hear the valve noise but get no
water, check to see if the water is turned
off outside the house.
No water coming
from taps.
Water main turned off.
Explain.
2) Check to see if taps are opened.
Tap is closed.
User error.
Turn on the tap.
3) Hot and cold hoses are reversed.
Incorrect installation.
Incorrect installation.
Reconnect hoses to correct
taps.
4) Incorrect water temperature selected.
Select correct temp.
User error.
Read and understand
manual.
5) If items above check out OK, turn off the
water, remove the hoses, and check the
grit filters.
Grit, sand, and
foreign substances
plugging filter.
Normal sediment in water
supply.
Remove the filters, clean
them with a small brush, and
replace them.
Water inlet valve(s)
defective.
Replace the inlet valves.
Loose connection.
Loose connection.
Remove and replace the
connector(s).
∞Ω
Coil is open
Replace the valve.
1. Does the display show a PE error code?
PE Error displayed.
Connector is loose, wire is
broken, or the pressure
switch is defective.
Remove and replace the
connector. If this does not
resolve the issue, replace the
pressure switch.
2. Use TEST MODE to read the frequency
of the pressure switch while filling an
empty washer.
Less then 26.2 kHz
Pressure switch is
defective.
Replace the pressure switch.
6) If everything checks out this far, check
the vent hole in the pressure switch for
blockage and make sure the plunger
can move freely.
2. If the inlet valve fails (no clicking or
buzzing) when the washer should be
filling, check the connectors on each
valve and at the main board.
2) Check resistance of the inlet valve.
Pressure Switch
Controller
Replace the main board.
1. If the pressure switch and inlet valves
test good, the problem is probably a
defective main board.
35
5) Water fills continuously of intermittently
When, what, and how to check
Result of Check
Possible Cause
How to repair
Wrong Installation/Leakage
1. Check to see that the drain hose is
properly installed in a standpipe.
Drain hose is fallen
and lying on the floor.
Incorrect installation.
Install the drain hose in a
standpipe that is between 36
~ 46 inches (0.9 ~ 1.2 m)
from the floor.
2. Figure where the leak is starting.
Water leaks from a
part.
Defective part.
Repair or replace the part.
Pressure Switch
No rotation.
Water level is not
detected.
Check the pressure switch
tube to verify it is not kinked,
bent, blocked, or cut. Repair
it as necessary.
Detergent buildup or a
foreign object is blocking
airflow.
Unstop it.
1. Verify the pulsator is rotating while water
is filling the tub.
2. If the pressure switch tests good, verify
the vent hols on the tub's air chamber is
not blocked.
Blocked.
Inlet Valve
Replace the valve.
Inlet valve is defective.
1. Water comes in though the inlet valve
even when the washer is unplugged.
Water fills.
Controller
Replace the main board.
1. Water fills the washer immediately when
the washer is turned on, even before
pushing the START button.
The triac has failed on the
main board.
36
6) Display "LE" message and doesn't work
When, what, and how to check
Result of Check
Possible Cause
How to repair
1. LE error code appears.
1) Check the hall sensor, as shown.
Brown
DC 15V
Black / (Ground)
White
Blue
Red
Hall sensor
assembly
In PCB assembly
2) Check resistance of the motor.
Gray-White
DC 15V
Correct reading.
OV
Defective
Gray - Red
-Blue
DC 12V
Correct reading.
OV
Defective
Replace the main board.
Infinite resistance.
The motor has an open
coil.
Replace the motor.
Normal Resistance
Normal condition.
Motor is good.
37
Replace the main board.
7) Water does not drain.
When, what, and how to check
Result of Check
Possible Cause
How to repair
Drain Pump
1. Can you hear the drain pump running?
Yes
Drain pump is blocked by
foreign objects.
NOTE: There is no place to
do this. Please include the
correct pump information for
this machine. This is useless.
2. Check resistance between terminals if
there is no working sound of the drain
pump.
∞Ω
The motor is open.
Replace the pump.
3. If the motor tests good, check the
connector.
LEAVE BLANK
Defective connector.
Replace the main board.
LEAVE BLANK
Connector OK.
Replace the main control
board.
Pinched, kinked, or
mashed.
Incorrect installation.
Reinstall correctly.
LEAVE BLANK
Blocked hose.
Unstop the hose and reinstall it so it is not kinked,
pinched, or mashed.
Drain Hose
1. Verify the drain hose is not pinched,
kinked, or mashed.
2. Verify the drain hose is not clogged or
obstructed.
8) Water drains, but at the wrong time
When, what, and how to check
PV asm
1. If water runs back into the machine after
the drain cycle, inspect the pump's
check valve to verify it is not obstructed
by lint or foreign material.
Result of Check
Possible Cause
How to repair
Remove the blockage or
foreign objects.
Blockage in pump
housing or drain
bellows.
Check valve and / or
drain bellows
deformed or
damaged.
LEAVE BLANK
Replace the check valve and
/ or the bellows. These soft
rubber parts may swell if
contacted by petroleumbased products.
The pump runs.
Defective triac on main
board.
Replace the main board.
Controller
1. Check to see if the drain pump or drain
motor runs at power up (before the
POWER button is pressed.
38
8) Water drains when it should not
When, what, and how to check
Result of Check
Possible Cause
How to repair
Drain Hose
1. Verify the drain hose is inserted in a
standpipe or drain that is 0.9 ~ 1.2 m
(36 ~ 46 inches) above the floor.
Discharge height
incorrect.
Incorrect installation.
Insert the drain hose in a
standpipe or drain that is
0.9 ~ 1.2 m (36 ~ 46 inches)
above the floor.
9) Drain error (DE) is displayed even when water drains normally
When, what, and how to check
Result of Check
Possible Cause
How to repair
Pressure Switch
1. In TEST MODE, check the pressure
switch frequency with the tub empty.
Below 26.3 kHz
Defective pressure
switch
Replace the pressure switch.
Between 26.3 and
27.1 kHz
Defective main board
Replace the main board.
10) Machine spins even with lid open
When, what, and how to check
Result of Check
Possible Cause
How to repair
Lid Switch
1. Check resistance between both
terminals on the lid switch with the lid
open.
Contacts of switch are
welded.
0~9 Ω
Change the lead wire
assembly.
Defective main board.
Replace the main board.
∞Ω
39
11) Vibration, Noise or Unbalance Error happens during spin.
When, what, and how to check
Result of Check
Possible Cause
How to repair
Using conditions such as
installation etc.
Not leveled.
2. Verify the load is not unbalanced,
causing vibration and noise.
Incorrect installation.
Laundry is
unbalanced.
Level the washer.
Rearrange items in the tub
for a more even distribution.
The pulsator rotates
initially, then the
inner
tub rotates.
Defective clutch.
Replace the clutch spring ot
the clutch assembly, as
necessary.
Oneor more of the
suspension rods is
defective.
Replace all four suspension
rods as a set. Be sure to get
the rods in the correct
positions.
Suspension
1. Does the outer tub strike the top cover
during a spin cycle when the washer is
running empty?
Yes
※ It is very important to determine the cause of any noise or defect in order to repair the problem correctly the first time.
12) Power turns ON or OFF by itself.
When, what, and how to check
Result of Check
Possible Cause
How to repair
Noise on the power line.
If the issue persists, contact
the local power provider.
Input voltage
1. This is usually caused by a spike or
surge on the main power input to the
house.
40
12) Power is automatically turned off during operation or immediately turning on
the power button.
When, what, and how to check
Result of Check
Possible Cause
How to repair & settle
Auto Power Relay or Controller
1. It would be defect of the controller if
power is automatically tumed off
immediately when turning on the power
switch even though there is no defects
in the power switch.
Automatically tumed
off
Change the controller.
13) Sensor
(1) Sensor failure
Problems
Result of Check
Possible Cause
① Installation of a non-calibrated main
board.
·If the value is not within 1~26 by
checking the controller group.
Recalibrate or replace the controller.
② Short
·Check the value of the sensor
electrode by using TEST MODE
during the operation of a normal
operation *washing, rinsing, spinning,
etc.) If the value shows no change, the
sensor is defective.
One of these should repair this.
Clean the electrode of the sensor.
Reset the sensor by entering and exiting
the test mode.
Check the wiring harness and connectors
to the sensor.
③ The sensor is contaminated with a film
of detergent, laundry additives, hard
water scale, etc.
·The difference between the sensing
value measured from the supplied
water by a jig and the sensor value of
the product is 5 or more.
One of these should repair this.
Clean the electrode of the sensor.
Reset the sensor by entering and
exiting the test mode.
Replace the sensor.
④ Sensor is out of order
·tE - Temperature Sensor Fault
Verify the operation of the temperature
sensor in the QC test mode.
Check the wiring harness.
Replace the sensor.
Replace the main board.
※ Stop or reset the sensor by entering and exiting the TEST MODE.
41
(2) Sensor inaccuracy
Problems
Result of Check
How to repair
① Contamination on the sensor causes
inaccurate readings.
·The difference between the sensing
value measured from the supplied
water by a jig and the sensor value of
the product is 5 or more..
One of these should repair this.
Clean the electrode of the sensor.
Reset the sensor by entering and exiting
the test mode. Replace the sensor.
② Inaccurate sensor readings.
·If the value measured from the jig is
normal but the consumer is not
satisfied with
Reset the sensor by entering and exiting
the test mode.
**
- To set the sensor to detect a higher detergent level, increase the sensor group by 1 or 2 steps.
- To set the sensor to detect a lower detergent level, decrease the sensor group by 1 or 2 steps. (See below.)
(3) Changing the controller group
Press and hold CUSTOM PROGRAM and DELAY WASH, then press the POWER button.
▶ Initial Test mode display: All LEDs are off, except I-SENSOR LED
Display the number of TR calibration times: Display 0 means not calibrated, 1 for the first time and so on.
1. Press PROGRAM once. It will display the current controller group. (1 ~ 26)
Press PROGRAM again to decrease the controller group by 1.
2. Press START / PAUSE once. It will display the current controller group. (1 ~ 26)
Press START / PAUSE again to increase the controller group by 1.
※ The buzzer sounds if there is no controller group.
42
5. EXPLODED VIEW
BODY-A
BODY-B
43
5-1. EXPLODED VIEW OF TOP COVER ASSEMBLY
A011
A056
A063
A061
A062
A240
A202
A050
A201
A200
A148
A180
A184
A390
A020
A183
A152
A186
A154
A153
A151
A147
A150
A241
A410
A105
A135
A230
A100
A190
A125
A380
HOT (RED)
A275
COLD (BLUE)
A276
A157
A140
44
5-2. EXPLODED VIEW OF OUT CASE ASSEMBLY
F032
F015
F005
F004
F070
F002
F013
F012
F003
F000
F100
F011
F090
F026
F025
F150
F080
F020
F082
F027
F023
45
5-3. EXPLODED VIEW OF TUB ASSEMBLY
K005
K000
K012
K021
K020
K030
K040
K050
K061
K060
K100
NATURAL
K250
K350
K064
K170
K140
K345
K340
K200
K290
K351
K230
K210
K201
K410
K305
K430
K300
46
K400
K420
6. REPLACEMENT PART LIST
47
P/No.: MFL40322129