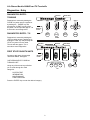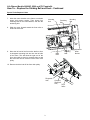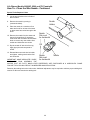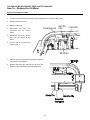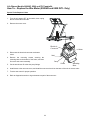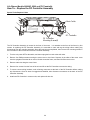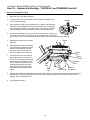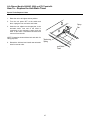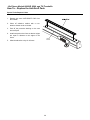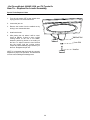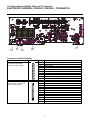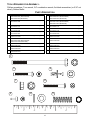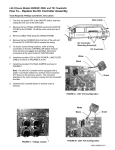
1
Models 9000HR, 8500, and T9i Treadmills
Customer Support Services
SERVICE MANUAL
©1999 Brunswick Corporation. All rights reserved. Life Fitness is a registered trademark of Brunswick Corporation.
Zone Trainer and Heart Rate Zone Training are trademarks of Brunswick Corporation. Any use of these trademarks, without the express
written consent of Brunswick Corporation, is forbidden.
M051-00K60-A013
November-2002
Life Fitness Models 9000HR, 8500, and T9i Treadmills
INTRODUCTION
This service manual is applicable to Treadmill Models TR9000HR, TR8500, and T9i. Note: Information in this
service manual represents typical configuration and may differ slightly from actual equipment. This manual consists
of the following topics and sections.
INTRODUCTION
SPECIAL SERVICE TOOL REQUIREMENTS
THEORY OF OPERATION
TERMINOLOGY
COMPONENT IDENTIFICATION
TABLE OF CONTENTS
Section I
TROUBLESHOOTING GUIDES
Section II
DIAGNOSTIC MODE
Section III
"How To..." SERVICE AND REPAIR GUIDES
Section IV
ELECTRONIC OVERVIEW
WIRING BLOCK DIAGRAMS
Section V
MISCELLANEOUS INFORMATION
If an operating problem should arise, turn to the TROUBLESHOOTING GUIDES and attempt to isolate what is
causing the malfunction. The GUIDES are listed by symptoms and follow with suggestions as to the most probable
cause of the problem.
Once you have pinpointed the source of the problem, turn to the appropriate "How To..." section and review the
proper procedures for removing, replacing or adjusting a part. The "How To..." sections are organized by
replaceable part (or assembly) name, and under the title of the service procedure will be list only those special
service tools need to perform the task. See next page for Special Service Tool Requirements.
Refer to COMPONENT IDENTIFICATION in the front part of this section to locate and identify in order service
repair parts for your machine.
If you do not have a part in stock, a form to order by FAX has been included in Section V for your convenience or
you can call Life Fitness Customer Support Services any Monday through Friday from 8:00 AM to 5:00 PM central
standard time. To speed-up our response time to your particular situation, please have the following information
available for the customer service phone technician who will be prepared to assist you:
1. Serial number
2. Equipment model number
3. Symptom or problem
4. Part name and number to order
When you receive your order, review the appropriate "How To..." section and follow the step by step procedures
designed to help you install the part quickly and correctly.
If you have any questions or comments please phone, mail, or fax us at:
LIFE FITNESS COMPANY - CUSTOMER SUPPORT SERVICES
10601 Belmont Avenue, Franklin Park, IL 60131; U.S.A.
Telephone: 847-451-0036, Toll Free: 800-351-3737, FAX: 847-288-3702
i
Life Fitness Models 9000HR, 8500, and T9i Treadmills
SPECIAL SERVICE TOOL REQUIREMENTS
Unless otherwise specified, only basic hand tools are required to perform service procedures
outlined in this section. Some of these standard tools should consist of: Philips and StraightBlade Screw Drivers, Torx Set, Pliers, Rubber Mallet, Pry Bar, Snap Ring Pliers (internal and
external), Standard and Metric size Socket Set (3/8 or 1/2 drive), and Standard and Metric size
Combination, open-end, or Box Wrenches.
Specialized tools will be listed after the sub-heading Special Service Tools:, which appears
below the Service Procedure Heading at the top of the page. If no specialized tools are
required, then the title would read: Special Service Tools: NONE, which means that standard
hand tools should be employed to provide service to the product.
Specialized tools must be used to safely and effectively complete the service procedures.
Improvisation or attempts to use any other tool could result in unnecessary damage to the
equipment or personal injury.
ii
Life Fitness Models 9000HR, 8500, and T9i Treadmills
THEORY OF OPERATION
The treadmill is an electromechanical device that operates on 120 volt system and is controlled
through the electronics in the display console. The key components that make up the treadmill
are the unit frame, electric motor and motor controller, belt and deck, wax and wax motor,
pulleys and rollers, and the display console.
Initially, voltage is received by the Line Filter which distributes this power to the motor controller
and other various electrical and electronic components that activates all the mechanical
devices. The operator ultimately controls all electromechanical devices through the console
display, making settings and adjustments to speed, incline, and custom workout programs.
The Unit Frame is critical not only to support the operator but also to support the
electromechanical devices and the unit's overall appearance. Although the frame is a nonmaintenance item, its design and structure are essential to providing years of safe and reliable
service.
The most critical parts on the treadmill are the Belt and Deck. Regardless of all other
components, the success of a good treadmill is its belt and deck. The Deck is made up of a
special particle board which allows for flexibility and long wear. Under the deck are the
lifesprings which are designed to support and absorb the shock load. To prevent the deck from
being worn out by constant operation of the belt, wax is applied to the inside of the belt. This is
accomplished by a wax motor which pumps the wax out of the wax bag and through the wax
nozzle. Remember, when replacing the belt, reverse or replace the deck, and check the antistatic tinsel.
The Belt is designed to endure constant stress loads. It is mounted directly over the front and
rear rollers. The Main Drive Motor has a pulley on the end of its shaft which is connected by a
drive belt to the pulley on the front roller. When the front roller is driven by the motor the striding
belt moves accordingly. The rear roller is not motor driven but travels along with the current
speed of the front roller. Belt tension is adjustable by means of adjusting bolts which are located
at the ends of the rear roller. When turned, they are used to adjust belt tension and belt
centering. In order to increase belt and deck life, it is important to properly keep clean all areas
of the machine.
The Display Console is the brain center of the treadmill. It is here where all electromechanical
operations are controlled for specific program operations. Depending on the display console,
various selections and settings can be easily accomplished either through a numeric keypad or
up/down arrows. The display console allows the operator to selectively choose the program and
input pertinent statistical information such as weight, age, language, etc.
The treadmill is by far one of the most popular pieces of all cardiovascular exercise equipment.
With proper routine maintenance and care, it will provide a lifetime of healthy cardiovascular
exercise.
iii
Life Fitness Models 9000HR, 8500, and T9i Treadmills
TERMINOLOGY
Anti-Scuff Pads
Rubber strips located on the surface of each side of the frame, and used to ensure
sure footing.
Anti-Static
Tinsel
A copper tinsel wire that discharges static electricity from the striding belt during
operation.
Connectors
Plastic devices used to connect wiring together.
Deck
Special particle board that is used for the running surface.
Display Console
Board
Electronic board used for making direct input settings and monitoring output
messages which are displayed in the digital readout display.
Dynamic Current
Current which changes randomly.
EEPROM
Electrically erasable programmable read only memory.
EEROM
Electrically erasable read only memory.
Front Roller
Motor belt driven, the front roller drives the striding belt.
HR & LF Pulse
Sensors
Located in each handle grip and measures heart rate.
Jumper
Electrical connector used to connect between two electrical points.
LED
Light emitting diodes are used to indicate a condition.
Levelers
Adjustable supports under the rear of the treadmill, which are used to stabilize the
unit.
Lift Motor
The motor that raises and lowers the unit for incline operations.
LifeSprings
Springs under the deck to absorb impact of the walker or runner.
Main Drive Belt
Connects between the main drive motor pulley and the front roller pulley, and used
to transmit the driving power of the main drive motor to the front roller.
iv
Life Fitness Models 9000HR, 8500, and T9I Treadmills
TERMINOLOGY
Main Wire
Harness
Routed through the left uprights to DC Motor Controller and then, to the control
console.
Heart Rate Wire
Harness
Routed through right side of upright.
Motor Controller
Receives an output signal from the console display to perform all functions.
Overlay Bezel
Plastic covering with key pad which is part of the display console.
PCB
Programmable Circuit Board
Line Filter
Receives main electrical source from the wall outlet and filters voltage to the DC
Controller for all electromechanical systems.
Polar Receiver
Monitors heart rate.
Rear Roller
A free spinning roller with adjusting screws at each end of the roller are used for
tensioning and centering the striding belt.
Rear Roller
Guards
Located at the back of each side of the rear roller, are used as protective guards.
RPM
Revolutions per minute.
Static Current
Steady current flow.
Stop Switch
A switch used to interrupt power going to the motor to stop the unit.
Striding Belt
Sometimes referred to as the 'walking belt' and used to walk or run on.
Telemetry
Receiver
A sensor that reads Heart Rate signal transmitted from the operator's chest strap
transmitter.
Ties
Plastic straps used to secure loose wiring to the main frame.
Wax Bracket
A mounting bracket that spans across the rear width of the unit and is located inside
the striding belt area, is used to secure the positions of the wax tube and wax
nozzle.
Wax Motor
This motor is mounted on the frame and is used to pump the wax out of the wax
bag, through the wax tube, and out the wax nozzle onto the underside of the striding
belt.
v
Life Fitness Models 9000HR, 8500, and T9i Treadmills
COMPONENTS IDENTIFICATION (9000HR Displayed)
Cup
Holder
ERGO
Bar
Console
Left
Upright
Emergency
Stop
End
Cap
Anti-Scuff
Pad
Motor
Cover
Right
Upright
Rear
Roller
Guards
vi
Life Fitness Models 9000HR, 8500, and T9i Treadmills
COMPONENTS IDENTIFICATION
Striding
Belt
Rear
Roller
Life Springs
Tensioning
Bolts
Front
Roller
Drive
Belt
Leveler
Spray Bar &
Nozzle
Drive
Motor
Deck
Screws
Wax Motor
Deck
Screws
Deck
vii
Life Fitness Models 9000HR, 8500, and T9i Treadmills
TABLE OF CONTENTS
SECTION I TROUBLESHOOTING GUIDES
PAGE
STRIDING BELT SLIPS DURING FOOTFALL ..................................................................... 2
MAXIMUM SPEED IS REDUCED......................................................................................... 2
KNOCKING SOUND AT REAR OF MACHINE ..................................................................... 2
KNOCKING SOUND COMING FROM DECK....................................................................... 2
STRIDING BELT FOLDS ...................................................................................................... 2
STRIDING BELT TRAVELING BEYOND TRACKING LIMITS ............................................. 3
STRIDING BELT NOT CENTERED...................................................................................... 3
STRIDING BELT MISALIGNED ............................................................................................ 3
RUBBING SOUND FROM UNDERNEATH MACHINE......................................................... 4
SQUEAKING NOISE............................................................................................................. 4
LOUD GROANING SOUND FROM FRONT OF MACHINE ................................................. 4
LOUD GROANING SOUND ON FOOTFALL........................................................................ 4
DISPLAY DOES NOT ILLUMINATE WHEN POWERED ON............................................... 5
DISPLAY OVERLAY KEYS ARE NOT RESPONDING WHEN PRESSED .......................... 6
UNIT RESETS RANDOMLY OR PAUSES ........................................................................... 6
NO POWER .......................................................................................................................... 7
WAX LEAK ............................................................................................................................ 8
LIFEPULSE HEART RATE DOES NOT RESPOND ............................................................ 9
EXCESSIVE SWEAT OR CLEANER ON ELECTRODE SENSORS.................................... 10
DISPLAY READS HEART RATE WITH HANDS REMOVED............................................... 10
NO CHEST STRAP DETECTED .......................................................................................... 10
ERRATIC HEART RATE READINGS ................................................................................... 10
SECTION II-A DIAGNOSTIC TR9000HR/T9i
DIAGNOSTIC ENTRY TRHR9000........................................................................................ 2
DIAGNOSTIC ENTRY T9i..................................................................................................... 2
FIRST STATE ON BOTH UNITS .......................................................................................... 2
SYSTEM TEST ..................................................................................................................... 3-10
DIAGNOSTICS – INFORMATION ........................................................................................ 11-13
DIAGNOSTICS – MAINTENANCE ....................................................................................... 14
DIAGNOSTICS – CONFIGURATION ................................................................................... 15
SECTION II-B DIAGNOSTIC TR8500
DIAGNOSTIC SETTINGS..................................................................................................... 18
DIAGNOSTIC MODES.......................................................................................................... 19
DESCRIPTION......................................................................................................... 19
MOTOR TEST.......................................................................................................... 20
ERROR CODE TROUBLESHOOTING TABLE ....................................................... 21
INCLINE TEST ......................................................................................................... 22
WAXER TEST.......................................................................................................... 22
POLAR TEST ........................................................................................................... 22
STATISTICS............................................................................................................. 22
SETTINGS ............................................................................................................... 23
SYSTEM ERRORS .................................................................................................. 24
viii
Life Fitness Models 9000HR, 8500, and T9i Treadmills
TABLE OF CONTENTS - Continued
SECTION III HOW TO…REPLACE…
STRIDING BELT AND DECK................................................................................................ 2
TENSIONING STRIDING BELT ........................................................................................... 5
ADJUST STRIDING BELT TRACKING ................................................................................ 6
PERFORM STALL TEST ...................................................................................................... 7
FRONT ROLLER................................................................................................................... 8
REAR ROLLER ..................................................................................................................... 11
DRIVE BELT ......................................................................................................................... 12
DRIVE MOTOR ..................................................................................................................... 14
MOTOR BRUSHES............................................................................................................... 16
LIFESPRING ABSORBERS.................................................................................................. 17
WAX NOZZLE....................................................................................................................... 19
LIFT MOTOR......................................................................................................................... 21
WAX MOTOR........................................................................................................................ 23
DC CONTROLLER ASSEMBLY ........................................................................................... 24
ON/OFF SWITCH ................................................................................................................. 25
WAX BAG – TR8500 INT’L AND TR9000HR DOM/INT’L .................................................... 26
ANTI-STATIC TINSEL .......................................................................................................... 27
ANTI-SCUFF PADS .............................................................................................................. 28
LEVELER ASSEMBLY .......................................................................................................... 29
CONTROL BOARD ............................................................................................................... 30
TETHER, AND THE TELEMETRY RECEIVER AND CABLE............................................... 31
MAIN WIRING HARNESS AND ERGO BAR........................................................................ 32
DOMESTIC AND INTERNATIONAL LINE CORDS.............................................................. 34
LINE FILTER ......................................................................................................................... 35
NOTES .................................................................................................................................. 36
SECTION IV ELECTRONIC OVERVIEW
DISPLAY CONSOLE – TR9000HR/T9i................................................................................. 2
DISPLAY CONSOLE – TR8500............................................................................................ 4
DC CONTROLLER – ALL MODELS ..................................................................................... 6
BLOCK DIAGRAM ................................................................................................................ 8
SECTION V – MISCELLANEOUS INFORMATION
PREVENTATIVE MAINTAINENCE TIPS.............................................................................. 2
INSTALLATION INSTRUCTIONS......................................................................................... 3-8
ix
Life Fitness Models 9000HR, 8500, and T9i Treadmills
NOTES
x
Life Fitness Models 9000HR, 8500, and T9i Treadmills
TROUBLESHOOTING GUIDE
SECTION I
TROUBLESHOOTING GUIDE
1
Life Fitness Models 9000HR, 8500, and T9i Treadmills
TROUBLESHOOTING GUIDE
Malfunction
Probable Cause
Corrective Action
Striding Belt slips during
footfall.
Striding belt slips on front roller
during stall test.
Check striding belt & re-tension as necessary.
See How…To Adjust Belt Tension.
Maximum speed is
reduced.
User is pushing striding belt.
Instruct users not to push striding belt in either
direction.
Wax system malfunction.
Inspect spray pattern between 8" (200mm) and
16" (400mm). Refer to Diagnostics.
If not, verify wax nozzle is clean, hoses are not
kinked, wax bag is not empty, or wax is
contaminated.
Striding belt/deck malfunction.
The deck laminate worn
through or the underside of
striding belt glazed over (hard,
glossy).
Replace belt and deck. See How To…Replace
Striding Belt.
Insufficient power source.
Plug treadmill into a dedicated circuit. Refer to
the Operations Manual.
Faulty rear roller bearings.
Replace rear roller assembly.
Wax build up on rear roller.
Run unit for 10 hours to break-in the treadmill.
Knocking sound coming
from deck.
Life Springs not positioned
correctly and/or loose mounting
hardware.
Reposition or tighten life springs.
Striding belt folds.
Out of wax.
Check wax bag.
Wax Pump failure.
Replace pump.
Worn belt or deck.
Replace as necessary.
Knocking sound at rear of
machine.
2
Life Fitness Models 9000HR, 8500, and T9i Treadmills
TROUBLESHOOTING GUIDE
Malfunction
The Striding Belt is
traveling beyond the
tracking limits.
Probable Cause
Corrective Action
Striding belt needs to be retensioned or tracking needs
adjustment.
Refer to belt tensioning or tracking adjustment
procedure in operation or service manual.
Worn striding belt or user
pushing belt.
Center striding belt according to belt centering
technique. See How To...Adjust And Tension
The Striding Belt.
Striding belt folded over.
Verify wax in bag. Replace if necessary. See
How To…Replace Wax Bag.
Verify the wax is not contaminated (flakes).
Replace wax bag and wax if contaminated. See
How To…Replace Wax Bag.
Verify the wax nozzle is not clogged. Clean
nozzle if clogged. See How To…Replace Wax
Nozzle.
Refer to “Wax Manual” in the diagnostics
section of this manual to verify if the wax pump
is functioning properly. Replace if necessary.
See How To…Replace Wax Pump.
Replace the belt and deck. See How To…
Replace Striding Belt. Perform belt and deck
test for wear.
Striding belt not centered.
Striding belt tension or tracking
needs to be adjusted.
Adjust striding belt . See How To…Adjust And
Tension The Striding Belt.
Striding belt mis-alignment,
but properly tensioned.
Improper walking/running.
Verify unit is level. Notify Club Manager.
3
Life Fitness Models 9000HR, 8500, and T9i Treadmills
TROUBLESHOOTING GUIDE
Malfunction
Rubbing sound from
underneath machine.
Squeaking noise.
Loud groaning sound
heard from front of
machine while elevating.
Loud groaning on footfall.
Probable Cause
Corrective Action
Foreign objects may be stuck
underneath the machine.
Inspect underneath striding belt and machine.
Remove any debris or objects that may cause
interference with the treadmill.
Tinsel is installed incorrectly.
Reposition tinsel on the outside of the striding
belt.
Wax bracket loose or missing.
Inspect wax bracket underneath deck and
verify wax bracket is secure. See How To…
Drive pulley making contact
with frame.
Inspect setscrew. If loose, apply 242 Loctite
and retighten.
Drive motor belt may be worn
or damaged.
Replace faulty drive motor belt. See How To…
Lift mechanism pivot points are
dry.
Lubricate pivot points.
Lift screw dirty or gummy.
Clean and lubricate threaded screw.
Faulty lift motor or lift screw nut
stripped.
Replace the lift motor. See How To…Replace
Lift Motor.
High friction between deck and
striding belt.
Refer to belt and deck test in diagnostics.
4
Life Fitness Models 9000HR, 8500, and T9i Treadmills
TROUBLESHOOTING GUIDE
Malfunction
Display does not illuminate
when machine is powered
on.
Probable Cause
Corrective Action
Insufficient power source.
Plug treadmill into a dedicated amp circuit.
Refer To The Operations Manual.
Loose 10 pin connection at
display console or DC control
board.
Check all electrical connections for proper
attachment. Refer to wiring block diagram in
section 5.
Damaged main harness wire
connection.
Replace wire harness. See How To…Replace
Main Wire Harness.
Faulty display console.
Verify if 8VDC is present at P1 pin, 3-4 and
12VDC at P1 pin 9.
If yes, replace Display Console. See How To…
Replace Display Console PCB.
If no, replace the Control Board. See How To…
in section 3.
Damaged main cable.
Perform continuity test from pin connector to
pin connector, and then from connector pins to
frame.
5
Life Fitness Models 9000HR, 8500, and T9i Treadmills
TROUBLESHOOTING GUIDE
Malfunction
Display overlay keys are
not responding when
depressed.
Probable Cause
Loose ribbon connection(s).
Corrective Action
Verify that the ribbon connections is attached to
the display PCB.
Reseat the connection and verify the operation.
Unit resets randomly or
pauses.
Worn or defective overlay
assembly.
Replace overlay assembly. See How To…
Replace Overlay Decal.
Insufficient power source.
Plug treadmill into a dedicated amp circuit.
Refer to the Operations Manual.
Damaged ground prong on line
cord.
Replace line cord. See How To… Replace Line
Cord.
Loose connections at display
console.
Secure all connections at display console PCB.
Line cord improperly seated in
electrical outlet.
Inspect power connection at electrical outlet
and at machine for proper contact.
Emergency stop magnet not
engaged.
Re-engage the emergency stop magnet.
Magazine making contact with
stop key on the overlay
Move all possible obstructions off the console
and handlebar.
6
Life Fitness Models 9000HR, 8500, and T9i Treadmills
TROUBLESHOOTING GUIDE
Malfunction
Unit resets randomly or
pauses.
No Power.
Probable Cause
Corrective Action
Emergency stop switch magnet
not making proper contact.
Re-seat the emergency stop switch magnet
and verify the operation.
Pinched main wire harness.
Replace the main wire harness. See How
To…Replace Main Wire Harness.
Open ground path.
Using voltmeter, check all points for continuity:
console pan screws, console mounting screws,
handlebar screws, and handrail mounting
screws to frame with respect to ground. Ground
must be a non-painted surface.
Lift motor over-heating which
causes unit to pause.
Inspect thread screw for dirt. Perform lift motor
test. Refer to diagnostics.
On/Off switch.
Turn the switch to the ON position.
Insufficient power source.
Plug treadmill into a dedicated amp circuit.
Refer to the Operations Manual.
Using a voltmeter, verify power at outlet. If no
power exists, reset circuit breaker at panel.
Damaged line cord.
Replace line cord. See How To…Replace Line
Cord.
Line cord improperly seated in
socket.
Inspect power connection at wall outlet and at
machine for proper contact.
No line filter.
Verify voltage at the line filter.
Verify 120VAC at the control connector P1.
Refer to Service Manual, Section 4 Electronics.
7
Life Fitness Models 9000HR, 8500, and T9i Treadmills
TROUBLESHOOTING GUIDE
Malfunction
No Power.
Probable Cause
DC Controller
Corrective Action
Turn the switch to the ON position.
Verify at P3, 8VDC on Pins 3 and 4. Refer to
Service Manual, Section 4 Electronics.
Verify at P3, for 12VDC on Pin 9. Refer to
Service Manual, Section 4 Electronics.
Verify both LEDs 5 and 6 are lit. Refer to
Service Manual, Section 4 Electronics.
Wax Leak.
Loose hose connections.
Inspect hose connections and secure as
necessary, replace if necessary.
Faulty connection at bag.
Replace wax bag and plastic coupling.
Wax bag is torn.
Replace wax bag. See How To…Replace Wax
Bag.
Wax hose damaged.
Inspect for leaks and replace.
Wax hose in pump is
damaged.
Inspect wax hose.
Wax passes through pump
and slowly drips from nozzle.
Replace wax motor. See How To…Replace
Wax Motor.
8
Life Fitness Models 9000HR, 8500, and T9i Treadmills
TROUBLESHOOTING GUIDE
Malfunction
Lifepulse Heart Rate System
does not respond or
improper heart rate reading
or "Reading Heart Rate"
appears in the message
center for more than 2
minutes without giving heart
rate reading.
Probable Cause
Corrective Action
Dirty handlebar sensors.
Wipe sensors with a clean soft cloth.
Inadequate contact with all four
sensors.
Verify a firm grip of all four sensors (two on
top, two on bottom of handlebar).
User running over 4.5 mph
(7.5kph).
For accurate heart rate reading, user must
slow down to less than 4.5 mph (7.5kph).
User may have an unusual
heart condition.
Have different people grasp sensors to detect
any variance.
Loose connections at display
console and handlebar.
Secure connections at display console and
handlebar.
Faulty heart rate sensors..
Replace handlebar sensors. See How To…
Replace Heart Rate Kit.
Faulty display console PCB.
Replace display console PCB. See How To…
Replace Display Console PCB.
9
Life Fitness Models 9000HR, 8500, and T9i Treadmills
TROUBLESHOOTING GUIDE
Malfunction
Probable Cause
Corrective Action
Electrode sensors not
working.
Excess sweat or cleaning fluids
come in contact with electrodes
in handlebar.
Inspect and wipe clean. Replace sensors if
contacts are coming off sensors.
Display reads a continuous
heart rate reading when
hands are removed.
Harness wires pinched at
handlebar or handrail.
Replace ERGO bar assembly if the wires are
damaged. See How To…Replace ERGO bar
Assembly.
No Chest Strap detected.
Chest strap sensors not making
good contact with body of user.
Adjust chest strap and moisten sensors to
make better contact with skin.
User is out of monitoring range.
Move within 3 ft (1 meter) of receiver
Loose connection at receiver.
Check connection on receiver. See How
To...Replace Telemetry Receiver.
Faulty chest strap.
Replace chest strap.
Faulty receiver.
Verify 5VDC at P6 pin 2. If yes, replace
transmitter. If no, replace display console
PCB.
Telemetry turned OFF.
Enter Manager’s Configuration mode and turn
telemetry to ON. Refer to Diagnostics.
Receiver is turned slightly
sideways.
Position receiver so it’s horizontal with the
console. See How To...Replace the Telemetry
Receiver.
Bad connection at Telemetry
cable and receiver.
Check cable jack and receiver connection.
Cross-talk between units
(closer than 1 meter apart.)
Position treadmills to recommended
distances. Refer to the Operations Manual.
Erratic Heart Rate readings.
10
Life Fitness Models 9000HR and T9i Treadmills
SECTION II-A
DIAGNOSTICS
TR9000HR/
T9i
1
Life Fitness Models 9000HR and T9i Treadmills
Diagnostics - Entry
DIAGNOSTICS ENTRY TR9000HR
Diagnostics is entered by holding the
‘PAUSE’ key when power is applied or
by holding the ‘PAUSE’ key and
pressing the ‘CLEAR’ key twice from
any state. The unit will take approx. 3 to
4 seconds to enter Diagnostics.
Distance
Time
Heart Rate
Incline
Speed
Select
Enter
Clear
Workout
Profile
DIAGNOSTICS ENTRY - T9i
Diagnostics is entered by holding the
‘JOG’ key when power is applied or by
holding the ‘JOG’ key and pressing the
‘STOP’ key twice from any state.
The unit will take approx. 3 to 4
seconds to enter Diagnostics.
Calories
Quick
Start
Cool
Down
Pause
Stop
Tr9000
Cal./Hour
Calories
Time
Distance
Heart Rate
Incline
Speed
Select
FIRST STATE ON BOTH UNITS
On entry to this state, the message
“SERVICE MENU” will appear.
Workout
Profile
“USE ARROW KEYS TO SCROLL
THROUGH LIST”.
Walk
Using any of the arrow keys will allow
you to scroll through four main
categories.
Jog
T9i
SYSTEM TEST
INFORMATION
MAINTAINANCE
CONFIGURATION
Press the ‘ENTER’ key to enter the desired category.
2
Run
Cool
Down
Stop
Life Fitness Models 9000HR and T9i Treadmills
Diagnostics – System Test
SYSTEM TEST
Upon entry into this category, a SYSTEM COMM TEST will be performed.
SYSTEM COMM TEST
This test will attempt to communicate with all of the modules within the treadmill unit. If all the modules
communicate, the message is: “SYSTEM COMM OK” followed by an ‘AUTO ENTER’ event. If a module does not
respond to the console processor an ERROR message will be displayed.
The console cannot perform a loop back test, the message is:
“SYSTEM COMM TWO WIRE.”
JW1 jumper is miss connector or missing from board
If the motor controller module does not communicate, if the motor controller has no power, or if the harness is
disconnected, the message:
“COMM BAD”,
“CHECK HARNESS BETWEEN CONSOLE AND MOTOR CONTROLLER”,
Press the ‘ENTER’ key to advance to the SYSTEM TEST MENU.
Press the ‘CLEAR’ key or ‘STOP’ key to return to the SERVICE MENU.
SYSTEM TEST MENU
Upon entry into the area, the message is:
“SYSTEM TEST MENU”,
“USE ARROW KEYS TO”,
“ SCROLL THROUGH LIST”
Using any of the arrow keys will allow you to scroll through the nine systems test areas.
MAIN MOTOR MODULE
Speed Automatic Test
Speed Manual Test
Speed Errors
LIFT MOTOR MODULE
Incline Automatic Test
Incline Manual Test
Incline Errors
WAXER MOTOR MODULE
Waxer Automatic Test
Waxer Manual Test
Waxer Errors
BELT/DECK TEST
DISPLAY TEST
CONSOLE EEPROM TEST
LIFEPULSE TEST – applies only to TR9000HR and T9i units
TELEMETRY TEST
CSAFE TEST
Press the ‘ENTER’ key to enter the desired category.
3
Life Fitness Models 9000HR and T9i Treadmills
Diagnostics – System Test
MAIN MOTOR MODULE
Speed Automatic Test
This test allows the user to test the main drive motor and controller controlling the target speed. Upon entry into this
test a SA (speed automatic) will be in the profile window. The user can select a target speed by using the speed
arrow keys. The actual speed as calculated by the speed feedback sensor is shown in the actual portion of the
message center.
The incline system can be activated in this test as well. However, the display will only show the target incline for two
seconds while the incline keys are being pressed. It will then return to showing the speed information.
System Communication Module Timeout Readout
During the Speed Automatic Test, if a user wants to see how the communication module timeout occurrences are
occurring, press the ‘TIME DOWN’ arrow key to show them. There will be 3 modules that will be display in the
message center. In order from left to right they are motor controller, lift module, waxer module. During operation of
the treadmill, if any module has a communication timeout to the console, the readout for that module will increment
up to a maximum of nine. After any successive communication to a module, the readout is zeroed out for that
module. If any module gets nine consecutive timeouts, that module will be placed into a disabled mode. Depending
on which module has the timeout, the treadmill may or may not experience a shutdown, reset, Notify Maintenance
Notification or continue to operate.
Press the ‘CLEAR’ key or ‘STOP’ key to exit the Speed Automatic test and return to the System Test Menu.
Press the ‘ENTER’ key to advance to the Speed Manual test.
Speed Manual Test
This test allows the user to test the main drive motor and controller controlling the motor rpm. Upon entry into this
test a SM (Speed Manual) will be in the profile window. The user can select a target motor rpm by using the speed
arrow keys. The actual motor rpm as calculated by the speed feedback sensor is shown in the actual portion of the
message center.
The incline system can be activated in this test as well. However, the display will only show the target incline for two
seconds while the incline keys are being pressed. It will then return to showing the speed information.
Press the ‘CLEAR’ key or ‘STOP’ key to exit the Speed Manual test and return to the Speed Automatic test.
Press the ‘ENTER’ key to advance to the Controller Errors test.
Speed Errors
This test allows seeing the current motor controller error conditions that are being displayed on the motor controller
display. Upon entry into this test a SE (speed errors) will be in the profile window.
The following is a list of the current motor controller error conditions:
OVERSPEED ERROR
BELT MOVING ERROR
RUNNING ERROR
START UP ERROR
DRIVE TRANSISTOR ERROR
DYNAMIC CURRENT TRIP
LOW VOLTAGE ERROR
Refer to the Error Code Troubleshooting Table on the next page.
4
Life Fitness Models 9000HR and T9i Treadmills
Diagnostics – System Test
ERROR CODE TROUBLESHOOTING TABLE
T9I/TR9000:
MEANING:
YOU WILL GET THIS ERROR IF:
Start-up error
Belt commanded to move and OPTO not
seen or belt started to move and stalled.
The OPTO sensor is unplugged or lost
communication when you start a
workout.
Running error
Belt stalled after it was moving at its
target speed and/or lost OPTO after
moving at target speed.
The OPTO sensor is disconnected or
lost target speed after a workout starts.
Belt moving error
Belt seen moving via OPTO but motor
controller did not command it to move.
Movement of the striding belt prior to
starting a workout.
Over speed error
Belt commanded to move but it is moving
over target goal by 3 mph.
Moving the belt manually faster then the
commanded/target speed during a
workout.
Drive transistor
error
Shows up if motor controller detects a
failed part. This isn’t a reset-able error.
Treadmill will not allow workouts until
serviced.
Main motor wires/leads are
disconnected at the start of a workout.
If the motor is properly connected and
in working condition then the drive
transistor could have failed. Check DC
Controller
Low voltage error
Shows up if motor controller detects a low
voltage condition.
The motor thermal wires are
disconnected, broken, or become loose.
Speed unattained
error
Shows up in system error log only
The belt and deck are badly worn, the
motor can not reached the commanded
speed.
No Comm error
Console lost communications with motor
controller board. This could mean that the
console has intermittent communications
with the motor controller (possibly
because of faulty cables) or the console
was never able to communicate with the
motor controller (possibly because of
broken wires).
Communication wires in the console
cable are broken.
Waxer Needs
Filling
Waxer bag contains <= 6% wax solution.
Replace wax fill bag
Waxer Empty
Waxer bag is emptied. This isn’t a resetable error. Treadmill will not allow
workouts until the waxer bag is serviced.
Replace wax fill bag
Level Switch Error
Shows up in system error log only on
TR8500.
…the treadmill is at non-zero incline
and you unplug the incline home switch
and then you command the incline
down to zero.
Incline time-out
error
Shows up in system error log only
…the treadmill is at 0% incline and you
disconnect the incline motor and then
start a workout.
Dynamic Current
Trip
Shows up in systems error log only.
Worn striding belt and deck motor
causing motor to work to hard to move.
Press the ‘CLEAR’ key or ‘STOP’ key to exit the Speed Errors test and return to the Speed Manual test.
5
Life Fitness Models 9000HR and T9i Treadmills
Diagnostics – System Test
LIFT MOTOR MODULE
Incline Automatic Test
This test allows the user to test the lift motor and switches controlling the target incline. Upon entry into this test an
IA (incline automatic) will be in the profile window. The user can select a target incline by using the incline arrow
keys. The actual incline as calculated by the time count is shown in the actual portion of the message center.
The state of the level incline switches will be displayed in the profile window. The speed system can be activated in
this test as well. However, the display will only show the target speed for two seconds while the speed keys are
being pressed. It will then return to showing the incline information.
Press the ‘CLEAR’ key or ‘STOP’ key to exit the Incline Automatic test and return to the System Test Menu.
Press the ‘ENTER’ key to advance to the Incline Manual test.
Incline Manual Test
This test allows the user to test the lift motor without switches controlling the incline manually. Upon entry into this
test an IM (incline manual) will be in the profile window. The user move incline by using the incline arrow keys. The
actual incline as calculated by the time count is shown in the actual portion of the message center.
The state of the level incline switches will be displayed in the profile window.
The speed system can be activated in this test as well. However, the display will only show the target speed for two
seconds while the speed keys are being pressed. It will then return to showing the incline information.
Press the ‘CLEAR’ key or ‘STOP’ key to exit the Incline Manual test and return to the Incline Automatic test.
Press the ‘ENTER’ key to advance to the Incline Errors test.
Incline Errors
This test allows seeing the current lift motor error conditions. Upon entry into this test an IE (incline errors) will be in
the profile window.
The following is a list of the current lift motor error conditions:
INCLINE TIMEOUT ERROR - Home switch blocked or unplugged.
LEVEL SWITCH ERROR – Zero home position not detected.
NO AC POWER ERROR – No AC to lift.
Press the ‘CLEAR’ key or ‘STOP’ key to exit the Incline Errors test and return to the Incline Manual test.
6
Life Fitness Models 9000HR and T9i Treadmills
Diagnostics – System Test
WAXER MOTOR MODULE
Waxer Automatic Test
This test allows the user to see information concerning the waxer motor. Upon entry into this test a WA (waxer
automatic) will be in the profile window. The waxer information will scroll automatically every 3 seconds. The
following is a list of the current information that can be seen:
WAXER UNPLUGGED
WAXER FIRED – XXX
PRE WAXER FIRED - XXX
WAXER - XX/100 FULL
NEXT WAX - XX HOURS or XX MINUTES
MANUAL WAX- XX TIMES
INITIAL WAX- XX MINS
WAX INTERVAL XX MINS
MIN WAX SPEED- X.X
The speed system and incline systems can be activated in this test as well. However, the display will only show the
target speed or incline for two seconds while the speed/incline keys are being pressed. It will then return to showing
the waxer information.
Press the ‘CLEAR’ key or ‘STOP’ key to exit the Waxer Automatic test and return to the System Test Menu.
Press the ‘ENTER’ key to advance to the Waxer Manual test.
Waxer Manual Test
This test allows the user to manually fire the waxer system. Upon entry into this test a WM (waxer manual) will be in
the profile window.
Note: When testing wax system, place paper or towels under nozzle when determining spray pattern (8-16” wide).
TO FIRE WAXER PRESS THE QUICK START KEY
The speed system and incline systems can be activated in this test as well. However, the display will only show the
target speed or incline for two seconds while the speed/incline keys are being pressed. It will then return to showing
the waxer information.
Press the ‘CLEAR’ key or ‘STOP’ key to exit the Waxer Manual test and return to the Waxer Automatic test.
Press the ‘ENTER’ key to advance to the Waxer Errors test.
Waxer Errors
This test allows seeing the current wax motor error conditions. Upon entry into this test a WE (waxer errors) will be
in the profile window.
The following is a list of the current waxer motor error conditions:
WAXER UNPLUGGED
WAXER NO AC POWER
Press the ‘CLEAR’ key or ‘STOP’ key to exit the Waxer Errors test and return to the Waxer Manual test.
7
Life Fitness Models 9000HR and T9i Treadmills
Diagnostics – System Test
BELT/DECK TEST
This test allows the user to test the belt and deck condition. This test attempts to approximate a wattage meter. It
will give the user the percentage of power, wattage, bus voltage, and temperature readings.
The speed system and incline systems can be activated in this test. However, the display will only show the target
speed or incline for two seconds while the speed/incline keys are being pressed. It will then return to showing the
belt/deck information. The initial message will be:
“POWER METER”,
“RECOMMENDED SPEED ABOVE 3.5 MPH” or
“RECOMMENDED SPEED ABOVE 5.0 KPH”
The initial information displayed will be:
POWER XXX WATT XXXX
By pressing the ‘COOLDOWN’ key, the display will toggle to the information:
VOLTAGE XXX TEMP XX ºC
The display will lock on the current information if the ‘PAUSE’ key or ‘JOG’ key is pressed.
WATT is the wattage measured by the motor controller to move the belt.
VOLTAGE is the bus voltage of the motor controller. It is not the input line voltage.
Press the ‘CLEAR’ key or ‘STOP’ key to exit the Belt/Deck test and return to the System Test Menu.
LIFEPULSE TEST
This test will allow the user to test the lifepulse heart rate system. The lifepulse system can be manually tested. A
heart will appear in the profile window.The system will show when the user has placed their hands on the lifepulse
sensors. When the left sensor detects “hands on” condition, a ‘L’ will be placed in the profile window with the heart.
When the right sensor detects “hands on” condition, a ‘R’ will be placed in the profile window with the heart. A timer
will start counting from the time when a both left and right “hands on” condition occurs to when the lifepulse system
can reliable give the user their heart rate. This timer will stop when the heart rate is given. The gain value of the
heart rate signal is shown. The confidence level of the heart rate value is displayed. The value ranges from 0 to 9.
A value of 9 is considered to be high confidence. A value of 0 is considered to be low confidence. The speed
system and incline systems can be activated in this test. However, the display will only show the target speed or
incline for two seconds while the speed/incline keys are being pressed. It will then return to showing the lifepulse
information.
Press the ‘CLEAR’ key or ‘STOP’ key to exit the Lifepulse test and return to the System Test Menu.
TELEMETRY HEART RATE TEST
This test will allow the user to test the telemetry heart rate system. Upon initial entry to this test, a message
concerning the telemetry system on/off will occur. If the telemetry heart rate system is disabled, no heart rate value
will be given.
If the system is enabled, a telemetry heart rate signal can be provided and a heart rate value will be shown. The
signal will also generate the ‘ENTER’ LED to flash at the heart rate pulse frequency.
Press the ‘CLEAR’ key or ‘STOP’ key to exit the Telemetry Heart Rate test and return to the System Test Menu.
8
Life Fitness Models 9000HR and T9i Treadmills
Diagnostics – System Test
DISPLAY TEST
All Lights On Test/Keypad Test
This test will allow the user to test the display console. Upon entry to this test, all lights will be turned on.
Pressing keys will result in a beep sound and, for all but the ‘ENTER’ and ‘CLEAR’ key or ‘STOP’ keys, a character
will be repeated across the message center display.
KEYS
TIME UP
TIME DOWN
INCLINE UP
INCLINE DOWN
SPEED UP
SPEED DOWN
SELECTUP
SELECT DOWN
QUICK
WALK
PAUSE/JOG
RUN
COOL DOWN
COOL DOWN T9I
DISPLAYED CHARACTER
‘1’
‘2’
‘3’
‘4’
‘5’
‘6’
‘7’
‘8’
‘9’
‘A’
‘B’
‘C’
‘D’
‘E’
Pulling the Emergency Stop switch will result in the message:
‘REPLACE EMERGENCY STOP SWITCH’.
Pressing the ‘CLEAR’ key or ‘STOP’ key to exit the Display test and return to the System Test Menu.
Pressing the ‘ENTER’ key will advance to Walking LED test.
Walking LED Test
This test will light each individual segment per character until complete. It will then light each character separately
until all characters have been lit. Each individual LED will be tested also. If the ‘PAUSE’ key or ‘JOG’ key is
pressed, the sequence will halt and remain there until the ‘PAUSE’ is pressed again.
Pressing the ‘PAUSE’ key or ‘JOG’ key can LOCK the display. This will prohibit the scrolling of the LED’s.
Pressing the ‘CLEAR’ key or ‘STOP’ key to exit the Walking LED test and return to the Keypad test.
DISPLAY CONSOLE EEPROM TEST
This test allows the user to test the display console EEPROM. This test will read/write/replace all used locations in
the display console EEPROM. The EEPROM location being tested will be displayed in the heart rate window. If
there is an error, the bad location will be displayed. The following is a list of current information that can be seen:
TESTING EEPROM XXXX
EEPROM GOOD
EEPROM BAD AT XX
Press the ‘CLEAR’ key or ‘STOP’ key to exit the Display Console EEPROM test and return to the System Test
Menu.
9
Life Fitness Models 9000HR and T9i Treadmills
Diagnostics – System Test
C-SAFE TEST
This test will give information concerning whether there is a CSAFE system connected to the treadmill. A special
LOOP BACK CABLE is required for this test. This test, is performed to determine fault between Life Fitness
equipment and CSAFE system. Pressing the Time Up arrow key will reset the console and send out the standard
power up message to the network. The console should display “SENDING…” . If the CSAFE network is
communicating to the console it will display “RECEIVING…” then “READY MODE”, the communication between
the unit and the CSAFE are functioning properly. If the network does not function properly you will see the console
display “SENDING…” then “NOT CONNECTED.” When the CSAFE is not used the console will display “NOT
CONNECTED”
Display: "RX.-xx TX.-xx 'MESSAGE' 'TIMER'" -updated every second
Overview:
The 'Rx' and 'Tx' sections show you the commands being Rxed/Txed. The Rx/Tx sections both show decimal points
whenever were are Rxing/Txing. The 'MESSAGE' sections report useful messages about the current networking
state of the machine or error conditions.
The 'TIMER' section shows you networked time-out timers and auto status timers counting down.
Messages:
-"RESETING CSAFE NETWORK" is shown every time this mode is entered or whenever user presses the
'cooldown' key. This means the Csafe State machine is reset to its powerup mode. You can thus see the kiosk
configuring the equipment and verify we have a valid network connection.
-'RX-xx' shows last Rxed command from network. Shows 'RX-00' for empty frame receptions. On rejected frames
this shows the byte that caused the rejection.
-'TX-xx' shows last Txed command that equipment sent.
-'NOT CONNECTED' means Csafe state machine is in the power-up mode and has not been configured by the
kiosk yet. After any frame has been Rxing this message goes away indicating we are connected to a network.
-'RECEIVING...' means we are currently Rxing a frame
-'FRAME BAD' means frame was detected to have a bad checksum or any of the other types of framing error listed
in the Csafe spec.
-'FRAME REJECTED' means frame was good (no framing error's detected) but frame contained invalid
commands/data for current Csafe State.
-'READY MODE' -Csafe 'Ready' state
-'GET ID MODE XX' -Csafe 'Idle' state. Network has configured equipment to ask for ID's.
-'HAVEID MODE'
-'COMM TIME-OUT'
-'INUSE MODE'
-'FINISHED'
Timers:
-2 types of timers are shown. One is our internal network timer. It is shown at the end of the display during 'GET ID
MODE', 'HAVEID MODE', and 'FINISHED' states. Its default setting is 65 seconds for the 'GET ID MODE' and 15
seconds for the other modes. -The other time that is shown is the auto status and/or auto 'UpList' option. When the
network activates these options you will see a countdown timer (from 1 to 30 seconds) that will send the
equipment’s status or 'UpList' whenever the timer times out. This is shown in the 'Ready' and 'InUse' modes.
Pressing the ‘CLEAR’ key or ‘STOP’ key to exit the C-SAFE test and return to the System Test Menu.
10
Life Fitness Models 9000HR and T9i Treadmills
Diagnostics - Information
SYSTEM INFO MENU
Upon entry into the area, the message is:
“INFORMATION MENU”,
“USE ARROW KEYS TO”,
“ SCROLL THROUGH LIST”
Using any of the arrow keys will allow you to scroll through the eight system information areas.
SYSTEM STATISTICS
SOFTWARE VERSION
LIFT MOTOR INFO
WAX MOTOR INFO
SYSTEM ERRORS
MAINTENANCE INFO
Press the ‘ENTER’ key to enter the desired category.
SYSTEM STATISTICS
This area will allow the user to see system information concerning the following areas:
TOTAL HOURS - XX
TOTAL MILES - XX
BELT HOURS - XX
BELT MILES - XX
LIFT MINUTES - XX
HILL PROGRAM SELECTIONS
RANDOM PROGRAM SELECTIONS
MANUAL PROGRAM SELECTIONS
FAT BURN PROGRAM SELECTIONS
CARDIO PROGRAM SELECTIONS
QUICK START PROGRAM SELECTIONS
GERKIN PROTOCAL
MY WRKS
CUSTOM
EZ INCLINE
SPORT
WALK
JOG
XTRAIN
HR HILL
HR INTRV
HR EX
The information will automatically scroll every 3 seconds or using any of the arrow keys will allow you to scroll
through the system statistics.
Pressing the ‘PAUSE’ key or ‘JOG’ key can LOCK the display. This will prohibit the scrolling of the information.
Press the ‘CLEAR’ key or ‘STOP’ key to exit the System Statistics and return to the System Info Menu.
SOFTWARE VERSIONS
This area will allow the user to see system information concerning the following areas:
CONSOLE SOFTWARE VERSION - XX
MOTOR CONTROLER SOFTWARE VERSION - XX
LIFEPULSE SOFTWARE VERSION -XX
CSAFE VERSION – XX
BOOT VERSION - XX
The information will automatically scroll every 3 seconds or using any of the arrow keys will allow you to scroll
through the system information.
Press the ‘CLEAR’ key or ‘STOP’ key to exit the Software Versions and return to the System Info Menu.
11
Life Fitness Models 9000HR and T9i Treadmills
Diagnostics - Information
LIFT MOTOR INFORMATION
This area will allow the user to see the current information about the lift motor. The information will cover the
following areas:
UNIT CONFIGURATION – 60 HERTZ or 50 HERTZ
CURRENT LIFT “ON TIME” IN MINUTES
INCLINE BUCKET INFORMATION – 16 BUCKETS
INCLINE AT PERCENT INFORMATION
BUCKET 0
BUCKET 1
BUCKET 2
BUCKET 3
BUCKET 4
BUCKET 5
BUCKET 6
BUCKET 7
BUCKET 8
BUCKET 9
BUCKET 10
BUCKET 11
BUCKET 12
BUCKET 13
BUCKET 14
BUCKET 15
TIME - XX
TIME -XX
TIME - XX
TIME - XX
TIME - XX
TIME - XX
TIME - XX
TIME - XX
TIME - XX
TIME - XX
TIME - XX
TIME - XX
TIME - XX
TIME - XX
TIME - XX
TIME - XX
The information will automatically scroll every 3 seconds or using any of the arrow keys will allow you to scroll
through the lift motor information.
Press the ‘CLEAR’ key or ‘STOP’ key to exit the Lift Motor Info and return to the System Info Menu.
WAX MOTOR INFORMATION
This area will allow the user to see the current information about the wax motor. The information will cover the
following areas:
WAXER FIRED – XXX
WAXER - XX/100 FULL
NEXT WAX - XX HOURS or XX MINUTES
MANUAL WAX- XX TIMES
INITIAL WAX- XX MINS
WAX INTERVAL XX MINS
MIN WAX SPEED- X.X
The information will automatically scroll every 3 seconds or using any of the arrow keys will allow you to scroll
through the wax motor information.
Pressing the ‘PAUSE’ key or ‘JOG’ key can LOCK the display. This will prohibit the scrolling of the information.
Press the ‘CLEAR’ key or ‘STOP’ key to exit the Wax Motor Info and return to the System Info Menu.
12
Life Fitness Models 9000HR and T9i Treadmills
Diagnostics - Information
SYSTEM ERRORS
This area will allow the user to see the last 25 logged system errors. The error information will be displayed from
the most recently logged to the oldest. Each system error will be displayed in the following format.
Error # Brief Error Title
This format allows the user to scroll through all logged system errors without seeing any error details. The system
errors will be scrolled automatically every 3 seconds or can be scrolled by using any of the arrow keys.
If the user wants to see the details about an error condition, the user must press the ‘ENTER’ key when the error
title is displayed on the message center.
When the ‘ENTER’ key is pressed, all of the error log details will begin to display. These error details will scroll
automatically every 3 seconds or can be scrolled by using any of the arrow keys.
Press the ‘CLEAR’ key or ‘STOP’ key to go back to just seeing the error titles.
Press the ‘CLEAR’ key or ‘STOP’ key to exit the System Errors and return to the System Info Menu.
13
Life Fitness Models 9000HR and T9i Treadmills
Diagnostics - Maintenance
MAINTENANCE MENU
Upon entry into the area, the message is:
“MAINTENANCE MENU”,
“USE ARROW KEYS TO”,
“SCROLL THROUGH LIST”
Using any of the arrow keys will allow you to scroll through the ten system maintenance procedures.
REPLACING BELT /DECK
REPLACING WAXER BAG
REPLACING CONSOLE
REPLACING MOTOR CONTROLLER
REPLACING DRIVE MOTOR
REPLACING LIFT MOTOR
REPLACING WAX MOTOR
Press the ‘ENTER’ key to choose the desire procedure.
Upon the selection of the desired procedure, the system will gather all-important information concerning that
procedure and log the procedure the Console will beep. Upon successful completion of the log.
MAINTENANCE INFO
This area will allow the user to see the last 12 logged system repairs. The repair information will be displayed from
the most recently logged to the oldest. Each system repair will be displayed in the following format.
Repair # Brief Repair Title
This format allows the user to scroll through all logged system repairs without seeing any repair details. The system
repairs will be scrolled automatically every 3 seconds or can be scrolled by using any of the arrow keys.
If the user wants to see the number of repairs, the user must press the ‘ENTER’ key when the repair # is displayed
on the message center.
When the ‘ENTER’ key is pressed, all of the repairs procedure details will begin to display. These repair details will
scroll automatically every 3 seconds or can be scrolled by using any of the arrow keys.
Press the ‘CLEAR’ key or ‘STOP’ key to go back to just seeing the repair titles.
Press the ‘CLEAR’ key or ‘STOP’ key to exit the System Repair and return to the System Info Menu.
Press the ‘CLEAR’ key or ‘STOP’ key to exit the System Maintenance and return to the Service Menu.
14
Life Fitness Models 9000HR and T9i Treadmills
Diagnostics - Configuration
CONFIGURATION MENU
Upon entry into the area, the message is:
“CONFIGURATION MENU”,
“USE ARROW KEYS TO”,
“SCROLL THROUGH LIST”
Using any of the arrow keys will allow you to scroll through the three system configuration areas.
MANAGER CONFIG
MANUFACTURER CONFIG
Press the ‘ENTER’ key to choose the desire area.
Press the ‘CLEAR’ key or ‘STOP’ key to exit the Configuration Menu and return to the Service Menu.
15
Life Fitness Models 9000HR and T9i Treadmills
Diagnostics - Configuration
MANAGER CONFIG
This area will allow the user to see the current configuration about the system. The information will cover the
following areas:
LANGUAGE SELECTION
ENGLISH/METRIC UNITS
MAXIMUM SPEED
MINIMUM SPEED
MAXIMUM INCLINE
MAXIMUM DURATION
TELEMETRY ON/OFF
PAUSE TIMEOUT DURATION
WATTS DISPLAY ON/OFF
METS DISPLAY ON/OFF
PACE DISPLAY ON/OFF
CALORIE PER HOUR DISPLAY ON/OFF
DISTANCE CLIMBED ON/OFF
WAX MAINTENANCE REMINDER ON/OFF
ACCELERATION RATE 1 - 5
DECELERATION RATE 1 – 5
DEFAULT SELECTIONS FOR UNITS TR9000/T9i
LANGUAGE SELECTION
ENGLISH FOR ALL
ENGLISH/METRIC UNITS
ENGLISH FOR ALL
MAXIMUM SPEED
TR9000-10MPH T9i-12MPH
MINIMUM SPEED
0.5 MPH FOR ALL
MAXIMUM INCLINE
15% INCLINE
MAXIMUM PROGRAM TIME 60 MINUTES FOR ALL
TELEMETRY ON/OFF
ON FOR ALL
PAUSE TIMEOUT DURATION 1 MINUTE FOR ALL
WATTS DISPLAY ON/OFF
OFF FOR ALL
METS DISPLAY ON/OFF
OFF FOR ALL
PACE DISPLAY ON/OFF
ON FOR ALL
CALORIE PER HOUR DISPLAY ON/OFF
OFF FOR ALL
DISTANCE DISPLAY ON/OFF OFF FOR ALL
ACCELERATION RATE 1 – 5 3 FOR ALL
DECELERATION RATE 1 – 5 3 FOR ALL
The information will automatically scroll every 3 seconds or using the ‘TIME UP’ or ‘TIME DOWN’ arrow keys will
allow you to scroll through the configuration items.
The information can be changed when the item is displayed in the message center by using any of the remaining
arrow keys.
Pressing the ‘PAUSE’ key or ‘JOG’ key can LOCK the display. This will prohibit the scrolling of the information.
All changed items will be saved to the memory upon exiting of the manager’s configuration.
Press the ‘CLEAR’ key or ‘STOP’ key to exit the Manager’s Config and return to the Configuration Menu.
16
Life Fitness Model 8500 Treadmill
SECTION II-B
DIAGNOSTICS
TR8500
17
Life Fitness Model 8500 Treadmill
Diagnostics – Manager’s Settings
NOTE: In the illustration,
there’re three data Display
windows consisting of a total
of 10 tiles. Each tile consists
of a seven-segments which
illuminates to make-up a
number or letter. Example:
“ConS =” translates to
“Software Version Mode x.xx.”
Refer to the tables throughout
this section for complete
default setting explanations.
Calories/Speed
Display
Distance/Incline
Display
Time/Weight
Display
Four, 7-Segments
Three Tiles
(Segments Not Shown)
Four Tiles
Behind Secments
Manager Configuration:
Press and hold down the
Time/Weight UP arrow key
and press the Stop key twice.
Display windows show “ConS
=.” Use the Quick Start key to
move forward through each
setting modes and the Stop
key to move back. To exit
Managers settings, press the Stop key to move backward through each mode until the Data Display windows show
“ConS x.xx.” Press the Stop key one more time. When the computer is no longer in Managers settings, the Data
Display windows show the animated “flyers”, or the center window shows an underscore.
Manager Settings
Display Mode
Units (English/Metric)
Maximum Workout Time
Maximum Speed
Maximum Incline
Flyers ON/OFF
Polar ON/OFF
Acceleration Rate
Deceleration Rate
Waxer System Installed
18
Sequence
1
2
3
4
5
6
7
8
9
10
Default
diSP ON
UnitS LbS
tinE 99
SPd 10.0
inc
15.0
Fly
ON
PoLAr ON
AccEL = 3
dEcEL = 3
Lub SyS = no
Life Fitness Model 8500 Treadmill
Diagnostics – Service Menu
DIAGNOSTIC MODES
Service Menu: Press the Stop key twice and then hold down the Incline Up arrow key. To advance through the
diagnostic modes press the Quick Start key, to go backwards use the Stop key
There are 12 different diagnostic modes and settings shown in the order as they appear in the table.
Sequence
1
2
3
4
5
6
7
8
9
10
11
12
Diagnostic Modes
Software Version Mode
Display Test (all lights on)
Cycling Display Test
Keypad Test
Motor Test
Incline Test
Waxer Test
Polar Test (heart rate)
Statistics
Settings
System Errors
Photoshoot Mode
Default
“ConS x.xx”
“diSPLAY”
cycling lights
“buttonS”
“bELt tESt”
“LiFt tESt”
“Lub tESt”
“PolAr tESt”
“StAtS”
“SettingS”
“ErrorS”
“PhotoSHoot”
Diagnostic Settings
Display Mode
Units (English/Metric)
Maximum Workout Time
Maximum Speed
Maximum Incline
Flyers ON/OFF
Polar ON/OFF
Drive Ratio
Acceleration Rate
Deceleration Rate
Waxer System Installed
Waxer Settings
Sequence
1
2
3
4
5
6
7
8
9
10
11
12-21
Default
diSP ON
UnitS LbS
tinE
99
SPd 10.0
inc
15.0
Fly
ON
PoLAr ON
dri = 11350
AccEL = 3
dEcEL = 3
Lub SyS = no
LubX xxx
DESCRIPTION
Software Version Mode
Upon entry into this mode, the console software version will be display first as “ConS xx.x.”, then the motor
controller software as “CtrL xx.xx.”, and finally the date the software version was made (MM = 2 digit month,
DD = 2 digit day, and YYYY = 4 digit year). Use the Weight arrow key to cycle through the different versions.
Display Test = “diSPLAY”
This mode turns all of the displays on. To cycle through the displays, press the Quick Start key.
Cycling Display Test
This mode cycles through the different display segments automatically.
Keypad Test = “buttonS”
This test allows you to check the keypad. Use the table below to verify the key functions.
Key
Weight Up Arrow
Incline Up Arrow
Speed Up Arrow
Weight Down Arrow
Incline Down Arrow
Speed Down Arrow
Emergency Stop Button
(pressed)
Emergency Stop Button
(released)
Not-Used key
Stop Key
Quick Start Key
Default
“1”
“2”
“3”
“4”
“5”
“6”
“EEEE EEE EEE”
“---- --- ---”
“---- --- ---”
Exits keypad test mode
Enters motor test mode
19
Life Fitness Model 8500 Treadmill
Diagnostics
Motor Test = “bELt tESt”
This test checks the motor and motor controller. Use the Speed arrow keys to increase or decrease motor speed
from 0.5 to 10.0 mph. The Time window shows the actual OPTO speed while the Speed window shows the target
speed. Speed LED is ON during test mode. The Time LED flashes when information is sent to the motor controller.
The Weight LED flashes when information is received from the motor controller. Use the Incline arrow keys to
select items as listed below.
Item
Description
Default
Motor Status byte #1
Motor Status byte #2
Target RPM
Actual RPM
Power
Current
Gives current status of the motor
controller.
Shows commanded (target) rpm
Shows OPTO (actual) rpm
Shows motor power in watts
Shows % maximum current being used.
Range = 0 to 100 where 100 = 100% of
maximum current is being used.
Shows buss voltage
“
XX0 “
“
XX1 “
“xxxx tArgEt”
“xxxx ActuAL”
“ P = xxxx”
“
I = xxx”
Voltage
“
E = xxx”
During this test if an error occurs, it usually shows up because the motor draws excessive current. This can occur
during power-up or when a user tries to start a workout. In either case, the motor automatically shuts OFF, a
beeping sound occurs, and an error code is displayed. Most errors can be cleared out by pressing the Stop key,
however, if the error persists, refer to the Error Code Troubleshooting Table on the next page.
20
Life Fitness Model 8500 Treadmill
Diagnostics
ERROR CODE TROUBLESHOOTING TABLE
TR8500
MEANING:
YOU WILL GET THIS ERROR IF:
“Err 1”
Belt commanded to move and opto not
seen or belt started to move and stalled.
The opto sensor is unplugged or lost
communication when you start a workout.
“Err 2”
Belt stalled after it was moving at its
target speed and/or lost opto after moving
at target speed.
The opto sensor is disconnected or lost target
speed after a workout starts.
“Err 3”
Belt seen moving via opto but motor
controller did not command it to move.
Movement of the striding belt prior to starting a
workout.
“Err 4”
Belt commanded to move but it is moving
over target goal by 3 mph.
Moving the belt manually faster then the
commanded/target speed during a workout.
“Err 5”
Shows up if motor controller detects a
failed part. This isn’t a reset-able error.
Treadmill will not allow workouts until
serviced.
Main motor wires/leads are disconnected at the
start of a workout. If the motor is properly
connected and in working condition then the
drive transistor could have failed. Check DC
Controller
“Err 6”
Shows up if motor controller detects a low
voltage condition.
The motor thermal wires are disconnected,
broken, or become loose.
“Err 7”
Shows up in system error log only
The belt and deck are badly worn; the motor
can not reached the commanded speed.
“Err 8”
Console lost communications with motor
controller board. This could mean that the
console has intermittent communications
with the motor controller (possibly
because of faulty cables) or the console
was never able to communicate with the
motor controller (possibly because of
broken wires).
Communication wires in the console cable are
broken.
“Err 9”
Waxer bag contains <= 6% wax solution.
Replace wax fill bag
“Err 10”
Waxer bag is emptied. This isn’t a resetable error. Treadmill will not allow
workouts until the waxer bag is serviced.
Replace wax fill bag
“Err 11”
Shows up in system error log only on
TR8500.
The treadmill is at non-zero incline and you
unplug the incline home switch and then you
command the incline down to zero.
“Err 12”
Shows up in system error log only
The treadmill is at 0% incline and you
disconnect the incline motor and then start a
workout.
21
Life Fitness Model 8500 Treadmill
Diagnostics
Incline Test = “LiFt tESt”
Using the Incline up and down arrow keys, check incline positions in 0.5% increments. During this test, the Incline
LED will illuminate the Time window shows the percent of incline, and the Incline window shows the incline setting.
If the treadmills incline home switch is pressed (indicating it is at 0.0% incline) then the Distance LED will turn on.
Once the home switch is released (indicating it is above 0.0% incline) the Distance LED will shut off. The Calories
LED will turn on if the Incline controller detects 60Hz line frequency. The Calories LED is off if 50Hz is detected.
Waxer Test = “Lub tESt”
This test lets you check the waxer system. The weight LED illuminates when you’re in this test mode. You can
toggle the waxer do a test squirt by pressing either of the Weight arrow keys. The words ON and OFF indicate
when the test squirt has started and ended. This information is shown in the Time display as: SSS=ON or
SSS=OFF. If the waxer is disabled it is displayed as: SSS = “---“. Doing a waxer test squirt will automatically reenable the waxer. The Time LED illuminates when the waxer is enabled.
Polar Test = “PolAr tESt”
Shows the polar value currently beginning detected. If no polar pulse is detected then “Hr = 0” is displayed.
If heart rate is detected “Hr = xxx” will be displayed.
Statistics = “StAtS”
Statistic mode keeps track of the total workout times, distances, program selections, lift times, and several waxer
items. Use any arrow keys to cycle through the selections listed in the table below.
Statistic
Topic
Display
Definition
Time
Total equipment
usage
tinE xxxx.xx
Time is displayed in hours and minutes as hhhh.mm. Once time
exceeds 9999.59 the minutes will no longer be displayed. Time
will continue to be tracked and saved up to a maximum of
999,999 hours (over 100 years).
Distance
Total equipment
mileage
diSt xxxx.xx
Distance is displayed in miles. Whole miles displayed as
th
MMMM up to 9999. 1/100 of a mile displayed as “mm” up to
99. Once distance exceeds 9999.99, less than a whole mile will
no longer be displayed. Distance will continue to be tracked
and saved up to a maximum of 999,999 miles. If unit is set to
Metric units then distance is saved in kilometers instead of
miles.
Workouts
Total number of
workouts
Prog xxxxxx
The treadmill only has one program, which is a manual workout,
and will record and display up to 999,999 program selections.
Lift Time
Total number of lift
time
LiFt xxxx.xx
Measured in minutes “mmmm” up to 9999, and seconds “ss” up
to 59. Once time exceeds 9999.59, the seconds no longer are
displayed. Lift time will continue to be tracked and saved up to a
maximum of 999,999 minutes.
Wax intervals
Wax intervals (in
minutes)
Lub1 xxxxxx
“Lub1 through Lub4” are wax system statistics about
lubrication.
Waxer fired
Number of times
waxer fired
Lub2 xxxxxx
Waxer fired
manually
Number of times
waxer was fired
manually
Lub3 xxxxxx
Waxer presoak
Number of times
waxer did a pre-soak
squirt
Lub4 xxxxxx
22
Life Fitness Model 8500 Treadmill
Diagnostics
Settings = “SEttingS”
There are 21 different settings available. Settings are selected with the Weight arrow keys. Once a setting is shown
it can be changed using the Speed arrow keys.
SETTING
Display Mode
SEQUENCE
1
DEFAULT
“diSP ON”
Units (English/Metric)
2
“UnitS LbS”
Maximum Workout Time
3
“tinE
99”
Maximum Speed
4
“SPd
10.0”
Maximum Incline
5
“inc
15.0”
Flyers ON/OFF
6
“Fly
ON”
Polar ON/OFF
7
“PoLAr ON”
Acceleration Rate
9
“AccEL = 3”
Deceleration Rate
10
“dEcEL = 3”
Wax System Installed
11
“Lub SyS = no”
Wax Settings
12-21
“LubX
xxx”
23
DESCRIPTION
This setting turns the console’s ability to display messages
ON and OFF while in the Settings Mode. When turned
OFF, the display reads “01 OFF.” When turned ON, the
display reads “02 LbS.”
This mode switches between Metric and English units.
English is displayed as “LbS” (for pounds) and Metric “grS”
(for grams).
This mode sets the maximum allowable workout time which
is: 1 to 99 minutes.
This mode sets the unit to the maximum workout speed,
which is: 0.5 to 10.0 mph (0.8 to 16.0 kph).
This mode sets the maximum allowable incline from 0.0 to
15.0 %.
Flyers are animated circles that appear in the Data Display
when the treadmill is turned ON. When turned OFF, only a
single underscore character is displayed in the center
display.
Switching ON this feature makes it possible to use the
Polar Heart Rate Chest Strap and to see heart rate
readings.
Sets the acceleration ramp rate of the motor controller from
1 to 5. Default is 3.
Sets the deceleration ramp rate of the motor controller from
1 to 5. Default is 3.
Signals to the system whether or not a wax system has
been installed.
There are 10 different wax settings. They are “Lub0”
through “Lub9.” When OFF, “12-21” appear in the display.
Life Fitness Model 8500 Treadmill
Diagnostics
System Errors = “ErrorS”
The treadmill saves the last 25 system errors, which can be retrieved for review. Use the Time down arrow to
move forward through the errors which is displayed as “Exx= ErrXXX”. The last error logged-in, is the first error
to show. Use the Time up arrow to move backwards through the errors. At the last error, press the Time up
arrow to get the total number of errors: 0xffff (65535).
Use the Incline arrow key to toggle between viewing an error and seeing how many times it has occurred.
Total number of occurrences goes up to 255. No more occurrences will be recorded after this. Display shows
occurrences as “OccurEd xxx”, where xxx =’s 1 to 255 times.
Clear all system errors by holding down the Incline down arrow while pressing the Speed up arrow. Display will
read “Clr”. Press the Speed down arrow to start the clearing process. If you decide not to clear at the “Clr”
prompt, then press the Stop key.
Error Modes
Total number of system errors
Last error
Number of times error occurred
Clearing mode
Canceled clearing mode
Once cleared
Default
“t-Er = xxxxx”
“Exx= Err xxx”
“Occurred xxx”
“Clr”
“---“
“oooo ooo ooo”
Photoshoot mode = “PHotoSHoot”
Data displayed is non-functional and intended only to simulate values for photographic sessions.
24
Life Fitness Models 9000HR, 8500, and T9i Treadmills
SECTION III
HOW TO…
SERVICE AND REPAIR GUIDE
1
Life Fitness Models 9000HR, 8500, and T9i Treadmills
How To... Replace the Striding Belt and Deck
Special Tools Required: None
IMPORTANT: When replacing the striding belt, the deck must be flipped to the unused waxed side or else
replaced. Whenever a deck is replaced, the striding belt must be replaced. Before flipping a deck, wipe off
any debris from the unused waxed side without removing the wax. When installing the unused side into
position, be careful not to disturb the waxed side. If both sides of a deck are used, then the deck must be
replaced. T9i uses a none waxed deck, but requires flipping.
1. Turn the unit power OFF at the switch, and then unplug
the line cord at the wall outlet.
2. Remove four Phillips screws securing the motor cover to
the frame. Squeeze in the sides of the motor cover near
the uprights so that the tab on user’s left side clears the
frame, and then lift off the motor cover.
3. At the back of the unit, remove the rear roller guards.
Motor Cover
Tab
(User’s Left
Side Only)
Rear Roller Guards
NOTE: Mark the left and right shaft ends of the rear
roller to ensure that the bearing wear-patterns
remain on the same sides for reinstallation.
4. Remove the rear roller adjusting bolts by
turning them counter-clockwise, then lift the
rear roller out from under the striding belt.
5. Remove four deck screws at each corner of the
deck, and slide out the deck from under striding
belt without disturbing the unused waxed
surface.
Striding Belt
Slackened
6. Reach in under the striding belt and remove
two screws securing the wax bracket to the
frame. Lay the wax bracket on top of the
Lifesprings on the users left side. Not
applicable for T9i units.
Deck Removal
From Under Belt.
Make sure to Flip Deck
to Unused Waxed Side,
or Replace Deck if both
sides have been used.
2
Life Fitness Models 9000HR, 8500, and T9i Treadmills
How To... Replace the Striding Belt and Deck - Continued
Special Tools Required: None
7. Index the motor bracket to the frame to maintain
proper belt tension setting. Then loosen four
mounting bolts on the motor bracket, and also the
tensioning bolt.
Mounting
Bolt
Tensioning
Bolt
Mounting
Bolt
8. Slide the motor forward toward the front roller to
loosen the drive belt.
Jam
Nut
Drive
Belt
9. Move the left end of the front roller shaft out from
its elongated mounting hole and into the left side
of the frame. This will allow the right end of the
front roller shaft to clear its mounting hole so that
the drive belt can be removed off the front roller
pulley.
Fixed
Plate
Mounting
Bolts
10. Remove the drive belt off the front roller pulley.
Elongated
Hole
3
Grooved
Shaft (Left
End)
Front
Roller
Adjustable
Motor
Bracket
Life Fitness Models 9000HR, 8500, and T9i Treadmills
How To... Replace the Striding Belt and Deck - Continued
Special Tools Required: None
11. Remove the front roller out from under the
right side of the striding belt. Discard the
striding belt.
12. Install the front roller, deck, striding belt, and
rear roller in reverse order. Refer to
Tensioning Striding Belt, Belt Tracking, and
Stall Test.
13. Tension the motor drive belt using the
tensioning bolt, which is located next to the
motor bracket. When the motor drive belt is
properly tensioned (1/4” deflection), tighten
the motor bracket bolts.
Front Roller
Striding Belt
NOTE: When replacing the striding belt the
deck must be flipped to an unused side or
replaced. Whenever a deck is replaced, the
striding belt must also be replaced. If the deck
is to be flipped, carefully wipe debris from the
unused side without removing the wax.
14. Refer to diagnostics section to log
maintenance repair of the striding belt and
deck.
4
Life Fitness Models 9000HR, 8500, and T9i Treadmills
How To... Tension Striding Belt
Special Tools Required: None
TR9000 and TR8500
1. Center the new striding belt
between the front and rear rollers.
Place two pieces of tape 50” apart
on the right and left edges of the
striding belt. Tighten the striding
belt at the tensioning bolts.
Tape
2. Alternately tighten the tensioning
bolts 1/4 turn clockwise until the
distance between the tape
increases to 50.25”.
50”
3. Complete reassembly of remaining
components in reverse order of
removal.
4. Adjust the striding belt tracking. See How To...Adjust Striding Belt Tracking in this section.
5. Refer to diagnostics section to log maintenance repair of the striding belt.
T9i Treadmill
1. Center the new striding belt between the front
and rear rollers. Place two pieces of tape 38”
apart on the right and left edges of the striding
belt. Tighten the striding belt at the tensioning
bolts.
Tape
2. Alternately tighten the tensioning bolts 1/4 turn
clockwise until the distance between the tape
increases to 38.25”.
38”
3. Complete reassembly of remaining
components in reverse order of removal.
4. Adjust the striding belt tracking. See How To...Adjust Striding Belt Tracking in this section.
5. Refer to diagnostics section to log maintenance repair of the striding belt.
5
Life Fitness Models 9000HR, 8500, and T9i Treadmills
How To... Adjust Striding Belt Tracking
Special Tools Required: None
IMPORTANT: It is CRITICAL that the treadmill
be correctly leveled prior to any tracking
adjustments. An unstable unit can cause
Striding Belt misalignment. To level and
stabilize the unit, refer to instructions on
“How To…Replace The Leveler Assembly” in
this section.
1. After the treadmill has been installed and
leveled, the belt must be checked to confirm
proper tracking.
2. Turn the unit ON and set the main motor speed to 2.5 mph (4 km/h).
3. With the belt operating at specified speed,
NOTE its tracking. If the belt moves to the
right, turn the right adjusting bolt 1/4 turn
counterclockwise to bring the belt back to
center. If the belt moves to the left, turn
the left adjusting bolt 1/4 turn clockwise
and then turn the right tension bolt 1/4 turn
counterclockwise to bring the belt back to
center.
4. Repeat this adjustment until the striding
belt appears centered between rollers.
When striding appears to be centered
increase motor speed to 5 MPH. Allow the
unit to operate for several minutes to see
that the belt remains centered.
NOTE: During the adjustment above, DO NOT exceed one full turn of the adjusting screws in either direction.
6
Life Fitness Models 9000HR, 8500, and T9i Treadmills
How To… How To Perform a Stall Test
Special Tools Required: None
1. Locate the two adjusting bolts on each
side of the rear roller mounting
brackets. These bolts are accessible
from the holes provided in the rear
roller guards.
2. Enter the manual program and run unit
for five minutes at 5.0 mph (8.0 km/h).
DO NOT RUN on the BELT.
3. Press the down arrow speed button to
decrease striding belt speed to 2 mph (3.2
km/h). Begin walking on the treadmill.
Tightly grasp the handrails and attempt to
stall the striding belt. If it slips, proceed to
Step 4. If it does not slip, proceed to Step 5.
4. Stop the treadmill and increase belt tension
by turning the adjusting bolts clockwise in
1/4-turn increments. Once the belt is
properly tensioned, proceed to Step 5.
5. With the belt running, NOTE its tracking (centering). If the belt moves to the right, turn the right adjusting bolt
1/4 turn counterclockwise to bring the belt back to center. If the belt moves to the left, turn the left adjusting bolt
1/4 turn clockwise and then turn the right bolt 1/4 turn counterclockwise to bring the belt back to center. Repeat
this adjustment until the striding belt is centered. Allow the unit to operate for several minutes after each
adjustment to see that the belt remains centered.
NOTE: Make adjustments in 1/4 turn. DO NOT exceed one full turn of the adjusting bolts.
7
Life Fitness Models 9000HR, 8500, and T9i Treadmills
How To... Replace the Front Roller
Special Tools Required: None
1. Turn the unit power OFF at the switch, and then unplug
the line cord at the wall outlet.
2. Remove the motor cover.
3. Remove the rear roller guards.
Rear Roller Guards
4. Index the rear roller so that same belt tension can be
restored to its original state.
5. Loosen the rear roller adjusting bolts to slacken the
striding belt.
Index Mark
on end of
roller shaft
Rear Roller
Adjusting
Screw
8
Rear
Roller
Striding
Belt
Life Fitness Models 9000HR, 8500, and T9i Treadmills
How To... Replace the Front Roller - Continued
Special Tools Required: None
6. Index the motor bracket to the frame to restore
proper belt tension setting. Loosen four mounting
bolts at the motor bracket and the tensioning bolt to
relieve drive belt tension. Move the motor towards
the front roller to loosen the drive belt
Mounting
Bolt
NOTE: Do Not loosen the isomounts.
Tensioning
Bolt
Mounting
Bolt
Isomount
Jam
Nut
Drive
Belt
Fixed
Plate
7. Move the left end of the front roller shaft out
from its elongated mounting hole and into the
left side of the frame. This will allow the right
end of the front roller shaft to clear its
mounting hole so that the drive belt can be
removed off the front roller pulley.
8. Remove the drive belt off the front roller
pulley.
Elongated
Hole
9
Grooved
Shaft (Left
End)
Front
Roller
Mounting
Bolts
Adjustable
Motor
Bracket
Life Fitness Models 9000HR, 8500, and T9i Treadmills
How To... Replace the Front Roller - Continued
Special Tools Required: None
9. Remove the front roller out from under the
right side of the striding belt.
10. Position a new front roller and install the drive
belt around the front roller pulley.
11. Install the left end of the roller shaft into the
left side of the frame. Now move the right
shaft end into its mounting hole on right side
of the frame, and secure the left end of the
roller shaft (grooved end) into the elongated
hole.
Front Roller
12. Tighten the striding belt according to the
marks earlier established on the rear roller.
Slight additional adjustment may be required
to achieve proper striding belt tension. Do Not
over-tension the striding belt.
Striding Belt
13. Re-tension the drive motor to the index mark
so the drive belt can be restored to its original
state. When the motor drive belt is properly
tensioned (1/4” deflection), tighten the motor
bracket bolts.
10
Life Fitness Models 9000HR, 8500, and T9i Treadmills
How To... Replace the Rear Roller
Special Tools Required: None
1. Turn the unit power OFF at the switch, and then unplug the
line cord at the wall outlet.
2. Remove the rear roller guards. Index the rear roller to so that
same belt tension can be restored to its original state.
Rear Roller Guards
Index Mark
on end of
roller shaft
Rear Roller
Adjusting
Screw
Rear
Roller
Striding
Belt
Striding Belt
Slackened
3. Remove the rear roller adjusting bolts.
4. Remove the rear roller out from under the
striding belt.
5. Install new rear roller and position to the index
mark.
Rear Roller
Removal
6. Adjust the striding belt. See How To…Adjust
Tracking, Tension, and Stall Test in this
section.
7. Reinstall the rear roller guards.
11
Life Fitness Models 9000HR, 8500, and T9i Treadmills
How To... Replace the Drive Belt
Special Tools Required: None
Mounting
Bolt
Tensioning
Bolt
Mounting
Bolt
Jam
Nut
Drive
Belt
Mounting
Bolts
Fixed
Plate
Adjustable
Motor
Bracket
1. Turn the unit power OFF at the switch, and then unplug the line cord at the wall outlet.
2. Remove the motor cover
3. Index the motor bracket to the frame to maintain proper belt tension setting, and then loosen four mounting
bolts on the motor bracket, and also the tensioning bolt.
4. Slide the motor forward, toward the front roller, until the drive belt is loose.
12
Life Fitness Models 9000HR, 8500, and T9i Treadmills
How To... Replace the Drive Belt - Continued
Special Tools Required: None
5. Index the rear roller on both sides. These marks will be used
to bring the striding belt back to its original tension.
6. Loosen the striding belt by turning the rear roller adjusting
screws counterclockwise.
Index Mark
on end of
roller shaft
Rear Roller
Adjusting
Screw
7. Move the left end of the front roller shaft out from
its elongated mounting hole and into the left side
of the frame. This will allow the right end of the
front roller shaft to clear its mounting hole so that
the drive belt can be removed off the front roller
pulley.
8. With the drive belt off the front roller pulley,
remove the drive belt off the drive motor and
discard.
9. Install the new drive belt in reverse order. Retension the drive belt, at the index mark, at the
tensioning bolt on the motor bracket. When the
drive belt is properly tensioned (1/4” deflection),
tighten the motor bracket bolts.
Elongated
Hole
Grooved
Shaft (Left
End)
Front
10. Re-tension the striding belt to the index marks.
Additional adjustment may be required to
achieve proper striding belt tension. Do Not over-tension the striding belt.
13
Rear
Roller
Striding
Belt
Life Fitness Models 9000HR, 8500, and T9i Treadmills
How To... Replace the Drive Motor
Special Tools Required: None
1. Turn the unit power OFF at the switch,
and then unplug the line cord at the wall
outlet.
Mounting
Bolt
Tensioning
Bolt
Mounting
Bolt
2. Remove the motor cover.
3. Disconnect RPM sensor cable (P7) and
four motor cables (P17, P18, P11, P12)
from the control board.
NOTE: Polarity on P11 and P12.
Jam
Nut
Isomount
Bolt
4. Index the motor bracket to the frame to
maintain proper belt tension setting, and
then loosen four mounting bolts on the
motor bracket, and also the tensioning
bolt.
Current
Limit Wires
Drive
Belt
5. Remove the four mounting bolts from the
motor bracket, and then remove the
Current Limit Wire attached to the
mounting bolt.
NOTE: Do Not remove the isomount bolts.
Fixed
Plate
6. Cut the cable ties, lift the motor out from
under the drive belt, and remove the motor
from the unit frame.
OPTO Sensor/
Bracket
7. Remove the following from the motor:
(a) Motor Bracket
(b) OPTO sensor/bracket
(c) Flywheel
(d) Drive sheave and chopper wheel
Motor
Bracket
(attached)
Flywheel
New motor installation as follows:
1. Locate new chopper wheel with the tape to
the flywheel side.
2. Remove old chopper wheel from drive
sheave pulley and attach new chopper
wheel.
3. Install motor bracket, flywheel, and OPTO
sensor and bracket.
4. Position motor belt back on the drive motor
pulley and then lower the unit into position
over the four mounting studs. Using a
straight edge, align the drive sheave with
the outer edge of the front roller pulley.
Apply 242 Loctite on drive sheave
setscrews and tighten.
Isomount(4)
(Do Not
remove)
14
Mounting
Bolts
Adjustable
Motor
Bracket
Motor
Mounting
Bolts(4)
Life Fitness Models 9000HR, 8500, and T9i Treadmills
How To... Replace the Drive Motor - Continued
Special Tools Required: None
5. Loosely secure the four motor mounting bolts.
Make sure the current limit wire is attached to
the mounting stud.
Mounting
Bolt
6. Tension the drive belt using the tensioning bolt,
which is located next to the motor bracket.
When the motor drive belt is properly tensioned
(1/4” deflection), tighten the motor bracket
bolts.
Tensioning
Bolt
Mounting
Bolt
Jam
Nut
Isomount
Bolt
7. Reinstall the motor cover.
Current
Limit Wires
8. Refer to diagnostics section to log maintenance
repair of the drive motor.
Drive
Belt
Fixed
Plate
15
Mounting
Bolts
Adjustable
Motor
Bracket
Life Fitness Models 9000HR, 8500, and T9i Treadmills
How To... Replace the Motor Brushes
Special Tools Required: None
1. Turn the unit power OFF at the
switch, and then unplug the line
cord at the wall outlet.
2. Remove the motor cover.
Brush
Motor
Terminal
3. Remove the plastic cover from
each side of the drive motor.
4. Remove the spring-clip retaining
the brushes by pushing in the
spring-clip to release the spring
from the brushes.
5. Pull the brushes out just enough
to disconnect the brush wire
from the motor terminal.
6. Install new brushes in reverse
order, making sure to position
brush wires as shown. Secure
brushes with the spring-clip by
pushing in and up on the springclip.
Spring Clip
16
Brush Cable
(Make sure this cable
is positioned toward
the motor housing as
shown.)
Life Fitness Models 9000HR, 8500, and T9i Treadmills
How To... Replace the Life Spring Absorbers
Special Tools Required: None
NOTE: The striding belt does not require removal to replace life
springs.
1. Turn the unit power OFF at the switch, and then unplug the
line cord at the wall outlet.
2. Remove the motor cover.
3. Remove the rear roller guards.
Rear Roller Guards
4. Index the rear roller, then loosen the striding belt by
turning
the
rear
roller
adjusting
bolts
counterclockwise.
Index Mark
on end of
roller shaft
Rear Roller
Adjusting
Screw
17
Rear
Roller
Striding
Belt
Life Fitness Models 9000HR, 8500, and T9i Treadmills
How To... Replace the Life Spring Absorbers - Continued
Special Tools Required: None
5. Remove the four deck screws, one at each
corner of the deck.
6. Remove the deck from under the striding
belt. Be careful not to disturb the waxed
surfaces (9000HR, and 8500 Int’l only).
Striding Belt
Slackened
Deck Removal
From Under Deck
7. Remove the four tinnerman clips from the Lifesprings at each corner of the frame.
8. Remove the Allen screws(8) and washers(8) securing the Lifesprings to the frame mounts. Discard the life
springs, but save the hardware.
9. Install new lifesprings making
sure to face each notch
towards the center of the
unit. Torque 1/4-20 screws to
21-23 in lbs.
10. Reinstall the tinnerman clips
on the lifespings at each
corner of the unit for deck
placement.
10. Reinstall the deck and secure
into position with the deck
screws.
11. Re-tension
striding
belt
according to the index marks.
If further adjustment is
required,
see
to
How
To…Adjust
Striding
Belt
Tracking or Tensioning in this
section.
Tinnerman
Clip(4)
Corner
Deck
Screw(4)
Allen
Screw(8)
Washer(8)
Corner
Lifespring
Assembly(4)
Illustration Shown
Without Left Side of Frame
For Clarity Purpose Only
18
Center
Lifespring
Assembly(4)
Life Fitness Models 9000HR, 8500, and T9i Treadmills
How To...Clean the Wax Nozzle
Special Tools Required: None
1. Turn the unit power OFF at the switch, then unplug
the line cord at the wall outlet.
2. Remove the motor cover.
3. Remove the rear roller guards.
Rear Roller Guards
4. Index the rear roller and then, loosen the striding
belt by turning the rear roller adjusting bolts
counterclockwise.
Index Mark
on end of
roller shaft
5. With the striding belt loosened, remove the deck.
See How To …Remove Striding Belt and Deck in
this section.
6. Remove the mounting screws(2) securing the
wax bracket to the frame.
Rear Roller
Adjusting
Screw
19
Rear
Roller
Striding
Belt
Life Fitness Models 9000HR, 8500, and T9i Treadmills
How To...Clean the Wax Nozzle - Continued
Special Tools Required: None
7. Lay the wax bracket on the left side of
the unit frame.
Nozzle
Holder
8. Remove the nozzle by turning it
(counterclockwise).
9. Place the nozzle in a container of hot
water and let sit for at least 10 minutes
or when water has cooled enough to the
touch.
10. Remove the nozzle from the water and
inspect for cleanliness. If necessary,
scrub-clean with a medium-to-soft bristle
brush to remove any wax residue from
outside and inside the wax nozzle.
Nozzle
Flat must
be horizontal
OR
11. Dry the nozzle off with a lint-free rag.
Apply pipe joint seal compound to
treads.
12. Reinstall the wax nozzle into its holder,
and tighten, making sure that the flats
are horizontal.
Nozzle
Slot must
be horizontal
Nozzle
IMPORTANT: MAKE ABSOLUTELY SURE,
THAT UPON FINAL ASSEMBLY, THE
NOZZLE SLOT OR FLATS, WHICH EVER PREFERRED, ARE POSITIONED IN A HORIZONTAL PLANE.
FAILURE TO DO SO WILL RESULT IN IMPROPER WAX APPLICATION.
Retention the striding belt to the index marks. Additional adjustment may be required to achieve proper striding belt
tension. Do Not over-tension the striding belt.
20
Life Fitness Models 9000HR, 8500, and T9i Treadmills
How To... Replace the Lift Motor
Special Tools Required: None
1. Turn the unit power OFF at the switch, then unplug the line cord at the wall outlet.
2. Remove the motor cover.
3. Remove cable ties.
4. Disconnect the 3-pin P9
connector from the control
board.
Cross-Support
Hair Pin
Clip
5. Disconnect lift motor ground
wire from the bottom of the
frame.
6. Tilt the unit on its right side
(user’s right).
Lift Motor
7. Remove the hair clip pin and clevis pin from the lift
motor at the cross-support.
8. Remove the clevis pin and hair pin clip from the
bottom of the motor at the end of the motor tube.
21
Clevis Pin
Life Fitness Models 9000HR, 8500, and T9i Treadmills
How To... Replace the Lift Motor - Continued
Special Tools Required: None
Removing
Lift Motor
Pins
Clips
9. Install the new lift motor in reverse order. Make sure to secure cables with new tie straps.
10. Refer to diagnostics section to log maintenance repair of the lift motor.
22
Life Fitness Models 9000HR, 8500, and T9i Treadmills
How To... Replace the Wax Motor (9000HR and 8500 INT’L Only)
Special Tools Required: None
1. Turn the unit power OFF at the switch, then unplug
the line cord at the wall outlet.
2. Remove the motor cover.
Electrical
Connector
3. Disconnect the electrical connector at the wax
motor.
Motor
Inlet
4. Remove the mounting screws securing the
mounting base to the bottom of the frame, and then
lift out the wax motor assembly.
Pump
Outlet
5. Cut the wax hoses off at the wax pump fittings.
Mounting
Base
6. Install hoses to the new wax motor, and install the wax motor back into the base of the unit in reverse order.
7. Test the wax motor for proper operation.
8. Refer to diagnostics section to log maintenance repair of the wax motor.
23
Life Fitness Models 9000HR, 8500, and T9i Treadmills
How To... Replace the DC Controller Assembly
Special Tools Required: None
Main Cable
DC Controller
DC Controller
Mounting Screws(4)
The DC Controller Assembly is located in the front of the motor. It is attached to the front of the frame by four
screws. In replacing the DC Controller Assembly it is essential to mark and tag the wiring before making any
disconnects from the controller assembly. Once this has been accomplished, then remove four mounting screws in
the front frame of the unit and lift out the DC Controller Assembly.
1. Turn the unit power OFF at the switch, and then unplug the line cord at the wall outlet.
2. Remove four Phillips screws securing the motor cover to the frame. Squeeze in the sides of the motor cover
near the uprights so that the tab on user’s left side clears the frame, and then lift off the motor cover.
3. Remove cable ties along the cross frame.
4. Remove four screws from the front of the unit and lift out the DC Controller to access the wiring.
5. To ensure correct wiring locations, mark all wiring connectors at the back of the DC Controller before making
any disconnects. Once all wires are tagged and identified, then disconnect connectors at the back of the DC
Controller Assembly.
6. Install new DC Controller in reverse order, and replace all wire ties.
24
Life Fitness Models 9000HR, 8500, and T9i Treadmills
How To... Replace the ON/OFF Switch
Special Tools Required: None
1. Turn the unit power OFF at the switch, then unplug
the line cord at the wall outlet.
2. Remove the motor cover.
3. Mark and identify the wiring to the back of the
ON/OFF Switch before disconnecting, then
disconnect the wiring.
4. Squeeze the tabs on the sides ON/OFF Switch,
and remove it from the front of the unit.
ON/OFF
Switch
5. Install new ON/OFF switch in reverse order. Use
illustration to reconnect black and white wires
correctly to the switch terminal.
Load
Blk.
Load
Wht.
Line
Blk.
Line
Wht.
Switch
25
Life Fitness Models 9000HR, 8500, and T9i Treadmills
How To… Replace the Wax Bag – TR8500 Int’l and TR9000HR Dom/Int’l
Special Tools Required: None
1. Raise the unit to its highest elevation.
2. Turn the power OFF at the ON/OFF switch, and then unplug the unit
from the electrical outlet.
Engage
3. Pull out the three push rivets that fasten the front edge of the wax tray to
the bottom of the treadmill frame then, lower the wax tray. If necessary,
use a flat-edge screwdriver to pry off the rivets. The rivets are reusable.
Set the front edge of the wax tray down, with the wax bag on top of it.
Release
4. Clamp the wax bag hose to prevent any residual wax from seeping out
of the bag. Work the wax bag hose off the barbed fitting on the wax
pump, which is the inlet side. Remove the hose clamp, and then discard the empty wax bag.
Frame
5. Reattach the clamp to the new wax
bag hose.
6. Place the new wax bag on top of the
tray so its flange is facing out toward
the front of the treadmill. The wax
bag hose is now near the access
hole at the bottom of the motor pan.
7. Cut off the end of the new wax bag
hose approximately one half inch
from the end. Feed the hose through
the access hole in the bottom of the
frame, and then push the hose onto
the barbed fitting (wax pump inlet
side). Once the hose is secured to
the barbed fitting, release the hose
clamp.
Motor
Pan
Hose
Clamp
Wax Bag
Hose
Wax
Bag
Wax
Tray
Push Rivets
Barbed
Connetor
8. Align two holes of the wax bag flange with the two holes at the front edge of the wax tray and at the bottom of the
treadmill frame. Attach the wax tray and wax bag to frame with two push-rivets. Push these rivets in as far as
possible, then insert the third rivet.
9. Log maintenance repair.
26
Life Fitness Models 9000HR, 8500, and T9i Treadmills
How To... Replace the Anti-Static Tinsel
Special Tools Required: None
1. Raise the unit to its highest incline position.
2. Turn the unit power OFF at the switch and
then, unplug the line cord at the wall outlet.
Spray
Bar
3. Under the unit, adjacent to the spray bar, is the
anti-static tinsel. One end of the tinsel is
connected to the tensioning spring and the
other to the frame. Disconnect the tinsel and
remove it from the unit.
NOTE: Illustration shown without belt and deck for
clarity purposes.
4. Discard the old tinsel and install new anti-static
tinsel in reverse order.
Tensioning
Spring
Anti-Static
Tinsel
.
27
Life Fitness Models 9000HR, 8500, and T9i Treadmills
How To... Replace the Anti-Scuff Pads
Special Tools Required: None
1. Remove the worn ANTI-SCUFF PAD from
the FRAME.
2. Clean off adhesive residue with a nonabrasive cleaner such as alcohol.
3. Peel off the protective backing on the new
anti-scuff pad.
4. Install new pad on the frame so that its edges
are equal in distance to the edges of the
frame.
Unit
Frame
5. Allow the adhesive to dry 12-24 hours.
28
Life Fitness Models 9000HR, 8500, and T9i Treadmills
How To... Replace the Leveler Assembly
Special Tools Required: None
1. Turn the unit power OFF at the switch, then
unplug the line cord at the wall outlet.
2. Loosen the jam nut.
3. Remove the leveler from the welded nut by
turning it out counterclockwise.
3. Install new leveler.
4. After placing the unit where it will be used,
check its stability. If there is even a slight
rocking motion or the unit is not stable,
determine which leg leveler is not resting on
the floor. To adjust, loosen the Jam Nut and
turn the leveler until the rocking motion
ceases and both stabilizing legs rest firmly on
the floor. Retighten the jam nut.
Welded Nut
Jam Nut
Leveler
NOTE: It is important that the leveler be correctly
adjusted for proper unit operation. An unbalanced
unit can cause striding belt misalignment.
29
Life Fitness Models 9000HR, 8500, and T9i Treadmills
How To... Replace the Control Board
Special Tools Required: None
GENERAL
The Console Assembly is made up
of the three parts. The front half is
called the Overlay Bezel Assembly,
the back half is called the Console
Back Cover and when these two are
split, the Control Board is attached to
the back of the Overlay Bezel. The
main wiring cable is routed up
through the left upright and enters
the left side of the console. The
heart rate cable, if equipped, is
routed through the right upright and
enters the right side of the console.
To replace the Control Board, follow
the procedure below.
Overlay
Bezel
Assembly
Control
Board
Screws(5)
Console
Back Cover
Screws(9)
1. Turn the unit power OFF at the
switch, and then unplug the line
cord at the wall outlet.
Console Assembly
2. Remove the cup holders.
3. Remove nine screws and two push rivets from the console back cover.
4. Partially lift off the Overlay Bezel Assembly enough to access the main cable.
5. Disconnect the main cable and the heart rate cable (if equipped), from the Control Board.
6. Disconnect the ribbon cable and the telemetry cable connector from the Control Board.
7. Remove five mounting screws that attach the Control Board to the back of the Overlay Bezel.
8. Install a new Control Board or Overlay Bezel at this time.
9. Re-connect wiring and install Overlay Bezel in reverse order of removal.
10. Refer to diagnostics section to log maintenance repair of the console.
30
Life Fitness Models 9000HR, 8500, and T9i Treadmills
How To... Replace the Tether, and the Telemetry Receiver and Cable
Special Tools Required: None
1.
Turn the unit power OFF at the
switch, then unplug the line cord at
the wall outlet.
2.
Remove the Overlay Bezel. See
How To…Replace the Control
Board. At this time, if the tether
needs replacement, remove the
screw and washer securing the
tether, and install a new tether.
3.
Disconnect the emergency stop
cable from the telemetry cable
connector.
4.
Disconnect the telemetry cable from
the control board.
5.
Remove the foam wrap, which
contains the telemetry receiver from
the back of the Overlay Bezel.
6.
Remove the telemetry cable from
the receiver.
7.
Remove the telemetry receiver from
the foam wrap.
8.
Install new telemetry receiver or
wiring and install in reverse order.
Telemetry
Connector
Tether
Screw
Tether
Telemetry
Receiver
(foam wrapped)
Emergency
Stop Connector
NOTE: Make sure that the RED DOT on
the telemetry receiver is installed facing
the user.
31
Life Fitness Models 9000HR, 8500, and T9i Treadmills
How To... Replace the Main Wiring Harness and ERGO Bar
Special Tools Required: None
Removal
1. Turn the unit power OFF at the switch, then unplug the line cord at the wall outlet.
2. Remove the motor cover.
3. Remove the cup holders from the console assembly.
4. Remove nine screws and two
push rivets from the console
back cover.
Control
Board
5. Partially lift off the Overlay
Bezel Assembly enough to
access the main wiring cable
and the heart rate cable, if
equipped.
6. Disconnect the main wiring
cable and, the heart rate cable
(if equipped) from the Control
Board. Lay the Overlay Bezel
and Control Board aside.
7. Loosen the left and right
upright mounting bolts so that
the uprights can move outward
freely.
Overlay
Bezel
Assembly
Screws(5)
Console
Back Cover
Screws(9)
Console Assembly
8. Remove the left side ERGO
Bar mounting screw from the
left upright.
9. Lift the left side of the ERGO
Bar out from the left upright
and NOTE the grounding
spring in the upright. This
spring functions as a ground to
reduce static. Remove the
grounding spring from the left upright.
10. Remove the right side ERGO Bar mounting screw and then, the ERGO Bar. If equipped with
Heart Rate Cable route this cable
out from the console and right upright.
11. Remove the main wiring harness from the left upright.
32
Life Fitness Models 9000HR, 8500, and T9i Treadmills
How To... Replace the Main Wiring Harness and ERGO Bar - Continued
Special Tools Required: None
Installation
Main Wiring
Cable
1. Remove the lower end cap from the end
of the left upright.
2. Route the 10-pin connector of the main
wiring cable through the end and down
the upright. When is becomes visible at
the access hole at the bottom of the
upright, fish it our through the access
hole and reconnect it to the back of the
DC Controller.
Heart Rate
Cable
3. Route the other end of the main cable
(6-pin console connector) through the
upright and out the access hole at the
top of the handrail.
4. Now route the heart rate cable (if
equipped) up and out the access hole in
the right upright. Loosely secure the right
end of the ERGO Bar on the right
upright.
ERGO Bar
w/Heart Rate
Sensor
ERGO Bar
Mounting
Screw
ERGO Bar
Mounting
Screw
Grounding
Spring
User
Left
Upright
5. Install the grounding spring back into the
left upright and loosely secure the left
end of the ERGO Bar to the left upright.
NOTE: Make sure not to pinch or crimp the
main wiring cable going through the left upright with the ERGO Bar mounting screw.
User
Right
Upright
6. Position the Overlay Bezel and Control Board, and reconnect the Main Wiring Cable and Heart Rate Cable (if
equipped) to the Control Board, and secure overlay bezel to the back cover with mounting screws and push
rivets.
7. Tighten all remaining screws and bolts.
33
Life Fitness Models 9000HR, 8500, and T9i Treadmills
How To... Replace the Domestic and International Line Cords
Special Tools Required: None
DOMESTIC LINE CORD
1. Turn the unit power OFF at the
switch, then unplug the line cord
at the wall outlet.
Strain
Relief
2. Remove the motor cover.
3. Disconnect line cord ground wire
at the base of the unit.
4. Tag and identify the line cord
wiring at the back of the DC
Controller Board before
disconnecting. With the line cord
wiring marked and identified,
proceed to disconnect the line cord leads from the ON/OFF switch.
Line Cord
5. Using pliers, squeeze the strain relief, plastic grommet at the end of the line cord, and remove the line cord
cable from the front of the unit.
6. Install new line cord in reverse order.
INTERNATIONAL LINE CORD ONLY
1. Turn the unit power OFF at the switch, then unplug
the line cord at the wall outlet.
Front
2. Remove the motor cover.
3. Tag and identify the wiring at the back of the
ON/OFF switch and at line cord connector before
disconnecting. With all wires marked and identified,
proceed to disconnect.
Power line
cord bracket
4. Loosen the line cord bracket screw under the front
of the unit, and then remove the line cord.
5. Install a new line cord in reverse order.
Power line
cord bracket
nut and screw
34
Life Fitness Models 9000HR, 8500, and T9i Treadmills
How To... Replace the Line Filter
Special Tools Required: None
1. Turn the unit power OFF at the switch, then unplug the line cord at the wall outlet.
2. Remove the motor cover.
Line
Filter
Screws
3. The line filter is a rectangular metal
box locate at the base of the frame
between the wax pump and DC
Controller. To remove it, first mark and
tag wiring before disconnecting.
4. Disconnect line filter wiring, and then
remove the two mounting screws
securing the line filter to the base of the
unit.
Line
Filter
5. Lift out the line filter, and install new
line filter in reverse order.
35
Life Fitness Models 9000HR, 8500, and T9i Treadmills
NOTES
36
Life Fitness Models 9000HR, 8500, and T9i Treadmills
SECTION IV
ELECTRONIC OVERVIEW
AND
WIRING BLOCK DIAGRAM
1
Life Fitness Models 9000HR, 8500, and T9i Treadmills
ELECTRONIC OVERVIEW - DISPLAY CONSOLE - TR9000HR/T9i
P1
P3
P4
P7
P6
Connector and Pin Functions
Connector
Location
Pin
Functional Description
P1 is a 10 pin connector that
connects from the display
console to the DC controller.
1
2
3
4
5
6
7
8
9
10
GND - ground
GND - ground
+8Vdc - LEDs
+8Vdc - LEDs
Reed Sense
TXD – transmit data
RXD – data received
Bus_Req (bus request)
+12Vdc – emergency stop switch
Reed Sense
P2 (not shown) is a 12 pin ribbon
connector that connects to the
Display Console Overlay.
1
2
3
4
5
6
7
8
9
10
11
12
ESD ground
Switch strobe 0
Switch return 0
Switch strobe 1
Switch return 1
Switch strobe 2
Switch return 2
Switch strobe 3
Switch return 3
Switch strobe 4
Switch return 4
ESD ground
2
Life Fitness Models 9000HR, 8500, and T9i Treadmills
ELECTRONIC OVERVIEW - DISPLAY CONSOLE - TR9000HR/T9i
Connector
Location
Pin
Functional Description
P6 is a 6 pin connector that
connects to the Polar Receiver
and end of Session switch
1
2
3
4
5
6
Polar
VCC (5VDC)
GND
Reed Sense
12VDC
N/U
P7 is a 4 pin connector that
connects to the Lifepulse
electrodes
1
2
3
4
Left +
Left Right Right +
P3 and P4 are 8 pin connectors
that connect to the CSAFE and
Cardio Theater interface
1
2
3
4
5
6
7
8
N/U - not used
N/U - not used
Receive Data
Transmit Data
+8 Vdc
CTS
Ground
N/U - not used
P11 is a 2 pin connector that
connects to the Emergency
Stop Switch
1
2
Switch (-)
Switch +12Vdc
P14 is a 10 pin connector that
connects to the Background
Debug Mode Signals
1
2
3
4
5
6
7
8
9
10
/DS
/BERR
Ground
/BKPT /DSCLK
Ground
FREEZE/QUOT
/RESET
IPIPE1/DS1
+5 Vdc
IPIPE0/DS0
3
Life Fitness Models 9000HR, 8500, and T9i Treadmills
ELECTRONIC OVERVIEW - DISPLAY CONSOLE – TR8500
Connector and Pin Functions
Connector
Location
Pin
Functional Description
P2 is a 10 pin connector that
connects from the display
console to the DC controller.
1
2
3
4
5
6
7
8
9
10
GND - ground
GND - ground
+8Vdc - LEDs
+8Vdc - LEDs
Reed Sense
TXD – transmit data
RXD – data received
Bus_Req (bus request)
+12Vdc – emergency stop switch
Reed Sense
P1 is a 12 pin ribbon connector
that connects to the Display
Console Overlay.
1
2
3
4
5
6
7
8
9
10
11
12
ESD ground
Switch strobe 0
Switch return 0
Switch strobe 1
Switch return 1
Switch strobe 2
Switch return 2
Switch strobe 3
Switch return 3
Switch strobe 4
Switch return 4
ESD ground
4
Life Fitness Models 9000HR, 8500, and T9i Treadmills
ELECTRONIC OVERVIEW - DISPLAY CONSOLE – TR8500
Connector
Location
Pin
Functional Description
P6 is a 6 pin connector that
connects to the Polar Receiver
and end of Session switch
1
2
3
4
5
6
Polar
VCC (5VDC)
GND
Reed Sense
12VDC
N/U
P3 and P4 are 8 pin connectors
that connect to the CSAFE and
Cardio Theater interface
1
2
3
4
5
6
7
8
N/U - not used
N/U - not used
Receive Data
Transmit Data
+8 Vdc
CTS
Ground
N/U - not used
P5 is a 2 pin connector that
connects to the Emergency
Stop Switch
1
2
Switch (-)
Switch +12Vdc
5
Life Fitness Models 9000HR, 8500, and T9i Treadmills
ELECTRONIC OVERVIEW – DC CONTROLLER – All Models
LED5
LED6
P3
P18
P1
P17
P5
P9
P2
P10
P7
LED1
LED2
LED3
LED4
P12
Description
P4
Pin
Function
Service LED
LED1
LED2
LED3
LED4
LED5
LED6
Main Loop
COM Indicator/Communication
Home Switch
RPM or OPTO
+12VDC Console
+8VDC Console
Test Point (TP)
TP1
TP2
TP3
TP4
TP5
TP6
TPN
TP8
TP9
GND Console
+8VDC Console
+12VDC Console
15VDC Drive Voltage
5 VDC Controller Processor
Power supply bridge negative
Line frequency monitor
AC input ground
Power supply bridge positive
P1 is a 3 pin connector
to the main power
control board
1
2
3
AC LINE
AC NUETRAL
GND
1
2
3
4
5
Bridge Negative
Capacity junction
DC High Voltage Bus
Bridge Positive
AC Input
P4 is a 5 pin jumper
connector for voltage
selection
Location
P11
5
4
3
2
1
6
Life Fitness Models 9000HR, 8500, and T9i Treadmills
ELECTRONIC OVERVIEW – DC CONTROLLER – All Models
Connector and Pin Functions
Connector
Location
Pin
Functional Description
P7 is a 3 pin connector that
connects to speed sensor
1
2
3
RPM output
Isolated GND
+5VDC
P2 is a 4 pin connector that
connects to the home switch
1
2
3
4
Home SW Input
Keyed
Isolated GND
Isolated GND
P5 is a 2 pin connector for
MOV ground jumpers
1
2
MOV
Earth Ground
P3 is a 10 pin connector that
connects to the main wiring
cable to the console
1
2
3
4
5
6
7
8
9
10
GND
GND
8 VDC
8 VDC
NC
RXD
TXD
BUS-REQ
12VDC
ESS
P10 is a 2 pin connector which
connects to the wax motor
1
2
AC Neutral
Pump Motor
NOTE: P11, P12, P17, P18 are Faston Connectors for the Drive Motor.
• P11 – Motor positive terminal
• P12 - Motor negative terminal
• P17 – Motor IN for thermal cutoff
• P18 – Motor OUT for thermal cutoff
7
Console Cable
AK60-00037-0001
Polar E-Stop Cable
AK60-00043-0000
Home Switch Cable
AK60-00038-0000
8
Power Controller Cable
AK60-00039-0001
Wax Pump Cable
AK60-00041-0000
Life Fitness Models 9000HR, 8500, and T9i Treadmills
Block Diagram
Heartrate Cable
AK60-00042-0000
Life Fitness Models 9000HR, 8500, and T9i Treadmills
SECTION V
MISCELLANEOUS INFORMATION
1
Life Fitness Models 9000HR, 8500, and T9i Treadmills
PREVENTIVE MAINTENANCE TIPS
Preventive Maintenance Schedule
ITEM
WEEKLY
MONTHLY
QUARTERLY
BI-ANNUAL
ANNUAL
DISPLAY CONSOLE ASSEMBLY
Hardware
Overlay
Inspect
Clean
Inspect
Accessory
Cups
Inspect
Stop Switch
Clean
Inspect
Emergency
Switch/Key
Clean
Inspect
HANDLEBAR ASSEMBLY
Hardware
Inspect
Handlebar
Inspect
Side Hand
Rails
Inspect
Lifepulse
Sensors
Clean/Inspect
Smart Stop
Cover
Clean/Inspect
FRAME ASSEMBLY
Hardware
Motor Cover
Inspect
Clean
Vacuum Clean
Motor
Electronic
Compartment
Inspect
Drive Belt
Inspect
Leg Levelers
Inspect/Adjust
Front Roller
Inspect
Rear Roller
Inspect
WAX SYSTEM
Wax Bag
Inspect
Wax System
Wax Nozzle
Inspect
Clean
Every 2 weeks
2
Life Fitness Models 9000HR, 8500, and T9i Treadmills
INSTALLATION INSTRUCTIONS
IMPORTANT SAFETY INSTRUCTIONS !
⇒
DO NOT position the rear of the treadmill within 6 feet ( 2 meter ) of the nearest obstruction. The
sides of the treadmill should maintain a minimum clearance of 8 inches ( 20 cm ) from the nearest
treadmill or other obstruction.
⇒
DO NOT locate the treadmill outdoors, near swimming pools, or in areas of high humidity.
⇒
DO verify the contents of the delivery carton against the accompanying parts listing prior to setting
the cartons and shipping material aside. If any parts are missing, contact Life Fitness Customer
Support Services at the number listed on the back page of this assembly instruction booklet.
Save the shipping cartons in case of return.
⇒
DO read the entire Operation Manual prior to attempting to operate this machine, as this is essential
for proper use. The Manual explains how to properly use the treadmill and helps you to design an
aerobic workout tailored to your personal fitness needs or requirements.
3
TOOLS REQUIRED FOR ASSEMBLY...
Phillips screwdriver, Torx wrench, 3/4” combination wrench, flat blade screwdriver (or 5/16” nut
driver), Rubber Mallet
PARTS DESCRIPTION
1
3
5
7
9
11
13
15
17
19
USER LEFT HANDRAIL
AK60-00069-0001 (Model 9000HR)
AK60-00069-0002 (Model 8500)
HANDRAIL MOUNTING BOLT
0017-00101-1256
Qty: 1
2
Qty: 4
4
CONSOLE SCREW
0017-00101-1727
NUT
0017-00103-0188
MOUNTING SCREW
0017-00101-1621
GROUNDING SPRING (Model 9000HR Only)
OK60-01157-0000
FRONT HANDLEBAR ASSEMBLY
AK60-00046-0000 (Model 9000HR)
OK60-01081-0000 (Model 8500)
LEFT ROLLER GUARD
OK60-01085-0002
ACCESSORY TRAY LEFT
OK60-01008-0002
WAX BAG KIT
GK60-00002-0001
Qty: 4
6
Qty: 4
8
Qty: 14
10
Qty: 1
12
Qty: 1
14
Qty: 1
16
Qty: 1
18
Qty: 1
20
USER RIGHT HANDRAIL
AK60-00068-0001 (Model 9000HR)
AK60-00068-0002 (Model 8500)
DISPLAY CONSOLE ASSEMBLY
AK60-00014-0001 (Model 9000HR)
AK60-00015-0001 (Model 8500)
PUSH RIVET – CONSOLE / WAX BAG TRAY
0017-00042-1142
HANDLEBAR SCREW
0017-00101-1738
FLAT WASHER
0017-00104-0190
FRAME ENDCAP
OK60-01018-0000
HANDRAIL ENDCAP
OK60-01098-0000
Qty: 1
RIGHT ROLLER GUARD
OK60-01085-0001
ACCESSORY TRAY RIGHT
OK60-01008-0001
LINE CORD (INTERNATIONAL MODELS)
Qty: 1
3
5
6
7
8
9
10
1”
11
2”
3”
4
4”
5”
Qty: 1
Qty: 5
Qty: 2
Qty: 4
Qty: 4
Qty: 4
Qty: 1
Qty: 1
IMPORTANT!
DO NOT DISCARD THE SHIP KIT LOCATED ON TOP OF THE DECK
AND BELT. ALL NECESSARY COMPONENTS NEEDED TO
COMPLETE THE INSTALLATION ARE LOCATED IN THE SHIP KIT.
1.
Remove the MOTOR COVER and set aside.
2.
Feed one BOLT (#3) and WASHER (#10) through the forward most
USER RIGHT UPRIGHT (#2) mounting hole. Begin hand threading a
NUT (#7) onto the BOLT from under the FRAME (A).
3.
Position the USER RIGHT UPRIGHT (#2) mounting flange near the
BOLT (#3) as shown. Slide the USER RIGHT UPRIGHT mounting
flange under the BOLT and WASHER (#10) as shown. Align the
REAR MOUNTING HOLE of the USER RIGHT UPRIGHT mounting
flange with that of the FRAME (A). Insert a BOLT (#3) and WASHER
(#10) onto the REAR MOUNTING HOLE. Hand -thread a NUT (#7)
onto the BOLT from under the FRAME. Finger-tighten the two NUTS.
Repeat the procedure for the USER LEFT UPRIGHT (#1).
NOTE: BE SURE NOT TO DAMAGE THE MAIN WIRE HARNESS
2
3
10
A
7
UNDER THE USER LEFT UPRIGHT (#1).
4.
5.
6.
1
Locate the HANDLEBAR (#13). Position the HANDLEBAR
between the LEFT and RIGHT UPRIGHTS (#1 & #2). The
bend in the HANDLEBAR should face upward and tilt slightly
forward.
(Model 9000HR Only) Feed the WIRE HARNESS (B) leading
from the right end of the HANDLEBAR into the access hole
located on the inside of the USER RIGHT UPRIGHT (#2). The
WIRE HARNESS should be routed forward and out the side
access hole of the USER RIGHT UPRIGHT.
D
B
13
2
8
Secure the user right end of the HANDLEBAR (#13) to the
USER RIGHT UPRIGHT (#2) using one HANDLEBAR
MOUNTING SCREW (#8). Leave the screw loose at this time.
11
8
B
NOTE: BE CAREFUL NOT TO DAMAGE THE MAIN WIRE
HARNESS (B) WHEN ATTACHING THE HANDLEBAR (#13)
TO THE USER RIGHT UPRIGHT (#2).
7.
Insert the remaining HANDLEBAR MOUNTING SCREW (#8)
through the mounting hole of the USER LEFT UPRIGHT (#1).
Position the grounding spring (#11) over the HANDLEBAR
MOUNTING SCREW. Align the left side of the HANDLEBAR with
the HANDLEBAR MOUNTING SCREW. Secure the user left end
of the HANDLEBAR to the USER LEFT UPRIGHT.
18
17
NOTE: BE CAREFUL NOT TO DAMAGE THE MAIN WIRE
HARNESS (D) WHEN INSERTING THE HANDLEBAR
MOUNTING SCREW (#8) INTO THE MOUNTING HOLE OF THE
USER LEFT UPRIGHT (#1).
8.
Locate the DISPLAY CONSOLE (#4). Remove the REAR PANEL
ACCESS DOORS (C). Position the DISPLAY CONSOLE over the
UPRIGHTS (#1 & #2). Route the MAIN WIRE HARNESS (D)
leading from the top of the USER LEFT UPRIGHT (#1) through the
left side access hole of the DISPLAY CONSOLE and out the user
left rear panel access hole. Lower the left side of the DISPLAY
CONSOLE onto the USER LEFT UPRIGHT.
4
B
2
5
5
D
5
C
6
1
9.
(Model 9000HR Only) With the left side of the DISPLAY CONSOLE
(#4) supported, carefully route the HEART RATE WIRE HARNESS
(B) through the right side access hole of the DISPLAY CONSOLE.
18
17
10. (Model 9000HR Only) While pulling the USER RIGHT UPRIGHT (#2)
slightly outward, carefully lower the DISPLAY CONSOLE (#4) onto the
USER RIGHT UPRIGHT. Secure the DISPLAY CONSOLE to the
UPRIGHTS using four SCREWS (#5). Tighten the SCREWS securely.
4
(Model 8500 Only) Lower the DISPLAY CONSOLE (#4) onto the
USER RIGHT UPRIGHT (#2). Secure the DISPLAY CONSOLE to the
UPRIGHTS using four SCREWS (#5). Tighten the SCREWS securely.
CAUTION: BE CAREFUL NOT TO PINCH THE WIRE HARNESS
(D).
B
11. Secure the bottom of the DISPLAY CONSOLE (#4) to the inside of the
UPRIGHTS (#1 & #2) using two PUSH RIVETS (#6).
5
D
5
C
6
2
1
12. Connect all WIRE HARNESS CONNECTORS to their corresponding
JACKS located within the rear access holes. Feed excess WIRE
HARNESS into the DISPLAY CONSOLE (#4). Replace REAR PANEL
ACCESS DOORS (C) as necessary.
13. Tighten all BOLTS and SCREWS securely.
14. Insert the ACCESSORY TRAYS (#17 & #18) into the DISPLAY
CONSOLE (#4) as shown. Press downward firmly until the
ACCESSORY TRAYS snap securely into place.
1
15. Unwrap the MAIN WIRE HARNESS (D) located at the base of the
USER LEFT UPRIGHT (#1). Route the MAIN WIRE HARNESS under
the CROSS FRAME MEMBER (E). Connect the 10-PIN
CONNECTOR (10P) of the MAIN WIRE HARNESS to the
corresponding JACK (F) located at the top of the CONTROL BOARD
(G).
E
10P
F
G
16. Replace the MOTOR COVER. Secure the MOTOR COVER using four
MOUNTING SCREWS (#9).
CAUTION: BE SURE THE MOTOR COVER IS OUTSIDE ALL
MOUNTING TABS.
17. Using two MOUNTING SCREWS (#9) each, secure the four FRAME
ENDCAPS (#12) to the four FRAME (A) corners.
NOTE: THE LARGER END OF THE FRAME ENDCAPS (#12)
SHOULD FACE THE CENTER OF THE TREADMILL.
9
A
19. Using a rubber mallet, install the four HANDRAIL ENDCAPS
(#14).
Model 9000HR and International 8500 Only
6
15
9
18. Install the two REAR ROLLER GUARDS (#15 & #16) as
shown using one MOUNTING SCREW (#9) each.
20. Move the treadmill into the desired location for use. Plug the
line-cord into a dedicated NEMA R5 (U.S. only) electrical
outlet. Turn the power on at the ON/OFF switch located at the
front of the treadmill. Using the UP INCLINE ARROW KEY,
raise the treadmill to its maximum elevation (15%). Unplug the
treadmill from the electrical outlet.
D
16
12
12
9
9
21. Remove the tape securing the WAX TRAY (H) to the FRAME (A). Locate the WAX BAG (J). Position the HOSE CLAMP (K) over
the WAX BAG HOSE (L) approximately three inches from the end of the WAX BAG HOSE. Engage the HOSE CLAMP.
22. Cut off the end of the WAX BAG HOSE (L) approximately 1/2" from the end of the hose.
23. Position the WAX BAG (J) so the WAX BAG HOSE (L) faces the user left side and the WAX BAG FLANGE faces the front of the
treadmill. Slide the end on the WAX BAG HOSE over the BARBED CONNECTOR (M) leading from underside of the MOTOR
PAN (N). Disengage the HOSE CLAMP (K).
CAUTION: IT IS VERY IMPORTANT TO DISENGAGE THE HOSE CLAMP (K). FAILURE TO DO SO MAY RESULT IN
DAMAGE TO THE TREADMILL.
24. Place the WAX BAG (J) into the WAX TRAY (H). Align the holes of the WAX BAG FLANGE with the holes of the WAX TRAY.
Using two PUSH RIVETS (#6), secure the WAX BAG and TRAY to the underside of the MOTOR PAN (N). Using a THIRD PUSH
RIVET, secure the left end of the WAX TRAY to the underside of the MOTOR PAN.
25. Lower and level the treadmill according to the instructions located in the Operation Manual.
A
N
K
L
J
M
H
6
7
PRE-OPERATION CHECKLIST
⇒ Ensure that all fasteners are tight.
⇒ Make sure the STRIDING BELT is properly tensioned and aligned according to the Operation
Manual.
⇒ Confirm the wax bag has been installed.
⇒ Check the operation of the STOP switch and tether switch assembly.
(See Operation Manual.)
⇒ Confirm the display console is set to English or Metric units.
(See Optional Settings ENG/MET in Operation Manual.)
⇒ Refer to the Operation Manual for real time clock setting.
⇒ Read the entire Operation Manual before using the treadmill.
.
8