1
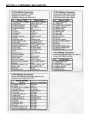
MC SERIES
Bill Acceptors
INSTALLATION AND SERVICE
MANUAL
TABLE OF CONTENTS
SECTION 1: GENERAL INFORMATION
Introduction......................................................... 3
Product Features................................................ 3
For your records................................................. 3
Unpacking.......................................................... 3
Installation........................................................ 3
Diagnostic LED................................................... 3
SECTION 2: MAINTENANCE
Cleaning Material............................................... 4
Cleaning..............................................................4
SECTION 3: NAMING CONVENTION
MC Series Naming..............................................5
SECTION 4: COMPONENT EXPLANATION
Input Power Requirements .................................6
Bill Acceptance................................................... 6
Bezel Types.........................................................6
Component Defininition.......................................7
Dip Switch Configurations...................................8
MC2600/MC2800 Slimline Bezel.........................9
MC2600/MC2800 Standard Bezel.....................10
MC7200 Slimline Bezel......................................11
MC7200 Standard Bezel...................................12
18 Pin Mating Connector...................................13
6 Pin Mating Connector.....................................13
30 Pin Mating Connector...................................13
16 Pin Mating Connector...................................13
SECTION 6: PARTS LIST
Overview............................................................32
MC Series Drive Chassis Assembly..................34
Drive & Stacker Chassis....................................35
SECTION 7: PC BOARD INTERFACE
CONNECTIONS
PC Board & Part Numbes................................ 36
MC Series Cashboxes...................................... 36
110 VAC Pulsed Interface (30 Pin)....................37
110 VAC Vend Serial Interface (30 Pin)............37
24 VAC Pulsed Interface (30 Pin).....................38
24 DC MDB Interface (30 Pin)..........................38
12V MDB Interface & MDB
Wake/Sleep(16 Pin)...........................................39
12V Ardac2/ITC Serial Interface (16 Pin)..........39
12V Pulse Interface (16 Pin).............................40
SECTION 8: HARNESS INTERFACES
Harness # 027202.............................................41
Harnes # 027281...............................................41
Harness # 408730.............................................42
Harness # 408721.............................................42
Harness # 408720.............................................43
Harness # 408731.............................................43
Accessory Kit # 408903.....................................44
Harness # 408732.............................................44
SECTION 5: DISASSEMBLY
Tools Needed.....................................................14
Removing the Cashbox Assembly.....................14
Removing Motors from Stacking Assembly.......15
Removing the Bezel..........................................15
Removing the Front Cover................................16
Removing Harness from microboard.................17
Removing Bottom Sensor Assembly.................17
Removing Microboard.......................................18
Removing Drive & Stacker Chassis Assembly..21
Removing Top Sensor Assembly.......................22
Removing Stacker Plate....................................22
Removing Belts.................................................24
Removing Motors..............................................27
Disassembling Bottom Sensor Assembly..........28
Removing Encode Wheel..................................26
Removing Side Sensor......................................29
Removing Top Sensor Board........................... 31
2
SECTION 1: GENERAL INFORMATION
Introduction
This manual contains information on
installing, operating, and maintaining the MC
Series bill acceptors. This manual is
intended for owners, route operators and
shop-level technicians as a primary source
of informtion. Taking time to read this
manual and becoming familiar with this
information will help you obtain the best
performance from your MC Series bill
acceptor.
Product Features
• Bill widths accepted: MC2600 and MC2800
(66mm), MC7200 (72mm)
• Operating Voltages: 110VAC, 24VAC, 24VDC,
12VDC
• Communication Interface: MDB, Pulse, Vend
Serial,ccTalk, ICT serial and Ardac 2 serial over
RS232.
• Four-Way Acceptance
• Mounting: Upstack or Downstack
• Lighted Bezel (on standard mask only)
• Coupon capable
• Superior Stringing Protection
Operating Temperature Range:
0oF - 150oF
For Your Records
A label indicating the model number and serial
number is affixed to the lower left hand side
(when facing the bill inlet). of the bill acceptor.
Refer to the model and serial number whenever
you call upon Coinco/Money Controls for
information or service.
Unpacking
After unpacking the unit, inspect for any possible
shipping damage. If damaged, notify the shipping company immediately. Keep the carton and
packing material to reuse if you need to transport
or ship the bill acceptor in the future. Labels
indicating the model and serial number are on
the side of the bill acceptor.
Refer to these numbers when calling upon your
Coinco Service Center representative for
information or service.
Installation
NOTE: The Metal mounting plate must be
connected to earth ground.
1. Remove power from host machine.
2. Set bill acceptor dip switches. (see Page 4).
3. Install the bill acceptor into the host machine
using the mounting studs and hardware in the
machine.
4. Install / Connect the proper interface harness
to the host machine.
5. Apply power to the machine, verify that the
Green Flashing Arrows on the front of the bill
acceptor are ON and blinking. This condition
indicates that the bill acceptor is ready to
accept bills.
• If the Lights are off, check wiring harness
connections and make sure power is applied.
• Also check the rear diagnostic LED, the
status codes are listed on the cashbox and in
Figure 2 below.
6. Check Operation, once the Green Arrows are
flashing, insert bills to verify proper
acceptance and credit.
Diagnostic LED
# of LED Flashes
Normal Pulse Rate
1 pulse per second
Fast Pulse Rate
3 pulses per second
Status
Ready
Check Stacker/Cashbox
Not Lit
Check Power
Steady ON
Replace Acceptor
2 Flashes
Bill Inhibited
3 Flashes
Disabled by Host
4 Flashes
Clear Bill Path
5 Flashes
Clean Bill path
3
SECTION 2: MAINTENANCE
Maintenance
Figure 2
Recommended Cleaning Material:
A mild solution of detergent can be used for
cleaning the belts, bill path and sensor lenses, as
well as for general cleaning of the acceptor.
Beverages or other water-soluble liquids which
have been spilled on or into the acceptor can
usually be removed with warm soapy water.
External surfaces can be cleaned with a damp
cloth.
Note: Petroleum-based cleaners and
freon-based propellants can damage plastic and
some electronic componenets. Scouring pads
and stiff brushes may harm the circuit boards
and can mar the plastic. These items should
never be used when cleaning the bill acceptor.
Cleaning the Optical Sensor Lenses and Gray
Scales
Warning: Remove power from the bill acceptor before opening the bill path.
Remove the cash box and bottom sensor housing from the acceptor. To clean the optical sensor
lenses and gray scales use a "Lint Free" cloth
with a mild detergent. Repeat the cleaning
process as needed until all the sensor surfaces
are free of contaminants. Remember to clean
both sensor lenses.
4
SECTION 3: NAMING CONVENTION
MC Series Model Naming Convention (Coinco Part #MC925926 Rev. 7)
MC XX X X X X X XX XXX
Bill Width Accepted
26 = 66mm
28 = 66mm (US$1-$100)
72 = 72mm
Bezel
0 = See “Build”
1 = Standard
2 = Slimline
3 = CRX-U USA Technologies
4 = CRX-G Generic
Input Voltage / Protocol
1 = 110VAC: Pulse, Vend Serial, Ardac2 Serial
2 = 24 VDC/AC: MDB, Pulse
3 = 12 VDC: MDB, ICT, Pulse, Ardac2 Serial
4 = 12 VDC: MDB w/ Wake/Sleep option
Mounting Configuration
U = Up
D = Down (Not for MC-CRX)
Cashbox Size
0 = See “Build”
5 = 500 Bills
9 = 900 Bills
N = None
3 = 300 Bills
7 = 700 Bills
B = 1100 Bills
I/O Harness
A
C
M
I
S
W
N
0
= Pulse/Power, Vend Serial (110VAC)
= Pulse/Power (24VAC)
= MDB (24VAC/VDC or 12V)
= Multi-Interface 12V (ICT, Pulse, Ardac2)
= 110VAC Ardac2 Serial
= MDB with Wake/Sleep (12V)
= None
= See Build
Build
00 = Standard
04 = 30 Pin 110V Logic Board
Country Code
002 = Australia
005 = Brazil
006 = Canada
014 = Germany
017 = Hungary
041 = United States
050 = China
(For Additional Country Codes See Page 2)
Retrofit Card Reader Only
MC XX- CRX - X
Bill Width Accepted
26 = 66mm
72 = 72mm
Back End Processing
U = USA Technologies
G = Generic
5
SECTION 4: COMPONENT EXPLANATION
Input Power Requirements
MCxxx1
120 VAC
90-135VAC @1.0A
MCxxx2
24VAC
20-32VAC @1.5A
MCxxx2
24VDC (MDB)
20-45VDC @1.5A
MCxxx3/MCxxx4
12VDC
10-14VDC @4A
Bill Acceptance:
US
MC2600
66mm
$1
$5
$10
$20
US
MC2800
66mm
$1
$5
$10
$20
$50
CANADA
MC7200
72mm
$5
$10
$20
$50
$100
EURO
€5
€10
€20
$100
Bezel Types
Slimline Bezel
Standard Bezel
NOTE: Both bezels available in downstack configuration.
6
SECTION 4: COMPONENT EXPLANATION
7
SECTION 4: COMPONENT EXPLANATION
US Dip Switch ON/OFF
(MC2600)
US Dip Switch ON/OFF
(MC2800)
Canada Dip Switch
ON/OFF (MC7200)
Euro Dip Switch
ON/OFF
Switch 1
$1 enable/disable
$10 enable/disable
$10 enable/disable
€5 enable/disable
Switch 2
$5 enable/disable
$20 enable/disable
$20 enable/disable
€10 enable/disable
Switch 3
$10 enable/disable
$50 enable/disable
$50 enable/disable
€20 enable/disable
Switch 4
$20 enable/disable
$100 enable/disable
$100 enable/disable
RESERVED
Switch 5
4 Pulse/1 Pulse per $
4 Pulse/1 Pulse per $
4 Pulse/ Pulse per $
RESERVED
Switch 6
Always/Harness enabled Always/Harness enabled Always/Harness enabled RESERVED
Switch 7
Short Pulse/Long Pulse
Short Pulse/Long Pulse
Short Pulse/Long Pulse
RESERVED
Switch 8
Coupon enable/disable
Coupon enable/disable
Coupon enable/disable
RESERVED
ON
1 2 3 4 5 6 7 8
OFF
8
SECTION 4: COMPONENT EXPLANATION
MC2600/MC2800 with Slimline Bezel
1.
All dimensions shown are for reference
purposes and are subject to manufacturing
and assembly tolerances.
All dimensions shown are in inches/millimeters
2.
Mounting Pattern
3.52”
(89.5)
4.28”
(108.71)
4.65”
(118.1)
2.00”
(50.8)
3.40”
(86.4)
X
Y
Cashbox
300
500
700
900
1100
X
Y
6.81in.
(172.9mm)
7.02
(178.3)
8.06
(204.7)
9.10
(231.1)
10.14
(257.6)
2.47in.
(62.7mm)
2.67
(67.8)
3.72
(94.5)
4.76
(120.9)
5.80
(147.3)
9
SECTION 4: COMPONENT EXPLANATION
MC2600/MC2800 w/ Standard Bezel
1.
Mounting Pattern
3.39
3.12
1.86
2.
3.52”
1.77
All dimensions shown are for reference
purposes and are subject to
manufacturing and assembly tolerances.
All dimensions shown are in
inches/millimeters
1.56
4.28”
4.65”
2.00”
X
3.40”
3.97
2.86
2.24
3.12
2.47
Y
2.17
8.70
9.29
4.57
5.10
8.84
4.21
2.02
6X
.23
.17
.21
1.00
1.85
2.00
.20
3.30
3.71
Cashbox
300
500
700
900
1100
X
Y
5.33in.
(135.4mm)
5.54
(140.1)
6.58
(167.1)
7.62
(193.5)
2.47in.
(62.7mm)
2.68
(72.6)
3.72
(94.5)
4.76
(120.9)
8.66
(220)
5.80
(147.3)
10
SECTION 4: COMPONENT EXPLANATION
MC7200 with Slimline Bezel
1.
2.
Mounting Pattern
3.71
(94.2)
3.63
(92.2)
All dims shown are for reference
purposes and are subject to
manufacturing and assembly tolerances.
All dimensions shown are in
inches/millimeters
3.52”
(89.5)
1.77
(45.0)
1.56
(39.6)
4.28”
(108.71)
4.65”
(118.1)
2.00”
(50.8)
3.40”
(86.4)
X
4.34
(110.3)
2.47
(62.7)
3.66
(93.0)
Y
3.13
(79.6)
2.24
(56.9)
2.17
(55.1)
10.10
(256.4)
4.62
.23
(5.9)
8.84
(224.6)
8.70
(222.1)
4.20
(106.6)
.21
(5.9)
.19
(4.8)
1.84
(46.8)
1.00
(25.4)
2.00
(50.8)
3.30
(83.8)
Cashbox
X
Y
3.68
[93.5]
300
500
6.81in.
2.47in.
(172.9mm) (62.7mm)
7.02
(178.3)
2.68
(68.1)
11
SECTION 4: COMPONENT EXPLANATION
MC7200 with Standard Bezel
1.
2.
1.86
(47.2)
1.77
(45.0
1.56
(39.6)
All dims shown are for reference
purposes and are subject to
manufacturing and assembly tolerances.
All dimensions shown are in
inches/millimeters
Mounting Pattern
3.63
(92.2)
3.36
(83.4)
3.52”
(89.5)
4.28”
(108.71)
4.65”
(118.1)
2.00”
(50.8)
X
3.40”
(86.4)
3.97
(100.8)
2.86
(72.6)
2.24
(56.9)
3.12
(79.2)
5.33
(135.4)
Y
2.47
(62.7)
2.04
(51.8)
2.17
(55.1)
8.70
(221.0)
9.29
(234.0)
4.57
(116.1)
6X
5.10
(129.5)
8.84
(224.5)
4.21
(106.9)
2.02
(51.3)
.23
(5.8)
1.85
(47.0)
.20
(5.0)
1.00
(25.4)
.21
(5.3)
.17
(4.3)
2.00
(50.8)
3.30
(83.8)
3.71
(94.2)
Cashbox
X
Y
300
5.33 in.
(135.4 mm)
2.47 in.
(62.7 mm)
500
5.54
(140.7)
2.68
(68.1)
12
SECTION 4: COMPONENT EXPLANATION
13
SECTION 5: DISASSEMBLY
Tools needed:
#2 Phillips head screwdriver
Flat head screwdriver
3/16” nut driver
1/8” nut driver
9 volt battery and battery connector harness
Remove Cashbox Assembly
1. Slide red button located on the top of the unit
forward. Lift up and pull back on cashbox
assembly. (Figure 3)
Figure 3
14
SECTION 5: DISASSEMBLY
Removing motors from stacking assembly
Figure 4
1. Apply power, insert business card into bill inlet
until stacker plate extends to fullest height.
Remove power. (Figure 4)
Removing the Bezel
Using a Phillips screwdriver, remove the screws
that secure the bezel and frame to the chassis
assembly. (Figure 5)
Figure 5
• Slimline Bezel - 3 screws, 3 nuts
• Standard Bezel - 4 screws
• Slimline Frame - 4 screws
Disconnect ground wire from metal frame.
15
SECTION 5: DISASSEMBLY
IMPORTANT
plastic shield
Note the plastic shield that appears on the metal.
(See Fig. 6--Slimline example)
When re-attaching, make sure the clear plastic
shield is against the PC board to prevent
shorting the microboard.
Figure 6
Removing the Front Cover
To remove front cover to expose the microboard,
push down the snap located on the top of the
unit. (Figure 8)
Figure 8
Pull the front cover forward.
Note--Removing the front cover will void the warranty.
16
SECTION 5: DISASSEMBLY
Removing Harnesses from the microboard
from Bottom sensor assembly (Figure 9)
1. Unplug Bottom Sensor Assembly harness
from Microboard.
2. Release harness from chassis clamps on the
side.
Figure 9
Remove Bottom Sensor Assembly
1. At bottom rear of unit, push down on red tab
and slide out bottom sensor assembly. (Figure
10)
Figure 10
17
SECTION 5: DISASSEMBLY
Remove Bottom Sensor Assembly
1. At the bottom and rear of unit, push down on
red tab and pull out bottom sensor assembly.
(Figure 11)
Figure 11
Removing Microboard (Figure 12)
1. Remove ribbon cable by sliding the plastic
connectors to the open position.
2. Gently pull ribbon cable from microboard
connector.
Figure 12
18
SECTION 5: DISASSEMBLY
Figure 13--Plastic Connectors in closed
position.
Closed Position
Figure 13
Figure 14--Plastic connectors in open position
Open Position
Figure 14
19
SECTION 5: DISASSEMBLY
Figure 15--Using a small flathead screwdriver,
carefully pry the board out at the four corners
indicated.
Figure 15
Figure 16
Blue/White
Figure 16-- Note the attached motor connection
wires.
Unplug the stacker motor (white & red) wires and
transport motor (white & blue) wires from the
microboard.
Red/White
20
SECTION 5: DISASSEMBLY
Removing Drive and Stacker Chassis
Assembly
Figure 17
1. Make sure stacker plate is fully receded into
unit.
2. Using phillips screw driver, remove one nut
from left and right side of the housing as shown.
(Figure 17)
3. Pull Drive and Stacker Chassis foward to lift
out of housing. (Figure 18)
Figure 18
21
SECTION 5: DISASSEMBLY
Removing Top Sensor Assembly from housing.
Figure 19
1. Using 3/16” nut driver, unscrew bolts from
both sides of housing. (Figure 19)
2. Push down Top Sensor Assembly until
assembly clears the side housing notches. Pull
assembly straight forward.
Removing Stacker Plate
Figure 20
1. Look for plastic tab on one side of the
assembly. This indicates the correct side to
begin stacker plate removal. (Figure 20)
22
SECTION 5: DISASSEMBLY
Do not pull or push the plastic tab, which will
break it. (Figure 21)
Figure 21
2. Pull out this side of the stacking plate,
clearing the cam. Then remove plate (Figure 22)
Figure 22
23
SECTION 5: DISASSEMBLY
To Remove Belts
Figure 23
1. Squeeze stacker motor spring (Figure 23) to
clear stacker motor gearbox snap fits on reverse
side (Figure 21).
Figure 21
1. Remove belts from transport gears.
(Figure 24)
Figure 24
24
SECTION 5: DISASSEMBLY
Removing Belts
2. Use screwdriver to push out retaining pin and
remove belts. (Figure 25)
Figure 25
Retaining pin removed (Figure 26)
Belts fully removed from unit.
Encoder
Wheel
Transport
Motor
Figure 26
Stacker
Motor
Motor Assembly
25
SECTION 5: DISASSEMBLY
Remove encoder wheel
Figure 27
1. Using flat head screwdriver, pry encoder
wheel from base of transport motor gearbox.
Encoder wheel removed.
Figure 28
26
SECTION 5: DISASSEMBLY
Removing motors
1. Push stacker motor in to clear reverse side
snap fit notches and lift out.
Figure 29
2. Pull remaining transport motor straight out.
Figure 30
27
SECTION 5: DISASSEMBLY
Disassembling the Bottom Sensor Assembly
Figure 31
1. Using 3/16” nut driver, remove two nuts as
shown.
2. Once nuts are removed, hold plate down to
keep the four springs from jumping out.
Bottom plate removed exposing springs and
sensor board.
Figure 32
Spring
Locations
28
SECTION 5: DISASSEMBLY
1. Pull sensor board straight out to remove from
housing.
Removing side sensor
Figure 33
Figure 34
1. Note that bottom sensor board is still
connected to bottom plate assembly housing.
2. Note location of side sensor.
3. Remove screws located on this side.
Side Sensor
29
SECTION 5: DISASSEMBLY
4. Note pin in front.
Figure 35
1. Unscrew nuts on either side of front pin and
remove pin.
2. Unscrew nuts on either side of rear pin and
remove pin.
Side Plate is removed.
Figure 36
30
SECTION 5: DISASSEMBLY
Pull out side sensor.
Figure 37
Removing Top Sensor Board
1. Using 1/8” nut driver, remove 3 screws
(Fig 38).
Light pipes
2. Remove Plastic cover, exposing top sensor
board.
Screws
Figure 38
31
MC Series Mask Options
See Page 33
SECTION 6: PARTS LIST
32
SECTION 6: PARTS LIST
Item #
Description
2600/2800
Part No.
925882
QTY.
7200 Part No.
QTY.
1
PBL/1669
1
1
Mask, Slimline
2
MET/290
1
MET/290
1
3
Adapter, Slimline
Mask
Screw, M4X12
HSC/326
3
HSC/326
3
4
5
Washer, 4mm
Nut, M4
HWA/026
HNT/010
3
3
HWA/026
HNT/010
3
3
6
Mask, Standard
PBL/1594
1
PBL/1633
1
7
Mask, Frame,
Standard
Screw, 6-32x5/8
MET/289
1
MET/289
1
300317
3
300317
3
409023
1
409023
1
8
9
MC Series
Download Box
Service Tools - MC Series Download Box
Part 9
33
SECTION 6: PARTS LIST
34
SECTION 6: PARTS LIST
35
SECTION 6: PARTS LIST
MC Series PC Boards and Harnesses
MC Series Cashboxes
36
SECTION 7: PC BOARD INTERFACE CONNECTIONS
MC2600/MC2800/MC7200 110 VAC Pulsed Interface
(30 Pin)
PULSE OUTPUT_
PULSE OUTPUT_
MC2600/MC2800/MC7200 110 VAC Vend Serial Interface (30 pin)
2
1
R 2
*
*
*
*
*
R 1
1
NOTE: * means output/input is active low.
NOTE: Pin 21 Ground of the 30 pin power connector and the metal
mounting plate must be connected to earth ground
37
SECTION 7: PC BOARD INTERFACE CONNECTIONS
MC2600/MC2800/MC7200 24 VAC Pulsed Interface
(30 Pin)
PULSE OUTPUT
PULSE OUTPUT
K
MC2600/MC2800/MC7200 24 DC MDB Interface
(30 Pin)
Note: Pin 21 Ground of the 30 pin power connector and the
Metal mounting plate must be connected to earth ground
38
SECTION 7: PC BOARD INTERFACE CONNECTIONS
MC2600/2800/7200 12V MDB Interface & MDB w/Wake/Sleep (16 Pin)
MDB_WAKE
14
MC2660/2800/7200 12V Ardac2/ICT Serial Interface (16 Pin)
39
SECTION 7: PC BOARD INTERFACE CONNECTIONS
MC2600/2800/7200 12V Pulse Interface (16 Pin)
40
SECTION 8: HARNESS INTERFACES
110 VAC Pulse/110VAC Power, Pulse Harness for 18 Pin L.B.
Harness #027205
110VAC Ardac 2 Serial Communications for 18 Pin L.B.
Harness #027281
41
SECTION 8: HARNESS INTERFACES
24 VDC MDB Communications and Power
Harness # 408730
ICT, Pulse, Ardac 2 Communications & Power
Harness # 408721
42
SECTION 8: HARNESS INTERFACES
Harness # 408720 12V MDB Communications & Power with & without Wake/Sleep
WHITE
1
24VAC Pulse & Power
Harness # 408731
43
2600/2800 110 VAC Pulse w/ Wall Plug Power
Accessory Kit #408903 Harness
110VAC Wall Plug
110 VAC Pulse/Power
Harness # 408732
44
Technical Support-Contact Information
USA
Coin Acceptors, Inc.
Phone:
800-325-2646
Email:
[email protected]
Web Site:
www.coinco.com
CANADA
Coin Acceptors Canada
Phone:
1-800--387-9300
Email:
[email protected]
Web Site:
www.coinco.com
Or contact your local Coinco Distributor or Service Center.
Coin Acceptors, Inc.
300 Hunter Avenue
St. Louis, MO 63124-2013
USA
314 725-0100
(800) 325-2646
Part No. 926236_Rev 5
45