1
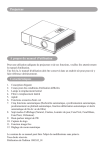
Klemko
e7 - Detetor
de Movimento
- AC/DC 12V
DC MOTION
SENSOR
FOR
LIGHT
&
AUTOMATION
CONTROL
Para
iluminação
e
controlo
de
automatismos
For light & automation
control
OS-186DC
870052
WATCHER-12V
Artigo
DC MOTION SENSOR
Não
se mova
parathe
o sensor
mas
Do not
move directamente
directly toward
sensor
but
através
do
seu
campo
de
cobertura
(Fig.1)
to move across it (See FIG.1)
DC MOTION SENSOR
FOR LIGHT & AUTOMATION CONTROL
OS-186DC
Pattern
sensitive
to movement
MenosLess
sensivel
ao movimento
se
towardsao
sensor
dirigidodirectly
directamente
sensor
Item
Item
Parafuso
Screw
3x8mm
3x8mm
Quantidade
Quantity
Anilha
Rubber
isolante
de
grommet
borracha
Manual
1
2
Mais
Moresensivel
sensitiveao
tomovimento
movement se dirigido
através
do campo
across the
pattern de cobertura
Fixação de
Cable clamp
cabo
1
FIG.1
Less
Menos
sensitive
sensivel
1
Mais
More
sensitive
sensivel
To avoid
nuisance
triggering
Para
evitar
activações
indesejadas
2
VERY
LOW STAND-BY
CURRENT.
CONSUMO
MUITO BAIXO
EM STAND-BY
GRANDE
ÁREA
DE PROTEÇÃO-180º
de cobertura
LARGE
AREA
PROTECTION
180 o Detection
coverage,
no
more
blind
spot.
sem ângulo morto
ENERGY-SAVING
Built-in
photocell
allowspermite
automatic
POUPANÇA
DE ENERGIA
- A célula
encastrada
um
operation at night
and disabled
daylight.
funcionamento
automático
durante ainnoite
e desactivar de dia.
Appropriatepara
TO SOLAR
LIGHTING
APPLICATION.
Adequado
APLICAÇÕES
SOLARES
theselecionar
desired
Adjustable
level" for
Nível
de luz"ambient
ambientelight
regulável
quesetting
permite
light
level
primes
thedo
sensor
action. é acionado
odusk
nível
LUX
solar
a partir
qual oforaparelho
Sensing
adjustable.
Campo field
de deteção
regulável.
Comandos
para regular
alcance
e tempo.
Adjustable distance
and time
controls.
Meets
European
standards.
De acordo
comsafety
as normas
Europeias de segurança.
Adequado
instalação no exterior
Fully
exteriorpara
weather-proof.
Easy
installation.
De fácil
instalação.
MANUAL DE INSTRUÇÕES
INSTRUCTION
MANUAL
TECHNICAL SPECIFICATIONS:
Especificações
Técnicas:
3
Rated Nominal:
Voltage:12VDC
12VDCouOR
50Hz.
Tensão
ACAC
50Hz.
Stand-by
em
corrente
DC:
cerca0.2mA
de 0.2mA
Stand-by
DC
current:
about
Comutação
de Contacto:
Contacto
livre
Switching Contact:
Free
contact.
Max.5A
para
5A Max.
for 12-230V
12-230VAC
AC
SELEÇÃO DEALOCALIZAÇÃO
SELECTING
LOCATION
Deteção
Fields of view
Max.5A
para
5A Max.
for 12-30V
12-30VDC
DC
TIME:
entre
6 segundos
e 2 minutos.
TIME:Regulável
Adjustable
from
about 6 seconds
to 2 minutes.
LUX:
5 LUX ~ .
LUX: Adjustable
Regulável a from
partirabout
de: 5 LUX
METER:
atéup
12to
metros.
METER:Regulável
Adjustable
about 12 meters.
o
Ângulo
de Deteção:
Atéto180
180º o(20ºC)
Detection
Angle: Up
(20 C.).
Modede
of Funcionamento:
Operation: Auto.
Modo
Automático
o
Temperatura
de funcionamento:
-20ºC
a o+45ºC
Operation Temperature:
-20 C
~ +45
C.
Quando
aplicado na
altura
recomendada height
de 2 a 3ofmetros,
a área
When mounted
at the
recommended
2-3M, the
o
de
deteção
abrange
cerca
de
12
metros
com
180º
de
cobertura.
detection area extends toward about 12M and is 180 wide.
Para
reduzircoverage,
a cobertura,
direcione
o detetor
progressivamente
To reduce
aim
the detector
downward
the ground.
para o solo.
DETECTION COVERAGE
Cobertura:
SIDE
Vista VIEW
lateral
2M
CONTEUDO DA EMBALAGEM
6
12M
6
2 0 2
6
that sways in wind.
Movimentos
que
acionamsensor
o sensor
Movement
triggers
Parafuso
Sensor
Caixa de
Screw
screw Parafuso
Sensor Wiring box Wood
3x8mm
8X25.4mm 3x8mm
Ligações 8x25.4mm
1
1
2
M
180 Fixedde
view
Captação
180º
Não direcione o sensor para postes ou árvores
Do not aim the sensor toward a pole or a tree
que se movam com o vento.
Artigo
Pattern
Quantidade
Quantity
2 3
Três níveis
Three
level de
of view
adjustable
range
alcance reguláveis
PACKAGE CONTENTS
Item
Item
TOP
VistaVIEW
de topo
12M
0
1
2
O
sensor motion
de movimentos
e7 pode
ser activado
animais
de
870052
sensor may
be activated
bypor
large
animals,
grande
luzes,
reflexos, fontes
de calor ou
objectos em of
lights, porte,
reflective
surfaces,
heat sources,
or movement
movimento.
Asfollowing
seguintesguidelines
orientaçõeswill
ajuda-lo-ão
evitar nuiobjects. The
help youa avoid
activações
indesejadas.
sance triggering.
Evite direcionar
o sensor
qualquer
tipo de
Avoid
aiming the
sensorpara
toward
any kind
of luz.
lights.
Se
pretende the
que sensor
o sensorincontrole
iluminação,
instale
o
If installing
tandema with
a light(s),
mount
módulo
abaixo
da fonte
de luz.
the sensor
module
below
the light(s).
Evite
o sensor
perto denear
fontes
de sources,
calor, como
Avoidinstalar
mounting
the sensor
heat
such as
ventiladores,
ar condicionado,
secadores
iluminação.
heating vents,
air conditioners,
dryer ou
vents
or lights.
Evite
o sensor
objectos
que se
possam
Avoiddirecionar
aiming the
sensorpara
toward
objects
which
maymover
move
in the
as bushes
orou
lawn
decorations.
com
o wind,
vento, such
tais como
arbustos
decorações
de jardim.
Avoiddirecionar
directingothe
sensor
areas
or objects
Evite
sensor
paratoward
áreas ou
objectos
cujas whose
surfaces are
highly
reflective
subject
to rapid
superficies
sejam
muito
reflexivasorouare
sujeitas
a mudanças
temperature
change, such
aspiscinas,
pools. por exemplo.
bruscas
de temperaturas,
como
CARACTERÍSTICAS
FEATURES
Embora o sensor
seja resistente
a intempéries,
sugerimos
a sua
Although
the sensor
is weatherproof,
it is strongly
suggested
instalação
local
abrigado
impeçaprevent
de ser afectado
pela
to locate itnum
under
the
shelterque
thato would
the sensor
from being
directly by the raindrop or the snow.
chuva
e pelahit
neve.
4
INSTALAÇÃO
INSTALLATION
Desligue
a by
alimentação
eléctrica,
o
Shut off alltoda
power
removing power
fuse orremovendo
turn off circuit
breaker.ou desligando o circuito.
fusível
Leia
o Manual
de carefully
Instruçõesbefore
antes da
Readcuidadosamente
entire Instruction
Manual
proceeinstalação.
ding.
All
with local
codes
and
As wirings
ligações should
deverãocomply
ser executadas
de electrical
acordo com
normas
may
a qualified
locaisrequire
e poderão
ter de serelectrician.
feitas por profissional qualificado.
The
total
lighting
connected
to theexceder
sensor5A.
must
A
carga
total
ligada load
ao sensor
não poderá
Nãonot
o
exceed
5Acontrolar
load. Domotores
not useou
it iluminação
to control motors
or high
utilize
para
de alta intensidade.
intensity discharge lights.
Se
substituir uma
iluminação
exterior
existente,
desligue-a
e
In replacing
an existing
outdoor
light,
beware
to turn off
the power,
disconnect and remove the old fixture.
remova-a
préviamente.
If there
is no ligação
power, eléctrica
a licensed
electrician
is required.
Se
não existir
contacte
um electricista.
Procedimentos
Install procedurede instalação
Fixe
firmemente
baserigidly
do sensor
na selected
superfíciemounting
selecionada
Fasten
the box abase
to the
(parede
tecto)
o orificio
entrada
cabo
voltado
para
surfaceou
(Wall
or com
Ceiling)
withde
the
cable de
entry
hole
facing
downward.
(See FIG.2 )
baixo.
(Ver FIG.2)
Select a knock
out hole
on ana
connection
box
base,
insert
Selecione
um orificio
de saída
base, passe
o cabo
pela
anilha
theborracha
load ande power
cable
grommet
de
pelo orificio
dethrough
saída e rubber
em seguida
utilize and
os the
knock outpara
hole,
then
use
screws
toafix
the cable firmly
with
parafusos
fixar
bem
o cabo
com
abraçadeira.
(Ver FIG.3)
cable clamp.(See FIG.3 )
Ligue os cabos
de acordo
com
o esquema
de ligações
(Ver) FIG.4)
Connect
the wires
refer to
wiring
diagram.(See
FIG.4
Insira aterminal
barra deblock
junçãoby
manualmente.
Insert
hand.
Re-check
wires econnection
and
it is correct.
Confirme asthe
ligações
certifique-se
quemake
estãosure
correctas.
Junte
Assemble
base with
sensor
cover, com
then2fix
with 2 screws.
a base e a tampa
do sensor
e fixe-as
parafusos
(Ver
(See
FIG.5]FIG.5 )
Rode o METER
botão METER
a distância
de deteção
desejada.
6. Adjust
knob até
gently
to the desired
detection
Rodando oSetting
botão para
"-",too"sensor
detectará
um menor
"campo
distance.
knob
", sensor
detects
the smallest
de visão".
Rodando
o botão
parato"+",
detectará
um maior
"Field
of View".
Setting
knob
" + este
", sensor
detects
the
largest
"Field
of (Ver
View"
(See FIG.7).
"campo de
visão"
FIG.7).
Rode o TIME
botão knob
TIME.gently.
O tempo
minimo
regulação,
7. Adjust
The
min. de
setting
at " " rodando
is aboutpara
6"-",
seconds,
the max.e setting
at "rodando
+ " is about
minutes
é de 6 segundos
o máximo,
para 2"+"
é de cerca de 2
(See
FIG.7).
minutos
(Ver FIG.7).
botãoknob
LUX para
o nivel
desejado
iluminação.
As luzes
8. Rode
Adjusto LUX
gently
to the
desiredde
LUX
level. The
controladas
pelo aparelho
quando
a luz light
ambiente
controlled lighting
turns activam-se
ON when the
ambient
reaches
or goes
below the
preset
LUX value. The preset
atinja
o valor
selecionado.
O valor
pré-selecionado
representa
o nivel
value
at " " before
for full
dayde luz
a saídaex-factory.
de fábrica. " " stands
estará is
em
and
night
lightelevel,
and " " stands
for o
the
dusk
level
de dia
e noite,
o simbolo
representa
nivel
de light
crepúsculo
(See
FIG.7).
(Ver FIG.7)
Repita os
passos
4 a88until
até obter
a área de coverage
cobertura meets
9. Repeat
step
4 to de
step
the detection
your
requirement.
desejada
7
Cable
Abraçadeira
clamp
Mounting
Furos de
holes
fixação
Rubber
Anilha
grommet
de
Cable entry
hole
Entrada
de Cabo
FIG.3
FIG.2
borracha
Esquema de
ligações
WIRING
DIAGRAM
Vermelho
Red
Azul
Blue
Entrada
Input
Para
a
To
control
unidade de
unit
12V DC/AC
Red
Vermelho
Blue
Azul
controlo
METER
LUX
TIME
WALL MOUNT
Montagem
na parede
set desired
ParaTo
selecionar
a área
detecting range
de cobertura
Auto
shut-off
Controlo
do
timer
control
temporizador
FIG.7
To
setselecionar
ambienta
Para
light
level
Luz Ambiente
FIG.8
FIG.5
5
60
TESTETEST
DE MOVIMENTO (CAMINHAR)
WALK
O teste de movimento é utilizado para testar e ajustar a cobertura
The purpose of the Walk Test is used to test and adjust the
de deteçãocoverage
do e7 em modo
automático.
detection
of 870052
under Rode
Auto Mode. Please
o botãoTIME
TIME knob
para "-",
para
e o botão
adjust
to "o botão
", LUXLUX
knob
to "
", and
METER
knob to para
" + " "+"
before
proceeding
Walk
Test.
METER
antes
de executartoo the
Teste
de Movimento.
O
e7 necessita
período
deabout
aquecimento
de cerca
de 30
870052
needsde
to um
warm
up for
30 seconds
after
segundos
sertest,
ligado.
teste,
luz ligar-se-á
durante
cerca
power on.após
In the
theNo
light
willaturn
on for about
6 seconds
de
6 segundos
quando
o sensor once
for activado
com um
movimento
when
the sensor
is activated
the moving
object
is in the
na
área de deteção,
e depois
desligar-se-é
automáticamente.
detection
area, then
turn off
automatically.
Please
stop walking
as que
soon
as the
light
on. aIf existir
the
Pare o movimento
assim
a luz
ligue.
Se turns
continuar
moving
object
keeps
walking o
intemporizador
the detection
area,nova
the timer
movimento
na área
de deteção,
iniciará
will
reset and
re-count
forde
another
6 seconds.
contagem
de outro
período
6 segundos.
Walk Test
Teste de Movimento
(Caminhar)
6
60
FUNCIONAMENTO
Modo Automático
OPERATION
mode
OAuto
e7 pode
activar ou desactivar a iluminação, consoante o nivel
870052 Motion
Detector Light
automatically
selecionado
nos parâmetros
LUX Control
e TIMER.can
Quando
o nivel de
turnambiente
the lightatinja
ON and
OFF
depending
onethe
valuede
level set
luz
o nivel
LUX
selecionado
o sensor
by LUX andseja
Timer.
When
ambient
lightem
level
reachesna
LUX
movimento
activado
com
um objecto
movimento
área
setting
andathe
motion sensor
is activated
the moving
de
deteção,
iluminação
activar-se-á,
e voltaráas
a desactivar-se
object is in the detection
the de
light
will selecionado.
turn on,
automáticamente
quando secoverage,
atingir o nivel
tempo
and then turn off automatically when time set is reached.
Consequentemente,
quando olight
nivellevel
de luz
ambiente
não atinja
Conversely,
when ambient
does
not reach
LUX
o nivel LUX
o sensor
não podeand
ser the
activado
a
setting,
theselecionado,
sensor can not
be activated
light ewill
iluminação
arrancará
exista
na
not
turn onnão
even
there ismesmo
movingque
object
in movimento
the detection
área de deteção.
temporizador
pode
regulado
entre 6 and
coverage.
TimerOcan
be minimum
setser
about
6 seconds
segundos eset
2 minutos.
maximum
about 2 minutes.
NOTE:
NOTA:
FIG.6
Start Finish
Final
Inicio
Como
fazer ofo walk
Teste
de Movimento (Caminhar)
Procedures
test
Direcione
o sensor
para athe
área
de cobertura
desejada.
1. Aim
the sensor
across
desired
detection
coverage.
Ligue power
a energia
2. Turn
on .
Deixe oup
e7870052
aquecerfor
durante
de 30 segundos.
3. Warm
aboutcerca
30 seconds.
alguém para
caminhar
lado de fora
da área de
4. Peça
Haveasomeone
walk
across pelo
the detection
coverage
from
outside
the alight
turns
on.(See FIG.6)
detecçãountil
até que
luz se
acenda.(Ver
FIG.6)
5. Adjust
aimingdirecionando-a
to the detection
Regule sensor
a cabeçahead
do sensor,
paradirection.
a área de
deteção
Cada
é submetido
testes rigorosos
procedimentos
de
Eachsensor
Sensor
undergoesa rigorous
testingeand
quality control
controlo
de qualidade
da saída da
fábrica. Alguma
procedures
before itantes
is ex-factory.
Malfunctions
areanomalia
most
often due
to incorrect
or improper
aiming of ou
the
deverá
normalmente
ser installation
atribuida a uma
incorreta instalação
unit. Seeorientação
sections 3do& aparelho.
4.
deficiente
Veja os pontos 3 e 4.
A
iluminação
Lights
do notnão
turnse
onactiva
Desligue
a alimentação
e volte
ligar. on again.
1.Turn
power
off for atdurante
least 55 segundos
seconds,
thena turn
Verifiqueifse
as lâmpadas
e luminárias
estão
a funcionar,
se as ligações
2.Check
bulbs
and fixtures
work.
Wires
are connected
estão
de acordo
comwiring
o esquema
e se tem
corrente.
correctly
as the
diagram
and
the power is on.
Verifiqueifse
o sensorisestá
nivelado
que está
direcionado
para a at
área
3.Check
sensor
level
from eside
to side
and aiming
the
desired
detection area.
que
pretende.
4.Check
input
voltage
is noté below
Confirmeifque
a carga
de entrada
superior10.5V
a 10.5VDC/AC.
DC/AC.
ALights
iluminação
e off
desliga
rápidamente
turn onliga
and
quickly
FIG.4
Montagem
no tecto
CEILING
MOUNT
RESOLUÇÃO DE PROBLEMAS
TROUBLE-SHOOTING
Condições que
podem
Conditions
which
maycausar
causemenos
lower sensibilidade:
sensitivity.
Em
noites
de grande
a sensibilidade
In very
foggy
nights,nevoeiro,
sensitivity
may be lesspode
due to
diminuir
devido
a humidade
na lente.
moisture
collected
on the acumulada
lens.
In
days,
sensitivity
may be less
duediminuir
to the
Emvery
diashot
muito
quentes,
a sensibilidade
poderá
temperature
of human
to the
high
ambient
pois a temperatura
de umbody
corpoclose
humano
será
semelhante
temperature.
a temperatura ambiente.
In
days,
little
heat
emits pelos
from the
body
Emvery
diascold
muito
frios, very
o pouco
calor
emitido
corpos,
for
the ao
heavy
clothes
and
face covering,
which
causes
devido
uso de
roupas
pesadas,
o que causa
menor
less
sensitive
the sensor.
sensibilidade
doofsensor.
Clean with
softcom
damp
only. Soap
or polish
may
Limpar
apenas
um cloth
pano suave.
Detergentes
podem
damageothe
sensor
danificar
sensor
ou alens.
lente.
O calorfrom
da iluminação
pode
desempenho
deficiente.
1.Heat
theand
light
will causar
causeum
sensor
unsteady
performance.
Maintenance
Repair
2.Make
sure que
lights
are not reflecting
backnointo
theEvite
sensor.
Certifique-se
a iluminação
não gera reflexo
sensor.
Avoid anybrancas
white ou
or que
reflective
surfaces
inde
the
detection
superficies
gerem reflexo
na área
deteção.
Oriente o
coverage.
Aim sensor
and light
at different directions.
sensor
e a iluminação
em diferentes
direções.
3.Note
that que
the osensor
more
sensitive
inpois
winter
sincede
Lembre-se
sensor éismais
eficaz
no inverno
a energia
infrared
energy
is easier
fordetectada
the sensor
detect
infra-vermelhos
é mais
fácilmente
pelo to
mesmo
em in a low
temperatures.
temperaturas baixas.
A
iluminação
Lights
do not não
turndesliga
off
Confirme
que
o botão
TIMEcontrol
está regulado
para
minimo.of the
1.Make
sure
that
the TIME
knob on
theobottom
sensor is set to minimum.
Mantenha-se completamente fora do raio de alcance do campo
2.Stay completely out of the detection coverage to avoid
de deteçãothe
para
evitar a activação do sensor.
activating
sensor.
Confirme
que
o aparelho
não estáon
montado
numa superficie
3.Make
sure
unit
is not mounted
an unstable
object (tree
or
pole) (poste
that sways
in theque
wind.
Makecom
sure
the unit
is firmly
instável
ou árvore)
se mova
o vento
e asseguremounted.
se que está correctamente fixada.
4.Make
sure unit
aimednão
at se
something
would cause
Assegure-se
queiso not
aparelho
encontra that
direcionado
para
a temperature change such as tree branches, pools, air
algo
que
origine
diferenças
de
temperatura,
como
ramos
de
conditioners or heating vents.
árvores, piscinas, aparelhos de ar condicionado ou ventínhas.
A
iluminação
durante uma tempestade
Lights
turn onactiva-se
in storms
A
chuva,
a neve
o vento podem
oscilações de
Rain,
snow
andewindstorms
cancausar
causegrandes
large temperature
temperatura
quemay
podem
sensor.False
As falsas
activações
change which
turndesligar
on theosensor.
triggering
can
be minimized
by installing
theosensor
a protected
location
podem
ser reduzidas
instalando
sensor in
num
local protegido
ou
or turning
the
sensitivity da
control.
baixando
o down
nivel de
sensibilidade
célula.
Manutenção
e reparação
Maintenance
and repair
Keep thealens
clean
and
free of obstructions.
Do
Mantenha
lentearea
limpa
e sem
obstáculos.
Não tente abrir
ounot
attempt
to open or
repair altas
the unit.
Thereperigosas
are dangerous
high
reparar
o aparelho.
Existem
voltagens
no interior.
voltages inside and no user serviceable parts are applicable
Para
reparações,
o seu
agentefollow
electra.
to the
end user.consulte
For repair
service,
your warranty.
Garantia:
24 meses
com aby
utilização
do
Guarantee:
24 Months
normal normal
operation
aparelho.
of this product
------------------------------------------------------------------Klemdotica is a protected product of:
electra.pt
Copyright
C
2003 Aurex Industries, Inc.
All rights
reserved.
copy, or transmission
Klemko
Techniek
B.V.No reproduction,
the Netherlands
of this
product
may be made
without
permission.
T: +31
(0)346
210966
F: +31
(0)346writing
210961
[email protected]
www.klemko.nl
28-MLAU186DC