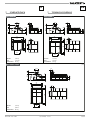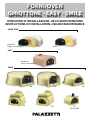
1
FORNI/OVEN
GHIOTTONE - EASY - SMILE
ISTRUZIONI D’INSTALLAZIONE, USO E MANUTENZIONE
INSTRUCTIONS OF INSTALLATION, USE AND MAINTENANCE
GHIOTTONE
medium
large - extralarge
small
EASY
medium
large - extralarge
SMILE
120
60
100
90
80
56
56 prof.64
IT
UK
Le apparecchiature da cottura (denominate in seguito “forni”)
PALAZZETTI LELIO S.P.A. (di seguito PALAZZETTI) sono costruite e collaudate seguendo le prescrizioni di sicurezza indicate
nelle Direttive Europee di riferimento.
Palazzetti’s cooking appliances (hereafter referred to as “oven”)
by PALAZZETTI LELIO S.P.A (hereafter referred to as PALAZZETTI) are manufactured and tested in accordance with the safety
requirements set forth by applicable European standards.
Questo manuale è indirizzato ai proprietari, agli installatori,
operatori e manutentori del forno.
This manual is for owners, and installers, operators and maintenance engineers of the oven.
In caso di dubbi sul contenuto e per ogni chiarimento contattare il Costruttore o il Servizio di Assistenza Tecnica Autorizzato citando il numero del paragrafo dell’argomento in discussione.
If you have any doubts about the contents or need some clarifications, do not hesitate to contact the manufacturer or an
authorised technical assistance centre, giving the number of
the paragraph in question.
La stampa, la traduzione e la riproduzione anche parziale
del presente manuale s’intende vincolata dall’autorizzazione Palazzetti.
The printing, translation and reproduction, in whole or in
part, of this manual require authorization by Palazzetti.
authorisation.
Le informazioni tecniche, le rappresentazioni grafiche e le
specifiche presenti in questo manuale non sono divulgabili.
The technical information, graphs and specifications in this
manual are not to be disclosed.
2/36
cod. 004720498 - 11/2010
GHIOTTONE - EASY - SMILE
IT
UK
INDICE
INDEX
1
1.1
1.2
1.3
1.4
1.5
1.6
1.7
1.8
1.9
1.10
1.11
1.12
1.13
PREMESSA
SIMBOLOGIA
DESTINAZIONE D’USO
SCOPO E CONTENUTO DEL MANUALE
CONSERVAZONE DEL MANUALE
AGGIORNAMENTO DEL MANUALE
GENERALITÀ
PRINCIPALI NORME ANTINFORTUNISTICHE
GARANZIA LEGALE
RESPONSABILITÀ DEL COSTRUTTORE
CARATTERISTICHE DELL’UTILIZZATORE
ASSISTENZA TECNICA
PARTI DI RICAMBIO
CONSEGNA DELL’APPARECCHIATURA 1
1
1.1
1.2
1.3
1.4
1.5
1.6
1.7
1.8
1.9
1.10
1.11
1.12
1.13
INTRODUCTION
SYMBOLOGY
USE
THE CONTENTS AND PURPOSE OF THE MANUAL
MAINTENANCE OF THE MANUAL
REVISIONE OF THE MANUAL
GENERAL
MAIN ACCIDENT PREVENTION INSTRUCTIONS
LEGAL WARRANTY
MANUFACTURER’S LIABILITY
USER FEATURES
TECHINICAL ASSISTANCE
SPARE PARTS
DELIVERY OF THE APPLIANCE
2
AVVERTENZE PER LA SICUREZZA
2
SAFETY INSTRUCTIONS
3
3.1
3.2
3.3
3.4
INSTALLAZIONE
POSIZIONAMENTO
CANNA FUMARIA
COMIGNOLI
INSTALLAZIONE FORNI
Ghiottone
Easy
Smile
3
3.1
3.2
3.3
5.4
INSTALLATION
POSITIONING
CHIMNEY FLUE:
CHIMNEYPOTS
OVENS INSTALLATION
Ghiottone
Easy
Smile
4
4.1
4.2
4.3
4.4
4.5
USO DELL’APAPRECCHIATURA
PRESCRIZIONI DI SICUREZZA
TIPO DI COMBUSTIBILE
PREPARAZIONE ALLA COTTURA
COTTURA
SPEGNIMENTO DEL FORNO
4
4.1
4.2
4.3
4.4
4.5
USE OF THE APPLIANCE
SAFETY REGULATIONS
FUEL
SETTING TO COOKING
COOKING
PUT THE OVEN OUT
5
5.1
MANUTENZIONE
PULIZIA DELLE BRACI E DELLA CENERE
5
5.1
MAINTENANCE
CLEANING THE EMBERS AND ASH
6
INFORMAZIONI PER LA DEMOLIZIONE
6
INFORMATION FOR DEMOLITION
7
SCHEDA TECNICA
7
TECHNICAL SCHEDULE
GHIOTTONE - EASY - SMILE
cod. 004720498 - 11/2010
3/36
IT
UK
Dear customer,
Gentile cliente,
We would first of all like to thank you for having
chosen one of our products and congratulate you
on your choice.
In order to get the best out of your new appliance,
please follow the advice and instructions given in
this manual.
desideriamo innanzitutto ringraziarLa per la preferenza che ha voluto accordarci acquistando il
nostro prodotto e ci congratuliamo con Lei per la
scelta.
Per consentirLe di utilizzare al meglio il Suo nuovo
forno, la invitiamo a seguire attentamente quanto
descritto nelpresente manuale.
1
1
PREMESSA
GENERAL
Do not start using the product until you have read
and understood the contents of this manual. If you
have any doubts at any time do not hesitate to call
the PALAZZETTI specialized personnel who are there
to help you.
PALAZZETTI reserves the right to modify the technical and/or functional specifications and features at
any time without prior notice.
Non operare se non si sono ben comprese tutte le
notizie riportate nel manuale; in caso di dubbi richiedere sempre l’intervento di personale specializzato Palazzetti.
PALAZZETTI si riserva il diritto di modificare specifiche e caratteristiche tecniche e/o funzionali dell’apparecchiatura in qualsiasi momento senza darne
preavviso.
1.1 SYMBOLS
1.1 SIMBOLOGIA
Nel presente manuale i punti di rilevante importanza sono evidenziati dalla seguente simbologia:
The important points in this manual are highlighted
with the following symbols:
Indicazioni concernenti il corretto
F INDICAZIONE:
utilizzo del prodotto e le responsabilità dei prepo-
Indications concerning the correct
F INDICATION:
use of the product and the responsibilities of those
sti.
ATTENZIONE: Punto nel quale viene espressa una
nota di particolare rilevanza.
PERICOLO: Viene espressa un’importante nota di
comportamento per la prevenzione di infortuni o
danni materiali.
using it.
ATTENTION: A particularly important note is written
here.
DANGER: Here there is an important not warning on
the prevention of bodily harm or material damage.
1.2 DESTINAZIONE D’USO
1.2 DESTINAZIONE D’USO
PALAZZETTI ‘s GHIOTTONE, EASY and SMILE ovens
are wood burning ovens, with fireproof structure,
designed for the cooking.
I forni GHIOTTONE, EASY e SMILE di PALAZZETTI,
sono forni alimentati a legna, con struttura in refrattario, adatti per la cottura.
Use of the product, as described above, and the
oven’s configurations are only those allowed by the
manufacturer: only use the appliance as set out in
the indications provided.
La destinazione d’uso sopra riportata e le configurazioni previste dell’apparecchiatura sono le uniche
ammesse dal Costruttore: non utilizzare la macchina in disaccordo con le indicazioni fornite.
Danger: the indicated use is applicable only for appliance in full structural, mechanical and engineering efficiency.
Pericolo: la destinazione d’uso indicata è valida solo
per apparecchiature in piena efficienza strutturale,
meccanica ed impiantistica.
1.3 SCOPO E CONTENUTO DEL MANUALE
4/36
1.3
PURPOSE AND CONTENTS OF THE MANUAL
Scopo
Lo scopo del manuale è quello di consentire all’utilizzatore di prendere quei provvedimenti e predisporre tutti i mezzi umani e materiali necessari per
un suo uso corretto, sicuro e duraturo.
Purpose
The purpose of the manual is to allow the user to
take the necessary precautions and to have all the
human and material means required for its correct,
safe and lasting use.
Contenuto
Questo manuale contiene tutte le informazioni
necessarie per l’installazione, l’impiego e la manutenzione dei forni GHIOTTONE, EASY e SMILE. La
scrupolosa osservanza di quanto in esso descritto
garantisce un elevato grado di sicurezza e produttività dell’apparecchiatura.
Contents
This manual contains all the information necessary for installation, use and maintenance of Oven,
GHIOTTONE, EASY e SMILE. By complying scrupulously with the contents of this manual you will ensure
a high degree of safety and productivity of the product.
cod. 004720498 - 11/2010
GHIOTTONE - EASY - SMILE
IT
UK
1.4 KEEPING THE MANUAL
1.4 CONSERVAZIONE DEL MANUALE
Conservazione e consultazione
Il manuale deve essere conservato con cura e deve
essere sempre disponibile per la consultazione, sia
da parte dell’utilizzatore che degli addetti al montaggio ed alla manutenzione.
Keeping and consulting the manual
The manual must be kept in a safe, dry place and be
available at all times for consultation by the user and
by those who see to its installation and maintenance.
Il manuale Istruzione Uso e Manutenzione è parte
integrante della macchina.
The instructions for use and maintenance manual
is an integral part of the unit.
Deterioramento o smarrimento
In caso di necessità fare richiesta di un’ulteriore copia a PALAZZETTI.
Deterioration or loss
If needed, ask PALAZZETTI for another copy of the
manual.
Cessione dell’apparecchiatura
In caso di cessione dell’apparecchiatura l’utente è
obbligato a consegnare al nuovo acquirente anche
il presente manuale.
Selling the product
If the product is sold the user must give the manual
to the new owner as well.
1.5 MANUAL UPDATE
1.5 AGGIORNAMENTO DEL MANUALE
This manual reflects the state-of-the-art at the time
the appliance was put on the market.
The appliances already on the market, together with
their technical documentation, will not be considered as wanting or inadequate simply because changes or adjustments have been made or new technologies have been applied to the next generation of
appliances.
Il presente manuale rispecchia lo stato dell’arte al
momento dell’immissione sul mercato della macchina.
Le macchine già presenti sul mercato, con la relativa
documentazione tecnica, non verranno considerate da PALAZZETTI carenti o inadeguate a seguito di
eventuali modifiche, adeguamenti o applicazione di
nuove tecnologie su macchine di nuova commercializzazione.
1.6 GENERAL INFORMATION
1.6 GENERALITÀ
Informazioni
In caso di scambio di informazioni con il Costruttore
dell’apparecchiatura fare riferimento al codice a barre presente nelle etichette che seguono il presente
libretto ed ai dati identificativi indicati alla pagina
“INFORMAZIONI GENERALI” alla fine del presente
manuale.
Information
If there is an exchange of information with the product manufacturer, please quote the serial number
and identification data which you will find on the
“GENERAL INFORMATION” page at the end of this
manual.
F Responsabilità
Con la consegna del presente manuale PALAZZET-
F Responsability
Upon delivery of this manual PALAZZETTI declines
Manutenzione straordinaria
Le operazioni di manutenzione straordinaria devono
essere eseguite da personale qualificato ed abilitato
ad intervenire sul modello di apparecchiatura a cui
fa riferimento il presente manuale.
Extraordinary maintenance
Extraordinary maintenance must be carried out by
personnel qualified to work on the product model
to which this manual refers.
delle opere di installazione
F Responsabilità
La responsabilità delle opere eseguite per l’installa-
for installation
F Responsibility
It is not the responsibility of PALAZZETTI to carry out
TI declina ogni responsabilità, sia civile che penale,
per incidenti derivati dalla non osservanza parziale
o totale delle specifiche in esso contenute. Palazzetti
declina, altresì, ogni responsabilità derivante da uso
improprio della macchina od uso non corretto da
parte dell’utilizzatore, da modifiche e/o riparazioni
non autorizzate, da utilizzo di ricambi non originali o
non specifici per questo specifico modello.
zione dell’apparecchiatura non può essere considerata a carico della PALAZZETTI, essa è, e rimane, a
GHIOTTONE - EASY - SMILE
all liabilities, both civil and penal, for any accidents
that may derive from the total or partial failure to
comply with the specifications contained in it. Palazzetti also declines all liabilities resulting from an
improper use of the unit, incorrect use by the user
or resulting from unauthorised alterations and/or
repairs, or the use of spare parts that are either not
genuine or not specific for this particular model.
cod. 004720498 - 11/2010
the work needed to install the product. Such works are entirely up to the installer who is requested
5/36
IT
UK
carico dell’installatore, al quale è demandata l’esecuzione delle verifiche relative alla canna fumaria e
della presa d’aria ed alla correttezza delle soluzioni
di installazione proposte. Devono essere rispettate
tutte le norme previste dalla legislazione locale, nazionale ed europea vigente nello stato dove la stessa è installata.
to check the flue and air intake and to check if the
installation solutions proposed are feasible. All applicable standards and local, national and European
legislation in force in the country where the product
is installed must be respected.
Uso
L’uso della macchina è subordinato, oltre che alle
prescrizioni contenute nel presente manuale, anche
al rispetto di tutte le norme di sicurezza previste dalla legislazione specifica vigente nello stato dove la
stessa è installata.
Use
Use of the product is subject to compliance with
all the safety standards established by the relevant
laws in force in the place of installation as well as the
prescriptions contained in this manual.
1.7 PRINCIPALI NORME ANTIFORTUNISTICHE RISPETTATE E DA RISPETTARE
1.7 MAIN ACCIDENT PREVENTION REGULATIONS TO COMPLY WITH
A) Direttiva 89/336/CEE: “Ravvicinamento delle legislazioni degli Stati membri relative alla compatibilità elettromagnetica”.
B) Direttiva 89/106/CEE: “Concernente il riavvicinamento delle disposizioni legislative, regolamentari ed amministrative degli stati membri concernenti i prodotti da costruzione”.
C) Direttiva 85/374/CEE: “Concernente il riavvicinamento delle disposizioni legislative, regolamentari ed amministrative degli stati membri in materia
di responsabilità per danno da prodotti difettosi”.
A) EEC directive 89/336: “Standardization of legislation of member states concerning electro-magnetic compatibility”
B) EEC directive 89/106: “Concerning standardisation of legislative, regulatory and administrative
instructions of member states regarding construction products.”
C) EEC directive 85/374: “Concerning standardisation of legislative, regulatory and administrative
instructions of member states regarding responsibility for damage caused by defective products.”
D)
1.8 GARANZIA LEGALE
1.8 LEGAL GUARANTEE
L’utente per poter usufruire della garanzia legale,
di cui alla Direttiva CEE 1999/44/CE deve osservare
scrupolosamente le prescrizioni indicate nel presente manuale, ed in particolare:
t operare sempre nei limiti d’impiego dell’apparecchiatura;
t effettuare sempre una costante e diligente manutenzione;
t autorizzare all’uso del prodotto persone di provata capacità, attitudine ed adeguatamente addestrate allo scopo.
L’innosservanza delle prescrizioni contenute in questo
manuale implicherà l’immediata decadenza della garanzia.
1.9 RESPONSABILITÀ DEL COSTRUTTORE
The user may only make use of the legal guarantee, as under the EEC directive 1999/44/CE, if he has
scrupulously complied with the regulations indicated in this manual, and more specifically:
t to work always within the product’s limits of use;
t maintenance must be constant and careful;
t only allow people who are capable and who have
been suitably trained to use the product.
Failure to comply with the instructions provided in this
manual will invalidate the guarantee immediately.
1.9 THE MANUFACTURER’S LIABILITIES
Il Costruttore declina ogni responsabilità civile e penale, diretta o indiretta, dovuta a:
t installazione non conforme alle normative vigenti
nel paese ed alle direttive di sicurezza;
t inosservanza delle istruzioni contenute nel manuale;
t installazione da parte di personale non qualificato
e non addestrato;
t uso non conforme alle direttive di sicurezza;
t modifiche e riparazioni non autorizzate dal Costruttore effettuate sulla macchina;
t utilizzo di ricambi non originali o non specifici per
il modello;
t carenza di manutenzione;
t tFWFOUJFDDF[JPOBMJ
6/36
cod. 004720498 - 11/2010
The manufacturer declines all civil and penal liabilities, direct or indirect, due to:
t Installation that fails to comply with the laws in
force in the country and with safety regulations;
t Failure to comply with the instructions given in
the manual;
t Installation by unqualified and untrained personnel;
t Use that fails to comply with safety directives;
t Alterations and repairs on the appliance not authorised by the manufacturer;
t Use of spare parts that are either not genuine or
specific for this particular model;
t Poor maintenance
t unforeseeable events.
GHIOTTONE - EASY - SMILE
IT
1.10 CARATTERISTICHE DELL’UTILIZZATORE
UK
1.10 USER CHARACTERISTICS
L’utilizzatore del prodotto deve essere una persona
adulta e responsabile provvista delle conoscenze
tecniche necessarie per la manutenzione ordinaria
dei componenti. Fare attenzione che i bambini non
si avvicinino all’apparecchiatura, mentre è in funzione, con l’intento di giocarvi.
1.11 ASSISTENZA TECNICA
The person who uses the product must be a responsible adult, with all the necessary technical knowhow to carry out routine maintenance of the components.
Do not let children near the product to play with it
when it is working.
1.11 TECHNICAL ASSISTANCE
Palazzetti è in grado di risolvere qualunque problema tecnico riguardante l’impiego e la manutenzione
nell’intero ciclo di vita della macchina.
La sede centrale è a vostra disposizione per indirizzarvi al più vicino centro di assistenza autorizzato.
1.12 PARTI DI RICAMBIO
Palazzetti is able to solve any technical problem concerning the use and maintenance of the appliance’s
whole life cycle.
The main office will help you find the nearest authorised service centre.
1.12 SPARE PARTS
Impiegare esclusivamente parti di ricambio originali.
F
Non attendere che i componenti siano logorati
dall’uso prima di procedere alla loro sostituzione.
Sostituire un componente usurato prima della rottura favorisce la prevenzione degli infortuni derivanti
da incidenti causati proprio dalla rottura improvvisa dei componenti, che potrebbero provocare gravi
danni a persone e cose.
Eseguire i controlli periodici di manutenzione come
indicato nel capitolo “5 - Manutenzione”.
Il prodotto viene consegnato perfettamente imballato e fissato ad una pedana in legno che ne permette la movimentazione mediante carrelli elevatori e/o
altri mezzi.
All’interno viene allegato il seguente materiale:
t libretto di uso, installazione e manutenzione
t etichetta codice a barre
GHIOTTONE - EASY - SMILE
Do not wait until the components are worn out before changing them.
Changing a worn component before it fails makes it
easier to prevent accidents that could otherwise lead
to serious injury to people or damage to things.
out the routine maintenance checks as explaiF Carry
ned in the chapter “ 5 - Maintenance” .
1.13 DELIVERY OF THE PRODUCT
1.13 CONSEGNA DELL’APPARECHIATURA
F
Use genuine spare parts only.
The product is delivered perfectly packed in cardboard and fixed to a wooden pallet so it can be handled by forklifts and/or other means.
will find the following items inside the product:
F You
t use, installation and maintenance manual
cod. 004720498 - 11/2010
t bar code label
7/36
IT
2
PRESCRIZIONI DI SICUREZZA
2
t UNA INSTALLAZIONE ED UN USO NON CORRETTO
DELL’ APPARECCHIATURA, POTREBBERO GENERARE
PERICOLOSI INCENDI. PER RAGIONI DI SICUREZZA, SEGUIRE ATTENTAMENTE LE ISTRUZIONI CONTENUTE IN
QUESTO LIBRETTO E CONTATTARE LE ISTITUZIONI LOCALI PER CONOSCERE LE RESTRIZIONI E LE NORMATIVE
VIGENTI NEL PAESE DI UTILIZZO DELL’ APPARECCHIATURA.
t LEGGERE TUTTE LE ISTRUZIONI PRIMA DELL’INSTALLAZIONE E DELL’UTILIZZO DELL’APPARECCHIATURA, LA
MANCATA OSSERVANZA DI TALE PRESCRIZIONE PUÒ
CAUSARE SERISSIMI DANNI A PERSONE, COSE ED ANIMALI. RICORDARE CHE LA MAGGIOR PARTE DEGLI INCENDI DERIVA DALL’INOSSERVANZA DELLA PRESCRIZIONE SULLE DISTANZE DA MATERIALI COMBUSTIBILI.
t QUESTO LIBRETTO CONTIENE IMPORTANTI ISTRUZIONI
DI INSTALLAZIONE, USO E MANUTENZIONE DELL’APPARECCHIATURA. CONSERVARLO CON CURA E IN LUOGO
ACCESSIBILE PER POSSIBILI CONSULTAZIONI FUTURE. IN CASO DI DANNEGGIAMENTO O PERDITA DELLO
STESSO RICHIEDERNE COPIE AL COSTRUTTORE.
t LA RESPONSABILITÀ DELL’INSTALLAZIONE E LA CONFORMITÀ DEL LUOGO DELL’INSTALLAZIONE RIMANGONO DI RESPONSABILITÀ DELL’UTILIZZATORE.
t I forni di PALAZZETTI, sono apparecchiature alimentate
a legna, adatti per la cottura di alimenti (esclusi alimenti
liquidi o contenenti alcolici). La destinazione d’uso sopra
riportata e le configurazioni previste dell’ apparecchiatura sono le uniche ammesse dal Costruttore: non utilizzare
l’apparecchiatura in disaccordo con le indicazioni fornite.
Pericolo: la destinazione d’uso indicata è valida solo per
apparecchiature in piena efficienza strutturale, meccanica ed impiantistica.
t La sicurezza di questa apparecchiatura è stata testata dal
Costruttore ed è garantita unicamente se l’installazione
e l’uso della stessa sono conformi a quanto riportato su
questo manuale.
t Non modificare o manomettere alcuna parte - estetica,
funzionale o strutturale- dell’apparecchiatura: ciò può
pregiudicare il suo corretto funzionamento e causare
gravi danni alla stessa, a persone, animali e cose, non coperti da Garanzia e per i quali il Costruttore non si ritiene
responsabile.
t Questa apparecchiatura può essere installata all’esterno
oppure all’interno di una casa (ad esclusione delle camere da letto). Nel caso di installazioni interne rispettare le
distanze di sicurezza da materiali combustibili, arieggiare
spesso la stanza e prevedere una efficiente canna fumaria: consultare i capitoli dedicati per maggiori informazioni. Contattare inoltre le istituzioni locali per verificare
che i locali di installazione siano conformi alle normative
vigenti e adatti all’installazione dell’apparecchiatura.
t Durante il trasporto degli imballi e l’installazione usare sempre le protezioni individuali di sicurezza (guanti, scarpe antiinfortunistiche, ecc...) ed accertarsi che
bambini o animali non sostino nelle vicinanze.
t Non procedere nell’installazione se si notano evidenti
anomalie (rottura dei refrattari, ecc...), e non tentare di
ripararle da se ma rivolgersi al Costruttore.
t Pericolo: fare attenzione che i bambini non giochino
con i componenti dell’imballo (es. pellicole e polistirolo). Pericolo di soffocamento!
8/36
UK
SAFETY INSTRUCTIONS
t AN IMPROPER INSTALLATION AND USE OF THE APPLIANCE MAY CAUSE DANGEROUS FIRES. FOR SAFETY REASONS, FOLLOW THE INSTRUCTIONS IN THIS
MANUAL CAREFULLY AND CONTACT LOCAL INSTITUTIONS TO KNOW THE RESTRICTIONS AND LAWS IN
FORCE IN THE COUNTRY WHERE THE APPLIANCE IS
USED.
t READ ALL THE INSTRUCTIONS BEFORE INSTALLATION
AND USE OF THE APPLIANCE, A NON OBSERVANCE OF
THIS INSRUCTION MAY CAUSE SERIOUS DAMAGES TO
PEOPLE, OBJECTS AND ANIMALS. REMEMBER THAT
THE GREATEST PART OF THE FIRES COMES FROM THE
NON OBSERVANCE OF THE INSTRUCTION ON DISTANCES FROM COMBUSTIBLE MATERIALS.
t THIS MANUAL CONTAINS IMPORTANT INSTRUCTIONS
FOR INSTALLATION, USE AND MAINTENANCE OF THE
APPLIANCE. SAVE IT CAREFULLY AND IN AN ACCESSIBLE PLACE FOR ANY FUTURE CONSULTATION. IF IT IS
DAMAGED OR LOST, YOU CAN ASK FOR SOME COPIES
OF IT TO THE MANUFACTURER.
t INSTALLATION AND CONFORMITY OF THE INSTALLATION PLACE ARE UNDER USER’S LIABILITY.
t PALAZZETTI’s ovens are wood burning appliances, proper to cook food (except liquids or alcoholic food). the
above described use and the provided configurations of
the appliance are the only permitted by the manufacturer: do not use the appliance in disagreement with the instructions given in this manual. Danger: The described
use is valid only for very good working appliances, mechanically and plant engineering.
t The safety if this appliance has been tested by the Manufacturer and is guaranteed only if the installation and use
of it conform to the instructions given in this manual.
t Do not modify or tamper with any parts - aesthetic, functional or structural - of the appliance: that may compromise is correct operation and cause serious damages to
the appliance, to people, animals and objects, that are
not covered by warranty and not on Manufacturer’s responsibility.
t This appliance may be installed outside or inside the
house (except bedrooms). If installed inside please respect the safety distances from combustible materials,
air often the room and be sure to use an efficient chimney flue: consult the designed chapters for more information. Contact then your local institutions to verify that
the installation areas conform to the laws in force and are
proper for the installation of the appliance.
t Please use always the safety individual protecions (as
gloves, accident prevention shoes, etc…) during packing transport and installation and be sure children or
animals do not stay near the operation area.
t Do not go on with the installation if you note clear anomalies ( break of the firebricks, etc...), and do not try to
repair them by yourself but contact the Manufacturer.
t Danger: Be sure that children do not play with packing
parts (as film and polystyrene). Choking danger!
cod. 004720498 - 11/2010
GHIOTTONE - EASY - SMILE
IT
3
UK
3
INSTALLAZIONE
INSTALLATION
3.1 POSIZIONAMENTO
3.1 POSITIONING
L’apparecchiatura può essere installata all’esterno oppure in locali interni.
The appliance may be installed outside or in inner areas.
If placed outside it is important that you do not
obstruct in any way the opening of the smoke connection.
In caso di posizionamenti all’esterno è importante
che non venga ostruita in nessun modo l’apertura
del raccordo fumi.
Il suolo davanti all’apertura dell’apparecchiatura
deve essere in materiale non combustibile e non
sensibile al calore; in caso contrario va prevista
una idonea protezione in materiale isolante e non combustibile (ad esempio una piastra in metallo dello spessore di 2-3 mm che sporga almeno 70 cm anteriormente
all’apparecchiatura) (fig. 2.1).
The surface in front of the opening of the appliance must be made of non combustible and non sensitive to heat material; in other case you should
provide a proper protection made of insulating and non
combustible material (for example a metal plate 2-3 mm
thick that sticks out at least to cm in front of the appliance) (pict. 2.1).
Always respect the safety distances from combustible material: follow the instruction given in the
picture 2.2.
Rispettare sempre le distanze di sicurezza da materiali combustibili: attenersi a quanto indicato
nella figura 2.2.
Fig. 2.1
Fig. 2.2
0
n. 7
mi
n.
mi
70
cm
cm
n.
mi
70
cm
In caso di installazioni interne è necessario prevedere una canna fumaria: essa deve essere in regola
con le normative vigenti nel Paese di utilizzo (per
maggiori dettagli consultare il cap. 2.2).
To install inside the house it is necessary to provide a chimney flue: It must be in conformity with
the laws in force in the country where it is used (for
more details see the chapter 2.2).
Se l’apparecchiatura è incassata all’interno di una
struttura muraria, essa deve:
t essere in grado di sopportare alte temperature;
t essere NON combustibile;
t essere adatta a contenere le dimensioni ed il peso
dell’apparecchiatura con la coibentazione esterna;
t essere in grado di smaltire i fumi della combustione
attraverso una canna fumaria (per maggiori dettagli
consultare il capitolo dedicato). .
Tutta la struttura muraria, soprattutto se esposta ad
agenti atmosferici, deve essere sigillata nelle giunzioni
per scongiurare danni dovuti ad infiltrazioni d’acqua e
dilatazioni termiche
If the appliance is built into a wall structure, it
must:
t be able to support high temperatures;
t be NONcombustible;
t be suited to contain the dimenions and weight of the
appliance with the outside insulation;
t be able to exhaust the fumes of the combustion through a chimney flue (for more details consult the referring chapter).
The wall structure, especially if exposed to atmospheric
agents, must be sealed in the connection points to avoid
damages caused by seepage of water and thermal expansion.
GHIOTTONE - EASY - SMILE
cod. 004720498 - 11/2010
9/36
IT
UK
3.2 CANNA FUMARIA
3.2 CHIMNEY FLUE
t In caso di installazioni interne è necessario prevedere
una canna fumaria: essa deve essere in regola con le
normative vigenti nel Paese di utilizzo.
AFFINCHÈ L’APPARECCHIATURA FUNZIONI IN MODO
OTTIMALE E SICURO, LA CANNA FUMARIA AL QUALE
ESSO È COLLEGATO DEVE ESSERE:
1) a norma (per le normative vedi punto successivo)
2) in perfetto ed efficiente stato di manutenzione
3) perfettamente pulita e libera da qualsiasi ostruzione
o strozzatura (in condizioni di normale funzionamento la pulizia deve essere effettuata almeno una volta
all’anno per scongiurare il pericolo di incendio degli
incombusti depositati sulle sue pareti interne).
4) dedicata ad una sola apparecchiatura
t Per evitare ritorni di fumi, eventuali ostacoli come alberi, fabbricati, ecc..dovranno essere ad almeno 8 metri
dall’uscita della canna fumaria (Fig. 2.3).
t To install inside the house it is necessary to provide a
chimney flue: It must be in conformity with the laws in
force in the country where it is used.
IN ORDER TO LET THE APPLIANCE WORK WELL AND
SAFELY, THE CHIMNEY FLUE TO WHICH IT IS CONNECTED MUST BE:
1) in conformity with the law ( see next point for the laws)
2) in a perfectly working and efficient maintenance state
3) perfectly clean and free from any obstruction or narrowing (in regular functioning conditions clenaing
must be made at least once a year to avoid danger of
fire of the not burned materials settled on its inner sides).
4) designed for only one appliance
t To avoid smoke back up, you should keep any obstacles
as trees, buildings, etc..at least 8 metres of distance from
the exit of the chimney flue (Pict. 2.3).
< 1,5 A
A
8m
Fig 2.4
Fig 2.3
t Le dimensioni della canna fumaria dovranno essere conformi a quanto riportato nella scheda tecnica. È consigliabile l’uso di canne fumarie coibentate in refrattario o
in acciaio inox di sezione circolare, con pareti interne a
superficie liscia (Fig. 2.4). La sezione della canna fumaria
dovrà mantenersi costante per tutta la sua altezza. Si consiglia un’altezza minima di 3 - 3,5m (vedi Fig.2.5) in funzione del diametro (vedi caratteristiche tecniche). È opportuno prevedere, sotto l’imbocco del canale da fumo,
una camera di raccolta per materiali solidi ed eventuali
condense. Le caratteristiche della canna fumaria devono essere conformi a quanto prescritto dalle norme UNI
9615, 9731 e UNI 10683.
Canne fumarie FATISCENTI, costruite con materiale non
idoneo (fibrocemento, acciaio zincato, ecc... con superficie interna ruvida e porosa) sono fuorilegge e pregiudicano il buon funzionamento del forno.
t The dimensions of FLUE PIPE must be as set forth in the
table of technical data. It is advisable to use flues insulated with a refractory material or in stainless steel with
a circular cross section and smooth internal walls (Fig.
2.4). Flue cross-section should be kept constant for all
its height. A minimum height of 3 - 3,5m is recommended (see Fig. 2.5) depending on diameter (see technical
characteristics). Under the outlet of the smoke pipe there
should be a chamber for gathering solid materials and
any condensation. The characteristics of the flue pipe
must be compliant with the provisions of standards EN
10683 - EN 1856-1-2 - EN 1857 - EN 1443 - EN 13384-1-3 EN 12391-1.
DETERIORATING flues made with unsuitable materials
such as asbestos cement, galvanised steel, etc., with a
rough or porous internal surface are illegal and can jeopardise the correct operation of the oven.
A= 3 - 3,5m
A
5°
<4
Fig 2.5
t Un perfetto tiraggio, (consigliati 12 pa), è dato soprattutto da una canna fumaria libera da ostacoli quali strozzature, percorsi orizzontali, spigoli; eventuali spostamenti
di asse dovranno avere un percorso inclinato con angolazione max di 45° rispetto alla verticale, meglio ancora se
10/36
Fig 2.6
t A perfect draught (12 pa suggested) is above all the result of a flue that is clear of obstructions such as chokes,
cod. 004720498 - 11/2010
GHIOTTONE - EASY - SMILE
IT
UK
di soli 30° (fig. 2.6).
t Detti spostamenti vanno effettuati preferibilmente in
prossimità del comignolo.
t II raccordo fumi tra forno e canna fumaria dovrà avere la
stessa sezione dell’ uscita fumi del forno.
horizontal sections or corners; any axial displacements
should be at a maximum angle of 45° compared to the
vertical axis, (better still if it is only 30°). These displacements should preferably be effected near the chimney
top.
t The SMOKE connection between the forno and flue
should have the same cross section as the oven’s smoke
outlet.
Forno
GHIOTTONE
EASY
SMILE
Sezione
canna
fumaria
Sezione
canna
fumaria
Ø20
e oltre
Oven
Cross
section
Ø25
e oltre
GHIOTTONE
EASY
SMILE
3.3 COMIGNOLI
t II comignolo deve essere del tipo ANTIVENTO con sezione interna equivalente a quella della canna fumaria e sezione di passaggio dei fumi in uscita almeno DOPPIA di
quella interna della canna fumaria (Fig. 2.7).
t Per evitare inconvenienti nel tiraggio, ogni apparecchiatura dovrà avere una propria canna fumaria indipendente. Nel caso di presenza di più canne fumarie sul tetto è
opportuno che le altre si trovino ad almeno 2 metri di distanza e che il comignolo dell’apparecchiatura SOVRASTI
gli altri di almeno 40 cm (Fig. 2.7).
t Se i comignoli risultano accostati prevedere dei setti divisori.
t In figura2.8 e2.9 vengono visualizzati i dati della tabella
delle prescrizioni relative alle distanze e al posizionamento dei comignoli.
Ø20
and more
Ø25
and more
3.3 CHIMNEY TOP
t The CHIMNEY TOP shall be the WINDPROOF type with
an inside cross section equivalent to that of the flue and
with a smoke outlet passage section at least DOUBLE the
internal one of the flue (Fig.2.7).
t To avoid draught problems, each oven should have its
own independent flue. If there is more than one flue on
the roof the others should be situated at a distance of at
least 2 metres and the oven’s chimney top should be at
least 40 cm ABOVE the others (Fig.2.7).
t If the chimney tops are near each other install some dividing panels.
t the data in the table of the UNI 10683/98 rules regarding
distances and positioning of chimney tops are given in
Figs.2.8 and 2.9.
>Am
Fig 2.8
Roof slant
Fig 2.7
Altezza minima del camino
(misurata allo sbocco)
0,50 m
Legenda: Tetto inclinato
B= oltre il colmo
Legend: Flat roof
B= technical volume
Distanza tra il camino e il colmo
≤ Am
Hm
0,50 m
≤ 5m
B
0,50 m
> 1,0 m
> 5m
B
0,4 m
2,0 m
Legenda: Tetto piano
B= volume tecnico
Inclinazione
del tetto
Cross
section
Legend: Sloped roof
B= beyond ridge
Distance between
the ridge cap and chimney
Minimum chimney height
a
A[cm]
H[cm]
a
A[cm]
H[cm]
15°
minore di 1,85m
0,50m oltre il colmo
15°
less than di 1,85m
0,50m beyond the ridge cap
maggiore di 1,85m
1m dal tetto
greater than di 1,85m
1m from the roof
minore di 1,50m
0,50m oltre il colmo
less than di 1,50m
0,50m beyond the ridge cap
maggiore di 1,50m
1,30m dal tetto
greater than di 1,50m
1,30m from the roof
minore di 1,30m
0,50m oltre il colmo
maggiore di 1,30m
2 m dal tetto
30°
45°
60°
minore di 1,20m
0,50m oltre il colmo
maggiore di 1,20m
2,60m dal tetto
GHIOTTONE - EASY - SMILE
30°
45°
60°
cod. 004720498 - 11/2010
Fig 2.9
less than di 1,30m
0,50m beyond the ridge cap
greater than di 1,30m
2 m from the roof
less than di 1,20m
0,50m beyond the ridge cap
greater than di 1,20m
2,60m from the roof
11/36
IT
UK
9a 9b
Optional
9
7
6a
6
4
1
2
GHIOTTONE SMALL
8
3
5
21
9
2a
8
2c
2a
5
15a
2a
5
1
15
2a
5
6a
2b
12/36
7a
2b
corda in
7c
2b
10b
10a
10
2b
6c
11
10c
7b
10c
12
10
10a
12b
11a
10b
cod. 004720498 - 11/2010
12c
Optional
Optional
GHIOTTONE LARGE
6b
GHIOTTONE - EASY - SMILE
IT
UK
9
12
8
3
4
1
2a
2b
2b
2b
corda in
7
10b
10a
10
10a
10
10b
11
13
13
5
Optional
6b
Optional
EASY LARGE
6a
7
8
8
7
6a
6a
6b
6b
5
5
3
3
4
SMILE 56
2
1
GHIOTTONE - EASY - SMILE
SMILE 56 prof. 64
9
4
cod. 004720498 - 11/2010
9
2
1
13/36
IT
UK
SMILE 60
17b
17a
11
10
17b
7
12
8
17a
13
6
12
10
11
3
9
6
7
2
5
12
18
6
15
4
8
12
6
2
Optional
4
1
3
3
18
SMILE 90
2
1
SMILE 80
4
14/36
cod. 004720498 - 11/2010
GHIOTTONE - EASY - SMILE
IT
UK
8
Optional
7
6
4
3
9
5
SMILE 100
2
1
6
7
Optional
4
3a
5
2a
SMILE 120
3b
GHIOTTONE - EASY - SMILE
2b
1
cod. 004720498 - 11/2010
8
15/36
IT
3.4 INSTALLAZIONE FORNI
UK
3.4 OVENS INSTALLATION
If the oven is built into a wall structure, especially if
exposed to atmospheric agents, must be sealed in
the connection points to avoid damages caused by
seepage of water and thermal expansion.
Se il forno è incassato in una struttura muraria, soprattutto se esposta ad agenti atmosferici, essa deve
essere sigillata nelle giunzioni per scongiurare danni dovuti ad infiltrazioni d’acqua e dilatazioni termiche.
Attendere almeno 4 giorni prima di utilizzare il forno per permettere la perfetta asciugatura delle stuccature.
PREPARAZIONE BASE DI APPOGGIO (GHIOTTONE/EASY)
1) Preparare un piano per l’ appoggio del forno: Il piano
dovrà:avere la struttura portante in cemento, mattoni o
altro materiale resistente e non combustibile;
- resistere alle alte temperature;
- resistere alle rigide temperature invernali;
- avere dimensioni e portata adeguata (consultare la
scheda tecnica specifica del proprio forno);
- essere stabile e perfettamente a livello.
Nella figura 2.10 viene dato un esempio indicativo di
come potrebbe essere costruito un piano adatto a sostenere il peso dell’apparecchiatura.
2) Preparare il piano di appoggio in cemento o altro materiale di dimensioni adeguate (vedi scheda tecnica specifica) assicurandosi che sia stabile e a livello.
Nell’area in cui sarà appoggiato il forno si consiglia vivamente di distendere uno strato di materiale isolante
(materassino in fibra ceramica, lana di roccia, spessore di
2-3 cm) per ottenere un’ottima coibentazione.
please wait at least 4 days before using the oven to
let the plaster dry perfectly.
SUPPORT BASE SETTING (GHIOTTONE/EASY)
1) Set a base to support the oven:The plate must:
- have the supporting structure made of concrete, bricks
or other kind of material resistant and noncombustible;
- resist to high temperatures;
- resist to winter harsh temperatures;
- have proper dimensions and capacity (see the technical schedule specific for your oven);
- be steady and perfectly flat:
In picture 2.10 you can see an indicative example of the
building of a proper plane to support the weight of the
appliance.
2) Prepare the support base made of concrete or other material of proper dimensions (see the specific technical
schedule) and be sure it is steady and flat.
In the area where the oven will be installed it is good
if you lay a coat of insulating material (fiber ceramic air
bed, rock wool, 2-3 cm thick) to get a perfect insulation.
Concrete pad
Piano appoggio
in materiale
cementizio
Stand block,
brick or metal
Basamento in materiale
cementizio o metallo
Fig 2.10
16/36
cod. 004720498 - 11/2010
GHIOTTONE - EASY - SMILE
IT
UK
MONTAGGIO FORNO
3) Montare il forno seguendo le istruzioni specifiche per
l’apparecchiatura in proprio possesso:
OVEN INSTALLATION
3) Install the oven following the instructions specific for
you’re appliance:
GHIOTTONE
GHIOTTONE
A) Inserire all’interno della fessura predisposta sullo schienale la cordina in fibra ceramica tenendola in posizione con
dei punti di silicone resistente alle alte temperature - oltre
1000°- (fig. 2.11 part.1). Appoggiare lo schienale (1) sopra i
materassini isolanti (fig. 2.11 part.2), posizionare le basette
(5-6a-6b) contro lo schienale senza fissarle in alcun modo
(fig. 2.11 part.3).
A) Insert the ceramic fiber rope in the preset slit on the back
placing it with some silicone joints resistant to high temperatures - over 1000° - (pict. 2.11 part.1). Put the back (1)
on the insulating air beds (pict. 2.11 part. 2), put the basis
(5-6a-6b) against the back but do not fix them (pict. 2.11part.3).
Fig 2.11
1
5
6a
GHIOTTONE
Medium
2
6b
GHIOTTONE
Large
1
3
1000°C
GHIOTTONE
Extra
Large
B) Infilare le squadrette (2c) all’interno delle apposite feritoie
dei moduli (fig. 2.12 part.1); inserire ad incastro tutti i moduli (2a-2b) (fig. 2.12 part.3) interponendo tra di essi la cordina in fibra ceramica tenuta in posizione con dei punti di
silicone resistente alle alte temperature - oltre 1000°- (fig.
2.12 part.2). Attenzione! Verificare che la larghezza dei moduli nella parte posteriore sia identica a quella rilevata nella parte frontale (fig. 2.12 part.4).
B) Insert the plates (2c) inside the proper slits of the modules (pict. 2.12 part.1); fit all the modules (2a-2b) (pict. 2.12
part.3) presenting among them the ceramic fiber rope fixed
ith some silicone joints resistant to high temperatures - over
1000° - (pict. 2.12 part.2). Attention! Verify that the width
of the modules in the back is the same as that in the front
(pict. 2.12-part.4).
(fig. 2.12 part.4).
Fig 2.12
4
2a
1
=
2c
2b
=
L
3
2
GHIOTTONE - EASY - SMILE
1000°C
cod. 004720498 - 11/2010
17/36
IT
UK
C) Unire gli elementi (15a-15b) senza serrare del tutto le viti
(fig. 2.13 part.1), posizionarli come nel dettaglio (fig. 2.13
part.2) e, se necessario, effettuare una regolazione verticale
tramite le asole (fig. 2.13 part.3) poi serrare del tutto le viti.
Sistemare i due elementi
frontali (7a-7b) interponendo tra essi e gli elementi laterali la cordina in fibra ceramica tenuta in posizione con
dei punti di silicone resistente alle alte temperature - oltre
1000°- (fig. 2.13 part.4). Siliconare tra i coperchi (8 -9) (fig.
2.13 part.5) e posizionarli come indicato in figura (fig. 2.13
part.6).
C) Connect the elements (15a-15b) and do not tighten the
screws (pict. 2.13 part.1), put them as in the detail (pict.
2.13 part.2) and, if necessary, make a vertical adjustment
with the slots (pict. 2.13 part.3) then tighten the screws.
Place the two front elements (7a - 7b) presenting between
them and the sides element the ceramic fiber rope fixed
with some silicone joints resistant to high temperatures over 1000° - (pict. 2.13-part.4).
Put some silicone between the caps (8-9) (pict. 2.13 part.5) and
place them as shown in picture (pict. 2.13 part.6).
2
1000°C
5
15a
9
8
8
GHIOTTONE
Medium
3
1
9
15b
6
8
7b
9
9
8
L
7a
4
GHIOTTONE
Large
GHIOTTONE
Extra
Large
6
1000°C
Fig 2.13
D) Terminato l’assemblaggio unire tutti gli elementi con i tiranti (10-10a-10b-10c) stringendo moderatamente (fig.
2.14 part.1) e tagliare la parte eccedente di barra filettata
con un seghetto per ferro. Siliconare con silicone resistente
alle alte temperature - oltre 1000°- le giunture ESTERNE degli elementi (fig. 2.14 part.2). Posizionare la basetta frontale (6c) a secco (fig. 2.14 part.3).
D) After the assemblage connect all the elements with the tierods (10-10a-10b-10c) tightening moderately (pict. 2.14
part.1) and cut the exceeding part of the threaded bar with
a hacksaw to cut iron. Put some silicone resistant to high
temperatures - over 1000° - in the OUTSIDE joints of the elements (pict. 2.14 part.2). Place the dry front basis (6c) (pict.
2.14-part.3)
Fig 2.14
1000°C
2
10
10a
10b
3
6c
1
10c
18/36
cod. 004720498 - 11/2010
GHIOTTONE - EASY - SMILE
IT
UK
E) Posizionare l’arco frontale (7c) dopo averlo siliconato nella
parte posteriore con silicone resistente alle alte temperature (fig. 2.15 part. 1-2).
OPTIONAL: sistemare una cordina in fibra ceramica sotto il
raccordo fumi (12) tenendola in posizione con del silicone
resistente alle alte temperature - oltre 1000°- (fig. 2.15 part.
3); posizionare il raccordo fumi (12) semplicemente appoggiandolo (fig. 2.15 part. 4).
E) Place the front arch (7c) after having put the silicone in
the back with some silicone resistant to high temperatures
(pict. 2.15 part. 1-2).
OPTIONAL: Put a ceramic fiber rope under the smoke connection (12) fixing it with some silicone resistant to high
temperatures - over 1000° - (pict. 2.15 part. 3); place the
smoke connection (12) just putting it on the base (pict. 2.15
part. 4).
Fig 2.15
12
3
1000°C
4
7c
Optional
2
1
1000°C
F) Completare l’installazione posizionando la portina (11)
(fig. 2.16 part. 1).
OPTIONAL: inserire la maniglia del registro fumi (12b-12c)
dopo aver creato il rivestimento (fig. 2.16 part. 2).
F) Complete the installation placing the little door (11) (pict.
2.16 part. 1).
OPTIONAL: insert the handle of smoke register (12b-12c)
after having made the covering (pict. 2.16 part. 2)
2
1
Fig 2.16
GHIOTTONE - EASY - SMILE
cod. 004720498 - 11/2010
19/36
IT
UK
G)
EASY
A) Inserire all’interno della fessura predisposta sullo schienale
(1) la cordina in fibra ceramica tenendola in posizione con
dei punti di silicone resistente alle alte temperature - oltre
1000°- (fig. 2.17 part.1). Appoggiare lo schienale (1) sopra
il piano coibentato (fig. 2.17 part.2). Inserite i tiranti (10) e
bloccarli nella sola parte posteriore con le viti e le rondelle
(10a-10b) (fig. 2.17 part. 3-4). Stendere il materassino di fibra ceramica (13) in dotazione sul piano di appoggio come
indicato (fig. 2.17 part. 5).
Posizionare le basette (5-6a-6b) contro lo schienale senza
fissarle in alcun modo (fig. 2.17 part.6).
EASY
A) Insert the ceramic fiber rope in the preset slit on the back (1)
placing it with some silicone joints resistant to high temperatures - over 1000° - (pict. 2.17 part.1). Put the back (1)
on the insulated plane (pict. 2.17 part.2). Insert the tie-rods
(10) and fix them only in the back with the screws and the
washers (10a-10b) (pict. 2.17 part. 3-4). Lay the supplied fiber ceramic air bed (13) on the support base as shown (pict.
2.17 part. 5).
Put the basis (5-6a-6b) against the back but do not fix them
(pict. 2.17-part.6)..
1
10a
10b
EASY
medium
5
6a
4
EASY
large
1
6
3
2
5
6b
10
1000°C
13
B) Inserire ad incastro tutti i moduli (2a-2b) (fig. 2.18 part.2)
interponendo tra di essi la cordina in fibra ceramica tenuta in posizione con dei punti di silicone resistente alle alte
temperature - oltre 1000°- (fig. 2.18 part.1). Attenzione! Verificare che la larghezza dei moduli nella parte posteriore
sia identica a quella rilevata nella parte frontale (fig. 2.18
part.3).
Fig 2.17
B) Fit all the modules (2a-2b) (pict. 2.18 part.2) presenting
among them the ceramic fiber rope fixed with some silicone joints resistant to high temperatures - over 1000° - (pict.
2.18 part.1). Attention! Verify that the width of the modules in the back is the same as that in the front (pict. 2.18part.3).
Fig 2.18
2a
1000°C
2
EASY
Extra
large
=
2b
3
1
=
C) Montare per ultimi gli elementi superiori interni (3-4) ed
esterni (8-9) (fig. 2.19).D)
20/36
C) As last parts install the inner (3-4) and outside (8-9) superior elements (pict. 2.19).
cod. 004720498 - 11/2010
GHIOTTONE - EASY - SMILE
IT
UK
Fig 2.19
9
EASY
Medium
EASY
Medium
3
8
4
EASY
Large
EASY
Large
1
2
EASY
Extra
Large
EASY
Extra
Large
D) Inserire il frontale (7) (fig. 2.20 part. 1); alla fine bloccate gli
elementi con le viti e le rondelle (10a-10b) stringendo moderatamente (fig. 2.20 part. 2).
D) Insert the front part (7) (pict. 2.20 part. 1); at the end fix the
elements with the screws and the washers (10a-10b) tightening moderately (pict. 2.20 part. 2).
Fig 2.20
7
10
2
1
10a
10b
E) Sigillare tutte le giunzioni a vista (per installazione all’interno)
con del silicone resistente alle alte temperature - oltre 1000°dato in dotazione (fig. 2.21 part.1) e inserire il raccordo fumi
(12b) all’interno dello spazio predisposto (fig. 2.21 part.2).
Completare l’installazione posizionando la portina (11) (fig.
2.21 part. 3).
Nel caso di installazioni all’esterno prima di verniciare il forno
con il rullato al quarzo, stendere nelle giunzioni con un pennello la protezione elastica (covergum).
OPTIONAL: stendere del silicone resistente alle alte temperature in prossimità del foro di uscita fumi, successivamente appoggiarvi sopra il raccordo fumi (12) (fig. 2.21 part.4-5). Inserire l’asta (12a) al raccordo fumi (12) e la maniglia del registro
fumi (12c) dopo aver creato il rivestimento (fig. 2.21 part. 6).
E) Seal all the joints (to install it outside) with some supplied
silicone resistant to high temperatures - over 1000° - (pict.
2.21 part.1) and insert the smoke connection (12b) inside
the preset space (pict. 2.21 part.2). Complete the installation placing the little door (11) (pict. 2.21 part. 3).
If installed outside, before painting the oven with the quartz
roller, spread the covergum in the joints with a brush.
OPTIONAL: spread some silicone resistant to high temperatures near the hole of the smoke exhaust, then put on it
the smoke connection (12) (pict. 2.21 part. 4-5) Insert the
bar (12a) in the smoke connection (12) and the handle of
smoke register (12c) after having made the covering (pict.
2.21 part. 6).
1000°C
12b
12
4
2
5
12a
12c
3
6
Fig 2.21
1000°C
GHIOTTONE - EASY - SMILE
11
Optional
1
cod. 004720498 - 11/2010
21/36
IT
UK
SMILE
SMILE 56-56 prof. 64 SMILE 80-100-120
Montare il forno seguendo l’ordine numerico indicato nelle figure: gli elementi della cupola vanno accostati e sigillati
utilizzando del silicone resistente alle alte temperature - oltre
1000°C (non fornito).
NB - Non fissare: per lo SMILE 56 la basetta (2), per lo SMILE 80
la base (1), per lo SMILE 100 le basette (1-2-3), per lo SMILE 120
le basette (1-2a-2b-3a-3b).
Sui modelli 56 e 56 prof. 64, applicare il raccordo fumi (7-8) sopra la bocca del forno.
OPTIONAL: Per i forni SMILE 80-100-120 richiedere i raccordi
metallici opzionali.
SMILE
SMILE 56-56 prof. 64 SMILE 80-100-120
Assemble the oven following the numbers order shown in the
pictures: put the elements of the dome together and seal them
with some silicone joints resistant to high temperatures - over
1000°C (not supplied).
N.B. - Do not fix: the basis (2) for SMILE 56, the basis for SMILE
80 (1), the basis for SMILE 100 (1-2-3), the basis for SMILE 120
(1-2a-2b-3a-3b).
On the models 56 and 56 prof. 64, apply the smoke connection
(7-8) on the oven’s opening.
OPTIONAL: For SMILE 80-100-120 ovens ask for optional metallic connections.
Fig 2.22
SMILE 56
SMILE 56 prof. 64
SMILE 120
1000°C
7
8
6
7
6b
4
6a
5
9
5
3
1000°C
3a
2a
4
3b
2
1
2b
1
9
1000°C
8
1000°C
7
6
2
3
55
4
3
1
9
4
2
1
SMILE 100
22/36
SMILE 80
cod. 004720498 - 11/2010
GHIOTTONE - EASY - SMILE
IT
UK
SMILE 60-90
Siliconare i bordi degli elementi laterali (6 e 4); attenzione! non
siliconare la scanalatura dei fondi (1 e 2).
Assemblare le teste (3 e 8) e i piani giro fumi (5 e 7).
Fissare il tutto con i tiranti laterali (dal 12 al 15), si raccomanda
di stringere moderatamente i tiranti.
Siliconare la sede dove appoggiano i piani (9 e 10) e la cappa
(11).
ATTENZIONE! Nella versione forno da 60 i pezzi 1,4,5,9 sono
assenti.
SMILE 60-90
Put some silicone on the edges of the side elements (6 and4);
attention! do not put the silicone on the groove of the bottoms
(1 and 2).
Assemble the heads (3 and 8) and the smoke turn planes (5
and 7).
Fix all the parts with side tie-rods (from 12 to 15), we suggest
to tighten the tie-rods moderately.
Put some silicone on the base of the planes (9 and 10) and the
hood (11).
ATTENTION! In the 60 oven version there are not the pieces 1,4,
5, 9.
Fig 2.23
SMILE 60 -90
17a
17b
solo per modd. 90
1 4 5 9 only for models 90
10
11
9
7
5
12
6
15
4
12
13
14
8
6
3
2
4
1
GHIOTTONE - EASY - SMILE
18
cod. 004720498 - 11/2010
23/36
IT
UK
COIBENTAZIONE ESTERNA (Ghiottone/easy/SMILE)
OUTSIDE INSULATION (Ghiottone/easy/SMILE)
6) Coibentare esternamente il forno utilizzando un materassino isolante, lana di roccia, fibra ceramica (13) con
spessore minimo di 2/3 cm; prevedere un rivestimento
esterno di almeno 10 cm da tutti i lati del forno da riempire con materiale isolante (es. vermiculite/argilla espansa) (fig. 2.24).
6) Insulate the oven in its external part using an insulating
air bed, rock wool, at least 2/3 cm thick fiber ceramic
(13); provide an external covering of at least 10 cm on all
the sides of the oven to be filled ith insulating material
(as vermiculite and expanded clay) (pict. 2.24).
Fig 2.24
min 10 cm
min 10 cm
min 10 cm
13
1
2
min 10 cm
Esempio indicativo di installazione
Indicative example of installation
24/36
cod. 004720498 - 11/2010
GHIOTTONE - EASY - SMILE
IT
4
UK
4
USO DELL’APPARECCHIATURA
4.1 SAFETY REGULATIONS
4.1 PRESCRIZIONI DI SICUREZZA
t Utilizzare questa apparecchiatura con la massima attenzione, seguendo scrupolosamente le indicazioni
contenute nel presente libretto.
t Non lasciare l’apparecchiatura accesa o appena spenta
senza sorveglianza.
t Questa apparecchiatura è stata concepita unicamente
per la cottura a legna di prodotti alimentari (es. pizze,
focacce, ecc...). Secondo le modalità indicate in questo
manuale.
Non è consentito il riscaldamento o la cottura di alimenti liquidi o contenenti alcolici.
Il Costruttore non si ritiene responsabile per l’utilizzo
improprio dell’apparecchiatura che risulta potenzialmente pericoloso per persone, animali e cose e fa decadere la garanzia.
t Non utilizzare per l’accensione o per ravvivare la fiamma liquidi chimici, alcool, olio per lanterne, gasolio, kerosene o similari. Tenere lontano dall’apparecchiatura
accesa questi liquidi infiammabili.
t Durante il riscaldamento della camera del forno lo
sportello deve essere tenuto chiuso.
t Durante l’uso e anche dopo diversi minuti dallo spegnimento del fuoco (calore residuo) alcune parti - interne
ed esterne - dell’apparecchiatura sono molto calde.
Evitare di entrare in contatto con queste superfici e
munirsi di protezioni personali per evitare pericoli di
scottature. In particolare prestare grandissima attenzione durante la pulizia del piano forno dalla cenere e
nell’introduzione dei cibi da cuocere.
t Non lasciare avvicinare all’apparecchiatura accesa
bambini, animali e non posizionare nelle sue vicinanze
oggetti infiammabili o sensibili al calore: il contatto e la
vicinanza con il fuoco possono causare incendi e danni
gravissimi a cose, persone o animali.
t Dopo ogni uso effettuare una manutenzione accurata
dell’apparecchiatura secondo quanto descritto nel capitolo dedicato. Prestare particolare attenzione allo stoccaggio della cenere e delle braci che vanno rimosse solo
dopo essere completamente spente e conservate in
contenitori ignifughi con coperchio ermetico lontano da
materiali combustibili.
t Questa apparecchiatura è stata progettata e costruita per
essere alimentata unicamente con legna.
t L’utilizzo di qualsiasi altro combustibile fa decadere la Garanzia.
t Non usare l’apparecchiatura come supporto di ancoraggio.
t Non riparare o sostituire parti dell’apparecchiatura da se
ma mettersi in contatto con il Costruttore.
GHIOTTONE - EASY - SMILE
USE OF THE APPLIANCE
t Use this appliance very carefully, following the instructions given in this manual.
t Do not leave the appliance on or just turned off with no
supervision.
t This appliance was designed only to cook wood-burning food (as pizzas, focaccia, etc…). according to the
instructions given in this manual.
Do not warm up or cook liquids or alcoholic foods.
The Manufacturer accepts no liability for a wrong use
of the appliance that may be dangerous for people,
animals and objects and make the warranty decay.
t To put on or relight the flame do not use chemical liquids, alcohol, oil for lamp, diesel oil, kerosene or similar ones. Keep those inflammable liquids far away from
the appliance.
t during the warming of the ovenspace the door must
stay closed.
t while using it and also some minutes after putting out
the fire (remaining warmth) some parts - inner and outside - of the appliance are very hot. avoid to touch those parts and use individual protections to avoid burn
danger. Take care especially while cleaning the oven
from the ash and putting food inside to cook it.
t do not let children, animals near the appliance turned
on and do not place any inflammable or sensitive to
heat objects near it: the contact and closeness to fire
may cause fires and serious damages to things, people
or animals.
t After each use make a careful maintenance of the appliance according to the instructions given in the referring chapter. Take care especially to the storage of the
ash and the embers that must be removed only after they
have been totally put out and save them in some fireproof containers with an hermetic cap far from combustible
material.
t this appliance was designed and built to be used only
with wood.
t If you use any other kind of fuel the warranty will decay.
t Do not use the appliance as a support for anchorage.
t Do not repair or substitute parts of the appliance by
yourself but contact the Manufacturer.
cod. 004720498 - 11/2010
25/36
IT
4.2 TIPO DI COMBUSTIBILE
UK
4.2 FUEL
IL FORNO È STATO TESTATO PER FUNZIONARE
SOLAMENTE A LEGNA, NON UTILIZZARE NESSUN
ALTRO TIPO DI COMBUSTIBILE.
THE OVEN HAS BEEN TESTED TO WORK ONLY BY
WOOD, DO NOT USE ANY OTHER KIND OF FUEL.
Caratteristiche della legna da utilizzare:
Accertatevi che il legname che state utilizzando:
t abbia provenienza nota e vergine;
t sia preferibilmente ottenuto da legni duri (ad esempio
faggio.
t non contenga alcun residuo chimico (es. vernici, collanti,
diserbanti, ecc... ) e non sia infestato da marciumi o parassiti.
t sia stagionato e asciutto con una percentuale di umidità inferiore al 20% (il legname deve essere conservato in
un luogo asciutto e riparato dagli agenti atmosferici per
almeno 6-12 mesi). Un legname asciutto garantisce tempi di riscaldamento del forno più rapidi e produce meno
residui di combustione.
Wood to be used:
Be sure that the wood you are using:
t comes from a certain and virgin origin;
t comes from hard woods (such as beech.
t doesn’t contain any chemical waste (as paints, adhesives,
herbicides, etc...) and is not infested by rot or parasites.
t is seasoned and dry with a lower percentage of humidity
than 20% (the wood must be stored in a dry place and far
from atmospheric agents for at least 6-12 months). Dry
wood can guarantee faster warming times of the oven
and produces less combustion waste.
Per la combustione utilizzare unicamente legname
con le caratteristiche sopradescritte, in caso contrario potrebbero crearsi incendi con gravissimi danni
all’apparecchiatura e a persone e cose non coperti da garanzia e per i quali il Costruttore non si ritiene responsabile.
For the combustion use only wood with the features above described, or fires with serious damages
to the appliance and to people and objects not covered by
warranty and not under Manufacturer’s liability may occur.
In particolare non utilizzare per la combustione:
t pallets, carbonella, coke o similari;
t legname trattato chimicamente, impregnato di sostanze
infiammabili (es. gasolio, ecc..) o di acqua marina;
t compensati, bilaminati e simili;
t residui di falegnameria, cantieri, traversine ferroviarie;
t legname di conifere o comunque resinoso (conferisce un
sapore sgradevole ai cibi, la resina è molto infiammabile
e le elevate quantità di sostanze resinose intasano velocemente la canna fumaria);
t legname ottenuto da oleandri, mogano o teak.
Especially do not use for the combustion:
t pallets, charcoal, coke or similar;
t Chemically treated wood, soaked in inflammable substances (as diesel oil, etc...) or in sea water;
t plywood, bilaminates and similar;
t joinery or yard wastage, railroad ties;
t conifer or resinous wood (it gives a bad taste to your food,
the resin is very inflammable and the high quantities of
resinous substances may clog very quickly the chimney
flue);
t wood coming from rose-bay, mahogany or teak;
4.3 SETTING TO COOKING
4.3 PREPARAZIONE ALLA COTTURA
Dopo aver installato il forno, è bene attendere almeno 4 giorni per eseguire la prima accensione,
per dar modo alla struttura di asciugarsi a sufficienza.
Le prime accensioni dovranno essere graduali ed effettuate a fuoco moderato (non più di 100°C - (scala
nera); esse dovranno servire unicamente ad asciugare l’umidità accumulata dai refrattari (fino a 20
litri di acqua in eccesso per un forno medio): riscaldando il forno troppo rapidamente, la forte evaporazione dell’acqua e il forte sbalzo termico rischiano di
provocare ai refrattari fratture irreparabili.
Procedere nello stesso modo anche dopo lunghi periodi di inattività, soprattutto se il forno è stato esposto a pioggia o umidità.
Il manifestarsi di piccole fessurazioni, particolarmente in seguito ad un uso intenso del forno, fa
parte del normale comportamento dei cementi
refrattari e non ha la minima conseguenza sulla
perfetta funzionalità del prodotto.
26/36
cod. 004720498 - 11/2010
After the installation of the oven, it is good to wait
at least 4 days to make the first lighting, to let the
structure dry well.
The first lighting should be gradual and done at low
flame (not over 100°C) - (black escale); they have to
be used only to dry the humidity stored by the firebricks (up to 20 litres of water over for a medium size
oven): warming the oven too fast, the strong evaporation of the water and the strong sudden change of temperature may cause irreparable breaks to
the firebricks.
Do the same also after long periods of inactivity,
especially if the oven has been exposed to rain or
humidity.
It is normal if little crackings appear, especially after an intense use of the oven and it has no consequences on the perfect operation of the product.
GHIOTTONE - EASY - SMILE
IT
UK
Eventuali odori sgradevoli sono causati dall’evaporazione o dall’essiccamento di alcuni materiali utilizzai
Tale fenomeno tenderà a protrarsi per qualche uso
fino a svanire.
Any bad smells may be caused by the evaporation
or drying of some material you used. That may occur
again when you use it until it will disappear.
To light the oven proceed as follows:
Per le accensioni procedete come indicato di seguito:
1) Scegliete dove fare fuoco all’interno del forno: la posizione corretta è lontano dall’apertura del forno in posizione centrale: sistemate della carta appallottolata, in
alternativa a questa è possibile utilizzare degli accendifuoco normalmente reperibili in commercio: utilizzare
solamente quelli scuri di tipo “ecologico” (a base di legno
e paraffina) evitando le zollette accendi-fuoco bianche
derivate dal petrolio o di origine chimica: possono arrecare gravi danni alle pareti del focolare.
Coprire la carta o l’accendifuoco con una piccola quantità di ramoscelli o qualche pezzo di legno sottile e ben
stagionato in modo che sviluppi il più possibile la fiamma.
1) Choose where light the fire inside the oven: the right position is far from the entrance of the oven in the centre:
roll some paper into a ball and place it inside, or you can
use some firelighter that you can find easily on the market: please use only the “ecologic” dark ones (made of
wood and paraffin) avoiding the white firelighter cubes
made of kerosene or of chemical origin: they may cause
serious damages to the sides of the fireplace.
Cover the paper or fire lighter with a small quantity of
twigs or some fine and well seasoned pieces of wood so
that it can light the flame as more as possible.
2) With proper individual protections, burn the paper, close the door and open the smoke register so that there is
a good inner ventilation.
2) Muniti di adeguate protezioni personali, accendere la
carta, chiudere la porta e aprire il registro fumi in modo
da garantire una buona ventilazione interna.
To put on or relight the flame do not use chemical
liquids, alcohol, oil for lamp, diesel oil, kerosene or
similar ones.
Non utilizzare per l’accensione o per ravvivare la
fiamma liquidi chimici, alcool, olio per lanterne,
gasolio, kerosene o similari.
3) As the flames become more intense add 1-2 pieces of
wood each time you open the door carefully and closing
it immediately after the loading
3) Mano a mano che le fiamme prendono intensità aggiungere 1-2 pezzi di legna alla volta aprendo con cautela la
porta e richiudendola subito dopo il carico.
4) As the flames become lower and form a fine bed of embers, load the fire with a normal quantity of wood (2-3
medium size pieces) without overloading it.
4) Appena le fiamme si saranno smorzate e avranno formato un buon letto di braci, caricare il focolare con un
normale quantitativo di legna (2-3 pezzi medi) senza sovraccaricarlo.
5) After and hour more or less (time is approximate and it
depends on the kind of wood used and the model of the
oven you are using) the oven reaches the right temperature and so you can begin to cook your food.
To be sure that the oven is ready to be used:
1) the thermometer on the door has to show the temperature of about 300° C ( black escale - Celsius degrees).
2) the firebricks inside the appliance must become white.
5) Dopo circa un’ora (il tempo è indicativo e dipende dal
tipo di legna usato e dal modello di forno che si stà utilizzando) il forno raggiunge la temperatura di esercizio e
quindi si può iniziare la cottura dei cibi.
Per essere certi che il forno è pronto per l’uso:
1) il termometro posto sulla porta deve segnare la temperatura di circa 300° C (scala nera - gradi Celsius).
2) i refrattari all’interno dell’apparecchiatura devono assumere un colore biancastro.
6) After that do not add more wood, wait until the flames
become lower and only some burning embers are left.
6) A questo punto non aggiungere più legna, attendere
che le fiamme si smorzino e che rimangano soltanto delle braci ardenti.
DO NOT REMOVE UN-BURNT WOOD AND STILL
BLAMING FROM THE FIREPLACE: IT MAY BE VERY
DANGEROUS FOR YOU, FOR OTHER PEOPLE AND
FIRES MAY OCCUR!
NON RIMUOVETE LA LEGNA INCOMBUSTA E ANCORA FIAMMEGGIANTE DAL FOCOLARE: POTREBBE ESSERE PERICOLOSISSIMO PER VOI STESSI, PER
ALTRE PERSONE E CAUSARE INCENDI!
GHIOTTONE - EASY - SMILE
cod. 004720498 - 11/2010
27/36
IT
UK
4.4 COOKING
4.4 COTTURA
INDOSSATE ADEGUATE PROTEZIONI PERSONALI E
UTILIZZATELE SEMPRE MENTRE STATE OPERANDO CON IL FORNO ACCESO O APPENA SPENTO.
NON LASCIATE AVVICINARE BAMBINI O ANIMALI
AL FORNO ACCESO.
WEAR PROPER INDIVIDUAL PROTECTIONS AND
USE THEM alwaysS WHILE YOU ARE WORKING
WITH THE OVEN ON OR JUST PUT OUT. DO NOT LET
CHILDREN OR ANIMALS NEAR THE OVEN WHILE IT
IS ON.
PER LA COTTURA UTILIZZATE SOLO ATTREZZATURA SPECIFICA PER FORNI A LEGNA (PALETTE,
SCOPE CON SETOLE IN RAME, CONTENITORI
ALIMENTARI RESISTENTI ALLE ALTE TEMPERATURE, ECC.. 5 MANUTENZIONE
TO COOK USE ONLY SPECIFIC TOOLS FOR WOOD
OVENS (SMALL COAL-SHOVEL, BROOMS WITH
COPPER BRISTLES, FOOD CONTAINERS RESISTANT
TO HIGH TEMPERATURES, ETC…)
3
2
1
OK!
11a
Fig 3.1
TA DEL FORNO UTILIZZARE UN
LIZZARE LA MANIGLIA FREDDA
OK!
D E L L’A P E R T U R A / C H I U S U R A
RIMUOVERLA DALLA MANIGLIA E
TENERLA A PORTATA DI MANO
PER I SUCCESSIVI UTILIZZI.
TO OPEN OR CLOSE THE DOOR
OF THE OVEN USE AN OVEN
GLOVE OR THE OPTIONAL COLD
HANDLE (11A): AFTER
OPENING/CLOSING REMOVE IT
FROM THE HANDLE AND LEAVE
IT NEAR THE OVEN FOR FURTHER
US
NON LASCIARE MAI L’APPARECCHIATURA INCUSTODITA DURANTE LA COTTURA.
NEVER LEAVE THE APPLIANCE WITH NO SUPERVISION DURING THE COOKING.
ALCUNE PARTI DEL FORNO (ESTERNE ED INTERNE)
DURANTE LA COTTURA E ANCHE PARECCHIO TEMPO DOPO LO SPEGNIMENTO RAGGIUNGONO TEMPERATURE MOLTO ELEVATE.
SOME PARTS OF THE OVEN (OUTSIDE AND INSIDE)
DURING THE COOKING AND ALSO FOR A LONG PERIOD AFTER PUTTING OUT REACH VERY HIGH TEMPERATURES.
NON INTRODURRE ALL’INTERNO DELLA CAVITÀ
DEL FORNO LIQUIDI ALCOOLICI PER CUCINARE
(ES. PER COTTURE ALLA FLAMBÈ).
DO NOT PUT INSIDE THE SPACEOF THE OVEN ALCOHOLIC LIQUIDS TO COOK (AS TO COOK FLAMBE’).
t Verificare che il forno sia pronto per la cottura (consultare
il cap. 3.3 “ Preparazione del forno alla cottura”).
t Aprire la porta del forno con la massima cautela, utilizzando la maniglia fredda (11a) optional o muniti di adeguate
protezioni personali, con un attrezzo adatto per forni (es.
una paletta o una scopa con setole in rame e manico lungo) pulite il piano cottura spostando in un angolo verso il
fondo del forno i residui delle braci ardenti e la cenere.
t Le modalità di cottura sono diverse a seconda della pie-
t Verify that the oven is ready to cook (consult the chapter
3.3 “oven setting to cooking”).
t Open the oven door very carefully, using the optional
cold handle (11a) or with proper individual protections,
with a proper tool to ovens (as a small coal-shovel or a
broom with copper bristles and long handle) clean the
cooking surface moving at an angle towards the end of
the oven the remaining burning embers and the ash.
28/36
cod. 004720498 - 11/2010
GHIOTTONE - EASY - SMILE
IT
UK
tanza che si desidera cuocere, di seguito vengono dati dei
suggerimenti, essi hanno valore puramente indicativo in
quanto dipendono da molteplici fattori (tipo di essenza
lignea usata, tipo di pietanza, modello di forno, ecc...).
I tempi di cottura sono variabili in funzione della quantità
e del tipo di cibo da cuocere: la cottura può essere sorvegliata attraverso lo spioncino.
t The ways of cooking are different according to the dish
you want to cook, here you can find some suggestions,
that are just examples because they depend on many
factors (kind of wood essence you used, kind of dish,
oven model, etc…).
Cooking times can change depending on the quantity
and kind of food to be cooked: cooking can be controlled
through the peephole.
Modalità di cottura:
Ways of cooking:
Cotture a forno spento: lo sportello deve rimanere chiuso come il registro fumi per tutta la durata della cottura, il fuoco deve rimanere spento in modo che la cottura
avvenga sfruttando solamente il calore accumulato dai
refrattari e mantenuto dalle braci in fondo al forno.
Cotture a forno acceso: richiedono un mantenimento
minimo della fiamma che va alimentata in modo che lambisca appena la volta e illumini il forno. Se quindi si desidera cucinare queste pietanze, dopo aver riscaldato a circa 300°C la camera del forno (vedi cap. 3.3 “ Preparazione
del forno alla cottura”) e aver ottenuto un buon letto di
braci, caricate su questo pochi pezzi di legna mantenendo la fiamma bassissima.
la cottura, in questo caso è possibile a sportello chiuso o
aperto: se operate con lo sportello aperto, il fuoco deve
essere lontano dalla bocca del forno ed è necessario prestare la massima attenzione.
Tipi di pietanze:
Pane, focaccie, torte: possono essere cotti direttamente
sul piano fuoco pulito dalla cenere: cottura a forno spento.
Pizze e farinate: possono essere cotti direttamente sul
piano fuoco pulito dalla cenere: cottura a forno acceso.
Carni: Cottura a forno spento o acceso.
Verdure e pesce: cottura a forno spento
4.5 SPEGNIMENTO DEL FORNO
Lo spegnimento del fuoco o delle braci deve essere graduale e non accelerato in alcun modo.
Il modo migliore per spegnere le braci è attendere il loro
normale raffreddamento; se avete fretta è possibile vaporizzare poca acqua sulle braci quasi spente per accellerare questo processo ma non utilizzate frequentemente
questo procedimento a causa dei fortissimi sbalzi termici
che si provocano.
GHIOTTONE - EASY - SMILE
Cook with the oven out: The door must stay closed as the
smoke register all the cooking time long, the fire must stay
out so that you can cook only by using the warmth stored
by the firebricks and saved by the embers at the end of the
oven
Cook with the oven on: you need to keep the flame on and
to feed it so that it just licks the vault and lights the oven.
If you want to cook those dishes, after warming at about
300°C the oven room (see chapter 3.3 “oven setting to cooking”) and having got a fine bed of embers, load on it few
pieces of wood holding the flame very low.
In this case, you can cook with closed or open door: if you
work with open door, fire has to be far from the entrance of
the oven and you need to take care a lot.
Dishes:
Bread, focaccia, cakes: you can cook them directly on fire
space clean by ash: cook with the oven out:
Pizzas and floury food: you can cook them directly on fire
space clean by ash: cook with the oven on:
Meat: cook with the oven out or on.
Vegetables and fish: cook with the oven out
4.5 PUT THE OVEN OUT
To put the fire or the embers out you have to make it gradually and not fast in any way.
The best way to put the embers out is to wait that they
become normally cold; if you are in a hurry you can vaporize some water on the embers almost out to accelerate
this process but do not use that way often because of the
strong sudden change of temperature that may occur.
cod. 004720498 - 11/2010
29/36
IT
5
MANUTENZIONE
UK
5
ATTENZIONE
MAINTENANCE STATE
ATTENTION
Prima di effettuare la manutenzione dell’apparecchiatura:
A) accertarsi che tutte le sue parti siano fredde;
B) verificare che la cenere e le braci siano completamente
spente;
C) indossare indumenti di protezione personali;
D) essere in possesso di adeguati utensili per effettuarla.
Before you start the maintenance of the appliance:
A) be sure all its parts are cold;
B) verify that the ash and embers are completely out;
C) wear safety individual clothes;
D) have got some proper tools to make it.
5.1 PULIZIA DELLE BRACI E DELLA CENERE
5.1 CLEANING THE EMBERS AND ASH
Dopo ogni utilizzo vanno rimosse le braci e la cenere dopo
aver atteso che, sia esse che il il forno, siano freddi. Le braci
devono venire rimosse con adeguata attrezzatura per forni
a legna (es. pala a manico lungo) seguendo le indicazioni
seguenti:
t la cenere e le braci devono essere stoccate in un contenitore metallico, non combustibile, munito di coperchio
ermetico;
t il contenitore deve poggiare su pavimentazione NON
sensibile al calore, lontano da materiali combustibili;
t prima di smaltirle, secondo le prescrizioni del Paese di
utilizzo dell’apparecchiatura, accertarsi nuovamente che
siano completamente spente e fredde.
t Attenzione! Le braci e la cenere, apparentemente spente,
possono dar origine a pericolosi incendi anche dopo alcuni giorni dalla rimozione.
After each use you have to remove embers and ash after
you waited that, both them and the oven, become cold.
Embers must be removed with the proper tools for wood
ovens (as long handle shovel) according to the following
instructions:
t
"TIBOEFNCFSTNVTUCFTUPSFEJOBNFUBMDPOUBJner, non combustible, with an hermetic cap;
t
UIFDPOUBJOFSNVTUMBZPOBøPPS/05TFOTJUJWFUP
heat, far from combustible materials;
t
CFGPSF USBTIJOH UIFN BDDPSEJOH UP UIF QSFTDSJQtions of the Country where the appliance is used, be sure
again that they are completely out and cold.
Attention! Embers and ash, that seem to be out,
may cause dangerous fires also after some days after you
have removed them.
6
6
INFORMAZIONI PER LA DEMOLIZIONE
E LO SMALTIMENTO
INFORMATION FOR DEMOLITION
AND DISPOSAL
La demolizione e lo smaltimento del prodotto sono ad
esclusivo carico e responsabilità del proprietario.
Smantellamento e smaltimento possono essere affidati anche a terzi, purchè si ricorra sempre a ditte autorizzate al
recupero ed all’eliminazione dei materiali in questione.
The demolition and disposal of the product are the sole responsibility of the owner.
Dismantling and disposal may be assigned to a third party
as long as it is a company authorised to salvage and eliminate said materials.
F
F
Attenersi sempre e comunque alle normative in vigore nel paese dove si opera per lo smaltimento dei
materiali ed eventualmente per la denuncia di smaltimento.
Tutte le operazioni di smontaggio per la demolizione devono avvenire ad apparecchio ferma.
Rottamare la struttura del forno tramite le ditte autorizzate.
L’abbandono del prodotto in aree accessibili costituisce un grave pericolo per persone ed animali.
La responsabilità per eventuali danni a persone ed
animali ricade sempre sul proprietario.
All’atto della demolizione la marcatura CE, il presente manuale e gli altri documenti relativi a questo
prodotto dovranno essere distrutti.
30/36
cod. 004720498 - 11/2010
Always comply with laws in force in the country of
installation concerning the disposal of materials
and, if necessary, the report of disposal.
All dismantling operations for demolition must take
place when the product is shut down.
tTDSBQUIFQSPEVDUTUSVDUVSFVTJOHBVUIPrised firms only
Dumping the appliance in accessible areas is a serious hazard for both people and animals.
The owner is always responsible for injury to people
and animals.
When the product is demolished, the CE mark, this
manual and all the other documents relative to the
product must be destroyed.
GHIOTTONE - EASY - SMILE
IT
7
SCHEDA TECNICA
[cm]
EASY MEDIUM
19,5
TECHNICAL SCHEDULE
[cm]
EASY LARGE
19,5
16
97
77
97
13
9,5
9,5
13
9
94
34
63
77
21,5
5,5
3
3
25
48,5
21,5
25
48,5
5,5
25
25
16
34
7
UK
47
VOLUME
AREA
PESO/WEIGHT
0,48 mq
0,115 mc
410 kg
VOLUME
AREA
PESO/WEIGHT
9
47
1,28 mq
0,46 mc
550 kg
[cm]
EASY EXTRA LARGE
19,5
21,5
3
25
48,5
5,5
25
16
97
77
9
126
34
9,5
13
VOLUME
AREA
PESO/WEIGHT
1,57 mq
0,64 mc
650 kg
GHIOTTONE - EASY - SMILE
47
cod. 004720498 - 11/2010
31/36
IT
[cm]
GHIOTTONE MEDIUM
17,5
19,5
17,5
39,7
38,3
50,4
54,8
5
32
54,8
40
50,4
39,7
19,5
32
GHIOTTONE SMALL
UK
118
104
21,5
23
114,5
98
83
69
79
70
16,5
45,5
85
VOLUME
AREA
PESO/WEIGHT
0,45 mq
0,16 mc
290 kg
VOLUME
AREA
PESO/WEIGHT
[cm]
GHIOTTONE LARGE
0,34 mq
0,98 mc
535 kg
19,5
17,5
32
5
32
54,8
50,4
38,3
39,7
118
104
23
21,5
21,5
171,5
155
140
23
5
54,8
50,4
38,3
118
104
143
126,5
111,5
45,5
16,5
16,5
VOLUME
AREA
PESO/WEIGHT
32/36
[cm]
GHIOTTONE EXTRA LARGE
17,5
39,7
19,5
45,5
0,46 mq
1,28 mc
680 kg
VOLUME
AREA
PESO/WEIGHT
cod. 004720498 - 11/2010
45,5
0,54 mq
1,57 mc
817 kg
GHIOTTONE - EASY - SMILE
IT
UK
[cm]
SMILE 56
[cm]
SMILE 56 prof. 64
ø14
60
19
35
43,5
7,5
7,5
19
35
43,5
60
ø14
56
56
66
70
64
67
54
54,5
VOLUME
AREA
0,3 mq
0,09 mc
PESO
170 kg
VOLUME
AREA
PESO
[cm]
SMILE 60
0,3 mq
0,09 mc
167 kg
[cm]
SMILE 80
18
9
24,5
36
102
80
74,5
64,5
24
47,5
36,5
ø 16
12
22,5
77
102
80
42
41,5
VOLUME
AREA
PESO
0,39 mq
0,13 mc
255 kg
GHIOTTONE - EASY - SMILE
VOLUME
AREA
PESO
0,5mq
0,15mc
225kg
cod. 004720498 - 11/2010
33/36
IT
[cm]
SMILE 90
UK
[cm]
SMILE 120
18
7,5
24,5
36
74,5
64,5
34
95
54
44
ø16
136
125
38
145
110
15,5
42
52
VOLUME
AREA
PESO
VOLUME
AREA
PESO
0,58 mq
0,19 mc
335 kg
1,17 mq
0,44 mc
365 kg
[cm]
SMILE 100
33
7,5
43
53,5
18
109,5
36,5
103
89
14,5
VOLUME
AREA
PESO
34/36
0,6 mq
0,23 mc
315 kg
45
cod. 004720498 - 11/2010
GHIOTTONE - EASY - SMILE
-B %JUUB 1BMB[[FUUJ OPO TJ BTTVNF BMDVOB SFTQPOTBCJMJUË QFS
FWFOUVBMJ FSSPSJ
QSFTFOUF PQVTDPMP
F TJ SJUJFOFtecniche,
MJCFSB EJ
PerEFM
maggiori
informazioni
WBSJBSFTFO[BQSFBWWJTPMFDBSBUUFSJTUJDIFEFJQSPQSJQSPEPUUJ
di installazione o di funzionamento
è operativo il:
TECHNICAL ADVICE
AFTER-SALES SERVICE
+ 39 0434.591121
Attivo dal Lunedì al Venerdì dalle 09.00
alle 12.00 e dalle 15.00 alle 18.00.
The company Palazzetti does not take responsibility for any
mistakes in this manual and consider itself free to change
the features of its products without notice.
&0 ,#((*.0*
*-'.0,#5*.-*
2&$-*$)&
For more technical,
installation
or
%* *-12#++#5*.-&
%* '3-5*.-#,&-2.
functioning.
information
you can contact the:
./&0#2*4.*+
TECHNICAL ADVICE
!" "
AFTER-SALES SERVICE
!
+39 0434.591121
From Monday
to Friday from 09.00 am to
12.00 am and from 03.00 pm to 06.00 pm.
"UUJWPEBM3-&%BM!&-&0%EBMMF
BMMF
FEBMMF
BMMF
#+#55&22*&+*.1/#
7JB3PWFSFEP1PSDJB1/*5"-:
5FM
5FMFGBY
*OUFSOFUXXXQBMB[[FUUJJU
&NBJMJOGP!QBMB[[FUUJJU
Versione - 11/2010 - COD. 004720498
pubblimmagine - Pn
!&01*.-&
&#+*55#5*.-&
La Ditta Palazzetti non si assume alcuna responsabilità per
eventuali errori del presente opuscolo e si ritiene libera di variare senza preavviso le caratteristiche dei prorpi prodotti.