1
CONTENUTO DELLA CONFEZIONE
SERIE FE
CAT8BFE0320701
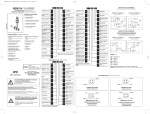
MANUALE DI INSTALLAZIONE
M.D. Micro Detectors S.p.A.
Strada S. Caterina, 235 - 41100 Modena Italy
Tel. +39 059 420411 Fax +39 059 253973
www.microdetectors.com
[email protected]
Dichiarazione di conformità
M.D. Micro Detectors S.p.A.
Dichiara sotto la propria responsabilità che questi
prodotti sono conformi ai contenuti delle direttive
CEE: 89/336 e 73/23 e ai successivi emendamenti.
• 1 x Manuale di installazione MD
• Accessorio regolazione trimmer ST82 per i
modelli con regolazione della sensibilità
• N°1 staffa + N°2 viti con rondelle e bulloni
• N°2 staffe + N°4 viti con rondelle e bulloni,
solo per FERHD / ** - **
• N°1 catarifrangente RL122,
solo per FERN / **-**
Connessioni versioni a connettore M8
Tasteggio diretto,polarizzata, ricevitore
SPECIFICHE TECNICHE
DESCRIZIONE GENERALE
• Fotocellule miniaturizzate ad alte
prestazioni
• Corpo in plastica di ridotte dimensioni:
20x11x31mm
• Ottica a 90°
• Uscita NPN o PNP
• Stato dell’uscita LO/DO selezionabile
• Regolazione di sensibilità a trimmer
• Grado di protezione IP67
• Emissione a luce rossa visibile
• Approvazioni:
• Proiettore e ricevitore portata 15 m
• Retroriflessione polarizzata su
catarifrangente portata 6 m
• Tasteggio energetico diffuso
portata 900 mm
• Tasteggio diffuso a soppressione di
sfondo con distanza regolabile fino
a 500 mm
Modello
FERW/0*-0*
FER8/0*-0*
Tipo
Distanza di rilevazione
Zona cieca
Isteresi
Regolazione di sensibilità –distanza
Emissione
Diametro dello spot
Selezione Luce-Buio
Tensione di alimentazione
Ondulazione residua
Corrente assorbita
Corrente di uscita massima
Caduta di tensione in uscita
Tipo di Uscita
Frequenza di commutazione
Tempo di risposta
Ritardo alla disponibilità
Protezioni elettriche alimentazione
Protezioni elettriche uscita
Limiti di temperatura operativa
Temperatura di immagazzinamento
Deriva termica
Soppr. di sfondo
15 ÷ 500 mm(1)
2 mm
-
Rifless. diretta
800 mm (1)
0
20% max
Materiale del contenitore
Cavo PVC 2m
Peso
DESCRIZIONE DEL CODICE
/ 4
5 - 6
FE
Fotocellula cubica miniatura 20x11x31mm
7
A
Uscita cavo
F
Uscita connettore M8 3pin
0
Corpo in plastica
W
Soppressione di sfondo 500mm Max
Riflessione diretta energetica 900mm Max
8
Retroriflessione polarizzata 6m
N
Proiettore 15m Max
H
Ricevitore 15m Max
D
HD
Proiettore + ricevitore 15m Max
0
LON/DON Selezionabile
FERD/0*-0*
FERH/00-0*
Proiettore
12 m
0
-
1600mm @ 12m
-
15 mA max
-
P
Logica PNP
N
Logica NPN
O
Proiettore
B
-
C
Max.
A
10 000 Lux minimo luce solare
3000 Lux minimo lampada alta freq.
-
IP 67
Giallo: stato dell’uscita
Verde: eccesso di guadagno> 1,1
-
PBT Corpo; PC ottica
3x0,18 ø 4mm
53 g versione a cavo; 9 g versione a connettore
2x0,18 ø 4mm
COLLEGAMENTI E INSTALLAZIONE
• Assicurarsi che la tensione di alimentazione sia correttamente stabilizzata con una
ondulazione residua (ripple) compresa all’interno dei dati di catalogo.
• Nel caso che il rumore indotto dalle linee di potenza risulti superiore a quello
previsto dalla normativa CE (immunità ai disturbi), separare i cavi del sensore
dalle linee di potenza e di alta tensione e inserire il cavo in una canalina metallica
connessa a terra. E’ consigliabile inoltre, collegare il sensore direttamente alla
sorgente di alimentazione e non a valle di altri dispositivi.
• Per estendere i cavi di alimentazione e uscita utilizzare un cavo avente conduttori
di sezione minima di 1 mm2. Il limite dell’estensione in lunghezza è 100m
(riferiti a tensione minima e corrente al carico di 100mA).
• Evitare che, sulle superfici ottiche, si depositi materiale come polvere, acqua,
condensa, ecc. in grado di compromettere le caratteristiche di lettura del
dispositivo.
• Evitare l’esposizione dell’ottica a solventi organici.
• Evitare che una forte sorgente di luce o la luce solare incida direttamente sul
ricevitore.
• Per la pulizia dell’ottica usare un panno umido e asciugare.
SCHEMI ELETTRICI DELLE CONNESSIONI
Allineamento e regolazione
Connessioni versioni a cavo
Uscita NPN
1 Bn
Uscita PNP
+10-30 VDC
1 Bn
carico
100 mA
carico
100 mA
4 Bk
4 Bk
3 Bu
+10-30 VDC
0V
0V
3 Bu
Emettitore
1 Bn
+10-30
VDC
1/Bn: Marrone
3/Bu: Blu
4/Bk: Nero
4 Bk
3 Bu
Codice colori
0V
Modelli a diffusione diretta
Installare l’unità utilizzando le staffe consigliate (a corredo) e collegare ed alimentare il
sensore seguendo lo schema di collegamento. Regolare il tipo di uscita che si desidera
ottenere, L: commutazione a chiaro, con ricezione di luce commuta l’uscita; D: commutazione a scuro, con cessazione di luce commuta l’uscita. Posizionare l’oggetto da rilevare
alla distanza di lettura desiderata , verificando che l’asse ottico sia perpendicolare alla
superficie dell’oggetto. N.B. In caso d’oggetti riflettenti e piani può essere conveniente
inclinare il sensore di qualche grado, rispetto alla perpendicolare.
Aggiustare la ricezione luce :
LED grn(=verde): ricezione con riserva funzione >1.1;
LED ora(=arancione): uscita attiva.
Regolare il Trimmer >SENS.< in posizione Max., posizionare l’oggetto e individuare i
punti di accensione e spegnimento del LED arancione orientando la barriera luminosa in
verticale ed in orizzontale. Scegliere la posizione mediana. Quando la ricezione è ottimale
si accende il LED verde. Se il LED arancione non commuta, la ricezione è nulla o insufficiente. In questo caso riaggiustare il sensore luminoso, pulirlo e verificare le condizioni
d’impiego.
Aggiustare il rilevamento dell’oggetto: rimuovere l’oggetto; il LED arancione (uscita) deve
commutare (posizione A=Max.). Se non commuta, ruotare il trimmer >SENS.< (campo di
rotazione 5 giri) verso Min., finché il LED arancione (uscita) commuta (ad es. posizione
A). Ruotare il trimmer su Min. Posizionare l‘oggetto e ruotare il
trimmer verso Max. finché si accende il LED verde (ad es.. posizione B). Se posizione B <posizione A, scegliere la posizione mediana
(ad es. posizione C). Verificare il funzionamento generale. Se il funzionamento è corretto, il procedimento è finito. In caso contrario
verificare le condizioni di impiego e riaggiustare. Se posizione A ≤
posizione B, l’influenza dello sfondo è troppo grande. Verificare le
condizioni di impiego e riaggiustare.
Min.
(1) Con ostacolo bianco 90% 100x100 mm
(2) Con riflettore RL110
R
Emissione a LED visibile rosso
FERN/0*-0*
Retrorifl. pol.
Ricevitore
5 m (2)
12 m
10 mm
0
Potenziometro 270°
LED visibile rosso
50mm @ 300mm
250mm @ 2,5m
Commutatore rotativo
10 ÷ 30 VCC massimo
≤10% Incluso
30 mA max
30 mA max
30 mA max
20 mA max
100 mA
1,8 V massimo @ 100 mA
PNP o NPN collettore aperto
1000 HZ con rapporto luce/buio 1:1
≤0,5 ms con carico resistivo
100 ms massimo
Inversione di polarità sovratensioni impulsive
Sovracorrenti, corto circuito, extratensioni
-25 ÷ +55 °C
-40 ÷ +70 °C
±15% della distanza nominale
Indicatori LED
3
(-)
(+)
(-)
(+)
Classe di protezione
2
Emettitore
DISEGNI MECCANICI
OUT
Immunità alla luce ambiente
1
posizione C). Verificare il funzionamento generale. Se il funzionamento è corretto, il procedimento è finito. In caso contrario verificare le condizioni di impiego e riaggiustare. Se
posizione A ≤ posizione B, l’influenza dello sfondo è troppo grande. Verificare le condizioni di impiego e riaggiustare.
Modelli a diffusione diretta con soppressione di sfondo.
Installare l’unità utilizzando le staffe consigliate (a corredo) e collegare ed alimentare
il sensore seguendo lo schema di collegamento. Regolare il tipo d’uscita che si desidera ottenere, L: commutazione a chiaro, con ricezione di luce commuta l’uscita; D:
commutazione a scuro, con cessazione di luce commuta l’uscita.
Posizionare l’oggetto da rilevare alla distanza di lettura desiderata , verificando che
l’asse ottico sia perpendicolare alla superficie dell’oggetto. N.B. In caso d’oggetti
riflettenti e piani può essere conveniente inclinare il sensore di qualche grado, rispetto alla perpendicolare.
Aggiustare la ricezione luce :
LED grn(=verde): ricezione con riserva funzione >1.1;
LED ora(=arancione): uscita attiva.
Regolare il Trimmer >SENS.< in posizione Max., posizionare l’oggetto e individuare i
punti di accensione e spegnimento del LED arancione orientando la barriera luminosa in verticale ed in orizzontale. Scegliere la posizione mediana. Quando la ricezione
è ottimale si accende il LED verde. Se il LED arancione non commuta, la ricezione è
nulla o insufficiente. In questo caso riaggiustare il sensore luminoso, pulirlo e verificare le condizioni d’impiego.
Aggiustare il rilevamento dell’oggetto: rimuovere l’oggetto; il LED arancione (uscita)
deve commutare (posizione A=Max.). Se non commuta, ruotare il
trimmer >SENS.< (campo di rotazione 5 giri) verso Min., finché il
LED arancione (uscita) commuta (ad es. posizione A). Ruotare il
trimmer su Min. Posizionare l‘oggetto e ruotare il trimmer verso
Max. finché si accende il LED verde (ad es.. posizione B). Se
posizione B<posizione A, scegliere la posizione mediana (ad es.
Modelli polarizzati a retroriflessione
Montare il catarifrangente in modo che la sua superficie sia perpendicolare all’asse ottico del sensore. Assicurarsi che la distanza tra il sensore e il catarifrangente non sia
superiore a quella specificata per il catarifrangente in uso. Fissare il sensore in modo
stabile ma non definitivo e selezionare lo stato dell’uscita.
Per ottenere un allineamento ottimale seguire la procedura seguente.
Aggiustare la ricezione luce :
LED grn(=verde): ricezione con riserva funzione >1.1;
LED ora(=arancione): uscita attiva.
Regolare il Trimmer >SENS.< in posizione Max. e individuare i punti di accensione e
spegnimento del LED arancione orientando la barriera luminosa in verticale ed in orizzontale. Scegliere la posizione mediana in modo che il raggio di luce rossa colpisca il
centro del riflettore. Quando la ricezione è ottimale si accende il LED verde. Se il LED
arancione non commuta, la ricezione è nulla o insufficiente. In questo caso riaggiustare
la barriera luminosa e il riflettore ed eventualmente pulirli.
Modelli a proiettore / ricevitore.
Scegliere il modo d’esercizio:
L: commutazione a chiaro, con ricezione di luce commuta l’uscita.
D: commutazione a scuro, con cessazione di luce commuta l’uscita.
Montare Emettitore e Ricevitore sul supporto (es. staffa) usando i fori di fissaggio di fronte al riflettore e orientare approssimativamente. Tenere conto della portata di ricezione
della barriera.
Allacciare a tensione d’esercizio. Si accende la spia luminosa d’emissione dell’emettitore.
Aggiustare la ricezione luce:
LED grn(=verde): ricezione con riserva funzione >1.1;
LED ora(=arancione): uscita attiva.
Manopola >SENS.< in posizione Max.
Individuare i punti d’accensione e spegnimento del LED arancione del ricevitore orientando la barriera luminosa in verticale ed in orizzontale. Scegliere la posizione mediana in
modo che il raggio di luce rossa colpisca il ricevitore. Quando la ricezione è ottimale si
accende il LED verde.
Se il LED arancione non commuta, la ricezione è nulla o insufficiente. In questo caso
riaggiustare emettitore e ricevitore ed eventualmente pulirli.
Aggiustare il rilevamento oggetto:
Portare l’oggetto nel raggio di luce; il LED arancione deve commutare. Se non commuta,
ridurre la sensibilità con la manopola >SENS.< finché il LED arancione commuta. Dopo
la rimozione dell’oggetto il LED verde deve riaccendersi. Se resta spento, tarare la sensibilità fino ad ottenere il limite di commutazione corretto.
Se il LED verde non si spegne in presenza dell’oggetto, l’attenuazione della luce è insufficiente (ad es. oggetti troppo piccoli, oggetti trasparenti).
FERW/**_*A
1
2
3
4
5
6
7
8
Area sensibile
Uscita connettore MBx1
Indicatore stato dell’uscita
Indicatore margine di segnale
Trimmer regolazione sensibilità
Trimmer selezione stato dell’uscita
RL122 (catarifrangente per FE)
STFE OO (staffa per FE)
1
2
3
4
5
6
Area sensibile
Uscita connettore MBx1
Indicatore stato dell’uscita
Indicatore margine di segnale
Trimmer regolazione sensibilità
Trimmer selezione stato dell’uscita
B
ATTENZIONE Questo prodotto NON è un componente
di sicurezza e NON deve essere usato in applicazioni
di salvaguardia della sicurezza delle persone.
Min.
C
Max.
A
PACK CONTENT
FE SERIES
• 1 MD Operating Manual
• ST82 knob regulation accessory for the
models with sensitivity adjustment
• N° 1 mounting bracket + N° 2 screws with
bolts and washers
• N° 2 mounting brackets + N° 4 screws with
bolts and washers, only for FERHD / ** - **
• N° 1 RL122 reflector,
only for FERN / **-**
INSTALLATION MANUAL
Setting object detection: remove the object; the orange LED (output) must change (position A=Max.). If not, turn the >SENS.< control knob (range 5 rotations) in the direction of
Min. until the orange LED (output) changes (e.g. position A). Set the knob to Min. Position
the object and turn the knob to Max. until the green LED lights up (e.g. position B). If
position B<position A, select middle position (e.g. position C). Check overall function. If
function is o.k. the setting procedure is over. If the setting is not o.k. check the operating
conditions and re-adjust.
If position A ≤ position B, background influence is too great. Check the operating
conditions and re-adjust.
Wiring diagrams M8 plug versions
Direct scanning, polarization, receiver
Emitter
OUT
(+)
(-)
(+)
(-)
TECHNICAL SPECIFICATIONS
GENERAL DESCRIPTION
• Miniature Photoelectric Switch series with
large scannino ranges
• Small dimensions: 20x11x31mm
plastic housing
• 90° optic axis orientation
• PNP 0r NPN output
• Lon/Don selectable output
• Trimmer adjustement
• IP67 Protection
• Red ligth emission
• Approvals
• Through-beam 15 m range
• Photoelectric reflex with polarizing
filter 6 m range
• Diffuse energetic scanner
900 mm scanning distance
• Proximity switch with
background suppression and adjustable
scanning distance up to 500 mm
M.D. Micro Detectors S.p.A.
Strada S. Caterina, 235 - 41100 Modena Italy
Tel. +39 059 420411 Fax +39 059 253973
www.microdetectors.com
[email protected]
Declaration of conformity
M.D. Micro Detectors S.p.A.
Declare under our sole responsibility that
these products are in conformity with the
following EEC directive: 89/336 and 73/23
and emendment.
Models
Type
Sensing distance
Blind zone
Hysteresis
Scanning distancesensitivity adjustment
Light source
Spot diameter
Ligtht on-Dark on select.
Supply voltage
Ripple
No load supply current
Load current max
Output voltage drop
Output type
Switching frequency
Response time
Time delay before availability
Supply electrical protections
Output electrical protections
Operation temperature range
Storage temperature
Temperature drift
FERW/0*-0*
FER8/0*-0*
FERN/0*-0*
FERD/0*-0*
FERH/00-0*
Background supp.
15 ÷ 500 mm(1)
2 mm
-
Energetic scan.
800 mm (1)
0
20% max
Reflex polariz
5 m (2)
10 mm
-
Receiver
12 m
0
-
Emitter
12 m
0
-
Potentiometer 270
Red visibile LED
250mm @ 2,5m
Turning commutator
10 ÷ 30 VCC Max
≤10% Included
30 mA max
30 mA max
20 mA max
100 mA
1,8 V max @ 100 mA
PNP or NPN open collector
1000 HZ With light/dark ratio 1:1
≤0,5 ms With resistite load
100 ms max
Overvoltage pulses and polarity reversal
Short circuit, overcurrent, overvoltage
-25 ÷ +55 °C
-40 ÷ +70 °C
±15% of scanning distance
50mm @ 300mm
30 mA max
Ambient light immunity
10 000 Lux minimum sunlight
3000 Lux minimum HF lamp
CODE DESCRIPTION
1
miniature cubic photoelectric switch
20x11x31mm
2
3
/ 4
5 - 6
FE
Housing material
Cable PVC 2m
Weight
7
A
Cable output
F
3 pin M8 connector
0
Background suppression 500mm Max
W
Energetic diffuse scanner 900mm Max
8
Reflex with polarizing filter 6m
N
Emitter 15m Max
H
Receiver 15m Max
D
0
LON/DON selectable
Plastic housing
P
PNP logic output
N
NPN logic output
O
Emitter
Min.
Yellow: output status;
Green: operative reserve> 1,1
-
PBT housing; PC Optics
3x0,18 ø 4mm
53 g cable version; 9 g Plug version
C
Max.
2x0,18 ø 4mm
A
(1) White target 90% 100x100 mm
(2) With RL110 reflector
• Make sure that the supply voltage is correctly settled with a ripple corresponding
to the values indicated on the catalogue.
• To extend the supply and output cables, it is necessary to use a cable having
conductors with a minimum size of 1 mm2. The maximum length of extension is
100m (this value is referred to a minimum tension and power supply at a load of
100mA).
• Avoid the deposit of dust, water, moisture, etc. on the optic surface; this kind of
deposits could compromise the reading features of the device.
• Protect the optic against organic solvents.
ELECTRIC DIAGRAMS OF THE CONNECTIONS
• Avoid direct exposure of the receiver to intense light sources or sun light.
Wiring diagrams cable versions
NPN output
1 Bn
+10-30 VDC
1 Bn
100 mA
load
+10-30 VDC
Alignment and adjustment
100 mA
load
4 Bk
3 Bu
• Clean the optic with a wet cloth and then dry it.
PNP output
4 Bk
0V
0V
3 Bu
Emitter
1 Bn
+10-30
VDC
1/Bn : Brown
3/Bu : Blue
4/Bk : Black
4 Bk
3 Bu
CODE DESCRIPTION
0V
Direct proximity scanner models
Mount the unit using the suggested brackets (supplied) and connect and align the sensor following the connection diagrams.
Select operating mode:
L: Light-switching; if light received, output switches.
D: dark-switching, if light interrupted, output switches
Place the object to be detected at the required reading distance, checking that the optic
axis is perpendicular to the object surface.
NOTE: In case of reflecting or flat objects, it could be convenient to recline the sensor of
some degrees with respect to the perpendicular.
Adjust the light reception:
LED grn(=green): light reception with function reserve >1.1
LED ora(=orange): switching output active. Set the >SENS.< control knob to max., place
the object and determine switch-on and switch-off points of the orange LED by moving
the light beam horizontally and vertically. Select middle position. At optimum reception,
the green LED lights up. If the orange LED does not change, too little or no light at all is
being received. In this case, re-adjust or clean the light sensor.
Setting object detection: remove the object; the orange LED (output) must change (position A=Max.). If not, turn the >SENS.< control knob (range 5 rotations) in the direction of
Min. until the orange LED (output) changes (e.g. position A). Set the knob to Min. Position
the object and set the knob in direction Max. until the green LED lights up (e.g. position
B). If position B<position A, select middle position (e.g. position C).
Check overall function. If function is o.k. the setting procedure is
over. If the setting is not o.k. check the operating conditions and readjust.
If position A ≤ position B, background influence too great. Check the
operating conditions and re-adjust.
B
-
• In case the noise produced by the power lines exceed the values foreseen by the
CE norm (interference immunity), separate the sensor cables from both the power
and high tension lines, and insert it in a grounding metal raceway. Moreover, it is
advisable to connect the sensor directly to the supply source and not to other
devices.
HD
Emitter+Receiver 15m Max
-
CONNECTIONS AND INSTALLATION
R
Visibile red emission LED
15 mA max
-
IP 67
Enclosure rating
LED indicators
1600mm @ 12m
-
MECHANICAL DRAWINGS
Direct proximity scanner with background suppression
Mount the unit using the suitable brackets (supplied), connect and align the sensor
following the connection diagrams.
Select operating mode:
L: Light-switching; if light is received, output switches.
D: dark-switching, if light is interrupted, output switches.
Place the object to be detected at the required reading distance, checking that the
optic axis is perpendicular to the object surface.
NOTE: In case of reflecting or flat objects, it could be convenient to recline the sensor
of some degrees with respect to the perpendicular.
Adjust the light reception:
LED grn(=green): light reception with function reserve >1.1
LED ora(=orange): switching output active. Set the >SENS.< control knob to max.,
place the object and determine switch-on and switch-off points
of the orange LED by moving the light beam horizontally and vertically. Select middle position. At optimum reception, the green
LED lights up. If the orange LED does not change, too little or no
light at all is being received. In this case, re-adjust or clean the
light sensor and check the operating conditions.
Photoelectric reflex switch, with reflector models
Mount the reflector so that its surface is perpendicular to the optic axis. Check that the
distance between the sensor and the reflector does not exceed the values specified for
the reflector itself. Fix the sensor safely but not permanently and select the output type.
For a perfect alignment , follow the procedure below.
Adjust te light reception:
LED grn(=green): light reception with function reserve >1.1
LED ora(=orange): switching output active. Set the >SENS.< control knob to max., determine switch-on and switch-off points of the orange LED by moving the light beam horizontally and vertically. Select middle position so as the red light beam strikes the center
of the reflector. At optimum reception, the green LED lights up. If the orange LED does
not change, too little or no light at all is being received. In this case, re-adjust photoelectric switch and reflector and, eventually, clean them.
Emitter – Receiver models
Select operating mode:
L: Light-switching; if light received, output switches.
D: dark-switching, if light interrupted, output switches
Mount Emitter and Reciver using the fixing holes to the holder (supplied) opposite to the
reflector and align roughly. Keep into consideration the reception capability of the light
beam. Power the device. The emission led of the emitter lights up.
Adjust te light reception:
LED grn(=green): light reception with function reserve >1.1
LED ora(=orange): switching output active. Set the >SENS.< control knob to max., determine switch-on and switch-off points of the orange LED of the receiver by moving the
light beam horizontally and vertically. Select middle position so as the red light beam
strikes the receiver. At optimum reception, the green LED lights up. If the orange LED
does not change, too little or no light at all is being received. In this case, re-adjust emitter and receiver and, eventually, clean them.
Setting object detection:
Place object in light beam. The orange LED must change. If not, reduce the sensitivity
using the >SENS.< control knob until the orange LED changes. When the object is removed, the green LED must light up again. If this is not the case, adjust the sensitivity until
the switching threshold is correctly set. If the green LED does not go out when an object
is present, the light reception is too low (e.g. object too small, object transparent).
FERW/**_*A
1
2
3
4
5
6
7
8
Sensitivity area
MBx1 connector output
Output satus led
Signal limit led
Sensitivity adjustment trimmer
Output status selectable trimmer
RL122 (FE polarizing filter)
STFE OO (FE bracket)
1
2
3
4
5
6
Sensitivity area
MBx1connector output
Output satus led
Signal limit led
Sensitivity adjustment trimmer
Output status selectable trimmer
B
WARNING These products are NOT safety sensors and
are NOT suitable for use in personal safety
application
Min.
C
Max.
A