1
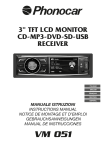
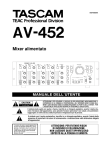
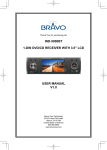
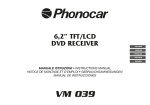
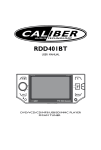
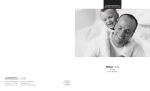
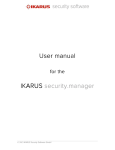
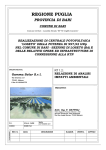
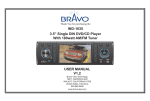
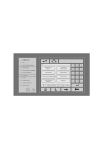
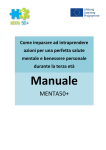
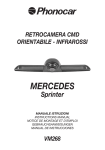
3” TFT LCD MONITOR
CD-MP3-DVD-SD-USB
RECEIVER
ITALIANO
ENGLISH
MANUALE ISTRUZIONI
INSTRUCTIONS MANUAL
VM 051
Connessioni • Connections
Parking SW
Reverse
IT/GB
VERDE-BIANCO / GREEN-WHITE
USCITA POSTERIORE
REAR LINE-OUT
ROSA / PINK
)
R ROSSO / RED
L BIANCO / WHITE
ANTENNA RADIO
RADIO ANTENNA
MICROFONO BLUETOOTH/BLUETOOTH MICROPHONE
USCITA VIDEO
GIALLO / YELLOW
VIDEO OUTPUT
INGRESSO RETROCAMERA
GIALLO / YELLOW
CAMERA INPUT
SWC (COMANDI AL VOLANTE/STEERING WHEEL COMMAND)
CONNESSIONE CAVI FRENO A MANO / PARKING BRAKE CONNECTIONS
Verde / Green
Interruttore freno a mano
Parking Brake Switch
Cavo freno a mano
Parking brake lead
Spia freno a mano
Brake light
2
Batteria
Battery
Massa
Car frame
Fuse
Fusibile
15A
Connessioni • Connections
IT/GB
CONNESSIONE CAVI RETROMARCIA / REVERSE DRIVING CABLE CONNECTIONS
Luci retromarcia
Reverse driving light
Massa
Car frame
Rosa / Pink
Cavo retrocamera
Rear view video camera lead
Batteria
Battery
Massa
Car frame
Cambio
Gearbox
CONNESSIONE E MEMORIZZAZIONE COMANDI AL VOLANTE
CONNECTION AND STORING STEERING WHEEL COMANDS
SWC (COMANDI AL VOLANTE
STEERING WHEEL COMMAND)
SWC 1
MASSA / GROUND
IT
GB
Selezionando SWC apparirà una
finestra dove si dovrà scegliere
il comando spostandosi con le
frecce. Premere per memorizzare
il comando scelto e attendere che
si illumini l’icona corrispondente,
questa operazione dovrà essere
effettuata per tutti i comandi
disponibili sul volante.
3
By pressing SWC, a window
will appear showing a number
of available command. Use
the arrow-keys to move to the
requested command. Press to
store the selected command
and wait for it to enlighten the
icon, this operation must be
carried out for all available commands on the steering wheel.
Funzionalità • Features
Premere il tasto
IT/GB
per aprire il pannello. • Press the button
to open the panel.
Feritoia inserimento disco
Slot, insert disc
Contatti pannello
Panel connection
Espulsione disco
Disc Eject
Slot SD Card media
Media SD Card Slot
Tasto Reset
Reset button
Operazioni frequenti / Some frequent operations:
1) Spostamento cursore / Move cursor
2) Conferma / Confirm
Nota/Note:
In modalità impostazioni (setting), la monopola del volume ha la stessa funzionalità dei tasti / .
In Setting mode, the VOL knob has the same function as the / button to select setting items.
Funzioni su frontalino / Panel controls
Premere il tasto
per accendere l’unità. • Press the button
1
8
2
9
3 4
10
11
5
12 13
to turn on/off the unit.
6
14
7
15 16
4
Funzionalità • Features
IT/GB
IT
1. Apertura frontalino
2. Accensione/Spegnimento (pressione 3 secondi).
Silenziamento audio (pressione breve).
3. Premere per navigare all’interno delle opzioni in DVD, CD e MP3/WMA.
Seleziona la stazione precedente in modalità RADIO.
4. Ruotare la manopola per regolare il volume.
Premere brevemente per selezionare impostazioni audio/video e ruotare per effettuare le regolazioni.
Premere 3 sec. per entrare nel menù impostazioni.
5. Scansione frequenze radio In modalità RADIO.
Scansione automatica con memorizzazione delle
stazioni radio, in modalità radio, premendo più di 2 secondi.
Stop in modalità CD, MP3/WMA e DVD video.
Termina chiamata in modalità Bluetooth.
6. Display 3” TFT.
7. Sensore IR per telecomando.
8. Conferma operazione.
Interrompe ricerca automatica in modalità RADIO.
9. Premere brevemente per cambiare la sorgente.
Premere 3 sec. per tornare al menù sorgenti, spostarsi con i tasti e premere OK per confermare.
10.Ricerca automatica stazione precedente (premere brevemente).
Ricerca manuale stazione precedente (premere più di 2 secondi).
Traccia/Capitolo precedente (CD, MP3/WMA, DVD)
Riproduzione veloce indietro x2, x4, x8, x20
(premere più di 2 secondi).
Spostamento a sinistra tra le opzioni.
11.Spostamento in basso tra le opzioni (Modalità DVD,
CD, MP3/WMA).
Riproduce la stazione memorizzata successiva Modalità RADIO).
12.Ricerca automatica stazione successiva (premere brevemente).
Ricerca manuale stazione successiva (premere più di 2 secondi).
Traccia/Capitolo successiva (CD, MP3/WMA, DVD)
Riproduzione veloce avanti x2, x4, x8, x20 (premere più di 2 secondi).
Spostamento a destra tra le opzioni.
13. Riproduzione/Pausa (Modalità DVD, CD, MP3/
WMA)
Seleziona banda radio: FM1 - FM2 - FM3 - AM1 - AM2 (Modalità radio).
Invia/Accetta chiamata bluetooth.
Seleziona programma RDS (Premere più di 2 sec.).
14.Ritorna al menù precedente.
15.Ingresso Audio/Video.
16.Porta USB.
5
GB
1. Panel open
2. Power on/off (press more than 2 seconds)
Mute
3. Press to navigate up among option items
(in DVD, CD and MP3/WMA modes)
Play the previous preset radio station.
4. Rotate the knob to adjust volume level.
Press to select Audio/video Setting, and rotate the knob to adjust level.
Press more than 2 seconds to enter Setting menu.
5. Preset scan (press briefly, in Radio mode)
Auto preset (press more than 2 sec., in Radio mode)
Stop (in CD, MP3/WMA, and DVD video mode)
Terminate call (in BT mode)
6. 3” inch TFT display.
7. Remote sensor.
8. Confirm operation.
Stop auto seeking (in Radio mode).
9. Short press to select playing mode.
Long press to return to main source menu use navigate button to select the desired mode and press OK button to confirm.
10.Search the previousstation automatically
(press briefly, in Radio mode).
Search the previous station manually, and each
press to seek step by step (press more than 2 seconds, in Radio mode).
Press to search the previous track or chapter (in CD, MP3/WMA, and DVD video mode).
Fast backward by 2, 4, 8, 20 step (press more than
2 seconds, in CD, MP3/WMA and DVD video mode).
Press to navigate left among option items
11.Press to navigate down among option
items (in DVD, CD and MP3/WMA modes).
Play the next preset radio station (in Radio mode).
12.Search the next station automatically (press briefly,
in Radio mode).
Search the next station manually, and each press to
seek step by step (press more than 2 seconds, in
Radio mode).
Search the next track or chapter (in CD, MP3/WMA,
and DVD video mode).
Fast forward by 2, 4, 8, 20 step (press more than 2 seconds, in CD, MP3/WMA and DVD video mode).
Press to navigate right among option items.
13.Play/Pause (in DVD, CD and MP3/WMA modes).
Band switch: FM1-FM2-FM3-AM1- AM2
Dial/Receive call.
RDS program type (press and hold more than 2 sec.)
14.Cancel source select menu and return to previous.
15.AV in.
16.USB port.
Telecomando • Remote controls
IT/GB
Lingua audio VCD - L/R/ST
23.Visualizza orario (Video)
Ritorna al menù precedente
24.Cambia angolo visione DVD
Termina chiamata (in modalità BT)
25.Sistema Video PAL/NTSC/AUTO
Banda radio (in funzionalità Radio)
Invia/Riceve chiamata (in modalità BT)
GB
1. Zoom (DVD/VCD only)
2. Title (DVD only)
3. Power on/off
4. Setup
5. Menu cursor
6. Enter
7. Program
8. Digit area
9. Select Audio/Video Setting, then rotate the
knob to adjust level.
10.Volume
11.Mute
12.Radio tune
Track skip/seek
13.Subtitle (DVD only)
14.Source switch
15.Repeat
16.Repeat A-B
17.Stop/Return
18.Play/Pause
19.Goto search
20.DVD menu
PBC (for VCD 2.0 or up)
21.OSD: On screen display
AMS: Search and store stations automatically
22.DVD audio
VCD audio L/R/ST
23.Display time/clock (Video mode)
Return to previous menu
24.Angle (DVD only)
Terminate call (in BT mode)
25.Video system PAL/NTSC/AUTO
Radio band (in Radio mode)
Dial/Receive call (in BT mode)
IT
1. Zoom (DVD/VCD)
2. Titoli DVD
3. Accensione/Spegnimento
4. Menù impostazioni
5. Spostamento nei menù
6. Conferma selezione
7. Programma riproduzione
8. Tastierino numerico
9. Seleziona impostazioni Audio/Video
10.Volume
11.Silenziamento audio
12.Sintonizzazione radio
Traccia successiva/precedente
13.Sottotitoli (DVD)
14.Cambio sorgente
15.Ripetizione
16.Ripetizione A-B
17.Stop/Indietro
18.Avvia/Pausa riproduzione
19.Ricerca personalizzata
20.Menù DVD
PBC (per VCD 2.0 o superiore)
21.OSD: Menù su schermo
AMS: Ricerca e memorizza
stazioni automaticamente
22.Lingua audio DVD
6
Funzioni di base • Basic Operation
IT/GB
IT ACCENSIONE/SPEGNIMENTO
1. Premere brevemente per accendere l’unità.
2. Premere per più di 2 secondi per spegnere l’unità.
GB
SILENZIAMENTO AUDIO
Premere brevemente per silenziare l’audio.
Note: • Regolando il volume quando l’unità è in silenziamento, l’audio viene ripristinato.
MUTE
Press briefly to cut the sound.
Note: • Doing the operation above again or
adjusting volume will release muting.
TURN ON/OFF THE POWER
1. Press to turn on the unit.
2. Press more than 2 seconds to power off.
ADJUST THE VOLUME
Rotate the knob on the panel or press
VOL +/- on the remote control to increase
or decrease the volume.
REGOLAZIONE VOLUME
Ruotare la manopola o premere i tasti
VOL+ e VOL- sul telecomando per regolare il volume.
PLAYING SOURCE SELECTION
Method 1 • Short press the SRC button on the panel
or remote control to cycle through all the available
sources.
Method 2 • In any mode, long press the
SRC button on the panel or remote control
to enter main source menu, then use navigate button to select the desired mode,
and press OK to confirm.
Note: • You should stop
switching when the playing
source you desired has been selected and
wait for some seconds, the unit
will auto enter the playing source
mode you have selected.
SELEZIONE SORGENTE DA RIPRODURRE
Metodo 1 • Premere brevemente il tasto SRC sul frontalino o sul telecomando fino a visualizzzare la sorgente
da riprodurre.
Metodo 2 • Premere per oltre 2 secondi
il tasto SRC sul frontalino o sul telecomando fino alla visualizzazione del menù
sorgenti.
Usare i tasti frecce per muoversi
nel menù e confermare la selezione con il tasto OK.
Note: • Non cambiare sorgente
dopo la conferma della selezione, l’unità impiega qualche
secondo per iniziare la riproduzione, attendere fino alla
visualizzazione sul display della
sorgente.
PARKING BRAKE
1. If ‘PRK SW’ cable is connected
to hand brake switch, the video
display of the TFT
monitor will be controlled by driving status, system
setup and input video sources.
2. When the car is moving ahead, if the video disc is
played, the screen appears “DO
NOT WATCH VIDEO WHILE DRIVING”. The above
warning screen will prevent the driver watching images. The passengers at the rear seats can watch
normally.
FRENO A MANO
1. Se il cavo ‘PRK SW’ è collegato al freno a mano, la visualizzazione sullo schermo
dipenderà dallo suo stato.
2. Quando l’auto è in movimento e si riproduce un filmato, sul display compare la scritta “DO NOT WATCH
VIDEO WHILE DRIVING”. Il messaggio avvisa il guidatore che non può guardare il video in movimento,
mentre i passeggeri posteriori possono continuare la
visione se l’unità è collegata ad un monitor da tetto o
poggiatesta.
WHEN REVERSE DRIVING
If the rear view video camera is connected, the unit
automatically switches to CAMERA
source during reverse driving. The unit returns to the
original work mode after the reverse
driving is done.
FASE DI RETROMARCIA
Quando è presente la retrocamera l’unità passa automaticamente alla visualizzazione sul display di quest’ultima all’innesto della retromarcia.
L’unità ritornerà nella visualizzazione normale appena
verrà ripristinata la marcia avanti.
7
Funzioni della manopola • Rotary knob menu
IT/GB
GB ROTARY KNOB MENU
IT FUNZIONI DELLA MANOPOLA
1.Ruotare la manopola per regolare il volume.
2.Premere brevemente la manopola per entrare nelle
impostazioni audio/video.
3.Premere la manopola per
accedere alle funzioni:
• AUDIO - EQ/Bassi/Medi/Alti
Bilanciamento/Fader, ruotare la
manopola per regolare il livello.
• VIDEO - Luminosità/Contrasto/
Saturazione, ruotare la manopola
per regolare il livello.
• EQ - Ruotare la manopola per
selezionare:
USER/FLAT/POP/ROCK/
CLASSIC/JAZZ
Con la funzione equalizzatore
attivata, la regolazione di bassi
o alti fa ricadere la modalità in
USER.
Quando l’equalizzatore non è
attivo l’unità riporta alti e bassi
all’ultima regolazione.
4. Premere la manopola più di 2
secondi per entrare nelle impostazioni di sistema, utilizzare
/ per muoversi nel menù e
selezionare la voce tramite OK.
1.Rotate the knob to adjust volume level.
2.Short press to access the A/V Setting menu.
3. Each press the knob to
change the • AUDIO - EQ/
Bass/Middle/Treble/Balance/
Fader, and rotate the knob to
adjust level.
• VIDEO - Bright/Contrast/Saturation, and rotate
the knob to adjust level.
• EQ: Turn the rotary encoder
to select: USER, FLAT, POPULAR, ROCK, CLASSIC, JAZZ.
With the equalizer function activated, if bass or treble is adjusted, the EQ Mode will revert
to “USER”. When the equalizer
function is activated, the most
recently selected bass/treble
levels cannot be adjusted.
When the equalizer function is
not active, the unit will return to
the most recently selected bass
and treble levels.
4. Press the knob more than 2
seconds to enter Setting mode,
then / and OK key to select
items.
GENERAL SETTING
BEEP: ON/ OFF - La funzione
BEEP permette di udire un tono
ad ogni accesso al menù.
LOUDNESS: ON/OFF - Durante l’ascolto di musica a basso volume la funzione
loudness permette una esaltazione delle basse e alte
frequenze.
TIME MODE: • 12 HOUR MODE: l’orologio sul display sarà visualizzato in formato 12 ore, ad esempio
11:18. • 24 HOUR MODE: l’orologio sul display sarà
visualizzato in formato 24 ore, ad esempio 20:32.
TIME ADJUST: Muoversi con i tasti / or / per
regolare ore e minuti. Tramite / si seleziona il segmento da regolare, impostare il valore con le frecce
/ .
MIRROR: ON/OFF - Questa opzione permette di convertire l’immagine della retrocamera in visione speculare. Ruotare la manopola per selezionare ON o OFF.
SWC (COMANDI AL VOLANTE)
Questa funzione permette di utilizzare i comandi
volante su vetture con protocollo resistivo con la possibilità di memorizzare fino a 6 comandi.
GENERAL SETTING
BEEP: ON/ OFF - The beep
tone feature allows the selection of an audible beep tone to
be heard each time the menu is accessed.
LOUDNESS: ON/OFF - When listening to music at
low volumes, this feature will selectively boost certain
bass and treble frequencies.
TIME MODE: • 12 HOUR MODE: the clock displays
in the type of 12 hours such as 11:18 AM. • 24 HOUR
MODE: the clock displays in the type of 24 hours such
as 20:18.
TIME ADJUST Press / or / key to set hour
and minute. Each time you press / to select one
segment of the clock display then you can press /
to put a clock right.
MIRROR: ON/OFF - This option allows for selection of
a mirror image view on a rear-camera. Turn the
rotary encoder to select “On” or “Off”.
SWC (STEERING WHEEL COMMANDS)
The Steering-wheel Commands function are assured
even on car-models fitted with Resistive-protocol, with
memorization-capacity of max. 6 commands.
8
Funzioni della manopola • Rotary knob menu
IMPOSTAZIONI DVD
TV SYSTEM: NTSC/PAL/AUTO
Seleziona il sistema TV nel menù
impostazioni.
TV TYPE: 4:3PS / 4:3LB / 16:9
Imposta il formato di visualizzazione dei filmati.
4:3 Pan Scan - Per monitor 4:3,
gli estremi destro e sinistro sono
tagliati
4:3 Letter Box - Per monitor 4:3,
compariranno due barre nere una in alto ed una in
basso dello schermo.
16:9 - Per monitor 16:9
IT/GB
DVD SETTING
TV SYSTEM: NTSC/PAL/AUTO
Select the TV system in the
setting menu.
TV TYPE: 4:3PS / 4:3LB / 16:9
Select TV type to watch wide
screen movies.
4:3 Pan Scan: For 4:3 TV, left
and right edges will be cut.
4:3 Letter Box: For 4:3 TV,
black bars will appear on top
and bottom.
16:9: For 16:9 wide screen TV.
PASSWORD
1.Press number button “ 0000 “ on the remote
control, then press the ENTER button to confirm.
2.Press the desired 4-digit password, and then press
ENTER button to confirm.
3.Record the password and keep it in a safe
place for future reference. If you forget the password,
please enter 0000 to reset a new password.
The password: 0000
RATING: 1 KID SAFE • 2 G • 3 PG • 4 PG13
5 PG-R • 6 R • 7 NC-17 • 8 ADULT
The rating of the disc is from 1 to 8:
(1) with the most limits when playing.
(8) with the least limits when playing.
Original setting: 8
Note:
The rating can be selected only under the password
unlocked status, and the limits can be worked only
under the password locked status.
PASSWORD
1. Premere sul tastierino numerico del telecomando
“0000” e premere ENTER per confermare.
2. Premere la sequenza di quattro numeri desiderata e
premere ENTER per confermare.
3. Memorizzare la password per un eventuale utilizzo
futuro. In caso di smarrimento della password, inserire
0000 per resettarla.
Password : 0000
Selezione grado di sicurezza: 1 KID SAFE • 2 G
3 PG • 4 PG13 • 5 PG-R • 6 R • 7 NC-17 • 8 ADULT
E’ possibile selezionare da 1 a 8 per il livello di sicurezza della visione:
(1) massimo delle limitazioni per la visione.
(8) nessuna limitazione alla visione.
Impostazione predefinita: 8
Nota:
Il livello di sicurezza può essere selezionato soltanto
se la password è sbloccata ed il limite Impostato avrà
effetto solo quando la password è attivata.
DEFAULT: RESTORE - If this item is selected, the
VM051 will return to original setting.
DEFAULT: RESTORE - Se viene selezionata questa
voce, il VM051 ritornerà alle impostazioni di fabbrica.
9
Funzioni della manopola • Rotary knob menu
IT/GB
IT IMPOSTAZIONE LINGUA
OSD LANGUAGE: Seleziona la lingua dei menù di
sistema.
AUDIO LANG: Seleziona la lingua
dei dialoghi nel DVD.
Nota: E’ possibile cambiare la
lingua premendo il tasto AUDIO
sul telecomando.
SUBTITLE LANG: Seleziona la
lingua dei sottotitoli nel DVD.
MENU LANG: Seleziona la lingua
del menù titoli nei DVD.
GB LANGUAGE SETTING
OSD LANGUAGE: Select language to display system
menu.
AUDIO LANG: Select the language of the dialogues (DVD).
Note: You can change the
language by pressing AUDIO
key of the remote controller.
SUBTITLE LANG: Select the
language of the subtitles (DVD).
MENU LANG: Select language
to display DVD menu.
RADIO SETTING
LOC_DX: LOC/DX: Seleziona la ricezione per stazioni
distanti o locali.
DX: La radio trasmetterà stazioni con segnali deboli e
forti.
LOCAL: La radio trasmetterà solo
stazioni con segnali forti.
RADIO SETTING
LOC_DX: LOC/DX: Choose radio distant or local.
DX: Stations with strong and weak signals can be
broadcast.
LOCAL: Only station with
strong signal can be
broadcast.
STEREO_MONO: STEREO/
MONO
Seleziona FM mono/stereo.
AF: ON/OFF
Attiva/Disattiva la frequenza alternativa (AF)
AF ON: funzione attivata.
AF OFF: funzione disattivata.
Attenzione: L’indicatore AF lampeggerà fino a quando
non si riceve il segnale RDS. Se il segnale RDS non è
disponibile disattivare la funzione AF
TA: ON/OFF
Attiva/Disattiva la ricezione degli annunci sul traffico
(TA). Quando la funzione TA è attiva l’indicatore sul
display lampeggia.
All’arrivo dell’annuncio l’indicatore TA sarà fisso sul
display.
Il VM051 passerà in modalità radio facendo ascoltare
l’avviso di traffico al volume impostato nella funzione
TA volume. Al termine dell’annuncio l’unità ritorna alla
modalità precedente come anche il livello del volume.
Quando la modalità TA è attiva, le funzioni SEEK,
SCAN, AMS saranno operative solo quando il codice
TP è stato ricevuto.
TA VOLUME: 00-34
Regolazione volume dell’annuncio sul traffico
REGIONAL: ON/OFF
REG ON: la funzione AF implementerà il codice regionale (del PI) e solo le stazioni con il codice regionale
STEREO_MONO: STEREO/
MONO
Choose FM mono/stereo.
AF: ON/OFF
Choose AF (Alternative
Frequency) on or off.
AF ON: function is activated.
AF OFF: function is disabled.
Remark: AF indicator on LCD will flash until RDS
information is received. If RDS service is not available
in your area, turn off the AF mode.
TA: ON/OFF
Choose TA (Traffic Announcements Identification) on
or off. When TA mode is turned on, the TA indicator will
blink. When traffic announcement is received, the TA
indicator will display. The unit will temporarily switch to
the tuner mode (regardless of the current mode) and
begin broadcasting the announcement at TA volume
level. After the traffic announcement is over, it will
return to the previous mode and volume level. When
TA is turned on, SEEK, SCAN, AMS function Rotary
Knob Menu can only be received or saved when traffic
program identification (TP) code is received.
TA VOLUME: 00-34
Choose TA-VOL level.
REGIONAL: ON/OFF
REG ON: AF function will implement the regional code
(of the PI) and only stations in the current region can
be tuned automatically.
10
Funzioni della manopola • Rotary knob menu
corrente saranno sintonizzate automaticamente.
REG OFF: la funzione AF ignorerà il codice regionale
(del PI) permettendo la sintonizzazione di tutte le stazioni.
CT: ON/OFF
Alcune stazioni trasmettono data e orario all’interno del
codice RDS, ma non è sempre corretto.
Selezionare ON per permettere all’unità di regolare in
base a questo segnale orario e data.
IT/GB
REG OFF: AF function will ignore the regional code (of
the PI) and stations in the other regions can also be
tuned automatically.
CT: ON/OFF
Some stations broadcast the time and date within the
encoded RDS signal. The clock time is automatically
adjusted when “CT” is set to “ON”.
BT Setting
PAIR: ON/OFF
Set pairing ON/OFF. If select ON, to return to BT main
IMPOSTAZIONI BLUETOOTH
menu.
PAIR: ON/OFF
AUTO CONNECT: ON/OFF
Impostare su ON per accoppiare
After disconnecting with your
il telefono.
mobile phone, the built-in
AUTO CONNECT: ON/OFF
bluetooth will send connection
Dopo la disconnessione con il
order automatically in 20s if you
telefono, il bluetooth proverà
have set the ‘AUTO CONNECT’
a riconnettersi nei 20 secondi
to ‘ON’.
successivi se questa funzione è
AUTO ANSWER: ON/OFF
impostata su ON
The built-in bluetooth changes
AUTO ANSWER: ON/OFF
the work mode to phone mode
Il bluetooth passerà automatiautomatically and displays the
camente alla modalità telefono
calling number when one call is
all’arrivo di una chiamata e accetterà la conversazione dopo 3/4 squilli quando l’opzione coming in.
The built-in bluetooth will put through the call
è impostata su ON
automatically if you have set the ‘AUTO ANSWER’
Diversamente la risposta alla chiamata dovrà essere
option to ‘ON’, whereas you should put through the
effettuata manualmente.
call manually.
PIN CODE
PIN CODE
In base alle versioni di VM051 il PIN per l’accoppiaAccording to the versions of the VM051 PIN for pairing
mento è “0000” oppure “1234”.
E’ possibile modificarlo con questa funzione inserendo is “0000” or “1234”. If you want to set a new pin code,
please input the desired 4-digit password by pressing
le 4 cifre desiderate tramite il telecomando e conferthe number button on the remote conrol, and then
mando con ENTER.
press ENTER button to confirm.
RESET: ON
Effettua il reset del bluetooth e riporta il PIN alle impo- RESET: ON
When RESET ON is selected, the Bluetooth system will
stazioni di fabbrica “1234”.
be cleared and return to default setting ,and the pin
PAIR NAME
code also changed to “1234”.
Mostra il nome che verrà visualizzato sul telefono:
PAIR NAME
Phonocar.
Display the BT device name: Phonocar.
11
Modalità radio • Radio mode
IT/GB
IT Premere SRC sul pannello frontale o sul teleco-
GB Press the SRC button on the front panel or remote
control to switch to the Radio source.
mando per passare alla modalità radio.
1
4
5
6
7
8
2
3
1. Indicatore sorgente / Source Indicator
2. Memoria preselezionata / Current Preset Channels
3. Orario / Time/Clock
4. Banda AM/FM / AM/FM Band
5. Informazioni RDS / RDS Information
6. Frequenza radio / Radio Station Frequency
7. Indicatore EQ / EQ Indicator
8. Indicatore AF / AF Indicator
SELEZIONARE UNA BANDA RADIO
SELECTING A BAND
Premere BAND per selezionare le seguenti bande radio Press BAND once or more to select FM1 - FM2 - FM3
FM1-FM2-FM3-AM1-AM2.
AM1 - AM2.
SELEZIONARE UNA STAZIONE
Premere
oppure
per sintonizzare un stazione.
Sintonia radio
- RICERCA AUTOMATICA
Premere
oppure
per sintonizzarsi su una stazione successiva o precedente.
- RICERCA MANUALE
Premere e mantenere premuto
oppure
per
entrare in ricerca manuale. Premere nuovamente i tasti
per spostare la frequenza passo passo.
Nota: Durante la ricerca manuale se la pausa tra due
operazioni supera i 5 secondi l’unità ritorna in modalità
ricerca automatica.
MEMORIE STAZIONI
E’ possibile memorizzare 6 stazioni per ogni banda (18
FM - 12 AM).
Memorizzazione
- Auto memorizzazione
1. Selezionare una banda (se necessario).
2. Premere AMS brevemente per effettuare scansione
delle memorie P1-P6 per 5 secondi ognuna.
3. Tenere premuto AMS più di 2 secondi, le 6 stazioni
con segnale più forte saranno automaticamente memorizzate.
- Memorizzazione manuale
1. Selezionare una banda (se necessario) e ricercare
una stazione.
2. Tenere premuto sul telecomando il numero della memoria dove si vuole memorizzare.
3. Il numero verrà visualizzato sul display.
Richiamo di una stazione
1. Selezionare una banda (se necessario).
2. Premere il numero della memoria desiderato.
SELECTING A STATION
Press the
or
tuning button to tune a station.
Tuning
- AUTO SEEK Press the
or
buttons to seek
the next/previous station automatically.
- MANUAL SEEK Press and hold the
or
buttons to enter manual tuning mode. Press the buttons
again to move the radio frequency number up or
down one step.
Note: During manual seeking, if the pause between
two operating steps is longer than 5 seconds, press the
or buttons, the unit will enter auto seeking.
PRESET MODE
Six numbered preset buttons store and recall stations
for each band. The stored stations (P1-P6) for the
current band can be viewed on the screen.
Storing Stations
- Auto storing
1. Select a band (if needed).
2. Press AMS briefly to scan the preset station P1 - P6
for 5 seconds each.
3. Hold AMS more than 2 seconds, the 6 strongest
available stations will be automatically saved in the
preset button (numbers 1-6).
- Manual Storing
1. Select a band (if needed), then select a station.
2. Press and hold a preset button (numbers 1-6) on the
remote control.
3. The preset number and station is displayed
and highlighted.
Recalling a Station
1. Select a band (if needed).
2. Press a remote control preset button (numbers 1-6)
to select the corresponding stored station.
12
Modalità radio • Radio mode / RDS (Radio Data System)
IT/GB
IT Il servizio RDS varia in base alle aree, le seguenti
informazioni e funzioni saranno disponibili solo dove è
presente questo servizio.
GB RDS service availability varies with areas. Please
understand if RDS service is not available in your area,
the following service is not available.
FUNZIONI RDS
AF (Frequenza Alternativa): Quando questa funzione
è attiva ed il segnale della stazione è debole, la radio
ricercherà automaticamente la stessa stazione con il
medesimo PI (identificativo programma radio) su un’altra frequenza dove il segnale è più forte.
PS (Nome Emittente): Il nome dell’emittente viene visualizzato al posto della frequenza radio.
RDS BASICS
AF (Alternative Frequency): When the radio signal
strength is poor, enabling the AF function will allow the
unit to automatically search another station with the
same PI (program identification) as the current station
but with stronger signal strength.
PS (Program Service name): The name of station will be
displayed instead of frequency.
ANNUNCIO INFORMAZIONI SUL TRAFFICO
Alcune stazioni RDS trasmettono informazioni sul
traffico con un codice che ne permette la priorità di
ascolto.
TP: (Programma Identificazione Traffico) Trasmissione
informazioni sul traffico.
TA: (Identificazione Annuncio Traffico) Annuncio sulle
condizioni del traffico.
EON: (Annunci Altre Stazioni) Quando viene ricevuto il
dato EON, l’indicatore si Illumina e le funzioni TA e AF
vengono implementate.
TA: Le informazioni sul traffico possono essere ricevute
dalla stazione corrente o da altre.
AF: La lista delle frequenze alternative sono aggiornate
dall’ EON.
EON abilità la radio all’utilizzo completo delle informazioni RDS. In questo modo la lista delle stazioni AF
viene costantemente aggiornata. Se viene selezionata
una stazione intorno a casa, sarà possibile ricevere
la stessa stazione su una frequenza alternativa con
miglior segnale, oppure un’altra stazione con lo stesso
programma musicale. EON tiene inoltre traccia delle
stazioni con trasmissione TP per
una ricezione più veloce.
TRAFFIC ANNOUNCEMENTS
Some RDS FM stations periodically provide traffic information.
TP: (Traffic Program Identification) Broadcasting of traffic information.
TA: (Traffic Announcements Identification) Radio announcements on traffic conditions.
EON: (Enhanced Other Networks)
When EON data is received, the EON indicator lights
and the TA and AF functions are enhanced.
TA: Traffic information can be received from the current
station or stations in other network.
AF: The frequency list of preset RDS stations is updated by EON data. EON enables the radio to make fuller
use of RDS information. It constantly updates the AF list
of preset stations, including the one that currently tuned
into. If you preset a station around the area at your
home, you will later be able to receive the same station
at an alternative frequency, or any other station serving
the same program, EON also keeps track of locally available TP stations for quick reception.
PTY Reception (Program Type)
RDS FM stations provide a program type identification signal.
Example: news, rock, info, sport,
etc.
PTY Mode: Press BAND more
than 2 seconds to turn
on the Program Type reception,
the previous PTY type is shown,
then use / to select the desired
program type. The selected PTY
type is shown and searching
starts if no other function is selected for 2 seconds. If there is
no corresponding program type,
NO PTY is shown and the unit will
return to normal mode.
PTY (Tipologia programma
dell’emittente)
RDS invia un codice identificativo
del tipo di programma dell’emittente Esempio: news, rock, info,
sport, ecc.
PTY Mode: Premere BAND più
di 2 secondi per entrare nel menù
del PTY. Verrà visualizzato l’ultimo
PTY, utilizzare le frecce per selezionare il programma desiderato.
L’unità inizierà a ricercare stazioni
con il PTY scelto, se non viene
trovata alcuna stazione verrà visualizzato NO PTY.
13
Modalità Disco/USB/SD card • Disc/USB/SD card mode
IT ACCESSO ALLA MODALITÀ DISCO
Se il disco è già presente all’interno premere il tasto
SRC sul pannello frontale o sul telecomando per passare sulla sorgente DISCO.
Per riprodurre un file da USB/SD card (supporto già
inserito) scegliere sorgente CARD o USB.
Il display mostrerà la seguente schermata:
1
2
IT/GB
GB ACCESSING DISC MODE
If a disc is already in the disc slot but is not playing,
press the SRC button on the front panel or on the
remote control to switch to the DISC source. To play
files from an SD or USB that is already inserted, choose
the CARD or USB source. The disc playback screen is
indicated below:
3
4
1. Indicatore sorgente / Source Indicator
2. Traccia corrente-totali / Current-total Track
3. Nome del file / Name of the song
4. Selezione Musica / Audio Folder
6
5. Selezione Immagini / Picture Folder
6. Selezione Video / Video Folder
INSERIMENTO DISCO
INSERT A DISC
Premere
per abbassare il frontalino. Inserire il disco Press
to flip down the panel. Insert the disc into the
nella feritoia.
slot.
Nota: Fare attenzione a non inserire un disco quando
Note: Please confirm whether there is a disc in
ne è già presente un altro all’interno.
the unit before you insert another one.
5
ESPULSIONE DISCO
Premere
per abbassare il frontalino e premere
per espellere il disco.
Nota: E’ possibile espellere Il disco a unità spenta, non
si accenderà una volta terminata l’espulsione.
Eject the Disc
Press
to flip down the panel. Press to eject the
disc.
Note: You can eject a disc with the unit powered
off. The unit remains off after the disc is ejected.
RIPRODUZIONE DISCO
1. Quando il disco è inserito Il display visualizza LOAD.
Per files MP3 o disco con files misti, la lettura potrebbe
impiegare oltre 1 minuto.
2. ERROR viene visualizzato in caso di errore nel caricamento.
3. Per VCD/CD, l’icona VCD o CD comparirà sul display.
4. Durante la riproduzione di file MP3/WMA compare la
relativa icona sul display.
5. L’icona DVD compare sul diplay quando è stato
inserito un DVD e successivamente comparirà il menù
titoli. Premere ENTER o per avviare la riproduzione.
DISC PLAYBACK
1. When disc inserted, display shows LOAD. For MP3
or disc with mixed files, reading time may exceed 1
minute.
2. ERROR will be displayed if error found in disc operation.
3. For VCD/CD, VCD or CD icon will appear on the
display.
4. While MP3/WMA files playback, MP3/WMA icon will
appear on the display.
5. For DVD, DVD icon will appear on the display and
TITLE appears. Press ENTER or
to play.
RIPRODUZIONE FILE AUDIO/VIDEO/IMMAGINI
Durante la riproduzioni di files AUDIO/VIDEO/IMMAGINI viene visualizzata la lista Category/Folder/File in
alto sul display che permette di vedere l’elenco dei
titoli, della traccia o il nome della cartella su un disco.
Se viene selezionata la cartella si potrà visualizzare il
suo contenuto.
AUDIO/PICTURE/VIDEO FILE PLAYBACK
When AUDIO/PICTURE/VIDEO file is played, Category/
Folder/File list will be displayed on the screen, and file/
folder name being played will be displayed on top. The
list lets you see the list of track titles or folder names on
a disc. If you select a folder on the list, you can view its
contents.
FILES AUDIO
1. Premere ESC per tornare al menù delle playlist.
FOR AUDIO FILES
1. Press ESC to return to playlist menu.
14
Modalità Disco/USB/SD card • Disc/USB/SD card mode
2. Utilizzare / per selezionare la cartella AUDIO.
3. Premere OK, sul frontalino o ENTER sul telecomando per visualizzare tutte le tracce audio disponibili.
4. Muoversi con le frecce / e posizionarsi sul file
desiderato tramite le frecce / . Premere OK,
sul frontalino o ENTER sul telecomando per avviare la
riproduzione.
5. Durante la riproduzione premere per interromperla
e per riprenderla.
FILES IMMAGINI
1. Premere ESC per tornare al menù delle playlist.
2. Utilizzare / per selezionare la cartella IMMAGINI.
3. Premere OK, sul frontalino o ENTER sul telecomando per visualizzare tutte le immagini disponibili.
4. Muoversi con le frecce / e posizionarsi sul file
desiderato tramite le frecce / .
Premere OK, sul frontalino o ENTER sul telecomando per avviare la riproduzione.
5. Durante la riproduzione premere per interromperla
tornare alla lista dei files.
FILES VIDEO
1. Premere ESC per tornare al menù delle playlist.
2. Utilizzare / per selezionare la cartella VIDEO.
3. Premere OK, sul frontalino o ENTER sul telecomando per visualizzare tutte le tracce audio disponibili.
4. Muoversi con le frecce / e posizionarsi sul file
desiderato tramite le frecce / .
Premere OK,
sul frontalino o ENTER sul telecomando per avviare la riproduzione.
5. Durante la riproduzione premere per interromperla
tornare alla lista dei files.
Nota: Durante la selezione delle cartelle, premere ESC
per tornare alla cartella superiore, se ci si trova nella
cartella principale il tasto ESC non potrà essere utilizzato.
VISUALIZZAZIONE ID3 TAG
L’unità supporta ID3 TAG versione 2.0
INSERIMENTO FILE E NOME
CARTELLA
Solo i file audio nominati con i
caratteri presenti nella lista sono
visualizzati correttamente. L’utilizzo di ogni altro carattere causerà la visualizzazione errata.
IT/GB
2. Use / to select AUDIO folders.
3. Press OK, on the front panel or ENTER on the remote control to display all available audio file folders.
4. Use / to enter file list and use / to select desired file, press OK, on the front panel or ENTER on
the remote control to start play.
5. During the file playing, press will enter power on
logo, then press to return.
FOR PICTURE FILES
1. Press ESC to return to playlist menu.
2. Use / to select PICTURE folders.
3. Press OK, on the front panel or ENTER on the remote control to display all available picture file folders.
4. Use / to enter file list and use / to select desired file, press OK, on the front panel or ENTER on
the remote control to slide show the pictures, and press
PROG to select picture showing style.
5. During the file playing, press to stop and return to
the sub-root.
FOR VIDEO FILES
1. Press ESC to return to playlist menu.
2. Use / to select VIDEO folders.
3. Press OK, on the front panel or ENTER on the remote control to display all available video file folders.
4. Use / to enter file list and use / to select
desired file, press OK,
on the front panel or ENTER
on the remote control to start play.
5. During the file playing, press to stop and return to the
sub-root.
Note: During the folder selecting, press ESC to the
upper folder (parent folder). If the uppermost folder is
listed, ESC cannot be used.
ENTERING ID3 TAG
This unit supports ID3 tag version 2.0.
ENTERING FILE AND FOLDER NAMES
Names using the code list characters are the only file
names and folder names that
can be entered and displayed.
Using any other character will
cause the file and folder names
to be displayed incorrectly.
A file name entered with characters not on the code list may
not play correctly.
MP3 PLAYING ORDER
When selected for playing, files
and folders (Folder Search, File
Search or Folder Select) are
ORDINE DI RIPRODUZIONE
MP3
Quando si seleziona files e
cartelle per la riproduzione, la
15
Modalità Disco/USB/SD card • Disc/USB/SD card mode
riproduzione avverrà nell’ordine in cui sono stati scritti
sul supporto che potrebbe essere differente da quello
desiderato. E’ possibile impostare
( )
l’ordine di riproduzione assegnando
un numero all’inizio del nome del file/
cartella da 01 a 99.
Per esempio un supporto con la
seguente struttura cartelle/files è
soggetto alle funzioni ricerca cartella,
ricerca file o seleziona cartella come
mostrato in figura:
Il lettore riconoscerà solamente 3 livelli
di cartelle e non mostrerà cartelle contenente solo altre cartelle.
Nell’esempio, l’unità mostrerà le cartelle 2,3,5 e 7, ma non la 1 e la 6 poiché non contengono tracce dirette.
PROTEZIONE ELETTRONICA ANTISHOCK
• 10 secondi per CD-DA (CDA)
• >45 secondi per MP3 registrati a
44.1kHz, 128kbps
• >90 secondi per WMA registrati a
44.1kHz, 128kbps
INTERRUZIONE TEMPORANEA RIPRODUZIONE
• Durante la riproduzione premere per interrompere
la riproduzione.
• La scritta “PAUSE” verrà visualizzata sullo schermo.
Premere nuovamente per riavviare la riproduzione.
IT/GB
accessed in the order in which they were written to the
media. As a result, the order in which they are expected
to be played may not match the order
in which they are actually played. You
may be able to set the order in which
MP3/WMA files are to be played by
assigning file names beginning with
play sequence numbers such as “01”
to “99”. For example, a medium with
the following folder/ file hierarchy is
subject to Folder Search, File Search
or Folder Select as shown below.The
player will only recognize three folder
levels and does not display folders
containing only other folders. In the
example above, the unit will display
folders 3, 4, 6, and 8, but not 2 and 7
since they do not contain any tracks
directly. Folder 5 is not recognized at
all since it is at the fourth level.
ELECTRONIC SHOCK PROTECTION
• 10 seconds for CD-DA (CDA)
• >45 seconds for MP3 recorded at 44.1kHz, 128kbps
• >90 seconds for WMA recorded at 44.1kHz, 128kbps
STOP PLAYBACK TEMPORARILY
• During playback, press
to pause playback.
• Display “PAUSE” in the TV screen. Press again to
continue playback.
INTERRUZIONE COMPLETA RIPRODUZIONE
Durante la riproduzione di DVD, VCD, CD, MP3:
1.Premere una volta per interrompere la riproduzione, la posizione verrà salvata. Premere per riprendere dalla stessa posizione.
2.Premere due volte per cessare la riproduzione.
Premendo la riproduzione riprenderà dall’inizio.
STOP PLAYBACK ENTIRELY
During DVD, VCD, CD, MP3 playback:
1. Press key once stopping the playback and the relevant location on the disc is saved, press to resume the
playback from the saved disc location.
2. Press twice to cease the playback.
Press to start the playback from the beginning.
SELEZIONE TRACCIA DESIDERATA
• Premere
o
per passare alla traccia precedente/successiva.
• Utilizzare i tasti 1-9, 0, 10+ sul telecomando per selezionare la traccia desiderata.
SELECT DESIRED TRACK
• Press
or
to skip to the next /prevoius track.
• Use 1-9 and 0, 10+ buttons on the remote control to
select desired track number.
AVANTI/INDIETRO VELOCE IN RIPRODUZIONE
Premere
o
per 2 secondi e selezionare x2, x4,
x8, x20 per avviare la riproduzione veloce. Premere
brevemente per riprendere la riproduzione normale.
FAST FORWARD/BACKWARD DURING PLAYBACK
Press
or
for more than 2 seconds once or
more to select X2, X4, X8, X20, to fast backward or forward track during playback. Press briefly to playback
again.
16
Modalità Disco/USB/SD card • Disc/USB/SD card mode
IT/GB
REPEAT
RIPETI
Durante la riproduzione premere RIPETI una o più volte. During playback, press REPEAT once or more.
• Icona RPT apparirà sul display.
• Per CD/VCD: sul display apparirà RPT ONE ➞ RPT
ALL ➞ RPT OFF.
• Per DVD: sul display apparirà RPT CAPITOLO ➞ RPT
TITOLO ➞ RPT OFF.
• Per disco File: Sul diaply apparirà RPT UNO ➞ RPT
DIR ➞ RPT TUTTI ➞ RPT OFF.
Nota: Se non si seleziona RPT, quando il disco terminerà il sistema si fermerà. Senza altro comando dopo 5
minuti andrà in modalità stand by.
RIPETI A-B
Seleziona il passaggio desiderato per ripetere la riproduzione.
• Premere A ➞ B per selezionare il punto d’inizio. Il
display mostrerà RIPETI A.
• Premere A ➞ B di nuovo per selezionare il termine. Il
display mostra RIPETI A ➞ B e inizia la riproduzione il
passaggio selezionato.
• Premere A ➞ B nuovamente per uscire. Il display
mostrerà A ➞ B CANCEL.
• RPT icon will appear on the display.
• For VCD/CD: Display appears RPT ONE ➞ RPT ALL
➞ RPT OFF.
• For DVD: Display appears RPT CAPITOLO ➞ RPT
TITOLO ➞ RPT OFF.
• For File disc: Display appears RPT UNO ➞ RPT DIR
➞ RPT TUTTI ➞ RPT OFF.
Note: If you do not select RPT on, when the entire disc
or TITLE playback has finished, the system will stop. If
no other control, after 5 minutes the unit will turn into
standby mode.
REPEAT A B
Select desired passage to repeat playback.
• Press A ➞ B once to select starting point. Display
shows RIPETI A.
• Press A ➞ B again to select ending point. Display
shows RIPETI A ➞ B , and selected passage start to
replay.
• Press A ➞ B once again to exit. Display shows A ➞ B
CANCEL.
PBC - PLAYBACK CONTROL
1. If you insert a VCD with PBC, playback starts from
the beginning of the 1st track automatically.
2. Press PBC to show menu, use
/
or digit
button to select desired track. Press to stop. Press PBC
again to exit menu.
PBC - CONTROLLO PLAYBACK
1. Se si inserisce un VCD con PCB, la riproduzione inizia dalla prima traccia automaticamente.
2. Premere PCB per visualizzare il menu, utilizzare
/
o i numeri per la traccia desiderata. Premere
per interrompere. Premere PBC ancora per uscire dal
menu.
GOTO
Goto desired track/chapter or time point directly.
Press GOTO button on the remote control, track or
DVD Title/Chapter and time display on top of the
screen. Cur rent i tem is highlighted. Use / to select
desired item. Use digit button to select number. Press
ENTER to confirm.
GOTO
Premere GOTO sul telecomando, la traccia o il capitolo/titolo DVD e il tempo appariranno nella parte
superiore dello schermo. La riproduzione corrente è
evidenziata, usare / per selezionare quella desiderata. Usare i tasti numerici per selezionare il numero.
Premere ENTER per confermare.
PROGRAM
Premere PROG per entrare nella lista programmazione.
Usare / o / e i tasti numerici per inserire il numero.
Per i dvd o i file disc selezionare titolo o numero del capitolo. Per VCD e CD slezionare numero della traccia
Premere per riprodurre, o muovere il cursore e selezionare PLAY premendo ENTER.
Se si vuole cancellare la lista muovere il cursore su
CLEAR e premere ENTER.
Premere nuovamente PROG per uscire dalla modalità.
PROGRAM
- Press PROG to enter program list. Use / or /
cursor and digit button to enter number.
For DVD and File disc, select title and chapter number.
For VCD and CD, select track number.
Press to play, or move the cursor to select “PLAY”
and press ENTER to play.
If you want to delete the list, move the cursor to
“CLEAR”, press ENTER to delete all the list set before.
Press PROG again to exit program play.
17
Modalità Disco/USB/SD card • Disc/USB/SD card mode
IT/GB
SELEZIONE AUDIO DVD
Premere AUDIO per selezionare la lingua audio che si
desidera nel DVD multilingua.
DVD AUDIO SELECT
Press AUDIO to select audio language to listen if the
DVD has multiple audio languages.
SELEZIONE AUDIO VCD
Premere AUDIO per selezionare il canale audio da
ascoltare, L ➞ R ➞ MIX MONO ➞ STEREO premere
ancora per riselezionare.
VCD AUDIO SELECT
Press AUDIO to select audio channel to listen.
SELEZIONE TITOLO DVD
Premere TITLE per visualizzare il titolo e la lista capitoli,
usare i cursore o digitare il numero, premere ENTER
per riprodurre.
DVD TITLE SELECT
Press TITLE to display title or chapter list, use
cursor or digit number to select, press ENTER
to play.
DVD SUBTITLE SELECT
Press SUB.T to select the subtitle language
SELEZIONE SOTTOTITOLI DVD
Premere SUB.T per selezionare la lingua dei sottotitoli to show if the DVD has multiple language
da mostrare se il DVD è dotato di sottotitoli multilingua. subtitles.
DVD ANGLE SELECT
SELEZIONE ANGOLO DVD
Premere ANGOLO per selezionare i differenti angoli di Press ANGLE to select different angle to view
if the DVD has multiple-angle views.
visione se il DVD è dotata.
MIRROR IMMAGINE
Quando si visualizza un’immagine, premere ripetutamente per effettuare il mirror verticale dell’immagine,
e premere ripetutamente per effettuare il mirror in
orizzontale.
PICTURE MIRROR
When you view a picture, press repeatedly to mirror
the picture vertically, and press repeatedly to mirror
the picture horizontally.
ZOOM
Press ZOOM button, the picture will be
ZOOM
X2 ➞ X3 ➞ X4 ➞ X1/2 ➞ X1/3 ➞ X1/4 ➞ OFF
Premere il tasto ZOOM per ingrandire l’immagine.
X2 ➞ X3 ➞ X4 ➞ X1/2 ➞ X1/3 ➞ X1/4 ➞ OFF premere zoomed accordingly.
ancora per riselezionare.
18
Funzione Bluetooth • Bluetooth mode
IT/GB
IT ACCESSO ALLA MODALITÀ BLUETOOTH
GB ACCESSING BLUETOOTH MODE
Premere tasto SRC sul pannello o sul telecomando per Press the SRC button on the front panel or remote conentrare in Bluetooth
trol to switch to the Bluetooth source.
ACCOPPIAMENTO
Usare la funzione per stabilire una connessione tra
unità e telefono cellulare.
Premere la manopola per 2 secondi per entrare nei
Settaggi, poi usare / per selezionare i settaggi BT,
poi utilizzare / o / per passare l’opzione PAIR
da OFF in ON.
Premere ESC per tornare al menù principale. “IN ATTESA DI ACCOPPIAMENTO” apparirà sullo schermo
Attivare la funzione Bluetooth sul
proprio cellulare, mantenersi ad
una distanza massima di 3 mt
dall’unità e iniziare la ricerca di
dispositivi bluetooth.
Quando apparirà il nome
Phonocar è possibile selezionarlo.
A questo punto è richiesto i codice di accesso, inserire 1234 e
l’accoppiamento Bluetooth verrà
effettuato automaticamente.
Alcuni cellulari chiederanno la conferma della connessione.
Nota: La rubrica scaricata non sarà in ordine alfabetico.
Sincronizzazione rubrica non compatibile con
iPhone.
INTERROMPERE ACCOPPIAMENTO
Si può interrompere accoppiamento o disconnettersi
nel seguente modo:
Entrare nel settaggio BT, passare da PAIR ON a OFF,
poi premere ESC per tornare al menù principale. Dopo
aver disconnesso, Nessun Dispositivo apparira sullo
schermo l’icona Bluetooth sparirà.
ATTESA CHIAMATA IN ARRIVO
(Se il cellulare è dotato)
Durante la conversazione o nello streaming audio Bluetooth se abbiamo una chiamata in arrivo sullo schermo
apparirà la scritta “347 3312574 RISPONDI?”. Se si
preme si interrompe la conversazione in corso e si
risponde a quella in arrivo. Se si preme si rifiuta la
chiamata in arrivo e si continua con quella corrente.
TRASFERIMENTO VOCE
Durante la conversazione, premere per trasferire
l’audio dall’unità al cellulare, e premere nuovamente
per trasferire l’audio dal cellulare all’unità.
Alcuni cellulari trasferiranno l’audio dall’unità a se stessi
quanto si risponde alla chiamata
PAIRING
Use this function to establish a connection between the
unit and your mobile phone.
Press the knob more than 2 seconds to enter Setting
mode, then use / key to select BT setting item,
and use / o / , key to switch the PAIR: ON/OFF
options to ON.
Press ESC to return to Bluetooth main menu.
“WAITING FOR PAIRING” will appear on the screen.
Turn on Bluetooth function of
your mobile phone, keep phone
within 3 meters to the unit and
start to search for Bluetooth
devices. After the name of the
Bluetooth module “Phonocar”
appears on the pairing list on
your mobile phone, you should
select it. At this time, a pairing
code is required. Enter the pairing
code (“1234” by default) and
the Bluetooth pairing will process automatically. Some
mobile phones may instruct you to select connecting or
disconnecting, please select connecting.
Note: The downloaded phonebook will not be in alphabetical order.
Phonebook download not available on iPhone.
STOP PAIRING
You can stop pairing or disconnecting in this following
way: Enter BT Setting menu, switch the PAIR: ON/ OFF
options to OFF, then press ESC to return to Bluetooth
main menu. After disconnecting,“NO DEVICE” will
appear on the screen and the Bluetooth icon will disappear.
INCOMING PHONE WAITING
(Only the mobile phone with this function)
In the mode of communication or BT AUDIO (MUSIC
PLAYING), if there is a call coming in, the TFT screen
will appear “347 3312574 ANSWER?”. If you press
key to stop communication you are making, and
receiving the incoming phone. If you press key on to
reject the incoming call, and resume the former communication.
VOICE TRANSFER
During talking, press key to transfer audio from the unit
to your mobile phone, and press key again to transfer
audio from your mobile phone to the unit.
19
Funzione Bluetooth • Bluetooth mode
AUDIO BLUETOOTH
(Su cellulari dotati di funzione A2DP o AVRCP)
Dopo aver accoppiato il dispositivo, aprire il player
audio nel menù Bluetooth e settare la modalità trasmit
in Bluetooth. Questa volta, sullo schermo dell’unità
apparirà la scritta Musica in riproduzione. E l’audio
verrà trasferito dal cellulare all’unità. Alcuni cellulari
chiederanno la conferma della connessione. Dopo aver
trovato l’unità sotto il nome “Phonocar” nel cellulare,
connettersi e inserire il codice di accesso che in base
alle versioni è “0000 oppure 1234”. Durante la riproduzione audio si può premere sul telelecomando per
passare da Play a Pausa e premere
/
sul telecomando o sul pannello.
LOG
Dopo l’accoppiamento nel menù Bluetooth premere –
per visualizzare lo storico chiamate.
1. Chiamate perse.
Fare una chiamata usando la lista chiamate
perse. Premete i tasti / per
cercare il numero desiderato nella
lista.
2. Chiamate effettuate.
Fare una chiamata usando
la lista chiamate effettuate. Premete i tasti / per cercare il
numero desiderato nella lista.
3.Chiamate ricevute.
Fare una chiamata usando
la lista chiamate ricevute. Premete i tasti / per cercare il numero desiderato nella lista.
NOTE GENERALI SUL BLUETOOTH
1. Per cellulari N7X, N9X, Philips, Sony Ericsson, Samsung durante i nostri test, dopo una accoppiamento
risultato effettuato, l’unità risultava ancora in attesa.
A questo punto bisogna cercare il dispositivo
“Phonocar” nella lista dei dispositivi sul cellulare. Nel
menù sottostante, selezionare connessione così nello
schermo dell’unità apparirà OK. Altrimenti nessuna
voce si sentirà nella comunicazione. Alcuni cellulari
come Philips, quando riproducono in A2DP bisogna
entrare nella modalità riproduzione cercare il dispositivo
Phonocar e riconnettersi.
2. Durante l’accoppiamento, alcuni tipi di cellulari indicano come procedere, per esempio quando si fa una
chiamata con l’unità, ma non si sente nessuna voce, il
motivo è che la voce del cellulare no è stata trasferita
all’unità. I cellulari SAMSUNG possono indicare come
fare per trasferirla.
3. In base al cellulare se è selezionata la modalità pri-
IT/GB
Some mobile phones will transfer audio from the unit to
themselves once the incoming call is answered.
BT AUDIO
(Only the mobile phone with A2DP & AVRCP functions)
After pairing successfully, in the mode of Bluetooth main
menu, open the audio player of your mobile phone and
set the transmit mode to Bluetooth. At this time, the unit
screen will appear “MUSIC PLAYING”, and the audio
will be transferred from the mobile phone to the unit.
Some mobile phones may instruct to connect with the
unit. After found the Bluetooth device name “Phonocar”
on mobile phone, you should select to connect and that
according to the versions input the pairing code “0000”
or “1234”. When music playback, you can press on
the remote control to switch to play/pause, and press the
/
key on the front panel and remote control.
LOG
After pairing successfully, in the mode of Bluetooth main
menu, press key to select dialling history.
1. Missed Call.
Making a phone call using
missed call history.
Press / button to search for
desired record on the list.
2. Dialed Cal.
Making a phone call using
the dialled number history.
Press / button to search for
desired record on the list.
3. Received Call.
Making a phone call using the received call history. Press / button to search for desired record on
the list.
GENERAL NOTES FOR BLUETOOTH
1. For N7X, N9X, PHILIPS, Sony Ericssion,SAMSUNG
mobile phones, during our test, after the mobile phones appear connection successful, the unit still appear
waiting for pairing. At this time you must find the unit’s
Bluetooth module name “Phonocar” on the pairing list
on your mobile phone and select it. In the submenu,
select connecting, then the unit will appear pair OK.
Otherwise, there is no voice coming out when communicating, though the mobile phone has already displayed pair OK. Some mobile phones, such as PHILIPS,
when it playbacks A2DP, you must in its playbacking
mode, find the unit’s “Phonocar” and reconnect (check
your mobile phone whether has the A2DP & AVRCP
functions).
2. When pairing, some types of mobile phone can instruct you how to operate, for example, when you make
20
Funzione Bluetooth • Bluetooth mode
vata quando si fa una chiamata con l’unità potrebbe
accadere che invece di trasferire la voce il bluetooth si
disconnetta fino a quando la conversazione non termina. Certi cellulari necessitano di effettuare accoppiamento nuovamente.
4. Il nome dei dispositivo bluetooth deve essere scritto
in numeri e lettere.
5. Dopo aver effettuato l’accoppiamento, se non c’è
nessun suono verificare che l’audio stereo del Bluetooth sia attivo.
ATTENZIONE!!!
1)La sincronizzazione della rubrica non è compatibile con iPhone.
2)La sincronizzazone della rubrica non sarà
eseguità rispettando l’ordine alfabetico dei nomi.
IT/GB
a phone call with the unit, but no voice comes out, it is
because the mobile phone voice doesn’t be transferred
to the unit. The SAMSUNG mobile phone can instruct
voice should be transferred to Bluetooth device.
3. Depending on the mobile phone, if private mode is
selected, when you make a phone call with the unit,
when received, the voice can be transferred to the mobile phone. But sometime the Bluetooth maybe disconnect till the communication ends, and connects your
mobile phone and the unit automatically. Some mobile
phones maybe require you to perform again the pairing
operation.
4. For mobile phone, the Bluetooth device name must
be pr imary symbols or numbers. Otherwise, some unpredictable issues may occur during the Bluetooth
devices connecting and making phone call.
5. After paired OK, if no sound produced, please check
the Bluetooth stereo audio whether is switched to ON.
WARNING!!!
1) Phonebook download not available on iPhone.
2) The phonebook is not in alphabetical order.
21
Caratteristiche tecniche • Specifications
IT/GB
GENERALI
Alimentazione 12VDC (11V-16V), Test voltage 14.4V, negative ground
Watt max
45W x 4 channels
Watt rms
20W x 4 channels (4 10% T.H.D.)
Impedanza altoparlanti
4-8ohm
Voltaggo preamplificatore 2.0V (CD play mode: 1KHz, 0dB, 10K load)
Fusibile 15A
Dimensioni (LxAxP) 178 x 50 x 164mm
Peso 1.38kg
Aux-in 500mV
GENERAL
Power supply 12VDC (11V-16V), Test voltage 14.4V, negative ground
Maximum power output 45W x 4 channels
Continuous power output 20W x 4 channels (4 10% T.H.D.)
Suitable speaker impedance 4-8ohm
Pre-Amp output voltage 2.0V (CD play mode: 1KHz, 0dB, 10K load)
Fuse 15A
Dimensions (WxHxD) 178 x 50 x 164mm
Weight 1.38kg
Aux-in level 500mV
3” (16:9) TFT LCD
Risoluzione display (dot) Active area (mm) Misura monitor (inch) Dot pitch (mm) Contrasto Luminosità 3” INCH (16:9) TFT LCD
Display resolution (dot) Active area (mm) Screen size (inch) Dot pitch (mm) Contrast ratio Brightness FM STEREO RADIO
Frequenze: Sensitivity Frequency response Stereo separation Image response ratio IF response ratio Signal/noise ratio AM(MW) RADIO
Frequenze Sensitivity 960(W)×240(H)
65.52×36.84
2.96 (Diagonal)
0.06825 x 0.1535
300
350nits
87.5-108.0MHz (Europe)
87.5-107.9MHz (America)
8dB μ
30Hz-15KHz
30dB(1KHz)
50dB
70dB
>55dB
FM STEREO RADIO
Frequency range: Usable sensitivity Frequency response Stereo separation Image response ratio IF response ratio Signal/noise ratio AM(MW) RADIO
522-1620KHz (Europe) Frequency range 530-1710KHz (America) (S/N=20dB) 30dBμ Usable sensitivity 960(W)×240(H)
65.52×36.84
2.96 (Diagonal)
0.06825 x 0.1535
300
350nits
87.5-108.0MHz (Europe)
87.5-107.9MHz (America)
8dB μ
30Hz-15KHz
30dB(1KHz)
50dB
70dB
>55dB
522-1620KHz (Europe)
530-1710KHz (America)
(S/N=20dB) 30dBμ
DISC PLAYER
DISC PLAYER
Sistema Disc digital audio system System Disc digital audio system
Frequency response 20Hz - 20KHz Frequency response 20Hz - 20KHz
Signal/noise ratio >80dB Signal/noise ratio >80dB
Total harmonic distortion Less than 0.20% (1KHz) Total harmonic distortion Less than 0.20% (1KHz)
Channel separation >60dB Channel separation >60dB
Video signal format system NTSC/PAL 60/PAL/AUTO Video signal format system NTSC/PAL 60/PAL/AUTO
Video output 1 0.2V Video output 1 0.2V
COMPONENTS
Staffe di montaggio
Viti M5x6 mm Mascherina (50 mm) Portafrontalino
Chiavi smontaggio
Libretto istruzioni
1
4
1
1
2
1
COMPONENTS
Mounting sleeve Machine screws M5x6 mm Mounting bolt (50 mm) Removable face plate case Removal key Operating Instructions 22
1
4
1
1
2
1
Caratteristiche tecniche • Specifications
Perno in gomma Telecomando
IT/GB
1 Rubber cushion 1 Remote control 1
1
FILE COMPATIBILI
Audio: MP3(*.mp3), WMA(*.wma)
Video: MP4 (*.avi, DIVX3.11/4.0/5.0/6.0) - MPEG 2
(*.vob) - MPEG 1 (*.dat)
Immagini: JPEG (*.jpg)
MP3 file: ISO 9660 or ISO 9660 + Joliet format Max. 30 caratteri.
Massimo livello di directory: 8.
Massimo numero di album: 99.
Massima lunghezza di ogni traccia: 99 minuti e 59
secondi.
Frequenza di campionamento supportata per dischi
MP3: da 8KHz a 48KHz (44.1KHz preferibilmente).
Bit rates supportati su dischi MP3: 32 - 320kbps
(128 kbps preferibilemente).
FILE TYPE SUPPORTED
Audio file: MP3(*.mp3), WMA(*.wma)
Video file: MP4 (*.avi, DIVX3.11/4.0/5.0/6.0) - MPEG 2
(*.vob) - MPEG 1 (*.dat)
Picture file: JPEG (*.jpg)
MP3 file: ISO 9660 or ISO 9660 + Joliet format - Max.
30 characters.
Max. nested directory is 8 levels.
The max. album number is 99.
The max. length of each track is 99 minutes 59 seconds.
Supported sampling frequency for MP3 disc:
8KHz to 48KHz (44.1KHz preferably).
Supported bit-rates of MP3 disc are: 32 - 320
kbps (128 kbps preferably).
DISCHI E FILES NON SUPPORTATI
*.AAC, *.DLF, *.M3U, *.PLS, MP3 PRO files e files
con DRM.
Dischi con sessione aperta.
DISC AND FILE NOT SUPPORTED
*.AAC, *.DLF, *.M3U, *.PLS, MP3 PRO files and files
with DRM.
Open session discs.
NOTE MP3/WMA
I files MP3 e WMA (Windows Media Audio) sono file
audio digitali compressi per permettere la memorizzazione di più files. Questa unità può riprodurre MP3/
WMA direttamente da files contenuti in dischi CD-R/
RW,DVD-ROM, DVD+RW, DVD-RW, DVD+R, DVD-R e
DVD-VIDEO, oppure su SD card/USB.
Il VM051 può riprodurre MP3(MPEG1, 2, 2.5 Audio
Layer 3). Tuttavia ci possono essere delle incompatibilità dovuto al formato di compressione o dal programma utilizzato per questa operazione.
MP3/WMA NOTES
MP3 and WMA (Windows Media Audio) music files are
digital audio files that are compressed to allow more
files to be stored. This unit can play MP3/WMA and
video directly from files contained on a CD-R/RW,
DVD-ROM, DVD+RW, DVD-RW, DVD+R, DVD-R and
DVD-VIDEO, or an SD card or USB Device. Many types
of software are available for converting audio files into
MP3/ WMA formats. Nero or Roxio Easy CD Creator
are recommended. This unit can play MP3 (MPEG1, 2,
2.5 Audio Layer 3). However, the MP3 recording media
and accepted formats are limited.
23
S.pA. - Via F.lli Cervi, 167/C - 42124 Reggio Emilia (Italy) - Tel. ++39 0522 941621 - Fax ++39 0522 942452
www.phonocar.com - e-mail:[email protected]