1
Fly290View
Telefono digitale senza filo/Digital Cordless Telephone
GUIDA PER L’UTENTE
USER’S MANUAL
Installazione ed uso/Installation and use
Prima di usare questo apparecchio, si prega di leggere completamente
queste instruzioni
Before operating this system, please read these instructions completely
POICHÉ QUESTO TELEFONO NON PUÒ ESSERE UTILIZZATO NEL CASO DI
MANCANZA DI ALIMENTAZIONE, L’UTENTE DOVREBBE POTER UTILIZZARE UN
TELEFONO INDIPENDENTE PER LE CHIAMATE DI EMERGENZA
AS THIS TELEPHONE CAN NOT BE USED IN CASE OF POWER CUT, USER SHOULD
USE AN INDEPENDENT TELEPHONE FOR EMERGENCY CALLS
SOMMARIO / CONTENTS
SOMMARIO / CONTENTS ................................................................................. 2
ITALIANO ............................................................................................................. 6
CONVENZIONI TIPOGRAFICHE ............................................................................... 7
AVVERTENZE GENERALI PER L'INSTALLATORE .................................................... 8
Note Generali ................................................................................................... 8
Realizzazione dell'Impianto ............................................................................. 9
Raccomandazioni ............................................................................................. 9
Norme di sicurezza......................................................................................... 10
Pulizia ............................................................................................................ 10
CARATTERISTICHE E FUNZIONALITA’.................................................................. 11
Accessori ........................................................................................................ 11
INSTALLAZIONE .................................................................................................. 12
Batteria........................................................................................................... 12
Tastiera .......................................................................................................... 14
Uso del menù.................................................................................................. 15
Lingua del display .......................................................................................... 16
Registrazione dell’unità nella base ................................................................ 16
FUNZIONAMENTO DELL’UNITA’ .......................................................................... 17
Accensione e spegnimento.............................................................................. 17
Effettuare una chiamata esterna .................................................................... 18
Effettuare una chiamata interna .................................................................... 18
Rispondere ad una chiamata telefonica entrante........................................... 19
Modificare il volume dell’altoparlante e del ricevitore ................................. 19
Disattivare il microfono (Mute) ..................................................................... 19
Selezione ultimi numeri chiamati ................................................................... 20
Chiamare un numero dalla lista delle chiamate perse................................... 20
Programmazione numeri di selezione breve .................................................. 21
Chiamare un numero di selezione breve ........................................................ 22
Visualizzazione durata della chiamata .......................................................... 22
Uscita dalla copertura ................................................................................... 22
TRASFERTA, CHIAMATA IN ATTESA, CHIAMATA ALTERNATA E CONFERENZA A TRE
............................................................................................................................ 22
Chiamata in attesa ......................................................................................... 22
Trasferire una chiamata esterna ad un altro telefono ................................... 23
Chiamata Alternata (Passaggio da una chiamata interna a una chiamata
esterna e viceversa)........................................................................................ 23
Conferenza a tre............................................................................................. 23
AGENDA.............................................................................................................. 24
Uso della tastiera alfanumerica..................................................................... 24
Aggiungere un numero alla rubrica............................................................... 24
Modificare un numero dell’agenda................................................................ 25
Consultare l’agenda....................................................................................... 26
Eliminare un numero dall’agenda ................................................................. 26
Eliminare di tutti i numeri dall’agenda.......................................................... 27
Chiamare un numero in agenda..................................................................... 28
CONFIGURAZIONE DEL TELEFONO .......................................................... 29
Blocco tastiera ............................................................................................... 29
Impostazione melodia e volume per chiamate esterne................................... 29
Impostazione melodia e volume per chiamate interne ................................... 30
Attivazione/disattivazione funzione Baby Call............................................... 30
Attivazione/disattivazione beep tastiera......................................................... 31
Nome del telefono........................................................................................... 32
Programmazione codice PIN ......................................................................... 32
Risposta alla chiamata mediante un tasto qualsiasi ...................................... 33
Cancellare la lista degli utenti chiamanti ...................................................... 34
Reset del telefono ........................................................................................... 34
CARATTERISTICHE TECNICHE ............................................................................. 35
DICHIARAZIONE DI CONFORMITÀ CE .................................................................. 36
USO PER CUI IL DISPOSITIVO È DESTINATO. ......................................................... 37
ENGLISH ............................................................................................................. 38
EDITING CRITERIA ........................................................................................ 39
GENERAL INSTRUCTIONS FOR THE INSTALLER ................................... 40
General Notes ................................................................................................ 40
Making the Installation .................................................................................. 41
Warnings ........................................................................................................ 41
Safety Instruction ........................................................................................... 41
Cleaning ......................................................................................................... 42
FEATURES AND FUNCTIONS ................................................................................ 42
Accessories..................................................................................................... 43
INSTALLATION............................................................................................... 43
Battery............................................................................................................ 43
Keypad ........................................................................................................... 45
Using the menu............................................................................................... 46
Handset display language .............................................................................. 47
Register this unit to a DECT GAP base station ............................................. 47
UNIT OPERATION .......................................................................................... 48
Switching the unit On/Off............................................................................... 48
Making an external call ................................................................................. 49
Making an internal call.................................................................................. 49
Answering an incoming phone call ................................................................ 49
Changing the speaker volume ........................................................................ 50
Deactivating the microphone (Mute) ............................................................. 50
Last numbers redial........................................................................................ 50
Calling a number out of the Caller List ......................................................... 51
Storing speed dial numbers............................................................................ 52
Calling a speed dial number .......................................................................... 52
Call Duration Display.................................................................................... 53
Out of Range .................................................................................................. 53
CALL TRANSFER, ON HOLD, TOGGLE AND THREE PARTY CONFERENCE ........... 53
Call on hold.................................................................................................... 53
Transfer External call to another handset ..................................................... 53
Brokers Call (Toggling between an internal call and an external call)......... 54
Three party conference call (Conf) ................................................................ 54
PHONEBOOK ....................................................................................................... 55
Use of the alphanumerical keypad ................................................................. 55
Adding an entry to the Phonebook ................................................................. 55
Changing a number and name from the Phonebook...................................... 56
Reading Phonebook list.................................................................................. 57
Erasing one number and name from the Phonebook ..................................... 57
Erasing all numbers and name from the Phonebook ..................................... 58
Calling a number out of the Phonebook list................................................... 58
HANDSET SETTINGS ..................................................................................... 59
Key lock.......................................................................................................... 59
Ringer Melody and Volume for External Calls .............................................. 60
Ringer Melody and Volume for Internal Calls............................................... 61
Enable/disable the baby call function ............................................................ 61
Enable/Disable Key Tone............................................................................... 62
Handset name................................................................................................. 63
Set PIN Code.................................................................................................. 63
Answering a Call Using Anykey..................................................................... 64
Erase Caller List ............................................................................................ 65
Handset Reset................................................................................................. 65
TECHNICAL SPECIFICATIONS .................................................................... 66
CE CONFORMITY DECLARATION ......................................................................... 67
DESIGNED USE OF THE DEVICE............................................................................ 67
ITALIANO
Grazie per aver scelto un prodotto Esse-ti
Questo prodotto è stato progettato appositamente
per facilitare l'Utente nelle attività telefoniche
quotidiane ed è stato costruito a regola d'arte
utilizzando materiali adatti a renderlo affidabile
nel tempo.
I prodotti Esse-ti vengono tutti sottoposti a
specifici ed approfonditi test in laboratorio, in
modo da offrire all'Utente quante più garanzie
possibili.
La responsabilità per vizi derivanti dall'uso del prodotto, fa carico all'Utente. La Esse-ti
è responsabile esclusivamente dei difetti ai sensi e nei limiti del D.P.R. 24/05/1988 n.
224 (attuazione della direttiva CEE n. 85/374 relativa al ravvicinamento delle
disposizioni legislative, regolamentari e amministrative degli Stati membri in materia di
responsabilità per danno da prodotti difettosi, ai sensi dell'art. 15 della legge 16 aprile
1987, n. 183).
La Esse-ti si riserva il diritto di modificare in qualsiasi momento e senza
preavviso le caratteristiche dei propri prodotti.
CONVENZIONI TIPOGRAFICHE
Per semplificare la lettura e la comprensione del manuale da parte dell’utente
sono stati utilizzati nel testo diversi stili, ognuno dei quali ha un significato
logico preciso. La tabella seguente presenta un esempio degli stili utilizzati (a
sinistra) in corrispondenza del significato logico loro attribuito (a destra).
Esempio
Significato
TITOLO DI
CAPITOLO
Stile applicato al titolo di ogni capitolo. Ogni
nuovo capitolo inizia a pagina nuova.
TITOLO PRIMARIO
Stile usato per indicare i titoli di ampie sezioni
all’interno dei capitoli, come i vari titoli
principali del capitolo.
Titolo Secondario
Stile che sta ad indicare il titolo di uno
specifico paragrafo all’interno del titolo
primario.
Titolo Terziario
Questo stile viene utilizzato per suddividere
ulteriormente il paragrafo specifico.
Esempio
Stile che definisce un esempio.
Nota
Così si presentano le specificazioni relative al
testo: prestare attenzione.
Attenzione
Testo normale
La presenza di questo stile indica possibili
rischi a cose o persone, essere molto cauti.
Stile definito per la normale stesura del testo.
Operazione da effettuare
Stile che indica l’esatta sequenza di operazioni
necessarie ad effettuare una programmazione
o a richiamare un servizio.
Pulsante da premere
Stile che indica la selezione.
ITALIANO
7
AVVERTENZE GENERALI PER L'INSTALLATORE
Note Generali
Prestare attenzione alle avvertenze contenute in questa sezione in quanto
forniscono importanti indicazioni relative ad una corretta e sicura installazione,
all'uso e alla manutenzione del prodotto.
• L'apparecchio deve essere destinato ESCLUSIVAMENTE all'uso per il
quale è stato progettato. La Esse-ti non può essere considerata responsabile
per eventuali danni derivanti da impieghi impropri.
• Premesso che il prodotto è stato progettato nel rispetto delle norme vigenti,
l'installazione dovrà avvenire all'interno di impianti conformi anch'essi alle
norme vigenti.
• Prima di collegare il prodotto alla rete elettrica accertarsi che la tensione di
linea corrisponda a quella indicata nell'etichetta apposta sul prodotto stesso.
• Prima di effettuare qualsiasi intervento all'interno o all'esterno del prodotto
(pulizia, manutenzione, ecc.) scollegare l'apparecchiatura dalla rete di
alimentazione.
• E' opportuno prevedere a monte del prodotto un appropriato interruttore di
sezionamento e protezione, in modo da interrompere l'alimentazione in caso
di guasto.
• Per qualsiasi intervento di riparazione rivolgersi esclusivamente ad un
centro assistenza tecnico autorizzato.
• Installare il prodotto in un locale aerato e tenere conto delle fessure di
aerazione, che non andranno mai e in nessun caso ostruite.
• Prestare attenzione ai simboli indicanti un fulmine con freccia all'interno di
un triangolo: indicano la presenza di tensioni pericolose
• Prestare attenzione ai simboli indicanti un punto esclamativo all'interno di
un triangolo: indicano di procedere con la massima attenzione poiché
sussistono situazioni di potenziale pericolo o addirittura di morte
• Fare riferimento al paragrafo "Caratteristiche Tecniche" per avere
informazioni riguardanti le condizioni di utilizzo del prodotto
• Non accostare il prodotto ad altre apparecchiature elettriche o elettroniche
che non siano state progettate per essere abbinate ad esso
• Non installare il prodotto in ambienti potenzialmente esplosivi
• Assicurarsi che il prodotto sia installato come prescritto
8
ITALIANO
• Collegare all'impianto le apposite protezioni relative alla linea di
alimentazione e quelle relative alle linee telefoniche
• Non introdurre oggetti, liquidi o polveri né usare spray all'interno del
prodotto
• Non aprire la carcassa del prodotto, in quanto all'interno non sono presenti
parti manutenibili dall'Utente. In caso di necessità rivolgersi ad un centro
assistenza autorizzato
• In caso di fughe di gas nell'ambiente non utilizzare il portatile per segnalare
l'emergenza
• In caso di necessità di sostituzione delle batterie, provvedere al corretto
smaltimento e non gettare tra i rifiuti ordinari
• Gli elementi dell'imballaggio (sacchetti di plastica, polistirolo espanso, ecc.)
non devono essere lasciati alla portata dei bambini in quanto potenziali fonti
di pericolo
Realizzazione dell'Impianto
La realizzazione di impianti telefonici interni dovrebbe essere effettuata da
personale specializzato
Non sono consentiti l'installazione e l'allacciamento alla rete di
telecomunicazione di terminali telefonici non conformi alle norme vigenti.
Raccomandazioni
Le principali cause di disturbi sulle linee telefoniche e sulle reti di
alimentazione elettrica (che possono provocare malfunzionamenti e
danneggiamenti al prodotto) sono attribuiti a:
• contatti accidentali con linee a tensioni più elevate (corto circuito)
• accoppiamenti elettromagnetici con altri conduttori posti nelle vicinanze
• brusche variazioni di carico, specie per le linee elettriche di alimentazione
(motori elettrici ecc.)
• perturbazioni transitorie generate da eventi atmosferici (fulmini)
Le protezioni per linee telefoniche vanno inserite non solo sulle linee urbane,
ma anche sulle linee derivate con un percorso esterno al fabbricato o linee alle
quali siano connessi apparecchi con alimentazione di rete, come fax, modem,
segreterie, cordless, ecc.
La protezione per linee di alimentazione deve essere collegata all'ingresso della
linea di alimentazione elettrica del prodotto.
ITALIANO
9
Il morsetto di terra delle protezioni, per ottenere un efficace funzionamento dei
dispositivi, deve essere collegato a una presa di terra efficiente.
Norme di sicurezza
•
•
•
•
•
•
•
•
Utilizzare esclusivamente batterie ricaricabili dello stesso tipo e non quelle
non ricaricabili. Prestare attenzione alla polarità delle batterie durante
l’inserimento.
Utilizzare esclusivamente il caricabatterie in dotazione. Non utilizzare altri
carica batterie poiché ciò potrebbe danneggiare le celle delle batterie.
Evitare di toccare i contatti di ricarica o linea con oggetti metallici o
aguzzi.
Il funzionamento di alcuni dispositivi medicali potrebbe essere influenzato.
Non posizionare l’unità in un ambiente umido o ad una distanza inferiore
ad 1.5 metri da una sorgente d’acqua.
Non utilizzare l’unità in un ambiente in cui ci sia rischio di esplosioni.
Eseguire le operazioni di inserimento batterie e manutenzione generale con
molta cura.
Poiché questo telefono non può essere utilizzato nel caso di mancanza di
alimentazione, l’utente dovrebbe poter utilizzare un telefono indipendente
per le chiamate di emergenza, e.g. un cellulare.
Pulizia
Pulire l’apparecchio con un panno morbido inumidito o con un panno
antistatico. Non utilizzare mai solventi abrasivi o prodotti per pulizia.
10
ITALIANO
CARATTERISTICHE E FUNZIONALITA’
Questo prodotto è un telefono DECT da tavolo che può essere utilizzato in
abbinamento con qualsiasi Base DECT compatibile con lo standard GAP.
È possibile registrare l’unità ad un massimo di 4 basi diverse.
Importante: non tutti i servizi della base alla quale è registrata l’unità sono
disponibili a causa di funzioni proprietarie della base.
Caratteristiche:
• Chiamata in viva voce
• Chiamata in attesa
• Chiamata diretta (Baby Call)
• Chiamata alternata
• Conferenza a tre
• Lista 3 ultime chiamate effettuate
• Lista 10 ultime chiamate perse
• Rubrica con 50 numeri e nomi
• 6 numeri di selezione breve
• 9 melodie per la suoneria
• Differenziazione suoneria tra chiamate interne ed esterne
• Tono di avviso assenza copertura radio dalla base
• Tono di avviso batteria scarica
• Blocco tastiera
Accessori
Gli accessori includono:
• Telefono desktop (1)
• Batteria (1)
• Alimentatore (1)
• Guida dell’Utente (1)
ITALIANO
11
INSTALLAZIONE
Batteria
Prima di utilizzare l’unità per la prima volta, assicurarsi che le batterie siano
state caricate per almeno 10 ore mediante l’alimentatore fornito a corredo. In
caso contrario il telefono non funziona correttamente.
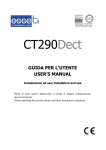
Installazione della batteria
Inserire la batteria (indicata con A in figura) nel vano batterie nella parte
posteriore dell’unità come mostrato.
Carica della batteria
Inserire la spina dell’alimentatore fornito a corredo nella presa di
corrente elettrica e collegare il connettore dell’alimentatore con la presa
corrispondente (indicata con B in figura) posta nella parte posteriore del
telefono accanto al vano batterie.
A
B
Batteria
Presa per alimentatore
Importante: usare esclusivamente l’alimentatore
fornito per caricare la batteria.
12
ITALIANO
Quando la batteria è quasi scarica, il telefono emette dei segnali di
avvertimento e il simbolo della batteria sul display inizia a lampeggiare.
ITALIANO
13
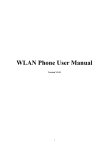
Tastiera
A
H
B
C
I
J
K
L
D
E
F
G
M
O
P
14
Q
R
S
T
U
ITALIANO
A
B
Microtelefono
Accensione-Spegnimento/ Chiamata interna/Conferma programmazione
funzione.
Tasto selezione breve M1-M3
Identificativo chiamante – Mostra l’identificativo del chiamante e le
chiamate perse.
Agenda – Elenco dei numeri di telefono memorizzati nell’agenda.
Mute (microfono disattivato durante la conversazione) /C (Correzione
inserimenti errati ) / Escape (uscita dal menù di programmazione o ritorno
al modo di riposo)
R Tasto Flash
Tasto scorrimento SU/GIU / Attivazione del menù di programmazione
premendo il tasto SU o GIU.
Tasto selezione breve M4-M6
Tasti cursore Destra/Sinistra
Redial (Tasto ripetizione selezione – ricerca ultimi tre numeri di telefono
selezionati ) / Pause. (inserimento pausa durante l’immissione di numeri di
telefono nell’agenda)
Regolazione volume altoparlante
Altoparlante – Accensione/Spegnimento
()GHIghi+
PQRSpqrs
JKLjkl%
ABCabc
TUVtuv
βÄÖÜ
DEFdef
MNOmno/
WXYZwxyz
Selezione lettere minuscole / Tasto conferenza
C
D
E
F
G
H
I
J
K
L
M
N
O
P
Q
R
S
T
U
V
X
Y
Uso del menù
Il telefono viene utilizzato tramite menù.
Per accedere al Menù
qr
Premere il Tasto SU o il Tasto GIU (Tasti MENU)
quando il telefono è nello stato di riposo.
Per scorrere le voci del Menu
qr
Premere i tasti SU/GIU.
Per confermare una selezione
ITALIANO
15
Premere il tasto INT/OK.
Il tasto INT/OK
viene utilizzato quasi sempre per confermare una
programmazione o accedere ad un submenù.
(tasto Cancella) viene utilizzato quasi sempre per tornare al menù
Il tasto
precedente o annullare l’operazione. Premere il tasto
per 2 secondi per
tornare al modo stand-by.
Lingua del display
È possibile selezionare la lingua del display tra tre opzioni differenti. Le
opzioni sono inglese, tedesco e italiano.
qr
Premere il tasto Menu (Tasto SU o GIU) quando il
telefono è nello stato di riposo.
qr
Selezionare PT prog con i tasti SU/GIU.
Premere INT/OK per confermare.
qr
Selezionare Lingua con i tasti SU/GIU.
Premere INT/OK per confermare.
qr
Selezionare la lingua desiderata con i tasti SU e GIU.
Premere INT/OK per confermare.
Registrazione dell’unità nella base
Ogni nuova unità deve essere registrata nella base per poter effettuare chiamate.
Per attivare il Modo di Registrazione della base fare riferimento al manuale
dell’utente della base stessa.
16
qr
Premere il tasto Menu (Tasto SU o GIU) quando il
telefono è nello stato di riposo.
qr
Selezionare Registra con i tasti SU/GIU.
ITALIANO
Premere INT/OK per confermare.
qr
Selezionare la base desiderata con i tasti SU/GIU.
Premere INT/OK per confermare.
Il display visualizza “Ricerca…”
Attendere 15 secondi fino alla visualizzazione del N° RFPI di 11 cifre
XXXXX-XXXXXX.
Premere INT/OK per confermare.
Immettere il codice PIN della base. Per informazioni sul codice PIN fare
riferimento al manuale dell’utente della base.
Premere INT/OK per confermare.
Il telefono si trova in modo stand-by una volta completata con successo la
registrazione.
FUNZIONAMENTO DELL’UNITA’
Accensione e spegnimento
Per spegnere l’unità
Premere e tenere premuto il tasto INT/OK per 2
secondi quando il telefono è nello stato di riposo.
Per accendere l’unità
Premere e tenere premuto il tasto INT/OK per 2
secondi.
Quando l’unità è spenta non è possibile ricevere chiamate.
ITALIANO
17
Effettuare una chiamata esterna
Chiamata diretta
Sollevare il microtelefono
Oppure
Premere il tasto Altoparlante. Viene attivata la modalità
vivavoce.
L’utente riceve il tono di invito alla selezione esterna.
Selezionare il numero di telefono e attendere il collegamento.
Preselezione
Selezionare il numero di telefono. Se necessario, è possibile cancellare le
cifre premendo il tasto di cancellazione .
Sollevare il microtelefono o premere il tasto Altoparlante
.
Il numero di telefono viene selezionato automaticamente.
Nota: Il numero massimo di cifre selezionabili è 25.
Effettuare una chiamata interna
In caso di più telefoni registrati alla base, è possibile effettuare chiamate interne
tra i telefoni.
Premere il tasto INT/OK quando il telefono è nello stato
di riposo.
Selezionare il numero del telefono interno.
Il telefono chiamato suona.
Quando l’utente chiamato risponde si entra in connessione vivavoce. È
possibile passare alla modalità microtelefono sollevando il microtelefono
stesso.
Per terminare la chiamata
Il modalità microtelefono riagganciare il microtelefono stesso; in
modalità vivavoce premere il tasto Altoparlante
18
.
ITALIANO
Rispondere ad una chiamata telefonica entrante
In caso di chiamata entrante il numero di telefono viene visualizzato se inviato
dalla rete (se il servizio è disponibile).
Quando la chiamata entrante è una chiamata interna, il display visualizza il
numero del telefono chiamante.
Quando la chiamata entrante è una chiamata esterna e se il numero non viene
trasmesso il display visualizza ‘ESTERNA‘.
Risposta alla chiamata
Per rispondere ad una chiamata entrante
Sollevare il microtelefono.
Oppure
Premere il tasto Altoparlante. Viene attivata la modalità
vivavoce.
Modificare il volume dell’altoparlante e del
ricevitore
Il volume dell’altoparlante e del ricevitore può essere modificato mediante i
tasti di regolazione durante la conversazione.
In modalità microtelefono o vivavoce
Premere il tasto contrassegnato dal + o dal –
rispettivamente per aumentare o diminuire il volume.
Il volume può essere modificato secondo 9 livelli.
Disattivare il microfono (Mute)
È possibile disattivare il microfono durante la conversazione
Premere il tasto MUTE per disattivare il microfono (LED
rosso acceso).
Premere nuovamente il tasto MUTE per attivare il
microfono. (LED rosso spento)
ITALIANO
19
Selezione ultimi numeri chiamati
L’unità memorizza gli ultimi tre numeri di telefono selezionati nella memoria.
Per accedere alla lista di ripetizione della selezione
Premere il tasto REDIAL quando il telefono è nello stato
di riposo.
Spostarsi all’interno della lista dei numeri premendo il
tasto REDIAL.
Quando viene visualizzato il numero desiderato
Sollevare il microtelefono oppure premere il tasto altoparlante
effettuare la chiamata in vivavoce.
per
Il numero viene selezionato automaticamente.
Per uscire dalla lista senza effettuare una chiamata
Premere il tasto C per 2 secondi.
Chiamare un numero dalla lista delle chiamate
perse
L’unità memorizza i numeri di telefono delle ultime 10 chiamate perse nella
lista degli utenti chiamanti.
Questo avviene solo quando il numero di telefono della chiamata entrante è
stato inviato dalla rete.
È possibile selezionare il numero desiderato mediante MENU o mediante il
tasto chiamate perse
.
Selezione mediante MENU
qr
Premere il tasto Menu (Tasto SU o GIU) quando il
telefono è nello stato di riposo.
qr
Selezionare Caller ID con i tasti SU/GIU.
Premere INT/OK per confermare.
qr
Spostarsi all’interno della lista con i tasti SU/GIU.
Quando viene visualizzato il numero desiderato
20
ITALIANO
Sollevare il microtelefono oppure premere il tasto altoparlante
effettuare la chiamata in vivavoce.
per
Il numero viene selezionato automaticamente.
Selezione mediante TASTO CHIAMATE PERSE
Premere il Tasto Chiamate Perse quando il telefono è
nello stato di riposo.
qr
Spostarsi all’interno della lista con i tasti SU/GIU.
Quando viene visualizzato il numero desiderato
Sollevare il microtelefono oppure premere il tasto altoparlante
effettuare la chiamata in vivavoce.
per
Il numero viene selezionato automaticamente.
In entrambi i casi per uscire dalla lista senza effettuare una chiamata
Premere il tasto C per 2 secondi.
Programmazione numeri di selezione breve
Il telefono consente la memorizzazione di sei numeri (contrassegnati da
M1..M6) per la selezione breve.
qr
Premere il tasto Menu (Tasto SU o GIU) quando il
telefono è nello stato di riposo.
qr
Selezionare Memorie dir. con i tasti SU/GIU.
Premere INT/OK per confermare.
qr
Selezionare la posizione in memoria desiderata con i
tasti SU/GIU.
Premere INT/OK per confermare.
Immettere il numero.
Premere INT/OK per confermare.
ITALIANO
21
Durante l’inserimento per cancellare una cifra errata premere il tasto C
Ripetere la procedura per programmare un altro numero.
.
Chiamare un numero di selezione breve
Premere il Tasto M1..M6 desiderato.
Il display mostra il numero corrispondente.
Sollevare il microtelefono oppure premere il tasto altoparlante
effettuare la chiamata in vivavoce.
per
Visualizzazione durata della chiamata
Una volta terminata la chiamata (Esterna o Interna) il display visualizza la
durata della chiamata per 3 secondi. La durata viene visualizzata nel formato
{mm : ss} (minuti : secondi).
Uscita dalla copertura
Quando l’unità si trova fuori della copertura di funzionamento della base o
quando non è registrata alla base, il display visualizza “Ricerca…”.
TRASFERTA, CHIAMATA IN ATTESA, CHIAMATA
ALTERNATA E CONFERENZA A TRE
Chiamata in attesa
Per mettere una chiamata esterna in attesa durante la conversazione
Premere INT/OK.
Per recuperare la chiamata in attesa
Premere nuovamente il tasto INT/OK.
22
ITALIANO
Trasferire una chiamata esterna ad un altro
telefono
Effettuare una chiamata esterna oppure una volta ricevuta una chiamata
esterna entrante premere il tasto INT/OK.
Selezionare il numero del telefono interno e riagganciare per trasferire la
chiamata esterna.
La chiamata è stata trasferita all’interno chiamato.
Chiamata Alternata (Passaggio da una chiamata
interna a una chiamata esterna e viceversa)
Con una chiamata esterna in attesa è possibile effettuare una chiamata ad un
altro telefono interno. Si può quindi passare dalla prima alla seconda chiamata e
viceversa.
Mettere la chiamata esterna in attesa premendo il tasto
INT/OK.
Selezionare il numero del telefono interno
Quando la chiamata viene stabilita
Premere il tasto INT/OK per passare da una chiamata
all’altra.
Una chiamata viene messa in attesa ed è possibile parlare con l’altro utente
chiamante.
Nota: riagganciando la chiamata viene terminata, come pure la
conversazione dell’altro telefono con l’utente esterno.
Conferenza a tre
È possibile stabilire una conferenza a tre con un altro utente chiamante interno
e un utente chiamante esterno.
Mettere la chiamata esterna in attesa premendo il tasto
INT/OK.
ITALIANO
23
Selezionare il numero del telefono interno.
Quando la chiamata viene stabilita
Premere il tasto “#” per 2 secondi per stabilire la
conferenza a tre.
Entrambi i telefoni iniziano il conteggio del tempo di conversazione.
Nota Per parlare con l’utente interno durante la conferenza premere
il tasto INT/OK. La chiamata esterna viene messa in attesa. È
possibile passare da una chiamata all’altra o ristabilire la
conferenza in qualsiasi momento.
AGENDA
Uso della tastiera alfanumerica
Il telefono può memorizzare fino a 50 nominativi e numeri.
Usare la tastiera alfanumerica per immettere il testo. Per selezionare una lettera
premere il tasto corrispondente. Ad esempio, premendo il tasto numerico
il display visualizza il primo carattere (J). Premere ripetutamente il tasto per
selezionare un altro carattere del tasto. Premere due volte il tasto
per
selezionare la lettera ‘B’. Per selezionare ‘A’ e ‘B’ premere prima il tasto
,
attendere 2 secondi fino a quando il cursore si sposta nella posizione successiva
e premere due volte il tasto
.
I caratteri inseriti erroneamente possono essere cancellati premendo il tasto C
. Il carattere davanti al cursore viene cancellato.
Premere il tasto
per immettere caratteri minuscoli. Per inserire uno spazio
premere il tasto cursore destro
.
Aggiungere un numero alla rubrica
24
qr
Premere il tasto Menu (Tasto SU o GIU) quando il
telefono è nello stato di riposo.
qr
Selezionare Agenda con i tasti SU/GIU.
ITALIANO
Premere INT/OK per confermare.
qr
Selezionare Inserisci con i tasti SU/GIU.
Premere INT/OK per confermare.
Immettere il nome
Premere INT/OK per confermare.
Immettere il numero
Premere INT/OK per confermare.
Durante l’inserimento premere il tasto C
l’operazione.
per 2 secondi per annullare
Nota: Dopo un nuovo inserimento tutte le voci vengono riordinate
in ordine alfabetico.
Modificare un numero dell’agenda
qr
Premere il tasto Menu (Tasto SU o GIU) quando il
telefono è nello stato di riposo.
qr
Selezionare Agenda con i tasti SU/GIU.
Premere INT/OK per confermare.
qr
Selezionare Edit con i tasti SU/GIU.
Premere INT/OK per confermare.
qr
Selezionare il nome e il numero da modificare con i tasti
SU/GIU.
Premere INT/OK per confermare.
ITALIANO
25
Usare il tasto C per cancellare un vecchio nominativo
Inserire il nuovo nominativo
Premere INT/OK per confermare.
Usare il tasto C per cancellare un vecchio numero.
Inserire il nuovo numero.
Premere INT/OK per confermare.
Per interrompere l’operazione:
Premere il tasto C per 2 secondi.
Consultare l’agenda
qr
Premere il tasto Menu (Tasto SU o GIU) quando il
telefono è nello stato di riposo.
qr
Selezionare Agenda con i tasti SU/GIU.
Premere INT/OK per confermare.
qr
Selezionare Leggi con i tasti SU/GIU.
Premere INT/OK per confermare.
qr
Consultare l’agenda con i tasti SU/GIU.
Premere il tasto C per tornare allo stato di riposo.
Eliminare un numero dall’agenda
26
qr
Premere il tasto Menu (Tasto SU o GIU) quando il
telefono è nello stato di riposo.
qr
Selezionare Agenda con i tasti SU/GIU.
ITALIANO
Premere INT/OK per confermare.
qr
Selezionare Cancella con i tasti SU/GIU.
Premere INT/OK per confermare.
qr
Selezionare la voce dell’agenda da eliminare con i tasti
SU/GIU.
Premere INT/OK per confermare.
Premere nuovamente il tasto INT/OK per confermare.
Per interrompere l’operazione:
Premere il tasto C.
Eliminare di tutti i numeri dall’agenda
qr
Premere il tasto Menu (Tasto SU o GIU) quando il
telefono è nello stato di riposo.
qr
Selezionare Agenda con i tasti SU/GIU.
Premere INT/OK per confermare.
qr
Selezionare Cancella tutto con i tasti SU/GIU.
Premere INT/OK per confermare.
Premere nuovamente il tasto INT/OK per confermare.
Per interrompere l’operazione:
Premere il tasto C.
ITALIANO
27
Chiamare un numero in agenda
È possibile effettuare una chiamata a un numero memorizzato in agenda
attraverso il MENU o utilizzando il tasto Agenda .
Uso del MENU
qr
Premere il tasto Menu (Tasto Su o GIU) quando il
telefono è nello stato di riposo.
qr
Selezionare Agenda con i tasti SU/GIU.
Premere INT/OK per confermare.
qr
Selezionare Leggi con i tasti SU/GIU.
Premere INT/OK per confermare.
qr
Spostarsi all’interno della lista con i tasti SU/GIU.
Quando viene visualizzato il numero desiderato
Sollevare il microtelefono oppure premere il tasto altoparlante
effettuare la chiamata in vivavoce.
per
Il numero viene selezionato automaticamente.
Uso del Tasto Agenda
Premere il tasto Agenda quando il telefono è nello stato
di riposo.
qr
Spostarsi all’interno della lista con i tasti SU/GIU.
Quando viene visualizzato il numero desiderato
Sollevare il microtelefono oppure premere il tasto altoparlante
effettuare la chiamata in vivavoce.
per
Il numero viene selezionato automaticamente.
28
ITALIANO
CONFIGURAZIONE DEL TELEFONO
Blocco tastiera
qr
Premere il tasto Menu (Tasto SU o GIU) quando il
telefono è nello stato di riposo.
qr
Selezionare Blocca tast con i tasti SU/GIU.
Premere INT/OK per confermare.
Il display visualizza “Bloccata”. La tastiera è bloccata.
Per sbloccare la tastiera
r
Premere il tasto GIU e il tasto INT/OK.
Impostazione melodia e volume per chiamate
esterne
qr
Premere il tasto Menu (Tasto SU o GIU) quando il
telefono è nello stato di riposo.
qr
Selezionare PT prog con i tasti SU/GIU.
Premere INT/OK per confermare.
qr
Selezionare Prog.ring Est.con i tasti SU/GIU.
Premere INT/OK per confermare.
qr
Selezionare la melodia desiderata con i tasti SU/GIU.
Premere INT/OK per confermare.
qr
ITALIANO
Selezionare il volume desiderato con i tasti SU/GIU.
29
Premere INT/OK per confermare.
Impostazione melodia e volume per chiamate
interne
qr
Premere il tasto Menu (Tasto SU o GIU) quando il
telefono è nello stato di riposo.
qr
Selezionare PT prog con i tasti SU/GIU.
Premere INT/OK per confermare.
qr
Selezionare Prog.ring Int. con i tasti SU/GIU.
Premere INT/OK per confermare.
qr
Selezionare la melodia desiderata con i tasti SU/GIU.
Premere INT/OK per confermare.
qr
Selezionare il volume desiderato con i tasti SU/GIU.
Premere INT/OK per confermare.
Attivazione/disattivazione funzione Baby Call
In caso di attivazione della funzione, il numero programmato viene selezionato
automaticamente premendo un tasto qualsiasi.
Tutte le altre funzioni della tastiera sono disattivate fino a quando la
programmazione non viene annullata.
Attivazione
30
qr
Premere il tasto Menu (Tasto SU o GIU) quando il
telefono è nello stato di riposo.
qr
Selezionare PT prog con i tasti SU/GIU.
ITALIANO
Premere INT/OK per confermare.
qr
Selezionare Baby call con i tasti SU/GIU.
Premere INT/OK per confermare.
Immettere il numero di telefono della Baby Call mediante la tastiera
numerica.
Premere INT/OK per confermare.
Il display visualizza “Baby call”.
Disattivazione
rr
Premere due volte rapidamente il tasto GIU.
Attivazione/disattivazione beep tastiera
Questa programmazione consente di attivare e disattivare i toni associati alla
pressione dei tasti del telefono.
qr
Premere il tasto Menu (Tasto SU o GIU) quando il
telefono è nello stato di riposo.
qr
Selezionare PT prog con i tasti SU/GIU.
Premere INT/OK per confermare.
qr
Selezionare Prog. tono con i tasti SU/GIU.
Premere INT/OK per confermare.
qr
Selezionare On o Off con i tasti SU/GIU.
Premere INT/OK per confermare.
ITALIANO
31
Nome del telefono
Il nome del telefono viene visualizzato sul display in modo stand-by. Per
immettere o modificare il nome
qr
Premere il tasto Menu (Tasto SU o GIU) quando il
telefono è nello stato di riposo.
qr
Selezionare PT prog con i tasti SU/GIU.
Premere INT/OK per confermare.
qr
Selezionare Nome con i tasti SU/GIU.
Premere INT/OK per confermare.
Immettere o modificare il nome del telefono tramite la tastiera
alfanumerica. Per cancellare una lettera premere il tasto C
con il
cursore posto a destra della lettera stessa.
Premere INT/OK per confermare.
Programmazione codice PIN
Questa programmazione consente di modificare il codice PIN del telefono.
qr
Premere il tasto Menu (Tasto SU o GIU) quando il
telefono è nello stato di riposo.
qr
Selezionare PT prog con i tasti SU/GIU.
Premere INT/OK per confermare.
qr
Selezionare Prog pincode con i tasti SU/GIU.
Premere INT/OK per confermare.
Il display visualizza “PT pin:”
32
ITALIANO
Immettere il codice PIN attuale del telefono (VALORE DI DEFAULT =
1590)
Premere INT/OK per confermare.
Il display visualizza “Nuovo:”
Immettere il nuovo codice PIN.
Premere INT/OK per confermare.
Il display visualizza “Conferma:”
Reimmettere il nuovo codice PIN.
Premere INT/OK per confermare.
Nota: il codice PIN di default è 1590.
Risposta alla chiamata mediante un tasto
qualsiasi
Mediante questa impostazione è possibile rispondere a una chiamata entrante
premendo un qualsiasi tasto della tastiera alfanumerica. Alla pressione del tasto
verrà attivata la modalità vivavoce.
qr
Premere il tasto Menu (Tasto SU o GIU) quando il
telefono è nello stato di riposo.
qr
Selezionare PT prog con i tasti SU/GIU.
Premere INT/OK per confermare.
qr
Selezionare Risp. Ogni T. con i tasti SU/GIU.
Premere INT/OK per confermare.
qr
ITALIANO
Selezionare On o Off con i tasti SU/GIU.
33
Premere INT/OK per confermare.
Cancellare la lista degli utenti chiamanti
Il telefono memorizza i numeri degli ultimi 10 utenti esterni chiamanti (purché
tali numeri vengano inviati dalla rete).
Per cancellare la lista degli utenti chiamanti
qr
Premere il tasto Menu (Tasto SU o GIU) quando il
telefono è nello stato di riposo.
qr
Selezionare PT prog con i tasti SU/GIU.
Premere INT/OK per confermare.
qr
Selezionare Cancella CID con i tasti SU/GIU.
Premere INT/OK per confermare.
Viene visualizzato “Confermare?”.
Per confermare
Premere INT/OK.
Per uscire
Premere il tasto C.
Reset del telefono
Questa funzione consente di ripristinare la configurazione di default del
telefono.
Tale configurazione è la seguente:
34
ITALIANO
Lingua di visualizzazione:
Codice Pin:
Agenda:
Lista ripetizione della selezione:
Lista utenti chiamanti:
Baby Call:
Beep tastiera:
Selezione da memoria:
inglese
1590
vuota
vuota
vuota
disattivata
attivata
vuota
Per riportare il telefono alla configurazione di default:
qr
Premere il tasto Menu (Tasto SU o GIU) quando il
telefono è nello stato di riposo.
qr
Selezionare PT prog con i tasti SU/GIU.
Premere INT/OK per confermare.
qr
Selezionare Set default con i tasti SU/GIU.
Premere INT/OK per confermare.
Il display visualizza “PT pin:”
Immettere il codice PIN del telefono (VALORE DI DEFAULT = 1590)
Premere INT/OK per confermare.
Il display visualizza “Confermare?”
Per confermare
Premere INT/OK.
Per uscire
Premere il tasto C.
CARATTERISTICHE TECNICHE
Standard: DECT= Digital Enhanced Cordless Telecommunications
Standard GAP (Generic Access Profile)
ITALIANO
35
Frequenza:
Larghezza di banda del canale:
Modulazione:
Potenza di uscita in trasmissione:
Velocità trasmissione dati:
Codifica vocale:
Distanza di comunicazione (max.):
ESTERNA
INTERNA
Alimentazione:
ENTRATA
USCITA
Batteria
Batteria ricaricabile Ni-MH telefono :
Autonomia:
Stand-by
Conversazione:
Temperatura di funzionamento:
Temperatura di magazzinaggio:
Dimensioni :
Peso:
1880 ~~ 1900 MHz (BW=20MHz)
1.728MHz
GFSK
10mW
1.152 Mbps
ADPCM 32 K bps
300 metri
50 metri
AC110 / 230 VAC 60Hz / 50Hz
DC 9V 500mA
PT079 Ni-MH 3.6V 650mA
PT079 3.6V 650mA
100 ore
10 ore
0°C - 40°C
0°C - 40°C
200 x 160 x 60 mm
600g ca.
DICHIARAZIONE DI CONFORMITÀ CE
La società Esse-ti S.r.l. con sede in Zona Ind. Squartabue, I-62019 Recanati
(MC), Italia, dichiara che il presente dispositivo è conforme alle seguenti
norme:
• EN 301489-01/-06: EMC TEST (Electromagnetic compability Standard
for Radio Equipment)
• EN 60950:2000: Safety Information Technology equipment including
Electrical business Equipment.
• TBR 10 (July 1999): Speech coding algorithm
• EN 301406: Dect Essential requirements
• TBR 6: General Terminal Attachment Requirement
La conformità a questi requisiti è espressa mediante la marcatura
36
ITALIANO
USO PER CUI IL DISPOSITIVO È DESTINATO.
Il presente dispositivo è stato progettato per essere usato in connessione alle reti
PSTN in tutte le nazioni Europee e Turchia.
Informazione aggiuntiva: in caso di mancanza di alimentazione dalla rete
elettrica non sarà possibile comporre numeri di emergenza.
ITALIANO
37
ENGLISH
Thank you for choosing an Esse-ti product
This product has been especially designed for
easy operation. It has been manufactured with
perfect workmanship using suitable materials for
long-lasting performance.
All Esse-ti products are subjected to extensive
reliability and operational testing in our
laboratories in order to provide total guarantee
for the user.
The User shall be responsible for defects arising from the use of the product. Esse-ti
shall only be responsible for defects according to and within the limitations set by the
Presidential Decree dated 24/05/1988 no. 224 (fulfilling the EEC directive no. 85/374 on
the harmonisation of statutory and administrative regulations of the Member States on
the liability for damages arising from defective products under art. 15 of Law no. 183 of
16 April 1987).
Esse-ti reserves the right to modify the characteristics of the products at any time
without prior notice.
38
ENGLISH
EDITING CRITERIA
This paragraph describes the editing criteria followed in this manual, together
with their meaning for easier user’s reference. The following table shows the
printing styles on the left and their meaning on the right column.
Example
CHAPTER
TITLE
Meaning
Style used for the title of chapters. A new
chapter begins on a new page.
PRIMARY TITLE
Style used for the title of large sections in a
chapter, such as the main titles of the chapter.
Secondary Title
Style used for the title of a specific paragraph
in the primary title.
Tertiary Title
Style used for additional sections in a specific
paragraph
Example
Style used for examples.
Note
Style used for explicatory notes: pay attention!
Warning
Normal text
Style used to indicate possible risks for
individuals and properties: caution!
Style used for normal text.
Operation to be carried out
Style used to indicate the sequence of
operations that must be carried out for
programming or service implementation.
Button to press
Style used to indicate the selection.
ENGLISH
39
GENERAL INSTRUCTIONS FOR THE
INSTALLER
General Notes
•
•
•
•
•
•
•
•
•
•
•
•
•
•
40
Carefully read the notes contained in this section as they provide important
information on the correct safe installation, use and maintenance of the
product.
The product must be EXCLUSIVELY used for the purpose it was designed
for. Esse-ti shall not be responsible for damages arising from improper use.
The product has been designed in compliance with the regulations in force
and must be installed in system that comply with the provisions of law.
Before connecting the product to the electric mains, make sure that the line
voltage corresponds to the value indicated on the product label.
Always disconnect the product from the power supply mains before
carrying out any operation either inside or outside the product (cleaning,
maintenance, etc.).
A protective cut-out switch must be installed upstream in order to interrupt
power supply in case of fault.
Always refer to an authorised assistance centre for repair.
Install the product in a well-ventilated place, making sure not to obstruct
the ventilation slots.
Beware of symbols showing lightening with arrow inside a triangle since
they indicate the presence of dangerous voltage.
Beware of symbols showing an exclamation mark inside a triangle since
they indicate potentially dangerous or even lethal situations that require
utmost attention.
For information on how to use the product see the paragraph "Technical
Features".
Do not use the product in association with other electric or electronic
devices that were not especially designed to be used with it.
Do not install the product in potentially explosive environments.
Make sure that the product has been installed as required.
ENGLISH
•
•
•
•
•
•
Connect the protections for the power supply and telephone lines to the
installation.
Do not introduce objects, liquids or powders inside the product. Do not use
sprays inside the product.
Do not open the product case since it does not contain any user-serviceable
parts. If necessary, contact an authorised assistance centre.
In case of gas leaks in the environment do not use the telephone to make an
emergency call.
When replacing the batteries, arrange for suitable disposal with similar
waste.
Packing components (such as plastic bags, foam polystyrene, etc.) must be
kept out of the reach of children because potentially dangerous.
Making the Installation
Internal telephone installations must be carried out by specialised personnel.
The installation and connection of telephone terminals to the
telecommunications network that do not comply with the regulations in force is
not permitted.
Warnings
The main causes of interference on telephone lines and power supply mains
(that may result in malfunctioning or damages to the product) are:
• accidental contacts with lines with higher voltage (short circuit)
• electromagnetic association with other conductors located nearby
• sudden load variations, especially for power supply lines (electric motors,
etc.)
• temporary interference caused by weather conditions (lightening)
Safety Instruction
•
•
Rechargeable Battery Only. Only insert rechargeable batteries of the same
type, never use ordinary, non-chargeable batteries. Insert rechargeable
batteries so they connect to the right polarity.
Only use the charger plug supplied. Do not use other chargers, as this may
damage the battery cells.
ENGLISH
41
•
•
•
•
•
•
Do not touch the charger and plug contacts with sharp or metal objects.
The operation of some medical devices may be affected.
Do not place the unit in a damp room or at a distance of less than 1.5
meters away from a water source.
Do not use the telephone in an environment where there is a risk of
explosions.
Dispose of batteries and maintain the telephone in an environment-friendly
manner.
As this telephone can not be used in case of power cut, user should use an
independent telephone for emergency calls, e.g. a mobile phone.
Cleaning
Clean the telephone with slighty damp cloth or with an anti-static cloth. Never
use cleaning agent or abrasive solvents.
FEATURES AND FUNCTIONS
This product is a desktop DECT GAP Portable Part which has the advantage to
work with a DECT GAP Fixed Part (base station).
You can subscribe the unit to maximum 4 different DECT GAP base stations.
Important note: not all the services of the base station this unit registered to can
be used due to proprietary of base station.
Features:
• Handsfree call
• Call on hold
• Baby Call
• Brokers call
• Three party conference
• Last 3 dialed numbers list
• Last 10 lost calls list
• 50 numbers and names Phonebook
• 6 speed dial numbers
• 9 ringer melodies
42
ENGLISH
•
•
•
•
External and internal call melody characterization
Out of range alarm tone
Empty battery alarm tone
Key lock
Accessories
Accessories Include :
• DESK Handset ( 1 )
• Battery ( 1 )
• Adaptor ( 1 )
• User Guide ( 1 )
INSTALLATION
Battery
Before you use the unit for the first time, you must make sure the battery are
charged for at least 10 hours. If you don’t do this, the telephone will not
function properly.
Installation of the battery
Plug in the battery into compartment located in the rear of the unit
(indicated by A in the figure) as shown.
Charging the batteries
Plug one end of the adapter into the power outlet and the other end into
the adapter jack (indicated by B in the figure) in the rear of the unit,
near the battery compartment.
ENGLISH
43
A
B
Battery
Adapter jack
Important Note: Only use the adapter unit
provided to charge the battery.
When the battery is low, you will hear warning signals and the battery symbol
on the display will blink.
44
ENGLISH
Keypad
A
H
B
C
I
J
K
L
D
E
F
G
M
O
P
ENGLISH
Q
R
S
T
U
45
A
B
C
D
E
F
Handset
Power ON-OFF/Establish internal connection / Confirm function setting
Memory dial - speed dial key M1-M3
Caller ID - List the caller ID and missed call.
Phone book - List the telephone number stored in phone book.
Mute (Microphone OFF in conversation) / C (correct mistake input) /
Escape (escape from programming menu or return to standby mode)
R (Flash/Recall)
Up/Down key - Activate the programming menu by pressing UP or DOWN
key
Memory dial - speed dial key M1-M3
Cursor Key (Left/Right)
Redial keyb(browsing of the last three dialed telephone numbers) / Pause
key (Insert a pause in phone book telephone number input).
Speaker volume control - Increase or decrease speaker volume
Speaker phone - Speaker phone on/off.
()GHIghi+
PQRSpqrs
JKLjkl%
ABCabc
TUVtuv
βÄÖÜ
DEFdef
MNOmno/
WXYZwxyz
Lower case select / Conference Key.
G
H
I
J
K
L
M
N
O
P
Q
R
S
T
U
V
X
Y
Using the menu
The phone is menu driven.
To enter the Menu
qr
Press the Menu key (UP or DOWN key) when the unit
is in stand-by mode.
To scroll through the menu
qr
Press the UP and DOWN keys.
To confirm a selection
Press INT/OK key.
46
ENGLISH
INT/OK key
is almost every time used to confirm a setting or to enter a sub
menu.
C key
(Erase key) is almost every time used to return to previous menu or
abort operation. Press
key for 2 seconds to return to stand by mode.
Handset display language
You can select one of three different display languages. They are English,
German and Italian.
qr
Press the Menu key (UP or DOWN key) when the unit
is in stand-by mode.
qr
Select HS SETTING by using the UP and DOWN keys.
Press INT/OK key to confirm.
qr
Select LANGUAGE by using the UP and DOWN keys.
Press INT/OK key to confirm.
qr
Select the desired language by using the UP and
DOWN keys.
Press INT/OK key to confirm.
Register this unit to a DECT GAP base station
Every new unit must be registered onto a DECT GAP base station before you
can make a phone call.
To activate the DECT GAP base station’s Registration Mode, please refer to
base station user guide for Registration Mode activation procedures.
qr
Press the Menu key (UP or DOWN key) when the unit
is in stand-by mode.
qr
Select HS SETTING by using the UP and DOWN keys.
ENGLISH
47
Press INT/OK key to confirm.
qr
Select HBASE No. by using the UP and DOWN keys.
Press INT/OK key to confirm.
It will display “Searching…”.
Wait for 15 seconds till 11 digits RFPI No. XXXXX-XXXXXX appears.
Press INT/OK key to confirm.
Enter the Base station PIN Code. Please refer to the base station user
guide for Pin Code.
Press INT/OK key to confirm.
It will be at standby mode after successful registration.
UNIT OPERATION
Switching the unit On/Off
To power off the unit
Press and hold the INT/OK key for 2 seconds in the
standby mode.
To power on the unit
Press and hold the INT/OK key again for 2 seconds.
When the unit is power off, no call can be received.
48
ENGLISH
Making an external call
Direct call
Pick up the handset
Or
Press Speaker Phone key to use the handsfree mode.
You will hear the external dial tone.
Enter the telephone number and wait for connection.
Pre- dialing
Enter the telephone number. If needed, you can erase digits by pressing
.
the Erase button
Lift the handset or press Speaker Phone key
.
The phone number will be dialed automatically.
Note: The maximum 25 digits can be dialed.
Making an internal call
If you have more than one handset subscribed to the base station, you can make
an internal call between the handsets.
Press INT/OK key when the unit is in standby mode.
Press a handset No.
The called handset will ring.
When the called party answers, you can talk to the handsfree speaker phone or
lift the handset.
To end the call
Replace the handset or press Speaker Phone key
mode.
if in handsfree
Answering an incoming phone call
When there is an incoming call, the telephone number is displayed when sent
by the network (if service is available).
ENGLISH
49
When the incoming call is an internal call, the display shows the calling
handset No.
When it’s an external call and the number is not transferred (private call)
‘EXTERNAL‘ is displayed.
Answering call
To answer an incoming call
Pick up the handset
Or
Press Speaker Phone key to use the handsfree mode.
Changing the speaker volume
The volume of the speaker or handset receiver can be changed via the volume
control keys during conversation.
With the handset lift or in handsfree mode
Press + or – key to increase or decrease volume.
The volume can be changed in 9 levels.
Deactivating the microphone (Mute)
It is possible to deactivate the microphone during a conversation:
Press MUTE key to mute the microphone. ( Red LED
activated)
Press MUTE key again to activate the microphone. (Red
LED Deactivated)
Last numbers redial
The unit saves the three last dialed telephone numbers in the redial memory.
To enter the Redial list
Press REDIAL key in the stand-by mode.
Scroll through the Redial memory by pushing REDIAL
key.
50
ENGLISH
When the desired number appears on the display
Lift the handset or press Speaker Phone key
mode.
to use the handsfree
The number will be dialed automatically.
To escape the redial list if you don’t want to make a call from the list:
Press C key
for 2 seconds.
Calling a number out of the Caller List
The unit saves the telephone numbers of the last 10 missed calls in the caller
list.
This is only done when the telephone number of the incoming call has been
sent via the network service.
You can access the saved telephone numbers list through the MENU or through
the Caller ID key
.
Using the MENU
qr
Press the Menu key (UP or DOWN key) when the unit
is in stand-by mode.
qr
Select CALLER ID by using the UP and DOWN keys.
Press INT/OK key to confirm.
qr
Scroll through the Caller List by using the UP and
DOWN keys.
When the desired number appears on the display
Lift the handset or press Speaker Phone key
mode.
to use the handsfree
The number will be dialed automatically.
Using the Caller ID key
.
Press the Caller ID key.
qr
ENGLISH
Scroll through the Caller List by using the UP and
DOWN keys.
51
When the desired number appears on the display
Lift the handset or press Speaker Phone key
mode.
to use the handsfree
The number will be dialed automatically.
In both cases to escape the list if you don’t want to make a call from the list:
Press C key
for 2 seconds.
Storing speed dial numbers
The telephone can store up to six speed dial numbers (M1..M6).
qr
Press the Menu key (UP or DOWN key) when the unit
is in stand-by mode.
qr
Select MEMORY DIAL by using the UP and DOWN
keys.
Press INT/OK key to confirm.
qr
Select MEMORY DIAL No. by using the UP and
DOWN keys.
Press INT/OK key to confirm.
Enter number
Press INT/OK key to confirm.
During adding, press C
key to erase wrongly entered digits.
Repeat above to program other memory dial no.
Calling a speed dial number
Press the desired key M1..M6.
The display shows the corresponding number.
Lift the handset or press Speaker Phone key
mode.
52
to use the handsfree
ENGLISH
Call Duration Display
When the External/Internal call is finished, the call duration will be visible for
3 seconds. The time is displayed in the following format :{mm : ss}(minutes :
seconds).
Out of Range
When the unit is out of the working range of the base unit or when it’s not
subscribed to the base unit, it will display “Searching…”.
CALL TRANSFER, ON HOLD, TOGGLE AND THREE
PARTY CONFERENCE
Call on hold
To put an external call on hold during conversation
Press INT/OK key.
If you want to retrieve the call on hold
Press INT/OK key again.
Transfer External call to another handset
Make an external call or after receiving an external incoming call, press
INT/OK key.
Enter the internal handset No. and hang up handset to transfer the
external call.
You will be disconnected but both other callers can talk together.
ENGLISH
53
Brokers Call (Toggling between an internal call
and an external call)
If you place an external call on hold, you can make a call to another internal
handset. You can then toggle between the first and the second call.
Put the external call on hold by pressing INT/OK key
Enter the called internal handset No
When the call is connected
Press INT/OK key (Toggle) to switch between both
calls.
One call will be placed on hold and you can talk to the other caller.
Note: If you hang up, your call will be disconnected and the other
handset talking to the external caller along.
Three party conference call (Conf)
You can establish three party conference with the other internal caller and an
external caller.
Put the external call on hold by pressing INT/OK key
Enter the called internal handset No
When the call is connected
Press “#” button for 2 sec to establish three party
conference.
Both handsets will start counting talking time.
Note: If during conference call you want to talk to internal caller,
press INT/OK key External call will be placed on hold. You
can Toggle or restart conference at any time.
54
ENGLISH
PHONEBOOK
Use of the alphanumerical keypad
The telephone book up to 50 names and numbers.
Use the alphanumerical keypad to enter text. To select a letter, press the
corresponding button. For ex. if you press numerical button
, the first
character (J) will be shown on the display. Press multiple times if you want to
select another character under this button.
twice to select the letter ‘B’. If you want to select ‘A’ as well
Press button
as ‘B’, press button
first, wait for 2 seconds until the cursor has moved to
the next location and select then button
twice.
Wrongly entered characters can be erased by pressing the C
key. The
character on the left of the cursor will be erased.
key to show small case letters. To insert a space press right cursor key
Press
.
Adding an entry to the Phonebook
qr
Press the Menu key (UP or DOWN key) when the unit
is in stand-by mode.
qr
Select PHONE BOOK by using the UP and DOWN
keys.
Press INT/OK key to confirm.
qr
Select ADD by using the UP and DOWN keys.
Press INT/OK key to confirm.
Enter the name
Press INT/OK key to confirm.
ENGLISH
55
Enter the number
Press INT/OK key to confirm.
During adding, press C
key for 2 seconds to abort.
Note: After new entry, all entries are alphabetically sorted.
Changing a number and name from the
Phonebook
qr
Press the Menu key (UP or DOWN key) when the unit
is in stand-by mode.
qr
Select PHONE BOOK by using the UP and DOWN
keys.
Press INT/OK key to confirm.
qr
Select EDIT by using the UP and DOWN keys.
Press INT/OK key to confirm.
qr
Select the name and number to change by using the UP
and DOWN keys.
Press INT/OK key to confirm.
Use C key to erase old name entry
Enter new name
Press INT/OK key to confirm.
Use C key to erase old number entry
Enter new number
56
ENGLISH
Press INT/OK key to confirm.
During changing, press C
key for 2 seconds to abort.
Reading Phonebook list
qr
Press the Menu key (UP or DOWN key) when the unit
is in stand-by mode.
qr
Select PHONE BOOK by using the UP and DOWN
keys.
Press INT/OK key to confirm.
qr
Select READ by using the UP and DOWN keys.
Press INT/OK key to confirm.
qr
Read the phonebook list by using UP and DOWN keys.
Press C
key to return to standby mode.
Erasing one number and name from the
Phonebook
qr
Press the Menu key (UP or DOWN key) when the unit
is in stand-by mode.
qr
Select PHONE BOOK by using the UP and DOWN
keys.
Press INT/OK key to confirm.
qr
Select DELETE by using the UP and DOWN keys.
Press INT/OK key to confirm.
ENGLISH
57
qr
Select the phonebook entry to be deleted by using UP
and DOWN keys.
Press INT/OK key to confirm.
Press INT/OK key to confirm again.
During the deleting, press C
key to abort.
Erasing all numbers and name from the
Phonebook
qr
Press the Menu key (UP or DOWN key) when the unit
is in stand-by mode.
qr
Select PHONE BOOK by using the UP and DOWN
keys.
Press INT/OK key to confirm.
qr
Select ERASE ALL by using the UP and DOWN keys.
Press INT/OK key to confirm.
Press INT/OK key to confirm again.
During the deleting, press C
key to abort.
Calling a number out of the Phonebook list
You can call a number stored in the Phonebook list by using the menu or
through the Phonebook key .
Using the MENU
qr
58
Press the Menu key (UP or DOWN key) when the unit
is in stand-by mode.
ENGLISH
qr
Select PHONE BOOK by using the UP and DOWN
keys.
Press INT/OK key to confirm.
qr
Select READ by using the UP and DOWN keys.
Press INT/OK key to confirm.
qr
Select the phonebook entry by using UP and DOWN
keys.
When the desired number appears on the display
Lift the handset or press Speaker Phone key
mode.
to use the handsfree
The number will be dialed automatically.
Using the Phonebook key
Press the Phonebook key when the unit is in stand-by
mode.
qr
Select the phonebook entry by using UP and DOWN
keys.
When the desired number appears on the display
Lift the handset or press Speaker Phone key
mode.
to use the handsfree
The number will be dialed automatically.
HANDSET SETTINGS
Key lock
qr
ENGLISH
Press the Menu key (UP or DOWN key) when the unit
is in stand-by mode.
59
qr
Select KEY LOCK by using the UP and DOWN keys.
Press INT/OK key to confirm.
The display shows “LOCKED”. The keypad is now locked.
To unlock the keypad
r
Press DOWN key and INT/OK key.
Ringer Melody and Volume for External Calls
qr
Press the Menu key (UP or DOWN key) when the unit
is in stand-by mode.
qr
Select HS SETTING by using the UP and DOWN
keys.
Press INT/OK key to confirm.
qr
Select SET EXTRING by using the UP and DOWN
keys.
Press INT/OK key to confirm.
qr
Select the desired ringer melody by using the UP and
DOWN keys.
Press INT/OK key to confirm.
qr
Select the desired ringer volume by using the UP and
DOWN keys.
Press INT/OK key to confirm.
60
ENGLISH
Ringer Melody and Volume for Internal Calls
qr
Press the Menu key (UP or DOWN key) when the unit
is in stand-by mode.
qr
Select HS SETTING by using the UP and DOWN
keys.
Press INT/OK key to confirm.
qr
Select SET INTRING by using the UP and DOWN
keys.
Press INT/OK key to confirm.
qr
Select the desired ringer melody by using the UP and
DOWN keys.
Press INT/OK key to confirm.
qr
Select the desired ringer volume by using the UP and
DOWN keys.
Press INT/OK key to confirm.
Enable/disable the baby call function
If you enable this function, the programmed number will be dialed
automatically when pushing any keys.
All other functions of the keypad will be disabled until the setting has been
cancelled.
Activation
qr
Press the Menu key (UP or DOWN key) when the unit
is in stand-by mode.
qr
Select HS SETTING by using the UP and DOWN
keys.
ENGLISH
61
Press INT/OK key to confirm.
qr
Select BABY CALL by using the UP and DOWN keys.
Press INT/OK key to confirm.
Enter baby call telephone number using numeric key pad.
Press INT/OK key to confirm.
The display will show BABY CALL.
Deactivation
rr
Press DOWN key twice quickly to disable baby call.
Enable/Disable Key Tone
Through this programming you can activate and deactivate the tones associated
to the key pressing.
qr
Press the Menu key (UP or DOWN key) when the unit
is in stand-by mode.
qr
Select HS SETTING by using the UP and DOWN
keys.
Press INT/OK key to confirm.
qr
Select SET KEYTONE by using the UP and DOWN
keys.
Press INT/OK key to confirm.
qr
Select ON/OFF by using the UP and DOWN keys.
Press INT/OK key to confirm.
62
ENGLISH
Handset name
The name of the handset will be displayed in standby mode. If you want to
enter or change this name:
qr
Press the Menu key (UP or DOWN key) when the unit
is in stand-by mode.
qr
Select HS SETTING by using the UP and DOWN
keys.
Press INT/OK key to confirm.
qr
Select USER NAME by using the UP and DOWN keys.
Press INT/OK key to confirm.
Enter or change the handset name by means of the alphanumerical
keypad. Wrongly entered characters can be erased by pressing the C
key. The character on the left of the cursor will be erased.
Press INT/OK key to confirm.
Set PIN Code
This programming allows you to change the handset PIN code.
qr
Press the Menu key (UP or DOWN key) when the unit
is in stand-by mode.
qr
Select HS SETTING by using the UP and DOWN
keys.
Press INT/OK key to confirm.
qr
Select SET PINCODE by using the UP and DOWN
keys.
Press INT/OK key to confirm.
ENGLISH
63
The display shows “HS PIN:”
Enter the current Handset Pin Code (DEFAULT PIN = 1590)
Press INT/OK key to confirm.
The display shows “NEW PIN:”
Enter the new Pin code.
Press INT/OK key to confirm.
The display shows “RETYPE”
Re-enter the new Pin code.
Press INT/OK key to confirm.
Note: the default PIN code is 1590.
Answering a Call Using Anykey
Through this programming you can answer an incoming call by simply pressing
any key in the alphanumerical keypad. The call will be answered in handsfree
mode.
qr
Press the Menu key (UP or DOWN key) when the unit
is in stand-by mode.
qr
Select HS SETTING by using the UP and DOWN
keys.
Press INT/OK key to confirm.
qr
Select ANYKEY TALK by using the UP and DOWN
keys.
Press INT/OK key to confirm.
qr
64
Select ON/OFF by using the UP and DOWN keys.
ENGLISH
Press INT/OK key to confirm.
Erase Caller List
The unit stores the numbers of the last 10 callers (provided these numbers are
sent by the network).
To erase the caller list
qr
Press the Menu key (UP or DOWN key) when the unit
is in stand-by mode.
qr
Select HS SETTING by using the UP and DOWN
keys.
Press INT/OK key to confirm.
qr
Select ERASE CID by using the UP and DOWN keys.
Press INT/OK key to confirm.
Prompt “SURE?” is displayed.
To confirm
Press INT/OK key.
To escape
Press C key.
Handset Reset
This function allows you to reset the handset to its standard settings.
The unit default settings are:
Display language:
Pin Code:
Phone Book:
Redial List:
Call List:
Baby Call:
Key Click:
ENGLISH
English
1590
None
Empty
Empty
Off
On
65
Memory Dial:
Empty
To reset the handset to its standard settings:
qr
Press the Menu key (UP or DOWN key) when the unit
is in stand-by mode.
qr
Select HS SETTING by using the UP and DOWN
keys.
Press INT/OK key to confirm.
qr
Select SET DEFAULT by using the UP and DOWN
keys.
Press INT/OK key to confirm.
The display shows “HS PIN:”
Enter the Handset Pin Code (DEFAULT PIN = 1590)
Press INT/OK key to confirm.
The display shows ARE YOU SURE?
To confirm
Press INT/OK key.
To abort
Press C key.
TECHNICAL SPECIFICATIONS
Standard: DECT ( Digital Enhanced Cordless Telecommunications )
GAP ( Generic Access Profile )
Channel Bandwidth:
Modulation:
Transmission Output Power:
Data Transmission Rate:
Speech coding:
66
1.728MHz
GFSK
10mW
1.152 Mbps
ADPCM 32 K bps
ENGLISH
Communication Range (max.):
OUTDOOR
INDOOR
Power Supply:
INPUT
OUTPUT
Battery
Handset Rechargeable Ni-MH Battery :
Operating Time:
Standby
Talk:
Operating Temperature:
Storage Temperature:
Dimensions:
Weight:
300 Meters
50 Meters
AC110 / 230 VAC 60Hz / 50Hz
DC 9V 500mA
PT079 Ni-MH 3.6V 650mA
PT079 3.6V 650mA
100 Hours
10 Hours
0°C to 40°C
0°C to 40°C
200 x 160 x 60 mm
600g ( Approx )
CE CONFORMITY DECLARATION
Esse-ti s.r.l., with registered seat in Zona Ind. Squartabue, I-62019 Recanati
(MC), Italy, hereby declares that this device complies with the following
standards:
• EN 301489-01/-06: EMC TEST (Electromagnetic compability Standard
for Radio Equipment)
• EN 60950:2000: Safety Information Technology equipment including
Electrical business Equipment.
• TBR 10 (July 1999): Speech coding algorithm
• EN 301406: Dect Essential requirements
• TBR 6: General Terminal Attachment Requirement
Compliance with the above requirements is shown with
.
DESIGNED USE OF THE DEVICE.
This product is intended for connection to analogue PSTN lines within all
EUROPEAN COUNTRIES and Turkey.
ENGLISH
67
However due to differences between the individual PSTN’ provided in the
telephone network the approval does not, of it self give an unconditional
assurance of successful operation on every PSTN network termination point.
Additional information: In the event of a mains power failure it will not be
possible to dial emergency services numbers.
68
ENGLISH
Fly290View – GUIDA PER L’UTENTE / USERS’S MANUAL
Esse-ti S.r.l.
Zona Ind.le Squartabue
62019 Recanati (MC)
ITALY
Tel: ++39 071 7506066-7506105
Fax: ++39 071 7506057
www.esse-ti.com
[email protected]
13/02/2004