1
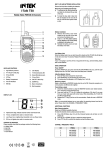
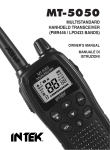
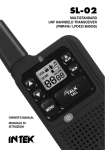
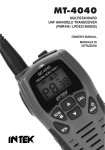
T100WP
WATERPROOF PMR446
HANHDELD TRANSCEIVER
OWNER'S MANUAL
MANUALE DI
ISTRUZIONI
Index
English
Contents .................................................................................................................. 1
Introduction............................................................................................................. 2
Features and Benefits ........................................................................................... 3
Contents of Package ............................................................................................. 3
Keys and Controls ................................................................................................. 4
LCD Display ........................................................................................................ 5-6
Installation .............................................................................................................. 6
Battery Operation ................................................................................................... 7
Basic Operation ...................................................................................................... 8
Advanced Functions ........................................................................................ 9-13
Additional Functions ........................................................................................... 13
Specifications ....................................................................................................... 14
Channels / CTCSS Charts .................................................................................... 14
Important Informations ........................................................................................ 15
Declaration of Conformity.................................................................................... 16
User Information ................................................................................................... 16
IMPORTANT !
It is recommended to carefully read this instruction manual throughout, before using the radios.
This also in order to prevent you from using the radios out of the limits stated by the regulations.
IMPORTANT !
The maximum operating range will vary depending on terrain and environment. Range will be
usually greater in open fields. While range is usually shorter within and around buildings or large
structures. This unit may not ensure privacy of communication.
1313
RoHS
2002/95/EC
-1-
Congratulations !
Congratulations on your selection and purchase of this high quality product. With proper care
and adherence to the set-up and user instructions in this Owner’s Manual, this unit will let you
enjoy years of trouble-free service.
We are committed to providing quality products that fit your needs, however we would like to
receive any comments or suggestions that you might have on this product, which will help us in
continuous improvement of the quality.
Applications
The T100WP is a compact design two-way communication device, operating on the PMR 446
MHz band. Radio must be operated on the PMR band and on the channels allowed in the
country where the product is been used, in accordance with the local regulations. It can
be used to provide immediate, high quality, cost free 2-way communication, for both business
or personal use, it is the ideal communication tool for many applications, like :
Industry
Sport & Leisure
Construction Sites
Sporting Events, Concerts, Meetings
Shops, Stores & Shopping Malls
Bike & Motorcycle Riding
Warehouses & Buildings
Kids and old personsControl
Hotels & Resorts
Camping and Hiking
Safety & Emergency
Indoor & Outdoor Activities
Baby Monitor
Sailing and Sports Flight
Floating / Waterproof
The radio is designed to meet the water proofing standard of IP67 and will float in water. It can
withstand immersion in water up to 1m depth for 1 hour. This radio is not suitable for scuba
diving. The radio will only meet this rating if fully assembled and if all rubber seals are well
maintained and correctly fitted. After your radio is submerged in water, you might notice that
the sound is distorted. This is because there is still water remaining in and around the speaker
and microphone. Just shake the radio to clear excess water, and the sound should return to
normal.
Warning :
If your radio is exposed to salt water, clean your radio thoroughly with fresh water, and dry it
before turning it on.
-2-
English
Introduction
Features and Benefits - Contents of Package
English
FEATURES AND BENEFITS
The radio includes a number of advanced features, nevertheless its operation is user firendly
and you may get familiar with it, after few minutes of use.
Please refer to the following list of the main feautres in this two-way radio :
8 PMR Channels
38 CTCSS Codes
Roger Beep Tone
Keypad Program Tone
Keypad Lock
Automatic Squelch function
Monitor function
Automatic Power Save Circuit
VOX (Baby Room Monitor) / Handsfree Use
Dual Watch function
Adjustable Hi-LO Transmitter Power
Channel Scan
CTCSS Scan
5 Selectable Call Tone Melodies
BackLighted LCD Display
Battery status Indication
External Earset-Microphone Jack
TOT (Time-Out-Timer) function
Stop Watch function
TX Power selection
IP67 Waterproof
CONTENTS OF PACKAGE
Please carefully check that the package contains the following items :
2x
2x
1x
2x
Main Unit (Radio with Antenna)
950mAh Li-Ion battery pack
Double 230VAC Desk Charger
Belt Clip
2x Earset-Microphone
2x Handstraps
1x User Manual (this one)
-3-
1
English
Keys and Controls
6
2
4
5
3
11
7
8
9
10
12
13
14
15
16
17
1.
2.
3.
4.
5.
6.
7.
8.
9.
10.
11.
12.
13.
14.
15.
16.
17.
High efficency antenna
Belt clip
Battery compartment
PTT (Push-To-Talk) Key
LAMP / Monitor Key
External earset-microphone jack
Keypad LOCK Key
CHANNEL UP Key
CHANNEL DOWN Key
Built-in Microphone
Backlighted LCD Display
ON-OFF Key
CALL Tone Key
VOLUME UP Key
VOLUME DOWN Key
MENU key
Built-in Speaker
-4-
LCD Display
English
J
A
B
C
D
E
F
G
TX
RX
DW
SC
LO
H
I
K
L
M
N
A. Keypad Lock Icon
Is lighted when the keypad lock function is enabled.
B. TX Icon
Is lighted when the radio is in transmit mode.
C. RX Icon
Is lighted when the radio is in receive mode.
D. DW Icon
Is lighted when the Dual Watch function is enabled.
E. SC Icon
Is lighted when the Automatic channels or CTCSS Tone scanning function is enabled.
F.
LO Icon
Is lighted when the transmitter is in LOW POWER mode.
G. Keypad Beep Tone Icon
Is lighted when keyboard program tone function is enabled.
H. VOX Icon
Is lighted when VOX (handsfree use) function is enabled.
I.
CTCSS Code Number
It shows the selected CTCSS Code Number.
J.
Channel Number
It shows the selected channel, from 1 to 8.
-5-
K. Stop Watch Icon
Is lighted when Stop Watch function is enabled.
L.
Power Save Icon
Is lighted when Automatic Power Save circuit has been enabled.
M. Roger Beep Icon
Is lighted when the Roger Beep function is enabled.
N. Battery Status Icon
Is shows the current battery level condition.
INSTALLATION
Removing and installing the Belt Clip
Remove the belt clip before installing the batteries.
1) To remove the clip, pull the block tab and slide
the clip toward the up side of the unit.
2) To install the clip, slide it down into the slot
situated on the rear side of the unit, until the
block system make a click.
Battery installation
1) Remove the belt clip, unscrew the screw and
remove the battery cover.
2) Insert the battery connector in the connector
located inside the battery compartment and
install the battery pack.
3) Reinstall the battery cover and tighten the
screw.
4) Charging the Rechargeable Battery pack.
Recommend to turning OFF the unit while
charging. Charge the Battery pack 10-14 hrs.
prior to initial use.
WARNING !
When the battery capacity is low, the bA Lo indication and the battery status icon will flash on
the LCD display. Recharge the battery pack at this time. Please refer to the following item
"BATTERY CHARGING".
-6-
English
LCD Display - Installation
Battery Operation
English
BATTERY OPERATION
Battery Charging
Radios must be recharged only by using supplied
accessories.
1)
2)
3)
4)
5)
6)
7)
8)
Switch OFF the radio (do not turn ON the unit
during charging process).
Install the supplied battery pack into the battery
compartment.
Connect the supplied 230VAC adaptor charger
jack to the desktop charger outlet and make
sure that it has been fully inserted.
Plug the adaptor charger to the 230VAC outlet.
Place the unit into the desktop charger.
The LED indicator will be lighted in RED color
to confirm that the charger is powered.
The LED indicator will be lighted in GREEN color to confirm that battery is fully charged.
When the charging process has finished, remove the unit from the desktop charger and
disconnect it from the AC outlet.
NOTES !
1. LED Indicators on the charger base will NOT turn OFF automatically, except take out the
unit from the charger base and disconnect the electricity.
2. The charging time is around 6 hours to fully charge batteries if they are at their lowest
level or around 14 hours to fully charge new batteries.
3. In case LED Indicators on the Charger Base do not turn RED with units placed inside,
please double check if units being put in proper position, or change battery pack and
retry the recharge process.
WARNING !
1. Always switch OFF radio before starting the battery charging process.
2. Use only the enclosed battery charger or original INTEK battery chargers.
3. The charger base is not water proof, ensure the radio is dry before connecting to the
charger.
4. If you’re not going to use the unit for a long period of time e.g. several week, please take
out the battery.
5. Please dispose of old and defective batteries in a safe & environmentally friendly manner.
6. Do not dispose of batteries in fire.
7. Only replace batteries with the same or equivalent type recommended by the
manufacturer.
-7-
BASIC OPERATION
Power ON-OFF
1. To power on the unit, press and hold the ON-OFF key (12), the LCD display (11) will show
the channel number (J) and the CTCSS code number (I).
2. To power off the unit, press and hold again the ON-OFF key (12).
Using the radio
The unit has 8 main channels and 38 CTCSS codes. You can communicate with any other
PMR that is using the same main channel & CTCSS code.
Speaking to other radios
1. Press and hold the PTT key (4), the TX Icon (B) will be lighted on the LCD display (11).
2. Hold the unit in a vertical position with the Microphone at 5-8 cm from the mouth and then
speak.
3. When you have finished speaking, release the PTT key (4).
4. Now you are ready to receive incoming transmission. Adjust the volume to the desired level
if necessary.
Time-Out-Timer (TOT)
A timer disables transmitting after 3 minutes maximum transmission period.
Transmitting can only be reactivated by releasing and pressing the PTT key (4) again.
Using the supplied Earset-microphone
1. Plug the supplied Earset-Microphone into the earphone Jack (6).
2. Press the PTT key on the earphone to speak and release it to listen.
3. Adjust volume control if necessary.
WARNING !
Use only original accessories. Connecting and using accessories other than the original
ones, may cause serious damage to the radio and will void the warranty. Always set the
volume to minimum before connecting an external earset, in order to avoid damaging
the earset or the user’s ear.
Channel Selection
Press the CHANNEL UP (8) or CHANNEL DOWN (9) keys to select the desired channel (1-8).
Adjusting speaker volume (8 Levels)
1. Press the VOLUME UP (14) to increase the volume level.
2. Press the VOLUME DOWN (15) to decrease the volume level.
The LE (J) indication and the selected volume level (01-08) (I) will appear on the LCD display (11).
-8-
English
Basic Operation
Advanced Functions
English
ADVANCED FUNCTIONS
Menu Operation
Press Menu Key (16) several time to select the Menu functions.
Menu --> CTCSS - TX Power selection --> VOX --> VOX sensitivity --> Channel SCAN -->
CTCSS Tone SCAN --> Dual Watch --> CALL Tone --> Roger Beep --> Keypad Beep Tone -->
Stop Watch
CTCSS Code Selection
The radio has 38 CTCSS private codes available. Different CTCSS tones may be associated to
different channels. To choose the desired CTCSS code, please proceed as follows :
1. Press the Menu Key (16) until the CTCSS code number (I) blinks on the LCD display (11).
The CTCSS code 00 (I) indicates that no CTCSS tone is programmed on that channel.
2. Press the CHANNEL UP (8) or CHANNEL DOWN (9) keys to select the desired CTCSS
code number. Pressing and holding the CHANNEL UP (8) or CHANNEL DOWN (9) keys,
the selection will move quicker.
3. To confirm the selection and exit the Menu Mode, press the LOCK key (7) or press the
MENU Key (16) to move to the next function.
Selecting a CTCSS code of 00 will disable the CTCSS feature. To communicate between two
or more radios, both the channel and CTCSS code selections must be the same. To
communicate with other models and brands of radios, the actual radio frequency and CTCSS
frequency must be matched. The frequency chart and CTCSS Code chart are included to help
with this selection.
Transmitter RF Power Setting
Your radio has a HI/LOW Power selection function. This function is very convenient to reduce
the current drain and extend battery life when communicating within short distance. To select
the output power proceed as follow :
1. Press the MENU Key (16) 2 times, until the HI or Lo (I) indication will blink on the LCD
display (11).
2. Press the CHANNEL UP (8) or CHANNEL DOWN (9) keys to select the desired power level
HI (high power) or LO (low power).
3. To confirm the selection and exit the Menu Mode, press LOCK key (7) or press the MENU
key (16) to move to the next function.
4. When the LOW power level is selected, the LO icon (F) appears on the LCD Display (11).
-9-
VOX (Handsfree use) Function
Your radio is equipped with a user selectable Voice Operated Transmitter function (VOX), that
is used for automatic voice transmission (handsfree use or baby room monitor use). In this
mode, transmission is automatically initiated by speaking into the microphone (10) and there is
no need to push the PTT key (4). To enable the VOX function, please proceed as follows :
1. Press the MENU key (16) three times, until the VOX icon (H) and the OFF indication
appear on the LCD display (11).
2. Press the CHANNEL UP (8) or CHANNEL DOWN (9) keys to enable the VOX function; the
On indication will appear on the LCD display (11).
3. To confirm the selection and exit the Menu Mode, press LOCK key (7) or press the MENU
key (16) to move to the VOX sensitivity level selection function.
VOX Sensitivity Level Selection
1. Press the MENU key (16) four times, until the LE indication, the VOX icon (H) and the
selected VOX level will blink on the LCD display (11).
2. Press the CHANNEL UP (8) or CHANNEL DOWN (9) keys to select the level of sensitivity
(from 01 to 05). The VOX level 05 indicates the highest VOX sensitivity.
3. To confirm the selection and exit the Menu Mode, press LOCK key (7) or press the MENU
key (16) to move to the next function.
4. When VOX feature is on, the VOX icon (H) will appear on the LCD display (11).
Automatic Channel Scanning
To start the automatic channel SCAN function proceed as follows :
1. Press the MENU key (16) five times, until the channel number (J) and the SC Icon (E) will
blink on the LCD display (11).
Press the CHANNEL UP (8) or CHANNEL DOWN (9) keys to start the automatic channel
scanning.
SCAN will automatically stop when a signal is detected on one channel, in order to listen to
the communication and SCAN will re-start when no more signal is detected on that
channels.
2. If you press the PTT (4) or LOCK (7) keys during the SCAN operation, SCAN will stop
automatically and radio will set the last used channel.
- 10 -
English
Advanced Functions
Advanced Functions
English
Automatic CTCSS tone Scanning
This function allows automatic CTCSS tone scanning on the selected channel. Please proceed
as follows :
1. Select the desired channel number; the CTCSS tone scanning will be activated on this channel.
2. Press the MENU key (16) six times, until the CTCSS tone number (I) and the SC Icon (E)
will blink on the LCD display (11).
3. Press the CHANNEL UP (8) or CHANNEL DOWN (9) keys to start the automatic CTCSS
tone scanning on the selected channel; the SC Icon (E) will be lighted on the LCD display.
SCAN will automatically stop when a signal is detected on the active channel, in order to
listen to the communication and SCAN will re-start when no more signal is detected on that
channel.
4. If you press the PTT (4) or LOCK (7) keys during the SCAN operation, SCAN will stop
automatically and radio will set the last used channel.
Dual Watch Function
The radio is equipped with a Dual Watch function that allows to monitor 2 differents channels
without the CTCSS code. To set the Dual Watch function, please proceed as follows :
1. Select the first channel to be monitored.
2. Press the MENU key (16) seven times, until the DW Icon (D) and the selected channel will
blink on the LCD display (11).
3. Press the CHANNEL UP (8) or CHANNEL DOWN (9) keys to select the second channel to
be monitored.
4. Now the radio will start monitoring the two channels and will stop when a signal is received
on one of the two stored channels.
5. To disable the Dual Watch function and return to Stand-by mode, press the LOCK key (7).
Call Tone Setting
Call Tone can only be transmitted once (not more than 3 sec.) in any 60 sec. period. The radio
is equipped with 5 user selectable Call tone melodies. To set the desired Call tone melody,
please proceed as follows :
1. Press the MENU key (16) eight times, until the C indication (J) and melody number (I) will
blink on the LCD display (11).
2. Press the CHANNEL UP (8) or CHANNEL DOWN (9) keys to set the desired melody,
between the 5 available melodies.
3. To confirm the selection and exit the Menu Mode, press LOCK key (7) or press the MENU
key (16) to move to the next function.
4. Press the Call key (13) to transmit the Call Tone Melody.
- 11 -
Roger Beep Tone Setting
The radio is equipped with a user selectable Roger Beep Tone feature, which enables you to
send a Beep Tone at the end of each transmission after every release of the PTT key (4). This
will prompt any receiving unit that your transmission has ended. To enable or disable this
function, please proceed as follows :
1. Press the MENU key (16) nine times, until the Roger Beep icon (M) and the On or OFF
indications will blink on the LCD display (11).
2. Press the CHANNEL UP (8) or CHANNEL DOWN (9) keys to set the desired selection on
(Roger Beep tone enabled) or oFF (Roger Beep tone disabled). If the Roger Beep function
is enabled, a beep tone is heard to confirm the selection.
3. To confirm the selection and exit the Menu Mode, press LOCK key (7) or press the MENU
key (16) to move to the next function.
4. When the Roger Beep tone is enabled, the R icon (M) appears on the LCD display (11).
Keypad Program Tone Setting
When a key is pressed, a beep tone is heard to confirm your command. The user may enable
or disable this keypad program tone.
1. Press the MENU key (16) ten times, until the keypad tone icon (G) and the On or OFF
indications will blink on the LCD display (11).
2. Press the CHANNEL UP (8) or CHANNEL DOWN (9) keys to set the desired selection on
(keypad tone enabled) or oFF (keypad tone disabled). If the keypad tone is enabled, a
beep tone is heard to confirm the selection.
3. To confirm the selection and exit the Menu Mode, press LOCK key (7) or press the MENU
key (16) to move to the next function.
4. When the Keypad tone is enabled, the keypad tone icon (G) appears on the LCD display
(11).
Stop Watch function
This function will enable a timer function.
1. Press the MENU key (16) eleven times, until the Stop Watch Icon (K) and the 00:00
indication will blink on the LCD display (11).
2. Press the CHANNEL UP key (8) to start counting and press the CHANNEL DOWN key (9)
to stop the function. The radio can still operate in this mode.
3. Press the CHANNEL UP key (8) again to re-start.
4. To reset the timer press the CHANNEL DOWN key (9) two times.
5. To exit to Stand-by mode press the LOCK Key (7).
- 12 -
English
Advanced Functions
Additional Functions
English
ADDITIONAL FUNCTIONS
Keypad Lock
To avoid entering unwanted command, press and hold the LOCK Key (7) for about 2 seconds.
The Lock Icon (A) will appear on the LCD Display (11). When the keypad is locked, the PTT
(4), CALL (13) and LAMP/MONITOR (5) keys are enabled. To unlock the keypad press and
hold the LOCK key (7) for about 2 seconds.
LCD Backlight
Shortly press the LAMP/MONITOR key (5) to backlight the LCD display (11). Press this key
again to turn OFF the LCD backlight.
Monitor Function
Press and hold the LAMP/MONITOR key (5) for about 4 seconds to activate the Monitor
function; a double beep will confirm the selection. Quickly press again this key to disable the
function. To open temporary the Squelch in order to listen to the background noise and weak
signals, press and hold the LAMP/MONITOR key (5) for about 2 seconds and release it within
2 seconds.
Automatic Power Save
The radio has a Automatic Power Save circuit designed to extend battery life. If it senses no
transmission within 10 seconds, it automatically switches to the Power Save mode. The Power
Save icon (L) will appear on the LCD display (11). The Radio can still receive transmissions in
this mode.
- 13 -
Specifications - Channels/CTCSS Charts
Channels
Channel Spacing
Operating Frequency
Power Source
RF Output Power
Dimensions
Weight
English
SPECIFICATIONS
8 PMR Channels with 38 CTCSS Codes
12.5 KHz
446.00625 - 446.09375 MHz
Rechargeable Li-Ion Battery Pack 3.7V 950mAh
0.5W ERP
H215 x W62 X D45 mm (antenna included)
gr. 215 (with battery pack)
CHANNELS FREQUENCY TABLE
FREQ.
CH
FREQ.
CH
FREQ.
CH
446.00625
446.01875
446.03125
1
2
3
446.04375
446.05625
446.06875
4
5
6
446.08125
446.09375
-
7
8
-
CTCSS - TONE FREQUENCY CHART
No
OF
01
02
03
04
05
06
07
Freq. (Hz)
CTCSS OFF
67,0
71,9
74,4
77,0
79,7
82,5
85,4
No
08
09
10
11
12
13
14
15
Freq. (Hz)
88,5
91,5
94,8
97,4
100,0
103,5
107,2
110,9
No
16
17
18
19
20
21
22
23
Freq. (Hz)
114,8
118,8
123,0
127,3
131,8
136,5
141,3
146,2
- 14 -
No
24
25
26
27
28
29
30
31
Freq. (Hz)
151,4
156,7
162,2
167,9
173,8
179,9
186,2
192,8
No
32
33
34
35
36
37
38
-
Freq. (Hz)
203,5
210,7
218,1
225,7
233,6
241,8
250,3
-
Important Informations
English
IMPORTANT INFORMATIONS
Important !
Changes or modifications to this product could void your authority to operate this unit. Your
radio is produced and factory set to transmit a regulated signal on an assigned frequency. It is
against the law to alter or adjust the settings inside the radio to exceed those limitations. Any
adjustment to your radio must be made by a qualified authorized technician or service.
To be safe and sure :
Never open the cabinet of your radio.
Never change or replace anything in your radio (except the battery).
Your radio might cause TV or radio interference even when it is operating properly. To
determine whether your radio is causing the interference, turn it off. If the interference goes
away, your radio is causing it. Try to eliminate the interference by moving your radio away from
the receiver. If you cannot eliminate the interference, stop using the radio.
Hazardous Environments :
Do not operate the radio in hazardous environments.
Care and Safety :
To clean the radio, use a soft cloth dampened with water. Do not use cleaners or solvents
because they can harm the body of the unit and leak inside, causing permanent damage. Use
a dry, lint-free cloth to clean the battery contacts.
Battery Operation - Important Information
Dispose of battery in the proper manner, according to federal, state and local regulations that
apply in your area. A battery may leak electrolyte if it is mixed in a set with different battery
types, if inserted incorrectly, if disposed of in fire, or if an attempt is made to charge a battery
not intended to be charged. Discard leaky batteries immediately. Leaking batteries can cause
skin burns or other personal injury.
Notice ! Use of PMR446 Transceivers
This transceiver may be used in all the European countries and in some other countries as
well, according with the regulation of the country where the product is used.
PMR446 (8 channels) : Austria, Belgium, Czech Rep., Denmark, Finland, France, Germany,
Greece, Island, Irland, Italy, Luxembourg, Norway, Holland, Poland, Portugal, Spain, Sweden,
Switzerland, UK, Turkey
- 15 -
DECLARATION OF CONFORMITY
With the present declaration, we certify that the following products :
INTEK T100WP
comply with all the technical regulations applicable to the above mentioned products
in accordance with the EC Directives 1999/5/EC.
Type of product :
PMR 446 Transceiver
Details of applied standards :
EN 300 296-2 V1.3.1
EN 301 489-1 V1.9.2, EN 301 489-5 V1.3.1
EN 60950-1:2006+A11:2009+A1:2010+A12:2011
Manufacturer :
INTEK S.R.L.
16 Via G. Marconi
20090 Segrate, Italy
Tel. +3902 2695 0451 / Fax. +3902 2695 2185
E-mail : [email protected]
Notified Body :
Bay Area Compliance Laboratories Corp.
1274 Anvilwood Ave, Sunnyvale
CA 94089, USA
Identification Number : 1313
Contact Reference :
Armando Zanni
Tel. +3902 2695 0451 / Fax. +3902 2695 2185
E-mail : [email protected]
Segrate, 04-03-2014
dr. Vittorio Zanetti
(C.E.O.)
USER INFORMATION
in accordance with art. 13 of the Legislative Decree of 25th July 2005, no. 15 ”Implementation of Directives
2002/95/EC, 2002/96/EC and 2003/108/EC, relative to reduction of the use of hazardous substances in
electrical and electronic equipment, in addition to waste disposal”.
The crossed bin symbol shown on the equipment indicates that at the end of its working life the
product must be collected separately from other waste.
The user must therefore take the above equipment to the appropriate differentiated collection
centres for electronic and electro technical waste, or return it to the dealer when purchasing a
new appliance of equivalent type, in a ratio of one to one.
Appropriate differentiated waste collection for subsequent recycling, treatment and environment-friendly
disposal of the discarded equipment helps to prevent possible negative environmental and health effects and
encourages recycling of the component materials of the equipment.
Illegal disposal of the product by the user will be punished by application of the administrative fines provided
for by the legislative decree no. 22/1997 (article 50 and following of the legislative decree no. 22/1997).
- 16 -
English
Declaration of Conformity - User Information
Indice
Indice . . . . . . . . . . . . . . . . . . . . . . . . . . . . . . . . . . . . . . . . . . . . . . . . . . . . . . . . . . 17
Introduzione . . . . . . . . . . . . . . . . . . . . . . . . . . . . . . . . . . . . . . . . . . . . . . . . . . . . . 18
Caratteristiche principali . . . . . . . . . . . . . . . . . . . . . . . . . . . . . . . . . . . . . . . . . . . 19
Contenuto della Confezione . . . . . . . . . . . . . . . . . . . . . . . . . . . . . . . . . . . . . . . . 19
Italiano
Tasti e comandi . . . . . . . . . . . . . . . . . . . . . . . . . . . . . . . . . . . . . . . . . . . . . . . . . . 20
Display LCD . . . . . . . . . . . . . . . . . . . . . . . . . . . . . . . . . . . . . . . . . . . . . . . . . . 21-22
Installazione . . . . . . . . . . . . . . . . . . . . . . . . . . . . . . . . . . . . . . . . . . . . . . . . . . . . . 22
Utilizzo della batteria . . . . . . . . . . . . . . . . . . . . . . . . . . . . . . . . . . . . . . . . . . . . . . 23
Operazioni di base . . . . . . . . . . . . . . . . . . . . . . . . . . . . . . . . . . . . . . . . . . . . . 24-25
Funzioni avanzate . . . . . . . . . . . . . . . . . . . . . . . . . . . . . . . . . . . . . . . . . . . . . . 25-29
Funzioni supplementari . . . . . . . . . . . . . . . . . . . . . . . . . . . . . . . . . . . . . . . . . . . 29
Specifiche Tecniche . . . . . . . . . . . . . . . . . . . . . . . . . . . . . . . . . . . . . . . . . . . . . . 30
Tabella canali / Tabella CTCSS . . . . . . . . . . . . . . . . . . . . . . . . . . . . . . . . . . . . . 30
Informazioni importanti . . . . . . . . . . . . . . . . . . . . . . . . . . . . . . . . . . . . . . . . . . . 31
Avvertenze Importanti - Avviso agli utenti . . . . . . . . . . . . . . . . . . . . . . . . . . . . 32
Dichiarazione di Conformità . . . . . . . . . . . . . . . . . . . . . . . . . . . . . . . . . . . . . . . . 33
Garanzia limitata . . . . . . . . . . . . . . . . . . . . . . . . . . . . . . . . . . . . . . . . . . . . . . . . . 34
IMPORTANTE !
Si consiglia vivamente di prendere visione del contenuto di questo manuale, prima di utilizzare la
ricetrasmittente. Questo anche per evitare di utilizzare gli apparecchi al di fuori dei limiti previsti
dalle norme di legge in vigore.
IMPORTANTE !
La massima portata operativa è variabile secondo le condizioni del terreno e ambientali. La
portata è normalmente maggiore negli spazi aperti, mentre diminuisce sensibilmente all’ interno o
intorno agli edifici o altre strutture. Questa ricetrasmittente può non garantire la segretezza delle
comunicazioni.
- 17 -
Introduzione
Congratulazioni per aver scelto ed acquistato un prodotto di qualità INTEK. Con un uso
corretto e seguendo il set-up e le istruzioni d’ uso in questo Manuale di Istruzioni, questo
apparecchio vi garantirà un servizio senza problemi per molti anni.
Ci impegnamo costantemente a fornire prodotti di qualità che rispondano alle vostre esigenze,
ma siamo comunque sempre molto interessati a ricevere eventuali vostri commenti o
suggerimenti su questo prodotto, che ci aiutino nel continuo miglioramento della qualità.
Applicazioni
INTEK T100WP è una ricetrasmittente personale di ultima generazione, leggera e compatta,
che opera nella banda europea PMR 446 MHz. La radio deve operare nella banda PMR446
e nei canali ammessi nel paese dove il prodotto viene utilizzato, in accordo con le
restrizioni locali. Questo apparecchio permette una comunicazione via radio immediata, di
alta qualità, sia per l’ uso professionale che personale, è uno strumento di comunicazione
ideale per molteplici usi, quali :
Commercio
Sport & Tempo Libero
Industria, Cantieri Edili
Eventi Sportivi, Concerti, Meetings
Negozi, Magazzini & Centri Commerciali
Uso in Bicicletta o Motocicletta
Capannoni, Uffici & Palazzi
Monitoraggio Anziani o Neonati
Hotels & Resorts
Campeggio e Escursioni
Sicurezza & Soccorso
Attività Indoor & Outdoor
Controllo Bambini
Nautica e Volo Sportivo
Galleggiante / Impermeabile
La radio è progettata per soddisfare gli standard di impermeabilizzazione IP67. La radio
galleggia e può essere immersa in acqua fino a 1 m di profondità per 1 ora. Non è comunque
adatta per le immersioni subacquee. La radio risponde a questo standard solo se
completamente assemblata e se tutte le guarnizioni in gomma sono ben mantenute e
correttamente montate. Se la radio è stata immersa in acqua, il suono potrà risultare distorto.
Questo perché è ancora presente dell' acqua residua dentro e intorno ad altoparlante e
microfono. Basta scuotere la radio per eliminare l'acqua in eccesso dopodichè il suono
dovrebbe tornare alla normalità.
Attenzione: Se la radio è stata immersa in acqua salata, pulirla accuratamente con acqua
dolce e asciugarla prima di accenderla.
- 18 -
Italiano
Congratulazioni !
Caratteristiche principali - Contenuto della Confezione
CARATTERISTICHE PRINCIPALI
Questo apparecchio comprende numerose funzioni avanzate, ciò nonostante l’ utilizzo è molto
semplice e potete prendere familiarità con la radio dopo pochi minuti di uso.
Per favore riferitevi alla lista seguente delle principali funzioni incorporate :
Italiano
8 Canali PMR
38 Codici Privati CTCSS
Tono Roger Beep
Tono di Inserimento Comandi
Blocco della Tastiera
Squelch automatico
Monitor
Circuito automatico Power Save
Sistema VOX (Baby Room Monitor) / Uso Mani Libere
Funzione Dual Watch
Potenza del Trasmettitore Regolabile Hi-LO
Scansione automatica dei Canali e dei toni CTCSS
5 Diversi Toni Musicali di Chiamata
Display LCD retroilluminato
Indicatore di Livello Batteria
Presa per Microfono Auricolare Esterno
Funzione TOT (Time-Out-Timer)
Funzione Stop Watch
Potenza del trasmettitore alta-bassa selezionabile
Contatti per caricabatterie da tavolo
Standard di impermeabilizzazione IP67
CONTENUTO DELLA CONFEZIONE
Per favore controllate che la confezione contenga tutti i seguenti componenti :
2x Microfono-auricolare
2 x Unità Principale (Radio + antenna)
2x Cinghietta
2 x Pacco batterie ricaricabile Li-Ion da 950mAh
1x Manuale di istruzioni
1 x Caricabatterie doppio da tavolo
2 x Clip da cintura
- 19 -
Tasti e Comandi
1
6
4
5
3
11
7
8
9
10
12
13
14
15
16
17
1.
2.
3.
4.
5.
6.
7.
8.
9.
10.
11.
12.
13.
14.
15.
16.
17.
Antenna ad alta efficenza
Clip da cintura
Vano batterie
Tasto PTT (Push-To-Talk)
Tasto LAMP / Monitor
Presa microfono-auricolare esterno
Tasto blocco tastiera KEYLOCK
Tasto CANALE UP
Tasto CANALE DOWN
Microfono entrocontenuto
Display LCD retroilluminato
Tasto ON-OFF
TAsto di chiamata CALL
Tasto VOLUME UP
Tasto VOLUME DOWN
Tasto MENU
Altoparlante entrocontenuto
- 20 -
Italiano
2
Display LCD
J
A
B
Italiano
C
D
E
F
G
TX
RX
DW
SC
LO
H
I
K
L
M
N
A. Icona blocco tastiera Keylock
Indica che la funzione di blocco di tastiera KEYLOCK è attivata.
B. Icona TX
Indica che la radio è in trasmissione.
C. Icona RX
Indica che la radio è in ricezione.
D. Icona DW
Indica che la funzione Dual Watch è attiva.
E. Icona SC
Indica che la funzione di scansione automatica dei canali o dei toni CTCSS è attivata.
F. Icona LO
E' accesa quando viene selezionata la bassa potenza del trasmettitore.
G. Icona tono di tastiera
Indica che il tono di programmazione è attivato.
H. Icona VOX
Indica che la funzione VOX (uso a mani libere) è attivata.
I. Numero del codice CTCSS
Indica il numero del tono CTCSS selezionato (da 1 a 38).
J. Indicazione del canale
Indica il numero del canale selezionato (da 1 a 8).
- 21 -
Display LCD - Installazione
K. Icona Stop Watch
Indica che la funzione Stop Watch è attivata.
M. Icona Roger Beep
Indica che la funzione Roger Beep è attivata.
N. Icona stato batteria
Indicazione del livello di carica della batteria.
INSTALLAZIONE
Rimozione e installazione clip da cintura
1) Tirare la linguetta di blocco verso l’esterno e
quindi delicatamente far slittare la clip verso la
parte alta della radio.
2) Per installare la clip, far slittare la stessa verso
il basso nello slot apposito situato nella parte
posteriore della radio, finché il meccanismo di
blocco compie un clic.
Installazione del pacco batterie
1) Rimuovere la clip, togliere la vite e rimuovere il
coperchio del vano batterie.
2) Inserire il connettore del pacco batterie e
installare il pacco stesso.
3) Richiudere il coperchio e rimettere la vite.
4) Eseguire la ricarica del pacco batterie per
almeno 10-14 ore al 1° utilizzo. Spegnere la
radio durante la ricarica
ATTENZIONE !
Quando la capacità della batteria è bassa, l' indicazione bA Lo e l' icona del livello batteria (N)
lampeggeranno sul display LCD. A questo punto ricaricare la batteria. Fare riferimento al
paragrafo successivo "RICARICA DELLA BATTERIA".
- 22 -
Italiano
L.
Icona Power Save
Indica che la funzione di risparmio energia Power Save è abilitata.
Utilizzo della batteria
UTILIZZO DELLA BATTERIA
Ricarica della batteria
Le radio devono essere ricaricate utilizzando
esclusivamente gli accessori in dotazione.
L’operazione di ricarica avviene nel seguente modo :
Italiano
1)
Spegnere la radio. Non accenderla durante il
processo di ricarica.
2) Installare il pacco batterie in dotazione.
3) Inserire il jack dell' adattatore da rete 230VAC
nella presa del caricabatterie da tavolo,
assicurandosi che sia ben inserito.
4) Inserire l' adattatore nella presa di rete
230VAC.
5) Posizionare le radio nel caricabatterie doppio
da tavolo.
6) Gli indicatori LED di colore rosso si illumineranno ad indicazione del corretto collegamento alla
rete elettrica e del corretto posizionamento delle radio.
7) Una volta terminato il processo di ricarica, togliere le radio dal caricabatterie da tavolo.
NOTE :
1.
2.
3.
Gli indicatori LED non si spengono automaticamente, ad eccezione che le radio vengano
tolte dal caricabatterie o che lo stesso venga tolto dalla rete elettrica.
Il processo di carica è di circa 6 ore per batterie scariche o 14 ore se le batterie sono
nuove.
Nel caso che gli indicatori LED non si accendano, controllare che le radio siano
correttamente inserite nell' alloggiamento del caricabatterie da tavolo. Controllare anche
il corretto funzionamento delle batterie.
ATTENZIONE !
1.
2.
3.
4.
5.
6.
7.
Spegnere sempre le radio prima di iniziare il processo di ricarica delle batterie.
Utilizzare solamente l' adattatore da rete 230VAC in dotazione o caricatori originali INTEK.
Il caricatore da tavolo non è impermeabile pertanto assicurarsi che le radio siano
completamente asciutte prima di collegare l' adattatore da rete.
In caso di inutilizzo delle radio per diverso tempo (es. per settimane), per favore rimuovere i
pacchi batteria.
Eliminare le batterie vecchie e difettose utilizzando gli appositi contenitori.
Non gettare le batterie nel fuoco.
Sostituire le batterie solo con modello uguale o equivalente, consigliato dal costruttore.
- 23 -
Operazioni di base
OPERAZIONI DI BASE
Utilizzo della radio
La radio dispone di 8 canali PMR446 e 38 codici CTCSS. E' possibile comunicare con altre
radio che utilizzano lo stesso canale e lo stesso codice CTCSS.
Comunicare con altre radio
1. Per trasmettere mantenere premuto il tasto PTT (4); l' icona TX (B) sarà accesa sul display LCD.
2. Mantenere la radio in posizione verticale con il microfono a 5-8 cm dalla vostra bocca e
quindi parlare con voce normale.
3. Terminata la conversazione, rilasciare il tasto PTT (4).
4. La radio può ora ricevere comunicazioni da altri apparecchi. Regolare il livello del volume
se necessario, agendo sui tasti VOLUME UP (14) o VOLUME DOWN (15).
Time-Out-Timer (TOT)
Un timer disattiva automaticamente la trasmissione dopo 3 minuti, la quale può essere
riattivata rilasciando e ripremendo il tasto PTT (4).
Utilizzo del microfono-auricolare in dotazione
1. Collegare il microfono-auricolare all' apposita presa (6).
2. Premere il tasto PTT sul microfono per trasmettere e rilasciarlo una volta terminata la
conversazione.
3. Regolare il livello del volume se necessario.
AVVERTENZA !
Usare solo accessori originali. Collegare ed utilizzare accessori diversi da quelli
originali può causare gravi danni al ricetrasmettitore ed inoltre la perdita della garanzia.
Ridurre sempre il livello di volume al minimo prima di collegare una cuffia o microfono
esterni e aumentarlo gradatamente per evitare di danneggiare l'accessorio o l' udito dell'
operatore.
Selezione del canale principale
Utilizzare i tasti CHANNEL UP (8) o CHANNEL DOWN (9) per selezionare il canale desiderato
tra gli 8 canali PMR446 disponibili.
- 24 -
Italiano
Accensione e spegnimento della radio
1. Per accendere la radio mantenere premuto il tasto ON-OFF (12), il display LCD (11)
mostrerà il numero del canale (J) e il numero del tono CTCSS (I).
2. Per spegnere la radio, ripetere la stessa procedura.
Utilizzo della radio - Funzioni avanzate
Regolazione del volume di ascolto (8 livelli)
Premere i tasti VOLUME UP (14) o VOLUME DOWN (15) per regolare il volume di ascolto al
livello desiderato (8 livelli). Sul display LCD (11) comparirà l' icona LE (J) e il livello del volume
impostato (I) (01-08).
Italiano
FUNZIONI AVANZATE
Funzioni del Menu
Premere il tasto MENU (16) più volte per selezionare le funzioni del menu secondo l' ordine
descritto di seguito :
Menu --> CTCSS --> Selezione potenza trasmettitore --> VOX --> Livello sensibilità VOX -->
Scansione canali --> Scansione toni CTCSS --> Dual Watch --> Tono di chiamata CALL -->
Roger Beep --> Tono beep di tastiera --> Stop Watch
Selezione del tono CTCSS
La radio dispone di 38 codici privati CTCSS. E’ possibile associare un diverso tono CTCSS a
ciascun canale. Per impostare un tono CTCSS, eseguire le seguenti operazioni :
1. Premere una volta il tasto MENU (16) finchè il numero del tono CTCSS (I) lampeggia sul
display LCD (11). Se nessun tono è selezionato verrà visualizzato 00 (I).
2. Premere i tasti CHANNEL UP (8) o CHANNEL DOWN (9) per selezionare il tono CTCSS
desiderato. Mantenendo premuto uno di questi tasti, la selezione avverrà con velocità
maggiore.
3. Per confermare la selezione eseguita ed uscire dal menu, premere il tasto LOCK (7)
oppure premere il tasto MENU (16) per passate alla funzione successiva.
Note : Selezionando il codice CTCSS 00, la funzione CTCSS sarà disattivata. Per comunicare
tra due o più radio, le selezioni del canale e del codice CTCSS devono essere le stesse. Per
comunicare con altri modelli e marchi di radio, l’attuale frequenza radio e la frequenza del tono
CTCSS devono coincidere. Fate riferimento alle tabelle delle frequenze (canali e toni CTCSS)
in questo manuale.
Selezione della Potenza del Trasmettitore
La radio dispone di una funzione di regolazione della potenza RF del trasmettitore (alta/bassa).
Questa funzione è molto utile per ridurre il consumo delle batterie durante comunicazioni a
breve distanza. Per selezionare la potenza del trasmettitore, eseguire le seguenti operazioni :
1. Premere 2 volte il tasto MENU (16) finchè le icone HI o Lo iniziano a lampeggiare sul
display LCD (11).
2. Premere i tasti CHANNEL UP (8) o CHANNEL (DOWN) (9) per selezionare il livello di
- 25 -
Funzioni avanzate
Impostazione della funzione VOX (uso a mani libere)
La radio dispone della funzione VOX, che può essere utilizzata per una trasmissione di voce
automatica (uso a mani libere o uso come baby room monitor). In questa modalità, la
trasmissione inizia automaticamente parlando nel microfono (10). Non c’ è bisogno quindi di
premere il tasto PTT (4). Per impostare la modalità VOX, eseguire le seguenti operazioni :
1. Premere 3 volte MENU (16) finchè le icone VOX (H) e OFF (funzione VOX disattivata)
iniziano a lampeggiare sul display LCD (11).
2. Premere i tasti CHANNEL UP (8) o CHANNEL DOWN (9) per attivare la funzione VOX; sul
display comparirà l' icona On.
3. Per confermare la selezione eseguita ed uscire dal menu, premere il tasto LOCK (7)
oppure premere il tasto MENU (16) per passate alla selezione della sensibiltà della
funzione VOX.
Selezione del livello di sensibilità del VOX
1. Premere 4 volte il tasto MENU (16) finchè l' indicazione LE (J), l' icona VOX (H) e il livello
di sensibilità impostato (I) iniziano a lampeggiare sul display LCD (11).
2. Premere i tasti CHANNEL UP (8) o CHANNEL DOWN (9) per selezionare il livello di
sensibilità desiderato, (dal livello 01 al livello 05). La funzione VOX è più sensibile
impostando il livello 05.
3. Per confermare la selezione eseguita ed uscire dal menu, premere il tasto LOCK (7).
4. Quando la funzione VOX è attivata, l' icona VOX (H) appare sul display LCD (11).
Scansione Automatica dei canali
Questa funzione permette la scansione automatica dei canali. Per attivare la scansione
procedere come segue :
1. Premere 5 volte il tasto MENU (16) finchè il numero del canale in uso (J) e l' icona SC (E)
iniziano a lampeggiare sul display LCD (11).
2. Premere il tasto CHANNEL UP (8) per attivare la scansione automatica dei canali in ordine
crescente o il tasto CHANNEL DOWN (9) per attivare la scansione automatica dei canali in
ordine decrescente. La radio inizierà automaticamente la scansione alla ricerca dei canali
in uso, esclusi i codici CTCSS e sul display verrà visualizzata l' icona SC (E). La scansione
si arresta sul primo canale attivo trovato, per poi ripartire al termine della comunicazione.
- 26 -
Italiano
potenza desiderato HI (alta potenza) o Lo (bassa potenza).
3. Per confermare la selezione eseguita ed uscire dal menu, premere il tasto LOCK (7)
oppure premere il tasto MENU (16) per passare alla funzione successiva.
4. Se è stata selezionate la bassa potenza del trasmettitore, sul display comparirà l' icona LO (F).
Funzioni avanzate
3. Se durante la scansione vengono premuti il tasto PTT (4) o il tasto LOCK (7), la radio
interromperà la scansione e si posizionerà sull' ultimo canale dove è avvenuta una
comunicazione.
Scansione Automatica dei toni CTCSS
Per attivare la scansione dei toni CTCSS procedere come segue :
Italiano
1. Selezionare il canale desiderato, su cui attivare la scansione dei toni CTCSS.
2. Premere 6 volte il tasto MENU (16) finchè il numero del tono CTCSS (I) e l' icona SC (E)
iniziano a lampeggiare sul display LCD (11).
2. Premere il tasto CHANNEL UP (8) per attivare la scansione automatica dei toni CTCSS in
ordine crescente o il tasto CHANNEL DOWN (9) per attivarla in ordine decrescente. La
radio inizierà automaticamente la scansione alla ricerca dei toni CTCSS sul canale in uso e
sul display verrà visualizzata l' icona SC (E). La scansione si arresta sul primo segnale
attivo trovato, per poi ripartire al termine della comunicazione.
3. Se durante la scansione vengono premuti il tasto PTT (4) o il tasto LOCK (7), la radio
interromperà la scansione e si posizionerà sull' ultimo canale dove è avvenuta una
comunicazione.
Impostazione della funzione Dual Watch
La radio è dotata della funzione Dual Watch, che consente di monitorare 2 canali differenti,
senza nessun codice CTCSS. Per abilitare la funzione Dual Watch, eseguire le seguenti
operazioni :
1. Selezionare il primo canale da monitorare.
2. Premere 7 volte il tasto MENU (16) finchè l' icona DW (D) e il numero del canale corrente
inizieranno a lampeggiare sul display LCD (11).
3. Premere i tasti CHANNEL UP (8) o CHANNEL DOWN (9) per selezionare il secondo
canale da monitorare.
4. La radio inizierà il monitoraggio arrestandosi automaticamente quando, su uno dei 2 canali,
verrà ricevuto un segnale, per poi riprendere la scansione al termine della comunicazione.
Sul display comparirà l' icona DW (D).
7. Per disattivare la funzione Dual Watch e ritornare in modalità Stand-by, premere il tasto
LOCK (7).
- 27 -
Funzioni avanzate
1. Premere 8 volte il tasto MENU (16) finchè appare la scritta C (J) e il numero della melodia
selezionata (I) inizia a lampeggiare sul display LCD (11).
2. Premere i tasti CHANNEL UP (8) o CHANNEL DOWN (9) per selezionare la melodia
desiderata, tra le 5 disponibili.
3. Per confermare la selezione eseguita ed uscire dal menu, premere il tasto LOCK (7)
oppure premere il tasto MENU (16) per passate alla funzione successiva.
4 Per inviare una chiamata, premere brevemente il tasto C (13).
Impostazione della funzione Roger Beep
Questa funzione permette di inviare automaticamente una nota musicale quando viene rilasciato
il tasto PTT (4). Questo avviso musicale conferma al vostro corrispondente che la vostra
trasmissione è finita. Per impostare la funzione Roger Beep, eseguire le seguenti operazioni :
1. Premere 9 volte il tasto MENU (16) finchè l' icona del tono Roger Beep R (M) e le scritte
On o OFF iniziano a lampeggiare sul display LCD (11).
2. Premere i tasti CHANNEL UP (8) o CHANNEL DOWN (9) per selezionare On (tono beep
attivato) o OFF (tono beep disattivato). Se la funzione viene attivata, si udirà un tono di
conferma.
3. Per confermare la selezione eseguita ed uscire dal menu, premere il tasto LOCK (7)
oppure premere il tasto MENU (16) per passate alla funzione successiva.
4. Se il tono Roger Beep è attivato, sul display compare l' icona R (M).
Impostazione del tono di tastiera
Ogni qualvolta viene premuto un tasto della radio, un tono beep è prodotto per confermare il
comando inserito. Questa nota musicale può essere attivata o disattivata dall’utente,
eseguendo le seguenti operazioni :
1. Premere 10 volte il tasto MENU (16) finchè l' icona del tono (G) e le scritte On o OFF
iniziano a lampeggiare sul display LCD (11).
2. Premere i tasti CHANNEL UP (8) o CHANNEL DOWN (9) per selezionare On (tono beep
attivato) oppure OFF (tono beep disattivato). Se la funzione viene attivata, si udirà un tono
di conferma.
3. Per confermare la selezione eseguita ed uscire dal menu, premere il tasto LOCK (7)
oppure premere il tasto MENU (16) per passate alla funzione successiva.
4. Se il tono di tastiera è attivato, sul display compare l' icona del tono (G).
- 28 -
Italiano
Impostazione del Tono di Chiamata Call
Il tono di chiamata Call può essere trasmesso solo 1 volta ogni 60 secondi e ha una durata di 3
secondi. La radio dispone di 5 differenti toni musicali (melodie) per l' avviso di chiamata. Per
selezionare la melodia desiderata, eseguire le seguenti operazioni :
Funzioni avanzate - Funzioni supplementari
Impostazione della funzione Stop Watch
Questa funzione consente di visualizzare un timer sul display LCD (10).
Italiano
1. Premere 11 volte il tasto MENU (16) finchè l' icona del timer (K) e le scritte 00:00 iniziano a
lampeggiare sul display LCD (11).
2. Premere il tasto CHANNEL UP (8) per far partire il timer.
3. Premere il tasto CHANNEL DOWN (9) per fermare il timer e premere il tasto CHANNEL UP
(8) per farlo ripartire.
4. Per azzerare il timer, premere 2 volte il tasto CHANNEL DOWN (9).
5. La radio continuerà a funzionare normalmente durante il conteggio del timer.
6. Per fermare il timer e tornare in modalità Stand-By, premere il tasto LOCK (7).
FUNZIONI SUPPLEMENTARI
Blocco della Tastiera
Per evitare l' inserimento di comandi accidentali, premere il tasto LOCK (7) per circa 2 secondi.
L' icona LOCK (A) apparirà sul display LCD (11). Quando questa funzione è inserita, solo i tasti
PTT (4), C (13) e LAMP/MONITOR (5) sono attivi. Per sbloccare la tastiera, mantenere
nuovamente premuto il tasto LOCK (7) per circa 2 secondi.
Illuminazione del display LCD
Premere brevemente il tasto LAMP/MONITOR (5) per illuminare il display LCD (11) e premerlo
nuovamente per spegnerlo.
Funzione Monitor
La radio dispone di un sistema di silenziamento automatico (SQUELCH) che, in assenza di
segnale, toglie automaticamente il rumore di fondo o i segnali troppo deboli, a causa delle
condizioni ambientali o di portata. Mantenere premuto il tasto LAMP/MONITOR (5) per circa 4
secondi per attivare la funzione Monitor; un doppio beep confermerà la selezione. Premere
brevenemte il tasto LAMP/MONITOR (5) per disattivare la funzione. Per aprire
temporaneamente lo Squelch e ascoltare il rumore di fondo o i segnali più deboli, mantenere
premuto il tasto LAMP/MONITOR (5) per circa 2 secondi e rilasciarlo entro i 2 secondi.
Automatic Power Save
La radio comprende un dispositivo automatico chiamato AUTOMATIC POWER SAVE, che
permette di estendere in modo significativo la durata della batteria. Se la radio resta in Stand
By (modo di attesa) per almeno 10 secondi, il circuito Power Save viene attivato e sul display
LCD (11) l' icona (L) sarà accesa. La radio può comunque sempre ricevere trasmissioni in
questa modalità.
- 29 -
Specifiche tecniche - Tabelle canali/CTCSS
Canali
8 Canali PMR446 con 38 toni CTCSS
Spaziatura canali
12.5 KHz
Gamma di frequenza
Alimentazione
Potenza di uscita
Dimensioni
Peso
446.00625 - 446.09375 MHz
Pacco batterie ricaricabile 3.7V 950mAh
0.5W ERP
A215 x L62 x P45 mm (con antenna)
gr. 215 (incluso pacco batterie)
Italiano
CARATTERISTICHE TECNICHE
TABELLA CANALI
FREQ.
CH
446.00625
446.01875
FREQ.
446.03125
446.04375
P1
P2
CH
FREQ.
P3
P4
CH
446.05625
446.06875
P5
P6
FREQ.
CH
446.08125
446.09375
P7
P8
CTCSS - TABELLA DEI TONI PRIVATI
No
OF
01
02
03
04
05
06
07
Freq. (Hz)
CTCSS OFF
67,0
71,9
74,4
77,0
79,7
82,5
85,4
No
08
09
10
11
12
13
14
15
Freq. (Hz)
88,5
91,5
94,8
97,4
100,0
103,5
107,2
110,9
No
16
17
18
19
20
21
22
23
Freq. (Hz)
114,8
118,8
123,0
127,3
131,8
136,5
141,3
146,2
- 30 -
No
24
25
26
27
28
29
30
31
Freq. (Hz)
151,4
156,7
162,2
167,9
173,8
179,9
186,2
192,8
No
32
33
34
35
36
37
38
-
Freq. (Hz)
203,5
210,7
218,1
225,7
233,6
241,8
250,3
-
Informazioni importanti
INFORMAZIONI IMPORTANTI
Italiano
Importante !
Modifiche o interventi sulla radio possono farvi perdere la vostra autorizzazione ad utilizzare il
prodotto. Questa ricetrasmittente è progettata per trasmettere un segnale regolato su
specifiche frequenze assegnate. E' una violazione della legge modificare i settaggi o le
regolazioni interne della radio per eccedere questi limiti. Qualsiasi regolazione o intervento
tecnico sul prodotto deve essere effettuata unicamente da un tecnico qualificato o da un centro
di servizio autorizzato.
Per la sicurezza :
Non aprite mai il contenitore della radio (tranne per sostituzione delle batterie).
Non cambiate o sostituite nulla all' interno della radio (tranne le batterie).
La vostra radio potrebbe occasionalmente causare delle interferenze radio o TV, anche se
utilizzata correttamente. Per determinare se queste interferenze sono causate dalla vostra
radio spegnete l' apparecchio. Se le interferenze sono cessate, la causa è la vostra radio. Per
eliminare il problema, spostate la radio più lontana dal ricevitore radio o TV disturbato. Se le
interferenze persistono, non usate la radio in tale luogo.
Luoghi pericolosi :
Non utilizzate la radio in luoghi pericolosi, esempio presenza di esplosivi o di dispositivi
sensibili alle trasmissioni radio, all' interno di aeromobili.
Cura e Manutenzione :
Per pulire la radio, usare un panno soffice inumidito con l' acqua. Non usate assolutamente
solventi o prodotti similari, in quanto gli stessi possono danneggiare il contenitore della radio, lo
schermo LCD e penetrare all' interno della radio, causando danni al circuito e alle batterie.
Avviso :
Il contenuto di questo manuale è stato attentamente controllato, tuttavia il fabbricante non
assume alcuna responsabilità per problemi derivanti da errori e omissioni nel testo. Nessuna
parte di questo manuale può essere riprodotta o utilizzata in ogni modo, senza autorizzazione
specifica del fabbricante.
Antenna Danneggiata
Non usare mai la radio se l' antenna è danneggiata. Se un' antenna danneggiata viene a
contatto con la pelle, è possibile che accada una piccola bruciatura.
Informazioni Importanti sulle Batterie
Eliminate le batterie utilizzando gli appositi contenitori previsti nella vostra area. Le batterie
possono provocare perdite di liquido elettrolita, se inserita in modo errato, gettata nel fuoco o
se caricata in modo errato o con caricatori diversi da quello originale.
- 31 -
Avvertenze Importanti - Avviso agli utenti
AVVERTENZE IMPORTANTI !
Nella maggior parte dei paesi CEE, l' impiego di ricetrasmettitori PMR 446 è libero, in
conformità con le direttive CEE e l' utente non é soggetto ad alcuna tassa, concessione,
autorizzazione o licenza d' uso. In alcuni paesi, tuttavia, la regolamentazione può essere
differente; si consiglia pertanto di verificare la stessa presso il vostro rivenditore prima di
utilizzare l' apparecchio.
Avvertenza ! Utilizzo degli apparecchi PMR446
PMR446 (8 canali) : Austria, Belgio, Rep. Ceca, Danimarca, Finlandia, Francia, Germania,
Grecia, Islanda, Irlanda, Italia, Lussemburgo, Norvegia, Olanda, Polonia, Portogallo, Spagna,
Svezia, Svizzera, UK, Turchia
BANDA PMR : L' uso di questo apparecchio può essere soggetto a restrizioni nazionali (per l'
uso in Italia è richiesta l' autorizzazione generale come da D.I. 259 del 01-08-03 art. 99 comma
3; All. 25 art. 36). E' sufficiente presentare una semplice dichiarazione e versare un modesto
canone annuo (da 12 euro indipendente dal numero degli apparati).
AVVISO AGLI UTENTI
Ai sensi dell’art. 13 del decreto legislativo 25 luglio 2005, n. 15”Attuazione delle Direttive
2002/95/CE, 2002/96/CE e 2003/108/CE, relative alla riduzione dell’uso di sostanze pericolose
nelle apparecchiature elettriche ed elettroniche, nonché allo smaltimento dei rifiuti”.
Il simbolo del cassonetto barrato riportato sull’apparecchiatura indica che il
prodotto alla fine della propria vita utile deve essere raccolto separatamente dagli
altri rifiuti.
L’utente dovrà, pertanto, conferire l’apparecchiatura giunta a fine vita agli idonei
centri di raccolta differenziata dei rifiuti elettronici ed elettrotecnici, oppure
riconsegnarla al rivenditore al momento dell’acquisto di una nuova apparecchiatura di tipo
equivalente, in ragione di uno a uno.
L’adeguata raccolta differenziata per l’avvio successivo dell’apparecchiatura dismessa al
riciclaggio, al trattamento e allo smaltimento ambientalmente compatibile contribuisce ad
evitare possibili effetti negativi sull’ambiente e sulla salute e favorisce il riciclo dei materiali di
cui è composta l’apparecchiatura.
Lo smaltimento abusivo del prodotto da parte dell’utente comporta l’applicazione delle sanzioni
amministrative di cui al dlgs. n. 22/1997” (articolo 50 e seguenti del dlgs. n. 22/1997).
- 32 -
Italiano
QUESTO PRODOTTO E' DESTINATO AL MERCATO ITALIANO E PERTANTO L' IMPIEGO
DELLO STESSO E' SOGGETTO ALLE NORME DI LEGGE IN VIGORE IN ITALIA.
Dichiarazione di Conformità
DICHIARAZIONE DI CONFORMITA'
Con la seguente dichiarazione si attesta che i prodotti :
Italiano
INTEK T100WP
soddisfano tutte le norme tecniche applicabili ai suddetti prodotti secondo le Direttive
Comunitarie 1999/5/EC.
Tipo di prodotto :
Ricetrasmettitore PMR 446
Dettagli degli standard applicati :
EN 300 296-2 V1.3.1
EN 301 489-1 V1.9.2, EN 301 489-5 V1.3.1
EN 60950-1:2006+A11:2009+A1:2010+A12:2011
Produttore :
INTEK S.R.L.
Via G. Marconi, 16
20090 Segrate (Mi)
Tel. 02-26950451 / Fax 02-26952185
E-Mail [email protected]
Notified Body :
Bay Area Compliance Laboratories Corp.
1274 Anvilwood Ave, Sunnyvale
CA 94089, USA
Identification Number : 1313
Punto di contatto :
Armando Zanni
Tel. 02-26950451 / Fax 02-26952185
E-Mail [email protected]
Segrate, 04-03-2014
dr. Vittorio Zanetti (amministratore unico)
1313
RoHS
2002/95/EC
- 33 -
Garanzia limitata
Questo prodotto é garantito contro difetti nei materiali e nella lavorazione, in condizioni di uso
e servizio normali, per un periodo di un anno, sempre che il prodotto sia ritornato senza spese
al rivenditore presso cui é stato acquistato, accompagnato dallo scontrino fiscale o altro
documento di acquisto, comprovante la data effettiva di acquisto. Questa garanzia non copre
difetti o danni derivanti da abuso, uso improprio, modifiche non autorizzate, perdita di liquidi
delle batterie, utilizzo in ambiente inadatto o normale deperimento d' uso.
Tutti i valori presenti nel manuale sono misurati in condizioni ottimali di utilizzo. Tutti i disegni, i
testi e le caratteristiche tecniche non sono impegnativi e possono essere variati in qualunque
momento.
T100WP
Data:
N. di serie :
Timbro e firma del rivenditore
Prodotto importato e distribuito da
INTEK S.R.L.
Via G. Marconi, 16 - 20090 Segrate (MI) - Tel. 02-26950451 - Fax. 02-26952185
www.intek-com.it / e-mail : [email protected]
- 34 -
Italiano
GARANZIA LIMITATA
PRINTED IN CHINA