1
ISTRUZIONI PER IL MONTAGGIO
ASSEMBLING INSTRUCTIONS
OPERATION DE MONTAGE
MONTAGEANLEITUNG
INSTRUCCIONES PARA EL MONTAJE
FORMA B3/B9 MONOSUPPORTO
B3/B9 FORM SINGLE-BEARING
FORME B3/B9 MONOPALIER
FORM B3/B9 EINZELAUFHÄNGUNG
FORMA B3/B9 MONOSOPORTE
ATTENZIONE: prima del montaggio verificare
che le sedi coniche di accoppiamento (sia
dell'alternatore che del motore) siano regolari e
ben pulite.
CAUTION: before assembling verify that the
conical coupling parts are in order and clean.
ATTENTION: Avant le montage verifier que les
siéges coniques pour l`accouplement (de
l`alternateur et du moteur) soient en ordre et
propres.
ACHTUNG: Vor der Montage ist zu überprüfen,
daß die Kegelsitze gleichmäßig und sauber sind.
ATENCION: Antes del montaje, verificar que las
partes cónicas del acoplamiento estén en orden
y bien limpias.
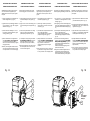
1) Fissare la flangia F al motore utilizzando viti e
rondelle adeguate allo scopo (fig. 1A).
1) Fasten the flange F to the motor using screws
and washers adequate to the purpose. (fig.
1A).
1) Fixez la bride F au moteur à l'aide de vis et
de rondelles appropriées.(fig. 1A).
1) Den Flansch F mit Hilfe entsprechender
Schrauben und Unterlegscheiben am Motor
befestigen. (fig. 1A).
1) Fijar la brida F al motor utilizando los tornillos
y arandelas adecuados para ello. (fig. 1A)
2) Applicare il tirante T per il fissaggio assiale del
rotore avvitandolo a fondo sulla sporgenza
dell'albero motore (fig. 1A).
2) Apply the rod T for the axial clamping of the
rotor, and screw it tight on the engine shaft. (fig.
1A).
2) Monter la tige centrale T pour la fixation
axiale, la vissant a fond sur le bout d`arbre
du moteur (fig. 1A).
2) Die Zugstange T für die Achsbefestigung des
Rotors durch vollständiges Einschrauben auf
dem Überstand der Motorwelle anbringen (fig.
1A).
2) Montar el tirante T para la fijación axial del rotor
atornillándolo a fondo sobre el saliente del
cigüeñal del motor (fig. 1A)
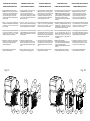
3) Fissare l'alternatore alla flangia con le 4 viti
V1 e relative rosette R1 in dotazione (coppia
di serraggio 25Nm) (fig. 1B).
3) Fasten the complete alternator to the flange
using the 4 screws V1 and washers R1
provided (driving torque 25Nm). (fig. 1B).
3) Fixez l'alternateur complet à la bride à l'aide
des 4 vis V1 et des rondelles
correspondantes R1 fournies en dotation
(couple de serrage 25Nm). (fig. 1B)
3) Den kompletten Wechselstromgenerator mit
Hilfe von 4 Schrauben V1 und
entsprechenden Unterlegscheibe R1 am
Flansch befestigen (Anzugsmoment 25Nm)
(fig. 1B)
3) Fijar el alternador completo a la brida con los 4
tornillos V1 y correspondientes arandelas R1
incluidas (par de torsión 25Nm). (fig. 1B)
4) Bloccare assialmente il rotore applicando le
rosette R2 (utilizzare rosette Ø24/8,4)
e serrando il dado autobloccante D2 sul
tirante T con chiave dinamometrica (coppia di
serraggio 25÷30Nm).
4) Lock axially the rotor by placing the washers
R2 (use Ø24/8,4 washers) and tight the
self-locking nut D2 on the rod T, using a
torque spanner (driving torque 25÷30Nm).
4) Bloquer axialement le rotor, en utilisant las
rondelles R2 (utilise rondelles Ø24/8,4)
et vissant a fond l`écrou autobloquant D2 sur
la tige centrale T en utilisant la clef
dynamometrique (couple de serrage de
25÷30Nm).
4) Den Rotor in Achsenrichtung blockieren,
indem die Unterlegscheiben R2 (verwende
Ø24/8,4 Unterlegscheiben) angebracht
und die selbstsperrende Mutter D2 auf der
Zugstange T mit einem
Drehmomentenschlüssel angezogen wird
(Drehmoment 25÷30Nm).
4) Bloquear axialmente el rotor utilizando las
arandelas R2 (utilizar arandelas Ø24/8,4)
y apretando la tuerca autoblocante D2 sobre el
tirante T con llave dinamométrica (par de
apriete 25÷30Nm)
Attenzione: prima di applicare il dado osservare
che la porzione filettata del tirante penetri nel
rotore permettendo così un sicuro bloccaggio.
Caution: before applying the nut, make sure that
the threaded part of the rod enters the rotor,
in order to obtain a tight lock.
Attention: avant de mettre l`écrou, controler que
la partie fileteé de la tige centrale entre dans
le rotor, permettant ainsi un bloquage fermé.
Achtung: Bevor die Mutter angebracht wird ist
sicherzustellen, daß der Gewindeteil der
Zugstange in den Rotor eingeschraubt wird,
um eine sichere Blockierung zu ermöglichen.
Atención : antes de montar la tuerca asegurarse
de que la parte roscada del tirante entra en el
rotor, permitiendo así un blocaje seguro.
Fig. 1A
Fig. 1B
R1
F
V1
R
T
V
R2
T
usare rosette
use washers
Ø24/8,4
D2