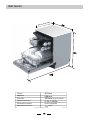
1
Istruzioni per l’uso LAVASTOVIGLIEASCOMPARSATOTALE 12 place settings 12 coperti 14 place settings 14 coperti Alt function Funzione Alt Auto program Programmazione automatica Guida rapida For detailed operating method read corresponding content on the instruction Per ulteriori indicazioni si the rimanda ai singoli capitoli delle istruzioni per l’uso. manual. Switch on the appliance Accendere l’apparecchio Riempire il cassetto del detersivo Fill the detergent dispenser Controllare il livello del Check the rinse aid level brillantante Controllare livello del sale Check theilregeneration salt level rigenerante Load the baskets Caricare i cestelli Select a programme Selezionare un programma Messa inthe funzione della Running dishwasher lavastoviglie Changing thealtro programme Scelta di un programma Add forgotten in the Aggiunta delledishes stoviglie dishwasher. dimenticate Open la theporta door,press the On/Off button to switch on the appliance . Aprire e premere il pulsante On/Off per accendere l’apparecchio Comparto A: AWith ognieach ciclowash di lavaggio. cycle. Comparto B: Compartment Solo per programmi prelavaggio. For programmes withcon pre-wash only. (Attenersi alle istruzioni d’uso!) (Follow the user instructions!) C A B Indicatore meccanico C. Electric indicator on controlcomandi panel (if(se provided). Spia elettrica sul pannello presente) (On models with water softener system only.) (Solo sui modelli con addolcitore.) Electric indicator on control panel provided). Spia elettrica sul pannello comandi (se(ifpresente). If there is noacquistato salt warning in the control panel di livello del sale sul panSe il modello non èlight dotato di una spia elettrica (for some models), can estimate when tostabilire fill the lasalt into di inserimennello comandi (solo suyou alcuni modelli), è possibile frequenza thedelsoftener by the number of cycles the dishwasher has run. to sale nell’addolcitore basandosi sul numero di cicli effettuati dalla lavastoviglie Scrape off any largediamount leftoverAmmorbidire food. Softeni remnants burnt food inpresenti pans, Rimuovere i residui cibo piùofgrossi. residui di of cibo bruciato then load the baskets. Refer to the dishwasher instructions. nei tegami, quindi caricare i cestelli. Si vedano loading le istruzioni per il caricamento Press theil Programme Button until finché the selected programme lights up. Premere pulsante “Programme” il programma selezionato non si illumina ( See the section entitled “Operation instruction (vedere la sezione intitolata “Istruzioni per l’uso”) ”) Aprire il rubinetto chiudere la porta dell’elettrodomestico. La macchina entrerà in T urn on the waterdell’acqua tap ,close ethe door . The machine will start working after about 10 seconds. funzione dopo circa dieci secondi 1. ciclo dicycle lavaggio in corso può essere modificato solo a for distanza pochi secondi dal inizio, 1. AUn running can only be modified if it has been running a shortditime. Otherwise the suo detergent per evitare che been il detersivo sia and già entrato in already circolazione e l’acqua giàcase, statathe scaricata. Se ciò may have already released the water drained. If this sia is the detergent accade,must è necessario dispenser be refilled.ricaricare il detersivo nel cassetto. 2. Tenerethe premuto il pulsante “Programme” per3più di 3 secondi perthe annullare programma in corso. Programme Button 2. Press for more than seconds to cancel runningil programme. 3. Select a new un programme. 3. Selezionare nuovo programma. 4. Restart theladishwasher. 4. Riavviare lavastoviglie 1 Aprirethe leggermente la porta perdishwasher. arrestare la lavastoviglie. 1.Open a little to stop the 2. La porta door può essere aperta completamente una volta che i mulinelli 2.After the spray arms stop working, you can open the door completely. smettono di ruotare. 3.Add the forgotten dishes. dimenticate. 3. Aggiungere le stoviglie 4.Close the door, the dishwasher will start la running again after 10 nuovaseconds. 4. Chiudere la porta: dopo dieci secondi lavastoviglie entrerà mente in funzione. AVVERTENZA! Open doo rcon carefully. Aprire the la porta cautela: Hot steam may escdi ape possibile fuoriuscita when the door is opened! vapore molto caldo! In caso di spegnimento If the appliance is switched dell’apparecchio off during a wash durante cycle. un ciclo di lavaggio Se la appliance lavastoviglie è stata spenta mentre eracycle, in corso un switched ciclo di lavaggio, alla riaccensione è neIf the is switched off during a wash when cessario nuovamente il ciclo di lavaggio e mettere in funzione l’apparecchio secondo la on again,selezionare please re-select the washing cycle and operate the dishwasher sequenza di the accensione iniziale state ). according to original Power-on Switch off the appliance Spegnere l’apparecchio When the working has finished, the buzzer of della the lavastoviglie viene emesso otto volte, Al termine del ciclocycle di lavaggio, il segnale acustico dishwasher will sound 8 times, then stop. dopodiché si tacita. Spegnere la lavastoviglie con il pulsante di accensione/spegnimento Turn off the appliance using the On/Off Button. Chiudere il rubinetto Turn off the water tap, dell’acqua scaricare i unload theebaskets cestelli. Avvertenza: attendere alcuni minuti 15) prima di scaricare la lavastoviglie per evitare maneggiare Warning: wait a few minutes (about(circa 15 minutes) before unloading the dishwasher to avoiddihandling stoviglie e utensili mentrewhile sonothey ancora caldi tendono a rompersi più facilmente. In questo modo si the dishes and utensils are molto still hot andemore susceptible to break. They will alsouna dry migliore better.Unload the appliance, starting from thel’apparecchio lower basket. otterrà anche asciugatura delle stoviglie. Svuotare iniziando dal cestello inferiore Leggere attentamente il presente libretto Dear Customer, Gentile cliente, This appliance is in tended to be used in household and similar applications such questo apparecchio è destinato per ilas: solo utilizzo domestico o per impie-staff kitch en areas in shop s, offices and other ghi simili, quali: working environme nts; -aree adibite a cucina per il personale in negozi, uffici e altri ambienti di -farm hous es; lavoro; -by clients in hotels, motels and othe r residential -agriturismi; type environments; -camere d’albergo, moteltype e altri ambienti di tipo residenziale; -bed and breakfast environments. -bed and breakfast e simili. Please carefully read this manual before using the ■ Leggere attentamente le istruzioni di usare la lavastoviglie per dishwasher, it will help you to prima use and maintain the dishwasher properly. acquisire familiarità con l’utilizzo e la manutenzione ottimali della Keep stessa.it as a refer in the later days. ■ Pass Conservare il presente libretto per owner consultazioni it on to any subsequent of thefuture. appliance. ■ Cedere il libretto a eventuali proprietari futuri dell’apparecchio. IlThis presente libretto contienesections alcuni capitoli relativi Instructions, alla sicurezza, al funmanual contains on safety Operating all’installazione Instructions, eInstallat ion I nstructions and zionamento, alla guida alla risoluzione dei problemi. Troubleshooting Tips, etc. Prima di rivolgersi al servizio di assistenza To review the section on troubleshooting Tips ■ Consultare il capitolo sulla risoluzione dei problemi aiuta a risolvere will help you to solve some common problems dayourself soli i guasti by . più comuni. IfSe you not solv e the problems by yourself , ■ noncan è possibile risolvere da soli il problema, rivolgersi a un tecnico please ask for the help of professional technicians. qualificato. NOTA: The manufacturer, following a policy of constant development a nd u pdating of the product, may In linea con la sua politica di sviluppo e aggiornamento make modifications without giving può priorapportare notice. costante dei propri prodotti, il fabbricante modifiche all’apparecchio senza preavviso. 1) Informazioni sulla sicurezza.............................................1 2)Smaltimento.......................................................................2 3) Istruzioni per l’uso.............................................................3 Pannello dei comandi..................................................................3 Control Panel...................................................3 Caratteristiche della lavastoviglie................................................3 Dishwasher Features.................................... ...3 4) Prima di utilizzare per la prima volta...............................4 A、Water Soft ener...... ......... ..................... ..... ..4 A,Addolcitore. ..........................................................................4 Loading the into the Softener.................5 B,B、Inserimento delSalt sale nell’addolcitore...................................5 Fill the Rinse Dispenser.........................5 CC 、Riempimento del Aid dosatore del brillantante..........................5 D,D、Funzioni delof detersivo. .........................................................6 Function Detergent .................................6 5)Attention Caricamento deiorcestelli della lavastoviglie. ...................9 before after loading the Dishwasher Precauzioni prima e dopo il caricamento dei cestelli Baskets..........................................................9 Lavastoviglie. ...............................................................................9 Loading the upper Basket ...............................10 Loading the Lower Basket ...............................10 Carico del cestello superiore.......................................................10 Carico del cestello inferiore.........................................................10 Cycle 6)Wash Avvio di unTable...........................................11 programma di lavaggio.................................11 Turning on th e Appliance................................11 Tabella dei cicli di lavaggio..........................................................11 Change the Programme.............. .... ................12 Accensione dell’apparecchio.......................................................11 At the End of the Wash Cycle...........................12 Scelta di un programma diverso..................................................12 Al termine del ciclo di lavaggio....................................................12 Filtering System.............................................13 7)Caring Manutenzione e pulizia.....................................................13 for the Dishwasher..................... . .........14 Sistema di filtraggio.....................................................................13 Cura della lavastoviglie...............................................................14 Installation p reparation .................................. 15 dimensions and installation...16 8)Aesthetic Note perpanel's l’installazione.....................................................15 Tension adjustment of the door spring ..............18 Preparazione all’installazione. .....................................................15 Connection of drain hoses .............................. 18 Dimensioni e installazione del pannello estetico... 16 Dishwash er installation steps ......................... 19 Regolazione tensione molla porta...............................................18 About Electricity Connecting...........................20 Collegamento dei tubi di scarico.................................................18 Cold Water Connection.................................. 21 Procedura di installazione lavastoviglie.......................................19 Informazioni sull’allacciamento elettrico......................................20 Allacciamento dell’acqua fredda..................................................21 Be fore calling for se rvice............................ .....23 9)Error Guida alla risoluzione dei problemi.................................23 codes.................................... . ..............24 Techdinical information.............................. .. .....25 Prima rivolgersi al servizio di assistenza.................................23 Codici di errore............................................................................24 Dati tecnici...................................................................................25 Caricamento dei cestelli secondo En50242 1. NOTE IMPORTANTI SULLA SICUREZZA LEGGERE INTERAMENTE LE ISTRUZIONI PRIMA DELL’USO AVVERTENZA! When Nell’utilizzo della lavastoviglie è necessario alle precauzioni elencate di seguito: using your dishwasher, followattenersi the precautions listed below: ISTRUZIONI PER IL COLLEGAMENTO A TERRA ■This L’elettrodomestico devebeessere collegato terra. In appliance must earthed. In theaevent of caso a ■ di malfunzionamenti o rotture,earthing la messawill a terra riduce il malfunction or breakdown, reduce rischio allaproviding corrente elettrica un the riskdioffolgorazioni an electricoffrendo shock by a path of percorso con minore resistenza. La lavastoviglie è fornita least resistance of electric current. This appliance con un cavo dotato conduttore spina con messa a is equipped with adicord having ean equipmentterra. grounding conductor and a grounding plug. The La spina collegata a una presa di corrente plugdeve mustessere be plugged into an appropriate outlet idonea, installataand e collegata a terra nel rispetto diwith tutte le that is installed grounded in accordance norme regole locali. all locale codes and ordinances. ■ ■ AVVERTENZA! Improper connection of the equipment-grounding L’errato collegamento del conduttore di messa a terra può conductor can result in the risk of an electric shock. comportare il rischio di folgorazioni. Check with a qualified electrician or service In caso di dubbi circa il corretto collegamento a terra dell’erepresentative rivolgersi if you area in whether the o al lettrodomestico, undoubt elettricista qualificato appliance is properlyNon grounded. Dolanot modify the servizio di assistenza. modificare spina fornita con plug provided with the appliance; If it does not fit l’apparecchio. Se non si inserisce correttamente nella presa, the outlet.aHave a proper outlet installed by aun tipo di richiedere un elettricista qualificato di installare qualified electrician. presa adatto. AVVERTENZA! USO CORRETTO from detergent and rinse keep enere children detersivi eaway brillantanti fuori dalla portata dei aid, bambini. ■Do Nonnot usare impropriamente, sedersi salire sulla porta o ■TKeep abuse, sit on, or stand on othe door or dish childfar ren away from the open door aperta of the dishwasher, rack of thedella dishwasher. Non avvicinare i bambini alla porta della lavastovisui cestelli lavastoviglie. there someindetergent lefteventuali inside. residui di glie percould evitarestill chebeentrino contatto con touchlathe heatingdurante element duringdopo or un ciclo ■Do Nonnot toccare resistenza o subito This appliance is not intended for use by persons immediately after use. detersivo. di lavaggio. (istruzione valida soltanto per le macchine con children )with reduced physical, sensory or (This instruction is only applicable to machines ■Q(including uesto elettrodomestico concepitoand per persone resistenza esposta). mental capabilities, or non lackèofstato experience with a visual heating element.) (bambini inclusi) con capacità fisiche, sensoriali o mentali ■Do Non utilizzare la lavastoviglie senza avere prima verificato knowledge ,unless they have been given supervision not operate your dishwasher unless all che tutti i pannelli di protezione siano correttamente monenclosure panels are properly in place. Open tati. Se la lavastoviglie è in funzione, aprire la porta con the door very carefully if the dishwasher is cautela per there evitareislaafuoriuscita di spruzzi di acqua. operating, risk of water squirting out. Do Quando la porta è aperta, non appoggiare oggetti not place any heavy objects on or stand onpesanti the sopra o contro di essa: l’elettrodomestico potrebbe door when it is open. The appliance could tip rovesciarsi in avanti. forward. loading items da to be washed : When Per caricare le stoviglie lavare: Locate items so that they are 1) 1) Disporresharp gli utensili appuntiti in modo che not non likely possano todanneggiare damage the door seal;della porta. la guarnizione ) Warning: Knives utensils with devono 2 2) Avvertenza: i coltelliand e gliother altri utensili appuntiti sharp be loade the basket esserepoints dispostimust nel cestello condleinpunte rivolte verso il with their points down or placed in a basso o in posizione orizzontale. horizontal position. When Quandousing la lavastoviglie è in funzione, evitare che oggetti your dishwasher, you should di plastica entrino in contatto con la resistenza (istruzione preve nt plastic items from coming into contact validathe soltanto per le macchine con resistenza esposta). with heating element.(This instruction is only machines with a visual g applicable Al termine deltociclo di lavaggio verificare cheheatin la vaschetta element.) del detersivo sia vuota. th atinthe detergent comparment is e mpty Check Non lavare lavastoviglie oggetti in plastica, salvo se after completion th e wash cycle. contrassegnati comeofidonei al lavaggio in lavastoviglie o Do not indicazioni wash plastic items unless they are markednon recanti analoghe. Per gli oggetti in plastica dishwasher safe or the equivalent. For plastic items appositamente contrassegnati, verificare le indicazioni del not so marked, check the manufacturer's produttore. recommendations. Use Utilizzare detersivi brillantanti specifici per lavaonlysoltanto deterge nt anderinse additives stoviglie. designed for an automatic dishwasher. Never Non utilizzare sapone, detersivo perrgent, lavatrice per il use soap, laun dry dete or ohand lavaggio a detergent mano. Conservare prodotti washing in you rquesti dishwa sher.lontano Keep dalla these out of the reach of children. portata products dei bambini. ■ ■ ■ ■ ■ ■ ■ ■ ■ ■ ■ ■ ■ ■ ■ ■ ■ ■ ■ ridotte o prive diconcerning esperienza euse conoscenze, a meno by cheanon or instruction of the appliance vengano supportate e for istruite come utilizzarlo da una persoperson responsible theirsusafety. na responsabile della sicurezza. Children should be loro supervised to ensure that they do play with appliance. Cnot ontrollare chethe i bambini non giochino con l’elettrodomestico. detergents arefortemente strongly alcalini alkaline, they I Dishwash detersivi pererlavastoviglie sono e possono can be extremely dangerous if swallowed. Avoid quindi essere molto tossici se ingeriti. Evitare il contatto con la contact with eskin eyes andi bambini keep children cute e gli occhi nonand far avvicinare quando laaway porta from the dishwasher when the door is open. della lavastoviglie è aperta. door should not be affinché left open, NThe on lasciare aperta la porta non aumenti il rischio di since this could increase the risk of tripping. inciampo. s upply cord is damaged, it must be replaced SIfe the il cavo di alimentazione è danneggiato, richiederne la soby the man ufacturer or its service agent or a stituzione al produttore, al servizio di assistenza o a personale similarly qualified person in order to avoid a qualificato, hazard. al fine di evitare qualsiasi pericolo. Quando si elimina o si mette fuori servizio una vecchia lavastoRemove the door to the compartment when viglie, rimuovere la porta delwashing vano di lavaggio. removing an old dishwasher from service or discarding it. Il materiale di imballo deve essere smaltito correttamente. of packing UPlease tilizzare d laispose lavastoviglie soltantomaterials per lo scopoproperly. per cui è stata Use the dishwasher only for its intended function. concepita. During installatio n, the power supply must not In fase di installazione non piegare né appiattire eccessivabe excessively or dangerously bent or flattened. mente il cavo di alimentazione. Do not tamper with controls.Non manomettere i comandi. LThe ’elettrodomestico deve essere collegato to all’impianto idrico con appliance is to be connected the water mains using new hose sets that oldtubi hose-sets tubi flessibili nuovi, vale a dire nonand riutilizzando vecchi. not behareused. Lshould a lavastoviglie una capienza massima di 14 coperti. maximum nu mber of place settings be LThe a pressione massima di carico dell’acqua è di 1 to MPa. washed is 14 . La pressione minima di carico dell’acqua è di 0,04 Mpa. The maximum pe rmissible inlet water pressure is 1Mpa. The minimum permissible inlet water pressure is 0.04Mpa . LEGGERE E OSSERVARE ATTENTAMENTE LE PRESENTI NOTE SULLA SICUREZZA CONSERVARE LE PRESENTI ISTRUZIONI 2. Smaltimento Dispo se of the dishwasher material correctly. Smaltire correttamente il materialepackaging di imballo della lavastoviglie. All pa ckaging materials ca n be recycled. Tutti i materiali di imballo sono riciclabili. Plastic parts are marked with the standard international abbreviations: Le parti in plastica sono contrassegnate con le abbreviazioni internazionali standard: PE polietilene, for polyethylene, e .g. wrapping material PE ad es. le pellicole di sheet avvolgimento PS Polistirene, for polysty e.g. padding material PS ad es.rene, il materiale di imbottitura POM Poliossimetilene, ad es. i ganci in pla plastica POM po lyoxymethylene, e.g. stic clips PP ad es. il contenitore sale PP Polipropilene, polypropylene, e.g. Salt del filler ABS Acrilonitrile-butadiene-stirene, ad es. il pannello dei comandi ABS Acrylonitrile Butadiene Styrene, e.g. Control Panel . ■ ■ ■ ■ ■ AVVERTENZA! ckaging material could be dangerous for children! IPa l materiale di imballo può essere pericoloso per i bambini! ■ For disposing of package and the a ppliance ple ase go to a recycling cen tre. Therefore cut ■Poffer lothesmaltimento dell’imballo dell’elettrodomestico un’isolaunusable. ecologica. Tagliare il cavo di alimentapower s upply cableeand mak e the doorrivolgersi closin g adevice zione e rendere inutilizzabile il dispositivo di chiusura della porta. packaging is manufactured from recycled paper and should be dispos ed in the ■GCardboard li imballi in cartone sono prodotti con carta riciclata e devono essere smaltiti tramite gli appositi contenitori per la waste paper collection for recycling . raccolta differenziata. By ensuring this product is disposed of correctly, you will help prevent potential n egative ■Iconsequences l corretto smaltimento di questo prodotto contribuisce a evitare possibili negativi per l’ambiente e la salute, for the environment and human health, whicheffetti could otherwise be caused by inappropriate waste han dling of this prod uct. che potrebbero derivare da una gestione non corretta dei rifiuti generati dal prodotto. more detailed information rec di ycling ofprodotto, this product, please conufficio tact your locale alla ■PFor er informazioni più approfondite sulabout riciclaggio questo rivolgersi al proprio comunale city office and your household waste disposal service. società incaricata del servizio di smaltimento dei rifiuti domestici. DISPOSAL: Donon notsmaltire dispose this prodotto productcome as unsorted municipal waste.È Collection of such SMALTIMENTO: questo rifiuto urbano indifferenziato. necessario che questo rifiuto waste separately for special treatment is venga smaltito mediante raccolta differenziata pernecessary. un adeguato trattamento. 3. Istruzioni per l’uso get the best performance frominteramente your dishwasher, readper all l’uso operating instructions IMPORTANTE P To er ottenere risultati ottimali, leggere le istruzioni prima di utilizzare before using it for first time. l’elettrodomestico perthe la prima volta. Pannello dei Comandi Rinse Aid Salt Aid 1.Pulsante Button: di accensione/spegnimento: di attivare e disatti1.On/Off To turn on/off theconsente power supply. vare l’alimentazione. 2.Delay To Press buttonilto delay. 2.PulsanteButton ritardo::Premere perthe impostare ritardo. 3.Option to press this button to selectper a express 3.Pulsante Button: “Opt” (opzioni): premere questo pulsante scegliere tra orasciugatura extra drying espressa e asciugatura extra 4.DDisplay isplay: visualizza errore,the tempo di ritardo ecc. 4. screen:codici to show error code,d ela y time etc. •Rinse Indicatore brillantante;salt indicatore aggiunta sale: Aidlivello indicator,Add indicator: when the dispenser needs to be refilled. Indicates Indica la necessità di ricaricare il contenitore. time or edirror codes in dicator: • Delay Indicatore tempi ritardo o codici errore: 25 • Program Indicatori diindicators: programma: • Alt Indicatore funzioni Alt: functions indicator: • Infall Spia di afflusso: Warning Light : se accesa, indica che i rubinetti non sono aperti. Being on When faucets is not open ed. •Indicatore opzioni: Option delle Indicator: (asciugatura (Exp ress) espressa) (Extra drying) (asciugatura extra) Express c an be use when choose Intensive Normal L’opzione “Express” (asciugatura espressa) può essere utilizzata Eco Glass . se viene scelta la modalità “Intensive” (intensivo)-> “Normal” (norExtra drying can b e use when choose In tensive male)-> “ECO” (ecologico) “Glass” (vetro). Normal ECO Glass ->1hour. L’opzione “Extra” (asciugatura extra) può essere utilizzata se la modalità “Intensive” (intensivo)-> “Normal” (normale)-> “ECO” Dual zone wash function, press the 5. Alt Button: (ecologico) -> “Glass” (vetro) viene impostata su una durata di button to select either upper basket or lower ba sket un’ora. loaded. 5.Program Pulsante “Alt”: Funzione di lavaggio Dual Zone: premere 6. Button : To Press the button to select a il pulsante per selezionare il carico del cestello superiore o inferiore. wash Program. 6.Pulsante programma: premere per selezionare un programma di lavaggio. Dishwasher Features Vista anteriore Front view 1 2 3 Vista Baposteriore ck View 8 4 5 9 6 10 7 12 11 13 1 2 3 Mulinello superiore Top spray arm Portaposate Cutlery ra ck Cestello superiore Upper basket 4 5 6 Tubo Innerinterno pipe Cestello inferiore Lower basket Contenitore del sale Salt container 7 8 9 Distributore Dispenser Griglia portatazze Cup shelf Mulinello Spray arms 10 11 12 Gruppo filtro Filter assembly Regolatore 13 Adjuster Connettore del tubo di carico Inlet pipe conne ctor Tubo di scarico Drain pipe 4. Prima di utilizzare per la prima volta Prima di using mettereyour in servizio la lavastoviglie: Before dishwasher for the first time: A. Regolare Set the water softener l’addolcitore dell’acqua B. Aggiungere Add 1.5Kg1,5Kg dishwasher and then full fill the salt container di sale dasalt lavastoviglie e riempire il contenitore del salewith con water acqua C. Riempire Fill the rinse aid dispenser il dosatore del brillantante D. Riempire Fill in detergent il cassetto del detersivo A.Addolcitore L’addolcitore deve essere regolato manualmente selettore di durezzadial. dell’acqua. The water softener must be set manually,utilizzando using theil water hardness L’addolcitore è concepitoisper rimuoveretodall’acqua i sali e i minerali che potrebbero un effetto The water softener designed remove minerals and salts from the determinare water, which wouldnegativo have sulla funzionalità elettrodomestico. a detrimental or adverse effect on the operation of the appliance. The higher the content of these salts, the harder your water is. La durezza dell’acqua aumenta quantominerals più è alto iland grado di minerali e sali presenti nell’acqua. softener should be adjusted according to the hard ness utilizzata. of the water yourlocale area.è Your local Waterindicazioni Authority ÈThe opportuno regolare l’addolcitore in funzione della durezza dell’acqua L’enteinidrico in grado di fornire in can advise you on the hardness o f the water in your area. merito alla durezza dell’acqua. Regolazione del consumo di sale Adjusting Salt Consumption The dishwasher is designed allow forlaadjustment in the amount of sa lt co nsumed baseddell’acqua on the hautilizzata. rdness Questa of La lavastoviglie è stata studiata pertoconsentire regolazione del consumo di sale sulla base della durezza the water used. is intended to optimise anddicustomise caratteristica mira aThis ottimizzare e personalizzare il livello consumo di the sale.level o f salt consumption. Osservare la procedura descritta di seguito per regolare tale consumo. w the steps below for adjustment in salt consumption. 1.Please Aprirefollo la porta e accendere l’elettrodomestico: 1. Open dooril,Switch the appliance; 2. Tenerethe premuto pulsante on “Program” per più di cinque secondi per avviare l’addolcitore entro 60 secondi dall’ac2. Press the Program button than s econds to start the water softener censione della lavastoviglie (le for spiemore di livello del 5sale e del brillantante si accendono a intermittenza all’avvio della set model within 60seconds after the appliance was switched on( The Salt and modalità impostata); aid warning“Program” lights will on periodically when corretta it g et ininthe set model ); 3.Rinse Premere il pulsante perbe selezionare l’impostazione funzione dell’ambiente di utilizzo; le impo3. Press the Program button to select the proper set according to your loca l environment, stazioni possono essere modificate secondo la sequenza riportata in basso: H1->H2->H3->H4->H5->H6; th e sets will change in the follo wing sequence: H1->H2->H3->H4->H5-> H6; 4. Premere il tasto di accensione/spegnimento 4. Press the Power button to end the set per up terminare model. il modello di configurazione. WATER HARDNESS DUREZZA DELL’ACQUA dH fH Clarke mmol/l 0~0.94 Posizione del Selector Position Salt consumption Consumo di sale (gram/cycle) (grammi/ciclo) H1 0 selettore 0~5 0~9 0~6 6-11 10-20 7-14 1.0-2.0 H2 9 12-17 21-30 15-21 2.1-3.0 H3 12 18-22 31-40 22-28 3.1-4.0 H4 20 23-34 41-60 29-42 4.1-6.0 H5 30 35-55 61-98 43-69 6.1-9.8 H6 60 Nota:1 Nota:2 °Clarke=1.78 °fH=0.178mmol/l 1 1° °dH=1.25 dH = 1,25 ° Clarke = 1,78 ° fH=0.178 mmol/l ° dH: gradi tedeschi °dH: German degree ° fH: gradi francesi °fH: French degree ° Clark: gradi britannici °Clark: British degree Impostazioni di fabbrica: H4 (EN 50242) The manufactory setting: H4 (EN 50242) Per conoscere la durezza dell’acqua della propria zona rivolgetevi all’ente dell’acqua potabile. Contact your local water board for information on the hardness of your water supply. your model does havediany water softener, you may questa skip this section. NOTA: Se ilIfmodello acquistato nonnot è dotato addolcitore è possibile tralasciare sezione. WATER SOFTENER ADDOLCITORE The hardness of the wain terbase varies from Se place to plac e. Iffunziona hard water is used insu the dishwasher, de posits will La durezza dell’acqua varia alla zona. la lavastoviglie con acqua dura, piatti e utensili si formeranno dei depositi. form on the dish es and utensils. Questo elettrodomestico è dotato di un addolcitore speciale che utilizza un sale appositamente studiato per eliminare calcare e sali minerali The appliance is equipped with a special softener that uses a salt container specifically designed to eliminate dall’acqua. lime and minera ls from the water. B. Inserimento del sale nell’addolcitore Utilizzare sale per lavastoviglie. Always esclusivamente use the salt intended for use with dishwasher. salt contain located the lower basket should be fill ed as explained IlThe contenitore del saleersiis trova sotto albeneath cestello inferiore e deve essereand riempito nel modo seguente: in t he foll owing: Attenzione! ■Attention! Utilizzare esclusivamente sale per lavastoviglie! Ogni tipo di sale diverso non studiato appositamente per Only use salt spe cif ically desi gne d for tda hecucina, use i ngenera dishwashers! Every other type L’utilizzo of l’utilizzo in lavastoviglie, in particolare il sale effetti dannosi sull’apparecchio. di sale saltnon notidoneo speciesonera fically de sig ned fo u se responsabilità in a d ishwasher, espe cially table salt, will il fabbricante dar the qualsiasi per danni e comporta la decadenza della garandamage zia. the w ater sof tener. In case of damages caused by the use of unsuitable salt the ma nuf act urer does not give any wa rranty nor is liable for any damages caused. ■ Aggiungere il sale poco prima di iniziare uno dei programmi completi di lavaggio. In questo modo si impedisce Only fil l wi th salt just b efore starting one of the co mp let e washing p rograms. che eventuali versamenti di of sale o dior acqua salata sul della possano causare corrosione. This wigli ll prevent any g rains salt salty wate r, fondo which malavastoviglie y have been spilled, remaining on the bottom of the machi ne for any period of time, which may cause corrosi on. Apertura il cestello svitare e togliere il tappo contenitore delfrom sale. the salt container. A Dopo Afteraver the rimosso lower basket hasinferiore, been removed, unscrew and dal remove the cap dotazione) into nel foro introdurre circa 1,5 kgabout di sale1.5kg per lavastoviglie. B Inserire Place l’estremità the end ofdell’imbuto the funnel(in(supplied) the ehole and introduce of dishwasher salt. Riempire il contenitore del sale con acqua. La fuoriuscita di una piccola quantità di acqua durante il riempimenFull fill the salt container with water,It is normal for a small amount of water to come out of the C tosalt del container. contenitore con il sale è normale. riempito il contenitore, riapplicare il tappo avvitandolo in senso orario fino allo scatto. D Dopo Afteraver filling the container , screw the cap tightly back clockwise. E La The salt light willcomandi stop being afteruna thevolta salt riempito container has beendel filled spia delwarning sale sul pannello si spegne il contenitore sale.with salt. dopo aver inserito il sale è necessario avviare un programma di should lavaggiobe (sistarted suggerisce selezionare un programF Subito Immediately after filling thenel saltcontenitore into the salt container, a washing program (Wedisuggest to use a short program Otherwise filtersalata system, pump or danni otheralimportant of the becomponenti damaged importanti della ma breve), ). per evitare chethe l’acqua possa recare sistema diparts filtraggio, allamachine pompa o may ad altri by salty water. This is di out of warranty. macchina. Eventuali danni questo tipo non sono coperti da garanzia. NOTA: 1. l contenitore del sale deve solowhen in casothe di accensione dellalight spiain delthe livello del sale sul pannello 1. IThe salt container mustessere only ricaricato be refilled salt warning control panel comes on. comandi. Se laon capacità di dissoluzione del sale ès,bassa, la spia potrebbe rimanere accesa unathough volta riempito Depending how well the salt dissolve the salt warning light may still be anche on even the il contenitore del sale. salt container is filled. Se il modello acquistato non è dotato di una di livello del saleMode sul pannello (su alcuniwhen modelli), If there is no salt warning light in the spia con elettrica trol panel (for some ls),youcomandi can estimate to fill èthe possibile stabilire frequenza inserimento del sale basandosi salt into the la softener bydithe cycles that thenell’addolcitore dishwasher has run. sul numero di cicli effettuati dalla 2. lavastoviglie. If there are spills of the salt, a soak or a rapid program should be run to remove the excessive sa lt. 2.Se vi sono spargimenti di sale è consigliabile procedere a un ciclo veloce o a un ammollo per eliminare i residui sparsi. C. Riempimento del contenitore del brillantante Contenitore brillantante Rinse Aid del Dispenser Il brillantante è rilasciato durante l’ultima fase di risciacquo per evitare che si formino gocce di acqua sulle stoviglie, con la conThe rinseformazione aid is released during othe final rinse to prevent from forming droplets on your dishes, which sulle can stoviglie. La seguente di macchie rigature. Inoltre migliora water l’asciugatura facilitando lo scivolamento dell’acqua leave spots and streaks. It also improves drying by allowing water to roll off the dishes. Your dishwasher is lavastoviglie è stata studiata per l’utilizzo di brillantante liquido. Il dosatore del brillantante è situato all’interno della porta a fianco designed to use liquid rins e aids. The rinse aid dispenser is located inside the door next to the detergent dispenser. al del detergente. il dosatore, il tappo e versareuntil il liquido finché l’indicatore livello non diventa Tocontenitore fill the dispenser, open thePer capriempire and pour the rinse aprire aid into the dispenser the level indicator turnsdel completely completamente nero. Il dosatore del brillantante ha una capienza di circa 110ml. black. The volume of the rinse aid container is about 110ml. Funzione Functiondel of brillantante Rinse Aid IlRinse brillantante è aggiunto automaticamente durante l’ultimo risciacquo: ciò assicura risciacquo e un’asciugatura ottiaid is automatically added during the last rinse, ensuring thorough rinsing, un andperfetto spot and streak free drying. male delle stoviglie, evitando macchie e rigature. Attention! Attenzione! Only use branded rinse aid for dishwasher. Never fill the rinse aid dispenser with any other substances Utilizzare solo brillantanti specifici per l’utilizzo in lavastoviglie. Non riempire il dosatore con prodotti non specifici (ad es. deter(e.g. Dishwasher cleaning agent, liquid detergent). This would damage the appliance. gente per lavastoviglie, detersivo liquido), onde evitare di danneggiare l’apparecchio. Quando riempire dosatore When to Refill ilthe Rinsedel Aidbrillantante Dispenser Se la spia del brillantante non è presente nel pannello dei comandi, è possibile stimare la quantità di liquido da inserire basandosi If there is no rinse-aid warning light in the c ontrol panel, you can estimate the amount from the colour sulofcolore dell’indicatore ottico di livello “C”, situato del tappo. il dosatore è pieno, appare completathe optical level indicator next atofianco the cap. When Quando th e rinse-aid c ontainer is l’indicatore full, the whole " C "located mente di colore scuro. Se la quantità inizia a diminuire, diminuisce anche l’intensità del puntino nero. Il livello del brillantante non indicator will be dark .As the rinse -aid diminishes, the size of the dark dot decreases. You should never let dovrebbe maiaid scendere al 1di/sotto the rinse leve l fall 4 full.di ¼. (Rinse-Aid indicator) Se quantità inizia a diminuire,the l’intensità nero Aslathe rinse aid d iminishes, size o fdel thepuntino black dot cambia seguito. changes, as illustra ted below. on the come rinse indicato aid leveldiindicator Pieno Full 3/4 3 / pieno 4 full 1/2 1 / pieno 2 full 1/4 per spotting eliminare le macchie 1 / pieno: 4 full -consigliabile Should refillil rabbocco to eliminate Vuoto Empty 1 2 3 Per aprirethe il dosatore, girare tappo direzione freccia “open” (aperto) e tirarlo verso di sé. To open dispenser, turn ilthe capverso to thesinistra "open"in(left) arrowdella and lift it out. Versare il brillantante nel dosatore facendo attenzione a non farlo traboccare. Pour the rinse aid into the dispenser, being careful not to overfill. Replace the cap by inserendolo inserting it allineato aligned con withla "open" arrow (aperto) and turning it toverso the closed arrow. Richiudere il coperchio freccia “open” e girarlo destra in(right) direzione della freccia “closed” (chiuso). Clean up any rinse aid spilled while during filling with an absorbent cloth to avoid excessive foaming NOTA D opo aver riempito il dosatore asciugare il brillantante eventualmente caduto per evitare l’eccessiva formazione di schiuma during the next wash. Don't forget to replace the cap before you close dis hwa sher door. durante il lavaggio successivo. Non dimenticarsi di reinserire il coperchio prima di chiudere la porta della lavastoviglie. Regolazione del dosatore del brillantante Adjusting Rinse Aid Dispenser Selettore (brillantante) Il dosatore può avere sei o quattro livelli di regolazione. Al primo lavaggio impostarlo The rinse “4”. aid dispenser haslasix or four settings. Always start with the insoddidispenser sul numero Se si osserva presenza di macchie o di un’asciugatura set on "4". If spots and poor drying are a p roblem, theilamount of rinse sfacente, aumentare la quantità di brillantante erogato increase rimuovendo coperchio del aid dispensed by removing dispenser thenon dialrisultano to "5". If ancothe dosatore e ruotando il selettorethe verso il puntolid “5”.and Serotating le stoviglie still are drying properly are eliminate, show spots, adjustilthe dial to sul thelivello next radishes ben asciutte o not le macchie non sonoorstate spostare selettore higher lever untilnon your spot-free. The recommended setting is "4". successivo finché si dishes ottiene are un’asciugatura senza macchie. Il livello raccoman(Factory value is "4".) dato è “4”. (corrispondente al valore di fabbrica) NOTA: Increase the if there drops ofrimangono water or lime spots on the dishes after washing. Aumentare la dose dose se dopoare il lavaggio gocce d’acqua o calcare. Ridurre la dose Reduce it if there are sticky whitis h stains on your dishes or a bluish film on glassware or nel caso in cui si formino macchie biancastre appiccicose o aloni bluastri sui bicchieri o knife blades. coltelli. D. Funzione del detersivo Con i suoi componenti chimici, ingredients il detersivo èare necessario pertorimuovere lo sporco definitivamente. maggior parte Detergents with its chemical necessary remove dirt, c rush ed dirteliminarlo and transport it out of theLa dishwasher. dei detersivi in commercioquality è indicata per questo Most of the commercial deterge nts arescopo.. suitable for this purpose. Attenzione! Attention! Uso corretto del detersivo Proper Use of Detergent Usare solo detersivi speciali per lavastoviglie. Conservarli in un luogo fresco e asciutto. Non inserire il detersivo in polvere nel contenitore Use only detergent specifically made for the use in dishwashers. Keep your detergent fresh and dry. finché non si è pronti per lavare i piatti. Don't put powdered detergent into the dispenser u ntil you're re ady to wash dish es. Detergenti Detergents Esistono tre 3tipi di detersivo There are sorts of d etergents 1. con fosfato e cloro 1.With phosphate and with ch lorine 2. con fosfato e senza cloro 2.With phosphate and without chlorine 3. senza fosfato e senza cloro 3.Without phosphate and without chlorine new in pulverised detergent is withprivi out di phosphate. Thus the water function of I Normally nuovi detersivi polvere sono generalmente fosfato; di conseguenza nonsoftener vi è indicata la funzione di addolcitore del fosfaphosphate is notsigiven. In this case we to fill salt inanche the salt con taine r evendell’acqua when è pari solo a 6°dH. Se si to. In questo caso consiglia di versare salerecommend nel relativo contenitore, quando la durezza the hardness of water onlycon 6 °dH. If dete witho ut phosphate are used the case of hard water caso, aggiungeutilizzano detersivi senza is fosfati acqua dura,rgents su piatti e bicchieri appariranno delle in macchie bianche. In questo white spots appear risultati on d ishes and glasses. this cloro caseeseguono please add detergent to Macchie reach resistenti e coloranti reoften più detersivo per ottenere migliori. I detersivi In senza un more leggero candeggio. better results. Detergents without chlorine do only bleach a little.unS programma tron g and coloured spots will not non saranno quindi rimossi completamente. In questo caso selezionare con una temperatura più alta. be removed completely. In this case please choose a program with a higher temperature. Detersivo concentrato Concentrated Detergent I Based detersivionpossono essere suddivisi fondamentalmente duebetipi a seconda della loro composizione chimica: their chemical composition, deterge nts in can split in two basic types: alkaline dete rgents with caus tic comp onents ■dconventional, etersivi tradizionali, alcalini con componenti caustici alkalin e co ncentrated detergen ts with ncon atural enzymes ■dlow etersivi concentrati a basso contenuto alcalino enzimi naturali Detersivo in pastiglie Detergent Tablets I Detergent detersivi in pastiglie di diffe marche dissolvono a velocitàspeeds. diverse. Per ragione, alcune pastiglie non riescono a tablets of rentdifferenti brands sidisso lve at different For questa this reason some dissolversi e a sviluppare tutto il loro potere pulente durante i programmi brevi. Se si usa il detersivo in pastiglie, selezionare quindi detergent tablets cannot dissolve and develop the ir full cleaning power during short i programs. programmi lunghi, per garantire la completa rimozione dei detersivo. There fore please use long programs wh enresidui u sin g di deterg ent tablets, to ensure the complete removal of detergent residua ls. Erogatore di detersivo Detergent Dispenser L’erogatore deve essere riempito prima dell’inizio di ogni ciclo di lavaggio, secondo le istruzioni fornite nella tabella dei cicli di lavaggio. La vostra lavastoviglie utilizza unathe quantità minore detersivo brillantantethe rispetto alle lavastoviglie tradizionali. In The dispenser must be refilled before start of eachdiwash cyclee following instructions genere, per un carico normale è necessario soltanto un cucchiaio di detersivo. Per oggetti molto sporchi si usa una quantità provided in the wash cycle table . Your dis hwa sher uses less de tergent and rinse aid than maggiore. Aggiungere sempre il detersivo poco di avviare laoflavastoviglie, altrimenti inumidirsi e non dissolversi Conventional dis hwa sher. Generally, only prima one tablespoon detergent is neededpotrebbe for correttamente. a normal wash load. More heavily soiled items need more detergent. Alway s ad d the detergent just be fore starting the dish was her, otherwise it could get damp and will not dissolve properly. Quantità di detersivo da usare Amount of Detergent to Use Premere il bottone per aprire NOTA: AVVERTENZA! lid is closed: press release button.di T he lid will sp ring open. ■SIfe the il coperchio è chiuso, premere il pulsante rilascio. Il coperchio si aprirà con uno scatto. Always add the detergent just before starting each wash ■Aggiungere il detersivo sempre poco prima di avviare ogni ciclo cycle. di lavaggio. use branded detergent aid for dishwasher. ■UOnly tilizzare solamente detersivi di marca specifici per lavastoviglie. IlDishwasher detersivo per lavastoviglie Tenerlo fuori dallatoportata bambini. detergent èiscorrosivo! corrosive! Take care keepdei it out of reach of c hildren. Versare il detersivo Fill in Detergent A B Versare il detersivo nell’erogatore. La marcatura Fill the detergent dispenser with detergent. indica i livelli di dosaggio, The marking come illustrato aindicate destra: s the dosing levels , as illustrate d on the righ t: A Posizione percycle il ciclodeterg di lavaggio principale. The placedel of detersivo main wash ent placed. B Posizione il ciclo di prelavaggio. The placedel of detersivo pre-washper cycle deterge nt placed. Osservare le raccomandazioni di dosaggio e conservazione Plea se o bserve the manufacturers dosing and storagedel produttore così come riportate confezione. Recommendations assulla stated on the detergent pac kaging. Chiudere il coperchio e premerlo si blocca correttamente. Close the lid and press until itfinché locks non in place. Se i piatti sonoare particolarmente sporchi, aggiungere una dose supplementare di detersivo nella camera di prelavaggio. If the dishes heavily soiled, place an additional L’effetto del detersivo comincerà durante la fasechamber. di prelavaggio. detergent do se in the pre-wash detergent This detergent will take effect during the pre-wash phas e. NOTA: find informazioni informationsulla about the amount o f detergent for per th eciascun single programme on the last page . ■You Maggiori quantità di detersivo necessaria programma sono contenute nell’ultima pagina. aware, t according to the level soiling dell’acqua and the specific of water differences are possible. ■Please Considerare peròtha che il grado di sporco e la durezza possonohardness produrre differenze nei risultati ottenuti. observe th e manufacturer's rec detergente ommendations on sulla the de tergent packaging. ■Please Osservare le indicazioni del produttore del riportate confezione dello stesso. 5. Caricamento dei cestelli della lavastoviglie Suggerimenti ■SiConsider suggeriscebuying di acquistare utensili idonei al lavaggioas in dishwasher-proof. lavastoviglie. utensils which are identified Use a mild detergent is described as 'kind to dishes'. If necessary, seek further ■Utilizzare un detersivo nonthat aggressivo commercializzato come “delicato con le stoviglie”. Se necessario, richiedere ulteriori information from the detergent informazioni ai produttori di detersivi.manufacturers. For particular items, select a program with as low a temperature as possible. ■PerTostoviglie particolari scegliere un programma con la temperatura più bassa possibile. prevent damage, do not take gla ss a nd c utlery out of the dishwasher immediately ■Alafter fine dithe evitare danni, non estrarre stoviglie e posate dalla lavastoviglie appena il programma è terminato. programme h as ended. Per il lavaggio in lavastoviglie le seguenti posate / stoviglie Non sono Are notadatte suitable wooden, horn china or da lavare nel cestello ■CCutlery aricare with le stoviglie grandi e più difficili mother-of-pearl handles inferiore. items thatinare not corno heat resistant ■PPlastic osate con manici legno, o madreperla. Older cutlery with glued parts are not ■Otemperature ggetti in plastica non resistenti althat calore resistant ■PBonded osate con parti incollate non resistenti a temperature elevate cutlery items or dishes ■PPewter osate oor piatti incollati Oggetti in peltro o rame copper items ■BCrystal icchieri glass di cristallo ■OSteel ggettiitems in acciaio soggetti a ruggine subject to rusting ■PWooden iatti da portata in legno platters ■OItems ggettimade in fibrefrom sintetiche synthetic fibres Poco Areadatte of limited suitability types of glasses can become ■ASome lcuni tipi di bicchieri possono diventare opachi dopo un dull after a large number of washes certo numero di lavaggi aluminum parts have a a scolorire du■LSilver e partiand in argento e alluminio tendono tendency to discolour during washing rante il lavaggio may fade machine lucide posso■IGlazed n caso dipatterns lavaggi frequenti le ifdecorazioni washed frequently no opacizzarsi Precauzioni prima e dopo il caricamento dei cestelli (Per risultati ottimali, attenersi alle seguenti indicazioni per caricare lavastoviglie. (Forottenere best performance of the dishwasher, follow these loading guidela lines. Le caratteristiche e l’aspetto dei e del delle posatemay possono diversi a seconda del modello). Features and appearance ofcestelli baskets andcestino cutlery baskets vary essere from your model.) Rimuovere residui di cibo più grossi. Ammorbidire residui remnants di cibo bruciato presenti Scrape offi any large amounts o f leftover food. iSoften of burnt foodnei in tegami. pans. Non necessario risciacquare le stoviglie con acqua. It is ènot necess ary to rinse the d ishes under running water. Place objects in the dishwasher inseguito: following way: Caricare le stoviglie come descritto di 1.Items such asbicchieri, cups, glasses, pots /pans, faced downwards. I.Disporre tazze, tegami/pentole, ecc. etc. rivoltiare verso il basso. 2.Curved items, or onesinclinata with recesses, bead loaded aslant socon that wateraffinché can run off. possa defluire. 2. Sistemare in posizione gli oggettishould bombati, esempio quelli incavi, l’acqua 3.All utensils are stacked securely and can not tip over. 3. Sistemare saldamente tutte le stoviglie in modo che non possano capovolgersi. 4.All utensils are placed in the way that the spray arms can rotate freely during washing. 4. Caricare tutte le stoviglie in modo che i mulinelli possano ruotare liberamente durante il lavaggio. Verycaricare small items should not be washed the dishwasher as theyfacilmente could easily falldai outcestelli. of the basket. NOTA: Non nella lavastoviglie oggetti moltoinpiccoli, poiché potrebbero cadere hollowleitems sucfonde, h as cup s,ad glasses, etc. With the opening facingl’acqua downwards so that al loro interno. ■CLoad apovolgere stoviglie quali esempiopans tazze, bicchieri e pentole, affinché non si raccolga water can not collect in the con tainer or a deep b ase. ■Non disporre piatti e posate uno all’interno dell’altro e non sovrapporli. and items of cutlery must not lie ins ide one another, or cover each oth er. ■PDishes er evitare danneggiamenti, i bicchieri non devono toccarsi. To avoid damage to glasse s, th ey must not touc h. ■CLoad aricarelarge le stoviglie piùmost difficilidifficult da lavare nel cestello inferiore. ite ms grandi which eare to clea n into the lower bask et. upper basketsuperiore is designed to ho ld più more delicate and lighter dishwaretazzine such as , coffee ■UThe tilizzare il cestello per stoviglie delicate e leggere, quali bicchieri, da glasses caffè e tazze da tè. and tea cups ■I coltelli a lama lunga disposti in posizione verticale costituiscono un potenziale pericolo! bladed knives stored in an upright position are a potential haza rd! ■DLong isporre orizzontalmente nel ocestello superiore posate lunghe appuntite, come ad esempio i coltelli da cucina. Long and/or sharp items f cutlery such aslecarving kniv ese/o must be positioned ■Nhorizonta on caricarellyeccessivamente lavastoviglie. Questa indicazione consente di ottenere buoni risultati e di consumare enerin the upper b la asket. Please doragionevole. not ove rload yo ur dishwasher. This is important for good results and for gia in modo reasonab le consumption of energy. Svuotamento della lavastoviglie Si svuotare primafrom il cestello inferiore, quindi quello affinché non goccioli sulle stoviglie sottostanti. Toconsiglia preventdiwater dripping the uppe r basket into the superiore, lower basket, we l’acqua recommend that you empty the lower basket first and then the upper basket. ■ Metodo di caricamento della lavastoviglie Carico del castello superiore The u pper basket is designedalle to stoviglie hold more Il cestello superiore è destinato piùdelicate delicate e and lighter such ase glasses, coffee andtè, piccole leggere, qualidishware bicchieri, tazzine sottotazza, tazze da tea cups and saucers, as well asche plates, smalltroppo bowlssporinsalatiere e padelle (a condizione non siano and pansi piatti (as long as they in are not too che).shallow Posizionare e le stoviglie modo che dirty). non vengano Position thegetti dishe s an d co okware so that they will spostati dai d’acqua. not get moved by the spray of wate r. IN Carico del castello inferiore Le piùthat grandi quellelarge più difficili daand lavare Westoviglie suggest youeplace items thedevono most essere preferibilmente caricate adwer esempio difficult to clea n ite ms are tonel be cestello placed inferiore, into the lo tegami, coperchi, piatti da portata e insalatiere, come basket:pentole, such as pots, pans, lids, se rving dishes and bowls, as shown the figure Si below. It is pre illustrato nella figurainsottostante. suggerisce di ferable disporre to i piatti place serving dishessul and lids the side of the rack s da portata e i coperchi lato deion cestelli, affinché non ostacoliin order to avoid the ro tation of the top spray no la rotazione del blocking mulinello superiore. arm. IN Non dimenticare che: that: Please be reminded ■ Pentole, insalatiere, ecc. devono capovolte. Pots, serving bowls, etc, mustsempre alwaysessere be placed top down. ■ IDeep tegamipots profondi devono essere inclinati in modo facilitare should be slan ted to allow water todaflow out. il deflusso dell’acqua ■ Il cestello inferiore presenta divisori ribaltabili che possono essere reclinati per sistemare pentole e tegami di grandi dimensioni The Botto m Basket features fo lding spikes so that larger or more pots and pans can be loaded. Adjusting Uppersuperiore Basket Regolazione the del castello The height of the upper basket can be adjusted in order to Per ampliare lo spazio disponibile per utensili di grandi dimensioni da dicreate mo re space for large utensils both for the upper sporre nel cestello superiore o in quello inferiore, è possibile regolare l’al/lower basket. The height of the upper basket can b e tezza del cestello superiore. eseguire regolazione dell’altezza adjusted by placing thePer wheels onladifferent height of thedel cestelloLong superiore si spostano rotelle susalad diverseservers altezze delle Gli rails. items, servinglecutlery, and guide. knives oggetti lunghi, quali posate a servire e coltelli, devono sistemati should be placed on the shelf so that they doessere not obstruct sullaro ribaltina, che nonarms.. ostruiscano la rotazione dei mulinelli. the tation in ofmodo the spray Abbassamento della ribaltina delle tazze Folding back the cup shelives Fo r better stacking of po ts and pans, Per meglio tegami, thecaricare spikesalc an b e pentole folded edown asè possibile ripiegare i divisori come nella figura a destra. sho willustrato in the picture right. Sollevare il cestello in Tirare verso l’alto la maniglia posizione superiore per abbassare il cestello Folding Spikesdei ofcestelli Upper and D ivisori ribaltabili Lower superioreBasket e inferiore Fo caricare r betteralstacking of poetstegami, and pans, Per meglio pentole è the spikes can be folded down as possibile ripiegare i divisori come illustrato nella show in the picture righ t. figura a destra. Maniglia di regolazione Castello delle posate Cutlery should be pla ced in the cutlery rack separately Lefrom posateeach devono essere nel cestello inserendoleand separatamente other in sistemate th e ap propriate positions, do make sure th eeutensils do not nestsi together, this per may negli appositi spazi accertandosi che non sovrappongano non comcause bad performance. promettere i risultati del lavaggio. Per ottenere risultati di lavaggio ottimali, sistemare l’argenteria nel cestello in modo che: ■ Non si sovrapponga. ■ I manici siano in basso. ■ Gli utensili lunghi siano al centro. 6. Avvio di un programma di lavaggio Tabella dei cicli di lavaggio NOTA: ( Programma ) indica Means: to fill rinse into the Rinse-Aid Dispenser. cheneed è necessario caricare il brillantante nell’apposito dosatore. Informazioni sulla scelta di un ciclo Tutto All in 1uno Per For stoviglie normally soiled loads, normalmente sporche, such pentole, as pots ,bicchieri plates,glasses come e padelle poco and lightly soiled pans. sporche. Auto Intensive Intensivo Normale Normal Lavaggio con sistema Sensing, per Auto sensing wash, Auto lightly, stoviglie sporche, normalmente normallymolto or heavily soiled sporche o poco con o senza crockery, with sporche, or with out residui essiccati dried-on food For heaviest soiled crockery, Per stoviglie molto sporche e pentole, and normally soiled pots、 padelle, piatti ecc. normalmente sporchi pans、dishes etc with dried con residuiessiccati. on soiling. For stoviglie normally soiled loads, Per normalmente sporche, such pentole, as pots ,bicchieri plates,glasses come e padelle poco and lightly soiled pans. sporche. Programma standard giornaliero This is Standard programme, it is adatto suitable to clean normally soiled tableware per stoviglie normalmente sporche:and è is the most efficien t programme in ilit programma più efficiente in termini terms of its combined and water di consumo combinatoenergy di energia e di (*EN 50242) consumption for that typ e of tableware. acqua per tale tipo di stoviglie. Descrizione Pre- wash( 45℃ ) Prelavaggio(45°C) ℃) Was h (55 Lavaggio (55 °C) Rinse Risciacquo Risciacquo (65℃ °C) Rinse (65 ) Asciugatura Dryin g Pre-wash (45 Prelavaggio(45 °C) ℃) Autowash Autolavaggio (45-55 (45-55 °C) ℃) Risciacquo Rinse Risciacquo (62℃ °C)) Rinse (62 Asciugatura Drying Pre-wash(50 Prelavaggio(50 °C) ℃) ℃) Wash (65°C) Lavaggio(65 Rinse Risciacquo Rinse Risciacquo Risciacquo (65℃°C) Rinse(65 ) Asciugatura Drying 5/30g 5/30g (o 3in1 3 in 1) (or ) Consumo energetico (Kwh) Acqua (L) 185 1.3 14 120~180 0.9~1.3 Pre-wash( 45℃) Prelavaggio(45°C) Wash (55 (55°C) ℃) Lavaggio Risciacquo Rinse Risciacquo (65 ℃ °C)) Rinse (65 Asciugatura Drying 5/30g 5/30g (o(or 3 3in1 in 1)) 185 1.3 14 Pre-wash Prelavaggio Wash (50 (50°C) ℃) Lavaggio Rinse(65℃) Risciacquo(65°C) Asciugatura Drying 5/30g 5/30g (o(or 3 3in1 in 1)) 175 0.93 10 115 0.87 14 5/30g 5/30g (o(or 3 3in1 in 1)) 60 1.15 10 30g 40 0.6 10 0.01 3.5 For ilightly loads that Per carichi soiled poco sporchi che non do not need excellent di drying richiedono un’efficienza asciugatura efficiency. ottimale. Ra pid Rapido A shorter wash for lightly Un lavaggio breve per carichi poco soiled loadspiù that do not sporchi che non richiedono l’asciugatura. need drying. Ammollo Soak To rinse dishes i that plan di comPer risciacquare piattiyou in attesa pletare to washil carico. later that day. Prelavaggio Pre-wash 5/30g 5/30g (o 33in1 in 1) (or ) 8 1.6 Brillantante 8.4~12.7 175 1 ora 1H our For stoviglie lightly soiled crockery Per e bicchieri poco sporchi. and glass 5/30g 5/30g (o(or 3 3in1 in 1)) Tempo (min) 5/30g 5/30g (o(or33in1 in 1)) Pre-wash Prelavaggio lavaggio(45°C wash(45℃)) Risciacquo Rinse Risciacquo (60°C Rinse(60 ℃) ) Asciugatura Drying Pre-wash(50 ℃) Prelavaggio(50°C) Wash(60℃) Lavaggio(60°C) Risciacquo(60°C) Rinse (60℃) Asciugatura Drying Wash (40 ℃) Lavaggio(40C) Rinse Risciacquo Rinse (45 Asciugatura (45℃ C)) Bicchieri Glass Detersivo di prelavaggio/lavaggio principale 17 NOTA: questoprogramme programma èis unthe ciclotest di prova. Si The riportano di seguito le per il test *EN 50242 : This cycle. information forinformazioni comparability testdi comparabilità conformemente a EN in acco rdance with EN50242: 50242, as follows: ■ Capacity: Capienza: 1414 coperti setting ■ Position Posizione del cestello superiore: rotelle superiori Upper basket: upper wheels onsulle railsguide ■ Rinse Impostazione del brillantante: 6 aid setting: 6 Po:0.45w. ■ Pl:0.49w; Pl:0.49w; Po:0.45w. Accensione dell’apparecchio Avvio di un ciclo di lavaggio Starting a cycle wash ■1Estrarre i cestelli inferiore caricare i piatti eload reinserire cestelli. and push them back. Draw out the lowere superiore, and upper basket, the idishes SiItconsiglia di caricare prima il cestello di procedere con quello superiore (vedere sezione intitolataentitled “Caricamento dei cestelli della lavastoviglie”) is commended to load theinferiore, lower quindi basket first, then the upper one (seela the section ■“ Versare il detersivo la sezione”intitolata “Sale, detersivo e brillantante”). Loading the (vedere Dishwasher ). ■2Inserire nella spina. deve fra 220-240 V c.a./50Aid HZ” e la Pourlainpresa the elettrica detergent (seeL’alimentazione the sectionelettrica entitled “essere Salt, compresa Detergent and Rinse ). presa deve essere da 10 A 250 V c.a. Verificare 3 che Insert the plug into the socket. The power su pply is 220-240 VAC /50 HZ, the specification l’alimentazione di acqua sia aperta alla massima pressione. of the socket is 10A 25di0VAC. Make sure that the water supply is turned on to full p ressure. ■Aprire la porta e premere il tasto accensione/spegnimento. 4 Open the door, pre ss the ON/OFF Button. I programmi di lavaggio scorrono nella direzione seguente: ■Premere il pulsante “Program” per modificare il programma. 5 All Press prog ram Button , the wash program will be(intensivo)->”Normal” cha nged as follows direction: “ in 1” the (tutte le funzioni) ->”Auto” (automatico)->”Intensive” (normale)->”ECO” (ecologico)->”Glass” (bicchieri)- All in 1->Auto->Intensive->Normal->ECO->Glass->1Hour ->Rapid->Soak ; >”1Hour” (un’ora)->”Rapid” (rapido)->”Soak” (ammollo); If volta a program isun selected, response lightsiwill light. Thenlaclose the door, the dishwasher Una selezionato programma,the la spia corrispondente illumina. Chiudere porta per avviare la lavastoviglie. begins to start. Modifica del Programma Premessa: Premise: modificare un programma in corso soltanto in esecuzione da poco In time. caso contrario, è possibile 1 È A possibile cycle that is underway can on ly be modified if it se hasè only been running fortempo. a short Otherwise, the che il detersivo sia già stato erogato e che la lavastoviglie abbia già scaricato l’acqua del lavaggio. In questo caso sarà detergent may have already be en released, a nd the appliance may have already drained the wash water. necessario riempire la vaschetta detersivo (vedere la sezione intitolata “Dosaggio del detersivo”). If this is the case , nuovamente the detergent dispenserdel mu st be refilled (see the section entitled " Loading the Detergent " ). porta e tenere il pulsante “Program” per più di 3 secondi: macchina entra in standby. questo pun2 Aprire more than 3 seconds Open la the door ,p resspremuto the Program button , thela machine will be in standb yAstate, to è possibile modificare il programma scegliendo il ciclo desiderato (vedere sezione “Avvio di un ciclo di lavaggio “ .”). then yo u can change the program to the desired cycle setting (see the section entitled " Starting a wash cycle. . ." ). NOTA: Se si apre la porta è in corso un programma, la lavastoviglie si arresta. La The spia del programma If you open the quando door during a wash cycle , the machine will pause. program lightcessa will di lampeggiare vienethe emesso un segnale acustico ogni minuto fino a quando si chiude la porta. Dopo la stop blinkinge and buzzer will mooing every minute unless younon close the door . After chiusura dellathe porta, il programma viene will riavviato secondi. you close door ,the machine keepdopo on 10 working after 10 seconds. Un piatto dimenticato? ÈApossibile stoviglie qualsiasi momento prima che si apra la vaschetta del detersivo. forgottenaggiungere dish can beleadded anydimenticate time beforeinthe detergent cup opens. Aprirethe leggermente porta door a littlela.porta. Close theladoor 4 Chiudere 1 Open Quando mulinelli si fermano è possibile aprire the ispray arms stop working, you can opencompletathe door 2 After mentela porta completely. Thelavastoviglie dishwasherriprende will run after 10 seconds. a funzionare dopo 10 secondi. 5 La forgotten Aggiungere ledishes. stoviglie dimenticate 3 Add Al termine del ciclo di lavaggio When the del wo rking has finished, buzzer of lavastoviglie the dishwasher sound forvolte, 8 seconds, then stop. Turn off Al termine ciclo dicycle lavaggio, il segnale the acustico della vienewill emesso otto dopodiché si tacita. Spegnere the appliance con using the ON/OFF button, shut off the water supp ly and open the door of theladishwasher. la lavastoviglie il pulsante di accensione/spegnimento, chiudere il rubinetto dell’acqua e aprire porta della lavastoviglie. Wait for a alcuni few minutes before unlo ading e dishwasher to avoid ha ndlin g the disheseand utensils while Attendere minuti prima di scaricare la th lavastoviglie per evitare di maneggiare stoviglie utensili mentre sonothey ancora are still hoteand morea susceptible to break age. The y will also dry better. molto caldi tendono rompersi più facilmente. In questo modo, inoltre, si asciugheranno meglio. Spegnere lavastoviglie Switch Offla the Dishwasher IlThe programma terminato seinlathis spiacase corrispondente è spenta. programèlight is off,solo only the programme has ended. 1.Spegnere lavastoviglie premendo il pulsante di accensione/spegnimento. 1.Switch offlathe dishwasher by pressing the ON/OFF button. 2.Turn off the water tap! 2.Chiudere l’acqua. Aprire la porta cautela. Open the door con carefully. IHot piatti caldi siare rompono facilmente. Prima di rimuoverli dalla lavastoviglie quindi raffreddare 15 minuti. dishes sensitive to knocks. The dishes should therefore bevanno allowed to lasciati cool down aroundper 15circa minutes Aprire porta dellafrom lavastoviglie, lasciarla socchiusa e attendere alcuni minuti prima di estrarre le stoviglie. In questo modo si beforelaremoving the appliance. Open the dishwasher's door, leave raffredderanno e asciugheranno meglio.it ajar and wait a few minutes before removing the dishes. In this way they will be cooler and the drying will be improved. Svuotare lavastoviglie Unloadinglathe dishwasher It normale is normal that the dishwasher is wet inside. È che all’interno della lavastoviglie sia presente dell’acqua. Empty the lower basketinferiore first and then upper one. This will avoid watermodo dripping fromresidui the upper Basket ontosul Svuotare prima il cestello per poi the passare a quello superiore. In questo eventuali di acqua presenti the dishes in thenon lower one. cestello superiore goccioleranno sulle stoviglie sottostanti. Wash th e arms in When soapy following and warmthis water and use from a softstep1 brushtotostep 3, the filter system will be removed; procedure It is dangerous tothem open the dooraprire whenlawashing, because the hot potrebbe water may scald you. Durante ilfrom lavaggio pericoloso porta, perchè l’acqua calda provocare ustioni. clean the jets. Replace them afteritrinsing thoroughly. AVVERTENZA! when following Stepè 3 to Step 1, the filter system will be installed. 7. Manutenzione e pulizia Sistema di filtraggio IlThe filtrofilter evitaprevents che grossi residui di cibo o altri oggetti penetrino nellafrom pompa. Questi residui possono larger remnants of food or other objects getting inside the pum. intasare il filtro e devono quindi essere rimossi. The residues may block the filter, in this case they must be removed. IlThe sistema filtraggio è composto da un filtro a maglia grossa,filter) una filtro piatto filter di system consists of a coarse filter,a flat (Main (filtro e un microfiltro And aprincipale) microfilter(Fine filter). (filtro sottile). Filtro Mainprincipale filter 2 1 Fo od and soil particles trap ped in this filter are pulverized by apolverizzate Le particelle di cibo e sporcizia intrappolate da questo filtro vengono da un apposito gettolower del mulinello inferiore e convogliate scarico. specia l jet on the spray arm and washed downallo to drain. 2 2 1 Filtro a maglia grossa Coarse filter Le piùsuch grosse, pezzi di ossaoro glass, vetro, che ostruire lo La particelle rger ite ms, as come p ieces of bones thatpotrebbero could block scarico, vengono intrappolate filtro afilter. maglia the drain are trapped in the nel coarse To grossa. removePer therimuovere items le particelle raccolte premere corpo sommità e sollevarlo. caught bydal thefiltro, filter, gently leggermente squeeze theil tap onsulla the top of this filter and lift out. 3 Filtro Finesottile filter 3 Questo filtro trattiene residui di in cibo vaschetta evitando che si This filter holds soil sporcizia and fooderesidues thenella sump area a nd depositino piatti durante il ciclo di lavaggio. preve nts itnuovamente from beingsui depo sited on the dishes durin g wash cycle. Detersivo concentrato Filter assembly IlThe filtrofilter rimuove efficacemente le food particelle di cibo dall’acqua del lavaggio, affinché itpossa riutilizzata il ciclo. efficiently re mo ves particle s from the wash water, allowing to beessere rec ycled duringdurante the cycle. Al fine di ottenere prestazioni e risultati ottimali, è necessario pulire regolarmente il filtro. Si consiglia pertanto di rimuovere le For best performance and results, the filter must be cleaned re gularly. For this reason, it is a goo d idea to particelle di cibo più food grandiparticles che rimangono intrappolate dopo ogni lavaggio, il filtrothe semicircolare e ilfilter bicchierino remove the larger trapp ed in the filter after e ach was h sciacquando cycle by rinsing semicircular and con rimuovere il filtro, tirare il manico bicchierino verso l’alto. cup acqua undercorrente. runnin g Per water. To remove the filter device,del pull the cup handle in the upward d irection. AVVERTENZA! 1 2 NOTA: Non d utilizzare mai must la lavastoviglie montare the i filtri.. The ishwasher never b esenza used without filters. Improper replacement of the filter may reduce the performance level ofpotrebbero the appliance Se il filtro viene riposizionato in modo errato, le prestazioni della lavastoviglie risuland damage dishes and eutensils. tare compromesse e piatti utensili potrebbero danneggiarsi. Apertura Passo filtro inindirezione antioraria. Step 11: :Ruotare Turn theil filter anti-clockwise direction, Step 22: :sollevare lift the filter assy filtrante up Passo il gruppo Eseguendo i passaggi 1 a 2 di questa possibile il filtro.will be removed; When following thisdaprocedure fromprocedura step1 to èstep 2, therimuovere filter system when following it from Step 2 to Step 1, the filter system will be installed. Per rimontarlo, ripetere i passaggi nell’ordine inverso (da 2 a 1). N.B.: Remarks: - Verificare i filtrifor non ostruiti termine di the tuttidishwa i cicli disher lavaggio. - Inspect theche filters blosiano cking a fter al e very time has been used. - il filtrothe a maglia possibile rimuovere gruppo filtrante. Rimuovere residui - BySvitando unscrewing coarsegrossa filter, èyou can remove thetutto filteril system. Re move any foo deventuali remna nts and di cibo e lavare i clean under running water. filtri the con filters acqua corrente il gruppo filtrante should una volta settimana. NOTA:pulire Thetutto entire filter assembly be alla cleaned once a week. Pulizia del filtro Cleaning the Filter Per pulire the il filtro a maglia grossa e il fine microfiltro, utilizzare uno spazzolino. Rimontarele i componenti del filtro come illustrato nelle To clean coarse filter and the filter, use a c leaning b rush. Reassemb the filter p arts as shown in the figures on theinlast page and reinsert the entire assembly inlavastoviglie, the dis hwa sher, positio ning it in its seat and pressing downwards. figure fondo al libretto e reinserire tutto il gruppo nella posizionandolo in sede e premendolo verso il basso. When cleaning the filters, don't knock on them. Otherwise, the filters could be AVVERTENZA! promettere il corretto funzionamento lavastoviglie contorted and the performance of thedella dishwasher could be decreased. Evitare di battere sui filtri per pulirli, in quanto ciò potrebbe VVAKNMNHJ. deformarli e com- Cura della lavastoviglie Pulire il pannello deican comandi utilizzando un panno umido. Dopo la pulizia, The control panel be cleaned by using a lightly dampened cloth.asciugare accuratamente. Per le cleaning, superfici esterne unait buona cera lucidante per elettrodomestici. After make utilizzare sure to dry thoroughly. Non utilizzare oggetti pagliette o detergenti aggressivi su alcuna parte della lavastoviglie. For the exterior, useappuntiti, a good appliance polish wax. Never use sharp objects, scouring pads or harsh cleaners on any part of the dishwasher. Pulizia dellaThe porta Cleaning Door Per pulire il bordo della porta utilizzare soltanto un panno morbido inumidito con acqua calda. To clean the e dge around the door, you should use only a soft warm, damp cloth. Al fine di evitare che l’acqua penetri nella serratura della porta e nei componenti elettrici, non To avoid pene tration o f wa ter into the door lock and electrical components, do not utilizzare detergenti spray di alcun genere. use a spray cleaner of any kind. AVVERTENZA! Non utilizzare detergenti spraytoper pulire il pannello dellaasporta in quanto potrebbero Never use a spray cleaner clean the door panel it may damage the doordanloc k neggiarne la serratura e i componenti elettrici. and electrical components. Non utilizzare agenti o alcuni tipi di shou pannilddinot carta, graffiare Abrasive agents orabrasivi some paper towels be onde used evitare becau ilserischio of thedirisk of oscratching macchiare or la superficie di acciaio inossidabile. leaving spots on the stainless steel surface. Protect Against Protezione contro ilFreezing gelo Durante l’inverno adottare precauzioni che on evitino formazione in di winter. ghiaccioEvery nella lavastoviglie. Al termine del ciclo di lavaggio please take frost protection measures the la dishwasher time a fter washing cycles, eseguire le operazioni seguenti: please operate as follows : 1. Scollegare la lavastoviglie dalla rete elettrica. 1.Cut off theilelectrical power to the dishwasher. 2. Chiudere rubinetto dell’acqua e scollegare il tubo di carico dalla valvola dell’acqua. 2.Turn off thel’acqua waterpresente supply and disconnect water inlet pipe from the valve. 3. Scaricare nel tubo di caricothe e nella valvola. (Utilizzando unwater recipiente per raccoglierla) 3.Drain the water from the inlet pipe an d water valve. (Use a pan to gather th e water) 4. Ricollegare il tubo di carico alla valvola dell’acqua. 4.Reconnect the water inlet pipe to the water valve. 5. Rimuovere filtro sul fondo della of vasca asciugare fuoriuscita con spugna. 5.Remove theilfilter at the bottom the etub and usel’acqua a sponge to soak upuna water in the sump. NOTA: dishwasher cannot work because of the ice, se If la your lavastoviglie non funziona a causa del ghiaccio, please contact professional service persons. rivolgersi al servizio di assistenza Cleaning the Spray Arms Pulizia dei mulinell I Itmulinelli devonoto essere per eliminare le ostruzioni di is necessary cleanpuliti the regolarmente spra y arms re gularly fo r hard calcare presenti sugli ugelli sui sp cuscinetti. wate r che micals will clogethe ray arm jets a nd bearings. Per rimuovere il mulinello superiore, svitare il dado in senso orario e rimuoveTo remove the up per spray arm, hold the nut, rotate the arm re il mulinello. clockwise to remove it. Per rimuovere il mulinello inferiore, estrarlo tirandolo verso l’alto Lavare i mulinelli con acqua sapone e utilizzare uno uspazzolino To remove th e lower spraycalda arm,epull out the spray arm pwa rd. morbido per pulire gli ugelli. Risciacquare con cura e rimontare i mulinelli. Wash the arms in soapy and warm water and use a soft brush to clean the jets. Replace them after rinsing them thoroughly. Suggerimenti per una lunga durata della lavastoviglie Dopo ogni lavaggio After Every Wash Dopo ciascun lavaggio, chiudere il rubinetto dell’acqua e After every wash, turn off the water supply to umidità the lasciare la porta leggermente aperta in modo che e appliance and leave the door slightly open so that odori non rimangano all’interno della lavastoviglie. moisture and odours are not trapped inside. Scollegare laPlug spina Remove the Prima di eseguire la pulizia o la manutenzione, scollegare Before cleaning or performing maintenance, always sempre spina dalla presa corrente. removelathe plug from the di socket. No Solvents Abrasive Cleaning abrasiNon utilizzareorsolventi o detergenti vi per la pulizia. To cle an the e xterior a nd rubber p arts of the dishwasher, Per pulire le solvents superfici esterne e le parti in gomma della lavado not use or abrasive cle aning products. stoviglie, Only use a clo th with warm so apy water. non utilizzarespots solventi né detergenti abrasivi. To remove o r stains from the surface of the Utilizzare soltanto un panno e acqua calda saponata. interior, use a cloth da mpened with water a n a little Per rimuovere le macchiepro dalle superfici vinegar, o r a cleaning duct mad e specifically for dishwashers. interne, utilizzare un panno inumidito con acqua e un po’ di aceto o un detergente apposito per lavastoviglie. In casonot di periodi di inutilizzo When in Use prolungati for a LongTime Si consiglia di eseguire un ciclo lavaggio conwith la lavastoviIt is recommend that you run di a was h cy cle the glie vuota. Al termine del lavaggio, scollegare la dishwasher empty an d the n remove the plugspina fromdalla the presa di corrente, chiudere rubinetto dell’acqua e lasciare sock et, turn off the wa terilsupply and leave the door of leggermente aperta la porta della lavastoviglie. Questa the appliance slightly open. This will help the d oorpreseals to last longer and prevent odours from cauzione prolunga la durata delle guarnizioni dellaforming porta ed within appliance. evita lathe formazione di odori all’interno dell’elettrodomestico. Per spostare l’elettrodomestico Moving the Appliance Se è necessario spostare l’elettrodomestico, tentare di manIf the appliance must be moved, try to keep it in the tenerlo posizioneIfverticale. Se ènecessary, assolutamente necessaverticalinposition. absolutely it can be rio, può essere positioned on ribaltato its back.sulla superficie posteriore. Guarnizioni Seals Uno fattori che causa formazione Onedei of the factors that la cause odoursditoodori formall’interno in the della lavastoviglie sono i residui che trapped rimangono dishwasher is food that remains in intrappolati the seals. nelle guarnizioni. Pulirle con una Periodic cleaning withregolarmente a damp sponge will spugna preventumida this from occurring. per evitare questo inconveniente. 8. Istruzioni di Installazione Attenzione: L’installazione dei of tubi e dei compoThe installation the pipes nenti elettrici deve essere affidata a and electrical equipments un tecnico should bespecializzato. done by professionals. ● Attenzione! Pericolo di folgorazione Togliere l’aliElectrical Shock Hazard mentazione prima di installaDisconnectelettrica electrical power before installing dishwasher. re la lavastoviglie La mancata osservanza di questa Failure to do so can result in death or precauzione può comportare il rischio electrical shock. di folgorazione Preparazione Installationall’installazione preparation Per installare la lavastoviglie, ai tubi di carico e scarico inlet e al cavo alimentazioThe installation position of posizionarla dishwashervicino should be near the existing and di drain hoses and ne. Scegliere power cord. il lato del mobile del lavello più adatto a consentire l’allacciamento comodo dei tubi di carico della lavastoviglie. One side of the cabinet sink should be chosen to facilitate the connection of drain hoses of Nota: verificare gli accessori di installazione forniti a corredo (gancio del pannello estetico, viti) the dishwasher. Note: please check the accompanying installation accessories(hook for aesthetic panel, screw) Leggerecarefully attentamente le istruzioni di installazione. Please read the installation instruction. ● 1 2 Illustrazioni delle dimensioni del mobile and lavello e della posizione di montaggio della lavastoviglie Illustrations of cabine t dimensions installation pos ition of the dishwasher Preparare adeguatamente il luogo di installazione prima di collocarvi la lavastoviglie. Scegliere Preparations should b e made before moving the dishwasher to the installation place. un luogo vicino al lavello per agevolare l’installazione dei tubi di carico e scarico (vedere figura 1). Choose a place near the sink to facilitate the installation of inlet and drain hoses (see 1). deve essere installata all’angolo del mobile, verificare che vi sia spazio libero sufficiente Se la figure lavastoviglie If dishwasher is installed at the per aprire la porta (vedere figura 2).corner of the cabinet, there should be some sp ace (illustrated in figure 2) when th e door is opened. 【Figura1 Figure1】 Dimensioni del mobile Cabinet dimensions Meno than di 5 mm tra lato Less 5mm superiore lavastoviglie between the top e mobile e porta esterna of dishwasher and allineataand al mobile cabinet the outer door aligned to cabinet. 90 ° 90 ° 820mm 580mm Ingressi linee elettrica, di scarico e drain di and Electrical, fornitura idrica water supply line 80 entrances 100 Spazio tra base della Spaceebetween cabinet vasca pavimento bottom and floor 600 mm 【Figura2 Figure2】 Lavastoviglie Dishwasher Spazio minimo all’apertura Minimum space when della the door is porta opened Vasca di Cabinet lavaggio Porta della Do or of dishw ashe r lavastoviglie Spazio minimo mm Minimum space 50 of 50mm ● Aesthetic panel's dimensions installation Dimensioni e installazione del and pannello estetico pannello esteticowooden può essere modificato illustrato figura 3. 1 IlThe aesthetic panel couldcome be processed according to the Figure 3. prof. 8 【Figura3 Figure3】 Il pannello estetico deve should essere moThe aesthetic panel dificato in funzione dimensioni be processed indelle accordance indicate figure with thenelle illustrated dimensions prof. 8 prof. 8 (Unità: mm) (Unit: mm) 16 gancio legno e inserire il gancio fessura 2 Installare Install theilhook onsul thepannello aestheticestetico woodeninpanel and put the hook intonella the slot of thedella outerporta door of esterna della lavastoviglie (vedere figura 4a). Dopo averlo posizionato, fissare il pannello sulla dishwasher(see figure 4a). of thefigura panel4b). , fix the panel onto the outer door by porta esterna utilizzando le After viti e positioning i bulloni (vedere screws and bolts(See figure 4b) . Figura4a 【Figure4a】 Installazione del of pannello esteticopanel Installation aesthetic Figura4b 【Figure4b】 Installazione delaesthetic pannello Installation of estetico di legno Estrarre le quattro viti corte wooden panel le quattro viti 1 .Estrarre take away the four corte short screws 2 .Firssare pin up the four long le quattro viti screws lunghe 17 Firssare le quattro viti lunghe ● Tension adjustment of the door Moda della porta: regolazione dellaspring tensione La tensione ottimale delle molle dellatoporta esternatension è impostata fabbrica. tensione Thea door springs are set at the factory the proper for theinouter door.Tale If aesthetic deve peròpanel essere caso cui to sulla lavastoviglie si installino pannelli in lewooden are regolata installed,nel you will in have adjust the door spring tension. Rotateestetici the adjusting gno. Girare la vite di regolazione per il regolatore allentare il cavo di acciaio (vedere figura 5). screw to drive the adjustor to strain or relax the steel cable(see figure 5). Si raggiunge tensione della Door springlatension is ottimale correct when molla quando la porta rimane complethe door remains horizontal in the tamente apertaposition,yet in posizione orizzontafully opened rises le, ma si chiude scatto selift sollevata to a close with a the slight of a leggermente con un dito. finger. Figura5 【Figure5】 Regolazione tensione, molla Tensiondella adjustment della spring porta of the door ● Connection of drain hoses Collegamento dei tubi di scarico Insert the drain hdiose pipe withconduttura a minimum diameter 40mm, minimo or let it di run intooppure the sink, making sure to Inserire l’estremità un into tuboadidrain scarico in una di scarico conofdiametro 4 cm appoggiarlo al lavanavoid bending crimping it. The top ofL’estremità the ho se must dino, evitando di or piegarlo o di schiacciarlo. libera be del less tubo than deve 1000mm. trovarsi a un’altezza non superiore a 100 cm. FISSARE IL TUBO DI SCARICO COME INDICATO IN A O B banco Front NOTA NOTE parte superiore del tubo La Themisurare top ofmeno thedihose 1000 deve must be less than mm. 1000mm. anteriore Counter A B TuboDrain di scarico pipe φ 40mm 18 Dishwasher installation steps Procedura di installazione lavastoviglie porta del mobile porta esterna lavastoviglie utilizzando le staffe in dotazione. Per la posizio1 Fissare Install la the furniture dooralla to the outer doordella of the dishwasher using the brackets provided. Refer to ne thedelle template of the brackets. staffe, for farepositioning riferimento all’apposita mascherina. la tension tensione of delle porta unaan chiave brugola: ruotare chiave in motion senso orario 2 Regolare Adjust the themolle door della springs bycon using Allena key turning in a la clockwise to per tighten theleleft andsinistra right door springs. tomancata do this could causedidamage to your dishwasher stringere molle e destra della Failure porta. La osservanza questa precauzione può compromet(Illustration 2) . della lavastoviglie (v. Figura 2). tere l’efficienza il tubo di carico allathe linea dell’acqua fredda.. 3 Collegare Connect the inlet hose to cold water supply il tubo di scarico. allo schema6) (figura 6). 4 Collegare . (Figure Connect the drain hose. Fare Referriferimento to diagram Collegare il cavo di alimentazione. 5 Connect the power cord . la condensation striscia anti-condensa sotto the la superficie di lavoro del mobile, verificando che a filo con il bordo del 6 Fissare Affix the strip under work surface of cabinet. Please ensure thsia e condensation piano di lavoro. strip is flush with edge of work surface. la lavastoviglie vano (v. Figura 4). 4) 7 Posizionare Place the dishwasher intonel position.(Illustration a livello della lavastoviglie regolare posteriore, chiave a brugola la vite a 8 Messa Level the dishwasher. The rearPer food can beil piedino adjusted from theruotare front ofcon theuna dishwasher by turning brugola posta nella parte centrale della base, sul lato anteriore lavastoviglie. Per regolare the Allen screw in the middle of the base of dishwasher use della an Allen key (Illustration 5A). To adjust i piedini anteriori, conwundriver cacciavite finché la feet lavastoviglie sia a livellois(Figura 5B). the front feet, use ruotarli a flat scre and piatto turn the front until thenon dishwasher level (Illustration 5B). lavastoviglie deve essere fissata ininposizione. Questa essere 9 La The dishwasher must be secured place. There areoperazione two ways può to do this: compiuta in due modi: A.Piano Normal work surface:Put the installation hook intonella the fessura slot of the and securealit piano to thedi lavodi lavoro normale: inserire il gancio di montaggio del side pianoplane laterale e fissarlo work the(v.wood screws (Illustration 6). ro consurface le viti perwith legno Figura 6). B.Piano Marble or granite work otop:Fix sideilwith (Illustration di lavoro in marmo granite:the fissare lato Screw. con la vite. (Figura 7).7). ensa ti-cond an Striscia Striscia Figura 77】 【Figure 19 a ndens anti-co La lavastoviglie deve essere posizionata in piano per garantire il corretto funzionamento dei cestelli e prestazioni Dishwasher must be level for proper dish rack operation and wash performance. di lavaggio ottimali. controllare chelevel la lavastoviglie in piano, una livella a bolla portato e sul binariothat del cestello Place a spirit on doorsiaand rackposizionare track inside the tub assulla shown check the 1 Per all’interno della vasca, come indicato in figura. dishwasher is level. level the dishwasher by regolando adjusting the three legs individually. 2 Mettere in piano la lavastoviglie ciascuno dei trelevelling piedini di livellamento. in modo la lavastoviglie non please si ribalti una volta posizionata in piano. 3 Fare When levelche the dishwasher, pay attention not to let the dishwasher tip over. 【Figura Figure 88】 Illustration of piedini feet adjustment Regolazione dei NOTE: NOTA: The maximum adjustment I piedini possono essere regolati fino a height of the feet is un’altezza massima di 50 50 mm.mm. Chec k level Front to Back Controllare il livello fronte/ retro Livella bolla Spirit alevel Controllare il livello datounside lato all’altro Check level si de Informazioni sull’allacciamento elettrico Precauzione di sicurezza: For personal safety: CON QUESTO NON OR È CONSENTITO UTILIZZARE CAVI DI PROLUNGA O E. DO NOT USEELETTRODOMESTICO AN EXTENSION CORD AN ADAPTER PLUG WITH THIS APPLIANC AVVERTENZA! ADATTATORI. NON TAGLIARE NÉ RIMUOVERE PER ALCUNA RAGIONETHE IL CONDUTTORE DO NOT, UNDER ANY CIRCUMSTANCES, CUT OR REMOVE EARTHING DI TERRA DEL CAVO DI ALIMENTAZIONE. CONNECTION FROM THE POWER CORD. Requisiti elettrici Plea se look at the ra ting label to know the rating voltage connect the dishwash er to the app supp ly. Per informazioni sulle caratteristiche di targa, verificare la and targhetta e collegare la lavastoviglie a ropriate una fontepower di alimenUse the required fuse 10 amp, time delay fuse or circuit breaker rec ommended and provide separate circuit serving tazione only thisadeguata. appliance.Utilizzare il fusibile ad azione ritardata da 10 A o l’interruttore automatico consigliato e utilizzare un circuito separato solo per la lavastoviglie. Allacciamento elettrico Provvedere a una corretta messa a terra esistente prima dell’uso Verificare che la tensione e la frequenza dell’alimentazione siano conformi a quelle indiEnsure the voltage and frequency of the power be ing corresponds to those on the rating plate. Only insert the plug into an electrical so cket which is earthed cate sulla targhetta. Inserire la spina soltanto in una presa di corrente collegata a terra properly. If the electrical socket to which the appliance must be conne cted is not correttamente. Se la presa elettrica a cui si desidera collegare l’elettrodomestico nonas appropriate for the plug , replace the socket, rather than using a adaptors or the like they could ca use overhea ting and burns. è appropriata, sostituire la presa e non utilizzare adattatori o riduzioni che potrebbero causare surriscaldamenti o ustioni. ISTRUZIONI PER IL COLLEGAMENTO A TERRA L’elettrodomestico deve collegato a terra. In This appliance must be essere earthed. In the event of a malfunction or breakdown, earthing will caso di malfunzionamenti o rotture, la messa a terra reduce the risk of electric shock by providing a riduce rischio di folgorazioni offrendo corrente path oilf least resistance for the electricalla current. elettrica un percorso con minore resistenza. Laan lavaThis appliance is equipped with a cord having equipment-earthin g co and an stoviglie è fornita con unnductor cavo dotato di earthing conduttore plug. The plug must be plugged into an appropriate dioutlet terra that e spina con messa terra. La spina deve is installed and a earthed in accordance with allcollegata local standards and requirements. essere a una presa di corrente idonea, installata e collegata a terra nel rispetto di tutte le norme e regole locali. 20 AVVERTENZA! L’errato collegamento di messa a terImproper connecti ondel of conduttore th e equ ipmentgrounding conductor ca n re sul t i n th e risk ra può comportare il rischio di folgorazioni. In caso of an electric shock. Che ck wi th a qualified di dubbi circa il corretto collegamento a terra electrici an or service represe ntativ e if youdell’eare i n doubt whether theaapp an ce is properly lettrodomestico, rivolgersi un lielettricista qualificato grounded. Do not mo dify the plug p rovided w ith o al servizio di assistenza. Non modificare la spina the appliance; If it is n ot fit for the outlet. fornita dotazione. Seinlastalled spina non inserisce Have ainproper ou tlet b y asiqualifi ed corelectrici an. rettamente nella presa, richiedere a un elettricista qualificato di installare un tipo di presa adatto. Allacciamento del tubo di carico con acquastop Per lavastoviglie allawater rete idrica necessario utilizzare Thel’allacciamento appliance mustdella be conne cted to the mainsèusing new hos e-sets. tubi nuovi. Non The old hose should not be reused. riutilizzare tubi-sets vecchi. Wate r pressure must be between 0,04 MPa and 1 MPa. If the pressure is below the 1 2 3 La pressione dell’acqua deve essere compresa tra 0,04 MPa e 1 MPa. Se la pressione minimum consult our Service Department for advice. scende al di sotto della soglia minima, rivolgersi al servizio di assistenza. Pull The safety supply hoses completely out from storage compartment at rear of dishwasher. Estrarre completamente il tubo con acquastop dal vano posto sul located retro della lavastoviglie. Tighter the screws of thedisafety supply hose tosul the raccordo faucet withcon thread 3/4inch.da 3/4”. Serrare le viti del tubo carico acquastop filettatura Aprire completamente di avviare la lavastoviglie. Turn water fully on beforel’acqua startingprima the dishwasher. INFORMAZIONI SUL TUBO CON ACQUASTOP. IlThe tubosafety acquastop è un tubocon a doppia parete. L’impianto è stato in modo da farlo es intervenire per bloccare il flusso dithe acqua supply hose sists of the double walls. The concepito hose's system guarante its intervention by blocking flow of di warottura ter in del case of di the sup ply hose breaking when the air space between supplyèhose lf and in caso tubo carico e quando lo spazio and fra quest’ultimo tubo e quello esternothe ondulato pienoitse d’acqua . the outer corrugate d ho se is full of water. AVVERTENZA! Un eventuale tubo collegato a una doccetta lavello può esplodere installato sulla stessa della lavastoviglie. Se il A hose that attach es to a sink spray can del burst if it is insta lled onse the same water line astubazione the dish washer. If your sink lavello tubo di questothat tipo,the si consiglia scollegarlo e di tappare il foro. has onutilizza e, it is un re commended hose be di disconnected and the hole plugged. Come scollegare il tubo di carico con acquastop l’acqua. Turn off the water. 1Chiudere Scaricare la pressione premendo l’apposito the pulsante. Scaricando la pressione si protegge stessi e and l’ambiente circostante dal Release the water pressure by depressing pressure release button. This relieves watersepressure protects you, and the 2rischio fortisevere spruzzi. room, di from splashing. il tubo di carico acquastop dal raccordo. Unscrew the safety supply hose from the faucet. 3 Svitare ALLACCIAMENTO ALLA SORGENTE DI ACQUA FREDDA Allacciare il tubo di carico fredda un raccordo con filettatura da 3/4”. e make verificare che sia itfissato saldamente. tubi Conne ct th e co ld water dell’acqua supply hose to aathreaded 3/4(inch) connector and sure that is fastened tightlySeini place. sono non sono lungoused periodo di tempo, lasciar scorrere l’acqua tutte le eventuali If thenuovi watero pipes arestati newutilizzati o r haveper noun t been for an extended period of time, let per the eliminare water run to make sure impurità that the water isalclear a nd freeIl of impurities. If this precaution is no t taken, there is a risk thedell’acqua water inlet n get blocked presenti loro interno. mancato rispetto di questa istruzione può causare ostruzioni nel that carico conca conseguenti danni and da ma ge the applian ce. all’elettrodomestico. Posizionamento dell’elettrodomestico Positioning the Appliance Position thel’elettrodomestico applianc e in thedove desired location. The backposteriore should rest against the wall behind it, and the sides, Posizionare desiderato. La superficie deve appoggiare contro la parete retrostante e i lati contro cabinets walls. T heè dishwasher equippe d withewater supply drainl’installazione, hoses th at can ialong mobilithe o leadjacent pareti adiacenti. La or lavastoviglie dotata di tubi is flessibili di carico scarico e, perand facilitare può essere be positioned either the right or the left s ides to facilitate proper installation. posizionata a destra o atosinistra. Come tubi flessibili l’acqua in eccesso How scaricare to Draindai Excess Water From Hoses Se il lavello si 1000 trova ahigher un’altezza 100excess cm dal pavimento, l’acqua in eccesso presente nei tubi non può essere raccolta If the sink is fromsuperiore the floor,athe water in hoses cannot be drained dire ctly direttamente Tale acqua in una vaschetta in unor apposito contenitore esterno, posto a into the sink.nel It lavandino. will be necessary to dovrà drain essere excessscaricata water from hoses into aobowl suitable containe rinferiore that is held outside and lower than the sink. un’altezza rispetto al lavello. Waterdell’acqua Outlet Uscita Allacciare tubo di scarico. Al fine. The di evitare di acqua, il tubo di scarico essere montato Connect ilthe water drain hose drainperdite hose must be correctly fitted todeve avoid water leaks.correttamente. Accertarsi Ensure that the water ho se is not kinked or squashed. che il tubo di scarico noninlet sia strozzato o appiattito. Tubo di prolunga Extension Hose Se è necessario utilizzare tubo di prolunga, accertarsi che sia simile a quello di scarico. If you need a drain hoseun extension, make sure to use a similar drain hose. It must b e di nocompromettere longer than 4l’efficacia metres; otherwise effect of deve the dishwasher could be reduced. Per evitare di lavaggio the dellacleaning lavastoviglie, non essere di lunghezza superiore a 4 metri. Syphon Connection Allacciamento al sifone Inserire l’estremità uninto tuboadidrain scarico in una di diameter scarico con minimo di 40into mmthe oppure al lavanInsert the drain hdi ose pipe withconduttura a minimum ofdiametro 40mm, or let it run sink,appoggiarlo making sure to dino, piegarlo o di it. schiacciarlo. libera be delless tubothan deve1000mm. trovarsi a un’altezza non superiore a 100 cm. avoidevitando bendin di g or crimping The top ofL’estremità the hose must 21 Avvio della lavastoviglie Primafollowing di avviarethings la lavastoviglie controllare The should be checkedquanto beforesegue. starting the dishwasher. La lavastoviglie deve essere livellata e correttamente fissata. 1 The dishwasher is level and fixed properly valvola di carico deve essere aperta. 2 La The inlet valve is open raccordi tubo di carico essere ben serrati e stagni 3 IFill hose del connections aredevono fully tightened and not leaking caviwires devono correttamente 4 IThe areessere tightly connected collegati 5 L’alimentazione The power is switched on essere presente. elettrica deve 6 IThe and edrain hoses are knotted tubiinlet di carico scarico non devono essere strozzati. 7 All packing materials andeprintings should be taken outrimossi from the dishwasher Tutto il materiale di imballo i fogli stampati devono essere dalla lavastoviglie voltainstallation, completata l’installazione, il presente libretto.this manual. Attenzione: una After pleaseconservare make sure to keep Le informazioni che contiene sono molto utili per l’utilizzatore. The content of this manual is very helpful to the users. 9.Guida alla risoluzione dei problemi Prima di rivolgersi al servizio di assistenza La consultazione delle tabelle nelle pagine seguenti può essere utile per evitare di rivolgersi al servizio di assistenza. Problema La lavastoviglie non si avvia Problemi tecnici Possibili cause Fusibile bruciatoor o interruttore Fuse blown, the automatico scattato circuit breaker acted Sostituire il fuse fusibileoro reset ripristinare l’interruttore automatico. evenReplace circuit breaker. RemoveScollegare any other tuali altre apparecchiature collegate allo stesso circuito della lavastoviglie. appliances sharing the same circuit with the dishwasher L’alimentazione Power supplyelettrica is not non èturned stata inserita on Verificare chethe la lavastoviglie cheand la porta sia perfetMake sure dishwashersia is accesa turned eon the door is tamentesecurely. chiusa closed Accertarsi che il cavo di alimentazione sia correttamente Make sure the power cord is properly plugged intocollegato the alla presa di corrente. wall socket. La pressione dell’acqua è Water pressure is low insufficiente Controllare tubo di supply carico sia correttamente e che Check thatche theil water is allacciato connected properly and l’acqua sia aperta. the water is turned on. La portaofnon è correttamente La porta non è correttamente chiusa. Door dishwasher Make sure to close the door properly and latch it. chiusa. not properly closed. La lavastoviglie non pompa acqua Schiuma nella vasca Tubo Kinkdiinscarico drain strozzato hose Controllare il tubo di scarico. Check drain hose. Filtro Filterostruito clogged Controllare il filtrothe a maglia Check coarse filter grossa (vedere la sezione “Pulizia delFilter filtro”)") (see section titledintitolata " Cleaning The Lavello intasato Kitchen sink clogged Controllare il lavello per verificare scarichi correttamente. Se ilwell. problema è Check the kitchen sink to che make sure it is draining causato dallo scarico del lavello, è probabile che sia necessario l’intervento If the problem is the kitchen sink not draining ,you may di un idraulico piuttosto che quellothan del servizio di assistenzafor della lavastoviglie. need a plumber rather a serviceman dishwashers. Detersivo idoneo Impropernon detergent Fuoriuscita di brillantante Spilled rinse-aid stato utilizzato withun detersivo Presenza di macchie nella ÈDetergent con coloranti parte interna della vasca colourant was used Hard dura water minerals Problemi Patina bianca sulla Acqua generali superfici interne Presenza di macchie di ruggine sulle posate Rumorosità Rimedio Rumore di urti nella vasca di lavaggio Tintinnio nella vasca di lavaggio Rumore di urti nei tubi dell’acqua Per la formazione di schiuma, utilizzare soltanto detersivo Useevitare only the special dishwasher detergent to avoid suds. per lavastoviglie. Se è the presente della schiuma, lavastoviglie If this occurs, open dishwasher and letaprire sudsla evaporate. eAdd attendere cheofevapori. Aggiungere 4 litri di acqua 1 gallon cold water to theall’incirca tub. Close and latch fredda the nella vasca. Chiudere la lavastoviglie e selezionare unwill ciclodrain qualsiadishwasher, then select any cycle. Dishwasher si. lavastoviglie scaricherà l’acqua come Aprire outLathe water at the first step.Open theprima dooroperazione. after draining la termine dello scarico verificare che la schiuma sia stata is porta stop al and check if the sudse is disappeared. eliminata. necessario, ripetere l’operazione. Repeat ifSe necessary. Pulire immediatamente eventuali fuoriuscite di brillantante. Always wipe up rinse-aid spills immediately. Accertarsi il detersivo sia del tipo senza Make sureche that the detergent is the onecoloranti. without colourant. Per pulire le superfici interne una spugna To clean the interior, use autilizzare damp sponge withinumidita con detersivo per lavastoviglie e indossare guanti di gomma. dishwasher detergent and wear rubber gloves. Non utilizzare detergenti diversi dal detersivo per lavastoviglie Never use any other cleaner than dishwasher per evitare la schiuma. or suds. detergent forformazione the risk ofdi foaming Le posate macchiate The affected itemsnon aresono resistenti alla corrosione. not corrosion resistant. Non è stato avviato un not programma doporun thee senza la funzione A programme was Always quick selezionare wash programme . Turbo (se l’aggiunta sale e alcuni residui di saleany crockery presente).in the dishwasher and without run afterdel dishwasher without sono nel ciclo di lavaggio. Doposelecting the Turbo function (if present), salt penetrati was added. l’aggiunta delsalt sale, eseguire sempre pro- dishwasher salt. Traces of have after iladding gramma lavaggio rapido senza stoviglie gotten di into the wash cycle. IlThe tappoliddell’addolcitore of the softer è allentato is loose Controllare tappo. Accertarsi che saldamente serrato. Check theillip .Ensure the fix is sia fine. Uno dei mulinelli A sp ray arm isurta contro una stoviglia knocking againstnel cestello an item in a basket Stoviglie sistemate Items ofnon crockery saldamente all’interno della are loose in the vasca wash cabinet Interrompere programma e sistemare nuovamente le stoviglie Interrupt theil programme, and rearrange the items che ostruiscono il mulinello. which are obstructing the spray arm. IlThis problema puòcaused essere may be causato dallainstallation posizione di by on-site installazione o dalla sezioor the cross-section of ne tubi. thedei piping. Interrompere programma Interrupt theil programme, eand sistemare nuovamente le stoviglie. rearrange the items of crockery. Thisha has no sul influence on the della dishwasher function. Non effetti funzionamento lavastoviglie. In caso di if in doubt, contact suitablyqualificato. qualified plumber. dubbio, rivolgersi a unaidraulico Problema I piatti non sono puliti Risultati di lavaggio non soddisfacenti Presenza di velature sulle stoviglie in vetro Presenza di segni neri o grigi sui piatti Residui di detersivo nelle vaschette Mancata asciugatura dei piatti Asciugatura non soddisfacente Possibili cause IThe piattidishes non sonowere stati not sistemati correttamente. loaded correctly. Rimedio Vedere le note in della sezione “Caricamento dei cestelli della lavastoviSee notes " Loading the Dishwasher Baskets ". glie”. IlThe programma non era suffiprogramme was cientemente intensivo. not powerful enough. Selezionare un programma piùprogramme. intensivo. Vedere la “Tabella dei cicli di Select a more intensive lavaggio”. See" Wash Cycle Table ". Non stata erogata una quanNot èenough detergent tità sufficiente di detersivo was dispensed. Utilizzare più detergent, detersivo o sceglierne uno diverso Use more or change your detergent. Items are bloccano blockingi mulinelli Le stoviglie the path of spray arms. Risistemare lethe stoviglie in modo che the i mulinelli possano ruotarefreely. liberaRearrange items so that spray can rotate mente. IlThe gruppo sul fondo filterfiltrante combination della lavastoviglie è sporco o in the base of wash cabinet is montato not clean or non è stato correttais not Questa correctly fitted. può mente. condizione This may ostruire i foricause dei mulinelli. the spray arm jets to get blocked. Pulire e/oand/or montarefitcorrettamente il gruppo filtrante. Pulire gli ugelli dei Clean the filter combination correctly. mulinelli.the Vedere “Pulizia Clean spray armdei jets. See "Cleaning the Spray mulinelli”. Arms". Combinazione Combinationdiofacqua soft morbiwater and toodi much da ed eccesso detersivo. detergent. Se l’acqua tenera, utilizzare meno detersivo e scegliere ciclo più Use less èdetergent if you have soft water andun select breve per lavare le stoviglie in vetro. a shortest cycle to wash the glassware and to get them clean. Utilizzare un detergente per eliminare le macUse a mild abrasiveleggermente cleaner toabrasivo eliminate those marks. chie. Alcuni utensiliutensils di alluminio Aluminum hanno i piatti. have sfregato rubbed contro against dishes. Le stoviglie bloccano le vaDishes block detergent cups. schette del detersivo. Risistemare correttamente stoviglie. Re-loading the dishesleproperly. Caricamento non adeguato Improper loading Caricarethe la lavastoviglie in base alle istruzioniin fornite. Load dishwasher as suggested the directions. Brillantante insufficiente Too little rinse-aid Aumentare ilthe dosaggio di brillantante/riempire Increase amount of rinse-aid/refillil serbatoio. the rinse-aid dispenser. Stoviglie troppo presto Dishes estratte are removed too soon Non not svuotare la lavastoviglie subito dopoimmediately il lavaggio. Aprire leggermenDo empty your dishwasher after te la porta inOpen modo che vaporeslightly possa fuoriuscire. Iniziare a svuotare washing. theil door so that the steam can la lavastoviglie solounloading quando le stoviglie sono appenaonly tiepideonce al tatto. escape. Begin the dishwasher t Svuotare per are primobarely il cestello inferiore. In questo modo si evitano he dishes warm to the touch. Empty the low gocciolamenti nel cestello basket first.dalle Thisstoviglie prevents watersuperiore. form dropping off dishes in the upper basket. Programma errato Wrong program has been selected In program the washing temperature is lower. Pershort il programma breve la temperatura di lavaggio è bassa. Pertanto, This lowers cleaning performance. anchealso l’efficacia del lavaggio è inferiore. Scegliere Choose un programma con a with apiù long washing time. unprogram tempo di lavaggio lungo. Utilizzo posate with con rivestiUse ofdicutlery a low-quality mento di scarsacoating qualità Il deflusso dell’acquaisè more più difficoltoso queste stoviglie. Posate o Water drainage difficultsuwith these items. piatti di questo tipo nonofsono lavaggio lavastoviglie. Cutlery or dishes thisadatti typealare not in suitable for washing in the dishwasher. Codici errore When sisome come viene on, the appliance will display codes to warn you: Quando verificamalfunctions un malfunzionamento, visualizzato un codice di errore error che segnala il problema. Codici Significati Possibili cause E1 Tempo di carico prolungato.scarsa qualità Longer inlet time. Rubinetti non aperti, presa or dell’acqua strozzata Faucets is not opened, water intake is o pressione troppo restricted,or waterbassa. pressure is too low. E4 Fuoriuscita Overflow. Un componente lavastoviglieleaks perde.. Some elementdella of dishwasher E8 Orientamento della valvola di distribuzione non Failure riuscito. of orientation of distributary valve. Circuitocircuit apertooro break rottura of della valvola di distribuzione. Open distributary valve. AVVERTENZA! In overflow caso di fuoriuscite, chiudere l’alimentazione dell’acqua prima before di chiamare il servizio di assistenza. If occurs, turn off the main water supply calling a service. Se è presente acqua sulla base a causa di fuoriuscite o piccole perdite, rimuoverla prima If there is water in the base pan because of an overfill or small leak, di riavviare la water lavastoviglie. the should be removed before restarting the dishwasher. Dati tecnici 550 Altezza Height : Larghezza Width : Profondità: Depth : Pressione dell’acqua: Water pressure: Alimentazione elettrica: Power supply: Alimentazione Capacity:elettrica: iusa) ta ch por (con 815mm 598 mm chiusa) with porta the door closed ) 550mm ((con 0.04-1.0MPa vedererating la targhetta see label coperti settings 14 place 2. Cestello inferiore: 1. Cestello superiore: Piatto ovale Piatti fondi Piatti piani Piatti da dessert Ciotole grandi Ciotole medie Ciotole piccole Bicchieri Piattini Tazze Caricamento dei cestelli secondo En50242: Informazioni sui test di comparabilità conformemente a EN 50242 Capienza: 14 coperti Posizione del cestello superiore: posizione bassa Programma: ECO Impostazione del brillantante: 6 Impostazione dell’addolcitore: H4 Mestoli per salse Forchette da portata Coltelli Cucchiaini da tè Cucchiai da portata Cucchiaini da dessert Forchette Cucchiai 3. Portaposate: IlCutlery cestellobasket delle posate 5 posizioni: couldpuò be assumere have 5 positions: Modalità 1 Mode 1 Posizione 1: sollevare il cestello sinistro. I cestelli sinistro e dePosition one: lift the left baskettrasversale. up, both left and right stro sono entrambi in posizione baskets are sideling. Modalità 2 Mode 2 Posizione 2: regolare il cestello sinistro nella posizione bassa. two: adjust left basket to mentre lower position, left è in Il Position cestello sinistro è inthe posizione piana quello destro basket is flat and right basket is sideling. posizione trasversale. Mode 3 Modalità 3 Posizione 3: sollevare il cestello destro. I cestelli sinistro e destro Position three: the rightpiana. basket up, both left and right sono entrambi inlift posizione baskets are flat. Mode 4 Modalità 4 Posizione 4: spostare il cestello destro da destra verso sinistra. I Position Four: Move the right basket from right to left, two due cestelli sovrapposti. basket are sono overlapping. Mode 5 Modalità 5 Posizione Estrarre il cestello destro dalfrom vassoio. Viene utilizzaPosition 5: Five: Remove the right basket the tray, toonly solohas il cestello the left sinistro. basket. Technical Data Sheet Scheda tecnica Scheda tecnica di lavastoviglie domestica conforme alla direttiva UE 1059/2010: Sheet of household dishwasher a ccording to EU Directive 1059 /2010: Produttore Manu facturer SmalvicSmalvic Tipo/Descrizione Type / Description LAVASTOVIGLIE A SCOMPARSA TOTALE LAVASTOVIGLIE A SCOMPARSA TOTALE Coperti standard Standard place settings 14 Categoria efficienza class energetica Energydiefficiency Consumo energia/anno Annualdienergy consumption Consumo energia ciclo di standard Energydiconsumption of lavaggio the sta ndard cle aning cycle Consumo di corrente in modalità OFF Powe r consumption of off-mode Consumo di corrente in modalità Left-on Powe r consumption of left-on mode Consumo di acqua/anno Annual water consumption Categoria efficienzaclass di asciugatura Drying di efficiency Ciclo di lavaggio Standard cleastandard ning cycle Durata del programma delthe ciclo lavaggio standard Program duration of stadindard cleaning cycle A+ + 14 A++ 266 kWh 266 kWh 0,93 kWh 0.93 kWh 0,45 W 0.45 W 0,49 W 0.49 W 2800 litri 280 0 liter A A ECO 50°C ECO 50 ℃ Rumorosità Noise level Montaggio Moun ting Possibilità di incasso Could be built-in Altezza 175 min 175 min 47 dB(A) re 1 pW 47 dB(A ) re 1 pW A semincasso Build under Sì Yes 81,5 cm Height Larghezza 59,8 cm81.5 cm Width (con connettori) Profondità 55 cm 59.8 cm Consumo di corrente Depth (with conne ctors) 1760-2100 W 55 cm Tensione/frequenza nominale Powe r consumption 220-240 V~/ 50 Hz 176 0-2100 W 0,4-10 bar = 0,04-1 MPa 220 -240 V~ / 50 Hz Pressione dell’acqua (pressione del flusso) Rated voltage / freque ncy Water pressure (flow p ressure) 0.4-10 bar = 0.04-1 MPa NOTE: nota : A + + + (efficienza massima) atoDD(efficienza minima) (highest efficiency) (lowest efficiency) Consumo energetico di “ “222” all’anno in base a 280on cicli di lavaggio con acquausing freddacold e consumo delle ” kWh Energy consumption 222kWh per year, based 280 standardstandard cleaning cycles water fill andmodalità a the consumption of the low power modes. consumption will depend on how the app liance is used. potenza ridotta. Il consumo energetico effettivoActual dipendeenergy dall’utilizzo dell’elettrodomestico. Consumo acqua di “2800” all’anno in year, base a 280 cicli lavaggio standard. Il consumo di acqua dipende dall’utilizWater condisumption “2800litri ”litres per based on di 280 standard cleaning cycles.effettivo Actual water consumption willdell’elettrodomestico. depend on how the appliance is used. zo A (efficienza massima) atoGG(efficienza minima) (highest efficiency) (lowest efficiency) Questo programma è adeguato per il lavaggio coperti normalmente sporchiand ed èthat il piùitefficace This program is suitable for cleaning soileddinormally soiled tableware is the in termini di consumi energetici e di acqua combinati per detto di coperti. most efficient programme intipo terms of its combined energy and water consumption for that type of tab leware. Questo apparecchio è conforme alle normative e direttive europee seguenti nella configurazione in cui viene fornito: -The LVDdevice 2006/95/CE meets the European standards and the directives in the c urre nt version at delivery: - EMC2004/108/CE LVD 2006/95/EC EMC200 4/108/EC -- ErP 2009/125/CE -I valori ErP 2009/125/EC di cui sopra sono stati misurati conformemente alle normative e nelle condizioni di funzionamento specificate. I risultati possono variare considerevolmente in base alla quantità e alwith grado di sporcizia delle specified stoviglie, alla durezzaconditions. dell’acqua, alla quanThe above values have been measured in accordance standards under operating tità di detersivo, ecc.greatly according to quantity a nd pollution of the dishes, water hard ness, Results may vary amount of dete rgent, etc. Questo libretto è stato redatto conformemente alle norme e regole dell’Unione europea. The manual is based on the European Union's standards and rules.