1
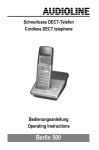
Telefono senza fili
Cordless telephone
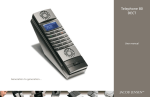
DC50
Istruzioni per l’uso
Operating Instructions
2
Istruzioni per l’uso . . . . . . . . . . 3
Operating Instructions . . . . . . . 27
Declaration of Conformity . . . . 52
2
1
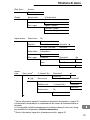
Sommario
1
2
3
4
5
6
7
8
9
10
11
12
13
Indicazioni di sicurezza . . . . . . . . . . . . . . . . . . . .
Mettere in funzione il telefono . . . . . . . . . . . . . . . .
Elementi di comando . . . . . . . . . . . . . . . . . . . . . .
Come funziona il mio telefono? . . . . . . . . . . . . . . .
Compiere telefonate . . . . . . . . . . . . . . . . . . . . . .
Impianti telefonici interni / Servizi addizionali . . . . .
Struttura di menu . . . . . . . . . . . . . . . . . . . . . . . .
Funzioni speciali . . . . . . . . . . . . . . . . . . . . . . . . .
Ampliare il sistema telefonico . . . . . . . . . . . . . . .
In presenza di problemi . . . . . . . . . . . . . . . . . . . .
Specifiche tecniche . . . . . . . . . . . . . . . . . . . . . . .
Consigli per la cura / Garanzia . . . . . . . . . . . . . . .
Indice alfabetico . . . . . . . . . . . . . . . . . . . . . . . . .
4
5
7
8
10
13
14
19
21
22
23
25
26
3
Indicazioni di sicurezza
1 Indicazioni di sicurezza
Leggere attentamente le presenti istruzioni per l’uso.
Impiego conforme agli usi previsti
Il presente apparecchio consente di compiere telefonate all’interno di una rete di telecomunicazione. Qualsiasi altro impiego è considerato come non conforme agli usi previsti.
Non sono consentite modifiche o trasformazioni non autorizzate. Non aprire per nessuna ragione l’apparecchio autonomamente e svolgere riparazioni di propria iniziativa.
Luogo di installazione
Evitare un’esposizione a fumo, polvere, vibrazioni, sostanze chimiche, umidità, calore e
raggi solari diretti.
Non utilizzare l’unità portatile in aree esposte al rischio di deflagrazione.
Alimentatore di rete
Attenzione: Utilizzare solo l’alimentatore a spina fornito in dotazione visto che
altri alimentatori di rete potrebbero addirittura danneggiare il telefono. Non
ostacolare il libero accesso all’alimentatore a spina con mobili o altri oggetti simili.
Batterie ricaricabili
Attenzione: Non gettare le batterie ricaricabili nel fuoco, né sommergerle in
acqua.
Caduta di tensione
In caso di caduta di tensione non è possibile impiegare l’unità per telefonare. Si consiglia di ricorrere in caso di emergenza ad un telefono con filo in grado di funzionare anche senza alimentazione elettrica esterna.
Apparecchiature mediche
Attenzione: Evitare di utilizzare il telefono nelle vicinanze di apparecchiature
mediche. Non è possibile escludere completamente il rischio di eventuali interferenze.
Telefoni DECT1 possono causare un fastidioso ronzio in apparecchi acustici.
Smaltimento
Sussiste l’obbligo legislativo al corretto smaltimento di beni di consumo. Il simbolo riportato sul telefono e raffigurato qui a lato indica che apparecchi usati
elettrici ed elettronici e batterie esauste non sono da smaltire assieme ai normali rifiuti domestici.
Procedere allo smaltimento di apparecchi elettrici o elettronici presso un
centro di raccolta incaricato con lo smaltimento conforme.
Consegnare batterie ed accumulatori per lo smaltimento presso rivenditori al
dettaglio di batterie o centri di raccolta che mettono a disposizione appositi
contenitori.
Smaltire confezioni ed imballaggi in base a quanto indicato dalle norme in vigore a livello locale.
1 DECT: Digital Enhanced Cordless Telephone = Standard per telefoni senza cavo.
4
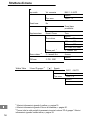
Mettere in funzione il telefono
2 Mettere in funzione il telefono
Indicazioni di sicurezza
Attenzione: Prima della messa in funzione, leggere attentamente le indicazioni di sicurezza riportate al capitolo 1.
Verificare il contenuto della confezione
La confezione contiene:
− una stazione base con alimentatore di
rete
− un cavo di collegamento telefonico
− un’unità portatile
− due batterie ricaricabili
− un manuale di istruzioni per l’uso
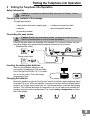
Collegare la stazione base
Attenzione: Posizionare la stazione base con una distanza minima di 1 m da
altre apparecchiature elettroniche visto che altrimenti si possono verificare interferenze reciproche.
Procedere al collegamento della stazione base seguendo quanto raffigurato sul disegno. Utilizzare per motivi di sicurezza solo l’alimentatore di rete oltre che il cavo di collegamento telefonico forniti in dotazione.
Presa di collegamento telefonico
Presa elettrica
Inserire le batterie ricaricabili
Inserire le batterie nel rispettivo vano batterie aperto. Utilizzare a tale scopo solo batterie del tipo AAA Ni−MH 1,2 V. Osservare la
corretta polarità! Chiudere quindi il vano
batterie.
Caricare le batterie 2
Riporre l’unità portatile in sede di prima messa in funzione per una durata di minimo 16
ore nella stazione base / stazione di carica. Avendo posizionato l’unità portatile nella
stazione base / stazione di carica in maniera corretta, la spia di controllo dello stato di
carica è accesa. L’unità portatile si surriscalda durante il processo di carica. Questo è
un fenomeno normale e non pericoloso. Evitare di caricare l’unità portatile con dispositivi di carica differenti o estranei. Lo stato di carica attuale è visualizzato sul display:
Carico
A metà
Debole
Scarico
5
Mettere in funzione il telefono
Attivare e disattivare l’unità portatile
Allo scopo di risparmiare gli accumulatori ricaricabili è possibile spegnere e accendere
di volta in volta l’unità portatile.
2 sec Disattivare l’unità portatile
Attivare l’unità portatile
Impostare data e orario
A pagina 14 sono riportate indicazioni relative all’impostazione di data e orario presso
l’unità portatile in sede di prima messa in funzione.
Impianti telefonici interni
A pagina 13 sono riportate ulteriori informazioni in caso si volesse collegare il telefono
ad un impianto telefonico interno.
6
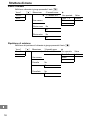
Elementi di comando
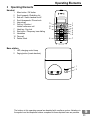
3 Elementi di comando
Unità portatile
1
2
Tasto menu / Tasto OK
Scorrere verso sopra / Elenco ripetizione
di chiamata
3 Concludere chiamata / Attivare o
disattivare unità portatile
4 Scorrere verso sotto / Rubrica telefonica 11
10
5 Chiamate interne
6 Elenco chiamate / Tasto R /
9
Avviare una chiamata a conferenza
7 Tasto cancelletto / Blocco tastiera
8 Tasto asterisco / Selezione a toni temporanea
8
9 Funzione vivavoce
10 Accettare la chiamata
11 Cancellare / Indietro
1
2
3
4
5
6
7
Stazione base
1
2
LED di controllo dello stato di carica
Tasto di ricerca unità portatile
(tasto di paging)
1
2
I tasti riportati nelle presenti istruzioni per l’uso sono raffigurati con un contorno uniforme. Con riserva di scostamenti per tasti e simboli visualizzati sul display del telefono rispetto a tasti e simboli di display qui raffigurati.
7
Come funziona il mio telefono?
4 Come funziona il mio telefono?
Rappresentazioni e modi di scrittura
2 sec tenere rilasciare Inserire numeri o lettere
Premere brevemente il tasto raffigurato
Premere il tasto raffigurato per 2 secondi
Tenere premuto il tasto raffigurato
Rilasciare il tasto raffigurato
Unità portatile squilla
Stazione base squilla
Estrarre l’unità portatile dalla stazione base
Riporre l’unità portatile nella stazione base
Spento oppure
Testo o simboli sul display
Simboli sul display
Display
DC50
1
22:15 02/05
Descrizione
Nome dell’unità portatile pagina 15
Numero di chiamata interno dell’unità portatile pagina 10
Indicazione di ora e data pagina 14
Permanente: Indicazione dello stato di carica delle batterie.
Se la spia lampeggia: Caricare le batterie ricaricabili.
Segmenti che scorrono: Processo di carica delle batterie in corso. pagina 5
La segnalazione acustica di chiamata è disattivata. pagina 14
Segreteria telefonica su rete telefonica.
VMWI1 − Serzivio opzionale del proprio gestore di rete telefonica pagina 13
Permanente: Chiamata telefonica in corso.
Se la spia lampeggia: Chiamata telefonica in arrivo. pagina 10
La funzione vivavoce è attivata. pagina 12
Il microfono è disattivato. pagina 11
Permanente: Il collegamento con la stazione base è buono.
Se la spia lampeggia: Il collegamento con la stazione base non è
buono. Avvicinarsi alla stazione base.
Il blocco tastiera è attivato. pagina 12
La funzione di allarme è attivata. pagina 14
Walkie Talkie La funzione Walkie Talkie è attivata. pagina 16
1 VMWI: Visual Message Waiting Indication
8
Come funziona il mio telefono?
Navigazione nel menu
I differenti menu consentono di raggiungere tutte le funzioni del telefono. Il percorso da
seguire per giungere alla funzione desiderata è indicato dalla struttura di menu. pagina 14
Aprire il menu principale
o
Selezionare il sottomenu desiderato
Aprire il sottomenu
o
Selezionare la funzione desiderata
Aprire la funzione
o
Selezionare l’impostazione desiderata
La tastiera consente di inserire numeri o lettere
Confermare le immissioni
Tornare indietro di un livello
Interrompere le procedure di programmazione e
memorizzazione e tornare indietro alla modalità di
stand−by
Ogni singolo processo si interrompe automaticamente se entro 60 secondi non
si procede con una immissione.
Creare voci nella rubrica telefonica − Esempio 3
Come navigare nei menu e compiere immissioni è indicato dall’esempio Creare voci
nella rubrica telefonica. Si consiglia di seguire l’esempio riportato per tutte le altre impostazioni che si desiderano compiere.
Aprire la rubrica telefonica
, o Nuova voce , Selezionare e confermare la funzione
Immetti nome , <Immett. Nr.>
,
Inserire e confermare il nome (max. 13 caratteri)
Inserire e confermare il numero di chiamata (max. 24
cifre)
9
Compiere telefonate
5 Compiere telefonate
Ricevere una chiamata
, o Ricevere una chiamata
Concludere una chiamata
o
Concludere una chiamata
Telefonare
Inserire un numero di chiamata (max. 24 cifre)
In caso di immissione errata cancellare l’ultima cifra
Selezionare un numero di chiamata
È altresì possibile premere prima il tasto di chiamata e ricevere il segnale di linea libera. Le cifre immesse per la composizione del numero di chiamata desiderato sono immediatamente selezionate. Nel corso di una simile chiamata
non è possibile eseguire una correzione di singole cifre che compongono il numero di chiamata.
Ripetizione di selezione
Selezionare l’ultimo numero di chiamata composto
, , o Ricomporre
,
Selezione dell’ultimo numero di chiamata composto
Selezionare un numero di chiamata dall’elenco di ripetizione di chiamata
Il telefono memorizza gli ultimi 10 numeri di chiamata selezionati in un elenco disponibile per la funzione di ripetizione di chiamata.
Aprire l’elenco di ripetizione di chiamata
o , Selezionare la voce e instaurare un collegamento
Riselezionare chiamate ricevute
Il telefono memorizza fino a 30 chiamate ricevute in un elenco chiamate.
Aprire l’elenco chiamate
o , Selezionare la voce e instaurare un collegamento
Selezionare numeri dalla rubrica telefonica
Per fare questo è necessario aver memorizzato i numeri di chiamata nella rubrica telefonica. pagina 9 e 17
Aprire la rubrica telefonica
o , Selezionare la voce e instaurare un collegamento
Compiere chiamate interne 4
Condurre chiamate interne
Per poter condurre chiamate interne gratuite è necessario aver precedentemente registrato due o più unità portatili (UP1, UP2, ...) ad una stazione base.
UP1: , o per es. 2 , Selezionare il numero di chiamata interno dell’unità
portatile desiderata
UP2: Ricevere la chiamata interna presso l’altra unità portatile
UP1 / UP2: Concludere la chiamata interna
10
Compiere telefonate
Inoltro interno di chiamate esterne
UP1: , o per es. 2 , UP2: UP1: Selezionare il numero interno con chiamata esterna
in corso
Ricevere la chiamata interna presso l’altra unità
portatile
Trasferire la chiamata
Se l’unità portatile selezionata non risponde, è possibile riprendere la chiamata
esterna premendo il tasto .
Compiere chiamate a conferenza
Questa funzione consente di condurre una conferenza con una chiamata esterna ed un
altro interlocutore interno.
UP1: , o Selezionare il numero interno con chiamata esterna
per es. 2 , in corso
UP2: Ricevere la chiamata interna presso l’altra unità portatile
UP1: Avviare la conversazione a conferenza
UP1 / UP2: La conferenza è conclusa nel momento in cui uno
dei partner di chiamata interni conclude la chiamata
Impostare il volume del ricevitore
Il volume è regolabile durante lo svolgimento di una chiamata in 6 livelli.
o
Selezionare il volume desiderato
Impostare il suono
Durante lo svolgimento di una chiamata telefonica è possibile modificare il suono del ricevitore.
, o Volume , Aprire la funzione
o per es.:
NORMALE , Selezionare il suono desiderato
Silenziamento del microfono nell’unità portatile 5
È possibile attivare e disattivare il microfono dell’unità portatile con chiamata telefonica
in corso.
, o Escl. micr. , Disattivare il microfono (silenziamento)
, o No escl.
,
Attivare il microfono
11
Compiere telefonate
Visualizzazione della durata di conversazione
Durante lo svolgimento di una chiamata, la durata della telefonata è visualizzata in ore,
minuti e secondi sul display.
Funzione vivavoce 6
Utilizzare questa funzione per ascoltare il partner di chiamata attraverso l’altoparlante.
Attivare la funzione vivavoce
Disattivare la funzione vivavoce
Blocco tastiera 7
L’attivazione del blocco tastiera consente di ricevere telefonate in arrivo come di consueto.
Attivare il blocco tastiera
2 sec. 2 sec Disinserire il blocco tastiera
Ricerca dell’unità portatile (funzione di paging)
Avendo perso d’occhio la propria unità portatile è possibile ritrovarla facilmente grazie
all’emissione di un tono di ricerca.
{«}
Avviare il tono di ricerca
o
Interrompere il suono di paging
12
Impianti telefonici interni / Servizi addizionali
6 Impianti telefonici interni / Servizi addizionali
Tasto R in impianti telefonici interni
Avendo collegato il telefono ad un impianto telefonico interno, il tasto R consente di accedere a tutte le altre funzioni disponibili come per es. trasferimento di chiamata e funzione di richiamata automatica. Si prega di consultare le istruzioni per l’uso del proprio
impianto telefonico interno per individuare il tempo flash da impostare al fine di poter
usufruire di queste funzioni. Il rivenditore specializzato è in grado di indicare se il telefono acquistato funzionerà senza alcun problema nel proprio impianto telefonico interno. Impostare il tempo flash pagina 16
Pausa di selezione
In presenza di impianti telefonici interni è necessario preselezionare un numero di accesso
alla rete esterna per ottenere un segnale di linea libera prima di poter compiere una telefonata. Alcuni impianti telefonici interni di vecchia data richiedono un intervallo di tempo di
poco superiore prima di trasmettere un segnale di libero. In particolare, proprio per questi impianti telefonici interni è possibile prevedere, dopo aver inserito il numero di accesso alla rete
esterna, una pausa di selezione che consente di comporre il numero di chiamata desiderato
senza dover necessariamente attendere il segnale di libero.
3 sec Inserire una pausa di selezione
Il telefono rimane in attesa, in seguito all’inserimento del numero di accesso alla rete
esterna, per un determinato intervallo di tempo prima di procedere con la selezione del
numero di chiamata vero e proprio.
La pausa è anche programmabile in sede di immissione dei numeri di chiamata
nella rubrica telefonica.
Tasto R e servizi addizionali
Il telefono supporta servizi addizionali messi a disposizione dal proprio gestore di rete telefonica come per es. le funzioni di chiamata in attesa, avviso di chiamata e chiamata a conferenza. Con il tasto R è possibile accedere a questi servizi addizionali. Si prega di consultare
il proprio gestore di rete telefonica per ottenere informazioni sul tempo flash necessario per
l’utilizzo dei servizi addizionali. Rivolgersi al proprio gestore di rete telefonica per ottenere
l’abilitazione ai servizi addizionali. Impostare il tempo flash pagina 16
Visualizzazione del numero di chiamata (CLIP1)
A condizione che il collegamento telefonico disponga di questa funzione, l’apparecchio
visualizza il numero telefonico del chiamante non appena il telefono squilla. Nel caso in
cui il chiamante abbia soppresso la trasmissione del proprio numero di chiamata, appare un’apposita indicazione. Visto che il numero di chiamata non è visualizzabile, questo non sarà memorizzato nell’elenco chiamate.
La visualizzazione del numero di chiamata è un servizio opzionale offerto dal
proprio gestore di rete telefonica. Si consiglia di rivolgersi al proprio gestore di
rete telefonica per ricevere ulteriori informazioni a riguardo.
Segreteria telefonica integrata nella rete telefonica 8
Nel caso in cui il proprio gestore di rete telefonica offra una segreteria telefonica integrata
nella rete telefonica, sull’apparecchio appare il simbolo (VMWI2) indicante la presenza di
nuovi messaggi. La segreteria telefonica e l’indicazione sulla presenza di nuovi messaggi
mediante simboli sono servizi opzionali offerti dal proprio gestore di rete telefonica. Tali funzioni saranno peraltro solo accessibili nel caso in cui il gestore di rete telefonica offra i servizi
descritti. Per maggiori dettagli a riguardo, rivolgersi al proprio gestore di rete telefonica.
1 CLIP: Calling Line Identification Presentation
2 VMWI: Visual Message Waiting Indication
13
Struttura di menu
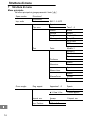
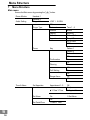
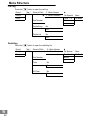
7 Struttura di menu
Menu principale 9
Nel menu principale si giunge premendo il tasto .
Spaz. monitor
Imp. audio
Ricevitore1
Ricevitore2
Vol. suoneria
Tipo suon.
Toni
BAS 1 − 6 ALTO
Spento
Esterno
Interno
Ricerca
Sveglia
Mus. appunt.
Tasto
Conferma
Attenzione
Attesa chiam.
AllarmePortat
Tono 1 − 4
Bolero
Mattino
Gugliel. Tell
Pomp&Circums.
Je Te Veux
ABC
Modello 1
Modello 2
Modello 3
Spento
Acceso
Spento
Acceso
Spento
Acceso
Spento
Acceso
Spento
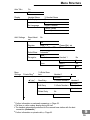
10
Ora e sveglia
Reg. appunt.
Appuntam.1 − 5
Data Ora
Impost. sve.
Imp. Data/ora
14
Acceso
Spento
Data Ora
Spento
Acceso Nome appunt.
Impost. sve.
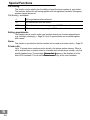
Struttura di menu
11
Risp. Auto.1
Acceso
Spento
Display
Nome ricevit.
Display conv. 2
Nome ricevit.
Ora
Numero
Inglese/ Tedesco
Francese / Italiano
Olandese / Spagnolo
Sel. Lingua
12
Impost avanz.
Reset ricev.
Registro
Selez. base
Elim. regist
No
Sì
Base 1 − 4
Imm. PIN base
Automatico 3
Base ...
Ricevitore
Ricevitore1
Ricevitore ...
Base 1
Base ...
Base
Impost.
base
Suon. privat 4
Attendere... Attendere...
<Immett. Nr.>
Ricevitore1
Nuova voce
Ricevitore ...
<Immett. Nr.>
Modifica voce
<Immett. Nr.>
Elimina voce
No
Sì
No
Sì
No
Sì
Ricevitore1
Ricevitore ...
Ricevitore1
Ricevitore ...
1 Ulteriori informazioni riguardo l’accettazione automatica di chiamata pagina 19.
2 Autonomia di conversazione o visualizzazione del numero di chiamata durante la
chiamata.
3 L’unità portatile individua automaticamente la stazione base più vicina con la mig-
liore possibilità di collegamento (Selezione automatica).
4 Ulteriori informazioni riguardo le chiamate personali pagina 20.
15
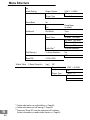
Struttura di menu
13
Imp. audio
Vol. suoneria
Tipo suon.
Reset base
No
Reset base
predefinite
Sì
Supplementare
BAS 1 − 6 ALTO
Spento
Tono 1 − 9
Modal. Chiam.
Ora richiam.
Chiam. pref. 1
Blocco chiam. 2
<Immett. Nr.>
PIN base
PIN : 0000
Tono
Impulsi
80 msec, 100 msec,
120 msec, 180 msec,
250 msec, 300 msec,
600 msec, 800 msec
<Immett. Nr.>
Acceso
Spento
14
Walkie Talkie
Imm. ID gruppo 3
Spento
Vol. suoneria
Tipo suon.
BAS 1 − 6 ALTO
Spento
Tono 1 − 4
Bolero
...
1 Ulteriori informazioni riguardo il prefisso pagina 19.
2 Ulteriori informazioni riguardo il blocco di chiamata pagina 20.
3 Presso tutte le unità portatili è necessario inserire lo stesso ID di gruppo. Ulteriori
informazioni riguardo i walkie−talkie pagina 19.
16
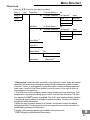
Struttura di menu
Rubrica telefonica 15
Nella rubrica telefonica si giunge premendo il tasto .
Voce 1
Voce 2
Voce ...
Nuova voce
Immetti nome 1
<Immett. Nr.>
Modifica voce Immetti nome 1
<Immett. Nr.>
Non speciale 2
Tono 1 − 4
Bolero
...
Non speciale 2
Tono 1 − 4
Bolero
...
Salva
Indietro
Salva
Indietro
Copia voce 3
Copia tutto 3
Elimina voce
No
Sì
Informazioni
... Mem. disp.4
1 Inserire testo: I tasti numerici riportano altresì delle lettere. Premendo ripetutamente il relativo tasto, si ha modo di selezionare lettere, cifre e caratteri speciali. Con
il tasto 1 è possibile inserire degli spazi vuoti.Con il tasto asterisco si ha modo di passare dalle lettere maiuscole a quelle minuscole e viceversa. Spostare il cursore a
destra con il tasto di scorrimento in basso per poter inserire lettere riportate sullo
stesso tasto.
2 Possibilità di assegnare una determinata melodia di suoneria ad una voce dell’elenco telefonico. In presenza di una chiamata da parte di un determinato interlocutore
l’unità portatile risponde con la melodia di suoneria impostata. Per questa funzione è
necessaria la visualizzazione del numero di chiamata (CLIP5). La visualizzazione del
numero di chiamata è un servizio opzionale offerto dal proprio gestore di rete telefonica. Si consiglia di rivolgersi al proprio gestore di rete telefonica per ricevere ulteriori
informazioni a riguardo.
3 Non appena la procedura di copia è stata avviata presso una unità portatile, l’unità
portatile selezionata per il trasferimento squilla. Le voci dell’elenco telefonico sono
copiate non appena viene instaurato un collegamento con il tasto di chiamata.
4 Visualizzazione delle posizioni di memoria libere nella rubrica telefonica.
5 CLIP: Calling Line Identification Presentation
17
Struttura di menu
Elenco chiamate
Nell’elenco chiamate si giunge premendo il tasto .
Voce 1
Voce 2
Voce ...
Memorizza
Immetti nome
<Immett. Nr.>
Usa numero
Elimina voce
No
Sì
Elimina elen.
No
Sì
Non speciale
Tono 1 − 4
Bolero
...
Salva
Indietro
Ripetizione di selezione
Nell’elenco di ripetizione di chiamata si giunge premendo il tasto .
Voce 1
Voce 2
Voce ...
Memorizza
Immetti nome
<Immett. Nr.>
Usa numero
18
Cancella
No
Sì
Cancellato
No
Sì
Non speciale
Tono 1 − 4
Bolero
...
Salva
Indietro
Funzioni speciali
8 Funzioni speciali
Ricezione automatica di chiamate
L’attivazione di questa funzione consente di ricevere automaticamente una chiamata
estraendo semplicemente l’unità portatile dalla stazione base. pagina 15
Procedura di selezione
Il telefono è in grado di operare sia con impianti di commutazione interni analogici (procedura di selezione a impulsi) sia con impianti telefonici digitali (procedura di selezione
a toni). pagina 16
Selezione a frequenza temporanea
Qualora fosse possibile utilizzare il telefono soltanto con la procedura di selezione a
impulsi, non sarà necessario rinunciare ai vantaggi della procedura di selezione a toni
(per es. interrogazione della segreteria telefonica dalla rete telefonica). Durante una
chiamata in corso è infatti possibile passare temporaneamente alla procedura di selezione a frequenza.
3 sec Tenere premuto con chiamata in corso per la durata
indicata
Alla fine della telefonata il telefono ritorna di nuovo automaticamente alla procedura di
selezione a impulsi.
Sorveglianza di uno spazio interno
Questa funzione è disponibile in presenza di due unità portatili del tipo DC50.
Instaurare attraverso il sottomenu Spaz. monitor" un collegamento con un’altra unità
portatile e posizionare l’unità portatile nello spazio interno che si desidera sorvegliare.
Accettare la chiamata con l’altra unità portatile. A questo punto è possibile sorvegliare lo
spazio interno fintanto che il collegamento tra i due apparecchi rimane attivo.
Walkie−talkie 16
Questa funzione è disponibile in presenza di due unità portatili (UP1, UP2, ...) del tipo
DC50.
Per poter operare la funzione è necessario impostare la funzione presso tutte le unità
portatili che vi desiderano partecipare pagina16. Con questa funzione tutte le unità
portatili operano indipendentemente dalla stazione base. Durante l’uso della funzione
non sarà possibile ricevere o compiere telefonate esterne presso le unità portatili.
per es.: UP 1: Chiamare le unità portatili
per es.: UP 2: Accettare la chiamata
UP 1/UP 2: Concludere la chiamata
Call by call 17
Con questa funzione è possibile impostare un numero selezionato automaticamente e
preposto al numero di chiamata vero e proprio. Questa funzione trova particolare applicazione in presenza di numeri cosiddetti call by call.
È consentito memorizzare un numero di call by call composto da fino a 24 cifre. Il numero di call by call preselezionato automaticamente non è visualizzato sul display davanti al numero di chiamata composto.
Premendo prima il tasto di chiamata per ottenere un segnale di libero ed inserendo
quindi un numero di chiamata, il numero di call by call precedentemente memorizzato è
preselezionato automaticamente.
19
Funzioni speciali
Blocco di chiamata 18
La funzione consente di bloccare numeri di chiamata o numeri di prefisso. Il blocco di
chiamata inserito vale per tutte le unità portatili registrate. Non è invece possibile bloccare i numeri di chiamata d’emergenza.
Blocco di chiamata − Esempi
0
Tutte le chiamate interurbane sono bloccate.
00
Tutte le chiamate con l’estero sono bloccate.
017
È bloccata la selezione di numeri cellulari che iniziano con 017".
019
Sono bloccati numeri di chiamata che iniziano con 019".
Impostare un appuntamento
Con questa funzione è possibile farsi avvisare dalla propria unità portatile sulla presenza di un appuntamento (per es.: compleanni, riunioni) pagina 14. È possibile memorizzare 5 appuntamenti con rispettivi nomi.
Allarme
Con la funzione è possibile farsi svegliare dalla propria unità portatile all’orario precedentemente impostato. pagina 14
Chiamata personale 19
La memoria offre la possibilità di salvare in tutto 10 numeri di chiamata personali.
Avendo memorizzato presso un’unità portatile un numero di chiamata personale, non
appena giunge una telefonata da parte del numero di chiamata in questione, squillerà
solo la rispettiva l’unità portatile. Su tutte le altre unità portatili DC50 è indicato il messaggio Chiam. priv. . Ciò nonostante è possibile accettare la chiamata presso una
qualsiasi unità portatile.
20
Ampliare il sistema telefonico
9 Ampliare il sistema telefonico
La funzione standard internazionale GAP1 Standard regola la compatibilità di unità portatili e stazioni base di costruttori diversi. Ciò consente di integrare apparecchi SWITEL
e apparecchi di altri costruttori all’interno di un unico sistema telefonico. Può comunque
anche verificarsi la mancata disponibilità di alcune funzioni.
Maggior numero di unità portatili
È possibile registrare complessivamente fino a 6 unità portatili presso la propria stazione base.
Registrazione di unità portatili
Prima di compiere la procedura di registrazione di un’unità portatile, passare con la rispettiva stazione base alla modalità di registrazione.
3 sec Avviare la modalità di registrazione
Procedere a questo punto con la procedura di selezione presso la propria unità portatile
pagina 15. Utilizzare per la selezione il codice PIN attualmente impostato pagina
16.
Una volta eseguita la selezione, all’unità portatile è assegnato un numero di chiamata
interno. Questo numero di chiamata interno è visualizzato sul display.
Per registrare unità portatili di altri costruttori, leggere prima le rispettive istruzioni per l’uso.
Deselezione di unità portatili
La deselezione di un’unità portatile da una stazione base è possibile solo con
un’altra unità portatile registrata presso la stessa stazione base.
Maggior numero di stazioni base
È possibile registrare unità portatili contemporaneamente presso 4stazioni base differenti. Ogni stazione base necessita di una propria presa telefonica. Si può trattare di allacciamenti con lo stesso o differente numero di chiamata.
Per chiamate in corso non è invece possibile compiere un trasferimento da una
stazione base all’altra.
Aumento della portata
Posizionare le stazioni base in modo da ottenere un’intersecazione della portata delle
singole stazioni base. Provare la portata dell’unità portatile visto che eventuali ostacoli
presenti negli edifici possono limitare la portata. Registrare quindi l’unità portatile presso
tutte le stazioni base. Passare alla funzione di selezione automatica per le stazioni
base pagina 15. L’unità portatile cerca automaticamente la stazione base più vicina
per instaurare il miglior collegamento possibile.
Mobilità grazie a luoghi di ubicazione differenti
Registrare l’unità portatile presso le stazioni base presenti in ubicazioni differenti. Passare alla funzione di selezione automatica per le stazioni base pagina 15. Indipendentemente dal luogo in cui ci si trova, l’unità portatile cercherà sempre automaticamente la stazione base più vicina con la portata migliore.
1 GAP: Generic Access Profile = Standard per l’interazione di unità portatili con sta-
zioni base di altri costruttori.
21
In presenza di problemi
10 In presenza di problemi
In presenza di problemi con il telefono, seguire le indicazioni riportate qui di seguito. In
caso di reclami entro il periodo di garanzia, rivolgersi al rivenditore autorizzato.
Domande e risposte
Domande
Non è possibile collegarsi alla
stazione base.
Risposte
− Verificare se la registrazione alla stazione base
è stata eseguita con il codice PIN corretto. pagina 15
Non è possibile condurre una
chiamata telefonica
− La linea telefonica non è collegata correttamente oppure presenta un guasto. Utilizzare
esclusivamente il cavo di collegamento telefonico fornito.
− Provare con un altro telefono se l’allacciamento
telefonico in questione è funzionante.
− L’alimentatore di rete non è inserito oppure si è
in presenza di una caduta di tensione totale.
− Le batterie ricaricabili sono scariche o difettose.
− La distanza dalla stazione base è troppo
grande.
− Il numero di chiamata è stato bloccato (blocco
chiamate) pagina 20
Collegamento disturbato, si interrompe.
− La distanza dalla stazione base è troppo
grande.
− Luogo di installazione della stazione base errato.
− Estrarre brevemente l’alimentatore di rete dalla
presa di corrente.
− Ripristinare la configurazione iniziale. pagina 23
− Le batterie ricaricabili sono difettose.
− Riporre l’unità portatile correttamente nella stazione base. Pulire le superfici di contatto di
unità portatile e stazione base con un panno
morbido e asciutto.
− Posizionare l’unità portatile per la durata di 14
ore nella stazione base.
Il sistema non reagisce più.
Le batterie ricaricabili si scaricano piuttosto subito.
La visualizzazione del numero di − La visualizzazione del numero di chiamata è un
chiamata (CLIP1) non funziona
servizio opzionale offerto dal proprio gestore di
rete telefonica. Per maggiori dettagli a riguardo,
rivolgersi al proprio gestore di rete telefonica.
− Il chiamante ha disattivato la trasmissione del
proprio numero di chiamata.
1 CLIP: Calling Line Identification Presentation
22
Specifiche tecniche
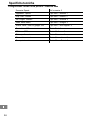
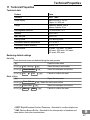
11 Specifiche tecniche
Specifiche tecniche
Caratteristica
Valore
Standard
DECT1−GAP2
Alimentazione elettrica
Ingresso: 220/230 V, 50 Hz
Uscita: 6 V, 400 mA
Portata
in campo aperto: ca. 300 m
in ambienti interni: ca. 50 m
Batterie ricaricabili
2 x AAA Ni−MH 1,2 V
Autonomia di stand−by
fino a 125 ore
Autonomia di chiamata
fino a 13 ore
Procedura di selezione
Procedura di selezione a toni
Temperatura ambiente consentita
10°C fino 30°C
Umidità atmosferica relativa consentita
da 20% a 75%
Funzione flash
80 msec, 100 msec, 120 msec,
180 msec, 250 msec, 300 msec,
600 msec, 800 msec
Ripristinare la configurazione iniziale 20
Unità portatile
In caso di reset le voci della rubrica telefonica non sono cancellate.
Aprire il menu principale
o Impost avanz. , o Reset ricev.
o No
,
oppure Sì , Selezionare e confermare il menu
Selezionare e confermare il sottomenu
Interrompere o confermare il reset
Stazione base
Aprire il menu principale
o Impost. base
o Reset base
o No
,
,
oppure Sì , Selezionare e confermare il menu
Selezionare e confermare il sottomenu
Interrompere o confermare il reset
1 DECT: Digital European Cordless Telephone = Standard per telefoni senza cavo.
2 GAP: Generic Access Profile = Standard per l’interazione di unità portatili con sta-
zioni base di altri costruttori.
23
Specifiche tecniche
Configurazione iniziale unità portatile / stazione base
24
Suoneria: Spento
Vol. suoneria: 3
Appuntam.: Spento
Tipo suon. > Esterno: 1
Risp. Auto.: Acceso
Tipo suon. > Interno: 2
Sel. Lingua: Tedesco
Tipo suon. > Ricerca: 3
Selez. base: Base 1
Tipo suon. > Sveglia: 3
Walkie Talkie > Imm. ID gruppo: 000
Tipo suon. > Mus. appunt.: 3
Ora richiam.: 100 msec
Toni > Tasto: 1
PIN base: 0000
Toni > Conferma: Acceso
Chiam. pref.: vuoto
Toni > Attenzione: Acceso
Blocco chiam.: vuoto
Toni > Attesa chiam.: Acceso
Suon. privat: vuoto
Toni > AllarmePortat: Acceso
Consigli per la cura / Garanzia
12 Consigli per la cura / Garanzia
Consigli per la cura
Pulire le superfici degli apparecchi con un panno morbido e antipilling.
Non utilizzare mai detergenti o solventi.
Garanzia
Gli apparecchi SWITEL sono costruiti e collaudati in osservanza dei processi di produzione più moderni. L’impiego di materiali selezionati e tecnologie altamente sviluppate
sono garanti di una perfetta funzionalità e lunga durata in vita. La garanzia non viene
considerata esecutiva qualora la causa del malfunzionamento dell’apparecchio è dovuta al gestore della rete telefonica oppure se questa è da attribuirsi ad un impianto telefonico interno interposto. La garanzia non si estende a batterie o accumulatori ricaricabili utilizzati all’interno degli apparecchi. Il periodo di garanzia è di 24 mesi a partire
dalla data di acquisto.
Entro il periodo di garanzia sarà eliminato gratuitamente qualsiasi guasto relativo a difetti di materiale o di produzione. La garanzia rilasciata cessa in caso di intervento da
parte dell’acquirente o di terze persone. La presente garanzia non ricopre danni dovuti
all’uso o all’esercizio non conformi a quanto previsto, a montaggio o conservazione errati, a collegamento o installazione impropri così come a forza maggiore o a qualsiasi
altro influsso esterno. Con riserva di apportare modifiche di miglioria, sostituire le parti
difettose oppure cambiare l’apparecchio completo in caso di reclami. Parti o apparecchi
sostituiti passano di nostra proprietà. Sono esclusi diritti di risarcimento per danni qualora non siano dovuti a intenzione o colpa grave del produttore.
Nel caso in cui il presente apparecchio dovesse ciò nonostante presentare un difetto
durante il periodo di garanzia, si prega di rivolgersi esclusivamente al negozio di rivendita dell’apparecchio SWITEL assieme al relativo scontrino di acquisto.In base a quanto
riportato nelle presenti disposizioni, tutti i diritti di garanzia dovranno essere rivendicati
nei confronti del rivenditore autorizzato. Decorso il termine di due anni dalla data di acquisto e consegna dei nostri prodotti non sarà più possibile fare valere alcun diritto di
garanzia.
25
Indice alfabetico
13 Indice alfabetico
A
Allarme, 20
Ampliare il sistema
telefonico, 21
Attivare e disattivare l’unità portatile, 6
Aumento della portata, 21
B
Bloccare numeri di
chiamata, 20
Blocco di chiamata, 20
Blocco tastiera, 12
C
call by call, 19
Caricare le batterie, 5
Chiamata personale, 20
Collegare la stazione base, 5
Come funziona il mio
telefono?, 8
Compiere chiamate a conferenza, 11
Compiere chiamate interne, 10
Compiere telefonate, 10
Concludere una chiamata, 10
Condurre chiamate interne, 10
Consigli per la cura, 25
Contenuto della confezione, 5
Creare voci nella rubrica telefonica, 9
D
Deselezione di unità
portatili, 21
Domande e risposte, 22
Durata di conversazione, 11
E
Elementi di comando, 7
Elenco chiamate, 18
F
Funzione vivavoce, 12
Funzioni speciali, 19
G
Garanzia, 25
26
I
Impegno, 20
Impianti telefonici interni, 13
Impostare data e ora, 14
Impostare il suono, 11
Indicazioni di sicurezza, 4
Inoltro interno di chiamate
esterne, 11
Inserire le batterie ricaricabili, 5
Inserire testo, 17
M
Maggior numero di stazioni
base, 21
Maggior numero di unità portatili, 21
Menu principale, 14
Mettere in funzione il
telefono, 5
Mobilità, 21
Modi di scrittura, 8
P
Paging, 12
Pausa di selezione, 13
Preselezione, 19
Procedura di selezione, 19
R
Rappresentazioni, 8
Registrazione di unità
portatili, 21
Ricerca dell’unità portatile, 12
Ricevere una chiamata, 10
Ricezione automatica di chiamate, 19
Ripetizione di selezione, 10, 18
Ripristinare la configurazione
iniziale, 23
Ripristino, 23
Riselezionare chiamate ricevute, 10
Rubrica telefonica, 17
S
Segreteria telefonica integrata
nella rete telefonica, 13
Selezionare numeri dalla rubrica telefonica, 10
Selezione a frequenza temporanea, 19
Selezione automatica, 15, 21
Servizi addizionali, 13
Silenziamento del
microfono, 11
Simboli sul display, 8
Sorveglianza di uno spazio interno, 19
Specifiche tecniche, 23
Stato di carica delle batterie, 5
Struttura di menu, 14
Sveglia, 20
T
Tasto R e servizi addizionali, 13
Tasto R in impianti telefonici interni, 13
Telefonare, 10
V
Visualizzazione del numero di
chiamata, 13
VMWI, 13
Volume del ricevitore, 11
W
Walkie−talkie, 19
21
Contents
1
2
3
4
5
6
7
8
9
10
11
12
13
Safety Information . . . . . . . . . . . . . . . . . . . . . . . .
Putting the Telephone into Operation . . . . . . . . . . .
Operating Elements . . . . . . . . . . . . . . . . . . . . . . .
How to Operate the Telephone . . . . . . . . . . . . . . .
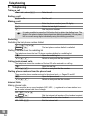
Telephoning . . . . . . . . . . . . . . . . . . . . . . . . . . . .
PBX / Supplementary Services . . . . . . . . . . . . . . .
Menu Structure . . . . . . . . . . . . . . . . . . . . . . . . . .
Special Functions . . . . . . . . . . . . . . . . . . . . . . . .
Expanding the Telephone System . . . . . . . . . . . . .
In Case of Problems . . . . . . . . . . . . . . . . . . . . . .
Technical Properties . . . . . . . . . . . . . . . . . . . . . .
Maintenance / Guarantee . . . . . . . . . . . . . . . . . . .
Index . . . . . . . . . . . . . . . . . . . . . . . . . . . . . . . . .
28
29
31
32
34
37
38
43
45
46
47
49
50
27
Safety Information
1 Safety Information
Please read this operating instruction manual thoroughly.
Intended use
The telephone is suitable for telephoning within a public telephone network system. Any
other use is considered unintended use. Unauthorised modification or reconstruction is
not permitted. Under no circumstances open the device or complete any repair work
yourself.
Installation location
Prevent excessive exposure to smoke, dust, vibration, chemicals, moisture, heat and direct sunlight.
Do not use the handset in potentially explosive areas.
Power supply
Caution: Only use the power adapter plug supplied because other power supplies could damage the telephone. Ensure access to the power adapter plug
is not obstructed by furniture or such.
Rechargeable batteries
Caution: Do not throw batteries into a fire or immerse them in water.
Power failure
The telephone cannot be used to make calls in the event of a power failure. Always
keep a cord connected telephone which operates without an external power supply
available in case of emergency situations.
Medical equipment
Caution: Never use the telephone in the vicinity of medical equipment. Effects
on such equipment cannot be fully ruled out.
DECT1 telephones can cause an unpleasant humming sound in hearing aids.
Disposal
You are obliged to dispose of consumable goods according to legal requirements. The adjacent symbol on the telephone indicates that electrical and electronic apparatus and batteries no longer required must be disposed of separate
from domestic waste.
Electrical and electronic devices must be disposed of at suitable collection
points provided by the public waste authorities.
Batteries must be disposed of at the point of sale or at appropriate collection
points provided by the public waste authorities.
Packaging materials must be disposed of according to local regulations.
1 DECT: Digital Enhanced Cordless Telephone = Standard for cordless telephones.
28
Putting the Telephone into Operation
2 Putting the Telephone into Operation
Safety information
Caution: It is essential to read the Safety Information in Chapter 1 before
starting up.
Checking the contents of the package
The package contains:
− a base station with power adapter plug
− a telephone connection cable
− a handset
− two rechargeable batteries
− an operating manual
Connecting the base station
Caution: Position the base station at least 1 m away from other electronic
devices, otherwise there is a risk of mutual disturbance.
Connect the base station as illustrated in the diagram. For reasons of safety, only use
the power adapter plug supplied and telephone connection line enclosed.
Telephone line socket
Mains power outlet
Inserting the rechargeable batteries
Insert the rechargeable batteries in the
open battery compartment. Only use batteries of the type AAA Ni−MH 1.2 V. Pay attention to correct polarity. Close the battery
compartment cover.
Charging the batteries 22
Before the handset is used for the first time, insert it in the base station/charging station
for at least 16 hours. When the handset is inserted in the base station/charging station
properly, the charge control lamp lights up. The handset warms up during the charging
process. This is normal and does not represent a risk. Do not charge the handset with
charging units from other manufacturers. The current battery charge status is indicated on the display:
Full
Half empty
Low
Empty
29
Putting the Telephone into Operation
Switching the handset on and off
The handset can be switched on and off in order to save the battery power.
2 sec Switch the handset off
Switch the handset on
Setting the date and time
The information on Page 38 explains how to set the date and time on the handset when
starting it up for the first time.
Private branch exchanges
The information on Page 37 explains how to install your telephone in a private branch
exchange.
30
Operating Elements
3 Operating Elements
Handset
1
2
3
4
5
6
Menu button / OK button
Scroll upwards / Redialling list
End call / Switch handset on/off
Scroll downwards / Phone book
Internal call
Call log / R button /
Initiate conference call
7 Hash key / Key lock
8 Star button / Temporary tone dialling
9 Handsfree
10 Take call
11 Delete / Back
11
10
9
1
2
3
4
5
6
8
7
Base station
1
2
LED, charging control lamp
Paging button (locate handset)
1
2
The buttons in this operating manual are depicted with a uniform contour. Variations in
the symbols on the telephone buttons compared to those depicted here are possible.
31
How to Operate the Telephone
4 How to Operate the Telephone
Display and notation of operation sequences
2 sec Press and hold Release Off
Enter digits or letters
Press the button depicted briefly
Press the button depicted for 2 seconds
Press and hold the button depicted
Release the button depicted
Handset rings
Base station rings
Remove the handset from the base station
Place the handset in the base station
Text or icon in the display
or
Icons in the display
Display
DC50
1
22:15 02/05
Description
Name of the telephone. Page 39
Internally assigned call number of the handset. Page 34
Display of the time and date. Page 38
On: Displays battery capacity.
Flashing: The batteries must be recharged.
Run−through segments: Batteries are being charged. Page 29
The ringing tone has been switched off. Page 38
Answering machine provided by the telephone network.
VMWI1 − Optional service provided by the telephone network provider.
Page 37
On: A call is currently being made.
Flashing: A call has been received. Page 34
Handsfree mode has been activated. Page 36
The microphone is switched off (muting). Page 35
On: The connection to the base station is good.
Flashing: The connection to the base station is not good. Move
towards the base station.
The key lock is activated. Page 36
The alarm is activated. Page 38
Walkie Talkie The Walkie Talkie" function is activated. Page 40
1 VMWI: Visual Message Waiting Indication
32
How to Operate the Telephone
Navigating in the menu
All the functions can be accessed via the various menus. Refer to the menu structure to
find how to access the respective functions. Page 38
Open the main menu
or Select the submenu required
Open the submenu
or Select the function required
Open the function
or Select the setting required
Enter digits or letters using the relevant digit keys
Confirm the input
Move one level back
Cancel programming and saving processes and
return to Standby mode
Every process is automatically cancelled if there is no input within 60 seconds.
Creating phone book entries − example 23
The way in which to navigate through the menus and enter data is explained by means
of the example Creating phone book entries. Proceed as in this example for all the
settings.
Open the phone book
, or New Entry , Select the function and confirm
<Enter Name>
,
<Enter Number> , Enter the name (max. 13 characters)
Enter the number (max. 24 characters)
33
Telephoning
5 Telephoning
Taking a call
, or Take the call
Ending a call
or End the call
Making a call
Enter the phone number (max. 24 digits)
Delete the last digit if incorrect
Dial the phone number
It is also possible to press the Call button first to obtain the dialling tone. The
digits in the phone number then entered are dialled immediately. It is not possible to correct wrong digits individually using this dialling procedure.
Redialling
Redialling the last phone number dialled
, , or Redial , The last phone number dialled is redialled
Dialling a number from the redialling list
The telephone stores the last 10 phone numbers dialled in a redialling list.
Open the redialling list
or , Select an entry and dial the number
Calling back missed calls
The telephone stores the numbers of the last 30 calls received in a call log.
Open the call log
or , Select an entry and dial the number
Dialling phone numbers from the phone book
There must be phone numbers stored in the phone book. Pages 33 and 41
Open the phone book
or , Select an entry and dial the number
Internal Calls 24
Making internal calls
There must be two or more handsets (HS1, HS2, ...) registered on a base station in order to make internal calls free of charge.
HS1: , or e.g. 2 , Dial the internal call number of the handset required
HS2: HS1 / HS2: 34
Take the call on the other handset
End the internal call
Telephoning
Transferring external calls internally
HS1: , or e.g. 2 , HS2: HS1: Dial the internal call number during the conversation
with the external caller
Take the call on the other handset
Forward the call
If the handset called does not answer, take the external call back by pressing
the button.
Conference calls
An external call can be transferred to another internal handset for a conference call.
HS1: , or Dial the internal call number during the
2
,
conversation with the external caller
e.g.
HS2: HS1: HS1 / HS2: Take the call on the other handset
Start the conference
The conference is terminated by one of the internal
handset users ending the call
Adjusting the receiver volume
The volume can be adjusted to one of 6 settings during a call.
or Select the required volume
Setting the tone
You can alter the tone of the caller’s voice during a call.
, or SoundEnhancer , Open the function
or e.g:
NORMAL , Select the required tone
Muting the microphone in the handset 25
The microphone in the handset can be activated and deactivated during a telephone
conversation.
, or Mute
,
Deactivate the microphone (muting function)
, or Unmute
,
Activate the microphone
35
Telephoning
Talk time display
The duration of a call is displayed in hours, minutes and seconds during the call.
Handsfree 26
Use this function to listen to the caller via the loudspeaker.
Activate handsfree mode
Deactivate handsfree mode
Key lock 27
Calls can still be taken in the normal way even when the key lock function is activated.
2 sec Activate the key lock function
2 sec Deactivate the key lock function
Searching for the handset (Paging)
If you have mislaid your handset, you can locate it with the aid of a search tone.
{«}
Start the search tone
or End the search tone
36
PBX / Supplementary Services
6 PBX / Supplementary Services
R button on private branch exchanges
If the telephone is connected to a private branch exchange, functions such as transferring calls and automatic call back can be used via the R button. Please refer to the operating manual supplied with your private branch exchange to determine which recall
(Flash) time must be set in order to use these functions. The dealer where you purchased the exchange can provide information as to whether the telephone will work properly with the exchange. Setting the recall time Page 40
Dialling pause
In the case of private branch exchanges, it is necessary to enter an access code to get
an outside line with its corresponding dialling tone. When using some older private
branch exchanges, it takes a little time before the dialling tone becomes audible. Particularly in the case of such private branch exchanges, it is possible to insert a dialling
pause after the number for the outside line so that the number can be dialled in a continuous process without having to wait for the dialling tone.
3 sec Insert dialling pause
After dialling the number for the outside line, the telephone waits a specific time before
dialling the actual phone number.
The pause can also be entered with the phone numbers in the phone book.
R button and supplementary services
Your telephone supports the supplementary services offered by your telephone network
provider, such as brokering, call waiting and conference calls. The supplementary services can be used in conjunction with the R button. Please contact your telephone network provider regarding which recall time must be set to use the supplementary services. Please contact the telephone network provider with regard to enabling the
supplementary services. Setting the recall time Page 40
Call number display (CLIP1)
If this function is available with your telephone line, the number of the caller appears in
the display when the phone rings. If the caller has suppressed transmission of his phone
number, a corresponding message appears in the display. The phone number is not displayed and, as a result, is not stored in the calls list.
The caller number display (CLIP) function is an optional service offered by telephone network providers. Contact your network provider for further information.
Answering machine in the telephone network 28
If your telephone network provider has an answering machine available for you in the telephone network, the (VMWI1) icon indicates a new message has been recorded for
you. The provision of an external answering machine and indication of new messages
via an icon are optional services from the telephone network provider. These functions
can only be used when your telephone network provider actually offers the service. Contact your network provider for further information.
1 CLIP: Calling Line Identification Presentation
2 VMWI: Visual Message Waiting Indication
37
Menu Structure
7 Menu Structure
Main menu 29
Access the Main menu by pressing the button.
Room Monitor
Audio Setting
Handset 1
Handset 2
Ringer Volume
Ringer Type
Tones
LOW 1 − 6 HIGH
Off
External
Internal
Paging
Alarm
Appointment
Key
Confirmation
Warning
Call Waiting
Range Alarm
Tone 1 − 4
Bolero
Morning
William Tell
Pomp&Circums.
Je Te Veux
ABC
Pattern 1
Pattern 2
Pattern 3
Off
On
Off
On
Off
On
Off
On
Off
30
Time & Alarm
Set Appointm.
Appointment1 − 5
Date Time
Set Alarm
Set Date&Time
38
On
Off
Date Time
Off
On Appoint Name:
Set Alarm
Menu Structure
31
Auto Talk1
On
Off
Display
Handset Name
Talk Display 2
Handset Name
Time
Number
English/ German
French / Italian
Dutch / Spanish
Sel Language
32
Add. Settings
Reset Handset
Register
Select Base
Deregister
No
Yes
Base 1 − 4
Enter Base PIN
Automatic 3
Base ...
Handset
Handset 1
Handset ...
Base 1
Base ...
Base
Base
Settings
Private Ring 4
<Enter Number>
Please Wait... Please Wait...
Handset 1
No
Yes
No
Yes
Handset ...
New Entry
<Enter Number>
Handset 1
Handset ...
Edit Entry
<Enter Number>
Handset 1
Handset ...
Delete Entry
No
Yes
1 Further information on automatic answering Page 43.
2 Call time or caller number display during the call.
3 The handset automatically searches for the nearest base station with the best
connection (Automatic).
4 Further information on private calls Page 44.
39
Menu Structure
33
Audio Setting
Ringer Volume
Ringer Type
Reset Base
No
Reset Base
to default
Yes
Additional
LOW 1 − 6 HIGH
Off
Tone 1 − 9
Dial Mode
Recall Time
Prefix Dial 1
Call Barring 2
<Enter Number>
Base PIN
PIN : 0000
Tone
Pulse
80 msec, 100 msec,
120 msec, 180 msec,
250 msec, 300 msec,
600 msec, 800 msec
<Enter Number>
On
Off
34
Walkie Talkie Enter Group Id 3
Off
Ringer Volume
Ringer Type
1 Further information on prefix dialling Page 43.
2 Further information on call barring Page 44.
3 The same "Group ID" must be entered on all handsets.
Further information on walkie−talkie function Page 43.
40
LOW 1 − 6 HIGH
Off
Tone 1 − 4
Bolero
...
Menu Structure
Phone book 35
Press the button to open the phone book.
Entry 1
Entry 2
Entry ...
New Entry
Edit Entry
<Enter Name> 1
<Enter Number>
<Enter Name> 1
<Enter Number>
No Special 2
Tone 1 − 4
Bolero
...
No Special 2
Tone 1 − 4
Bolero
...
Save
Go Back
Save
Go Back
Copy Entry 3
Copy All 3
Delete Entry
No
Yes
Information
... Mem Avail 4
1 Entering text: Letters are also imprinted on the digit keys. Letters, digits and special
characters are entered by pressing the relevant key the respective number of times.
Press the 1 button to enter spaces. Use the Star button to switch between upper and
lower case. Press the Scroll Down button to move the cursor to the right to enter letters assigned to the same key.
2 This function is used to assign a certain ringing melody to a phone book entry. Your
handset then rings with this melody when a call is received from this caller. This function requires the CLIP5 function is enabled. The CLIP (caller number display) function
is an optional service offered by telephone network providers. Contact your network
provider for further information.
3 When the copy process is started on a handset, the handset to which the data is
being copied rings. The phone book entries are copied as soon as the connection is
established by pressing the Call button.
4 Display of the memory capacity still available in the phone book.
5 CLIP: Calling Line Identification Presentation
41
Menu Structure
Call log
Press the button to open the call log.
Entry 1
Entry 2
Entry ...
Store to Phbk <Enter Name>
<Enter Number>
Use Number
Delete Entry
No
Yes
Delete List
No
Yes
No Special
Tone 1 − 4
Bolero
...
Save
Go Back
Redialling
Press the button to open the redialling list.
Entry 1
Entry 2
Entry ...
Store to Phbk
<Enter Name>
<Enter Number>
Use Number
42
Clear
No
Yes
All Clear
No
Yes
No Special
Tone 1 − 4
Bolero
...
Save
Go Back
Special Functions
8 Special Functions
Automatic answering
If this function is activated, an incoming call is taken when the handset is removed from
the base station. Page 39
Dialling mode
The telephone can be operated in new, digital exchanges (TONE) as well as analogue
exchanges (PULSE). Page 40
Temporary tone dialling
If you only operate the telephone using the PULSE dialling mode, you can still make use
of the advantages of TONE dialling mode (e.g.: remote access of the answering machine in the conventional telephone network). You can temporarily switch to Tone dialling when a connection has already been made.
3 sec Press the button during a call
When the call is ended, the equipment automatically switches back to Pulse dialling.
Room monitoring
This function can be used when two DC50 handsets are available for use.
Use the Room Monitor" submenu to dial a second handset and place the handset in the
room to be monitored. Take the call on the second handset. You can then monitor the
room as long as the connection remains established.
Walkie−Talkie 36
This function can be used when two DC50 handsets (HS 1, HS 2, ...) are available for
use.
The function must be activated on all the handsets participating in the facility,
Page 40. When this function is activated, the handsets operate independent of the
base station. No external calls can be made or taken by the handsets when this function
is being used.
E.g.: HS 1: Call the handset
E.g.: HS 2: Take the call
HS 1/HS 2: End the call
Prefix dialling 37
This function enables a specified number to be dialled automatically prior to the actual
phone number. This is mainly implemented when using call−by−call numbers.
A call−by−call prefix with up to 24 digits can be stored. The call−by−call number is automatically prefixed and is not displayed in addition to the selected phone number.
If you press the Call button first to obtain a dialling tone and then enter the phone number, the call−by−call number stored is also prefixed.
43
Special Functions
Call barring 38
This function can be used to bar the dialling of specific phone numbers or area codes.
The numbers defined for call barring applies to all the registered handsets. Emergency
numbers cannot be barred.
Call barring − examples
0
All long−distance calls are barred.
00
All international calls are barred.
017
All mobile phone numbers beginning with 017" are barred.
019
All phone numbers beginning with 019" are barred.
Setting appointments
The handset can be used to make your handset remind you of certain appointments
(e.g.: birthdays, meetings) Page 38. Up to 5 appointments can be stored together
with a name.
Alarm
This function is provided so that the handset can be used as an alarm clock, Page 38
Private calls 39
Up to 10 private phone numbers can be stored in the phone number memory. When a
call is received from a number stored in a handset as a private phone number, only that
specific handset rings. The message Private Call appears in the displays of all the
other DC50 handsets. The call can be taken, however, by all the other handsets.
44
Expanding the Telephone System
9 Expanding the Telephone System
The international GAP1 standard regulates the compatibility of handsets and base stations from different manufacturers. As a result, it is possible to integrate SWITEL devices
and devices from other manufacturers together in one telephone system. It is possible,
however, that some functions are not available.
Multiple handsets
Up to 6 handsets can be registered on the base station.
Registering handsets
Before starting with the registration process for a handset, switch the respective base
station to Registration mode.
3 sec Initiate Registration mode
Complete the registration process for your handset, Page 39. The currently valid PIN
code is used for registration purposes, Page 40.
The handset is automatically assigned an internal call number following registration.
The internal call number appears in the display.
To register handsets from other manufacturers, please refer to the operating
manual supplied with them.
Deregistering handsets
A handset can only be deregistered from a base station using another handset
registered to that base station.
Multiple base stations
Your handsets can be simultaneously registered on up to 4 different base stations. Each
base station requires its own telephone cable socket. Connections can be used with the
same call number or with different ones.
Calls in progress, however, cannot be transferred from one base station to another.
Increasing the range
Position the base stations so that the ranges of the individual base stations overlap. Test
the range of your handsets because obstructions in buildings restrict the range. Register
the handset on all the base stations. Activate the Automatic selection of base station
Page 39. The handset then automatically searches for the nearest base station with
the best connection.
Mobility through registration at various locations
Register the handset on base stations at various locations. Activate the Automatic selection of base station, Page 39. Regardless of your current location, the handset automatically searches for a base station within range.
1 GAP: Generic Access Profile = Standard for the interoperation of handsets and
base stations from other manufacturers.
45
In Case of Problems
10 In Case of Problems
Should problems arise with the telephone, please refer to the following information first.
In the case of claims under the terms of guarantee, contact your sales outlet.
Problems and solutions
Problems
No connection to base station
possible
Solutions
− Check that the handset has been registered on
the base station with the correct PIN code. Page 39
No telephone calls possible
− The telephone line is not connected properly or
is defective. Only use the telephone connection
cable supplied.
− Test whether the telephone connection is in order by using another telephone.
− The power adaptor plug is not plugged in or
there is a complete power failure.
− The rechargeable batteries are empty or defective.
− The handset is too far from the base station.
− The phone number has been barred (call barring) Page 44
Connection is disturbed or cut off − The handset is too far from the base station.
− The base station is in an unsuitable location.
The system no longer responds
− Disconnect the power adapter plug briefly from
the power socket.
− Reset the default settings. Page 47
The batteries are empty in a
short time
− The batteries are defect.
− Place the handset in the base station properly.
Clean the contact surfaces on the handset and
base station with a soft, dry cloth.
− Place the handset in the base station for 14
hours.
The CLIP 1 function does not
work
− The CLIP (caller number display) function is an
optional service offered by telephone network
providers. Contact your network provider for
further information.
− The caller has suppressed the transmission of
their phone number.
1 CLIP: Calling Line Identification Presentation
46
Technical Properties
11 Technical Properties
Technical data
Feature
Value
Standard
DECT1−GAP2
Power supply
Input: 220/230 V, 50 Hz
Output: 6 V, 400 mA
Range
Outdoors: Approx. 300 m
Indoors: Approx. 50 m
Rechargeable batteries
2 x AAA Ni−MH 1.2 V
Standby
Up to 125 h
Max. talk time
Up to 13 h
Dialling mode
Tone dialling mode
Permissible ambient temperature
10°C to 30°C
Permissible relative humidity
20% to 75%
Flash function
80 msec, 100 msec, 120 msec,
180 msec, 250 msec, 300 msec,
600 msec, 800 msec
Restoring default settings 40
Handset
Phone book entries are not deleted during the reset process.
Open the main menu
or Add. Settings , Select the menu and confirm
or Reset Handset , Select the submenu and confirm
or No
Cancel or confirm the reset
or Yes
,
Base station
Open the main menu
or Base Settings , Select the menu and confirm
or Reset Base , Select the submenu and confirm
or No
Cancel or confirm the reset
or Yes , 1 DECT: Digital European Cordless Telephone = Standard for cordless telephones.
2 GAP: Generic Access Profile = Standard for the interoperation of handsets and
base stations from other manufacturers.
47
Technical Properties
Default settings, handset/base station
48
Alarm: Off
Ringer Volume: 3
Appointment: Off
Ringer Type > External: 1
Auto Talk: On
Ringer Type > Internal: 2
Sel Language: German
Ringer Type > Paging: 3
Select Base: Base 1
Ringer Type > Alarm: 3
Walkie Talkie > Enter Group Id: 000
Ringer Type > Appointment: 3
Recall Time: 100 msec
Tones > Key: 1
Base PIN: 0000
Tones > Confirmation: On
Prefix Dial: Empty
Tones > Warning: On
Call Barring: Empty
Tones > Call Waiting: On
Private Ring: Empty
Tones > Range Alarm: On
Maintenance / Guarantee
12 Maintenance / Guarantee
Maintenance
Clean the housing surfaces with a soft, fluff−free cloth.
Never use cleaning agents or solvents.
Guarantee
SWITEL equipment is produced and tested according to the latest production methods.
The implementation of carefully chosen materials and highly developed technologies
ensure trouble−free functioning and a long service life. The terms of guarantee do not
apply where the cause of equipment malfunction is the fault of the telephone network
operator or any interposed private branch extension system. The terms of guarantee do
not apply to the batteries or power packs used in the products. The period of guarantee
is 24 months from the date of purchase.
All deficiencies resulting from material or production faults which occur during the period
of guarantee will be eliminated free of charge. Rights to claims under the terms of guarantee are annulled following intervention by the purchaser or third parties. Damage
caused as a result of improper handling or operation, incorrect positioning or storing, improper connection or installation, Acts of God or other external influence are not covered
by the terms of guarantee. In the case of complaints, we reserve the right to repair or replace defect parts or provide a replacement device. Replacement parts or devices become our property. Rights to compensation in the case of damage are excluded where
there is no evidence of intent or gross negligence by the manufacturer.
If your equipment shows signs of defect during the period of guarantee, please return it
to the sales outlet in which you purchased the SWITEL equipment together with the purchase receipt. All rights to claims under the terms of guarantee in accordance with this
agreement must be asserted exclusively with regard to your sales outlet. Two years after
the purchase and transfer of our products, claims under the terms of guarantee can no
longer be asserted.
49
Index
13 Index
A
Alarm, 44
Answering machine in the telephone network, 37
Appointments, 44
Automatic answering, 43
Automatic base selection, 39
Automatic selection, 45
B
Battery charge status, 29
C
Call barring, 44
Call number display, 37
Call−by−Call, 43
Calling back missed calls, 34
Calls list, 42
Charging the batteries, 29
Conference calls, 35
Connecting the base
station, 29
Creating phone book
entries, 33
D
Deregistering handsets, 45
Dialling mode, 43
Dialling pause, 37
Dialling phone numbers from
the phone book, 34
E
Ending a call, 34
Entering text, 41
Expanding the telephone system, 45
Explanations, 32
G
Guarantee, 49
H
Handsfree, 36
How to operate the
telephone, 32
I
Icons in the display, 32
Increasing the range, 45
Inserting the batteries, 29
Internal calls, 34
K
Key lock, 36
50
M
Main menu, 38
Maintenance , 49
Making a call, 34
Making internal calls, 34
Menu Structure, 38
Mobility, 45
Multiple base stations, 45
Multiple handsets , 45
Muting the microphone, 35
N
Notation, 32
O
Operating elements, 31
P
Package contents, 29
Paging, 36
Phone book, 41
Prefix dialling, 43
Private branch exchanges, 37
Private calls, 44
Problems and solutions, 46
Putting the telephone into operation, 29
R
R button and supplementary
services, 37
R button on private branch exchanges, 37
Receiver volume, 35
Redialling, 34, 42
Registering handsets, 45
Reset, 47
Restoring default settings, 47
Room monitoring, 43
S
Safety information, 28
Searching for the handset, 36
Setting the date and time, 38
Setting the tone, 35
Special functions, 43
Supplementary services, 37
Switching the handset on and
off , 30
T
Taking a call, 34
Talk time, 36
Technical data, 47
Telephoning, 34
Temporary tone dialling, 43
Transferring external calls internally, 35
V
VMWI, 37
W
Walkie−talkie, 43
Index
51
Declaration of conformity 41
WE
TELGO AG
OF
Route d’Englisberg 17
CH−1763 Granges−Paccot
Declare under our own responsibility that the product
MODEL:
DC50
DESCRIPTION:
Cordless DECT telephone
Is in conformity with directives: R&TTE Directive (1999/5/EC)
COMPLIANCE IS ACHIEVED BY CONFORMITY TO THE FOLLOWING:
EN301 406 v.1.4.1; EN301 489−6; EN60950 : 2001; EN 50 360−61; TBR10;
TBR21 (EN301 437); TBR22; TBR 38; CLIP Test (Country Variant);
EG 201 121 −Interface Test (Country Variant)
AUTHORISED BY:
________________________
Signed:
Name (printed):
Selim Dusi
Position in company:
Managing Director
Date of issue:
02.11.2005
Copies of this document will be held on file for a period of 10 years after the last production.
Supplier:
TELGO AG, Route d’Englisberg 17
CH−1763 Granges−Paccot
Product:
DC50
This product is intended for connection to analogue PSTN lines within Switzerland.
However, due to differences between the individual PSTNs provided in the different countries,
the approval does not, of itself, give an unconditional assurance of successful operation on
every PSTN network termination point.
UCZZ21863VZ(0)
Version 2.0 − 17.03.2006
Printed in China