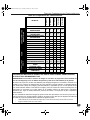
1
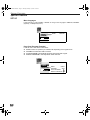
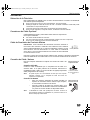
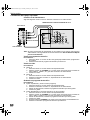
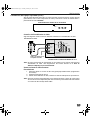
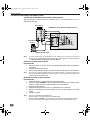
For assistance, please call: 1-888-VIEW-PTV or send e-mail to: [email protected] TQB2AA0382 10112 PRINTED IN MEXICO ® Sistema de proyección de vídeo a color Instrucciones de Operación PT-51G36 PT-M5131V PT-M5131X PT-61D31V PT-61D31X PT-51G36 PT-M5131V PT-M5131X PT-61D31V PT-61D31X Color Video Projection System Operating Instructions ® Para asistencia llame al teléfono: 1-888-VIEW-PTV o envíe un correo electrónico a la dirección: [email protected] TQB2AA0382 10116 IMPRESO EN MEXICO 0382E.PROD NEW.fm Page 1 Tuesday, February 27, 2001 2:16 PM :$51,1* 7R PRYH VHW SXVK IURP OHIW VLGH RI VHW &DVWHUV RQ ULJKW VLGH GR QRW SLYRW LQ DOO GLUHFWLRQV 6HW FDQ WLS RYHU LI PRYHG IURP ULJKW VLGH ZLWK ULVN RI SHUVRQDO LQMXU\ $'9(57(1&,$ 3DUD PRYHU HO FRQMXQWR HPSXMH GHVGH HO ODGR L]TXLHUGR GHO PLVPR /RV URODQDV GH OD GHUHFKD QR VRQ SLYRWDQWHV HQ WRGDV ODV GLUHFFLRQHV (O FRQMXQWR VH SXHGH WXPEDU VL VH OR PXHYH GHVGH HO ODGR GHUHFKR FRUULHQGR DVt HO ULHVJR GH VXIULU GDxRV SHUVRQDOHV 0LVH HQ JDUGH /RUV GX GpSODFHPHQW GX WpOpYLVHXU OH SRXVHU VXU VRQ F{Wp JDXFKH /HV URXOHWWHV GX F{Wp GURLW QH SRXYDQW WRXUQHU GDQV WRXWHV OHV GLUHFWLRQV O·DSSDUHLO SRXUUDLW WRPEHU V·LO HVW SRXVVp GH FH F{Wp HW FDXVHU DLQVL GHV ULVTXHV GH EOHVVXUH WARNING RISK OF ELECTRIC SHOCK DO NOT OPEN WARNING: To reduce the risk of electric shock do not remove cover or back. No user-serviceable parts inside. Refer servicing to qualified service personnel. The lightning flash with arrow head within a triangle is intended to tell the user that parts inside the product are a risk of electric shock to persons. The exclamation point within a triangle is intended to tell the user that important operating and servicing instructions are in the papers with the appliance. WARNING: To prevent fire or shock hazard, do not expose this appliance to rain or moisture. 1 0382E.PROD NEW.fm Page 2 Tuesday, February 27, 2001 2:16 PM TABLE OF CONTENTS Table of Contents Feature Comparison Chart ......................................3 Congratulations ........................................................4 Customer Record .....................................................................4 Care and Cleaning ...................................................................4 Specifications ...........................................................................4 Installation.................................................................5 Television Location...................................................................5 Optional Cable Connections.....................................................5 AC Power Supply Cord ............................................................5 Cable / Antenna Connection ....................................................5 Optional Equipment Connections.............................................6 VCR Connection.......................................................................6 Cable Box Connection .............................................................7 VCR and Cable Box Connection .............................................8 Amplifier Connection (To Audio Amp) .....................................9 Digital TV - Set-Top (DTV-STB) Connection or DVD Player Connection (some models)..................................................10 Picture In Picture (PIP) Operation ..........................................11 Roller Guide Menu™Navigation ............................12 Remote Control Guide............................................................12 Roller Guide Feature Chart ....................................13 Special Features .....................................................16 Menu Languages....................................................................16 Program Channels .................................................................16 Closed Captioning ..................................................................17 Closed Caption on Mute.........................................................17 Convergence 1 .......................................................................18 Convergence 2 .......................................................................19 Sleep Timer ............................................................................20 Timer 1 and 2 .........................................................................20 Picture Adjustments ...............................................................21 Favorite Channels and Captions ............................................21 Lock .......................................................................................22 Troubleshooting Chart ...........................................23 Read these instructions completely before operating TV. Contents are subject to change without notice or obligation. Copyright 2001 by Matsushita Electric Corporation of America. All rights reserved. Unauthorized copying and distribution is a violation of law. 2 0382E.PROD NEW.fm Page 3 Tuesday, February 27, 2001 2:16 PM FEATURE COMPARISON CHART A/V JACKS AUDIO A/V IN (REAR/FRONT) AUDIO OUT S-VHS INPUT COMPONENT INPUT PT-51G36 PT-61D31V PT-61D31X FEATURES MENU LANGUAGE ENG/SPAN/FR PROTECTIVE SCREEN 2 TUNER PIP CLOSED CAPTIONING V-CHIP CAPABILITY 2RF VIDEO NORM AUDIO NORM STEREO AI SOUND BASS/BALANCE/TREBLE SURROUND NUMBER OF SPEAKERS PT-M51D31X SPECIAL FEATURES MODELS PT-M51D31V Feature Comparison Chart r r r r r r r r r r r r r r r r r r r r r r r r r r r r r r r r r r r r r r r r r r r r r r r r r r r r r r r r r r r r 2 2 2 2 2 3 3 3 3 3 (2/1) (2/1) (2/1) (2/1) (2/1) r r r r r r r r r r r r r r IMPORTANT INFORMATION REGARDING THE USE OF VIDEO GAMES, COMPUTERS, OR OTHER FIXED IMAGE DISPLAYS. WARNING: The marking or retained image on the picture tube resulting from viewing fixed image is not an operating defect and as such is not covered by Warranty. The projection television is designed to display constantly moving images on the screen. Continuous viewing of stationary images such as letterbox pictures on standard screen TVs (with top/bottom bars), non-expanded standard (4:3) pictures on wide screen TVs (with side bars shown on each side of an image), stock market report bars (ticker running at the bottom of the screen), video game patterns, fixed scoreboards, bright station logos, on-line (internet) or repetitive computer style patterns should be limited. The extended use of fixed image program material can cause a permanent picture tube damage, shown as a “shadow image” viewable on normal programs. This type of irreversible picture tube deterioration can be limited by performing the following steps: • • Limit the display of fixed image program material to no more than 15% of total viewing time per week. Turn the power off when not in use. 3 0382E.PROD NEW.fm Page 4 Tuesday, February 27, 2001 2:16 PM CONGRATULATIONS Congratulations Your new Projection Television (PTV) features state-of-the-art technology for high quality picture and sound with complete audio/video connections for your home theater system. Your PTV is designed to give you many years of enjoyment. It was thoroughly tested and tuned at the factory for best performance. Customer Record The model and serial number of this product are located on the back of the TV. You should note the model and serial number in the space provided and retain as a permanent record of your purchase. This will aid in identification in the event of theft or loss. Model Number Serial Number Care and Cleaning Projection Screen (Turn PTV Off) The projection screen is a high precision lens system which has a protective screen. The protective screen is fully washable with the following precautions: r Use a mild soap solution or window cleaner and a clean cloth. • DO NOT USE ABRASIVE CLEANERS. • Do not use laundry detergent or automatic dishwasher soap. • Do not use alcohol, ammonia, or petroleum based products. r Avoid excessive moisture and wipe dry. • Prevent solution from running into the receiver below. r Avoid bumping or scraping the screen. Note: Do not spray any type of cleaning fluid directly on the screen. Cabinet and Remote Control r For cabinets and remote control, use a soft cloth dampened with water or a mild detergent solution. Avoid excessive moisture and wipe dry. r Do not use benzene, thinner or other petroleum based products. Specifications Power Source PT-51G36 (3.3A) PT-M51D31V (3.3A) PT-61D31V (3.3A) 120V AC, 60Hz PT-M51D31X (3.3A) PT-61D31X (3.3A) 127V AC, 60Hz Channel Capability - 181 VHF-12; UHF-56; Cable-113 Video Input Jacks 1Vp-p, 75 Ohm, Phono Jack Type Audio Input Jacks 500mV RMS 47K Ohm To Audio AMP Jack 0-2.0V RMS 4.7K ohm DTV Input (Y / PB / PR) 75 Ohm, Phono Jack Type S-Video Input Jacks S-Video (Y-C) Connector Specifications are subject to change without notice or obligation. 4 0382E.PROD NEW.fm Page 5 Tuesday, February 27, 2001 2:16 PM INSTALLATION Installation Television Location This unit can be used as an entertainment center. Consult your dealer for available options. r Avoid excessive sunlight or bright lights, including reflections. r Keep away from excessive heat or moisture. Inadequate ventilation may cause internal component failure. r Fluorescent lighting may reduce remote control transmitting range. r Keep away from magnetic equipment, including motors, fans and external speakers. Optional Cable Connections Shielded audio and video cables should be used between components. For best results: r Use 75-ohm coaxial shielded cables. r Use appropriate input and output connectors, that match your component connectors. r Avoid long cables to minimize interference. AC Power Supply Cord CAUTION: TO PREVENT ELECTRIC SHOCK MATCH WIDE BLADE OF PLUG TO WIDE SLOT OF AC OUTLET AND FULLY INSERT. DO NOT USE A PLUG WITH A RECEPTACLE OR OTHER OUTLET UNLESS THE BLADE CAN BE FULLY INSERTED TO PREVENT BLADE EXPOSURE. Polarized plug PROTECT POWER CORDS FROM BEING WALKED ON, ROLLED OVER, CRIMPED, BENT OR PINCHED, PARTICULARLY AT PLUGS, CONVENIENCE RECEPTACLES, AND THE POINT WHERE THEY EXIT FROM THE APPARATUS. Cable / Antenna Connection For proper reception, either a cable or antenna connection is required. Cable Connection Connect the cable supplied by your local cable company to ANT1 connection on back of television. Select cable mode and ANT1 in SET UP menu under Prog Chan (Program Channels). Note: A cable converter box may be required for proper reception. Check with your local cable company for compatibility requirements. Incoming Cable from Cable Company 75 Ohm VHF/UHF on back of TV Antenna Connections • • Note: For proper reception of VHF/UHF channels, an external antenna is required. For best reception an outdoor antenna is recommended. Connect home antenna to ANT1 connection on back of Incoming Cable from Home Antenna television. Select TV mode and ANT1 in the SET UP menu under Prog Chan. Cable Mode is preset at the factory. Antenna users must change to TV mode and select ANT1 in the Set Up Menu under Prog Chan. 5 0382E.PROD NEW.fm Page 6 Tuesday, February 27, 2001 2:16 PM INSTALLATION Optional Equipment Connections VCR Connection Follow this diagram when connecting your television to a VCR only. VCR VIDEO OUT Y L AUDIO OUT ANT 1 R ANT OUT ANT IN incoming Cable VIDEO PB S-VIDEO VIDEO PR SPLIT OUT L AUDIO ANT 2 R COMPONENT INPUT INPUT TO AUDIO AMP VIDEO INPUT 1 2 CABLES NOT SUPPLIED Note: CONNECTIONS ON BACK OF TV (may vary) The remote control must be programmed with supplied codes to operate the VCR. See Programming the Remote Control in the Remote Control Quick Reference Guide. Viewing a television program Procedure 1. 2. Select ANT1 in the SET UP menu under Prog Chan (Program Channels). Tune the television to the television program you want to view. Viewing a video Procedure r r Option A 1. Select ANT1 in the SET UP menu under Prog Chan (Program Channels). 2. Press the TV/VIDEO button on the remote control to select the video input (VIDEO 1, VIDEO 2, etc.) connected to your VCR. 3. Begin the video. Option B 1. Select ANT2 in the SET UP menu under Prog Chan (Program Channels). 2. Tune the television to Channel 3 or 4, depending on your VCR. 3. Begin the video. Recording a television program Procedure r r 6 Option A (Recording and viewing the same program) 1. Select ANT2 in the SET UP menu under Prog Chan (Program Channels). 2. Tune the television to Channel 3 or 4, depending on your VCR. 3. Using the VCR, tune to the television program you want to record. 4. Begin recording. Option B (Recording one program while viewing another program) 1. Select ANT1 in the SET UP menu under Prog Chan (Program Channels). 2. Press the TV/VIDEO button on the remote control to select the video input (VIDEO 1, VIDEO 2, etc.) connected to your VCR. 3. Using the VCR, tune to the television program you want to record. 4. Begin recording. 5. Press the TV/VIDEO button on the remote control to switch back to TV mode. 6. Tune the television to the television program you want to view. 0382E.PROD NEW.fm Page 7 Tuesday, February 27, 2001 2:16 PM INSTALLATION Optional Equipment Connections (Cont.) Open the door on the TV front panel to use the connections for your optional equipment (Palmcorder, VCR, or other video components). Select input 3 mode by pressing TV/VIDEO button. CONNECTIONS ON FRONT OF TV (may vary) INPUT 3 VIDEO L-AUDIO-R Cable Box Connection Follow this diagram when connecting your television to a cable box only. CONNECTIONS ON BACK OF TV (may vary) CABLE BOX Incoming Cable Y ANT IN ANT 1 VIDEO PB S-VIDEO VIDEO PR SPLIT OUT ANT OUT CABLES NOT SUPPLIED L AUDIO ANT 2 R COMPONENT VIDEO INPUT Note: INPUT INPUT TO AUDIO AMP 1 2 The remote control must be programmed with supplied codes to operate the cable box. See Programming the Remote Control in the Remote Control Quick Reference Guide. Viewing a premium (scrambled) cable channel Procedure 1. 2. 3. Note: Select ANT2 in the SET UP menu under Prog Chan (Program Channels). Tune the television to Channel 3. Using the cable box, tune to the premium cable channel you want to view. To use special features such as Favorite Channels and Channel Captions (see Special Features section for more information), ANT1 must be selected in the SET UP menu under Prog Chan. 7 0382E.PROD NEW.fm Page 8 Tuesday, February 27, 2001 2:16 PM INSTALLATION Optional Equipment Connections (Cont.) VCR and Cable Box Connection Follow this diagram when connecting your television to both a VCR and a cable box. VCR CONNECTIONS ON BACK OF TV (may vary) VIDEO OUT L AUDIO OUT R Y ANT IN CABLE BOX ANT OUT Incoming Cable ANT 1 VIDEO PB S-VIDEO VIDEO PR SPLIT OUT L AUDIO R ANT 2 COMPONENT VIDEO INPUT ANT OUT INPUT INPUT 1 2 TO AUDIO AMP ANT IN CABLES NOT SUPPLIED Note: The remote control must be programmed with supplied codes to operate the VCR and cable box. See Programming the Remote Control in the Remote Control Quick Reference Guide. Viewing a premium (scrambled) cable channel Procedure 1. 2. 3. Note: Select ANT2 in the SET UP menu under Prog Chan (Program Channels). Tune the television to Channel 3. Using the cable box, tune to the premium cable channel you want to view. To use special features such as Favorite Channels and Channel Captions (see Special Features section for more information), ANT1 must be selected in the SET UP menu under Prog Chan. Recording a premium (scrambled) cable channel Procedure 1. 2. 3. 4. 5. 6. Note: 8 Select ANT2 in the SET UP menu under Prog Chan. Press the TV/VIDEO button on the remote control to select the video input ( VIDEO 1, VIDEO 2, etc.) connected to your VCR. Turn the VCR ON. Tune the VCR to Channel 3 or 4, depending on your VCR. Using your cable box, tune to the premium cable channel you want to record. Begin recording. To view a different channel while recording: • Select ANT1 in the SET UP menu under Prog Chan. • Press the TV/VIDEO button on the remote control to select TV mode. • Tune the television to a television program (except another premium cable channel). 0382E.PROD NEW.fm Page 9 Tuesday, February 27, 2001 2:16 PM INSTALLATION Optional Equipment Connections (Cont.) Amplifier Connection (TO AUDIO AMP) To listen through a separate stereo system, connect an external audio amplifier TO AUDIO AMP inputs on back of television. Note: TO AUDIO AMP terminals cannot be connected directly to external speakers. CONNECTIONS ON BACK OF TV (may vary) CABLES NOT SUPPLIED Y ANT 1 VIDEO PB S-VIDEO VIDEO PR SPLIT OUT L AUDIO ANT 2 AMPLIFIER R COMPONENT VIDEO INPUT INPUT INPUT 1 2 TO AUDIO AMP Audio Adjustments Procedure 1. Select SPEAKERS ON located in the on screen AUDIO menu . 2. Set amplifier volume to minimum. 3. Adjust TV volume to desired level. 4. Adjust amplifier volume to match the TV. 5. Select SPEAKERS OFF & VARIABLE AUDIO OUT from AUDIO menu to control speakers from the TV or select FIXED AUDIO OUT to control speakers from the external amplifier. 6. Volume, mute, bass, treble and balance are now controlled from the TV, if you select VARIABLE AUDIO OUT mode. 9 0382E.PROD NEW.fm Page 10 Tuesday, February 27, 2001 2:16 PM INSTALLATION Digital TV - Set-Top Box (DTV-STB) Connection or DVD Player Connection (some models) Use this diagram to connect the Panasonic DTV-STB (Digital TV-Set-Top Box) to the back of your TV. Press the TV/VIDEO button to select Component mode. TERMINAL ON BACK OF DTV-STB OR DVD PLAYERS Y R-AUDIO-L Y PB ANT 1 PR VIDEO PB S-VIDEO VIDEO PR SPLIT OUT R-AUDIO-L VIDEO SVIDEO NTSC OUTPUT DIGITAL OUTPUT L AUDIO ANT 2 R COMPONENT INPUT INPUT 2 VIDEO INPUT 1 TO AUDIO AMP CABLES NOT SUPPLIED COMPONENT VIDEO INPUT ON BACK OF TV Notes: r There are three video inputs, Y, PB, and PR. Separate component color inputs provide luminance and color separation. Use the L (left) and R (right) audio inputs. r Select DTV-STB to 480i output mode. TV set can receive 480i signal only. 10 0382E.PROD NEW.fm Page 11 Tuesday, February 27, 2001 2:16 PM INSTALLATION Picture In Picture (PIP) Operation This television includes a two tuner Picture In Picture (PIP) feature. This allows watching two (2) live broadcasts at the same time without or with an external video source (VCR). Basic PIP Operation Procedure Press the PIP button on the remote control to display the PIP frame on screen. 1. 2. Note: The audio is for the Main Picture only. Choose channels for the PIP frame by pressing the remote control PIP CHANNEL up/down buttons. Choose channels for the Main Picture by pressing the remote control CH up/down buttons or by using the numeric keypad. SWAP Button The SWAP button switches the PIP and Main Picture source. Press the RECALL button for on screen PIP and Main Picture source status. PIP Operation with a Cable Box Procedure r To view premium (scrambled) cable channels through your cable box in the Main Picture: Note: Use this procedure if you want to watch premium cable channels in the Main Picture while viewing a television program or video in the PIP frame. 1. 2. 3. 4. 5. 6. Note: Select ANT2 in the SET UP menu under Prog Chan (Program Channels). Tune television to Channel 3. Press the PIP button on the remote control to display the PIP frame on screen. Note: The audio is for the Main Picture only. Verify the cable box is ON. Choose channels for the Main Picture by tuning the cable box. Choose channels for the PIP frame by pressing the TV button on the remote control and using the PIP CHANNEL up/down buttons. Swap is not available when using the cable box to tune channels. If your cable box has a video output, it can be connected to the television to allow you to use all PIP functions. See the equipment manual for more information. (Tune the PIP to the video input connected to the cable box). 11 0382E.PROD NEW.fm Page 12 Tuesday, February 27, 2001 2:16 PM ROLLER GUIDE MENU NAVIGATION Roller Guide Menu Navigation ROLLER GUIDE MENU SELECTIONS Procedure 1. 2. 3. 4. 5. 6. 7. 8. 9. Press the ACTION button on the Remote Control to display the Roller Guide Menu. Press the CH up/down to rotate the Roller Guide to the desired feature. Press the ACTION button to display main menus and submenus. Press the CH up/down buttons to highlight desired main menu feature. Press the VOL right button to enter submenus. Press the CH up/down buttons to highlight desired submenu feature. Press the VOL right/left button to select or adjust feature. Press the ACTION button twice to return to the Roller Guide Menu. To exit the Roller Guide Menu, press the VOL left button. Remote ACTION / Navigation Button CH VOL VOL CH Remote Control Guide The Remote Control Quick Reference Guide is located within the package provided with this TV. 12 0382E.PROD NEW.fm Page 13 Tuesday, February 27, 2001 2:16 PM ROLLER GUIDE FEATURE CHART Roller Guide Feature Chart MENU DESCRIPTION SET UP LANGUAGES r Select English, Spanish, or French menu. r MODE - Select Cable or TV. See Installation section in manual. ANTENNA - Select ANT 1 or ANT 2 (some models). AUTO PROGRAM - Automatically program channels having a signal into memory. MANUAL PROGRAM - Manually add or delete channels from memory. r PROG. CHAN (Program Channels) r r r CC (Closed Captioning) r r r OTHER ADJ. r CC ON MUTE - Activate C1-C4 for Closed Captioning display when the remote MUTE button is pressed. CC MODE - Select T1-T4 or C1-C4 for Closed Captioning, program guides and other information. AUTO POWER ON - Select SET to power up the PTV at the same time as the Cable Box or other components or select OFF. CONVERGENCE 1 - Adjustment may be required when the PTV is moved because of the effects of the Earth’s magnetic field on the projection tubes. CONVERGENCE 2 - Adjustment may be required after setting Convegence 1. AUDIO r r AUDIO ADJ. (Adjustments) r r r MODE - Select STEREO, SAP (Second Audio Program) or MONO. (Use MONO when stereo signal is weak.) BASS - Increase or decrease the bass response. TREBLE - Increase or decrease the treble response. BALANCE - Emphasize the left/right speaker volume. NORMAL - Reset BASS, TREBLE and BALANCE to factory default. 13 0382E.PROD NEW.fm Page 14 Tuesday, February 27, 2001 2:16 PM ROLLER GUIDE FEATURE CHART Roller Guide Feature Chart (Cont.) MENU DESCRIPTION r OTHER ADJ. (Adjustments) SURROUND SPEAKERS r AI SOUND - Automatically adjust volume to maintain a comfortable listening level. (AI sound is not available in VIDEO mode). BBE - Sound technology enhances speech intelligibility and restores the dynamic range of musical passages to provide outstanding natural sound. r SURROUND - Enhances audio response when listening to stereo. r r ON - TV speakers operate normally. OFF & VAO (Variable Audio Output) TV speakers off - audio adjustable by TV. OFF & FAO (Fixed Audio Output)TV speakers off — audio adjustable only by the external amplifier. r TIMER r Set the time and the day of the week. (Time will display on screen after turning on the television, pressing the RECALL button or changing channels). r Set timer to turn off TV in 30, 60 or 90 minutes. Select NO to turn timer off. r Set one or both timers to automatically turn television on and off at selected times, on selected channels, and on selected days. (Clock must be set to use Timer features). CLOCK SET SLEEP TIMER 1 TIMER 2 14 0382E.PROD NEW.fm Page 15 Tuesday, February 27, 2001 2:16 PM ROLLER GUIDE FEATURE CHART Roller Guide Feature Chart (Cont.) MENU DESCRIPTION PICTURE r r r VIDEO ADJ. (Adjustments) r r r OTHER ADJ. r (Adjustments) COLOR - Adjust desired color intensity. TINT - Adjust natural flesh tones. BRIGHTNESS - Adjust dark areas for crisp detail. PICTURE - Adjust white areas of picture. SHARPNESS - Adjust clarity of outline detail. NORMAL- Reset all picture adjustments to factory default settings. COLOR TEMP - Adjust white balance to COOL (blue), WARM (red) or NORMAL. CHANNELS r CHANNEL SCAN - Select FAV (16 favorites) or ALL channels to scan channels using the up/down CH buttons. r PRESET CAPTION - Enter channel numbers for preset captions. MANUAL CAPTION - Enter channel numbers and captions manually. INPUT LABEL - Label video connections for on screen display of optional equipment. FAVORITES r CAPTION r LOCK r MODE HOW LONG? Lock All, Channels or Game with a secret code. Note: r For more information about Block Programs, see the V-CHIP Parental Lock manual provided with the TV package. Select the period of time (12, 24, 48 hours or ALWAYS) for your option to be locked. 15 0382E.PROD NEW.fm Page 16 Tuesday, February 27, 2001 2:16 PM SPECIAL FEATURES Special Features SET UP Menu Languages In SET UP Menu, select IDIOMA / LANGUE to change menu language to ENGLISH, ESPAÑOL (Spanish), or FRANÇAIS (French). IDIOMA/ LANGUE PROG CHAN CC OTHER ADJ. MODE ENGLISH Prog Chan (Program Channels) In SET UP menu under PROG CHAN select: r r r r MODE to select TV (antenna) or CABLE mode depending on the signal source. ANTENNA to select either ANT1 or ANT2. AUTO PROGRAM to automatically program all channels with a signal. MANUAL PROGRAM to manually add or delete channels. IDIOMA/ LANGUE PROG CHAN CC OTHER ADJ. 16 MODE CABLE ANTENNA ANT1 AUTO PROGRAM MANUAL PROGRAM 0382E.PROD NEW.fm Page 17 Tuesday, February 27, 2001 2:16 PM SPECIAL FEATURES CC (Closed Captioning) This receiver contains a built-in decoder that displays CC (Closed Captioned) text across the screen (white or colored letters on black background). It allows the viewer to read the dialogue of a television program or other information. The program viewed must include Close Captioning for the feature to work. CC Mode Procedure r r r r In SET UP Menu, select CC (Closed Caption). Select CC MODE. Select OFF, C1, C2, T1, T2, C3, C4, T3 or T4: • OFF - When Closed Caption is not desired. • C1 - For video related information to be displayed, up to 4 lines on screen at a time. (It does not block relevant parts of the picture). Text may be in any language. • C2 to C4 - For other modes of video related information. • T1 - For program guide and other information to be displayed, when available. (Blocks a large portion of the picture on the television screen). • T2 to T4 - For other modes of information. (Blocks a large portion of the picture on the television screen). Press ACTION to return to submenu options, and exit menus. CC On Mute Activates the on screen Closed Caption feature when the MUTE button on the remote control is pressed. Note: This feature only functions when the Closed Caption Mode is OFF. The program being viewed must be broadcast with Closed Captioning. (Refer to your local TV guide). Procedure r In SET UP Menu, select CC (Closed Caption). r r r Select CC On Mute. Select NO, C1, C2, C3, or C4. Recommended set up for Closed Caption when using the MUTE button: • • r r r CC CC ON MUTE: C1 MODE: OFF Press ACTION to return to submenu options, and exit menus. Press the MUTE button to activate the Closed Caption feature. Press the MUTE button again to deactivate the feature. IDIOMA/ LANGUE PROG CHAN CC OTHER ADJ. CC ON MUTE NO CC MODE OFF 17 0382E.PROD NEW.fm Page 18 Tuesday, February 27, 2001 2:16 PM SPECIAL FEATURES Convergence 1 In SET UP menu select CONVERGENCE under OTHER ADJ. only after moving the PTV to adjust for the effects of the earth’s magnetic field on the projection tubes. IDIOMA/ LANGUE PROG CHAN CC OTHER ADJ. AUTO POWER ON OFF CONVERGENCE 1 CONVERGENCE 2 Note: Convergence seldom needs adjusting except after moving the PTV. Use the navigation buttons to align the horizontal and vertical green lines on screen with the outside reference marks, as shown below. Press the ACTION button to move the RED CONVERGENCE screen. CONVERGENCE GREEN NEXT : ACTION Reference Marks Use the navigation buttons to align the red cross with the white cross pattern at the center of the screen. Press the ACTION button to continue to the blue convergence adjustment screen and repeat. CONVERGENCE RED NEXT : ACTION Note: To prevent picture tube damage do not leave test pattern on for an extended period of time. Convergence Adjustment An adjusted cross pattern appears white with a minimum of color fringing. 18 0382E.PROD NEW.fm Page 19 Tuesday, February 27, 2001 2:16 PM SPECIAL FEATURES Convergence 2 In SET UP menu select CONVERGENCE 2 under OTHER ADJ. Note: Only converge this after CONVERGENCE 1 is adjusted properly. IDIOMA/ LANGUE PROG CHAN CC OTHER ADJ. AUTO POWER ON OFF CONVERGENCE 1 CONVERGENCE 2 Procedure r r r Press the 1 through 9 keyboard buttons on the remote control to select the desired convergence point. Use the navigation buttons to align the RED cross with the white cross pattern. Press the ACTION button to continue to the BLUE convergence adjustment screen and repeat. Note: Remote Control must be in TV mode. 1 2 3 RED 4 6 NEXT : ACTION 7 8 9 Convergence Adjustment An adjusted cross pattern appears white with a minimum of color fringing. 19 0382E.PROD NEW.fm Page 20 Tuesday, February 27, 2001 2:16 PM SPECIAL FEATURES TIMER Sleep In TIMER menu, select SLEEP to turn TV off in 30, 60 or 90 minutes. Select NO to turn off timer. CLOCK SET SLEEP TIMER 1 TIMER 2 HOW LONG? 30 Timer 1 and Timer 2 In TIMER menu, select one or both timers to turn the television on and off at selected times, on selected channels, and on selected days. Note: TIME must be entered in CLOCK SET to operate TIMER features. CLOCK SET SLEEP TIMER 1 TIMER 2 DAY SAT ON TIME _ _: _ _ OFF TIME _ _: _ _ ENTER CHANNEL _ _ _ SET TIME FIRST Turn Off After 90 Minutes The TV automatically turns OFF after 90 minutes when turned on by the TIMER. If the OFF time is selected or if a key is pressed, the automatic OFF after 90 minutes will be cancelled. TIMER Activation The TIMER is active when the TV is OFF or ON. The TV will switch to the selected channel at the selected time set in the TIMER. 20 0382E.PROD NEW.fm Page 21 Tuesday, February 27, 2001 2:16 PM SPECIAL FEATURES PICTURE Other Adjustments In Picture menu under OTHER ADJ. select: r COLOR TEMP to increase and decrease WARM (red) and COOL (blue) colors to suit personal preferences. VIDEO ADJ. OTHER ADJ. COLOR TEMP NORMAL CHANNELS Favorites In CHANNELS menu under FAVORITES select: r CHANNEL SCAN FAV to enter up to 15 favorite channels. r CHANNEL SCAN ALL to scan all channels when using the CH up/down buttons. FAVORITES CAPTION CHANNEL SCAN FAV ENTER CHANNEL 123 FAVORITE CHANNELS Caption In CHANNELS menu under CAPTION select: r PRESET CAPTION to enter channel numbers for popular TV stations. r MANUAL CAPTION to enter numbers and captions manually. r INPUT LABEL to label video input connections for on screen display. FAVORITES CAPTION PRESET CAPTION MANUAL CAPTION INPUT LABEL 21 0382E.PROD NEW.fm Page 22 Tuesday, February 27, 2001 2:16 PM SPECIAL FEATURES LOCK MODE To use LOCK options: r ENTER CODE FIRST - Use the numeric keypad to enter a four-digit secret code. After entering your secret code for the first time, the on screen display will change to CHANGE CODE. Note: Use a code that is easy to remember or record it in a safe place. In MODE submenu select: r LOCK SET to choose: l OFF - To turn lock function off. l ALL - To lock all channels and video inputs. l CHANNEL - To lock up to four channels of your choice. l GAME - To lock channels 3, 4 and video inputs. r BLOCK PROGRAMS - To use Block Programs Ratings. r CHANGE CODE - Use numeric keypad to change your four-digit secret code. Note: If in CHANGE CODE you enter a different code from the one used previously, the new code becomes the controlling code. Press the ACTION button to return to submenu, then select HOW LONG to choose the period of time you want your option to be locked (12, 24, 48 hours or ALWAYS). Note: Be cautious when selecting ALWAYS. If ALWAYS is selected, and you forget your secret code, the television must be serviced by a qualified technician in order to clear the LOCK setup. Press the ACTION button to return to submenu, and to exit menus. LOCK SET MODE HOW LONG? OFF BLOCK PROGRAMS: U.S. TV PROGRAMS STATUS OFF ENTER CODE FIRST - - -- Note: If GAME, CHANNEL or ALL is selected, and if a blocked channel or video input is selected, the message PG (Parent Guard) displays in the upper right corner of the television screen Unlock LOCK SET by reentering the same four-digit secret code and selecting OFF. For more information about Block Programs, see the V-CHIP Parental Lock manual provided with the TV package. 22 0382E.PROD NEW.fm Page 23 Tuesday, February 27, 2001 2:16 PM TROUBLESHOOTING CHART Troubleshooting Chart Before calling for service, determine the symptoms and follow suggested solutions. AUDIO VIDEO Solutions Adjust Antenna Location and Connection Noisy Audio Snowy Video Adjust Antenna Location and Connection Check Antenna Lead-in Wire Noisy Audio Multiple Image Move TV from Electrical Appliances, Lights, Vehicles, and Medical Equipment Noisy Audio Interference Increase Volume Check Mute Check TV SPEAKERS on/off No Audio Normal Video Change Channel Set TV or Cable Mode Properly Check Antenna Cables Noisy Audio No Video with Snow ? No Audio No Video / No PIP Check Power Cord is Plugged into Active Outlet Adjust Brightness and Audio Controls Change Channel Check Cable Connections Program the Remote Control Again Check Second Video Source Operation Adjust Color Settings Change Channel Normal Audio No Color Check Audio Is Set To Stereo Or Mono, Not SAP Wrong Audio Normal Video Change CC (Closed Captioning) from Text Mode Normal Audio Black Box on Screen Replace Remote Control Batteries Normal Video Normal Audio Intermittent Remote Control Operation 23 0382E.PROD NEW.fm Page 24 Tuesday, February 27, 2001 2:16 PM NOTES Notes Panasonic Consumer Electronics Company, Division of Matsushita Electric Corporation of America One Panasonic Way Secaucus, New Jersey 07094 www.panasonic.com (800) 222-4213 24 Panasonic de Mexico, S.A, de C.V. Amores No. 1120 Col. Del Valle C.P. 03100 México, D.F. Tel. (915 ó 015) 488-1000 Fax (915 ó 015) 575-6763, 575-6765 Panasonic Sales Company, Division of Matsushita Electric of Puerto Rico Inc. (“PSC”) Ave. 65 de Infantería, Km 9.5 San Gabriel Industrial Park Carolina, Puerto Rico 00985 Tel. (787) 750-4300 Fax (787) 768-2910 For assistance, please call: 1-888-VIEW-PTV or send e-mail to: [email protected] ® TQB2AA0382 10112 PRINTED IN MEXICO Sistema de proyección de vídeo a color Instrucciones de Operación PT-51G36 PT-M5131V PT-M5131X PT-61D31V PT-61D31X PT-51G36 PT-M5131V PT-M5131X PT-61D31V PT-61D31X Color Video Projection System Operating Instructions Para asistencia llame al teléfono: 1-888-VIEW-PTV o envíe un correo electrónico a la dirección: [email protected] TQB2AA0382 10116 IMPRESO EN MEXICO ® 0382S PROD NEW.fm Page 1 Tuesday, February 27, 2001 2:17 PM :$51,1* 7R PRYH VHW SXVK IURP OHIW VLGH RI VHW &DVWHUV RQ ULJKW VLGH GR QRW SLYRW LQ DOO GLUHFWLRQV 6HW FDQ WLS RYHU LI PRYHG IURP ULJKW VLGH ZLWK ULVN RI SHUVRQDO LQMXU\ $'9(57(1&,$ 3DUD PRYHU HO FRQMXQWR HPSXMH GHVGH HO ODGR L]TXLHUGR GHO PLVPR /RV URODQDV GH OD GHUHFKD QR VRQ SLYRWDQWHV HQ WRGDV ODV GLUHFFLRQHV (O FRQMXQWR VH SXHGH WXPEDU VL VH OR PXHYH GHVGH HO ODGR GHUHFKR FRUULHQGR DVt HO ULHVJR GH VXIULU GDxRV SHUVRQDOHV 0LVH HQ JDUGH /RUV GX GpSODFHPHQW GX WpOpYLVHXU OH SRXVHU VXU VRQ F{Wp JDXFKH /HV URXOHWWHV GX F{Wp GURLW QH SRXYDQW WRXUQHU GDQV WRXWHV OHV GLUHFWLRQV O·DSSDUHLO SRXUUDLW WRPEHU V·LO HVW SRXVVp GH FH F{Wp HW FDXVHU DLQVL GHV ULVTXHV GH EOHVVXUH ADVERTENCIA RIESGO DE SACUDIDAS ELECTRICAS. NO ABRIR. ADVERTENCIA: A fin de reducir el riesgo de sacudidas eléctricas, no deberán quitarse ni la cubierta ni la tapa posterior. No hay en el interior pieza alguna que el usuario tenga que reparar. Todo servicio habrá de brindarlo personal de reparación capacitado. El propósito del relámpago con punta de flecha dentro de un triángulo es el de advertir al usuario de que existen piezas internas del producto que representan riesgo de que las personas reciban sacudidas eléctricas. El propósito del signo de exclamación dentro de un triángulo es el de advertir al usuario de que los documentos que acompañan al aparato incluyen importantes instrucciones de funcionamiento y reparación. ADVERTENCIA: Con el objeto de prevenir el riesgo de incendio o de sacudida eléctrica, este aparato no deberá verse expuesto a la lluvia ni a la humedad. 1 0382S PROD NEW.fm Page 2 Tuesday, February 27, 2001 2:17 PM INDICE Indice Tabla de Comparacion de Caracteristicas .............3 Felicidades ................................................................4 Registro del Usuario.................................................................4 Cuidado y Limpieza..................................................................4 Especificaciones.......................................................................4 Instalación .................................................................5 Ubicación de la Televisión........................................................5 Conexiones de Cable Opcional................................................5 Cable de Suministro de Corriente Alterna................................5 Conexiones de Cable / Antena ................................................5 Conexiones de Equipo Opcional ..............................................6 Conexión de la Videocasetera Imagen en Imagen Con 1 Sintonizador .......................................................................6 Conexión del Decodificador de Cable Imagen en Imagen Con 2 Sintonizadores .........................................................7 Conexiones del Decodificador de Cable y Videocasetera Imagen en Imagen Con 2 Sintonizadores ..........................8 Operación de Imagen en Imagen Con 1 Sintonizador ..........9 Conexión del Amplificador de Sonido (TO AUDIO AMP) ....11 Conexión del Decodificador de Televisión Digital (DTV-STB) o Disco de Video Digital .....................12 Operación de la Imagen en la Imagen (IDI) .......................13 Menú de la Guía Giratoria MR Navegación .............14 Guía del Control Remoto........................................................14 Tabla de Características de la Guía Giratoria ......15 Funciones Especiales ............................................18 Idiomas del Menú ..................................................................18 Programación ó Canales........................................................18 CC Subtítulos.......................................................................19 CC En Mudo ........................................................................19 Convergencia 1 ......................................................................20 Convergencia 2 ......................................................................21 Apagado Automático (Cronómetro)........................................22 Cronómetro 1 y Cronómetro 2................................................22 Ajuste de la Imagen................................................................23 Canales (Favoritos y Títulos) .................................................23 Bloqueo ..................................................................................24 Cuadro de Localización de Fallas .........................25 Lea estas instrucciones completamente antes de operar la T.V. El contenido está sujeto a cambios sin previo aviso u obligación. Derechos reservados 2001 por Matsushita Electric Corporation of America. Todos los derechos reservados. La copia y distribución sin autorización es violación de la ley. 2 0382S PROD NEW.fm Page 3 Tuesday, February 27, 2001 2:17 PM CONECTORES DE A/V AUDIO PT-51G36 PT-61D31V PT-61D31X CARACTERÍSTICAS LENGUAJE DEL MENÚ ENG/ESP/FRAN PANTALLA PROTECTORA IMAGEN EN IMAGEN CON 2 SINTONIZADOR SUBTITULACION CAPACIDAD DEL V-CHIP 2RF VIDEO NORM AUDIO NORM ESTERO SONIDO IA BAJOS/BALANCE/AGUDOS EVOLVENTE NUMERO DE BOCINAS PT-M51D31X CARACTERÍSTICAS ESPECIALES MODELOS PT-M51D31V TABLA DE COMPARACION DE CARACTERISTICAS Tabla de Comparacion de Caracteristicas r r r r r r r r r r r r r r r r r r r r r r r r r r r r r r r r r r r r r r r r r r r r r r r r r r r r r r r r r r r r 2 2 2 2 2 3 3 3 3 3 ENTRADA A/V (POSTERIOR/DELANTERA) (2/1) (2/1) (2/1) (2/1) (2/1) SALIDAS DE r r r r r AUDIO ENTRADA S-VHS r r r r r ENTRADA DE VIDEO r r r r COMPUESTO INFORMACIÓN IMPORTANTE ACERCA DEL USO DE VIDEO JUEGOS, COMPUTADORAS, U OTROS TIPOS DE IMÁGENES FIJAS. ADVERTENCIA: El marcado o retención de imágen en los tubos de proyección como resultado del uso de una imágen fija no es un defecto de operación y como tal no está cubierto por la garantía. El sistema de proyección de video esta diseñado para desplegar imágenes en movimiento constante en la pantalla. El uso constante de imágenes fijas tal como peliculas en formato letterbox en pantallas estándar (con barras arriba y abajo de la imágen), peliculas estándar no expandidas (4:3) en TV’s de pantalla ancha (con barras laterales visibles a cada lado de la imágen), barras de reporte de la bolsa mercantil (barra con información en movimiento en la parte inferior de la pantalla), patrores de video juegos, marcadores deportivos fijos, logos de estación televisora, patrones de internet u otros patrones de tipo computadora deben limitarse. El useo extendido de material de imágen fija puede causar daño permanente a los tubos de proyección, el cual se presenta como ‘imágen fantasma” visible en la imágen normal. Este tipo de desgaste irreversible de los tubos de proyección puede limitarse mediante los siguientes pasos: • • Limite el tiempo de uso de material de imágen fija a no más del 15% del tiempo de uso total a la semana. Apague la unidad cuando no se este usando. 3 0382S PROD NEW.fm Page 4 Tuesday, February 27, 2001 2:17 PM FELICIDADES Felicidades Su nueva Televisión de Proyección (PTV) se caracteriza por utilzar lo último en tecnología en calidad de imagen y sonido, cuenta con conexiones completas de Audio y Video para su Sistema de Teatro en Casa. Su PTV esta diseñada para brindarle muchos años de entretenimiento, fué sintonizada y comprobada en su totalidad en la fábrica para su mejor desempeño. Registro del Usuario El modelo y el número de serie de este producto se localizan en la parte posterior de este PTV. Deberá anotar el modelo y el número de serie en los espacios que se proveen a continuación y consérvelos permanentemente como comprobación de su compra. Esto le ayudará a identificarlo en caso de robo ó pérdida. Los consumidores en los Estados Unidos de América pueden registrar su producto en la siguiente dirección electrónica: www.prodreg.com/panasonic. Número de Modelo Número de Serie Cuidado y Limpieza Pantalla de Proyección (Apague el PTV) La pantalla de proyección es un sistema de lentes de alta precisión el cual contiene una pantalla protectora. La pantalla protectora es completamente lavable, con las siguientes precauciones: r Use una solución de jabón o limpiador de vidrios y un paño limpio. • NO UTILICE LIMPIADORES ABRASIVOS. • No use detergente para lavar ropa ó jabón para lavaplatos automático. • No use alcohol, amonia, o productos derivados del petróleo. r Evite el exceso de humedad y frote hasta secar. • Prevenga que la solución se derrame al interior del receptor. r Evite golpear o rayar la pantalla. Nota: Evite rociar cualquier tipo de limpiadores directamente sobre la pantalla. Gabinete y Control Remoto r Para gabinetes y control remoto use un paño humedecido con agua o una solución detergente suave. Evite el exceso de humedad y frote hasta secar. r No use benceno, diluyentes u otros productos a base de petróleo. Especificaciones Fuente de Potencia PT-51G36 (3,3A) PT-M51D31V (3,3A) PT-61D31V (3,3A) 120Vca, 60Hz PT-M51D31X (3,3A) PT-61D31X (3,3A) 127Vca, 60Hz Capacidad de Canales - 181 VHF-12; UHF-56; Cable-113 Terminales de Entrada de Video 1Vp-p, 75 Ohmios,Terminal tipo fonográfico Terminales de Entrada de Audio 500mV rms 47Kilo Ohmios Terminales de Salida de Audio 0-2.0V rms 4,7Kilo Ohmios Componente Entrada de Vídeo 75 Ohmios,Terminal tipo fonográfico Terminal de Entrada S-Video Conectores S-Video (Y-C) Las especificacines están sujetas a cambios sin previo aviso ni obligación alguna. 4 0382S PROD NEW.fm Page 5 Tuesday, February 27, 2001 2:17 PM INSTALACIÓN Instalación Ubicación de la Televisión Esta unidad puede ser utilizada como un centro de entretenimiento. Consulte a su distribuidor para obtener opciones disponibles. r r r r Evite el exceso de luz del sol u otras luces brillantes, incluyendo reflejos. Mantenga alejada la unidad del exceso de calor o humedad. Ventilación inadecuada puede causar fallas en componentes internos. Iluminación fluorecente puede reducir de transmisión del Control Remoto. Evite el equipo magnético, incluyendo motores, ventiladores ó bocinas externas. Conexiones de Cable Opcional Cables blindados de Audio y Video deben usarse entre los componentes. Para mejores resultados: r r r Use cable coaxial blindado de 75-ohmios. Use los conectores de entrada y salida apropiados, iguales a los de su componente. Evite el uso de cables largos para minimizar interferencia. Cable de Suministro de Corriente Alterna PRECAUCION: PARA PREVENIR UNA DESCARGA ELECTRICA, BUSQUE LA HOJA ANCHA DEL ENCHUFE E INSERTELA POR COMPLETO EN LA RENDIJA ANCHA CORRESPONDIENTE DE LA TOMA DE CORRIENTE ALTERNA. NO USE ESTE ENCHUFE CON UN RECEPTACULO U OTRA TOMA DE CORRIENTE SALVO QUE LA HOJA SE PUEDA INSERTAR POR COMPLETO PARA PREVENIR LA EXPOSICION DE LA HOJA. Enchufe polarizado PROTEJA EL CABLE DE AC DE SER PISADO, ENRROLLADO, PLEGADO, TROZADO O PERFORADO, PARTICULARMENTE EN LOS CONECTORES Y EN LOS PUNTOS DONDE SALEN DEL APARATO. Conexión de Cable / Antena Para una recepción adecuada se requiere una conexion de cable o de antena. Cable de entrada de la Compañía de Cable Conexión del Cable Conecte el cable suministrado por su compañía local de cable a la conexión ANT1 en la parte posterior de la televisión. Seleccione la modalidad de cable y ANT1 en el menú de SET UP (Ajuste) bajo PROG CNLS (Programación de Canales). Nota: Se puede requerir de un decodificador de cable para una recepción adecuada. Verifique con su compañía de cable local sobre los requisitos de compatibilidad. 75 Ohmios VHF/UHF en la parte posterior de la TV Conexión de Antena • • Nota: Para una recepción adecuada de canales VHF/UHF se requiere de una antena externa. Para la mejor recepción, se recomienda una antena en el exterior. Conecte el cable de la antena a la conexión ANT1 en la parte posterior de la televisión. Seleccione la modalidad de TV y ANT1 en el menú de SET UP bajo PROG CNLS. Cable de Entrada de una Antena de Casa La Modalidad de Cable está predispuesta de fábrica. Usuarios de Antena deberán cambiar a la modalidad de TV y seleccionar ANT1 en el Menú de Setup bajo PROG CNLS. 5 0382S PROD NEW.fm Page 6 Tuesday, February 27, 2001 2:17 PM INSTALACIÓN Conexiones de Equipo Opcional Conexión de la Videocasetera Siga este diagrama cuando conecte su televisión solamente a una videocasetera TERMINALES EN LA PARTE POSTERIOR DE LA TV Videocasetera VIDEO OUT Y L ANT 1 VIDEO PB S-VIDEO AUDIO OUT VIDEO R ANT IN PR SPLIT OUT L ANT OUT CABLES NO INCLUIDOS AUDIO ANT 2 R COMPONENT VIDEO INPUT INPUT INPUT 2 1 TO AUDIO AMP Cable de entrada Nota: El control remoto debe ser programado con los códigos que se incluyen para operar la videocasetera. Vea Programación del Control Remoto en la Guía de Referencia Rápida para el Control Remoto. Viendo un programa de televisión Procedimiento 1. Seleccione ANT1 en el menú de SET UP (Ajuste) bajo PROG CNLS (Programación de canales). 2. Sintonize la televisión al programa de televisión que desea ver. Viendo un vídeo Procedimiento r Opción A 1. Seleccione ANT1 en el menú de SET UP bajo PROG CNLS. 2. Presione el botón de TV/VIDEO en el control remoto para seleccionar la entrada de vídeo (VIDEO 1, VIDEO 2, etc.) que está conectada a su videocasetera. 3. Comience el vídeo. r Opción B 1. Seleccione ANT2 en el menú de SET UP bajo PROG CNLS. 2. Sintonize su televisión al canal 3 ó 4, dependiendo de su videocasetera. 3. Comience el vídeo. Grabando un programa de televisión Procedimiento r Opción A (Grabando y viendo el mismo programa) 1. Seleccione ANT2 en el menú de SET UP bajo PROG CNLS. 2. Sintonize su televisión al canal 3 ó 4, dependiendo de su videocasetera. 3. Usando la videocasetera, sintonize el programa de televisión que desea grabar. 4. Comience a grabar. r Opción B (Grabando un programa mientras se ve otro programa) 1. Seleccione ANT2 en el menú de SET UP bajo PROG CNLS. 2. Presione el botón de TV/VIDEO en el control remoto para seleccionar la entrada de vídeo ( VIDEO 1, VIDEO 2, etc.) que está conectada a su videocasetera. 3. Usando la videocasetera, sintonize el programa de televisión que desea grabar. 4. Comience a grabar. 5. Presione el botón de TV/VIDEO en el control remoto para regresar a la modalidad de TV. 6. Sintonize su televisión al programa de televisión que desea ver. 6 0382S PROD NEW.fm Page 7 Tuesday, February 27, 2001 2:17 PM INSTALACIÓN Conexiones de Equipo Opcional (cont.) Abra la puerta del panel frontal de la TV para usar estas conexiones para su equipo opcional (videocámara, VCR u otros componentes de vídeo). Seleccione el modo de entrada video 3 presionanado el botón TV/VIDEO. CONEXIONES EN EL FRENTE DE LA TELEVISION INPUT 3 VIDEO L-AUDIO-R Conexión del Decodificador de Cable Siga este diagrama cuando conecte su televisión solamente a un decodificador de cable. Decodificador de Cable Y ANT 0UT ANT 1 VIDEO S-VIDEO PB VIDEO PR SPLIT OUT ANT IN L AUDIO ANT 2 R COMPONENT VIDEO INPUT INPUT 1 INPUT 2 TO AUDIO AMP Cable de entrada de la Compañía del Cable TERMINALES EN LA PARTE POSTERIOR DE LA TV Nota: El control remoto debe ser programado con los códigos que se incluyen para operar el decodificador de cable. Vea Programación del Control Remoto en la Guía de Referencia Rápida para el Control Remoto. Viendo un Canal de Cable Premium Procedimiento 1. 2. 3. Seleccione ANT2 en el menú de SET UP (Ajuste) bajo PROG CNLS (Programación de Canales). Sintonize la televisión al canal 3. Usando el decodificador de cable, sintonize el canal de cable premium que desea ver. Nota: Para usar funciones especiales tales como Canales Favoritos y Títulos de Canal (vea la sección de Funciones Especiales para más información), ANT1 debe estar seleccionada en el menú de SET UP bajo PROG CNLS. 7 0382S PROD NEW.fm Page 8 Tuesday, February 27, 2001 2:17 PM INSTALACIÓN Conexiones de Equipo Opcional (Cont.) Conexiones del Decodificador de Cable y Videocasetera Siga este diagrama cuando conecte su televisión tanto a una videocasetera como a un decodificador de cable. Videocasetera TERMINALES EN LA PARTE POSTERIOR DE LA TV VIDEO OUT L AUDIO OUT R Y ANT IN ANT OUT Cable de entrada Decodificador de cable ANT 1 VIDEO PB VIDEO PR SPLIT OUT L AUDIO R ANT 2 COMPONENT VIDEO INPUT ANT OUT S-VIDEO INPUT INPUT TO AUDIO AMP 2 1 ANT IN CABLES NO INCLUIDOS Nota: El control remoto debe ser programado con los códigos que se incluyen para operar la videocasetera y decodificador de cable (caja de cable). Vea Programación del Control Remoto en la Guía de Referencia Rápida para el Control Remoto. Viendo un canal de cable premium Procedimiento 1. 2. 3. Nota: Seleccione ANT2 en el menú de SET UP (Ajuste) bajo PROG CNLS (Programación de canales). Sintonize la televisión al canal 3. Usando el decodificador de cable, sintonize al canal de cable premium que desea ver. Para usar la funciones especiales tales como Canales Favoritos y Títulos de canal (vea la sección de Funciones Especiales para más información), ANT1 debe estar seleccionada en el menú de SET UP bajo PROG CNLS. Grabando un canal de cable premium Procedimiento 1. 2. 3. 4. 5. 6. Nota: • • • 8 Seleccione ANT2 en el menú de SET UP bajo PROG CNLS. Presione el botón TV/VIDEO en el control remoto para seleccionar la entrada de vídeo (VIDEO 1, VIDEO 2, etc) que está conectada con su videocasetera. Encienda la videocasetera. Sintonize la videocasetera al canal 3 ó 4, dependiendo de su televisión. Usando el decodificador de cable, sintonize al canal de cable premium que desea grabar. Comienze a grabar. Para ver un canal diferente mientras graba: Seleccione ANT1 en el menú de SET UP bajo PROG CNLS. Presione el botón TV/VIDEO en el control remoto para seleccionar la modalidad de televisión. Sintonize la televisión a un programa de televisión (excepto otro canal de cable premium). 0382S PROD NEW.fm Page 9 Tuesday, February 27, 2001 2:17 PM INSTALACIÓN Conexiones de Equipo Opcional (Cont.) Conexión del Amplificador de Sonido (TO AUDIO AMP) Conecte a la entrada de audio de un amplificador externo para escuchar el sonido en sistema estéreo. Nota: Las terminales TO AUDIO AMP no pueden ser usadas directamente para bocinas externas. CABLES NO INCLUIDOS Y S-VIDEO ANT 1 VIDEO PB VIDEO PR SPLIT OUT L AUDIO ANT 2 R COMPONENT VIDEO INPUT AMPLIFICADOR INPUT INPUT 1 2 TO AUDIO AMP TERMINALES EN LA PARTE POSTERIOR DE LA TV Ajustes de Sonido (Audio) 1. 2. 3. 4. 5. 6. Seleccione ALTAVOCES SI en el menú de SONIDO (AUDIO). Ajuste el volumen del AMP (amplificador) al mínimo. Ajuste el volumen de la Televisión al nivel deseado. Ajuste el volumen del AMP hasta igualar el de la Televisión. Seleccione OFF & VAO (parlantes apagados y salida variable de audio) en el menú AUDIO para controlar Altavoces o bocinas de la TV o bien seleccione FAO (salida fija de audio) para controlar Altavoces o bocinas del amplificador externo. El Volumen, el silencio, los bajos, los altos y el balance ahora son controlados por medio de la Televisión. 9 0382S PROD NEW.fm Page 10 Tuesday, February 27, 2001 2:17 PM INSTALACIÓN Conexión del Decodificador de Televisión Digital (DTV-STB) o Disco de Video Digital (algunos modelos) Utilice este diagrama para conectar el decodificador de Televisión Digital Panasonic (DTV-STB) o Disco de Video Digital a su Televisor. Presione el botón TV/VIDEO para seleccionar la modalidad de entrada Componente. Entradas para Televisión Digital en la parte posterior del Decodificator de Televisión Digital (DTV-STB) o Disco de Video Digital Entradas para Televisión Digital en la parte posterior del Televisió Y R-AUDIO-L Y PB ANT 1 PR VIDEO PB S-VIDEO VIDEO PR SPLIT OUT R-AUDIO-L VIDEO SVIDEO NTSC OUTPUT DIGITAL OUTPUT CABLES NO INCLUIDOS L AUDIO ANT 2 R COMPONENT VIDEO INPUT INPUT INPUT 1 2 TO AUDIO AMP COMPONENT VIDEO INPUT ON BACK OF TV Notas: r El televisor tiene un grupo de entradas de video compuesto: Y, PB y PR. Los entradas separadas para las señales compuestas de color, proveen una mejor separación de luminancia y color. Utilice las entradas de audio compuesto; Izquierda (L) y Derecha (R) para conectar. r Seleccione el modo de salida para formato 480i del DTV-STV. El televisor solo puede recibir señales en formato 480i. 10 0382S PROD NEW.fm Page 11 Tuesday, February 27, 2001 2:17 PM INSTALACIÓN Operación de Imagen en Imagen (IDI) Esta televisión incluye la característica de Imagen en Imagen con un sintonizador dual. Esto le permite ver dos (2) transmisiones en vivo al mismo tiempo con o sin una fuente de vídeo externa tal como videocasetera, decodificador de cable, etc. Operación Básica de IDI Procedimiento Presione el botón PIP en el control remoto para desplegar el recuadro IDI en pantalla. 1. 2. Nota: El Audio es sólo de la Imagen Principal. Escoja canales para el recuadro IDI presionando el botón PIP CHANNEL (Canales de PIP) arriba/abajo en el control remoto. Escoja canales para la Imagen Principal presionando los botones CH (Canal) arriba/ abajo o usando el teclado numérico. Botón SWAP El botón SWAP (CAMBIO) intercambia la fuente de las imágenes IDI y la Principal. Presione el botón RECALL (LLAMADA) para obtener el estado de la fuente de IDI e Imagen Principal en pantalla. Operación de IDI con un Decodificador de Cable Procedimiento r Para ver canales de cable premium a través del decodificador de cable en la Imagen Principal: Nota: 1. 2. 3. Use este procedimiento si desea ver canales de cable premium en la Imagen Principal mientras ve un programa de televisión o vídeo en el recuadro de IDI. Seleccione ANT2 en el menú de SET UP (Ajuste) bajo PROG CNLS (Programación de canales). Sintonize la televisión al canal 3. Presione el botón PIP en el control remoto para desplegar el recuadro de IDI en pantalla. Nota: El Audio es sólo de la Imagen Principal. Verifique que su decodificador de cable esté Encendido. Escoja canales para la Imagen Principal sintonizando su decodificador de cable. Escoja canales para el recuadro de IDI presionando el botón TV en el control remoto y usando los botones PIP CHANNEL arriba/abajo. Nota: La función de SWAP no está disponible cuando se usa el decodificador de cable para sintonizar canales. Si su decodificador de cable tiene salida de vídeo puede ser conectada a la televisión, para permitirle usar todas las funciones de IDI. (Sintonize el IDI a la entrada de vídeo conectada a su decodificador de cable). 4. 5. 6. 11 0382S PROD NEW.fm Page 12 Tuesday, February 27, 2001 2:17 PM MENU DE LA GUÍA GIRATORIA NAVEGACIÓN. Menu de la Guía Giratoria Navegación. . Menú de la Guía Giratoria Procedimiento 1. 2. 3. 4. 5. 6. 7. 8. 9. Pulse el botón ACTION (Acción) el control remoto para visualizar el Menú de la Guía Giratoria. Pulse el botón CH arriba/abajo para girar la Menú de el Guía Giratoria hasta llegar a la función deseada. Pulse el botón ACTION para visualizar los menús principales y submenú. Pulse los botones arriba/abajo de CH para resaltar la función deseada del menú principal. Pulse el botón de la derecha del VOL para entrar los submenús. Pulse los botones arriba/abajo de CH para resaltar la función de los submenú. Pulse el botón de la derecha o izquierda del VOL para seleccionar o ajustar una función. Pulse dos veces el botón ACTION para regresar al Menú de la Guía Giratoria. Para salir del Menú de la Guía Giratoria, pulse el botón izquierdo VOL. ACTION (Acción) Remota / Boton de Navegación CH VOL VOL CH Guía del Control Remoto La Guía de Referencia Rápida del Control Remoto se incluye con en el empaque de esta televisión. 12 0382S PROD NEW.fm Page 13 Tuesday, February 27, 2001 2:17 PM TABLA DE MENUS DE LA GUÍA GIRATORIA Tabla de Menus de la Guía Giratoria MENU DESCRIPCIÓN AJUSTE IDIOMA r r PROG CNLS (Programación de Canales) r r r r CC (Closed Captioned - Subtítulos) r r OTROS AJ r (Otros Ajustes) r Seleccione Francés. menús de Inglés, Español, o MODO - Seleccione Cable o Televisión. Vea la sección de Instalación en su manual. ANTENA - Seleccione ANT 1 o ANT 2 (algunos modelos). PROGRAM AUTO - Programación automática de los canales con señal en la memoria. PROGRAM MANUAL - Manualmente incluye o anula canales en memoria. CC EN MUDO - Seleccione C1, hasta C4 para visualizar Subtítulos en pantalla cuando el botón MUTE (MUDO) del control remoto es presionado. MODALIDAD CC - Seleccione T1 hasta T4 ó C1 hasta C4 para información transmitida, si está disponible, en un cuadro grande negro. AUTOENCEN - Seleccione SET (AJUSTE) para encender la televisión al mismo tiempo que la Caja del Cable u otros componentes, ó seleccione OFF. CONVERGENCIA 1 - Ajustes pueden ser requeridos cuando su PTV es movida, por el efecto de los campos magnéticos de la tierra en los tubos de proyección. CONVERGENCIA 2 - Ajuste puede ser requerido después de ajustar Convergencia 1. SONIDO r r AJ AUDIO (Ajustes de Sonido) r r r MODO - Seleccione ESTEREO, SAP (Programa Secundario De Sonido) ó MONO (use MONO cuando la señal de estéreo es débil). BAJOS - Aumenta o disminuye la respuesta de los bajos. ALTOS - Aumenta o disminuye la respuesta de los altos. BALANCE - Enfatiza el volumen del altavoz DERECHO / IZQUIERDO. NORMAL - Reajusta BAJOS, ALTOS y BALANCE a los niveles prefijados de fábrica. 13 0382S PROD NEW.fm Page 14 Tuesday, February 27, 2001 2:17 PM TABLA DE MENUS DE LA GUÍA GIRATORIA Tabla de Menus de la Guía Giratoria MENU DESCRIPCIÓN r OTROS AJ (Otros Ajustes) r r ENVOLVENTE r r ALTAVOCES r AI SONIDO - Automáticamente ajusta el volumen, para mantener confortable el nivel a escuchar. BBE - La tecnologia de sonido BBE mejora el entendimiento de los discursos y restaura el rango dinámico de pasajes musicales para proveer un sonido natural sobresaliente. ENVOLVENTE - Use la función de sonido ambiental para mejorar la respuesta auditiva cuando se escucha una transmisión en estéreo. SI - Altavoces de la TV funcionan normalmente APAGADAS Y SALIDA DE AUDIO VARIABLE Altavoces de la TV están apagados, el sonido va de acuerdo al de la Televisíon. APAGADAS SALIDA DE AUDIO FIJA Altavoces de la TV están apagados, el sonido se ajusta sólo con amplificador externo. CRONOMETRO r AJUSTE DE RELOJ APAGADO r (Apagado Automático) CRONOM 1 r CRONOM 2 (Cronómetros) Cuando se ajusta, TIME (HORA) aparecerá en pantalla después de presionar el botón de POWER (ENC/APAG), el botón RECALL (LLAMADA), o al cambiar canales . Programe la TV para que automáticamente se apague en 30, 60, ó 90 minutos. Seleccione NO para apagar el cronómetro. Programe dos cronómetros para que enciendan y apaguen automáticamente a la Televisión en la hora, canal y días seleccionados (El reloj debe de estar ajustado a tiempo para poder hacer uso del cronómetro). IMAGEN r r r AJ. IMAGEN. (Ajustes) r r r 14 COLOR - Ajusta la intensidad del color deseada. TINTE - Ajusta los tonos naturales de la piel. BRILLO - Ajusta las áreas oscuras para detalles más nítidos. CONTRASTE - Ajusta las áreas blancas de la imagen. NITIDEZ- Ajusta para dar mejor claridad a los detalles de la silueta. NORMAL- Reajusta todas las modificaciones de la imagen a los predispuestos de fábrica. 0382S PROD NEW.fm Page 15 Tuesday, February 27, 2001 2:17 PM TABLA DE MENUS DE LA GUÍA GIRATORIA Tabla de Menus de la Guía Giratoria MENU OTROS AJ. DESCRIPCIÓN r (Otros Ajustes) TEMP COLOR - Ajusta la preferencia de color AZUL, ROJO, o NORMAL. CANALES r FAVORITOS r r TITULOS r EXPLORA CAN - Seleccione FAV (16 favoritos) o TODOS para explorar canales, usando los botones CH arriba/abajo. PREFIJADO - Asigne los números de canal para los títulos/siglas prefijados. MANUAL - Introdusca los números de los canales y sus títulos/siglas manualmente. PONGA TITULO (SIGLAS) - Ponga título a las entradas de video desplegadas en pantalla y conexiones opcionales de equipo. BLOQUEO r MODO TIEMPO Active el bloqueo en Todos, Canales o Juego con un código secreto. Nota: r Para más información acerca de programas vea el manual V-CHIP Guía de los Padres incluido en el paquete de la televisión. Seleccione la duración del bloqueo. (12, 24, 48 horas o SIEMPRE). 15 0382S PROD NEW.fm Page 16 Tuesday, February 27, 2001 2:17 PM FUNCIONES ESPECIALES Funciones Especiales Ajuste IDIOMAS En el menú de SET UP (AJUSTE) bajo IDIOMA/LANGUE seleccione el idioma del menú ENGLISH (Inglés), ESPAÑOL o FRANCAIS (Francés). MODO IDIOMA/ LANGUE PROG CNLS CC OTROS AJ. ESPAÑOL PROG CNLS (Programación de Canales) En el menú de SETUP bajo PROG CNLS seleccione: r r r r MODE para seleccionar la modalidad de TV (antena) o CABLE dependiendo de la fuente de la señal ANTENA para seleccionar ANT 1 ó ANT 2 (algunos modelos). PROGRAMA AUTO para programar automáticamente todos los canales con señal. PROGRAMA MANUAL para manualmente incluir o borrar canales. IDIOMA/ LANGUE PROG CNLS CC OTROS AJ. 16 MODO CABLE ANTENA ANT1 PROGRAMA AUTO PROGRAMA MANUAL 0382S PROD NEW.fm Page 17 Tuesday, February 27, 2001 2:17 PM FUNCIONES ESPECIALES CC (Subtítulos) Esta televisión contiene un decodificador integrado que despliega subtítulos (texto en letras blancas o de colores sobre un fondo negro) en pantalla. Permite al usario leer el diálogo de un programa de televisión u otra información. El programa visto debe incluir la modalidad de subtítulos para que esta función opere. Modo CC Procedimiento r r r r En el menú de SET UP, (Ajuste), seleccione CC (Subtítulos). Seleccione MODO CC . Seleccione NO, C1, C2, T1, T2, C3, C4, T3 ó T4: • NO - Cuando no se desea la modalidad de subtítulos. • C1 - Para que la información relacionada con el vídeo sea desplegada en hasta 4 líneas en pantalla a la vez. (No bloquea partes relevantes de la imagen). El texto puede ser en cualquier idioma. • C2 a C4 - Otras modalidades de información relacionada con el vídeo. • T1 - Para que la guía de la programación o cualquier otra información sea desplegada en pantalla, cuando sea disponible. (Bloquea una gran porción de la imagen en la pantalla de la televisión). • T2 a T4 - Para otras modalidades de información. (Bloquea una gran porción de la imagen en la pantalla de la televisión). Presione ACTION para regresar a las opciones de los submenús y para salir de los menús. CC En Mudo Activa la modalidad de subtítulos en pantalla cuando el botón MUTE (MUDO) en el control remoto es presionado. Para desactivar presione nuevamente el botón MUTE (MUDO). Nota: Esta función opera solamente cuando la modalidad de subtítulos está apagada (NO). El programa visto debe ser transmitido con la modalidad de subtítulos. (Consulte su guía de televisión local). Procedimiento r r r r En el menú de SET UP, seleccione CC . Seleccione CC EN MUDO. Seleccione NO, C1, C2, C3 ó C4. Ajuste recomendado para la modalidad de subtítulos cuando se usa el botón MUTE (Mudo): • r r r CC EN MUDO: C1 • MODO CC : NO Presione ACTION para regresar a las opciones de los submenús, y salir de los menús. Presione el botón MUTE (MUDO) para activar la característica de Subtítulos. Presione el botón MUTE (MUDO) nuevamente para desactivar la característica. IDIOMA/ LANGUE PROG CNLS CC OTROS AJ. CC EN MUDO C1 MODO CC NO 17 0382S PROD NEW.fm Page 18 Tuesday, February 27, 2001 2:17 PM FUNCIONES ESPECIALES Convergencia 1 En el menú de SET UP, (Ajuste) seleccione CONVERGENCIA únicamente después de mover el PTV para ajustar los efectos de campo magnético de la tierra en los tubos de proyección. IDIOMA/ LANGUE PROG CNLS CC OTROS AJ. Nota: AUTOENCENDIDO NO CONVERGENCIA1 CONVERGENCIA 2 La necesidad de ajustar CONVERGENCIA es ocasional, sólo cuando se mueve el PTV. Use los botones de navegación para alinear las líneas verdes horizontales y verticales en la pantalla con las marcas de referencia de afuera, como se muestra abajo. Presione el botón de ACTION para moverse hacia la pantalla RED CONVERGENCE (Convergencia Roja). CONVERGENCIA NEXT CONVERGENCE : ACTION VERDE PRÓXIMO : ACTION Marcas de Referencia Use los botones de navegación para alinear la cruz roja con el patrón de la cruz blanca al centro de la pantalla. Presione ACTION para continuar con el ajuste en la pantalla de la convergencia AZUL y repítalo. CONVERGENCIA ROJO PRÓXIMO : ACTION Nota: PARA PREVENIR DAÑO AL TUBO DE LA IMAGEN, NO DEJE ENCENDIDO EL PATRON DE PRUEBA POR UN PERIODO DE TIEMPO PROLONGADO. Convergencia Un patrón cruzado aparecerá en blanco con un mínimo de borde de color cuando se termine de ajustar. 18 0382S PROD NEW.fm Page 19 Tuesday, February 27, 2001 2:17 PM FUNCIONES ESPECIALES Convergencia 2 En el menu de SET UP bajo la opción OTHER ADJ. seleccione CONVERGENCIA 2. Nota: Realice este ajuste solamente después de que CONVERGENCIA 1 a sido ajustada correctamente. IDIOMA/ LANGUE PROG CNLS CC OTROS AJ. AUTOENCENDIDO NO CONVERGENCIA1 CONVERGENCIA2 Procedimiento r r r Presione los botones del 1 al 9 en el control remoto para seleccionar el punto de convergencia deseado. Use los botones de navegación para alinear la cruz ROJA con el patrón blanco. Presione el botón de ACTION para pasar al ajuste de covergencia AZUL y repita el paso anterior. Note: El control remoto debe estar en modo de TV. 1 2 3 ROJO 4 6 PRÓXIMO : ACTION 7 8 9 Convergencia Un patrón cruzado aparecerá en blanco con un mínimo de borde de color cuando se termine de ajustar. 19 0382S PROD NEW.fm Page 20 Tuesday, February 27, 2001 2:17 PM FUNCIONES ESPECIALES CRONOMETRO Apagado En el menú de TIMER, seleccione APAGADO para poder apagar la Televisión en 30, 60 ó 90 minutos. Seleccione NO para desactivar el CRONOMETRO. RELOJ APAGADO CRONOM 1 CRONOM 2 TIEMPO ? 30 CRONOM 1 y CRONOM 2 En el menú de TIMER seleccione dos cronómetros, CRONOM 1 y CRONOM 2, para encender o apagar la Televisión a la hora seleccionada de un canal seleccionado, en los días seleccionados. Nota: La HORA debe anotarse en el menú de RELOJ para que las funciones del CRONOMETRO funcionen. RELOJ APAGADO CRONOM 1 CRONOM 2 DIA SAB ENCENDER _ _: _ _ APAGAR _ _: _ _ ELIJA CANAL ___ PONER TIEMPO Apagado después de 90 minutos La Televisión se apaga automáticamente después de 90 minutos cuando se encendió con el CRONÓMETRO. Si se selecciona APAGAR o si se presiona una tecla, el apagado automático de 90 minutos se cancela. Activación del CRONÓMETRO El CRONOMETRO está activo cuando la Televisión está apagada o encendida. La Televisión cambiará al canal seleccionado a la hora seleccionada según se anotó en el CRONOMETRO. 20 0382S PROD NEW.fm Page 21 Tuesday, February 27, 2001 2:17 PM FUNCIONES ESPECIALES IMAGEN Otros Ajustes En el menú de PICTURE (Imagen) bajo OTROS AJ. seleccione: r TEMP COLOR (temperatura) para aumentar o disminuir el rojo y el azul para acomodarse a las preferencias personales. AJ. IMAGEN OTROS AJ. TEMP COLOR NORMAL CANALES Favoritos En el menú de CHANNELS (Canales) bajo FAVORITOS seleccione: r EXPLORA CAN FAV para introducir hasta 15 canales favoritos. r TODOS para explorar todos los canales cuando se usan los botones CH (Canal) arriba/ abajo. FAVORITOS TITULO EXPLORA CAN FAV ELIJA CANAL 123 CANALES FAVORITOS Título En el menú de CHANNELS bajo TITULO seleccione: r PREFIJADO para asignar el número de canal para las estaciones populares de televisión prefijadas. r MANUAL para introducir los números y títulos manualmente. r PONGA TITULO para clasificar las conexiones de entrada de vídeo que se visualizan en la pantalla. FAVORITOS TITULO PREFIJADO MANUAL PONGA TITULO 21 0382S PROD NEW.fm Page 22 Tuesday, February 27, 2001 2:17 PM FUNCIONES ESPECIALES BLOQUEO MODO Para usar las opciones de BLOQUEO: r ELIJA CODIGO - Use el teclado numérico para introducir un código secreto de cuatro dígitos. Después de introducir su código por primera vez, el mensaje en pantalla cambia a CAMBIAR CODIGO. Nota: Use un código que sea fácil de recordar y escríbalo en un lugar seguro. En el submenú de MODO seleccione: r BLOQUEO para seleccionar: r r l l l l NO - Para apagar la función de bloqueo. TODOS- Para bloquear todos los canales y entradas de vídeo. CANAL - Para bloquear hasta cuatro canales de su elección. JUEGO - Para bloquear los canales 3, 4 y las entradas de vídeo. PROGRAMAS - Para usar clasificaciones en programas y vídeos. CAMBIAR CODIGO - Para cambiar su código secreto de cuatro dígitos. Nota: Si en la opción de CAMBIAR CÓDIGO se introduce un código diferente al usado previamente, el código nuevo se convierte en el código controlador. Presione el botón ACTION (ACCION) para regresar al submenú, seleccione TIEMPO para seleccionar la duración del bloqueo (12, 24, 48 horas o SIEMPRE). Nota: Sea cuidadoso al seleccionar SIEMPRE. Si siempre está seleccionado, y usted olvida su código secreto la televisión deberá ser atendida por un técnico calificado para limpiar el ajuste del bloqueo. Presione el botón ACTION (ACCION) para regresar a los submenús, y salir de los menús. MODO TIEMPO? BLOQUEO NO PROGRAMAS : NO PROGRAMAS DE EEUU ACTIVADA NO INGRESAR - - - - CLAVE Nota: Si JUEGO, CANAL o TODO está seleccionado, y si una de las entradas de vídeo o de los canales bloqueados es seleccionado, el mensaje PG (Protección de los Padres) se mostrará en la esquina superior derecha de la pantalla de la televisión. Desactive BLOQUEO al introducir nuevamente su código secreto de cuatro dígitos y seleccionando BLOQUEO NO. Para más información acerca de programas vea el manual V-CHIP Guía de los Padres incluido en el paquete de la televisión. 22 0382S PROD NEW.fm Page 23 Tuesday, February 27, 2001 2:17 PM CUADRO DE LOCALIZACIÓN DE FALLAS Cuadro de Localización de Fallas Antes de solicitar servicio, establezca los síntomas y lleve a cabo las siguientes posibles soluciones. SONIDO IMAGEN Soluciones Ajuste la Ubicación y / o Conexión de la Antena Sonido Ruidoso Imagen Moteada Ajuste la Ubicación y la Conexión de la Antena Verifique el Cable de Entrada de la Antena Sonido Ruidoso Imagen Múltiple Aleje la TV de los Aparatos Electrodomésticos, Luces, Vehículos y Equipo Médico Sonido Ruidoso Interferencia Aumente el Volumen Revise Mute (MUDO) Revise en el Menú de Audio: ALTAVOCES SI Sin Sonido Imagen Normal Cambie el Canal Ajuste apropiadamente la modalidad de TV o del Cable Verifique los Cables de la Antena Sonido Ruidoso Sin Imagen ? Sin Sonido Sin Imagen/sin IDI Verifique que el Cable de Corriente este Enchufado a una toma de Corriente Activa Ajuste los Controles de Brillo y Audio Cambie el Canal Verifique las Conexiones del Cable Programe otra vez el Control Remoto Verifique la Operación de la Segunda Fuente de Video Ajuste el Color Cambie el Canal Sonido Normal Sin Color Verifique en el menú de AUDIO que el Ajuste se encuentre en Estéreo o Mono, no en SPA Sonido Erróneo Imagen Normal Cambie CC (Subtítulos) de la Modalidad de Texto Sonido Normal Caja Negra en Pantalla Reemplace las Pilas del Control Remoto Imagen Normal Sonido Normal Operación Intermitente del Control Remoto 23 0382S PROD NEW.fm Page 24 Tuesday, February 27, 2001 2:17 PM NOTAS Panasonic Consumer Electronics Company, Division of Matsushita Electric Corporation of America One Panasonic Way Secaucus, New Jersey 07094 www.panasonic.com (800) 222-4213 24 Panasonic de Mexico, S.A, de C.V. Amores No. 1120 Col. Del Valle C.P. 03100 México, D.F. Tel. (915 ó 015) 488-1000 Fax (915 ó 015) 575-6763, 575-6765 Panasonic Sales Company, Division of Matsushita Electric of Puerto Rico Inc. (“PSC”) Ave. 65 de Infantería, Km 9.5 San Gabriel Industrial Park Carolina, Puerto Rico 00985 Tel. (787) 750-4300 Fax (787) 768-2910