1
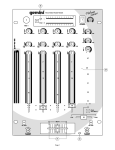
of one source into another. The left side of the CROSSFADER (32) is
CHANNEL 1 and the right side is CHANNEL 2.
SPECIFICATIONS
INPUTS:
123456
123456
123456
123456
123456
123456
1. Unscrew the outside
FADER PLATE SCREWS (B).
-
Do not touch INSIDE SCREWS (C).
2. Carefully remove old Crossfader and unplug CABLE (D).
DJ Mic..............................................................................1.5mV 2 KΩ Balance
Phono @ 1kHz........................................................................2mV 47 kΩ
123 12
123 12
123 12
3. Plug new Crossfader into
CABLE (D) and place back into mixer.
4. Screw Crossfader to mixer with
FADER PLATE SCREWS (B).
123123
123123
123123
Line.....................................................................................100 mV 10 kΩ
OUTPUTS:
12345678901234567890123
12345678901234567890123
12345678901234567890123
Amp..........................................................................0 dB 1V 400 Ω
Max...............................................................................18V Peak-to-Peak
D
GENERAL:
Low (Channels 1-2)...........................................................+ 12dB/- 32 dB
Mid (Channels 1-2)..............................................................+ 12dB/- 32 dB
The CROSSFADER CURVE BUTTON (19) allows you to adjust the kind
of curve the crossfader has .Depress the crossfader curve button to
make the curve steep and cutting (perfect for scratching).Release the
crossfader curve button to make the curve gradual and gentle. The
CROSSFADER REVERSE SWITCH (31) allows you to reverse the
crossfader so that CHANNEL 2 is controlled by the left side of the
crossfader and CHANNEL 1 is controlled by the right side of the
crossfader.
NOTE: When the CROSSFADER REVERSE SWITCH (31) is activated
(moved to the right), only the crossfader reverses. The
Channel Slides, Gain, Kill Switches and tonal controls do not
reverse.
6. PUNCH IN: The PUNCH IN BUTTONS (18,46) allow you to add a
channels signal to the mix when the crossfader is set to the opposite
channel.
High (Channels 1-2).............................................................+ 12dB/- 32 dB
Gain (Channels 1-2).......................................................................0 to -20dB
Frequency Response............................................20Hz - 20kHz +/- 2dB
Distortion..............................................................................less than 0.02%
S/N Ratio..........................................................................better than 80dB
Talkover Attenuation........................................................................16dB
Power Source...................................................115/230V
50/60Hz 20W
Dimensions.............................10”Wx 10.24”H x 3.3”D(254 x 260 x 84 mm)
Weight.....................................................................................6.3 lbs(3 kg)
7. OUTPUT CONTROL SECTION: The level of the MASTER OUTPUT (3) is
controlled by the MASTER (45) control.
NOTE: The RECORD OUT (5) has no level control. The level is set
by the channel slides and the gain controls of the selected
channel. The tonal qualities are set by the low, mid and high
controls of that same channel.
8. TALKOVER SECTION: The purpose of the talkover section is to
allow the program playing to be muted so that the mic can be heard
above the music. The MIC/TALKOVER (14) switch has three
settings. When the MIC/TALKOVER (14) switch is in the left
position, the mic and talkover are both off . When the MIC/
TALKOVER (14) switch is in the center position the mic is on, the
MIC INDICATOR (15) will glow, but talkover is off. When the MIC/
TALKOVER (14) switch is in the right position. The mic and talkover
will be on and the volume of all sources except the Mic input are
lowered by 16 dB. MIC LEVEL (17) controls the level of the MIC.
The MIC EQ (16) control allows you to fully adjust the tone of the
MIC.
9. CUE SECTION: By connecting a set of headphones to the
HEADPHONE (47) jack, you can monitor either channel or both
together. Move the CUE SWITCH (42) to the left to monitor CHANNEL
1. Move the CUE SWITCH (42) to the right to monitor CHANNEL 2.
By rotating the CUE PGM PAN (43) control to the left you will be
able to monitor the assigned cue signal. Rotating to the right will
monitor the PGM (program) output. Use the CUE LEVEL (44)
control to adjust the headphone volume without effecting the overall
mix.
10. DISPLAY: The peak hold, dual function DISPLAY (29) indicates
either the MASTER output left and right levels or the channel 1 and
channel 2 levels. You can choose the option you want by pressing
the DISPLAY (30) button.
NOTE: When the DISPLAY (29) is in the channel 1/channel 2 display
mode, by adjusting the individual channel gain and tone
controls, you can increase or decrease the signal to match
the other channel’s signal. The channel slides and crossfader
have no effect on the display readings.
Page 5