1
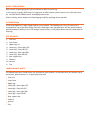
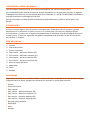
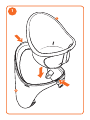
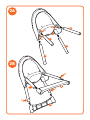
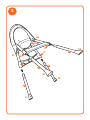
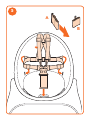
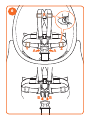
HICCUP HIGHCHAIR
INSTRUCTIONS
INSTRUCCIONES PARA
LA TRONA HICCUP
E
ARANT
EE
GU
E
Garantía de 4 años válida sólo en Reino Unido e Irlanda
IMPORTANT: RETAIN FOR FUTURE
GB REFERENCE. READ CAREFULLY.
YOUR CHILD’S SAFETY MAY BE AFFECTED IF YOU DO NOT
FOLLOW THESE INSTRUCTIONS
user guide
Thank you for choosing a Cosatto product. Please take a little time to read the important safety
notes detailed below. This will ensure many years of happy, safe use.
safety: take note
WARNING: A CHILD’S SAFETY IS YOUR RESPONSIBILITY
•WARNING: Do not leave your child unattended.
•WARNING: Ensure the harness is correctly fitted.
•WARNING: Be aware of the risk of open fires and other sources of strong heat, such as electric bar fires, gas fires, etc, in the vicinity of the highchair.
•WARNING: Do not use the highchair unless all components are correctly fitted and adjusted.
•Suitable for children aged between 6 months and 3 years old approximately.
•Do not use the highchair until the child can sit unaided.
•Do not use the highchair if any part is broken torn or missing.
•Do not use on elevated surfaces.
•Complies with EN14988:2006
care & maintenance
•Regularly check that the harness is correctly fitted and that the webbing straps have not become frayed or damaged. If the harness is damaged we recommend that a new one is fitted.
•Clean the highchair with a damp cloth or sponge. Do not use abrasives or bleach.
parts information
Please retain all packaging until you are certain no parts are missing.
In the case of assembly difficulties, missing parts or other queries, please contact our aftersales team
on +44 (0)870 050 5900 or email [email protected]
After assembly, please dispose of all packaging carefully, recycling where possible.
introduction
The Hiccup highchair is light weight and easy to assemble. The feeding tray is easy to clean and is
removable for up to the table dining. The four sturdy legs have slip proof feet and are spread wide to
provide excellent stability in use. The integral safety harness is fully adjustable and easily removable for
cleaning.
list of parts
(1) Seat unit
(2) Seat frame
(3) Upper legs x4
(4) Lower leg - Front right (FR)
(5) Lower leg - Front left (FL)
(6) Lower leg - Rear right (RR)
(7) Lower leg - Rear left (RL)
(8) Rear support bar
(9) Footrest
(10)Harness
(11) Tray
replacement parts
The replacement parts listed below are available for your product. In the event that you require any of
these parts, please contact us at [email protected]
• Seat unit
• Seat frame
• Upper leg
• Lower leg - Front right (FR)
• Lower leg - Front left (FL)
• Lower leg - Rear right (RR)
• Lower leg - Rear left (RL)
• Rear support bar
• Footrest
• Harness
• Tray
highchair assembly
1 – assembling the seat
Fit the seat unit (1) to the seat frame (2). Push down on the seat unit until it locks in place at (a) & (B).
2 – fitting the legs
2A Turn the seat assembly over and fit the four upper legs (3) into the mountings on the base of the
seat frame. Adjust the position of the legs until the spring loaded pins locate in the holes in the
mountings (a).
2B Push the rear upper legs together a little (B) and fit the rear support bar (8). Push the front upper
legs together a little (C) and fit the footrest (9).
3 – fitting the legs (continued)
Noting the identification marking on the underside of seat unit, align the holes in the rear support bar,
footrest and upper legs (D). Fit the lower legs (4 - FR), (5 - FL), (6 - RR) & (7 - RL) into the bottom of the
rear support bar and footrest until the spring loaded pins locate in the holes. There are identification
markings on each lower leg and the seat assembly to show where each lower legs should be fitted.
When all the legs are fitted turn the assembly the right way up.
4 – fitting the tray
Place the tips of the tray (11) into the seat unit at (A) Position the latch underneath the tray so it is
aligned with the slot in the front of the seat unit. Press the tray down at (B) until it locks in place.
Check the security of the tray before use.
To remove the tray, reverse the above instruction.
Note: Only slide the tray horizontally when fitting or removing tray. Damage could occur if the tray is
fitted or removed at an acute angle.
5 – fitting the harness
Flatten the butterflies (a) on the harness (10). Push the butterflies through the slots in the seat then
turn the butterflies through 90o (B).
6 – using the harness
To release the harness push in the tabs at (a).
To fasten the harness push the tabs on the waist straps into the buckle (B).
To adjust the harness slide the straps through the adjusters to the required lengths. (X, Y & Z).
E
IMPORTANTE: CONSERVE PARA
FUTURA REFERENCIA. LEA
ATENTAMENTE. EN CASO DE NO
SEGUIR ESTAS INSTRUCCIONES,
LA SEGURIDAD DE SU HIJO
PODRÍA VERSE AFECTADA
guía del usuario
Gracias por escoger un producto Cosatto. Le recomendamos que lea atentamente las notas
importantes relativas a la seguridad descritas a continuación. Esto le garantizará un uso seguro y
duradero del producto.
seguridad: Le rogamos tenga en cuenta lo siguiente
ADVERTENCIA: LA SEGURIDAD DE SU HIJO ES RESPONSABILIDAD SUYA
•ADVERTENCIA: Asegúrese de que su hijo esté siempre bajo la
supervisión de un adulto.
•ADVERTENCIA: Asegúrese de que el arnés esté correctamente instalado.
•ADVERTENCIA: Tenga en cuenta los riesgos que pueden suponer las
chimeneas y otras fuentes de calor como las estufas eléctricas, chimeneas de gas, etc., cuando éstas se encuentran cerca de la trona.
•ADVERTENCIA: No utilice la trona a no ser que todos los componentes estén correctamente instalados y ajustados.
•Adecuado para niños de entre 6 meses y 3 años aproximadamente.
•No utilice la trona hasta que el niño pueda sentarse solo sin la ayuda de otra persona.
•No utilice la trona si le falta cualquiera de sus piezas o si una de estas está dañada o rota.
•No la utilice sobre superficies desniveladas.
•Cumple con la norma EN14988:2006
cuidado y mantenimiento
•Compruebe periódicamente que el arnés esté correctamente instalado y que las cintas de tela no estén agrietadas ni dañadas. Si el arnés estuviera dañado, le recomendamos que instale un arnés nuevo.
•Limpie la trona con una esponja o un paño húmedo. No utilice productos abrasivos ni lejía.
información sobre las piezas
Conserve todo el embalaje hasta que se haya cerciorado de que no falta ninguna pieza.
En caso de dificultades durante el montaje, de que falten piezas o cualquier otra cuestión, le rogamos
se ponga en contacto con nuestro equipo post-venta llamando al +44 (0) 870 050 5900 ó enviando un
mensaje electrónico a [email protected]
Una vez montada la unidad, deseche el embalaje responsablemente y recicle las partes que le sea
posible.
introducción
La trona Hiccup es ligera y fácil de montar. La bandeja para la comida es de fácil limpieza y puede
desmontarse a fin de acercar la trona a la mesa. Sus cuatro patas son robustas, disponen de pies
anti-resbalones y se abren con el objetivo de proporcionar un excelente nivel de estabilidad durante el
uso de la trona. El arnés de seguridad integrado es completamente ajustable y es de fácil extracción
para facilitar su limpieza.
lista de piezas
(1) Asiento
(2) Marco del asiento
(3) 4 patas superiores
(4) Pata inferior – delantera derecha (FR)
(5) Pata inferior – delantera izquierda (FL)
(6) Pata inferior – posterior derecha (RR)
(7) Pata inferior – posterior izquierda (RL)
(8) Barra de apoyo posterior
(9) Reposapiés
(10) Arnés
(11) Bandeja
recambios
Disponemos de todos los recambios listados a continuación para su producto. En caso de que necesite
cualquiera de estas piezas, póngase en contacto con nosotros en [email protected]
• Asiento
• Marco del asiento
• Pata superior
• Pata inferior – delantera derecha (FR)
• Pata inferior – delantera izquierda (FL)
• Pata inferior – posterior derecha (RR)
• Pata inferior – posterior izquierda (RL)
• Barra de apoyo posterior
• Reposapiés
• Arnés
• Bandeja
montaje de la trona
1 – montaje del asiento
Acople el asiento (1) al marco del asiento (2). Empuje el asiento hacia bajo hasta que quede bloqueado
en (A) y (B).
2 – instalación de las patas
2A Gire el conjunto del asiento sobre sí mismo y acople las cuatro patas superiores (3) a los montantes
situados en la base del marco del asiento. Ajuste la posición de las patas hasta que los pasadores
dotados de resortes se introduzcan en los orificios de los montantes (a).
2B Acerque ligeramente las patas posteriores superiores (B) la una a la otra y acople la barra de apoyo
posterior (8). Acerque ligeramente las patas delanteras superiores (C) la una a la otra y acople el
reposapiés (9).
3 – instalación de las patas (continuación)
Teniendo primero en cuenta las marcas de identificación situadas en la sección inferior del asiento,
alinee los orificios situados en la barra de apoyo posterior, el reposapiés y las patas superiores (D).
Acople las patas inferiores (4 - FR), (5 - FL), (6 - RR) & (7 - RL) en la sección inferior de la barra de apoyo
posterior y el reposapiés hasta que los pasadores dotados de resortes se introduzcan en los orificios. En
cada una de las patas inferiores y en el conjunto del asiento encontrará marcas con indicaciones acerca
de dónde deberán instalarse las patas inferiores.
Una vez que haya instalado todas las patas, deberá girar el conjunto al revés sobre sí mismo.
4 – instalación de la bandeja
Coloque las puntas de la bandeja (11) en el asiento en (A) Coloque el pestillo debajo de la bandeja a fin
de que quede alineado con la ranura situada en la sección delantera del asiento. Empuje la bandeja
hacia abajo (B) hasta que quede bloqueada en la posición correcta. Antes de utilizarla, compruebe que
la bandeja esté bien fijada y sea segura.
Para extraer la bandeja realice el procedimiento anterior a la inversa.
Atención: Cuando instale o extraiga la bandeja, deslícela siempre en posición horizontal. Si la bandeja se
instala o se extrae en posición inclinada, podría dañarse la unidad.
5 – instalación del arnés
Alise las mariposas (A) del arnés (10). Pase las mariposas a través de las ranuras del asiento y, a
continuación, gire las mariposas 90º (B).
6 – uso del arnés
Para soltar el arnés presione los pulsadores en (A).
Para abrochar el arnés introduzca en la hebilla (B) los pulsadores situados en la correa de la cintura.
Para ajustar el arnés, deslice las correas a través de los ajustadores a las longitudes deseadas. (X, Y & Z).
1
3
2
4
5
6
8
9
10
11
7
1
1
A
B
2
2a
A
3
A
A
3
A
3
3
2B
B
C
B
C
9
8
3
RR
FR
RL
FL
D
6
D
D
D
4
7
RL
FR
5
FL
RR
4
A
A
11
B
C
5
A
B
10
6
X
A Z
Y A
B
B
Cosatto Ltd, Bentinck Mill, Bentinck Street, Farnworth, Bolton, Lancashire, BL4 7EP, England.
Tel: +44(0)871 977 3900 www.cosatto.com
For up to date information and manuals for all cosatto products visit www.cosatto.com